

Multibor Podolog, Podolog MAX, Beauty Suite User Manual

Professional StationProfessional Station
Professional Station
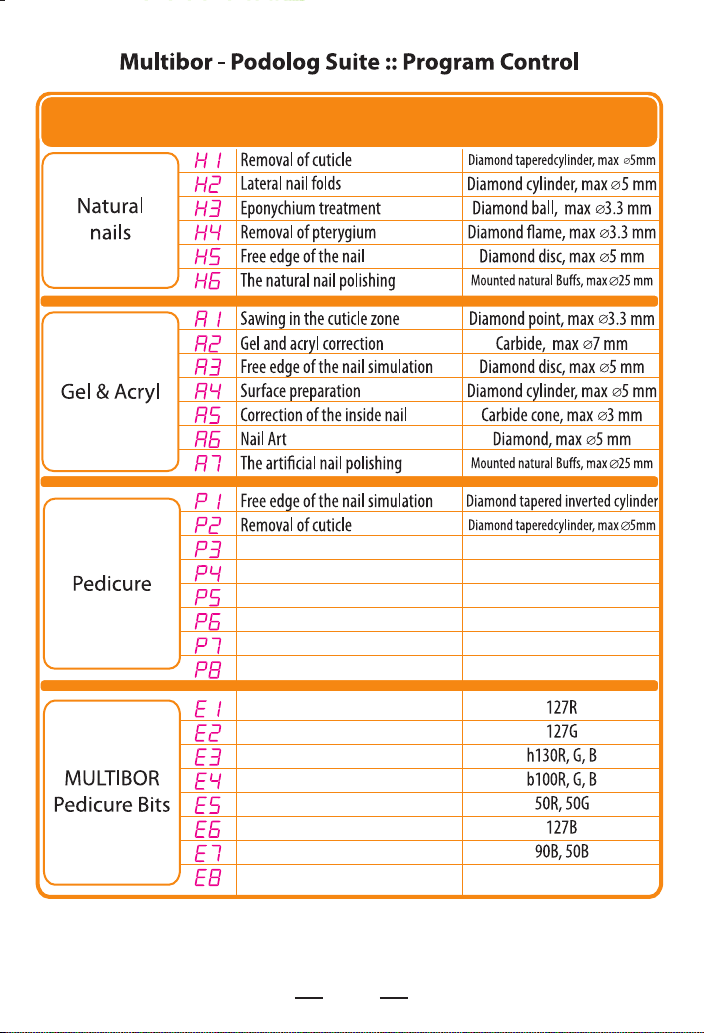
Type
Lateral nail folds
For toes abrading
ToolNameDisplay
Diamond ball, max o3.3 mmEponychium treatment
Diamond ame, max o3.3 mmRemoval of pterygium
Diamond cylinder, max o5 mm
Silicone, max o10 mmThe natural nail polishing
Abrasive, silicone, max o13 mmThe step's skin grinding
Abrasive, silicone, max o9 mm
Very rough heels primary treatment
Rough skin intensive abrading
For a basic step's cracks treatment
On the edge of step cracks treatment
Removing of corns and rough skin on toes
Final foot polish
Lateral nail folds soft abrading
Carbide ball o2 mmRemoval of a corn callus
Please note the following:
The progrms for “MULTIBOR Pedicure Bits” and program for the “Pedicure” are dierent. If you work with replaceable sand caps
based on rubber or with sintered cersmics, please select the “Pedicure” only. If you try to activate the “MULTIBOR Pedicure Bits”,
there is a risk that your tool bends or breaks down/
2

PROFESSIONAL TOOLS
Before getting started, please read this User Guide carefully.
Attention! The device has sucient means of electronic protection,
but no automation is able to provide 100% safety against unjustied,
inept or destructive steps by the User.
Please remember! Before you switch on the rotation, make sure that
nothing stands in its way, the engine is free, there is a tool in the
collet clamp, the collet clamp is locked, and the collet holds the tool
rmly.
Caution! Mechanical defects in the entire device or in separate parts
thereof and absence of its components as well as damaged or burnt
engine or its power cable shall deprive the User of the opportunity of
free repair and shall not impose any warranty obligations upon the
Manufacturer.
Please handle the device with due care and use it as prescribed. Do
not allow for excessive workload and do not use it for operations the
device is not intended for, and it will then serve you very well for
years!
Should you have any questions regarding the use of the device or
should you put the device into such modes of operation where from
you don't know the way out, please contact the Service Center.
Service Center
www.multibor.eu
3
Introduction
Multibor — Podolog Suite is a series of devices from the Podolog
lineup developed under the Multibor-Suite technology intended for
intensive operation with signicant workloads while providing the
entire range of services in the elds of machine-assisted manicure and
pedicure as well as for incrementing, modeling, and correction of
articial nails.
The lineup of devices comprises the following models:
• Multibor – Podolog
• Multibor – Podolog MAX
These models have dierent technical properties and congurations.
Multibor — Podolog Suite is a milling cutter for masters of nail care
(hereinafter, the 'Milling Cutter'). This is a microprocessor unit with
separate programs for dierent types of operations and for dierent
types of tools with automatic selection of preset programs and with
digital adjustment for optimal mode of operation.
4
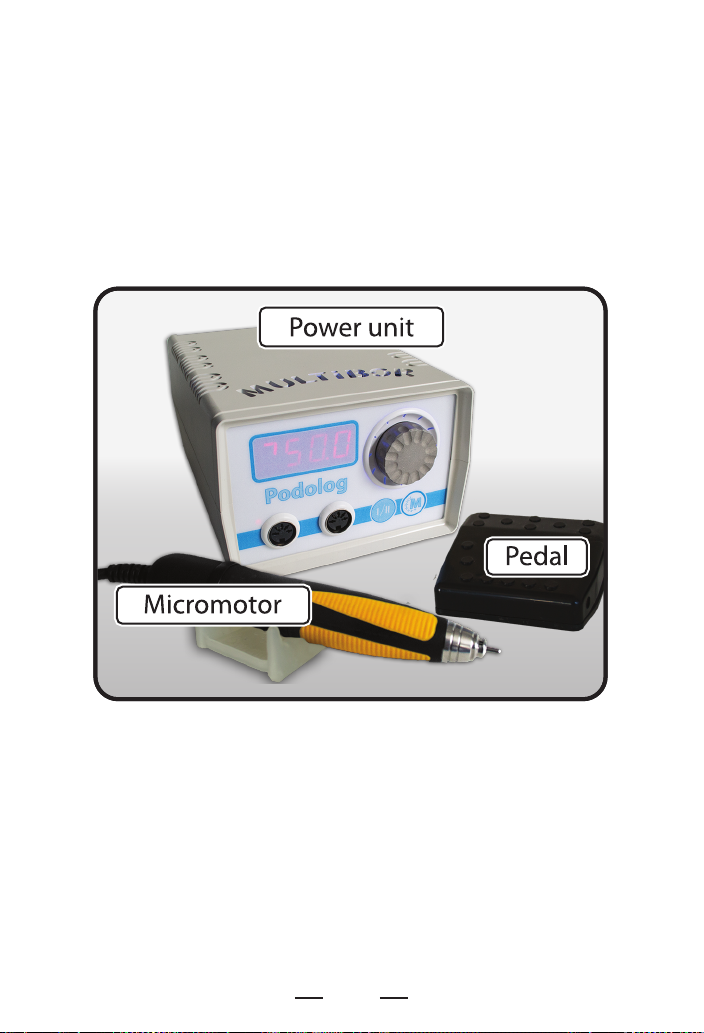
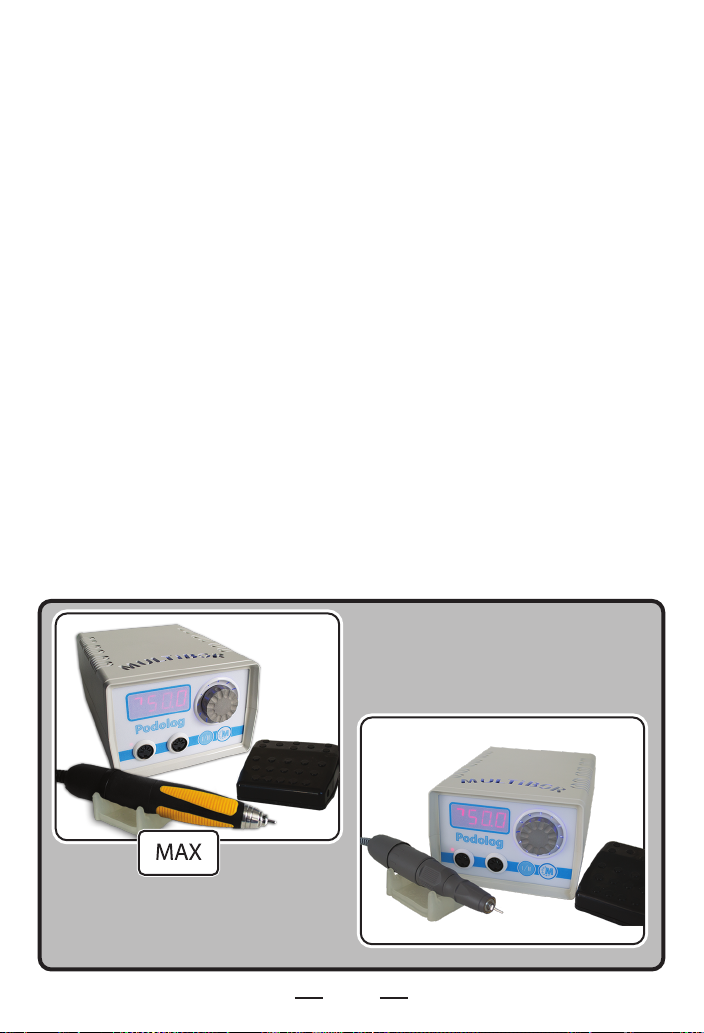
Delivery Set
· Power unit
· Handheld milling cutter (micromotor)
· Micromotor pad
· Pedal (available in specic models)
· User Guide
· Packaging
Safety Precautions
In order to ensure safe operation of the Milling Cutter, please learn
the safety precautions specied in this User Guide. Do not try to use
the Milling Cutter is a manner not specied in this document. Do not
try to use the Milling Cutter for operations not specied in this
document.
5

ATTENTION! Disregarding these safety precautions may damage
the Milling Cutter or may result in its ignition or in electric shock for
you.
ATTENTION! Plug the Milling Cutter in the electric mains thru
standard three-pin sockets with grounded terminals only.
Nine Simple Rules:
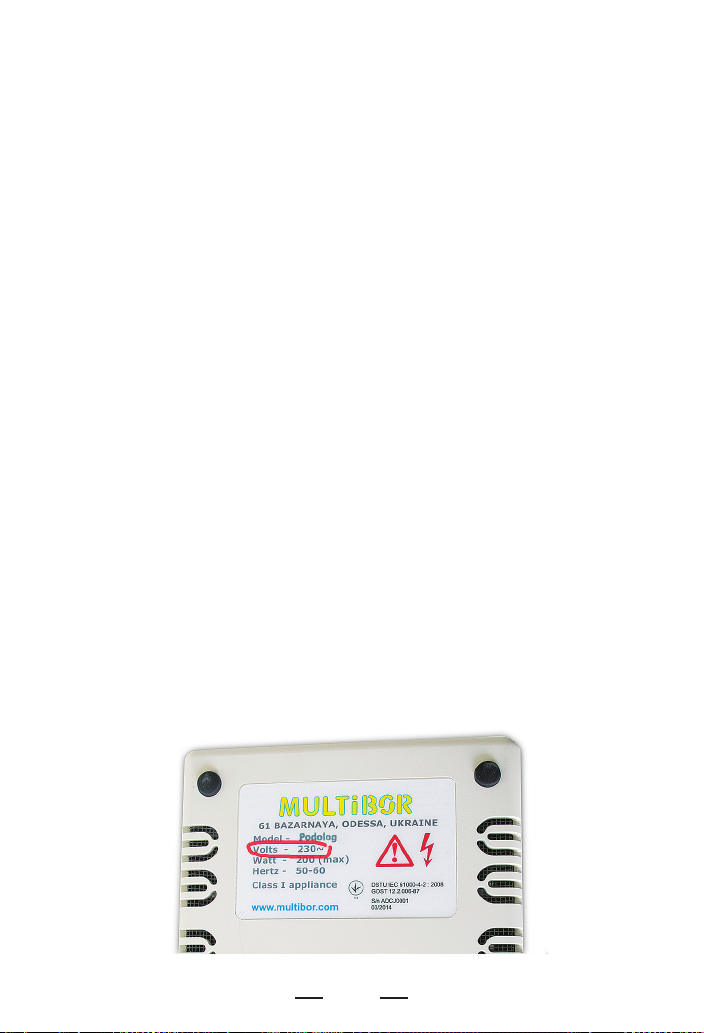
1. Never use electric mains where voltage and frequency are
dierent from the parameters specied on the casing of the Milling
Cutter.
2. Do not try to plug or unplug the Milling Cutter with wet hands.
3. Always insert the plug deeply to the end.
4. Never pull the power cable to withdraw the plug out of the wall
socket.
5. Avoid damage to and do not modify and do not stretch the power
cable and the connection cable. Do not put any items onto them. The
connection cable remains under big workload while in use, therefore
it would quickly break down if used improperly (e.g. knots and loops
in the cable, constant bending at sharp angles, abrupt moves).
6. Do not switch the Milling Cutter on if the power cable or
connection cable is looped or knotted.
7. Do not plug the Milling Cutter in a wall socket, which is used to
provide power to some other equipment (via extension cables,
T-junctions, etc.)
8. Use high-quality and properly operating tools (caps, milling tools,
etc.) only. Shank ends must be plain-shaped and all parts of the tools
must be rmly xed to each other. Do not use any worn tools as it
may result in their destruction.
9. When selecting the operation modes for the Milling Cutter, do not
go beyond the maximum permitted limits for a specic tool as it may
result in destruction of the tool and in breakdown of the Milling
Cutter.
6
Make sure there is some free space around the wall socket, so that
you can quickly unplug the device if necessary. In the event of smoke,
unusual fumes or strange noise near the Milling Cutter, switch it o
immediately, unplug it and refer to the Service Center. Do not place
any items onto the power unit. If any external items or uids get into
the Milling Cutter, unplug it o immediately and contact the
technical
ATTENTION! It is prohibited to disassemble or modify any
components of the Milling Cutter. Several parts of the power unit
bear high voltage. It is not allowed to perform any maintenance
procedures not specied in this User Guide.
Do not use any ammable spays near the Milling Cutter.
Do not keep any ammable uids near the Milling Cutter.
Do not place the Milling Cutter in locations with high humidity or
dust or smoke contents and in locations under direct sunlight as
well as in the vicinity of heating equipment.
The voltage and frequency of the power supply mains
are shown on the device!
7
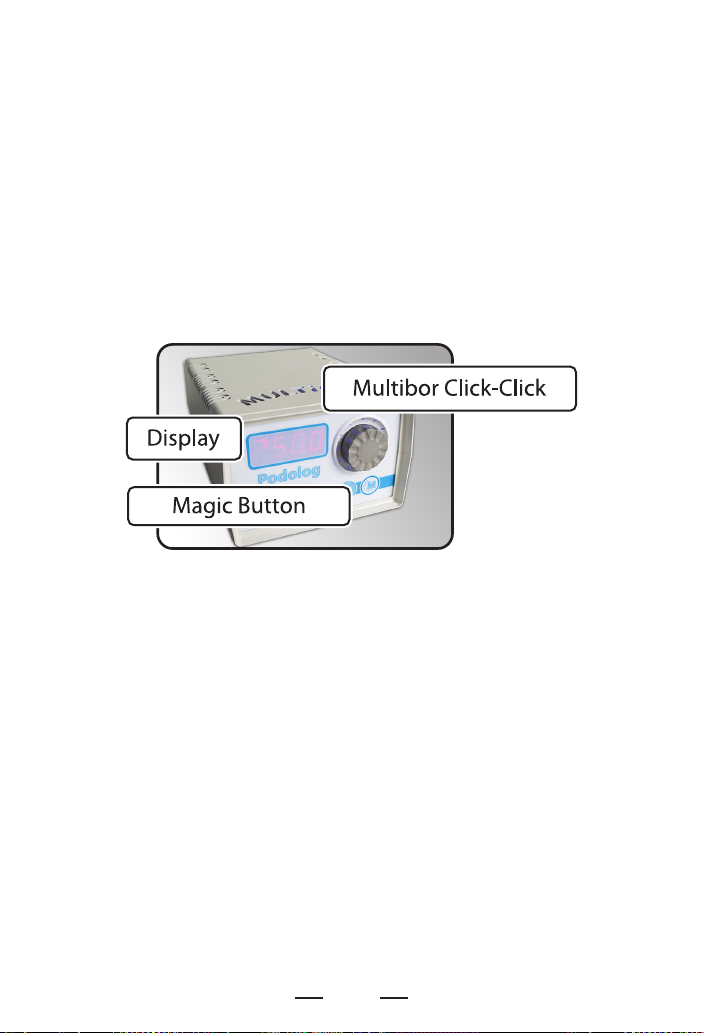
Description and designation of the major components
Power Unit
This is a microprocessor-based power supply unit for direct current
micromotors able to quickly adjust their operation modes. The
power unit is designated for the operation jointly with the handheld
milling cutter.
The controls and signal functions of the power unit have several
unique features based on the unique technologies by Multibor
Company, and namely:
- Multibor Click-Click manipulator
- Multibor Magic Button switch
Thru the 'Multiobr Click-Click' (hereinafter, the 'Manipulator'), it is
possible to:
- switch the rotation on or o
- increase or decrease the rotation speed
- change the rotational direction: 'Reverse' function
- select a control program from the list
Thru the 'Multibor Magic Button' (hereinafter, the 'M-button'), it is
possible to:
- activate the program control mode
- deactivate the program control mode
Attention! When in the program control mode, such parameters as
output power, maximum torque, protection operating level and the
like are automatically selected and adjusted by the processor in
accordance with the preset algorithms and thus cannot be altered by
the user.
8
 Loading...