

Multenet GPRS / EDGE, UMTS HSDPA / HSUPA, PROD0301, PROD0302 User Manual
1
Manual
Wireless Routers
Wireless Routers
MULTeNET Wireless Routers
User Manual
English
Version 1.0
March 2008
Mobile Router
GPRS / EDGE
Broadband Router
UMTS HSDPA / HSUPA

Wireless Routers
2
Manual
Document Scope
This manual describes how to install, configure and operate the Multenet Wireless Routers.
For updated product features, refer to our website at www.multenet.com
Revision History
Revision No Changes
1.0 First release
Data, Illustrations, Alterations
The data and illustrations found in this document are not binding. We reserve the right to
modify our products in line with our policy of continuous product development. The information
in this document is subject to change without notice and should not be construed as a
commitment by Multenet.
Multenet assumes no responsibility for any errors that may appear in this document. If you
have any suggestions for improvement or amendment, or have found errors in this publication,
please notify us through your distributor or email techsupport@multenet.com
Trademarks
EtherPAD and PocketPAD are registered Trademarks of Multenet. Internet Explorer, Windows
95/98/2000/NT/XP are registered trademarks of Microsoft Corporation. Ethernet is a trademark
of XEROX Corporation. Modbus is a trademark of Schneider Electric, Inc.
Copyright 2008 Multenet All rights reserved.
Contact details:
Multenet Technologies (Pty) Ltd.
P O Box 7155, Stellenbosch, 7599
The Vineyard Centre, Adam Tas Road,
Stellenbosch, 7600
Sales Email : sales@multenet.com
Technical Support Email : techsupport@multenet.com
Website : http://www.multenet.com

Manual
3
Manual
Wireless Routers
Contents
INTRODUCTION
6
Introduction to the Wireless Routers 7
Wireless Connectivity 7
GPRS 7
EDGE 7
UMTS HSDPA 7
HSUPA 7
Wireless Routers 7
Mobile Router 7
Broadband Router 7
Product Features 8
Security 9
Firmware Updates 9
GETTING STARTED
10
Inserting SIM cards 11
Attaching the Antenna 11
10/100 Base-T Ethernet Network Connection 12
Serial Port Connection 12
Configuration of the Wireless Router 12
Discovering Multenet Devices 12
CONFIGURATION
15
Configuration Overview 16
Web Browser Configuration 17
Requirements 17
Check your web browser proxy settings 17
Open Web configuration 17
Log into Web Configuration 17
Home 18
Management 19
Security 19
System Information 19
Date and Time 19
Mobile 21
Networking 22
Ethernet Parameters 22
PPP (Point-to-Point Tunnelling Protocol) 23
Routing 31
VPN 32
DNS (Domain Name Server) 34
SNMP (Simple Network Management Protocol) 34
Port Forwarding 35
DHCP 36

Wireless Routers
4
Manual
Firewalling 36
Serial 38
Port Settings 38
Applications 40
Configuration File Upload 46
Monitoring and Support
47
Monitoring 48
PPP Connection 48
Routing Table 50
Firewall Log 51
Example of Firewall Log 51
DHCP Server Log 51
Connection List 52
Mobile Network 52
Support 54
Config Info 54
Config File 55
System Log 56
Contact Us 57
Tools 58
Ping 58
Traceroute 58
SMS Services 59
UPGRADING
Firmware upgrade 61
TROUBLESHOOTING
62
Verifying MAC Addresses 62
Ping 63
ARP 63
Traceroute 63
Telnet 64
Web Browser Proxy Settings 64
Recovering from a Lost Password 66
System 67
Serial Interface 67
Network Interface - 10/100 Base-T 67
GSM 67
Mobile Network 68

Manual
5
Manual
Wireless Routers
APPENDIX
69
Interface Pin-outs 71
Network Interface 71
Serial Interface 71
RS-422 Serial Interface Pin-out 72
Cables 73
Crossed Serial Cable 73
Full Crossed Serial Cable 73
Null-Modem Crossed Serial Cable 74
Straight Serial Cable 74
NOTES 75

Wireless Routers
6
Introduction
INTRODUCTION
The chapter provides information on functionality and provides an overview of wireless
communication technologies.

Introduction
7
Introduction
Wireless Routers
Introduction to the Wireless Routers
Wireless Connectivity
To determine which wireless technology is best suited for your application, the following
guideline will give you some indication of the differences in these technologies.
GPRS
GPRS is a basic low speed GSM data service offered by most GSM operators. It has a
basic upload speed of 11kb/s and a download speed of around 44kb/s. Although GPRS is
very reliable and almost universally available where GSM exists, it has a major drawback of
relatively long latency times with an average latency of around 700 – 900mS. GPRS is ideal
for telemetry applications (meter reading, remote monitoring of devices etc.) or low speed
transaction based systems such as ATM’s but it is unsuitable for video links.
EDGE
EDGE is an enhancement to GPRS which is effectively four times the speed in both the
upload and download directions (i.e. 176Kb/s down and 44kb/s up). It is however not as widely
available as GPRS, but is capable of providing low to medium grade streaming video due to
the higher bandwidth and lower latency.
UMTS HSDPA
HSDPA is an advanced technology which provides very high speed wireless mobile data.
Current speeds are 7.2Mb/s in the download direction depending on the network’s capabilities.
Because of the above, HSDPA is ideal for almost all applications which need reliable, high
speed networking. Applications include remote signage high quality CCTV and provision of
internet access to areas with no access to wired services.
HSUPA
HSUPA is the latest release of high speed wireless network which offers significantly improved
uplink speeds as denoted by the ‘U’ in the name. Uplink intensive applications such as CCTV
will benefit considerably from this technology.
Wireless Routers
Mobile Router
The Mobile Router is capable of connecting to GSM/GPRS/EDGE networks. Typical applications are where reliability is important, but high speed is not a priority such as ATM machines,
credit cards authorizations and telemetry.
Broadband Router
The Broadband Router is capable of connecting to UMTS HSDPA / HSUPA networks. Typical
applications include remote office connectivity and CCTV video streaming.

Wireless Routers
8
Introduction
Product Features
The Wireless Routers have one RS-232/422/485 Serial interfaces, a integrated EDGE or
HSDPA modem depending on model, dual SIM slots and a single 10/100 Base-T Ethernet
interface.
A Wireless Router is capable of connecting a number of Ethernet devices via GSM/GPRS/
EDGE networks on the Mobile Router, or UMTS/HSDPA networks on the Broadband Router.
With always–on and DUAL SIM card technology they provide easy to deploy access to central
servers and the Internet via GSM networks. The Wireless Routers are capable of maintaining a
permanent PPP connection or alternatively making a connection on demand (dial-on-demand)
to the distant network. It also allows you to dial into an Ethernet network to access devices on
that network or dial out of an Ethernet network to connect to a remote RAS server.
Some of the features supported by the Wireless Routers are:
IP Masquerading, which allows one or more computers in a network without assigned IP
addresses to communicate with the Internet.
Port Forwarding, (sometimes referred to as tunnelling) which is the act of forwarding a network
port from one network node to another, can also be enabled.
The Firewall feature on the Wireless Routers allow you to implement security by setting up
Access Control rules. The Firewall feature allows you to control your connection denying any
unwanted traffic or simply viewing what traffic is passing through the Wireless Routers.
Another feature on the Wireless Routers is a DHCP server to dynamically allocate IP
Addresses to hosts connected to the Ethernet network.
VPN functionality is standard on the Wireless Routers, providing reliable and secure communication between the Router and your corporate network.

Introduction
9
Introduction
Wireless Routers
Security
Securing your Wireless Router is done on various levels. Authentication is required for
configuring the Wireless Routers. The administrator username is ‘root’ with the default
password being ‘xxx’. It is recommended that you change this password to protect against
unwanted configuration changes on the Router.
NOTE: DO NOT lose your password. If both the Bootloader and System passwords
are lost, you will need to send your Wireless Router back to Multenet to be
reprogrammed. There is a cost associated with this recovery procedure. You are
able to recover from a lost System password by erasing the Dataflash using the
Bootloader login. The firmware will then need to be uploaded via serial.
Firmware Updates
Multenet continues to develop its products extensively, with new firmware releases available
regularly. New releases may contain new protocols, new features, bug fixes, performance
improvements, etc.
These firmware updates can be downloaded from the Multenet website:
http://www.multenet.com/support/downloads.html
Alternatively, contact your local distributor or email Technical Support.
Firmware can be uploaded to the Wireless Routers via EtherPAD Explorer V1.5.2 and above
(included on CD).

Wireless Routers
10
Getting Started
GETTING STARTED
This chapter provides information on connecting your Wireless Router to the network. The
Wireless Routers operate on the GSM network and it is important to take signal strenth and
quality into account when installing these devices.

Getting Started
11
Getting Started
Wireless Routers
Inserting SIM cards
The Wireless Routers support Dual-SIM so that a second service provider can be used as a
backup should your primary service provider become unavailable.
On the front of the Wireless Routers, there are two SIM slots in which the SIM cards are
inserted. SIM slot 1 should be used for your primary service provider, and SIM 2 for the
secondary or backup operator. To insert the SIM cards, insert the SIM into the drawer which is
ejected by depressing the release button next to the SIM drawer. Ensure that the trays are fully
inserted before starting up the router. For a single SIM configuration the SIM1 slot should be
used.
Note: Your Subscriber Identity Module (SIM) card
is not included and must be obtained from your local
Cellular Service Provider.
A data enabled SIM card is required for
operation of
the Multenet Wireless Routers.
Attaching the Antenna
Antennas are supplied with Multenet’s range of wireless routers.
Attach the antenna to the connector on the front of the Wireless Router and fasten by turning.
In some cases, a combination of factors can mean that a suitable signal can only be obtained
by the use of additional optional antennas.
These issues include:
a. If the unit is inside a metal enclosure such as a DIN rail cabinet
b. Proximity to interference generating equipment such as large machinery
c. Distance from the nearest cell site
d. Shielding by concrete reinforcement (e.g. within a large shopping mall)
In these cases, contact Multenet to obtain information on installing aditional antennas.

Wireless Routers
12
Getting Started
10/100 Base-T Ethernet Network Connection
Connect to your router via the Ethernet Network through a 10/100 Base-T switch/hub or
directly via straight or crossover Ethernet cable.
Serial Port Connection
The Router is a DTE (Data Terminal Equipment) device. You need to choose the serial
cable best suited to your serial device. A number of cable options are available:
• Crossed Serial Cable (most commonly used).
• Full Crossed Serial Cable.
• Null-Modem Crossed Serial Cable. Connect to another DTE (Data Terminal Equipment)
device, such as a PC.
• Straight Serial Cable. Connect to a DCE (Data Communications Equipment) device such
as a Modem.
Configuration of the Wireless Router
There are a number of methods to configure the Router:
• Web Browser Configuration
• Configuration File Upload
• Telnet or Serial configuration
• BootP/DHCP
These configuration methods will be explained in the next chapter.
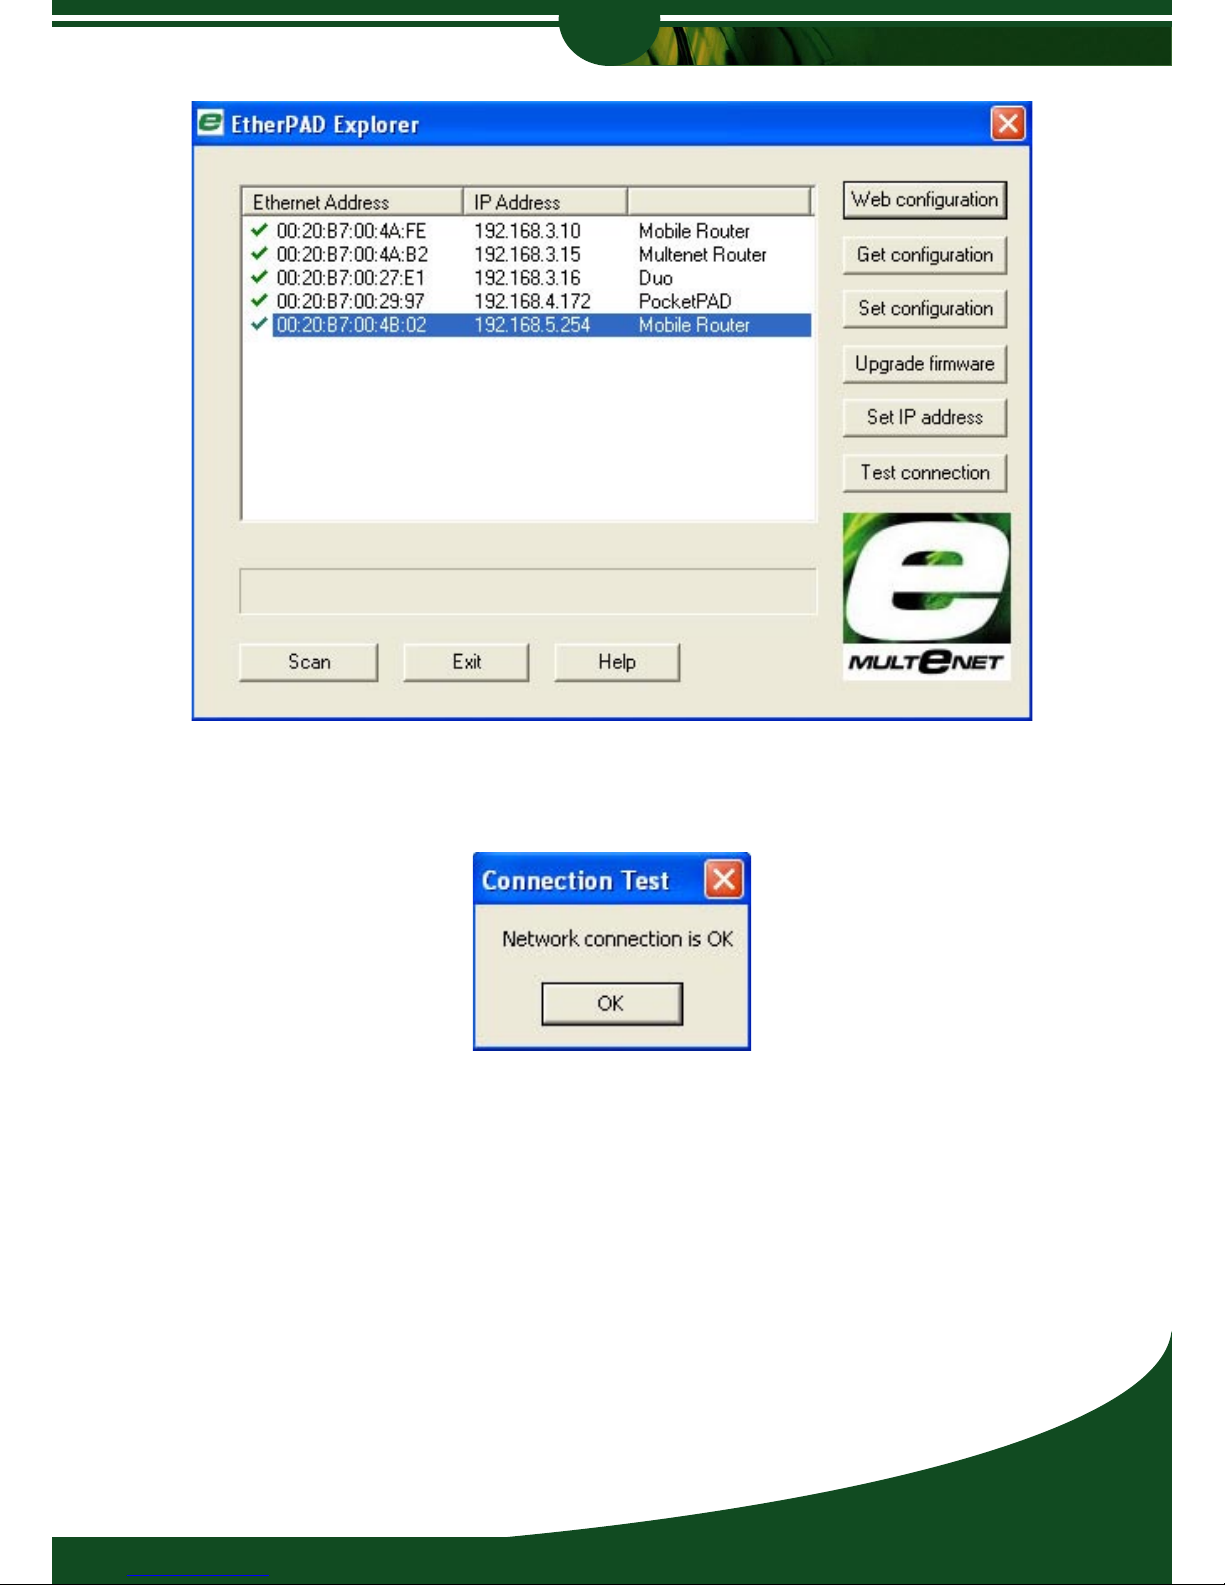
Discovering Multenet Devices
Please ensure that your system firewall is disabled, launch EtherPAD Explorer and click on
‘Scan’ to discover any Multenet devices on your local subnet.
or
Select [Run EtherPAD Explorer now] from the Autorun Menu to launch the executable from
the CD, then click on scan to start discovery.
Note: EtherPAD Explorer executable is available on
the Multenet Product CD, along with the installation for
MS Windows PCs

Getting Started
13
Getting Started
Wireless Routers
Click [Scan] in EtherPAD Explorer to find Wireless Routers and other Multenet products on
the local Ethernet segment. A broadcast is sent out to which Multenet products respond to. A
new device will have no IP Address set, unless a DHCP server is setup and has issued the
Router an IP Address. Identify the MAC Address on the Router to verify that the unit is online.
Multenet devices on remote segments and networks will not be seen by EtherPAD Explorer as
routers will block the broadcast.
You will need to [Set IP Address] to configure the Router via TCP/IP. Make sure the IP
Address falls in your local subnet. Ask your Network Administrator should you have issues
getting these details.
The default Root password is ‘xxx’. If an IP Address has already been set, it may be that the
DHCP server has assigned the network parameters. The Router, by default, is set to obtain an
IP Address from a DHCP server.
Wireless Routers
14
Getting Started
You can [Test connection] to check if the Router is reachable via TCP/IP. If the test fails,
check your IP Address and Subnet Mask settings.
Check that the IP Address you enter is not used by another host on the network. Duplicate IP
Addresses may cause unwanted network disruptions. Check the Troubleshooting Guide for
more fault-finding tips.

15
Configuration
Wireless Routers
CONFIGURATION
This chapter provides information on configuring your Wireless Router.

Wireless Routers
16
Configuration
Configuration Overview
There are a number of methods to configure the Router:
• Web Browser Configuration via network using a Web Browser.
• Configuration File Upload via network using EtherPAD Explorer.
• Telnet or Serial configuration via network using a terminal application.
• DHCP/BootP with TFTP automatically via network servers.
Three steps are required to configure the Router for operation:
1. Configure the Router’s IP Address, Network Mask and Gateway IP Address.
2. Configure PPP to connect to your service provider.
3. Configure the Serial communication parameters. (Optional)

Configuration
17
Configuration
Wireless Routers
Web Browser Configuration
Requirements
- Ethernet connection. A computer with an Ethernet port or a Local Area Network (LAN).
- A web browser such as the Internet Explorer or FireFox installed on your PC.
Check your web browser proxy settings
If your web browser is configured to use a proxy server, you may have problems connecting to
the configuration pages on your Router. In this case, disable the proxy server in your browser.
Open Web configuration
Select your Wireless Router in EtherPAD Explorer and click [Web configuration] to launch
your Web Browser.
Log into Web Configuration
Log into the Router (‘root’ with default password ‘xxx’) by clicking [Enter Configuration].
Wireless Routers
18
Configuration
Home
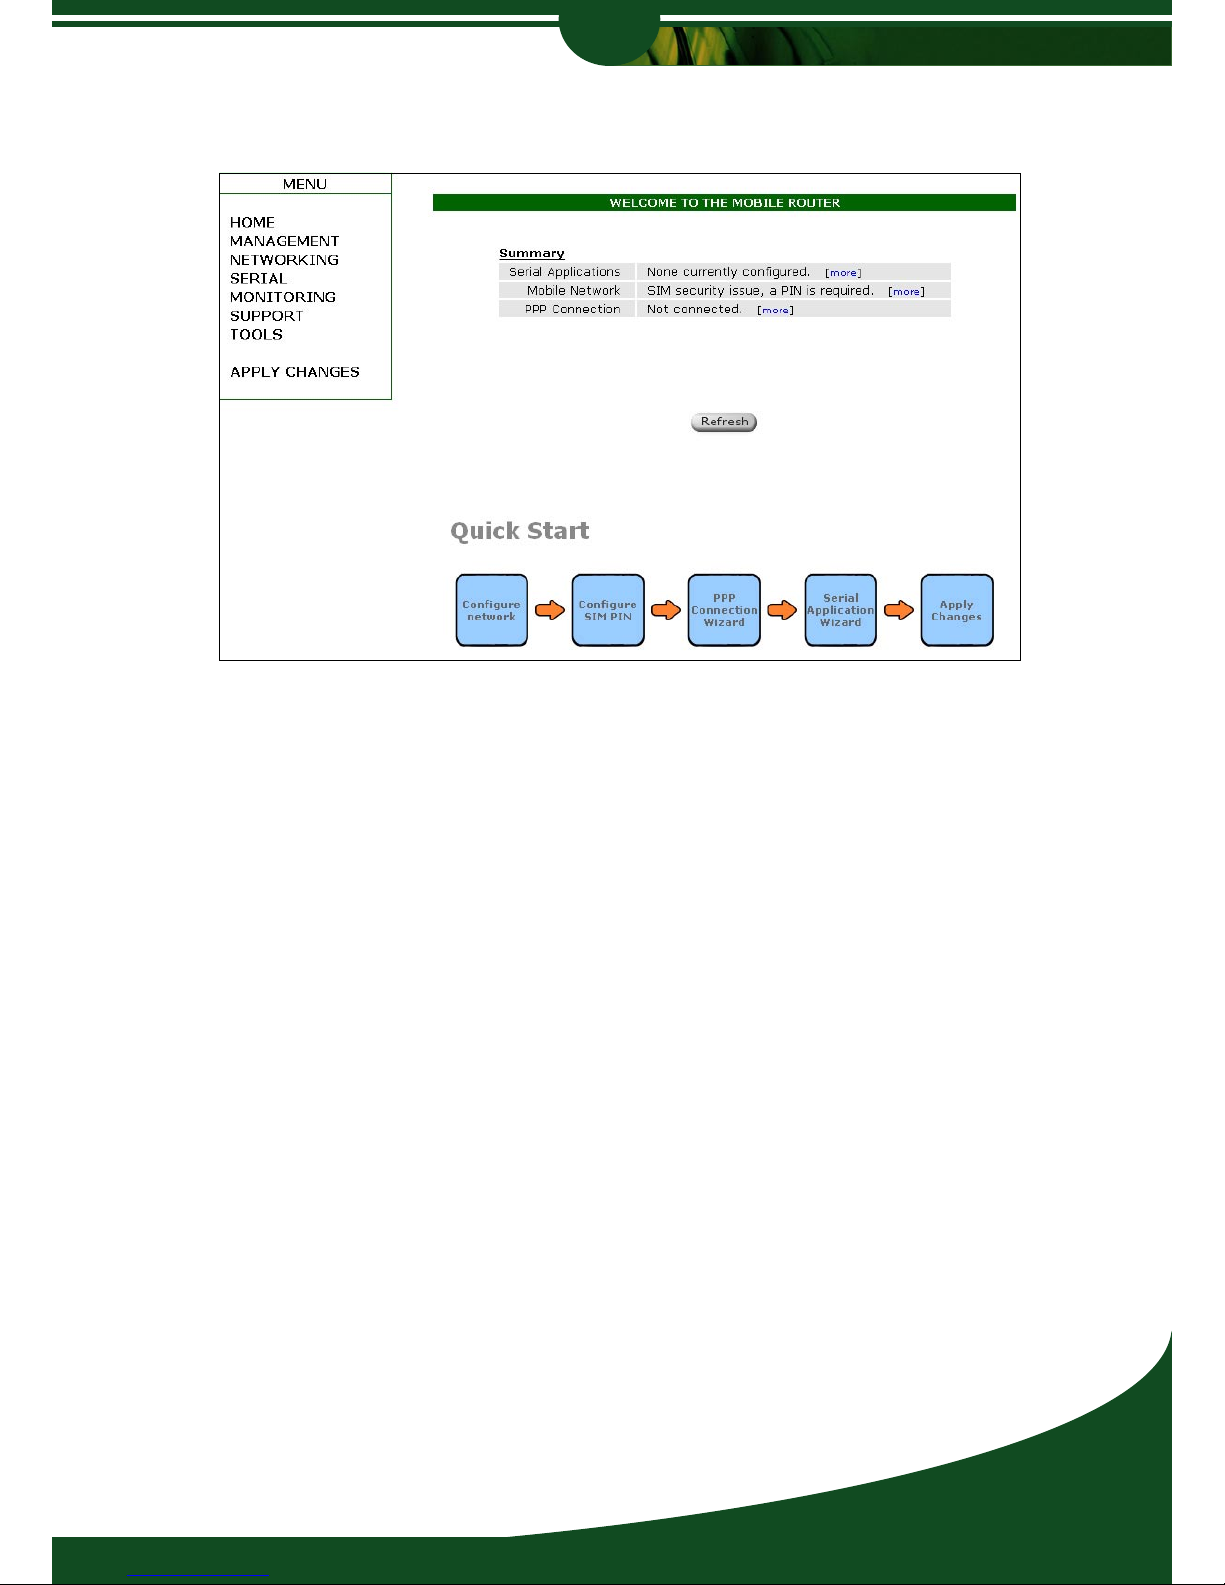
Logging in displays the home page.
Home Page Menu
SUMMARY
Summary displays useful information, and allows quick access to options such as configured
Serial Applications, Mobile Network status and PPP connection status and configuration.
QUICK START
The quickstart tabs are designed as a guideline to enable fast configuration of the Wireless
Router, using a structured approach and by utilizing configuration wizards for the setup of
the network configuration, SIM PIN, PPP and serial applications.
This is the recommended approach for setting up the Wireless Router.
NAVIGATION
Use the Navigation Bar on the left hand side of the page to navigate through the configuration
options of the Wireless Router. This manual will describe the different configuration options to
you by order of the navigation menu.
APPLY CHANGES AND SAVE/REBOOT
Once you have made configuration changes, you will need to click on ‘Apply Changes’ on the
navigation bar which will take you to the ‘Save and Reboot’ screen.
Reboot with new settings - Your changes will be saved and implemented
after reboot.
Reboot with old settings - Cancel your changes and reboot with the old
configuration.
Reboot with factory default settings - Remove all changes made (old & new).
The Router boots with the original default
settings.
Configuration
19
Configuration
Wireless Routers
Management
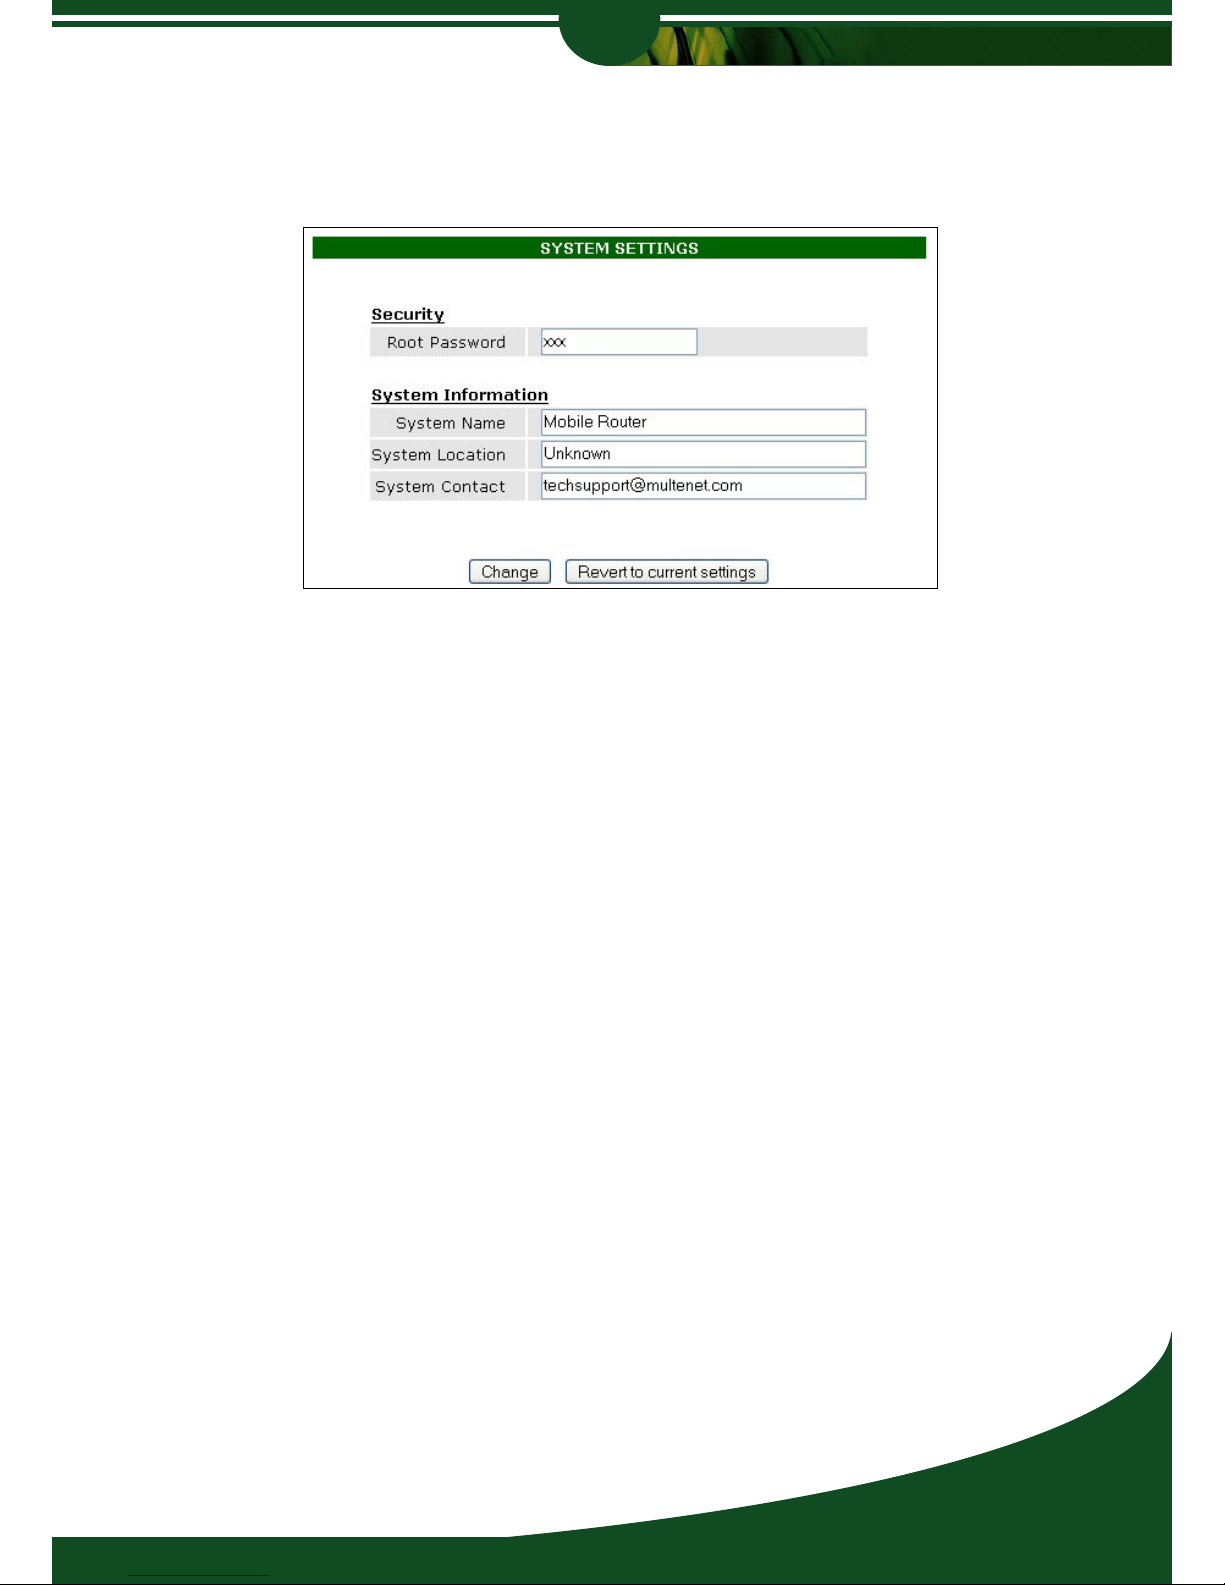
Management Settings provides options to change the Root password, and various device
specific parameters.
Security
The administrator username is ‘root’ with a default password being ‘xxx’. It is recommended to
change the password before deployment.
DO NOT lose your password. If you have lost a password, check ‘Recovering from a lost
password’ in the Troubleshooting chapter.
System Information
System Name - Identify your Router with this label. Handy if you have many devices
on the local network.
System Location - Set a Location name label for your device.
System Contact - Enter a contact for this Router (e-mail, name, telephone number)
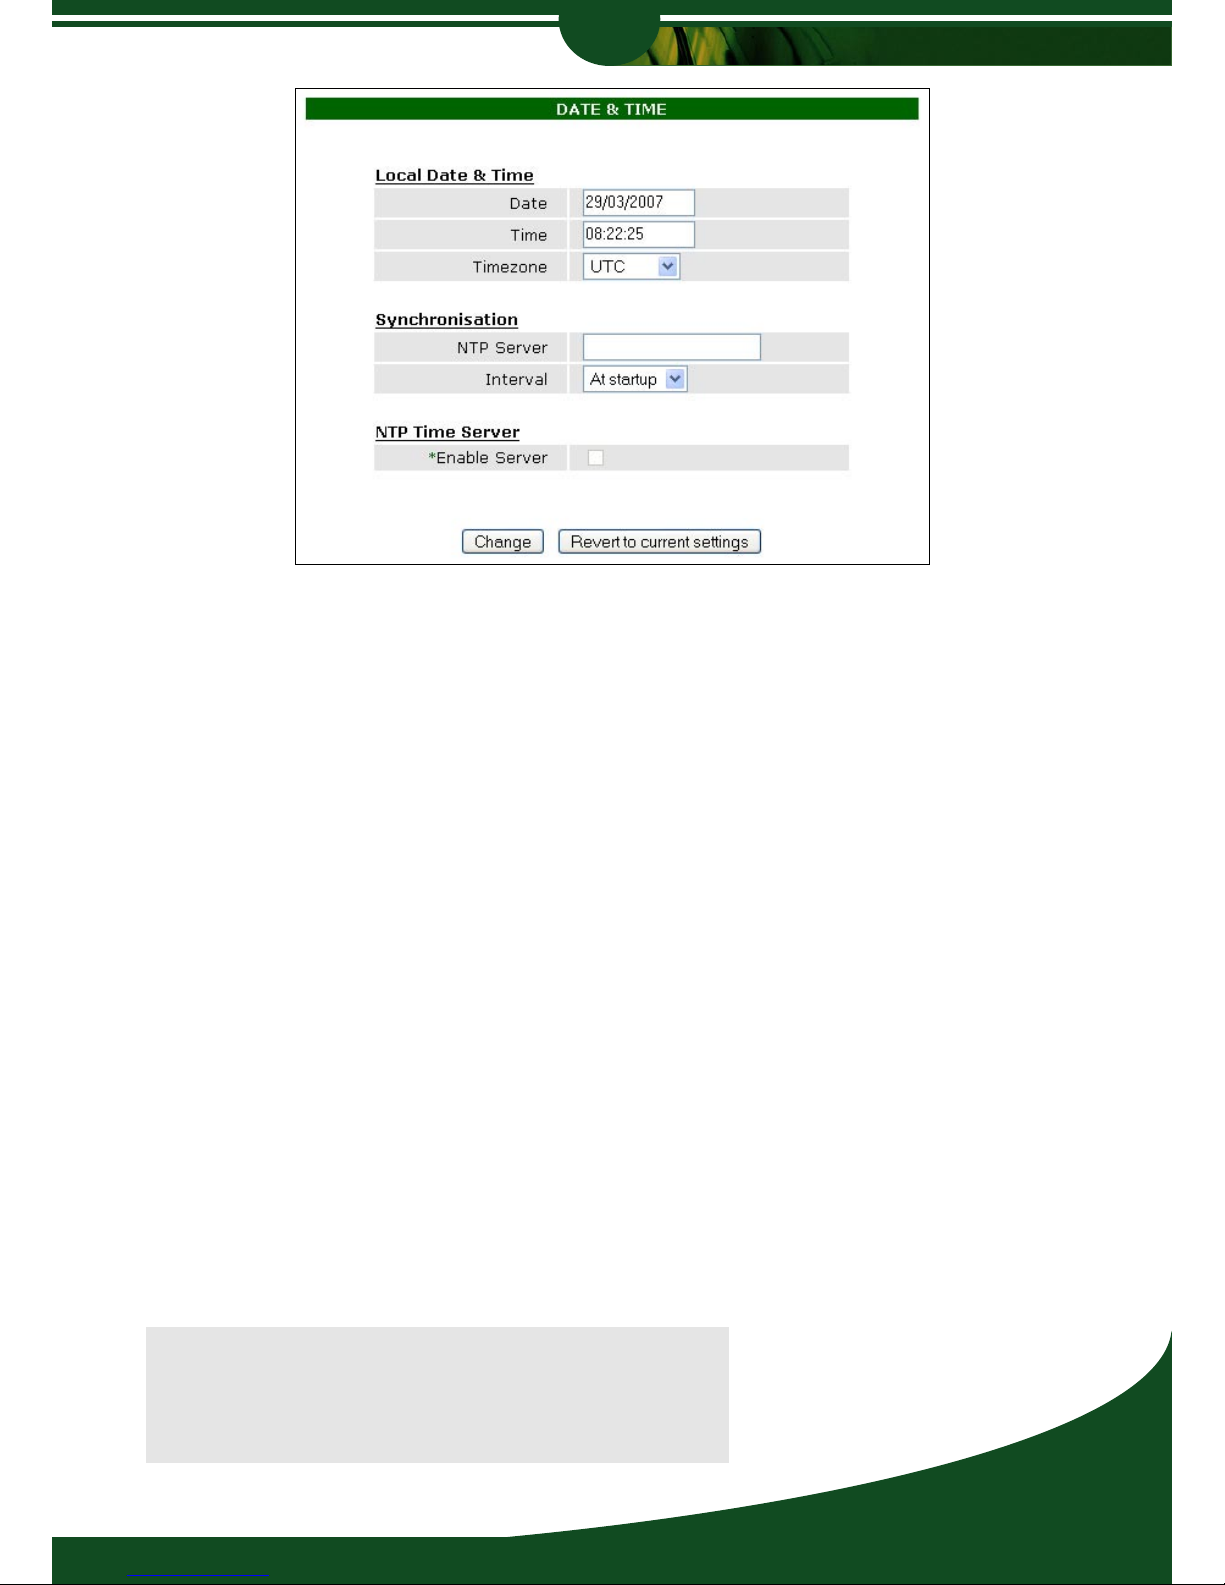
Date and Time
Date and Time provides options to change the date and time, and to configure the Router’s
NTP server settings. For this device to be used as a NTP time server, you need to first
configure a NTP server for this device to synchronise with.
Wireless Routers
20
Configuration
Local Date and Time
Date - Date should be entered in the format dd/mm/yyyy.
Time - 24h mode time.
Timezone - Select your Coordinated Universal Time (UTC).
Synchronisation
NTP Server - Enter the address of the NTP server you would like to synchronize
with. Network Time Protocol (NTP) provides a solution for the need
to synchronize network devices to an accurate time in a networking
environment. An NTP client synchronizes the time and date with an
NTP server. The NTP server should be a reliable source, such as
a time server on the Internet. A number of free public Internet time
servers are available.
Interval - Select the interval at which you would like the Wireless Router to
synchronise with the NTP time server.
NTP Time Server
Enable Server - Check this box to set up the Wireless Router to act as a NTP server.
This would enable local time synchronisation for your devices with
the Wireless Router.
Note:
For a list of public NTP servers go to www.ntp.org.
You should select the server closest to your location.
Configuration
21
Configuration
Wireless Routers
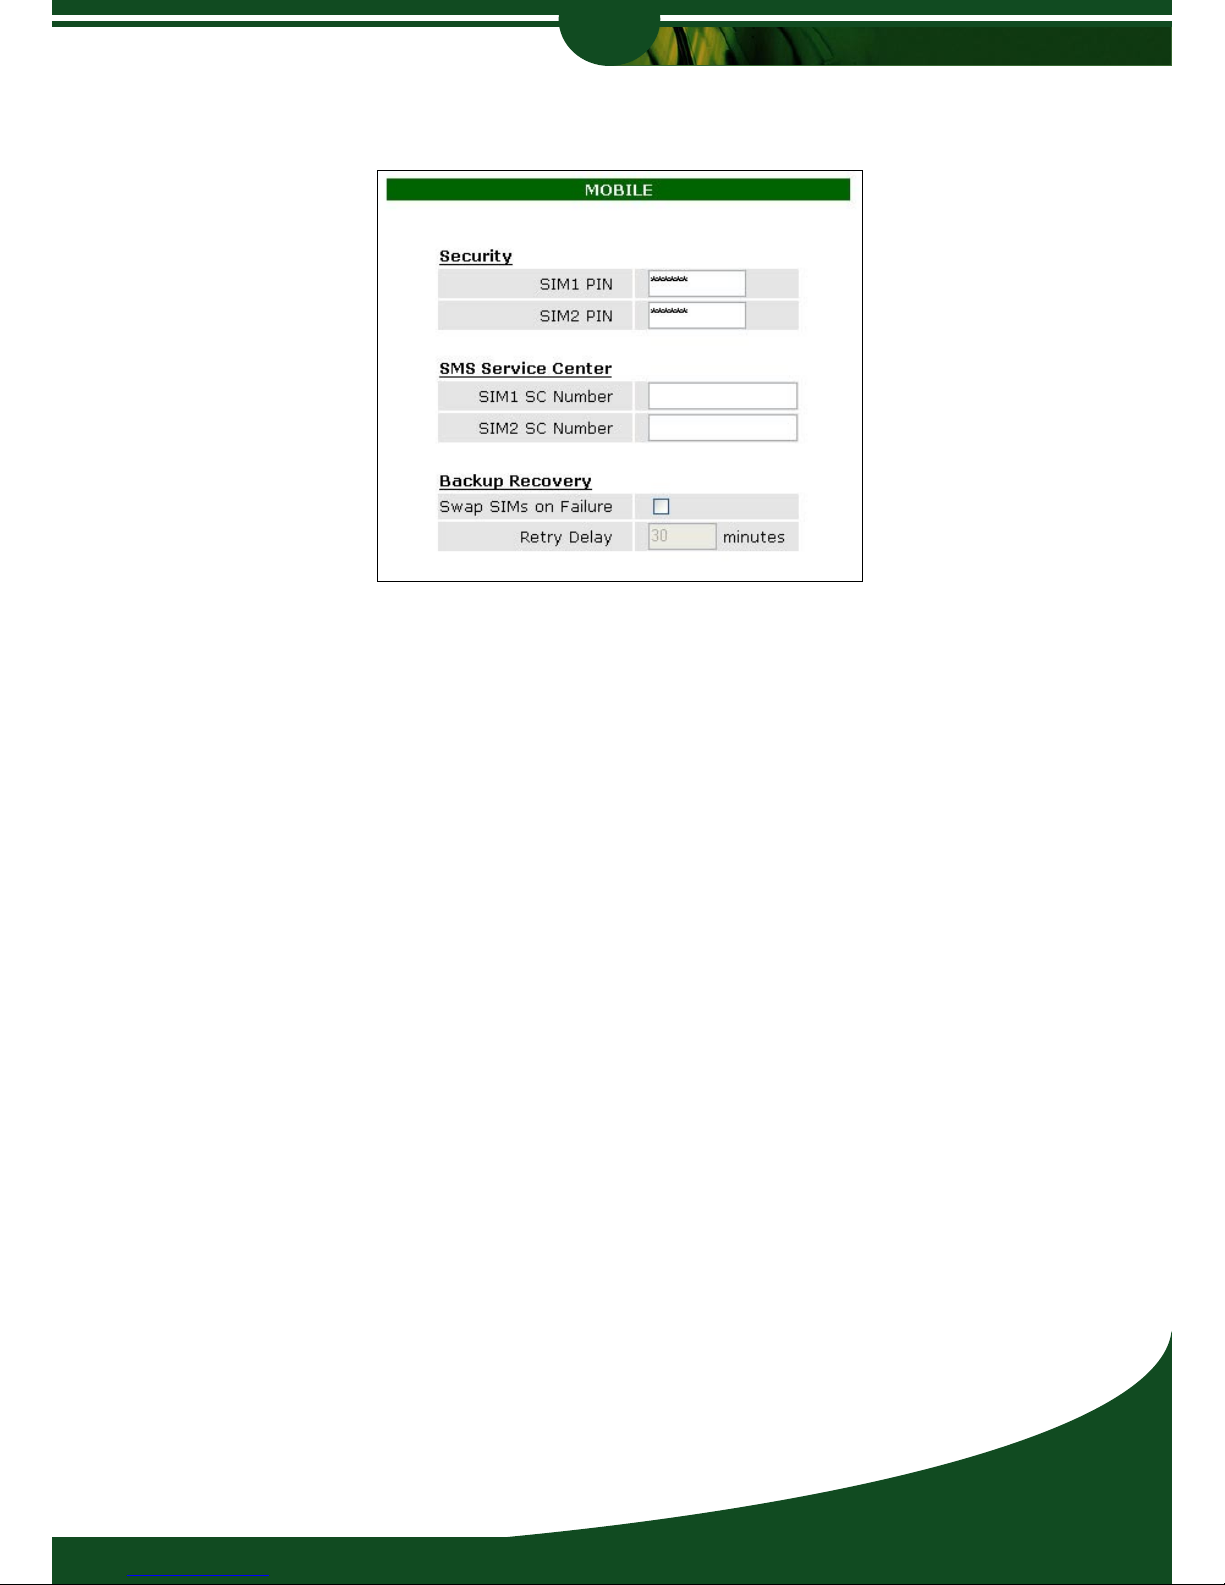
Mobile
Mobile settings allow the configuration of SIM security and network fail-over options.
Security
SIM PIN - If configured, enter SIM PIN(s) here.
SMS Service Provider
SIM SC Number - Enter the Message Centre Number(s) of you service provider. This is
needed to send SMS messages and SMS Status reports in the ‘Tools’
Menu.
Backup Recovery
The Wireless Router allows you to configure network failover from SIM1 to SIM2. If configured,
the Wireless Router will connect to a secondary or backup service provider should the service
on SIM1 become unavailable. A retry-delay can be set for when the service on SIM1 becomes
available.
Swap SIMS - To activate the Network Fail-over option, check this box.
Retry delay - The amount of time in minutes the Router should wait before trying
to switch to the primary (SIM1) network. A value of zero will result in
the Router only switching back to the alternate SIM when the current
network connection fails.
Wireless Routers
22
Configuration
Networking
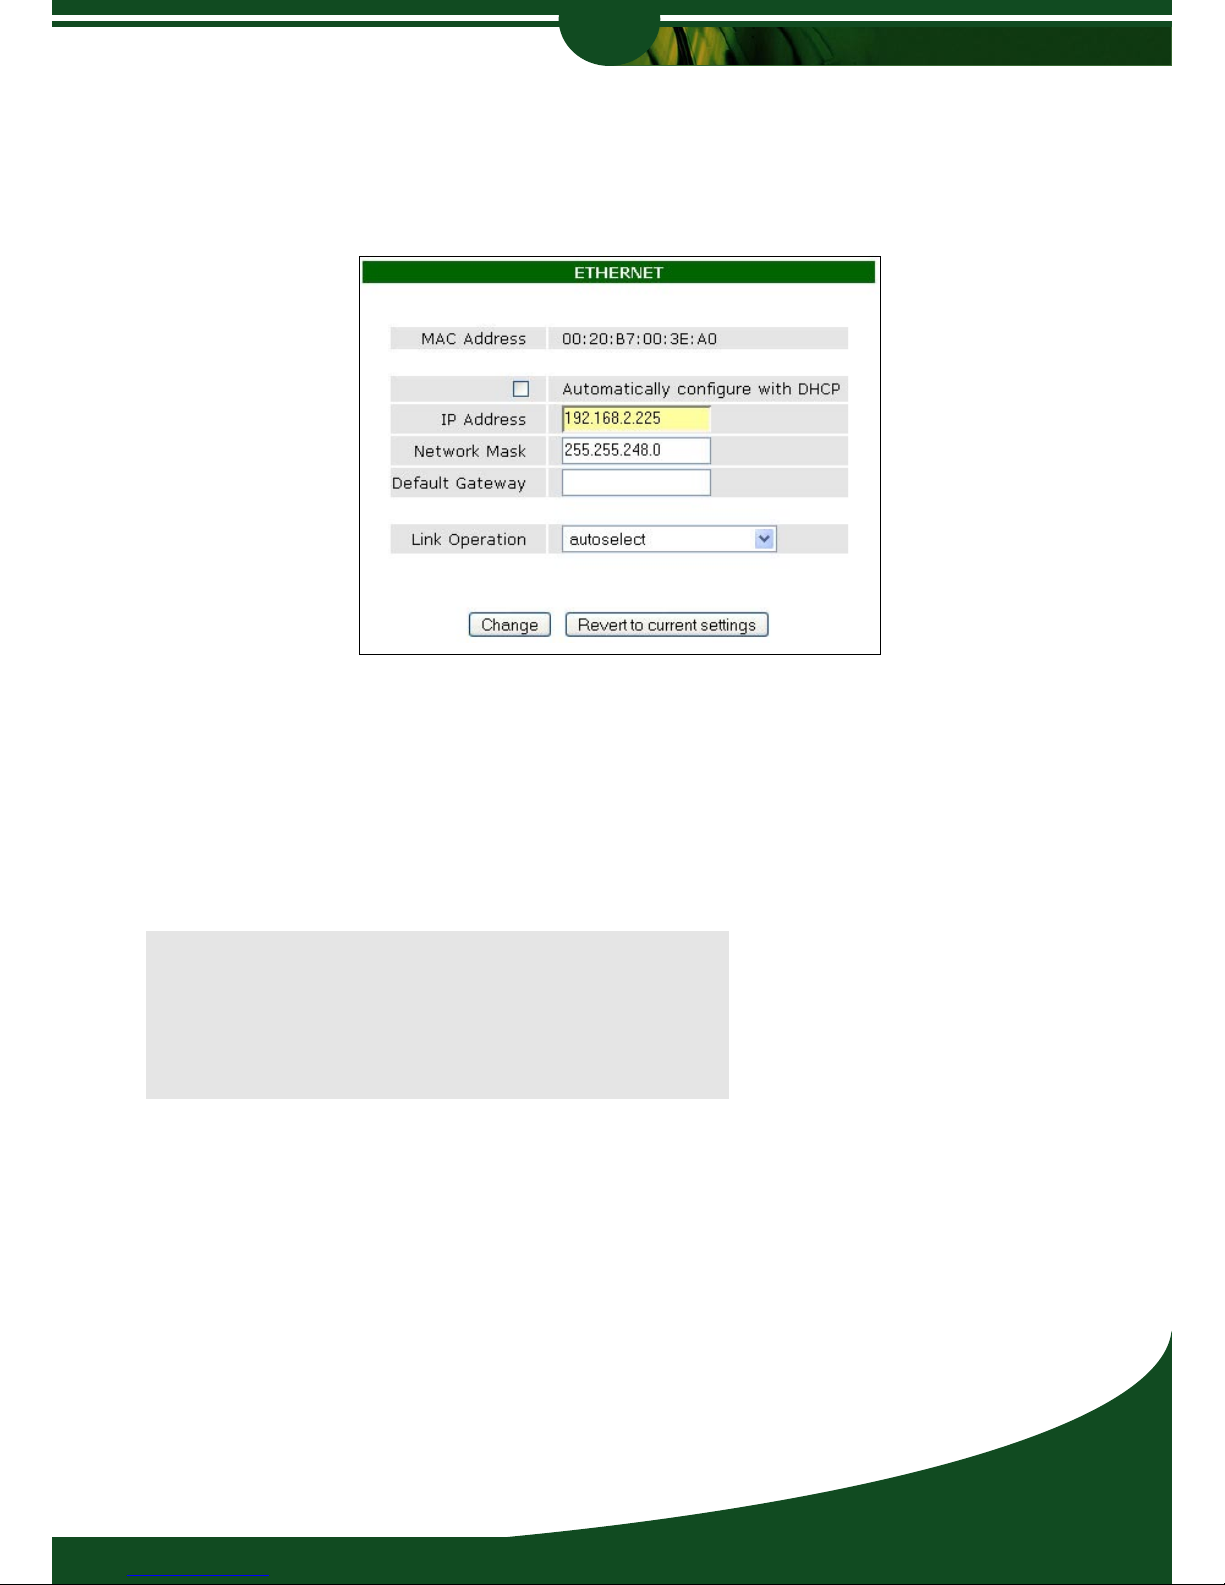
Network Settings provides for configuring the Ethernet parameters of the Wireless Router.
Ethernet Parameters
Clicking on ‘Ethernet’ or by selecting ‘Configure Network’ from the quickstart will open the
Ethernet configuration. The Ethernet Parameters allows you to set the IP Address, Subnet
Mask and Default Gateway. Once a static IP address is configured, the ‘Automatically
configure DHCP’ checkbox will be un-checked. Check the box to re-enable DHCP configuration. The Gateway can also be set here (all traffic not recognised for the local subnet will be
forwarded to the Gateway IP Address).
Note:
If a Default Gateway is configured, a Default Route
will automatically be created which can be viewed and
modified from the Routing section later in this chapter.
Configuration
23
Configuration
Wireless Routers
PPP (Point-to-Point Tunnelling Protocol)
There are two methods available for setting up PPP on the Wireless Router.
PPP Express - Wizard based setup to help you set up the PPP connection.
(Recommended)
Manual - Manual configuration for setting up a PPP connection.
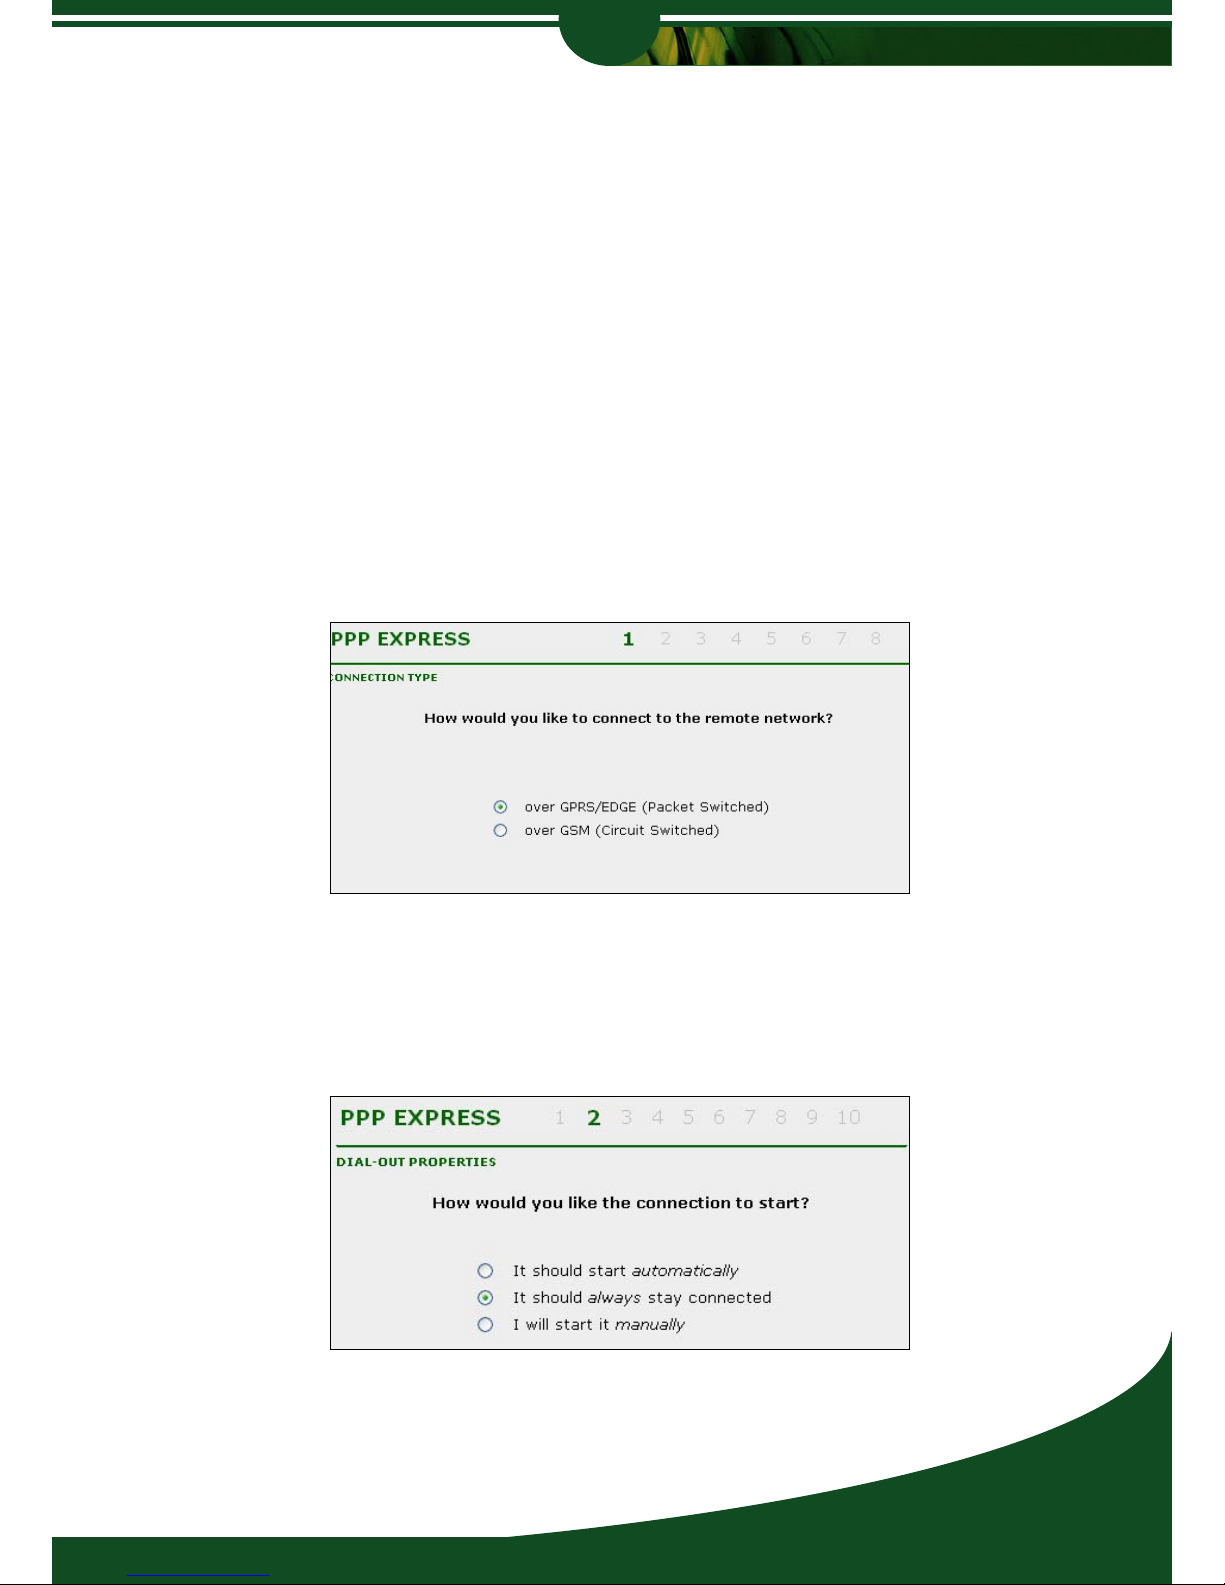
PPP EXPRESS
Launch the PPP Express Setup Wizard, by clicking on the ‘PPP Express’ link. This will launch
the wizard in a separate browser window as indicated below. The wizard will guide you through
setting up a connection. Depending on your environment, you will have the option of clicking
through and in most cases use the default assigned values. The following steps below show
how to set up a Always-On wireless connection.
1. Connection Type
You have the option for selecting either GPRS/EDGE, also used for HSDPA (Packet Switched),
or GSM (Circuit Switched) for connecting to the remote network.
2.Dial-out Properties
 Loading...