


MULCO

Instructions Manual
English / Español

Ronda
Swiss Movement / Movimiento suizo
Ronda cal. Z60
Water Resistance
Helium Release valve
Contents / Contenido
English / Español
07
27
29
30
33
32
Ronda
Chronograph
cal. Z60
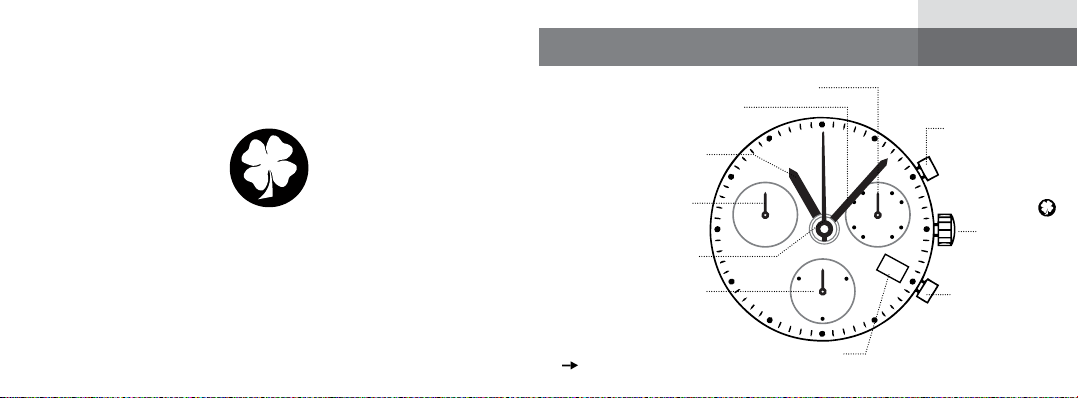
Display and Control Buttons
Second hand
Minute hand
A
S
I
R
F
S
T
U
N
U
M
D
H
T
MULCO
Z60
O
N
T
U
E
W
E
20
30
Hour hand
Day of the
week hand
Second counter
Minute counter
Chronograph
Push-button A
60
15
45
30
Crown
7
23
10
Push-button B
Battery: 395 - SR 927 SW
Date window
Z60
Z60
60
30
15
45
23
MULCO
24
MULCO
F
R
I
S
A
T
S
U
N
M
O
N
T
U
E
W
E
D
T
H
U
Z60
Z60
60
30
15
45
24
MULCO
MULCO
F
R
I
S
A
T
S
U
N
M
O
N
T
U
E
W
E
D
T
H
U
30
10
20
F
R
I
S
A
T
S
U
N
M
O
N
T
U
E
W
E
D
T
H
U
Z60
Z60
60
30
15
45
23
MULCO
24
MULCO
F
R
I
S
A
T
S
U
N
M
O
N
T
U
E
W
E
D
T
H
U
Z60
Z60
60
30
15
45
24
MULCO
MULCO
F
R
I
S
A
T
S
U
N
M
O
N
T
U
E
W
E
D
T
H
U
30
10
20
F
R
I
S
A
T
S
U
N
M
O
N
T
U
E
W
E
D
T
H
U
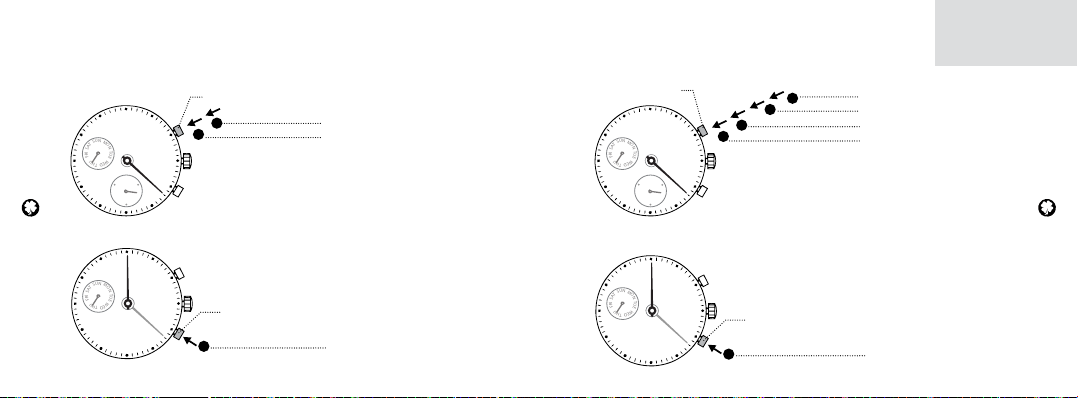
Chronograph: Basic function
Start / Stop / Reset
8
MULCO
Z60
30
20
10
MULCO
Z60
Push-button A
2
1
STOP
START
Zero positioning:
Press push-button B
(the three chronograph
hands will be reset
Push-button B
3
to their zero positions)
RESET
Chronograph
Chronograph:
Push-button A
MULCO
Z60
30
20
10
MULCO
Z60
Accumulated timing
4
3
2
1
STOP
RESTART
STOP
START
(timing is resumed)
Please note:
Following (4) , the accumulation of the timing
can be continued by pressing push-button A
Reset:
The chronograph hands
Push-button B
5
are returned to their zero
positions
RESET
9

Z60
Z60
60
30
15
45
23
MULCO
24
MULCO
F
R
I
S
A
T
S
U
N
M
O
N
T
U
E
W
E
D
T
H
U
Z60
Z60
60
30
15
45
24
MULCO
MULCO
F
R
I
S
A
T
S
U
N
M
O
N
T
U
E
W
E
D
T
H
U
30
10
20
F
R
I
S
A
T
S
U
N
M
O
N
T
U
E
W
E
D
T
H
U
Z60
Z60
60
30
15
45
MULCO
MULCO
F
R
I
S
A
T
S
U
N
M
O
N
T
U
E
W
E
D
T
H
U
30
10
20
F
R
I
S
A
T
S
U
N
M
O
N
T
U
E
W
E
D
T
H
U
F
R
I
S
A
T
S
U
N
M
O
N
T
U
E
W
E
D
T
H
U
Z60
Z60
60
30
15
45
MULCO
MULCO
F
R
I
S
A
T
S
U
N
M
O
N
T
U
E
W
E
D
T
H
U
30
10
20
F
R
I
S
A
T
S
U
N
M
O
N
T
U
E
W
E
D
T
H
U
F
R
I
S
A
T
S
U
N
M
O
N
T
U
E
W
E
D
T
H
U
Chronograph:
10
MULCO
Z60
30
20
MULCO
Z60
Intermediate or interval timing
Push-button A
4
1
Push-button B
10
2
3
Push-button B
5
Chronograph
1
Start
2
Display interval: (timing
continues in the background)
Making up the measured time:
3
(the 3 chronograph hands
are quickly advanced to
the ongoing measured time)
4
Stop: (Final time is displayed)
5
Reset: The 3 chronograph hands
are returned to their zero position
Please note:
Following (3) , further intervals
or intermediates can be displayed
by pressing push-button B
Adjusting the chronograph hands to zero position
MULCO
Z60
1
30
20
10
MULCO
Z60
30
20
10
2
Example:
III
Following a battery change
Keep push-buttons A and B
depressed simultaneously for
at least 2 seconds. The centre
stop-second rotates by 360°
(corrective mode is activated)
11

15
151515
23
60
30
15
45
MULCO
Z60
F
R
I
S
A
T
S
U
N
M
O
N
T
U
E
W
E
D
T
H
U
60
30
15
45
30
10
20
23
60
30
15
45
MULCO
Z60
Z60
F
R
I
S
A
T
S
U
N
M
O
N
T
U
E
W
E
D
T
H
U
60
30
15
45
MULCO
30
10
20
A
12
B
A
Adjusting the second counter
Single step 1 x short
Continuous long
Adjusting the next hand
Adjusting the hour counter hand (position 6h)
Single step 1 x short
Continuous long
Termination of the chronograph hands adjustment
3
can be carried out at any time
A
A
B
A
A
Chronograph
Setting the time
MULCO
Z60
MULCO
Z60
Second hand
III
Please note:
In order to set the time to the exact
second, the crown must be pulled
out when the second hand is in
position «60»
Once the hour and minute hands
have been set, the crown must be
pushed back into position (I)
13
at the exact second

Z60
Z60
60
30
15
45
MULCO
MULCO
Z60
Z60
60
30
15
45
MULCO
23
MULCO
Z60
Z60
60
30
15
45
MULCO
17
60
30
15
45
MULCO
60
30
15
45
F
R
I
S
A
T
S
U
N
M
O
N
T
U
E
W
E
D
T
H
U
30
10
20
F
R
I
S
A
T
S
U
N
M
O
N
T
U
E
W
E
D
T
H
U
F
R
I
S
A
T
S
U
N
M
O
N
T
U
E
W
E
D
T
H
U
Setting the date (quick mode)
MULCO
Z60
14
MULCO
Z60
23
24
Pull out crown to position II; rotate it
(the watch continues to run)
II
Please note:
The date can be changed during
the date changing phase between
9:00 PM and 12:00 PM; please
note that the date must be set to
the date of the following day
as in this case the automatic date
changing does not occur at midnight
Chronograph
Setting the date, day of the week (Z60) and time
Example:
MULCO
Z60
60
N
U
M
S
O
T
N
A
S
T
I
U
45
R
E
F
W
U
E
D
H
T
30
30
20
10
- Date / time on the watch: /1:25 AM/
- Present date / time: /8:30 PM/
15
23
1
2
1
Pull out the crown to position III
(the watch continues to run)
2
Turn the crown until yesterday’s
day of the week
MULCO
Z60
4
3
3
3
Push the crown to position II
4
Turn the crown until yesterday’s
date appears
17
4
WED
THU
appears
MON
15
3

Z60
Z60
60
30
15
45
17
60
30
15
45
MULCO
3
60
30
15
45
MULCO
60
30
15
45
F
R
I
S
A
T
S
U
N
M
O
N
T
U
E
W
E
D
T
H
U
F
R
I
S
A
T
S
U
N
M
O
N
T
U
E
W
E
D
T
H
U
F
R
I
S
A
T
S
U
N
M
O
N
T
U
E
W
E
D
T
H
U
Z60
Z60
60
30
15
45
60
30
15
45
3
60
30
15
45
MULCO
4
60
30
15
45
MULCO
60
30
15
45
F
R
I
S
A
T
S
U
N
M
O
N
T
U
E
W
E
D
T
H
U
F
R
I
S
A
T
S
U
N
M
O
N
T
U
E
W
E
D
T
H
U
F
R
I
S
A
T
S
U
N
M
O
N
T
U
E
W
E
D
T
H
U
MULCO
Z60
5
16
MULCO
Z60
4
5
Pull out the crown to position III
(the watch stops)
To set time to the exact second, please refer
to chapter «setting the time»
Turn the crown anticlockwise until
6
the correct date and day
6
7
of the week
7
Continue to turn the crown
THU
4
appears
Chronograph
Ronda
Cronógrafo
cal. Z60
anticlockwise until the correct time
4
8:30 PM appears
Please observe the AM/PM clock rhythm
8
Push the crown back into position I

Z60
Z60
60
30
15
45
23
MULCO
24
MULCO
F
R
I
S
A
T
S
U
N
M
O
N
T
U
E
W
E
D
T
H
U
Z60
Z60
60
30
15
45
24
MULCO
MULCO
F
R
I
S
A
T
S
U
N
M
O
N
T
U
E
W
E
D
T
H
U
30
10
20
F
R
I
S
A
T
S
U
N
M
O
N
T
U
E
W
E
D
T
H
U
Indicadores y mandos
Aguja horaria
Dia de la
18
semana
Cronómetro
segundero
Cronómetro de
minuto
Minutero
Segundero
N
U
M
S
O
T
N
A
S
T
I
U
R
E
F
W
U
E
D
H
T
MULCO
Z60
30
20
Fecha
Cronógrafo
Cronógrafo: funciones básicas
iniciar/ detener / reiniciar
Pulsador A
MULCO
Pulsador A
60
15
45
30
Corona
23
10
Pulsador B
Z60
30
20
MULCO
Z60
10
1
2
Pulsador B
3
Pila: 395 - SR 927 SW
PARAR
INICIAR
Posicionar en cero:
Presione el pulsador B
(Las agujas del cronógrafo
vuelven a su posición cero)
REINICIAR
(posicionar en cero)
19

20
Z60
Z60
60
30
15
45
23
MULCO
24
MULCO
F
R
I
S
A
T
S
U
N
M
O
N
T
U
E
W
E
D
T
H
U
Z60
Z60
60
30
15
45
24
MULCO
MULCO
F
R
I
S
A
T
S
U
N
M
O
N
T
U
E
W
E
D
T
H
U
30
10
20
F
R
I
S
A
T
S
U
N
M
O
N
T
U
E
W
E
D
T
H
U
Z60
Z60
60
30
15
45
23
MULCO
24
MULCO
F
R
I
S
A
T
S
U
N
M
O
N
T
U
E
W
E
D
T
H
U
Z60
Z60
60
30
15
45
24
MULCO
MULCO
F
R
I
S
A
T
S
U
N
M
O
N
T
U
E
W
E
D
T
H
U
30
10
20
F
R
I
S
A
T
S
U
N
M
O
N
T
U
E
W
E
D
T
H
U
Cronógrafo:
Pulsador A
MULCO
Z60
30
20
MULCO
Z60
Cronometrización acumulada
3
2
1
Nota:
10
Después de (4) puede seguir con
la acumulaciónde la cronometrización
presionando el pulsador A
Pulsador B
5
Cronógrafo
4
PARAR
CONTINUAR
PARAR
INICIAR
(reactivación)
Reiniciar:
Presionando el pulsador B
las agujas del cronógrafo
vuelven a su posición cero
REINICIAR
(posicionar en cero)
Cronógrafo:
MULCO
Z60
30
20
10
MULCO
Z60
Cronometrización de parciales
1
Iniciar
2
Lectura parcial: (la cronometriza-
ción continúa en segundo plano)
Reponer: (recuperación del
3
tiempo transcurrido)
4
Parar: (Lectura nal)
5
Reiniciar: las agujas
del cronógrafo vuelven a
1
2
3
Pulsador A
4
Pulsador B
su posición cero
Nota:
Pulsador B
Después de (3), pueden mostrarse
otros tiempos parciales si sigue
5
presionando el pulsador B
21

Z60
Z60
60
30
15
45
MULCO
MULCO
F
R
I
S
A
T
S
U
N
M
O
N
T
U
E
W
E
D
T
H
U
30
10
20
F
R
I
S
A
T
S
U
N
M
O
N
T
U
E
W
E
D
T
H
U
F
R
I
S
A
T
S
U
N
M
O
N
T
U
E
W
E
D
T
H
U
Z60
Z60
60
30
15
45
MULCO
MULCO
F
R
I
S
A
T
S
U
N
M
O
N
T
U
E
W
E
D
T
H
U
30
10
20
F
R
I
S
A
T
S
U
N
M
O
N
T
U
E
W
E
D
T
H
U
F
R
I
S
A
T
S
U
N
M
O
N
T
U
E
W
E
D
T
H
U
151515
15
Ajuste de las agujas del cronógrafo
a posición cero
MULCO
Z60
30
20
10
III
22
MULCO
Z60
30
20
10
2
Ejemplo:
Después de cambiar la pila
1
Presione los pulsadores A y B
simultaneamente durante al menos
2 segundos. La aguja del
cronómetro segundero gira 360º
(se activa el modo de corrección)
Cronógrafo
Continúa
A
B
A
Ajuste del cronómetro segundero central
Paso a paso 1 x corto
Continuo largo
A
A
Ajuste de la siguiente aguja
Ajuste del cronómetro horario (posición 6 h)
Paso a paso 1 x corto
Continuo largo
Fin del ajuste de las agujas del cronógrafo
3
(esto puede hacerse en todo momento)
A
A
B
23

23
60
30
15
45
MULCO
Z60
F
R
I
S
A
T
S
U
N
M
O
N
T
U
E
W
E
D
T
H
U
60
30
15
45
30
10
20
23
60
30
15
45
MULCO
Z60
Z60
F
R
I
S
A
T
S
U
N
M
O
N
T
U
E
W
E
D
T
H
U
60
30
15
45
MULCO
30
10
20
Z60
Z60
60
30
15
45
MULCO
MULCO
Z60
Z60
60
30
15
45
MULCO
23
MULCO
24
Ajustar la hora
MULCO
Z60
MULCO
Z60
segundero
III
Cronógrafo
Nota:
Para ajustar la hora al segundo
exacto, debe sacar la corona justo
en el momento que el segundero
se encuentra en «60»
Una vez que tenga ajustada la
hora, la corona se debe repulsar a
la posición (I) en el segundo exacto
Corrección rápida de la fecha
MULCO
Z60
Tire de la corona hasta la posición II
(el reloj prosigue su marcha)
Tenga en cuenta que:
La fecha se puede cambiar
durante la fase de cambio entre
las 21:00-24:00; por favor tenga
en cuenta que se debe establecer
la fecha del día siguiente ya que en
este caso el cambio de fecha automático no se produce a medianoche
MULCO
Z60
23
24
25

Z60
Z60
60
30
15
45
MULCO
17
60
30
15
45
MULCO
60
30
15
45
F
R
I
S
A
T
S
U
N
M
O
N
T
U
E
W
E
D
T
H
U
30
10
20
F
R
I
S
A
T
S
U
N
M
O
N
T
U
E
W
E
D
T
H
U
F
R
I
S
A
T
S
U
N
M
O
N
T
U
E
W
E
D
T
H
U
Z60
Z60
60
30
15
45
17
60
30
15
45
MULCO
3
60
30
15
45
MULCO
60
30
15
45
F
R
I
S
A
T
S
U
N
M
O
N
T
U
E
W
E
D
T
H
U
F
R
I
S
A
T
S
U
N
M
O
N
T
U
E
W
E
D
T
H
U
F
R
I
S
A
T
S
U
N
M
O
N
T
U
E
W
E
D
T
H
U
Z60
Z60
60
30
15
45
60
30
15
45
3
60
30
15
45
MULCO
4
60
30
15
45
MULCO
60
30
15
45
F
R
I
S
A
T
S
U
N
M
O
N
T
U
E
W
E
D
T
H
U
F
R
I
S
A
T
S
U
N
M
O
N
T
U
E
W
E
D
T
H
U
F
R
I
S
A
T
S
U
N
M
O
N
T
U
E
W
E
D
T
H
U
Setting the date, day of the week
(Z60) and time
MULCO
Z60
N
U
M
S
O
T
N
A
S
T
I
U
45
R
E
F
W
U
E
D
H
T
26
30
20
10
MULCO
Z60
Example:
- Fecha / hora en el reloj: /1:25 AM/
- Fecha actual/hora: /8:30 PM/
60
15
30
23
1
4
3
Cronógrafo
5
Tire de la corona hasta la posición III
17
4
MON
THU
MULCO
Z60
5
2
1
Tire la corona hasta la posición III.
4
(El reloj prosigue su marcha)
2
Gire le corona hasta que
aparezca el día de semana
del dia anterior
3
Regrese la corona a la posición II
4
3
Gire la corona hasta que aparezca
la fecha del día anterior
3
MULCO
Z60
4
6
7
(el reloj se detiene)
Para ajustar la hora al segundo exacto, por favor
reérase a la sección «ajustar la hora»
Gire la cororona hacia la izquierda
6
hasta que la fecha actual y el
dia de la semana
7
Siga girando la corona hacia la
aparezca
4
izquierda hasta que aparezca la
hora actual
Tenga en cuenta el modo horario de 24 h
8
Regrese la corona a la posición I
27

Water Resistance
Water Resistance
Resistencia al agua
Indications
Watch Dial
29
3 atm OK
5 atm
10 atm
Back of the
watch case
W/R 3 atm
W/R 5 atm
W/R 10 atm
Use in water
Light
Moderate
exposure
(light spray,
perspiration,
light rain)
OK OK NO NO NO
OK OK NO NO
Skin diving,
exposure
(swimming,
washing
dishes, etc)
NO NO NO NO
water sports
(no oxygen
cylinder)
OK
Scuba diving
with oxygen
cylinder
Pulling out
the crown
when the
watch is wet
29

Resistencia al agua
Indicaciones
Dial
30
3 atm OK
5 atm
10 atm
Trasera
W/R 3 atm
W/R 5 atm
W/R 10 atm
Tapa
Uso en el agua
Exposición
Exposición
moderada
menor
(lavar, tareas
(lavarse la
cara, lluvia)
de cocina,
natación)
NO NO NO NO
OK OK NO NO NO
OK OK NO NO
Buceo de
supercie,
deportes
marinos
OK
Buceo con
escafandra
usando
un tanque
de aire
Halar la
corona para
afuera cuan-
do el reloj
está mojado
30
Helium release valve
Válvula de escape de helio

Helium release valve
Válvula de escape de helio
MULCO Watches has been able to incorporate an automatic
helium release valve directly into the crown to allow gases to escape
as the watch resurfaces from the crushing pressure of the depths. This
innovation has eradicated a potential surface liable to warp under
the effects of water pressure, thereby improving the timepiece’s
water resistance even further.
Gasket B
Gasket A Gasket A
Gasket B
MULCO Watches ha logrado incorporar una válvula de
escape de helio automática directamente en la corona para
permitir que los gases escapen de la aplastante presión de las
profundidades. Esta innovación protege la suceptible supercie
de la pieza evitando deformarciones por los efectos de la
presión del agua, mejorando aún más la resistencia al agua
33
del reloj.
Gasket B
Gasket A Gasket A
Gasket B
33

WWW.MULCO.COM
 Loading...