


Wall-mounted CD Player
Model CPD-4
USER MANUAL
壁掛式CD音響
CPD-4
型號
操作說明書
Thank you for purchasing this product.
p
Be sure to read this user manual before operating the product and use it correctly.
p
Store this manual in a safe place for future reference.
p
多 謝 惠 顧 本 公 司 產 品。
p
為了正確及安全地使用本產品,使用前請詳細參閱此說明書。
p
請務必妥善保管本操作說明書。
p
ENGLISH
繁體中文
D0120 4752 A

CAUTION: TO REDUCE THE RISK OF ELECTRIC
SHOCK, DO NOT REMOVE COVER (OR BACK).
NO USER-SERVICEABLE PARTS INSIDE.
REFER SERVICING TO QUALIFIED SERVICE
PERSONNEL.
The lightning flash with arrowhead
symbol, within an equilateral
triangle, is intended to alert the
user to the presence of uninsulated
“dangerous voltage” within the
product’s enclosure that may be of
sufficient magnitude to constitute a
risk of electric shock to persons.
The exclamation point within an
equilateral triangle is intended to
alert the user to the presence
of important operating and
maintenance (servicing) instructions
in the literature accompanying the
appliance.
IMPORTANT SAFETY INSTRUCTIONS
1) Read these instructions.
2) Keep these instructions.
3) Heed all warnings.
4) Follow all instructions.
5) Do not use this apparatus near water.
6) Clean only with dry cloth.
7) Do not block any ventilation openings.
Install in accordance with the manufacturer’s
instructions.
8) Do not install near any heat sources such
as radiators, heat registers, stoves, or other
apparatus (including amplifiers) that produce
heat.
9) Do not defeat the safety purpose of the
polarized or grounding-type plug. A
polarized plug has two blades with one
wider than the other. A grounding type
plug has two blades and a third grounding
prong. The wide blade or the third prong
are provided for your safety. If the provided
plug does not fit into your outlet, consult an
electrician for replacement of the obsolete
outlet.
10) Protect the power cord from being
walked on or pinched particularly at plugs,
convenience receptacles, and the point
where they exit from the apparatus.
11) Only use attachments/accessories specified
by the manufacturer.
12) Use only with the cart,
stand, tripod, bracket,
or table specified by
the manufacturer, or
sold with the apparatus.
When a cart is used, use
caution when moving
the cart/apparatus combination to avoid
injury from tip-over.
13) Unplug this apparatus during lightning
storms or when unused for long periods of
time.
14) Refer all servicing to qualified service
personnel. Servicing is required when
the apparatus has been damaged in any
way, such as power-supply cord or plug is
damaged, liquid has been spilled or objects
have fallen into the apparatus, the apparatus
has been exposed to rain or moisture, does
not operate normally, or has been dropped.
2

< Do not expose this apparatus to drips or
splashes.
< Do not place any objects filled with liquids,
such as vases, on the apparatus.
< Do not install this apparatus in a confined
space such as a book case or similar unit.
< The apparatus draws nominal non-operating
power from the AC outlet.
< The apparatus should be located close
enough to the AC outlet so that you can
easily grasp the power cord plug at any time.
< The appliance coupler is used as the
disconnect device, the disconnect device
shall remain readily operable.
< If the product uses batteries (including a
battery pack or installed batteries), they
should not be exposed to sunshine, fire or
excessive heat.
< CAUTION for products that use replaceable
lithium batteries: there is danger of explosion
if a battery is replaced with an incorrect type
of battery. Replace only with the same or
equivalent type.
WARNING: TO PREVENT FIRE OR SHOCK
HAZARD, DO NOT EXPOSE THIS APPLIANCE
TO RAIN OR MOISTURE.
CAUTION
< DO NOT REMOVE THE EXTERNAL CASES OR
CABINETS TO EXPOSE THE ELECTRONICS. NO
USER SERVICEABLE PARTS ARE WITHIN.
< IF YOU ARE EXPERIENCING PROBLEMS WITH
THIS PRODUCT, CONTACT MUJI LIMITED
FOR A SERVICE REFERRAL. DO NOT USE THE
PRODUCT UNTIL IT HAS BEEN REPAIRED.
< USE OF CONTROLS OR ADJUSTMENTS OR
PERFORMANCE OF PROCEDURES OTHER
THAN THOSE SPECIFIED HEREIN MAY RESULT
IN HAZARDOUS RADIATION EXPOSURE.
MPEG Layer-3 audio coding technology licensed
from Fraunhofer IIS and Thomson.
This product is protected by certain intellectual
property rights of Microsoft. Use or distribution
of such technology outside of this product is
prohibited without a license from Microsoft.
Other company names, product names and
logos in this document are the trademark s or
registered trademarks of their respective
owners.
3

Before Using the UnitContents
Before Using the Unit . . . . . . . . . . . . . . . . . . . 4
Safety Precautions . . . . . . . . . . . . . . . . . . . . . 6
Discs . . . . . . . . . . . . . . . . . . . . . . . . . . . . . 11
MP3/WMA Compatibility. . . . . . . . . . . . . . . . . 12
Identifying the Parts. . . . . . . . . . . . . . . . . . . . 13
Remote Control Unit . . . . . . . . . . . . . . . . . . . 14
Installation Method . . . . . . . . . . . . . . . . . . . . 14
Connecting the AC adaptor . . . . . . . . . . . . . . . 15
Listening to a Disc . . . . . . . . . . . . . . . . . . . . . 16
Listening to the Radio. . . . . . . . . . . . . . . . . . . 18
Troubleshooting . . . . . . . . . . . . . . . . . . . . . . 19
Specifications . . . . . . . . . . . . . . . . . . . . . . . . 21
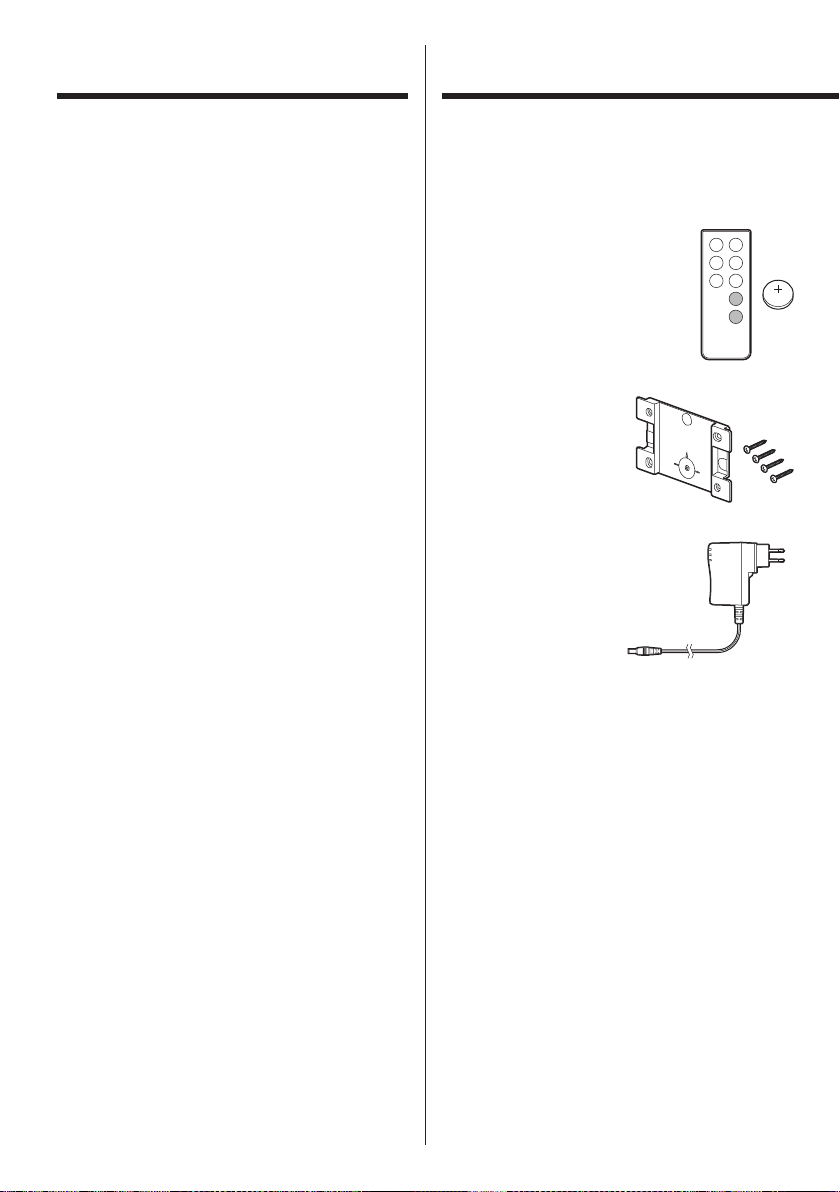
What’s in the box
Confirm the supplied standard accessories.
Remote control unit x 1
Battery (CR2025) for remote control
unit x 1
(The battery has been installed in the
remote co ntrol unit when shipped
from the factory.)
Wall-fixing plate x 1
Fixing screws x 4
Dedicated AC adaptor x 1
Owner’s manual (this document) x 1
4

AC adaptor’s plug
Please change the AC adaptor plug to suit the mains
socket where you will use the unit.
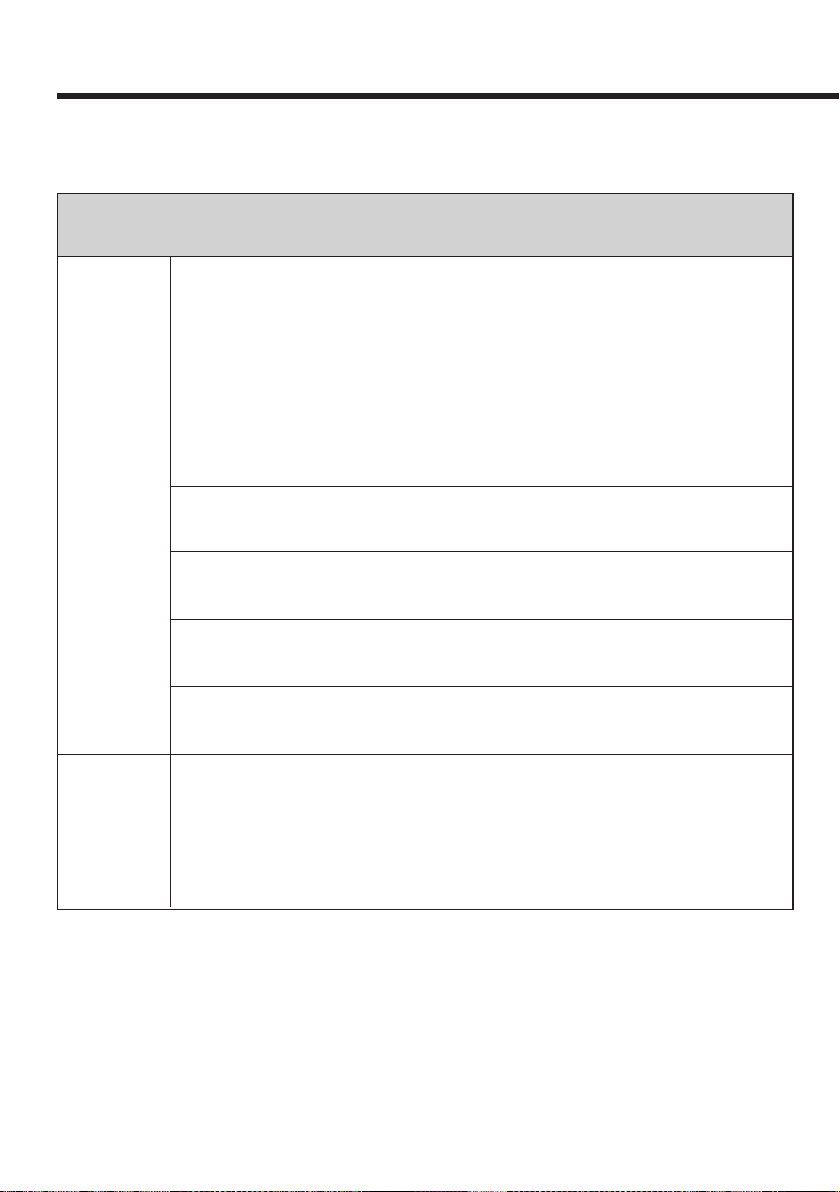
1. While pulling the tab at the side of the AC adaptor
plug, pull the plug out at an angle to remove it.
2. Attach the concave part o f the plug (A) to the
convex part (B) on the inside opposite the tab.
(A)
(B)
(A)
Read this before operation
When a disc is inserted into the unit, do not tilt the
<
unit. Doing so might cause a malfunction.
Before the unit is moved, or covered with a paper
<
or cloth for a moving, be sure to remove the disc
fro m the unit. If the unit is move d with a disc
inside, it might cause a malfunction.
Choose the installation location of your unit
<
carefully. Avoid pla cin g it in dire ct sunlight or
close to a source of heat. You should also avoid
locations that are subject to vibration, excessive
dust, heat, cold, or moisture. Doing s o might
result in discoloration or deformation, or cause a
malfunction.
When the unit is turned on, if a T V is turned on
<
nearby lines might ap pear on the T V screen
depending on the frequency of the TV broadcast.
This is not a mal function of the unit or the T V.
If you see such lines, turn off the unit (standby),
or remove the plug of the AC adaptor from the
socket.
While the plug of the AC adaptor is inserted into
<
the socket, power is consumed even in stand-by
mode.
ENGLISH
3. Insert the plug until you hear a click.
5
Safety Precautions
In order to use the product safely and correctly, and to prevent both injury to yourself and others
around you and damage to property, please read the following safety precautions carefully before use.
If you ignore the following warnings and use the product
Q
F
Disconnect at
plug
A
Prohibited
Warning
If anything unusual occurs
If smoke, a strange smell, or a strange noise is emitted from the
product
If water or foreign bodies get into the product
If the product falls and becomes damaged
You must remove the plug of the AC adaptor from the power socket
immediately.
Do not continue to use the product as this may cause a fire or electric
shock. Contact your retailer.
Before installing and removing this product, always ensure you
remove the plug of the AC adaptor from the power socket.
If the plug of the AC adaptor is still inserted into the power socket, there is a
risk of accident or electrocution.
Before moving this product, always remove the plug of the AC
adaptor from the power socket.
The cable of the AC adaptor may be damaged, and it may cause a fire or
electric shock.
If you do not use the product for an extended period of time, for
example, if you are going away on vacation, the plug of the AC
adaptor must be removed from the power socket for safety reasons.
Remove the plug of the AC adaptor from the power socket for safety
reasons before maintenance.
Otherwise, it may cause electrocution.
Do not damage the DC power cable and AC adaptor cable.
Do not place anything heavy on the DC power cable and AC adaptor
cable, or place the DC power cable and AC adaptor cable under the
product.
Do not alter, bend excessively, twist, pull, or heat the DC power cable
and AC adaptor cable and AC adaptor cable.
If the DC power cable or AC adaptor cable is damaged (the core is exposed
or broken), it may cause a fire or electric shock. In such a case, ask your
retailer to exchange it.
incorrectly, it may cause death or serious injury due to
fire or electrocution.
6

Q
A
Prohibited
If you ignore the following warnings and use the product
Warning
Keep the plug of the AC adaptor free from dust.
If there is dirt or dust between the plug of the AC adaptor and the power
socket, it may cause a fire or electric shock. Remove dirt or dust after
removing the plug of the AC adaptor from the power socket.
Do not use the product with any voltage other than that indicated on
the AC adaptor.
This product is for use within the country of purchase only. It cannot be
used in other countries. Do not use the product with any power supply or
voltage other than that indicated on the AC adaptor. Do not connect the
AC adaptor to DC power supplies of on ships, etc. Doing so may cause a fire
or electric shock.
Do not use any AC adaptor other than that supplied with this
product.
Do not use the AC adaptor supplied with this product for another
equipment.
Doing so may cause a malfunction, fire, or electric shock.
Do not leave the DC power cable near any heat sources such as stoves
or other objects that produce heat.
The cover of the DC power cable may be melted and it may cause a fire or
electric shock.
Do not touch the plug of the AC adaptor with wet hands.
Doing so may result in electrocution.
Do not pull on the AC adaptor cable when you remove the plug of the
AC adaptor from the power socket.
The AC adaptor cable may be damaged, and it may cause a fire or electric
shock. Be sure to grasp the plug of the AC adaptor when removing it from
the power socket.
Do not place vases or anything containing water or other liquids on
the product.
If water gets into the product, it may cause a fire or electric shock.
incorrectly, it may cause death or serious injury due to
fire or electrocution.
ENGLISH
7

Safety Precautions (Continued)
If you ignore the following warnings and use the product
Q
A
Prohibited
D
No
disassembly
S
Mandatory
Action
Warning
Do not locate the product in a place that is either damp or dusty. Do
not use the product in a bathroom.
Do not locate the product in a place where it may be exposed to
smoke or steam, such as near a kitchen table or humidifier.
Doing so may result in a fire, electric shock, or injury.
Do not take this product apart.
Doing so may cause a fire or electric shock. Ask the retailer for servicing/
repairs of the inside.
Do not alter this product.
Doing so may cause a fire or electric shock.
The product should be located close to the power socket so that you
can easily grasp the plug of the AC adaptor at any time.
If anything unusual occurs, you must remove the plug of the AC adaptor
from the power socket immediately.
The product should be located away from another equipment in
order to be able to expel heat.
When the product is installed in a rack or similar unit, leave a space of
at least 5 cm (2 inches) above the product.
Heat is generated inside the product, and may cause a fire if not expelled
properly.
incorrectly, it may cause death or serious injury due to
fire or electrocution.
8
Q
Q
Precaution
Against fall
If you ignore the following cautions and use the product
Caution
When installing this product, refer to the installation method in this
manual at all times, taking care to observe the following.
When attaching the wall-fixing plate, make sure that you use screw fixings
that are appropriate for the structure and material of the wall. The product
may cause injury in the event that it falls from the wall.
Do not place the product on an unstable or uneven place.
The product may cause injury in the event that it falls from the wall.
incorrectly, it may cause injury to yourself and others
around you and damage to property due to electrocution
or other accidents.
A
Prohibited
Do not move the product during playback.
Do not pick up or move the product since the disc spins very quickly during
playback. Doing so may cause scratches on the disc.
ENGLISH
9

Safety Precautions (Continued)
Battery Precautions
This product uses a battery. If you handle the battery incorrectly, it may result in the battery
heating up, catching fire, or leaking. Be sure to observe the following precautions.
Q
S
Mandatory
Action
A
Prohibited
D
No
disassembly
Warning
When inserting the battery into the remote control unit, check that
the polarities (positive “+” and negative “-”) are correctly positioned,
and insert it according to the indication on the battery case.
If you insert the battery incorrectly, it may cause a fire or injury, or staining
of surrounding objects due to explosion or leaking.
If the remote control unit is not used for a long time, remove the
battery.
Bat tery leakage may cause a fire or injury, or staining of surrounding
objects. If the battery leaks, wipe away the leakage inside the bat tery
compartment and replace the batter y with a new one. If the leakage
adheres to your skin, wash it with water.
Do not use any batteries other than those specified for the remote
control unit.
Otherwise, it may cause a fire or injury, or staining of surrounding objects
due to explosion or leaking.
Do not carry or store the battery with other metallic objects.
The battery may short circuit, which may cause it to explode or leak, etc.
Do not take the battery apart.
Acidic matter inside the battery may cause damage to your skin or clothes.
Warnings for battery usage
10
Discs
Discs that can be played on this
unit
CDs that bear the “COMPACT disc DIGITAL AUDIO”
logo.
CD- R and CD -RW discs that have been correctly
recorded in the audio CD format and finalized.
Finalized CD-R and CD-RW discs that contain MP3/
WMA files.
This unit can play back the above-m entioned disc
types. It cannot play back the discs of the other types.
Caution:
Playba ck of any other ty pe of disc could caus e
loud noise and damage to speake rs as well as
harm hearing. Never play back any other type of
disc.
If you are uncertain about the handling of a CD-R
<
or CD-RW disc, please contact the seller of the disc
direc tly.
Caution
Do not play any disc that is warped, defo rmed
<
or damaged. Playing such discs could cause
irreparable harm to the playing mechanisms.
Use a s of t oil-based felt-tipped pen to write
<
information on the label sid e. Ne ver use a ballpoint or hard -tipp ed p en, as this could cause
damage to the recorded side.
Never use a stabilizer. Using commercially available
<
CD st abilizers with this unit will damage the
mechanisms and cause them to malfunction.
Do not use irregularly-shaped discs (octagonal,
<
heart-shaped, business card size, etc.). CDs with
these shapes could damage the unit.
ENGLISH
Copy-protec ted discs and other discs that do
<
not conform to the CD standard might not play
correc tly in this unit. If you use such discs in this
unit, MUJI LIMITED and its subsidiaries will not be
responsible for any consequences or guar antee
the qualit y of reproduction . If you experience
problems with such non-standard discs, you
should contact their issuers.
About CD-R/CD-RW discs
This unit can play back CD-R and CD -RW discs that
have been recorded in the audio CD format (CD-DA).
Also can playback MP3 and WMA files recorded into
the CD-R /CD-RW discs.
Discs created by a CD recorder must be finalized
<
before use with this unit.
Depending on disc quality and recording
<
conditions, playback of some discs might not be
possible. Please see the manual for the device that
you used to create the disc.
Handling precautions
Always inser t a disc with the label side up. Only
<
one side of a Compact Disc can be played.
If there are scratches, fingerprints, or stains on the
<
recorded side (non-label side), an error may occur
when attempting to play back a disc. Handle the
disc carefully.
To remove a disc from its storage case, press down
<
on th e center of the case and li ft the disc out,
holding it carefully by the edges.
How to remove
the disc
How to hold the disc
Continued on the next page
11

Discs (Continued)
MP3/WMA Compatibility
Storage precautions
Discs should be returned to their cases af ter use to
<
avoid dust and scratches that could cause the laser
pickup to “skip.”
Do not expose disc s to direct sunlight or high-
<
temperature and humidit y for ex tended periods.
Long exposure to high temp eratures will warp
discs.
CD-R and CD-RW discs are more sensitive to the
<
effects of heat and ultraviolet rays than ordinary
CDs . It is important that they are not stored in
locations where th ey will be exposed to dire ct
sunlight. T hey should also b e kept away from
sources of heat, such as radiators and heatgenerating electrical devices.
Dirt on the disc may cause the sound to skip or
<
reduce the sound quality. Be sure to keep the discs
clean.
Maintenance
If a disc b eco mes dirty, wipe its surf ace r adially
<
from the center hole out ward towards the outer
edge with a sof t, dry cloth.
This unit can play MP3/WMA files recorded on a CD-R,
CD-RW discs.
This unit can play back monaural and stereo MP3
<
files that are in the MPEG-1 Audio Layer 3 format
with a sampling rate of 16 kHz or 48 kHz and a bit
rate of 32 to 320 kbps.
WMA file must have a sampling rate of 32 kHz, 44.1
<
kHz or 48 kHz, and a bit-rate of 48 to 192 kbps.
This unit cannot play copyright protected files.
<
Cautions when preparing MP3/
WMA files using a computer or
other device
Always include the extension in the file name. This
<
unit recognizes MP3 files by their “.mp3”, and WMA
files by their “.wma” file extensions.
Always close the session (complete disc creation).
<
This unit cannot play discs if the session has not
been closed.
If the disc contains more than 999 files or 99
<
folders, this unit cannot play it back correctly.
Never clean discs using chemicals such as record
<
spr ays , antistatic sprays and f luids, and thinner.
Such chemicals will do irreparable damage to the
disc’s plastic surface.
12

Identifying the Parts
Main unit
Display*
Mode button (MODE)
Volume button (−,+)
Lens
Protective sheet (card)
DC Power cable
(play/stop)
Remote control unit
Skip button (back) (.)
Back button (m)
Stop button (H)
Repeat button (REPEAT)
Skip button
Back/forward button
(.,/)
Remote sensor
Central hub
Speakers
FM antenna
Connection to the AC
adaptor
Skip button (forward) (/)
Forward button (,)
Play/Pause button (y/J)
FM button (FM)
ENGLISH
To simplify explanations, instructions
in this manual might refer to the
main unit or remote control unit only.
In such cases, the same controls on
the remote control and main unit will
operate similarly.
Volume button (VOLUME+/−)
13

Remote Control Unit
Installation Method
Notes on using the remote
control unit
Even if the remote control is used within its
<
effective operation range (5 m/16 feet), the unit
might not respond to the remote if there are any
obstacles between them.
The remote control might not function if sunlight
<
or other bright light shines directly on the remote
sensor of the unit.
The remote control might function incorrectly if
<
it is operated near other products that generate
inf rared rays o r if other remote co ntrol devices
that use infrared rays are operated near the unit.
Likewise, the other products might also function
incorrectly.
Before using the remote control
When you use the remote control for the first time,
pull out the insulation sheet from the rear.
Battery replacement
The battery has been installed in the remote control
unit when shipped from the factory.
To replace the battery, pull out the battery tray from
the rear, put the lithium-ion batter y (CR2025) in with
the "+" side facing up, and insert the tray again.
Attach the wall-fixing plate to the
1
wall.
Choose a sturdy wall, and install the wall-fixing plate
using the supplied screws or other fixings.
Make sure that the wall-fixing plate does not feel
<
shaky or loose.
Caution
Q
Be very careful when attaching the wall-fixing
plate to the wall.
When at taching to walls made of plasterboard or
<
concrete construction etc. please make sure that
you use proprietary fixings that are appropriate for
the wall. In particular, it is very hazardous to use
regular wood screws on walls that are ma de of
plasterboard or a similar type of material.
Extend the FM antenna.
2
Battery replacement time
If the distance required between the remote control
unit and main unit decreases, or the remote control
unit's buttons don't work, the battery is exhausted. In
this case, replace the battery with a new one.
For information about the collection of batteries,
please contact you r local municip ality, your waste
disp osal ser vice or the place where you purchas ed
them.
14
Unwind the FM antenna on the rear, and extend it.
Connecting the AC adaptor
Attach the unit to the wall-fixing
3
plate.
Line the unit up with the wall-fixing plate and clip the
back of the unit on at the slots.
Make sure that the unit is firmly attached.
<
Extend the FM antenna fully and position for the
<
best reception.
After connecting the power cord to the dedicated
AC adaptor cord, plug the adaptor into an outlet.
Into a power socket
Dedicated
AC adaptor
The DC power cable of
the unit
The plug of th e
AC adaptor
ENGLISH
15
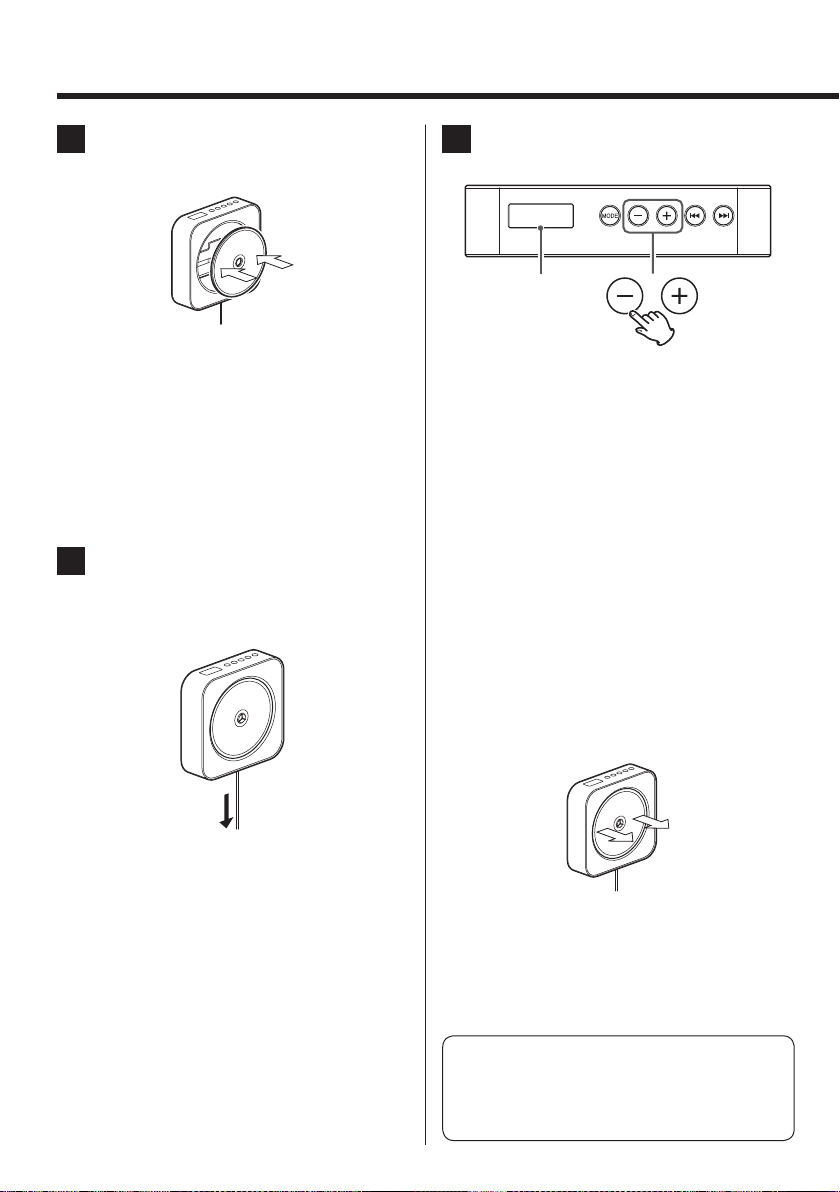
Listening to a Disc
Insert the CD into the unit.
1
Fix the CD onto the central hub of the unit.
Caution
Q
Fix the CD firmly into the unit until you hear
a cli ck. The CD will sp in very fast, so it is
extremely hazardous if the CD is not inserted
correctly into the unit.
Be careful not to press the CD too hard when you
<
fix it. Doing so may cause scratches on the CD.
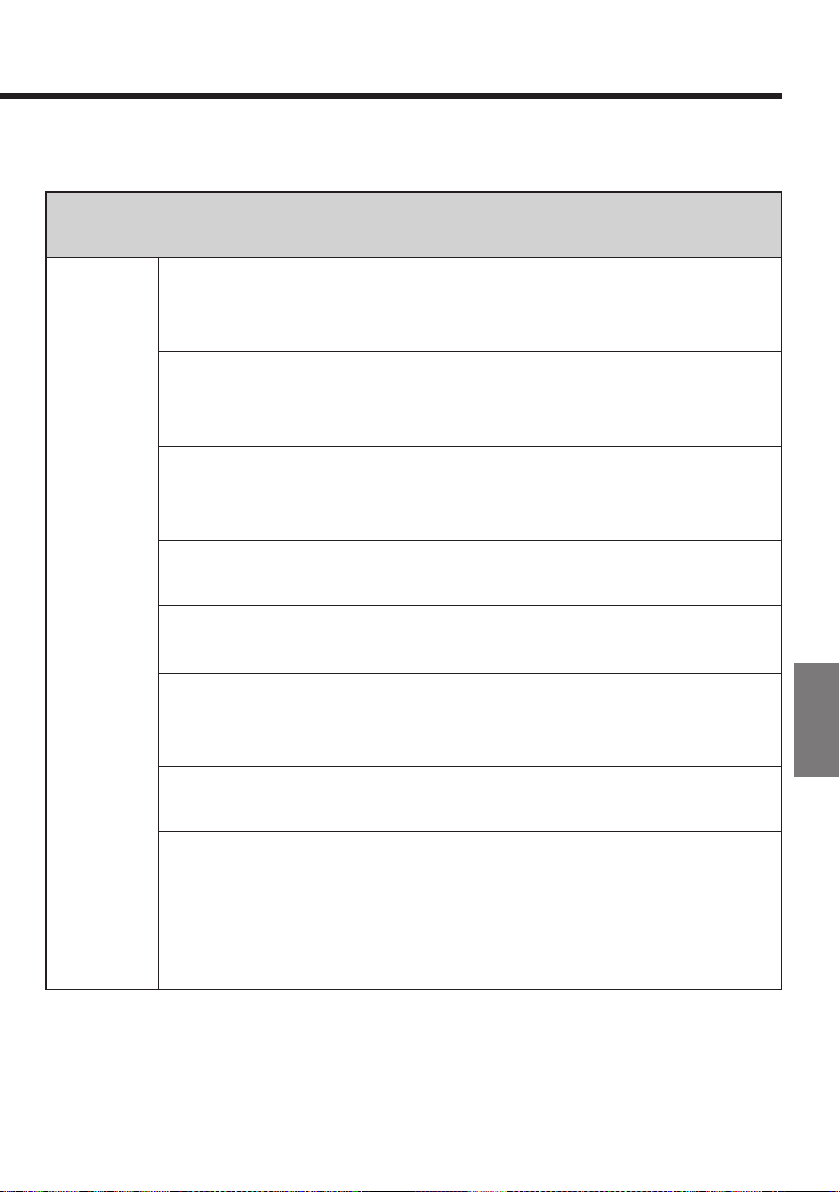
Gently pull the DC power cable to
2
play back the CD.
CD playback will start automatically.
Press the volume buttons (−,+) to
3
adjust the volume.
VOL 05
The volume level
is shown.
The volume can be adjusted in a range between
<
00 and 32. (“MAX” is shown on the display at 32.)
To stop the playback, gently pull the
DC power cable again.
The stop button (H) on the remote control unit
<
can also be used.
30 minutes after playback finishes, the machine
<
will automatically enter st and-by mode. To
re-ac tivate from stand-by m ode, pull on the
power cable lightly.
Removing the CD
Pull the CD straight outwards to remove it.
The play/pause but ton (y/J) on the remote
<
control unit can also be used.
Please do not touch the CD whilst it is spinning/
<
playing.
16
Be careful not to press the CD too hard when you
<
remove it. Doing so may cause scratches on the
CD.
Caution
Never touch the lens.
Please take care, as any damage or dirt can cause
the CD player to malfunction.
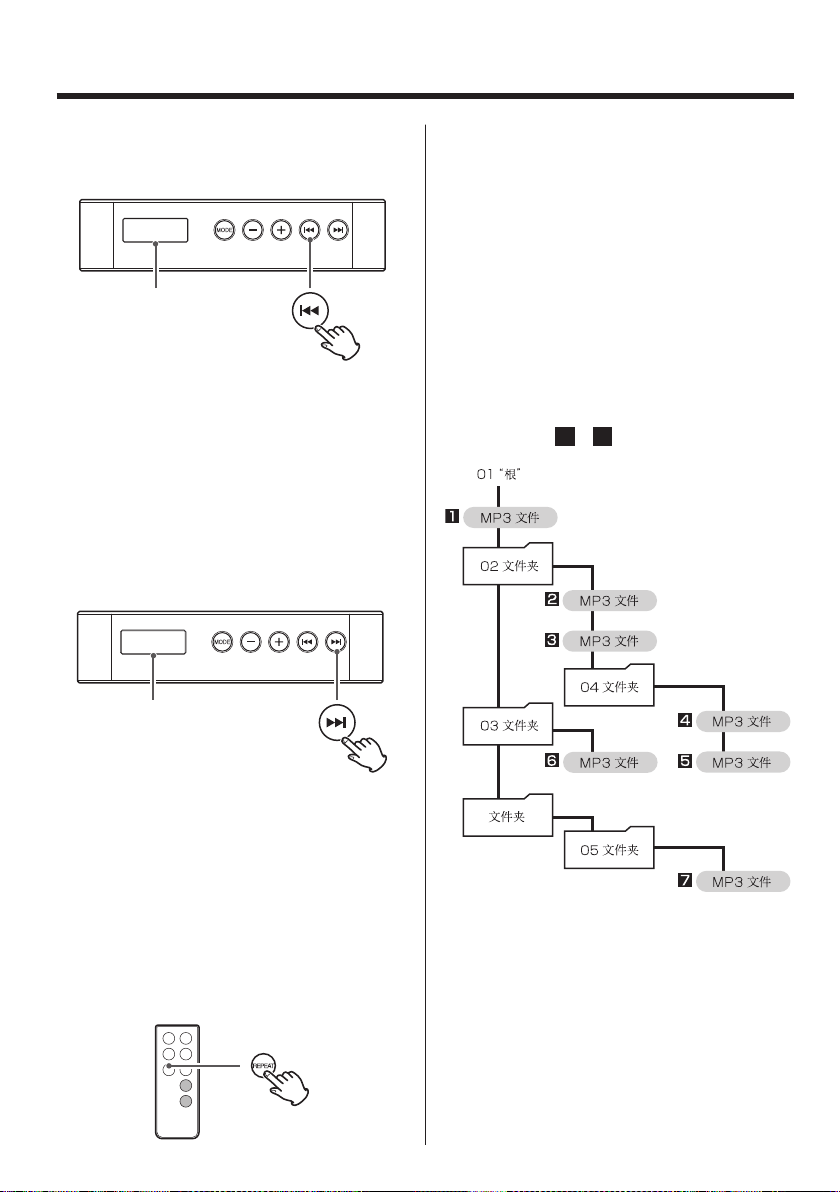
01root
1
MP3 file
Selecting tracks
To previous track
02 00:05
The track number and the
elapsed time are shown.
During playback, press the skip but ton (.)
<
repeatedly to return to the previous tracks.
During playback, press the skip but ton (.)
<
once to return to the start of the current track.
During playback, keeping the skip button (.)
<
held down will take you back more quickly.
To next track
During playback, press the repeat button (REPEAT)
<
once to play back all tracks on the disc repeatedly
fro m the first track ("REPE AT" is shown on the
display).
To sto p the repeat playback, p ress the repeat
<
button (REPEAT) again ("NORMAL" is shown on the
display).
MP3/WMA Playback Order
MP3/ WMA f iles on a CD can be stored in folders in
the same way that files are managed on a computer.
Moreover, multiple folders can be contained inside
another folder.
Here is an example of the file and folder structure
of an MP3/WMA disc, showing the order of the
folders and the playback order of the files ( 1 to
).
7
ENGLISH
04 00:05
The track number and the
elapsed time are shown.
During playback, press the skip but ton (/)
<
repeatedly to go to the next tracks.
During playback, press the skip but ton (/)
<
once to go to the start of the next track.
During playback, keeping the skip button (/)
<
held down will take you ahead more quickly.
Playing back all tracks repeatedly
MP3 file
02 folder
2
MP3 file
3
MP3 file
04 folder
4
5
MP3 file
MP3 file
03 folder
6
MP3 file
folder
05 folder
7
The playback order shown in the diagram above
<
may change depending on how you add, delete,
or move files or folders.
17
Listening to the Radio
Press the Mode button (MODE).
1
The source changes to FM.
FM 87.5
The frequency
is shown after
"FM" is shown.
The FM button (FM) on the remote control unit
<
can also be used.
When a CD is not inserted into the unit, pulling
<
the DC power cable will also perform the same
operation.
Select the station you want to
2
listen to.
Automatic selection
FM 87.5
Manual selection
To tune in to a station the unit cannot tune in to
automatically, press the skip button (.//)
repeatedly to select the st ati on you want to
listen to.
FM 87.5
Press the skip button (.//) briefly. The
<
frequency changes by a fixed step (0.1MHz). Press
repeatedly until the station you want to listen to
is tuned in.
You can also use the skip buttons (.//) on
<
the remote control.
Press the volume buttons (−,+) to
3
adjust the volume.
VOL 05
Hold down
Hold the skip button (.//) for more than
2 seconds and release it wh en the frequency
display starts changing continuously.
A station is tuned in automatically, an d the
frequency display will stop. Repeat this step until
the station you want to listen to is found.
To stop the automatic tuning process, press the
<
skip button (.//) briefly.
18
The volume level
is shown.
The volume can be adjusted in a range between
<
00 and 32. (“MAX” is shown on the display at 32.)

Troubleshooting
If the reception is poor
Extend the FM antenna or change its position to
improve the reception of a station.
To turn off the unit (standby),
press the Mode button (MODE)
again.
The FM button (FM) on the remote control unit
<
can also be used.
When a CD is not inserted into the unit, pulling
<
the D C power cable will also turn off the unit
(standby).
If you a have problem with your system, read this page
and tr y to solve the problem yourself before calling
your dealer.
General
No power.
Inser t the plug of the AC adaptor into a power
e
socket.
Che ck the connection of the DC power cable
e
and the AC adaptor cable.
If the bat ter y of the remote control unit is
e
exhausted, replace it with a new one.
I’m pressing the buttons but nothing is working.
Condensation. Wait one hour before using.
e
No sound is coming from the speakers.
The volume is turned down. Adjust the volume.
e
The remote control does not work.
The insulat ion sheet has been inser ted in th e
e
bat ter y compar tment when shippe d from the
factory. Pull it out before use. For details, s ee
page 14.
If the battery is exhausted, replace it with a new
e
one.
Use the remote control unit within the operation
e
range (5 m/16 feet) and point it at the remote
sensor on the main unit.
Remove obstacles between the remote control
e
unit and the main unit.
If a bright light is near the unit, turn it off.
e
The sound is noisy.
The unit is too close to a T V or similar device.
e
Relocate it away from the inter fering device or
turn it off.
ENGLISH
19

Troubleshooting (Continued)
CD player
Cannot insert the CD into the unit.
Remove dust or obstacles from the central hub
e
of the unit.
Cannot play.
Insert a disc with the label side facing you.
e
You cannot play back unfinalized CD-R/RW discs.
e
Finalize such a disc using a CD recorder and try
again.
Depending on the disc type, it may n ot be
e
possible to play back . For details, see pages 11
and 12.
The sound stutters or breaks up.
The unit is placed somewhere where there is
e
a lot of vibration. Put it so mewhere with less
vibration.
The disc is dirty. Clean the disc.
e
MP3/WMA
Cannot play.
Check the MP3/WMA file extension. For details
e
about the extension, see page 12.
FM Tuner
Cannot listen to any station, or the signal is too
weak.
Tune in to a station properly.
e
Change the position or orientation of the main
e
unit until you receive the station clearly.
Rotate the FM antenna until yo u receive the
e
station clearly.
A mic rocomputer is use d in this unit, it may
sometime s not ope rate corre ctly due to nois e,
etc. from around the unit. In this case, remove the
plug of the AC adaptor f rom the p owe r socket,
wai t for a while befo re inse rting the plug back
into the power so cke t, then operate the unit
again.
Maintenance
If the main unit or remote control unit gets dirty, wipe
with a soft cloth or use a diluted, mild, liquid soap.
Do not use benzine or thinner as they could damage
the surface of the unit.
Caution
Q
Remove t he plug o f the AC adaptor fr om the
power socket before maintenance.
20

Specifications
CD Player
Playable disc types ......CD/CD-R/CD-RW (8cm/12cm)
Playable formats ................ CD-DA, MP3/WMA file
Pickup
Non-contact optical pickup/semiconductor laser
Sampling frequency .......................... 4 4.1kH z
Frequency characteristic .............. 20Hz to 20kHz
Wow and flutter ... Below limited measurable quantity
TUNER
FM Frequency Range ...........87.5 MHz to 108.0 MHz
Playback formats (MP3/WMA)
MP3
Compatible format ......... MPEG-1/2 Audio Layer-3
Extension .......................................mp3
Sampling frequency ................. 16kHz to 48kHz
Bit rate ............................32kbps to 320kbps
WMA
Compatible format
Windows Media Audio Standard
(not copyright protected files)
Extension .......................................wma
Sampling frequency ...........32kHz, 44.1kHz, 48kHz
Bit rate ............................48kbps to 192kbps
Maximum number of folders ..................... 99
Maximum number of files (each folder) ........... 99
General
Supply voltage/power ........AC 100 - 240V, 50 / 60Hz
Power dissipation. . . . . . . . . . . . . . . . . . . . . . . . . . . . . . . . . .12W
Maximum outer dimensions (Main unit)
W=172mm H=172mm D=41mm
Weight (excluding the AC adaptor) ...............550g
Accessories
Remote control unit × 1
Battery (CR2025) for remote control unit × 1
The battery has been installed in the remote
control when shipped from the factory.
Wall-fixing plate × 1
Fixing screws × 4
Dedicated AC adaptor × 1
Owner’s manual (this document) × 1
Design and specifications are subject to change
<
without notice.
Illustrations may differ slightly from production
<
models.
ENGLISH
Speakers
Speaker unit .............. 3.5cm full range speaker × 2
Rated impedance ..................................4Ω
Amp
Rated output ...................................2W × 2
Frequency characteristic .............. 50Hz to 20kHz
21
使用之前目 錄
使用之前 ...........................................22
安全使用事項......................................24
光碟 ................................................28
MP3/WMA ..........................................29
遙控器的使用方法.................................30
安裝方式 ...........................................30
連接交流電源變壓器 ..............................31
各部位名稱 ........................................32
聆聽CD .............................................33
收聽廣播 ...........................................35
處理故障 ...........................................36
規 格 ...............................................37
確認附件
萬一附件不全或存在損壞,請聯繫您購買的商店。
遙控器×1
遙控器用鈕扣型鋰電池
(CR2025)×1
(出廠時已裝入遙控器)
壁掛板×1
安裝螺絲×4
專用交流電源變壓器×1
操作說明書(本書)×1
22

交流電源變壓器的插頭
請更換交流電源變壓器插頭以適應本機所用的電
源插座。
使用注意事項
● 裝有光碟時,請勿傾斜本機。否則可能導致故
障。
1. 拉動交流電源變壓器側面的拉扣,將插頭斜向
取出。
2. 將插頭的凹部(A)與拉扣對面的凸部(B)相
掛扣。
(A)
3. 插頭插入,直到聽到咔嗒聲。
(B)
(A)
● 移動本機或因搬家等原因而裝箱前,請務必取
出光碟。在裝有光碟的狀態下移動,可能導致
故障。
● 請勿將本機放置於溫度會升高的位置(如陽光
直射的位置或暖氣設備的旁邊)。此外,請勿
將本機放置於擴音器等會發熱的設備上方。否
則可能導致變色、變形或發生故障。
● 根據電視播放的電波狀態,如果在本機使用過
程中打開電視,畫面可能出現條紋,這並非本
機或電視的故障。此時,請將本機調到待機狀
態,或從插座上拔下交流電源變壓器。
● 在電源插頭插入插座的狀態下,本機將消耗待
機所需的電力。
繁體中文
23
安全使用事項
為了安全地使用本產品,並對您和他人的人身傷害及財產損失防患於未然,請熟讀
以下注意事項。
如果無視以下內容而錯誤操作,可能會因火災、觸電等原因導致
警告
F
死亡、重傷等人身事故。
萬一出現異常
冒煙或發出奇怪的聲音時。
異物或水進入本品內部時。
本產品掉落、破損時。
請立即從插座上拔下電源插頭。
如果在異常狀態下繼續使用,可能導致火災或觸電。此時,請委託銷
售商店進行修理。
安裝或拆除本產品時,請務必從插座上拔下電源插頭。
在電源插頭連接至插座的狀態下進行操作,可能導致觸電或發生故障。
移動本產品時,請務必從插座上拔下電源插頭。
否則可能導致電線受損,引起火災或觸電。
由於旅行等原因長期不用本產品時,為了安全起見,請務必從插座上
拔下電源插頭。
24
A
進行保養時,為了安全起見,請從插座上拔下電源插頭。
否則可能導致觸電。
切勿損壞電源線。
切勿用重物壓住電源線,或將電源線壓到本產品的下方。
切勿加工、勉強彎曲、扭曲、拉扯或加熱電源線。
如果電源線破損,可能導致火災或觸電。萬一電源線出現損壞(芯線
外露或斷線等),請委託銷售商店進行更換。
警告
A
如果無視以下內容錯誤操作,可能會因火災、觸電等原因導致死
亡、重傷等人身事故。
電源插頭不可積有灰塵。
如果電源插頭與插座之間有雜質或灰塵附著,可能導致火災或觸電。
請從插座上拔下電源插頭,然後清除雜質或灰塵。
切勿使用交流電源變壓器未標註的電壓。
本產品衹能在國內使用。不可使用交流電源變壓器未標注的電源電壓。
請勿與船舶等的直流(DC)電源連接。否則可能導致火災或觸電。
切勿使用非本產品附帶的交流電源變壓器。
切勿將本產品附帶的交流電源變壓器用於其他設備。
否則可能導致故障、火災或觸電。
電源線不可靠近加熱器具。
如果電源線的外層被溶化,可能導致火災或觸電。
切勿用濕手插拔電源插頭。
否則可能導致觸電。
拔下電源插頭時,切勿拉扯電源線。
否則可能導致電線受損,引起火災或觸電。請務必握住插頭,將其拔
下。
切勿在本產品上方放置花瓶或盛水的容器。
如果水進入本產品內部,可能導致火災或觸電。
繁體中文
切勿將本產品置於潮濕多塵的場所。切勿在浴缸附近及淋浴室內使用
本產品。
切勿將本產品放置於接觸油煙、水氣的場所(如烹飪枱、加濕器的旁
邊等)。
否則可能導致火災、觸電及人員受傷。
25

安全使用事項(續)
如果無視以下內容而錯誤操作,可能因火災、觸電等原因導致死
警告
D
亡、重傷等人身事故。
切勿拆解本產品。
擅自拆解可能導致火災或觸電。產品內部的檢修請委託銷售商店。
切勿改裝本產品。
否則可能導致火災或觸電。
本產品的安裝應靠近插座,並確保能輕鬆觸及電源插頭。
如果出現異常,請立即從插座上拔下電源插頭。
S
注意
Q
A
安裝本產品時,為了保持良好的散熱,應與其他設備保持適當的距離。
將本產品放在置物架等處時,產品上方應保留5cm以上的間隙。
否則,熱量積聚於產品內部,可能導致火災。
如果無視以下內容而錯誤操作,可能因觸電或其他事故,導致受
傷或損壞周邊的家庭財產。
安裝本產品時,請務必通過本說明書確認安裝方法,並注意以下事項。
安裝壁掛板請使用適合牆壁材質和結構的安裝螺絲。否則,可能因本
產品掉落而導致人員受傷。
切勿將本產品放置在鬆動的枱面或傾斜的、不穩定的位置上。
否則,可能因本產品掉落導致受傷。
在播放時切勿移動本產品。
光碟在播放時高速旋轉,因此請勿提起或移動本產品。否則可能損壞
光碟。
26
電池的操作
本產品使用電池。錯誤操作可能導致發熱、起火或漏液,因此請務必遵守以下注意事項。
警告
S
A
D
關於電池的警告事項
將電池放入遙控器時,請注意電池的正負極標示(正極 + 和負極 _
的朝向),按照電池盒的標示將電池正確放入。
錯置正負極可能導致電池破裂或漏液,進而引起火災、人員受傷或周
邊環境的髒污。
如果長期不使用遙控器,應將電池取出。
漏液可能導致火災、人員受傷或周邊環境的髒污。如果發生了漏液,
請將流到電池盒的液體完全擦除,並放入新的電池。萬一漏出的液體
接觸到身體,請用水將其沖洗乾淨。
切勿將非指定的電池用於遙控器。
破裂或漏液可能引起火災、人員受傷或周邊環境的髒污。
切勿將電池與金屬製的小物品一起攜帶或保管。
否則可能因短路而導致漏液或破裂。
切勿拆解電池。
電池內的酸性物質可能損傷皮膚和衣服。
繁體中文
27

光碟
本機可播放的光碟
標示有"COMPACT disk DIGITAL AUDIO"的 CD
以音樂CD格式正確刻錄且已封盤的CD-R及
CD-RW。
刻錄了MP3/WMA文件且已封盤的CD-R及
CD-RW。
本機可以播放以上光碟。無法播放上述以外的光
碟。
Q 注意
如果播放上述以外的光碟,可能產生巨大的噪音
而損傷聽覺,亦可能損壞喇叭。切勿播放上述以
外的光碟。
● 防拷貝CD,雙層光碟等不依據CD標準規格的特
殊光碟可能無法正常播放。本機不保證使用特
殊光碟時的功能及音質。如果特殊光碟難以播
放,請諮詢該光碟的銷售商。
CD-R/CD-RW
本機可以播放音樂CD格式(CD-DA)及以MP3/
WMA 格式刻錄的CD-R/CD-RW。
使用注意事項
● 有裂紋的光碟可能導致播放器故障,因此請勿
使用。
● 光碟勿貼標籖。留有透明膠或租賃CD標籖痕跡
的光碟以及標籖滲出糊狀物的光碟不可使用。
如果將這種狀態的光碟放入播放器,可能導致
故障。
● 需在光碟標籖面上書寫時,請使用油性的記號
筆。如果使用圓珠筆等前端堅固的筆,可能損
傷光碟表面,導致無法錄音/播放。
● 切勿使用市面銷售的CD穩定器。否則可能導致
無法播放及產生故障。
● 心形或八角形等特殊形狀的CD可能導致播放器
故障,因此請勿使用。
光碟的操作
● 請務必使光碟的標籖面(印刷面)朝上。
● 如果信號錄音面(無標籖面)存在劃痕、指紋
或污垢等物,播放時可能出現錯誤,因此請小
心操作。
● 從盒中取出光碟時,請按住盒子的中心,再用
手夾住光碟的外沿並拿起。
●
用CD刻錄機製作的光碟,請勿忘記進行封盤。
● 由於光碟品質或錄音狀態的不同,某些光碟可
能無法播放。詳情請閱讀手邊的產品說明書。
● 關於CD-R或CD-RW光 碟的操作,如有不明之
處,請直接諮詢光碟的銷售商。
28
取出方法
拿起方法

光碟的保管
● 使用後的光碟請務必放入盒內保管。隨手放置
光碟將導致彎曲或刮花。
●
請勿將光碟放置在陽光直射、高溫多濕的場
所。否則可能導致光碟變形、變質及無法播放。
● CD-R/CD-RW與一般的CD相比更易受到熱量及紫
外線的影響,因此,請勿長時間放置在直射陽
光下或發熱器具附近。
● 光碟的污垢可能導致音樂間斷或音質降低,因
此保管光碟時應保持清潔。
本機可以播放CD-R/CD-RW上刻錄的MP3/WMA文
件。
● 可播放音頻文件格式
MP3(“.mp3”)
位元速率 32kbps ∼ 320kbps
取樣頻率 16kHz ∼ 48kHz
WMA(“.wma”)
位元速率 48kbps ∼ 192kbps
取樣頻率 32、44.1、48kHz
※ 不對應DRM(數字版權管理)。
保養
● 如果信號錄音面帶有指紋或灰塵,請使用軟布
從內側中心向外側呈直角方向輕輕擦拭。
● 切勿使用唱片清潔劑、防靜電劑、稀釋劑等進
行擦拭。這些化學藥品可能侵蝕光碟表面。
使用電腦製作MP3/WMA文件時的注意 事項
● 請務必為文件格式。無法識別無設定格式的文
件。
● 刻錄到CD-R/CD-RW後,請進行封盤(完成光碟
的製作)。無法播放未封盤的光碟。
● 本機最多可對應999首歌曲,99個文件夾。如果
刻錄數量超過最大限度,將無法正確播放。
繁體中文
29

遙控器的使用方法
安裝方式
遙控器使用的注意事項
● 請將遙控器前端朝向主機的遙控傳感器,在
5米範圍內進行操作。請勿在主機與遙控器之間
放置障礙物。
● 如果直射陽光或照明強光照射遙控傳感器,遙
控器可能會無法操作。
●
請注意,操作本機的遙控器可能使受紅外線控製
的其他設備發生誤操作。
使用遙控器前
請從遙控器內取出絕緣片後再進行使用。
更換電池
出廠時遙控器裝有電池。
更換電池時,從遙控器內拉出電池托盤,如圖所
示,將1個鈕扣型鋰電池(CR2025)的正極(+)
朝上放入托盤。
將壁掛板裝到牆上。
1
選擇牢固的牆壁,使用附帶的螺絲等物件安裝壁
掛板。
● 請確認壁掛板沒有鬆動或浮起。
Q 注意
將壁掛板裝上牆時,請注意強度。
● 安裝到類似石膏板的建材或混凝土牆壁時,請
使用市面銷售適合牆壁材質和結構的安裝螺
絲。特別是使用木螺絲在石膏板上安裝時,螺
絲容易脫落,非常危險。
伸展FM天線。
2
電池的更換時間
操作範圍變小,按操作鍵無效時,請更換新電
池。用完的電池請按照電池記載的廢棄方法或按
照各地政府指定的廢棄方法丟棄。
警告
Q
如果誤用電池,可能因電池破裂或漏液而導致火
災、人員受傷或周邊環境的髒污 。請熟讀第27
頁的警告。
30
取下並伸展卷在背面的FM天線。

連接交流電源變壓器
在壁掛板上安裝CD播放器。
3
使壁掛板嵌入CD播放器背面的槽。
● 請確認安裝牢固。
● 請將FM天線伸展到信號接收最好的位置。
電源線與交流電源變壓器相連後,請將電源插頭
插入插座。
插入插座
交流電源變壓器
電源線 電源插頭
繁體中文
31

各部位名稱
主機
透鏡
保護片(紙製)
電源線(播放/停止開關)
遙控器
跳過按鈕(倒退)(.)
快退按鈕(m)
顯示屏*
模式按鈕(MODE)
音量按鈕(–、+)
跳過按鈕
快退/快進按鈕
(.、/)
遙控傳感器
中心夾頭
喇叭
FM天線
連接交流電源變壓器
跳過按鈕(進)(/)
快進按鈕(,)
停止播放按鈕(H)
重複播放按鈕(REPEAT)
如果主機與遙控器有功能相同的按
鈕,本操作說明書僅使用一方的按
鈕進行說明,未記載的另一方按鈕
功能相同。
32
播放/暫停播放按鈕(y/J)
FM 按鈕(FM)
音量按鈕(VOLUME +/-)
聆聽CD
將CD放入主機。
1
將CD裝到主機的中心夾頭。
Q 警告
請裝好CD,直到發出“喀奇”的聲音。光碟
播放時高速旋轉,如果沒裝好,可能導致CD
錯位飛出,非常危險。
● 裝入CD時,請注意避免擦到主機,以免劃傷
CD。
將電源線輕輕下拉,播放。
2
CD開始自動播放。
按音量按鈕(–、+)調節音量。
3
VOL 05
顯示音量。
● 音量可調節範圍為00至32(「MAX」)
如要停止播放,請再拉一次電源線。
● 可使用遙控器的停止按鈕(H)。
● 若停止播放狀態超過30分鐘,機器會自動轉為
待機狀態。欲解除待機狀態,請再次將電源線
向下輕拉。
取下CD的方法
請將CD筆直向手前方拉,將其取下。
繁體中文
● 可使用遙控器的播放按鈕(y/J)。
● CD轉動時,請勿觸摸。
● 取下CD時,請注意避免擦到主機,以免劃傷
CD。
注意
請勿觸摸透鏡。若有刮痕產生或髒污附著易導
致故障,敬請留意。
33
聆聽CD(續)
選曲
退回前一曲
02 00:05
●
在播放過程中,按 1 次重複播放按鈕(REPEAT),
將從第 1 曲到最後按順序循環播放(顯示屏顯
示“REPEAT”)。
● 如要停止循環播放,再按一次重複播放按鈕
(REPEAT)(顯示屏顯示“NORMAL”)。
顯示曲號與
播放時間。
●
在播放過程中,如果反複按跳過按鈕(.),
將退回前一曲。
●
在播放過程中,如果按 1 次跳過按鈕(.),
將從正播放曲目的開始播放。
● 在播放過程中,如果按住跳過按鈕(.),
將變為快退。
進到下一曲
04 00:05
顯示曲號與
播放時間。
●
在播放過程中,如果反複按跳過按鈕(/),
將進到下一曲。
●
在播放過程中,如果按 1 次跳過按鈕(/),
將從下一曲的開始播放。
● 在播放過程中,如果按住跳過按鈕(/),
將變為快進。
循環播放
MP3/WMA文件的播放順序
在刻錄了MP3/WMA文件的CD內,與普通電腦文件
的操作相同,可將MP3/WMA文件收入文件夾,也
可以將多個文件夾匯總成1個文件夾。
使用本機播放MP3/WMA光碟時的文件夾編號與文
件的播放順序(
● 通過增加/刪除文件、文件夾或通過改變位置,
可以改變上圖的順序。
1~7
)範例
34
收聽廣播
按模式按鈕(MODE)。
1
音源變為FM。
FM 87.5
顯示“FM”後,
顯示頻率。
● 也可以使用遙控器的FM按鈕(FM)。
● 未裝有CD時,拉電源線也能執行同樣的操
作。
選台。
2
自動選台
FM 87.5
手動選台
如想收到自動選台收不到的電台,請反複按
跳過按鈕(.//),選擇想聽的電台。
FM 87.5
● 每輕按1次跳過按鈕(.//),頻率將
改變0.1MHz。
● 也能夠使用遙控器的跳過按鈕(.//)操
作。
按音量按鈕(–、+)調節音量。
3
VOL 05
顯示音量。
繁體中文
按住
按住跳過按鈕(.//)2秒以上,顯示
屏顯示的頻率開始變化後,請鬆開手指。
自動接收到電台信號,顯示屏停止顯示頻
率。
● 如需在選台的途中停止,請輕按跳過按鈕
(.//)。
● 音量可調節範圍為00至32(「MAX」)
信號狀態不佳時
信號狀態不佳時,請改變 FM 天線的朝向,搜
尋信號最好的位置。
如需變為待機狀態,再按一次模式按鈕
(MODE)。
● 也可以使用遙控器的 FM 按鈕(FM)。
● 未裝有CD時,拉電源線也能變為待機狀態。
35

處理故障
本機出現異常時,要求維修服務前,請再次檢查
以下內容。
如果還是未能恢複正常,請聯繫您購買本產品的
銷售商店。
一般
不運轉。
e 請將電源插頭插入插座。
e 請確認電源線與交流電源變壓器線相連。
e 請為遙控器更換新電池。
無法操作。
e 可能結露了。請等待約1小時後使用。
沒有聲音。
e 請調節音量。
無法用遙控器操作。
e 出廠時,電池部分帶有絕緣片。請取出絕緣
片後使用。詳情參照第30頁。
e 如果電池電力不足,請更換新電池。
e 在離主機正面5米的範圍內朝向主機操作遙控
器。
e
如果主機與遙控器之間有障礙物將無法操作,
請調整位置。
e 主機附近如有強光燈,請關燈。
有雜音。
e 安裝播放器時,請盡可能遠離電視或微波爐等
發出電磁波的物品。
CD
CD無法放入主機。
e 請為主機中心夾頭清除灰塵或雜質。
無法播放。
e 裝入CD時請將標籖面朝上。
e 本機無法播放未封盤的CD-R/CD-RW。
e 因光碟種類不同,可能無法播放。詳情參照
第28頁及第29頁。
聲音有間隔或中斷。
e 請安裝在振動小的場所。
e 請保持CD清潔。
MP3/WMA文件
無法播放。
e 請確認文件的儲存格式。格式的詳情請參照
第29頁。
廣播
無法接收。信號狀態不佳。
e 請選擇電台。
e 請嘗試改變主機的位置與朝向。
e 請嘗試改變FM天線的位置。
主機使用了微電腦,因此可能因外部雜音或噪音
等原因而導致無法正常運轉。此時,請先從插座
上拔 下電源插頭,稍等片刻後再將電源插頭插 入
插座,然後重新操作。
保養
請使用微含中性清潔劑的軟布擦拭主機及遙控器
的污垢。
請勿使用化學抹布、輕油精、稀釋劑等進行擦
拭。否則可能損傷表面。
Q 警告
為安全起見,請從插座上拔下電源插頭後進行保
養。
36

規 格
CD播放器部分
使用的光碟 ......... CD/CD-R/CD-RW(8cm/12cm)
可播放格式 ................CD-DA、MP3/WMA文件
讀取器 ................非接觸式讀取、半導體激光
取樣頻率 ....................................44.1kHz
頻率範圍 .............................20Hz ∼ 20kH z
抖晃率 ..............................低於檢測限定值
調諧器部分
信號接收頻率 ..................87.5MHz ∼108.0MHz
播放格式(MP3/WMA)
MP3
對應標準 ...................MPEG-1/2 Audio Layer-3
格式 ............................................mp3
取樣頻率 ................................16 ∼ 48kHz
位元速率 ............................32k ∼ 320kbps
WMA
對應標準
Windows Media Audio Standard(不對應DRM)
格式 ............................................wma
取樣頻率 ..........................32、44.1、48kHz
位元速率 ............................48k ∼ 192kbps
文件夾數量上限 ..................................99
文件數量上限(各文件夾) .....................99
一般
電源電壓和電源頻率 ........AC 100 - 240V, 50 / 60Hz
額定消耗功率(電氣安全額定值) ............ 12W
最大外型尺寸(主機部分)
寬 172mm 高 172mm 深 41mm
重量(交流電源變壓器除外) .................550g
附件
遙控器×1
遙控器用鈕扣型鋰電池(CR2025)×1
(出廠時已裝入遙控器)
壁掛板×1
安裝螺絲×4
專用交流電源變壓器×1
操作說明書(本書)×1
規格及外觀可能因改良而變更,恕不另行通知。
操作說明書的部分插圖可能與商品不同。
繁體中文
喇叭部分
喇叭單元 ........................3.5cm 全音域型×2
額定阻抗 .........................................4Ω
擴大器部分
額定輸出功率(EIAJ) ........................2W×2
頻率範圍 .............................50Hz ∼ 20kH z
37

38

39
MUJI TAIWAN Company Limited
8F.,NO.8,Dongsing Rd.,Sinyi District.Taipei City 110,Taiwan
www.muji.tw
02-3765-5151
MUJI(Hong Kong)Company Limited
1903-5 Miramar Tower, 132 Nathan Road, Tsim Sha Tsui, Kowloon, Hong Kong
www.muji.com.hk
+852 2694-9309
MUJI THAILAND
MUJI PHILIPPINE
63-2-898 -0246
MUJI INDONESIA
http://muji.co.id/
62-21-39830165
Muji (Singapore) Pte Ltd
60 Albert Street #15-02to04, OG Albert Complex, Singapore 189969
www.muji.com.sg
 Loading...