

Page 1
Gasoline Engine 7 & 16 hp
with Electric Start
www.mud-skipper.com
(844) MUD-SKIP!
Page 2

FUEL AND ENGINE OIL 3
PRE-OPERATION INSPECTION 5
STARTING AND STOPPING THE ENGINE 6
INSPECTION AND MAINTENANCE 8
STORAGE OF ENGINE 11
CLEANING THE CARBURETOR FUEL JET 14
PRE SEASON CHECK LIST 15
TROUBLESHOOTING 16
INSTALLING A KILL SWITCH 18
STARTER WIRING 19
ENGINE BASE DIMENSIONS LT210 7hp 20
ENGINE BASE DIMENSIONS LT420 16hp 21
ENGINE PTO DIMENSIONS LT420 16hp 22
ENGINE PTO DIMENSIONS LT210 7hp 23
SPARE PARTS & SPECIFICATIONS 24
INSTALLING A MUD-SKIPPER OUTBOARD KIT 25
Page 1
Page 3

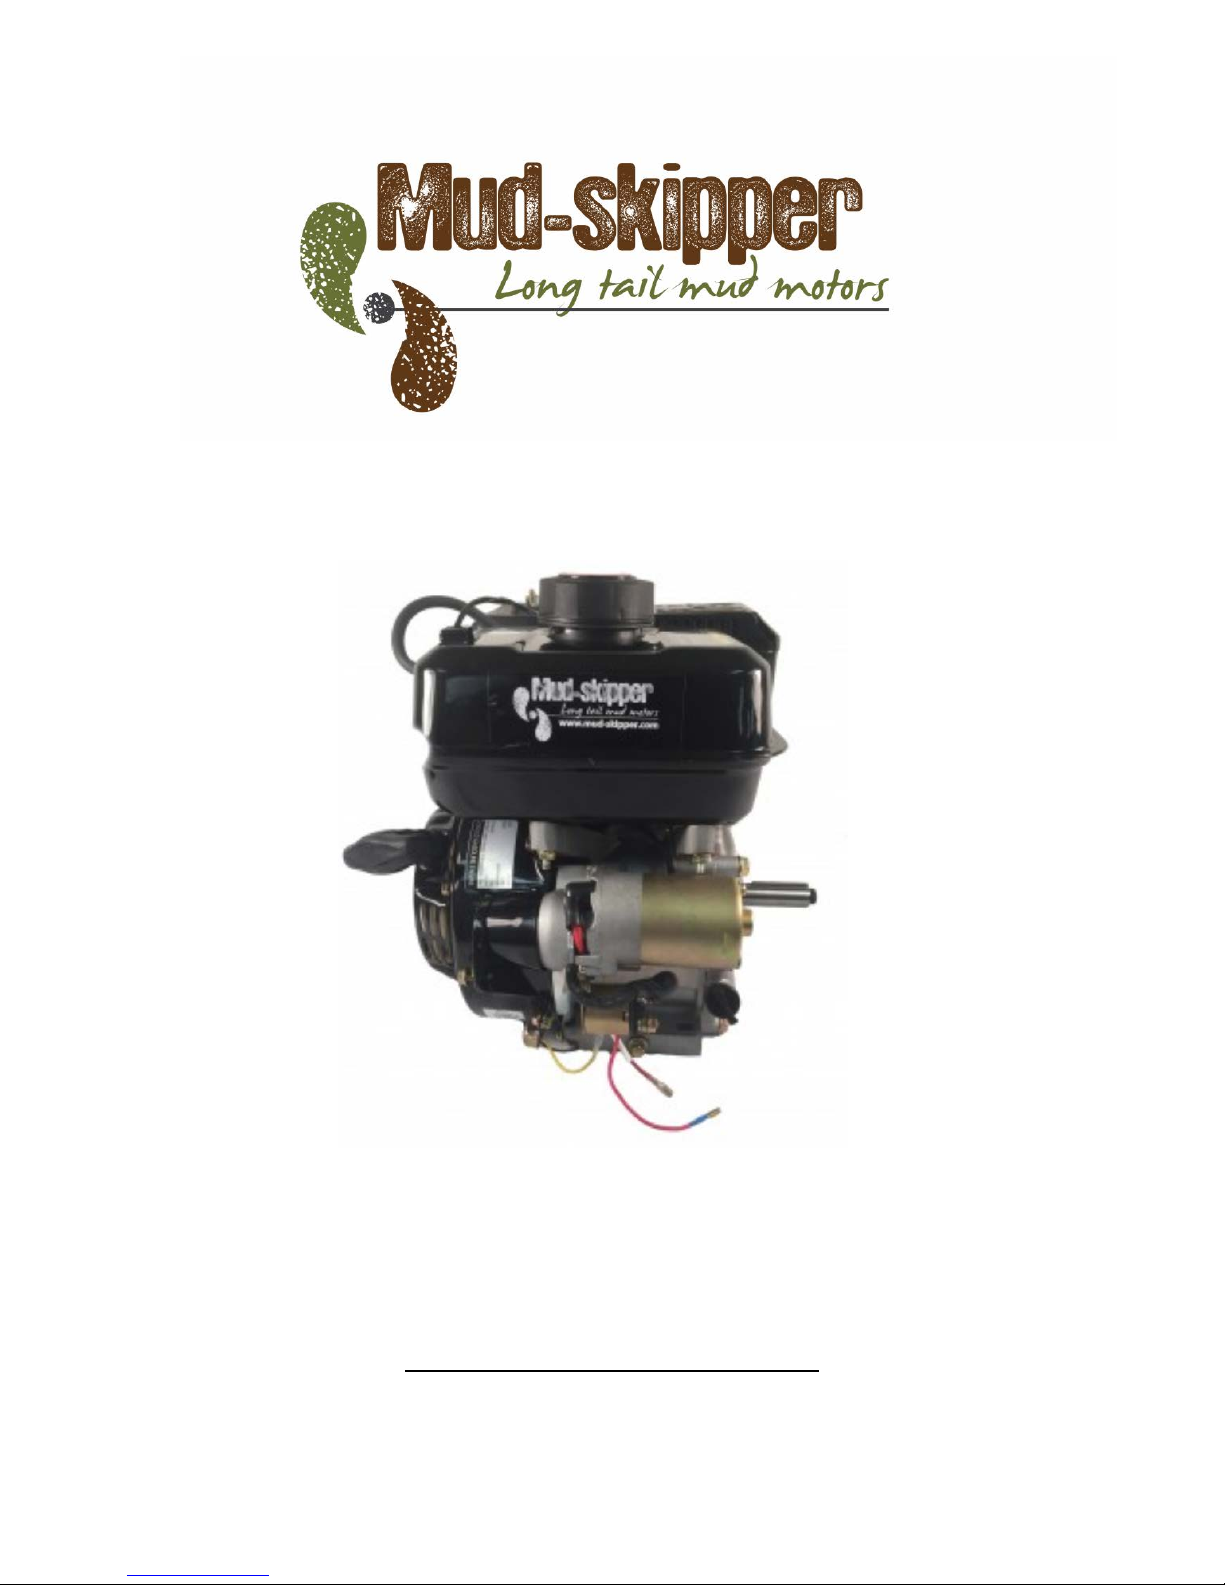
Thank you for purchasing the Mud-Skipper Gasoline engine.
This OPERATION MANUAL tells you how to operate and service your
gasoline engine. Please read it before using the engine to ensure proper
handling and operating.
Follow the instructions carefully to keep your engine in the best running
condition.
Do not run the engine indoors or where ventilation is poor.
Keep explosive and flammables at least 1 m (3ft) away from the engine.
Do not smoke when adding fuel
Do not run the engine when gasoline has split, clean the overflowing fuel
and fuel spillage.
Do not remove the fuel tank cap or add fuel while the engine is running or
hot.(Add fuel after the engine has cooled by waiting 2 or more minutes after
engine is stopped.)
Do not run the engine without the muffler or air cleaner installed.
Do not touch the muffler, muffler cover or engine body while the engine is
running or hot.
Place protective covers over the rotating parts. If rotating parts, such as the
drive shaft, pulley, belt, etc, are exposed, they are potentially hazardous. To
prevent injury, equip them with protective covers or shrouds.
If you have any questions concerning this manual, or any suggestions,
please contact Mud-Skipper at 1-844-MUD-SKIP.
Page 2
Page 4

FUEL AND ENGINE OIL
Use clean, fresh, unleaded ETHANOL FREE gasoline. wherever possible.
·Do not mix oil into the gasoline
Page 3
Page 5
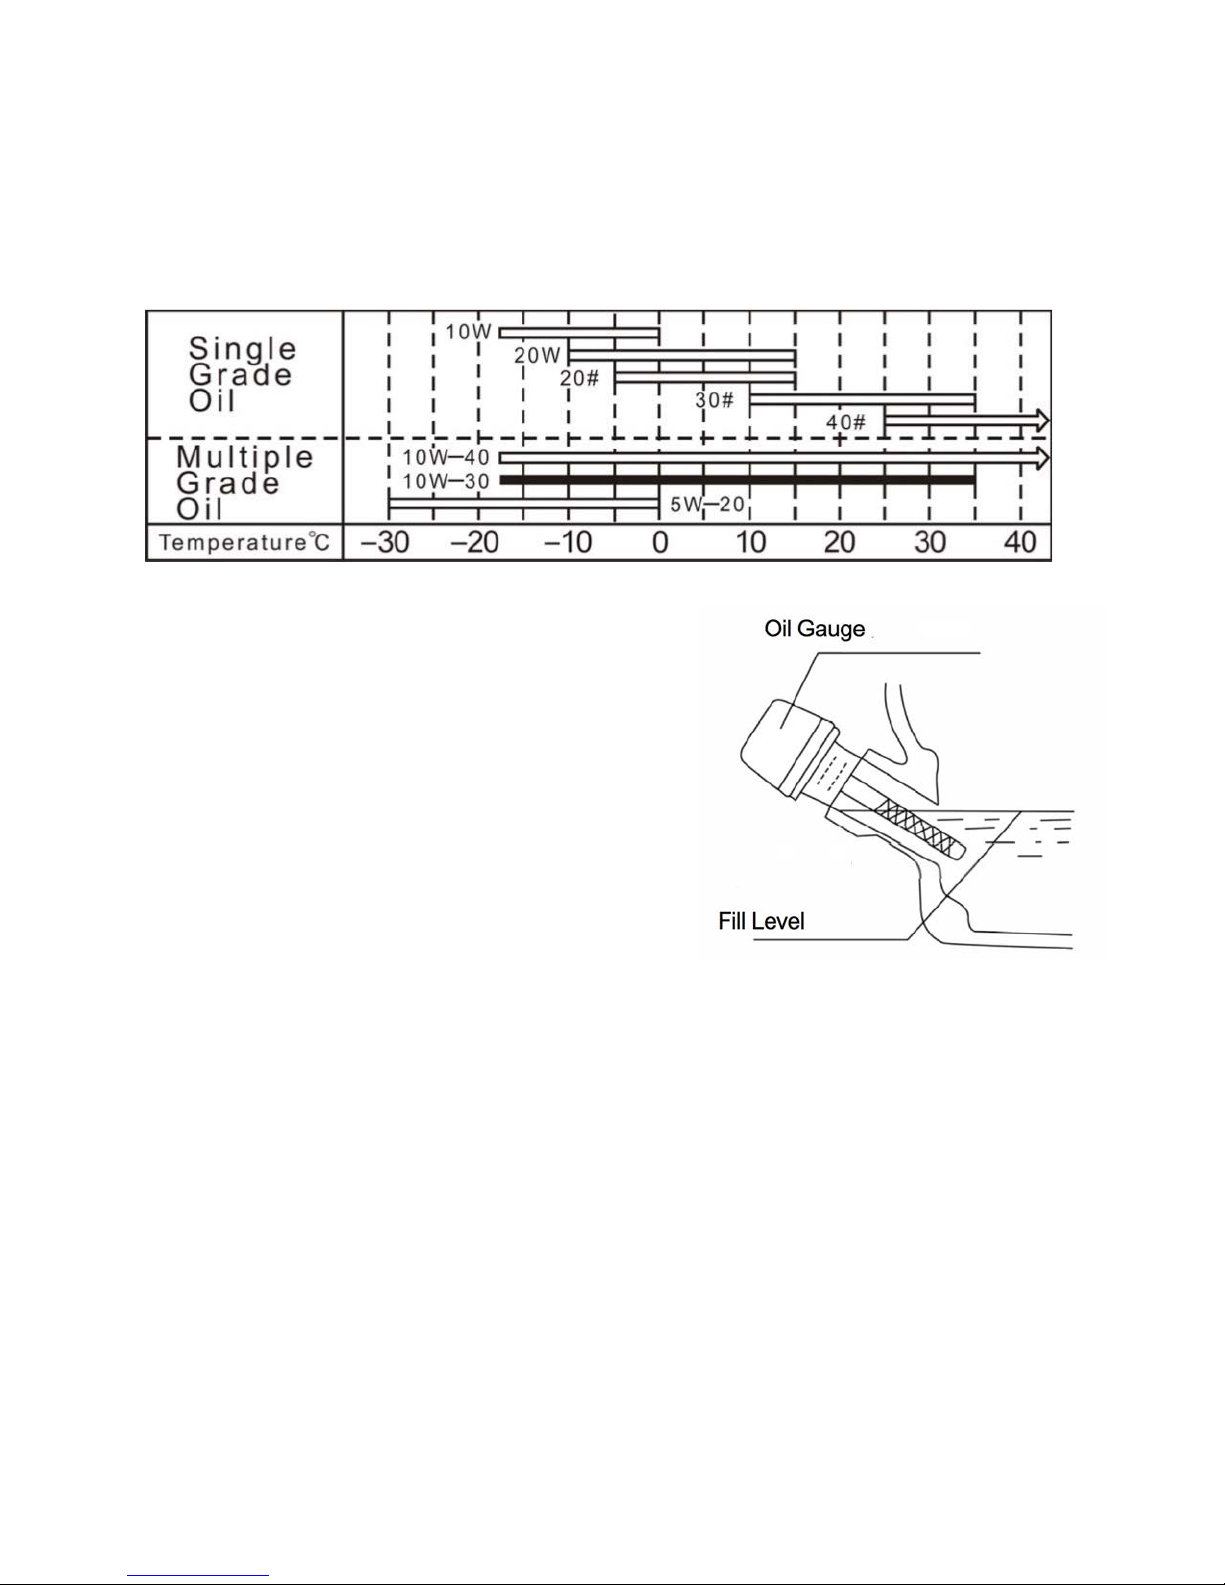
Engine Oil
·Use the engine oil grade depending on ambient temperature using the
table below
Note: Recommended engine oil: SAE
5W-40 mineral oil use only
Do not add commercial additives to the oil.
Do not mix gasoline into the oil
Before starting, be sure to conduct an oil
check.
Place the engine on a level surface when
adding oil and conducting inspections;
WARNING:
Engine is shipped without oil.
If using the engine on a Longtail, or Twister, the engine will be operated on
an angle, not level. Consequently, the oil sensor must be disabled. It is
installed for applications where the engine is operated on a level plane)
YOU MUST CHECK THE OIL LEVEL EVERY TIME YOU OPERATE
YOUR ENGINE.
WE WILL NOT ACCEPT RETURNS FOR SEIZED ENGINES DUE TO
LACK OF OIL.!
Page 4
Page 6

PRE-OPERATION INSPECTION
Fuel Inspection
·Is there fresh gasoline in the tank?
·Is old gasoline being used? If so, remove it and replace with fresh gasoline
·Is the fuel tank cap closed correctly?
WARNING:
Air-cleaner Inspection
Foam filters should be washed in detergent, dried and lightly impregnated
with oil. Paper filters should be replaced.
Engine Oil Inspection
Check the engine filled with the recommended engine oil, and
the oil is clean If not, replace it. You should replace it every season.
Inspect the Tightness of all Fastener Screws
Check the screws used to fasten the muffler (Do this when the muffler is
cold)
Fuel and Oil Leaks Inspection
Check for oil and fuel leaks and make the necessary repairs.
Page 5
Page 7

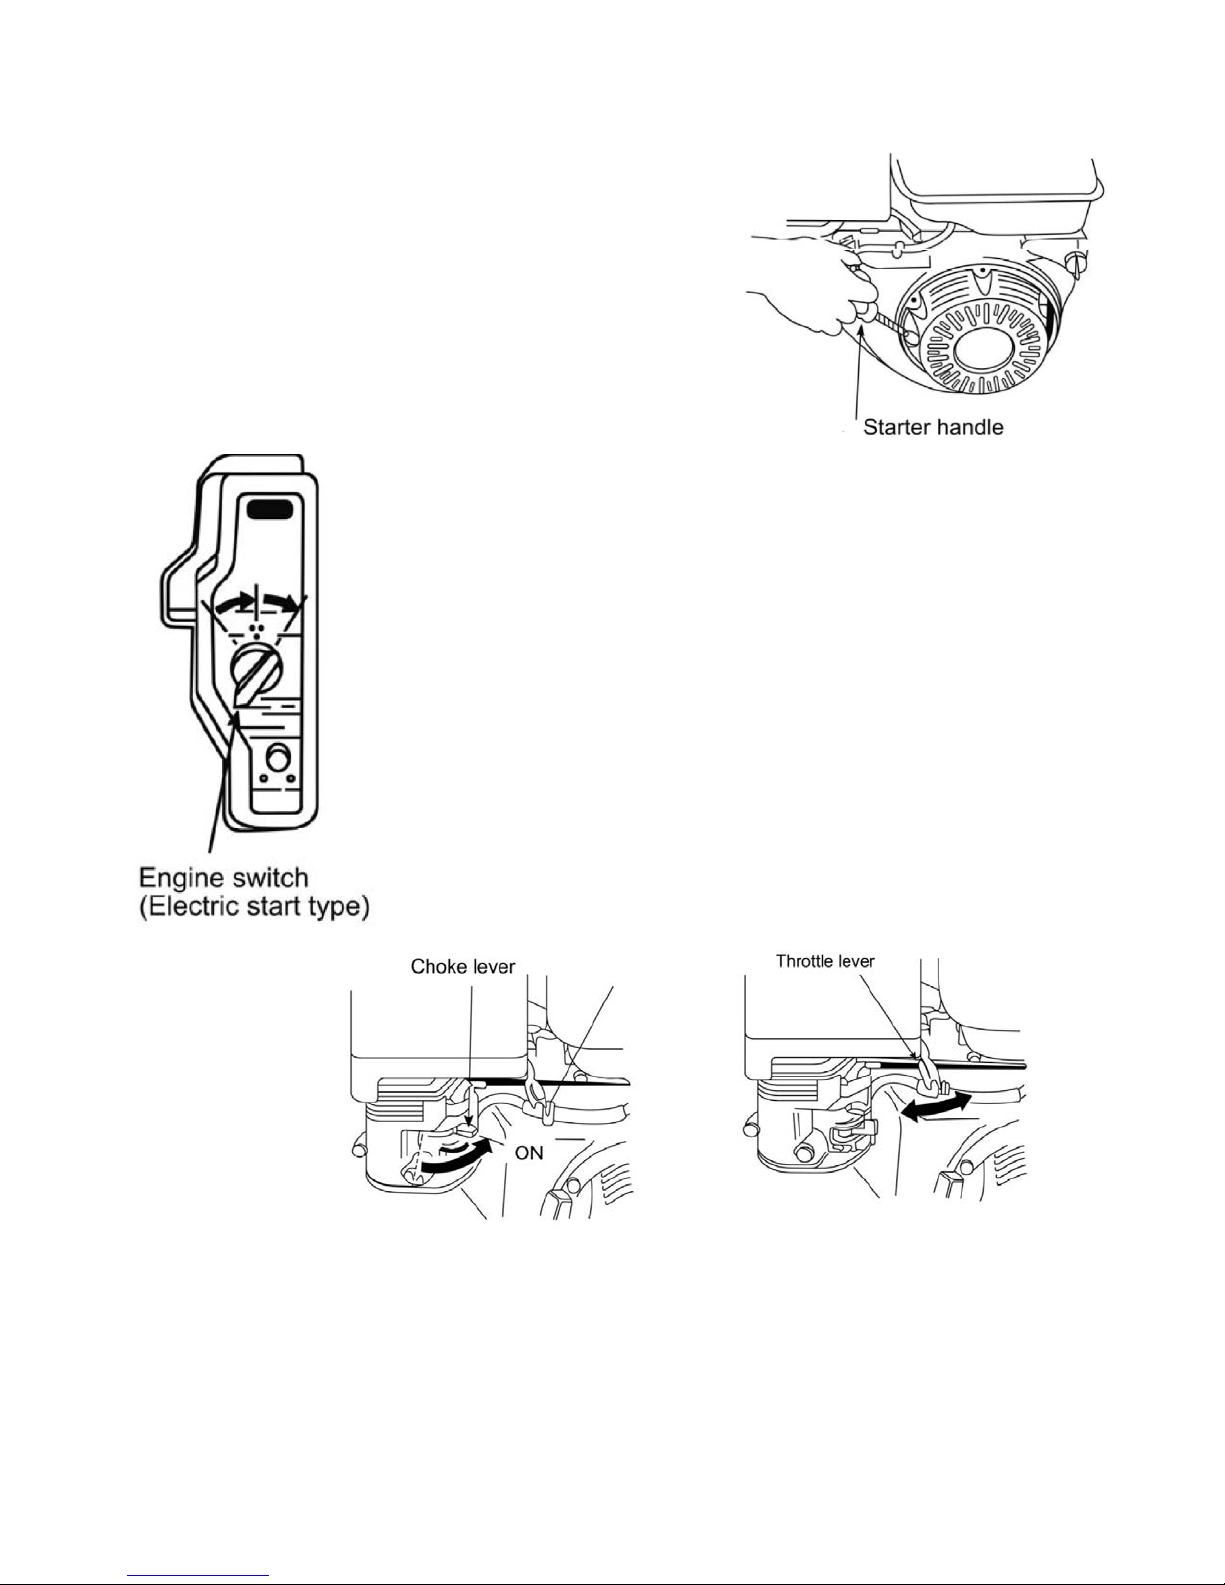
STARTING AND STOPPING THE ENGINE
Starting the Engine
OPEN the fuel cock Turn the engine switch to "ON" position
Completely CLOSE the choke valve Move throttle lever a little to OPEN
THESE ENGINES START BY CHOKING THE CARBURETOR,
REGARDLESS OF WHETHER THE ENGINE IS HOT OR COLD.
Page 6
Page 8
Due to EPA regulations, there is no fuel/air
mix adjustment on these engines as the
carburetor is preset.
Recoil start:
Hold the starter handle and pull it slightly
until the compression position is reached,
and then pull it swiftly from this position;
Slowly return the starter handle to its original
position after the engine
starts.
Electric start;
·Turn the key switch to "START" position;
and keep it there until the engine starts.
If engine does not start after running the
electric starter for 5 sec, wait 10 sec before trying
again.
After engine starts, release the key switch, it will
return to "ON"(or "RUN") position.
After engine starts, gradually turn the choke lever to
the full "OPEN" position, and set the throttle lever in
the Max. position. Before placing under load, warm up
the engine
for about 3
min.
To switch off,
turn the fuel
cock off first,
then use the
on/off switch.
Don’t switch
off the engine under load at high speed. It could cause damage.
Page 7
Page 9
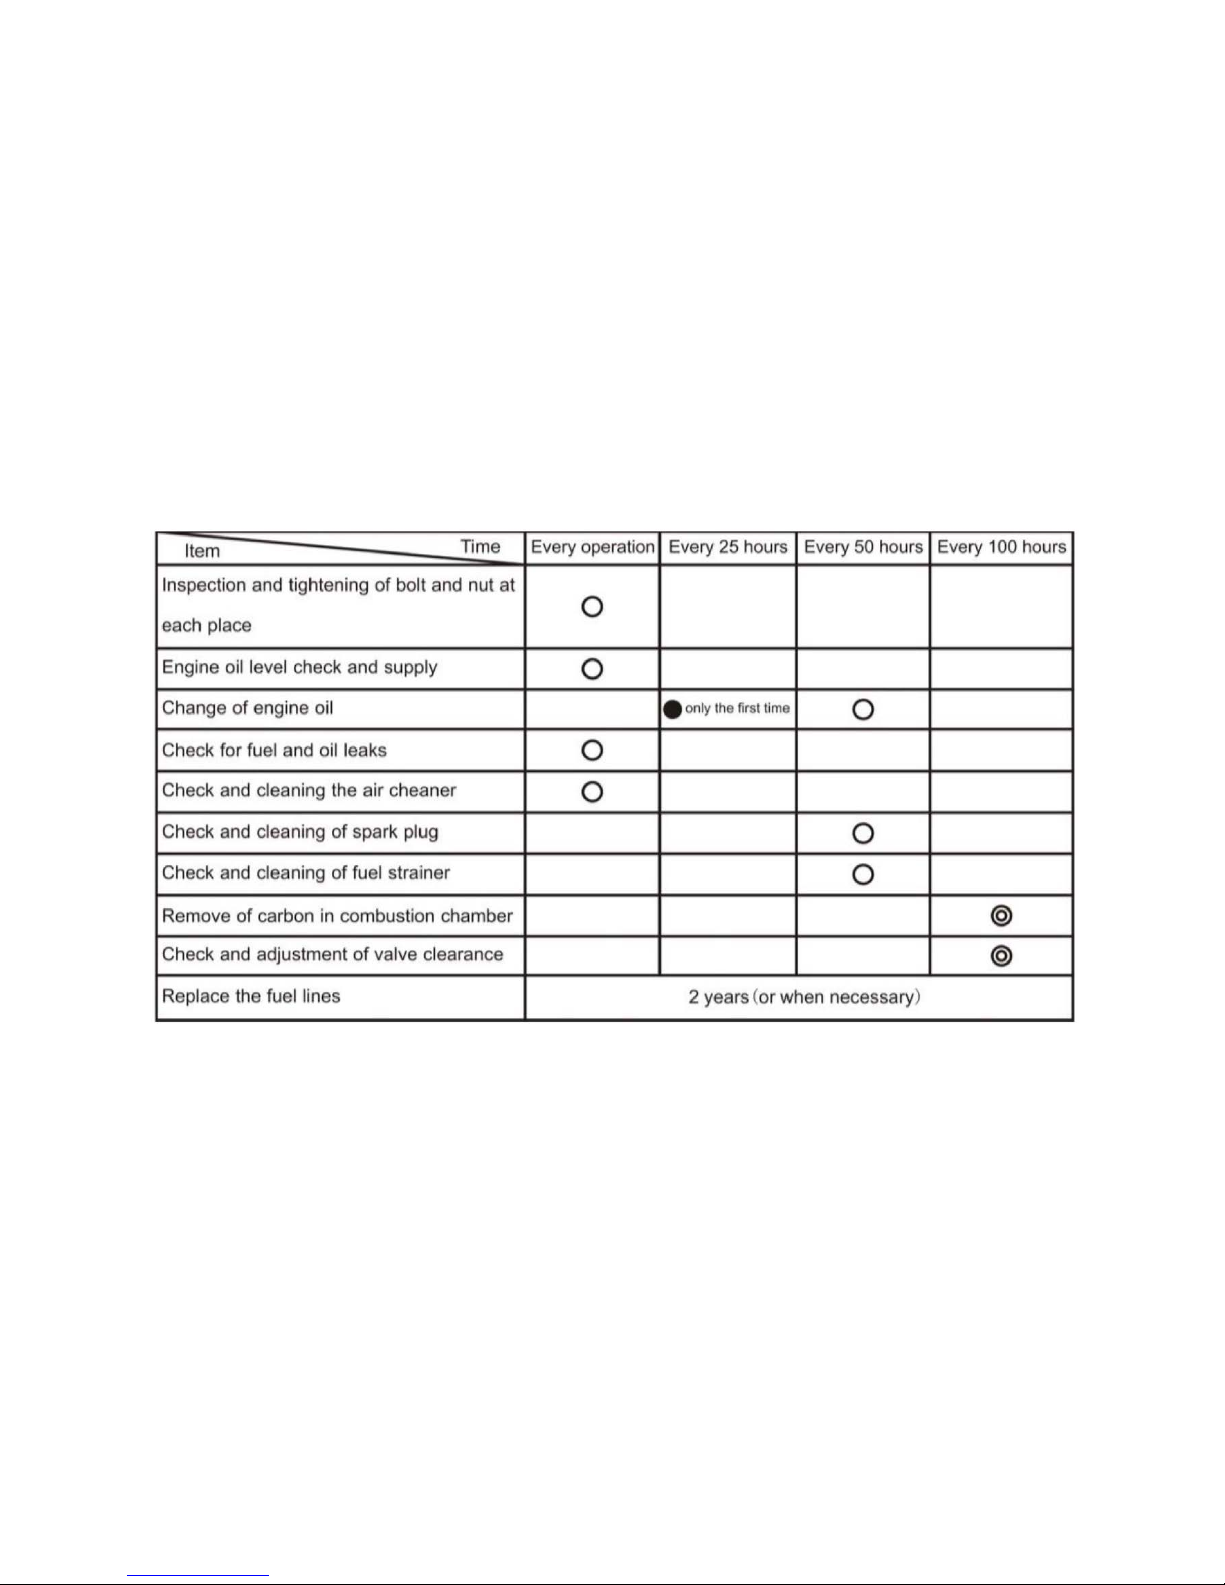
INSPECTION AND MAINTENANCE
Daily and Regular Inspection
Daily and regular inspections are important to assure safe, proper and
long-term operation of the engine. Refer to this inspection table when
conducting inspections and maintenance.
Regular Inspection Table:
Page 8
Page 10

CLEANING THE AIR FILTER
Page 9
Page 11

Cleaning the spark plug
Remove the carbon attached to the electrode
Polish the electrode with emery paper or wire brush
Adjust the electrode gap
Clean the fuel filter
Remove the filter from fuel tank neck
Clean it in solvent
Clean the fuel cock deposit cup
Remove the cup from fuel cock
Clean the cup
Replace the cup - use a new 2-ring
Page 10
Page 12

STORAGE OF ENGINE
Should the engine be stored for a long period, please do as follows:
Drain off the fuel in tank and oil in crankcase
Remove the spark plug, add about 2-3 cc. Engine oil into the cylinder, and reinstall
the spark plug. Pull the recoil until feeling the compression. At this time, both the inlet
and exhaust valve are closed to prevent the engine chamber from rusting.
Clean the surface of the engine with clean cotton cloth.
Store the engine in dry and dust free area.
Electric starter: Disconnect the battery, charge the battery once every month.
TROUBLE SHOOTING
Starting failure:
Is the engine switch turned to "ON" position?
Remove the spark plug, if it is soiled, clean or replace it.
Is the compression sufficient?
Confirm by pulling the starter handle six times slowly.
When compression is insufficient -
Check whether the spark plug is firmly tightened.
Is fuel cock open?
Is fuel sucked into the combustion chamber?
Close choke lever, pull the starter handle several times,
then remove the spark plug. When the tip of spark plug is wet, it is OK.
When fuel is not sucked in, check fuel strainer for blockages.
When engine does not start even though fuel is present, replace fuel with
new.
If fuel is not being drawn into the engine carburetor, remove the bowl,
undo the Jet Retainer, remove the jet and check all holes are clear.
Page 11
Page 13

Is there fresh fuel in the tank?
Is the fuel tank tap open?
Is the kill switch open?
Is the battery charged?
Is the HT Lead firmly fixed to the spark plug?
Is the gas tank cap vent hole plugged up?
Is there sufficient oil in the engine?
Is the Oil Sensor still connected?
Check Your Fuel
Is the fuel tank tap open and fuel is flowing? Remove the fuel tube to check for
flow.
Remove all old fuel and flush the tank. Look for particulate in the old fuel. If there
is rust, you must consider lining the tank with Caswell Gas Tank Sealer.
If you used ethanol based fuel, you have probably gummed up the carburetor
and worse, it forms varnish goop on almost everything if left too long.
Ethanol also attracts moisture, so you may have water in the bottom of the tank,
if you over wintered with ethanol fuel.
The gas tank cap has a small vent hole in it, and rainwater etc. can enter via this
route.
Ethanol rots plastic, rubber seals and causes rust. Why are you putting this in
your engine?
Check for a Spark!
It’s worth changing the spark plug every season.
Check the spark plug gap and adjust if necessary.
Check for a spark using a spark tester, removing the plug, re-attaching the HT
lead and placing the plug on the engine body (on bare metal). Pull the recoil cord
and observe the spark on the plug. It’s best to do this in a darkened room or at
Page 12
Page 14

night. You should see a bright blue spark. If there is a yellow or weak spark,
change the spark plug.
Check the HT lead, (This is the thicker lead that fits onto the spark plug.) Damage can occur to this, causing a short and grounding out the power to the plug.
look for cracks and perished rubber
Check the Ignition Coil
Using an ohmmeter, check the resistance between the side terminals of the coil.
Do this with all of the wires to the coil disconnected.
It should read 0.75 to 0.81 ohms.
Then check the resistance between either side terminal and the center high tension terminal.
https://youtu.be/M3Zc9Q33ex8
If the coil fails these tests, replace it.
Starter Fluid
Walmart sell an inexpensive Engine Starter Fluid for less than
$3.
Simply spray a jet for 3-4 seconds into the air intake (where
the
air filter is). Then start the engine. As long as you have a
spark,
the engine should fire up, and it will draw the fuel in from the
tank.
Page 13
Page 15

CLEANING THE CARBURETOR FUEL JET
Place a tray underneath the engine if
you intend to do this job on the boat,
but we recommend removing the
engine and doing this work in a
workshop. These parts are small and
easily lost.
To g a i n a c c es s to t h e F u e l J e t , u n do
the retainer screw at the base of the
carburetor bowl and pull off the bowl.
Up inside the screw hole, there is a
brass retainer. Using a small screwdriver, undo the retainer. The jet will drop out.
Wash the retainer, jet, float and pin with carburetor cleaner, then hold the jet up to
the light to inspect it. There are several very small holes in the shank of the brass
tube, so make sure these are all clear of debris.
Squirt carburetor cleaner up into the chamber where the jets resides and
into all orifices in the carburetor and reinstall the jet and retainer screw.
Be careful when replacing the carburetor bowl. There is a thin rubber gasket around the lip
which is easily reinstalled incorrectly, resulting in fuel leakage. It is best to install the gasket
onto the lip of the bowl, and secure it with a couple of dabs of silicon rubber or gasket
maker adhesive prior to replacing the bowl."
Page 14
Page 16

PRE SEASON CHECK LIST
Oil
Drain the sump and replace the oil at the beginning of every season, or every 25
hours use.
Air Filter
Remove the air filter. If foam, wash in detergent with warm water, and dry. Then
rub in a small amount of light oil, say a teaspoon full. This aids the filter to trap
dust particles.
Spark Plug
It’s worth changing the plug every season.
Check the spark plug gap and adjust if necessary.
Check for a spark using a spark tester, removing the plug, re-attaching the HT
lead and placing the plug on the engine body (on bare metal). Pull the recoil cord
and observe the spark on the plug. It’s best to do this in a darkened room or at
night. You should see a bright blue spark. If there is a yellow or weak spark,
change the spark plug.
Fuel
The engine should have been stored without fuel in the tank or carburetor.
Use only ethanol free fuel for your engine. Ethanol will clog up ports in your
carburetor and rot out rubber and plastic seals and hoses.
Carburetor
Check the choke butterfly is operating correctly. Apply a light coat of WD40 to
ensure free movement.If you stored your engine with ethanol based fuel in it, you may
need to strip
down the carburetor and thoroughly clean it. Use a commercial Carburetor Cleaner.
Linkages
There are numerous springs and rods connected to the carburetor and throttle
lever. These will vary from each sized engine, so it is a good idea to take a photo
of these as a reference, then check them every season for loss or damage. Take
the filter cover off to get a better view of these parts.
Dirty linkages can cause problems, so keep them as clean as possible. One way
to remove dirt and light oil is to spray with electrical contact cleaner. It’s worth changing the
plug every season.
Page 15
Page 17

TROUBLESHOOTING
Smoking Engine
Black smoke
Black smoke is an indicator of too much gas being burnt.
Blue or white smoke problem
Smoking engines indicates burning oil, probably caused by:
Over filling the crankcase with oil
Incorrect oil grades
Defective or obstructed crankcase breather
Crankcase air leak
Blown head gasket
Worn cylinder and/or rings
Turning/tilting the engine on its side
Surging Engine
When an engine surges or pants, it sounds as if the engine reaches full speed,
only to decelerate quickly. Engines rely on a precise volume of gasoline and air
to operate correctly..
Check the Air Filter
Clean foam filters with dish washer detergent and then apply a light coat of oil,
squeezing it into the foam. Paper filters must be replaced.
An air filter is a quick fix that should be your first remedy for a surging engine.
Problems in the Fuel System
Check and clean out the small vent hole in the gas tank cap for good ventilation.
Old gasoline, especially ethanol based, should be removed, the tank flushed
and replaced with fresh ethanol free fuel.
Check for rust in the tank, and consider lining the tank with Caswell Gas
Ta n k S ea l e r.
Do not store your engine with ethanol based fuel in the tank. Run the engine
until out of gas and drain the tank. Spray tank and carburetor with a light coat of
WD40. Ethanol is your enemy. Avoid it whenever possible.
Page 16
Page 18

Problems with Carburetor
Unbolt the carburetor bowl and thoroughly clean in fresh gasoline or carburetor
cleaner. (Remember to reinstall the thin rubber gasket correctly)
Check the float for free movement
Check all ports and vents for blockages, particularly the bolt that hold the bowl
on. It has port holes that tend to block.
Check the gaskets for tears or damage and replace if required.
Problems with Air or Vacuum Leaks
Check all nuts and bolts holding carburetor to the engine.
Change gaskets or use a liquid gasket to ensure a good seal.. Permatex FormA-Gasket No.1 Sealant.
A loose carburetor sucks air in through gaps where it attaches to the engine
block, altering the air/gasoline mix ratio. There is insufficient vacuum to pull
gasoline into the carburetor from the tank.
Post Season Check List
This check list is the most important thing you can do to make your start-up next
season go easily.
To p r e ve n t co r r os i o n i n s i de t h e e n gi n e cy l i n de r Remove the spark plug, and squirt a teaspoon of light oil through the plug hole.
Pull the recoil until you feel compression. At this time, both the inlet and
exhaust valve are closed, and this prevents the engine chamber from rusting;
Drain all fuel from the tank and run the engine to remove fuel from carburetor bowl.
Check the fuel tank for corrosion. If present, remove the tank and treat it with
Caswell Gas Tank Sealer.
Drain the oil from the engine.
Spray WD 40 inside the fuel tank, to reduce rusting. Replace the gas tank cap.
Disconnect the battery, charge the battery once every month.
Store under cover, in the dry.
Page 17
Page 19

INSTALLING A KILL SWITCH
Locate the Kill switch on a suitable position on the steering handle or somewhere on the
boat near the operator’s position, and run a twin flex wire to the engine.
Follow the diagram for wiring the actual switch from the enclosed Kill Switch instructions.
Connect one wire to the same bolt you used as the ‘ground’ for the black battery wire.
Connect the other wire to the joining two wires #3 and #11. You may snip off the
connectors of #3 & #11 and add the Kill Switch wire to them, using a wire nut. Alternatively,
find another male plug and add #3 and the Kill wire together and crimp the plug onto both.
Then plug into #11.
Run the engine and test the switch.
Kill switches are designed to be used. Make sure you do!
Page 18
Page 20

STARTER WIRING
Wire 1 To Terminal 10 (Positive lead from battery also to Terminal 10)
Wire 2 (Yellow) To Wire 7 (Black)
Wire 3 (Short Black) To Wire 6 (Black Leading From Under Engine)
Wire 4 (Thick Black) To Wire 9 (Long Red)
Wire 5 (Short Brown) To Wire 8 (Short Red)
To Include A Kill Switch:
Note- longer leads for kill switch, to mount switch at preferred location, are not included.
Wire Red Wire from Kill Switch To Wire 3 (Short Black), then reconnect to Wire 6. You may
clip the connectors off the wires and use a wire nut to connect, or attach new crimp
connectors. Black Wire from Kill Switch attaches to any ground on the engine.
To Start Engine:
Ensure engine has oil and gasoline
Connect positive terminal on 12V battery to Terminal 10.
Connect negative terminal on 12V battery to any ground on the engine
Set choke to full - even when engine is still hot.
Set throttle to idle. Turn key to start or use recoil pull start."
Page 19
Page 21

ENGINE BASE DIMENSIONS LT210 7hp
Page 20
Page 22

ENGINE BASE DIMENSIONS LT420 16hp
Page 21
90
196
2020
1
3
2
2-Ø12
0.022
0
深12
Ø11通孔
10
56°58'34"
7.5
103
1
7
Page 23

ENGINE PTO DIMENSIONS LT420 16hp
Page 22
Page 24

ENGINE PTO DIMENSIONS LT210 7hp
Page 23
Page 25

SPARE PARTS & SPECIFICATIONS!
Page 24
Page 26

INSTALLING A MUD-SKIPPER OUTBOARD KIT
Before installing the PTO
coupler, remove the bolt
in the end of the shaft. This has
been left in place for customers
who wish to use the engine for
other applications where an
attachment needs to be bolted
onto the shaft.
Failure to remove this bolt will result in damage to the shaft bearing seals and will
void any warranties.
For Longtail couplers (right), the square
key is not required. Simply slide the
coupler over the shaft and tighten the
three bolts so they protrude into the
keyway slot. Do not over torque.
PTO Housings will vary depending on
the model and kit size.
Slide the unit over the PTO
Coupler and bolt to the engine using
5/16-24 UNF bolts and shake proof
washers.
Page 25
Page 27

Page 26
 Loading...