

Page 1
Quick Test
PT-CTXM3
Page 2

Page 3
Page 4
Page 5
Page 6
Page 7
Page 8
Page 9
Page 10
K8
REPAIR PROCEDURE / PRODUCT WARRANTY CONTACT
Muchmore의 모든 제품은 영수증으로 입증된 최초의 구입일로부터 120일
동안 모든 제품들이 재료나 제품 생산상의 결함으로부터 안전하다는 것을
보증합니다. 위의 보증한도는 정상적인 소모, 잘못된 사용, 부적절한 수리
또는 개조로 인한 고장 및 결함은 보장하지 않습니다. 이것은 다음과 같은
사항에도 적용됩니다.
■제품과 함께 제공된 악어클립의 절단이나 다른 컨넥터로의 교체
■케이스의 기계적 손상
■전자부품과 회로기판의 기계적 손상
■회로기판의 납땜
모든 다른 가능성과 부적절한 취급을 피하기 위해, 수리나 보증을 위해
제품을 반납하기 전에 모든 구성 부분과 문제해결 지침을 우선 체크하십시오.
■정상적으로 작동하는 제품의 수리를 위한 반납은 서비스 비용이
청구됩니다.
본 제품을 반납함으로써, 고객은 M
uchmore에 해당 제품을 수리할 것을
위탁하는 것입니다. 만약 그것이 무보증이나 제한된 기간의 보증인 경우에는
제품의 최초구입날짜가 기입된 영수증 원본이 포함되어야 합니다. 그렇지
않으면 보증이 인정되지 않습니다. 보다 빠른 수리와 재배송을 위해서
주소와 고장의 자세한 설명을 함께 보내 주십시오.
본사의 제한된 보증 의무는 본사의 제품 설계서 원본에 따른 부품의 수리에
제한됩니다. 본사의 책임은 어떠한 경우에도 부품의 비용을 넘지 않습니다.
본사는 제품의 사용으로 인한 어떤 손상에도 책임을 지지 않습니다.
왜냐하면 본사는 제품의 설치와 사용을 관리할 수 없기 때문입니다. 본
제품을 작동시킴으로써, 사용자는 모든 결과적인 책임을 받아들입니다.
중량이나 크기 그리고 기타 사양들은 단순한 참고사항입니다. 제품
의 품질을
위해서 지속적으로 이루어지는 기술적 향상으로 인해 Muchmore는 그
사양들의 정확성에 대한 어떤 책임도 지지 않습니다.
Muchmore 애프터서비스
제품을 주의하여 포장한 후에 영수증과 고장의 자세한 설명을 함께 동봉해
주십시오.
그것을 전국의 Muchmore 취급점에 보내 주십시오.
취급점은 제품을 수리하거나 교환하여 드립니다.
재배송 비용은 보통 착불 입니다. 하지만, 전국의 Muchmore 취급점의
정책에 따라 바뀔 수도 있습니다.
사용시 궁금한 사항이나 꼭 개선해야 할 사항은 아래 연락처로 연락바랍니다.
411-842 경기도 고양시 일산구 풍동 127-1
TEL:031-903-0487 FAX:031-903-0497
Page 11

Page 12

3. 01 4. 08 0
00:00:03
13. 80
3. 01 4. 08 38050
00:00:03
13. 80
s3. 3 4. 08 0
00:00:03
13. 80
0. 00 0. 00 0
Set Voltage:
2. 0
0. 00 0. 00 0
Set Voltage:
3. 0
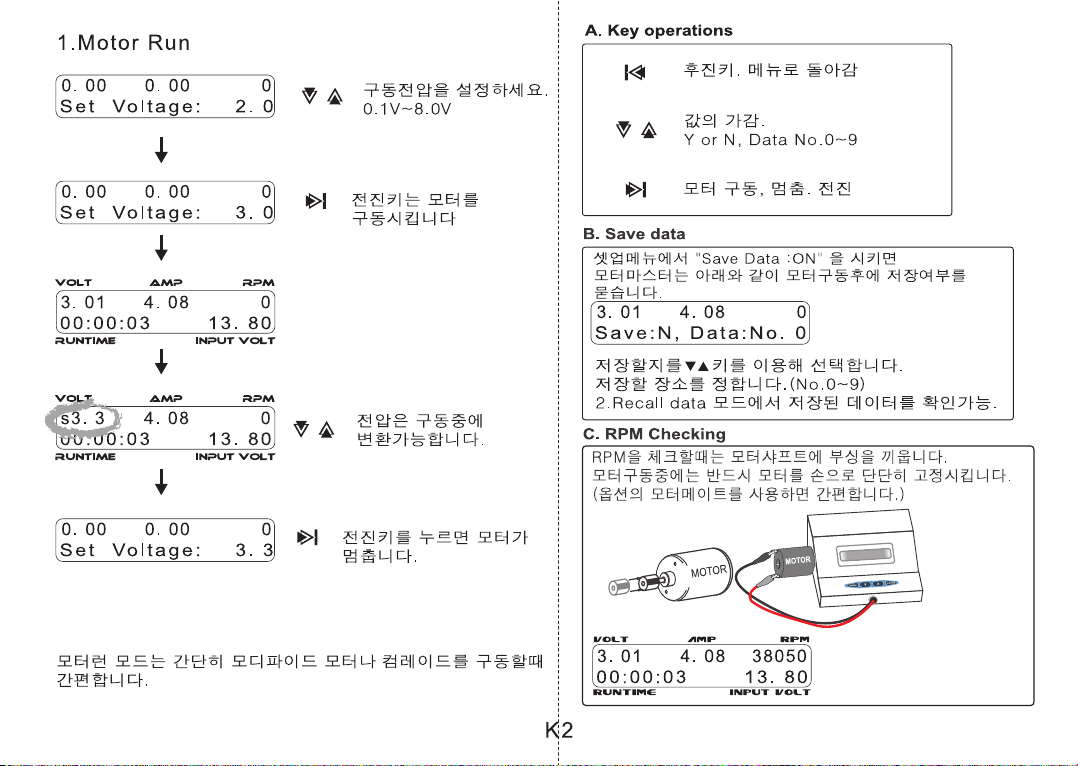
1.Motor Run
Return to main menu, backward
Increment or Decrement Voltage,
Y or N, Data No.0~9
Motor start or stop, forward
Select voltage number
0.1V~8.0V
Enter key starts motor run
0. 00 0. 00 0
Set Voltage:
3. 3
Enter key stops motor run.
Motor run mode is simple motor running mode when you want to
run your modified motor, Tire warmer, Comm lathe.
Voltage can be changed
during motor run.
A. Key operations
If you set "Save Data :ON" at Set up menu,
CTX-M will ask you as below after every motor run.
Determine Yes or No with keys,
then select where to save the data(No.0~9)
You can check data at 2.Recall data mode.
3. 01 4. 08 0
Save:N, Data:No. 0
C. RPM Checking
B. Save data
MOTOR
MOTOR
When checking RPM, put small bushing into motor shaft. Put
your motor into RPM sensor first, then start your motor. Don't
forget hold your motor during RPM checking.
E2
Optional "MR-MT Motor Mate" is aluminum CNC cut motor stand for Motor master series.
Page 13

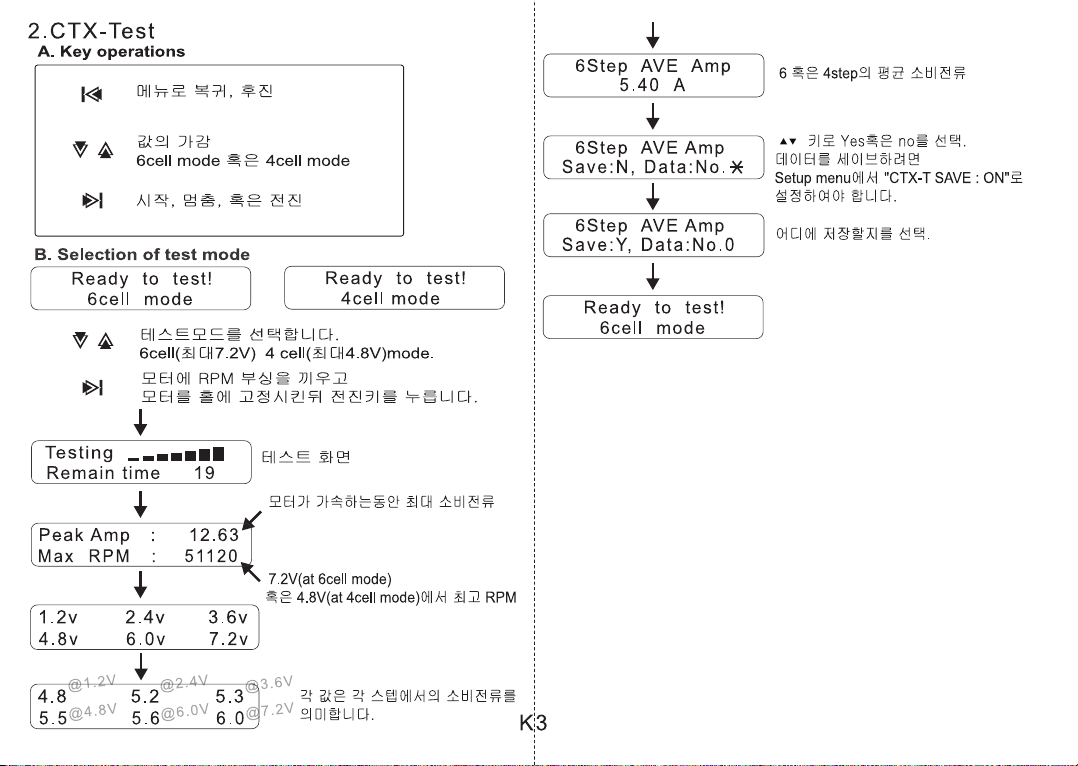
2.CTX-Test
Select to test mode 6cell(7.2V max) or 4 cell
(4.8V max)mode.
B. Selection of test mode
Ready to test!
6cell mode
Ready to test!
4cell mode
Testing
Remain time 19
Put RPM bushing into your motor shaft
and place your motor on RPM hole, then enter.
Testing display.
1.2v
@1.2V
@2.4V
@3.6V
@4.8V
@6.0V
@7.2V
4.8v
2.4v
6.0v
3.6v
7.2v
4.8
5.5
5.2
5.6
5.3
6.0
Each value means flowed
current(Ampere) at each step.
Return to main menu, backward
Increment or Decrement Voltage,
6cell mode or 4cell mode
Test start or stop, forward
A. Key operations
Peak Amp : 12.63
Max RPM : 51120
6Step AVE Amp
Maximum RPM at 7.2V(at 6cell mode)
or 4.8V(at 4cell mode)
This data means how much current
consumed(at peak) for your motor starts.
Average current(Ampere) of 6 or 4step
Determine data number where to save.
Determine Yes or No with keys.
For data saving, you should set
"CTX-T SAVE : ON" at Setup menu.
5.40 A
6Step AVE Amp
Save:N, Data:No.
6Step AVE Amp
Save:Y, Data:No.0
Ready to test!
6cell mode
E3
Page 14

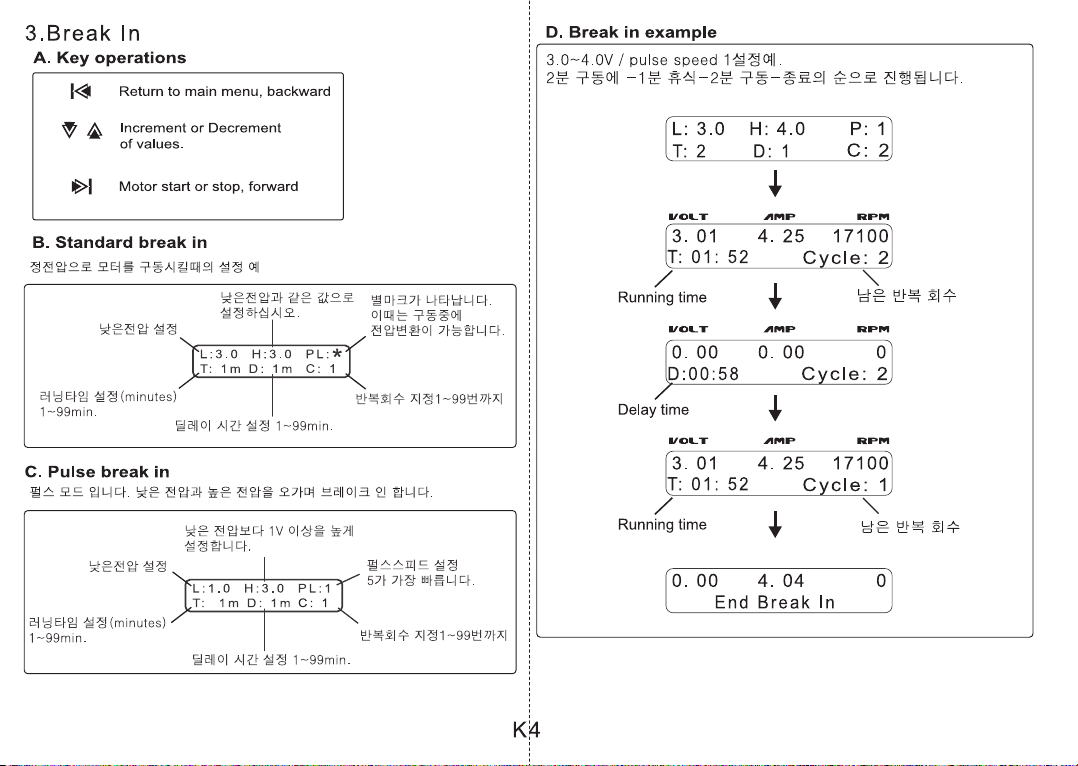
3.Break In
Return to main menu, backward
Increment or Decrement
of values.
Motor start or stop, forward
L:1.0 H:3.0 PL:1
T: 1m D: 1m
C: 1
Set low voltage.
Set high voltage value.
It must be 1V higher
than the low for Pulse break in.
Set the Running time(minutes)
1~99min.
Set the Running time(minutes)
1~99min.
Set the Delay time(minutes) 1~99min.
Set the Delay time(minutes) 1~99min.
Set the Cycle time
1~99times
Set the Cycle time
1~99times
Choose Pulse speed 1~5.
5 is the fastest
up and down mode.
L:3.0 H:3.0 PL:
T: 1m D: 1m
*
C: 1
Set Low voltage
Set this value equal
to lower voltage.
A. Key operations
B. Standard break in
C. Pulse break in
This mode runs motor at linear voltage.
This mode runs motor as pulse. You can set low and high voltage and pulse speed.
D. Break in example
3. 01 4. 25 17100
T: 2 D: 1
Cycle: 2
0. 00 0. 00 0
D:00:58
Cycle: 2
0. 00 4. 04 0
End Break In
L: 3.0 H: 4.0 P: 1
T: 01: 52
3. 01 4. 25 17100
Cycle: 1
T: 01: 52
C: 2
Remaining cycle times.
Delay time
If you set values as below,
motor will run 3.0~4.0V with pulse speed 1.
2minutes runs-1minute delay-2minutes run then finish.
Remaining cycle times.
Running time
Running time
If you set low & high
voltages equal, this mark
will appear. Voltage can
be changed during
standard break in.
E4
Page 15

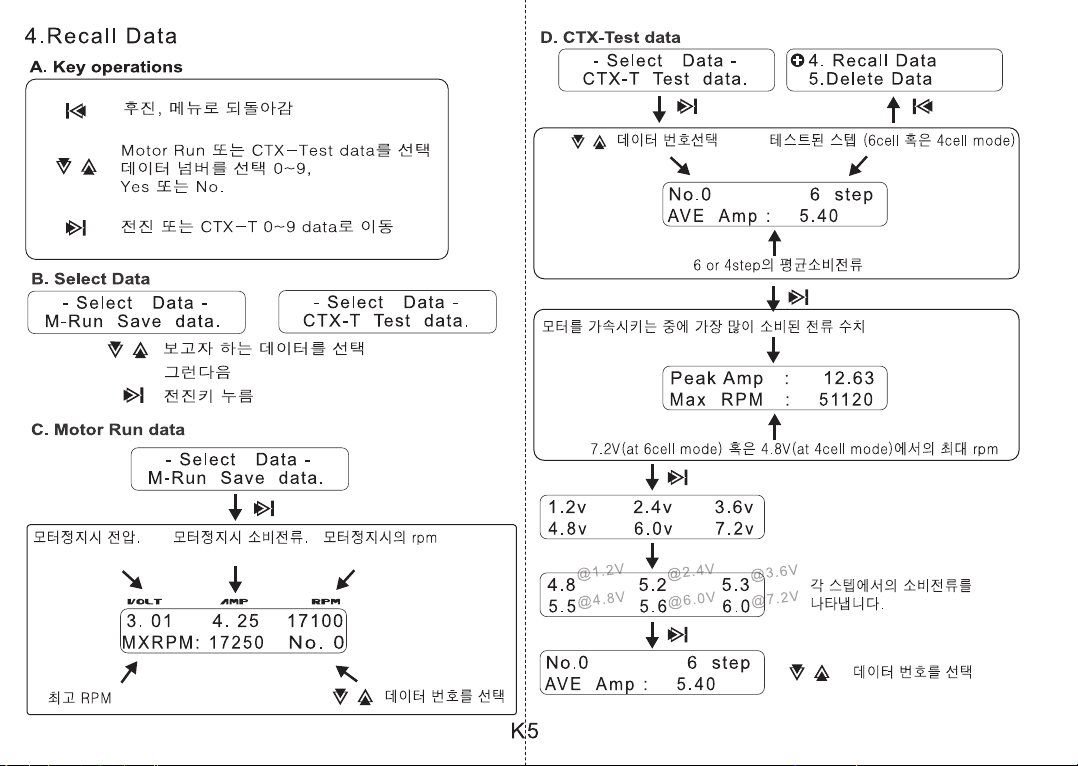
4.Recall Data
3. 01 4. 25 17100
MXRPM: 17250
Maximum RPM
Select data number.
RPM when you
stopped motor run.
Amp draw when you
stopped motor run.
Voltage when you
stopped motor run.
No. 0
Backward, back to menu.
Select data from Motor Run, CTX-test
then
Choose Motor Run or CTX-Test data.
Select Data Number 0~9,
Yes or No.
Forward or go to CTX-T 0~9 data.
A. Key operations
B. Select Data
C. Motor Run data
D. CTX-Test data
- Select Data -
M-Run Save data.
- Select Data -
M-Run Save data.
- Select Data -
CTX-T Test data.
- Select Data -
CTX-T Test data.
4. Recall Data
5.Delete Data
enter
No.0 6 step
AVE Amp : 5.40
No.0 6 step
AVE Amp : 5.40
Average current(Ampere) of 6 or 4step
Select data number.
Tested step (6cell mode or 4cell mode)
Peak Amp : 12.63
Max RPM : 51120
1.2v
@1.2V
@2.4V
@3.6V
@4.8V
@6.0V
@7.2V
4.8v
2.4v
6.0v
3.6v
7.2v
4.8
5.5
5.2
5.6
5.3
6.0
Maximum RPM at 7.2V(at 6cell mode) or 4.8V(at 4cell mode)
Each value means flowed
current(Ampere) at each step.
This data means how much current consumed(at peak) for your motor starts.
Select data number.
E5
Page 16

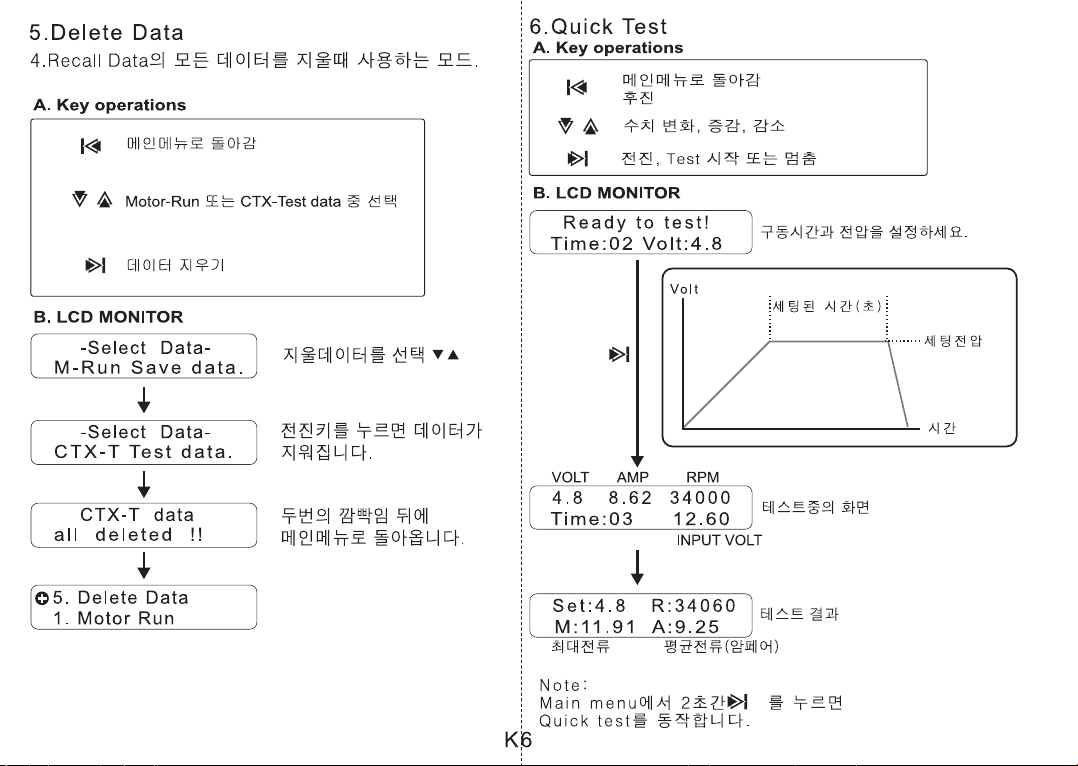
5.Delete Data
-Select Data-
M-Run Save data.
-Select Data-
CTX-T Test data.
CTX-T data
all deleted !!
Return to main menu
Select Motor-Run or CTX-Test data.
Data deleting
A. Key operations
B. LCD MONITOR
This mode will clear all data of Motor Run or CTX-Test
in 4.Recall Data.
Choose data with keys
then enter.
If you push enter,
all data will be deleted.
After twice blinking,
it will back to main menu.
1. Motor Run
5. Delete Data
6.Quick Test
Ready to test!
Time(seconds)
Set Voltage
Volt
Time
Time:02 Volt:4.8
4.8 8.62 34000
Time:03 12.60
Set:4.8 R:34060
M:11.91 A:9.25
Return to main menu,
Backward
Value change, Increment, Decrement
Forward, Test start or stop
A. Key operations
B. LCD MONITOR
Set up time(seconds) and Voltage.
Display during test
Test result
Average current(Ampere)Max Ampere
RPMAMPVOLT
INPUT VOLT
Note: +2seconds on
Main menu will run Quick test.
E6
Page 17

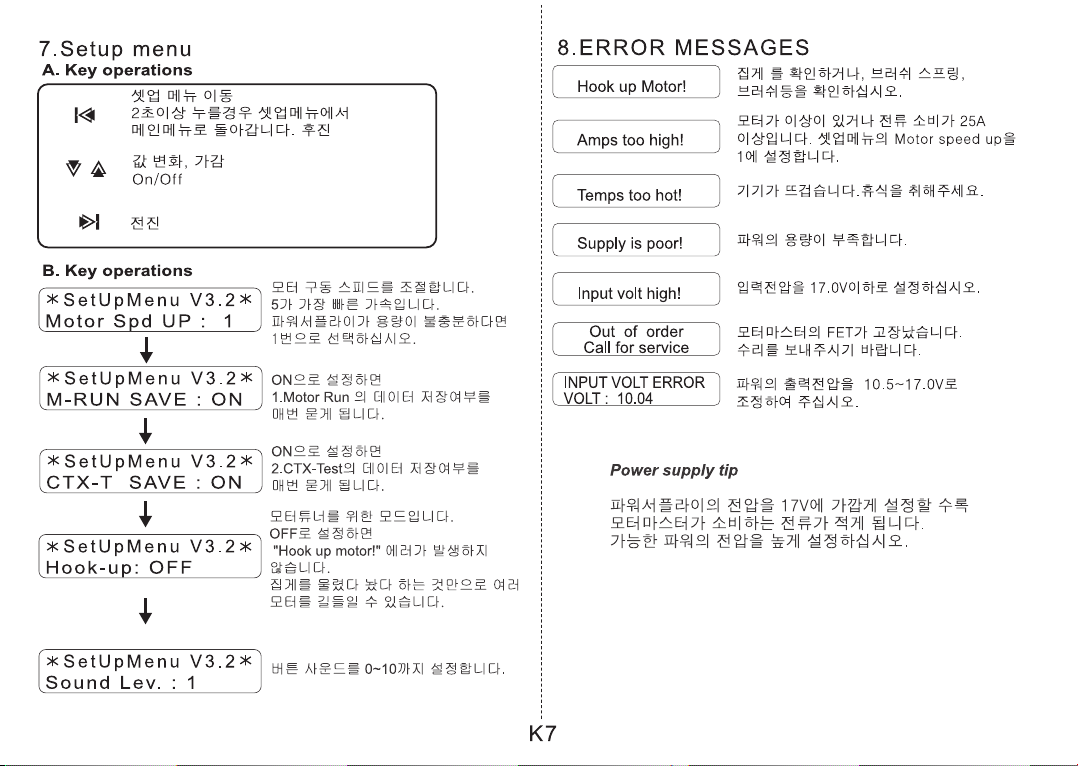
8.ERROR MESSAGES
Hook up Motor!
Amps too high!
Temps too hot!
Supply is poor!
Input volt high!
Check aligator clips, brushes,
brush springs.
Your motor consumes over 25A!
"Set Motor Spd UP: 1" at Setup menu.
Motor master is too hot to operate!
Cool down it, then operate.
Use power supply that has higher
capacity(more than 20A).
Decrease output voltage of power supply
down to 17.0V.
Motor master's FET is dead,
pls send us for repair.
Adjust output voltage of power supply
at 10.5~17.0V.
Out of order
Call for service
INPUT VOLT ERROR
VOLT : 10.04
Power supply tip
Motor master V3.2 Platinum, Marc Rheinard, Andy Moore Editions and
Surikarn V3.0 allow 10.5~17.0V input voltage.
If you set your output voltage of power supply as high as possible,
CTX-M will consume less capacity.
For example, If you set your supply output volt
at 16.9V, you can run even 7 turn motor(cunsuming 19ampere)
with 10ampere power supply!
7.Setup menu
SetUpMenu V3.2
Motor Spd UP : 1
SetUpMenu V3.2
Hook-up: OFF
Setup menu change
Press & hold : exit setup menu,
Backward
Value change, Increment, Decrement
On/Off
Forward
A. Key operations
B. Key operations
Adjust the speed of motor starting speed.
5 is the fastest acceleration mode.
If you use less than 14 Amp 12V power
supply, set this value at 1(slow start).
This mode is for severe motor tuner who
must tune tons of motor!
If you select OFF, CTX-M will not make
"Hook up motor!" error messege.
You don't have to push enter button
every time. Just connect or disconnect
alligator clips!
SetUpMenu V3.2
Sound Lev. : 1
You can select button sound 0~10.
0 is off, 1~5 are single sound, 6~9 are
double sound.
SetUpMenu V3.2
M-RUN SAVE : ON
If you choose ON, you can
save Data after every 1.Motor Run.
SetUpMenu V3.2
CTX-T SAVE : ON
If you choose ON, you can save Data
after every 2.CTX-Test.
E7
Page 18

REPAIR PROCEDURE / PRODUCT WARRANTY
MUCHMORE RACING warrants Motor Master manufactured by it to be from defects in material and workmanship for a period of 120days from the date of
purchase by the original purchaser for use. MUCHMORE RACING (or their associated distributors), at this option, will repair or replace without charge, or
refund the purchase price of, any product which fails during warranty period by reason of defect in m
aterial or workmanship found upon examination by
MUCHMORE RACING to have been the cause of failure. This warranty does not cover any failures attributable to abuse, mishandling, failure to follow
operating instruction, alteration or accident.To make claim under this warranty, the purchaser must return the product to MUCHMORE RACING (or their
associated distributors) at the address shown below, pro
perly packed and with shipping charges prepaid. All claims must be made in thirty(30) days after
the product failure and, in any event, with in thirty(30) days after the expiration of the 90day warranty. All claims must be accompanied by sales slip or
other written proof of date of purchase. Maximum repair costs for the purchaser error are 50% of retail price(original purchase price).Since we cann
ot
supervise the proper use of our products, we can accept no liability for direct or indirect damage of any type arising from their use or occurring to the
property of the user and/or third parties. Therefore, any use of this product shall take place at the user’s own risk. The warranty claim may not exceed the
value of this product in any case. By putting this product into operation you accept t
he above conditions and assume full responsibility for use of this
product.
CONTACT
Page 19

Page 20

Page 21

Page 22

Page 23

Page 24

Page 25

Page 26

.........................................................................................................................................................................................................................
..........................................................................
..........................................................................
修理依頼につきましてはこの保証書とご購入日が確認
できる領収書(レシート、店舗での保証書等)を添えて
ご依頼ください。
(★印欄に記入の無い場合は無効となります)
製品番号
本保証書は日本国内においてのみ有効です。
★お客様名
★ご住所
★電話番号
お客さま記入欄
販売店記入欄
★販売店名
★担当者名
保証書
J8
本製品には、マッチモア正規販売店よりご購入された場合に対し保証サービスがあります。説明書に明記されている正常な使用状態で故障した場
合は、この保証内容に記載された期間、条件のもとにおいて修理、もしくはその他の対応とさせていただきます。本製品を最初に購入されてから
120日間は保証サービスの対象となります。また、マッチモアレーシングの製造工程に対した製品保証にたいしては、初回使用時に初期不良と
契約店にて判断された場合は新品交換(購入より10日以内)、また、最初に購入してから120日以内では保証サービス修理を受けることが可
能です。(中古品、正規販売店以外からの購入に関しては、通常修理のみの取り扱いとなります)120日以内の保障サービスでは、最初に購入
した日が証明できるもの(領収書、保証書等)を添付の上、マッチモアジャパン修理受付窓口、もしくは購入された正規販売店へお問い合わせ下
さい。また、使用
者の不注意による破損(水没・粉砕・落下等)に対しても、120日以内であれば本製品の定価の50%以下で修理を受けるこ
とが可能です。本保証サービスは、マッチモアジャパン修理受付窓口、もしくは正規販売店からのご依頼に対してのみとなります。修理受付や製
品に対してのご質問は、マッチモアジャパン修理受付窓口、もしくは正規販売店へお問い合わせいただきますようお願い致します。
CONTACT
Page 27

MEMO
Page 28

MEMO
Page 29

MEMO
Page 30

MEMO
Page 31

MEMO
Page 32

 Loading...