

Page 1

MTZ
821/821.2/821.3
921/921.2/921.3/921.4
OPERATION
MANUAL
921 – 0000010 RE
Page 2

CONTENTS
Section 1. Introduction. International marks ........................................................................................ 4
Section 2. Safety regulations ................................................................................................................ 6
Section 3. Technical specifications .................................................................................................... 19
Section 4. General information. Tractor layout and operation .......................................................... 23
Section 5. Controls and instruments .................................................................................................. 25
Section 6. Preparation to work and work order ................................................................................. 38
Section 7. Operation and adjustment regulations ............................................................................... 48
Section 8. Rigging .............................................................................................................................. 60
Section 9. Troubleshooting ................................................................................................................ 71
Section 10. Maintenance .................................................................................................................... 75
Section 11. Storage .......................................................................................................................... 100
Section 12. Transport ....................................................................................................................... 100
Section 13. Appendix ....................................................................................................................... 101
2
Page 3

IMPORTANT!
In case of tractor bein g used by a customer or is lent or leased prior to starting operating it ensure
the operator:
A. . Is aware of safety measures and correct use.
B. . Has read and understood contents of the present operation manual.
NOTICE!
Due to constant product improvement structure of certain assembly units and parts may contain
alterations not mentioned in the present edition.
Some technical d ata and figures i n the p resent d ocument s ma y differ from actual for your machine.
Dimensions and weights are approximate (for reference only). Contact MTZ dealer for details.
General note: “Left” and “Right” terms in the present document are referenced from point of view
of a viewer behind the tractor moving forward.
TO OPERATOR’S ATTENTION!
1. Carefully read the present manual prior to running the tractor and strictly observe its
regulations.
2. Use seasonal diesel fuel according to the manual. Reduce engine oil change interval twice
when using fuel with up to 1% sulphur content.
3. Never allow idle engine operation exceed 15 minutes.
4. Keep in mind that diesel engine may be started with gear lever in most left position only (in
drive range engagement positions I or II).
5. With the tractor operating without rear PTO free two-speed PTO drive sw itch should be set to
position I (540rpm), free synchronous PTO drive lever should be set to neutral (middle) position,
control lever should be set to “PTO off” position (see “Controls and instruments” section).
6. Synchronous drive of rear PTO should not be used with track unit movin g faster than 8 km/h.
Otherwise tractor powertrain may be badly damaged.
7. Operation at 9th gear is allowed in overdrive only (range II).
8. Tractor cab is equipped with a single seat and only operator is allowed to stay into.
9. Certain tractor components are placed into SPS case, toolbox or cab at dispatch from the
factory. These should be installed by the user himself.
10. When commissioning new batteries remove sealing film from vents or cut afflux out of
polyethylene plugs.
11. Do not allow tractor operation with friction clutch engaged or not completely disengaged.
12. To start moving ensure hand parking reserve brake disengaged.
13. Set FDA switch knob to “driven” position in order to operate the tractor with no cardan shafts.
14. Never operate tractor in closed compartments with insufficient ventilation (air exchange):
exhaust gases may be fatal.
15. Never tow tractor with front wheel lifted up, otherwise FDA drive may fail leading to
emergency conditions.
16. Never lift machine front up with a towing shackle. Use the shackle to tow the tractor only.
17. Never perform maintenance or other works in fan or drive belt area with running engine.
18. Manufacturer never stops improving the machine, thus machine structure or operation rules
may be subject to alterations not reflected in the present manual.
3
Page 4

Section 1. INTRODUCTION. INTERNATIONAL MARKS
The present manual contains basic technical data, description of structure features, controls,
operation and maintenance for the following tractor models:
MTZ-821 (D243; 4x4), MTZ-821.2 (D243.S; 4x4),
MTZ-821.3 (D245.43S2; 4x4)
MTZ-921 (D245.5; 4x4), MTZ-921.2 (D245.5S; 4x4),
MTZ-921.3 (D245.5S2; 4x4).
MTZ-921.4 (D245.5S3A; 4x4)
4x4 tractors MTZ 821/821.2/921/921.2/921.3/921.4 is a garden-and-vineyard version of
universal wheeled tractor-cultivator MTZ-822/922 featuring smaller dimensions and ground
clearance. These tractors are aimed at performing different works at fruit plantations, in gardens and
vineyards, as well as in industry, construction, public services and transport, equipped with rigs,
semihinged machines, towing machine and appliances.
Used abbreviations and acronyms
AB - accumulator battery
DL - differential lockup
QC - quick coupler
PFE - paper filter element
UBGP - upper bevel gear and pinion of front driving axle reduction gears
UDP - upper dead point of engine piston
PTO - power take-off
PIC - power input connection
HMS - hydraulic mounted system
HPS - hydrostatic power steering
SM - shift maintenance
SPS - spare parts set
RH - rear hookup
CFE - control filter element for diesel engine air filter
MFE - main filter element
GB - gearbox
TMA - tractor machine assembly
FC - friction clutch
H - hookup
FDA - front driving axle
TM - technical maintenance
TC - towing coupler
4
Page 5

International symbols
In relation to instruments and controls use manufacturer uses standard international symbols.
Symbols and their descriptions are given below.
− See manual
− Brake
− Hand brake
− Horn
− Alarm signaling
− Fuel
−
Coolant
− Electric starting preheater
− Engine speed
− Engine oil pressure
− Engine coolant temperature
− Controls operation
− Fast
− Slow
− Forward
− Backward
− Battery charging
−
Cab limp
− Side lights
− Turn indicators
− Upper beam
− Lower beam
− Open
− Close
− Gradual change
− RH lever down
− RH lever up
− External cylinder, push-out
− External cylinder, retraction
− External cylinder, floating
− Clogging air filter
−
− Operation lights
− Differential lockup
− Power take-off engaged
− Front axle engaged
− Fan
− Screen washer
− Windshield wiper
− Rear window washer and wiper
− Trailer turn indicator
− Engine start (starter control unit
indicating lamp)
5
Page 6

ATTENTION! Do not start engine from
outside operator’s place. Always stay in the
and operating controls.
Section 2. SAFETY REGULATIONS
Carefully follow precautions and regulations
in tractor operation and maintenance to ensure
work safety.
General notes
1. Carefully study the present operator’s
manual prior to operating the tractor.
Insufficient knowledge on driving and
operating the tractor may cause accidents.
2. Specially trained and qualified operators are
allowed to use the tractor, only.
3. Use tractor’s safety belt, if any, in
operation. Contact dealer otherwise.
4. Never take passengers i nto the tract or’s cab
as there is no seat provided.
5. Keep all warning labels clean. Replace
damaged or missing labels.
6. Thoroughly inspect the tractor, trailed
machinery, rigs and coupling prior to
commencing work. Ensure its complete
operability prior to commencing work.
Trailed agricultural machines and
transporting trailers should be equipped
with rigid hitches to prevent them swaying
and tractor being run down while
transporting, and with safety chains and
cables.
7. Prior to starting the engine engage parking
brake, free PTO switch should be turned
OFF, PTO gear changing rod
(“Synchronous/Free”) should be set neutral,
range and gear chan ging lever sh ould be set
neutral.
Safety regulations for tractor operation
cab at operator’s seat when starting the engine
8. Never start engine with towing to avoid
intensive engine parts wear.
9. Never start engine and never operate
controls from outside operator’s place.
10. Warn surrounding and working on trailed
machinery persons prior to commencing
work.
11. Never leave tractor in motion.
12. Turn PTO off, stop the engine, set PTO
switching rod neutral, engage parking brake
and pull starter key out.
13. Do not operate the tractor in enclosed
compartments with insufficient ventilation
– exhaust gases may lead to death!
14. In case of engine or steering fail during
operation immediately stop the machine.
Steering with stopped engine required much
greater force applied.
Non-operating engine with no pressure in
steering system lights oil pressure indicator.
15. Do not stay under lifted agricultural
machines. Never leave rigs lifted up for
long stops.
16. Be careful not to exceed maximum total
weight of tractor and coupled machinery
and axles loads as pe r S e ct io n 3: “Tech ni c al
specifications”.
17. Be careful not to injure a person or
damage property while lifting agricultural
digs up and down and turning the tractor.
18. Cardan shaft transferring torque from
PTO to machinery tips should be enclosed.
19. Ensure any supplementary equipment and
auxiliaries are installed correctly and fit
your tractor.
Keep in mind danger of misusing a tractor
for yourself and other persons.
Do not use equipment not designed to be
installed onto a tractor.
20. Be careful not to roll over. Choose safe
speed according to road condition,
especially when driving off-road, crossing
trenches and slopes and in sharp turns.
21. Widen tractor’s wheel track as much as
possible for driving at slopes.
22. Avoid sharp turns with full load and at
high speed.
23. To use the tractor for transporting:
• Widen wheel track as much as possible;
• Interconnect brake pedals, adjust
simultaneous braking, if necessary;
• Check parking brake operability;
• Check light and sound signaling devices;
• Transporting trailers should be equipped
with rigid hitches and safety chains or
ropes;
6
Page 7

• Never drive down the hill with gear
disengaged (coasting)!
Drive the same gear up and down the hill.
• Never drive down the hill with engine
stopped. Oil pump should operate for safe
steering;
• Never use trailers weighing more than a
half of tractor’s actual weight without
independent braking system. The faster you
are driving and the greater is towed weight,
the longer should be safe distance;
• Disengage FDA to avoid excessive drive
parts and front tires wear;
• Do not lock rear axle differential when
turning or driving faster than 10 km/h;
• Never stop at slope. In need to stop engage
the 1st gear and parking brake.
24. Stop the engine and ensure PTO end stop
prior to leaving the cab and disconnecting
machinery when working with PTO-driven
attachments.
25. Never wear loose cloths when operating
PTO or near rotating machines.
26. Always engage parking brake and block
rear wheels with wedges on both sides.
Ensure secure fixation of the machine.
27. Use synchronous PTO dr ive for lower GB
gears at speed not exceeding 8 km/h,
otherwise tractor’s powertrain may be badly
damaged.
Set independent and synchronous drives rod
to middle (OFF) position and replace PTO
end cap.
28. Never clean, adj ust or service PTO-driven
machines with running engine.
29. Driving with installed agricultural rigs
faster than 15 km/h is not allowed.
Safety regulations for maintenance
30. Never fuel the tractor up with running
engine.
31. Never smoke when fuelling the tractor up.
32. Do not fill fuel tanks to the full – leave
enough space for fuel to expand.
33. Never add gasol ine or mix es to diesel fuel
to avoid increased fire or explosion hazard.
34. Timely apply summer and winter fuels.
Fill fuel tank in the end of each day to
reduce condensation at night.
35. All operations related to engine or tractor
cleaning, preparation to work, servicing,
etc. should be done with stopped engine
and braked tractor.
36. Engine cooling system is constantly
pressurized with a valve in radiator’s filler
cap. Do not remove the cap with hot
engine. Always slowly turn the cap to
depressurize.
37. Be careful not to burn yourself when
discharging coolant or water from cooling
system, hot oil from engine, hydraulics or
transmission.
38. Be careful when servicing batteries –
spoiled electrolyte shall burn skin.
39. Avoid open fire close to the engine fuel
system and batteries to prevent explosion
hazard.
40. Keep tractor and its systems, particularly
brakes and steering, operable to ensure
personal safety for operator and
surrounding people.
41. Modifications to the tractor or its certain
components without prior approval by a
dealer and manufacturer are prohibited.
42. Remove filter mesh from fuel tank filler
neck to avoid fuel spillover when fueling
the machine up mechanically.
The filter mesh is provided for manual
fueling the tractor up in the field only.
43. Charge the tractor with oils and grease
recommended by the manufacturer only.
Application of other lubricants IS
STRICTLY PROHIBITED!
Safety regulations for electrics operation
and maintenance
44. Adhere the following safety regulations to
prevent damage to semiconductor devices
and resistors:
• Never disconnect battery terminals with
running engine – that would cause voltage
crest in charging circuit and damage to
electric devices.
• Never disconnect electric wires prior to
stopping the engine and turning all electric
switches off.
• Observe polarity when connecting wires
to the battery. Incorrect connection shall
lead to short-circuit and dama ge to electric
systems.
7
Page 8

• Do not connect AB to electric system until
IMPORTANT! Do not turn starter and
instrument switch prior to full engine stop.
terminals and voltage polarity is verified.
• Never check for current with “a spark”
method that causes damage to electrical
equipment and fuses and wiring burn-out.
• Do not operate the tractor without battery
installed in electric system.
Fire safety regulations
45. The tractor should be equipped with fire-
fighting equipment, particularl y with spade
and fire-extinguisher. Operating tractor
with no fire-fighting means is not allowed.
46. Areas for storing tractors and fuels and
lubricants should be rounded with not less
than 3 m wide ploughed strip and provided
with fire-fighting means.
47. Charge tractors with fuels and lubricants
mechanically with engine stopped. Use
light at nights. Try to avoid fueling tanks up
from buckets.
48. Clean parts and assembly units from plant
residues prior to perform repair with
electro-gas welding in the field.
49. Prevent manifold and exhaust pipe
clogging with dust, fuel, straw, etc.
50. Prevent straw winding round rotating
parts of machinery coupled to the tractor.
51. Take appropriate fire-safety measures
when rinsing parts and assemblies with
kerosene or gasoline to avoid vapors
ignition.
52. Never operat e the tra ctor in fire-hazardous
areas with removed bonnet and other
protective devices from hot engine parts.
53. Never use open fire to warm up oil in the
engine oil pan, when filling tanks with fuel,
or to burn radiator core contaminants out.
54. Emerging fire seats should be buries under
sand, covered with tarpaulin, bagging or
other compact material.
55. Avoid inflammable materials being close
to exhaust manifold and pipe with running
engine.
56. Apply silencer or separate spark
preventers in exhaust system when
harvesting hay or straw or working in areas
of high fire hazard.
8
Page 9
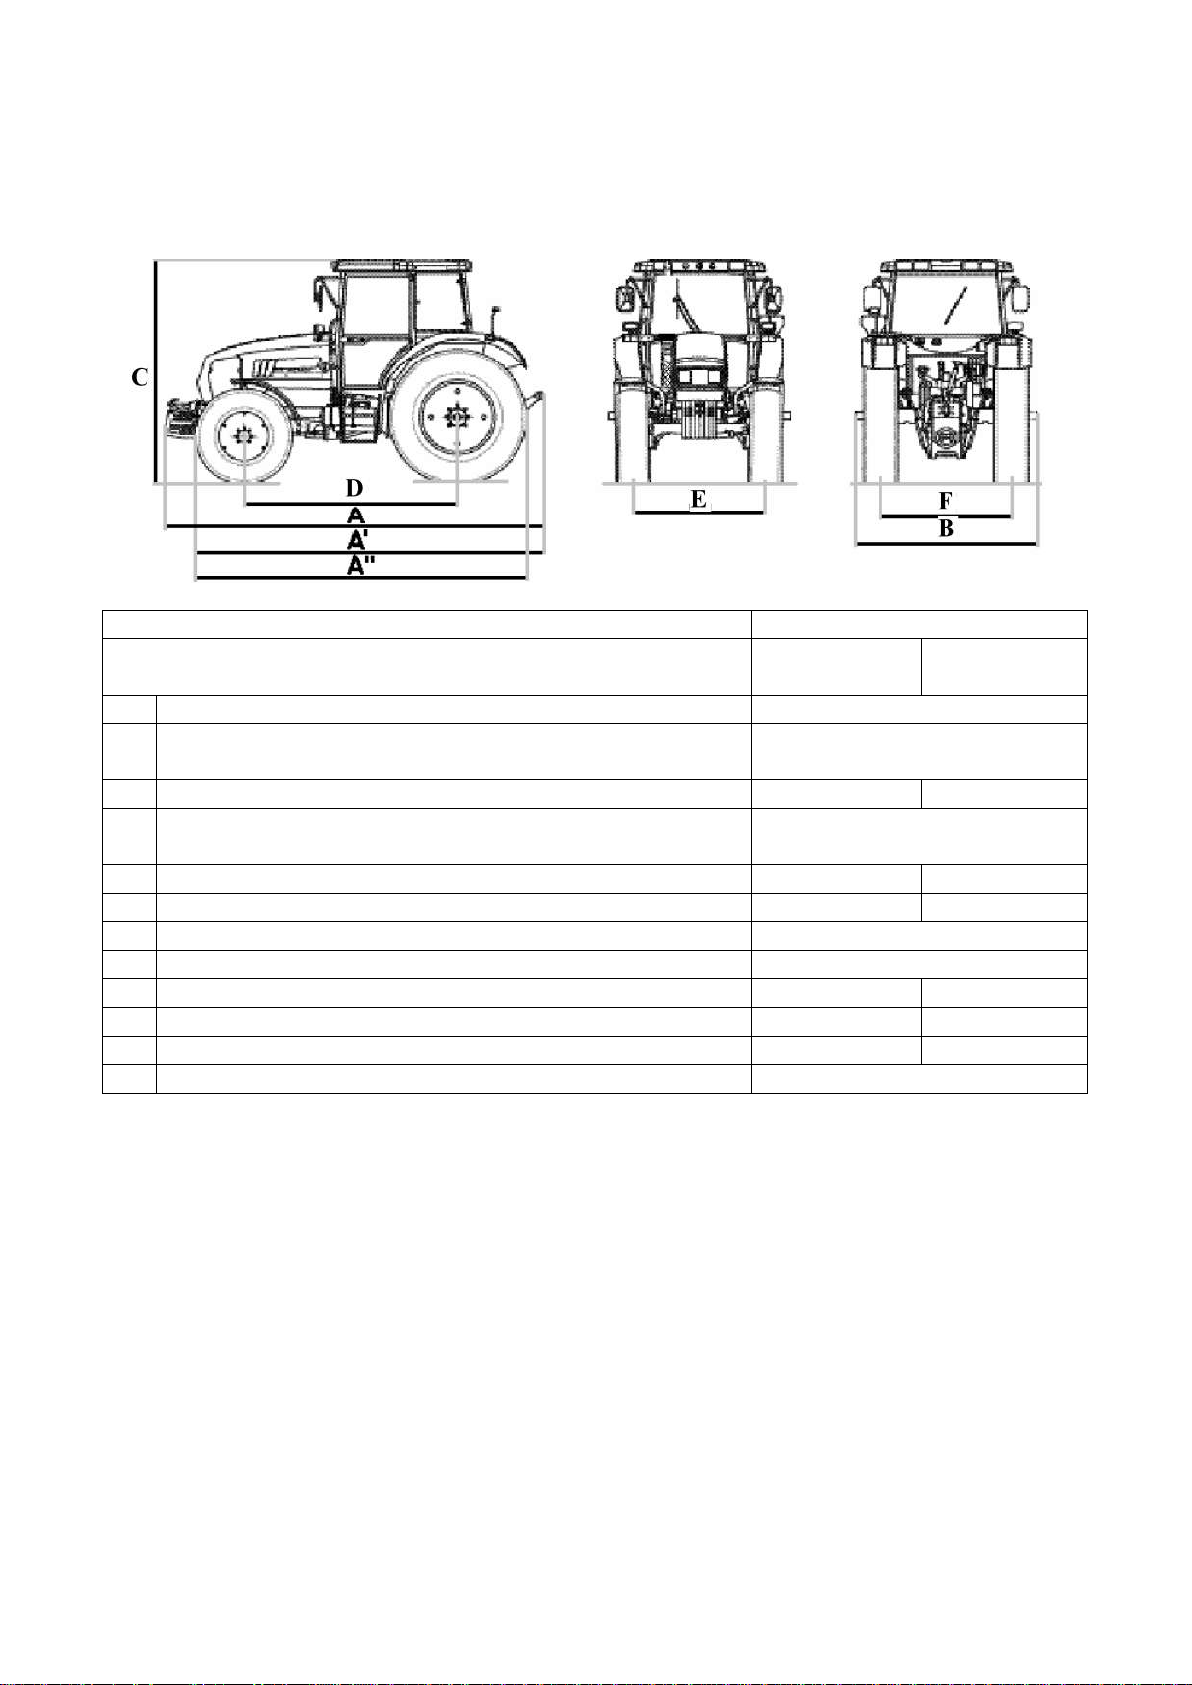
Parameters
Value
265/70R16 (f)
420/70R24 (r)
12,4L16 (f)
14,9R30 (r)
A
Length with loads and rig attachment, mm
4280
Length without loads with rig attachment in transporting
position, mm
A”
Length at overall wheels diameters, mm
3450
Width with front and rear rig attachment in transporting
position, mm
B
Width, mm
1550
C
Height, mm
2350
D
Wheel base, mm
2440
E
Front axle track, mm
1220-1420
F
Rear axle track, mm
1160-1585
Ground clearance under the rear axle, mm
257
Ground clearance under the front axle, mm
325
Delivery weight, kg
4000±100
Section 3. TECHNICAL SPECIFICATIONS
Overall dimensions and weight
Front and rear tires
A’
4225
4500
9
Page 10
Tractor component numbers
Tractor’s nameplate with stated machine and engine
serial numbers (outside the right cab side).
Serial number of the tractor is repeated on the left rail
of the half-frame or at front loads plate.
Engine number (repeated at the en gine nameplat e fix ed
to the engine head).*
Gearbox number (at the left side of gearbox casing).
*
D-243.S for MTZ-821.2; D-245.43S2 for MTZ-821.3; D-245.5 FOR MTZ-921; D-245.5S for MTZ-921.2, D-245.5S2
for MTZ-921.3., D245.5S3A for MTZ-921.4
10
Page 11
Friction clutch number (on the left side of clutch
casing).
Front driving axle number (on the left front side of
FDA casing).
Transmission number (to the right from rear view at
connection to gearbox).
11
Page 12

Diesel engine
D-243.S
D-245.43S2
D-245.5
D-245.5S
D-
921.3)
D-
921.4)
4-tact, in-line,
4 tact,
intercooler
4 tact,
er
4-tact, in-line, turbocharger,
Number of
pcs.
Carburetion
mode
Compression
(estimated)
Cylinder
diameter, mm
Piston stroke,
mm
Displacement
, l
Operation
sequence
Cooling
system
Rated speed,
rpm
Max. speed,
rpm
Min. speed,
RPM
Rated power,
kW
Max. torque,
Nm
411 (at 1400
RPM)
Lash between
rocker at cold
engine, mm
Fuel injection
UDP, deg.
Fuel injection
MPa
Model
Type
cylinders,
ratio
D-243
(MTZ-
821)
(MTZ-
821.2)
naturally aspirated
16±1 17±1 15±1 17±1
(MTZ-821.3)
in-line,
turbocharger,
Direct fuel injection
(MTZ-
921)
in-line,
turbocharg
4
110
125
4.75
(MTZ-
921.2)
intercooler
245.5S2
(MTZ-
245.5S3AM
(MTZ-
inlet (outlet)
valve and
lead angle to
2200 1800
2380 2070 1980 2070
600 800 700 800
60 62 65 70
298 (at 1400 RPM)
0.20-0.35
(0.20-0.35)
19-21 15-17 3-5
1-3-4-2
Water-cooled
397 (at 1000 RPM) 464 (at 1400 RPM)
0.15-0.30
(0.35-0.50)
(8-10)*
(7-9)**
3-5
pressure,
*
With fuel injection pump “Motorpal”
**
With fuel injection pump “Yazda”
21.6-22.4 23.5-24.7 21.6-22.4 23.5-24.7
12
Page 13

Diesel engine feed system
Fuel pump: 4-plunger, in-line, with boost
pump.
Regulator: mechanical all-mode.
Fuel filters: coarse filter and fine filter (with
replaceable paper filter element).
Turbocharger*: centripetal radial turbine on a
single shaft with centrifugal compressor. Type:
C14-126-01 (Czech Republic).
Fuel type: diesel:
Basic:
• L-0.2-40, L-0.2-62 (summer)
• Z-0.2 -35°C, Z 0.2 -45°C (winter)
• A-0.2 (up to -45°C)
Substitutes:
• L-0.5-40, L-0.5-62 (summer)
• Z-0.5 -35°C, Z 0.5 -45°C (winter)
• A-0.4 (up to -45°C)
Foreign:
• BS-2869, ASTM-D-VV-F-800 and other
(summer)
• DEF 2402B, SAE and other (winter)
• SAE VV-F-800 (up to -45°C)
Fuel tank capacity: 95 l.
Air filter: “Donaldson” with dry paper filter
element.
Engine lubrication system
Type: combined, with oil cooler (with water-
oil heat exchanger)**.
Oil filtering: prefilter mesh and fine
centrifugal filter (paper filter element)**.
Min. oil pressure: 0.08 MPa (0.8 kgf/cm2) at
600 RPM.
Normal oil pressu re: 0.25-0.35 MPa (2.5-3.5
kgf/cm2) at 1800 RPM.
Max. pressure at co ld engin e: up to 0.6 MPa
(6 kgf/cm2).
Refill capacity: 12 l.
Motor oil brands:
Basic:
+5°C to +50°C:
• M-10DM;
-40°C to +5°C:
• M-8DM;
Substitutes:
*
Not for MTZ-821.
**
For MTZ-821.3/921.3.
+5°C to +50°C:
• M-10G2k;
-40°C to +5°C:
• M-8G2k;
Foreign:
+5°C to +50°C:
• Shell, Rotella, TX 30, HESSOL and other;
-40°C to +5°C:
• Shell, Rotella, ТХ 20W/20, HESSOL and
other;
Friction clutch
Type: friction, dry, single-disk, with
tangentially suspended pressure plate. Plate
diameter – 340 mm.
Drive: hydrostatic with suspended pedal.
Engine cooling system
Type: water-cooled, closed, with forc ed water
circulation, with temperature control by
thermostat.
Normal operating temperature: 75°C to
95°C.
Thermostat: TS-107.
Cooling system capacity: 17 l (19 l) **.
Coolants:
Basic:
• OJ-40, OJ-65.
Substitute:
• Tosol A40M, Tocol A65M.
Foreign:
• MIL-E-5559, FL-3 Sort, S-735.
Steering
Type: hydraulic displacement with hydraulic
cylinder in steering trapezium.
Pump performance:
31 l/min for MTZ-821/821.2;
25 l/min for MTZ-
821.3/921/921.2/921.3/921.4.
Hydraulic cylinder: double-acting, cylinder
diameter 50 mm, piston stroke 250 mm.
13
Page 14

Metering pump: volumetric constant 160
cm3/turn, operating pressure up to 14 MPa.
Installed at front cab side.
Steering column: stepless height adjustment
within 100 mm.
Inclination adjustment: 25° to 40° with 5°
pitch. Steering wheel free move up to 25°.
Gearbox
Type: 18x4, mechanical, fixed-ratio, dual-
ranged, sliding gear transmission. 14x4
synchronized at request.
Multiplier
*
Type of both assemblies: mechanical with
direct and 1.36 step-up gears at multiplier and
direct and 1.32 step-down gears at back gear.
Form 18 forward-driving and 4 rearwarddriving gears.
*
Back gear for MTZ-821/821.2.
14
Page 15
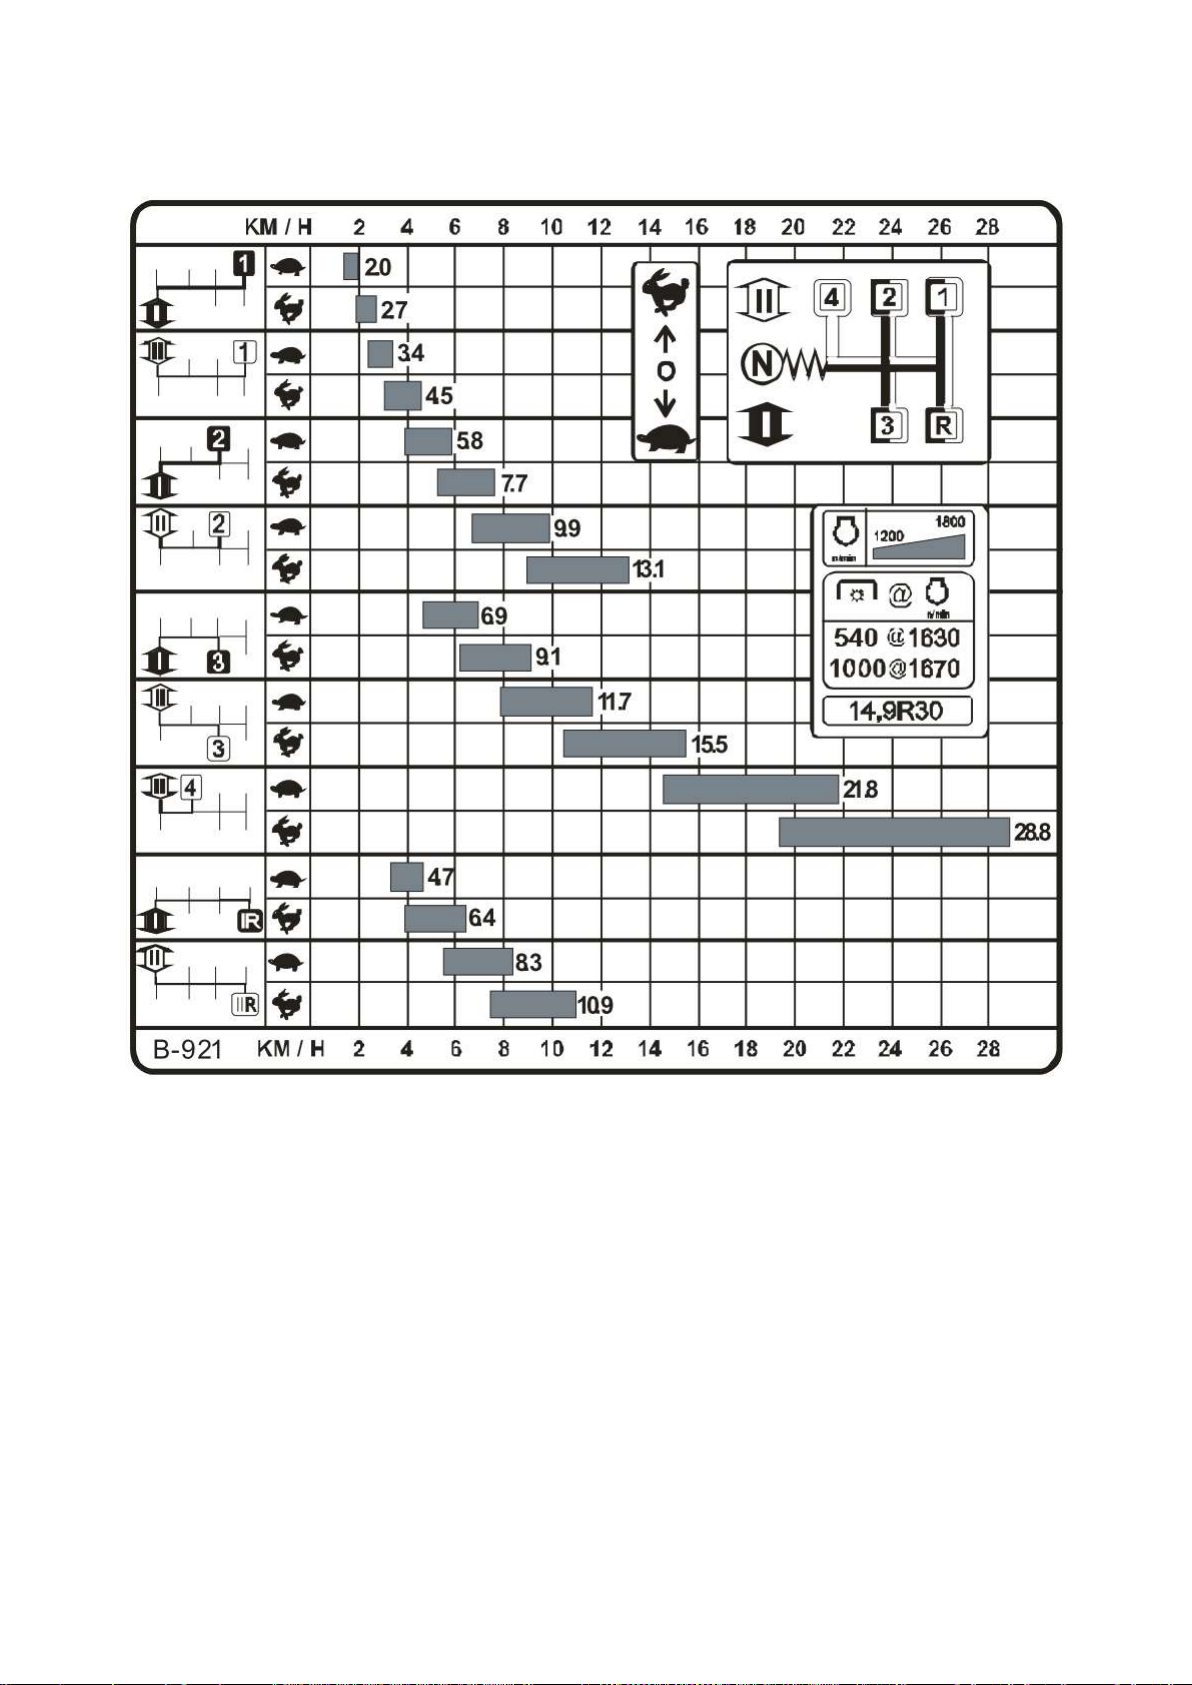
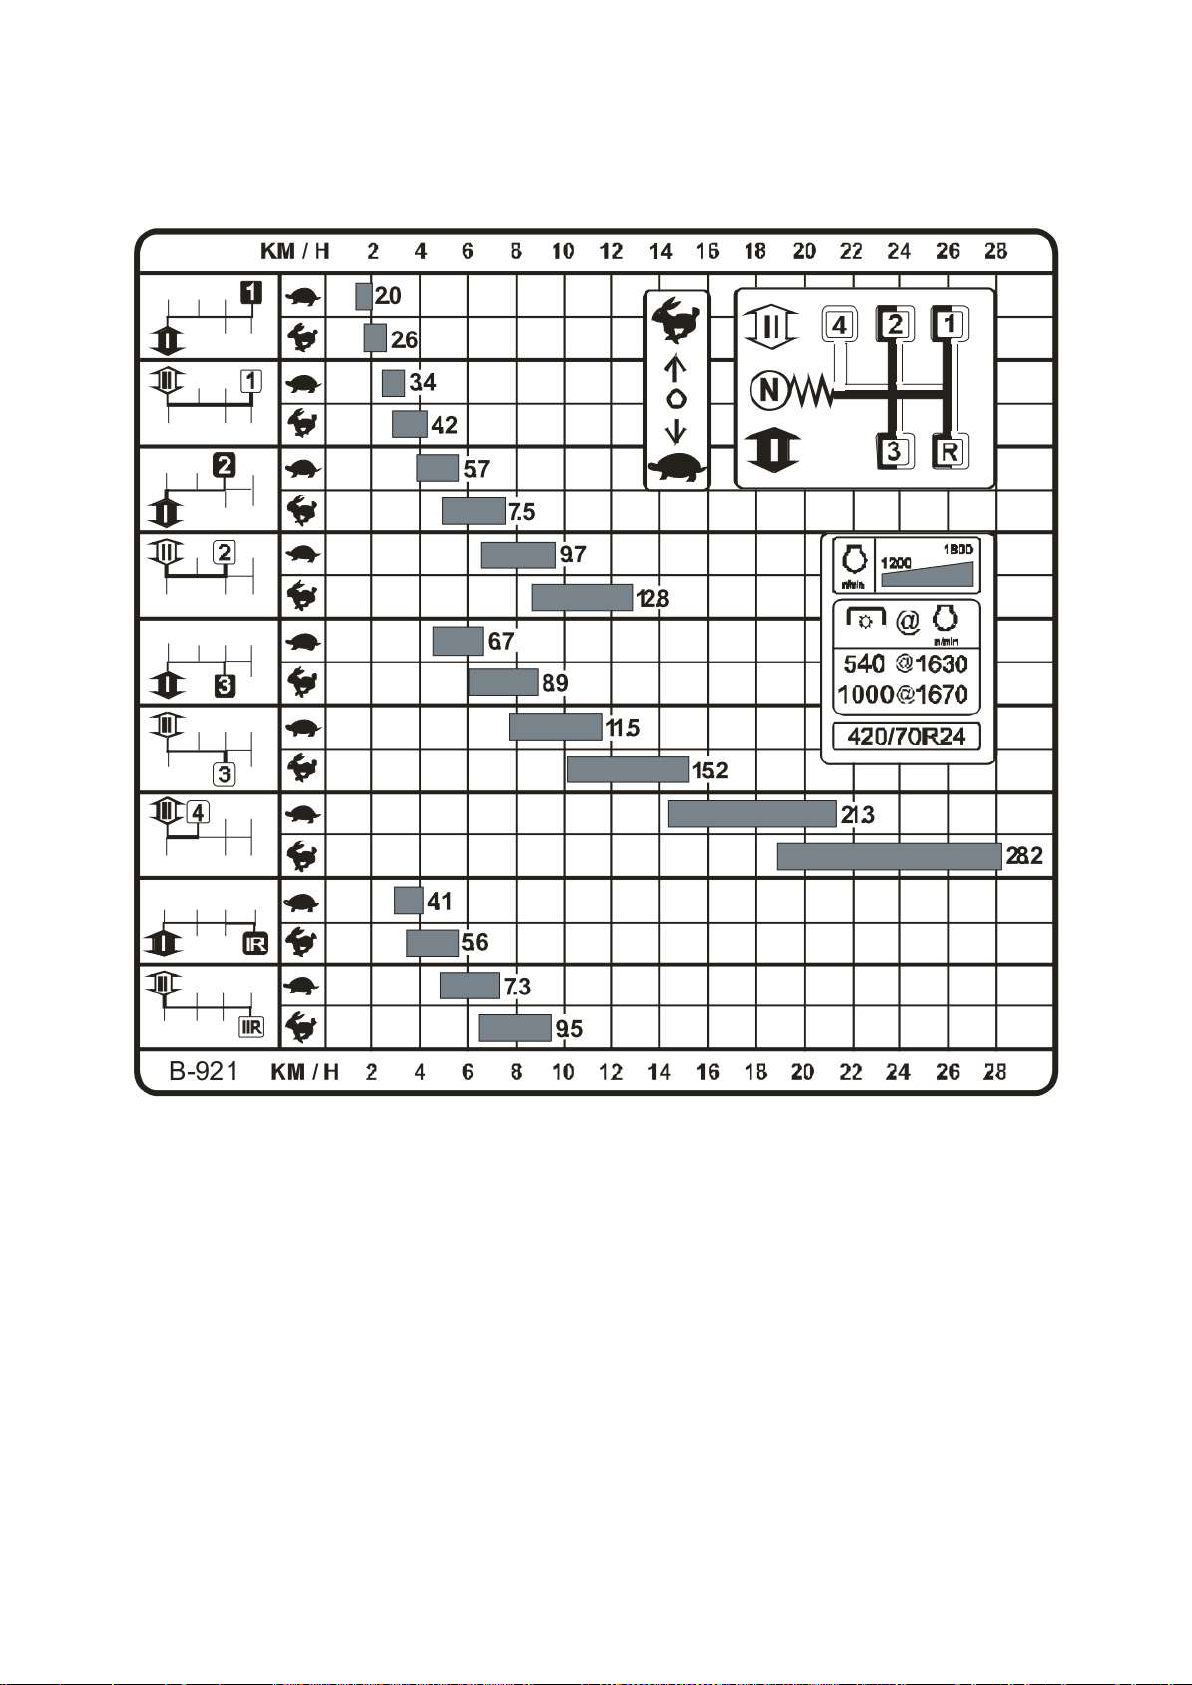
Estimated tractor speeds in km/h at rated diesel engine cranksh aft speed 1800 RPM (GB – 9/2 +
multiplier; rear tires 14.9R30). MTZ-821.3/921/921.2/921.3/921.4.
15
Page 16
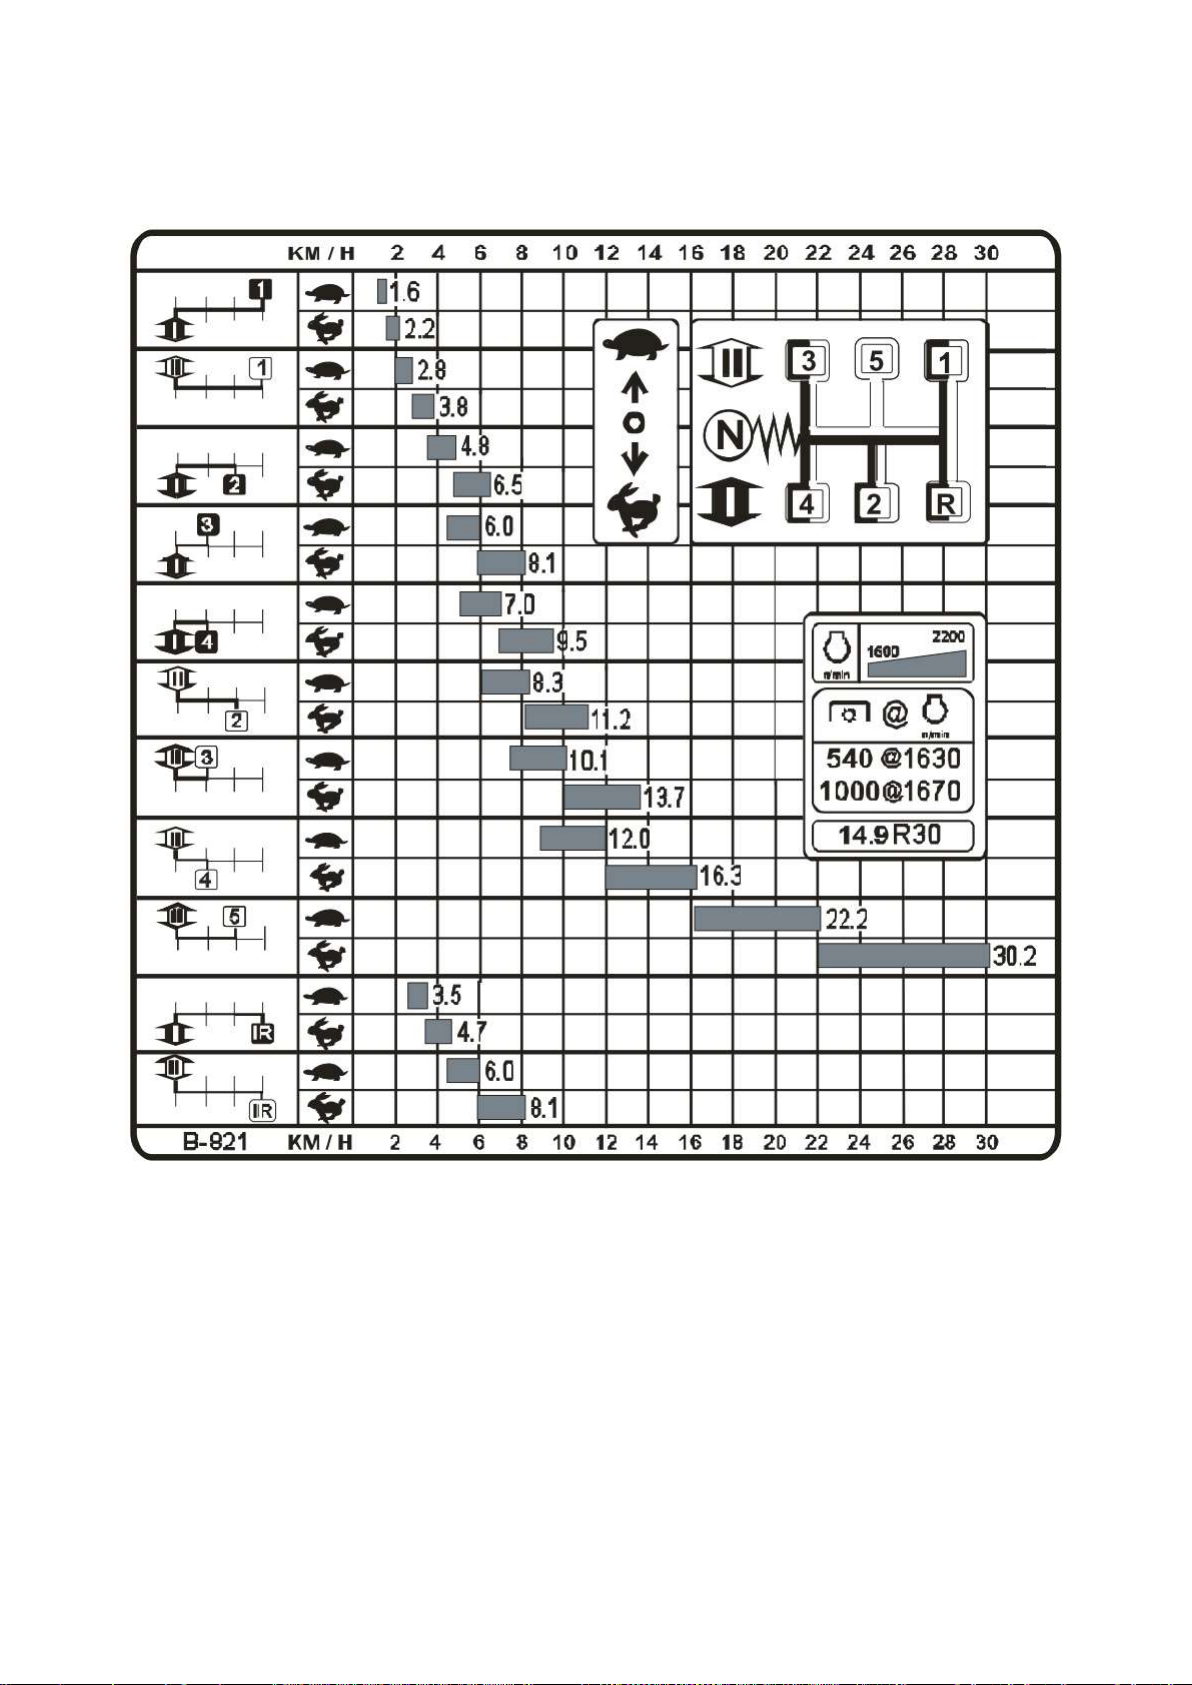
Estimated tractor s peeds in km/h at rated diesel engine crank shaft speed 1800 RPM (GB – 9/2 +
multiplier; rear tires 420/70R24). MTZ-821.3/921/921.2/921.3/921.4.
16
Page 17
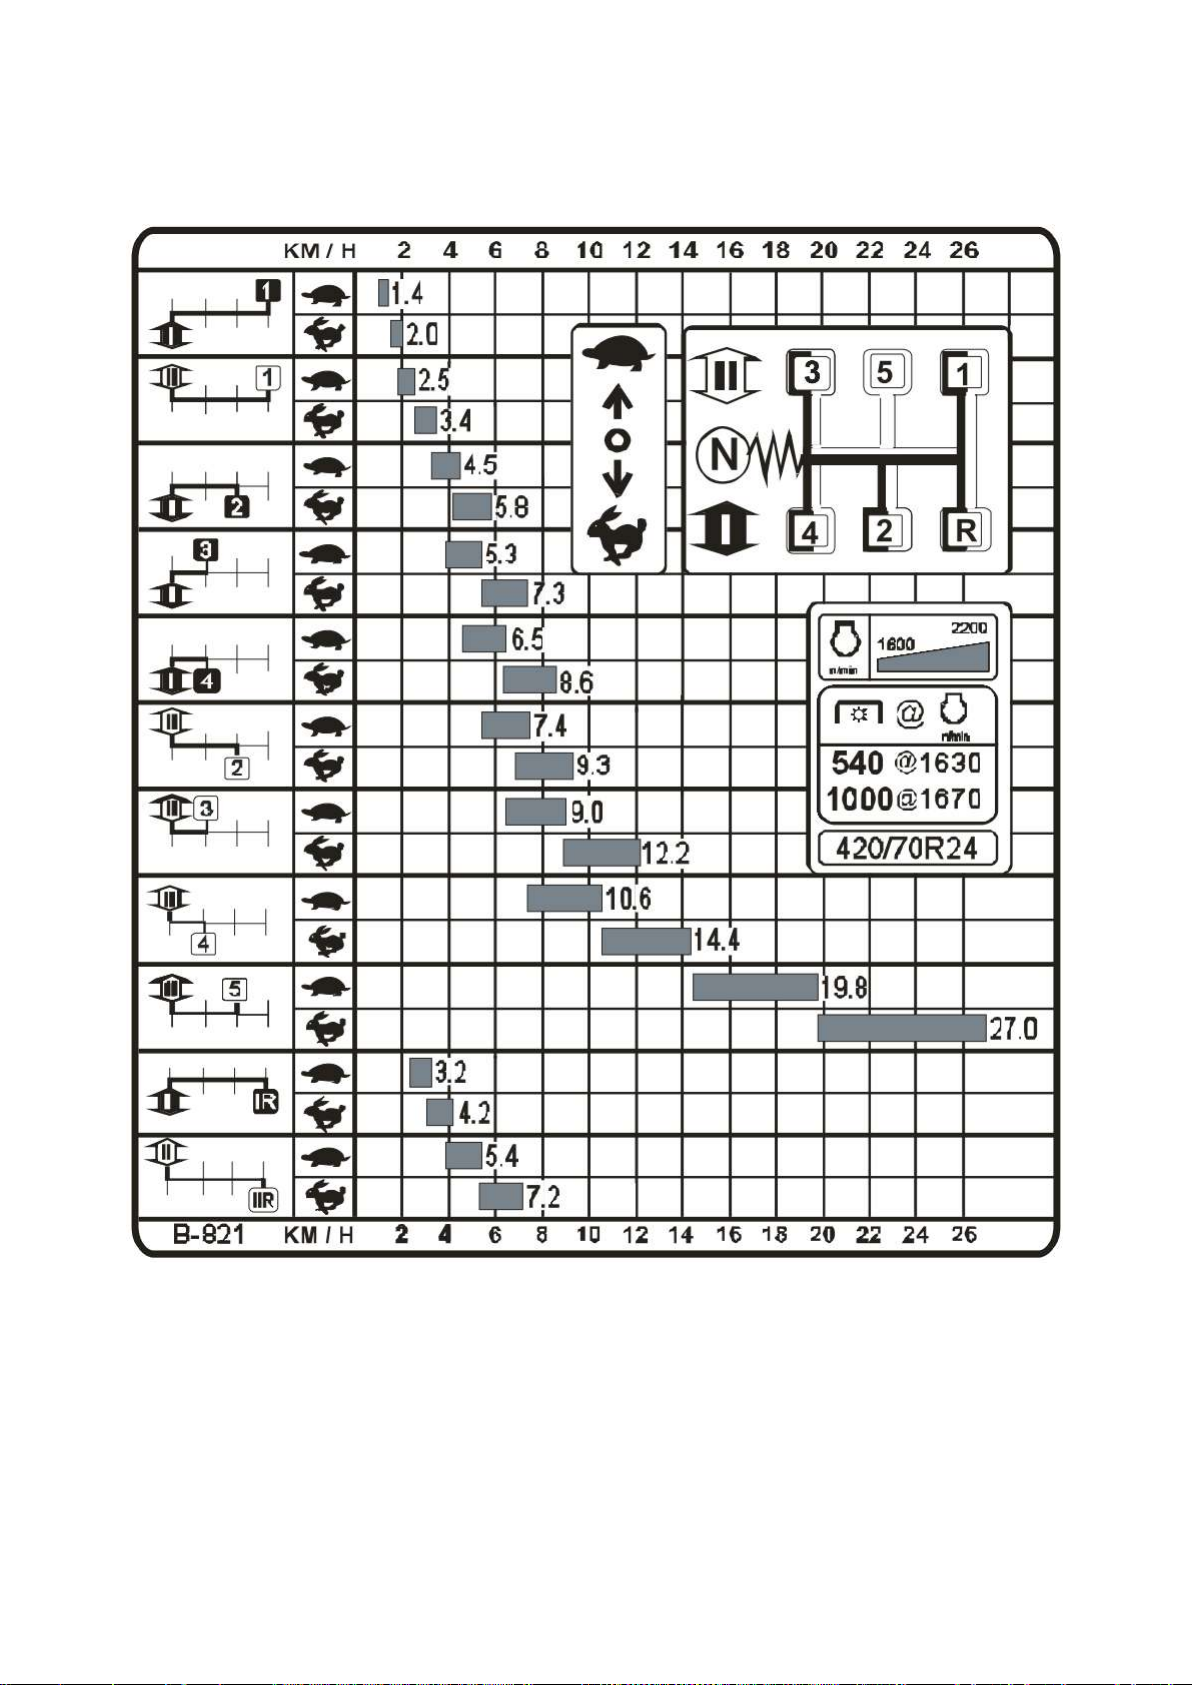
Estimated tractor s peeds in km/h at rated diesel engine crank shaft speed 2200 RPM (GB – 9/2 +
back gear; rear tires 14.9R30). MTZ-821/821.2.
17
Page 18
Estimated tractor speeds in km/h at rated diesel engine crankshaft speed 2200 RPM (GB – 9/2 +
back gear; rear tires 420/70R24). MTZ-821/821.2.
18
Page 19

IMPORTANT!
e. Contact
workshops with specially trained personnel to dismount and repair tires.
Permissible load
change, ±%
Drive axle
8*
+40
20
+20
25
+7
30 0 35
-10
IMPORTANT! Use appropriate front and rear tires. Correctly chosen front and rear tires ensure
kinematic discrepancy and excessive tire wear.
Front tires
265/70R16
12.4L16
14.9R30
-
+
420/70R24
+
-
Tire
Load on tire, N (kgf) at internal pressure kPa (kgf/cm2) at 30 km/h
80
(0.8)
100
(1.0)
120
(1.2)
140
(1.4)
160
(1.6)
180
(1.8)
200
(2.0)
4900
(500)
5586
(570)
6272
(640)
6958
(710)
7644
(780)
8330
(850)
9015
(920)
5684
(580)
6566
(670)
7252
(740)
7939
(810)
8673
(885)
9359
(955)
9996
(1020)
14700
(1500)
15729
(1605)
17297
(1765)
18865
(1925)
19943
(2035)
13328
(1360)
14798
(1510)
16317
(1665)
17689
(1805)
19110
(1950)
1. Never exceed tire pressure recommended by the manufacturer.
2. Do not perform welding or other repair works on a disk with pressurized tir
Table of permissible tire load changes relative to tractor speed:
Max. permissible
speed, km/h
maximal performance, elongate tires service life and reduce powertrain components wear.
Combination of worn and new tires or tires with different diameters or rolling radiuses may result in
Tire combinations:
Rear tires
Permissible loads on tractor tires in relation to tire pressure:
265/70R16
12.4L-16
420/70R24
14.9-30 -
- -
-
To get optimal operational parameters set tire pressure within ranges from minimal to maximal in
relation to actual loads acting on tires and speed according to tables.
For machines requiring dig tractive effort set pressure as for 30 km/h.
*
Increase tire pressure by 25%.
19
Page 20

Ambient temperature
Calcium chloride proportion, g/l of water
Up to -15°C
200
Up to -25°C
300
Up to -35°C
435
Tire
Quantity of liquid to put in, l
14.9-30
190
420/70R24
170
ATTENTION: Preparing a mix for ballast liquid always add calcium chloride to water and keep
stirring until it is completely dissolved. Use goggles when preparing a mix. In case of the mix
the eyes with cold clean water within 5 minutes and call for medical care as
soon as possible.
Ballast liquid
Additional wheel loading by filling wheel tubes with liquid is applied in case of insufficient wheel
traction to the ground in adverse conditions (overwet soils, etc.).
Note: it is preferably not to ballast from wheels as it affects tractor steerability.
In cold weather we reco mmend using calcium chloride and water mix according to the following
table:
Application of such a mix ensures low freezing point, increased solution density and safe and
efficient ballast. A tire should be filled with liquid up to 75% of its volume. While filling up with
liquid the tire valve should take the highest position.
The following table provides quantities of liquid to put in:
contact to eyes rinse
20
Page 21

Rear axle
Main gear: pair of bevel circle-arc toothed
gears.
Final drives: pair of straight gears.
Differential locking mechanism: mechanical
with manual control (for operator’s left hand).
Brakes
Main brakes: rear wheels, twin-disc, dry,
hydrostatically-driven, with suspended pedal.
Parking brake: combined with main brakes,
with independent mechanical actuator.
Front driving axle
Type: portal.
Main gear: bevel circle-arc toothed gears.
Differential
Type: self-locking, limited-slip.
Final drives: two-support reduction gears
with bevel gearing.
Recommended transmission oils:
Basic:
• Tap-15V
Substitute:
• TSp-15K, TSp-10, TAD-17I
Foreign:
• HESSOL, BECHEM, HYPOID
Drive: from transfer box by two cardan shafts
with intermediate support.
FDA control: mechanical.
Operation modes:
• FDA off;
• FDA on forcedly;
• FDA on/off automatically.
PTO drive
Type: independent two-speed synchronous.
Master clutch: planetary reduction gear with
band brake.
PTO control: mechanical.
PTO end rotation speed:
Independent drive:
I – 540 RPM for PTO at 1631 (2081)* RPM
for engine;
II – 1000 RP M for PTO at 1673 (2184)** RPM
for engine.
Synchronous drive:
• 3,90 rotations per path meter with
synchronous drive (tires 14.9R30);
• 4,45 rotations per path meter with
synchronous drive (tires 420/70R24).
PTO end: 6- or 8-splined (540 RPM) and with
21 splines (1000 RPM).
Rotation direction: clockwise.
Hydraulic mounted system (HMS)
Type: remote-cylinder system with hydraulic
jack featuring two actuating hydraulic
cylinders built in the rear hitch. HMS ensures
height, power and combined control.
Hydraulic system outputs; two side and two
rear outputs (rear side output is linked to the
rear right output).
Oil pump
Type: gear pump delivery discharge rate not
less than 45 l/min at engine speed of 1800
RPM.
Hydraulic distributor: RP 70.
Type: running-through, three-sectional, four-
position.
Actuating cylinder: two plunger hydraulic
cylinders Ø80 mm, plunger stroke 220 mm.
Recommended oils for HMS:
• Motor oils: M-10G2 updated, M-8G2k, M-
10G2k;
• Industrial oil: BECHEM Staroil No.32,
HUNOLD Hydraulikoel HLP 32.
Hydraulic system oil tank capacity: 45 l.
*
For MTZ-821/821.2
21
Page 22

Pneumatic system
Compressor
Type: single-cylinder, piston-type, air-cooled.
Dimensions: 72x38 mm (diameter – 72 mm,
stroke – 38 mm).
Trailer brakes control
Type: pneumatic, single- or double-line,
blocked with tractor brakes.
Pressure: 6.5-8.0 kgf/cm2 (0.65-0.8 MPa).
Pressure limited with safety valve: 8.5-10.0
kgf/cm2 (0.85-1.0 MPa).
Rear rigging mechanism
Type: jointed four-section of Cat.2.
Load capacity: 25 kN (at 610 mm from
suspension axle.
Suspension axle adjustment from 680 mm to
870 mm at request.
Electric equipment
Vehicle network voltage: 12V.
Starting system voltage: 12V.
Battery: 12V, 2x90 A∙h (located on the upper
half-frame rail).
Feeding system: on e 12V battery. 12V starter
feeding.
Generator: 12V, 1000W.
Starting aids*: glow plugs.
Lighting and warning light system
• Front embedded road headlamps with
upper and lower beams;
• Front and rear operation lights;
• Front and rear lights;
• Alarm lights;
• Tractor-and-trailer lights;
• Beacon light.
Tires
Front: 12.4L16; 265/70R16.
Rear: 14.9R30; 420/70R24.
*
For MTZ-821.3/921.3.
22
Page 23

Section 4. GENERAL INFORMATION. TRACTOR LAYOUT AND OPERATION
Garden-and-vineyard tractors MTZ-821,
MTZ-821.2, MTZ-821.3, MTZ-921, MTZ-
921.2, MTZ-921.3 and MTZ-921.4 are
versions of universal cultivating tractor MTZ922 and have the following distinctive
features:
• Independent fuel tank for 95 l loc ated near
the left cab footboard;
• Gearbox – mechanical, with two operation
modes (synchronized 14x4 at request);
• Hydraulic system oil pump actuator
located to the right from clutch casing;
• Rear ax le dif ferential lock – is mechani cal
with two operation modes:
1. Lock
2. Forced lock
Locking clutch is splined.
• Front driving axle featured with two-
support bevel reducing gears;
• Rear PTO is mechanically controlled.
Tractor frame consists of half-frame, friction
clutch casings, gearbox and rear axle.
Diesel engine is rigidly fixed to the friction
clutch casing through the rear plate and is
mounted onto the front rail with hinged
bearing.
Following powertrain components are located
behind the engine:
• Single-disk friction clutch;
• Mechanical 9/2 gearbox with gear-change
lever to the right. Mechanical multiplier*
(step-up gear) is locat ed bet ween clu tch and
gearbox to double numbers of forward and
rearward gears. The multiplier is controlled
with a lever at the left operator’s hand;
• Rear PTO with 2-speed independent and
synchronous drives. PTO is engaged and
disengaged with a lever at the right
operator’s hand;
• Front driving axle (FDA) with two-
support bevel reduction gears has increased
load-carrying capacity due to bevel roller
bearings into the reduction gear pivot
supports.
FDA drive consists of a transfer box,
intermediate and front cardan shafts and
intermediate bearing with multidisc wet
friction clutch. FDA is driven by the
secondary gearbox shaft to ensure
synchronic rotation of the front and rear
wheels at every gear. FDA is mechanicall y
controlled by a lever with three fixed
positions: “FDA on”, “FDA on/off
automatically” and “FDA on forcedly”.
FDA is conn ected to a beam by two hollow
axles allowing the axle with wheels to
swing transversely.
• Parking brake includes main brakes with
independent mechanical control.
Hydraulic rigging system consists of a
hydraulic jack with two vertical cylinders and
embedded regulator, of a rigging mechanism
and a distributor to control external consumers
(external cylinders).
Hydraulic jack performs the following
functions:
• Tractor suspension lifting up and down
with its dead weight;
• Automatic lifting suspension down to the
set position relative to the tractor
(positioning adjustment);
• Adjusting ploughing depth according to
soil resistance (force adjustment);
• Ploughing depth force adjustment with
positionally limited maximal depth
(combined adjustment);
• Automatic pump discharge in transport
condition.
The hydraulic jack is controlled with two
handles of force and positioning adjustment,
accordingly.
Force adjustment handle is the closest to the
seat at the side board. Its movement range
corresponds to full ploughing depth range
from minimal to maximal.
Positioning handle is located to the right from
force adjustment handle. Its movement range
corresponds to suspension positions from the
lowest to the transport.
Distributor is of flowing through type without
bypass valve. Is consists of 3 sections, each
having four positions: “neutral”, “lifting up”,
“lifting down”, and “floating”.
The tractor is equipped with pneumatic system
to control braking systems of trailers in single-
*
Back reduction gear (back gear) for MTZ-821/821.2.
driven mode.
23
Page 24

Towing coupler: double crossbeam (ТСУ-
1Ж-01) is united with rear digging mechanism
into a single assembly unit. At request a single
crossbeam may be mounted meeting DIN
requirements and fixed on the lower rod jaws.
Tractor cab is safe and comfortable.
The cab is equipped with venting and heating
system with air intake through filters over the
side windows. Design of filters in venting
system allows its partial self-cleaning in
motion.
Naturally the cab is vented through a hatch in
the roof and opening rear and side windows.
The cab is equipped with a comfortable seat
with mechanic suspension and hydraulic
damper (the seat is adjusted per operator’s
height and weight). Steering wheel is located
right in front of the seat and may be thrown
over to ease getting into and out of the cab.
The steering wheel is height-adjusted by 100
mm.
Control station is designed to ensure comfort
working conditions for operator and as
convenient tractor control as possible.
Instrumental board with fundamentally new
electric dashboards and electronic tachospeedometer are located on the steering
column, cable-driven fuel supply control
handle is located at the right wing of the
dashboard, gearbox control arm is located to
the right, hydraulic jack control arms are
situated at the right control board, parking
brake control lever is located to the left, rear
PTO control arm is situated at operator’s right
hand, multiplier control arm is located to the
left from the dashboard, distributor control
arms are located to the right from operator’s
seat. A board with (from the left to the right)
heater, front and rear working lights, rear
window washer and wiper switching keys.
Electric circuit fuses block is situated near the
board under a cover. Rear-view mirrors are
located on both sides of the cab. Additional
working lights are mounted on the roof.
Tractor design allows installation of additional
process equipment (available at request) and
extra loads.
24
Page 25
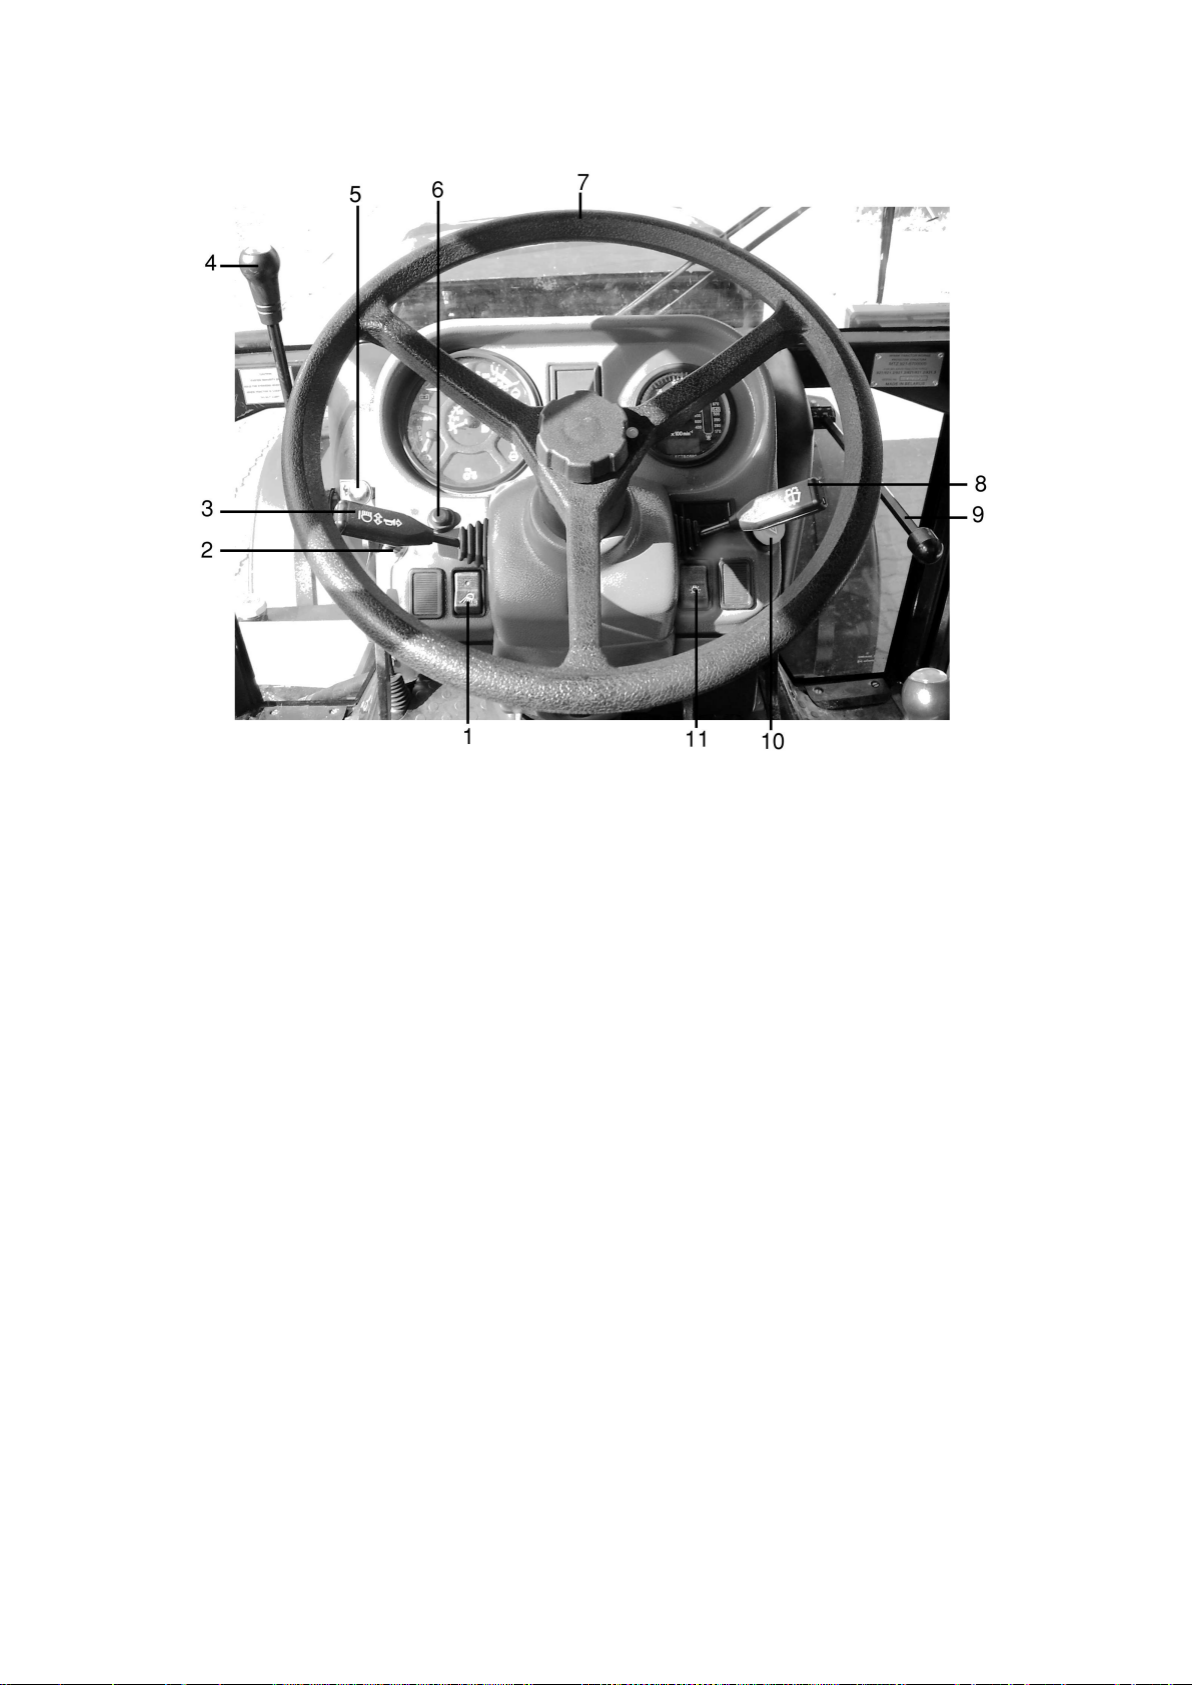
Section 5. CONTROLS AND INSTRUMENTS
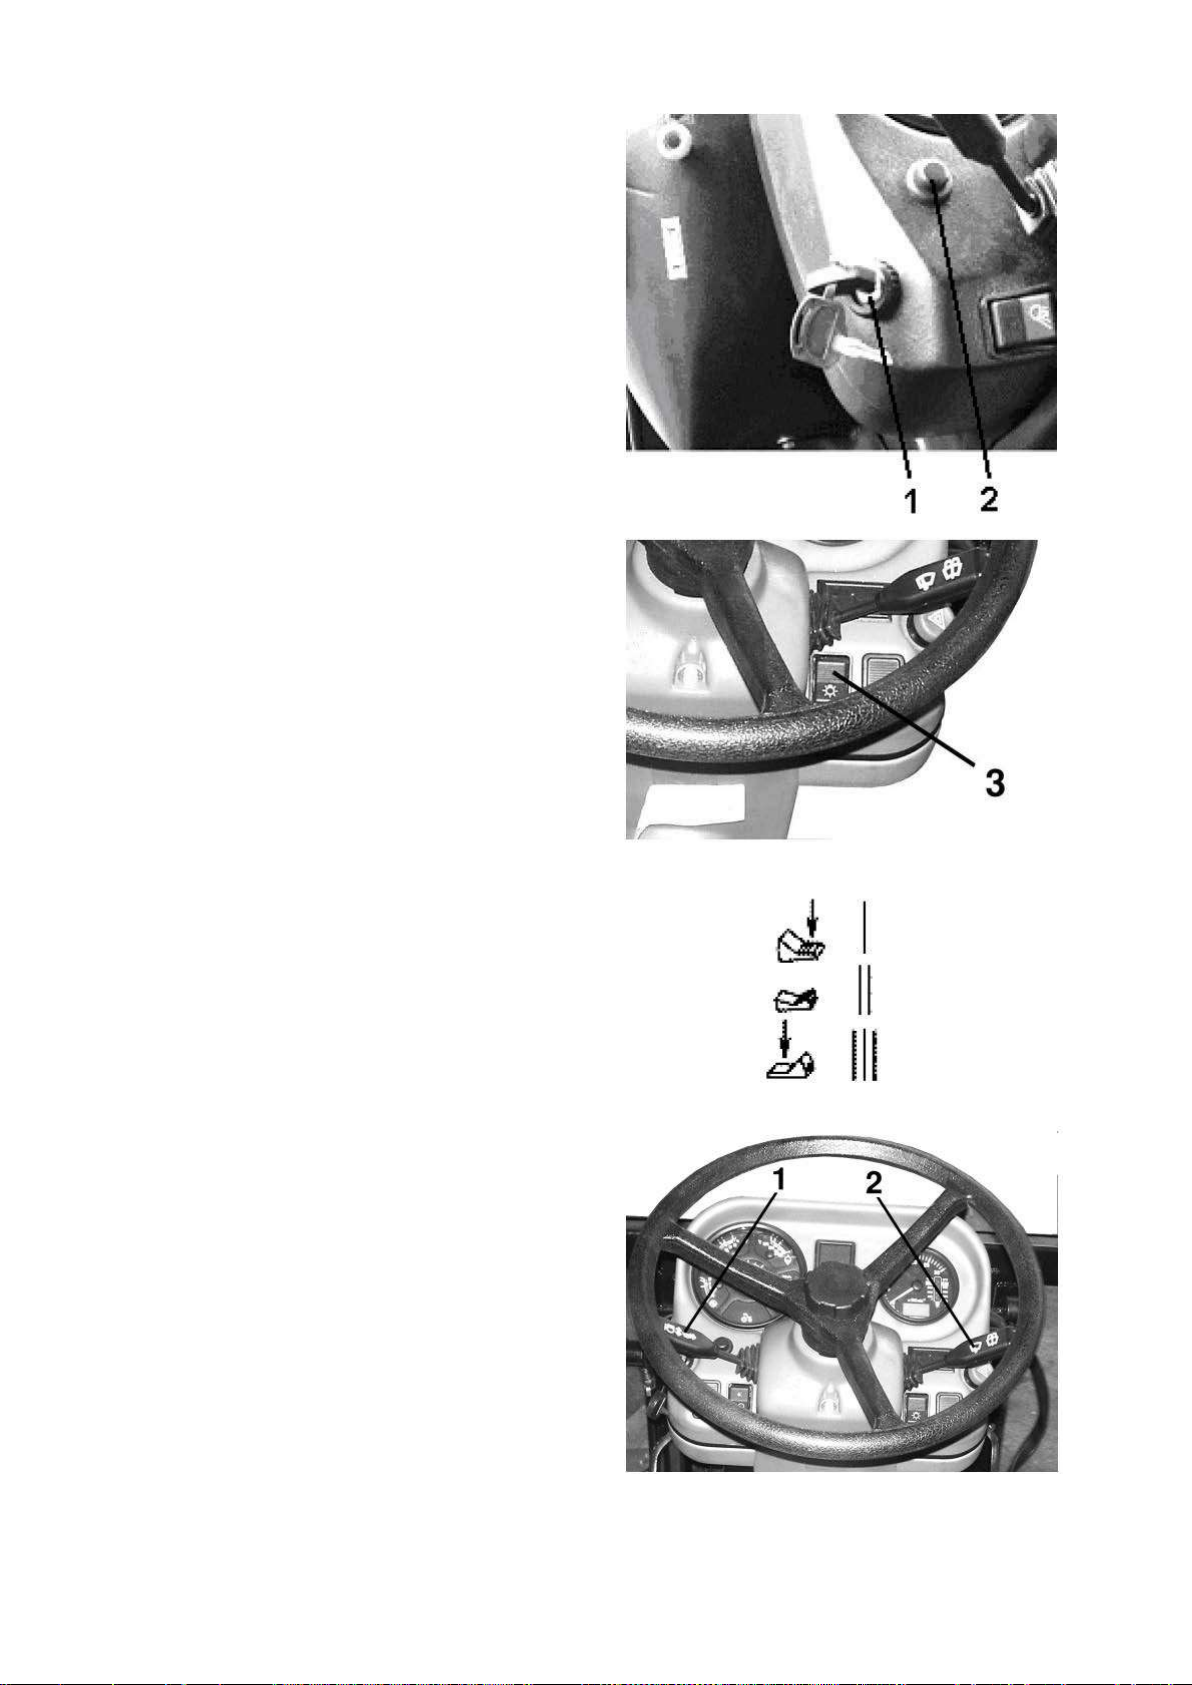
1. Switch for working lights at front brackets
2. Starter and instruments switch
3. Turn indicators, upper and lower beam and horn switch
4. Multiplier (step-up gear) switching handle
5. Engine stop knob
6. Remote ground switch
7. St eeri ng wheel
8. Front screen washer and wiper switch
9. Fuel supply control arm
10. Alarm lights switch
11. Central light switch
25
Page 26
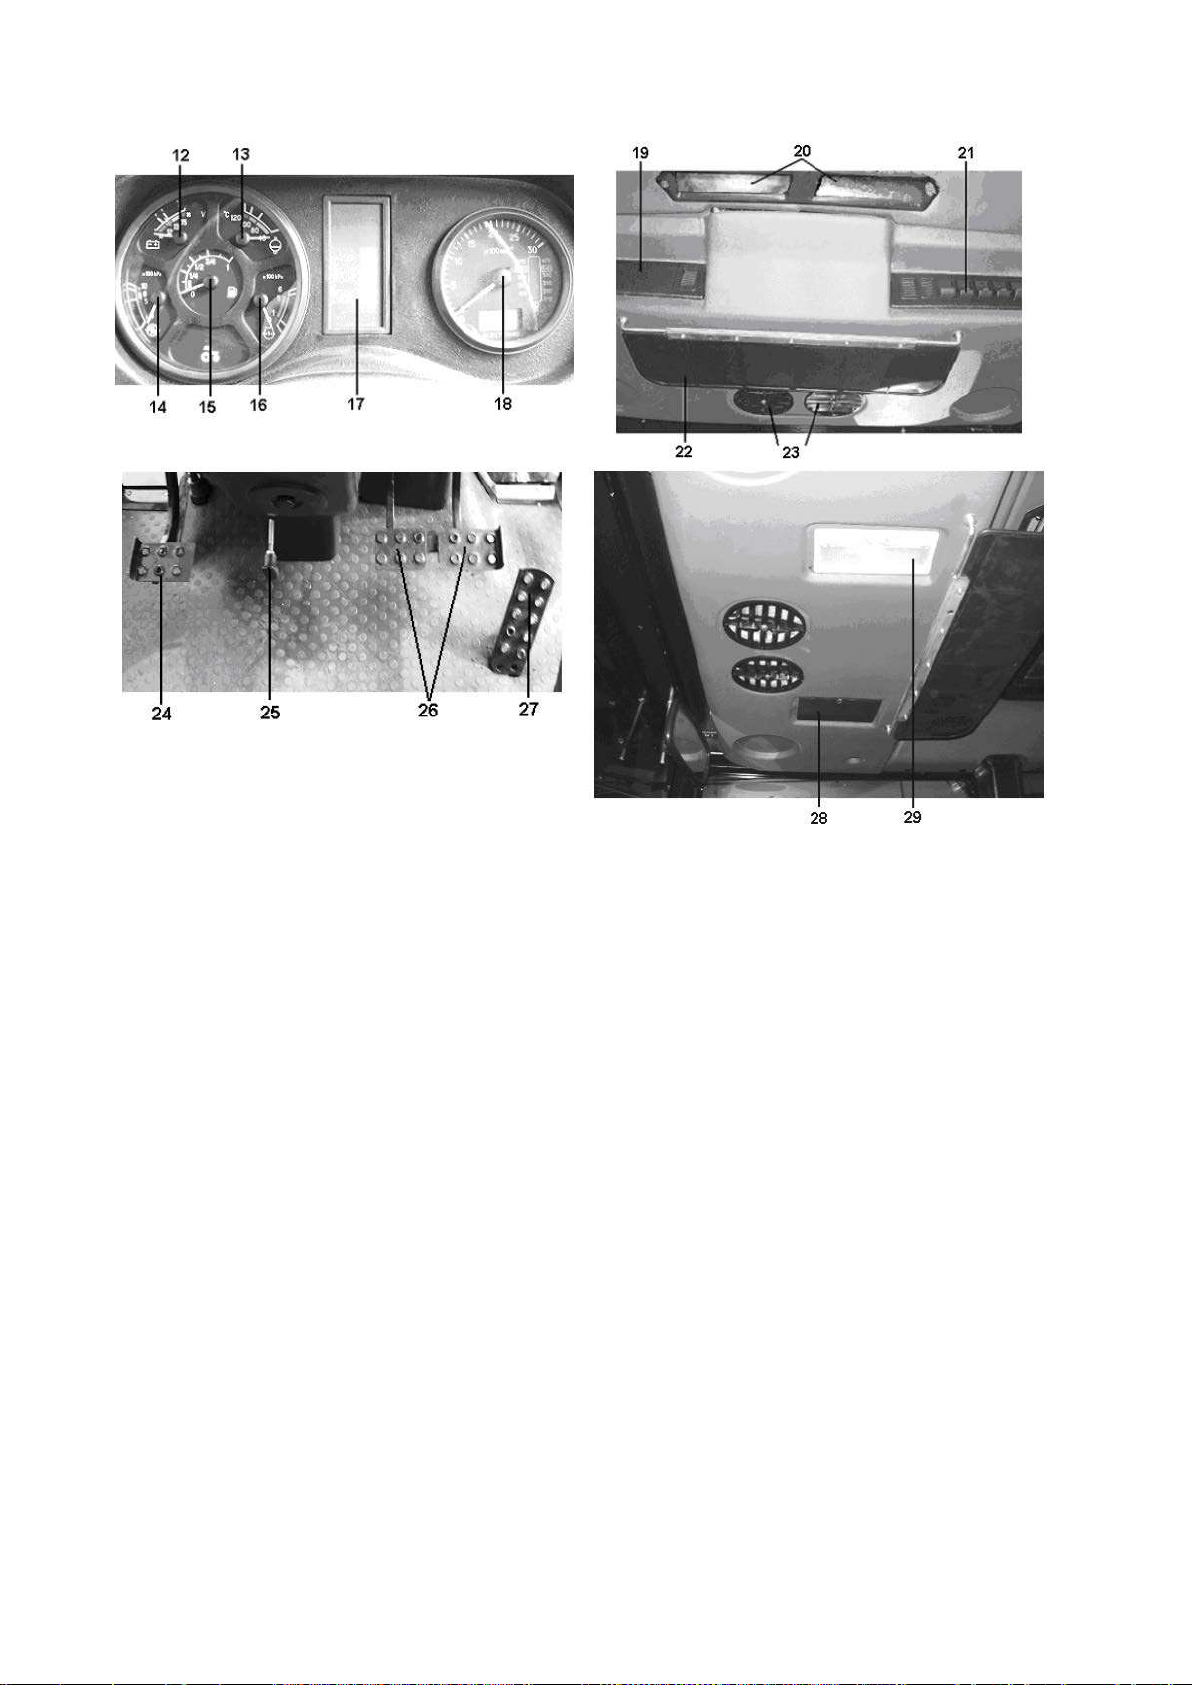
12. Voltage indicator
13. Engine coolant temperature indicator
14. Pneumatic system pressure indicator
15. Fuel tank level indicator
16. Engine oil pressure indicator
17. Control lights block
18. Tacho-speedometer
19. Radio or audio receiver (if any)
20. Recirculating flaps
21. Heater, front and rear working lights, rear screen washer and wiper keys board
22. Sun visor
23. Air deflector
24. Clutch pedal
25. Steering wheel inclination control rod
26. Brake pedals
27. Fuel supply control pedal
28. Heater, front and rear working lights, rear screen washer and wiper circuit fuse block cover
29. Cab lamp
26
Page 27
Fuel supply is controlled with a handle (9) or
IMPORTANT! To control with a pedal (27)
set the handle (9) to the middle position.
IMPORTANT! For synchronized multiplier*
(1) ON and OFF positions are reversed.
NOTE!
stable engine speed with pressed clutch
(1) lever has no fixed
position is allowed in winter to aid engine
start only.
INPORTANT! Activate the pump at low idle
cold engine start or for maintenance.
pedal (27) (see fig. at page 5-1). Moving the
handle up (push) increase fuel supply and
engine speed, and vice versa.
Multiplier* is contro lled with a lever (1) with
two fixed positions:
• ON – most rear position (pull).
• OFF – most forward position (push)
(direct drive).
1. The multiplier* (1) is switched at minimal
pedal.
2. The multiplier*
neutral position. Setting it to the middle
Rear axle differenti al lock is controlled with
a handle at the left operator’s hand.
Move the handle fully up to lock the
differential. The differential is locked
automatically after the handle is released.
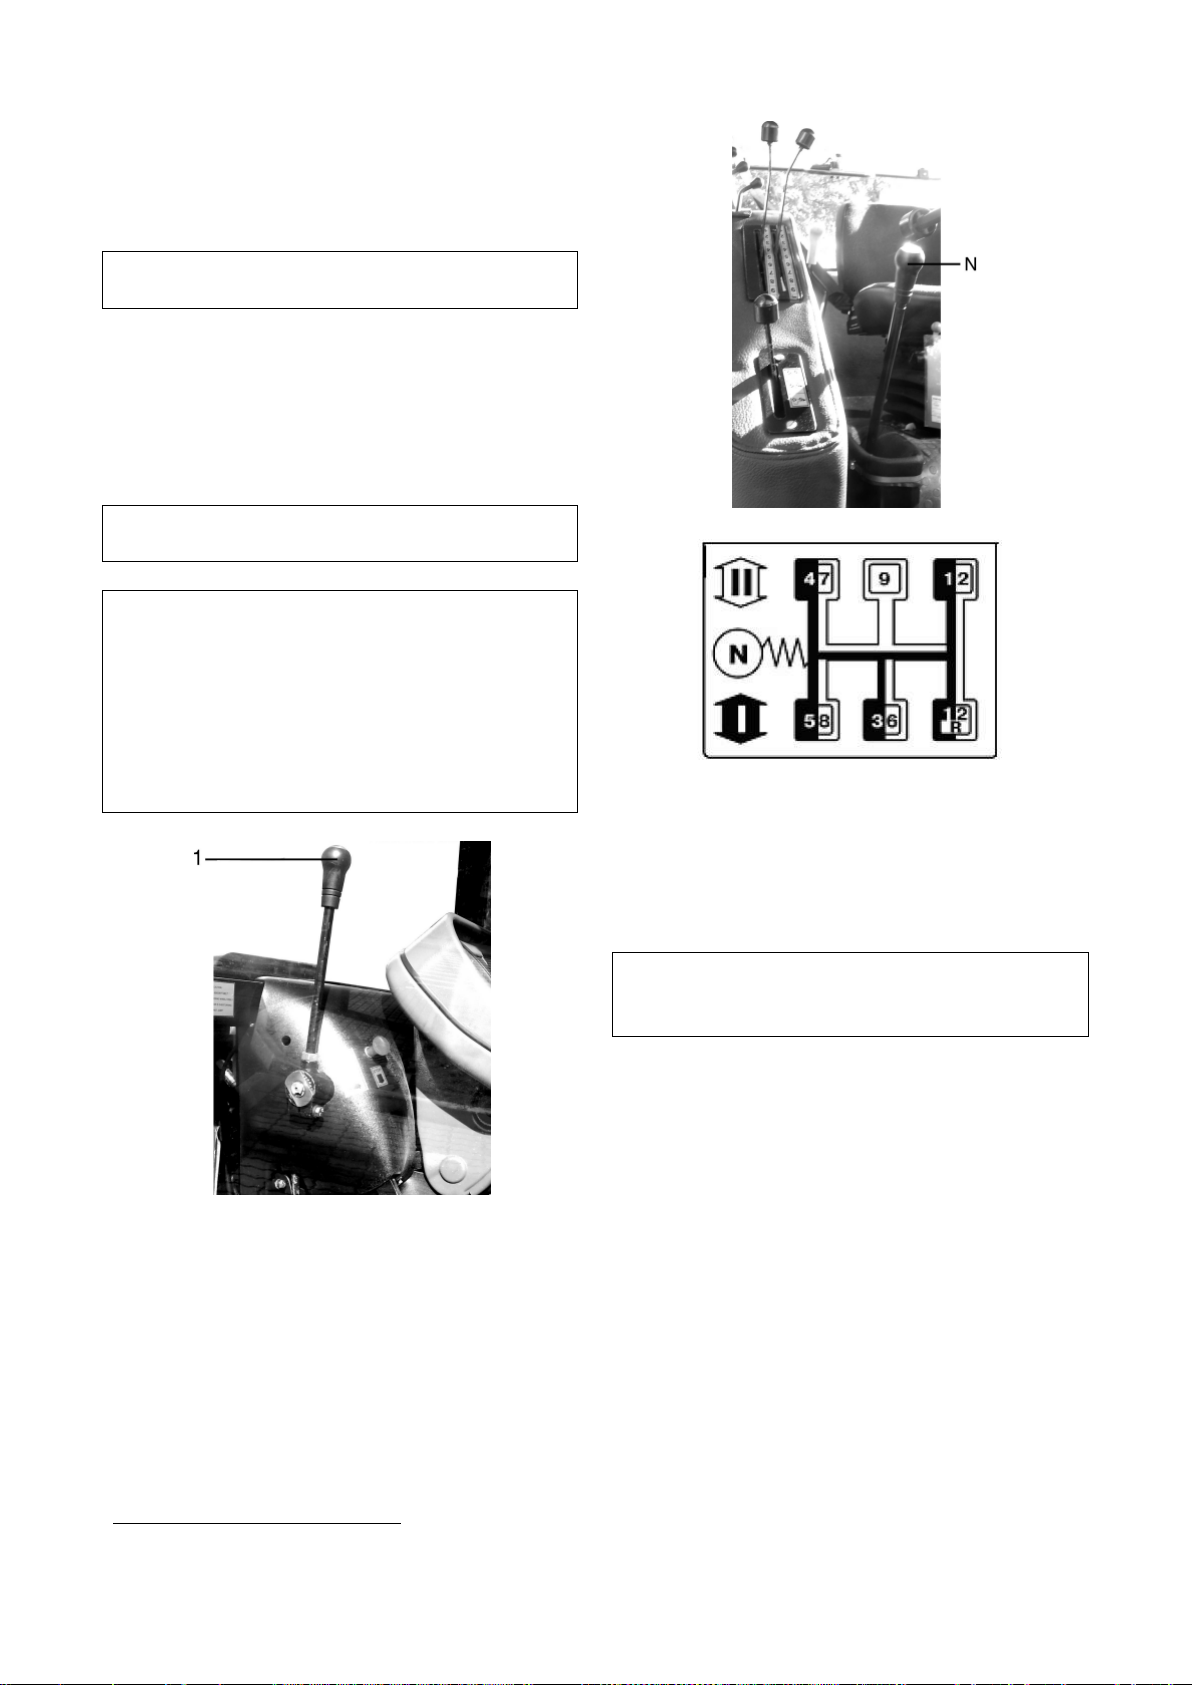
Gearbox is controlled with a lever (N) as
follows:
• Chose required range (I or II) by turning
the lever from neutral to the most left (pull)
and pushing it forward or pulling back to
engage required range. Return the lever to
neutral position;
• Select required gear according to
switching layout and engage.
*
Back gear for MTZ-821/821.2.
run of the engine only. Turn the pump off for
Rear PTO control
Independent and synchronous drives switching
handle.
The handle (2) has three positions:
• “Independent drive ON” – utmost up
position;
• “Drive OFF” – middle position;
• “Synchronous drive ON” –lowest
position.
Engage independent and synchronous drives at
lowest stable engine speed.
To engage synchronous drive:
• Start the engine;
• Fully press clutch pedal and engage 1st
gear;
27
Page 28
• Slowly release the clutch pedal and
INPORTANT! Synchronous PTO drive shall
km/h only. Otherwise the tractor’s powertrain
Set the handle (2) to the middle position
not using PTO.
simultaneously move the handle to the
lowest position.
Two-speed independent PTO drive switch
Independent PTO drive lever (2) has two
positions:
• I – 540 RPM – fully clockwise (down
view);
• II – 1000 RPM – fully counterclockwise.
To set required PTO end rotation speed loosen
bolt (1), turn the lever (2) to I or II position
and tighten the bolt (1).
be use at lower gears at speed not ex ceeding 8
may be badly damaged.
“Drive OFF” and replace PTO end cap when
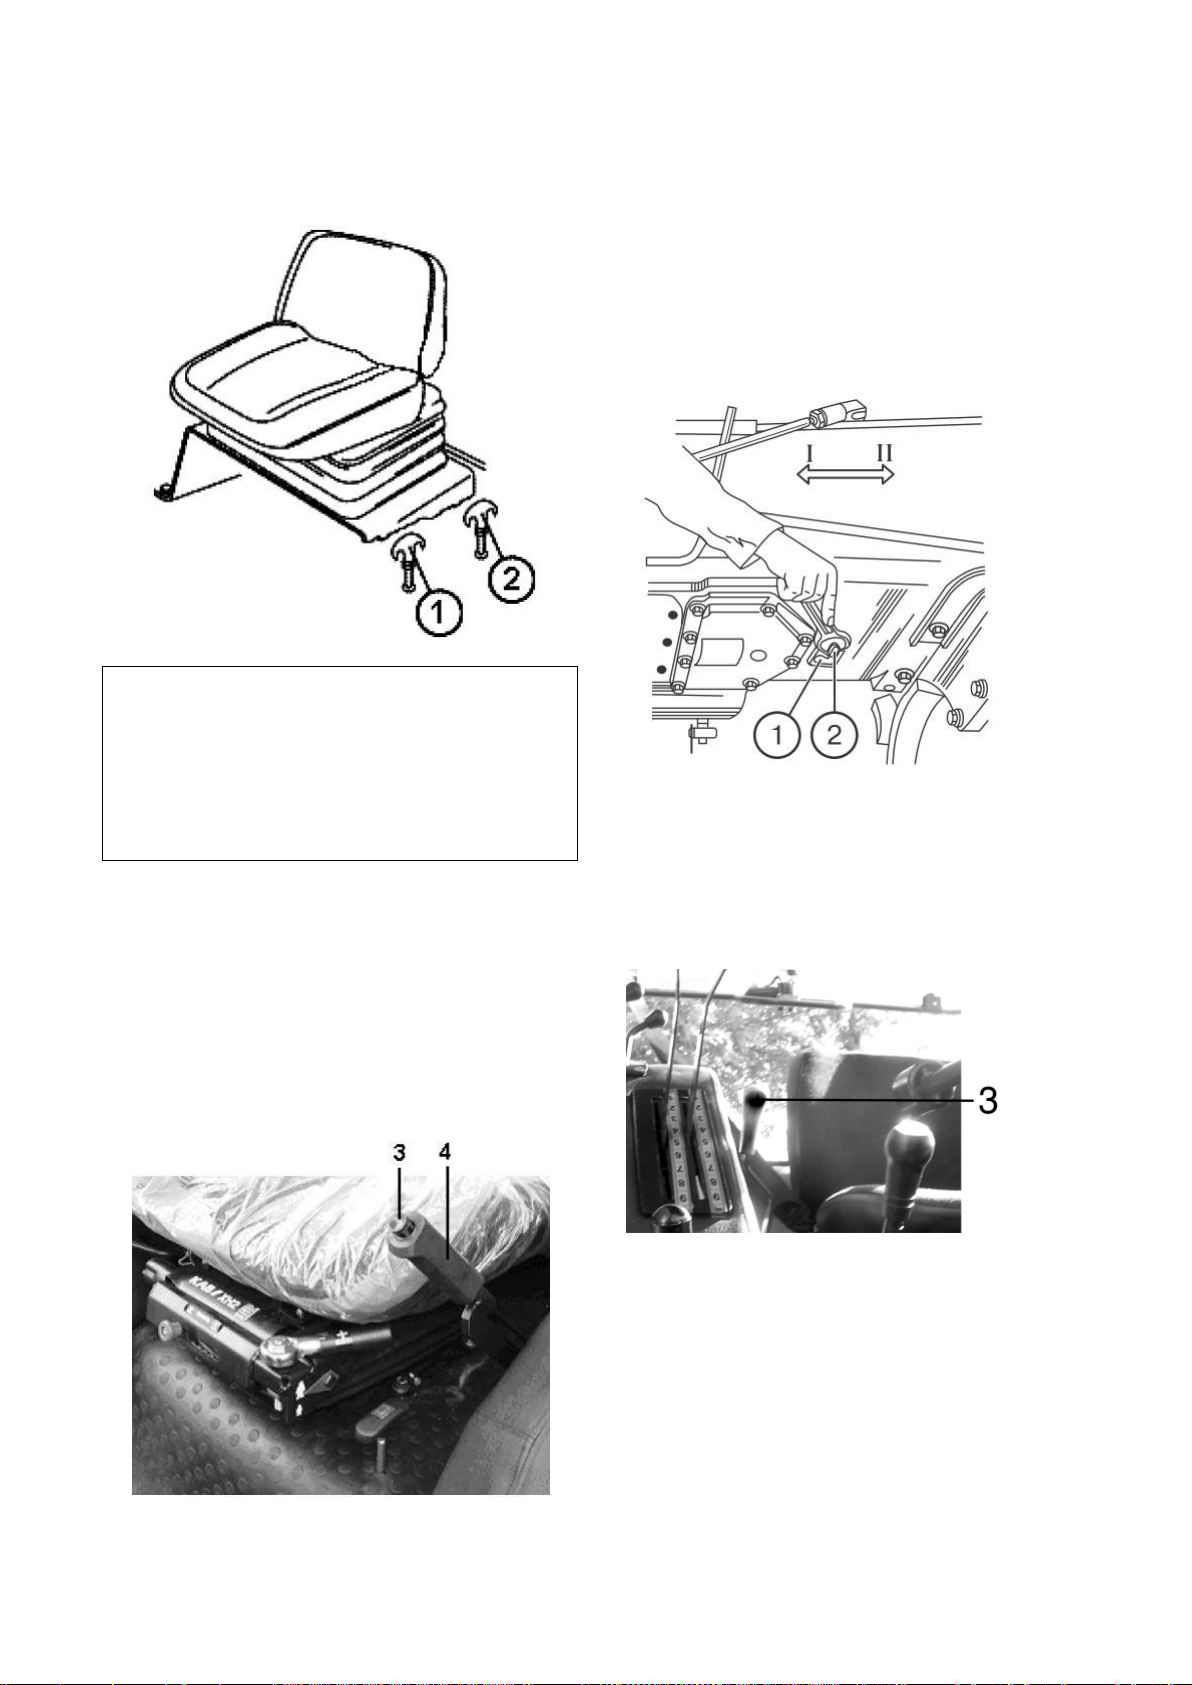
Parking brake control arm
• Upper position of lever (4) – parking
brake ON;
• Lower position of lever (4) – parking
brake OFF.
To disengage the parking brake press button
(3) of the control arm and press the lever fully
down.
Turning rear PTO on and off
Rear PTO is controlled with a lever (3) with
two positions:
• PTO ON – utmost rear position;
• PTO OFF – utmost forward position.
Compressor control
The handle (4) has two positions:
• Compressor ON – turn the knob by 180°
to orient an arrow at the knob against
tractor driving direction;
• Compressor OFF - turn the knob by 180°
to orient an arrow at the knob along tractor
driving direction.
28
Page 29
ATTENTION! Switch the compressor with
engine stopped or low idling.
IMPORTANT! Set lever (1) to “FDA ON
forcedly” position to operate tractor without
cardan shafts.
NOTE! Handles (5, 6) allow combined
(5) and control by handle (6).
IMPORTANT! Hydraulic jack cannot be
(2, 3, 4) in Lifting Up or Lifting Down
position.
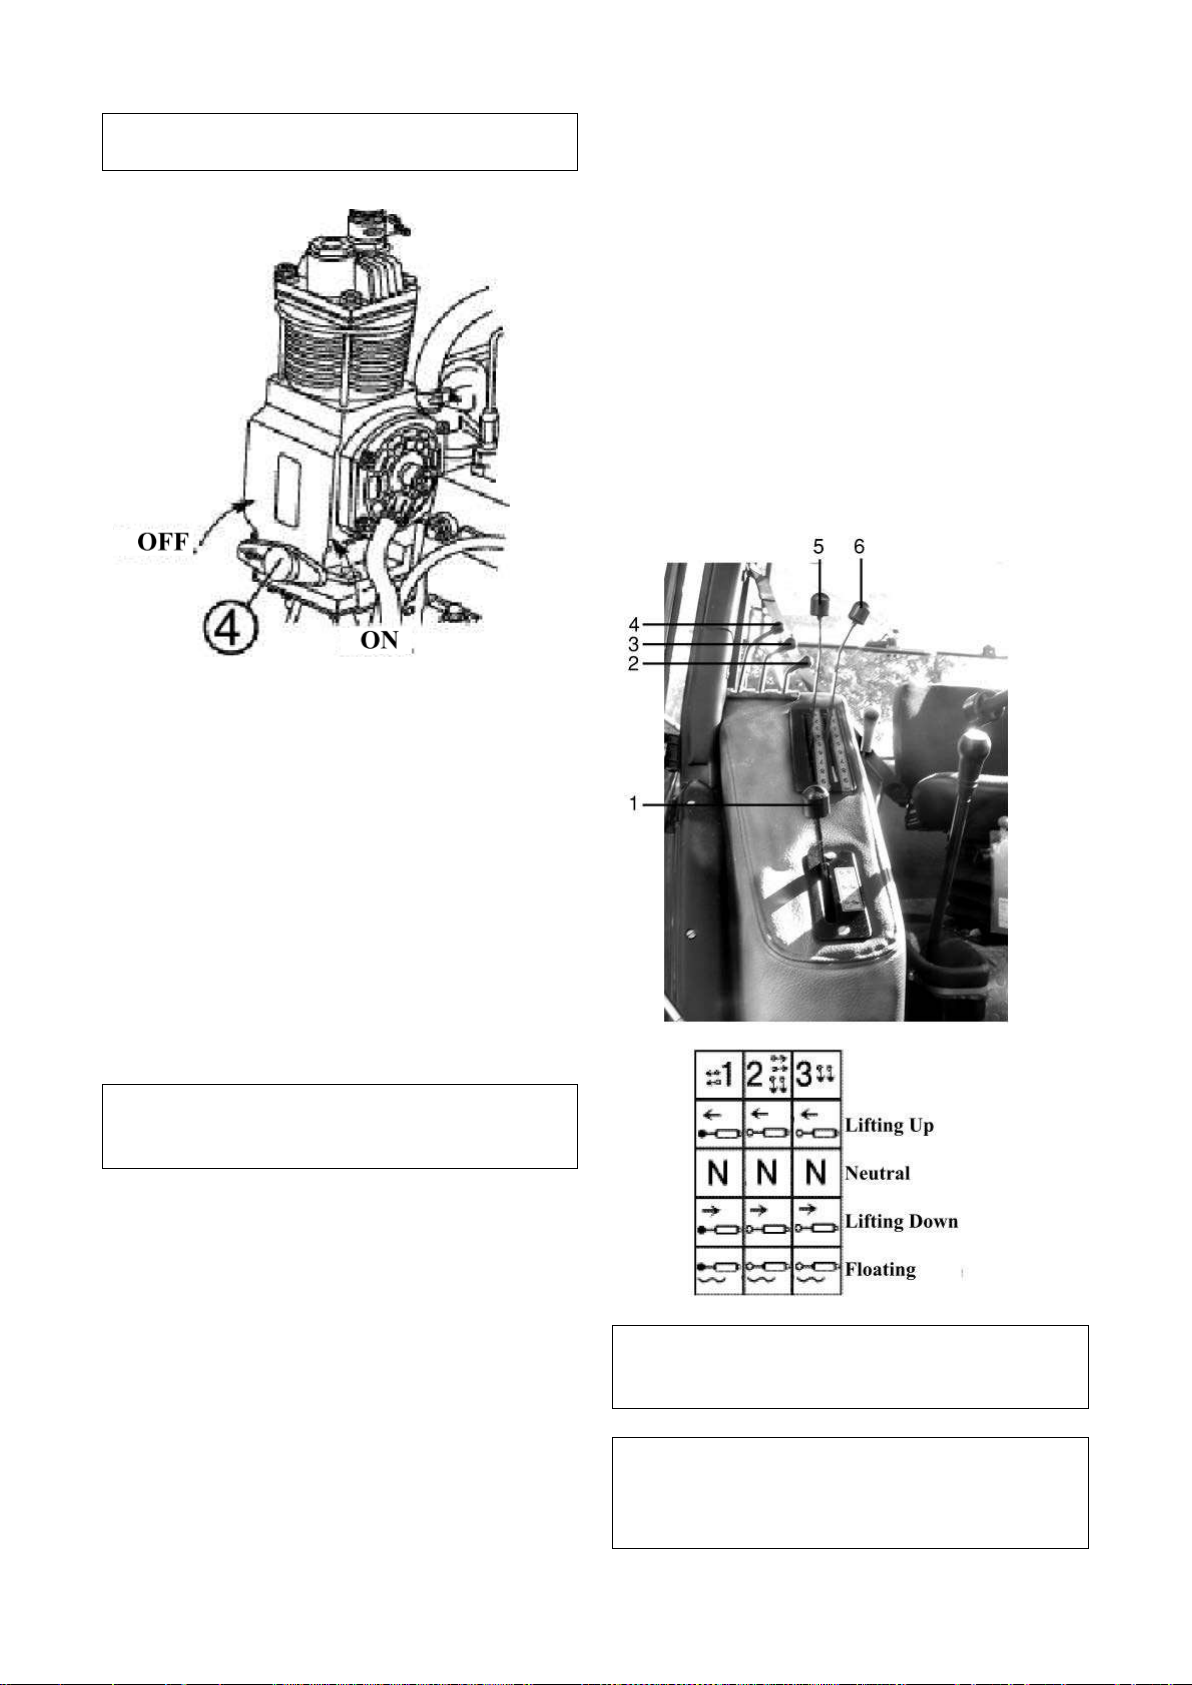
FDA drive control
PMV drive transfer box control arm (1) has
three fixed positions:
• FDA OFF – upper position. Used for
driving hard roads;
• FDA ON/OFF automatically – middle
position. FDA is automatically switched on
and off by freewheeling clutch depending
on rear wheels slippage. Used for various
field works;
• FDA ON forcedly – lower position. Used
briefly for performing works on loose or
wet soils and, if necessary, at backing.
• Most rearward – transporting position.
Hydraulic system distributor control
Each of three levers (2, 3, 4) controls external
cylinders and has four positions:
• Neutral – upper middle position (fixed);
• Lifting Up – upper non-fixed position.
Released handle returns to Neutral (lever
(4) has fixed Lifting Up position);
• Forced Lifting Down – lower middle non-
fixed position between Floating and Neutral
positions. Released handle automatically
returns to Neutral;
• Floating – lower fixed position.
RH jack control
Hydraulic jack is controlled with two arms (5,
6) at the right board for the right operator’s
hand.
Force adjustment handle is located closer to
the operator and has the following positions:
• Most forward – maximal tillage depth;
• Most rearward – minimal tillage depth.
Positioning adjustment (5) handle has the
following positions:
• Most forward – minimal tool height over
the ground surface;
adjustment with tilting depth limited by handle
controlled with arms (5, 6) with any of handles
29
Page 30
Indicators and switches
Starter and indicators switch (1)
Has four positions:
• 0 – “OFF”;
• I – “Indicators and control lights block
ON”. Oil pressure alarm lights at engine oil
pressure indicator (16), page 5-1, and alarm
buzzer sounds;
• II – “Starter ON” (non-fixed position).
Control light and alarm buzzer go off after
engine is started;
• III – “Radio feeding”. Turn the key
counterclockwise.
Remote AB switch (2)
The switch is on with button (2) pressed.
Repeated pressing switched the battery off.
Central light switch (3)
Has three positions:
• I – OFF (right part of the key is recessed);
• II – Front and rear sidelights, license plate
lighting, dashboard instruments lighting and
additional lights at trailed machi ne are ON
(middle position);
• III – All consumers od position II and
road lights are ON (left part of the key is
recessed).
Understeering switch (left) (1)
Allows switching on turn indicators, switching
between upper/lower beam of headlamps,
upper beam signaling, horn activation.
Turn indicators are switched by moving the
arm forward/rearward.
Lower/upper beam of headlamps
To light headlamps on set the central light
switch (1) to position III (see above) and set
the switching arm to the middle position
“Lower Beam”. Upp er beam is activated with
pushing the switching arm to stop. Arm
positions for upper and lower beams are fixed.
To blink with upper beam pull the arm to stop
from Lower Beam position regardless the light
switch position.
Understeering switch (right) (2)
Allows switching-on windshield washer and
wiper at 1st (low) or 2nd (high) speed.
Windshield wiper switch has three fixed
positions:
30
Page 31

• 0 – OFF
NOTE: The arm has to be manually returned
to OFF position.
Scale section,
color
Feeding system state
With running
engine
With stopped
engine
13.0 – 15.0 V
green
Normal charging
mode
10.0 – 12.0 V
red
Generator will
not operate
Discharged
battery
12.0 – 13.0 V
yellow
No AB charging
(
voltage)
Normal battery
charging
15.0 – 16.0 V
red
Overcharged
battery
White mark in
yellow section
Rated battery
voltage – 12.7 V
• I – Low speed
• II – High speed
Windshield washer is switched on by pulling
the arm up and simultaneous switching wiper
at the 2nd speed. The arm may be positioned
anyway.
Positions for switching windshield washer on
in not fixed, and the arm is returned to initial
position. To activate hor n pres s t he arm ax i al l y
in any switching arm position.
Dashboard
(1) Engine coolant temperature indicator
with alarm light
Indicator scale has three sections:
• Operating temperature – 80-100°C –
green;
• Not operating temperature (two) – 40-
80°C and 100-120°C – red.
(2) Engine oil pressure indicator with red
low pressure alarm light.
Indicator scale has three sections:
• Operating pressure – 100 kPa to 500 kPa –
green;
• Not operating pressure (two) – 0 kPa to
100 kPa and 500 kPa to 600 kPa – red;
• Pressure up to 600 kPa is permissible for
cold engine start. If the pressur e alarm ligh t
is on at running engine immediately stop it
and correct the fault.
(3) Fuel tank level indicator (with reserve
level alarm light).
The instrument has the following divisions:
0 – 1/4 - 1/2 - 3/4 – 1.
Never consume fuel to “empty tank” (with the
pointer in orange section).
(4) pneumatic system pressure indicator
(with pressure alarm light)
Indicator scale has three sections:
• Operating pressure – 500 kPa to 800 kPa –
green;
• Not operating pressure (two) – o kPa to
500 kPa and 800 kPa to 1000 kPa – red.
(5) Voltage indicator
Shows battery voltage with stopped engine and
with starter key in position I. with running
engine the indicator shows voltage at generator
terminals. Voltage indicator scale has the
following sections:
low charging
Tacho-speedometer
Electric tacho-speedometer at the dashboard
operates as follows:
• After stopping the tractor and turning
starter and indicators switch key to position
I display (7) shows engine working hours
(5);
• After starting the engine the pointer (8)
goes round the scale (1) to indicate engine
crankshaft rotation speed. The display (4)
shows PTO rotation speed (RPM). Scale (3)
is for PTO I, and scale (2) is for PTO II.
Electric signal of rotation speed is fed from
generator phase winding;
31
Page 32

• In motion display (7) indicates (6) tractor
speed (km/h), indication (5) disappears.
Speed electric signal is fed from speed
sensors on the rear axle caps.
1. Engine crankshaft rotation speed scale,
RPM.
2. PTO II rotation speed scale – 1000
RPM.
3. PTO I rotation speed scale – 540 RPM.
4. PTO rotation speed indicating display.
5. Engine working hours indication, h.
6. Tractor speed, km/h.
7. Engine working hours and tractor
speed indication display.
8. Engine crankshaft rotation speed
needle indicator.
Board with cab venting and heating system,
front and rear op erating lights, rear screen
washer and wiper switching keys.
Cab venting and heating system switch (1)
Is used to switch venting and heating system
fan on.
The switch has three positions:
• OFF;
• Low speed ON – light air feed;
• High speed ON – heavy air feed;
Front operating lights switch (2)
Press the key to light front operating lights on.
The key light will on.
First pair of rear operating lights switch (3)
Press the key to light the first pair of rear
operating lights on. The key light will on.
Second pair of rear operating lights switch
(4)
Press the key to light the second pair of rear
operating lights on. The key light will on.
Rear screen washer and wiper switch (5)
The switch has three positions:
• OFF;
• Screen wiper ON – fixed position;
• Screen wiper and washer ON – non-
fixed position.
Plugs (6)
For additional switches.
32
Page 33

Control lights block
Fuses
A fuse block is located under a cover (28), page 5-
1. Five fuses protect the following circuits from
overload:
1. Cab lamp (7.5 A)
2. Rear screen washer and wiper (7.5 A)
3. Two pairs of rear operating lights (15 A)
4. Headlamps (25 A)
5. Venting and heating system (25 A)
6. Beacon (15 A)
33
Page 34

WARNING! Never use fuses of higher rated cu rrent to prevent electric wires burn. Frequent fuse
burning requires fault investigation and elimination.
Two fuse blocks for BP-1 and BP-2 circuits are mounted under the dashboard. Unscrew bolt ( A)
under the steering column and remove casing (B) to access fuses. Twelve fuses protect the
following electric circuits from overload:
BP-2:
1. Road lights upper beam (25 A)
2. Horn (15 A)
3. Portable lamp socket (25 A)
4. Alarm lights (15 A)
5. Stop-light (15 A)
6. Windscreen washer and wiper (15 A)
BP-1:
1. Instruments feeding (7.5 A)
2. Turn indicators breaker (7.5 A)
3. Right road light lower beam (7.5 A)
4. Left road light lower beam (7.5 A)
5. Right side lights, instruments lighting
(15 A)
6. Left side lights (7.5 A)
34
Page 35

Connected electrics
IMPORTANT! Adjust the seat prior to
starting tractor operation. Stay present in the
seat while adjusting.
NOTE! Do not clean the seat upholstery with
lvents. Use warm water with small amount
of detergent only.
A standard multipurpose socket is provided for
connecting current consumers of a trailer or
towed agricultural machines. It is located
behind the rear cab panel. The socket is
connected to the plug of connected machine
harness.
Socket terminals are designated as follows:
1. Left turn indicator
2. Horn
3. Ground
4. Right turn indicator
5. Right side light
6. Stop-light
7. Left side light
8. Portable lamp socket
Operator’s weight adjustment requires
alternate motion of handle (2). The handle has
two positions: “+” – to i ncrease weight, “-“ –
to decrease. To change handle direction move
it fully forward and turn by 180°.
Seat height is adjusted with handle (3). Move
it to the right to lift the seat down, and to the
left to lift the seat up.
Back inclination is adjusted by pulling
adjusting arm (4) up and lowering and fixing
the back as required.
Operator’s seat
The seat has mechanical suspension with 90
mm stroke and hydraulic damper. Suspension
is protected with a rubber cover.
The seat may be adjusted as follows:
1. Longitudinal adjustment – within 150
mm range.
2. Weight adjustment – 50 kg to 120 kg
stepless.
3. Height adjustment - ±35mm.
4. Back inclination adjustment 5° to 20°.
Longitudinally the seat is adjusted with a
handle (1). Turn it counterclockwise to stop,
move the seat and release the handle.
so
35
Page 36

Steering wheel adjustment
NOTE! The steerin g wheel can b e adjust ed by
height within 100 mm.
To adjust steering wheel by height:
• Unscrew clamp (1) by 3-5 turns;
• Move the wheel (2) as required;
• Tighten the clamp (1) by hand as
possible.
Steering column may be inclined and fixed in
four positions from 20° to 40° with 5° pitch.
To adjust the column pull handle (3), incline
the steering column as required and release
handle (3).
Cab door latch
Handle (4) is used to open the cab door from
inside by pulling. Handle (5) disable cab door
opening from outside (when pulled).
36
Page 37

NOTE! Fully open recirculation flaps (3) and
(2) to quickly warm-up the cab.
NOTE! Close the valve to run the system for
venting at warm weather.
Cab heater control
To activate cab heater:
• Open the valve turning handle (1)
counterclockwise to stop;
• Turn heater fan on with a switch (2)
and adjust air direction as required with
regulated flaps (air deflectors) (4).
Opening and closing recirculation flaps
(3) amount of fresh air entering the cab
may be regulated.
run the heater fan at high speed with a switch
37
Page 38

Section 6. PREPARATION TO WORK AND WORK ORDER
WARNING! Ensure all protective guards are
in place prior to start the engine in order to
avoid personal injury.
ATTENTION! NEVER start new unbroken-
parts wear.
Preparing tractor to work
Depreserve tractor to prepare it for work as
follows:
• Remove protective covers and plugs from
the engine;
• Fill all refill capacities;
• Remove sediments from rough and fine
fuel filters and from fuel tank;
• Fill and flush fuel suppl y system with fuel
to remove air;
• Check fan belt tension;
• Check and adjust tire pressure;
• Service the battery;
• Tighten fasteners;
• Squirt all lubrication points;
• Check and, if necessary, adjust front
wheels toe-in.
in engine by towing to avoid excessive engine
Breaking-in
Your new tractor shall show safe and longterm operation in case of performing correct
breaking-in and necessary maintenance works
in due time. Observe following when
performing 30-hours breaking-in:
• Constantl y observe indicators information,
lubrication, cooling and feeding systems
operation. Observe oil and liquid levels in
refill capacities;
• Check tightening and retighten external
fixing connections;
• Break-in the engine at easy transporting
and field works (harrowing, cultivation,
sowing, etc.) gradually increasing load at
different gears;
• Do not overload the engine, do not allow
fuming or speed reduction. Signs of
overload are following: sharp speed
reduction, engine fuming and ignorance to
increased fuel supply;
• Tractor operation at too low gear with
little load at high engine speed causes fuel
overconsumption. Correctly chosen gear for
each given operation condition allows fuel
saving and reduced engine wear;
• Regularly perform monthly maintenance
according to recommendations of the
present manual;
• Perform maintenance operations after
breaking-in (see page 10-2).
38
Page 39

Starting the engine
IMPORTANT! Never start engine with
empty cooling system!
IMPORTANT! Stay at operator’s seat when
starting the engine and controlling instruments.
IMPORTANT! Never push or tow the tractor
to powertrain.
Starting in normal conditions
Check oil level in engine oil pan and coolant
level in radiator, check for fuel in the tank.
1. Brake the tractor with parking brake.
2. Set gear-switch lever to neutral position
and multiplier* arm to any of two fixed
positions (ON or OFF).
3. Set PTO lever to OFF position.
4. Turn remote battery switch on.
5. Set fuel supply lever to the middle
position.
6. Press clutch pedal, shift gear-switch lever
to the most left position (pull) and keep it
there.
7. Turn starter switch key to position II
(“Start”) and keep it until the engine is
started, but not more than 15 s. Starting
control light shall on at control lights
block and off after engine start. Repeat
starting not sooner than in 30-40 s after
the first unsuccessful, in any, attempt.
8. After engine start:
1. Release clutch pedal and gear-switch
lever;
2. Check operation of all indicator lights
and indicator readings (coolant
temperature, en gine oil pressure, bat tery
charge).
Starting at low temperature (+5°C and
below)
to start the engine by towing to avoid damage
• Keep the battery fully charged;
• Use clean winter diesel fuel without water
admixture;
• Fill fuel tanks in the end of each working
day to prevent condensation into the tanks.
Starting procedure
1. Switch off drive of hydraulic system oil
pump and compressor to reduce resistance
to crankshaft rotation.
2. Set multiplier† lever to the middle position
(between ON and OFF positions) to aid
start.
3. Lift (close) water cooler blind to quicken
engine warm-up.
4. Check oil level in the engine oil pan and
coolant level in the cooler.
5. Perform steps 1 to 7 (page 6-2).
6. As soon as the engine is started and its
speed is stable set speed at 1000 RPM to
stabilize oil pressure in operating range.
Release clutch pedal. Warm the engine up.
7. Check instruments operation. Adjust water
cooler blind to maintain normal thermal
conditions.
*
Back gear for MTZ-821/821.2
†
Back gear for MTZ-821.821.2
39
Page 40

IMPORTANT! Avoid starting with heavy
traction load (e.g. plough deepened in soil).
IMPORTANT! Always press clutch pedal
prior to engaging range and gear in the
pedal while operating the tractor as it leads to
clutch slip, overheating and breakdown.
IMPORTANT! Tractors are equipped with
steering. Pump does not
the system automatically switches to manual
mode requiring much effort to turn steering
wheel.
ATTENTION! For emergency tractor stop
press simultaneously clutch pedal and both
working brakes pedals.
Getting away and driving the tractor
Perform the following to move the tractor:
1. Set minimal speed for the engine
crankshaft.
2. Fully press clutch pedal and wait until all
rotating parts stop.
3. Shift the gear-switch lever from neutral to
the most left (to operator) position and push
it forward or pull rearward to engage
required range (I or II). Then return the
lever to Neutral position.
4. Select required gear according to the gear
shifting scheme and engage. If it is not
possible, release clutch pedal lightly and
press it again.
5. Select and fix required multiplier lever
position.
6. Engage parking brake and smoothly release
clutch pedal increasing fuel supply lightly.
Keep it increasing as motion begins.
Stopping the tractor
Act as follows to stop the tractor:
• Reduce engine crankshaft rotation speed;
• Fully press clutch pedal;
• Shift gearbox switch-lever to Neutral
position;
• Release clutch pedal;
• Press working brakes pedals to stop the
tractor.
Never stop the tractor with brakes with
engaged clutch;
• Engage parking brake.
gearbox. Do not keep your leg on the clutch
Steering
hydrostatic power
feed the system with the engine stopped and
Stopping the engine
Act as follows to stop the engine:
• Let the engine run at low speed after
releasing load to cool down. It is preferable
not to stop hot engine;
• Set minimal idle speed by pulling the fuel
supply control handle down;
• Stop the engine by pulling a stop handle to
stop;
Turn remote battery switch off to avoid battery
discharge.
40
Page 41

IMPORTANT! Turn PTO on and off at low
gine speed and with no working load at
agricultural machines transporters and tools.
running clutch for machines with
great inertia moment.
WARNING! Turn PTO off after each use for
the sake of safety.
Two-speed PTO switch position
Engine
RPM
PTO
RPM
Force mode (6 or 8 splines, speed I)
1631
(2081)*
Heavy duty mode (21 splines, speed
II)
1673
(2184)
WARNING! Use synchronous PTO at lower
only. Otherwise powertrain may be badly
damaged.
Power take-off (PTO)
en
Use free-
PTO ends with 6 or 8 square-sided splines are
available for PTO 540 RPM and with 21
involute splines are available for PTO 1000
RPM.
Set required drive speed and install an end
corresponding to the speed prior to starting
operating PTO.
PTO end replacement
1. Unscrew two bolts and remove cap (1).
2. Unscrew four nuts (3) and remove
cover (2).
3. Unscrew six bol ts (4), remove plate (6)
and end (5).
4. Install another end into the splined
bore, install the plate (6).
5. Ass emb le o th er pa rt s i s order r everse to
disassembly.
6. Replace guard and cap and fix with
nuts.
540
1000
*
IMPORTANT! Shift independent/
synchronous PTO switching rod to the middle
position (Drive OFF) on completion the work
and not using PTO.
gears at tractor speed not exceeding 8 km/h
*
For MTZ-821/821.2
41
Page 42

IMPORTANT! Engage independent PTO
inimal speed or with the engine
drive with running
engine and at smooth clutch coupling
position I (540 RPM). Shift lever switching
drive to the middle (neutral) position.
Special features of using rear PTO-driven
machines
General notes:
1. To connect a machin e to th e tract o r en sure
correct rear PTO control adjustment.
2. Install and secure required (6-, 8- or 21-
splined) PTO end and engage appropriate
drive.
3. Grease the shaft and cardan slip joint
pipe. Install cardan pivot joint at PTO
end and secure it in a fixing groove.
Ensure intermediate (telescopic) shaft
pivot fork (1) eyes (2) being planar,
otherwise the cardan drive and PTO
would be overloaded.
4. Install cover for agricultural machine
cardan shaft.
5. Having installed cardan drive ensure no
collision at cardan slip joint elements at
extreme machine positions relatively to
the tractor. Minimal overlap at cardan
telescopic part should be equal to 110-120
mm. Lesser overlap may result in drive
disengagement.
Agricultural machine safety coupling spring
(3) length should be adjusted so as to allow
cam half-couplings (4 and 5) rotate in relation
to each other at overload. Overtightened spring
result in coupling failure and cardan drive and
PTO overload.
drive at m
stopped.
Engage synchronous PTO
engagement.
Operating the tractor without PTO set PTO
control arm to “PTO OFF” position and twospeed PTO drive switching coupling – to
between independent and synchronous PTO
42
Page 43

Pneumatic system to control trailer’s brakes
Single-line pneumatic drive
1 – Compressor; 2 – Pressure regul at or; 3 – Air bleed valve; 4 – Tank; 5 – Alarm pressure signaling
light; 6 – Pressure indicator; 7 – Pressure cell; 8 – Alarm pressure cell; 9 – Condensate discharge
valve; 10 – Coupling head; 11 – Control line; 12 – Brake valve.
Tract is equipped with pneumatic system to
control brakes of trailers and other towed
machines with air brakes.
The system is as well used to pump-up tires
and for other applications requiring
pressurized air energy.
Air is taken into the system from the engine’s
intake manifold. Compressor (1) compresses
and passes air to the tank (4) through pressure
regulator (2) keeping required pressure in the
tank.
Compressed air passes from the tank to the
brake valve (12) via the piping. From the
brake valve the air passes via control line (11)
to the coupling head (10) and farther to the
trailer’s air system.
Pressure regulator is equipped with air bleed
valve (3) used to pump-up tires and for other
applications. There is a pressure cell (7) and
alarm pressure cell (8) to control air pressure
in the system. Dashboard features pressure
indicator (6) and red alarm light (5). Valve (9)
is provided to remove condensate from the
tank.
43
Page 44

Double-line pneumatic drive
Tractors may have double-line pneumatic
drives to control air brakes of trailers.
The system is as well used to pump-up tires
and for other applications requiring
pressurized air energy.
1 – Compressor; 2 – Pressure regul at or; 3 – Air bleed valve; 4 – Tank; 5 – Alarm pressure signaling
light; 6 – Pressure indicator; 7 – Pressure cell; 8 – Alarm pressure cell; 9 – Condensate discharge
valve; 10 – Feeding line; 11, 11a – Coupling heads; 12 – Control line; 13 – Brake valve.
Air is taken into the system from the engine’s
intake manifold. Compressor (1) compresses
and passes air to the tank (4) through pressure
regulator (2) keeping required pressure in the
tank. Compressed air passes from the tank to
the brake valve (13) and to the feeding line
(10) with constantly pressurized coupling head
(11) (with red cap).
Hydraulic system
The brake valve is connected via the control
line to non-pressurized coupling head (11a)
(with yellow cap). Brakes of trailers and
agricultural machines are controlled in two
modes: direct and automatic.
Direct brakes control uses control line (12)
pressure increase up to 6.5-8.0 kgf/cm2 to stop
the tractor.
Feeding line (10) keeps pressurized and
continues pressurized air supply to the trailer’s
pneumatic system.
44
Page 45

Hydraulic system includes oil tank (1), gear pump (4), pump drive (3), side outputs (2), rear output s
(7), external cylinder control handles (5), follow-through distributor (6), and hydraulic jack (8).
Components layout is given below (top view).
Hydraulic distributor (6) is located at the right of the
tractor’s rear and is controlled with three handles (5) at
operator’s right hand.
Oil tank (14) of welded structure has capacity of 25 l.
The tank features filling cap (10) with safety valve (11),
oil level indicator (12), filter element (13), breather (9)
and discharge cap (15).
Hydraulic system oil pump is of right-hand rotation, is
located at the drive. Pump drive is switchable, is
independent from friction clutch and is located to right
from the clutch casing.
The drive consists of casing (1), gear (2) on splines (3)
of a shaft rotating in within two ball bearings. Balls (4)
inserted into the shaft (3) bore lock or unlock the shaft
with spline bushings (5, 7) with a fixture (6) controlled
by a fork through the roller (11) tetrahedron.
Drive (12) ensures 1800 (1830)* RPM for the pum p sh aft (8 ) at rated engine speed. B all -t ype clut ch
(3, 4, 5, 6, 7) allows switching the pump on and off with engine running at minimal idling speed.
To switch the pump on/off:
• Loosen bolt (9) by 1.5-2 turns;
• T
urn switching roller (11) with a wrench by the tetrahedron CW/CCW to stop;
• Tighten bolt (9).
*
For MTZ-821/821.2
45
Page 46

ATTENTION! Never try to couple machines
system is failed.
ATTENTION!
hydraulic system pump should be
emergency only. Pump drive may be
hydraulic system pump off. Having
Hitched or semihitched machine from
Hitched or semihitched machine with
ceeding half of the tractor’s
one, from TC.
Gear (2) is constantly engaged with PTO drive
gear. In disengaged state (see activation
scheme) fixing (6) is shifted to the most right
position, balls (4) disengage with bushing (5)
under centrifugal force and shaft (3) and gear
(2) freely rotate in bearings. In engages state
(fixing shifted to the most left position) balls
(4) are guided into the bushing (5) holes by the
fixing (6) taper and torque is transferred from
gear (2) through shaft (3) and splined bushing
(5) to the pump shaft. The drive is suitable for
another pump (NHs10/16) driven by the
splined bushing (7).
with hookup or with TC and h ydraulic brakes,
for machines of servic e weight exceeding half
of the tractor’s one, if hookup hydraulic
1. Hookup
always on. OFF function for the pump is for
disconnected in case of the pump failure or
broken oil lines connected by the pump.
2. Stop the engine prior to switching hookup
disconnected the pump drive, decouple the
following:
•
hookup;
•
hydraulic brakes, for machines of service
weight ex
46
Page 47

HMS hydraulic jack
Hydraulic mounted system is equipped with
hydraulic jack and ensures operation in the
following modes:
• Lifting hanging platform up and down with
its dead weight;
• Positioning adjustment – automatically
maintained position of the hanging platform
in relation to the tractor;
• Force adjustment – tillage depth adjustment
in relation to soil resistance;
• Combined adjustment – tillage depth
adjustment in relation to soil resistance with
maximal tillage depth limited by
positioning adjustment.
Positioning adjustment handle (2) is used to
control hanging platform with coupled tool.
Positioning adjustment
Force adjustment handle (1) should be set to
the front position (“9” figure at the board)
when connecting a tool.
It allows accurate and delicate control over
connected rigs over the ground like spraying
machine, leveler, etc. Positioning adjustment
may be applied with tillers at plain fields.
Using positioning adjustment at uneven
surfaces is limited due to inevitable vertical
movements of the tool while tractor driving
the field.
1. Set force adjustment handle (1) to
extreme (front) position along the
driving direction (“9” figure at the
board).
2. Set required machine elevation over the
ground with positioning adjustment
handle (2).
“1” figure at the board corresponds to
transporting position of RH, and “9” figure
corresponds to minimal tool elevation over the
ground.
47
Page 48

Section 7. OPERATION AND ADJUSTMENT REGULATIONS
Setting front track
Front track of the tractor ma y be altered with
exchanging left and right wheels only. Front
track is equal to 1220 and 1365 mm.
To adjust the track:
1. Engage parking brake. Put blocks on
both sides of rear wheels.
2. J ack the front axle up (or front wheels
alternately) to ensure clearance
between wheels and ground.
3. Remove front wheels.
4. Unscrew nuts fixing the wheel disk to
FDA reduction gear flange.
Exchange wheels com plete at both sides to get
required track. Pay special attention to ensure
wheels rotation direction correspondence to an
arrow at the tire side, i.e. lugs direction should
be the same.
Tighten wheel fixing nuts to 250-300 Nm.
Front axle toe-in adjustment
Wheels toe-in is adjusted by changing steering
rod length as follows:
1. Drive the tractor not less than 3 meters
straight at a plain ground.
2. Measure dimension A between two
opposite points at the rim shoulder in
the front part of the front axle at the
wheel axle level.
3. Mov e the tractor fo rwa rd to rotate front
wheels by 180° approximately and
measure dimension B in the rear part of
the front axle bet ween the same points
as when measuring A dimension. A
dimension should be less then B
dimension. Measured difference
constitutes wheels toe-in and should be
equal to 0-8 mm.
To correct toe-in:
1. Loosen nuts of adjusting tube at the
steering rod.
2. Set required toe-in rotating the tube.
3. Tighten the nuts.
48
Page 49

Setting rear track
Track width,
K, mm
Disk is interfacing with the
hub. Disk enforcing ring is
bracket is
installed at recess at the disk
Wheels are interchanged
between sides. Disk enforcing
Rim bracket is installed at
Track width,
K, mm
Other variants are not
14.9-30 tire
DW12-30 wheel
Wheel mounting scheme
1220
1432
Notes
outside. Rim
face.
ring is interfacing with the hub.
recess inside.
Wheel mounting scheme
420/70R24 tire
W12x24 wheel
Notes
recommended.
1220
49
Page 50

FDA reduction gear turning angle adjustment
Angle of upper pair (3) turn to the neutral position should be equal to 55°±1°. It is adjusted by
screwing bolt (2) in. After adjustment lock the bolt (2) with nut (1) to 70-80 Nm.
Adjusting rear PTO control mechanism
At assembly at the fact ory or after repair (e. g.
after brake band replacement) control
mechanism should be adjusted as follows:
1. Set eccentric axle (15) (fig. 2) to initial
position with flattened surface B
vertical and fasten with lock bar (17)
and bolt (17).
2. Disconnect rod (4) (fig. 1).
3. Unscrew bolt (9) to release spring (6).
4. For the sake of safe unit disassembly
ensure constant contact between upper
sleeve (7) and bolt (9) while
unscrewing the bolt until the spring is
completely released.
5. Remove the rear axle cap to access
screws (13) (fig. 1).
6. Fix arm (11) neutr al inserting M10x10
bolt or Ø8mm stud (10) into a bore in
the arm and corresponding hole in the
rear axle case.
7. Remove lock bar (26) (fig. 2), tighten
screws (21) to 10 kgf (1 kgf∙m) with a
wrench or 100mm pliers. Then loosen
each screw by 2-2.5 turns.
8. Remove bolt (stud) (10) (fig. 1)
holding arm (11) in initial position for
adjustment.
9. Screw bolt (9) in directing its tip into a
recess at the sleeve cap (7) to get A
dimension equal to 26-29 mm.
10. Shift arm (11) back to ON position.
11. Install rod (4) (fig. 1). Adjusting rods
(4) and (15) ensure arm (1) rocking
area in the middle of the control board
opening. Upon completion of
adjustment replace the stop plate (26)
(fig. 2) and rear axle cap, lock rods (4)
and (15) and bolt (9) (fig. 1).
50
Page 51

Fig.1. Rear PTO control:
1 – Control arm; 2 – Adjusting fork; 3, 8 – Locknuts; 4 – Rod; 6 – Springs; 7 – Outer sleeve;
9 – Stop bolt; 10 – Adjusting bolt (for adjustment only); 11 – Control roller arm; 12 – Control
roller; 13 – Adjusting screws; 14 – Inner sleeve; 15 – Rod.
If
• PTO slips,
• Switching force at arm (1) exceeds 12-15
kgf (120-150 Nm),
• Brake bands are partially worn,
then adjust band brakes (PTO cap allows
external adjustment to ensure maximum
efficiency of external readjustment by turning
eccentric shaft by 180°) as follows:
1. Set arm (11) (fig. 1) to neutral position
and fix it inserting Ø8mm stud (10) or
M10x60 bolt into a bore in the arm
(11) and corresponding hole in the rear
axle case.
2. Unscrew bolt (16) (fig. 2), remove
plate (17) from splined end at axle
(15).
3. Turn ecc ent ric axle (15) clockwise wi t h
S=13mm wrench to get required
clearance between b rak e band and PTO
drum (PTO end cannot be turn by
hand).
4. Replace plate (17) and tighten bolt
(16).
5. Remove stopping bolt or stud from arm
(11) (fig. 1).
After several external adjustments eccentric
axle may take the most left position (with
flattened surface B placed vertically to the
left), indicating used external adjustment
reserve.
In that case set eccentric axle to initial position
turning it counterclockwise (flattened surface
vertically to the right). Then perform
adjustment as describe above (during assembly
at the factory or after repair to PTO).
In other cases it is preferably to correct fault
by changing rod length and basic adjustment.
51
Page 52

Fig. 2. Planetary reduction gear of rear PTO:
1 – Drive switching clutch; 2 – Crown gear shaft; 3 – Nut; 4 – Carrier; 5 – Sun gear; 6 – Satellite;
7 – Crown gear; 8 – Satellite axle; 9 – Brake drum; 10 – PTO; 11, 13 – Brake band;
12 – Switching drum; 14 – Rear cover; 15 – Eccentric axle; 16 – Lock bar fixing bolt; 17 – Lock
bar; 18 – Removable end; 19 – Lock bar of removable plate; 20 – End fixing bolt; 21 – Adjusting
screws; 22, 24 – Arm; 23 – Spring unit; 25 – Control roller; 26 – Adjusting screw lock bar.
Clutch drive
Clutch drive is used to control friction clutch.
It is of hydrostatic type, with suspended pedal.
Drive consists of the main cylinder (1) (fig. 3),
suspended pedal (9), elbow (12), actuating
cylinder (19), arm (14), tank (2), piping (11),
flexible sleeve (13), bracket (22), and
backward springs (3), (23).
Pressing pedal (9) makes brake fluid pass from
the main cylinder (1) via piping (11), elbow
(12), and flexible sleeve (13) to actuating
cylinder (19), moving rod (18). Rod (18) turns
arm (14) connected to the friction clutch
shifter through the shaft disconnecting engine
and transmission.
Brake fluid “Neva-M” (TU 2451-05337632629-2003) is used as working fluid in
clutch actuating system.
Clutch control adjustment
Clutch control is adjusted as follows:
1. Adjusting clearance between piston and
piston tappet of the main cylinder (1):
1. Screw main cylinder (1) (fig. 3) tappet
into t he fork (6) observing B dimension
(10±1.5mm), tighten nut (10).
2. Rotating bolt (4) adjust free travel of
pedal (9) measured at the cover center
within C dimension (6-12mm) to ensure
clearance between piston and piston
tappet of the main cylinder (1).
3. Tighten nut (5).
2. Adjusting free travel of clutch shifter:
1. Remove backward spring (23) from
actuating cylinder (19).
2. Remove pin (15) to disconnect rod (18)
from arm (14).
52
Page 53

ATTENTION! Keep brake fluid level in tank
s while
flushing the system.
Fig. 3. Clutch control:
1 – Main cylinder; 2 – Tank; 3, 23 – Backward spring; 4 – Bolt; 5, 10, 17 – Nut; 6, 16 – Fork;
7, 15 – Pin; 8, 22 – Bracket; 9 – Pedal; 11 – Piping; 12 – Elbow; 13 – Flexible sleeve; 14 – Arm;
18 – Rod; 19 – Actuating cylinder; 20 – Protective cap; 21 – Bypass valve.
3. Turn arm (14) counterclockwise until
release bearing thrusts against release
lever.
4. Holding rod (18) into actuating cylinder
(19) piston to stop turn fork (16) to align
bores in arm (14) and the fork. Screw
fork (16) in by 5-5.5 turns (6-7 mm) and
connect to the arm with pin (15).
5. Tighten locknut (17), cotter pin (15), and
put backward spring (23) on.
Flushing clutch control hydraulic system
1. Fill tank (2) with brake fluid to MAX mark.
Remove protective cap (20) and put rubber
hose onto bypass valve (21) head. Put the
other end of the hose into a reservoir with
brake fluid.
2. Press clutch pedal several times. Holding it
pressed unscrew bypass valve (21) by a
quarter-turn to discharge excessive brake
fluid with air bubbles into a reservoir with
brake fluid.
3. Tighten bypass valve (21) and release
clutch pedal.
4. Flush the system until there are no air
bubbles in discharged brake fluid.
5. Remove the hose and put protective cap
(20) on.
6. Check brake fluid level in tank (2) and add,
if necessary.
(2) between MIN and MAX mark
Having verified clutch control adjustment,
check clutch engagement fineness as follows:
1. Start the engine and set its speed at
1400±100 RPM.
2. Engage parking brake.
3. Fully press friction clutch pedal and in
5 seconds, not less, engage gears.
Engagement should be “fine”, with no
unwanted sounds, otherwise repeat
adjustment check.
53
Page 54

IMPORTANT! Adjust working pressure with
parking brake rod and pneumatic valve rod
disconnected.
Adjusting main brakes
Adjust working brakes as follows:
1. Loosen locknuts (2) and set left and right
brake pedal (3), (5) pads coplanar with stop
bolts (1) so as to allow easy pedal junction
with junction plate (4). Tighten locknuts
(2).
2. Adjust free travel of the right brake pedal
(clearance between piston and piston tappet
of the main cylinder for the right brake)
with fork (7) as follows:
• Loosen locknut (6), uncotter and remove
pin (8);
• Turn fork (7) to ensure free travel of the
pedal from initial position to the moment
of the tappet contact to the piston,
measured at the pedal pad center, equal
to 4-8 mm;
• Connect fork (7) to the brake pedal with
pin (8), tighten locknut (6) and cotter the
pin.
3. Repeat above operations for the left brake
pedal (5).
4. Flush brake actuating hydraulic system as
follows:
• Fill tanks (14) with recommended brake
fluid to MAX mark or to the level of
15±5 mm to the upper edge of the tank;
• Remove dust and dirt from valves (12),
remove caps from the valves and put
hoses onto actuating cylinder valve
heads. Put the other ends of the hoses
into transparent containers half-full of
brake fluid;
• Interconnect pedals with junction plate
(4);
• Unscrew valves (12) of the left and right
actuating cylinders (11) by 1/2-3/4 turn,
press brake pedals several times and
tighten valves of the both cylinders
holding the pedals pressed. Release
pedals (press quickly, release smoothly);
• Flush the system until there are no more
bubbles leaving the hose put into
container with brake fluid;
• Press interconnected pedals several
times until it starting to resist. Keep
pedals pressed and open valve (12) of
the left actuating cylinder by 1/2-3/4 turn
to discharge fluid with air bubbles from
the system through the hose. Shift pedals
forward to stop, close the valve and
release pedals.
Repeat the procedure several times to
completely remove air.
Repeat the procedures above for the right
actuating cylinder.
Observe fluid level in the tanks while flushing,
do not let it down below MIN mark (1/3-1/4 of
the tank capacity).
Having completed flushing, put protective
caps on and add fluid to MAX mark or t o the
level at 15±5 mm from the top edge of the
tank.
Verify free pedals s troke separatel y with force
equal to 300±10 N (30±1 kgf). The stroke
should be equal to 100-120 mm, otherwise
adjust the stroke as follows:
1. Uns crew locknuts (15) of bolts (9) and
(10) by several turns.
2. Rotate bolts (9) and (10) to set required
pedal stroke.
3. Lock the bolts.
Check brakes operability in motion and, if
necessary, readjust to ensure simultaneous
braking start for both wheels with bolts (9) and
(10) as follows: unscrew locknut (15) of
lagging wheel brake and screw adjusting bolt
in to make braking start simultaneous; tighten
locknuts (15).
54
Page 55

IMPORTANT! Braking distance should not
exceed 6 m when driving at 20 km/h at dry
cted brake pedals.
m, driving path should keep straight.
asphalt with interconne
Braking nonsimultaneity should not exceed 0.5
55
Page 56

Parking brake
IMPORTANT! Parking brake should be
adjusted after main brake pedals only.
Parking brake should be adjusted as follows:
1. Uncotter and remove pin (7).
Disconnect fork (6) from arm (14).
2. Uncotter and remove pin (10) with
washers to disconnect brake valve rod
from arm (11).
3. Screw bolts (12) into parking brake
control arms (13) to set clearance
between their edges and brake lever
plates. Ensure no gap between
actuating cylinder fork (8) groove edge
and brake lever pin (9).
4. Loosen locknut (5) and turn fork (6) to
change rod (4) length so that pin (7)
freely connects the rod to the lever
(14). Lock the rod with locknut (5) and
cotter the pin.
5. Connect brake valve rod to lever (11)
placing washers and ensuring 1-2 mm
gap between pin (10) and upper edge
of lever (11) groove. Cotter the pin (see
adjusting brake valve and its actuator).
With correctly adjusted brake 400N force at
handle (1) should make latch (15) secure the
handle at tooth 2-4 of sector (3) and ensure
tractor holding at 18% slope.
56
Page 57

Checking and adjusting brake valve of
IMPORTANT! Pressure readings at pressure
line system and to rise
line system
with correctly adjusted brake valve actuator
when interconnected brake pedals are fully
pressed or parking brake is engaged.
pneumatic system and its actuator
Pneumatic line of t railer brakes features brake
valve (6). Check and adjust, if necessary,
brake valve operation to ensure correct
operation of the brake valve and brakes of
trailers connected to the tractor.
Perform adjustment with free brake controls
after main brakes and parking brake
adjustment.
For single-line pneumatic drive:
1. Connect pressure gauge of not less than 10
kgf/cm2 capacity to a connection head of
the tractor’s pneumatic system.
2. Switch compressor on and pressurize the
tank up to 7.7-8.0 kgf/cm2 accor ding to an
air pressure gauge at the dashboard.
Pressure gauge connected to connection
head should indicate pressure of not less
than 7.7 kgf/cm2, otherwise act as follows:
• Verif y 1-2 mm gap between pin (2) and
upper edge of lever (1) groove;
• If there is no gap, uncotter and remove
pin (2) and rotate tip (3) to set rod
length;
• Check and adjust, if necessary, spring
(5) precompression to 36-38 mm rotating
nuts (4). Then lock the nuts.
Pressure readings at pressure gauge
connected to the connection head should
fall to null with correctly adjusted brake
valve actuator when interconnected brake
pedals are fully pressed or parking brake is
engaged to stop at tooth 2-4.
3. Disconnect press ure gauge fro m connecti on
head.
For double-line pneumatic drive:
1. Connect pressure gauge of not less than 10
kgf/cm2 capacity to the control line
connection head with yellow cap.
2. Switch compressor on and pressurize the
tank up to 7.7-8.0 kgf/cm2 accor ding to an
air pressure gauge at the dashboard.
Pressure gauge connected to connection
head should indicate pressure of 0 kgf/cm2,
otherwise act as follows:
• Verif y 1-2 mm gap between pin (2) and
upper edge of lever (1) groove;
• If there is no gap, uncotter and remove
pin (2) and rotate tip (3) to set rod
length;
• Check and adjust, if necessary, spring
(5) precompression to 36-38 mm rotating
nuts (4). Then lock the nuts.
• Pressure readings at pressure gauge
connected to the connection head should
rise to 6.5-8.0 kgf/cm2 with correctly
adjusted brake valve actuator when
interconnected brake pedals are fully
pressed or parking brake is engaged to
stop at tooth 2-4.
• Disconnect pressure gauge from
connection head.
If brake valve actuator adjustment cannot
ensure the above pressure settings dismount
the brake valve and send to a workshop for
repair.
gauge connected to the connection head should
fall to null for a singleto 6.5-8.0 kgf/cm2 for a double-
57
Page 58

Checking and adjusting pressure regulator
of pneumatic system
After 100 working hours (TM-3), in case of
incorrect pressure regulator operation or after
its disassembly for cleaning or worn parts
replacement the pressure regulator should be
adjusted as follows:
1. Connect a pressure gauge with 0.1-0.2
kgf/cm2 graduating marks and not less
than 16 kgf/cm2 capacity to perform
check and adjustment.
2. Remove cap (1).
3. Fully screw cap (2) into the casing with
a wrench.
4. Start engine. Switch compressor on and
pressurize the tank with air until safety
valve (6) is activ ated at pressure of 8.510 kgf/cm2. Loose locknut (7) and
adjust the safety valve activated at
pressure exceedin g the s aid range wit h
screw (8). Tighten the locknut.
5. Screw cap (2) in gradually to adjust
force of springs (3, 4) to ensure
discharge valve (5) opening at 7.7-8.0
kgf/cm2 in the tank.
6. Fasten the cap (2) the required position
with paint applied to the casing thread,
put cover (1) on.
7. Part ly open cond ensate di scharge valv e
of the tank and depressurize the tank to
6.5-7.0 kgf/cm2. Valve (5) should close
and switch the compressor to tank
pressurization mode.
8. Disconnect control pressure gauge
from the tank.
58
Page 59

Adjusting FDA cardan shaft
Adjust safety coupling in intermediate bearing
and verify cardan b earings play for the cardan
drive.
Tighten flange (1) nut (2) of the rear
intermediate beari ng shaft en d to set the s afety
coupling to transfer 40-80 kgf∙m (400-800
Nm) of torque.
Adjusting FDA drive transfer box control
rod
Adjust the rod as follows:
1. Set lever (7) to “FDA ON forcedly”
position (upper fixed position).
2. Loosen locknut (4) by 2-3 turns,
uncotter and remove pin (2).
3. Turn lever (1) clockwise to the lowest
position (to completely engage transfer
box (8)).
4. Rotate fork (3) to adjust rod (5) length
so that pin (2) freely enters bores in
fork (3) and lever (1) turned clockwise
to stop.
5. Tighten locknut (4) and cotter pin (2).
59
Page 60

Section 8. RIGGING
Hitch with quick coupler
Rear three-point device
Type (category)
NU-2 (cat. 2)
Lower rods
Solids
Lower rod length*, mm
885
Upper
51
Lower
45
Rated length of connection
elements, mm
Upper rod pin
25
Lower rod pivot bores
28.7
Distance between PTO edge and platform axle, mm
587
Platform axle load capacity, kN
45
ТСУ-1Ж-01
(double crossbar)
ТСУ-1
(single crossbar)*
ТСУ-3В
(fork)
RH element
Mounted on
(on request)
Mounted
(on request)
Distance between PTO edge and link
pin axle, mm
Link pin diameter, mm
30
30
40
Vertical load on TC, kN
12
6.5
6.5
Machine turn angle in relation to the
tractor with removed jaws, degree
Hitches and towing couples
Rear hitch NU-2
Is used for the following applications: hitched machines (ploughs, cultivators, mills, etc.),
semihitched machines (ploughs, tillers, etc.).
Rod pivot length, mm
*
With platform axle length equal to 870 mm.
ТСУ-1Ж-01 (double crossbar)
Is used for the following applications: semihitched machines (seeders, vegetables harvester, etc.),
semitrailed machines (croppers, balers, etc.)
platform axle
independently
400 596 400
60 80 80
*
Crossbar for platform axle per DIN 9676.
Rear hitch NU-2 is produced per cat. 2 and allows coupling machines from cl. 1.4 and 0.9
tractor sets. The hitch features solid lower rods connected to ТСУ-1Ж-01 crossbar (double crossbar
for agricultural machine lugs) for cat. 2 PTO drive.
Lower rods are transversally locked with internal telescopic drawbars capable to allow lower
rods rocking within ±55 mm.
Hookup rods feature automatic jaws allowing quick machine and tool coupling.
Hitch platform axle may be equipped with a crossbar for agricultural machines with ТСУ-1
fork. Using PTO requires cardan shaft of 1000mm rated length so that m achine coupling point in
relation to the crossbar is in the cardan shaft center. Otherwise PTO drive would be overloaded.
ТСУ-3В fork is used for trailers.
The tractor has 4 pairs of free hydraulic outputs (right side is connected to the right rear one)
to service coupled machinery with included high-pressure sl eeves. Outputs ensure not less than 45
l/min oil flow rate (depending on hydraulic pump technical state). Oil takeoff by hydraulic cylinders
60
Page 61

of the coupled machine should not exceed 16 l. check oil level in hydraulic tank with working
Tractor axle
M
MIN
…M
MAX
, t
Front
MP = 2 t
Rear
MZ = 4 t
cylinder rods retracted.
Locking and interrupting devices (enveloping half-couplings and interrupters included into
SPS) are provided to prevent oil loss during machinery coupling or at unpredictable disconnection.
Power may be hydrostatically taken off through an output (see “Section 5. Controls and
instruments”, handle (4) at p. 5-6) with fixed “Lifting Up” position to actuate auxiliary h ydraulic
motors. Working pressure should not exceed 11 MPa to avoid hydraulic system overheating. Use
separate line to discharge oil from hydraulic motor bypassing the distributor.
The tractor is equipped with fittings with phantom flow section DU=12mm and M20x1.5
thread. Use appropriate adapters with phantom flow section of not less than DU=12mm in order to
connect machines with other fittings.
Steerability and axle load criteria
Hitching with the rear hitch is one of the most widely used ways to couple machinery. It
creates need to ensure longitudinal stability of TMA without prejudice to tractor steerability.
Longitudinal stability is measured with steerability criterion being a ratio of steering axle
load to the tractor’s service weight:
KU = ≥ 0.2
KU – tractor steerability factor;
MP – shar e of full service wei ght of tractor acti ng on the front wheel s of a tractor cou pled
with machine;
MEM – tractor service weight without machine.
Required steerabili ty factor is achieved with pl acing ballast weights (av ailable on request).
However, the ballast may be used to improve towing capacity of the tractor.
Permissible axle loads:
but not exceeding overall load capacity of single front or rear wheel tires. Overall load acting on the
tractor wheels should never exceed MP + MZ ≤ 6 t.
61
Page 62

Rear hitch (RH).
Towing coupler (TC) – crossbar.
(standard version)
RH and TC are united into a single assembly
mounted on brackets at the rear axle casing
sides (fig. 1). RH connection points are
represented by Walterscheid automatic jaws
and correspond to the second categor y. RH is
lifted up and down with hydraulic jack levers.
Distance between connection points of the
lower rods is the platform axle length at jaw
pivots and is equal to 870 mm. The crossbar is
used for trailed agricultural machines,
connection pin (kingpin) diameter is 30 mm.
The crossbar ensures standard distance
between jaws.
Tip are fastened to the lower rod ends with
pins 6 and split pins with rings. Pins may be
inserted into either upper or lower, biased,
bores at the tips to ensure the platform axle
length equal to 870 mm. Telescopic drawbars
(TS) (fig. 2) lock the lower rods (tool) or
rocking within ±55 mm.
Locked position is used for operation with
hitched and trailed agricultural machines and
tools, save for machines with active operatin g
elements (mills, etc.).
To lock insert splined pin (4) into the outer
tube (2) bore (5) and the inner tube (2) bore
aligned by rotating screw (1) with a handle (6).
To ensure RH rocking:
• Remove splined pin (4) from the tube;
• Install crossbar (9) (fig. 1) symmetri call y to
longitudinal axis of the tractor;
• Turn a screw to align the inner tube bore at
the groove center of the outer one;
• Insert the splined pin into the groove and
the bore to lock;
• Lock handle 6 (fig. 2) on flattened surfaces
of the inner tube.
Fig. 1. RH and TC
1 – Upper rod;
2 – Hydraulic jack lever, right;
3 – TC fork;
4 – Right brace;
5 – Right tip;
6 – Pin;
7 – Right lower rod;
8 – Right telescopic drawbar;
9 – Crossbar;
10 – Left telescopic drawbar (TS);
11 – Left lower rod;
12 – Left tip;
13 – Left brace;
14 – Hydraulic jack lever, left.
62
Page 63

ATTENTION! Dismount towing fork when
the guides.
ATTENTION! Dismount the towing fork
prior to installing the hitch platform length
adjusting mechanism.
Fig. 2. Telescopic drawbar
1 – Screw; 2 – Inner tube; 3 – Outer tube; 4 – Splined pin; 5 – Outer tube bore; 6 – Handle.
EQUIPMENT ON REQUEST
Towing fork (3) (fig. 1) is used for trailed
applications. It is installed at guiding sides
fixed to the rear axle casing. The fork is
supplied mounted onto a tractor.
operating RH as follows: unscrew 4 bolts and
nuts fixing it to the sides, pull the fork out of
Hitch platform length adjusting mechanism
(fig. 3) is used for applications involving
machines and tools with platform axle length
within 600-870 mm.
63
Page 64

ATTENTION! Removing tips from ends of
rods (2) insert pins (1) into the bores in the
rods as per fig. 3. Fasten the pins with split
their installation onto the tool hitch platform
set and
supplied with the tractor.
In need to work with agricultural machines
and tools featuring irregular hitch axle install
the mechanism as follows according to fig. 3:
• Install drawbar split pins onto the grooves;
• Fasten shackle (10) to plate (7) with pin (8);
• Fasten the fix with a split pin with ring;
• Insert bushing (14) into the shackle eye;
• Push screw (11) through the shackle and
bushing. Screw thread should be located to
the left. Machined plate edges should be
oriented to the tractor;
• Push stud (9) into the bushing and screw
bores flush with the bushing surface;
• Put locknuts (13) onto both threaded ends
of the screw;
• Put tips (5) and (12) with jaws onto plate
(7) (fig. 3). Symmetrically take the tips to
threaded ends of screw (11) and insert the
screw into e yes (6) of the tips (by hand or
with a wrench (S=46), rotating bushing
(14));
pins. Split pins on eyes (6) and (13) of tips (5)
and (12) are used to fasten lower rod pivots at
axle. Pivots are included into RH
• Fasten the plate and lugs (2) to the rod ends
with bolts (4) and nuts and washers
tightened to 320-360 Nm.
Fig. 3. Tool hitch platform axle length
adjusting mechanism
1 – Pin;
2 – Rod;
3 – Spacer;
4 – Bolts and nuts;
5 – Left tip;
6 – Left tip eye;
7 – Plate;
8 – Pin;
9 – Stud;
10 – Shackle;
11 – Screw;
12 – Right tip;
13 – Right tip eye;
14 – Bushing with hexahedron.
64
Page 65

PTO and machine drive
Rotation speed, RPM
Transferred
power, kW (HP)
PTO
Engine
PTO 1S
PTO 2
540
1000
1631 (2081*)
1673 (2184*)
PTO 1S
PTO 2
Tractor: PTO end Machine: PIC bushing
PTO 1 S
(8 splines)
PTO 1
(6 splines)
PTO 2
(21 splines)
Independent drive
Synchronous
*
For MTZ-821/821.2
PTO End type
PTO 1
drive
PTO 1
540
1631 (2081*)
3.9 rotations per meter
14.9R30 tires
59.4 (80.91)
(53.4 (72.5))
*
65
Page 66

Such position of the hitched machine PIC in
Cardan ball joint inclination
angle (deg., max.)
Constant-
velocity
Engaged
22
25
(50 briefly)
Disengaged
55
relation to the tractor’s PTO allows using
standard cardan shafts.
Rear PTO ensures synchronous machine
actuation (active semitrailers, planting
machines, etc.) regardless applied end type.
Drive speed should not exceed 8 km/h.
In order to avoid overloading PTO drive with
coupled inertia machines (balers, harvesting
combines, etc.) use cardan shafts with
overrunning clutches on PIC side.
Using rear PTO for 540 RPM install safety
coupling on PIC side to limit power takeoff
over permissible values. Safety coupling may
be used as well for overload protection of the
drive.
Cardan shaft installation
Using cardan shaft with protective covering
and PTO protecting bridge ensures safe
connection.
End forks should be coplanar.
PTO
Universal
Telescopic elements of cardan shaft should
overlap by not less than 110 mm in order to
avoid disconnection and jamming.
66
Page 67

Shaftless PTO drive
ATTENTION! Mounted machine installation should be agreed with RUPE “MTZ” beforehand.
*
Dimensions for coupled machine
Certain machines m ay be installed on PTO directly, without cardan shaft (reduction gears,
hydraulic pumps, etc.). Ensure case centering per Ø162mm in PTO cover. Provide grooves on the
edge side and at PTO end spline out in order to avoid damage. PTO cover fixing studs may be
replaced with longer ones of the same size, if necessary.
Mounted machine installation
To connect mounted technical appliances (spraying tanks, loaders, stack ers, etc.) the tractor
is provided with a series of installation holes suitable for strapping frames (half-frames) and other
elements.
Selecting agricultural machines
There is wide range of various machines and agricultural tools for agricultural tractors. Such
technical appliances have various technical performance determined by its type and application.
Thus tractor’s operation manual (RE) provides information on tractor’s structure, operational
machinery abilities for coupling, loading modes and safety regulations allowing correct machine
selection and connection. Anyway, manufacturer’s recommendations are not universal for all
operation cases, as even if coupled with the same machine, tractor’s energy performance and
machine and soil effect on the tractor may vary greatly in different operation conditions.
67
Page 68

ATTENTION!
Selecting agricultural machines with active working elements keep in mind, that VON end
and machine’s cardan
Ensure availability of required operational equipment to connect the machine (appropriate
ty of common operation (in transport and operating state) of tractor and
machine.
Technical appliance
Specific resistance,
kN (kgf)
Possible coverage.
M
Ploughs
Potato combines
10-12 (1000-1200)
1.4
rotates clockwise (PTO edge view).
When coupling or purchasing certain machines ensure its compatibility with MTZ tractor as
follows:
1. Get recommendation by machine’s supplier (manufacturer), if possible.
2. Examine machine and tractor operation manuals.
3. Check compatibility:
• In power consumption;
• In hitch load capacity;
• In connection dimensions, including correspondence of PTO
coordinates;
• In permissible TC, tire and axle loads.
4.
PTO end type and dimensions, hoses, cutoff clutches, etc.). Order and purchase equipment
for additional charge, if required.
5. Check possibility of tractor driving within TMA: assess steerability and cross-country
ability.
6. Check possibility of tractor driving at required by application speeds.
7. Check possibili
The tractor may be coupled with machines of 1.4 drawbar category and of class 2 wheeled
tractor’s set. Besides, machines of class 0.9 tractor’s set may be used in harsh conditions or at heavy
soils. Hitches and towing devices, PTOs and hydraulic outputs are internationally standardized,
allowing connection of foreign machines.
Tool coverage and til lage depth generall y depend on speci fic soil resist ance that determine s
working speed diagnosis considering agricultural requirements. The heavier soil, the higher specific
resistance.
Soils: heavy
medium
light
Disk harrows
Share scufflers
Cultivators
Seeding machines
Harvesters
Combines:
clippers
18-25 (1800-2500)
12-14 (1200-1400)
6-8 (600-800)
1.6-2.1 (160-210)
6.0-10.0 (600-1000)
1.6-3.0 (160-300)
1.2-1.8 (120-180)
1.2-1.5 (120-150)
2.6-3.3 (260-330)
0.7
1.0
To 1.7
To 6.0
To 1.4-2.0
4-8
To 7.2
To 9
1.4
Two bores for self-tapping screws may be drilled inside the cab side panel to install coupled
machine operation control board.
68
Page 69

ATTENTION!
ractor operation with or without the machine overall axle loads may exceed
Front axle load should always (with or without the coupled machine) be equal to not less than
Coupled machine’s cardan should be equipped with safety devices (safety cover or guards).
Consider the following when connecting TMA:
In any case of t
maximum permissible tractor’s service weight;
20% (0.2) of tractor’s service weight;
Using safety chains (ropes) for trailers and semitrailers is obligatory;
Hydraulic systems of the tractor and coupled machines should always be connected with cutoff
clutches;
Never use connecting oil lines with flow section less than 12 mm as is causes oil overheating in
hydraulic system and early pump breakdown;
Transport works
Almost half time the tractor is used in transport and has access to public roads. Thus
transport TMAs are subject to higher safety requirements.
According to GOST tractor trailers and semitrailers should be equipped with main and
parking brakes, safety chains or ropes. Main brakes system is of single-line type and is controlled
from operator’s working place. Parking brake actuator should be located at the machine.
Vehicles are connected via ТСУ-1Ж-01 at TMA driving speed not exceeding 15 km/h.
Trailers and semitrailers should have maximum speed limit sign located at the rear to the
left.
TMA overall dimensions should not exceed 2.5 m in width and 3.8 m in height to have
access to public roads, otherwise is should be agreed with road police.
Vehicle’s load capacity depends on land relief, road slope and condition. Overall semitrailer
(trailer) weight should not exceed 6000 kg considering permissible longitudinal slope in 12°.
The tractor is provided with combined multipin socket with coupled machine equipment
feeding jack according to GOST and ISO standard.
69
Page 70

Operation
Tractor packaging
Speed, km/h
Note
Working on slopes
10 max.
TMA in sharp turns
5 max.
Actuation through
synchronous PTO
Transporting TMA to
vehicles)
Transport works
ТСУ-1
15 max.
Driving speed selection
Vehicle’s driving speed may be limited by the coupled machine possibilities according to a
sign applied.
Choosing driving speed the operator should consider driving intensity, state and features of
coupled machines and carried load, road and weather conditions, tractor’s abilities and limitations
by traffic regulations and working processes. Operator should reduce speed or stop in front of any
obstacle to ensure safety.
8 max.
operation site (save for
Machine speed may be limited by the coupled machine abilities according to a sign applied.
15 max. On public roads
70
Page 71

FAULT, SYMPTOMS
REMEDY
ENGINE
Engine will not start
Air in fuel system
Flush the system with manual pump. Eliminate
air inflow, if necessary.
Faulty fuel pump
Remove fuel pump from the engine and send to
repair workshop
Engine shows insufficient power
No full fuel supply due to misadjusted fuel
pump control rods
Adjust control rods
Clogged filter element of fine fuel filter
Replace filter element
Faulty injectors
Reveal faulty injectors, wash and adjust
Incorrect fuel injection lead angle
Set recommended fuel injection lead angle
Clogged engine air filter
Service air filter
Unstable cold operation of the engine
Air intake into fuel system
Remove air from the fuel system
Misadjusted idling spring in the fuel pump
Adjust idling spring
Faulty fuel pump
Disassemble fuel pump from the engine and
send to repair workshop
Engine fuming in all operation modes
A. Black fume from exhaust pipe
Clogged engine air filter
Service the air filter
Injector sprayer needle hanging-up
Reveal faulty injector, wash or replace sprayer,
adjust the injector, if necessary
Low-quality fuel
Replace fuel with recommended one
Faulty fuel pump
Disassemble fuel pump from the engine and
send to repair workshop
B. White smoke from exhaust pipe
Cold engine
Warm the engine up, keep coolant temperature
within 75-95°C range at operation
Misadjusted clearances between valves and
rockers
Adjust clearances
Water in fuel
Replace fuel
Incorrect fuel injection lead angle
Set recommended fuel injection lead angle
C. Blue smoke from exhaust pipe
Oil in combustion chamber due to worn parts of
piston-cylinder group
Replace worn parts of piston-cylinder group
Excessive oil in engine oil pan
Discharge excessive oil to set the level at the
upper mark of oil dipstick
Engine overheating
Boiling coolant in cooler
Clean the cooler of dirt and dust. Clean cooling
tension
Poor fuel dispersion by injectors
Reveal faulty injectors, clean, wash, adjust
Section 9. TROUBLESHOOTING
system of scale, if necessary. Adjust fan belt
71
Page 72

FAULT, SYMPTOMS
REMEDY
Too low oil pressure at warm engine
Pressure gauge or cell malfunction
Replace
Engine lubrication system pump malfunction
Correct malfunction or replace the pump
Too low oil level in oil pan
Add oil to the upper mark at oil dipstick
Hanged discharge valve of centrifugal oil filter*
Rinse the valve and adjust pressure
Extremely worn junctions “crankshaft necks –
bearings”
Send engine for repair
POWERTRAIN, CLUTCH
Clutch shall not transfer full torque
No free travel of clutch pedal
Adjust free travel of the pedal
Worn driven plate pads
Replace drive plate assembly
Clutch shall not fully disengage
Excessive free travel of the pedal
Adjust free travel of the pedal
Oil in dry compartment of friction clutch
Worn crankshaft sealing collar
Replace collar
MAIN DRIVE
Increase noise in conical pair
Misadjusted main drive gear teeth and
differential bearings engagement
Adjust gear engagement and bearing gaps
BRAKES
Ineffective braking (brakes do not hold)
Incorrect brakes control adjustment
Adjust brakes control
Oiled or worn brake disk pads
Remove oil leaks. Replace disks, if necessary
REAR PTO
Rear PTO shall not transfer full torque (slips)
Misadjusted control mechanism due to badly
worn brake band friction pads or otherwise
Adjust PTO control mechanisms
Unclear PTO control arm shifting (jams, rests,
Eliminate impediments to free control
positions
FRONT DRIVING AXLE
forward
Worn free-wheeling clutch parts
Replace free-wheeling clutch
Jamming grooves at free-wheeling clutch outer
wear products
Disassemble the clutch and wash its parts
Deformed springs at roller cushion mechanism
Replace springs
Transfer box control rod is too long
Adjust rod length according to “Section 7.
Adjustments”
dirt, etc. in mechanism connections)
Front axle is not automatically activated with slipping rear wheels during tractor move
ring are contaminated with oil oxidation or part
*
Not for MTZ-921.3 with D245.5S2 engine.
mechanism parts moving. Control arm should be
clearly fixed in “PTO ON” and “PTO OFF”
72
Page 73

FAULT, SYMPTOMS
REMEDY
Front tires are quickly worn or ply-separated
Front and rear tire pressure does not correspond
to recommended
Keep front and rear tire pressure consistent with
recommended to prevent malfunctions
Misadjusted wheel toe-in
Adjust
FDA is constantly activated due to breakdown
Check forced FDA activation operation. Correct
mechanism
Safety clutch of intermediate bearing shall not transfer required torque
Misadjusted torque transfer of the clutch
Adjust
Worn driving and driven clutch plates
Replace disks
Disk springs lost elasticity or broke
Replace springs
HYDROSTATIC POWER STEERING
Increase effort on steering wheel
Insufficient oil pressure in power steering
hydraulic system. Faulty feeding pump
Send feeding pump for repair or replace
Insufficient oil in oil tank
Add oil to the level
Excessive friction between mechanical parts of
steering column
Repair
No thrust at steering wheel turning
Insufficient oil in the tank
Add oil and flush the system
Spontaneous steering wheel turning (“motoring”) with no operator’s action
Dosing pump slide valve shall not return to
neutral position
a) splined end of steering column shaft jams in
dosing pump driving shaft
Adjust steering column
b) excessive friction between mechanical parts
of steering column
Repair
Guide wheels turn does not correspond to the steering wheel rotation direction
Incorrect dosing pump cylinder outputs
connection to the turning cylinder
Change connection
HYDRAULIC HITCH
Hitch platform does not lift up or its load
“Lift Up” position. Oil is generally overheated
1. Insufficient oil in the tank – add oil to the
eliminate air intake.
Load capacity reduces as oil warm up. Load
capacity restores as oil cools
Worn or damaged oil pump – replace the pump
Hitch platform does not lift down with the
Slide valve jams in hydraulic jack distributor
discharge filter and fill the tank with clean oil
Mounted plough pops-up out of soil or deepens
adjustment mode
Destroyed power cell spring – replace the spring
Handles shall not hold the set position
Worn friction washers fixing handles to the
bracket
Heavy hydraulic system vibration with the tool
1. Destroyed or shrunk spring – replace the
2. Destroyed stop – replace the stop.
or jamming in transfer box control
malfunction. Adjust transfer box control
capacity is drastically reduced. Pump “squeals”
with one of external distributor handles set to
handles set to the front position, additional
pusher pressing is required
excessively with little handle shift in force
going down
tank to correct level.
2. Air intake to the pump suction line –
casing in “Lift Up” or “Neutral” position due to
contaminated oil – rinse the system, replace
spring.
73
Page 74

FAULT, SYMPTOMS
REMEDY
ELECTRICALS
Low charge of the battery
Low level of regulated voltage
Replace voltage regulator at generator
Slipping generator drive belt
Adjust belt tension
Increased transition voltage between battery
oxidation
Strip connection terminals, tighten and lubricate
“ground” switch fixation and “ground” bridges
Faulty battery
Replace
Battery “boils” and requires frequent distilled water additions
High level of regulated voltage
Replace voltage regulator at generator
Faulty battery
Replace
Starter shall not start and rotate engine crankshaft
Disconnected one of wire terminals to the
battery
Secure tips at battery terminals
Heavily oxidized wire tips and battery terminals
Strip battery terminals and wire tips, lubricate
their noncontact areas with petrolatum
Activated engine starting interlock or faulty
interlock switch
Set gearbox lever to the most left position or
replace the switch
Insufficient starting torque of the starter due to
battery discharge
Charge the battery correctly
Faulty starter
Disassemble the starter and send for repair
Generator shall not show full power
Slipping generator drive belt
Adjust belt tension
Faulty generator
Disassemble generator and send for repair
Generator noise
Slipping or overtight fan belt
Adjust belt tension
Worn bearing
Disassemble generator and send for repair
Starting preheater control light is not on
Starting preheater circuit break
Repair
Heater circuit parts malfunction
Replace
CAB HEATING AND VENTING UNIT
Warm air shall not enter the cab
Water shall not circulate through the heating
Closed valve – open. Clogged hoses – clean. Air
not operate – consult qualified technician
Warm wet air enters the cab
Water leak from heating cooler and from heating
system connections. Damaged hoses
Repair
PNEUMATIC SYSTEM
Insufficient air pressure in the tank, pressure slowly rises and quickly drops at engine stop
Air leak in the system
Repair
Compressor malfunction
Disassemble and send for repair
Air pressure in the tank quickly drops with pressed brake pedals
Brake valve malfunction
Disassemble and send for repair
Excessive oil discharge to pneumatic system
Compressor malfunction
Disassemble and send for repair
terminals and wire tips due to slackening or
noncontact areas with petrolatum. Tighten
unit
or ice plugs in heater hoses – remove. Fan shall
74
Page 75

FAULT, SYMPTOMS
REMEDY
No air bleeding to pump tires up
Air bleeding valve rod is insufficiently flush
with pressure regulator
Fully tighten connection hose but to connection
pipe
Pressure regulator switches compressor to idling
Depressurize the tank by 1.5…2 kgf/cm2
Ineffective or slowly releasing trailer brakes
Misadjusted brake valve actuator
Adjust
Misadjusted brake valve
Disassemble and send for repair
Trailer braking system malfunction
Repair
Maintenance type
Servicing intervals or times in operating hours
Maintenance to prepare the tractor for operation:
Maintenance to prepare tractor for break-in
Maintenance during breaking-in
SM (8-10)
Maintenance after breaking-in
After 30 operating hours
Scheduled maintenance:
Shift (SM)
8-10
Maintenance No.1 (TM-1)
125
Maintenance No.2 (TM-2)
500
Maintenance No.3 (TM-3)
1000
Special maintenance
2000
Seasonal maintenance (TM-SS and TO-O3)
At starting autumn and winter (TO-O3) or
spring and summer (TO-SS) operation
Maintenance in special operating conditions
While preparing for operation in special
conditions
Maintenance at storage
Section 10. MAINTENANCE
Maintenance represents a system of preventive measures aimed at premature tractor wear
prevention by creating and maintaining normal operational conditions and by adjusting wear parts
and assemblies.
Generally maintenance does not require tractor disassembly is performed by operators.
Scheduled scope and intervals are binding.
Shift maintenance plays great role in measure system for holding tractor operability on.
TYPES OF TRACTOR MAINTENANCE
75
Page 76

MAINTENANCE TO PREPARE TRACTOR FOR OPERATION
Observe “Section 6. Preparation to work and
work order” while preparing the tractor to
operational break-in.
Maintenance during break-in:
Perform shift maintenance while breaking the
tractor in (see SM operations below).
Maintenance after break-in (after 30
operating hours):
1. Examine and clean the tractor;
2. Listen to engine and other components
operation;
3. Verify cylinder head bolts tension.
Tighten, if necessary;
4. Verify and adjust, if necessary, gaps
between engine valves and rockers;
5. Clean centrifugal oil filter rotor;
6. Check and adjust, if necessary, fan belt
tension;
7. Discharge sediment fro m the fuel tank
and rough fuel filters;
8. Check operability of clutch, brakes,
pneumatic drive. Service, if necessary;
9. Check and service, if necessary, the
battery;
10. Change oil in:
• Engine oil pan;
• Powertrain casings;
• Wheel reduction gears and main
FDA drive and intermediate bearing.
11. Repl ace filter element of RH hydraulic
system;
12. Clean engine oil prefilter mesh;
13. Squirt all lubrication points;
14. Remove condensate from pneumatic
system tank;
15. Service air filter, if necessary;
16. Check front tire pressure and toe-in;
17. Check and tighten, if necessary,
external bolted connections, including
that of FDA cardan drive intermediate
bearing bracket fixation, powertrain
casings, rear wheel hubs, hydraulic
jack and front and rear wheel nuts;
18. Check air fi l ter an d en gi ne i nt ake l eaks.
Repair, if any;
19. Check operability of engine, lighting
and signaling systems, screen washer
and wiper.
76
Page 77

Lubrication and maintenance layout
77
Page 78

SCHEDULED MAINTENANCE TABLE
Lubricate,
add
Remove,
replace
Shift maintenance (SM) each 10 operating hours
1
Engine oil level
+ 2 Coolant level in cooler
+ 3 Oil level in hydraulic system oil tank
+ 4 Condensate removal from pneumatic tank
+ 5 Oil level in power steering oil tank
+
Brake fluid level in main clutch cylinder and
main brakes tanks
7
Tire pressure
+
Maintenance No.1 (TM-1) after 125 operating hours
8
Sediments from fuel tank and rough fuel filter
+ 9 Fan belt
+
Rear wheel hubs. Front and rear wheels
(wheel nuts torque)
11* FDA reduction gear bearings
+
12
Air filter
+
13
Shifter bearing
+
14
Battery
+
15
Cab venting and heating filter
+
16
Front wheels toe-in
+ +
Intermediate bearing
**
and reduction gear of
front driving axle (UBGP)
18* Steering hydraulic cylinder ball joints
+
19* Steering rod ball joints
+
20* Clutch pedal free travel adjustment
+
21* Turbocompressor
***
+
22* Centrifugal oil filter
+
23* Engine oil
+
Maintenance No.2 (TM-2) after 500 operating hours
24
Engine valve gaps
+ +
25
RH hydraulic system filters
+
26
Steering wheel
+ +
27
Brakes
+ +
28
Pressure regulator filter
+
29
**
Pneumatic system leaks
+
30
**
PTO control
+ +
31
Generator
+
32
Filter element in power steering oil tank
+
33
Fine fuel filter
+
34
Transmission oil (level check)
+
35
FDA casings oil (level check)
+ +
36
FDA reduction gear axis bearing clearances
+ +
Pos.
6
10
Maintained area Check Flush
+
+
Adjust
17
+
*
Perform maintenance operations after 250 hours.
**
Not shown at lubrication layout.
***
For MTZ-821.3/921/921.2/921.3/921/4.
78
Page 79

Table continued
Lubricate,
add
Remove,
replace
Maintenance No.3 (TM-3) after 1000 operating hours
37
Engine head fixing bolts
+
38
Rough fuel filter
+
39
Fine fuel filter
+
40
Engine breather
+
41
Generator
+
42**
External bolted connections
+
43
Turbocompressor
*
+
44
Transmission oil
+
45
Engine oil prefilter
+
Oil in intermediate bearing, wheel reduction
gear casings and main drive casing
47
Oil in hydraulic system tank
+
48
Oil in power steering tank
+
Special maintenance after 2000 operating hours
49
Engine injectors
+ +
50
Fuel pump. Injection lead angle
+ +
51
Fuel pump. Bench adjustment
+ +
52
Engine cooling system
+
53
Starter
+
54
Centrifugal engine oil filter
***
discharge valve
+ +
Pos.
46
Maintained area Check Flush
+
Adjust
*
For MTZ-821.3/921/921.2/921.3/921.4.
**
Not shown at lubrication layout.
***
Paper filter element for MTZ-921.3/921/4.
79
Page 80

Operations
At shifting to autumn and winter conditions
+5°C)
At shifting to spring and summer conditions
+5°C)
Change summer oil brands for winter ones (see
table on lubricants):
Change winter oil brands for summer ones
in engine oil pan
in engine oil pan
in RH and HPS hydraulic tanks
in RH and HPS hydraulic tanks
in transmission casings
in transmission casings
in main FDA drive casing
in main FDA drive casing
in wheel reduction gear casings
in wheel reduction gear casings
in intermediate FDA drive bearing
in intermediate FDA drive bearing
Check battery state, recharge, if necessary.
Check density of acid in the batteries per
summer standards
Flush engine cooling system and fill with
antifreeze coolant
Disassemble cardan shafts and check axial
Tighten nuts to remove axial play
Engine cooling system
17 (19)*
Engine lubrication system
12
Transmission casings
40
FDA casing
1.6
Reduction gear casing at FDA final drive (each)
1.5
Casing of PVD reduction gear upper conical pair (each)
0.3
Hydraulic system oil tank
25.0
Power steering oil tank
6.0
Fuel tank
95
FDA cardan drive intermediate bearing housing
0.15
Seasonal maintenance should be combined with scheduled maintenance works.
(with stable daily average temperature below
flange tightness at transfer box axles,
intermediate bearing axles and main drive gear.
Refill capacities, l
(with stable daily average temperature over
*
For MTZ-921.3/921.4
80
Page 81

Shift maintenance (SM) each 8-10 operating
IMPORTANT! Do not overfill engine with
interpreted as great oil consumption. Never
allow the engine run with oil level below the
lower mark at the dipstick.
WARNING! Cooling system is pressurized.
e cap from hot engine is
Leave the engine to cool down.
Cover the cap with cloth and turn the cap
slowly to depressurize gradually prior to
liquid.
NOTE! If using machines requiring great oil
takeoff, add oil to the level corresponding to
the upper “C” mark with retracted rods of
hydraulic cylinders at mounted machine.
hours or daily
Operation 1. Engine pan oil level check.
Stop the engine and check oil level in 15
minutes. Oil level should locate between the
upper and the lower marks at oil dipstick (3).
Remove oil filler neck (1) cap (2) and add oil
to the upper mark at the dipstick (3), if
necessary.
oil. Burning excessive oil may be erroneously
Operation 2. Coolant level in cooler check.
Remove cooler cap and check coolant level.
Coolant level should be 50-60 mm below the
filler neck edge (1). Add coolant, if necessary.
Pressure is controlled by the cooler cap valve.
Removing th
dangerous!
complete cap removal. Avoid burning by hot
Operation 3. Hydraulic system oil tank level
check.
Place the tractor on a plain horizontal ground
prior to check oil level. Check oil level with an
oil meter (2). The level should locate between
“0” and “П” marks. If n ecessar y, remove filler
cap (1) and add oil to “П” mark with hitch in
the lowest position.
81
Page 82

NOTE! Loosen two fasteners and remove left
side facing grill to access the power steering
oil tank (the tank is installed onto the front
brace in front of the oil cooler).
WARNING! Filling with or adding other
fluids may disturb operation of clutch and
brakes control hydraulic actuators.
Operation 4. Condensate discharge from air
tank.
On completion of the work, with pressurized
air tank, pull horizontally discharge valve ring
(1) to remove condensate.
Operation 5. Power steering oil tank level
check.
Place the tractor on a plain horizontal ground
and stop the engine prior to checking oil level.
Check power steering oil tank level with an oil
metering dipstick (1). Oil level should locate
between the upper and the lower marks at the
dipstick. Remove oil filler neck cap (2) and
add oil to the upper mark, if necessary.
Operation 6. Checking brake fluid levels in
main clutch cylinder and main brakes
tanks.
Visually check fluid levels in the main clutch
cylinder tank (1) and in main brake cylinder
tanks (3).
Oil level should locate between MIN and
MAX marks at the tank shells. If necessary,
remove caps (4) and add brake fluid to MAX
level, i.e. to 15±5 mm from the upper tank
edge.
“Neva-M”, “ROSDOT” or analogous brake
fluids are recommended for use.
Level sensor (2) is installed on the cylinder
cap to control brake fluid level in main brake
cylinder tanks.
tire pressure consistent with regulation of
“Section 3. Technical specifications”.
Operation 7. Tire pressure check
Check cold tire press ure an d ex am i ne t ire t read
for damages. If necessa ry, make front and rear
82
Page 83

NOTE! Check generator belt tension at
crankshaft pulley”
fragment with ordinary generator guard. Belt
force applied to the belt fragment middle.
Maintenance No.1 (TM-1) each 125
operating hours.
Includes operations of the previous
maintenance and the following:
Operation 8. Removing sediments from fuel
tank and rough fuel filter.
Unscrew discharg e caps (1) o f th e fuel tan k (2)
and filter (3) and remove sediments until clean
fuel starts to discharge. Gather the sediments
into a suitable container for used oils and
liquids. Tighten discharge caps aft er cle an fuel
with no water or dirt start to flow.
Operation 9. Engine cooling fan belt tension
check.
Examine the belt for w e a r or damage. Replac e,
if necessary.
To check generator belt tension at an engine
with elongated guard apply approximately
40N to the middle of “generator pulley – water
pump pulley” belt fragment (1). Sagging
should constitute 6-10 mm. If necessary, turn
generator housing to adjust the belt tension,
with previously loosened and then tightened
plate fixing bolts and nuts of generator fixi ng
bolts.
necessary, with a torque wrench. Torque
should be equal to 230-330 Nm.
Verify torque and tighten front and rear wheel
nuts to 250-300 Nm, if necessary. Disk-to-rim
fasteners for rear wheels should be tightened
to 160-200 Nm. Wheel-to-hub fixing nuts
should be tightened to 200-250 Nm for the
front wheels, and 300-350 Nm – for the rear
ones.
“generator pulley –
sagging should constitute 15-20 mm with 40N
Operation 10. Rear wheel hubs. Front and
rear wheels (wheel nuts torque).
Verify torque and tighten bolts (1) fixing rear
wheel hubs (four bolts per each hub), if
83
Page 84

84
Page 85

ATTENTION! We do not recommend
removing control filter element from the
housing. Contaminated control filter element
) (broken paper blind, unstuck bottom
and replace
MFE.
Operation 11. Lubricating FDA reduction
gear bearings.
Lubricate bearings (1) with grease fittings
through opening (2). Make 4-5 pressings.
Operation 12. Servicing air filter.
Air filter element clogging is controlled with
clogging indicator. A lamp at the dashboard
signals of increased contamination.
Air filter is serviced as follows:
• Remove right side front grill and facing to
access the air filter;
• Pull latch (1) (yellow), turn cap (2)
counterclockwise by 12.5° and remove the
cap;
• Remove main filter element (3);
• Examine control filter element (CFE) for
contamination without removing it from
housing.
indicates damage to the main filter element
(MFE
plate). It such a case rinse CFE
• Blow the main filter element with
compressed air inside and outside to
completely remove dust. Air pressure
should not exceed 0.2-0.3 MPa (2-3
kgf/cm2) to avoid paper blind breakage;
• Direct air flow angularly to the filter
element surface. Avoid damaging and
oiling filter element while servicing;
• Wash oiled or contaminated filter elements,
that cannot be clean ed wit h compressed air ,
with OP-7 or OP-10 soapy paste water
solution at temperature of 40-50°C;
• The solution should be prepared from 20g
of paste per 1l of water. Missing paste may
be replaced with domestic powder detergent
with the same concentration;
85
Page 86

NOTE! Check MFE state every 20 operating
hours in dusty conditions.
NOTE! Do not overfill the shifter with grease.
the friction clutch.
WARNING! Batteries contain sulfuric acid
Drink much water or milk if acid is
Do not allow sparks or fire get close to the
protective gloves when servicing batteries.
• Wash the element by dipping into the
cleaning solution for half-hour. Then rinse
the element with the same solution within
15 minutes and with clean water at 3545°C. dry within 24 hours. Never use open
fire and air hotter than +70°C to dry the
filter element out;
• Assemble the air filter in reverse order.
Operation 13. Clutch shifter bearing
lubrication.
• Remove plug (1) at the left side of clutch
housing;
• Insert a tip of piston gun into the hole to get
full contact with the grease-fitting and
make 4-6 pressings of “Litol-24” grease
through a grease-fitting in shifter casing.
Excessive grease ma y get to fricti on surfac e of
Operation 14. Batteries.
that causes burns at contacts with skin, eyes or
cloths. In case of acid contact with external
body surface rinse it with much clean water.
swallowed. Wash eyes with much water within
15 minutes and take medical advice in case of
contact with eyes.
acid area as it may provoke explosion. Charge
batteries in vented room. Wear goggles and
• Remove left and right side grills at the front
facing to access batteries;
• Clean the batteries of dust and dirt;
• Keep the batteries clean and dry;
• Ensure secure battery fixation. Clear
surrounding surface prior to removing caps;
• Check electrolyte level. It should be 12-15
mm over protective m esh (or between level
marks at transparent battery casing);
• Check acid density in each battery cell.
Density should correspond to fully charged
battery;
• Add distilled water, if necessary;
• Ensure cleanness of terminals (2) and plugs
(3).
• Grease terminals with petrolatum and clean
plug vents (3), if necessary.
86
Page 87

ATTENTION! Do not switch the fan on prior
to wet paper filter element.
ATTENTION! Be careful not to damage
paper filter element.
NOTE! Clean filter each 8-10 operating hours,
i.e. each shift, in dusty conditions.
Operation 15. Cleaning cab heating and
venting system filter.
to cleaning filters in wet ambient as dust sticks
Filter elements of venting system are located
on both sides of the cab.
• Get a pedestal or small step ladder to acces s
the filter;
• Unscrew two screws (2) with plastic caps
under prominent edge of the roof;
• Remove panel (1) and filter (3);
• Remove dust from the filter by tapping;
• Clean the filter with compressed air under
pressure not exceeding 1 MPa. Keep the
hose tip not closer than 300 mm to the filter
in order not to d amage paper filter elem ent.
Direct air flow through the filter oppositely
to ordinary air flow direction indicated by
arrows at the filter;
• Replace the filter is reverse order. Repeat
procedure to clean fil ter at the other side o f
the cab.
Operation 16. Front wheels toe-in (each
second TM-1).
Front wheels should toe in within 0-8 mm.
adjust, if necessary, according to regulations of
“Section 7. Adjustments”.
Operation 17. Checking oil level in
intermediated cardan drive bearing and in
the upper FDA reduction gear conical pa ir
hollow.
Check oil levels in hollows of intermediate
bearing and FDA reduction gear upper conical
pairs. Add oil, if necessary, to the lower edges
of inspection and filler openings closed with
plugs (1, 2). Replace and tighten the plugs.
87
Page 88

NOTE! If play cannot be removed by
joint and replace worn parts.
Operation 18. Lubricating steering
hydraulic cylinder ball joints (each second
TM-1).
Using a syringe lubricate ball joints through
grease-fittings (3) (two grease-fittings) with
“Litol-24” grease or recommended substitute
until the grease comes out in gaps.
Operation 19. Checking play is steering ball
joints (each second TM-1).
Turn steering wheel in both directions with
running engine to check free travel and pla y in
ball joints (1) of steering rod (4). Perform the
following in case of playing ball joints:
• Remove safety wire (3);
• Tighten threaded plug (2) so as to eliminate
gap in the ball joint. Lock the plug.
tightening threaded plugs, disassemble the ball
Operation 20. Adjusting free travel of
friction clutch pedal (each second TM-1).
Adjust free travel of the friction clutch pedal
(see “Section 7. Adjustments”).
Operation 21. Turbocompressor* (MTZ-
821.2/921/921.2/921.3/921.4).
Verify turbocompressor (1), exhaust manifold
(2) and exhaust pipe bracket (3) fixing bolts
torque. Tighten the bolts to 35-40 Nm (3.5-4.0
kgf∙m), if necessary.
*
Perform maintenance operation after 250 hours.
88
Page 89

ATTENTION! Engine filter operates properly
rotating rotor can be heard from
warm engine stop.
Maintenance No.2 (TM-2) each 500
operating hours.
Includes mentioned above and the following
operations:
Operation 22. Cleaning centrifugal engine
oil filter.
• Remove nut (1) and cap (2);
• Lift rotor (3) up to stop to insert screw
driver (5) to prevent rotor rotation. Rotate
rotor nut with wrench (4) to remove rotor
housing (3);
• Remove cover (6), impeller (7) and filter
mesh (8);
• Clean all parts of sediments, wash them
with diesel fuel and blow with compressed
air;
• Align balancing marks at rotor cup and
housing to assemble the rotor. Tighten the
nut fixing the cup with little force to
completely settle the cup into the rotor.
Ensure free rotation of the rotor;
• Replace filter cap, tighten cap nut to 35-40
Nm (3.5-40 kgf∙m).
if sound of
under the filter cap within 30-60 seconds after
Operation 23. Engine oil change.
• Place the tractor on a plain ground. Engage
parking brake;
• Warm the engine up to normal operating
temperature (not less than 70°C);
• Remove cap (2) from filler neck (1);
• Remove drain plug (4) from the engine oil
pan and discharge oil to appropriate
container for used oil;
• Replace drain plug (4);
• Fill the oil pan with oil recommended by
the present manual (see “Table of
lubricants”);
• Check oil level with dipstick (3);
• Replace oil filler cap, start and run the
engine within 1-2 minutes. Add oil to
required level, if necessary.
89
Page 90

Operation 24. Engine valve clearances.
ATTENTION! Verify and adjust clearances
at cold engine.
NOTE! In the following hydraulic system PFE
should be replaced each 1000 operating hours.
• Disassemble cylinder head cover;
• Verify and, if necessary, tighten bolts and
nuts fastening rocker arm shaft brackets to
60-90 Nm (6-9 kgf∙m);
• Rotate crankshaft clockwise until 1st
cylinder valves overlap (exhaust valve
starts to open, inlet valve completes
closing);
• Verify and adjust, if necessary, clearances
in valves 4, 6, 7 and 8 (valves are numbered
in direction from the fan). For clearances
for inlet and exhau st valves see “Sect ion 3.
Technical specifications”;
• Rotate crankshaft by 360° until 4th cylinder
valves overlap and adjust clearances of
valves 1, 2, 3 and 5;
• Tighten screw locknuts and replace
disassemble parts.
Operation 25. Replacing PFE filter of RH
hydraulics.
• Remove screws (1) and remove cover (2);
• Remove housing (4) with PFE (3);
• Rinse housing (4) with cleaning solution;
• Install new PFE complete with housing (4)
into the tank of hydraulic system;
• Replace cover (2) and fasten with bolts (1).
Operation 26. Free travel of steering wheel.
Steering wheel free travel should not exceed
25° with running engine. Otherwise eliminate
play in steering ball joints, tighten pivot arm
nuts, eliminate play in steering column and
steering linkage.
90
Page 91

Operation 27. Brakes check and adjustment
Check and adjust brake pedal in operation in
case of:
• Nonsimultaneous braking of left and right
wheels;
• Ineffective wheel braking (large braking
distance);
• Excessive brake housing heating and other
signs of brakes malfunction.
Adjust, if necessary, according to instructions
of “Section 7. Adjustments”.
Operation 28. Cleaning pressure regulator
filter.
To clean the filter:
• Unscrew bolts (1) and remove cover (2);
• Remove the filter, rinse it with cleaning
solution and blow with compressed air;
• Replace the filter and the cover, tighten
bolts (1).
Operation 29. Pneumatic system leak test.
• Pressurize pneumatic system to 6.0-6.5
kgf/cm2 (per dashboard air pressure
indicator) and stop the engine;
• Observe pressure drop with air pressure
indicator. Pressure drop should not exceed
2.0 kgf/cm2 after 30 minutes. Otherwise
locate and repair air leak.
Operation 30. Rear PTO control check.
Lever (1) should not require force exceeding
120-150 Nm (12-15 kgf) to switch between
ON and OFF positions. Shifts should be clear.
If necessary, adjust according to regulations of
“Section 7. Adjustments”.
Operation 31. Cleaning generator.
Clean generator of dirt and dust. Verify and
tighten, if necessary, generator fixing bolts (1).
Check state and tension of generator (2)
connections. Tighten, if necessary.
91
Page 92

Operation 32. Replacing filter element in
NOTE! If the following repl ace filter element
in the power steering oil tank each 1000
operating hours.
power steering oil tank.
Turn and remove side grill at front facing to
access the oil tank.
• Unscrew bolts (1), remove cover (2) and
filter element assembly;
• Install new filter element into the oil tank,
close the cover and fasten with bolts.
Remove oil filler cap (3) and add oil to the
upper mark at oil meter, if necessary.
Operation 33*. Removing sediment from
fine fuel filter.
Unscrew drain plug (1) and discharge
sediment until clean fuel with no signs of
water or dirt flows out. Install drain plug (1).
Flush the fuel system, if necessary.
Operation 34. Transmission oil change.
Check transmission oil level with a dipstick
(1) to the left of the gearbox. Normal operating
oil level should be between the middle and the
lower marks at the dipstick.
In case of transmission oil level below the
lower mark at the dipstick remove
transmission oil filler cap (2) and add oil to
normal operating level.
Remove transmission oil filler cap and add oil
to correct transmission oil level, if necessary.
*
Perform maintenance after 250 hours.
92
Page 93

NOTE! Perform this operation at warm engine
only.
Operation 35. FDA housing oil level check.
• Check oil level in left and right housings of
lower FDA reduction gear conical pairs.
Add oil to the level of inspection and filler
ports closed with plugs (2), if necessary;
• Check oil level in FDA differential case.
Add oil to the level of inspection and filler
port closed with plug (1), if necessary.
Operation 36. Reduction gear support
bearings (axis) check and adjustment.
Verify tightness in bearings (4, 5). Adjust, if
necessary.
Bearing preload should be equal 0.03-0.06mm.
Stub axle turning force applied to flange (6)
should be equal to 60-80 N with correctly
adjusted bearings.
If necessary, adjust as follows:
• Unscrew four bolts (2), screw two
disassembling bolts into threaded bores in
axle (1) and press the axle out to allow
adjusting shims (3) removal and
installation;
• Remove or install required number of
adjusting shims from under the upper axis
(1) flange. Diametrical shims should be of
equal thickness;
• Screw disassembling bolts out and tighten
bolts (2) to 120-140 Nm.
Maintenance No.3 (TM-3) each 1000
operating hours.
Includes mentioned above and the following
operations:
Operation 37. Engine cylinder head bolts
torque verification.
should be equal to 160-180 Nm (16-18
kgf∙m).
• Disassemble rocker cover, cylinder head
cover and rocker shaft assembly;
• Using a torque wrench verify and tighten
cylinder head bolts in sequence according
after the figure to the right. Bolt torque
93
Page 94

IMPORTANT! Verify and adjust, if
necessary, valve clearances after this
operation.
94
Page 95

IMPORTANT! After filter replacement flus h
fuel system with manual pump with air bleed
plug (4) unscrewed by 2-3 turns.
Operation 38. Flushing rough fuel filter.
• Close fuel tank valve;
• Remove upper filter surface and unscrew
four bolts (1). Remove cup (3);
• Remove filter element (2) screwing it out of
the housing;
• Flush all parts with diesel fuel and assemble
the filter;
• Open fuel tank valve and fill the system
with fuel.
Operation 39. Replacing filter element of
fine fuel filter.
• Unscrew filter (1) from connection pipe (5)
at housing (3);
• Install new filter complete with gasket (2)
preliminarily lubricated with motor oil;
• Turn the filter by ¾ turn as soon as gasket
(2) touches mounting area A at housing (3).
Turn the filter by hand only.
Other nonseparable fuel filters with the
following parameters may be used:
• Filtering completeness not less than 90%;
• 150 l/h relative flow at 0.01 MPa pressure
drop;
• Diameter – 95-105 mm;
• Height – 140-160 mm;
• Connection thread MI6x1.6;
• Sealing gasket outer diameter – 70-75 mm.
To remove air from the system:
• Loosen fine filter cap (1);
• Unscrew flushing pump handle (3);
• Ensure fuel tank valve is open and there is
fuel in the tank;
• Loosen plug (2) at the fuel tank;
• Quickly flush the system with flushing
pump until clean fuel with no air bubbles
comes out from under the plugs. Tighten
fuel pump cap (2). Keep flushing the
system until fuel with no air bubbles comes
out from under the fine fuel filter cap (1);
• Install flushing pump handle.
95
Page 96

NOTE! In case of hindered engine start loosen
sleeve nut of each injector fuel line and
remove air from the system cranking the
engine within 10-15 s. Tighten the sleeve nut.
Operation 40. Flushing engine breather.
• Unscrew bolts (1) and remove breather
housing (2);
• Remove the breather from the housing,
flush it with diesel fuel and blow with
compressed air. Add some oil into the
breather filter, let it drain and reinstall the
filter.
Operation 41. Generator check.
Remove drive belt (1) from generator pulley
(2) and check free rotation of generator rotor
and play in bearings. Check state and tightness
of terminal connections. Tighten terminal
connections and generator fasteners, if
necessary. Contact qualified specialist in case
of excessive play in rotor bearings.
Operation 42*. Outer bolted connections.
Check and tighten, if necessary, the most
important bolted connection:
• Front and rear wheel nuts; rear wheel hub
nuts;
• Front brace – half-frame girders – ballast
weights;
• Engine – clutch casing;
• Clutch casing – gearbox casing;
• Gearbox casing – rear axle casing;
• Rear axle casing – brackets of rear hitch
and towing coupler;
• Front and rear cab supports;
• Rear axle casing – half-axle sleeves;
• Cardan shaft flange nuts;
• Cardan drive intermediate be aring casing –
clutch casing;
• Steering hydraulic cylinder brackets and
pins;
• Sleeves – FDA casing;
• Adjustable brace cover fixing bolts;
• ТСУ-3В towing fork plates fastening bolts
and nuts;
*
Not shown at lubrication diagram.
96
Page 97

97
Page 98

ATTENTION! Be careful to avoid cont act to
hot oil.
AIMPORTANT! Note filter positioning in
the oil line. Random installation is not
allowed.
• Towing coupler and hydraulic jack guide
brackets fixing bolts and nuts.
Operation 43. Turbocompressor (MTZ
821.2/821.3/921/921.2/921.3/921.4).
• Disassemble turbocompressor assembly and
dip it into a diesel fuel bath for two hours;
• Blow turbocompressor with dry
compressed air and reinstall.
Operation 44. Transmission oil change.
• Warm transmission up prior to changing
oil;
• Place tractor on a plain ground, lower the
tool and stop the engine;
• Engage parking brake and use shims to
prevent wheel move;
• Unscrew drain plugs (1) from the gearbox
and rear axle casing and filler cap (see
Lubrication diagram, pos.44). Drain oil to a
special container for use oil. Dispose of
used oil in proper way.
Reinstall drain plugs and add fresh oil to the
transmission.
Operation 45. Flushing engine oil prefilter.
• Loosen four clamps at connection sleeves
and remove filter (1) from oil line in front
of engine oil cooler;
• Rinse the filter with diesel fuel and blow
with compressed air in direction of an
arrow at the filter housing;
• Install the filter considering correct
positioning in the oil line;
• Tighten clamp bolts.
98
Page 99

Operation 46. Changing oil in wheel
reduction gear housings, main drive and
intermediate bearing of FDA cardan drive.
• Run the tractor and warm oil in FDA
housings up;
• Place the tractor on a plain ground. Stop the
engine. Engage parking brake and block the
wheel with shims of both sides;
• Unscrew inspection and filler plugs (1)
from wheel reduction gears, main gear,
upper conical pair and intermediate bearing;
• Unscrew drain plugs (2) of the main gear,
upper conical pair, reduction gears and
intermediate bearing. Drain oil into a
special container and dispose of in a due
manner;
• Reinstall and tighten drain plugs;
• Fill housings with fresh transmission oil to
the lower edges of inspection and filler
openings;
• Reinstall and tighten inspection and filler
plugs.
Operation 47. Hydraulic system tank oil
change.
Warm hydraulic system oil up prior to
changing.
Place the tractor on a plain ground, stop the
engine and retract hydraulic cylinder rods.
Change oil as follows:
• Remove filler cap (1) and drain plug (3)
from hydraulic system tank and drain oil
into a container for used oil. Dispose of the
oil in a suitable manner;
• Reinstall drain plug (3) and fill in new oil
according to lubrication diagram and table
of lubricants;
• Check oil level with oil meter (2). The level
should be between “O” and “P” marks;
• Reinstall filler cap (1).
99
Page 100

IMPORTANT! Check and adjust injectors in
a specialized workshop.
WARNING! Diesel fuel is sprayed and jet-
cardboard for that purpose. Wear goggles.
Tighten all fuel line connections prior to
starting the engine. Immediately apply for
medical care in case of fuel spraying to skin.
Operation 48. Changing oil in power
steering tank.
Follow instructions of Operation 47. Turn
fasteners and remove left side grill of the
tractor’s facing to access power steering tank.
Change oil in power steering tank as follows:
• Remove filler cap (2) and drain plug (3).
Drain oil from the tank into a container for
used oil;
• Reinstall drain plug (3) and add new oil to
the upper mark at dipstick (1);
• Reinstall cap (2) and left facing grill.
Special maintenance after each 2000
operating hours
Includes above and the following operations:
Operation 49. Engine injector check.
concentrations. Injection start and end
should be clearly distinguished.
injected and may be a source of bad injury if to
check injector sp raying by hand. Us e paper or
Remove and replace injectors as follows:
• Completely clear adjoining working surface
prior to disconnecting or loosening any fuel
system parts;
• Unscrew nuts (4) and disconnect high-
pressure fuel lines (5) from injectors (3) and
fuel pump;
• Disassemble fuel lines (5);
• Unscrew four banjo-bolts (1) of drain line
and disassemble drain fuel line (2). Replace
sealing copper washers (two per each bolt);
• Unscrew bolts (6) fixing injectors and
remove injectors (3);
• Send injectors to a specialized workshop
for inspection. An injector is considered to
be good in case of creating fuel fog with no
separate drops, continuous jets or
100
 Loading...