

Page 1
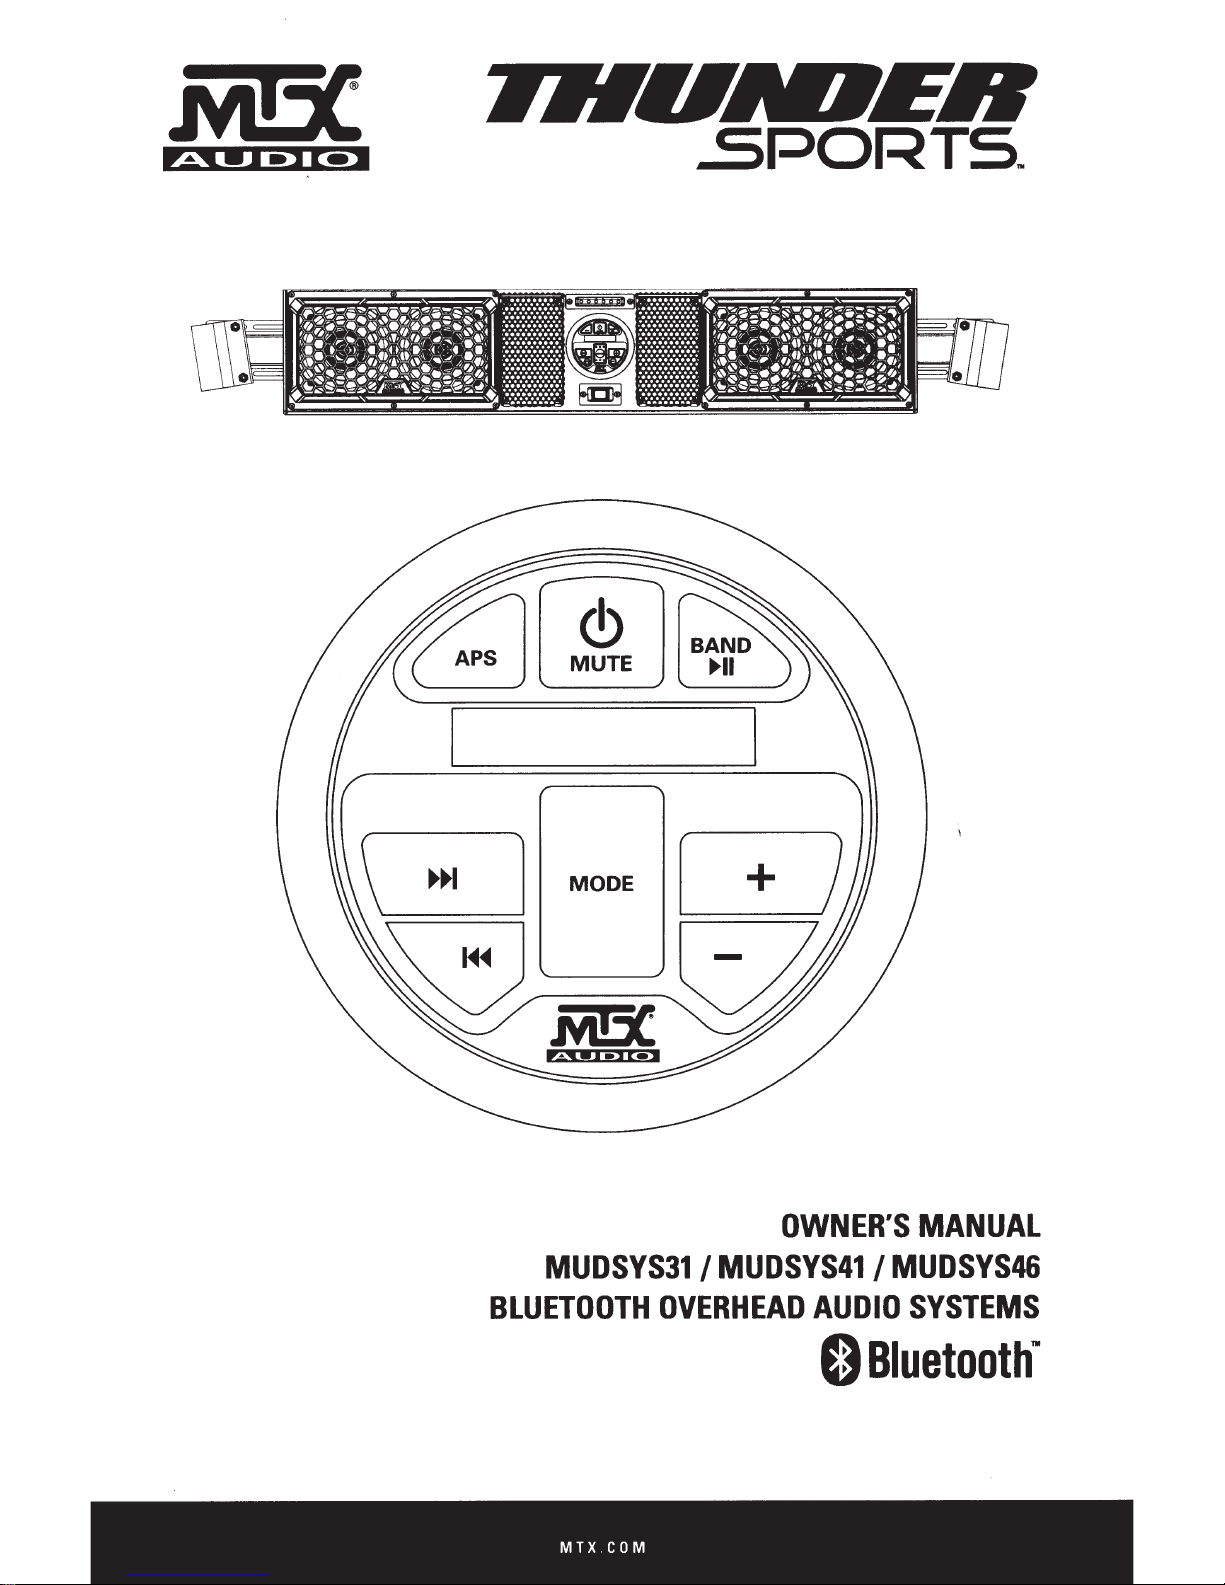
MODE
MUDSYS31/
BLUETOOTH
MTX
OVERHEAD
COM
OWNER'S
MUDSYS41/
AUDIO
Bluetooth·
0
MANUAL
MUDSYS46
SYSTEMS
Page 2
IMPORrJUn
Installation of overhead products requires careful planning
questions regarding wire routing
1-800-225-5689.
NOTICE
in
a vehicle, please contact MTX Technical Support at
and
preparation.
If
you have any
When connecting power
where
short circuit develops between the vehicle connection point
it
is connected to the vehicle's battery. Failure to
and
ground wires ensure that the
do
WARNINGS
•
Clean
the unit with a damp soft cloth, using a non-abrasive cleaner.
•
Do
not use solvents such
the unit.
•
Remember to leave the dome light switch
dome lights, if
PIIDDUCT
Model#
Serial#-----------------------------Dealer's
Date of
Name---------------------------
Purchase--------------------------
left
on, can drain the vehicle's battery.
INFDIIIIIATIDN
as
benzene, thinner
as
they
will
in
the off position when the vehicle
INTHEBDX
•
Bluetooth Overhead Audio System
• In-Line 15A
• Installation
•
Ring
• Butt Connector
•
Rubber
Fuse
and
Fuse
Holder
Cables (Power/Ground/Accessory) 3 Meter
Terminal
Inserts
(2)
(1)
100mm
x
120mm
(2)
yellow
so
power wire is fused at the point
can result in damage to the vehicle if a
and
the product.
damage the finish
and
operation of
is
unattended,
as
the
INTIIDDUCTIDN
Thank you for purchasing this MTX Audio Bluetooth Overhead Audio System that
deliver exceptional quality music to your off road vehicle. This easy to
is
capable of withstanding the wind, sun, rain,
takes you. They are designed to
Congratulati011s
and
enjoy the ultimate audio experience with MTX!
fit
a variety of
and
more ensuring that you can enjoy it wherever life
ORV
make
and
models that use factory roll
install
and
FEATURES
•
Four
6.5"
All-Weather
•
Source Unit
•
Integrated 280-Watt Peak Power Amplifier
•
AM
I
FM
Radio-
•
Inputs-
•
RCA
•
Clock
•
Integrated Wiring Harness (Power, Ground, Accessory,
•
Storage Cargo Nets (Excludes
•
Overhead
Bluetooth
Output
LED
Dome Light
Coaxial Speakers
USA
and
European Radio Frequency
2.0,
3.5mm
Auxiliary, &
MUDSYS31)
USB
(External Memory Stick)
and
12V
Remote
Turn
is
designed to
use
all
On
Output)
in
one unit
cages.
2
MTX
COM
Page 3
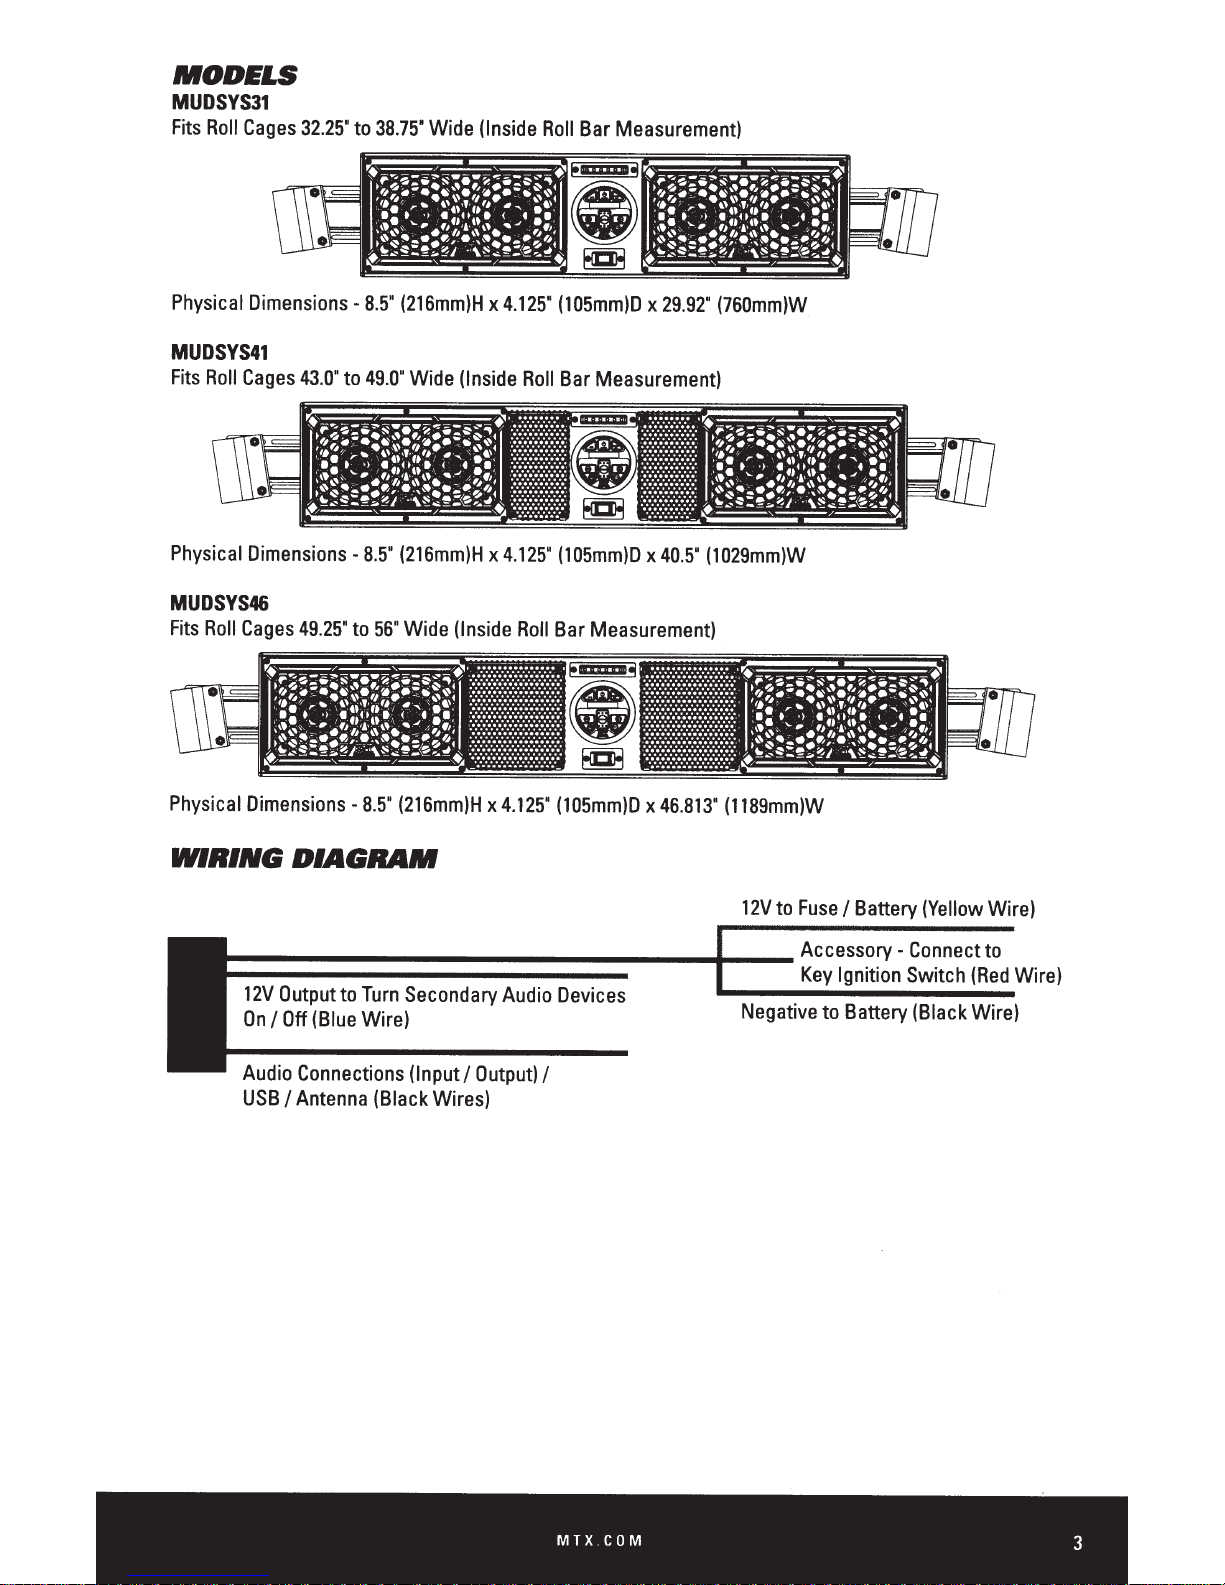
MODELS
MUDSYS31
Fits
Roll
Cages
32.25"
to
38.75"
Wide
(Inside
Roll
Bar
Measurement)
Physical
Dimensions-
MUDSYS41
Fits
Roll
Cages
Physical
Dimensions-
MUDSYS46
Fits
Roll
Cages
Physical
Dimensions-
WIRING
8.5"
(216mm)H
43.0"
to
49.0"
Wide
8.5"
(216mm)H
49.25"
to
56"
Wide
8.5"
(216mm)H
DIAGRAM
x
(Inside
x
(Inside
x4.125"
4.125"
Roll
4.125"
Roll
(105mm)D
Bar
Measurement)
(105mm)D
Bar
Measurement)
(105mm)D
x
29.92"
x
40.5"
(1029mm)W
x46.813"
(760mm)W
(1189mm)W
__________________
12V
Output
On
I
Audio
USB
to
Otf
(Blue
Connections
I
Antenna
Turn
Wire)
(Black
Secondary
(Input/
Wires)
Audio
Output)
Devices
I
.....
12V
___
Negative
to
Fuse
AccessoryKey
to
I
Battery
Ignition
Battery
(Yellow
Connect
Switch
(Black
Wire)
to
(Red
Wire)
Wire)
MTX COM
3
Page 4

SOURCE
UNI'J'
BU'J"J'DN
LAYDU'J'
7
1.
Power I Mute
to mute the audio output. Press
2.
+Button-
3.
-Button-
4. ~ Button-
5. ~ Button-
6.
Band I
USB
mode to play and pause.
7.
Mode
Button-
hold
MODE
that includes Bluetooth Pair/Bass/Treble/Balance/Fade/Loud/EO/AREA USA-EURmme Mode.
See
"Settings
8.
APS
Button (Auto Program Station)- Press to scan radio frequencies. Press
seconds to auto program the first six strongest stations received.
Button-
Press the button to increase the volume.
Press this button to decrease the volume.
Press the button to play the next track. Press
Press the button to play the previous track. Press and hold to tune the radio frequency.
~••
Button-
Press button to switch between radio, Bluetooth, USB, and AUX modes. Press
button for 2 seconds and then press
Menu"
Press the button to turn power
and
hold the button to turn power
Press button
section for operation.
in
radio mode to switch between
MODE
On.
When the power is
Off.
and
hold to tune the radio frequency.
AM
and
button to cycle through settings menu
On,
FM.
Press button
and
press the button
hold for 2
in
and
MTX COM
Page 5

SE7TINGS
the
hold
and
Press
settings
•
•
• Treble-
• Balance-
•
•
•
•
•
menu.
this function
Use
Pair-
BT
"Biuetooth Operation"
Bass- Adjust
the
Adjust
Adjust
setting diverts
L7
The
fader function will
Faderbe
Loud
low
EQsetting
Area
location
Time
The
adjusted.
-This turns
volumes.
the+/- buttons
Use
Rock.
is
Tuning
between
Format-
-Use the+/- buttons
Use
MENU
MODE
the
button
section for pairing instructions.
level
bass
treble
balance
the
audio
all
loudness
the
to
and
USA
the+/- buttons
seconds
for 2
pair a Bluetooth
to
the+/- buttons.
using
using
level
between
the
to
decrease
control
choose
an
to
European
to
then
and
enabled
Range
the+/- buttons.
and
left
the
only
side
left
output
the
The
Off.
and
On
setting between,
EQ
appropriate
the
select
frequency.
format between
time
a
select
the
press
is
-7
is
to
to
-7
device
Range
right speakers
diverts
R7
and
entire
the
from
loudness will
Flat,
AM/FM
MODE
unit.
the
default
+7,
+7,
to
using
audio
all
system.
boost
Classic,
tuning
and
12
button
Please
setting
default
the+/-
the
This
the
Pop,
band
24
to
setting
buttons.
right
should
low
and
for your
hour
cycle
through
the
see
0.
is
0.
is
only.
side
not
frequencies
Default
Rock.
styles.
the
need
to
at
ANI/FNI
the
Press
strongest station.
stations.
APS
the
hold
and
through
quickly through
RADIO
button
Band
Hold
will
APS
The
feature with
or~
the~
preset stations.
the
the
frequency
BLUETOOTH
unit supports Bluetooth for
This
Android®
iPhone®
Connect
•
•
• Select "MTX
•
Note:
connection
Bluetooth
•
•
and
to
Press
Quickly
device
The
Some
Track
The
Holding
Play/Pause
The
your device
for 2
MODE
release
and
SOUND
then
will
devices
will automatically
function:
Audio
Forward
Track
the
button
OPERATION
between
select
to
button
APS
the
program
auto
to
start
enable
to
Note:
band
stations,
manual
Holding
until
programmed
button
OPERATION
wireless
smartphones
using
seconds,
hold
then
BAR"
to
pair
require a
may
Track
and
Button
for 2 seconds
will
and
following
the
PAIR
BT
MODE
the
from
unit.
the
pass
made.
be
Back buttons
Play/Pause
FM.
and
AM
from
the
hold)
the
~I~
second
(2
tuning
or
~
the
button
the
streaming
music
tablets.
steps:
displayed.
be
will
more
for 2
available Bluetooth
of
list
Input
code.
can
scan
will
music
the
the
Tap
use
to
current
scan
will
and
mode
~after
is
the
released.
from
seconds
and
passcode,
the
select
through
track
the
playing
button
APS
APS
the
station
FM
through
those
use
is
unit
Bluetooth
"Pairing" will
devices.
"0000",
playing
track
music
the
on
scan
to
feature to
radio
the
preset stations.
the
same
manual
in
enabled
prompted
if
the
on
tracks
on
device.
to
auto
tuned
is
controls
mode
devices
displayed.
be
and
device.
the
next
the
program
to
will
the
device.
the
using
If
to.
Press
scan
scan
including
USB
An
memory
the
song.
the
connected through
OPERATION
memory
stick into
files
Press
button
USB
the
on
hold
and
pause/resume
to
external
mp3
11>11
USB
the
memory
the
USB.
stick
input connector.
~or~
be
can
automatically.
stick
for 2
selected
the
to
used
Using
seconds
song.
through
music
play
"Mode"
the
the~
Press
fast forward/backward
to
Phones
MTX.COM
button
or~
other devices
and
unit if desired.
the
select
to
button
the
The
USB.
the
play
selected
be
will
USB
a
Insert
unit will
read
next/previous
Press
song.
charged
when
5
Page 6

CLOCK
Press
the
"Band"
the hour.
flash.
OPERATION
and
hold
the
"Band"
button for 2 seconds
Once
set to desired
Use
the
same
process to set the minutes to desired number.
INSTALLATION
The
MUDSYS31,
diameter between
the unit
Each
has
designed
cage.
unit
a top
Each
to
comes
side
to
MUDSYS41,
1.75
"
the roll
top bracket
cage
preassembled
flat bracket
lock the unit into
button for 2 seconds
until
the hour number
number,
and
and
2'. Installation
and
part two
and
an
place
has
four
press
MUDSYS46
involves
in
the carton.
underside
between the
14)
total bolts.
to
display
the
"Band"
will
mount to a variety of
is
a two part process. Part
connecting the wiring to the
Each
end
C-clamp
roll
the
clock.
is
flashing, then
button again
When
displayed,
use
the+/- buttons
and
the minutes number
roll
cages that
one
involves securely
vehicle's
press
have
battery.
and
to
adjust
will
a
mounti
hold
ng
When the
to
accommodate a variety of
roll
MUDSYS31,
49
.
25
width
retightened
of
40
bolts
are
loosened,
bar
dimension is between
43
.0"
and
'
and
56.0
'
for the
has
been
established,
to
a torque specification
-
45
inch/lbs.
49
the bracket
roll
cages whose i
32.25
.0"
for the
MUDSYS46.
these
can
"
and
38
.
75
MUDSYS41,
Once
the proper
bolts
should
slide
nside
" for the
and
be
Each
C-bracket
allowing
6
it
has
two
12)
total bolts.
to
mount to a variety of roll
These
c
ages
bolts
can
including
MTX
COM
be
loosened
those that
to adjust the
are
angled.
clamp
angle
Page 7

Remove
bracket
Once
should
The
designed
can
(+)terminal
and
protect against
be
terminal.
the unit powers
the
bolts
from
the C-bracket
and
C-bracket
the C-brackets
be
retightened to a torque specification of
unit
has
an
integrated wiring harness that
can
are
be
properly
in
the proper
to connect to the vehicle's
be
cut to fit the individual vehicle.
on
the
vehicle's battery
fuse
holder
should
damage
be
attached to the
or injury if a short
connected to the negative(-)
The
red
accessory wire
on
when the
vehicle
terminal
TROUBLESHOOTING
so
the top
positioned
location
for mounting,
includes
battery providing it
The
yellow
using
one
of the
yellow
in
the wire were
on
the
needs
to
be
connected to
is
On
and
powers
around
the
roll
the
65-70
inch/lbs.
a
power,
power.
wire
is
designed to
included
wire
no
more
to
ring
than
occur.
vehicle's battery
the
Off
when
cage.
bolts
ground,
The
terminals.
using
and
accessory wire that
wiring harness
be
connected to the positive
The
18
inches from the battery to
The
black wire
the
second
accessory switch.
the
vehicle
is
not
is
3 meters but
included
is
designed
included
This
ensures that
being
15A
ring
used.
are
fuse
to
Problem
No
Power
No
Sound
No
Radio
Reception
USB
Aux
Stick Not
Input
or
Reading
RCA
Output
Distortion
Media Device
Through
USB
Does
Not Work
Cause
Incorrect
Blown
Volume
Output
The
Wiring
Fuse
Is
Too
Blown
Antenna
Connected
The
Signals
Music
File
Are
is
Format
Volume
Is
Too
Device
USB
Input
Only
Memory Stick
MTX
Low
Cable
is
not
Too
Weak
Not Supported
High
On
External
Reads
USB
COM
Solution
Check
Wiring to
Ensure
Connection without
Replace
Increase
Call
Fully
Select
Convert
Lower
Fuse
the
Volume
for Repair Assistance
Insert
the
Antenna
a Station
Music
Volume
Manual
File
on
Device
Play
Media Device
Auxiliary Input
Shorts
Cable
to
MP3
External
Through
7
Page 8

This
equipment
to
Part
15
of
interference
energy
and,
radio
communications.
If
this
equipment
turning
following
the
•
Reorient
•
Increase
•
Connect
•
Consult the
measures:
the
has
been
the
FCC
rules.
in a residential
if
not
installed
However,
does
cause
equipment
or
relocate
the
off
the
separation
equipment
dealer
or
an
tested
and
These
limits
installation.
and
used
this
harmful
and
on,
you
receiving
between
to
an
the
outlet
experienced
found
to
comply
are
designed
This
equipment
in
accordance
is
no
guarantee
interference
are
encouraged
antenna.
equipment
on
a different
radio!lV
with
to
provide
generates,
with
the
that
to
radio
to
try
and
receiver.
circuit
technician
the
limits
for a Class B digital
reasonable
uses,
instructions,
interference
or
television
to
correct
than
the
one
for
help.
protection
and
may
will
not
reception,
the
interference
to
which
can
radiate
cause
occur
which
the
device,
against
harmful
pursuant
harmful
radio
frequency
interference
in a particular
can
be
determined
by
one
or
receiver
is
connected.
installation.
more
of
to
by
the
Changes
this
conditions:
received,
©
Engineered
Due
MTX
MTX005072
8 MTX COM
or
equipment.
(1)
including
2016
Mitek
to
continual
Audio,
modifications
This
This
device
device
not
expressly
complies
may
interference
Corporation.
in
the
U.S.A.
product
4545
East
RevD
4/16 • 21A10494 • AW0015264
All
development.
Baseline
not
cause
that
rights
Rd.
approved
with
part
harmful
may
cause
reserved.
all
specifications
Phoenix,
by
15
of
interference,
undesired
MTX
AZ
85042
Mitek
Corporation
the
FCC
Rules.
and
operation
is a trademark
are
subject
U.S.A.
1-800-225-5689
could
Operation
(2)
this
device
of
Mitek
to
change
void
the
user's
is
subject
must
to
accept
Corporation.
without
notice.
authority
the
following
any
Designed
to
operate
two
interference
and
 Loading...