

Page 1
USERGUIDE
HARDWARE
MTX-ROUTER-HELIOS Lite 4G WiFi
SMART SOLUTIONS FOR A CHANGING WORLD
#WeAreConnectivity
www.mtxm2m.com
Page 2

2
MTX-ROUTER-HELIOS Lite | 2018/12
MTX © by MATRIX ELECTRONICA S.L.U.
SUPPORT: iotsupport@mtxm2m.com | SALES: info@mtxm2m.com | mtxm2m.com
Index
BRIEF INTRODUCTION ............................................................................................................8
1. General ......................................................................................................................................................8
2. Product Feature ........................................................................................................................................9
3. Block Diagram ...........................................................................................................................................11
4. Product SPEC ............................................................................................................................................12
INSTALLATION INTRODUCTION ............................................................................................. 15
1. General ......................................................................................................................................................15
2. Encasement List .......................................................................................................................................16
3. Installation and Cable Connection ..........................................................................................................17
4. Power .........................................................................................................................................................20
5. Indicator Lights Introduction ....................................................................................................................21
6. Reset Button Introduction ........................................................................................................................22
CONFIGURATION AND MANAGEMENT ................................................................................. 23
1. Conguration Connection .........................................................................................................................23
2. Access the Conguration Web Page ........................................................................................................24
2.1 IP Address Setting ........................................................................................................................24
2.1.1 IP Address - DHCP ...........................................................................................................24
2.1.2 IP Address - Static ...........................................................................................................24
2.2 Access the Conguration Web Page ...........................................................................................25
3. Basic ..........................................................................................................................................................27
3.1 WAN ...............................................................................................................................................27
3.2 WAN Status ...................................................................................................................................30
3.3 LAN ................................................................................................................................................30
3.4 LAN Status ....................................................................................................................................32
4. Advanced ...................................................................................................................................................34
4.1 Statically Assigned .......................................................................................................................34
4.2 Advanced Router ..........................................................................................................................34
4.3 MAC Address Clone ......................................................................................................................35
4.4 SDNS .............................................................................................................................................35
Page 3

3
MTX-ROUTER-HELIOS Lite | 2018/12
MTX © by MATRIX ELECTRONICA S.L.U.
SUPPORT: iotsupport@mtxm2m.com | SALES: info@mtxm2m.com | mtxm2m.com
5. Wireless .....................................................................................................................................................36
5.1 Basic Settings ...............................................................................................................................36
5.2 Wireless Security ..........................................................................................................................37
5.3 Wireless Status ............................................................................................................................38
6. VPN ............................................................................................................................................................40
6.1 PPTP ..............................................................................................................................................40
6.2 L2TP ..............................................................................................................................................41
6.3 IPSEC.............................................................................................................................................42
6.4 GRE ...............................................................................................................................................43
7. Security ......................................................................................................................................................44
7.1 Firewall ..........................................................................................................................................44
7.2 Access Restriction ........................................................................................................................45
7.3 MAC Filter ......................................................................................................................................47
7.4 Packet Filter ..................................................................................................................................48
8. Forwarding .................................................................................................................................................49
8.1 Port Forwarding ............................................................................................................................49
8.2 Port Range ....................................................................................................................................49
8.3 Port Triggering ..............................................................................................................................50
8.4 DMZ ...............................................................................................................................................50
9. QoS Setting ...............................................................................................................................................51
9.1 Trafc Monitoring ..........................................................................................................................51
10. M2M ........................................................................................................................................................52
10.1 Serial ...........................................................................................................................................52
10.2 SMS.............................................................................................................................................53
11. Administration.........................................................................................................................................54
11.1 Serial ...........................................................................................................................................54
11.2 Management ..............................................................................................................................54
11.3 System Time ...............................................................................................................................56
11.4 Congure ....................................................................................................................................57
11.5 Upgrade ......................................................................................................................................58
11.6 DDNS ..........................................................................................................................................58
11.7 Syslog..........................................................................................................................................59
Page 4
4
MTX-ROUTER-HELIOS Lite | 2018/12
MTX © by MATRIX ELECTRONICA S.L.U.
SUPPORT: iotsupport@mtxm2m.com | SALES: info@mtxm2m.com | mtxm2m.com
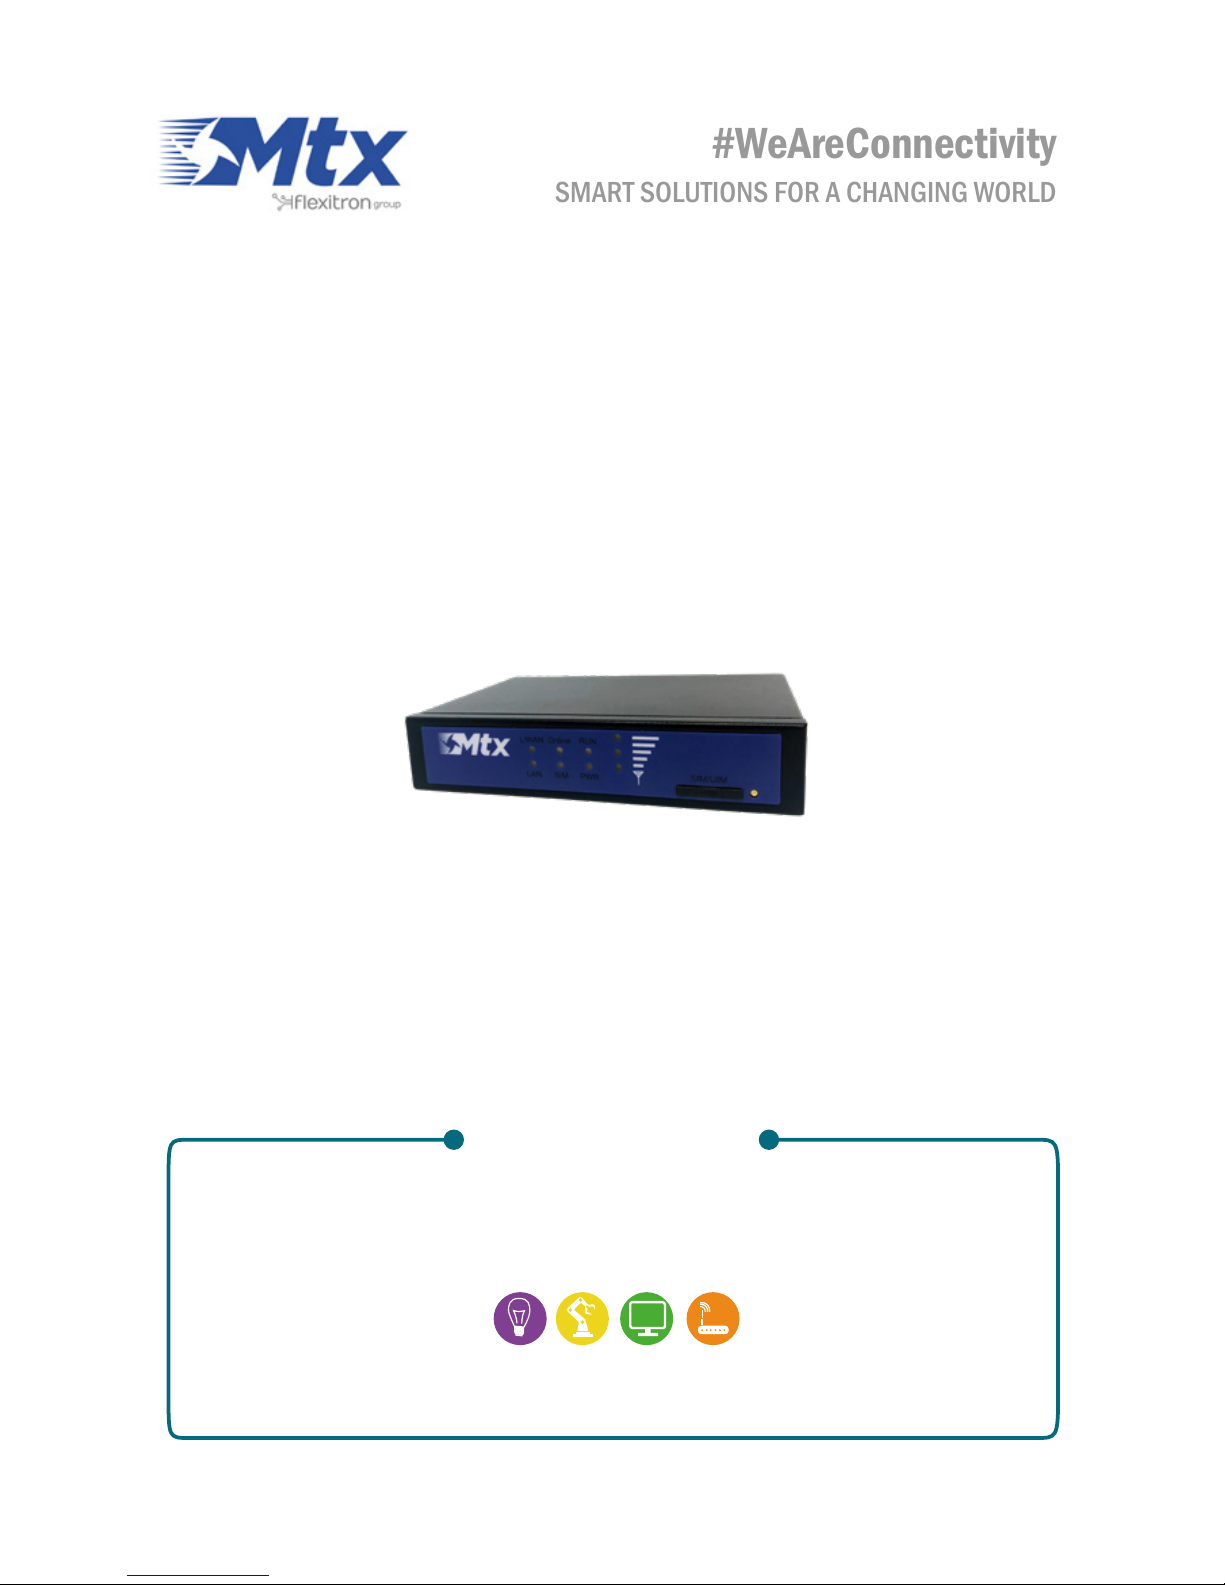
BRIEF INTRODUCTION
1. General
MTX-Router-Helios Lite 4G WiFi is a kind of terminal device that developed based on 2G/3G/4G, WiFi,
VPN technology. It adopts high-powered industrial 32-bits CPU and embedded real time operating
system. It supports RS232 (or RS485), Ethernet and WiFi port that can conveniently and transparently
connect one device to a cellular network, allowing to connect to existing serial, Ethernet and WiFi
devices with only basic conguration.
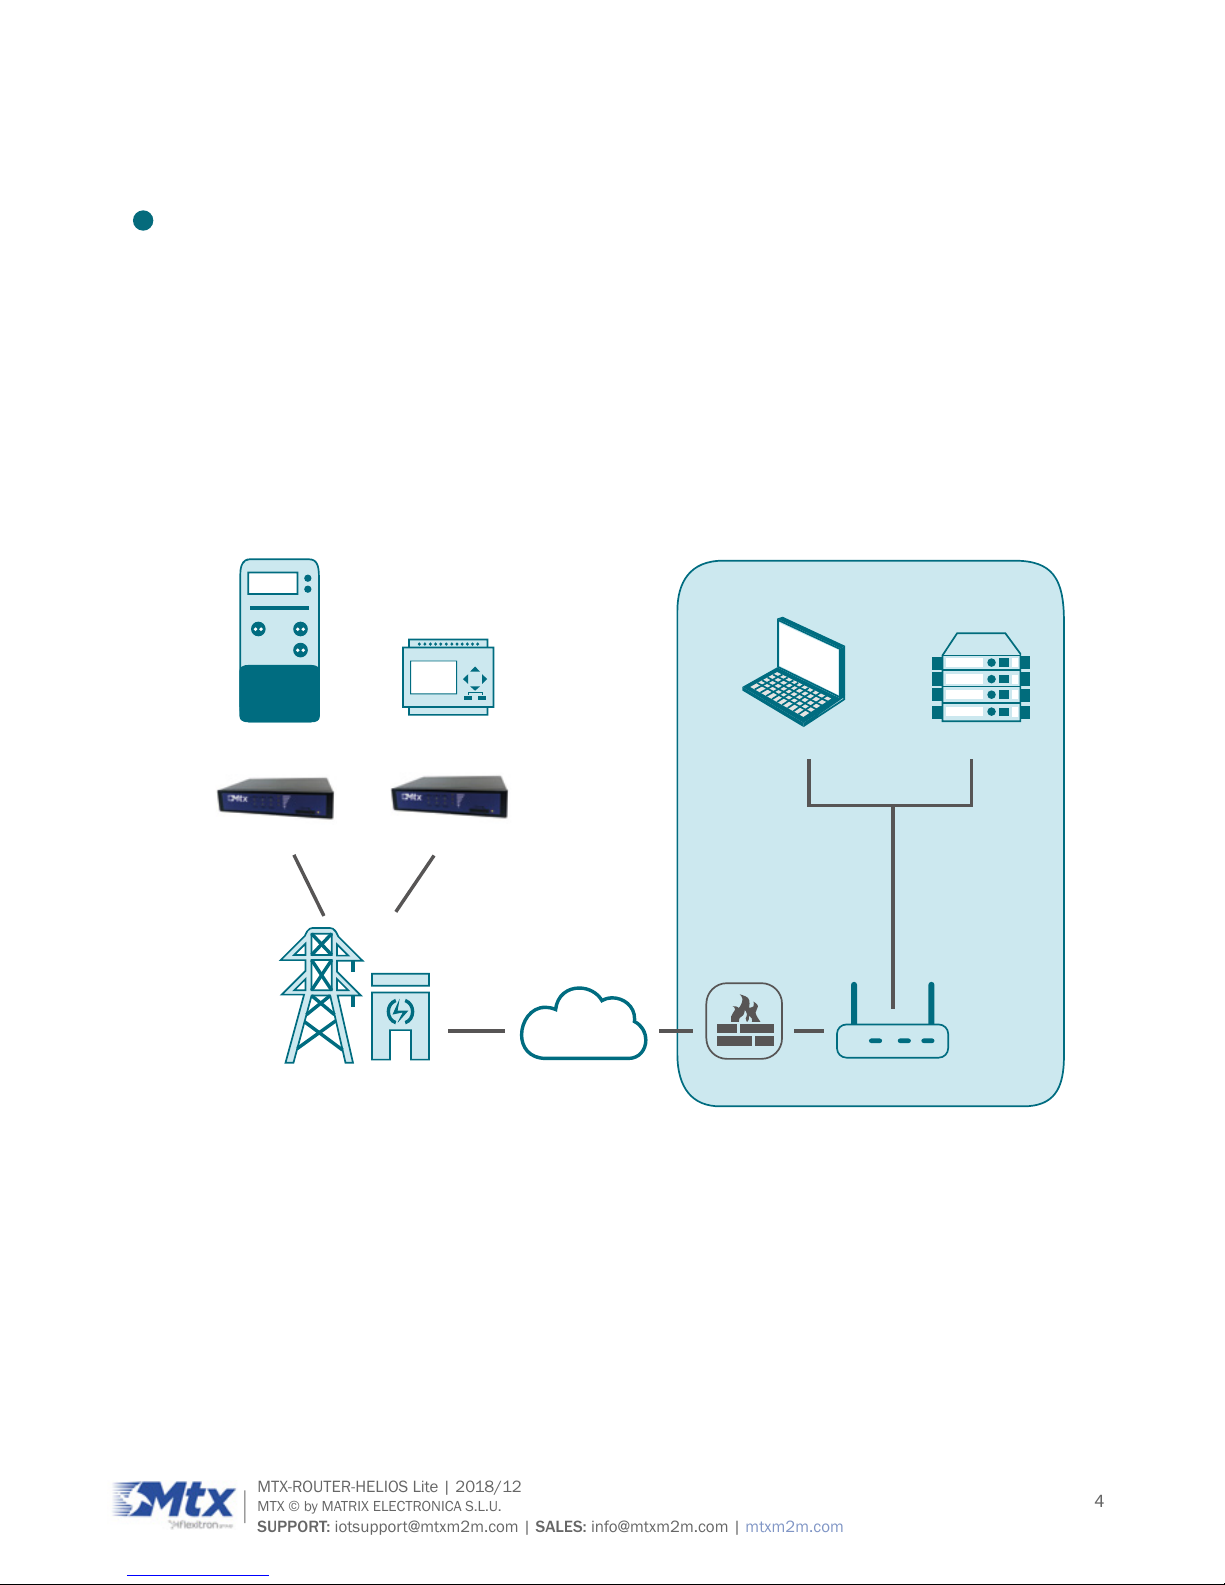
It has been widely used on M2M elds, such as intelligent transportation, smart grid, postal services,
industrial automation, telemetry, nance, POS, water supply, environment protection, post, weather,
and so on.
Router Application Topology:
INTERNET
3G/4G base station
82.9
Administrator System server
Firewall Router
MTX-Router-Helios Lite 4G WiFi
Power/water/oil meter PLC
OPERATION CENTER
MTX-Router-Helios Lite 4G WiFi
Page 5

5
MTX-ROUTER-HELIOS Lite | 2018/12
MTX © by MATRIX ELECTRONICA S.L.U.
SUPPORT: iotsupport@mtxm2m.com | SALES: info@mtxm2m.com | mtxm2m.com
2. Product Feature
ITEMS CONTENTS
Industrial
design
High-powered industrial cellular module
High-powered industrial 32bits CPU
Housing: iron, providing IP30 protection
Power range: DC 5~35V
High Support hardware and software WDT
Reliability
Support auto recovery mechanism to make router always online
Ethernet port: 1.5KV magnetic isolation protection
RS232/RS485 port: 15KV ESD protection
SIM/UIM port: 15KV ESD protection
Power port: reverse-voltage and over voltage protection
Antenna port: lightning protection (optional)
Standard
and
convenience
Support standard RS232/RS485, Ethernet and WiFi port that can connect to
serial, Ethernet and WiFi devices directly
Support standard WAN port & PPPOE protocol that can connect to ADSL directly
Support intellectual mode, enter into communication state auto. when powered
Support several work modes
Convenient conguration and maintenance interface (WEB or CLI)
Page 6

6
MTX-ROUTER-HELIOS Lite | 2018/12
MTX © by MATRIX ELECTRONICA S.L.U.
SUPPORT: iotsupport@mtxm2m.com | SALES: info@mtxm2m.com | mtxm2m.com
Highperformance
and security
Support multiple WAN access methods, including static IP, DHCP, PPPOE,
2.5G/3G/4G
Support double link backup between 2.5G/3G/4G and WAN (optional)
Support VPN client(PPTP, L2TP, IPSEC and GRE)(only for VPN version)
Support remote management, SYSLOG, SNMP, TELNET, SSH, HTTPS, etc.
Support local and remote rmware upgrade,import and export congure le
Support NTP, RTC embedded
Support multiple DDNS provider service
Support MAC address cloning
WiFi support 802.11b/g/n. support AP, client
WiFi support WEP,WPA,WPA2 encryption
Support multiple online trigger ways, including SMS, ring and data. Support link
disconnection when timeout
Support APN/VPDN
Support multiple DHCP server and DHCP client, DHCP binding MAC address,
DDNS, Firewall, NAT, DMZ host, QoS, trafc statistics, real-time display data
transfer rate etc.
Support TCP/IP, UDP, FTP(optional), HTTP, etc.
Supports SPI rewall, VPN pass-through, access control, URL ltering,etc.
Support local log storage
Page 7
7
MTX-ROUTER-HELIOS Lite | 2018/12
MTX © by MATRIX ELECTRONICA S.L.U.
SUPPORT: iotsupport@mtxm2m.com | SALES: info@mtxm2m.com | mtxm2m.com
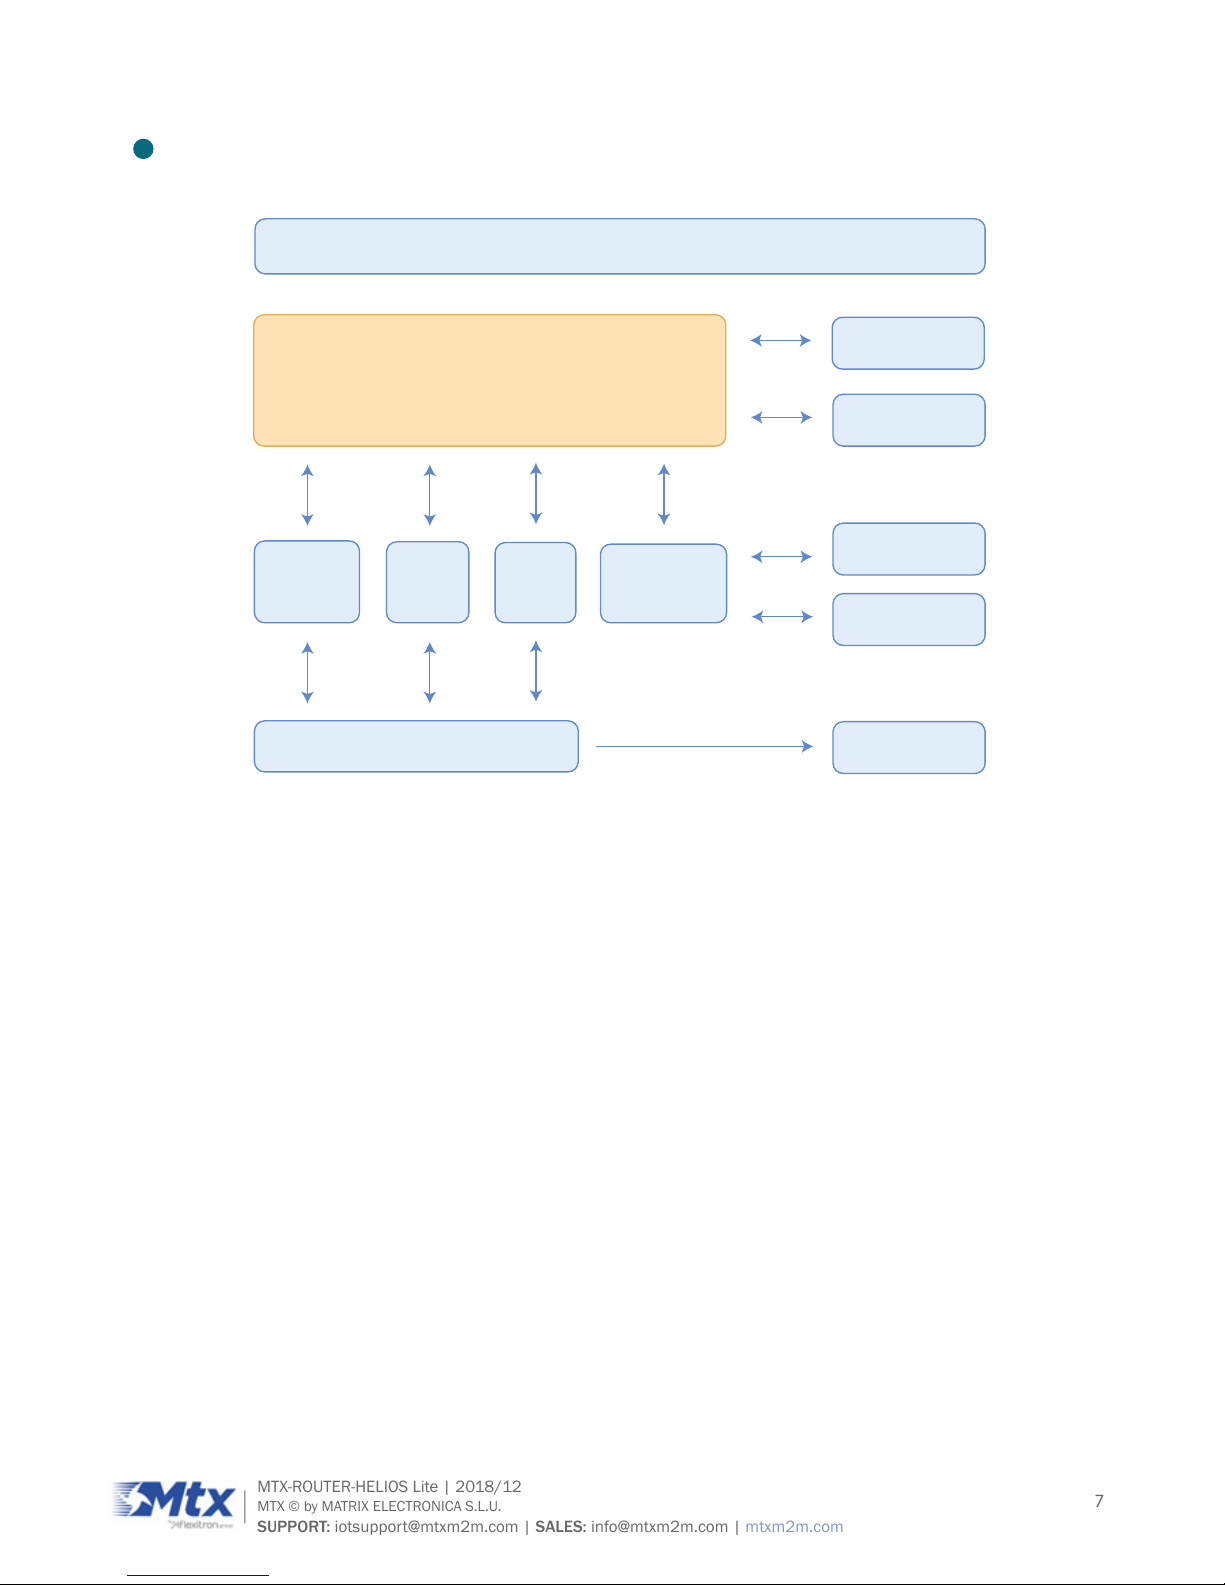
3. Block Diagram
32 bit CPU system
Router principle chart
RTC
Watchdog
LED indicator
SIM/UIM card
Power
RS232
RS485
LAN &
WAN
WiFi
Cellular
module
User interface
Page 8

8
MTX-ROUTER-HELIOS Lite | 2018/12
MTX © by MATRIX ELECTRONICA S.L.U.
SUPPORT: iotsupport@mtxm2m.com | SALES: info@mtxm2m.com | mtxm2m.com
4. Product SPEC
ITEMS CONTENTS
Hardware
system
CPU Industrial 32bits CPU
FLASH 16MB (Extendable to 64MB)
SDRAM 128MB
Interface
WAN
1 10/100Mbps WAN port(RJ45), auto MDI/MDIX, 1.5KV
magnetic isolation protection
LAN
1 10/100Mbps Ethernet ports(RJ45), auto MDI/MDIX, 1.5KV
magnetic isolation protection
Serial
Data bits: 5, 6 ,7, 8
Stop bits: 1, 1.5(optional), 2
Parity: none, even, odd, space(optional), mark(optional)
Baud rate: 2400~115200 bps
Antenna
Cellular: Standard SMA female interface, 50 ohm
WiFi: Standard SMA male interface, 50 ohm
SIM/UIM Standard 3V/1.8V user card interface, 15KV ESD protection
Power Std. 3-PIN power jack, reverse-voltage, over voltage protection
Reset
Press this key for 8 seconds to restore the router to its
original factory default settings
Indicator “Signal strength” ”PWR” ”RUN” ”SIM” ”Online” ”LAN” ”WAN”
Page 9

9
MTX-ROUTER-HELIOS Lite | 2018/12
MTX © by MATRIX ELECTRONICA S.L.U.
SUPPORT: iotsupport@mtxm2m.com | SALES: info@mtxm2m.com | mtxm2m.com
Network
Wireless
network
GSM/GPRS/EDGE: 850/900/1800/1900MHz
CDMA: 800/1900MHz
WCDMA/HSUPA/HSPA+: 850/900/1900/2100MHz
CDMA2000 1x/ EVDO Rev. A: 800/1900MHz
TD-SCDMA: 1880-1920/2010-2025MHz(A/F)
TDD-LTE: Band 38/39/40/41& Band 61/62 (Private Network)
FDD-LTE: Band 1/2/3/4/5/7/8/13/17/20/25
WAN Support PPP/PPPOE
LAN Support APR
Network Support CHAP/PAP Authentication
Authentication
Network
access
Support APN/VPDN
IP applications
Support Ping,Trace, DHCPServer, DHCP Relay, DHCP Client,
DNS relay, DDNS, Telnet
IP routing Support static routing
WiFi
Standard IEEE802.11b/g/n
Bandwidth
IEEE802.11b/g: 54Mbps (max)
IEEE802.11n: 150Mbps (max)
Security
IEEE802.11b/g: 54Mbps (max)
IEEE802.11n: 150Mbps (max)
Power supply
Standard
power
DC 12V/1.5A
Power range DC 5~35V
Consumption <410mA (@12VDC)
Page 10

10
MTX-ROUTER-HELIOS Lite | 2018/12
MTX © by MATRIX ELECTRONICA S.L.U.
SUPPORT: iotsupport@mtxm2m.com | SALES: info@mtxm2m.com | mtxm2m.com
Physical
Dimensions 136x99x28mm
Weight 395g
Environmental
limits
Operating
temperature
-35~+75ºC (-31~+167ºF)
Storage
temperature
-40~+85ºC (-40~+185ºF)
Operating
humidity
95% ( unfreezing)
Page 11

11
MTX-ROUTER-HELIOS Lite | 2018/12
MTX © by MATRIX ELECTRONICA S.L.U.
SUPPORT: iotsupport@mtxm2m.com | SALES: info@mtxm2m.com | mtxm2m.com
INSTALLATION INTRODUCTION
1. General
The router must be installed correctly to make it work properly.
WARNING: forbidden to install the router when powered.
Page 12

12
MTX-ROUTER-HELIOS Lite | 2018/12
MTX © by MATRIX ELECTRONICA S.L.U.
SUPPORT: iotsupport@mtxm2m.com | SALES: info@mtxm2m.com | mtxm2m.com
2. Encasement List
NAME QUANTITY REMARK
Router host 1
Cellular antenna (Male SMA) 1
WiFi antenna (Female SMA) 1
Network cable 1
Power adapter 1
Manual CD 1
Certication card 1
Maintenance card 1
RS232 Console cable 1 Optional
RS485 Console cable 1 Optional
Page 13
13
MTX-ROUTER-HELIOS Lite | 2018/12
MTX © by MATRIX ELECTRONICA S.L.U.
SUPPORT: iotsupport@mtxm2m.com | SALES: info@mtxm2m.com | mtxm2m.com
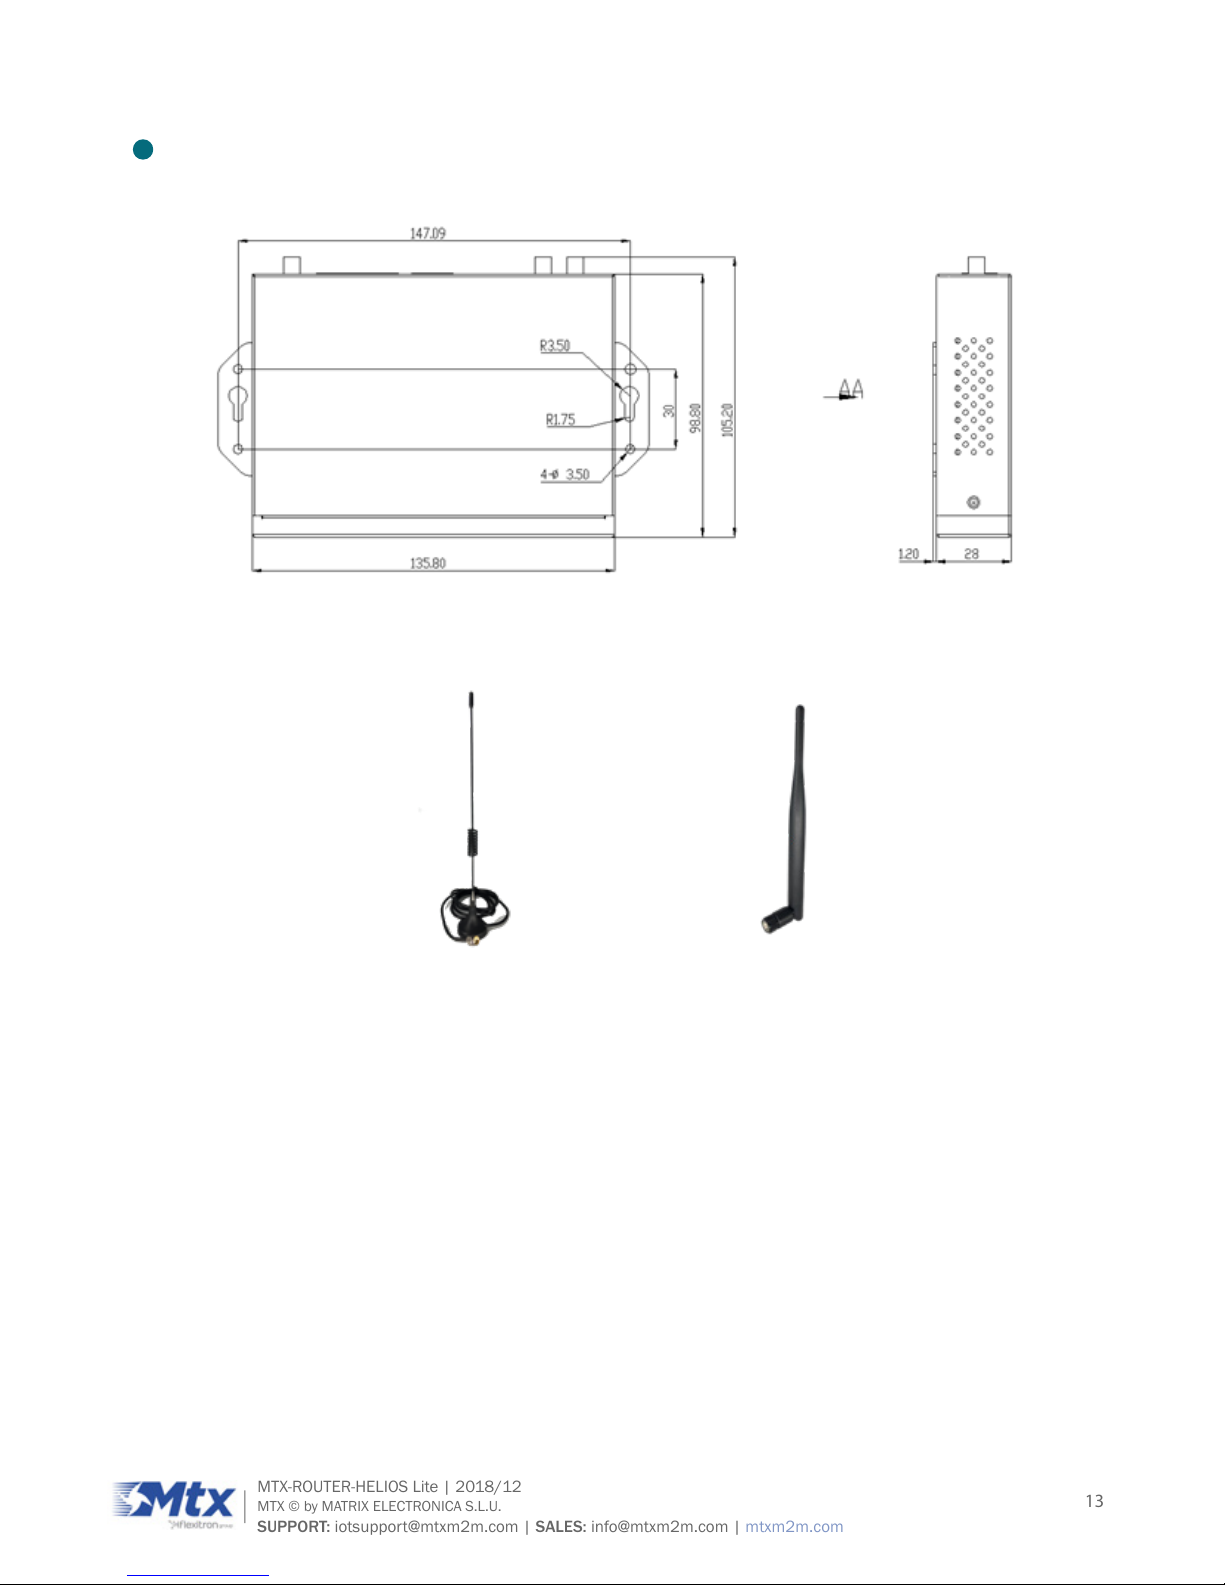
3. Installation and Cable Connection
Dimension (the xing piece is detachable). Unit: mm.
INSTALLATION OF ANTENNA:
Cellular antenna (standard) WiFi antenna (standard)
Screw the SMA male pin of the cellular antenna to the female SMA interface of the router with sign
“ANT”(some models are two antennas, namely “ANT1”, “ANT2”).
Screw the SMA female pin of the WiFi antenna to the male SMA interface of the router with sign “WiFi”.
WARNING: the cellular antenna and the WiFi antenna can not be connected wrongly. And the antennas
must be screwed tightly, or the signal quality of antenna will be inuenced.
Page 14

14
MTX-ROUTER-HELIOS Lite | 2018/12
MTX © by MATRIX ELECTRONICA S.L.U.
SUPPORT: iotsupport@mtxm2m.com | SALES: info@mtxm2m.com | mtxm2m.com
INSTALLATION OF SIM/UIM CARD:
Turn off router, press SIM/UIM button with a needle. The SIM/UIM card sheath will ick out. Put SIM/
UIM card into the card sheath (metal point outside), insert card sheath back to the SIM/UIM card outlet.
WARNING: forbidden to install SIM/UIM card when powered.
INSTALLATION OF CABLE:
Network cable (standard) Console cable (standard)
Insert one end of the network cable into the switch interface with sign “Local Network”, and insert the
other end into the Ethernet interface of user’s device. The signal connection of network direct cable is:
RJ45-1 RJ45-2
1 1
2 2
3 3
4 4
5 5
6 6
7 7
8 8
Page 15

15
MTX-ROUTER-HELIOS Lite | 2018/12
MTX © by MATRIX ELECTRONICA S.L.U.
SUPPORT: iotsupport@mtxm2m.com | SALES: info@mtxm2m.com | mtxm2m.com
Insert the RJ45 end of the console cable into the RJ45 outlet with sign “console”, and insert the DB9F
end of the console cable into the RS232 serial interface of user’s device.
The signal connection of the console cable is as follows:
RJ45 DB9F
1 8
2 6
3 2
4 1
5 5
6 3
7 4
8 7
The signal denition of the DB9F serial communication interface is as follows:
PIN RS232 SIGNAL NAME THE DIRECTION FOR ROUTER
1 DCD output
2 RXD output
3 TXD input
4 DTR input
5 GND
6 DSR output
7 RTS input
8 CTS output
Page 16

16
MTX-ROUTER-HELIOS Lite | 2018/12
MTX © by MATRIX ELECTRONICA S.L.U.
SUPPORT: iotsupport@mtxm2m.com | SALES: info@mtxm2m.com | mtxm2m.com
4. Power
Power adapter (standard)
The power range of the router is DC 5~35V.
Warning: When we use other power, we should make sure that the power can supply power above 7W.
We recommend user to use the standard DC 12V/1.5A power.
Page 17

17
MTX-ROUTER-HELIOS Lite | 2018/12
MTX © by MATRIX ELECTRONICA S.L.U.
SUPPORT: iotsupport@mtxm2m.com | SALES: info@mtxm2m.com | mtxm2m.com
5. Indicator Lights Introduction
The router provides following indicator lights: “Power”, “RUN”, “SIM”, “Online”, “LAN”, “WAN”, “Signal
Strength”.
INDICATOR LIGHT STATE INTRODUCTION
Power
ON Router is powered on
OFF Router is powered off
RUN
BLINK Router works properly
OFF Router does not work
SIM
ON SIM/UIM card is recognized
OFF SIM/UIM card is not recognized
Online
ON Router has logged on network
OFF
Router hasn’t logged on
network
LAN
OFF
The corresponding interface of
switch is not connected
ON / BLINK
The corresponding interface
of switch is connected /
Communicating
WAN
OFF
The interface of WAN is not
connected
ON / BLINK
The interface of WAN is
connected /Communicating
Signal strength
All off The signal is terrible
One Light ON Signal strength is weak
Two Lights ON Signal strength is medium
Three Lights ON Signal strength is good
Page 18

18
MTX-ROUTER-HELIOS Lite | 2018/12
MTX © by MATRIX ELECTRONICA S.L.U.
SUPPORT: iotsupport@mtxm2m.com | SALES: info@mtxm2m.com | mtxm2m.com
6. Reset Button Introduction
The router has a “Reset” button to restore it to its original factory default settings. When user press
the “Reset” button for up to 8 seconds, the router will restore to its original factory default settings and
restart automatically.( The auto-restart is as follows: The “RUN” indicator turns off for about 10 seconds
and then functions normally).
Page 19

19
MTX-ROUTER-HELIOS Lite | 2018/12
MTX © by MATRIX ELECTRONICA S.L.U.
SUPPORT: iotsupport@mtxm2m.com | SALES: info@mtxm2m.com | mtxm2m.com
CONFIGURATION AND MANAGEMENT
This chapter describes how to congure and manage the router.
1. Conguration Connection
Before conguration, you should connect the router and your PC with the supplied network cable. Plug
the cable’s one end into the Local Network port of the router, and another end into your PC’s Ethernet
port.
The connection diagram is as following:
Diagram
Please modify the IP address of PC the same as network segment address of the router, for instance,
192.168.1.9. Modify the mask code of PC as 255.255.255.0 and set the default gateway of PC as the
router’s IP address (192.168.1.1).
Page 20

20
MTX-ROUTER-HELIOS Lite | 2018/12
MTX © by MATRIX ELECTRONICA S.L.U.
SUPPORT: iotsupport@mtxm2m.com | SALES: info@mtxm2m.com | mtxm2m.com
2. Access the Conguration Web Page
2.1 IP Address Setting
2.1.1 IP Address - DHCP
2.1.2 IP Address - Static
Set the IP PC address to 192.168.1.9. Set the subnet mask to 255.255.255.0. Set the default gateway
to 192.168.1.1. Congure the DNS server as the local DNS server, such as 8.8.8.8.
Page 21

21
MTX-ROUTER-HELIOS Lite | 2018/12
MTX © by MATRIX ELECTRONICA S.L.U.
SUPPORT: iotsupport@mtxm2m.com | SALES: info@mtxm2m.com | mtxm2m.com
2.2 Access the Conguration Web Page
The chapter is to present main functions of each page. Users visit page tool via web browser after connect
users’ PC to the router.
Start a web browser and type 192.168.1.1 in the Address (URL) eld (The Default IP Address of the
Ethernet port is 192.168.1.1). It will prompt the Web management tool of the router. The users login in
the web page, there will display a page to choose language. Users have to click “Continue” to make it
work if modify language.
After access to the information main page.
The operation data and state of each module can be completely observed in the information main page,
which including basic information of routing, WAN, LAN, wireless, network, CPU, memory and other basic
information.
Page 22

22
MTX-ROUTER-HELIOS Lite | 2018/12
MTX © by MATRIX ELECTRONICA S.L.U.
SUPPORT: iotsupport@mtxm2m.com | SALES: info@mtxm2m.com | mtxm2m.com
Access other pages. It will prompt a login page. The default username and password are both “admin”.
Please input the username and password login to access the conguration pages.
Input correct user name and password to visit relevant menu page.
Page 23

23
MTX-ROUTER-HELIOS Lite | 2018/12
MTX © by MATRIX ELECTRONICA S.L.U.
SUPPORT: iotsupport@mtxm2m.com | SALES: info@mtxm2m.com | mtxm2m.com
3. Basic
3.1 WAN
Select the appropriate wide area networking mode according to different requirements. Set the
corresponding parameters according to different connection modes.
Dual Both Online: WAN and Bkup WAN are both online.The system will automatically switch back to the
main chain when the main link is available if enabled.
Link Fail to Restart: Time of restart system for all link fail.
Disable WAN connection.
Put in the IP address, subnet mask, default gateway, and DNS Server(optional) assigned by the provider.
Normally, The Internet IP Address of the router is allocated by the ISP automatically.
You may choose “PPPoE” if you connect the WAN port to a PPPoE server. Input the correct username and
password provided by ISP or administrator.
Page 24

24
MTX-ROUTER-HELIOS Lite | 2018/12
MTX © by MATRIX ELECTRONICA S.L.U.
SUPPORT: iotsupport@mtxm2m.com | SALES: info@mtxm2m.com | mtxm2m.com
If you want to access to 2G/3G/4G network, you can choose “2G/3G/4G-PPP” or “2G/3G/4G-DHCP”
mode.
• SIM Switch/Reset: Time of restart SIM card for dial fail
• User Name: Login users’ ISP(Internet Service Provider)
• Password: Login users’ ISP
• Dial String: Dial number of users’ ISP
• APN: Access point name of users’ ISP
• Network Mode: Select the appropriate network model according to the environment
• Permitted Authentication:Select the authentication protocol according to the requirements
Refer to 2G/3G/4G-PPP mode.
Page 25

25
MTX-ROUTER-HELIOS Lite | 2018/12
MTX © by MATRIX ELECTRONICA S.L.U.
SUPPORT: iotsupport@mtxm2m.com | SALES: info@mtxm2m.com | mtxm2m.com
• Force reconnect: Reset the connection according to the set time
• Connect Fail: Switch to Backup WAN after link failure times
• Dial Fail to Restart: Time of restart system for this link fail
• Keep Alive: This function is used to detect whether the Internet connection is active. It will
redial to users’ ISP immediately to make the connection active if users set it and when the
router detect the connection is inactive. Species how many seconds to wait before reconnect
the link after it terminates
• None: Do not set this function
• Ping: Send ping packet to detect the connection, when choose this method. Users should also
congure “Keep Alive Interval”, “Keep Alive Server IP” and “Keep Alive Server IP2” items
• Route: Detect connection with route method, when choose this method. Users should also
congure “Keep Alive Interval”, “Keep Alive Server IP” and “Keep Alive Server IP2” items.
• PPP: Detect connection with PPP method, when choose this method. Users should also
congure “Detection Interval” item
• Keep Alive Fail: Switch to Backup WAN after keep alive fail times
NOTE: When users choose the “Route” or “Ping” method, it’s quite important to make sure that the “Keep
Alive Server IP” and “Keep Alive Server IP2” are usable and stable, because they have to response the
detection packet frequently.
Page 26

26
MTX-ROUTER-HELIOS Lite | 2018/12
MTX © by MATRIX ELECTRONICA S.L.U.
SUPPORT: iotsupport@mtxm2m.com | SALES: info@mtxm2m.com | mtxm2m.com
3.2 WAN Status
The page shows the specic connection details, including module information, network operators, as well
as the connection of the IP address and DNS, etc.., according to the different connection types.
3.3 LAN
Set IP address and subnet mask of LAN. The LAN IP and WAN IP must not be in the same network
segment.
• Local DNS: You can choose to use these reliable DNS server if you have your own DNS server
or other stable and reliable DNS server. Optional conguration
• Assign WAN Port to Switch: Use WAN port to LAN port
Page 27

27
MTX-ROUTER-HELIOS Lite | 2018/12
MTX © by MATRIX ELECTRONICA S.L.U.
SUPPORT: iotsupport@mtxm2m.com | SALES: info@mtxm2m.com | mtxm2m.com
• DHCP Type: DHCP Server and DHCP Forwarder
• DHCP Server: Keep the default Enable to enable the router’s DHCP server option. If users
have already have a DHCP server on their network or users do not want a DHCP server, then
select Disable
• Start IP Address: A numerical value for the DHCP server to start with when issuing IP
addresses. Do not start with 192.168.1.1 (the router’s own IP address)
• Maximum DHCP Users: Put in the maximum number of PCs that users want the DHCP server
to assign IP addresses to. The absolute maximum is 253 if 192.168.1.2 is users’ starting IP
address
• Client Lease Time: Client Lease Time is the amount of time a network user will be allowed
connection to the router with their current dynamic IP address. Enter the amount of time, in
minutes, that the user will be “leased” this dynamic IP address
• Static DNS (1-3): Domain Name System (DNS) is how the Internet translates domain or
website names into Internet addresses or URLs. Users’ ISP will provide them with at least one
DNS Server IP address. If users wish to utilize another, enter that IP address in one of these
elds. Users can enter up to three DNS Server IP addresses here. The router will utilize them
for quicker access to functioning DNS servers
• WINS: Windows Internet Naming Service (WINS) manages each PC’s interaction with the
Internet. If users use a WINS server, enter that server’s IP address here. Otherwise, leave it
blank
• No DNS Rebind: When enabled, it will prevent an external attacker to access the router’s
internal Web interface. It is a security measure
• Additional DNSMasq Options: Some extra options users can set by entering them in
Additional DNS Options
Page 28

28
MTX-ROUTER-HELIOS Lite | 2018/12
MTX © by MATRIX ELECTRONICA S.L.U.
SUPPORT: iotsupport@mtxm2m.com | SALES: info@mtxm2m.com | mtxm2m.com
For example:
• static allocation: dhcp-host=AB:CD:EF:11:22:33,192.168.0.10,myhost,myhost.domain,12h
• max lease number: dhcp-lease-max=2
• DHCP server IP range: dhcp-range=192.168.0.110,192.168.0.111,12h
3.4 LAN Status
LAN port MAC, IP and DNS and other information
• Host Name: Host name of LAN client
• IP Address: IP address of the client
• MAC Address: MAC address of the client
• Conn. Count: Connection count caused by the client
• Ratio: The ratio of 4096 connection
• DNCP Server: Enable or disable the router work as a DHCP server
• Starting IP Address: The starting IP Address of the DHCP server’s Address pool
• Ending IP Address: The ending IP Address of the DHCP server’s Address pool
• Client Lease Time: The lease time of DHCP client
Page 29

29
MTX-ROUTER-HELIOS Lite | 2018/12
MTX © by MATRIX ELECTRONICA S.L.U.
SUPPORT: iotsupport@mtxm2m.com | SALES: info@mtxm2m.com | mtxm2m.com
• Host Name: Host name of LAN client
• IP Address: IP address of the client
• MAC Address: MAC address of the client
• Expires: The expiry the client rents the IP address
• Delete: Click to delete DHCP client
Page 30

30
MTX-ROUTER-HELIOS Lite | 2018/12
MTX © by MATRIX ELECTRONICA S.L.U.
SUPPORT: iotsupport@mtxm2m.com | SALES: info@mtxm2m.com | mtxm2m.com
4. Advanced
4.1 Statically Assigned
• Statically Assigned: Assign the static IP address to the specied client according to MAC address
4.2 Advanced Router
• Route Name: Dened routing name by users, up to 25 characters
• Metric: 0-9999
• Destination LAN NET: The Destination IP Address is the address of the network or host to which
users want to assign a static route
• Subnet Mask: The Subnet Mask determines which portion of an IP address is the network
portion, and which portion is the host portion
• Gateway: IP address of the gateway device that allows for contact between the router and the
network or host
Page 31

31
MTX-ROUTER-HELIOS Lite | 2018/12
MTX © by MATRIX ELECTRONICA S.L.U.
SUPPORT: iotsupport@mtxm2m.com | SALES: info@mtxm2m.com | mtxm2m.com
• Interface: Indicate users whether the Destination IP Address is on the LAN & WLAN (internal
wired and wireless networks), the WAN (Internet), or Loopback (a dummy network in which one
PC acts like a network, necessary for certain software programs)
4.3 MAC Address Clone
Some ISP need the users to register their MAC address. The users can clone the router MAC address to
their MAC address registered in ISP if they do not want to re-register their MAC address.
• Clone MAC address: It can clone three parts: Clone LAN MAC, Clone WAN MAC, Clone Wireless
MAC
NOTE: One MAC address is 48 characteristic. MAC address can not be set to the multicast address, the
rst byte must be even. And MAC address value of network bridge br0 is determined by the smaller value
of wireless MAC address and LAN port MAC address.
4.4 SDNS
When users host their domain names on free or commercial servers, they usually get a static IP (nonchangeable IP) address for their websites, which involves the use of static name servers, or static DNS,
as well. Static DNS settings will never update on their own and will remain the same, until you decide to
update them. Static DNS settings are very useful, since they provide a stable service with no interruptions,
and can increase the overall speed of the website.
Page 32

32
MTX-ROUTER-HELIOS Lite | 2018/12
MTX © by MATRIX ELECTRONICA S.L.U.
SUPPORT: iotsupport@mtxm2m.com | SALES: info@mtxm2m.com | mtxm2m.com
5. Wireless
5.1 Basic Settings
• Wireless Network: “Eanble”, radio on. “Disable”, radio off
• Wireless Mode: AP, Client, Adhoc, Repeater, Repeater Bridge options
• Network Mode
• Mixed: Support 802.11b, 802.11g, 802.11n wireless devices
• BG-Mixed: Support 802.11b, 802.11g wireless devices
• B-only: Only supports the 802.11b standard wireless devices
• B-only: Only supports the 802.11b standard wireless devices.
• G-only: Only supports the 802.11g standard wireless devices
• NG-Mixed: Support 802.11g, 802.11n wireless devices
• N-only: Only supports the 802.11g standard wireless devices
• SSID: The SSID is the network name shared among all devices in a wireless network. The
SSID must be identical for all devices in the wireless network. It is case-sensitive and must not
exceed 32 alphanumeric characters, which may be any keyboard character. Make sure this
setting is the same for all devices in your wireless network
• Channel: A total of 1-13 channels to choose more than one wireless device environment,
please try to avoid using the same channel with other devices
• Channel Width: 20MHZ and 40MHZ
• Channel: Channel for 40MHZ, you can choose upper or lower
• Wireless SSID Broadcast: Enable, SSID broadcasting; Disable, Hidden SSID
• Virtual Interfaces: Click Add to add a virtual interface. Add successfully, click on the remove,
you can remove the virtual interface
• AP Isolation: This setting isolates wireless clients so access to and from other wireless clients
are stopped
Page 33

33
MTX-ROUTER-HELIOS Lite | 2018/12
MTX © by MATRIX ELECTRONICA S.L.U.
SUPPORT: iotsupport@mtxm2m.com | SALES: info@mtxm2m.com | mtxm2m.com
5.2 Wireless Security
Wireless security options used to congure the security of your wireless network. This route is a total of
seven kinds of wireless security mode. Disabled by default, not safe mode is enabled. Such as changes
in Safe Mode, click Apply to take effect immediately.
• WEP: Is a basic encryption algorithm is less secure than WPA. Use of WEP is discouraged due to
security weaknesses, and one of the WPA modes should be used whenever possible. Only use
WEP if you have clients that can only support WEP (usually older, 802.11b-only clients)
• Authentication Type: Open or shared key
• Default Transmit Key: Select the key form Key 1 - Key 4 key
• Encryption: There are two levels of WEP encryption, 64-bit (40-bit) and 128-bit. To utilize WEP,
select the desired encryption bit, and enter a Passphrase or up to WEP key in hexadecimal
format. If you are using 64-bit (40-bit), then each key must consist of exactly 10 hexadecimal
characters or 5 ASCII characters. For 128-bit, each key must consist of exactly 26 hexadecimal
characters. Valid hexadecimal characters are “0”-”9” and “A”-”F”
• ASCII/HEX: ASCII, the keys is 5 bit ASCII characters/13bit ASCII characters. HEX, the keys is
10bit/26 bit hex digits
• Passphrase: The letters and numbers used to generate a key
• Key1-Key4: Manually ll out or generated according to input the pass phrase
• WPA Personal/WPA2 Personal/WPA2 Person Mixed:TKIP/AES/TKIP+AES, dynamic encryption
keys. TKIP + AES, self-applicable TKIP or AES. WPA Person Mixed, allow WPA Personal and
WPA2 Personal client mix
• WPA Shared Key: Between 8 and 63 ASCII character or hexadecimal digits
• Key Renewal Interval (in seconds):1-99999
Page 34

34
MTX-ROUTER-HELIOS Lite | 2018/12
MTX © by MATRIX ELECTRONICA S.L.U.
SUPPORT: iotsupport@mtxm2m.com | SALES: info@mtxm2m.com | mtxm2m.com
5.3 Wireless Status
• MAC Address: MAC address of wireless client
• Radio: Display whether radio is on or not
• Mode: Wireless mode
• Network: Wireless network mode
• SSID: Wireless network name
• Channel: Wireless network channel
• TX Power: Reection power of wireless network
• Rate: Reection rate of wireless network
• Encryption-Interface wl0: Enable or disable Encryption-Interface wl0
• Received (RX): received data packet
• Transmitted (TX): transmitted data packet
• MAC Address: MAC address of wireless client
• Interface: Interface of wireless client
• Uptime: Uptime of wireless client
• TX Rate: Transmit rate of wireless client
Page 35

35
MTX-ROUTER-HELIOS Lite | 2018/12
MTX © by MATRIX ELECTRONICA S.L.U.
SUPPORT: iotsupport@mtxm2m.com | SALES: info@mtxm2m.com | mtxm2m.com
• RX Rate: Receive rate of wireless client
• Signal: The signal of wireless client
• Noise: The noise of wireless client
• SNR: The signal to noise ratio of wireless client
• Signal Quality: Signal quality of wireless client
Page 36

36
MTX-ROUTER-HELIOS Lite | 2018/12
MTX © by MATRIX ELECTRONICA S.L.U.
SUPPORT: iotsupport@mtxm2m.com | SALES: info@mtxm2m.com | mtxm2m.com
6. VPN
6.1 PPTP
• Server IP or DNS Name: PPTP server’s IP Address or DNS Name
• Remote Subnet: The network of the remote PPTP server
• Remote Subnet Mask: Subnet mask of remote PPTP server
• Permitted Authentication: Select permitted authentication
• MPPE Encryption: Enable or disable Microsoft Point-to-Point Encryption
• MTU: Maximum Transmission Unit
• MRU: Maximum Receive Unit
• NAT: Network Address Translation
• User Name: User name to login PPTP Server
• Password: Password to log into PPTP Server
Page 37

37
MTX-ROUTER-HELIOS Lite | 2018/12
MTX © by MATRIX ELECTRONICA S.L.U.
SUPPORT: iotsupport@mtxm2m.com | SALES: info@mtxm2m.com | mtxm2m.com
6.2 L2TP
• User Name: User name to login L2TP Server
• Password: Password to login L2TP Server
• Gateway(L2TP Server): L2TP server’s IP Address or DNS Name
• Remote Subnet: The network of remote PPTP server
• Remote Subnet Mask: Subnet mask of remote PPTP server
• Permitted Authentication: Select permitted authentication
• MPPE Encryption: Enable or disable Microsoft Point-to-Point Encryption
• MTU: Maximum transmission unit
• MRU: Maximum receive unit
• NAT: Network address translation
Page 38

38
MTX-ROUTER-HELIOS Lite | 2018/12
MTX © by MATRIX ELECTRONICA S.L.U.
SUPPORT: iotsupport@mtxm2m.com | SALES: info@mtxm2m.com | mtxm2m.com
6.3 IPSEC
• Name: Indicate this connection name, must be unique
• Enabled: If enable, the connection will send tunnel connection request when it is reboot or reconnection, otherwise it is no need if disable
• Local WAN Interface: Local addresss of the tunnel
• Remote Host Address: IP/domain name of end opposite; this option can not ll in if using
tunnel mode server
• Local Subnet: IPSec local protects subnet and subnet mask, i.e. 192.168.1.0/24; this option
can not ll in if using transfer mode
• Remote Subnet: IPSec opposite end protects subnet and subnet mask, i.e.192.168.7.0/24;
this option can not ll in if using transfer mode
• Local ID: Tunnel local end identication, IP and domain name are available
• Remote ID: Tunnel opposite end identication, IP and domain name are available
• Use a Pre-Shared Key: Choose use share encryption option
• Enable Advanced Settings: Enable to congure 1st and 2nd phase information, otherwise it will
auto negotiation according to opposite end
• Phase 1(IKE)
• Encryption: IKE phased encryption mode
Page 39

39
MTX-ROUTER-HELIOS Lite | 2018/12
MTX © by MATRIX ELECTRONICA S.L.U.
SUPPORT: iotsupport@mtxm2m.com | SALES: info@mtxm2m.com | mtxm2m.com
• Integrity: IKE phased integrity solution
• DHGrouptype: DH exchange algorithm
• Lifetime: Set IKE lifetime, current unit is hour, the default is 0
• Phase 2(ESP)
• Encryption: ESP encryption type
• Integrity: ESP integrity solution
• Keylife: Set ESP keylife, current unit is hour, the default is 0
• IKE aggressive mode allowed: Negotiation mode adopt aggressive mode if tick; it is main mode
if non-tick
• Perfect Forward Secrecy: Tick to enable PFS, non-tick to disable PFS
• Enable DPD Detection: Enable or disable this function, tick means enable
• Time Interval: Set time interval of connect detection (DPD)
• Timeout: Set the timeout of connect detection
• Action: Set the action of connect detection
6.4 GRE
GRE (Generic Routing Encapsulation, Generic Routing Encapsulation) protocol is a network layer protocol
(such as IP and IPX) data packets are encapsulated, so these encapsulated data packets to another
network layer protocol (IP)transmission. GRE Tunnel (tunnel) technology, Layer Two Tunneling Protocol
VPN (Virtual Private Network).
• Name: GRE tunnel name
• Through: The GRE packet transmit interface
• Local Tunnel IP: The local tunnel ip address
• Local Netmask: Netmask of local network
• Peer Wan IP Addr: The remote WAN address
• Peer Tunnel IP: The remote tunnel ip address
• Peer Subnet: The remote gateway local subnet, eg: 192.168.1.0/24
Page 40

40
MTX-ROUTER-HELIOS Lite | 2018/12
MTX © by MATRIX ELECTRONICA S.L.U.
SUPPORT: iotsupport@mtxm2m.com | SALES: info@mtxm2m.com | mtxm2m.com
7. Security
7.1 Firewall
You can enable or disable the rewall, lter specic Internet data types, and prevent anonymous Internet
requests, ultimately enhance network security.
Firewall enhance network security and use SPI to check the packets into the network. To use rewall
protection, choose to enable otherwise disabled. Only enable the SPI rewall, you can use other rewall
functions: ltering proxy, block WAN requests, etc.
• Block Anonymous WAN Requests (ping): By selecting “Block Anonymous WAN Requests (ping)”
box to enable this feature, you can prevent your network from the Ping or detection of other
Internet users. so that make More difcult to break into your network. The default state of this
feature is enabled ,choose to disable allow anonymous Internet requests
• Filter IDENT (Port 113): Enable this feature can prevent port 113 from being scanned from
outside. Click the check box to enable the function otherwise disabled
• Block WAN SNMP access: This feature prevents the SNMP connection requests from the WAN
• Limit ssh Access: This feature limits the access request from the WAN by ssh, and per minute up
to accept two connection requests on the same IP. Any new access request will be automatically
dropped
• Limit Telnet Access: This feature limits the access request from the WAN by Telnet, and per
minute up to accept two connection requests on the same IP. Any new access request will be
automatically dropped
Page 41

41
MTX-ROUTER-HELIOS Lite | 2018/12
MTX © by MATRIX ELECTRONICA S.L.U.
SUPPORT: iotsupport@mtxm2m.com | SALES: info@mtxm2m.com | mtxm2m.com
• Filter Proxy: Wan proxy server may reduce the security of the gateway, Filtering Proxy will refuse
any access to any wan proxy server. Click the check box to enable the function otherwise
disabled
• Filter Cookies: Cookies are the website of data the data stored on your computer.When you
interact with the site ,the cookies will be used. Click the check box to enable the function
otherwise disabled
• Filter Java Applets: If refuse to Java, you may not be able to open web pages using the Java
programming. Click the check box to enable the function otherwise disabled
• Filter ActiveX: If refuse to ActiveX, you may not be able to open web pages using the ActiveX
programming. Click the check box to enable the function otherwise disabled
7.2 Access Restriction
Use access restrictions, you can block or allow specic types of Internet applications. You can set specic
PC-based Internet access policies. This feature allows you to customize up to ten different Internet Access
Policies for particular PCs, which are identied by their IP or MAC addresses.
Two options in the default policy rules: “Filter” and “reject”. If select “Deny”, will deny specic computers
to access any Internet service at a particular time period. If choose “lter”, it will block specic computers
to access the specic sites at a specic time period. You can set up 10 Internet access policies ltering
specic PCs access Internet services at a particular time period.
• Access Policy: You may dene up to 10 access policies. Click Delete to delete a policy or
Summary to see a summary of the policy
• Status: Enable or disable a policy
• Policy Name: You may assign a name to your policy
• PCs: The part is used to edit client list, the strategy is only effective for the PC in the list
Page 42

42
MTX-ROUTER-HELIOS Lite | 2018/12
MTX © by MATRIX ELECTRONICA S.L.U.
SUPPORT: iotsupport@mtxm2m.com | SALES: info@mtxm2m.com | mtxm2m.com
Set up Internet access policy.
1. Select the policy number (1-10) in the drop-down menu
2. For this policy is enabled, click the radio button next to “Enable”
3. Enter a name in the Policy Name eld
4. Click the Edit List of PCs button
5. On the List of PCs screen, specify PCs by IP address or MAC address. Enter the appropriate
IP addresses into the IP elds. If you have a range of IP addresses to lter, complete the
appropriate IP Range elds. Enter the appropriate MAC addresses into the MAC elds
6. Click the Apply button to save your changes. Click the Cancel button to cancel your unsaved
changes. Click the Close button to return to the Filters screen
7. If you want to block the listed PCs from Internet access during the designated days and time,
then keep the default setting, Deny. If you want the listed PCs to have Internet ltered during
the designated days and time, then click the radio button next to Filter
8. Set the days when access will be ltered. Select Everyday or the appropriate days of the week
Page 43

43
MTX-ROUTER-HELIOS Lite | 2018/12
MTX © by MATRIX ELECTRONICA S.L.U.
SUPPORT: iotsupport@mtxm2m.com | SALES: info@mtxm2m.com | mtxm2m.com
9. Set the time when access will be ltered. Select 24 Hours, or check the box next to From and
use the drop-down boxes to designate a specic time period
10. Click the Add to Policy button to save your changes and active it
11. To create or edit additional policies, repeat steps 1-9
12. To delete an Internet Access Policy, select the policy number, and click the Delete button
Website Blocking by URL Address: You can block access to certain websites by entering their URL.
Website Blocking by Keyword: You can block access to certain website by the keywords contained in the
web page.
NOTE: The default factory value of policy rules is “ltered”. If the user chooses the default policy rules for
“refuse”, and editing strategies to save or directly to save the settings. If the strategy edited is the rst, it
will be automatically saved into the second, if not, please keep the original number.
Turn off the power of the router or reboot the router can cause a temporary failure. After the failure
of the router, if can not automatically synchronized NTP time server, you need to ensure the correct
implementation of the relevant period control function.
7.3 MAC Filter
Using MAC address for data ltering.
Page 44

44
MTX-ROUTER-HELIOS Lite | 2018/12
MTX © by MATRIX ELECTRONICA S.L.U.
SUPPORT: iotsupport@mtxm2m.com | SALES: info@mtxm2m.com | mtxm2m.com
7.4 Packet Filter
This page can create rewall rules to protect your network from malicious attacks on Internet network
viruses.
• Packet lter: Enable or disable packet ltering
• Policy: Select the action of the data package that does not conform to the setting rules
• Accept only the data packets conform to the following rules: Only access to match the address
• Discard packets conform to the following rules: Only receive the network address that complies
with the custom rules, and drop all other addresses
NOTE: Add lter matching rules. Source port, destination port, source address, destination
address must be lled in at least one item
• INPUT: Data packets from WAN port to LAN port
• OUTPUT: Data packets from the LAN port to the WAN port
• Pro: Protocol type for a data packet
• Sport: The source port of the data package
• Dport: Port of destination
• Source IP: The source IP address of the data package
• Destination IP: Destination IP address
Page 45

45
MTX-ROUTER-HELIOS Lite | 2018/12
MTX © by MATRIX ELECTRONICA S.L.U.
SUPPORT: iotsupport@mtxm2m.com | SALES: info@mtxm2m.com | mtxm2m.com
8. Forwarding
8.1 Port Forwarding
Port Forwarding allows you to set up public services on your network, such as web servers, ftp servers,
e-mail servers, or other specialized Internet applications. Specialized Internet applications are any
applications that use Internet access to perform functions such as videoconferencing or online gaming.
When users send this type of request to your network via the Internet, the router will forward those
requests to the appropriate PC.
• Application: Enter the name of the application in the eld provided
• Protocol: Chose the right protocol TCP,UDP or Both. Set this to what the application requires
• Source Net: Forward only if sender matches this ip/net (example 192.168.1.0/24)
• Port from: Enter the number of the external port (the port number seen by users on the Internet)
• IP Address: Enter the IP Address of the PC running the application
• Port to: Enter the number of the internal port (the port number used by the application)
• Enable: Click the Enable check box to enable port forwarding for the application
8.2 Port Range
Port Range Forwarding allows you to set up public services on your network, such as web servers, ftp
servers, e-mail servers, or other specialized Internet applications. Specialized Internet applications are
any applications that use Internet access to perform functions such as videoconferencing or online
gaming. When users send this type of request to your network via the Internet, the router will forward
those requests to the appropriate PC.
• Application: Enter the name of the application in the eld provided
• Start: Number of the 1st port you want users to see on the Internet and forwarded to your PC
• End: Number of the last port you want users to see on the Internet and forwarded to your PC
• Protocol: Chose the right protocol TCP,UDP or Both. Set this to what the application requires
• IP Address: Enter the IP Address of the PC running the application
• Enable: Click the Enable check box to enable port forwarding for the application
Page 46

46
MTX-ROUTER-HELIOS Lite | 2018/12
MTX © by MATRIX ELECTRONICA S.L.U.
SUPPORT: iotsupport@mtxm2m.com | SALES: info@mtxm2m.com | mtxm2m.com
8.3 Port Triggering
Port Triggering allows you to do port forwarding without setting a xed PC. By setting Port Triggering rules,
you can allow inbound trafc to arrive at a specic LAN host, using ports different than those used for the
outbound trafc. This is called port triggering since the outbound trafc triggers to which ports inbound
trafc is directed.
• Application: Enter the name of the application in the eld provided
• Triggered Port Range: Enter the number of the rst and the last port of the range, which should
be triggered. If a PC sends outbound trafc from those ports, incoming trafc on the Forwarded
Range will be forwarded to that PC
• Forwarded Port Range: Enter the number of the rst and the last port of the range, which
should be forwarded from the Internet to the PC, which has triggered the Triggered Range
• Enable: Click the Enable check box to enable port triggering for the application
8.4 DMZ
The DMZ (DeMilitarized Zone) hosting feature allows one local user to be exposed to the Internet for use
of a special-purpose service such as Internet gaming or videoconferencing. DMZ hosting forwards all the
ports at the same time to one PC. The Port Forwarding feature is more secure because it only opens the
ports you want to have opened, while DMZ hosting opens all the ports of one computer, exposing the
computer so the Internet can see it.
Any PC whose port is being forwarded must should have a new static IP address assigned to it because
its IP address may change when using the DHCP function.
• DMZ Host IP Address: To expose one PC to the Internet, select Enable and enter the computer’s
IP address in the DMZ Host IP Address eld. To disable the DMZ, keep the default setting:
Disable
Page 47

47
MTX-ROUTER-HELIOS Lite | 2018/12
MTX © by MATRIX ELECTRONICA S.L.U.
SUPPORT: iotsupport@mtxm2m.com | SALES: info@mtxm2m.com | mtxm2m.com
9. QoS Setting
9.1 Trafc Monitoring
Show the bandwidth of WAN, LAN, WiFi.
• Abscissa axis: Time
• Vertical axis: Speed rate
Page 48

48
MTX-ROUTER-HELIOS Lite | 2018/12
MTX © by MATRIX ELECTRONICA S.L.U.
SUPPORT: iotsupport@mtxm2m.com | SALES: info@mtxm2m.com | mtxm2m.com
10. M2M
10.1 Serial
There is a console port on the router. Normally, this port is used to debug. This port can also be used for
serial transmission. The router has embedded a serial to TCP program. The data sent to the serial port is
encapsulated by TCP/IP protocol stack and then is sent to the destination server. This function can work
as a IP Modem.
• Baudrate: The serial port’s baud rate
• Databit: The serial port’s data bit
• Parity: The serial port’s parity
• Stopbit: The serial port’s stopbit
• Flow Control: The serial port’s ow control type
• Enable Serial TCP Function: Enable the serial to TCP function
• Protocol Type: The protocol type to transmit data
Page 49

49
MTX-ROUTER-HELIOS Lite | 2018/12
MTX © by MATRIX ELECTRONICA S.L.U.
SUPPORT: iotsupport@mtxm2m.com | SALES: info@mtxm2m.com | mtxm2m.com
• UDP(DTU): Data transmit with UDP protocol , work as a DTU which has application protocol and
hear beat mechanism
• Pure UDP: Data transmit with standard UDP protocol
• TCP(DTU): Data transmit with TCP protocol , work as a DTU which has application protocol and
hear beat mechanism
• Pure TCP: Data transmit with standard TCP protocol, router is the client
• TCP Server: Data transmit with standard TCP protocol, router is the server
• Modbus TCP Server: MODBUS TCP and MODBUS RTU conversion
• TCST: Data transmit with TCP protocol, Using a custom data
• Server Address: The data service center’s IP Address or domain name
• Server Port: The data service center’s listening port
• Device ID: The router’s identity ID
• Device Number: The router’s phone number
• Heartbeat Interval: The time interval to send heart beat packet. This item is valid only when
you choose UDP(DTU) or TCP(DTU) protocol type
• TCP Server Listen Port: This item is valid when Protocol Type is “TCP Server”
• Custom Heartbeat Packet : This item is valid when Protocol Type is “TCST”
• Custom Registration Packets: This item is valid when Protocol Type is “TCST”
10.2 SMS
For the SMS Function, support SMS to the router for Disconnect, Connect, Reboot functions. The default
state of the router is Connect. You can congure the below parameters for SMS control.
SMS Center: Please check with the SIM card operator.
Page 50

50
MTX-ROUTER-HELIOS Lite | 2018/12
MTX © by MATRIX ELECTRONICA S.L.U.
SUPPORT: iotsupport@mtxm2m.com | SALES: info@mtxm2m.com | mtxm2m.com
11. Administration
11.1 Serial
Set the user name and password, to support the input of 32 characters.
The new password must not exceed 32 characters in length and must not include any spaces. Enter the
new password a second time to conrm it.
NOTE: Default username is admin.
It is strongly recommended that you change the factory default password of the router, which is admin.
All users who try to access the router’s web-based utility or Setup Wizard will be prompted for the router’s
password.
11.2 Management
Congure WEB server parameters.
• Protocol: This feature allows you to manage the router using either HTTP protocol or the HTTPS
protocol
• Local Web GUI port: Set the access port of the WEB server. For example, when the gateway
address is 192.168.1.1 and set the server port 1010, you will enter the address bar in the
http://192.168.1.1:1010 to access the WEB conguration page. The default port for the server
is 80
• Telnet: Enable or disable Telnet server
Page 51

51
MTX-ROUTER-HELIOS Lite | 2018/12
MTX © by MATRIX ELECTRONICA S.L.U.
SUPPORT: iotsupport@mtxm2m.com | SALES: info@mtxm2m.com | mtxm2m.com
• SSH TCP Forwarding: Enable or disable to support the TCP forwarding
• Password Login: Allows login with the router password (username is admin)
• Port: port number for SSHd (default is 22)
• Authorized Keys: Here users paste their public keys to enable key-based login (more secure
than a simple password)
• Remote Access: This feature allows you to manage the router from a remote location, via the
Internet. To disable this feature, keep the default setting, Disable. To enable this feature, select
Enable, and use the specied port (default is 8080) on your PC to remotely manage the router.
You must also change the router’s default password, if you haven’t . To remotely manage the
router, enter http://xxx.xxx.xxx.xxx:8080 (the x’s represent the router’s Internet IP address, and
8080 represents the specied port) in web browser’s address eld. You will be asked for the
router’s password.
• If use https, need to specify the url as https://xxx.xxx.xxx.xxx:8080 (not all rmwares does
support this without rebuilding with SSL support).
• SSH Management: Enable SSH to remotely access the router by Secure Shell.
• Telnet Management: Enable SSH to remotely access the router.
NOTE: If the Remote Router Access feature is enabled, anyone who knows the router’s Internet
IP address and password will be able to alter the router’s settings.
Page 52

52
MTX-ROUTER-HELIOS Lite | 2018/12
MTX © by MATRIX ELECTRONICA S.L.U.
SUPPORT: iotsupport@mtxm2m.com | SALES: info@mtxm2m.com | mtxm2m.com
• Location: Equipment location
• Contact: Contact this equipment management
• Name: Device name
• RO Community: SNMP RO community name, the default is public, Only to read
• RW Community: SNMP RW community name, the default is private, Read-write permissions
11.3 System Time
Select your time zone. To use local time, leave the check mark in the box next to Use local time.
To adjust the time, user can set to modify the time of the system. They can change to adjust time by
manual to achieve adjust time by the system if the system fails to get NTP server.
• NTP Client: Get the system time from NTP server
• Time Zone: Time zone options
• Summer Time (DST): Set it depends on users’ location
• Server IP/Name: IP address of NTP server, up to 32 characters. If blank, the system will nd a
server by default
Page 53

53
MTX-ROUTER-HELIOS Lite | 2018/12
MTX © by MATRIX ELECTRONICA S.L.U.
SUPPORT: iotsupport@mtxm2m.com | SALES: info@mtxm2m.com | mtxm2m.com
11.4 Congure
• Reset router settings: Click the Yes button to reset all conguration settings to their default
values. Then click the Apply Settings button.
NOTE: Any settings you have saved will be lost when the default settings are restored. After
restoring the router is accessible under the default IP address 192.168.1.1 and the default
password admin.
• Backup Settings: You may backup your current conguration in case you need to reset the
router back to its factory default settings.Click the Backup button to backup your current
conguration
• Restore Settings: Click the Browse button to browse for a conguration le that is currently
saved on your PC.Click the Restore button to overwrite all current congurations with the ones
in the conguration le
NOTE: Only restore congurations with les backed up using the same rmware and the same
model of router.
Page 54

54
MTX-ROUTER-HELIOS Lite | 2018/12
MTX © by MATRIX ELECTRONICA S.L.U.
SUPPORT: iotsupport@mtxm2m.com | SALES: info@mtxm2m.com | mtxm2m.com
11.5 Upgrade
Update software to get new features.
• Firmware Upgrade: Contact us for New rmware versions. If the Router is not experiencing
difculties, then there is no need to download a more recent rmware version, unless that
version has a new feature that you want to use
NOTE: When you upgrade the Router’s rmware, you lose its conguration settings, so make
sure you write down the Router settings before you upgrade its rmware.
• To upgrade the Router’s rmware:
1. Download the rmware upgrade le
2. Click the Browse... button and chose the rmware upgrade le
3. Click the Upgrade button and wait until the upgrade is nished
NOTE: Upgrading rmware may take a few minutes.Do not turn off the power or press the reset
button.
• After ashing, reset to default: If you want to reset the router to the default settings for the
rmware version you are upgrading to, click the YES option
11.6 DDNS
If user’s network has a permanently assigned IP address, users can register a domain name and have
that name linked with their IP address by public Domain Name Servers (DNS). However, if their Internet
account uses a dynamically assigned IP address, users will not know in advance what their IP address
will be, and the address can change frequently. In this case, users can use a commercial dynamic DNS
service, which allows them to register their domain to their IP address, and will forward trafc directed
at their domain to their frequently-changing IP address.
Page 55

55
MTX-ROUTER-HELIOS Lite | 2018/12
MTX © by MATRIX ELECTRONICA S.L.U.
SUPPORT: iotsupport@mtxm2m.com | SALES: info@mtxm2m.com | mtxm2m.com
• User Name: Users register in DDNS server, up to 64 characteristic
• Password: Password for the user name that users register in DDNS server, up to 32 characteristic
• Host Name: Users register in DDNS server, no limited for input characteristic for now
• Type: Depends on the server
• Wildcard: Support wildcard or not, the default is OFF. ON means *.host.3322.org is equal to
host.3322.org
• Do not use external ip check: Enable or disable the function of ‘do not use external ip check
• Force Update Interval: Unit is day, try forcing the update dynamic DNS to the server by settled
days
• DDNS Status shows connection log information
11.7 Syslog
Alotcer router support stock log locally for at least 2 weeks. You could click the “Backup” button to
download the log from the router and check the details.
Page 56

56
MTX-ROUTER-HELIOS Lite | 2018/12
MTX © by MATRIX ELECTRONICA S.L.U.
SUPPORT: iotsupport@mtxm2m.com | SALES: info@mtxm2m.com | mtxm2m.com
Enable Syslogd to capture system messages. To send them to another system, enter the IP address of a
remote syslog server.
• Syslog Out Mode: 3 mode options
• Net: The log information output to a syslog server
• Console: The log information output to console port. (The log from the console is the most
detailed, so if need to debug, could run serial port software to read and save the log)
• Web: The log information output to local web page
• Remote Server: If choose net mode, users should input a syslog server’s IP Address and run a
syslog server program on it
 Loading...