

Page 1

MONIT
MONITOR60i / MONITOR600i
OR5i / MONITOR6C /
OWNERS MANUAL
Page 2
INTRODUCTION
Congratulations on your purchase of MTX Loudspeakers. Your new speakers represent the latest
technologies in loudspeaker design and manufacturing. They will provide outstanding performance and
years of listening enjoyment. Please take time to read through this manual thoroughly to insure you get
maximum performance out of your new loudspeakers.
FEATURES
• Video shielding for placement near a TV or monitor (MONITOR6C)
• 19mm dome tweeter (MONITOR600i, MONITOR60i and MONITOR6C)
• 12mm balanced dome tweeter (MONITOR5i)
• MDF cabinets
• Black ash finish to blend in with any decor
• MTX 1 year limited warranty
SPEAKER PLACEMENT
MAIN LEFT AND RIGHT CHANNELS
MONITOR600i, MONITOR60i, MONITOR5i
All MTX Loudspeakers have been engineered to combine deep powerful bass with crisp, natural high
frequency performance. Because there are many factors that affect loudspeaker performance, there is
no universal rule for speaker location. Best results will be obtained with some experimentation using the
following guidelines.
To achieve the most realistic stereo image, position the speakers so that an equilateral triangle is formed
between the speakers and the listening position (Figure 1). Turning the speakers slightly towards the
listening position can improve the image focus.
Bass loudness can be increased by moving the speakers closer to the rear wall. This sometimes can
degrade the stereo image. Use your judgement as to what location best fits your preferences.
SURROUND LEFT AND RIGHT CHANNELS
MONITOR60i, MONITOR5i
If you are using the MONITOR60i and MONITOR5i for rear channel speakers in a home theater application they should be placed to the side and slightly behind the listening position (Figure 1). If this is not
practical, they can be placed on the rear wall to either side of the listening position (Figure 2). For best
results, the surround speakers should be spaced equal distances from the listening position with the
tweeters at or above ear level.
RIGHT
FRONT
LEFT
FRONT
CENTER
CHANNEL
LEFT
REAR
RIGHT
REAR
LISTENING AREA
45
RIGHT
FRONT
LEFT
FRONT
CENTER
CHANNEL
LEFT
REAR
RIGHT
REAR
LISTENING AREA
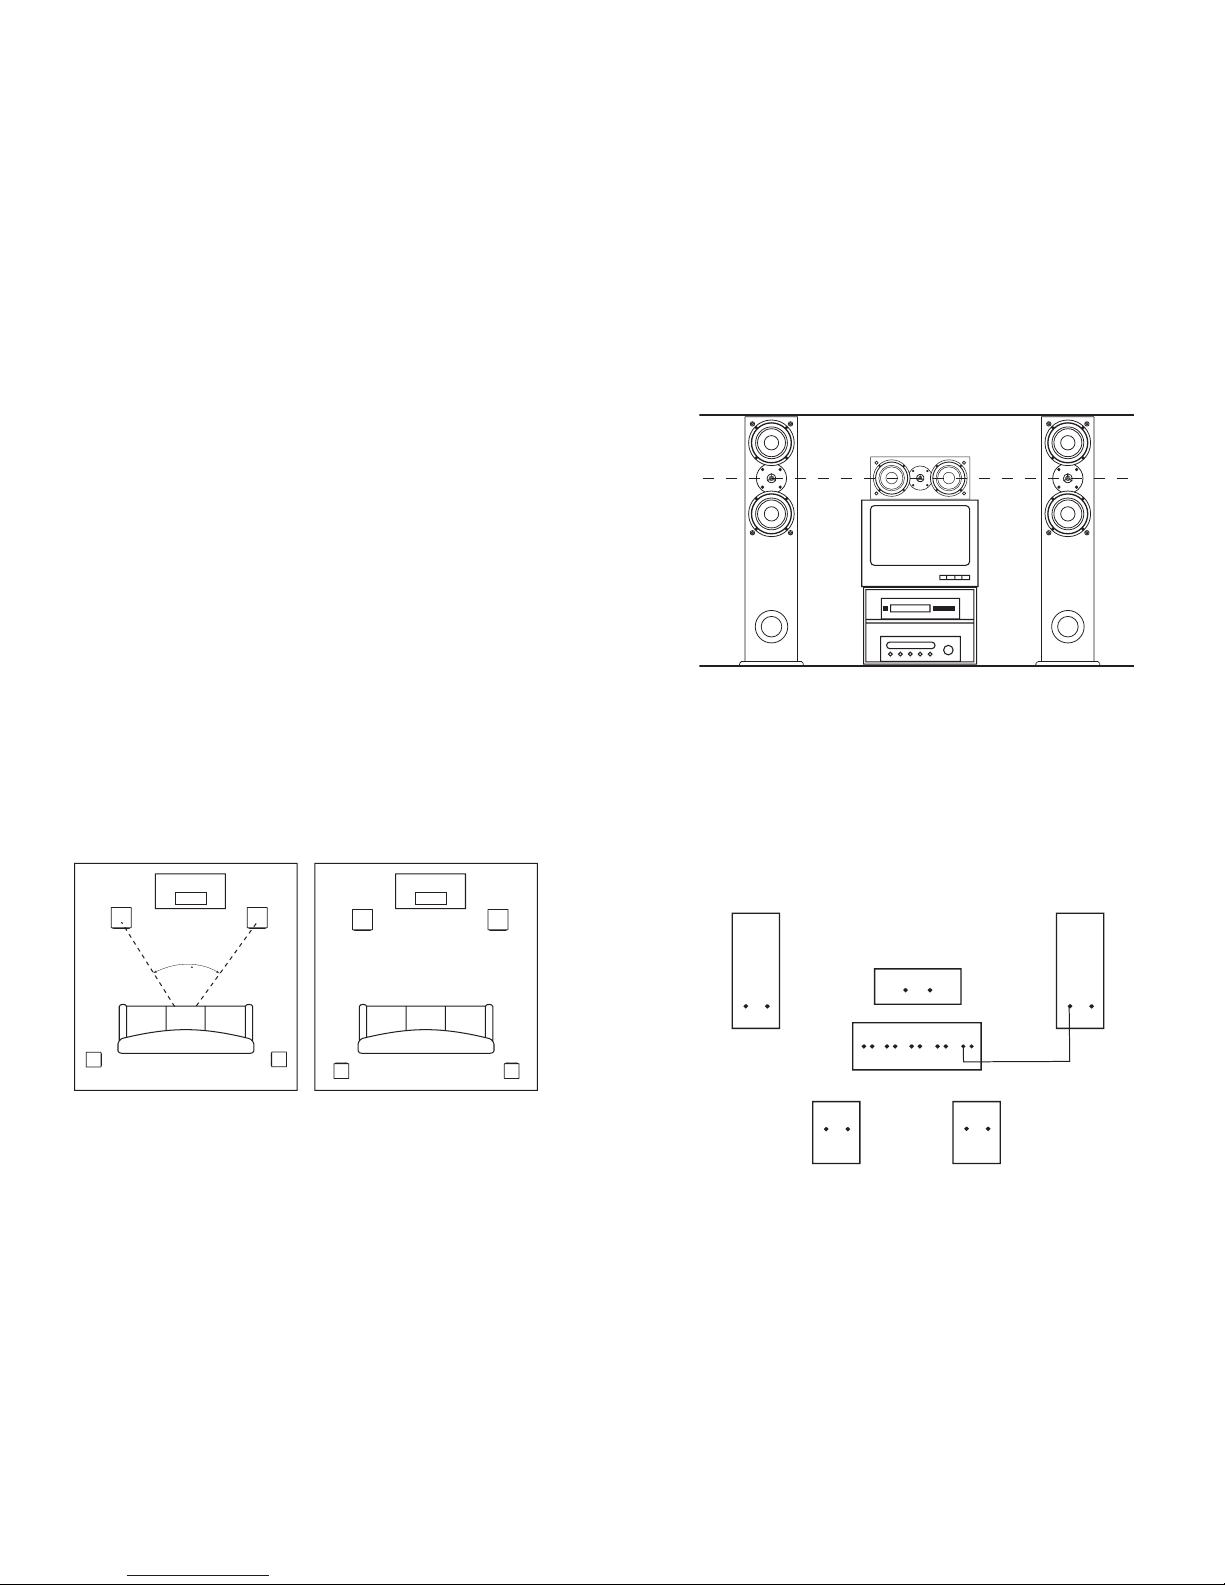
CENTER CHANNEL
MONITOR6C
When using the MONITOR6C as a center channel speaker in a home theater application the following
guidelines should be used for optimum performance.
Locate the speaker as close to the center of your TV or monitor as possible (Figure 1). This will anchor
the central image of your home theater to the location of the images seen on the screen.
Figure 1- Typical Loudspeaker Placement
Figure 2- Alternate Loudspeaker Placement
Place the center channel at an equal distance to the listening position as the main speakers are. Also,
place the height of the center channel’s tweeter as close to the same height as the main speakers’
tweeters (Figure 3). This will prevent image blurring when sounds are panned from the one side of the
room to the other.
HOOK UP
Note: If your amplifier or receiver has a 4/8Ω switch, optimum performance will be achieved using
the 4Ω or lowest impedance position.
Use 16 gauge or heavier speaker wire for connecting to your amplifier or receiver. Cut wire lengths leav-
ing an extra 12” to 24” at each end to allow for moving the speaker or receiver.
Using a wire cutter or a sharp knife, strip 1/2” of insulation off each end of the wire to expose the conduc-
tor. Twist wire ends to prevent from fraying. Connect the conductors to the binding posts on the bottom
or back of the speaker by unscrewing the post enough to expose the hole in the terminal post. Slip the
exposed conductor in the hole and tighten the post. Repeat this step for connecting to your amplifier or
receiver. Refer to the owner’s manual supplied with your electronics to assist with proper hook up.
Note: To ensure proper performance, make sure that the wire from the red (+) terminal on the
speaker is connected to the red (+) terminal on your amplifier or receiver. Likewise, make sure
the wire from the black (-) terminal on the speaker is connected to the black (-) terminal on the
amplifier or receiver. (Figure 4)
+
-
REDBLACK
REDBLACK
REDBLACK
REDBLACK REDBLACK
+
-
+-+
-
+
-
Once your speakers are hooked up, turn on your electronics and test to make sure they are functioning
properly. If your speakers sound “thin” with little bass and have a poor center image, one of the speaker
wires is probably hooked up backwards. Double check all connections for proper polarity.
Figure 3- Proper Placement of Center Channel Speaker
Figure 4- Connecting Speakers to Amplifier or Receiver
Place the center channel at an equal distance to the listening position as the main speakers are. Also,
place the height of the center channel’s tweeter as close to the same height as the main speakers’
tweeters (Figure 3). This will prevent image blurring when sounds are panned from the one side of the
room to the other.
HOOK UP
Note: If your amplifier or receiver has a 4/8Ω switch, optimum performance will be achieved using
the 4Ω or lowest impedance position.
Use 16 gauge or heavier speaker wire for connecting to your amplifier or receiver. Cut wire lengths leaving an extra 12” to 24” at each end to allow for moving the speaker or receiver.
Using a wire cutter or a sharp knife, strip 1/2” of insulation off each end of the wire to expose the conductor. Twist wire ends to prevent from fraying. Connect the conductors to the binding posts on the bottom
or back of the speaker by unscrewing the post enough to expose the hole in the terminal post. Slip the
exposed conductor in the hole and tighten the post. Repeat this step for connecting to your amplifier or
receiver. Refer to the owner’s manual supplied with your electronics to assist with proper hook up.
Note: To ensure proper performance, make sure that the wire from the red (+) terminal on the
speaker is connected to the red (+) terminal on your amplifier or receiver. Likewise, make sure
the wire from the black (-) terminal on the speaker is connected to the black (-) terminal on the
amplifier or receiver. (Figure 4)
+
-
REDBLACK
REDBLACK
REDBLACK
REDBLACK REDBLACK
+
-
+-+
-
+
-
Once your speakers are hooked up, turn on your electronics and test to make sure they are functioning
properly. If your speakers sound “thin” with little bass and have a poor center image, one of the speaker
wires is probably hooked up backwards. Double check all connections for proper polarity.
Figure 3- Proper Placement of Center Channel Speaker
Figure 4- Connecting Speakers to Amplifier or Receiver
MTX HOME SPEAKERS
SPEAKER SYSTEM
MTX HOME SPEAKERS
SPEAKER SYSTEM
 Loading...