

Page 1
HD Driving Video Recorder
User Manual
MDP02
1080 FHD HD Driving Recorder User Manual
In addition of the general recording function, there are other 4 main
features:
(1) HD 1080P 30 FPS H. 264 MOV HD night vision and HDMI HD output.
(2) Quick way to lock and unlock video files.
(3) Parking monitoring function: While sett ing on the parking mode, it will
automatically identify the surrounding and start to take rec or d if there i s a ny
incident.
(4) Built-in G-Sensor can detect impact and trigger emergency record
automatically. The came ra then saves and stores video of the incident alon g
with video from a few moments preceding and following the event.
In order to better play the biggest effectiveness of vehicle traveling data
recorder, please read this manual carefully before use.
Page 2
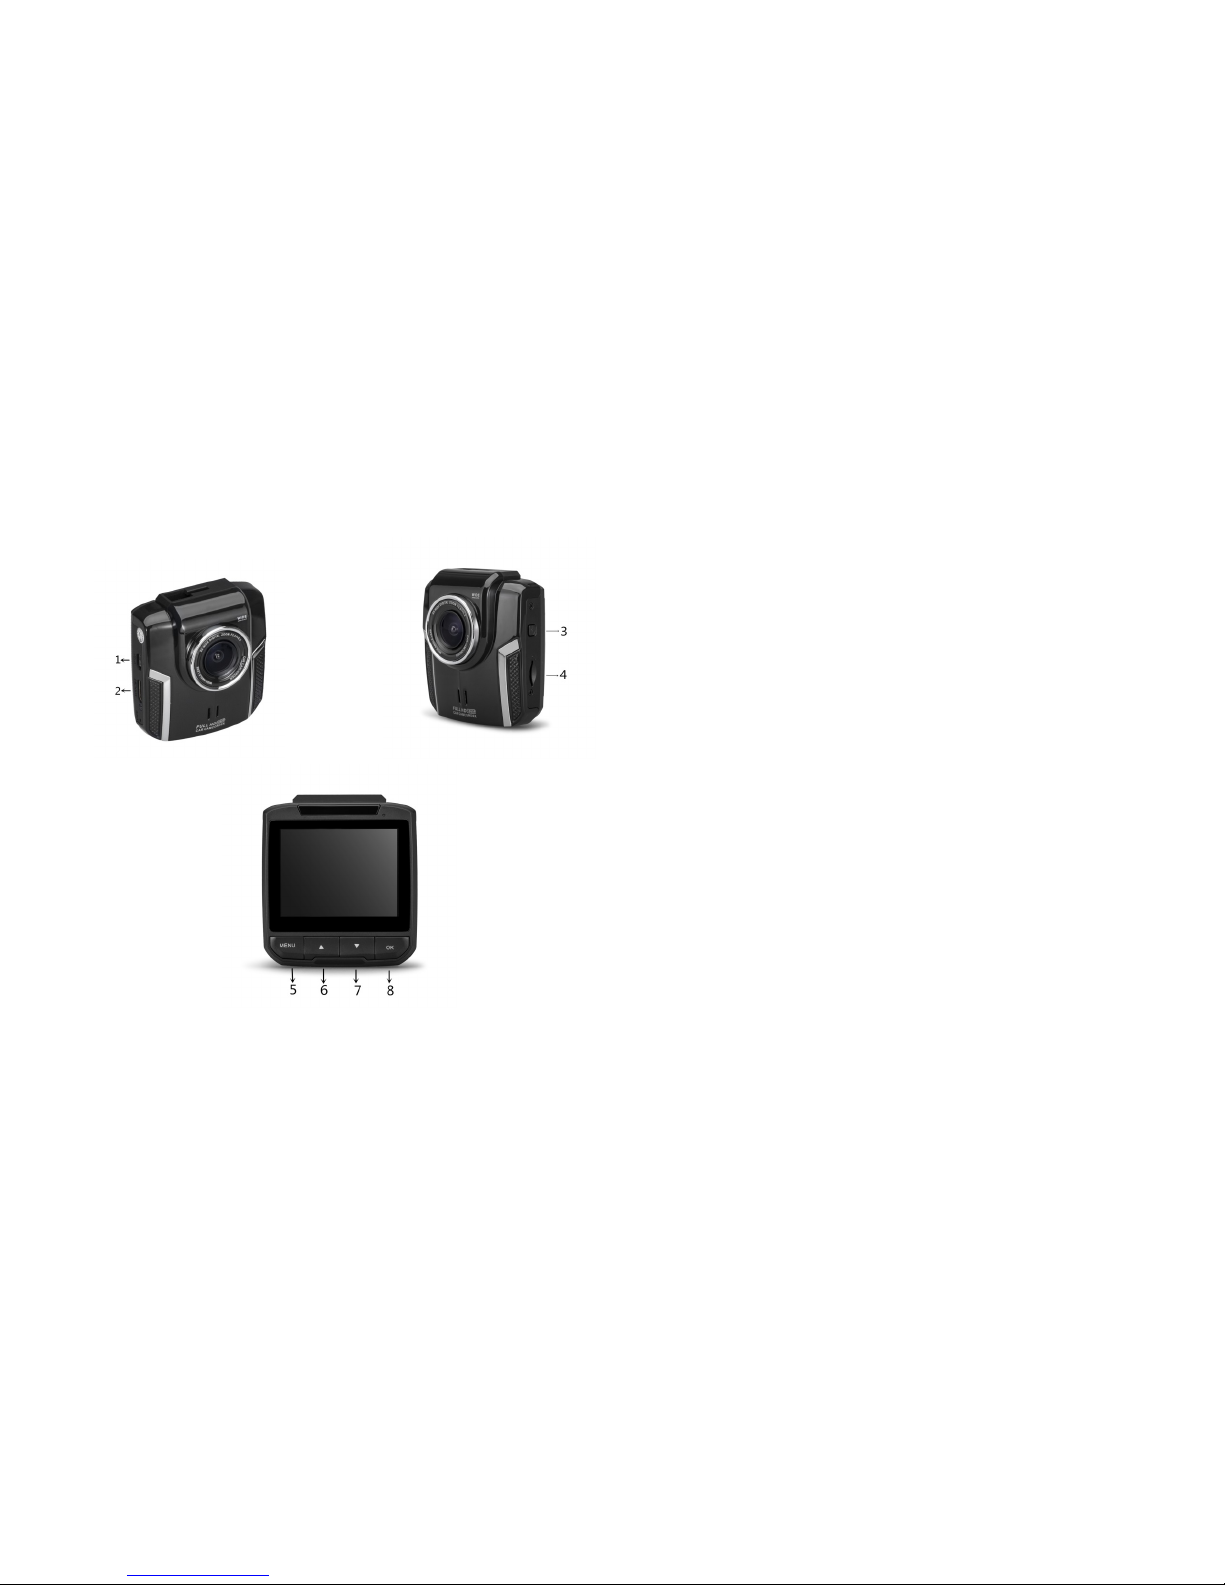
1. Product Feature and function
1. USB Port 2. HDMI Output 3.ON/OFF 4.TF Card slot
5. MENU 6.Up 7. Down 8.OK
2. Button and Function
1、 Power But ton ON/OFF
Alternatively you can choose to turn the camera off using the power
button; the files will be automatically saved.
2、OK Key
Function 1:Start/Stop video recording;
In standby mode, shot press the OK button to start or stop recording.
Function 2:Capture a photo
To capture a photo in photo mood, press OK button.
Function 3:File Replay
In replay mode, press OK to replay or pause the video
Function 4:Accept Selection
In menus: press to accept selection.
3、Menu
Function 1:Accesses the menu system
Function 2:While recording, press and hold to turn the microphone on and
off.
4、Mode
Function 1:Enter the photo mode,
Long press the mode button to enter photo mode
Function 2:Double press the mode button to enter replay mode
Function 3:Protected files
When recording, short press mode to lock and unlock the video files.
5、Up
Function 1:In menus: moves selection up in the list.
Function 2:Press up button to zoom in when taking video or pictures.
Page 3

Function 3:Press up button to turn up the volume when replaying video.
Function 4:In replay mode, press up button to enter 9 screen preview.
6、Down:
Function 1: In menus: selects next item in list
Function 2: Press down button to zoom out when taking video or pictures.
Function 3: Press down button to turn down the volume when replaying
video.
Function 4:Press the down button to turn on/off the audio when in standby
mode or replaying video.
7、Parking Mode:
Function 1: Press the parking mode before turn off the device. It will have P
appear which means it has entered into parking mode. It will automatically
power on to take record and save the video file before power off.
Function 2:
If you want to cancel the parking mode, press the parking mode and you will
see the P disappear on the left side corner of the screen.
3. Battery Charging
Two ways:
1. Use USB data cable to connect with computer.
2. Use the original car power supply.
Charging remind: the LCD screen will appear the charging icon, after fully
charge, the icon will not l
Charging time: around 120 minutes
4. TF Card Preparation
TF card requirement: this device requires TF card speed over CLASS6.
Install and Remove TF Card
1. Insert the TF card into the slot until it is firmly fixed.
2. When remove the TF card, press the card it will be pop-up
Attention:
1. Do not remove the TF card while it is working.
2. Please pay attention to the direction when inserting the card. If reverse it
is it would probably damage the device or card.
3. When you insert the card into device, this device will set the card as
storage place then the data of the previous card cannot be read.
4. If the TF card cannot match with device, please insert again or change
another card.
5. Support 4~64G
5. Power ON/OFF
1. Short press power button , the screen w ill be lightened. Long press
the power button , the device will turn off.
2. Auto on/off when driving: plug into 5V car power supply. The device will
start and recording. When stop driving, it will base on menu selection to
save the current video and then auto turn off in 10 second.
Note: When low power of built-in battery, it will automatically save video and
turn off.
6. Basic Function Introduction
1. Switch working mode
This device has 3 working modes: video mode, photo mode and replay
mode. Press MODE to switch.
2. Setting the menu and system
In video or photo mode, press (MENU) twice to enter system setting
Page 4

then the menu setting column turn into blue. Press up/down to select the
setting item: press OK to confirm, press menu to exit.
3. System setting option
Date and Time
Auto off: 3/5/10 minutes
Key sound: ON/OFF
Language: English/
Portugal/Russian/Chinese/Japanese/Spanish/French/
German/Italian
TV mode: P/N
Light source frequency: 50/60
Back light: ON/OFF/1/2/3/5 minutes auto turn off
Formatting: memory card
Default setting: Yes/No
Fixed Vers ion: Version Number
4. Recording:
When entering the video mode, on the top of the left corner there is
icon, press OK to start recording. When taking record there is a icon flash
on the top of left corner. Press again t o stop ta king v ideo a nd the ic on will
disappear.
5. Video Mode Option
Photo:
1080FHD(1920X1080) 1080P(1440X1080) 720P(1280X720);
WVGA (848480*480)
Cycle recording: off, 3 minut es, 5 m inut es, 10 minutes
Exposure supply: +2/3,+1/3,+0/0,-1/3,-2/3,-1.0,-4/3, -5/3,-2.0
Motion detection: ON/OFF
Audio: ON/OFF
Date: ON/OFF
Acceleration sensor: off, l ow, middle, high
6. Photo mode and setting
1. Press the OFF button to enter video mode and then press MO DE to ent er
photo mode. It will appear camera icon on t op of left corner.
2. Press OK, you would hear the sound of taking picture. To
eliminate blurring image, please do not hold it wit h t r em bl e hands.
Shooting ways: Single shooting, 2 second timer shooting, 5 second timer
shooting, 10 second timer shooting.
Resolution: 12M,10M,8M,5M,3M,2M,VGA,1.3M
Continuous capture: ON/OFF
Image quality: high quality, standard quality, low quality
Sharpen: intensive, standard, soft,
White balance: auto, sunlight, cloudy, tungsten, fluorescent lamp
Color: colorful, black and white, brown
ISO: Auto, 100, 200, 400
Exposure compensation: +2/3, +1/3,+0/0,-1/3,-2/3,-1.0,-4/3, -5/3,-2.0
Face Recognition: OFF, face recognition, smiling face recognition
Image Stabilization: ON/OFF
Quick preview: OFF, 2 second, 5 second
Date: OFF, Date, Tim e/D ate
7. Replay:
1. Browse file: Start the device and press the MODE button twice to enter
the replay mode. Press up and down button to browse photo or video.
2. Delete and Lock
When entering the replay mode, press MENU to select the delete and
lock option. Press OK to enter “delete current selection” and “delete all”,
press OK to confirm. You can lock the file to protect important data but
locked files can only be deleted after unlock.
8. Shortcut key:
MODE key: For any emergency, press MODE key to lock the current video.
MEMU: Press the MENU to turn on/off the light of screen
Shortly press the power button to fast switch to light compensating.
Page 5

Press DOWN button to shut down the microphone
9. Charging and Recording:
Use the car charger to connect the USB port of this device. Turn on device
to take video while charging.
7. Video Transmission and USB Function
This device can support USB transfer. You can also transfer the video file to
computer via USB cable. Or you can plug the TF card and transfer the card
data via card reader.
PCCAM
This device can be used as PC camera. Connect it with the USB cable to
the computer, it will popup MSDC/PCCAM/POWER option. Press UP and
Down button to select the PCCAM and then press video button to confirm.
Starting my computer icon, you will find . Double click this icon then it
can be used for pc cam.
TV Play
Connect this device via TV cable to reply on the high quality TV.
Note: Installing driver is not needed
Product Character
Large screen for clearer preview and 1080P wide angle lens design will
suitable for different angle view and HD video recording.
-build in 1/3” high definition photosensitive element. It can capture clear
picture in darkness.
-build in lithium battery which can support charging while recording.
-build in microphone and speaker
-support large capacity micro TF card
-Auto recording when starts the car engine.
- Delayed start time to prevent peak forward current damage the device.
- G-SENSOR
8. Technical Specifications
Product Name
Video Recorder
Lens Chip OV-9712
LCD Size 2.31" TFT
Lens 140 Degree
Language
Chinese/English/Russian/Japanese/French/Italian
/German/Spanish/Korean
Video Resolution
1080P
Video Format
Motion.jpeg
G-sensor
3 Axis, Installed
Photo Resolution
1280*960(1M),1600*1200(2M),2048*1536(3M),
2592*1944(6M)
Photo Format
JPEG
TF Card
Support(4GB~64GB)
Microphone/Speaker
Internal
Current Frequency 50HZ/60HZ
USB/TV Output USB 2.0/NTSC, PAL and HDMI
Car Charger DC5V 1000mA( Input DC12V-24V)
Battery
Built-in 300mA Battery
Memory
512MB Nand flash
Night Vision
IR Night Vision
Battery Duration
20 minutes
 Loading...