

Page 1
HDWH2 & HDWH4
Wire Harness Installation
HDWH2 Fit Guide- 1998-2013 (Ultra Classic, Electra Glide, Street Glide, and Tri Glide)
Bracket ts- 1998-2013 (Road Glide and Road Glide Ultra)
Not for CVO Models
Contents:
1. MTX Wiring Harness- Includes all connectors for connecting to
MTX MUD amplifier and speakers.
2. Hook and loop fastener Pad
3. Speaker Adaptor Rings-2
Installation Tools:
Wrenches/Sockets- 7⁄16", 3⁄8", 1⁄2", 10mm
Torx Driver- T10, T25, T40
#2 Phillips Screw Driver
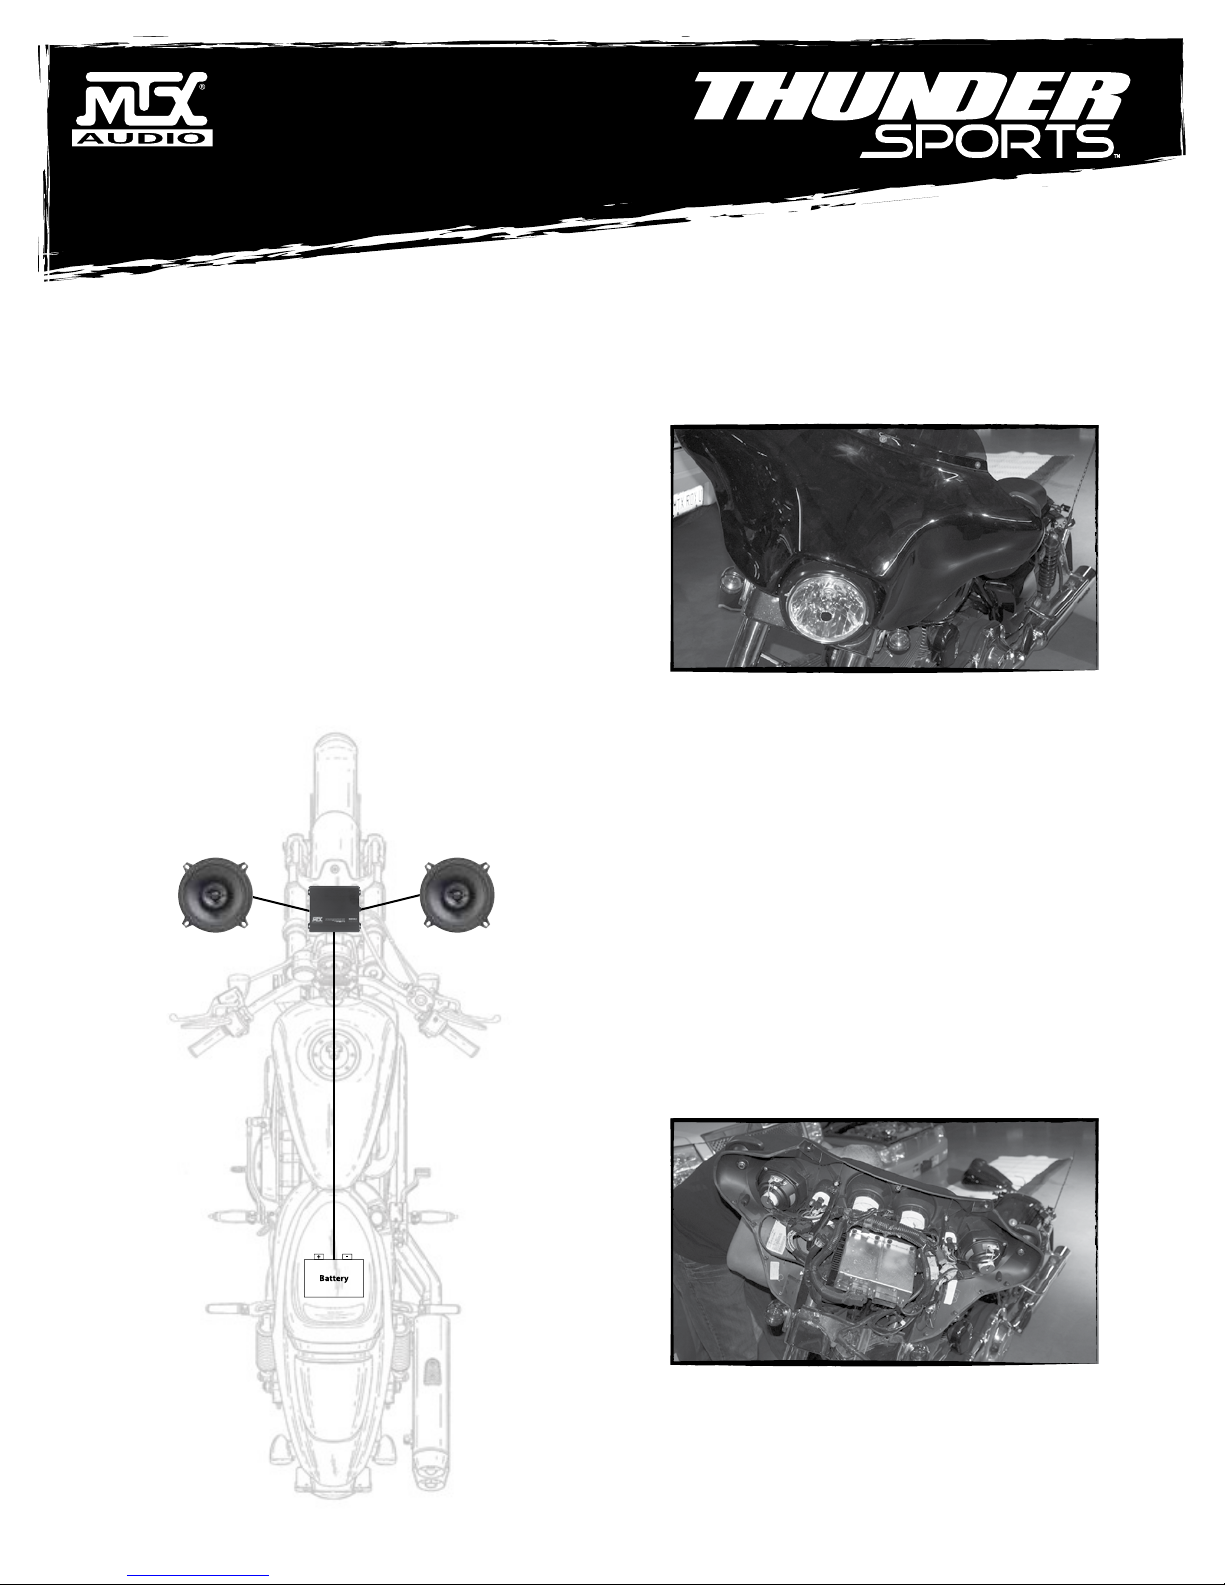
“Wiring Diagram”- shows the overall wire harness attached to the MUD amp and
battery in the bike.
Installation:
Please note if you are unsure about disassembling your motorcycle please have
this installed by a qualied technician.
ULTRA CLASSIC, ELECTRA GLIDE, STREET GLIDE AND TRI GLIDE INSTALLATIONS
Please go to page 3 for Road Glide and Road Glide Ultra installation.
First Step - Remove the Fairing
A- Remove the top bolts on the bottom of the windshield. After the bolts are
removed, carefully remove the windshield.
B- Remove the screws on the bottom sides of the fairing. This will allow the
fairing to be removed.
C- Pull the fairing forward and up slightly, the harness connecting the headlight
will need to be removed to completely pull the fairing away from the bike.
a. Be careful to not bump the fairing against the signal lights or other
installed lights connected to the front fork. A sock or other fabric can
be used to protect the side lights during fairing removal.
Second Step - Remove Existing Speakers
A- Pull the speaker wire connectors from the speakers, take care to pull them
from the plastic connector and not the wires so that the stock wire harness
is not damaged.
Clutch Brake
B- Use a Torx driver to loosen the 4 screws holding on the stock speakers.
C- Keep track of which wires go to the clutch and brake side speakers.
D- The speaker grill assembly needs to be removed from the stock speaker,
make sure to keep it in a safe place or remember its orientation. This will be
important for mounting the new speakers in place.
Page 2
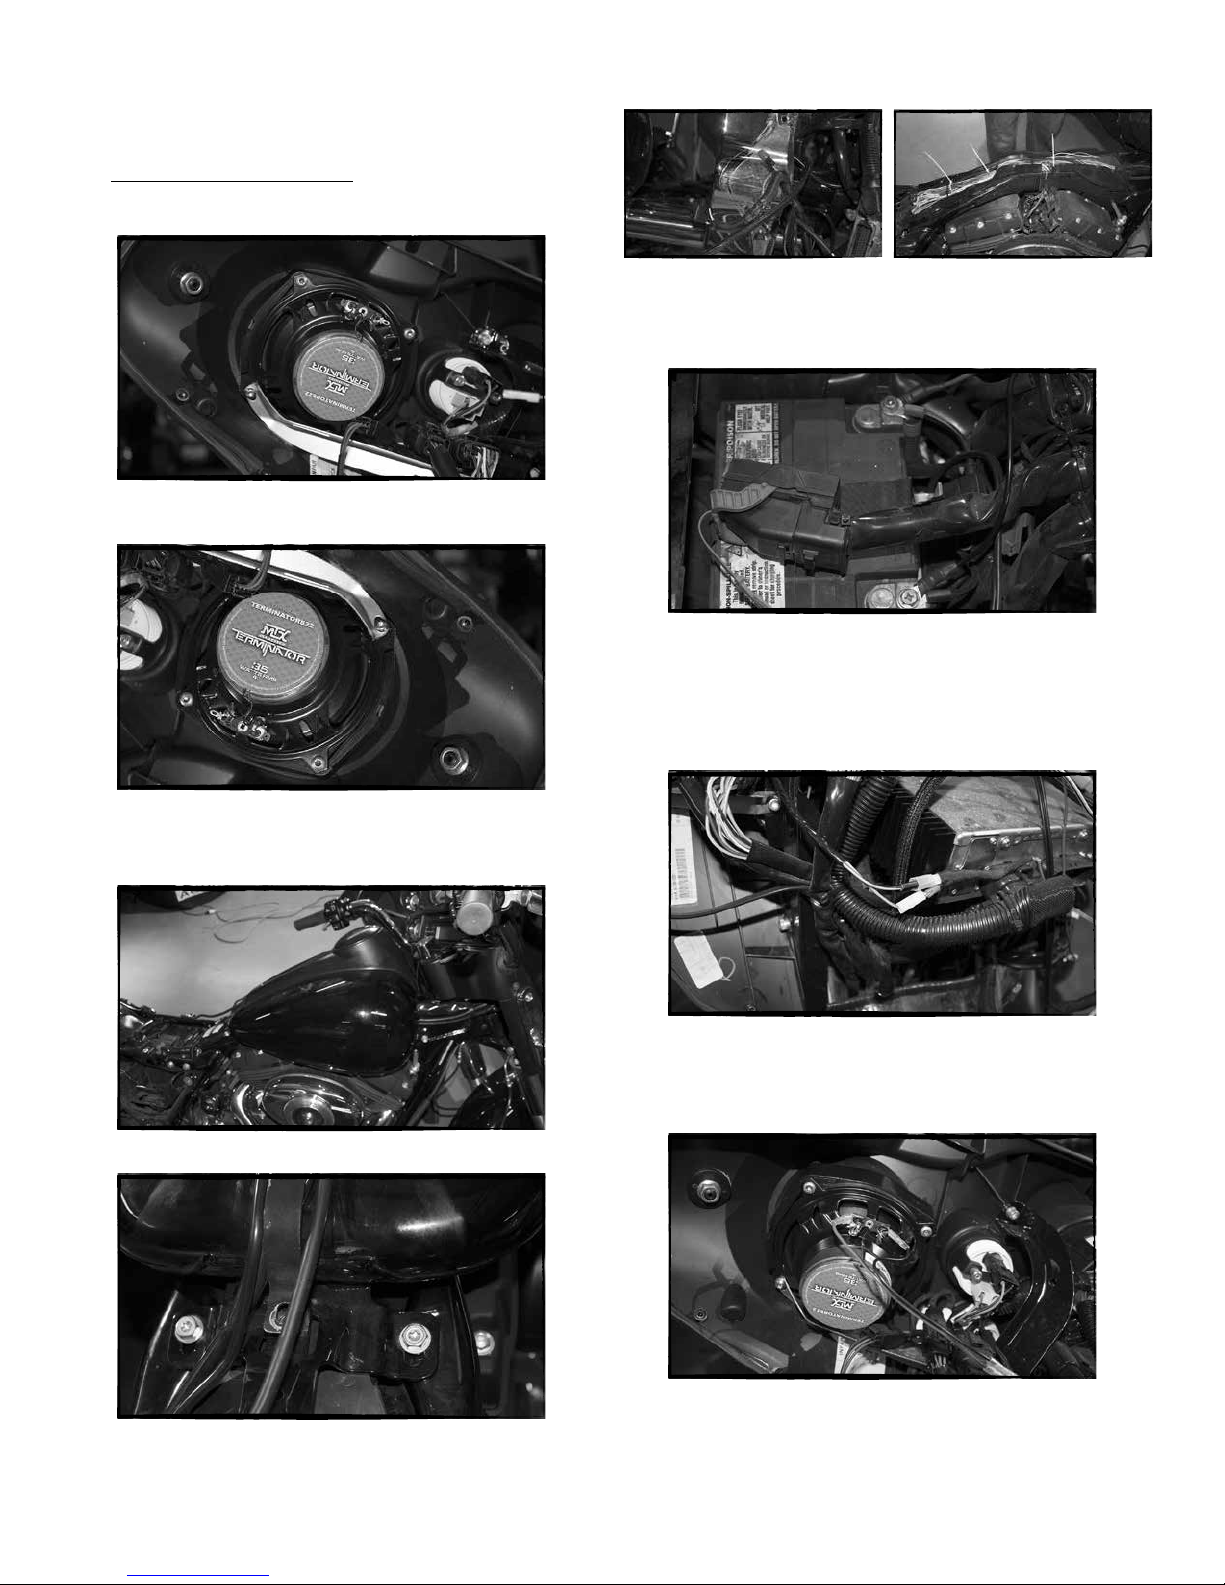
Third Step - Mount the New Speakers
A- Take the new speaker and place the speaker ring on the front. This correctly
spaces this high performance speaker so that it performs to maximum
potential.
E- Run the wire down though the wire channel and then snap the top of the wire
channel back in place.
B- Orient the new speaker into position as seen in the below image
ensure the terminals are in the easiest position to connect the speaker
wires.
C- Retighten the speaker screws until the speaker is held tightly against
the fairing.
to
F- The gas tank can be lowered back into place and the mounting bolts can be
put back and tightened in place.
G- Attach the power and negative wires to the battery.
Fifth Step - Connecting the Amp and Speakers (Ultra Classic Electra Glide, Street
Glide, Tri Glide)
A- Connect the MTX wire harness to the factory speaker wiring, making sure
the clutch side and brake side are connected to the correct input wires. The
wires are marked with a tag on each end. Plug the MTX harness connectors
into the corresponding factory connectors. Please ensure the connections
are secure so they do not come loose when riding.
Fourth Step - Route the Power Wire (2 People Recommended)
A- Run the wire harness along the factory harness.
B- Loosen the front two gas tank bolts using a T40 Torx driver.
C- Loosen the rear gas tank bolt using a T40 Torx driver.
B- Connect the speaker output wires to the new speakers mounted to the
bike. Also make sure to keep the clutch side and brake connectors
directed to the correct side. The speaker output wires are marked with a
tag indicating clutch or brake and have female fastons on each end that
will connect to the new speaker.
D- Lift the gas tank up enough to pop open the plastic wire channel on the
Brake side. Take care to not pull out fuel lines.
-2-
Page 3
C- Unplug the stock wire connected to the center of the cigarette lighter. Then
plug in the blue wire from the MTX wire harness into the cigarette lighter, and
then plug the stock cigarette lighter wire connector into the extra connector
on the MTX wire harness.
ROAD GLIDE AND ROAD GLIDE ULTRA INSTALLATION
First Step - Remove the Fairing
A- Remove the 6 bolts on the bottom side of the fairing. This will allow the fairing
to be removed.
D- If the MUD amp included with your kit has a High Level switch, move the
switch to Low Level. The MTX harness converts the signal to low level to
correctly work with the MUD amplifier.
E- Turn the gain to max and switch the filter to high pass.
F- Place Hook and loop fastener on bottom of the amplifier, and the top of the
radio.
a. If the radio does not have any modules on the top place the amplifier
with the wire harness pointing towards the brake side and make sure
the amp is pushed as far back on the radio as possible.
b. If the radio does have a module on the top place the Hook and loop fastener on the
open side of the radio. Place the amplier with the wire harness
pointing forward. The amp should be pushed back as far as possible
to keep it from interfering with the outer fairing.
G- Connect the amplier connectors to the MTX wire harness. There are 3
connections 1 large rectangular connector, and 2 bullet power connectors. Take
care to keep the power wire polarity correct. Red to Red, Black to Black.
a. Make sure the connections are securely snapped together.
H- Open fuse holder and place the 15 amp fuse in the holder.
B- Remove the right and left turn signals.
C- Pull the fairing forward and up slightly, the harness connecting the headlight will
need to be disconnected to completely pull the fairing away from the bike.
a. Take care to not bump the fairing against the signal or extra lights
connected to the front forks.
Second Step - Speaker Removal
A- Remove the speaker wire connectors from the speakers, take care to pull
them from the plastic connector and not the wires so that the stock wire
harness is not damaged.
B- Use a Torx driver to loosen the 4 screws holding the stock speakers.
I- Turn the bike to ACC and test to make sure the amplier and speakers power
up. If all works reverse the process to put the fairing back in place.
C- Keep track of which wires go to the clutch and brake side speakers.
-3-
Page 4

Third Step - Speaker Mounting
A- Place the new speaker along with the speaker ring on the front. This spaces
the speaker so it ts properly in place according to the below picture to keep
the terminals in the best location for connecting the speaker wires.
B- Tighten the 4 speaker screws back up so the unit is tightly held to the fairing.
Fourth Step - Routing the Power Wire and Wire Harness (2 People Suggested
TEAM LIFT)
A- Run the wire harness along the factory harness.
G- Attach the positive and negative wires to the battery.
Fifth Step - Connect the Amp and Speakers (Road Glide, Road Glide Ultra)
A- Connect the MTX wire harness to the factory speaker wiring, making sure
the clutch side and brake side are connected to the correct input wires. The
wires are marked with a tag on each end. Plug the MTX harness connectors
into the corresponding factory connectors. Please ensure the connections
are secure so they do not come loose when riding.
B- Loosen the front two gas tank bolts using a T40 Torx driver.
C- Loosen the rear gas tank bolt using a T40 Torx driver.
D- Lift the gas tank up enough to pop open the plastic wire channel on the brake
side. Take care to not pull out fuel lines. Removal of the gas tank will make
this much easier.
E- Run the wire down though the wire channel and snap the top of the wire
channel back in place.
F- The gas tank can be lowered back into place and the mounting bolts can be
put back and tightened in place.
B- Connect the speaker output wires to the new speakers mounted to the
bike. Also make sure to keep the clutch side and brake connectors
directed to the correct side. The speaker output wires are marked with a
tag indicating clutch or brake and have female fastons on each end that
will connect to the new speaker.
C- Unplug the stock wire connected to the center of the cigarette lighter. Then
plug in the blue wire from the MTX wire harness into the cigarette lighter, and
then plug the stock cigarette lighter wire connector into the extra connector
on the MTX wire harness.
-4-
Page 5

D- If the MUD amp included with your kit has a High Level switch, move the
switch to Low Level. The MTX harness converts the signal to low level to
correctly work with the MUD amplier.
E- Turn the gain to max and switch the lter to high pass.
F- Mount the amplier to the Harley bracket (Part Number RGBRACKET) as shown in
the photo. Ensure mounting bolts are tightened down securely. (Mounting hardware
included with the bracket)
G- Remove The 2 brake side front fork fairing nuts.
J- Open fuse holder and place the 15 amp fuse in the holder.
K- Turn the bike to ACC and test to make sure the amplier and speakers power
up. If all works reverse the process to put the fairing back in place.
H- Place the amplier bracket over these 2 bolts, and replace and tighten the
nuts. The amplier is now locked in place.(Amp pigtails face upward)
I- Connect the amplier connections on the wire harness. There are 3
connections, 1 large rectangular connector, and 2 bullet power connectors.
Take care to keep the power wire polarity correct. Red to Red, Black to Black.
a. Make sure the connections are securely snapped together.
-5-
Page 6

HDWH4 Fit Guide- 1998-2013 (Ultra Classic, Electra Glide, Street Glide and Tri Glide)
Bracket ts- 1998-2013 (Road Glide and Road Glide Ultra)
Not for CVO Models
Contents:
1. MTX Wiring Harness- Includes all connectors for connecting to
MTX MUD amplier and speakers.
2. Velcro Pad
3. Speaker Adaptor Rings-2
Installation Tools:
Wrenches/Sockets- 7⁄16", 3⁄8", 1⁄2", 10mm
Torx Driver- T10, T25 and T40
#2 Phillips Screw Driver
“Wiring Diagram”- shows the overall wire harness attached to the MUD amp and
battery in the bike.
Installation:
Please note if you are unsure about disassembling your motorcycle please have
this installed by a qualied technician.
ULTRA CLASSIC, ELECTRA GLIDE, STREET GLIDE AND TRI GLIDE INSTALLATIONS
First Step - Remove the Fairing
A- Remove the top bolts on the bottom of the windshield. After the bolts are
removed remove the windshield carefully.
B- Remove the screws on the bottom sides of the fairing. This will allow the
fairing to be removed.
C- Pull the fairing forward and up slightly, the harness connecting the headlight
will need to be removed to completely pull the fairing away from the bike.
a. Take care to not bump the fairing against the signal or extra lights
connected to the front forks “put a sock over the signal/head lights
to keep any damage from occurring to the fairing and or headlights”.
Second Step - Speaker Removal
A- Pull the speaker wire connectors from the speakers, take care to pull them
from the plastic connector and not the wires so that the stock wire harness
is not damaged.
Clutch Brake
B- Use a Torx driver to loosen the 4 screws securing the stock speakers.
C- Keep track of which wires go to the Clutch and Brake side speakers.
D- The speaker grill assembly needs to be removed from the stock speaker,
make sure to keep it in place or remember its orientation. This will be
important for mounting the new speakers in place.
E- Use a T10 Torx driver to remove the rear pod speakers. Remove the speaker
connections from the speakers. The wire harness will be used later in the
install to connect to the stock wiring and speakers.
-6-
Page 7

Third Step - Speaker Mounting
A- Take the new speaker and place the speaker ring on the front. This correctly
spaces this high performance speaker so that it performs to maximum
potential.
B- Orient the new speaker into position as seen in the below image to
ensure the terminals are in the easiest position to connect the speaker
wires.
C- Tighten the 4 speaker screws so the unit is tightly held to the fairing.
E- The gas tank can be lowered back into place, and the mounting bolts can be
put back and tightened in place.
F- Run the speaker wires past the battery and pull them through the holes in the
bottom of the rear speaker pods. Ensure the tagged Brake side and Clutch
side connectors are placed on the bike respective to the Brake and Clutch.
The harness has input and output wires, connect the male fastons into the
Stock wire harness.
G- Connect the female speaker outputs to the stock speakers and place them
back into place.
a. Tighten the speakers down with the Torx screws that were removed.
Fourth Step - Routing the Power Wire/Speaker Wire (2 People Recommended)
A- Run the wire harness along the factory harness.
B- Loosen the front two gas tank bolts using a T40 Torx driver.
C- Loosen the rear gas tank bolt using a T40 Torx driver.
D- Lift the gas tank up enough to pull the harness through on the clutch side
of the gas tank. The wire can sit between the side of the frame and the gas
tank. Ensure nothing is bound up that will prevent the gas tank from sitting
smoothly.
H- Attach the positive and negative wires to the battery.
Fifth Step - Connecting the amp and front speakers (Ultra Classic Electra Glide,
Street Glide, Tri Glide)
A- Connect the MTX wire harness to the factory speaker wiring, making sure
the clutch side and brake side are connected to the correct input wires. The
wires are marked with a tag on each end. Plug the MTX harness connectors
into the corresponding factory connectors. Please ensure the connections
are secure so they do not come loose when riding.
-7-
Page 8

B- Connect the speaker output wires to the new speakers mounted to the
bike. Also make sure to keep the clutch side and brake connectors
directed to the correct side. The speaker output wires are marked with a
tag indicating clutch or brake and have female fastons on each end that
will connect to the new speaker.
ROAD GLIDE AND ROAD GLIDE ULTRA INSTALLATION
First Step - Fairing Removal
A- Remove the 6 bolts on the bottom sides of the fairing. This will allow the
fairing to be removed.
C- Unplug the stock wire connected to the center of the cigarette lighter. Then
plug in the blue wire from the MTX wire harness into the cigarette lighter, and
then plug the stock cigarette lighter wire connector into the extra connector
on the MTX wire harness.
D- Turn the gain to 3⁄4 and switch the filter to high pass for both channels use
the 80Hz setting for the front channel.
E- Place Hook and loop fastener on bottom of the amplifier, and the top of the
radio.
a. If the radio does not have any modules on the top place the amplifier
with the wire harness pointing towards the brake side and make
sure the amp is pushed as far back on the radio as possible.
B- Remove the right and left turn signals.
C- Pull the fairing forward and up slightly, the harness connecting the headlight will
need to be disconnected too completely pull the fairing away from the bike.
a. Take care to not bump the fairing against the signal or extra lights
connected to the front forks.
Second Step - Speaker Removal
A- Remove the speaker wire connectors from the speakers, take care to pull
them from the plastic connector and not the wires so that the stock wire
harness is not damaged.
b. If the radio does have a module on the top place the Hook and loop fastener on the
open side of the radio. Place the amplier with the wire harness
pointing forward. The amp should be pushed back as far as possible
to keep it from interfering with the fairing.
F- Connect the amplier connections to the MTX wire harness. There are 4
connections, 2 large rectangular connectors, and 2 bullet power connectors.
Take care to keep the power wire polarity correct. Red to Red, Black to Black.
a. Make sure the connections are securely snapped together.
G- Open fuse holder and place the 15 amp fuse in the holder.
H- Turn the bike to ACC and test to make sure the amp and speakers power up.
If all works properly, reverse the process to put the fairing back in place.
B- Use a Torx driver to loosen the 4 screws holding on the stock speakers.
C- Keep track of which wires go to the clutch and brake side speakers.
-8-
Page 9

D- The speaker grill assembly needs to be removed from the stock speaker,
make sure to keep it in place or remember its orientation. This will be
important for mounting the new speakers in place.
E- Use a T10 Torx driver to remove the rear pod speakers. Remove the speaker
connections from the speakers. The wire harness will be placed back in later
in the install to connect to the stock wiring and speakers.
D- Lift the gas tank up enough to pop open the plastic wire channel on the brake
side. Take care to not pull out fuel lines. Removal of the gas tank will make
this much easier.
E- Run the wire down though the wire channel and snap the top of the wire
channel back in place.
F- The gas tank can be lowered in to place, and the mounting bolts can be put
back and tightened in place.
G- Run the speaker wires past the battery and pull them through the holes in the
bottom of the rear speaker pods. Ensure the tagged Brake side and Clutch
side connectors are placed on the bike respectively to the Brake and Clutch.
The harness has input and output wires, connect the male fastons into the
Stock wire harness.
Third Step - Speaker Mounting
A- Place the new speaker in place along with speaker ring according to the
below picture to keep the terminals in the best location for easy speaker
wire connection.
B- Tighten the 4 speaker screws so the unit is tightly held to the fairing.
Fourth Step - Routing the Power Wire (2 People Suggested)
A- Run the wire harness along the factory harness.
H- Connect the female speaker outputs to the stock speakers and place them
back into place.
a. Tighten the speakers down with the Torx screws that were removed.
I- Attached the positive and negative wires to the battery.
Fifth Step - Connecting the Amp and Speakers (Ultra Classic Electra Glide, Street
Glide, Tri Glide)
A- Connect the MTX wire harness to the factory speaker wiring, making sure
the clutch side and brake side are connected to the correct input wires. The
wires are marked with a tag on each end. Plug the MTX harness connectors
into the corresponding factory connectors. Please ensure the connections
are secure so they do not come loose when riding.
B- Loosen the front two gas tank bolts using a T40 Torx driver.
C- Loosen the rear gas tank bolt using a T40 Torx driver.
-9-
Page 10

B- Connect the speaker output wires to the new speakers mounted to the
bike. Also make sure to keep the clutch side and brake connectors
directed to the correct side. The speaker output wires are marked with a
tag indicating clutch or brake and have female fastons on each end that
will connect to the new speaker.
C- Unplug the stock wire connected to the center of the cigarette lighter. Then
plug in the blue wire from the MTX wire harness into the cigarette lighter, and
then plug the stock cigarette lighter wire connector into the extra connector
on the MTX wire harness.
G- Place the amplier bracket over these 2 bolts, and replace and tighten the
nuts. The amplier is now locked in place. (Amp pigtails face upward)
H- Connect the amp connections to the MTX wire harness. There are 4 connections
2 large rectangular connectors, and 2 bullet power connectors. Take care to
keep the power wire polarity correct. Red to Red, Black to Black.
D- Turn the gain to ¾ and switch the lter to high pass. For the front channel use
the 80Hz setting.
E- Mount the amplier to the Harley bracket (Part Number RGBRACKET) as
shown in the photo. Ensure mounting bolts are tightened down securely.
F- Remove The 2 brake side front fork fairing nuts.
a. Make sure the connections are securely snapped together.
I- Open fuse holder and place the 15 amp fuse in the holder.
J- Turn the bike to ACC and test to make sure the amp and speakers power up.
If all functions properly reverse process to put the fairing back in place.
-10-
 Loading...