

MTX Bass Slammer FEN10U Installation Directions Manual
Enclosure Volume: .6 Cubic Foot, Sealed
READ ALL DIRECTIONS CAREFULLY BEFORE BEGINNING
MOUNTING LOCATION: The enclosure mounts behind rear panel on passenger’s side and replaces factory cargo net.
TOOLS FOR INSTALLATION:
Phillips Head Screwdriver 15mm Wrench
11/32” Socket T-50 Torx
Ratchet 6” Ratchet Extension
INSTALLATION: Follow the steps below
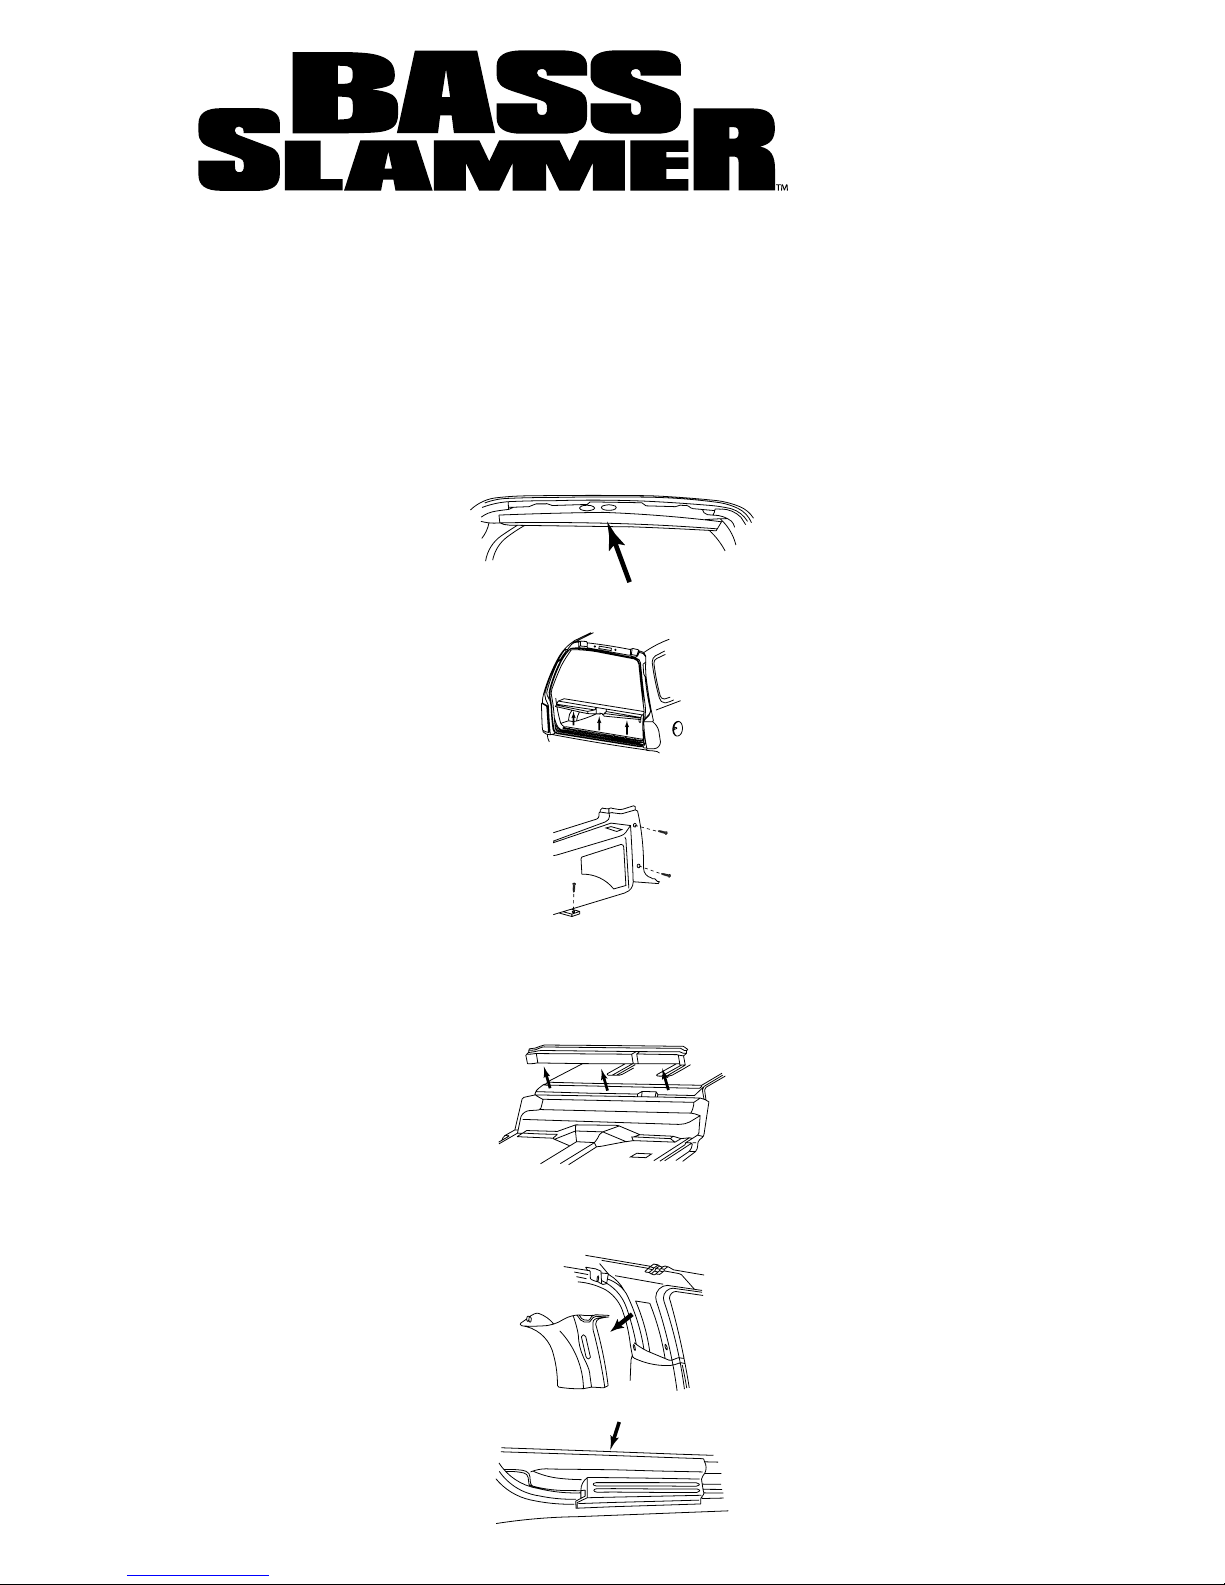
1. Start by removing the header trim, if you are standing at the rear of vehicle hatch facing in with hatch open over your
head this is the panel at the hinged section of hatch. This panel is held in place with four snaps. Pull from one side and
work over to the other.
2. Remove seal plate at bottom of hatch opening. Trim piece is held down by eleven snaps. As like the previous piece start
from one end and pull up slowly working your way over to the other side.
3. Remove tow screws on passenger side of vehicle. These are just left of the jack storage at the very rear of the opening.
They look like knobs, just twist by hand, no tools are needed.
4. If equipped with third row seating remove seat and then seat belt on passenger side. Unsnap seat belt cover, pull from
bottom of cover remove T-50 torx head bolt.
5. Remove pillar cover on passenger side rear, directly above the screws you removed in Step “3”. Panel is held into place
with 3 clips, pull in direction away from the window towards center of vehicle, top first then bottom.
6. Raise second row seating, remove carpet trim panel behind seats. Panel is held into place with 6 clips, pull up on one
end and work your way over to the other.
7. Remove second row seating seat belt. Top of belt can be removed by lifting cover from the bottom to unsnap. Remove
15mm bolt. Bottom of seat belt is held into place with T-50 torx head, lift rubber boot to remove.
8. Remove pillar cover at passenger side rear door, panel is held into place with 4 clips. Start by pulling on top left, then top
right. Pull slowly to center of vehicle. Bottom right clip is clipped into plastic panel, be careful not to break.
9. Remove passenger side rear door sill trim. Held into place by 3 clips. Pull slowly from the front, it will unsnap easy.
FEN10
10. Pull the weather strip rubber gasket up at the passenger side rear door, pull up all the way to the roof of the vehicle. If
you are standing at the rear passenger side door, look into the vehicle on the left hand side on the bottom of the rear
panel, there is a metal clip. This was hidden underneath the rubber gasket you removed earlier. Pull the metal clip up.
It is holding the front of the panel into place. Next pull from the top of the panel. You will find a tab on the bottom of the
panel, towards the front under the carpet. Remove the phillips head screw. Pull up and out on the panel to free it. The
panel will still be attached by the seat belts at the front and the rear, but you will be able to get enough slack to pull it to
the opposite side of the vehicle. This will give you enough room to work.
11. If vehicle was equipped with factory amplified subwoofer system remove three 11/32” bolts holding it into place.
12. Place gasket provided around woofer hole cutout. Connect black wire to negative side of woofer and red wire to the
positive side of woofer. Using screws provided install woofer into enclosure, making sure not to overtighten screws to
avoid stripping.
13. To install grill into factory panel, the cargo tray must be removed. Unsnap the 9 white clips around the perimeter of the
trim ring back. The trim ring along with entire cargo tray assembly will come out the front. Retain the clips and tray, you
may want to replace it if you sell the vehicle.
14. Install grill furnished into the front of the panel into the location previously occupied by the trim ring. Using the 1/2” screws
provided, screw grill from back through the factory slots in the panel
15. Place enclosure into empty location behind the area that was occupied by the cargo tray. Using screws and washers
provided mount the enclosure to vehicle through 3 holes in enclosure.
16. Make speaker connections to the enclosure from the amplifier, loosen terminal knobs (a 13mm nut driver can be used).
Connect speaker wires from amplifier to enclosure, positive to red terminal knob and negative to black terminal knob.
17. Replace the factory side panel. This is fairly easy, just reverse the process of removal. The rubber trim around the door
goes over the top of the panel. It is easier to start at the top and work your way down. Reverse Steps 1 thru 9 to reassemble the interior of the vehicle.
FACTORY SPEAKER WIRE COLORS
The drivers side rear speaker wires are located under threshold. 1997-1998 colors are left side, light blue/black (positive),
yellow (negative). 1999-Newer tan/white (positive), tan/yellow (negative).
The passengers side rear speakers are located under the threshold. 1997-1998 colors are right side, purple/white (positive),
light blue (negative). 1999-Newer tan/green (positive), brown/pink (negative).
Although every effort has been made to assure proper wiring color, Mitek is not responsible for any changes made by the
vehicle manufacturer which sometime occur. If wiring colors do not match then physical verification is required. These instructions are guidelines only and in no way are intended to replace a professional installation. As always before screwing
and drilling check to make sure you will not damage wires, hoses or cause damage to the vehicle.
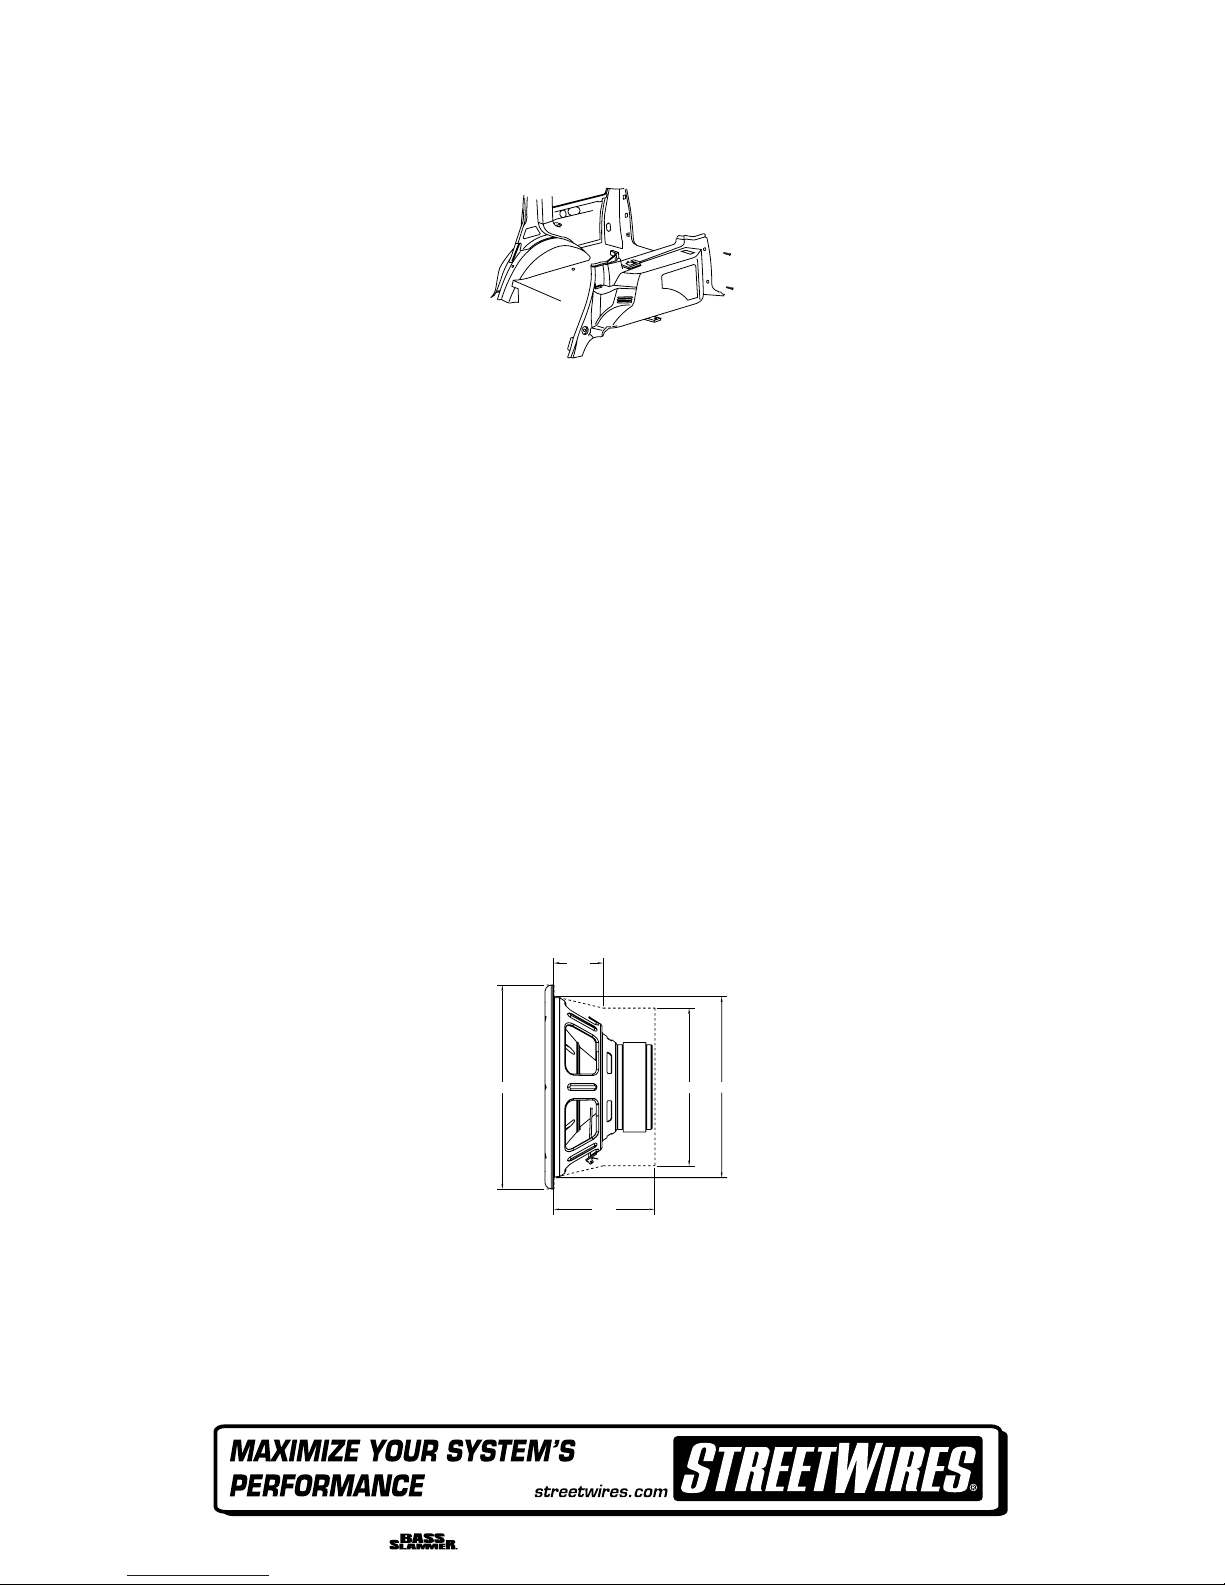
MAXIMUM ENCLOSURE MOUNTING SPECIFICATIONS
2 1/2"
10 3/8"
8" 9 3/16"
5 1/8"
One Mitek Plaza Winslow, IL 61089 BassSlammer.com 1-800-225-5689
21A7896
 Loading...