

Page 1

Bedienungsanleitung
Alarm System AS-200
Page 2

Inhaltsverzeichnis Funktionen
Funktionen ........................................................................................ 03
Bedienungspanel ............................................................................. 04
Vorderseite Bedienungspanel ....................................................... 04
LCD Display .................................................................................. 04
Rückseite Bedienungspanel ......................................................... 05
Kabelanschlüsse ........................................................................... 06
Funktionseinstellungen.................................................................. 07
Initialisierung ................................................................................. 07
Einstellungen ................................................................................ 07
Einstellungen verlassen ................................................................ 07
Werkseinstellungen ...................................................................... 07
Fernbedienung hinzufügen ........................................................... 07
Fernbedienung löschen ................................................................ 08
Alarmzonen hinzufügen ................................................................ 08
Alarmzonen löschen ..................................................................... 08
Passwort wechseln ....................................................................... 09
System Passwort wechseln .......................................................... 09
Programm Passwort wechseln ..................................................... 09
Uhr Einstellungen ......................................................................... 10
Zeit Einstellungen ......................................................................... 10
Aktivierungs-Zeit ........................................................................... 10
Deaktivierungs-Zeit ....................................................................... 11
Aktivieren/Deaktivieren ................................................................. 11
Wireless Übertragung ................................................................... 12
Wireless Sirene ............................................................................. 12
Alarm/Verzögerung ....................................................................... 12
Zeit-Einstellung Alarm/Verzögerung ............................................. 13
Alarm Nummer ............................................................................. 13
Telefonnummer löschen ............................................................... 14
SMS Nummer ............................................................................... 14
SMS Nummer löschen ................................................................. 15
SMS Benachrichtung an/aus ........................................................ 15
Alarmzonen Einstellungen ............................................................ 16
Audio Aufnahme ........................................................................... 16
Sirene aktivieren/deaktivieren ....................................................... 17
Notfall Sirene einstellen ................................................................ 17
SMS-Benachrichtung für Aktivierung/Deaktivierung .................... 17
Sprachaufforderung aktiv/deaktiv ................................................. 18
Sprachaufforderung ...................................................................... 18
Sabotage-Panel-Alarm Einstellungen ............................................ 19
IMEI Überprüfung ......................................................................... 19
SMS-Benachrichtigung für Netzausfall / Wiederherstellung ........ 19
Bedienung .......................................................................................... 20
System Status ............................................................................... 20
Fernbedienung einstellen ............................................................. 20
Außen/aktivieren ........................................................................... 20
Heim/aktivieren ............................................................................. 21
Deaktivieren .................................................................................. 21
Notruf ............................................................................................ 21
Antwort Alarmruf .......................................................................... 22
Fernbedienung .............................................................................. 22
System-Wahlfunktion .................................................................... 23
Alarming Aufnahme Überprüfung ................................................ 23
GSM Signal Überprüfung .............................................................. 24
Technische Daten ............................................................................ 25
Lieferumfang .................................................................................... 25
Pflege und Wartung ........................................................................ 26
Funktions- und Einstellungsbefehle ........................................... 28
• 4 Kabel und 99 Kabellose Überwachungsprogramme
• LCD Bildschirm mit Zeit Display
• Sprachausgabe für alle Funktionen
• 3 Gruppen für zeitliche Aktivierung/Deaktivierung
• Kann 6 Telefonnummern speichern; bei Alamierung wird automatisch ein
Anruf getätigt
• Kann 3 SMS Nummern speicher, bei Alamierung wir automatisch eine SMS
geschickt
• 12 V Ausgang
• Alarmknopf auf der Rückseite des Panels zum manuellen auslösen des Alarms
• 10 sek. Automatische Gesprächsaufzeichnung
• Eingebaute intelligente Sprachausgabe
• Eingebaute intelligente Englische Mitteilung
• Sendet SMS zum aktivieren/deaktivieren der Alarm Aufnahme
• Einstellungen zu Aktivierungs- und Verzögerungs Zeit
• Eingebauter Funksender für die Anbindung der Sirene (Kundenspezifisch)
• Der Benutzer kann Anrufe über das Panel tätigen
• Tasten-Funktion Außen/Heim/Fern Schaltung
• Notruf, Feuer, Gas, Tür, Raum, Fenster, Balkon Alarm
• Echtzeit, Verzögerung, 24Stunden, Umgehung der Überwachung
• Einfaches drahtloses hinzufügen weiterer Geräte
• Aktivieren/Deaktivieren des Monitors per Fernbedienung
• SMS-Alarm für Stromausfall und Wiederherstellung
• Eingebauter Ni-HM Akku
02 03DEUTSCH DEUTSCH
Page 3
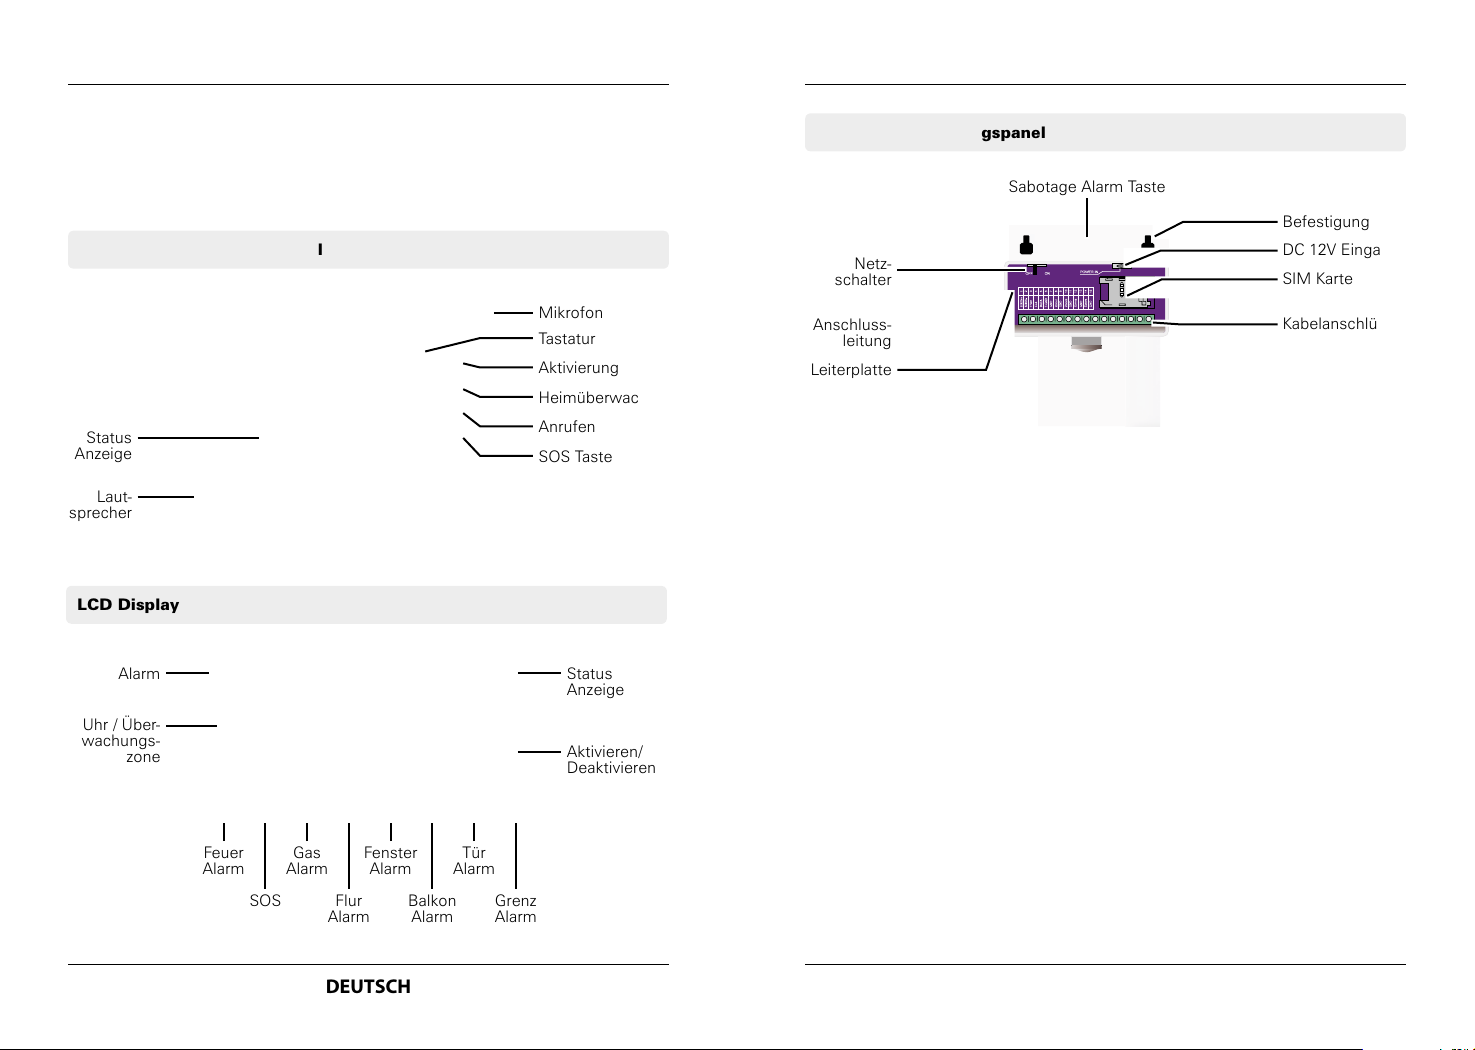
Bedienungspanel Bedienungspanel
Benutzen sie die kabelose Verbindung um die Sensoren hinzuzufügen. Stellen sie
bitte ihre Alarm-Sensoren Zentral im gewünschten Bereich auf. Es ist wichtig darauf
zu achten, das keine Gegenstände aus Metall in der Nähe platziert werden. Betonwände und Brandschutztüren können ebenfalls zu Störungen beitragen.
Vorderseite Bedienungspanel
Mikrofon
Tastatur
Aktivierung
Heimüberwachung
Status
Anzeige
Laut-
sprecher
LCD Display
Alarm
Anrufen
SOS Taste
Status
Anzeige
Rückseite Bedienungspanel
Sabotage Alarm Taste
Netz-
schalter
Anschluss-
leitung
Leiterplatte
Befestigung
DC 12V Eingang
SIM Karte
Kabelanschlüsse
Uhr / Über-
wachungs-
zone
Feuer
Alarm
SOS
Gas
Alarm
Flur
Alarm
Fenster
Alarm
Balkon
Alarm
Tür
Alarm
Grenz
Alarm
Aktivieren/
Deaktivieren
04 04DEUTSCH DEUTSCH
Page 4
Bedienungspanel Funktionseinstellungen
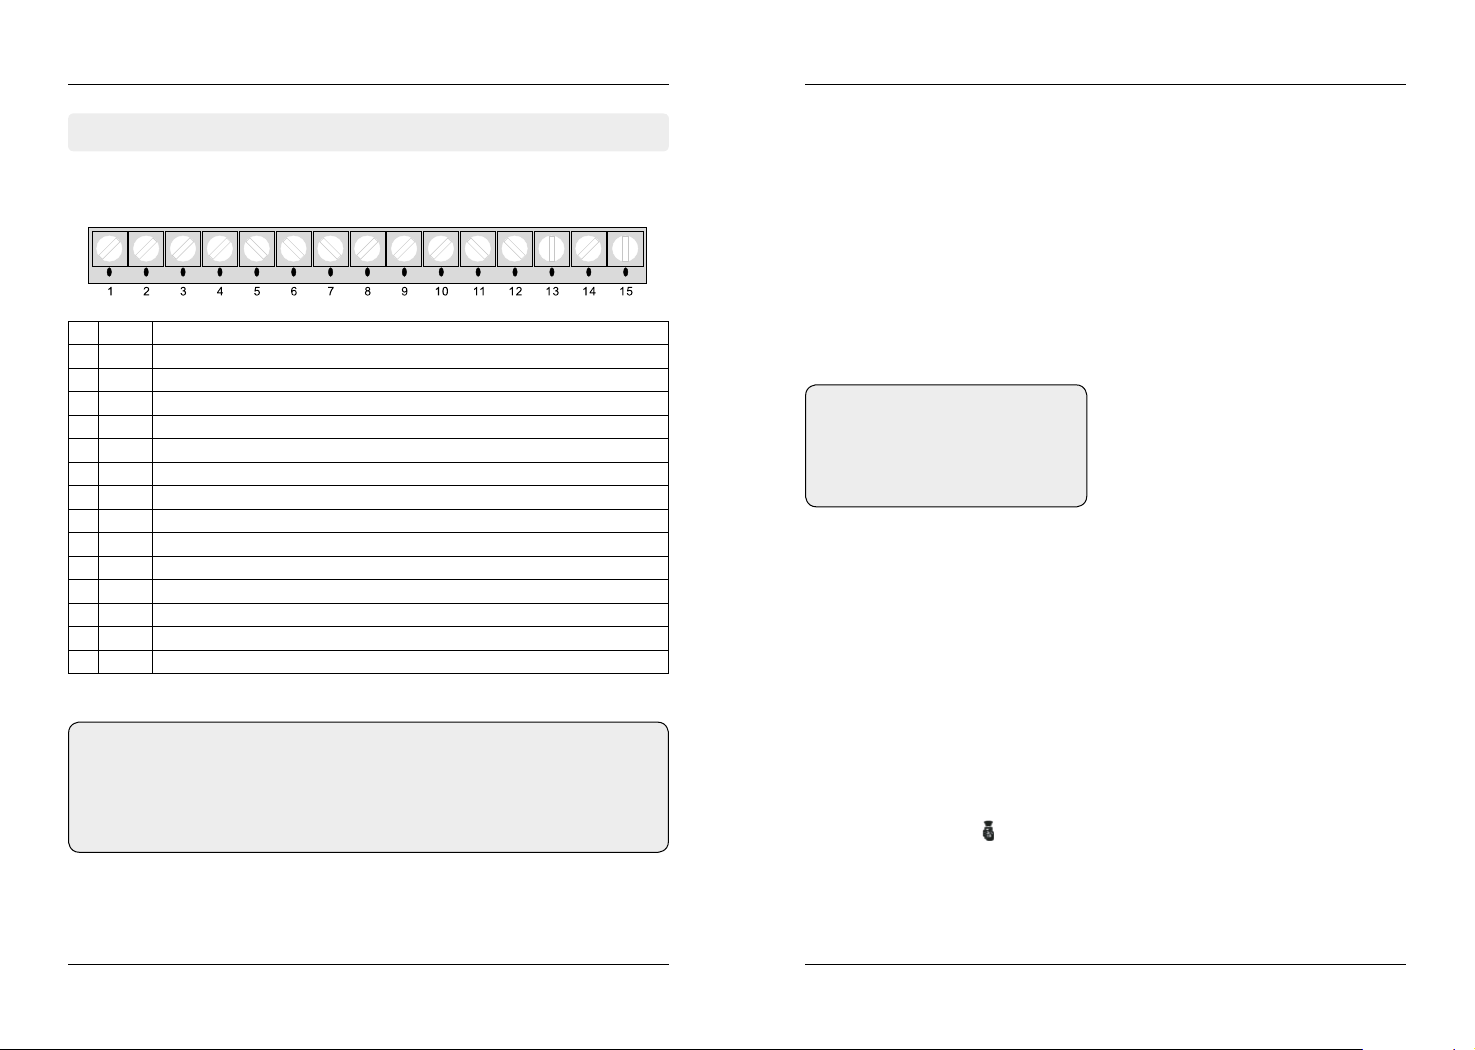
Kabelanschlüsse
SPK+
1 SPK+ Positiv-Sirene (rotes Kabel)
2 SPK - Negativ-Sirene (schwarzes Kabel)
3 LB+ Positiv-Zwei-Wege-Lautsprecher (rotes Kabel)
4 LB - Negativ-Zwei-Wege-Lautsprecher (schwarzes Kabel)
5 P1 12 V Ausgang (1)
6 GND Erdung
7 P2 12 V Ausgang (2)
8 GND Erdung
9 Z1 Sensor 1 (Sensor Nummer: 95)
10 GND Erdung
11 Z2 Sensor 2 (Sensor Nummer: 96)
12 GND Erdung
13 Z3 Sensor 3 (Sensor Nummer: 97)
14 GND Erdung
15 Z4 Sensor 4 (Sensor Nummer: 98)
SPK -
LB+
LB -
P1
GND
P2
GND
Z1
GND
Z2
GND
Z3
GND
Z4
1. Initialisierung
Bitte legen Sie ihre SIM-Karte ein. Stecken Sie ihren Adapter in den 12 V Ausgang
ein. Schalten Sie das Gerät jetzt ein. Das Zeit-Display wird 12:00 anzeigen. Das
(GSM) Symbol beginnt zu blinken. Das Gerät startet die GSM Verbindung mit einem
langen Piepton. Das Gerät ist nicht im Aktiven Zustand.
2. Einstellungen
Bitte geben sie nun das 4-stellige Passwort mit dem auf dem Panel befindlichen
Tastenfeld ein (Werkseinstellung 8888). Drücken Sie # um die Eingabe zu bestätigen. Sie erhalten eine Bestätigung per Sprachausgabe. Zur gleichen Zeit beginnt
die Anzeige (SET) zu leuchten. Das Display zeigt jetzt (0000) an. Hier werden jetzt
die verschiedenen Befehle per Ziffer eingegeben. Dieser Zustand hält, wenn keine
weitere Taste gedrückt wird 40 sec. an.
Eingabe: XXXX a #
Hinweis:
Im Eingabemodus können sie per
Taste CALL wieder alles löschen.Das
Werkseinstellungs Passwort 8888.
3. Einstellungen verlassen
Drücken sie * und # gleichzeitig um das Menü zu verlassen. Das Display (SET) wird
aufhören zu leuchten. Dies wird mit einem Signalton bestätigt.
Eingabe: * a #
4. Werkseinstellungen
Geben Sie im deaktiven Modus die 95175308246 ein. Bestätigen Sie dies mit #. Alle
LED‘s werden für 2 Sek. aufleuchten. Dies wird mit einem Signalton bestätigt.
Eingabe: 95175308246 a #
XXXX bedeutet 4-stelliges Passwort
Hinweis:
1. Schließen Sie hier zusätzlich die Erdung an. “Z1/Z2/Z3/Z4”.
2. Kabel bei SPK+ und SPK- nicht vertauschen. Es wird hier zu beschädigungen kommen.
5. Fernbedienung hinzufügen
Die Fernbedienungen die enthalten sind, sind bereits hinzugefügt. Zusätzliche Fernbedienungen müssen erst verbunden werden. Im Programm-Modus bitte die 20 eingeben. Zusätzlich müssen Sie den Kanal wählen auf dem die Fernbedienung liegen
soll 1-8. Bitte mit # bestätigen. Dies wird mit einem Signalton und einer Sprachausgabe bestätigt. Dieses Symbol zeigt das das Gerät bereit ist. Drücken sie eine
beliebige Taste auf der Fernbedienung. Das Gerät ist jetzt verbunden
Eingabe: 20 a A a #
06 DEUTSCH DEUTSCH 07
Page 5
Funktionseinstellungen Funktionseinstellungen
A = 1-8 des Kanals der Fernbedienung.
6. Fernbedienung löschen
Die Fernbedienung kann nach dem löschen das Panel nicht mehr bedienen. Im Programm-Modus bitte die 21 eingeben. Zusätzlich müssen Sie den Kanal wählen auf
dem die Fernbedienung liegt 1-8. Bitte mit # bestätigen. Dies wird mit einem Signalton und einer Sprachausgabe bestätigt.
Eingabe: 21 a A a #
A = 1-8 des Kanals der Fernbedienung
7. Alarmzonen hinzufügen
Der drahtlose PIR und die Tür-Sensoren sind bereits mit dem Gerät verbunden. Zusätzliche Sensoren müssen erst verbunden werden. Im Programm-Modus bitte die
(23) eingeben. Zusätzlich müssen Sie die Alarmzone wählen 01-99. Bitte mit # bestätigen. Dies wird mit einem Signalton und einer Sprachausgabe bestätigt. Dieses
Symbol zeigt das das Gerät bereit ist. Drücken Sie eine beliebige Taste auf dem
Sensor oder lösen sie diesen aus. Das Gerät ist jetzt verbunden.
Eingabe: 23 a XX a #
XX = 01-99 Alarmzone
8. Alarmzonen löschen
Der Sensor ist nicht mehr aktiv wenn Sie die Alarmzone löschen. Im Programm-Modus bitte die 24 eingeben. Zusätzlich müssen Sie den Kanal wählen auf dem der
Sensor liegt 01-99. Bitte mit # bestätigen. Dies wird mit einem Signalton und einer
Sprachausgabe bestätigt.
Eingabe: 24 a XX a #
XX = 01 -99 Sensoren-Kanal
9. Benutzer Passwort ändern
Benutzer Passwort wechseln
Das Benutzer Passwort, wird benutzt für die Deaktivierung
Standart: 1234
Im Programm-Modus bitte die 30 eingeben. Folgend bitte das neue 4-stellige Passwort eingeben. Bitte mit # bestätigen. Dies wird mit einem Signalton und einer
Sprachausgabe bestätigt.
Eingabe: 30 a XXXX a #
XXXX = das neue 4-Stellige Passwort
Als Beispiel: Wechseln sie das Passwort auf: 1012
Eingabe: 30 a 1012 a #
Programm Passwort wechseln.
Programm-Passwort ist das Passwort, das Sie eingeben sollten um in das System-Setup zu gelangen. Standart: 8888
Im Programm-Modus bitte die 31 eingeben. Folgend bitte das neue 4-stellige Passwort eingeben. Bitte mit # bestätigen. Dies wird mit einem Signalton und einer
Sprachausgabe bestätigt.
Eingabe: 31 a XXXX a #
XXXX = das neue 4-Stellige Passwort
Als Beispiel: Wechseln sie das Passwort auf: 2846
Eingabe: 31 a 2846 a #
Hinweis:
Das Benutzer-Passwort und das Programm-Passwort dürfen nicht übereinstimmen.
08 DEUTSCH DEUTSCH 09
Page 6
Funktionseinstellungen Funktionseinstellungen
10. Zeit Einstellung
Im Programm-Modus bitte die 32 eingeben. Dann die folgenden 2 Stellen für das
Jahr AA. Folgend die 2 Stellen für den Monat BB. Folgend die 2 Stellen für den Tag
CC. Folgend die 2 Stellen für Die Stunde DD. Folgend die 2 Stellen für die Minute EE.
Folgend die 2 Stellen für die Sekunde. Bitte mit # bestätigen. Dies wird mit einem
Signalton und einer Sprachausgabe bestätigt.
Operating method: 32 a AA a BB a CC a DD a EE a FF a #
AA bedeutet: Jahr
BB bedeutet: Monat
CC bedeutet: Tag
DD bedeutet: Stunde
EE bedeutet: Minute
FF bedeutet: Sekunde
Als Beispiel: Zeiteinstellung 15:35:40, Oktober, 1., 2009
Eingabe: 32 a 09 a 10 a 01 a 15 a 35 a 40 a #
11. Timer-Funktion
Aktivierungs-Zeit
Im Programm-Modus bitte die 33-35 eingeben. Folgend die 2 Stellen für die gewünschte Stunde AA. Folgend die 2 Stellen für die gewünschte Minute BB. Bitte
mit # bestätigen. Dies wird mit einem Signalton und einer Sprachausgabe bestätigt.
Eingabe: XX a AA a BB a #
XX bedeutet: Programmauswahl 33, 34, 35
AA bedeutet: Stunde
BB bedeutet: Minute
Als Beispiel: Zeiteinstellung 10:45pm
Eingabe: 33 a 22 a 45 a #
Deaktivierungs-Zeit
Im Programm-Modus bitte die 36-38 eingeben. Folgend die 2 Stellen für die gewünschte Stunde AA. Folgend die 2 Stellen für die gewünschte Minute BB. Bitte
mit # bestätigen. Dies wird mit einem Signalton und einer Sprachausgabe bestätigt.
Eingabe: XX a AA a BB a #
XX bedeutet: Programmauswahl 36, 37, 38
AA bedeutet: Stunde
BB bedeutet: Minute
Als Beispiel: Zeiteinstellung 7:55am
Eingabe: 36 a 07 a 55 a #
Zeitlich Aktivieren/Deaktivieren
Im Programm-Modus bitte die 39 eingeben. Folgend bitte die Eingabe zur Aktivierung oder Deaktivierung 1/0. Bitte mit # bestätigen. Dies wird mit einem Signalton
und einer Sprachausgabe bestätigt.
Eingabe: 39 a 0/1 a #
0: Zeiteinstellung aus
1: Zeiteinstellung an
Als Beispiel: Zeiteinstellung an
Eingabe: 39 a 1 a #
Hinweis:
Wenn die Zeiteinstellung aktiviert ist, erscheint das Uhr Symbol im Display.
10 DEUTSCH DEUTSCH 11
Page 7
Funktionseinstellungen Funktionseinstellungen
12. Wireless Übertragung
Im Programm-Modus bitte die 41 eingeben. Folgend bitte die Eingabe zur Aktivierung oder Deaktivierung (1/0). Bitte mit # bestätigen. Dies wird mit einem Signalton
und einer Sprachausgabe bestätigt. Die Wireless Übertragung ist nun abgeschaltet.
Eingabe: 41 a 0/1 a #
0: Wireless Übertragung aus
1: Wireless Übertragung ein
Als Beispiel: Wireless Übertragung an
Eingabe: 41 a 1 a #
Hinweis:
Nach der Aktivierung dieser Funktion gehen Sie folgendermaßen vor , um die
drahtlose Sirene mit der Haupteinheit zu verbinden. Drücken Sie # 411 und
stellen Sie die Sirene zurecht. Drücken sie anschließend 0 # auf dem Panel.
Bitte die Sirene in den 3 Sek. sicher hinstellen, damit die Verbindung bestehen
bleibt.
13. Wireless Sirene Programmieren
Im Programm-Modus bitte die 43 eingeben. Folgend die Programm Nummer 01-99. Bitte mit # bestätigen. Dies wird mit einem Signalton und einer Sprachausgabe bestätigt.
Eingabe: 43 a A a#
A=: Programm-Nummer 01-99
Als Beispiel: Programm-Nummer auf 10 setzen
Eingabe: 43 a 10 a#
14. Zeiteinstellung Verlassen/Verzögerung (Standart: 60 sek.)
Im Programm-Modus bitte die 44 eingeben. Folgend bitte die gewünschten Sekunden 01-99 eingeben. Bitte mit # bestätigen. Dies wird mit einem Signalton und einer
Sprachausgabe bestätigt.
Hinweis:
Diese Einstellung ist nur am Geräte-Panel aktiv. Fernbedienung und SMS-Service enthält keine Verzögerung.
15. Zeit-Einstellung Alarm/Verzögerung (Standart: 40sek.)
Im Programm-Modus bitte die 45 eingeben. Folgend bitte die gewünschten Sekunden 01-99 eingeben. Bitte mit # bestätigen. Dies wird mit einem Signalton und einer
Sprachausgabe bestätigt.
Eingabe: 45 a AA a #
AA = 01-99 Sekunden
Als Beispiel: Verzögerung auf 65 Sekunden
Eingabe: 45 a 65 a #
Hinweis:
Die Alarm-Verzögerung ist nur aktiv, wenn die entsprechende Zone als
Alarm-Verzögerung gewählt wurde.
16. Alarm Nummer
Im Programm-Modus bitte die 51-56 eingeben. Folgend bitte die gewünschte Telefonnummer eingeben (Mobil oder Festnetz). Bitte mit # bestätigen. Dies wird mit einem
Signalton und einer Sprachausgabe bestätigt.
Eingabe: XX a YY…YY a #
XX = Programmauswahl 1-6 (51-56)
YY…YY = Die gewünschte Telefonnummer
Als Beispiel: 13811111111 als Telefonnummer eingeben
Eingabe: 51 a 13811111111 a #
Eingabe: 44 a AA a #
AA = 01-99 Sekunden
Als Beispiel: Verzögerung auf 99 Sekunden
Eingabe: 44 a 99 a #
Hinweis:
Die Telefonnummer darf maximal 15 Ziffern haben.
12 DEUTSCH DEUTSCH 13
Page 8
Funktionseinstellungen Funktionseinstellungen
17. Telefon-Alarm-Nummer löschen
Im Programm-Modus, bitte die 51-56 eingeben. Bitte mit # bestätigen. Dies wird mit
einem Signalton und einer Sprachausgabe bestätigt.
Eingabe: XX a #
XX = Die Programmauswahl 51–56 löschen
Als Beispiel: Löschen der Nummer im Programm 53.
Eingabe: 53 a #
18. SMS-Alarm-Nummer Einstellungen
Wenn der Alarm ausgelöst wird, schickt das Programm automatisch eine SMS an die
eingegebene Nummer. Es können Maximal 3 Nummern eingegeben werden. Im Programm-Modus bitte die 57-59 eingeben. Folgend bitte die Telefonnummer eingeben.
Bitte bitte mit # bestätigen. Dies wird mit einem Signalton und einer Sprachausgabe
bestätigt.
Eingabe: XX a YY…YY a #
XX=Programmauswahl 1-3 (57-59)
YY…YY = Die gewünschte Telefonnummer
Als Beispiel: 13822222222 als Telefonnummer eingeben
Eingabe: 57 a 138222222 a #
Hinweis:
Die Telefonnummer darf maximal 15 Ziffern haben.
19. SMS-Alarm-Nummer löschen
Im Programm-Modus, bitte die 57-59 eingeben. Bitte mit # bestätigen. Dies wird mit
einem Signalton und einer Sprachausgabe bestätigt.
Eingabe: XX a #
XX= Die Programmauswahl (57-59) löschen
Als Beispiel: Löschen der Telefonnummer aus Programm 57
Eingabe: 57 a #
20. Alarmzonen Einstellungen
Die Eigenschaften der Alarmzone ändern. Im Programm-Modus bitte die 60 eingeben. Folgend bitte die gewünschte Alarmzone 01-99 wählen. Folgend bitte nun den
Alarmzonentyp von 1-4 wählen. Folgend den gewünschten Alarmtyp 1-8 wählen.
Folgend die Sirene AN/AUS 0/1 schalten. Bitte mit # bestätigen. Dies wird mit einem
Signalton und einer Sprachausgabe bestätigt.
Eingabe: 60 a AA a B a C a D a #
AA: Alarmzone 1-99
B: Alarmzonen Typ
1: Echtzeit Alarmzone
2: 40 Sekunden Verzögerungs Alarmzone
3: 24 Studen Alarmzone
4: Umleitung Alarmzone
C: Alarm Typ
1 SOS Alarm
2 Feuer Alarm
3 Gas Alarm
4 Tür Alarm
5 Flur Alarm
6 Fenster Alarm
7 Balkon Alarm
8 Grenz Alarm
D: siren EIN/AUS:
0: AUS
1: EIN
Hinweis:
Die Einstellung ist für alle Sensoren möglich inkl. Kabelsensoren.
Als Beispiel: Setze die Alarmzone 12 auf 24 Stunden, Feuer Alarm und Sirene an.
Eingabe: 60 a 12 a 3 a 2 a 1 a #
14 DEUTSCH DEUTSCH 15
Page 9
Funktionseinstellungen Funktionseinstellungen
21. Heim/Überwachung
Sie können hier wählen, welche Sensoren aktiv sind während Sie Zuhause sind. Im
Programm-Modus bitte die 61 eingeben. Folgend die entsprechende Alarmzone 0199 wählen. Folgend die gewünschte Alarmeinstellung 0/1. Bitte mit # bestätigen.
Dies wird mit einem Signalton und einer Sprachausgabe bestätigt.
Eingabe: 61 a XX a A a #
XX = (01-99) Alarmzone
A bedeutet:
0: Kein Alarm unter Heim auslösen
1: Alarm unter Heim auslösen
Als Beispiel: Sensor in Zone 11 löst Alarm aus, obwohl Sie Zuhause
Eingabe: 61 a 11 a 1 a #
Als Beispiel: Sensor in Zone 12 löst keinen Alarm aus, obwohl Sie Zuhause sind..
Eingabe: 61 a 12 a 0 a #
Nach diesen Einstellungen, wird der Sensor in der Zone 55 nicht funktionieren.
Hinweis:
Heim/Überachung ist für alle Zonen verwendbar.
22. Audio Aufnahme
Im Programm-Modus bitte die 701 eingeben. Bitte mit # bestätigen. Das Panel gibt
einen Signalton aus und zeigt es auf dem Display an. Nach einem 10 sek. Countdown startet die Aufnahme. Sprechen Sie in ca. 30 cm Abstand laut und deutlich.
10sek. später gibt es einen Signalton, die Aufnahme stoppt und wird ausgesprochen
wiederholt.
Eingabe: 701 a #
23. Sirene Aktivieren/Deaktivieren
Nach dem Aktivieren dieser Funktion, gibt die Sirene einen kurzen Signalton aus.
Nach dem Deaktivieren gibt die Sirene zwei kurze Signaltöne aus. Im Programm-Modus bitte die (75) eingeben. Die Sirene könne Sie AN/AUS schalten mit der (0/1). Bitte
mit # bestätigen. Dies wird mit einem Signalton und einer Sprachausgabe bestätigt.
Eingabe: 750 a # oder 751 a #
0: Sirene AUS, (System-Standard: 0)
1: Sirene EIN
Als Beispiel: Sirene aktivieren.
Eingabe: 751 a #
24. Sirenen Einstellung im Notfall
Beim drücken der Notfall-Taste gibt es einen sofortigen Alarm. Hier können Sie wählen ob die Sirene AN oder AUS bleibt. Im Programm-Modus bitte die 76 eingeben.
Folgend die Ziffer für AN oder AUS (1/0). Bitte mit # bestätigen. Dies wird mit einem
Signalton und einer Sprachausgabe bestätigt.
Eingabe: 760 a # oder 761 a #
0: Sirene AUS, (System-Standard: 0)
1: Sirene EIN
Als Beispiel: Sirene aktivieren.
Eingabe: 761 a #
25. SMS-Benachrichtung für Aktivierung/Deaktivierung (Standart:Aus)
Im Programm-Modus bitte die 77 eingeben. Folgend die Ziffer für AN oder AUS (1/0).
Bitte mit # bestätigen. Dies wird mit einem Signalton und einer Sprachausgabe bestätigt.
Eingabe: 77 a 0 a # or 77 a 1 a #
0: SMS Aus für Aktivierung/Deaktivierung (Standart)
1: SMS AN für Aktivierung/Deaktivierung
Als Beispiel: Sende SMS für Aktivierung/Deaktivierung
16 DEUTSCH DEUTSCH 17
Page 10
Funktionseinstellungen Funktionseinstellungen
26. Aktivierung/Deaktivierung Sprachausgabe
Dieses Gerät hat eine automatische Sprachausgabe bei der Aktivierung bzw. Deaktivierung, diese können Sie abschalten. Im Programm-Modus bitte die 83 eingeben.
Folgend die Ziffer für AN oder AUS (1/0). Dies wird mit einem Signalton und einer
Sprachausgabe bestätigt.
Eingabe: 83 a 0/1 a #
1: Aktiviert Sprachausgabe (Standart: An)
0: Deaktiviert Sprachausgabe
Als Beispiel: Sprachausgabe Deaktivieren
Eingabe: 83 a 0 a #
27. Sprachausgabe für alle andern Einstellungen
Für alle anderen Einstellungen können Sie, die Sprachausgabe auch Deaktivieren. Im
Programm-Modus bitte die (84) eingeben. Folgend die Ziffer für AN oder AUS (1/0).
Dies wird mit einem Signalton und einer Sprachausgabe bestätigt.
Eingabe: 84 a 0/1 a #
1: Aktiviert Sprachausgabe für alle Einstellungen (Standart: An)
0: Deaktiviert Sprachausgabe für alle Einstellungen
Als Beispiel: Sprachausgabe Deaktivieren
Eingabe: 84 a 0 a #
Hinweis:
Nach der Deaktivierung dieser Funktion, wird keine Sprachausgabe inkl. Aktivierung/Deaktivierung mehr erfolgen.
28. Sabotage-Panel-Alarm Einstellungen
Es gibt auf der Rückseite des Panels einen Sabotage-Alarm. Wenn Sie das Panel
mit der Halterung (Im Standartpaket enthalten) an der Wand befestigen, wird dieser
Knopf eingedrückt. Wird nun jemand versuchen das Panel von der Wand zu entfernen, löst sich dieser Knopf und es wird automatisch Alarm ausgelöst. Im Programm-Modus bitte die (84) eingeben. Folgend die Ziffer für AN oder AUS (1/0). Dies
wird mit einem Signalton und einer Sprachausgabe bestätigt.
Eingabe: 87 a 0/1 a #
0: Sabotage-Alarm aus (Standart)
1: Sabotage-Alarm an
Als Beispiel: Sabotage-Alarm an
Eingabe: 87 a 1 a #
29. IMEI Überprüfung
Im Programm-Modus bitte die (88) eingeben. Bitte mit # bestätigen. Der 15-Stellige
IMEI-CODE wird nun im Display in 4 Intervallen angezeigt.
30. SMS-Benachrichtigung für Netzausfall/Wiederherstellung
Bei einem Netzausfall schaltet sich das Display aus. Die interne Batterie, wird das
Gerät weiter versorgen. Das Gerät sendet nun eine SMS an ihre Nummer.
Hinweis:
Die Alarm-SMS ist „Zone 99“
18 DEUTSCH DEUTSCH 19
Page 11

Bedienung Bedienung
1.System Status
• Aktiviert.1-99 Überwachungszonen. Alarm wenn Sensoren auslösen
• Heim/Aktivierung. Sensoren lösen nur in bestimmten Zonen aus
• Deaktiviert.1-99 Überachungzonen.Alarm nicht aktiviert
• Programm-Modus. In diesem Modus wird kein Alarm ausgelöst
2. Fernbedienung
Sie können die Fernbedienung zum Aktivieren/Deaktivieren benutzen.
• Geschlossenes Schloß-Symbol: Aktivieren
• Offenes Schloß-Symbol: Deaktivieren
• Blitz-Symbol: Heim/Aktivierung
• Glocken-Symbol: Löst im Notfall den Alarm aus
3. Aktivieren
Wenn ein Sensor ausgelöst wird, löst der Alarm sofort aus. Drücken Sie bitte [ARM]
auf dem Panel. Das System zählt 60 Sekunden mit einem Signalton herunter. Die
[ARM] Anzeige leuchtet. Die Aktivierung war erfolgreich.
Fernbedienung: Drücken Sie das Schloß-Symbol, die Aktivierung ist sofort erfolgreich.
SMS-Fernsteuerung: Die Eingabe lautet: (Standart: 1234) + [1]. Folgend bekommen
Sie eine SMS. „System armed“.
Hinweis: Der SMS-Befehl kann nur von den vorgegebenen drei Alarm-SMS-Nummern angesteuert werden.
4. Heim/Aktivierung
Die Heim/Aktivierung ist dazu da um Sicherheit zu gewährleisten, während Sie zuhause sind. Lassen Sie nur ein Teil der Sensoren arbeiten z.b Fenster, Balkon, Randsensoren usw. Hier können Sie die zuvor eingestellten Zonen aktivieren.
Eingabe auf dem Panel: Drücken Sie die [HOME] Taste auf dem Panel
Fernbedienung: Drücken Sie das Blitz-Symbol auf ihrer Fernbedienung
5. Deaktivieren
Hier können Sie den Alarm stoppen, wenn dieser ausgelöst hat. Sie können außerdem die Anlage Deaktivieren. Jetzt wird trotz auslösen der Sensoren kein Alarm
gemeldet. (Ausnahme 24-Stunden-Alarmzone). Geben Sie auf dem Panel das Benutzer-Passwort (Standart:1234) ein und bestätigen sie mit#. Das Gerät ist nun Deaktiviert.
Eingabe auf dem Panel: Geben Sie das System-Passwort ein und #
Fernbedienung: Drücken Sie das geöffnete Schloß-Symbol auf der Fernbedienung
SMS remote operation: Der SMS Befehl ist: Fernbedienung Passwort (Standard:
1234) + 2
6. Notfall
Drücken Sie [SOS] Taste auf dem Panel, oder die [Glocken] Taste auf der Fernbedienung, oder den kabellosen Notfall-Knopf. Das Gerät löst sofort Alarm aus und ruft die
eingegebenen Telefonnummern an.
20 DEUTSCH DEUTSCH 21
Page 12
Bedienung Bedienung
7. Alarm Anruf
Das Gerät ruf bei Alarm, auf den voreingestellten Nummern an. Wenn Sie den Anruf
nicht entgegennehmen, wird das Gerät die nächste voreingestellte Nummer wählen.
Dies macht das Gerät 3-mal hintereinander. Nehmen Sie den Anruf an, so hören Sie
eine Sprachausgabe. Sie können nun über das Tastenfeld ihres Telefons, das Gerät
steuern.
Drücke [*]:Lesen Sie die Alarm-Informationen
Drücke [1]:Stoppt den Alarm und schaltet sich aktiv; Stoppt die Anrufe
Drücke [2]:Stoppt den Alarm und schaltet sich deaktiv;Stoppt die Anrufe
Drücke [3]:Sirene aus; Gerät ist für 60 Sekunden Aktiv. Drücken Sie erneut die (3) ist
das Gerät für weitere 60 Sekunden Aktiv.
Drücke [4]: Gerät startet eine 60sek. Gegensprechanlage.
Drücke [5]: 12V Ausgang an
Drücke [6]: 12V Ausgang aus
For the above operation of “arm, disarm and output control”, you could also send
SMS to realize. The SMS content format is: operation password (default: 1234) +
[1/2/5/6].
8. Fernsteuerung
Wählen Sie die Rufnummer des Gerätes. Nach kurzem Wählton, hören Sie eine Stimme “Please Enter Password”. Geben Sie das Passwort ein. Nun können Sie folgende
Befehle eingeben. Ist das Passwort wiederrum falsch, so hören Sie „Wrong Password, Please Re-Enter“
Drücke [1]: Gerät aktivieren. Sprachausgabe: “System armed”
Drücke [2]: Gerät deaktiviert. Sprachausgabe “System disarmed”
Drücke [3]: Gerät ist für 60 Sekunden Aktiv. Drücken Sie
erneut die (3) ist das Gerät für weitere 60 Sekunden Aktiv.
Drücke [4]: Gerät startet eine 60sek. Gegensprechanlage.
Drücke [5]: 12V Ausgang an
Drücke [6]: 12V Ausgang aus
Für die oben genannten Befehle könne Sie auch eine SMS schicken.
Befehl hierfür: Benutzer Passwort (Standart: 1234) + [1/2/5/6]
Hinweis:
Für jede Zahl die Sie drücken, hören Sie eine Signalbestätigung. Hören Sie diese
nicht geben Sie den Befehl erneut ein.
9. Telefon-Funktion
Im Deaktiven Zustand können Sie auch einen Anruf tätigen. Wählen Sie einfach die
Nummer auf dem Display und drücken Sie anschließend (CALL). Nach dem Gespräch können Sie mit der Taste (CALL) wieder auflegen. Das Gerät wird wieder in
den Deaktiven Zustand gehen.
10. Alarm-Aufnahme
Im Deaktiven Zustand bitte die (*0#) eingeben. Das Gerät gibt einen Signalton. Nach
der Anzeige des Alarms und der ausgelösten Zone, wird die genaue Zeit des Alarms
angezeigt. Mit der Eingabe (2) können Sie die vorher ausgelösten Alarme sehen. Mit
der Eingabe (8) könne Sie zurückkehren. Drücken Sie (*#) um das Menü zu verlassen.
Hier zur Verständlichkeit: Die 51. Überwachungszone; der Sensor 7; Alarm Zeit:
12:10 Uhr 1. August 2008.
Sie können die Aufnahme auch per SMS abrufen. (Max. die letzten 9 Aufnahmen).
SMS-Eingabe: Passwort (Standart 1234) + (3).
Als Beispiel: Alarm Aufnahme:
NO1 Zone: 05 TIME: 11-06-25 11:37
(Er gibt den ersten Datensatz: drahtlose Zone 5 Alarmzeit)
NO9 Zone: 19 Time: 11-06-25 11:45
(Er zeigt die neunte Aufzeichnung: drahtlose Zone 19 Alarmzeit)
dann sehen Sie die
Alarm-Zeit
22 DEUTSCH DEUTSCH 23
Page 13
Bedienung
Technische Daten
11. GSM Signal Checking
Vor der Installation des Gerätes, sollten Sie den Empfang des Gerätes testen. Hierzu
bitte die (81) eingeben. Bitte mit # bestätigen. Es gibt einen Signalton und das Display zeigt 00+XX
(XX zeigt das GSM-Signal an). Die Anzeige geht von 07-31. Zeigt das Gerät die 07 an,
so wechseln Sie den Standort.
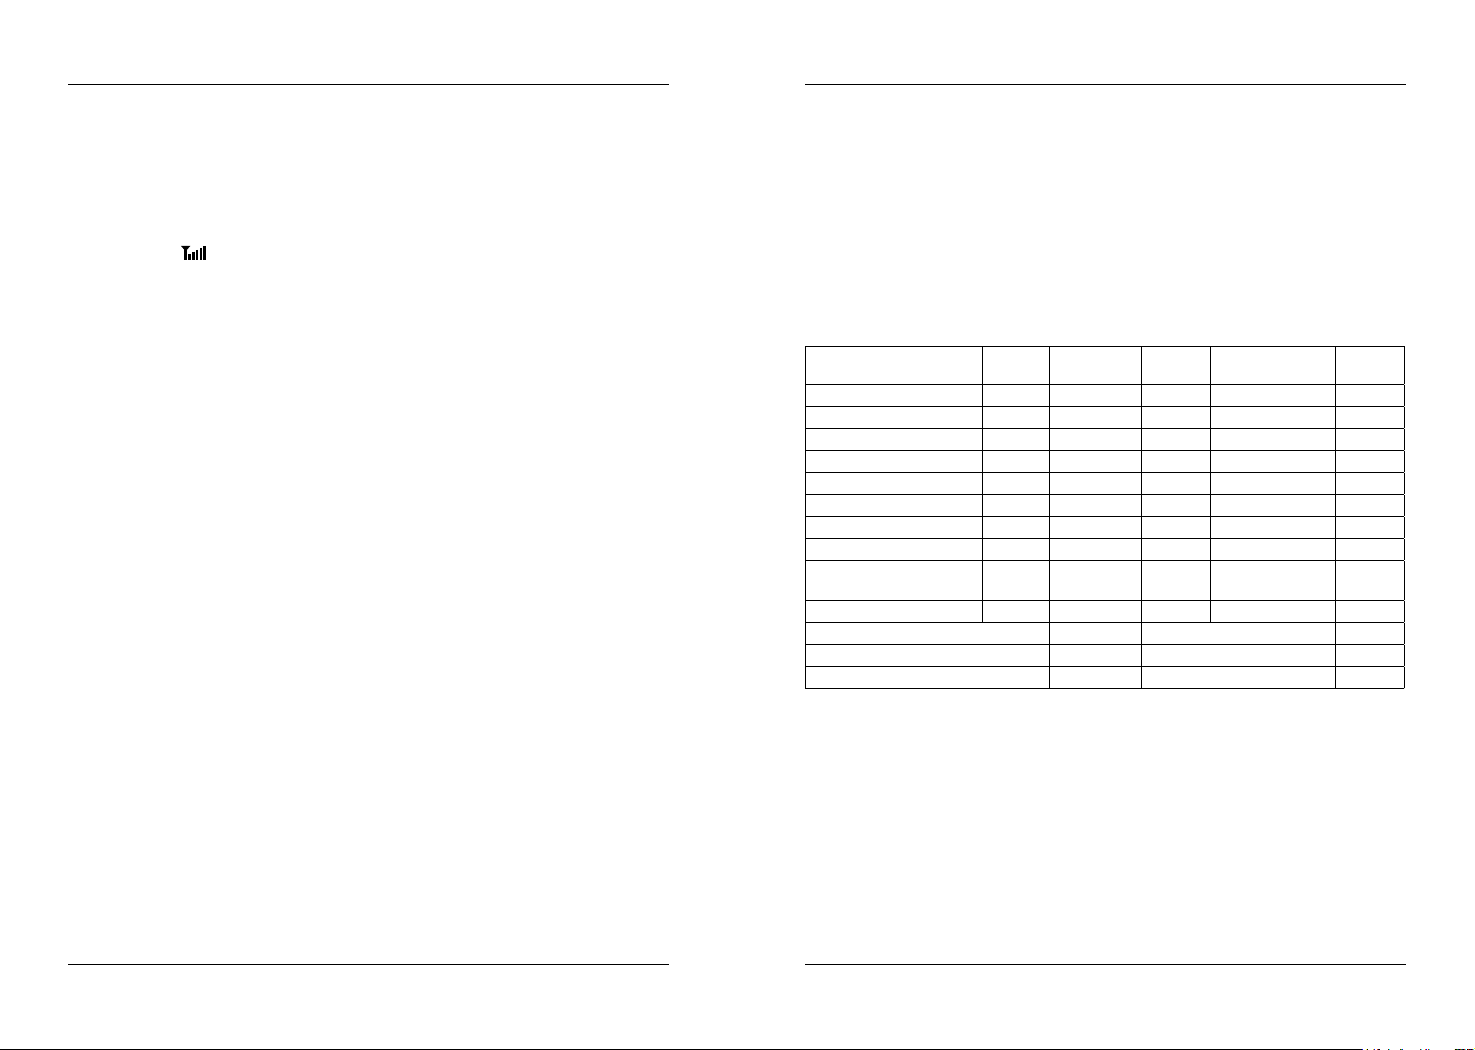
Dieses Zeichen zeigt das Signal an. Wenn die Intensität die Nummer 0-7 anzeigt,
wird dieses Symbol nicht angezeigt; Wenn es 8-15 anzeigt, wird dieses Symbol blinken; Ist die Anzahl größer als 16 , wird dieses Symbol auf dem Bildschirm angezeigt
ohne zu blinken.
Als Beispiel: Ist die Signal-Intensität 12 so zeigt das Gerät:
Stromversorgung: AC 220 V ± 10%
DC 12V (Built-in NI-HALLO) Akku
Standby-Strom: < 60 mA
Alarmierender Strom: < 450 mA
GSM-Band: 850/900/1800/1900 MHz
Drahtlosfrequenz: 868 MHz / 433 MHz
Wireless-Empfangsempfindlichkeit: 5 m V/m
Anti-Interferenz: 1 V/m (Frequenzbereich: 20 bis 1000 MHz)
Arbeitstemperatur: 10° ~ + 40°
Luftfeuchtigkeit: ≤90%(ohneNebel)
Funkmelder: 99 Stk
Alarmzone Aktivi-
Zone 1 aktiv deaktiv Echtzeit Tür Alarm ja
Zone 2 aktiv deaktiv Echtzeit Flur Alarm ja
Zone 3 aktiv deaktiv Echtzeit Fenster Alarm ja
Zone 4 aktiv aktiv Echtzeit Balkon Alarm ja
Zone 5 aktiv aktiv 24 Std. Feuer Alarm ja
Zone 6 aktiv aktiv 24 Std. Gas Alarm ja
Notruftaste aktiv aktiv 24 Std. Notruf Alarm nein
Zone 7-99 aktiv deaktiv Echtzeit Notruf Alarm ja
Überwachungszone
95-98
Sapotage Alarm Zone (99) aktiv aktiv 24 Std. Notruf Alarm ja
Programm Passwort 8888 Fernbedienung Ein
System Passwort 1234 Sirene Aus
Siren sound time 180 Sek. Haushaltsgeräte Optional
tät
aktiv deaktiv Echtzeit Notruf Alarm ja
Heim/Aktiv Typ Alarm
Information
Sirene
Lieferumfang
• 1x Gerätepanel
• 2x Fernbedienung
• 1x Sirene
• 1x Wireless-PIR-Sensor
• 1x Wireless-Türsensor
• 1x Netzteil (DC 12V / 1,2A)
• 1x Back-up-Batterie
• 1x Bedienungsanleitung
24 DEUTSCH DEUTSCH 25
Page 14

Pflege und Wartung
Pflege und Wartung
Die folgenden Vorschläge, werden benötigt um ihre Verpflichtungen im Rahmen der
Garantiebedingungen und der Verlängerung der Lebenszeit zu erhalten.
• Bitte alle Teile und Zubehör außerhalb der Reichweite von Kindern aufbewahren
• Die Alarmanlage muss trocken bleiben. Jegliche Flüssigkeit wie z.b Regen und
Feuchtigkeit können zu Beschädigungen führen.
• Schmutz kann die Alarmanlage ebenfalls beschädigen.
• Bitte nicht an heißen Stellen platzieren. Es wird die Lebensdauer verkürzen.
Akkus beschädigen oder sogar Kunstoffteile schmelzen
• Bitte nicht an extrem kalten Stellen platzieren. Es kann zu Kondenswasser führen.
• Es wird empfohlen das Gerät regelmäßig zu testen
Überprüfen Sie das Geräte-Panel alle 3 Monate:
1. Aktivierung/Deaktivierung
2. Telefonnummern richtig gewählt werden
3. Sensoren richtig arbeiten
4. Back-up Akku richtig arbeitet
Überprüfen Sie die Sensoren jeden Monat:
1. Lösen die Sensoren richtig aus
2. Überprüfen Sie alle Batterien in den Sensoren
3. Überprüfen Sie die Verbindung von des Sensoren zum Panel.
SIM-Karte überprüfen:
1. Überprüfen Sie die SIM-Karte z.b das Netzwerk-Signal.
2. Schalten Sie den PIN-Code aus.
3. Bewahren Sie das Passwort und die SIM-Kartennummer sicher auf.
• Stellen Sie das System in der Nähe von ihrem Schlafzimmer oder Büro auf.
• Wenn Sie das Alarmsystem lange nicht verwenden, trennen Sie es vom Stromnetz.
• Bitte nicht selbst Reperaturen durchführen, es kann zu Beschädigungen kommen.
• Lassen Sie das Gerät nicht herunterfallen, es kann hier zu Beschädigungen
kommen.
• Bitte nicht ohne Genehmigung die „110“ -„112“ oder sonstige Polizeistation-Nummern eingeben.
Bitte, lesen Sie diese Vorschläge sorgfältig durch. Sollte ihr Gerät nicht richtig funktionieren, werden wir unser bestes geben, das Problem schnellstmöglich zu lösen.
Optionales Zubehör
Signal-Verstärker
Türsensor
drahtlose Tastatur
Panic Taste
drahtloses
Blitzlicht
Fernbedienungen
Rauchmelder
Gas Sensor
PIR Sensor
26 DEUTSCH DEUTSCH 27
Page 15
Funktions- und Einstellungsbefehle
Funktions- und Einstellungsbefehle
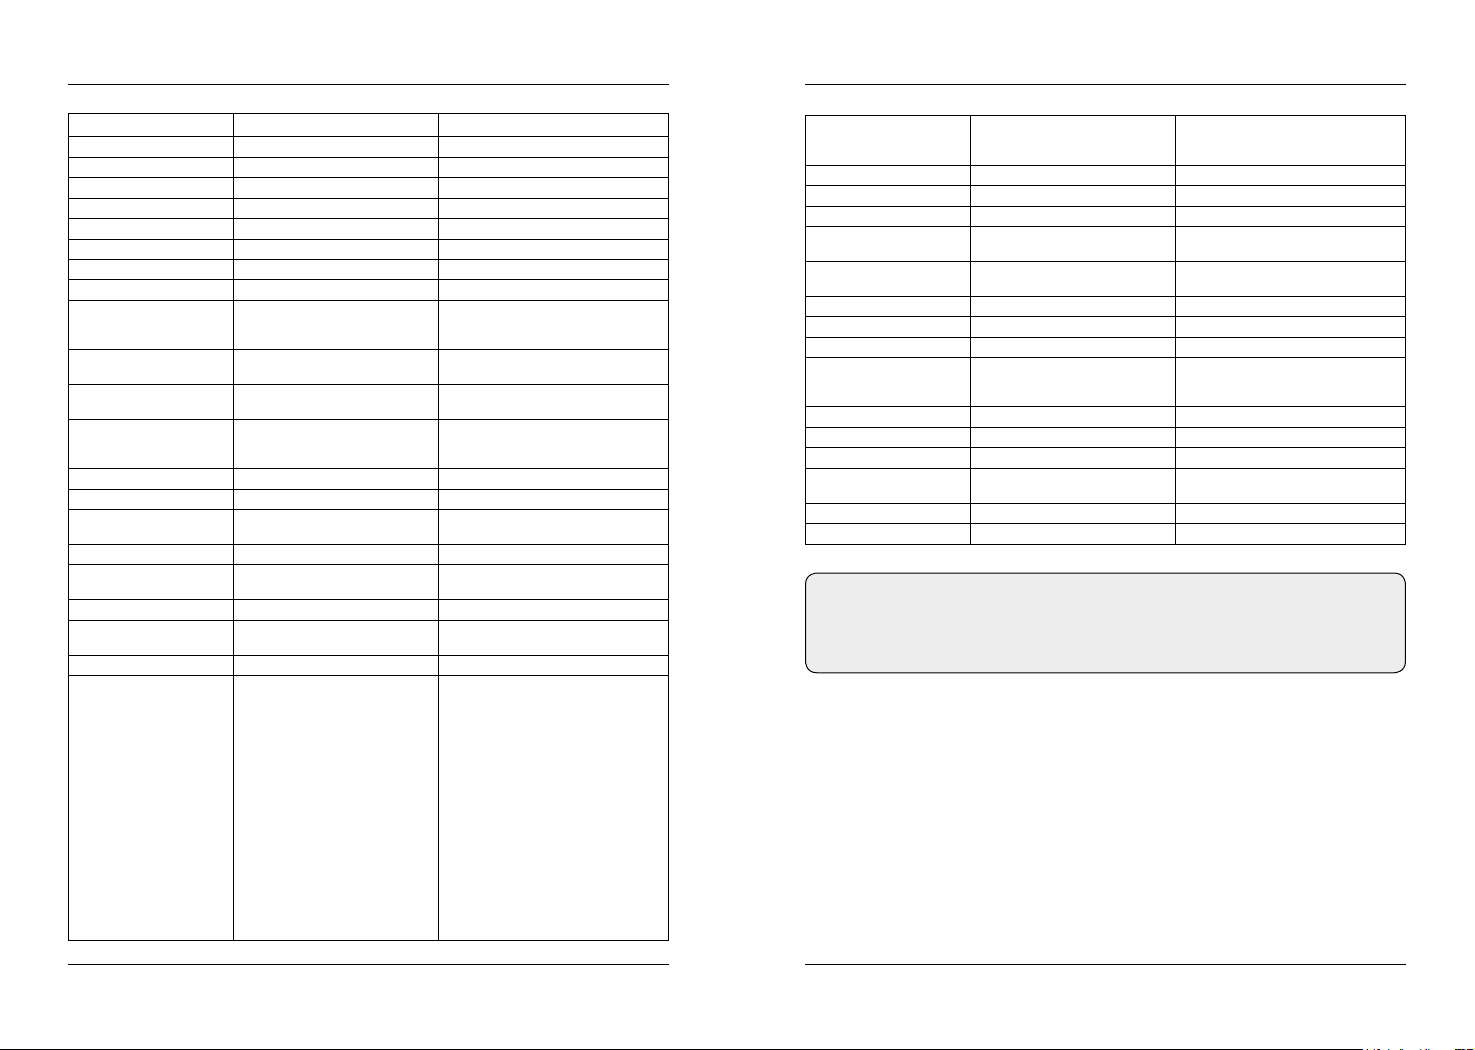
Betrieb Befehle Funktionsbeschreibung Anmerkungen
[Program Passwort]+[#] Programm-Modus Standart Passwort: 8888
[*] + [#] Programm-Modus verlassen
[20] + [1~8] + [#] Fernbedienung programmiern Max 8 Fernbedienungen
[21] + [1~8] + [#] Fernbedieung löschen
[23] + [01~99] + [#] Überwachungszonen hinzufügen Überwachungzone: 01-99
[24] + [01~99] + [#] Überwachungszone löschen Überwachungszone: 01-99
[30] + [Password] + [#] Benutzer-Passwort wechseln Standart: 1234
[31] + [Password] + [#] Programm-Passwort wechseln Standart: 8888
[32] + [AA] + [BB] + [CC] +
[DD] + [EE] + [FF] + [#]
[33~35] + [AA] +
[BB] + [#]
[36~38] + [AA] +
[BB] + [#]
[39] + [0/1] + [#] Zeiteinstellung
[41] + [0/1] + [#] Wireless Übertragung 0: Aus 1: An
[42] + [01~99] + [#] Wireless/Sirene programmieren Sirene/Nummer: 01-99
[44] + [01~99] + [#] Zeiteinstellung Verlassen/Verzö-
[45] + [01~99] + [#] Zeit-Einstellung Alarm/Verzögerung 6-Gruppen/Alarm Telefonnummer
[51]~[56] +
Phone number + [#]
[51]~[56] + [#] Telefonnummer löschen
[57]~[59] +
Phone number + [#]
[57]~[59] + [#] SMS Nummer löschen
[60] + [AA] + [B] +
[C] + [D] + [#]
System Zeit Einstellung [AA]:Jahr [BB]:Monat
Zeitlich/Aktivieren 3 Gruppen Auto/Aktiv
Zeitlich/Dektivieren 3 Gruppen Auto/Deaktiv
Aktiv/Deakitv
An/Aus
gerung
Alarm Telefonnummer Keine Verzögerung
SMS Nummer einstellen 3 Gruppen SMS Nummer
ÜberwachungszonenEinstellungen
[CC]:Tag [DD]:Stunde
[EE]:Minute [FF]:Sekunde
[AA]: Stunde [BB]: Minute
[AA]: Stunde [BB]: Minute
0: Aus 1: An
Standart: 60 Sekunden
AA: Überwachungszone: [01~99]
B: Alarmzonen/Typ:
[1] Echtzeit
[2] 40-Sekunden Alarmverzögerung
[3] 24 Stunden
[4] Umleitung
C: Alarm/Typ:
[1] SOS Alarm
[2] Feuer Alarm
[3] Gas Alarm
[4] Tür Alarm
[5] Flur Alarm
[6] Fenster Alarm
[7] Balkon Alarm
[8] Grenz Alarm
D: Sirene EIN/AUS
[0] AUS
[1] EIN
[61] + [01~12] +
[0/1] + [#]
[70] + [1] + [#] Stimmenaufnahme 10 Sekunden
[75] + [0/1] + [#] Sirenen Einstellung [0]: aus (Standard); [1]: ein
[76] + [0/1] + [#] Sirenen Einstellung im Notfall-Modus [0]: aus (Standard); [1]: ein
[77] + [1/0] + [#] SMS Benachrichtigung für Aktivie-
[81] + [#] GSM Signal Überprüfen Intensität: 07-31 bei der 07 bitte Platz
[83] + [0/1] + [#] Sprachausgabe Aktiv/Deaktiv [0]: aus (Standard); [1]: ein
[84] + [0/1] + [#] Sprachausgabe für alle Einstellungen [0]: aus (Standard); [1]: ein
[88] + [#] IMEI Überprüfung
[*] + [0] + [#] Alarmaufnahme überprüfen Taste 2: oben
[95175308246] + [#] Werkseinstellung Vorsicht
[operation password] + [1] Aktivieren per SMS Standart Passwort: 1234
[operation password] + [2] Deaktivieren per SMS Standart Passwort: 1234
[operation password] + [3] Alarm Aufnahme per SMS über-
[operation password] + [4] 12V Ausgang An Standart Passwort: 1234
[operation password] + [5] 12V Ausgang Aus Standart Passwort: 1234
Heim/Überwachung Zone: 01~12;
rung/Deaktivierung
prüfen
[0] Heim/Überwachung Alarm aus
[1] Heim/Überwachung Alarm ein
wechseln
Taste 8: unten
Drücke [*#]: Verlassen
Standart Passwort: 1234
Hinweis:
Die letzten fünf Funktionen können realisiert werden, wenn die GSM Signalstärke 20 erreicht hat.
Konformitätserklärung
Hiermit wird die Übereinstimmung mit folgenden Richtlinien/Normen bestätigt:
Richtlinie zur elektromagnetischen Verträglichkeit 2004/108/EG
EN 55013: 2001 + A1: 2003 + A2: 2006
EN 55020: 2007
EN 61000-3-2:2006 + A1:2009 + A2:2009
EN 61000-3-3:2008
Niederspannungsrichtlinie 2006/95/EG
EN 60065: 2002 + A1: 2006 + A11: 2008
28 DEUTSCH DEUTSCH 29
Page 16

User manual
Alarm System AS-200
Status: 1.0 März 2015 // Technische Änderungen, Druckfehler und Irrtümer vorbehalten.
Megasat Werke GmbH | Industriestraße 4a | D-97618 Niederlauer | www.mtvision.tv | [email protected]
Page 17

Content Function Instruction
Function Instruction ....................................................................... 03
Alarm Host Diagram ....................................................................... 04
Main panel front schematic diagram ............................................ 04
LCD display ................................................................................... 04
Back cover schematic diagram .................................................... 05
Wired ports ................................................................................... 06
Function Settings ............................................................................ 07
Initialization ................................................................................... 07
Enter Setings ................................................................................ 07
Exit Settings .................................................................................. 07
Factory Reset ................................................................................ 07
Coding of Remote Controller ........................................................ 07
Delete Remote Controller ............................................................. 08
Coding of Defense Zone ............................................................... 08
Delete Defense Zone .................................................................... 08
Change Password ......................................................................... 09
Change Operation Password ........................................................ 09
Change Program Password .......................................................... 09
Clock Setting ................................................................................. 10
Timing Settings ............................................................................. 10
Timely Arm .................................................................................... 10
Timely Disarm ............................................................................... 11
Timing Control .............................................................................. 11
Wireless Transmission Control ..................................................... 12
Wireless Siren Coding Encryption ................................................ 12
Time Setting of Out Arm Delay..................................................... 12
Time Setting of Alarm Delay ......................................................... 13
Alarm Number Setting .................................................................. 13
Delete Phone Number .................................................................. 14
SMS Receiving Number Setting ................................................... 14
Delete SMS Receiving Number .................................................... 15
Defense Zone Programming ......................................................... 15
Home Arm Defense Zone Setting ................................................ 16
Voice Recording ............................................................................ 16
Arm/ Disarm Siren Sound Setting ................................................. 17
Siren Setting in “Emergency Help” Mode .................................... 17
SMS Notification for Arm/Disarm ................................................. 17
Arm/ Disarm Voice Prompt ........................................................... 18
Voice Prompt for All Settings ........................................................ 18
Tamper Alarm Setting ................................................................... 19
IMEI Checking ............................................................................... 19
SMS Notification for Power Failure/ Recovery ............................. 19
Operation Instructions ................................................................... 20
System status ............................................................................... 20
Remote Controller Operation ....................................................... 20
Out Arm ........................................................................................ 20
Home Arm ..................................................................................... 21
Disarm ........................................................................................... 21
Emergency Help ........................................................................... 21
Answer Alarm Call ........................................................................ 22
Remote Control ............................................................................. 22
System Dialing Function ............................................................... 23
Alarming Record Checking ........................................................... 23
GSM Signal Checking ................................................................... 24
Specifications ................................................................................... 25
Delivery .............................................................................................. 25
Care and Maintenance ................................................................... 26
Function Setting Commands ........................................................ 28
• 4 wired and 99 wireless defense zones
• LCD screen with time clock display
• Voice prompt for all operations
• 3 groups of timely arm and disarm
• Can store 6 phone numbers: when alarming, system will
make alarm call to these numbers automatically
• Can store 3 SMS numbers: when alarming, system will send
alarming SMS automatically
• One programmable 12V relay output
• Tamper alarm function: there is a button at the back side of
the panel; it will make alarm once the button is loosen
• 10-second automatic message recording
• Built-in artificial intelligent digital voice announcer
• Built-in artificial intelligent English message
• Can send SMS to arm / disarm / check alarm record
• Can set arm and alarm delay time
• Built-in wireless transmitter for convenient connection to
wireless siren (customized)
• Users can make calls by using keypad on main unit, just like a telephone
• One-key-control function: Out Arm, Home Arm, Remote Arm
• SOS, fire, gas, door, hall, window, balcony, and boundary places alarm
• Real-time, delay, 24 hours, bypass defense zones programming function
• Wireless coding: easy to add additional wireless accessories
• Remote control Arm, Disarm, Monitor, and Intercom by phone
• SMS alarm for power failure or recovery;
• Built-in NI-HM rechargeable battery.
02 03ENGLISH ENGLISH
Page 18
Alarm Host Diagram Alarm Host Diagram
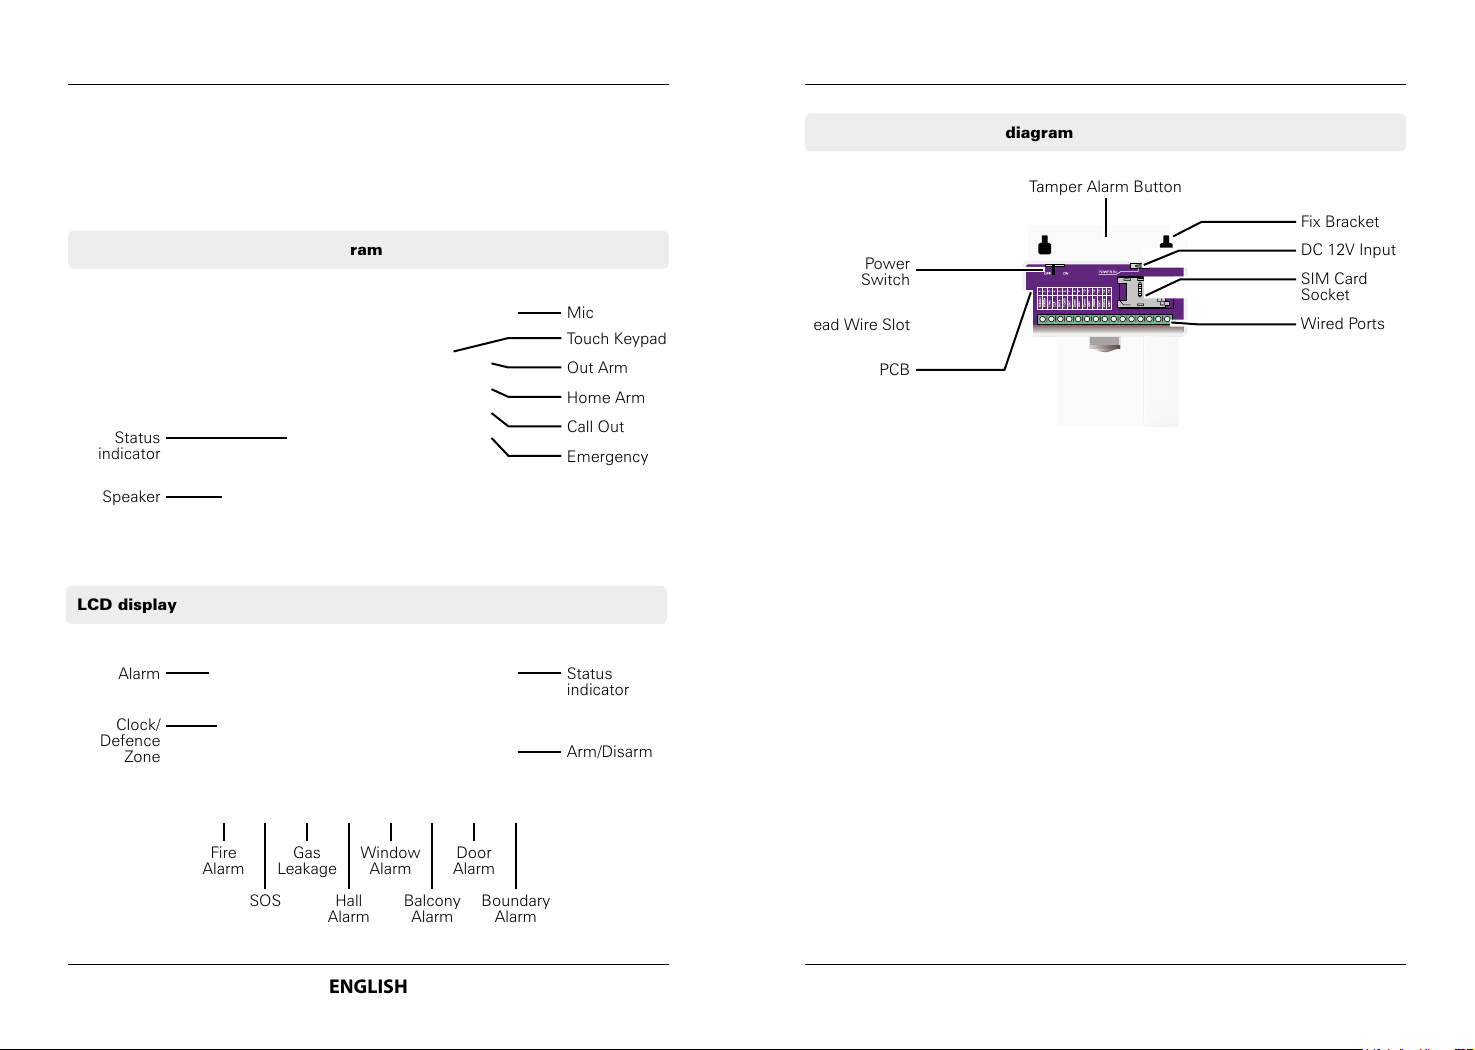
In order to make the main unit get the wireless signal well for all wireless accessories, please put the alarm host at the central place of your defense area. Make sure
it’s away from large metal objects and household appliances which may cause high
frequency interference, as well as barriers such as reinforced concrete wall or fire
door, etc.
Main panel front schematic diagram
Mic
Touch Keypad
Out Arm
Home Arm
Status
indicator
Speaker
LCD display
Alarm
Call Out
Emergency
Status
indicator
Back cover schematic diagram
Tamper Alarm Button
Power
Switch
Lead Wire Slot
PCB
Fix Bracket
DC 12V Input
SIM Card
Socket
Wired Ports
Clock/
Defence
Zone
Fire
Alarm
SOS
Gas
Leakage
Hall
Alarm
Window
Alarm
Balcony
Alarm
Door
Alarm
Boundary
Alarm
Arm/Disarm
04 04ENGLISH ENGLISH
Page 19
Alarm Host Diagram Function settings
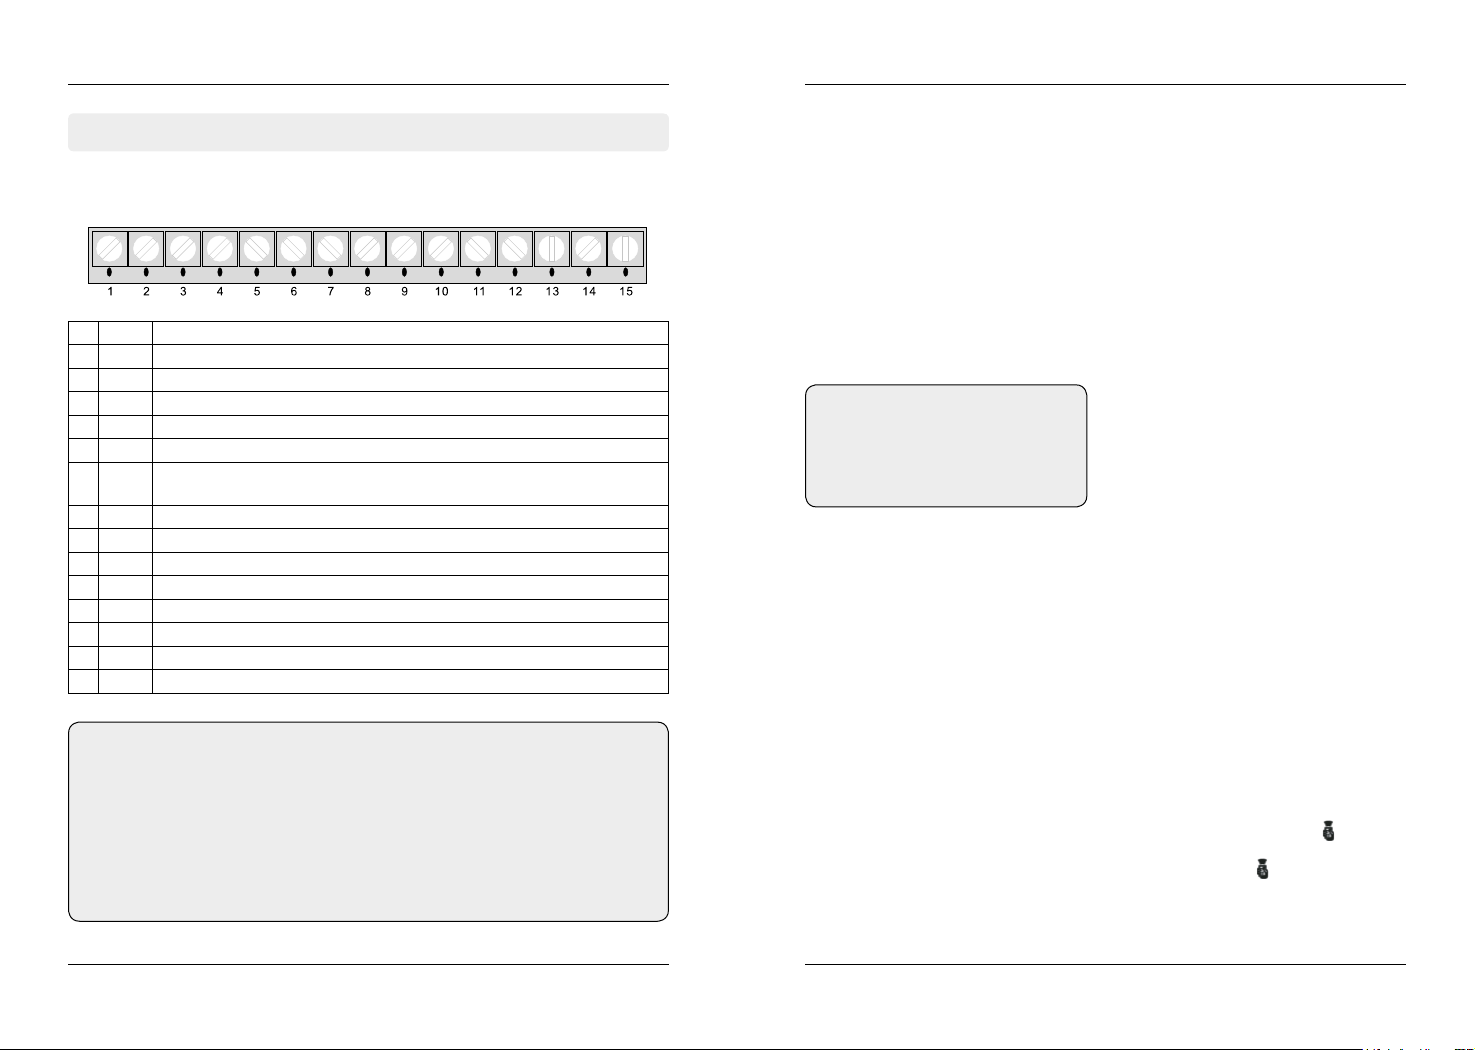
Wired ports
SPK+
1 SPK+ Positive of siren (red cable)
2 SPK - Negative of siren (black cable)
3 LB+ Positive of two-way speaker (red cable)
4 LB - Negative of two-way speaker (black cable)
5 P1 12 V output by remote control. Please refer to operation instruction part
6 GND Ground
7 P2 Linkage output port 2. There will be 12 V output once the system is
8 GND Ground
9 Z1 Wired sensor 1 (zone number: 95)
10 GND Ground
11 Z2 Wired sensor 2 (zone number: 96)
12 GND Ground
13 Z3 Wired sensor 3 (zone number: 97)
14 GND Ground
15 Z4 Wired sensor 4 (zone number: 98)
LB+
SPK -
armed, and be off once it’s disarmed.
LB -
P1
GND
P2
GND
Z1
GND
Z2
GND
Z3
GND
Z4
1. Initialization
Please insert SIM Card and plug in power adapter, and then power on the system,
the time clock display 12:00 on the LCD screen, the GSM network until a long beep.
Then the GSM indicator goes out indicating the system comes into disarm status.
2. Enter settings
In the state of disarm, input 4-digit password (default: 8888) by the keypad on the
main unit and press # button to confirm. You will hear a voice promt: please enter
instruction. At the same time, SET indicator is on without flashing and 0000 displays
on the screen, indicating the system enters setting status. You can perform different
settings repeatedly as long as the system keeps in setting status. The system will
exit setting mode and return ti disarm status if you don‘t press any keypad button
for 40 seconds.
Operating method: XXXX a #
Note:
In setting status, press CALL button can delete the numbers input.
The system default password is 8888.
3. Exit Settings
Press * and # buttons, the main unit emits a long beep and exits settings. The SET
indicator goes out and the system returns to disarm state.
Operating method: * a #
4. Factory Reset
In disarm status, use keypad to input 95175308246 and press # to confirm, all the
LED indicators will be on for 2 seconds and you will hear a long beep. The main unit
gets all its settings cleared and restores to its factory settings successfully.
Operating method: 95175308246 a #
XXXX indicates the 4-digit password.
Note:
1. LB+ and LB- are to connect external speaker. If you think the internal speaker is not loud enough, please contact us for professional speakers.
2. Connect one cable of the wired sensor to GND and the other to Z1/Z2/Z3/Z4.
3. Please pay attention to the siren connection SPK+ and SPK-. Do not mix the
two cables together when connecting. Otherwise, it damage the transistor
in the main panel.
5. Coding of Remote Controller
Extra remote controller has to be code to the alarm host in order to perform normally.
The one in the standard package has been coded. In setup state, use keypad to input
20, input the remote controller number 1~8, and then press # to confirm. The main
unit emits a long beep and you will hear “remote control coding”. The indicator
is on without flashing; press any button on the wireless remote controller, the main
unit makes a long beep and you will hear “coding completed”, indicator goes out,
indicating the remote controller succeeds in coding.
Operating method: 20 a A a #
06 ENGLISH ENGLISH 07
Page 20
Function settings Function settings
A indicates: 1~8 remote controllers number. You can add
maximum 8 remote controllers.
6. Delete Remote Controller
The remote controller can’t control the main unit after it’s deleted. In setup state, use
keypad to input 21, then input the remote controller number 1-8, and then press # to
confirm. The main unit emits a long beep and the Signal indicator flickers once. You
will hear a voice prompt “delete completed”.
Operating method: 21 a A a #
A indicates: 1~8 remote controllers number.
7. Coding of Defense Zone
Wireless detectors have to be coded to the main unit in order to trigger it alarm. The
wireless PIR and door sensor in the standard package have been coded. In setup
state, use keypad to input [23], input the defense zone number you want to code
[01~99], and then input [#] to confirm. The main unit emits a long beep and the
corresponding defense zone is displayed on the screen. You will hear a voice prompt
“detector coding”. Then trigger a wireless detector to emit a wireless signal; after
receiving the signal, the main unit makes a long beep, and you will hear “coding
completed”, the [ ] indicator goes out at the same time.
Operating method: 23 a XX a #
XX indicates: 01~99 defense zones number
8. Delete Defense Zone
The wireless detector can’t control the main unit after it’s deleted. In setup state, use
keypad to input 24, then input the defense zone number you want to delete 01~99,
and then input # to confirm. The main unit emits a long beep and the defense zone
indicator flickers once. You will hear a voice prompt “delete completed”.
Operating method: 24 a XX a #
XX indicates: 01~99 defense zones number
9. Change Password
Change Operation Password.
Operation password is the password used
to disarm or remote control. (Default: 1234)
In setup status, use keypad to input 30, then input the 4-digit new password, and
then press # to confirm. The main unit will make a long beep and you will hear a
voice prompt “setting completed”.
Operating method: 30 a XXXX a #
XXXX indicates: the new 4-digit password
For example: change the system password to 1012
Operating method: 30 a 1012 a #
Change Program Password.
Program password is the password you should input
in order to setup the system. (Default: 8888)
In setup status, use keypad to input 31, then input the 4-digit new password, and
then press # to confirm. The main unit will make a long beep and you will hear a
voice prompt “setting completed”.
Operating method: 31 a XXXX a #
XXXX indicates: the new 4-digit password
For example: change the system password to 2846
Operating method: 31 a 2846 a #
Note:
The operation password and the programming password can not be set as the
same number.
08 ENGLISH ENGLISH 09
Page 21
Function settings Function settings
10. Clock Setting
In setup status, use keypad to input 32, then input the last 2 digits AA of the present
year, the two digits BB of the month, the two digits CC of the date, the two digits
DD of the hour (24-hour system), the two digits EE of the minute, the two digits FF
of the second, and finally enter # to confirm. You will hear a long beep and a voice
prompt “setting completed”.
Operating method: 32 a AA a BB a CC a DD a EE a FF a #
AA indicates: the last 2 digits of the present year
BB indicates: the 2 digits of the present month
CC indicates: the 2 digits of the present date
DD indicates: the 2 digits of the present hour
EE indicates: the 2 digits of the present minute
FF indicates: the 2 digits of the present second
For example: set the time as 15:35:40, Oct. 1st, 2009
Operating method: 32 a 09 a 10 a 01 a 15 a 35 a 40 a #
11. Timing Settings
Timely Arm
In setup status, use keypad to input 33~35, then input the hour AA and minute BB
of the time you want to set to arm, and finally input # to confirm. You will hear a long
beep and a voice prompt “setting completed”.
Operating method: XX a AA a BB a #
XX indicates: the address code 33, 34, 35 of the timely arming
AA indicates: the hour of the setting time
BB indicates: the minute of the setting time
For example: set the arm time as 10:45pm
Operating method: 33 a 22 a 45 a #
Timely Disarm
In setup status, use keypad to input 36~38, then input the hour AA and minute BB
of the time you want to set to disarm, and finally input # to confirm. You will hear a
long beep and a voice prompt “setting completed”.
Operating method: XX a AA a BB a #
XX indicates: the address code 36, 37, 38 of the timely disarming
AA indicates: the hour of the setting time
BB indicates: the minute of the setting time
For example: set the arm time as 7:55am
Operating method: 36 a 07 a 55 a #
Timing Control
In setup status, use keypad to input 39, then input the number indicating turning on
timely arm/ disarm 1/0, and then input # to confirm. You will hear a long beep and a
voice prompt “setting completed”. The factory default is off.
Operating method: 39 a 0/1 a #
0: turn off the function of timely arm/ disarm
1: turn on the function of timely arm/ disarm
For example: turn on the function of timely arm/ disarm
Operating method: 39 a 1 a #
Note:
If turning on timely arm/disarm function, the clock icon will display on the
screen. If turn off the function, the icon will not display.
10 ENGLISH ENGLISH 11
Page 22
Function settings Function settings
12. Wireless Transmission
In setup status, use keypad to input 41, then input the number 1/0, and then input #
to confirm. You will hear a long beep and a voice prompt “setting completed”. The
factory default is off.
Operating method: 41 a 0/1 a #
0: turn off the function of wireless transmission
1: turn on the function of wireless transmission
For example: turn on the function of wireless transmission
Operating method: 41 a 1 a #
Note:
After activating this function, do as follows to set the wireless siren with the
main unit. Input 411#, and then make the siren you want to set into coding
status, finally press 0# on the panel. Pressing 0# means the panel will make
coding signal to the siren, this signal will last for 3 seconds. So please make
sure the siren is in coding status during this 3-second period.
13. Wireless Siren Coding Encryption
In setup status, use keypad to input 43, then input the number 0001~9999, and then
input # to confirm. You will hear a long beep and a voice prompt “setting completed”.
Operating method: 43 a A a#
A indicates: the code number 01~99
Note:
The setting is effective only with the panel keyboard operation. The operation
by remote controller or SMS is immediate arm without delay.
15. Time Setting of Alarm Delay (Default: 40 sec)
In setup status, use keypad to input 45, then input delay time 01~99, and then input #
to confirm. You will hear a long beep and a voice prompt “setting completed”.
Operating method: 45 a AA a #
AA indicates: the code number 01~99
For example: set the wireless coding number as 65
Operating method: 45 a 65 a #
Note:
Alarm delay is effective only when the correspondent zone of the detector is
set as alarm delay zone.
16. Alarm Number Setting
In setup state, input 51~56, then input the voice alarm-receiving number (mobile number or telephone number), and then press # to confirm. The main unit will make a
long beep, the Signal indicator will flicker once, and you will hear “setting completed”,
which indicate voice alarm-receiving number is set successfully.
For example: set the wireless coding number as 10
Operating method: 43 a 10 a#
14. Time Setting of Out Arm Delay (Default: 60 sec)
In setup status, use keypad to input 44, then input delay time 01~99, and then input
[#] to confirm. You will hear a long beep and a voice prompt “setting completed”.
Operating method: 44 a AA a #
AA indicates: the alarm delay time 01~99 seconds
For example: set the wireless coding number as 99
Operating method: 44 a 99 a #
Operating method: XX a YY…YY a #
XX indicates: the 1- 6 alarming user number 51~56
YY…YY indicates: voice alarm-receiving phone number
For example: set 13811111111 as the first voice call number
Operating method: 51 a 13811111111 a #
Note:
The alarm-receiving number can be maximum 15 digits.
12 ENGLISH ENGLISH 13
Page 23
Function settings Function settings
17. Delete Phone Number
In setup state, input 51~56, and then press # to confirm, the main unit will make a
long beep and the Signal indicator will flicker once and you will hear “delete completed”, which indicate the alarming user number is deleted successfully.
Operating method: XX a #
XX indicates: the 1- 6 alarming user number 51~56
For example: Delete the third alarming user number
from the system.
Operating method: 53 a #
18. SMS Receiving Number Setting
SMS Receiving number means when system is alarming, it will send SMS to this
mobile number. You can set maximum 3 SMS numbers.
In setup state, input 57~59, then input the SMS receiving number, and then press
# button to confirm. The main unit will make a beep, the Signal indicator will flicker
once and you will hear “setting completed”, which indicate setup successfully.
Operating method: XX a YY…YY a #
XX indicates: address codes of message-receiving numbers from the
first group to the third group 57~59
YY…YY indicates: the SMS receiving number
For example: setup 13822222222 as the first SMS receiving number
Operating method: 57 a 138222222 a #
Note:
The sms-receiving number can be maximum 15 digits.
19. Delete SMS Receiving Number
In setup state, use keypad to input 57~59, and then press # button to confirm. The
main unit will make a beep, the Signal indicator will flicker once and you will hear
“delete completed”, which indicate SMS number is deleted successfully.
Operating method: XX a #
XX indicates: address codes of SMS receiving numbers from the first
group to the third group 57~59
For example: delete the first SMS user number from the system
Operating method: 57 a #
20. Defense Zone Programming
If you want to change the alarm attribute of defense zone, such as turnoff the siren
when system alarms, you can do it by defense zone programming. In setup state,
first input 60, then the defense zone number 01~99, then input defense zone type
1~4, then input alarm type 1~8, and then select siren on/off 0/1, at last press # to
confirm. You will hear the main unit emit a long beep and a voice prompt “setting
completed”.
Operating method: 60 a AA a B a C a D a #
AA: defense zone number 01~99 means zone 1 to zone 99;
B: defense zone type
1: real-time defense zone
2: 40 seconds delay defense zone
3: 24 hours defense zone
4: bypass defense zone
C: alarm type
1 SOS Alarm
2 Fire Alarm
3 Gas Leak Alarm
4 Door Alarm
5 Hall Alarm
6 Window Alarm
7 Balcony Alarm
8 Boundary Alarm
D: siren ON/OFF: 0 OFF, 1 ON
Note:
The programming is suitable for
all defense zones including wired
defense zones.
For example: set defense zone 12 to be 24-hour, fire alarm and siren on
Operating method: 60 a 12 a 3 a 2 a 1 a #
14 ENGLISH ENGLISH 15
Page 24
Function settings Function settings
21. Home Arm Defense Zone Setting
Home arm defense: sometimes (for example, when you are at home), you want
some of the sensors work while some do not, you can do this setting.
In setup state, use keypad to input 61, then choose the corresponding defense zone
number 01~99, then choose [Home Arm], and then choose whether alarm 0/1 button, and finally press # to confirm. The main unit will make a long beep and a voice
prompt “setting completed”.
Operating method: 61 a XX a A a #
XX indicates: 01~99 is defense zone 1 to defense zone 99
A indicates:
0: no alarm under home arm status even the sensor is triggered
1: alarm under home arm status
Example: set sensor in defense zone 11 make alarm under home arm status
Operation: 61 a 11 a 1 a #
Example: set sensor in defense zone 12 not make alarm even when it’s triggered
under home arm status.
Operation: 61 a 12 a 0 a #
After this setting, when you “home arm” the system, sensor in defense zone 55 will
not work.
Note:
Home arm status is suitable for all defense zones including wired defense zones.
22. Voice Recording
In setup state, use keypad to input [701], and then press [#] to confirm. The main
unit will emit a beep and the [ ] indicator is on, and after 10 seconds countdown,
recording starts: record at 30cm away from the main unit with moderate tone; 10
seconds later, the main unit will make a beep indicating the recording stops and the
recorded voice will replay.
Operating method: 701 a #
23. Arm/ Disarm Siren Sound Setting
After you activate this function, when you arm the system, the external siren will
sound one short beep; and when you disarm it, there will be two short beeps.
In setting status, use keypad to input 75, then set siren sound OFF/ON by 0/1 button and finally press # to confirm; voice prompts: setting completed, please enter
instruction”.
Operating method: 750 a # or 751 a #
0: sound OFF, (system default: 0)
1: sound ON
Example: set arm/disarm siren alarm sound ON.
24. Siren Setting in “Emergency Help” Mode
Press “Emergency/SOS” button on the remote controller or the keypad, the system
will make alarm immediately. You can choose to activate the siren sound or not.
In setup state, use keypad to input 76, and then 1/0, finally press # to confirm. The
main unit will make a long beep and a voice prompt “setting completed”.
Operating method: 76 a A a #
A indicates: 0: siren off in “Emergency Help” mode
1: siren on in “Emergency Help” mode
System default: 0 siren off
For example: Set Emergency siren
25. SMS Notification for Arm/Disarm (Default: OFF)
In setup state, input use keypad to input 77, and then 1/0, finally press # to confirm.
The main unit will make a long beep and a voice prompt “setting completed”.
Operating method: 77 a 0 a # or 77 a 1 a #
0: no SMS for arm/disarm to the 3 alarm-receiving numbers (default)
1: SMS for arm/disarm to the 3 alarm-receiving numbers
For example: send SMS when arm
16 ENGLISH ENGLISH 17
Page 25

Function settings Function settings
26. Arm/ Disarm Voice Prompt
This product has this function: when you arm/ disarm it, it will give voice prompt
“system armed/ disarmed”. You can deactivate it if you do not need.
In setting status, first input 83, then 0/1 and finally press # to confirm. The main unit
will make a long beep and voice prompts:setting completed, please enter instruction.
Operating method: 83 a 0/1 a #
1: activate voice prompt for arm/ disarm (factory default)
0: deactivate voice prompt for arm/ disarm
For example: Set arm/disarm voice prompt OFF
Operating method: 83 a 0 a #
27. Voice Prompt for All Settings
For all above settings, you could hear the voice prompt such as “setting completed,
please enter instruction”, “delete completed”. You can deactivate the voice if you do
not need them. In setting status, first input 84, then 0/1 and finally press # to
confirm. The main unit will make a long beep and voice prompts: setting completed,
please enter instruction.
Operating method: 84 a 0/1 a #
1: activate voice prompt for all operations (factory default)
0: deactivate voice prompt
For example: Set voice prompt OFF
Operating method: 84 a 0 a #
28. Tamper Alarm Setting
There is a tamper alarm button at the back side of the panel. If you install the panel
with the bracket (included in the standard pack), this button will be pressed down.
When someone is trying to disassemble the panel, the button will be loosen once
the bracket is taken off and the system will make alarm at the same time.
In setting status, first input 87, then press 0/1 and finally press # to confirm. The
main unit will make a long beep and voice prompts: setting completed.
Operating method: 87 a 0/1 a #
0: Tamper alarm OFF (factory default)
1: Tamper alarm ON
For example: Set Tamper alarm ON
Operating method: 87 a 1 a #
Note: The alarm SMS is “zone 99 emergency alarm“.
29. IMEI Checking
In setting status, first input 88 and then press # to confirm. The 15-digit IMEI code
will be displayed separately in 4 pages (2 seconds per page) on the screen.
30. SMS Notification for Power Failure/ Recovery
In Out Arm status, if the main panel is powered off, the built-in battery will supply power, and main unit will send SMS (power charger off) to all the three preset
SMS-receiving numbers.
In Out Arm status, if the main panel recovers power, it will send SMS (power charger
on) to all the three SMS-receiving numbers. While in Disarm or Home Arm status, it
does not have this function.
Note:
The alarm SMS is zone 99
emergency alarm“.
18 ENGLISH ENGLISH 19
Page 26

Operation Instructions Operation Instructions
1.System status
There are 4 statuses as following:
• Arm: defense zone 1~99 will alarm when detectors are triggered
• Home Arm: in arm status, the defense zone which is set as Home Arm will
alarm when detectors are triggered.
• Disarm: defense zone 1~99 will not alarm when detector triggered (except 24
hours defense zone)
• System setup status: In this status, all defense zones will not alarm when detectors are triggered.
2. Remote Controller Operation
Users can use remote controller to set system as Out Arm, Home Arm, Emergency
Alarm, Real-time Disarm and etc.
• Out Arm: Press for lock button
• Disarm: Press for open lock button
• Home Arm: Press for flash button
• Emergency Alarm: Press for alarm button, system will alarm at once.
3. Out Arm
It means to guard all around your house while everyone is going out; all the detectors of the host are always working; when the detector is triggered by detecting
source (anti-theft, fire prevention, gas leak, etc.), the alarm system will sound the
alarm. Press ARM button on keypad, system will make a beep per second and totally
60 beeps. The ARM indicator will be on without flashing. It means Out Arm is set
successfully.
Main unit operation: Press ARM button, the system will enter arm status 60 seconds
later or delay time set by user
4. Home arm
It means, for the safety, while somebody is at home, you need to enable the peripheral door, window, balcony and boundary detectors of the alarm system while
prevent from triggering the indoor detectors, which may cause improper warning;
then, you shall select Arm at Home, let just part of the detectors work and disable
the other parts.
Main unit Operation: Press Home button on keypad
Remote Control Operation: Press flash button on remote controller once
5. Disarm
It means to stop the alarm when the main unit sounds the alarm or make the alarm
system in the state of non-warning. After disarming, even if you trigger the detector,
the main unit would not sound alarm (excluding 24-hour defense areas).
Use keypad to input system password (Default: 1234), then press # button. ARM or
STAY lights will be off. It means disarm setting successful.
Main Unit Operation: input system password + #
Remote Control Operation: Press open lock button on remote controller
SMS remote operation: The SMS command is: Remote Control Password (Default:
1234) + 2
After the setting, the host makes „Di“ Di“ sound, ARM LED is off and you will receive
a SMS: System disarmed.
Remote controller operation: Press lock button on remote controller, system will
enter OUT ARM mode immediately.
SMS remote operation: The SMS command is: Remote Control Password (Default:
1234) + [1]
After the setting, the host makes a „Di“ sound, ARM LED is on and you will receive
a SMS: System armed. Note: SMS command can only be controlled by the preset
three alarm SMS numbers.
6. Emergency help
Press [SOS] button on keypad, or [ ] button on remote controller or wireless panic
button, the main unit will alarm and make call to the preset user numbers.
20 ENGLISH ENGLISH 21
Page 27
Operation Instructions Operation Instructions
7. Answer Alarm Call
When the main unit sounds alarm, it will dial the preset numbers. If no one answers
the call, the system will call the next user number automatically. The system will call
each preset numbers for 3 times in order.
If you answer the call, you will hear the pre-record voice. You can set system via your
telephone or mobile phone keypad.
If you hang-up directly without answering the call, the system will call each preset
number for 3 times circularly.
Press *: Read the alarm information.
Press 1: Main unit stops alarming and Arm; it stops calling users.
Press 2: Main unit stops alarming and Disarm; it stops calling users.
Press 3: Siren off and monitors the scene for 60 seconds; for continued monitoring,
press 3 again to monitor for another 60 seconds.
Press 4: Main unit starts a 60-second two-way intercom. It cannot be controlled by
the mobile during the time of intercom.
Press 5: Linkage switch 1, 12V output on.
Press 6: Linkage switch 1, 12V output off.
For the above operation of “arm, disarm and output control”, you could also send
SMS to realize. The SMS content format is: operation password (default: 1234) +
[1/2/5/6].
8. Remote control
Dial the number associated to the alarm main unit by phone (mobile phone), and
after one ringing cycle, you can hear a voice prompt “Please enter password”. If the
password is right, you will here “Press 1 to arm, Press 2 to disarm, Press 3 to Monitor, Press 4 to Intercom”.
Note:
For each number pressing, it is valid only you hear a “DI” confirmation sound.
Please reenter it if you do not hear the sound. And sometimes for weak gsm
signal, you need to input for several times.
9. System Dialing Function
In disarm status; you can use the main unit to make any call just like a land-line
telephone. Dial telephone number on keypad, press CALL button, the main unit will
make a beep and the [Signal] indicator will be flashing. After the call, press CALL
button again, the main unit will be in disarm status.
10. Alarming Record Checking
In disarm state, input *0 #, then the main unit will make a long beep and enters the
state of alarm record checking. After displaying the alarm and defense zone number
indicator for 1 second, the LCD screen will display the exact alarming time of this defense zone. Press 2, you can upturn to check the previous alarming record; press 8,
downturn to check; and press *# to exit checking.
For example: the 51st defense zone; the 7th alarming; alarming time: 12:10, August
1st, 2008. LCD display for one second,
and then display
the alarming time:
If the password is wrong, you will hear a prompt voice “wrong password, please
re-enter”.
Press 1: arm, if finished successfully, you will hear a voice prompt “System armed”.
Press 2: disarm, if finished successfully, you will hear a voice prompt “System disarmed”.
Press 3: monitoring for 60 seconds, to continue monitoring, press 3 again to monitor
for another 60 seconds.
Press 4: two-way intercom for 60 seconds. You can’t operate the main unit during
this time.
Press 5: Linkage switch 1, 12V output on
Press 6: Linkage switch 1, 12V output off
You can also check the alarm records by SMS (Max: Latest 9 records). SMS Check
Command: Remote Control Password (Default: 1234) + [3] Reply SMS:
Eg: Alarm record:
NO1 Zone: 05 TIME: 11-06-25 11:37
(It indicates the first record: wireless zone 5 alarm time)
NO9 Zone: 19 Time: 11-06-25 11:45
(It indicates the ninth record: wireless zone 19 alarm time)
22 ENGLISH ENGLISH 23
Page 28
Operation Instructions
SpecificationsSpecifications
11. GSM Signal Checking
Before installing the main unit, you should check the signal of the installing place
in order to ensure the unit can perform well. In setup state, input 81 a #, the main
unit will make a long beep and display 00+XX (XX indicates the intensity of the GSM
signal). And the intensity should be within the range of 07-31; if it’s less than 07, you
should change place.
This icon indicates the signal intensity. When the intensity number is 0-7, this
icon will not be shown; when it’s 8-15, this icon will be flashing; when the number
is larger than 16, this icon will be on the screen without flash.
For example: if the signal intensity is 12, it will display as:
Power supply: AC 220V±10%
DC 12V (Built-in NI-HI) rechargeable battery
Standby Current: < 60 mA
Alarming Current: < 450 mA
GSM band: 850 / 900 / 1800 / 1900 MHz
Wireless Frequency: 868 MHz / 433 MHz
Wireless receiving sensitivity: 5 m V/m
Anti-interference: 1 V/m (Frequency range: 20-1000 MHz)
Working Temperature: 10° ~ +40°
Humidity: ≤90%(nofog)
Wireless detectors: 99 pcs
Defense Zone Arm Home Arm Ty p Alarm
Information
Zone 1 effective invalid real-time Door alarm yes
Zone 2 effective invalid real-time Hall alarm yes
Zone 3 effective invalid real-time Window alarm yes
Zone 4 effective effective real-time Balcony alarm yes
Zone 5 effective effective 24 hours Fire alarm yes
Zone 6 effective effective 24 hours Gas alarm yes
Emergency button effective effective 24 hours Emergency alarm no
Zone 7-99 effective invalid real-time Emergency alarm yes
Wire defense zone 95-98 effective invalid real-time Emergency alarm yes
Tamper alarm zone (99) effective effective 24 hours Emergency alarm yes
Program Password 8888 Remote control On
Operation Password 1234 Siren Off
Siren sound time 180 sec. Home Appliance Optional
Siren
Delivery
• Main panel 1pc,
• Remote controller 2pcs,
• Siren 1pc,
• Wireless PIR sensor 1pc,
• Wireless Door sensor 1pc,
• Power adapter (DC 12V/1.2A) 1pc,
• Back-up battery 1pc
• User manual 1pc.
24 ENGLISH ENGLISH 25
Page 29

Care and Maintenance
Care and Maintenance
The alarm system has excellent design and uses advanced technologies. It shall be
used with care. The following suggestions are required to maintain your obligations
under the warranty terms, and for prolonging the service life of the system.
• Place the control panel and all parts and accessories out of children’s reach.
• Keep the alarm system dry. Rain, humidity and various fluids or moisture all will
corrupt the electronic circuit.
• Do not use or place the alarm system in dirty locations, otherwise the electronic
elements will be damaged.
• Do no place the system in excessively hot locations. High temperature will
shorten the service life of electronic equipment, damage batteries, deform or
even melt some plastic parts.
• Do not place the system in excessively cold locations. Otherwise condensation
many occur and damage the circuit board of the alarm system.
• It is recommended that you check and test the alarm system periodically.
Check the main unit every three months:
1.Whether it can arm/disarm normally;
2.Whether it can dial the number for alarm normally;
3.Whether it can receive wireless detectors’ signal normally;
4.Whether the back-up battery can work normally.
Check the wireless detectors once a month:
1.Trigger wireless detectors to see if system can alarm normally;
2.Check all detectors’ batteries to see if it’s in low voltage;
3.Check whether wireless detectors can send signal to the main unit normally.
• Since the alarm system is continuously in operation or standby mode, the supply adaptor of the control panel shall be connected to a safe and reliable socket.
• Do not place the system near your bedroom or office table, because the siren
will make high-loudness sound in the case of alarm, which may adversely affect
your rest or work.
• If the alarm system will not be used for a long time , please disconnect the
system from the power supply.
• Please do not disassemble, repair or alter the products without permission, or
it may cause accidents and faults.
• Do not drop this product on the ground or on hard objects, as it may lead to
massive impact to cause faults and damages.
• Without approval and consent of relevant authorities, please do not set “110”,
“119” or the alarm phone number of police station for this main unit.
Please read the suggestions above carefully and follow the instructions herein. If any
of the equipment does not work properly, please send it to the dealer or authorized
service point for repair. We will try our best to solve the problem for you as soon as
possible.
The following accessories are optional
Check the SIM card:
1.Check the use of SIM card, such as network signal, balance, etc.
Signal Booster
Wireless Keypad
Wireless Outdoor
Flash Siren
2.Make sure the PIN code verification of the SIM card is closed.
3.Please keep the password and SIM card number safe, in case that
other people remote control the system illegally.
Door sensor
Smoke Detector
Panic button
Gas Detector
Remote controls
PIR Detector
26 ENGLISH ENGLISH 27
Page 30
Function Setting Commands
Function Setting Commands
Operation
Commands
[Program Password]+[#] Enter settings Default password: 8888
[*] + [#] Enter settings
[20] + [1~8] + [#] Coding of Remote Controller Max 8 remote controllers
[21] + [1~8] + [#] Delete Remote Controller
[23] + [01~99] + [#] Coding of Defense Zones Defense Zones Number: 01~99
[24] + [01~99] + [#] Delete Defense Zones Defense Zones Number: 01~99
[30] + [Password] + [#] Change Program Password Default: 1234
[31] + [Password] + [#] Change Program
[32] + [AA] + [BB] + [CC] +
[DD] + [EE] + [FF] + [#]
[33~35] + [AA] +
[BB] + [#]
[36~38] + [AA] +
[BB] + [#]
[39] + [0/1] + [#] Timing Control: turn on/ off the
[41] + [0/1] + [#] Wireless
[42] + [01~99] + [#] Wireless Siren Coding Encryption Siren coding number: 01~99
[44] + [01~99] + [#] Out Arm Delay Time Setting Default: 60seconds
[45] + [01~99] + [#] Alarm Delay Time Setting Default: no delay
[51]~[56] +
Phone number + [#]
[51]~[56] + [#] Delete Phone Number
[57]~[59] +
Phone number + [#]
[57]~[59] + [#] Delete SMS Receiving Number
[60] + [AA] + [B] +
[C] + [D] + [#]
Function
Remarks
Description
Password
System Time Setting [AA]: year [BB]: month[CC]: date
Timely Arm 3 groups of auto arm time
Timely Disarm 3 groups of auto disarm time
function of timely arm/disarm
Transmission Control
Alarm Number Setting 6 groups of alarming user number
SMS Receiving Number Setting 3 groups of SMS receiving number
Defense Zone
Programming
Default: 8888
[DD]: hour [EE]: minute [FF]: second
[AA]: hour [BB]: minute
[AA]: hour [BB]: minute
0: OFF 1: ON
0: OFF 1: ON
AA: Defense zone number: [01~99]
B: Defense zone type: [1] real-time
[2] 40 seconds delay
[3] 24 hours
[4] bypass
C: Defense zone location:
[1] SOS Alarm
[2] Fire Alarm
[3] Gas Leak Alarm
[4] Door Alarm
[5] Hall Alarm
[6] Window Alarm
[7] Balcony Alarm
[8] Boundary Alarm
D: Siren ON/OFF
[0] OFF
[1] ON
[61] + [01~12] +
[0/1] + [#]
[70] + [1] + [#] Voice Recording 10 seconds
[75] + [0/1] + [#] Siren Setting [0]: off (default); [1]: on
[76] + [0/1] + [#] Siren Setting in Emergency Help
[77] + [1/0] + [#] SMS Notification for Arm/ Disarm
[81] + [#] GSM Signal Checking Intensity: 07-31 (if its less than 07,
[83] + [0/1] + [#] Arm/ Disarm Voice Prompt [0]: off; [1]: on (default)
[84] + [0/1] + [#] Voice Prompt for All Settings [0]: off; [1]: on (default)
[88] + [#] IMEI Checking [AA]: year [BB]: month[CC]: date
[*] + [0] + [#] Alarming Record Checking Press 2: upturn
[95175308246] + [#] Factory Reset Use with caution
[operation password] + [1] Arm by SMS Default operation password: 1234
[operation password] + [2] Disarm by SMS Default operation password: 1234
[operation password] + [3] Alarm Record Checking by SMS Default operation password: 1234
[operation password] + [4] Turn on 12V output Default operation password: 1234
[operation password] + [5] Turn on 12V output Default operation password: 1234
Home Arm Defense Zone Setting Defense zone number: 01~12;
mode
[0] Home arm but not alarm;
[1] Home arm and alarm
[0]: off (default); [1]: on
you should change place.)
[DD]: hour [EE]: minute [FF]: second
Press 8: downturn
Press [*#]: Exit
Note:
The last five functions could be realized only when the GSM signal intensity
reaches 20.
Declaration of Conformity
This attesting conformity with the following directives / standards:
Electromagnetic Compatibility Directive 2004/108 / EC
EN 55013: 2001 + A1: 2003 + A2: 2006
EN 55020: 2007
EN 61000-3-2:2006 + A1:2009 + A2:2009
EN 61000-3-3:2008
Low Voltage Directive 2006/95/EG
EN 60065: 2002 + A1: 2006 + A11: 2008
28 ENGLISH ENGLISH 29
Page 31

Megasat Werke GmbH | Industriestraße 4a | D-97618 Niederlauer | www.mtvision.tv | [email protected]
Status: 1.0 March 2015 // Technical changes, misprint and errors reserved.
 Loading...