

Page 1
Page 2

Congratulations!
Care of Your Keyboard
Your keyboard will give you years of playing pleasure if you follow the simple rules given below:
Location
Do not expose the unit to the following
conditions to avoid deformation, discoloration, or
more serious damage.
! Direct sunlight.
! High temperature (near a heat source, or
expose under the sun inside ).
! Excessive humidity.
! Excessive dust.
! Strong vibration
a car
Power Supply
! Turn the power switch OFF when the
instrument is not in use.
! If an AC adaptor is used, it should be
unplugged from the AC outlet if the
instrument is not to be used for an extended
period of time.
! Unplug the AC adaptor during electric
storms.
! Avoid plugging the AC adaptor into the
same AC outlet as appliance with high
power consumption, such as electric
heaters or ovens. Also avoid using multi-
plug adaptors since these can result in
reduced sound quality, operation errors, and
possibly damage.
Turn Power OFF When Making
Connections
! To avoid damage to the instrument and
other devices to which it is connected, turn
the power switches of all related device OFF
prior to connecting or disconnecting cables.
Handling and Transport
! Never apply excessive force to the controls,
connectors or other parts of the instrument.
! Always unplug cables by gripping the plug
firmly, but not pulling on the cable.
! Disconnect all cables before moving the
instrument.
! Physical shocks caused by dropping, bump-
ing, or placing heavy objects on the instrument can result in scratches and more
serious damages.
Cleaning
! Clean the cabinet and panel with a dry soft
cloth.
! A slightly damp cloth may remove stubborn
grime and dirt.
! Never use cleaners such as alcohol or
thinner.
! Avoid placing vinyl object on top of the unit
(vinyl can stick to and discolor the surface).
Electrical Interference
! This instrument contains digital circuitry and
may cause interference if it is placed too
close to radio or television receivers. If this
occurs, move the instrument farther away
from the affected equipment.
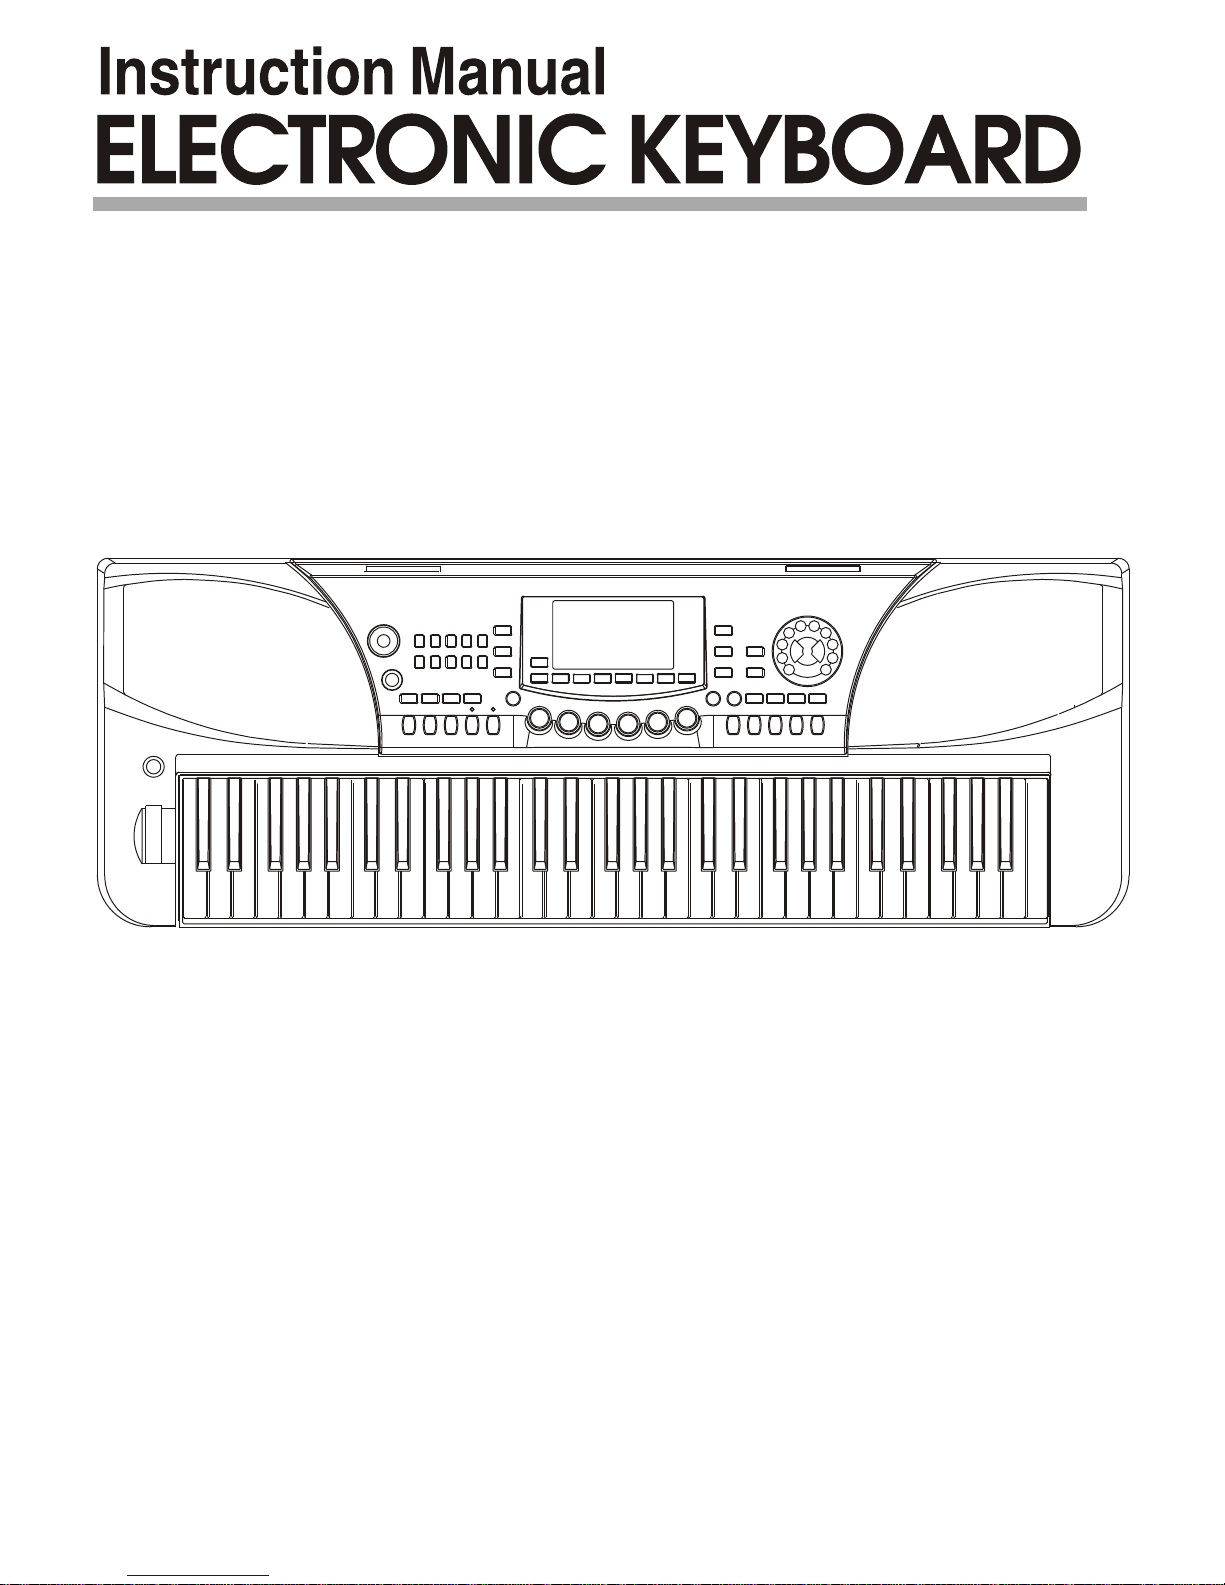
Thank you for choosing this is user-friendly but professional keyboard. This keyboard is produced in
high-powered, large capacity and large-scale integrated circuit.
It includes 310 voices, 160 styles, 120 songs and 5 demo songs with hi-quality PCM voices that could
perfectly express your performance. It also includes an USB port, which allows you to connect computers
easily.
Before you use the electronic, we recommend you to carefully read through this manual. Please keep this
instruction manual for futrue reference.
1
Page 3
Main Features
Keyboard:
61 keys touch keyboard, 3 touch levels.
Display:
8 characters, segment code, icon and white backlit.
Operation system:
User-Friendly interface, numeric keypads or [+/YES] / [-/NO] button for selection of styles, songs and voices.
No of Voices:
310 with 10 groups of percussive voices.
No of Styles:
160.
No of Songs:
120
No of Demo Songs:
5
Types of Chord:
Auto single/multi-fingered judgment.
Recording:
Record using REC and PLAY button.
Main Functions:
TUNING SPLIT POINT, MIDI, MODULATION/PORTAMENTO, PORTAMENTO TYPE, and DSP.
Memory:
A total of 4 banks, 6 memories in each group.
Mixer:
Adjust volume of each track (RHYTHM, BASS, ACCOMP, LOWER, UPPER)
Styles Control:
SYNC, START/STOP, FILL IN A/NORMAL, FILL IN B/VARIATION, INTRO/ENDING, FADE.
Other Functions:
DUAL, LOW VOICE, SUSTAIN, TOUCH, PIANO, DEMO, MODULATION.
2
Pitch Bend Wheel.
Direct Selective Functions:
TRANSPOSE,OCTAVE,DSP ON/OFF,TOUCH,SUSTAIN,METRONOME,MIXER
RHYTHM, BASS, ACCOMP, LOWER, UPPER .
Jacks:
1.USB: connecting PC with the USB port to perform MIDI IN/OUT function.
2. Pedal jacks (to control sustain, volume).
3. Phone jack.
4. Accessorial jacks.
Page 4
Contents
3
General Guide
Power supply
1.Using the AC adaptor
2.Using batteries
Connectors
1.The headphones jack
2.The Aux.Out jack
3.The sustain pedal
4.The volume pedal
5.The USB jack
Selecting & Playing voices
1.Voice numeber
2.Voice setting
Voice and Effects
1.Dual voice
2.Split/lower voice
4.Sustain
5.Touch response
6.Transpose
7.Octave
8.Modulation
9.Pitch bend
Selecting & Playing a Style
1.Style number
2.Style setting
Style Control
1.Start the style
2.Fill IN A/B
3.A.B.C
4.Tempo
5.Fade
Function Menu
1.Master tune
2.Beat
3.Split point
4.MIDI channel
5.Portamento and Modulation
6.Portamento type
7.DSP effect
Mixer
DSP
Metronome
Piano
Memory
1.Memory bank
2.Store/load parameter
3.Memory data
O.T.S function
Recording
1.Record waiting
2.Record start
3.Record stop
4.Record playback
Demo
Song
Chord Dictionary
MIDI function
1.How to use the USB
Specifications
Appendix 1-Voice list
Appendix 2-style list
Appendix 3-Demo list
Appendix 4-Song list
Appendix 5-Chord list
Appendix 6-MIDI list
4
5
5
5
6
6
6
6
6
6
7
7
7
7-8
7
8
8
8
9
9
9
9
10
10
10
10-12
10-11
11
11
12
12
13-14
13
13
13
14
14
14
15
15-16
16
16
17
17-18
17
17
18
18
19
19
19
19
19
20
20-21
22
23
23
24
25
26
27
27
28
29
Page 5
FADE
FUNCTION
/ BACK
ONE TOUCH
SETTING
O.T.S.
TEMPO
DEMO
FUNCTION
/ NEXT
VOICE
SONG
VOLUME
POWER
ON
OFF
RHYTHM BASS LOWER UPPER
DUAL
LOWER
TOUCH SUSTAIN
DSP
OCTAVE TRANSPOSE
METRO
PIANO
STORE
MEMORY
BANK
ACCOMP
MIXER
MIN MAX
5
4
2
1
3
6
8
7
0
9
YESNO
M5
M6
M1
M2
M3
M4
START/STOP
SYNC
INTRO/ENDING FILL-IN A FILL-IN B
STYLE
120 SONGS
001-031 CLASSICAL
032-041 FOLK & COUNTRY
042-071 GOLDEN & POP
072-087 JAZZ & FUSION
088-090 ORIENTAL
091-120 PIANO
160 STYLES
001-010 8 BEAT
011-020 16 BEAT
021-030 POP
031-040 BALLAD
041-050 ROCK
051-060 BALLROOM
061-075 DANCE
076-090 SOUL & FUNK
091-100 JAZZ
101-110 COUNTRY
111-130 LATIN/LATIN DANCE
131-140 WORLD
141-150
151-160
TRADITIONAL
INDONESIA
5 DEMOS
001 FUNK
002
003
004 I CAN......
005
AMERICAN PATROL
GUITAR & SAXPHONE
ALISE
310 VOICES
001-008 PIANO
009-016 MALLET
017-024 ORGAN
025-032 GUITAR
033-040 BASS
041-048 STRINGS
049-056 STRING ENSEMBLE
057-064 BRASS
065-072 REED
073-080 PIPE
081-088 LEAD
089-096 PAD
097-104 EFFECTS
105-112 ETHNIC
113-120 PERCUSSIVE
121-128 SOUND EFFECTS
129-300 OTHER VOICES
301-310 DRUM SET
TUTOR
SYSTEM
A.B.C.
RECORD
RECORD
PLAY/STOP
TOUCH
SUSTAIN
A.B.C.
LOWER
DUAL
FADE
CHORD DICTIONARY
LESSON LEFT RIGHT
BEAT
FOLLOWPERFORM
LEFT
RIGHT
CHORD
DICTIONARY
2
1
5 6
3
4
7
8
9
11
12 13 14 15 16
17
18
19
22 23
20
21
24
31
32
26 27 28 29 30
25
10
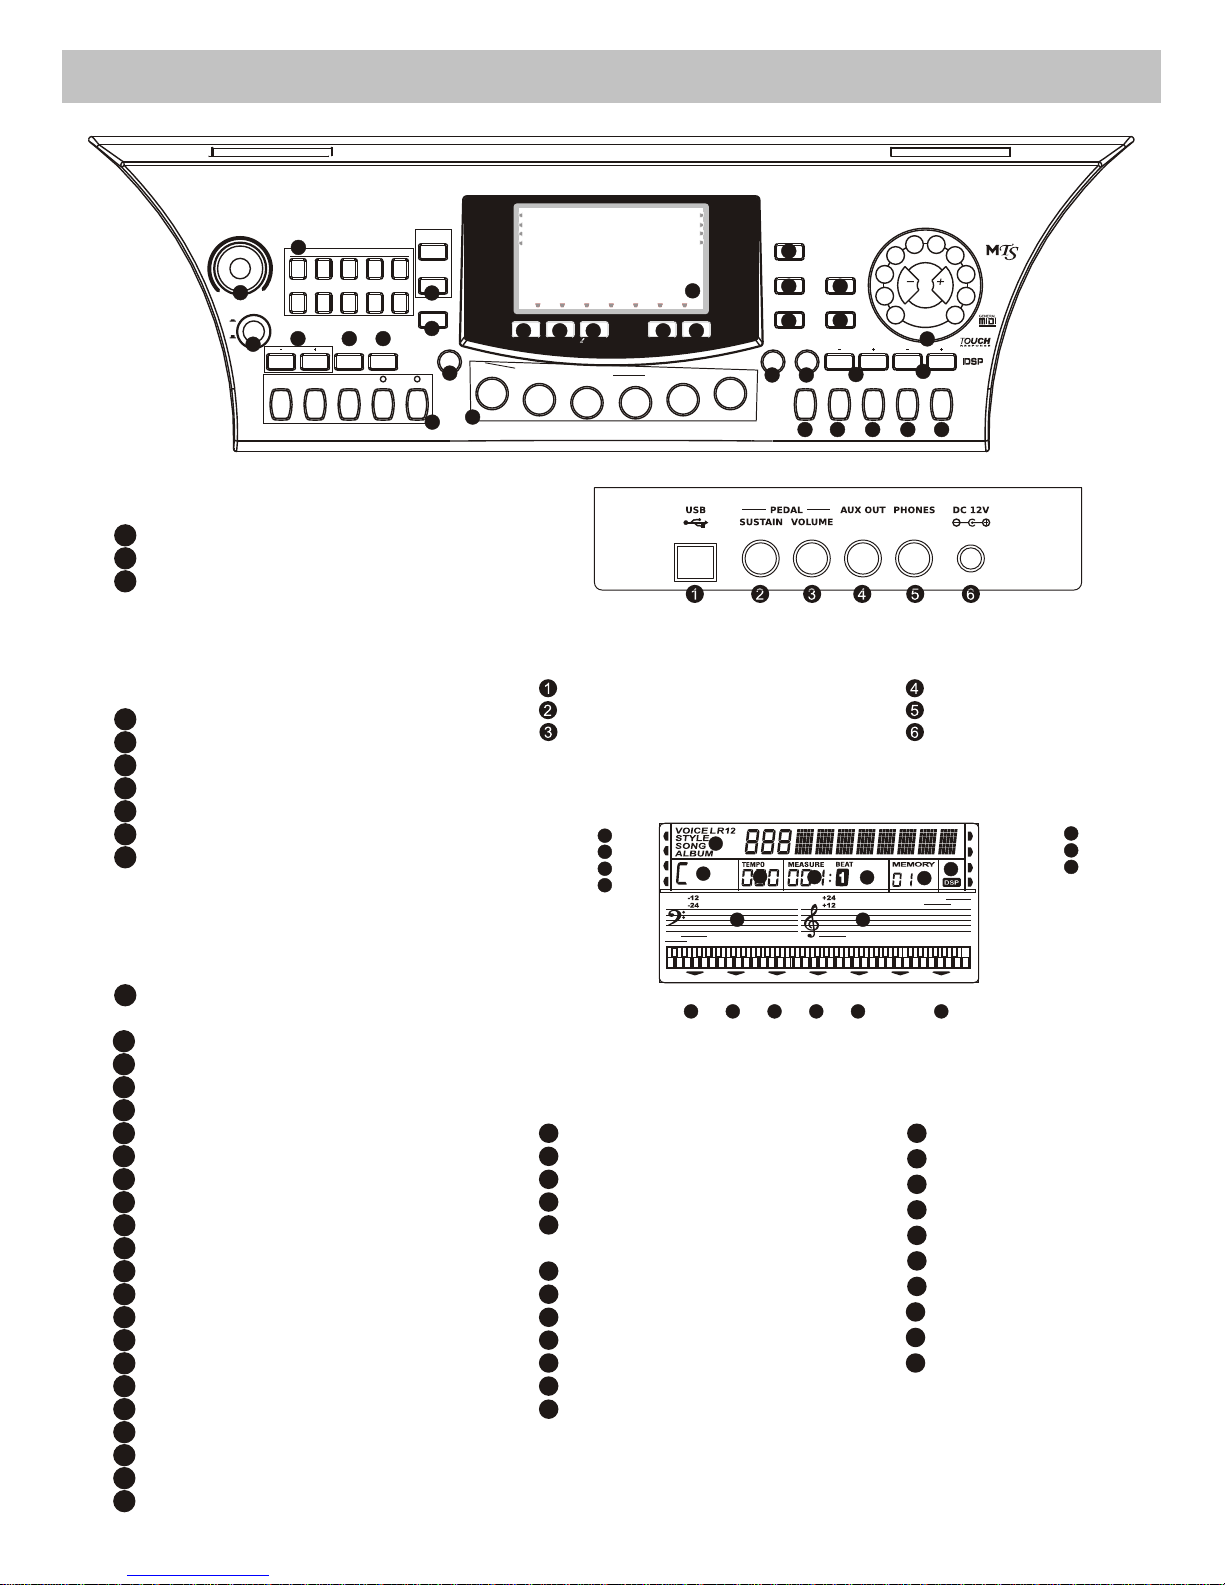
General Guide
1
2
3
4
5
6
7
8
9
10
11
12
13
14
15 16
17 18 19
20 21 22
RECORD
TOUCH
SUSTAIN
A.B.C.
LOWER
DUAL
FADE
CHORD DICTIONARY
BEAT
FOLLOWPERFORM
LEFT
RIGHT
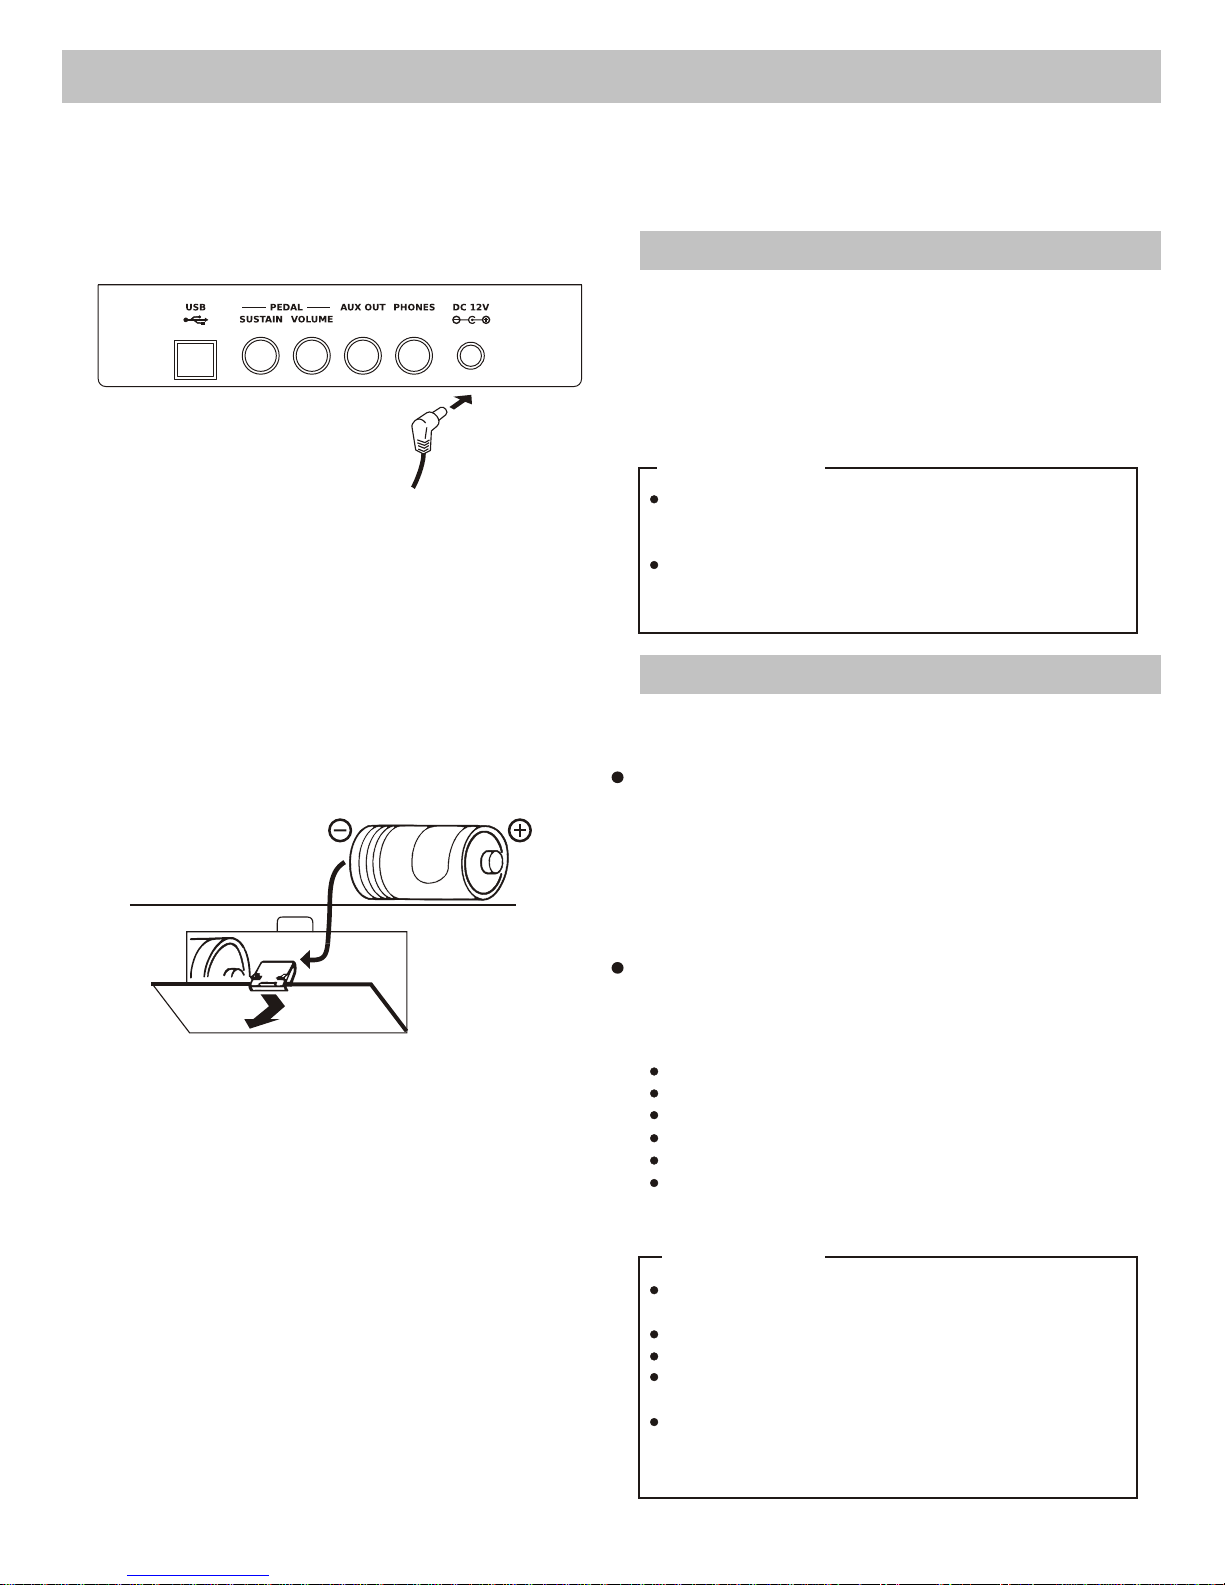
2. Rear Panel Jack
USB
SUSTAIN PEDAL
VOLUME PEDAL
3. LCD Display
SUSTAIN
CHORD DICTIONARY
BASS CLEF
TREBLE CLEF
BEAT
FOLLOW
PERFORM
RIGHT
RECORD
13
14
15
16
17
18
19
LEFT
20
21
22
AUX OUT
PHONES
DC 12V
POWER ON/OFF
MASTER VOLUME
MIXER
-RHYTHM
-BASS
-ACCOMP
-LOWER
-UPPER
TEMPO
FADE
A.B.C.
FUNCTION
DEMO
O.T.S.
ACCOMPANIMENT CONTROL
-START/STOP
-SYNC
-INTRO/ENDING
-FILL-IN A
-FILL-I B
PANEL MEMORY
-M1-M6
LESSON
LEFT
RIGHT/CHORD DICTIONARY
RECORD
PLAY/STOP
VOICE
STYLE
SONG
METRONOME
PIANO
STORE
MEMORY BANK
TRANSPOSE
OC TAVE
DUAL
LOWER
TOUCH
SUSTAIN
DSP
NUMERIC KEYPAD
LCD DISPLAY
1. Front Panel
1
2
3
4
5
6
7
8
9
10
11
12
13
14
15
16
1717
18
19
20
21
22
23
24
25
30
26
31
28
27
32
29
A.B.C
LOWER
DUAL
FADE
VOICE/STYLE/
SONG/ALBUM
CHORD
TEMPO
MEASURE
BEAT
MEMORY
DSP
TOUCH
1
2
3
4
5
6
7
8
9
10
11
12
4
Page 6
Power Supply
This electronic keyboard can be powered by current
from a standard household wall outlet (using the
specified AC adaptor) or by batteries.
Using The AC Adaptor
Make sure that only the AC adaptor specified for
this electronic keyboard is used. The adaptor shall
be 12V DC output, and center positive type. Be sure
to turn off the electronic keyboard before you
connect the adaptor into the AC wall outlet and the
cord into the unit.
Use only the specified AC adaptor. Using other types
of adaptor creates the risk of fire and electrical shock.
For safety sake, be sure to unplug the AC adaptor
from the wall outlet whenever leaving the electronic
keyboard unattended for a long time.
Using Batteries
Always make sure to turn the keyboard off before
inserting new batteries or replacing old ones.
To insert the batteries
Open the battery compartment on the bottom of the
keyboard.
Insert 6 D size (SUM-1, R-20) batteries into the
battery compartment and follow the correct polarity.
Replace the compartment cover and make sure it
locks firmly in place.
1.
2.
3.
Low battery indications
Any of the following symptoms indicate low battery
power. Replace the batteries as soon as possible
whenever any of the following occurs.
A dim and difficult-to-read LCD display.
Abnormally low speaker/headphone volume.
Distortion of the sound output.
Sudden power failure when playing at high volume.
Abnormal playing of the rhythms or demo songs.
Dimming of the display when playing at high volume.
When inserting batteries, make sure to follow the
polarity marking.
Never use batteries of different types.
Never mix old batteries with new ones.
Replace the batteries as soon as possible after any
sign of discharge.
Always remove the batteries from the battery
compartment when the keyboard is not expected to
be used for a long period of time.
CAUTIONS!
CAUTIONS!
5
Page 7
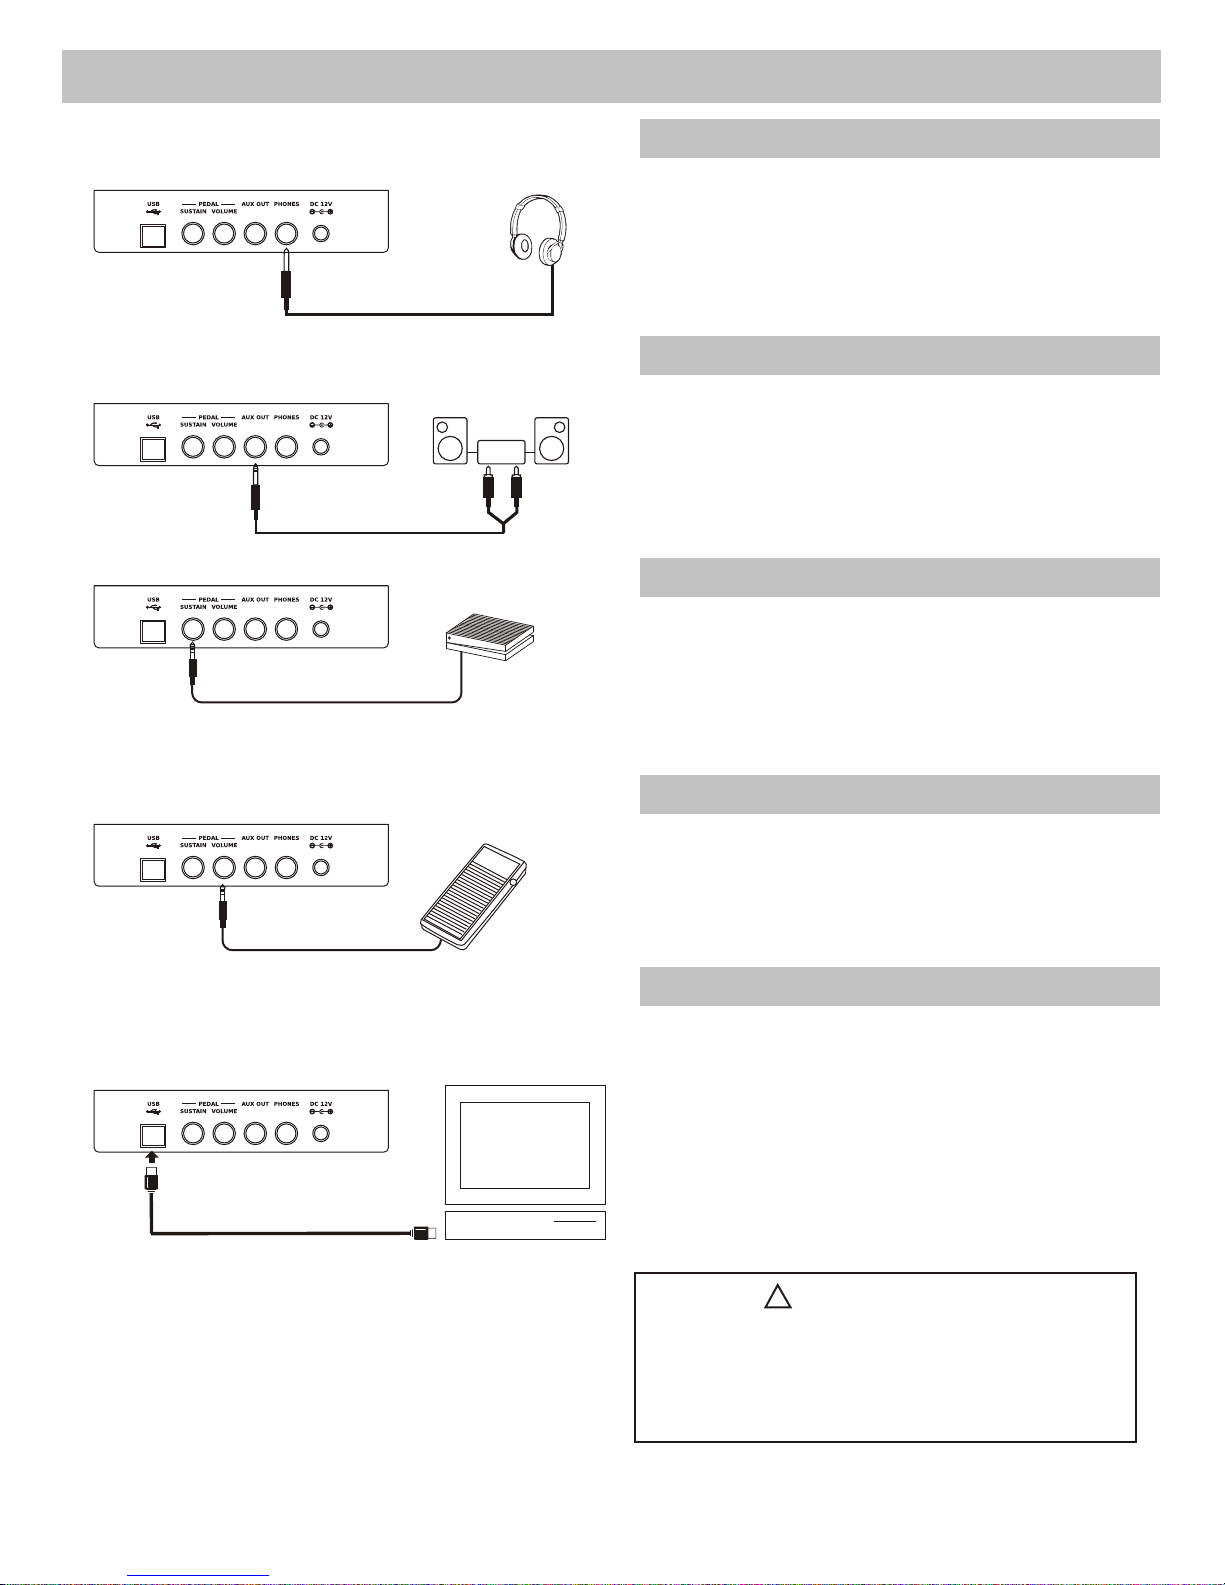
The Headphone Jack
The Aux. Out Jack
The AUX. OUT jack delivers the output of the
keyboard for connection to an external amplifier.
Using an audio cord to plug into AUX. OUT jack
located on the rear panel; then plug the other end
of the cord into LINE IN or AUX. IN of the amplifier.
Connections
If you prefer to play with headphone for high quality
personal monitoring, plug a stereo headphone set
into the rear panel PHONES jack.
Plugging a set of headphones into the PHONES
jack will shut off the speakers automatically.
The USB Jack
WARNING:
!
To avoid damages, turn the power switches of this
keyboard and all related devices OFF if you want to
plug in or unplug between this instrument with all
related devices.
Stereo
System
The Sustain Pedal
An optional footswitch can be plugged into the
SUSTAIN jack for sustain control. The footswitch
functions like the damper pedal of a piano. Press
for sustain, release for normal sound.
An optional volume control can be plugged into
the VOLUME jack for adjusting the volume of
sound.
The Volume Pedal
6
Connect to PC or other USB host devices that support
USB Audio. Device with USB cable, after the driver is
installed and initialization is finished, you can choose
USB Audio Device in the device menu of the software
to transfer midi data.
Page 8
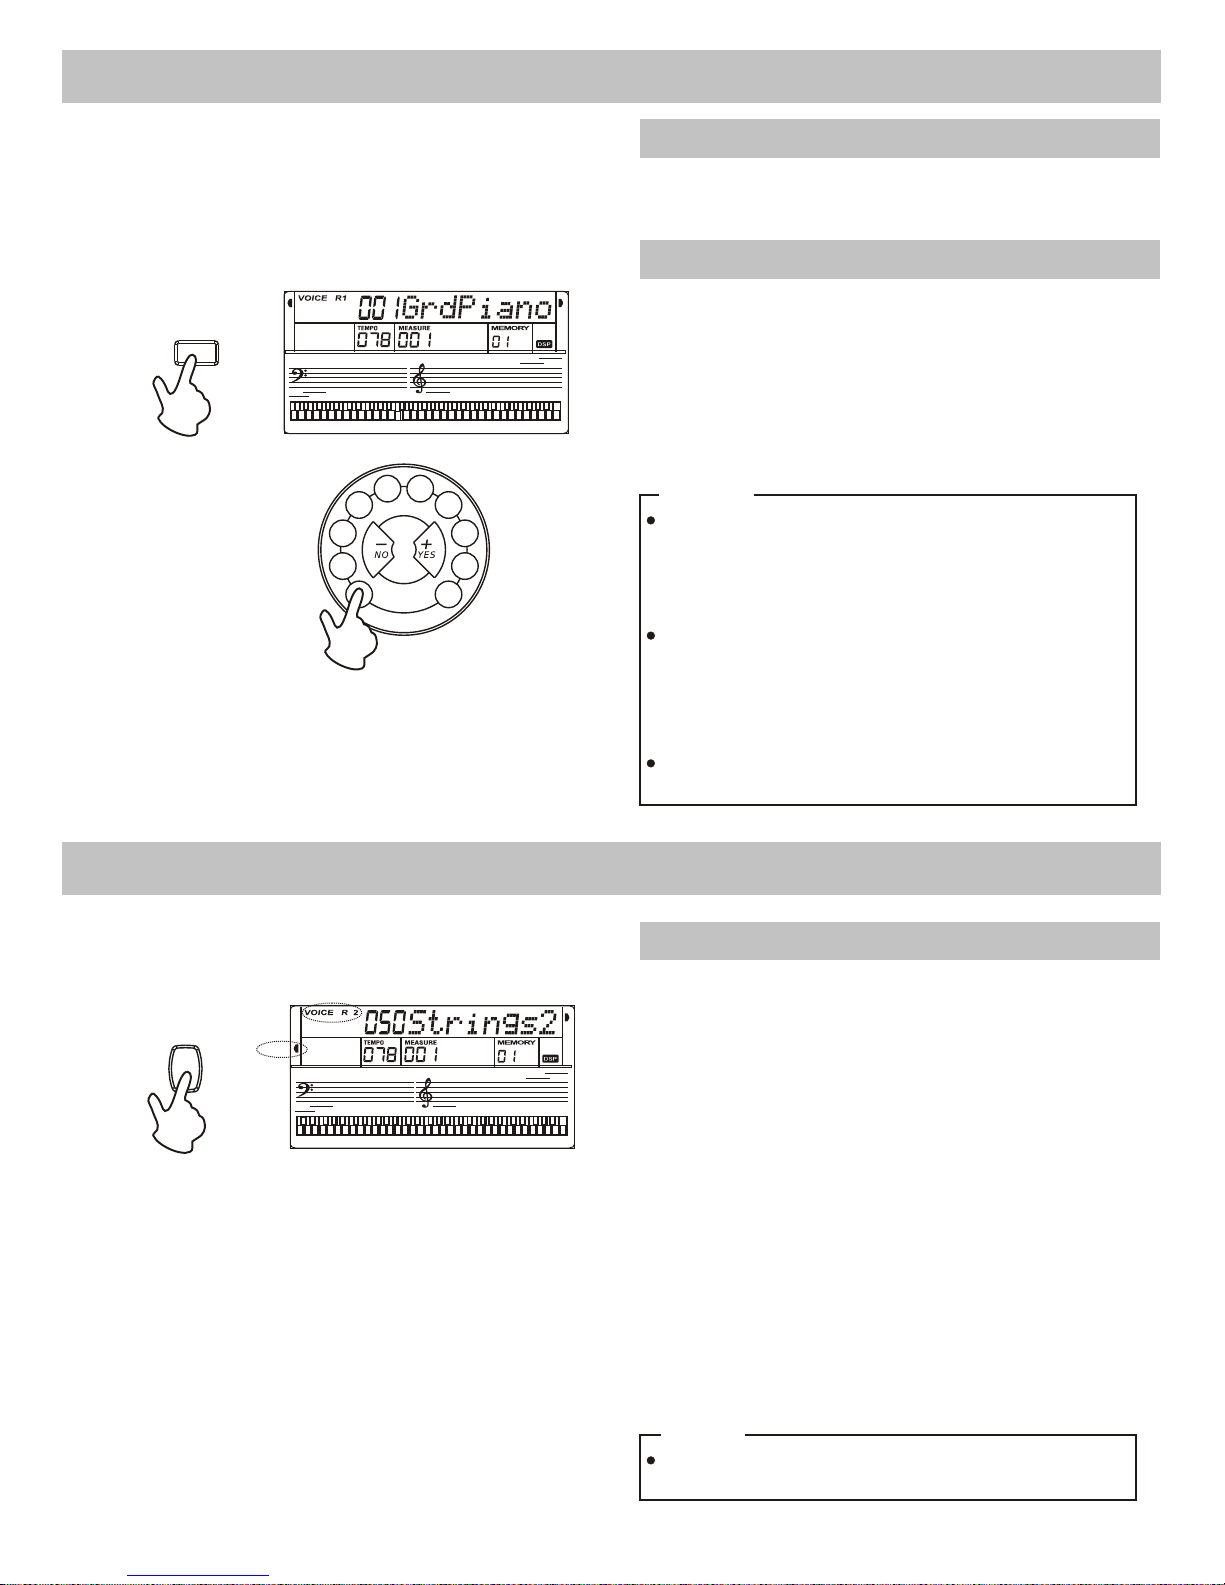
VOICE
Voice number
Dual Voice
Voice setting
Selecting & Playing a Voice
Voices & Effects
310 voices (see Appendix).
When the power is on, the default (VOICE R1) is
001, VOICE R1 flag and the voice name appear on
the LCD.
You can select the voice number by pressing the
[+/YES / -/NO] button or with the numeric keypads.
1.
2.
When you change voice function from other functions,
press the [VOICE] button first, the VOICE R1 flag
appears on the screen and the name of the first voice
appears on the LCD.
When the VOICE button is pressed each time, it will
judge whether the dual voice and the voice on the left
section of the keyboard are opened currently, and will
switch amongst the buttons. The sequence will be
VOICE R1--VOICE R2--VOICE L--VOICE R1.
Press [+/YES / -/NO] buttons or the numeric keypads
to select a voice.
This keyboard has dual voice function.
This function is capable to enhance the delicacy of
your music by playing two voices of musical
instruments simultaneously; new combinations of
voices and music could be created then. When the
dual function is off, the voice indicated is VOICE 1,
when the dual function is on, the voice indicated is
VOICE 2.
During the VOICE 1 status, press [DUAL] button to
enter the dual voice function. VOICE R2 and
DUAL signal would be lightened simultaneously.
The name and code of the dual voice will be
displayed on the LCD. Two selected voices will be
overlapped at the same time.
Press [DUAL] button again to turn off the dual voice
function.
""
In DUAL VOICE status, only the right area of
keyboard has the dual voice.
7
NOTE:
NOTE:
5
4
2
1
3
6
8
7
0
9
DUAL
DUAL
Page 9
8
Voice L Voice R1/R2
Split Point (#F3)
Split/Lower Voice
This function will split the keyboard into left (lower)
and right sections.
When the function is on, the left (low) section of the
keyboard will be used to accompany the melodies
played at the right (high) section of the keyboard.
The separation note for the 2 sections is the #F3
note.
Press [LOWER] button to turn on the lower voice;
the LOWER flag appears as well as VOICE L and
the name of the lower voice.
Press [LOWER] button again to turn off the lower
voice. The LOWER flag will be shut off.
""
2.
1.
LOWER
LOWER
Sustain
2.
1.
Press the [SUSTAIN] button to turn on the sustain
effect. (Sustain flag will appear) It allows the notes
played on the keyboard to have a longer sustain
effect.
Press the [SUSTAIN] button to turn the sustain
effect off.
When setting the pedal as the sustain pedal (see
function), the sustain effect by pedal is stronger than
the effect by pressing [SUSTAIN] button.
NOTE:
SUSTAIN
SUSTAIN
Touch Response
The touch function enriches the touch and sensitivity
level of the music that you play.
Levels (0-3) could be adjusted by the parameter of
the TOUCH button.
The higher the level of parameter, the stronger the
touch effect will be expressed.
TOUCH
TOUCH
Page 10
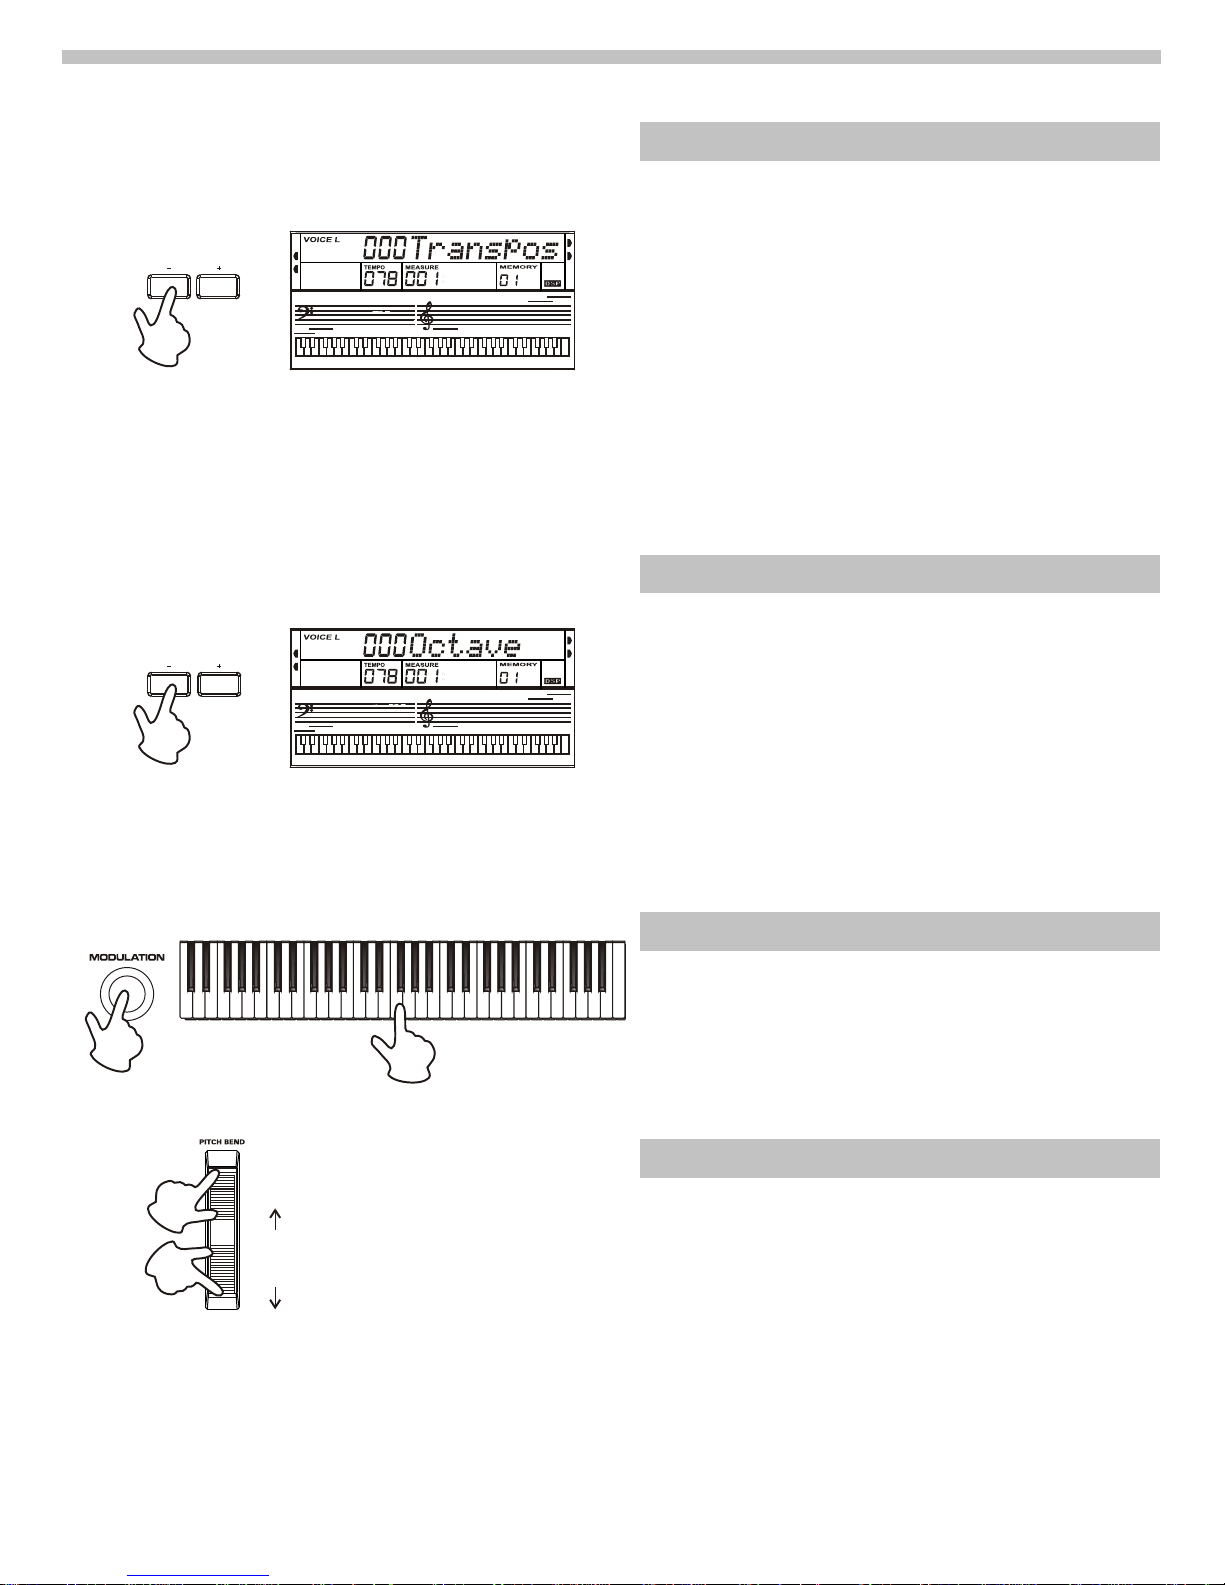
Modulation
Press and hold [MODULATION] button. You can
hear modulation effect when playing the keyboard.
Release the button to stop the modulation effect.
higher
(+2)cent
lower
(-2)cent
Pitch Bend
The pitch bend wheel can be used to bend the note
lower or higher, range between +/- 2 cent. When
you release the wheel, the note will be back to the
normal status.
Transpose
2.
1.
3.
Transpose switches the pitch of the notes that you
play; for instance, you will be able to switch the key
of a C note to G note by adding up the transpose
level. Press [TRANSPOSE +] / [TRANSPOSE- ] to
adjust the pitch level.
To cancel this function, press both [TRANSPOSE +]
and [TRANSPOSE-] simultaneously until the value
of transpose becomes 0 .
This function is also valid when there is an accompaniment of chord / lower voice function is on.
""
TRANSPOSE
Octave
2.
1.
Press [OCTAVE +] / [OCTAVE-] buttons to adjust
the octave and the value of octave will appear on
the display. Only one octave up and one octave
down are available.
To cancel this function, press both [OCTAVE +] and
[OCTAVE-] simultaneously until the value of octave
becomes 0 .""
OCTAVE
9
Page 11

Selecting & Playing a Style
Style Control
Style Number
Style Setting
Start the Style
The keyboard has 160 styles in total, from 001 to
160. The default style is 001. Press [STYLE] button
to enter to the style mode. LCD lights the STYLE
flag and displays the style number.
When the power is on, the style number will be
001 ; the STYLE flag is not showing on the display
yet, press [STYLE] button to enter the style status,
the STYLE flag will show up and the name of the
style will appear on the screen.
You can select the style number by pressing the
[+/YES] / [-/NO] button or with the numeric keypads.
""
2.
1.
Start button:
Use [START/STOP] button to start the style.
Sync function:
Press the [SYNC] button, the beat indicators flash
and a "waiting model " has been entered. The style
starts to play immediately after you press the keys.
To stop, simply press the [SYNC] button again; if
you hit the keys again, the style will be playing
again as well.
The function synchronizes the start of an automatic
accompaniment with the 'recognized' notes pressed
without pressing [START/STOP].
10
STYLE
5
4
2
1
3
6
8
7
0
9
START/STOP
START/STOP
SYNC
SYNC
INTRO/ENDING
INTRO/ENDING
FILL-IN A
FILL-IN A
FILL-IN B
FILL-IN B
Flashing simultaneously
The chord area
If A.B.C mode is off, play any key on keyboard to start
the style.
If A.B.C mode is on, only play the chord area key to
start the style with the Auto Bass Chord
accompaniment.
NOTE:
Page 12

INTRO/ENDING
This function is applicable to add in the beginning /
ending of a style. Its length varies in different styles.
When the INTRO/ENDING mode is processing,
the indicator above FILL A or FILL B will be
flashing until the mode finishes.
If you press the [INTRO/ENDING] button before
starting a style, this key will be used as INTRO
function.
Press [START/STOP] or [SYNC] and the style will
begin with a fill in intro. When a style is playing, hit
this key as an ENDING function.
""
""""
START/STOP
START/STOP
START/STOP
START/STOP
SYNC
SYNC
SYNC
SYNC
INTRO/ENDING
INTRO/ENDING
INTRO/ENDING
INTRO/ENDING
FILL-IN A
FILL-IN A
FILL-IN A
FILL-IN A
FILL-IN B
FILL-IN B
FILL-IN B
FILL-IN B
3.
Flashing
FILL IN A/B
A.B.C.
2.
3.
1.
While you are playing with accompaniment, you
can add fill in to the rhythm/accompaniment by
pressing the [FILL-IN A] or the [FILL-IN B] button;
this will automatically insert a fill in to a style.
The indicator above [FILL-IN A] / [FILL-IN B] will be
flashing when the fill in function is processing.
When a fill in finishes, the indicator will become still
and will stop flashing.
Press the [A.B.C.] button, (the A.B.C icon will
appear on the screen).
As soon as you play any fingering on the left-hand
section of the keyboard, the system will
automatically recognize the chord and begin to
play the appropriate bass line and the parts of the
chord along with the selected style.
The chord name recognized will be displayed.
""
2.
3.
1.
STYLE
A.B.C.
The chord area
11
Page 13

Tempo
Fade
Press the [TEMPO+] or [TEMPO-] button, the
tempo can be adjusted up or down within the range
of 30-280.
Hold either [TEMPO+] or [TEMPO-] button allows
you to speed up the selection.
Press [TEMPO+] and [TEMPO-] simultaneously to
set the tempo back to the default value.
1.
2.
3.
1.
2.
TEMPO
FADE
After flashing 10 seconds,
the indicator be off
After flashing 10 seconds,
the indicator be lit up
First step
Second step
FADE
FADE
TEMPO
Tempo must be adjusted before the style starts,
otherwise the tempo will remain as its default level
when a style is playing.
NOTE:
12
The FADE function creates a softer sound for playing
style, the volume will be altered as well.
Fade IN:
Before starting a style, the FADE IN function will be
enabled by pressing [FADE] button with the FADE
indicator lits up.
When a style started, the fade indicator will flash and
the volume of style will increase up to the maximum
level within 10 seconds; then the style plays normally
and the FADE indicator will shut off.
Press [FADE] button after FADE OUT function is
enabled, and the volume of style will increase up to the
maximum level within 10 seconds; then the style is
normally playing and FADE indicator off .
Fade OUT:
Press [FADE] button when playing a style; FADE
indicator will flash immediately and the volume of style
will be turned down to a minimum level within 10
seconds; then the FADE indicator shuts off and the style
is within the mute mode until the style stopped or has
entered the mode of FADE IN by pressing [FADE]
button.
START/STOP
First step
Second step
FADE
START/STOP
Page 14

Function Menu
Master Tune
Press [FUNCTION/BACK] or [FUNCTION/NEXT]
button to enter this function menu; when power is
on, the first item of this function is Master tune ,
press [FUNCTION/BACK] or [FUNCTION/NEXT]
button repeating to select other items, then press
[+/YES] / [-/NO] to adjust parameter, please refer to
the table on the left.
""
If there is no reaction for 3 seconds after pressing the
[FUNCTION] button, it will quit the function menu
automatically.
In TUNE menu, press [+/YES] / [-/NO] button to
adjust tune parameter; parameter range: -50 to +50
cents.
Press both [+/YES] and [-/NO] to reset the default
value of the tune.
NOTE:
FUNCTION
/ BACK
FUNCTION
/ NEXT
Content
Tune
Beat Type
Split Point
MIDI IN Channel
MIDI OUT Channel
Portamento and
Modulation
Portamento Type
DSP Reverb Type
DSP Reverb Level
DSP Chorus Type
DSP Chorus Level
LCD Display
Tune
Beat
Split pt
Midi In
Midi Out
MODU
Port Type
Rvb Type
Rvb Level
Crs Type
Crs Level
Range
-50...50
0 2...9
1...61
01...16, ALL
01...16
MODULATION(MODU)
/PORTAMENTO(PORT)
1-3
1--8
0--7
1--8
0--7
Default Value
0
4
19 (F3#)
ALL
01
MODULATIO
(MODU)
2
Reverb 5
2
Chorus 1
0
5
4
2
1
3
6
8
7
0
9
Beat
There are 9 types of beats. Press [+/YES] / [-/NO]
button to adjust the parameter.
FUNCTION
/ BACK
FUNCTION
/ NEXT
Split Point
In split point menu, press [+/YES] / [-/NO] button to
adjust its parameter. Parameter range: 1 to 61 (Low
C Note to High C).
FUNCTION
/ BACK
FUNCTION
/ NEXT
13
Page 15

MIDI Channel
Press [FUNCTION/BACK] or [FUNCTION/NEXT]
button to set the MIDI channel function. Press
[+/YES] / [-/NO] button to adjust its parameter; the
MIDI IN/OUT channel is from number 1 to 16.
FUNCTION
/ BACK
FUNCTION
/ BACK
FUNCTION
/ NEXT
FUNCTION
/ NEXT
Portamento and Modulation
Press [FUNCTION/BACK] or [FUNCTION/NEXT]
button to enter the portamento and modulation
function, MODU/PORT will appear on the display,
press [+/YES] / [-/NO] to select portamento or
modulation.
""
FUNCTION
/ BACK
FUNCTION
/ NEXT
Portamento Type
Press [FUNCTION/BACK] or [FUNCTION/NEXT]
button to enter the portamento setting function, the
number of PORT Type will appear on the screen,
press [+/YES] / [-/NO] to select a type, range from
1 to 3 and the default value is 2.
FUNCTION
/ BACK
FUNCTION
/ NEXT
14
Page 16

DSP Effect
Reverb Type
Press [FUNCTION/BACK] or [FUNCTION/NEXT]
button to enter the reverb type setting function, the
number of Rvb Type will appear on the screen.
Press [+/YES] / [-/NO] to select one of the 8 types
of reverbs. The default value is 5.
Reverb Level
Press [FUNCTION/BACK] or [FUNCTION/NEXT]
button to enter the reverb level setting function; the
number of Rvb Level will appear on the screen.
Press [+/YES] / [-/NO] to select a level, ranges from
0 to 7 and the default value is 2.
Chorus Type
Press [FUNCTION/BACK] or [FUNCTION/NEXT]
button to enter the chorus type setting function; the
number of Crs Type will appear on the screen.
Press [+/YES] / [-/NO] to select one of the 8 types;
the default value is 1.
Chorus Level
Press [FUNCTION/BACK] or [FUNCTION/NEXT]
button to enter the chorus level setting; the number
of Crs Type will appear on the screen.
Press [+/YES] / [-/NO] to select one of the 7 types;
the default value is 0.
1.
1.
2.
2.
3.
4.
FUNCTION
/ BACK
FUNCTION
/ BACK
FUNCTION
/ BACK
FUNCTION
/ BACK
FUNCTION
/ NEXT
FUNCTION
/ NEXT
FUNCTION
/ NEXT
FUNCTION
/ NEXT
Mixer
Through mixed control (works like a small mixer)
you can adjust the keyboard ambidextrously, by
controlling the accompaniment, bass and track
volume of drum etc.
Press [BASS +] / [BASS -] button, you can adjust
the track volume of bass.
Press [RHYTHM +] / [RHYTHM -] button, you can
adjust the track volume of drums.
You can turn off the volume of a channel. For
instance, press [RHYTHM +] and [RHYTHM -]
simultaneously, the volume off the RHYTHM
channel will be turned off. You will see ''oFF
Rhythm" in the LCD.
RHYTHM
RHYTHM
BASS
BASS
LOWER
LOWER
UPPER
UPPER
ACCOMP
ACCOMP
MIXER
MIXER
15
Page 17

Press [ACCOMP +] / [ACCOMP -] button, you can
adjust the track volume of accompany chord.
Press [LOWER +] / [LOWER -] button, you can
adjust the volume of the left keyboard section.
Press [UPPER +] / [UPPER -] button, you can
adjust the volume of the right keyboard section.
You can adjust the parameter by these keys and
the parameter selection will appear on the screen.
Please refer to the range of the parameter on the
left.
This function measures and imitates the output
signal of a musical instrument played at a realistic
environment.
You can adjust the value of DSP from the
FUNCTION menu, press [DSP] button to turn it on
or off.
Press [METRO] to turn on the metronome, press
[METRO] again to turn it off.
RHYTHM BASS LOWER UPPERACCOMP
MIXER
RHYTHM BASS LOWER UPPERACCOMP
MIXER
RHYTHM BASS LOWER UPPERACCOMP
MIXER
3.
4.
5.
6.
Track On Display Range Default Setting
RHYTHM Volume
BASS Volume
ACCOMP Volume
LOWER Volume
UPPER1 Volume
UPPER2 Volume
RHYTHM
BASS
ACCOMP
LOWER
UPPER
UPPER
0...31
0...31
0...31
0...31
0...31
0...31
23
23
23
12
23
20
DSP (Digital Signal Processing)
Metronome
METRO
The metronome can be turned on at anytime and
within any function.
NOTE:
DSP
16
Page 18

Piano
Memory
Press [PIANO] button to enter the piano mode. The
character PIANO will appear on the display and
the keyboard voice will be piano.
Press [PIANO] again to exit the piano mode. If you
enter the piano mode, the A.B.C. function will be
turned off.
If you press [DEMO], [SONG] or [MEMORY] button,
it will exit the piano mode.
In this mode, you can play styles without
accompaniment.
In piano mode, you will not be able to enter the
record function.
""
It has 4 banks. Press [MEMORY BANK] sequence
to select bank (1-4).
It can store 6 statuses of memories. (M1-M6)
Press [M1]~[M6], MEMORY (Bank 1-4) and
(Memory 1-6) will appear on the screen.
Press and hold [STORE] button, then press [M1] (or
[M2]-[M6]) and you can store data to M1 (or M2-M6)
memory.
Press and hold any of the 'M' buttons for loading
the data from memory. The number of the memory
will appear on the screen.
Press both [+/YES] and [-/NO] simultaneously and
to turn on the power again, the memories will be
erased and return back to the default setting.
1.
1.
1.
2.
2.
2.
3.
3.
3.
PIANO
Memory Bank
Store/Load Parameter
ONE TOUCH
SETT
ING
ONE
TOU
CH
SETTING
STORE
M5
M6
M1
M2
M3
M4
M5
M6
M1
M2
M3
M4
11
11
MEMORY
BANK
5
4
2
1
3
6
8
7
0
9
17
Page 19

Memory Date
The memory data can store main voice, dual voice,
left-hand voice, sustain on/off, styles, tempo,
function, mixer, ACCOMP parameter and octave
parameter to any of the 'M' buttons.
One Touch Setting is a powerful and convenient
function that allows you to reconfigure all settings
instantly with the touch of a single button.
Parameters:
TO RECALL A ONE-TOUCH SETTING
Select one of the styles.
Each style has four presets.
Press the [O.T.S.] button, LCD displays ''O.T.S'';
''A.B.C.'' would be turned on automatically.
Press any of the [M1]~[M4] buttons, corresponding
to the preset and LCD displays ''O.T.S 1-4''.
When a style is playing, press [O.T.S.] to turn on
the O.T.S mode, it will insert a ''Fill in'' automatically.
Insert ''FILL A'' when pressing [M1] or [M2] button.
Insert ''FILL B'' when pressing [M3] or [M4] .
O.T.S. Function
When the style is stopped, press [M1] ~ [M4] button.
No¡°FILL IN¡±will be inserted.
Press [O.T.S.] button again to exit the O.T.S. mode,
LCD displays ''MEMORY''.
NOTE:
Voice R1 number and volume
Dual function.
Voice R2 number and volume
Reverb and Chorus type and level
Octave
1.
2.
3.
4.
5.
O.T.S.
ONE
TOU
CH
SETTING
M5
M6
M1
M2
M3
M4
18
Page 20

Record
Record Stop
2.
1.
Stop Automatically:
If the capacity is full, recording will be stopped
automatically even recording is in process; the
screen will indicate ''FULL ''. When a style is
playing, press [INTRO/ENDING] button, after
''ending, '' recording will stop automatically.
Stop Manually:
Press [RECORD] button again to stop recording
immediately.
RECORD
RECORD
PLAY/STOP
LESSON LEFT RIGHT
BEAT
FOLLOWPERFORM
LEFT
RIGHT
CHORD
DICTIONARY
Record Start
After completion of all settings in the record waiting
status, play the keyboard (the chord area when
recording ACCOMP) or press [START/STOP]
button. It will start recording and the beat will follow
the current tempo.
Once the recording of one track is started, the original
data in the track will be overwritten.
If there is data stored in the ACCOMP track, then the
playback tempo will follow the tempo of the ACCOMP
track.
If there is no data stored in the ACCOMP track, the
MELODY tempo will then be one of the MELODY
tracks' tempo when record is playing.
NOTE:
START/STOP
SYNC
INTRO/ENDING FILL-IN A FILL-IN B
Record Waiting
Press [RECORD] button. Four counting beats on
the LCD will flash simultaneously. It indicates
''record waiting status''. Voice, style, memory and
recording tracks can be selected from this status.
The ACCOMP and MELODY tracks can be
recorded together but also separately. But notice
that 2 MELODY tracks cannot be recorded at the
same time.
2.
1.
RECORD
RECORD
PLAY/STOP
LESSON LEFT RIGHT
BEAT
FOLLOWPERFORM
LEFT
RIGHT
CHORD
DICTIONARY
Flashing
Record Playback
RECORD
RECORD
PLAY/STOP
LESSON LEFT RIGHT
BEAT
FOLLOWPERFORM
LEFT
RIGHT
CHORD
DICTIONARY
After selecting the track, press [PLAY/STOP] button
to start playing the track data. Press [PLAY/STOP]
again to stop playing.
If the recording memory is empty, the character ''EMPTY''
will appear temporary on the display, when you press
[PLAY/STOP].
NOTE:
19
Page 21

Demo
Song
There are 5 Demos in total (see Appendix)
Press [DEMO] to play demo songs, press [DEMO]
again to stop playing.
Press [+/YES] / [-/NO] or the numeric buttons to
select a demo song. The name of demo song will
appear on the display.
There are 120 songs with LESSON function.
Press [SONG] to enter the song mode, the flag of
SONG lits up in the LCD. Press [START/STOP] to
play a song, press [START/STOP] again to stop.
Press [+/YES] / [-/NO] to select a song number, the
name of the song will appear on the display.
In the prelude, the section value is negative, when
the value becomes positive, the melody of the song
will start playing.
The song mode includes LESSON 1/2/3 mode.
LESSON 1(One key):
Press [LESSON] button to enter lesson 1. The
''BEAT'' sign shows up on the display.
In this mode, the keyboard only respond the time
value of your performance. The notes of the melody
are displayed on the LCD screen; no matter which
keys have you pressed, the note still sounds out
correctly.
The grading system will give you marks according
to the total number of right notes and wrong notes
played.
2.
2.
3.
4.
1.
1.
DEMO
SONG
5
4
2
1
3
6
8
7
0
9
5
4
2
1
3
6
8
7
0
9
20
RECORD
RECORD
PLAY/STOP
LESSON LEFT RIGHT
BEAT
FOLLOWPERFORM
LEFT
RIGHT
CHORD
DICTIONARY
START/STOP
Page 22

21
LESSON 2 (Waiting):
Press [LESSON] button again to enter lesson 2.
The ''FOLLOW'' sign shows up. In this mode, you
can learn the tones of a demo song. The song
continues to play only if you have pressed the
correct keys according to the keyboard displays.
A "waiting status " will show up if a wrong key is
pressed.
The system of grade will give you marks according
to the total number of correct notes and wrong
notes that you haves played.
LESSON 3 (Melody off) :
In this mode, follow the current notes and tempo to
play with the demo song. The keyboard performs
accompaniment and displays the staff and notes of
the melody for you to follow. The accompaniment
keeps on playing. If you catch both the right note
and the right tempo, the entire score will be added;
otherwise, the score will be deducted.
LEFT and RIGHT Lesson Function:
You could learn either to using your left or right
hand to play along with a song.
Songs with rhythm (1--32,47), allows you to learn
the chords with your left hand and to learn to play
the melody with you right hand.
You can also learn to play the whole song at the
same time by using both hands.
Songs by piano(91--120) allows you to learn how to
accompany the melody with your left hand and the
theme with your right hand.
You can also learn how to play the whole song at
the same time by using both hands.
Chord Dictionary Function and Lesson Function are
not related; they are only sharing the same button.
RECORD
RECORD
RECORD
RECORD
RECORD
RECORD
PLAY/STOP
PLAY/STOP
PLAY/STOP
LESSON
LESSON
LESSON
LEFT
LEFT
LEFT
RIGHT
RIGHT
RIGHT
BEAT
BEAT
BEAT
FOLLOW
FOLLOW
FOLLOW
PERFORM
PERFORM
PERFORM
LEFT
LEFT
LEFT
RIGHT
RIGHT
RIGHT
CHORD
DICTIONARY
CHORD
DICTIONARY
CHORD
DICTIONARY
Page 23

Chord Dictionary
2.
1.
Chord dictionary is a function that helps you to
check the chord notes.
Press [RIGHT] button continuously for two seconds
to enter the dictionary mode, the flag is lightened on
the screen and "Dict" is displayed.
Specify and play the Chord type and the Chord root
that you want on the keyboard as follows:
RIGHT
CHORD
DICTIONARY
CHORD DICTIONARY
CHORD DICTIONARY
24 chords will be displayed in the dictionary mode
as follows:
Chord Root :
Note Chord type Note Chord
type
C4 M C5 7(b9)
C4# M(9) C5# 7(9)
D4 6 D5 7(#9)
E4b mM7 E5b 7(b13)
E4 M7 E5 7(13)
F4 m F5 7(#11)
F4# m(9) F5# dim7
G4 m6 G5 dim
Ab4 m7(9) A5b 7aug
A4 m7 A5 aug
B4b m7b5 B5b 7sus4
B4 7 B5 sus4
Note Chord Root Note Chord Type
C6 C F6# F#/Gb
C6# C#/Db G6 G
D6 D A6b Ab/G#
E6b Eb/D# A6 A
E6 E B6b Bb/A#
F6 F B6 B
Chord Type:
After selected the chord root and chord type that
you want to study, the chord type will be
displayed and the note combination will be
enabled in the area of the keyboard.
When you press the keyboard according to the
correct right note combination, the chord type
indicator will flash.
""
""
22
Page 24

MIDI Function
MIDI stands for Musical Instrument Digital Interface.
The standard interface between PC and other
electronic instrument(s).
Now you can choose the USB interface for transferring
midi data. The USB interface allows you to connect the
computer and to transfer messages conveniently.
Connect PC or other USB host devices which support
USB Audio Devices with an USB cable.
After the driver is installed and initialization is finished,
you can choose the ''USB Audio Device'' in the device
menu of the software that you are using on the host to
transfer midi data.
T '' '' and he USB jack is only compatble used in WIN XP
the driver will be setup automatically.
1.
2.
3.
How to Use the USB
MIDI IN
MIDI IN
MIDI OUT
MIDI OUT
MIDI transmit
4.
Major application
The keyboard control other equipment or electronic
instrument.
Other equipment control the keyboard.
PC recorded data (MIDI) can be played on the
keyboard.
23
Page 25

Specifications
Keys:
LCD Display:
Polyphony:
Voices:
Styles:
Song:
Demo:
Accompaniment Control:
Overall Control:
Other Control:
Connectors:
Weight:
Dimensions:
61 keys with Touch Response
Multi-functional LCD
64-note polyphony (max)
310 voices with 10 groups of percussive voices
160 styles
120 songs of different style
5 demo songs
Sync, Start/Stop, Fill in a/normal,
Fill in b/variation, Intro/ending, Fade
Record & Play/Stop
12V, Headphones, Aux. Out, Sustain,Volume,USB
6 kg(without batteries)
970(W) x 350(D) x 135(H)mm
Tuning split point, Modulation/Portamento,
Dsp,Dual, Low voice, Sustain,Touch, Piano, Demo,
Transpose,Octave,Metronome,Mixer
rhythm, bass, accomp, lower, upper .
24
Page 26

Appendix 1- Voice List
PIANO
01 Acoustic Grand Piano
02 Bright Acoustic Piano
03 Electric Grand Piano
04 Honky-Tonk Piano
05 E.Piano1
06 E.Piano2
07 Harpsichord
08 Clavi
MALLET
09 Celesta
10 Glockenspiel
11 Music Box
12 Vibraphone
13 Marimba
14 Xylophone
15 Tubular Bells
16 Dulcimer
ORGAN
17 Drawbar Organ
18 Jazz Organ
19 Rock Organ
20 Church Organ
21 Reed Organ
22 Accordion
23 Harmonica
24 Tango Accordion
GUITAR
025 Classic Guitar
26 Steel Guitar
27 Jazz Guitar
28 Clean Guitar
29 Muted Guitar
30 Overdriven Guitar
31 Distortion Guitar
32 Guitar Harmonics
BASS
33 Acoustic Bass
34 Finger Bass
35 Picked Bass
36 Fretless Bass
37 Slap Bass 1
38 Slap Bass 2
39 Synth Bass 1
40 Synth Bass 2
STRINGS
41 Violin
42 Viola
43 Cello
44 Contrabass
45 Tremolo Strings
46 Pizzicato Strings
47 Orchestral Harp
48 Timpani
STRING ENSEMBLE
49 Strings Ensemble 1
50 Strings Ensemble 2
51 Synth Strings 1
52 Synth Strings2
53 Choir Aahs
54 Voice Oohs
55 Synth Voice
56 Orchestra Hit
BRASS
57 Trumpet
58 Trombone
59 Tuba
60 Muted Trumpet
61 French Horn
62 Brass Section
63 Synth Brass 1
64 Synth Brass 2
REED
65 Soprano Sax
66 Alto Sax
67 Tenor Sax
68 Baritone Sax
69 Oboe
70 English Horn
71 Bassoon
72 Clarinet
PIPE
73 Piccolo
74 Flute
75 Recorder
76 Pan Flute
77 Blown Bottle
78 Shakuhachi
79 Whistle
80 Ocarina
LEAD
81 Lead1(square)
82 Lead2(sawtooth)
83 Lead3(calliope)
84 Lead4(chiff)
85 Lead5(charang)
86 Lead6(voice)
87 Lead7(fifths)
88 Lead8(bass & Lead)
PAD
89 Pad1(fantasia)
90 Pad2(warm)
91 Pad3(Polysynth)
92 Pad4(choir)
93 Pad5(bowed)
94 Pad6(metallic)
95 Pad7(halo)
96 Pad8(sweep)
EFFECTS
97 FX1(rain)
98 FX2(soundtrack)
99 FX3(crystal)
100 FX4(atmosphere)
101 FX5(brightness)
102 FX6(goblins)
103 FX7(echoes)
104 FX8(sci-fi)
ETHNIC
105 Sitar
106 Banjo
107 Shamisen
108 Koto
109 Kalimba
110 Bagpipe
111 Fiddle
112 Shanai
PERCUSSIVE
113 Tinkle Bell
114 Agogo
115 Steel Drums
116 Wood Block
117 Taiko Drum
118 Melodic Tom
119 Synth Drum
120 Reverse Cymbal
SOUND EFFECTS
121 Guitar Fret Noise
122 Breath Noise
123 Seashore
124 Bird Tweet
125 Telephone Ring
126 Helicopter
127 Applause
128 Gunshot
OTHER VOICES
129 Pianostr
130 Modernep
131 Galaxy
132 Galaxy2
133 Funk_Ep
134 Funk_Ep2
135 Polar
136 polarz
137 Gdharpsi
138 Clavr-Kb
139 clavrkb2
140 elclav
141 Wclzavrz
142 wclzael
143 Bell
144 Bell2
145 Vibes2
146 Vibesma
147 Marin-Kb
148 marinkb2
149 Marinbel
150 slopiano
151 qpiano
152 Jz-Org2
153 Jz-Org1
154 Jazzorg3
155 Clik-Org
156 Ele-Org
157 Ele-Org2
158 Danc-Org
159 New-Org
160 Organ3Zz
161 Piporgkb
162 Bgchurch
163 Elec-Org
164 Ufoorg
165 Q-Org
166 elorg1
167 70elorg
168 70elorg2
169 sloorg
170 ringo
171 autolux
172 elecorg2
236 Strings1
237 Slwstrzz
238 Synthst1
239 Systr1Zz
240 vlnhard2
241 violakb2
242 cello2
243 contra2
244 strrue
245 dreamstr
246 pizstr2
247 strpiz
248 Swet_Trp
249 Trombone
250 Trombon2
251 Tuba
252 Tubabl
253 Fmhorn
254 Bbbrass
255 Hibrass
256 Tenosax
257 Bari-Kb
258 Bassokb
259 swetbras
260 softsax
261 Whistle
262 Panflut2
263 Lead1
264 Lead2
265 Lead3
266 Lead4
267 Warplead
268 Warp-2
269 Pianstld
270 childtoy
271 ahold
272 fmlead
273 tunnel
274 tunnel2
275 fmlead2
276 fmlead3
277 fmlead4
278 roomlead
279 Sinepad
280 Softpad
281 Bellpad
282 Synpad
283 Hornpad
284 Newagpad
285 Bagpipe
286 Distorld
287 Systrel
288 Dist-2
289 Chorusld
290 Halon2
291 Dream
292 Dream2
293 Waspysyn
294 Orgpd
295 Trompad
296 Softacpd
297 theology
298 calm
299 padorg
300 palbel
173 Accodin2
174 Softacc
175 Accowaa
176 Softacc2
177 Harmonic
178 Harmharp
179 slowacc
180 accodin3
181 softacc3
182 mutharmp
183 bigharm
184 accomut
185 harm1
186 N-Gthamm
187 Pickgt
188 12Strgt
189 Stel-gt1
190 Cleagtkb
191 Pickcgt
192 Bcln-Gt
193 Cln-Gt
194 Solid-Gt
195 Solidwa
196 Chorusgt
197 Q-Gt
198 Mut-Gt2
199 Overgtkb
200 Tremolgt
201 Funk-Gt
202 cleagt2
203 cleagt3
204 rvcleagt
205 overgt2
206 Acostbs
207 Abascym
208 Fg-Bs-Kb
209 Fusionbs
210 Pickedkb
211 Fretlekb
212 Slapbs
213 Slpbs2Kb
214 Synthbs
215 Synbass1
216 Synbass2
217 Synthb2
218 Synbs2Kb
219 Acidbass
220 acostbs2
221 picked2
222 slapbs2
223 synthbs2
224 fgepbas
225 Vln-Hard
226 Viola-Kb
227 Violastr
228 Cello
229 Slocello
230 Cello2
231 Contrakb
232 Contrakq
233 Stringf1
234 Strgszz
235 Stringf2
DRUM SET
301 Standard Drum 1
302 Standard Drum 2
303 Room Drum
304 Rock Drum
305 Electric Drum
306 Analog Drumset
307 Dance Drumset
308 Jazz Drum
309 Brush Drumset
310 Standart Drumset
25
Page 27

Appendix 2- Style List
26
01
02
03
04
05
06
07
08
09
10
8 BEAT
16 BEAT
POP
11
12
13
14
15
16
17
18
19
20
21
22
23
24
25
26
27
28
29
30
31
32
33
34
35
36
37
38
39
40
BALLAD
ROCK
41
42
43
44
45
46
47
48
49
50
No. Name
Sweet Beat
Miami Beat
Rhythm & Beat
Guitar Pop 1
8 Beat Dance
8 Beat Disco
Pop Funk
8 Beat 1
60's 8 Beat
8 Beat 2
16 Beat Ballad
Pop 16 Beat 1
Pop 16 Beat 2
Modern 16 Beat
16 Beat Hot
16 Beat Modern
16 Beat Bossa Nova
16 Beat Funk
16 Beat
Cool Beat
Analog Night
Guitar Pop 2
Pop beat
Soft Beat
60's Pop
Sting Latin
Brit Pop 1
Brit Pop 2
Pop Hit
Fusion Shuffle
Rock Ballad 1
Folk Ballad
Pop Ballad 1
Pop Ballad 2
EP Ballad
Piano Ballad
New R&B Ballad
Natural Ballad
Love Ballad
Easy Ballad
Soft Rock
Hard Rock
Heavy Rock
Easy Rock
New Shuffle
Rock Hip Hop
Rock & Roll
Rock Shuffle
70's Rock & Roll
Folk Rock
No.
51
52
53
54
55
56
57
58
59
60
Name
BALLROOM
61
62
63
64
65
66
67
68
69
70
71
72
DANCE
73
74
75
76
77
78
85
86
87
88
89
90
79
80
81
82
83
84
SOUL & FUNK
91
92
93
94
95
96
97
98
99
100
JAZZ
Rhumba 1
Slow Waltz 1
Fox Trot
Samba
Cha Cha
Quick Step
Twist
Swing Fox
Jive
Beguine
Garage
Techno
Progressive
Rap 1
Rap 2
Disco
Soft Disco
Disco Party
70's Disco
70's Disco Funk
Club Dance
Euro Dance
80's Dance
Hip Hop
Down Beat
Funk
Electric Funk
Groove Funk
Rubber Funk
Cool Funky
Jazz Funk
Groove
Soul
Hip Hop Soul
Hip Hop Beat
R & B
Soul Beat
R & B Ballad
British Soul Pop
Samba Funk
Jazz Fusion
Fusion
Jazz Brush
Latin Jazz
Acid Jazz 1
Acid Jazz 2
Cool Jazz Ballad
Swing Shuffle
Big Band 40's
Big Band Medium
101
102
103
104
105
106
107
108
109
110
COUNCTRY
LATIN/LATIN DANCE
111
112
113
114
115
116
117
118
119
120
121
122
123
124
125
126
127
128
129
130
131
132
133
134
135
136
137
138
139
140
WORLD
TRADITIONAL
INDONESIA
141
142
143
144
145
146
147
148
149
150
151
152
153
154
155
156
157
158
159
160
No. Name
Country 8 Beat
Modern Country
Country Ballad 2
Country Pop
2/4 Country
Country
Country Quick Steps
Bluegrass
Country Flok
Country Rock
Bossa Nova
Habanera
Latin
New Reggae
Dance Reggae
Pasodoble
Lite Bossa
Latin Rock
Beguine
Slow Bolero
Disco Samba
Mambo
Meneito
Rumba 2
Tikitikita'
Dancing Tribe
Lambada
Pop Cha Cha
Cha Cha Cha
Salsa
Scottish
Laendler
Hawaiian
Sirtake
Venezia
6/8 Flipper
New Age
Tarantella
Enka
Norteno
Polka
German Polka
Party Polka
March
6/8 March
US March
Musette
French Musette
Mazurke
Waltz
Dandut1
Dandut2
Dangdu
Dangdut1
Dangdut2
Dangdut3
Keroncong1
Keroncong2
PopKeroncong
Slow Dangdut
Page 28

Appendix 3- Demo List
Appendix 4- Song List
01
02
03
04
05
06
07
08
09
10
11
12
13
14
15
16
17
18
19
20
21
22
23
24
25
26
27
28
29
30
31
42
43
44
45
46
47
48
49
50
51
52
53
54
55
56
57
58
59
60
61
62
63
64
65
66
67
68
69
70
71
88
89
90
91
92
93
94
95
96
97
98
99
100
101
102
10
104
105
106
107
108
109
110
111
112
113
114
115
116
117
118
119
120
72
73
74
75
76
77
78
79
80
81
82
83
84
85
86
87
32
33
34
35
36
37
38
39
40
41
¡¡Christmas 025-029
CLASSICAL 001-031 GOLDEN & POP 042-071 ORIENTAL 088-090
FOLK & COUNTRY 032-041
JAZZ & FUSION 072-087
PIANO 091-120
Aida
Annen Polka
Auf Flugeln Dec Gesanges
Brahms Waltz
Carmen-Entracte II
Carmen-Prelude
L'Arlesienne
La Traviata
Mazurka
Menuett
Musical Moments
Pizzicato Polka
Rigoletto
Serenade
Song Without Words
Swan
Prelude To Act 2 (Swan Lake)
Le Lac des Cygnes Acte I : n
2 : Valse (Swan lake)
The Happy Farmer
The Sleeping Beauty
Uungarische Tanz
Wiegenlied
Mov.2 Adagio Non Troppo
Piano Sonata No.9 In D
Mov.1 Andante Grazioso Piano
Sonata No.11 In A [Alla Tur
Sonata11ca]
Prelude In C
Chinese Dance
Emperors Waltz
March Militaire
Symphony No.40
Pianosonatan 08 IN Cm IN
Pathetique
Arpeggione Sonata in Am
Country
Jambalaya
Susanna
Bridge
Battle Hymne Of The Republic
The Old Gray Mare
American Patrol
In The Rain
Sippin Cider Through A Straw
On London Bridge
Are You Lonesome Tonight
Only You
End Of The World
House Of Rising Sun
Solveig's Song
The Blue-Bells Of Scotland
Over The Rainbow
Beautiful Dreamer
It`S Been A Long Long Time
Edelweiss
O Sole Mio
Der Deitcher`S Dog
You Are My Sunshine
Silent Night
Ave Maria
Five Hundred Miles
Happy New Year
It`S Beginning To Look A Lot Like
Christmas
Jeanie With The Light Brown Hair
My Bonnie
Song Of The Pearlfisher
Summer Palace
The Stage Coach
Entertainer
Annie Laurie
Killing Me Softly With His Song
Love Is Blue
Last Rose Of Summer
The Old King Cole
Chrysanf
Maple Leaf Rag
June Samba
Funk
I Can......
Sea Shore
Guitar&Saxphone
The Hip Hop`S Night
Blue Lunch
Cobweb
Wine
Jazz Old Man
Dark Eyes
Carlos
Sad
The Jazz
South Mud Bay
Give You A Rose
Flowing Rill
Alise
Military March
Habanera
Minuet
Bagatelle No.3
Old Macdonald Had A Farm
Wedding March
2-Part Invention #13 In A Minor.B.W. Iii
Minuet In G
Turkish March
Hey Diddle Diddle
March
Moseta Dance
Bulie Dance
Aria
Germanic Dance
Away In A Manger
Jack & Jill
Angles We Have Heard On High
Humpty Dumpty
Did You Ever See A Lassie
Chopsticks
Four Little Swans
Old France
"Jesus, Saviour Pilot Me"
Eclogue
Santa Claus Is Coming To Town
Brave Cavalier
America The Beautiful
Music Box Dancer
Name
Funk
American Patrol
Guitar&Saxphone
I Can......
Alise
NO
01
02
03
04
05
27
Page 29

28
Chord Name/[Abbreviation] Normal Voicing
Chord(C) DISPLAY
Major [M] C C
Sixth [6]
C6
C6
CM7 CM7
Major seventh add sharp Eleventh
[M7(#11)]
CM7(#11) CM7(#11)
Major add ninth [M(9)] CM(9) CM (9)
Major seventh ninth [M7(9)] CM7(9) CM7 (9)
Sixth ninth [6 (9)] C6(9) C6(9)
Augmented [aug] Caug Caug
Minor [m] Cm Cm
Minor sixth [m6] Cm6 Cm6
Minor seventh [m7] Cm7 Cm7
Minor seventh flatted fifth [m7b5]
Cm7b5 Cm7b5
Minor add ninth [m(9)] Cm(9) Cm (9)
Minor seventh ninth [m7(9)] Cm7(9) Cm7(9)
Minor seventh add eleventh [m7(11)] Cm7(11) Cm7(11)
Minor major seventh [mM7] CmM7 CmM7
Minor major seventh ninth [mM7(9)] CmM7(9) CmM7(9)
Diminished [dim] Cdim Cdim
Diminished seventh [dim7] Cdim7 Cdim7
Seventh [7] C7 C7
Seventh suspended fourth [7sus4] C7sus4 C7sus4
Seventh flatted fifth [7b5] C7b5 C7b5
Seventh ninth [7(9)] C7 (9) C7 (9)
Seventh add sharp eleventh [7(#11)] C7(#11) C7(#11)
Seventh add thirteenth [7 (13)] C7(13) C7 (13)
Seventh flatted Ninth [7(b9)] C7(b9) C7(b9)
Seventh add flatted thirteen [7(b13)] C7(b13) C7(b13)
Seventh sharp ninth [7(#9)] C7(#9) C7 (#9)
Major seventh augmented [M7aug] CM7aug CM7aug
Seventh augmented [7aug] C7aug C7aug
Suspended Fourth [sus4] Csus4Csus4
One plus tow plus five [1+2+5] C1+2+5 C
Major seventh[M7]
1-3-5
1-3-(5)-7
1-(3)-5-6
1-2-3-(5)-7
1-2-3-(5)-6
1-2-3-5
1-3-#5
1-b3-5
1-b3-5-6
1-b3-(5)-b7
1-b3-b5
1-b3-b5-6
1-3-(5)-b7
1-4-5-b7
1-3-b5-b7
1-2-3-(5)-b7
1-(2)-3-#4-5-b7 or
1-2-3-#4-(5)-b7
1-3-(5)-6-b7
1-b2-3-(5)-b7
1-3-5-b6-b7
(1)-#2-3-(5)-b7
1-3-#5-7
(1)-3-#5-b7
1-4-5
1-2-5
1-b3-b5-b7
1-2-b3-5
1-2-b3-(5)-b7
1-2-b3-4-5-(b7)
1-b3-(5)-7
1-2-b3-(5)-7
1-(2)-3-#4-5-7
or 1-2-3-#4-(5)-7
Appendix 5- Chord List
Page 30

29
Appendix 6- MIDI List
Function
Transmitted
Recognized
Remarks
Basic Default
Channel Changed
1ch
1ch
1-16ch
1-16ch
Default
Mode
Messages
Altered
X
X
***********
3
X
X
Note
Number
True voice
0-127
***********
0...127
0...127
Velocity :
Note on
Noteoff
O 9nH,V=1-127
X (9nH,V=0)
O 9nH,V=1-127
X (9nH,V=0; 8nH,V=0-127
After
Keys
Touch
Chs
X
X
X
X
Pitch Bend
O
O
Control
0
Change
1
5
6
7
10
11
64
65
66
67
80
81
91
93
120
121
123
Bank Select
Modulation
Portamento Time
Data Entry
Volume
Pan
Expression
Sustain Pedal
Portamento ON/OFF
Sostenuto Pedal
Soft Pedal
Reverb Program
Chorus Program
Level
Chorus Level
All Sound Off
Reset All Controllers
All Notes Off
Program
Change :
true #
O
***********
O
0...127
System Exclusive
X
O
System
£ºSong Position
Common
£ºSong Select
: Tune
X
X
X
X
X
X
System
:Clock
Real Time
:Commands
X
X *1
X
X *1
Aux
Note:
:LOCAL ON/OFF
:All Notes Off
Messages
:Active sense
:Reset
X
X
X
X
X
X
O
O
O
O
Reverb
O
O
X
O
O
X
X
O
X
X
X
X
X
X
X
X
X
X
O
O
O
O
O
O
O
O
O
O
O
O
O
O
O
O
O
O
*1
When the accompaniment is started, an FAH message is transmitted.
When accompaniment is stoped, an FCH message is transmitted.
When an FAH message is received, accompaniment is started.
When an FCH message is received, accompaniment is stoped.
Mode 1: OMNI ON , POLY Mode 2 : OMNI ON , MONO : YES
Mode 3: OMNI OFF , POLY Mode 4 : OMNI OFF , MONO : NO
Page 31

Version:V005
 Loading...