

Page 1
Maxxsonics® USA Inc.
maxxsonics.com
1290 Ensell Road
Lake Zurich Illinois 60047 USA
Phone: 847-540-7700
FAXX: 847-540-9776
©2014 Maxxsonics USA, Inc.
All Rights Reserved
Specifi cations And Designs
Are Subject To Change Without Notice.
Products Manual
T OLYMPUS
AMPLIFIERS
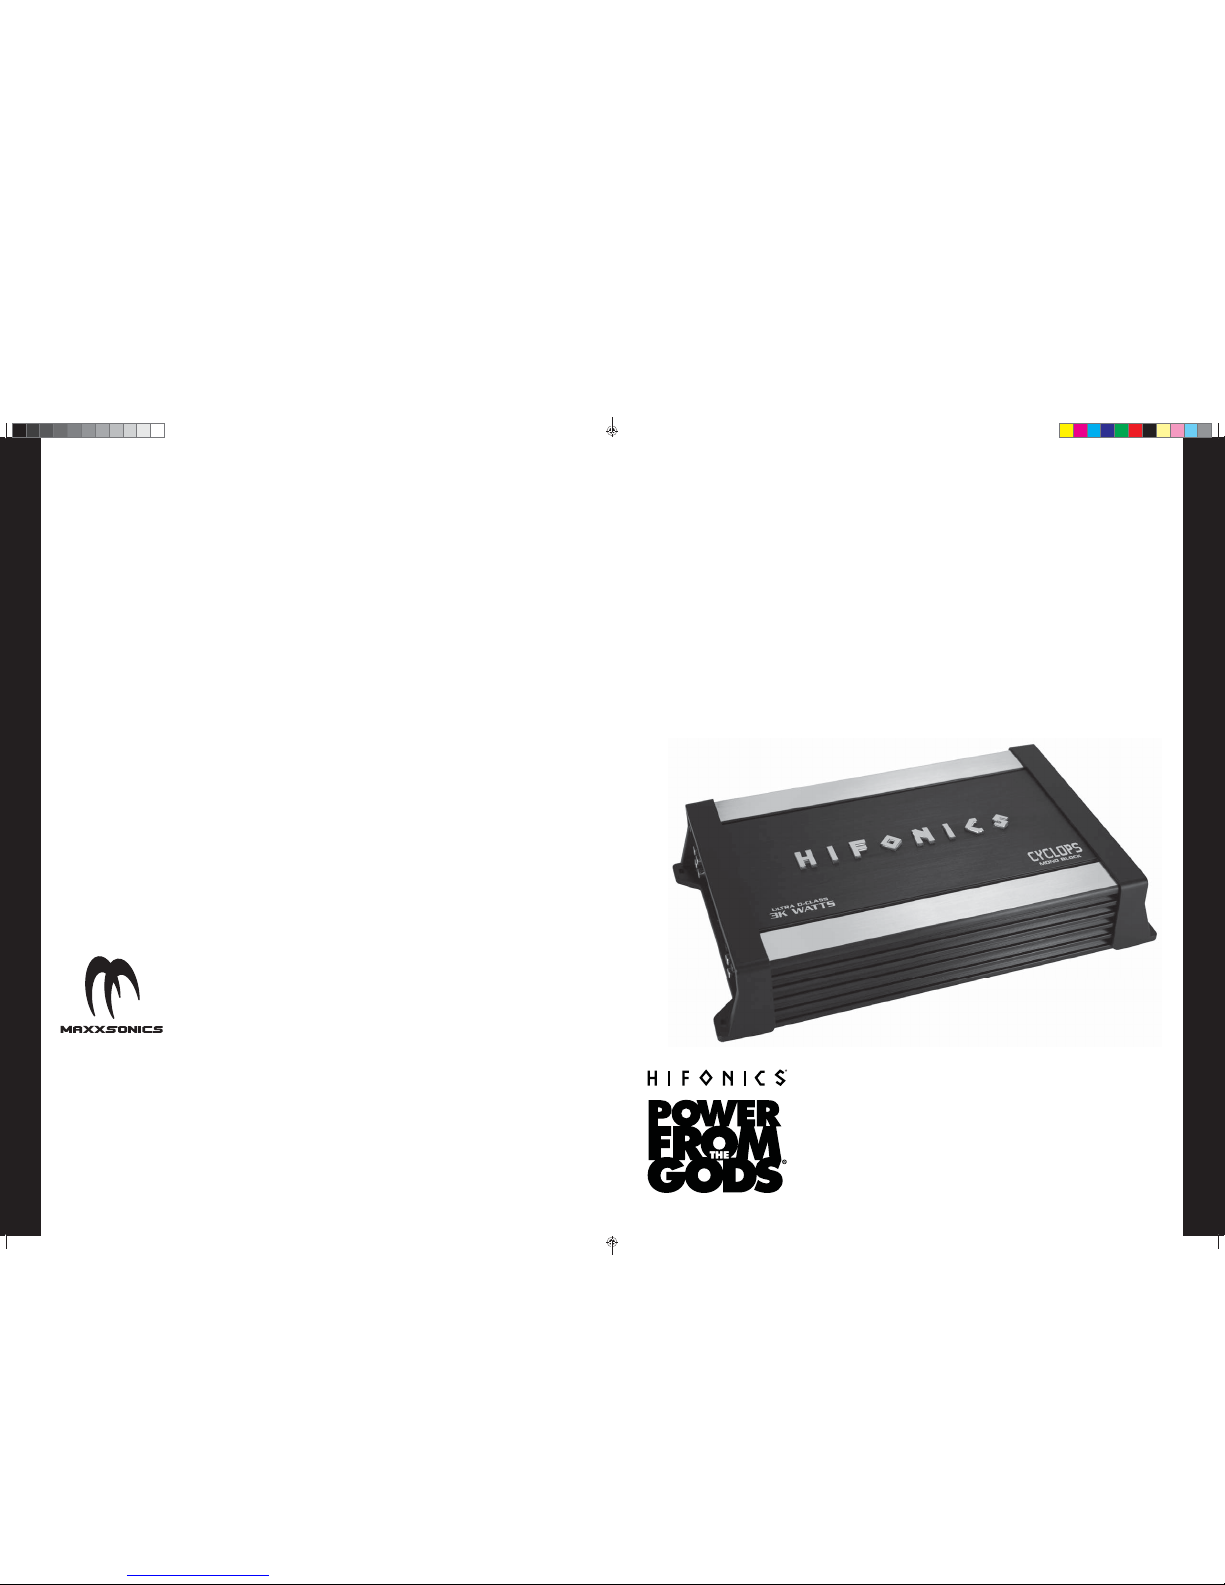
ODIN 2K & CYCLOPS 3K
Manual-MTOlypmus-Odin-Cyclops.indd Spread 1 of 12 - Pages(24, 1)Manual-MTOlypmus-Odin-Cyclops.indd Spread 1 of 12 - Pages(24, 1) 7/25/2014 6:19:21 PM7/25/2014 6:19:21 PM
Page 2

2
HIFONICS MT. OLYMPUS
HIGH PERFORMANCE AMPLIFIERS
The MT OLYMPUS Series products have been designed to a very high level of performance, with features
unavailable in any other product. All of the amplifi ers have variable crossovers built in, with added touches
such as subsonic fi lter, parametric bass equalization and a remote control module that allows the overall
Level of bass boost to be controlled from the driver’s seat.
To ensure years of listening pleasure, all amplifi ers have a built in diagnostic mode that will detect shorted
speaker leads, low impedance, dangerous high temperatures, DC shorts and will shut down the amplifi er to
help prevent damage. This series also features pre clip, soft clip and hard clip indication on the remote and
end panel of each amp to prevent damage to your audio investments.
TABLE OF CONTENTS
A. General Installation Procedure 3
B. Amplifi er Feature Descriptions 6
C. ODIN 2K & CYCLOPS 3K Mono Amplifi er Applications 8
D. Setting Up Systems to Maxximize Performance 12
E. Troubleshooting a System 14
F. Fine Tuning: Signal Processing 17
G. Specifi cations 20
H. Maxxsonics Limited Warranty 21
Check out our videos of new products, events and technical tutorials at
WWW.YOUTUBE.COM/MAXXSONICSUSAINC
The contents of this manual may not be reproduced or copied without the written consent of
MAXXSONICS USA, Inc.
23
Manual-MTOlypmus-Odin-Cyclops.indd Spread 2 of 12 - Pages(2, 23)Manual-MTOlypmus-Odin-Cyclops.indd Spread 2 of 12 - Pages(2, 23) 7/25/2014 6:20:02 PM7/25/2014 6:20:02 PM
Page 3

22 3
A. General Installation Procedure
A. GENERAL INSTALLATION PROCEDURE
KEYS TO SUCCESS
Follow these keys to success for your amplifi er installation for reduced system noise and great
sound quality.
» Separate Power/Ground & RCA - Make sure that Power/Ground and RCA signal cables are at least
18” apart. Consider running Power/Ground on one side of the vehicle and RCA signal on the other.
» Quality Cables - Use the highest quality RCA, Power and Ground Cables. Choosing great amplifi ers
is only part of the installation. Use quality, connectors throughout the system to assure great sound and
reduced injected noise from the vehicles electrical system.
» Chassis Ground - Never use factory screws or bolts to electrically ground amplifi ers. Use a short
(less than 18”) 0-gauge wire for Cyclops 3K or a 4-gauge wire for Odin 2K with a ring terminal or
grounding distribution block. Remove paint and secure amplifi er grounds directly to the chassis of the
vehicle.
» Proper Power & Fuse - Assure that you have fused each amplifi er with the appropriate fuse within 12”
of the vehicles battery.
SYSTEM DESIGN
The success of any car stereo system relies on several factors, such as the system design, execution of the
installation, and system setup. Remember that any system is only as good as its weakest link.
It is important to know that higher power systems or amplifi ers are not only useful for high sound pressure
levels (SPL) but also to establish headroom capability for an audio system. Headroom means that a system
to be able to reproduce musical peaks cleanly without distortion. Lower power amplifi ers will clip earlier
than their more powerful cousins, and cause loudspeaker failure when overdriven due to the harmonics
generated by a clipped signal, thus overheating voice coils.
Amplifi ers should be mounted with the fi ns running horizontally for best convection cooling, to minimize
overheating. Choose the best quality RCA cables for reliability and less engine noise interference in through
the audio system.
Manual-MTOlypmus-Odin-Cyclops.indd Spread 3 of 12 - Pages(22, 3)Manual-MTOlypmus-Odin-Cyclops.indd Spread 3 of 12 - Pages(22, 3) 7/25/2014 6:20:02 PM7/25/2014 6:20:02 PM
Page 4

4
A. General Installation Procedure
INSTALLATION
It is highly recommended that the amplifi er be mounted to a board of MDF or other solid structure using the
4 mounting screws provided. Avoid mounting the amplifi er to metal as this can introduce noise and other
unwanted issues. When mounting the amplifi er, ensure that it is mounted HORIZONTALLY for optimal heat
dissipation. Mounting amplifi ers to speaker enclosures is not recommended as this can cause damage to
the amplifi er components. When choosing a location for mounting the amplifi er, ensure that you check for
clearance from wires, gas tank, electrical devices and brake lines etc.
Power & ground connections: (see the features matrix on page 5 for proper gauge cables per amplifi er)
Run the wiring so that RCA cables are at least 18“ away from power and speaker cables. Keep RCA cables
away from electrical devices in the vehicle that can cause electrical noise, such as electric fuel pumps,
emission control modules and other on-board electronic modules.
Use a suffi cient gauge power cable and ground cable using the matrix on page 5 as reference to
what size wire you require. MT OLYMPUS series amplifi ers require at least 4 gauge power wire. In a
multi-amplifi er system, add the total value of the manufacturers recommended fusing to get your total system
amperage. Some applications may require multiple runs of power wire to meet the system requirements.
In multi-amplifi er systems it is advisable to mount a large enough fuse right at the battery, and run one or
multiple +12 volt power cables to a fused distribution block near the amplifi ers. It is then a simple matter to
connect the +12 volt terminal of each amplifi er to the distribution block. During this process, please ensure
that the main power fuse is removed to avoid shorting the electrical system. The main fuse must be within
12” of the vehicles battery.
Ground each amplifi er with as short a ground lead as possible directly to the vehicle chassis using at least
4 gauge wire or equivalent to the size of the amplifi ers’ power wire. Use a ground distribution block, if you
wish, but it is extremely important to keep the main ground lead from this distribution block to the chassis
as short as possible, not more than 18“. The ground connection integrity to the chassis is very important,
and the best way to achieve a good, solid electrical and mechanical contact is to use a large round crimp
lug, crimped and soldered to the ground cable. The next step is to scrape the paint off the vehicle chassis,
slightly larger than the ground lug, at the connection point. Drill a clearance hole in the chassis, the same
size as the lug hole, and use a bolt, spring washer and nut to securely fasten the ground lug. Use petroleum
jelly to coat the bolt/lug connection, to prevent oxidization over time.
21
H. Maxxsonics Limited Warranty
H. MAXXSONICS LIMITED WARRANTY
As the manufacturer of Maxxsonics, MB Quart, Autotek, Crunch and Hifonics car audio products, Maxxsonics
USA Inc. Warrants to the original consumer purchaser the amplifi er to be free from defects in material and
workmanship for one (1) Year from date of purchase.
All other parts and accessories of the system are warrantied to be free from defects in material and
workmanship for one (1) year from date of purchase. Maxxsonics will repair or replace at its option and
free of charge during the warranty period, any system component that proves defective in materials and
workmanship under normal installation, use and service provided that the product is returned to the authorized
Maxxsonics dealer from where it was purchased. A photo copy of the original receipt must accompany the
product being returned.
Valid purchase receipts will contain the name and address of the authorized reseller.
Any damage to the product as a result of misuse, abuse, accident, incorrect wiring, improper installation,
alteration of date code or bar code labels, revolution, natural disaster, or any sneaky stuff because someone
messed up, repair or alteration out side of our factory or authorized service centers and anything else you
have done that you should not have done is not covered.
This warranty is limited to defective parts and specifi cally excludes any incidental or consequential damages
connected therewith. This warranty is not to be construed as an insurance policy.
Warranty on installation labor, removal, re-installation and freight charges are not the responsibility of
Maxxsonics USA Inc.
Warranty products damaged as a result of insuffi cient or improper packing materials are not covered by this
limited warranty and such damaged product will be returned “as is” at the expense of the owner.
FOR EXTENDED WARRANTY INFORMATION, PLEASE VISIT
WWW.MAXXWARRANTY.COM
Designed and Engineered in the USA
www.maxxsonics.com
Manual-MTOlypmus-Odin-Cyclops.indd Spread 4 of 12 - Pages(4, 21)Manual-MTOlypmus-Odin-Cyclops.indd Spread 4 of 12 - Pages(4, 21) 7/25/2014 6:20:02 PM7/25/2014 6:20:02 PM
Page 5
20
G. Specifications
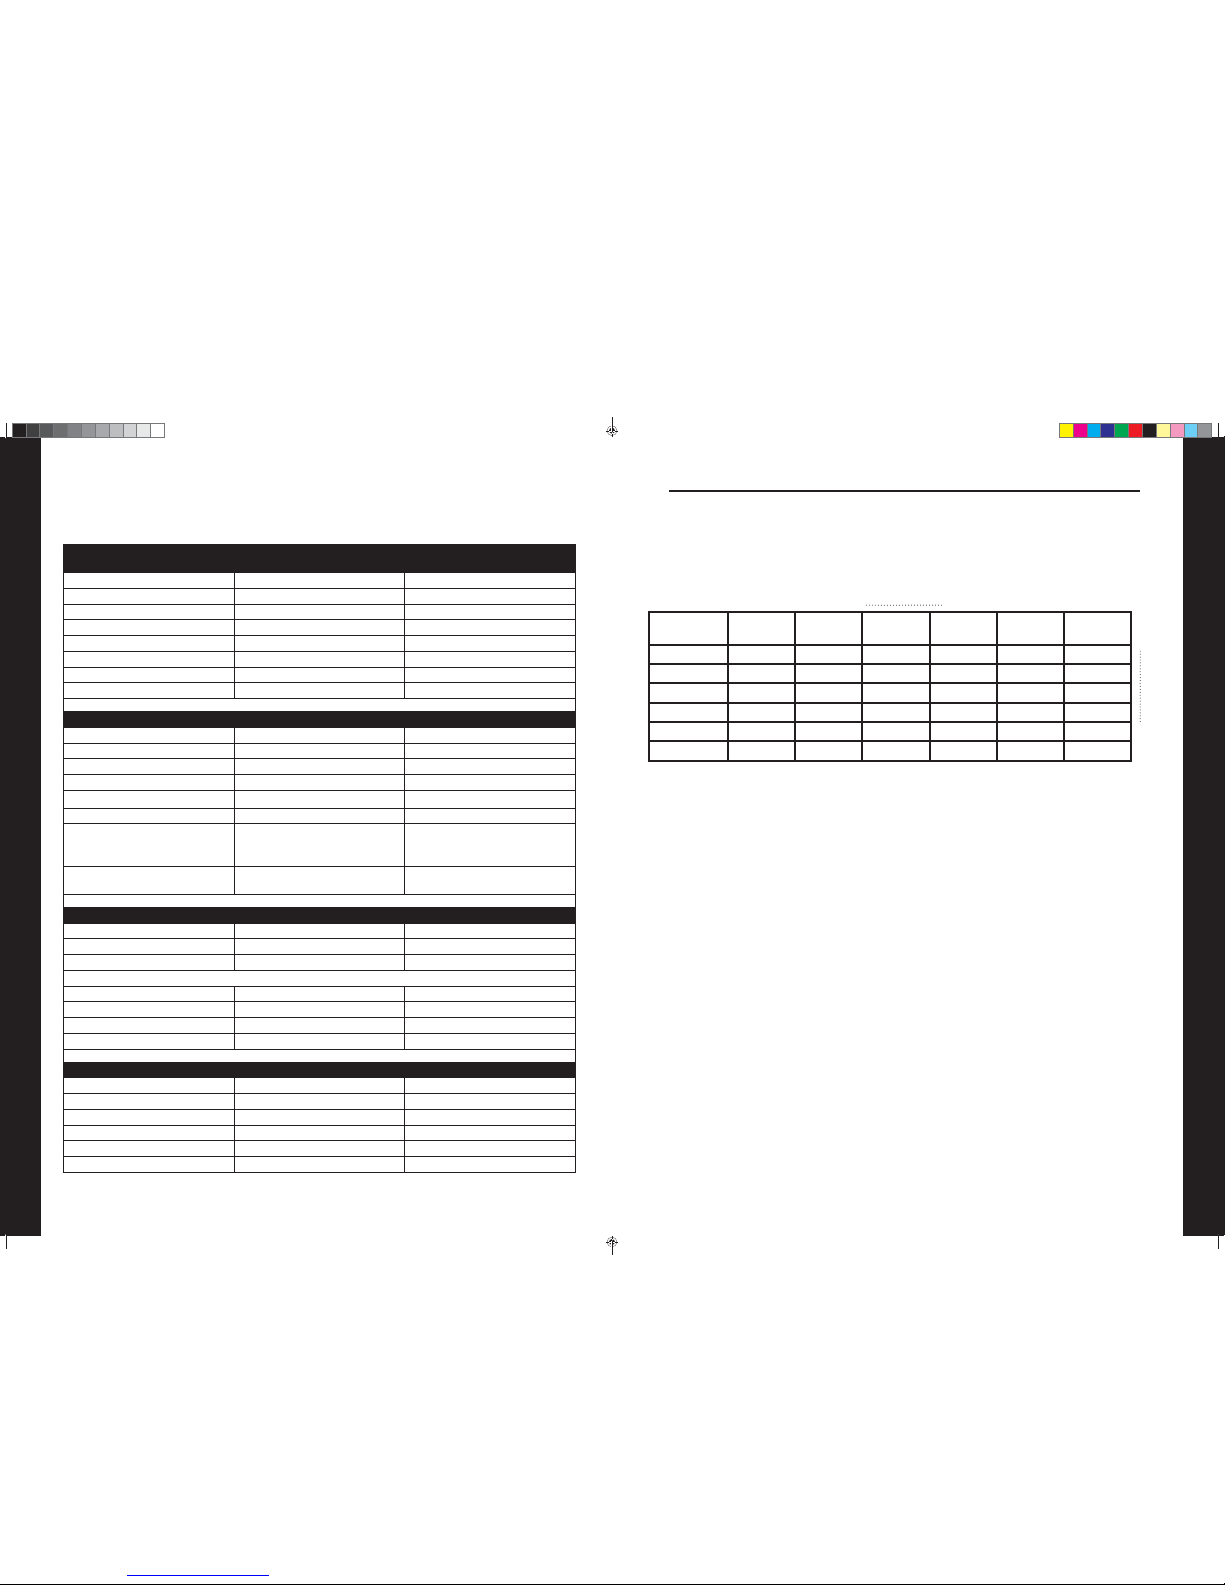
G. SPECIFICATIONS
OUTPUT POWER RATING
ODIN 2K
RMS/DYNAMIC
CYCLOPS 3K
RMS/DYNAMIC
4-Ohms 450/900 600/1200
2-Ohms 800/1600 1100/2200
1-Ohm 1000/2000 1500/3000
Mono Bridged @ 4-Ohms n/a n/a
Mono Bridged @ 2-Ohms n/a n/a
Power Supply PWM PWM
Output Power Circuit Confi g MOSFET MOSFET
Soft Start Up Sound Yes Yes
SPECIFICATIONS ODIN 2K CYCLOPS 3K
Frequency Response +/- 3dB 15Hz-250Hz 15Hz-250Hz
Damping Factor >200 >200
Signal to Noise Ratio (A-Weight) >96dB >96dB
THD & Noise % <0.1 <0.1
Variable Input Level Control 0.2V-9.0V 0.2V-9.0V
Input Impedence 47kΩ 47kΩ
Diagnostic Indicator
Top - Green (Power on)
Amber (Thermal) Red (Short)
Bottom - Green (Pre-Clip)
Amber (Near-Clip) Red (Clip)
Top - Green (Power on)
Amber (Thermal) Red (Short)
Bottom - Green (Pre-Clip)
Amber (Near-Clip) Red (Clip)
Protection (DC, Short, Thermal,
Overload)
Yes Yes
CROSSOVER FUNCTIONS ODIN 2K CYCLOPS 3K
Variable Low Pass Frequency 35Hz-250Hz 35Hz-250Hz
Multiplier Frequency No No
Variable Subsonic Filter 15Hz-35Hz 15Hz-35Hz
PARAMETRIC EQ
Frequency 30Hz-100Hz 30Hz-100Hz
Bandwidth Wide - Narrow Wide - Narrow
Boost 0-10dB 0-10dB
Phase Shift 0-180 0-180
CONNECTIONS ODIN 2K CYCLOPS 3K
Power Terminal 4-GA 0-GA
Speaker Terminal 12-GA 12-GA
Remote Control Module (HFR-G1) Yes Yes
Fuse Sizes 120 Amps (60x2) 150 Amp (Not included)
Dimensions (L x H x W) USA 14.6“x9.0"x2.8" 17.0"x9.0"x2.8"
Dimensions (L x H x W) METRIC 372x228x70mm 432x228x70mm
Features and specifi cations subject to change without notice
5
A. General Installation Procedure
TIP: Use the same approach when installing head units, equalizers or any audio equipment for that
matter - run short individual grounds from each piece directly to the vehicle chassis, to minimize
ground loops and system noise. All power, ground and speaker connections should be crimped and
soldered for reliability. Make sure that none of the cable insulation can chafe against exposed metal
in the vehicle, causing short circuits to the chassis.
WIRE LENGTH
SYSTEM
AMPERAGE
7 - 10 ft. 10 - 13 ft. 13 - 16 ft. 16 - 19 ft. 19 - 22 ft. 22 - 28 ft.
WIRE GAUGE
35 - 50 8 6 4 4 4 4
50 - 65 6 4 4 4 4 2
68 - 85 4 4 2 2 2 0
85 - 105 4 2 2 2 2 0
105 - 125 4 2 0 0 0 0
125 - 150 2 0 0 0 0 0
NOTE: This Matrix is a general rule of thumb. Please refer to the manufacturers specifi c requirements.
MT OLYMPUS specifi cations can be found on page 20.
Safe connection sequence:
After all cables are run, connect speaker wires to the speakers and amplifi ers, then run and plug in RCA
cables. Next, connect all power, ground, and remote turn on leads. Now, connect all +12 volt cables to the
amplifi er or amplifi ers and distribution blocks and fuse holders. Finally, connect the main +12 volt cable to
the battery, with the main fuse removed. We are almost ready to power up the system.
Power up the system:
The following procedure may seem like overkill, but there is nothing more frustrating when turning on a
system for the fi rst time, and it does not work properly immediately.
First, make sure the head unit is off, and turn all level controls to minimum (counterclockwise), including
the head unit volume control. Set all equalizers to 0 dB (no boost), and all crossover frequency controls at
approximate frequencies, as recommended by the loudspeaker manufacturer. Set all input selector and
crossover switches as required for the application. Remove all amplifi er fuses, and insert the main fuse at
the battery. If the fuse does not blow, you can insert the fuse in one of the amplifi ers, and we are ready to
turn on the system. Turn the head unit on, insert a CD, or select a radio station, and increase the head unit
volume control. If the system sounds fi ne, turn off the head unit, and install fuses in the remaining amplifi ers,
one by one, until the complete system is powered up and functioning properly.
Manual-MTOlypmus-Odin-Cyclops.indd Spread 5 of 12 - Pages(20, 5)Manual-MTOlypmus-Odin-Cyclops.indd Spread 5 of 12 - Pages(20, 5) 7/25/2014 6:20:02 PM7/25/2014 6:20:02 PM
Page 6
6
B. Amplifier Feature Descriptions
B. AMPLIFIER FEATURE DESCRIPTIONS
MT. OLYMPUS AMPLIFIERS
Mt. Olympus is a unique series of amplifi ers regarding channel stability and design.
NOTE: THIS MANUAL FEATURES THE AMPLIFIERS ODIN 2K AND CYCLOPS 3K ONLY
» The COLOSSUS and COLOSSUS PRO are stable at 4/2/1-Ohm per channel and 4/2-Ohms bridged.
» The BOLTAR and JUPITER are stable at 4/2-Ohms per channel and 4-Ohms bridged.
» The HERCULES and ATLAS is stable at 4/2/1-Ohm.
» The ODIN 2K and CYCLOPS 3K are stable at 4/2/1-Ohm.
» The input sensitivities for rated output powers are variable from 0.2V to 9V.
» All crossovers are fully variable in their respective ranges.
» Crossover fi lters are 12dB/Octave.
» A green POWER LED indicates the powered up and turned on condition.
» All HIFONICS amplifi ers feature a comprehensive diagnostic system, with speaker lead short circuit,
and amplifi er DC faults indicated by the red “PROTECT” LED.
CAUTION: DO NOT OPERATE ANY AMPLIFIER BELOW THE INTENDED IMPEDANCE. THIS
WILL CAUSE DAMAGE TO THE AMPLIFIER THAT WILL NOT BE COVERED UNDER THE
WARRANTY PRINTED IN THIS MANUAL.
19
F. Fine Tuning: Signal Processing
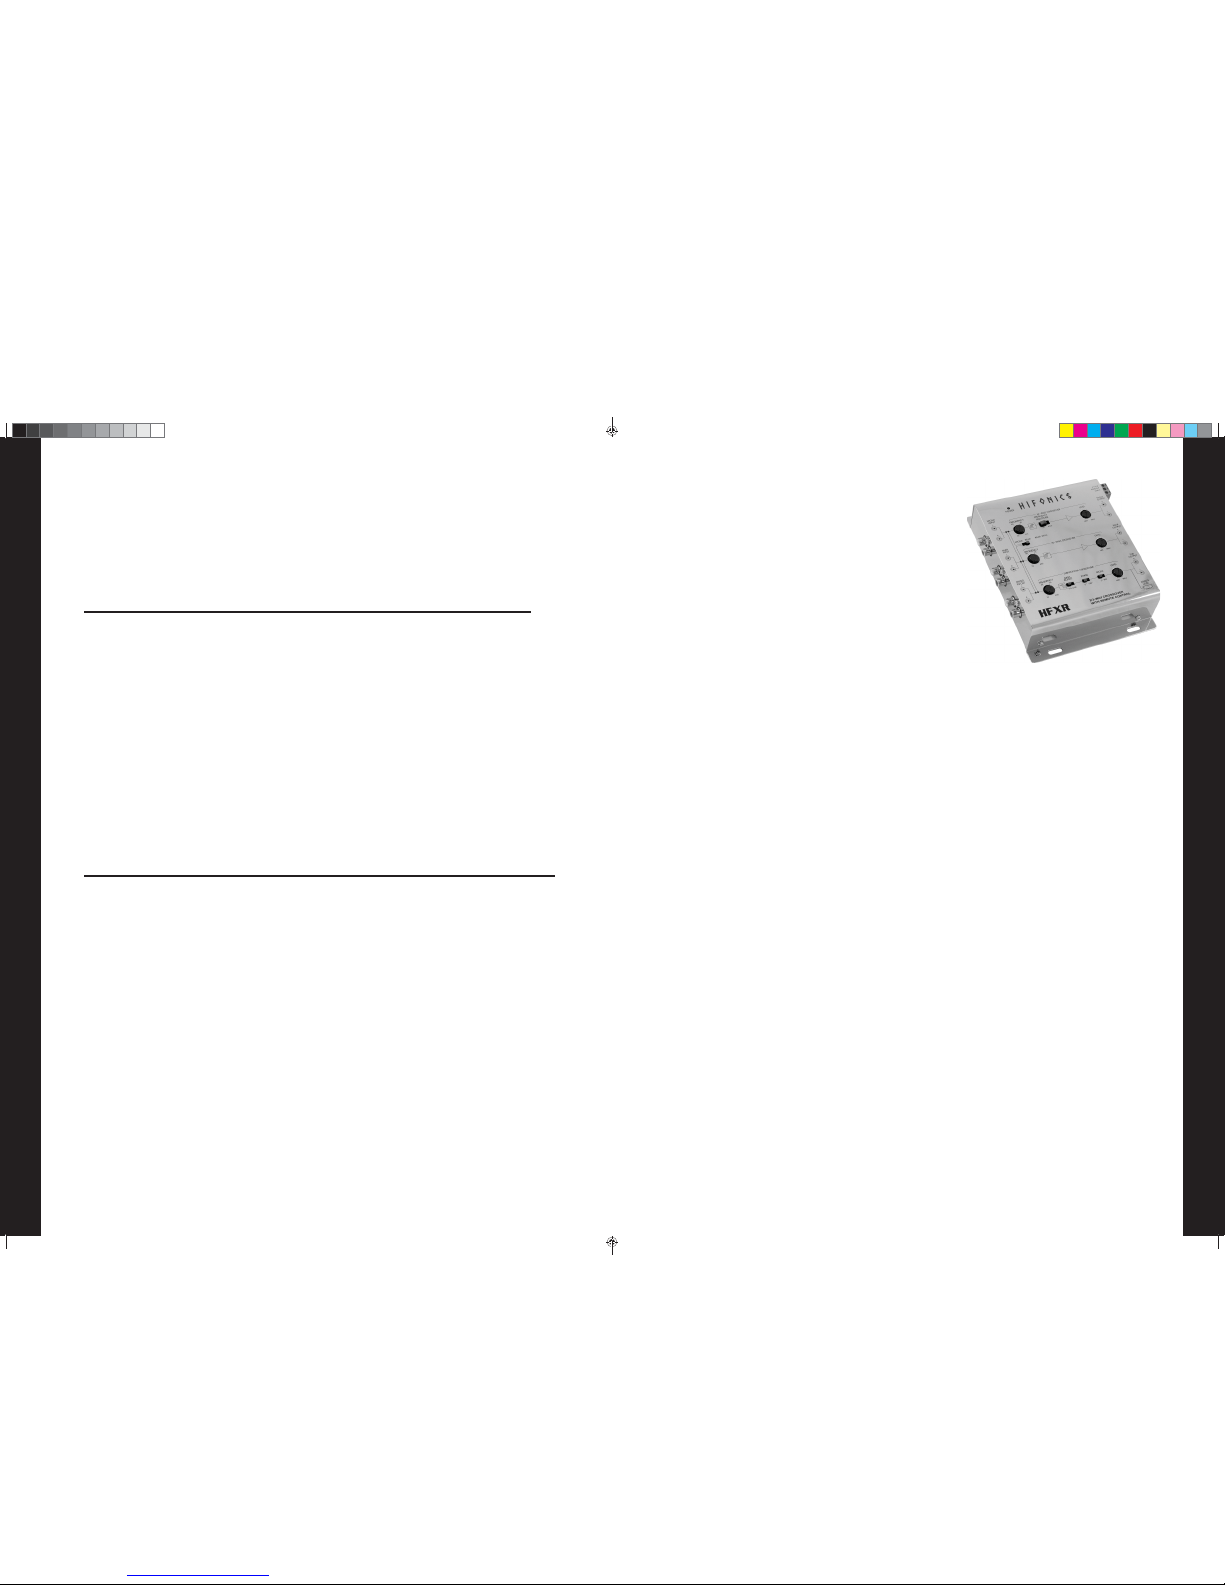
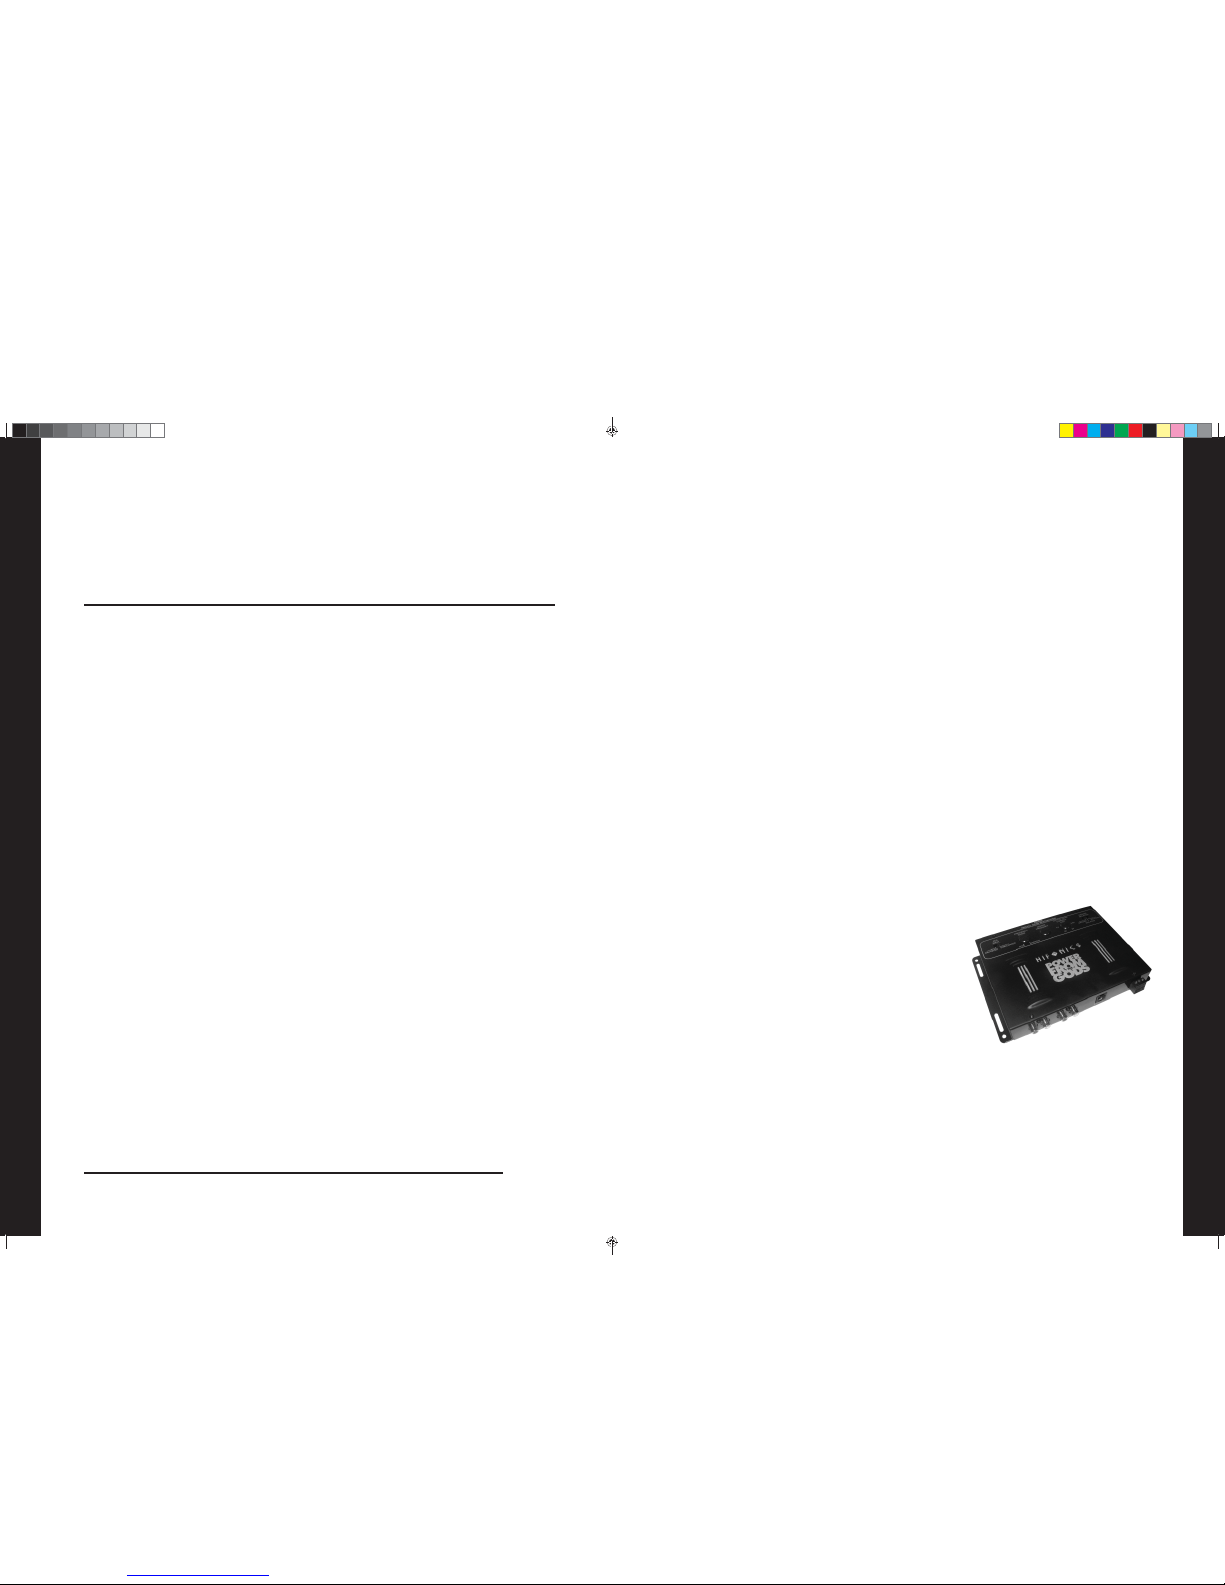
HFXR - Hifonics Electronic Crossover
If you have a multi-amplifi er system and need more crossover
control than what is built into the amplifi er, the HFXR is a
great solution for your system.
The HFX features can be set as a 2 channel or 4 channel
X-Over with 8.5 volt line driver.
FEATURES:
» Direct sub-in receivers with sub-outs 0 - 12dB bass boost
at bass remote
» Maximum pre-amp output: 8.5v RMS @ 45Hz bass boost
with quasi-parametric EQ
» Selectable for mono or stereo woofers
» 180° phase-shift switch
» Second order Butterworth front and rear channel
high-pass
» Level adjustments for front, rear and sub channels
» 2-channel full-range RCA preamp Cascading output
Manual-MTOlypmus-Odin-Cyclops.indd Spread 6 of 12 - Pages(6, 19)Manual-MTOlypmus-Odin-Cyclops.indd Spread 6 of 12 - Pages(6, 19) 7/25/2014 6:20:03 PM7/25/2014 6:20:03 PM
Page 7
18
F. Fine Tuning: Signal Processing
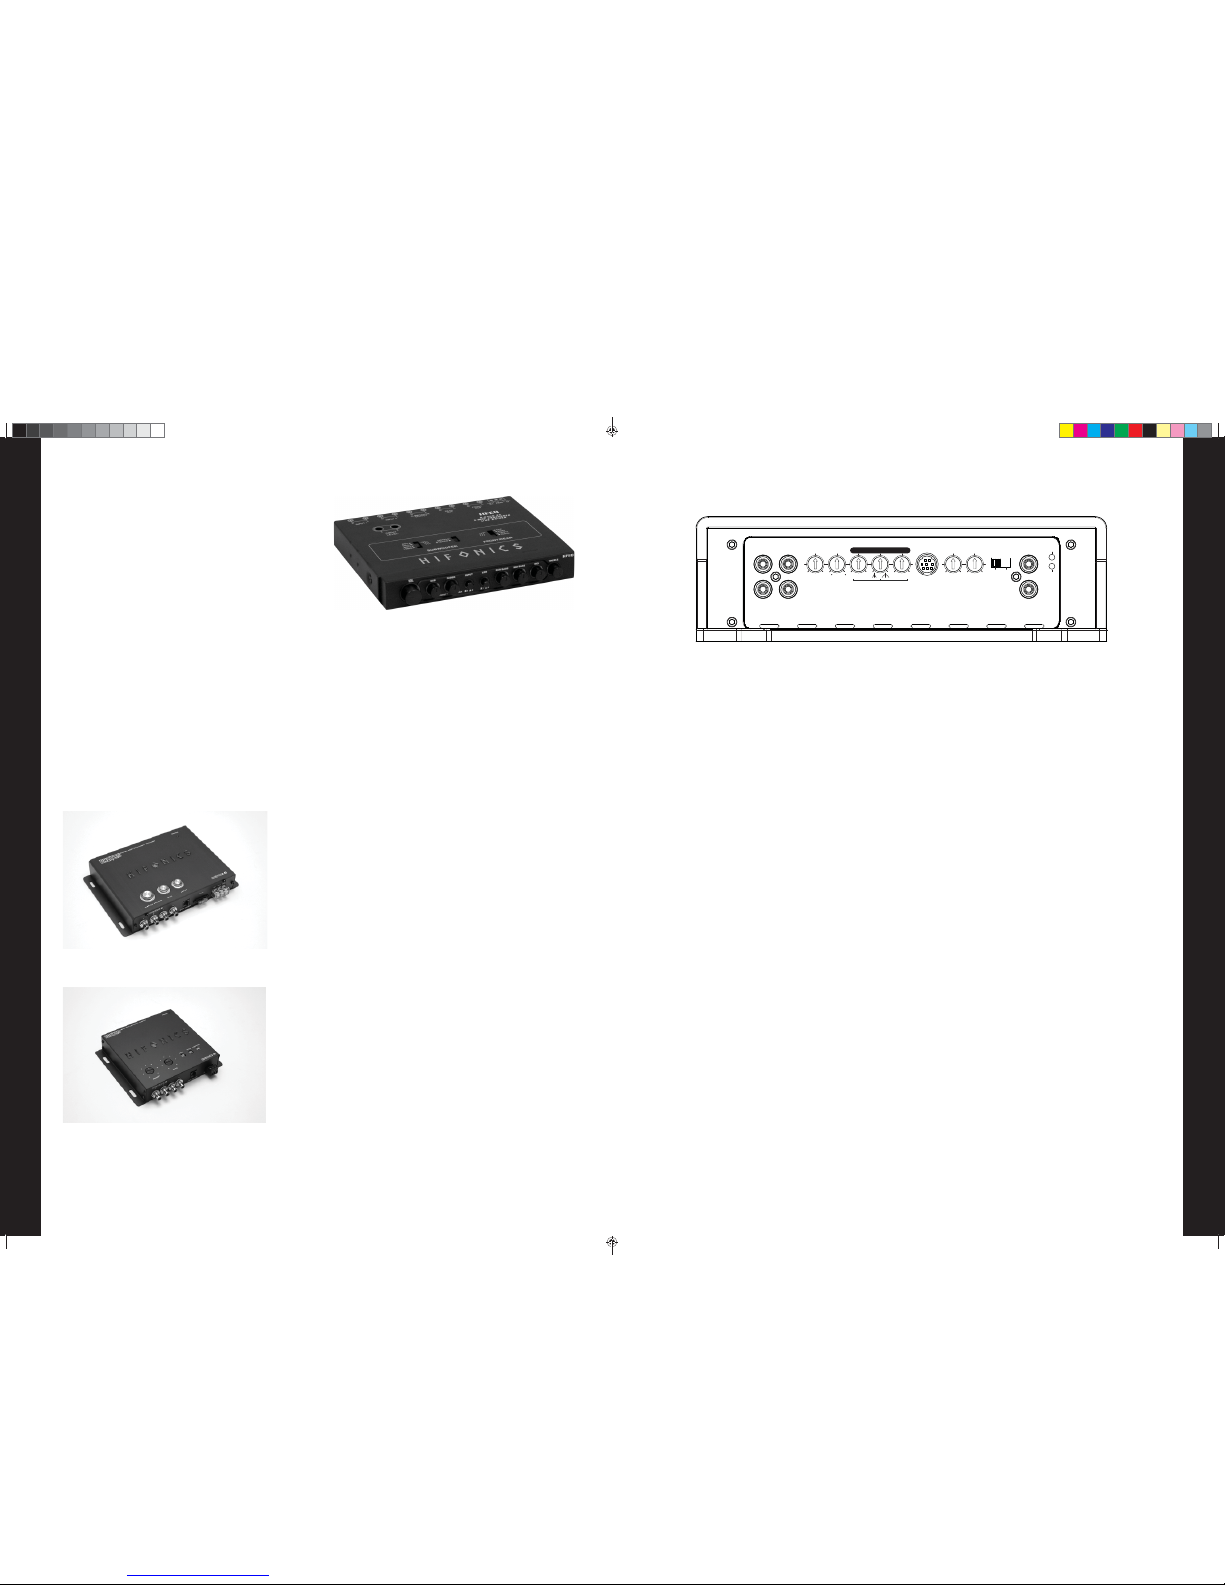
The HFEQ is a 4 band EQ 4-band equalizer with +18dB variable amplitude on each band. The HFEQ also
features a 9 volt line driver which means you can drive many amplifi ers without the need for an additional
line-driver.
Other features are Master volume and subwoofer volume control, Front to rear dual-amp fader, 2-audio
inputs with level matching. This means you can adjust the CD player and game console inputs so they don’t
blow your ears out when you switch between them. The HFEQ also gives you Selectable 12dB high-pass
front / rear crossover, Selectable 12dB low-pass sub output and Selectable for mono or stereo outputs.
BXiPro 2.0 & BXiPro 1.0 - Digital Bass Enhancement Processors
HFEQ - Hifonics EQ
The HFEQ is the perfect addition to any system.
The HFEQ is a ½ DIN ISO mount chassis which
means it needs a very narrow hole to be trimmed
into the dash. It can also be mounted under the
dash or center console. The key to successful
operation is “within reach” for quick adjustments to
the system when music style or sound changes.
If you just need to get a bit more control of the bass
frequencies, the BXiPro Digital Bass Enchantment
Processors are perfect.
The BXiPRO processors contain a Bass Driver circuit that
accurately recreates and injects Low frequency information
back into the signal path. What that means in everyday terms
is that the BASS BOOSTER will give more bass impact to
the best or the worst of your digital or analog media.
The BXiPro 2.0 also features input noise reduction circuitry
and master volume on the unit plus illuminated controls
7
B. Amplifier Feature Descriptions
5(027(
'HVLJQHGDQG(QJLQHHUHGLQWKH86$
,1387 287387
//
55
0$67(5
287
6/$9(,1
',$*1267,&
$0%(57+(50$/
5('6+257&,5&8,7
5('&/,3
$0%(51($5&/,3
*5((135(&/,3
067 6/9
02'(3+$6(
9 9
/(9(/
+]
68%621,&
+]
/3)
%$66(4
+] G%
%2267 :,'7+ &(17(5
FEATURES FOR ODIN 2K & CYCLOPS 3K
These amplifi ers feature two DIAGNOSTIC LED’s. One monitors Short Circuits and Thermal Protection while
the second monitors Clipping status.
» INPUT: RCA Inputs receives signal from the source unit.
» OUTPUT: Passes full range signal through the amplifi er unchanged by settings on the amplifi er. Use
these set of RCA’s to reduce the need for muliple runs of cable to the amplifi er installation location.
» LEVEL: This is the input level used to balance the amplifi er with the voltage from the source unit.
Voltage is variable from 0.2V to 9V.
» PHASE: Variable time alignment from 0 to 180 degrees.
» BASS EQ: PARAMETRIC
• BOOST: 0 to +10dB. Will enhance bass the FREQUENCY selected.
• WIDTH: Narrow to Wide range enhancements above and below the center FREQUENCY.
• CENTER: Variable center frequency from 30Hz to 100Hz.
» REMOTE: Plug in the bass remote to this port.
» SUBSONIC FILTER: Low frequency cutoff variable from 15Hz to 35Hz.
» LOW PASS FILTER: High frequency cutoff variable from 35Hz to 250Hz.
» MODE: (ODIN 2K & CYCLOPS 3K):
• MST (MASTER): Factory setting for the switch location when using the amp alone is always set to
MST. Also used when linking a pair of either the ODIN 2K or CYCLOPS 3K amplifi ers. When in MST
position, a single RCA can be connected to the MASTER OUT RCA receptacle to provide signal to
the SLAVE INPUT on the SLAVE amplifi er.
• SLV (SLAVE): Your MODE switch should only be in this position if you are linking a pair of ODIN
2K or CYCLOPS 3K amplifi ers and one of them will be the SLAVE. At that point the SLAVE amp will
receive the single RCA on the SLA VE IN. No other RCA’s can be connected to your amplifi er other
than SLAVE IN when in SLAVE IN position.
» DIAGNOSTIC INDICATORS: There are two indictor LED which visually represent the amp condition.
• Top: Green - Power On. Amber - Thermal mode. Red - Short Circuit.
• Bottom: Green is Pre-Clip, Amber is Near Clip, Red is Clipping.
Manual-MTOlypmus-Odin-Cyclops.indd Spread 7 of 12 - Pages(18, 7)Manual-MTOlypmus-Odin-Cyclops.indd Spread 7 of 12 - Pages(18, 7) 7/25/2014 6:20:03 PM7/25/2014 6:20:03 PM
Page 8
8
C. ODIN 2K & CYCLOPS 3K Amplifier Applications
C. ODIN 2K & CYCLOPS 3K
AMPLIFIER APPLICATIONS
Interconnect cable checklist:
A MONO signal source is suggested, such as would be available from the mono – sub bass output of an
active crossover, whether stand alone, or built into a head unit or equalizer.
IMPORTANT: Do not be tempted to connect the hot, or positive outputs, from any source together
to obtain a mono signal, as this could very well damage the output stage of that source. It is not
necessary, but recommended, to feed the SAME signal to both left and right inputs via a Y-adapter
RCA cable. Connect the mono speaker positive terminal to the RIGHT +, and its negative terminal
to LEFT -.
Control setting checklist:
» LEVEL: Minimum (7 oclock)
» PHASE: 0
o
(7 oclock)
» BOOST: 0 (7 oclock)
» WIDTH: Half (12 oclock)
» CENTER: 45Hz (10 oclock)
» SUBSONIC: 25Hz (12 oclock)
» LPF: 80Hz (11 oclock)
» MODE: MST
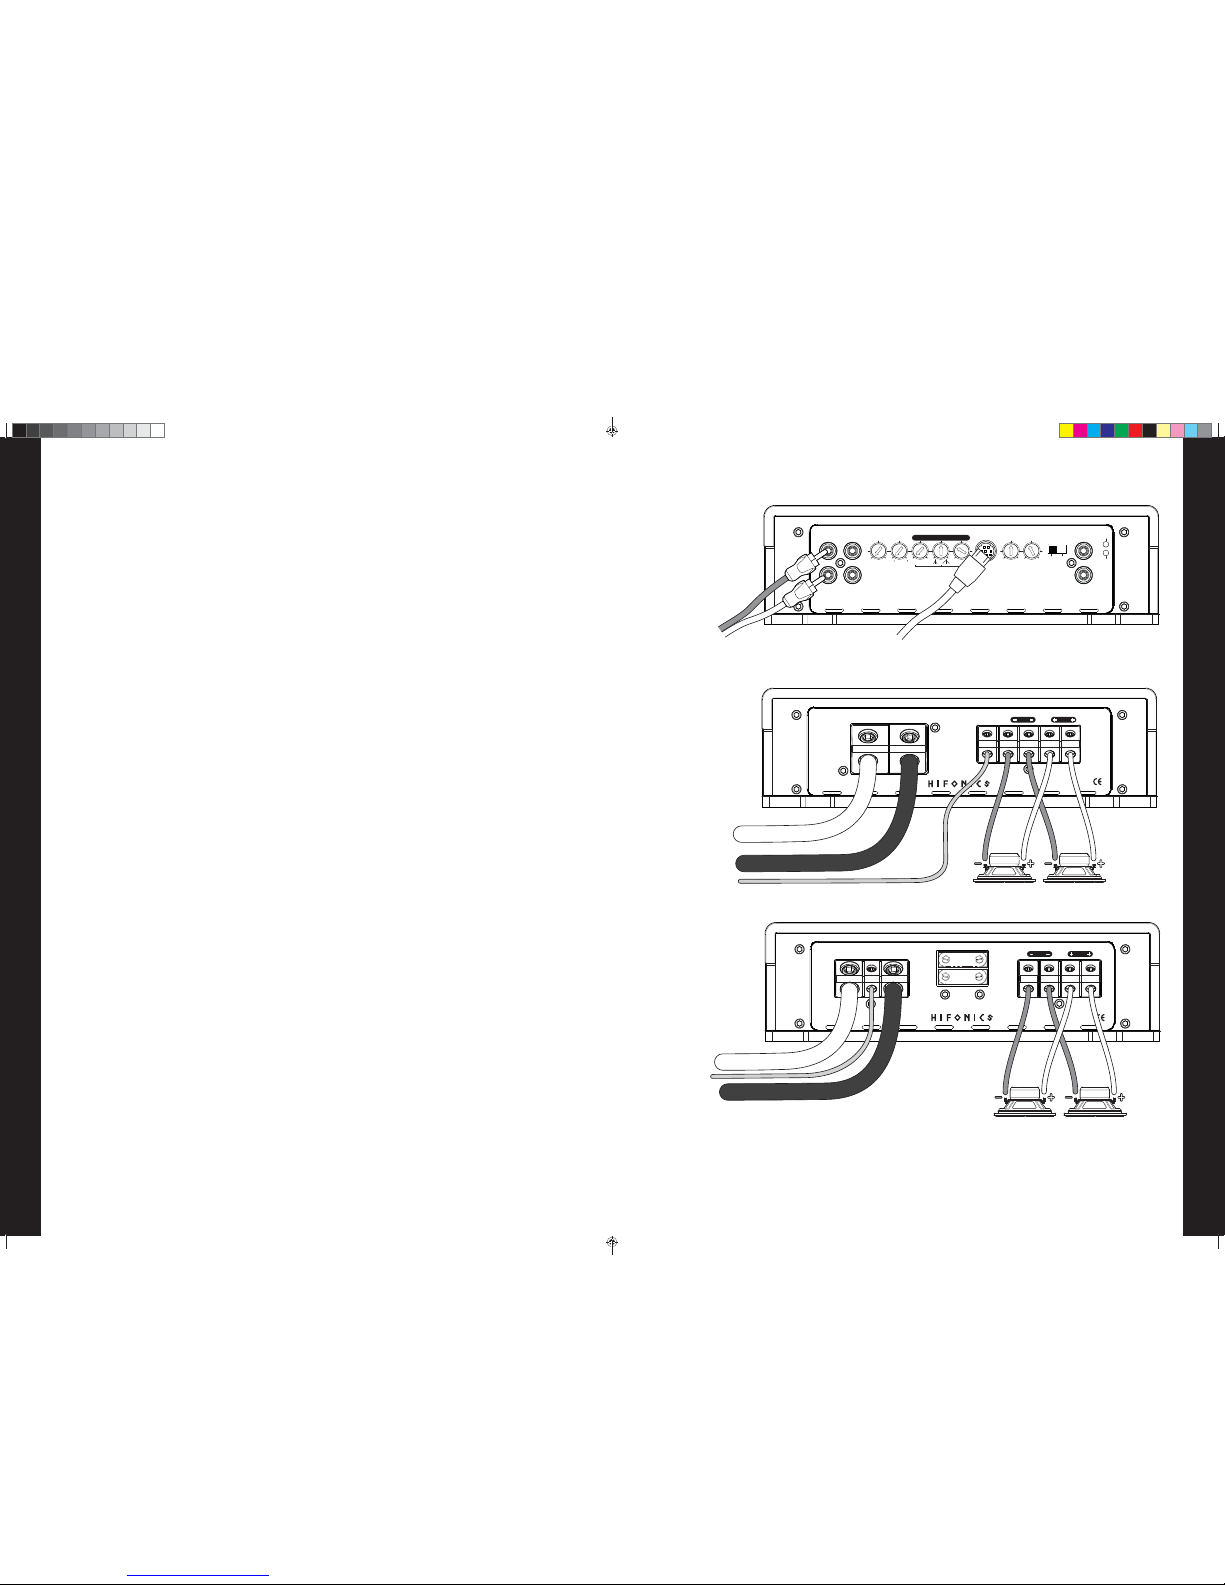
SINGLE AMP INSTALLATION PROCEDURE
1. Connect the amp LINE INPUTS to the Radio/CD player full range or mono line outputs with good quality
RCA interconnect cables.
2. Plug the HFR-G1 remote module into the amp remote input DIN connection.
3. Route a power cable (4-gauge for Odin 2K / 0-gauge for Cyclops 3K) directly to the vehicle battery with
an in-line fuse.
4. Connect a ground (4 or 0-gauge) cable directly to chassis ground within 18” of the amplifi er.
• Be sure to remove any paint or primer from the ground point.
• Use a nut, bolt and lock washer to secure the ground cable to the chassis ground.
5. Connect the subwoofer(s) in accordance to the diagrams below.
6. Make sure the MASTER/SLAVE switch is in the MST position.
NOTE: The amplifi er will not work if the MASTER/SLAVE switch is in the SLV position
17
F. Fine Tuning: Signal Processing
F. FINE TUNING: SIGNAL PROCESSING
Every audio system can benefi t from being fi ne-tuned. After the amplifi ers, speakers and subwoofers have
been dialed in, the next step is fi ne tuning with external signal processing. Amplifi ers have limited signal
processing designed for the specifi c speakers and subwoofers that are connected to those amplifi ers. For the
ultimate control of equalization in a vehicle, consider some of these Hifonics signal processors to continue
improving the sound of your system.
CONTROL
Most car audio enthusiasts are very happy to install a system, set it and forget it. However, there are a few
of us listeners – you know who you are – who are never satisfi ed. Especially if you have a wide variety of
musical styles you enjoy. You have noticed how a piece of music from one record company or one artist can
sound completely different than the next. One might need a quick adjustment to the bass, while another might
need to have the high end frequencies toned down to keep from ripping your face off. That requires control.
Hifonics Signal Processors put control at your fi ngertips. Wherever you and/or your installer can install the
remote controls included with several of these products, you will be able to make quick adjustments or
tweaks, to the system to refl ect the great and not so great recordings you play through your system.
EQUALIZATION
Shaping the sound is a critical process in the fi ne tuning of a high performance system. Creating a
boost at certain frequencies or dip where frequencies might be too strong is going to require real control
of equalization.
Here is a quick rundown of Hifonics processors. For more information, check out the website.
HDBR - Hifonics Digital Bass Restoration
The HDBR contains a BASS DRIVER circuit that accurately
recreates and injects Low Frequency information back into
the signal path. What that means in everyday terms is that
the HDBR will give more bass impact to your best high
quality digital media or your lowest quality recordings or
worst radio station reception.
The HDBR has a unique equalization circuit that contours the restored bass according to your desires using
the variable shaping controls.
We have also included a dash mount remote control with a Bass Maxximizer Indicator that becomes brighter
as you maximize the restoration or dimmer as you back off on enhancements allowing you to be in constant
control of the restoration level.
Manual-MTOlypmus-Odin-Cyclops.indd Spread 8 of 12 - Pages(8, 17)Manual-MTOlypmus-Odin-Cyclops.indd Spread 8 of 12 - Pages(8, 17) 7/25/2014 6:20:04 PM7/25/2014 6:20:04 PM
Page 9
16
E. Troubleshooting a System
A ticking or whine that changes with engine RPM:
1. This problem could be caused by radiation pickup of RCA cables too near to a fuel pump or a distributor,
for instance. Relocate cables to resolve this issue.
2. Check that the head unit ground is connected straight to the vehicle chassis, and does not use factory
wiring for ground.
3. Try to supply the head unit with a clean +12 volt supply directly from the battery +, instead of using a
supply from the in-dash wiring/fusebox.
A constant whine:
This type of noise can be more diffi cult to pinpoint, but is usually caused by some kind of instability, causing
oscillations in the system.
1. Check all connections, especially for good grounds.
2. Make sure that no speaker leads are shorting to exposed metal on the vehicle chassis.
3. RCA cables are notorious for their problematic nature, so check that these are good, in particular the
shield connections.
9
C. ODIN 2K & CYCLOPS 3K Amplifier Applications
5(027(
'HVLJQHGDQG(QJLQHHUHGLQWKH86$
,1387 287387
//
55
0$67(5
287
6/$9(,1
6((2:1(560$18$/
)25',$*1267,&&2'(6
067 6/9
02'(3+$6(
9 9
/(9(/
+]
68%621,&
+]
/3)
%$66(4
+] G%
%2267 :,'7+ &(17(5
',$*1267,&
$0%(57+(50$/
5('6+257&,5&8,7
5('&/,3
$0%(51($5&/,3
*5((135(&/,3
63($.(5287387
32:(5,1387
9 5(0*1'
63($.(5 287387
)86(
32:(5,1387
*1' 5(0 9
60
60
ODIN 2K
ODIN 2K, CYCLOPS 3K
CYCLOPS 3K
Minimum fi nal loudspeaker impedance: 1 Ohms mono
Manual-MTOlypmus-Odin-Cyclops.indd Spread 9 of 12 - Pages(16, 9)Manual-MTOlypmus-Odin-Cyclops.indd Spread 9 of 12 - Pages(16, 9) 7/25/2014 6:20:04 PM7/25/2014 6:20:04 PM
Page 10

10
C. ODIN 2K & CYCLOPS 3K Amplifier Applications
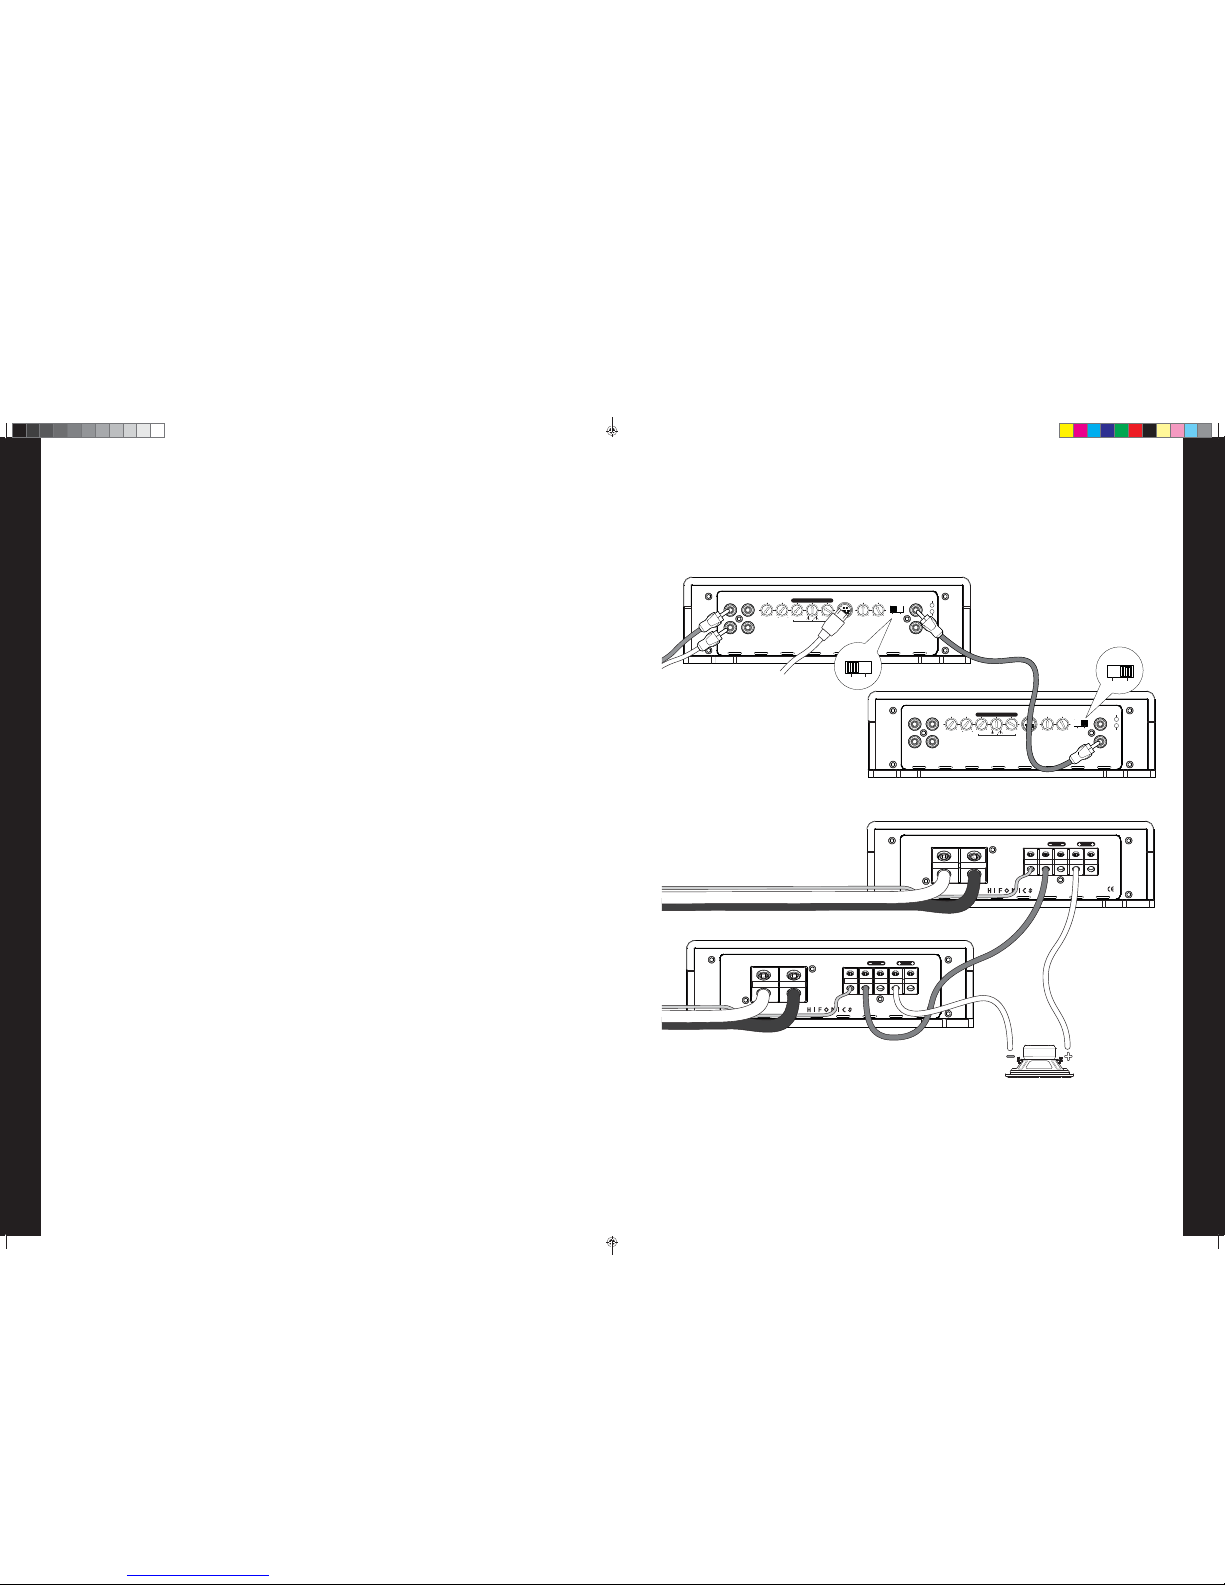
DUAL AMP INSTALLATION PROCEDURE
» Connect the amp LINE INPUTS to the Radio/CD player full range or mono line outputs with good quality
RCA interconnect cables.
» Plug in the HFR-G1 bass remote module into the amp remote input DIN connection on the Master amp.
This will allow the Master amp to control both Master and Slave with just one Bass Remote.
» Connect an RCA jumper cable from the Master amp MASTER OUTPUT to the Slave amp SLAVE
INPUT.
NOTE: This will “link” the amps so that the Master amp crossover switches will control both the
Master and Slave amps. The Slave amp crossover switches will be bypassed.
1. Route two power cables (4-gauge for Odin 2K / 0-gauge for Cyclops 3K) directly to the vehicle battery
with an in-line fuse to EACH amplifi er.
2. Connect two ground cables (4 or 0-gauge) directly to the chassis within 18” of EACH amplifi er.
3. Be sure to remove any paint or primer from the ground point.
4. Use a nut, bolt and lock washer to secure the ground cable to the chassis ground
5. Make sure the Master amp MASTER/SLAVE switch is in the MST position.
6. Make sure the Slave amp MASTER/SLAVE switch is in the SLV position.
7. Connect the subwoofer(s) in accordance to the diagrams on the next page.
8. Connect a 12 gauge jumper from Master amp speaker - to Slave amp speaker - as shown on the next
page.
15
E. Troubleshooting a System
Low output power
1. Check that level controls have been set up properly.
2. Make sure that the battery voltage, as measured at the amplifi er’s +12 volt and ground terminals,
is 12.6 volts or more.
3. Check all +12 volt and ground connections.
Fuses blowing
1. The use of loudspeaker impedances below the recommended minimums will draw more current. Confi rm
impedence for all speakers and subwoofer systems are not below reccomended levels.
2. A short on the main +12 volt cable from the battery to the vehicle chassis will cause the main fuse
to blow.
3. If an amplifi er fuse blows continually, with only +12 volt, ground and remote leads connected, the
amplifi er may be faulty.
System does not turn on
1. Check all fuses.
2. Check all connections.
3. Measure the +12 volt and remote turn on voltages at the amplifi er terminals. If these are non-existent or
low, take voltage measurements at fuse holders, distribution blocks, the head unit’s +12 volt and remote
leads to localize the problem.
4. If the HIFONICS lettering is illuminated but you do not have Power or Protection illuminated, simply
remove your remote wire and use a jumper wire from 12V+ on the amplifi er to the Remote connection
on the amplifi er. If the amplifi er turns on like normal then you do not have adequate voltage/amperage
on the Remote turn-on wire from the source unit to turn on the amplifi er. You will need to seek out a
certifi ed installer to install a relay for your amplifi er. If the jumper does not power your amplifi er on,
you may have internal damage and should contact Hifonics Customer Service to locate an Authorized
Repair Center.
Noise problems
System noise can be divided into two categories, hiss, and electrical interference.
Hiss, or white noise:
1. High levels of white noise usually occurs when amplifi er level controls are turned up TOO HIGH. You
must re-adjust according to the procedures in section “D. Setting Up Systems to Maxximize Performance”
2. Another major problem that can cause excessive hiss, is a noisy head unit - unplug the amplifi er input
RCA cables, and if the hiss level reduces, the source unit is at fault.
Electrical interference:
The inside of an automobile is a very hostile electrical environment. The multitude of electrical systems, such
as the ignition system, alternator, fuel pumps and air conditioners create radiated electrical fi elds, as well as
noise on the +12 volt supply and ground. Remember to isolate the problem. First unplug the amplifi er input
RCA cables, if the noise is still present, next check the speaker leads. If the noise is gone, plug the RCA’s
back into the amplifi er, and investigate the source driving the amplifi er, one component at a time.
Manual-MTOlypmus-Odin-Cyclops.indd Spread 10 of 12 - Pages(10, 15)Manual-MTOlypmus-Odin-Cyclops.indd Spread 10 of 12 - Pages(10, 15) 7/25/2014 6:20:05 PM7/25/2014 6:20:05 PM
Page 11
14
E. Troubleshooting a System
E. TROUBLESHOOTING A SYSTEM
The key to fi nding the problem in a misbehaving sound system is to isolate parts of that system in a logical
fashion to track down the fault.
Description of the Diagnostic system built into all HIFONICS amplifi ers
The diagnostic system will shut down the amplifi er, until reset by turning the head unit off, and back on. This
condition will be indicated by the front panel PROTECT LED lighting up under the following circumstances:
1. A short circuit on the loudspeaker leads.
2. An internal amplifi er fault that causes a DC offset on the loudspeaker output. Should the amplifi er go
into diagnostic mode, simply disconnect all RCA and speaker leads, while keeping +12 volt, power
ground and remote leads connected.
Should the amplifi er go into diagnostic mode, simply disconnect all RCA and speaker leads, while
keeping +12 volt, power ground and remote leads connected.
1. After diconnecting the RCA’s and speakers turn the amplifi er back on, and if the diagnostic LED lights,
the amplifi er has an internal fault.
2. If the diagnostic lights are showing good condition, plug the RCA cables back, and reset the amplifi er. If
it goes into diagnostic now, the fault lies in the input, either with bad cables or source unit.
3. If the amplifi er seems ok with RCA cables plugged in, connect the speakers, one at a time, and if one
speaker or its wiring is faulty, it will activate the diagnostic system.
4. If the amplifi er is still in Protection mode after the above steps, remove all RCA’s and wires from the
amplifi er. Take a 12” length of speaker wire, trim the plastic off of each end exposing the wire. Now
connect one end of the wire to the 12V+ on the amplifi er and connect the other to the Ground on the
amplifi er. You will have a brief spark indicating that the Capacitors have been discharged and the
drivercard has been reset. Remove the jumper wire and reconnect your Power, Ground and Remote
wires. Attempt to power the amplifi er up like normal. In some cases this can Reset the amplifi er if
permanent damage has not previously been done.
Amplifi er heatsink overheating
The amplifi ers will shut down when the heatsink temperature reaches 176 degrees fahrenheit (80 degrees
centigrade), and turn back on once the unit has cooled down below that point.
Causes of overheating:
1. Inadequate cooling - relocate or remount to provide better natural airfl ow over the fi ns.
2. Driving high power levels into low impedances - back off on the volume control, and confi rm you are not
loading the amplifi er with less than the recommended loudspeaker impedance.
3. Excessive voltage drop can also cause overheating. Confi rm the vehicle’s electrical system is
operating properly.
11
C. ODIN 2K & CYCLOPS 3K Amplifier Applications
5(027(
'HVLJQHGDQG(QJLQHHUHGLQWKH86$
,1387 287387
//
55
0$67(5
287
6/$9(,1
6((2:1(560$18$/
)25',$*1267,&&2'(6
067 6/9
02'(3+$6(
9 9
/(9(/
+]
68%621,&
+]
/3)
%$66(4
+] G%
%2267 :,'7+ &(17(5
',$*1267,&
$0%(57+(50$/
5('6+257&,5&8,7
5('&/,3
$0%(51($5&/,3
*5((135(&/,3
5(027(
'HVLJQHGDQG(QJLQHHUHGLQWKH86$
,1387 287387
//
55
0$67(5
287
6/$9(,1
6((2:1(560$18$/
)25',$*1267,&&2'(6
067 6/9
02'(3+$6(
9 9
/(9(/
+]
68%621,&
+]
/3)
%$66(4
+] G%
%2267 :,'7+ &(17(5
',$*1267,&
$0%(57+(50$/
5('6+257&,5&8,7
5('&/,3
$0%(51($5&/,3
*5((135(&/,3
63($.(5287387
32:(5,1387
9 5(0*1'
63($.(5287387
32:(5,1387
9 5(0*1'
067 6/9
02'(
067 6/9
02'(
Linking two amps for single or dual subwoofer application
Amplifi ers are stable to 2-OHMS when linked
Manual-MTOlypmus-Odin-Cyclops.indd Spread 11 of 12 - Pages(14, 11)Manual-MTOlypmus-Odin-Cyclops.indd Spread 11 of 12 - Pages(14, 11) 7/25/2014 6:20:05 PM7/25/2014 6:20:05 PM
Page 12
12
D. Setting Up Systems to Maxximize Performance
%$66(4
+] G%
%2267 :,'7+ &(17(5
D. SETTING UP SYSTEMS TO MAXXIMIZE
PERFORMANCE
ODIN 2K & CYCLOPS 3K
General:
At this point you are ready to get more specifi c on the settings for the amplifi er.
Phase:
Time alignment, typically recommended at 0 degrees unless using multiple amps and subs in both the front
and rear of the vehicle. The Phase can be adjusted to give the perception of bass reaching the listener at
the same time regardless of location.
Subsonic:
This setting acts as a low frequency cut off for your system bass reproduction. The point that you set it at
cuts off any frequencies from reproduction below this point.
EXAMPLE: If you adjust the Subsonic to 25Hz, the amplifi er will not play frequencies below 25Hz
but will play frequencies from 25Hz to the chosen Low Pass frequency.
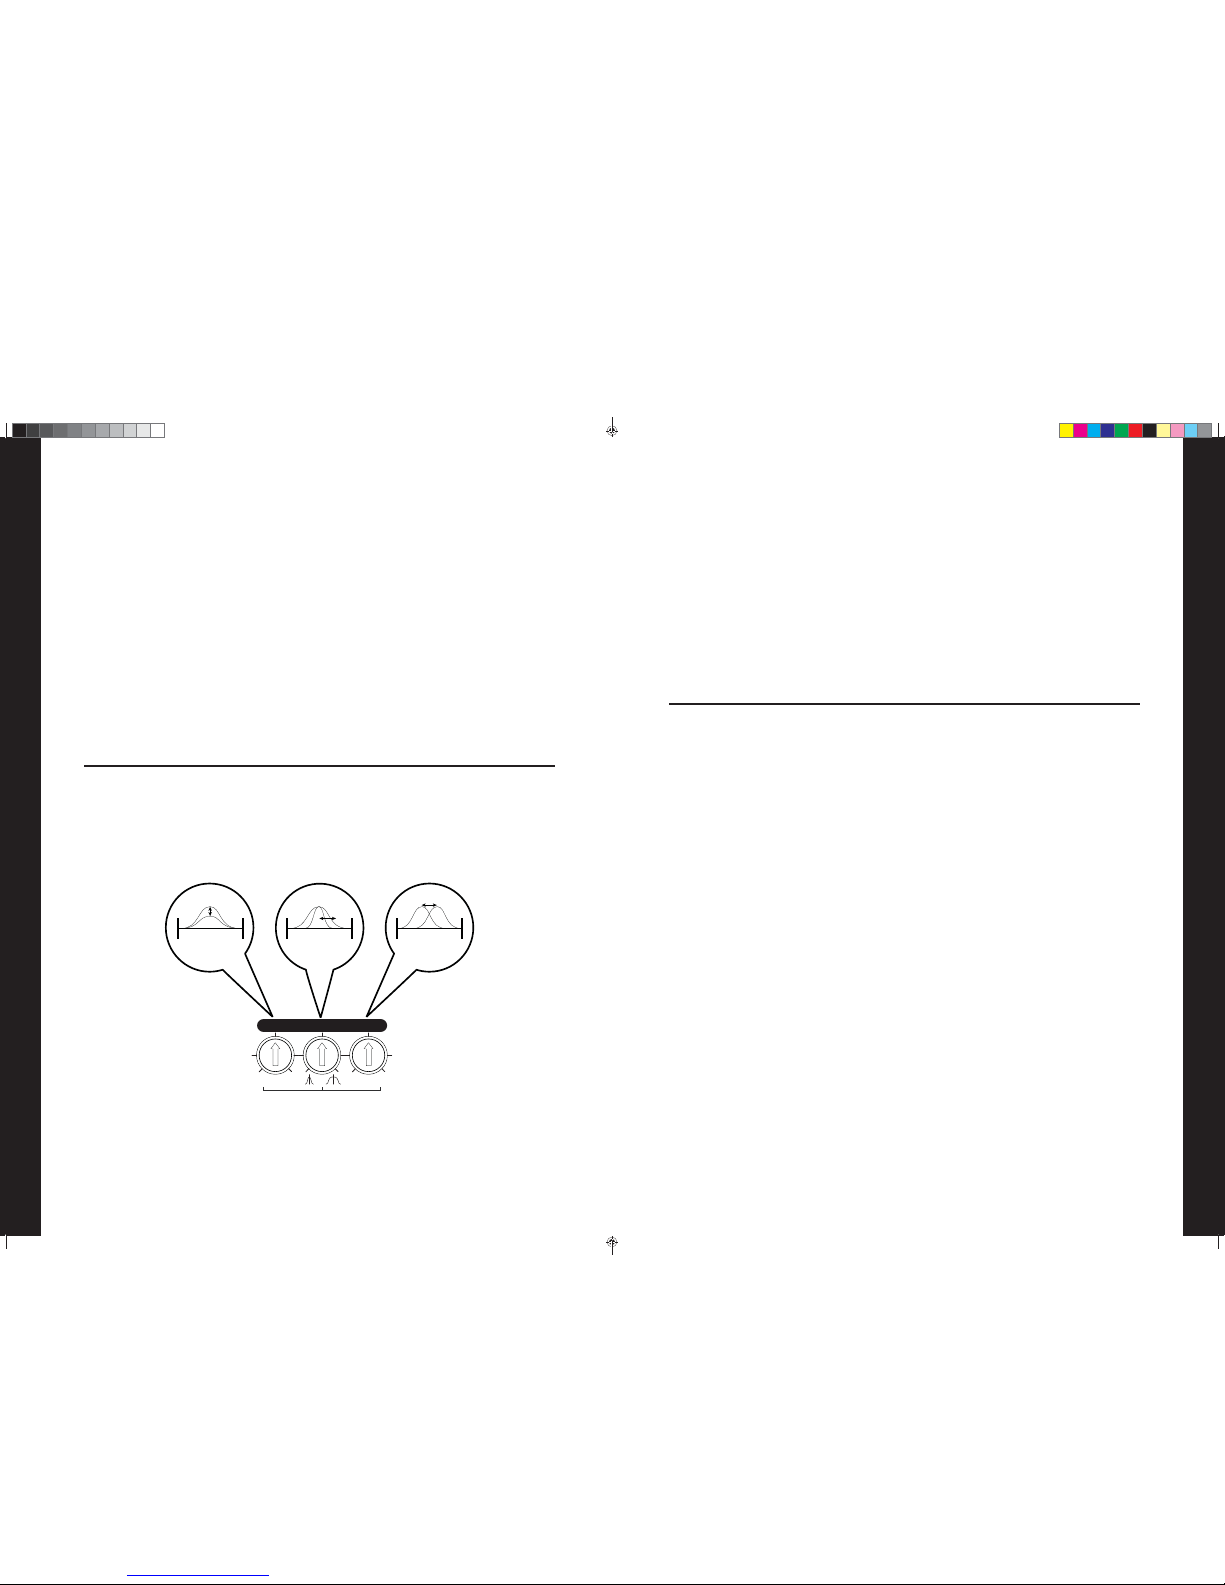
PARAMETRIC BASS EQ
Frequency:
This setting is used for selecting the frequency you want to focus your enhancement on. Suggested
enhancement is from 35-45Hz, but you should be careful not to set enhancement below the F3 or -3dB point
of your sub/enclosure combo.
13
D. Setting Up Systems to Maxximize Performance
Bandwidth:
This setting controls the amount of frequencies included in the Bass Boost. The bandwidth varies from
narrow to wide in a pyramid style boost with the selected Bass Frequency value being the center.
Boost:
This setting adjusts the amount of boost on the selected Bass Frequency and Bandwidth. This setting is
variable from 0-10dB. This feature provides impact to your bass, but if not adjusted correctly, it can be over
used and cause damage to your subwoofers and amplifi ers. It is best to slowly turn this setting clockwise
until the desired bass impact is felt. It is not recommended to exceed the 12 o’clock position unless listening
at a low volume or a low recording quality as this can result in high distortion and premature clipping.
Low Pass:
The Low Pass control acts as a ceiling and doesn’t allow frequencies above the desired setting to
be reproduced.
EXAMPLE: If you adjust the Low Pass to 80Hz, the amplifi er will not play frequencies above
80Hz but will play frequencies from 80Hz to the chosen Subsonic frequency.
Level Control Setup:
Ensure that the Level is turned completely to the left prior to turning the system on. Next you should insert a
CD or other source material that you are familiar with to use as a reference, and turn the head unit volume
control to about 80% of its full setting. The system sound level will of course be very low, and the following
procedures will help you to match the amplifi er input sensitivities properly to the head unit output signal level.
It is important to match the amplifi er LEVEL input sensitivity to the Radio/CD output sensitivity. This can be
located in the Radio/CD or other source unit owner’s manual.
If the Radio/CD output sensitivity is 2 volts, then adjust the amplifi er LEVEL input to 2 volts.
If you are not sure what the Radio output sensitivity is, follow these
general guidelines:
Turn the level control up slowly, until you hear distortion, then back of f a few degrees on the control. If at any
point your amplifi er goes into protection, you will need to turn the LEVEL to the left a bit and then try again.
If you reach a point where the output does not increase, stop turning the LEVEL control to the right as the
amplifi er/subwoofer combo has reached its maxx output in this application.
Manual-MTOlypmus-Odin-Cyclops.indd Spread 12 of 12 - Pages(12, 13)Manual-MTOlypmus-Odin-Cyclops.indd Spread 12 of 12 - Pages(12, 13) 7/25/2014 6:20:06 PM7/25/2014 6:20:06 PM
 Loading...