

MTN Products Horizons Counter Top Complete Manual
!
! ! !
MTN Products
!
!
!
!
Horizons Counter Top
Complete Manual
Cooler Disassembly Instructions Included
!
!
!

Horizons®!Counter!Top!Complete!Manual!
!
!
! ! !
i!
Table of Contents
TABLE OF CONTENTS ......................................................................................................... I
TECHNICAL SPECIFICATIONS ........................................................................................... 1
ELECTRICAL SPECIFICATIONS ................................................................................................... 1
REFRIGERANT ......................................................................................................................... 1
COLD WATER .......................................................................................................................... 1
HOT WATER ............................................................................................................................ 1
GENERAL INFORMATION ................................................................................................... 2
GETTING TO KNOW THE INTERFACE ............................................................................... 3
INSTALLING THE HORIZON COUNTER TOP UNIT ........................................................... 4
PROGRAMMING THE HORIZON® COUNTER TOP COOLER ........................................... 5
THE REAR PANEL ............................................................................................................... 7
UNDERSTANDING THE DISPENSE SYSTEM .................................................................... 8
THE HORIZONS® CT WATER SYSTEM ...................................................................................... 8
DISASSEMBLY ..................................................................................................................... 9
HOT TANK DRAIN LOCATION ..................................................................................................... 9
SIDE PANEL REMOVAL ........................................................................................................... 10
FRONT PANEL REMOVAL ........................................................................................................ 11
ACCESSING THE LCD CIRCUIT BOARD AND DISPENSE SOLENOID ............................................ 12
REAR PANEL REMOVAL .......................................................................................................... 13
ACCESSING THE HORIZONS® COUNTER TOP MAIN PCB ........................................... 14
PARTS LOCATION ............................................................................................................. 15
TROUBLESHOOTING ........................................................................................................ 17
WATER NOT DISPENSING ........................................................................................................ 17
COLD WATER RESERVOIR IS FROZEN ...................................................................................... 17
WARM WATER DISPENSING FROM COLD SIDE ........................................................................... 17
WATER DISPENSING FROM HOT SIDE NOT HOT ......................................................................... 17
HOT WATER IS BOILING ........................................................................................................... 17
WIRING DIAGRAM ............................................................................................................. 19
Horizons®!Counter!Top!Complete!Manual!
!
!
! ! !
1!
Technical Specifications
Electrical Specifications
Voltage: 115 VAC, 60 Hz
Current: 5.6 Amps
Wattage: 640
Refrigerant
R134a refrigerant 1.6 oz. charge
Cold Water
Reservoir: 3.5L Seam Welded 304 Stainless
Cold Water Temperature: 45°F
ARI Cooling Capacity: 0.5 gph at 50°F
Hot Water
Hot Tank: 1.4 Liter 304 Stainless
Heat Band: External 520 Watts
Hot Water: Temperature: 186°F +/- 5°F
ARI Heating Capacity: 37 (6 oz.) cups per hour
165°F +/-5°F

Horizons®!Counter!Top!Complete!Manual!
!
!
! ! !
2!
General Information
• This POU should only be connected to a potable water source.
• Unit to be used indoors only.
• Do not locate unit in direct sunlight or next to a heat source.
• Always maintain 4” of clearance around cooler for proper air circulation.
• Do not install cooler in an area that may freeze.
• Cooler should be installed within 6 feet of a power source.
• Receptacle must be three-pronged ground. Never use extension cords.
• This Horizons® POU should only be connected to a power source after installation to
a waterline.
• WARNING: Should it become necessary to gain access to electrical components,
disconnect electrical power and shut water off prior to removing panels.
!
Horizons®!Counter!Top!Complete!Manual!
!
!
! ! !
3!
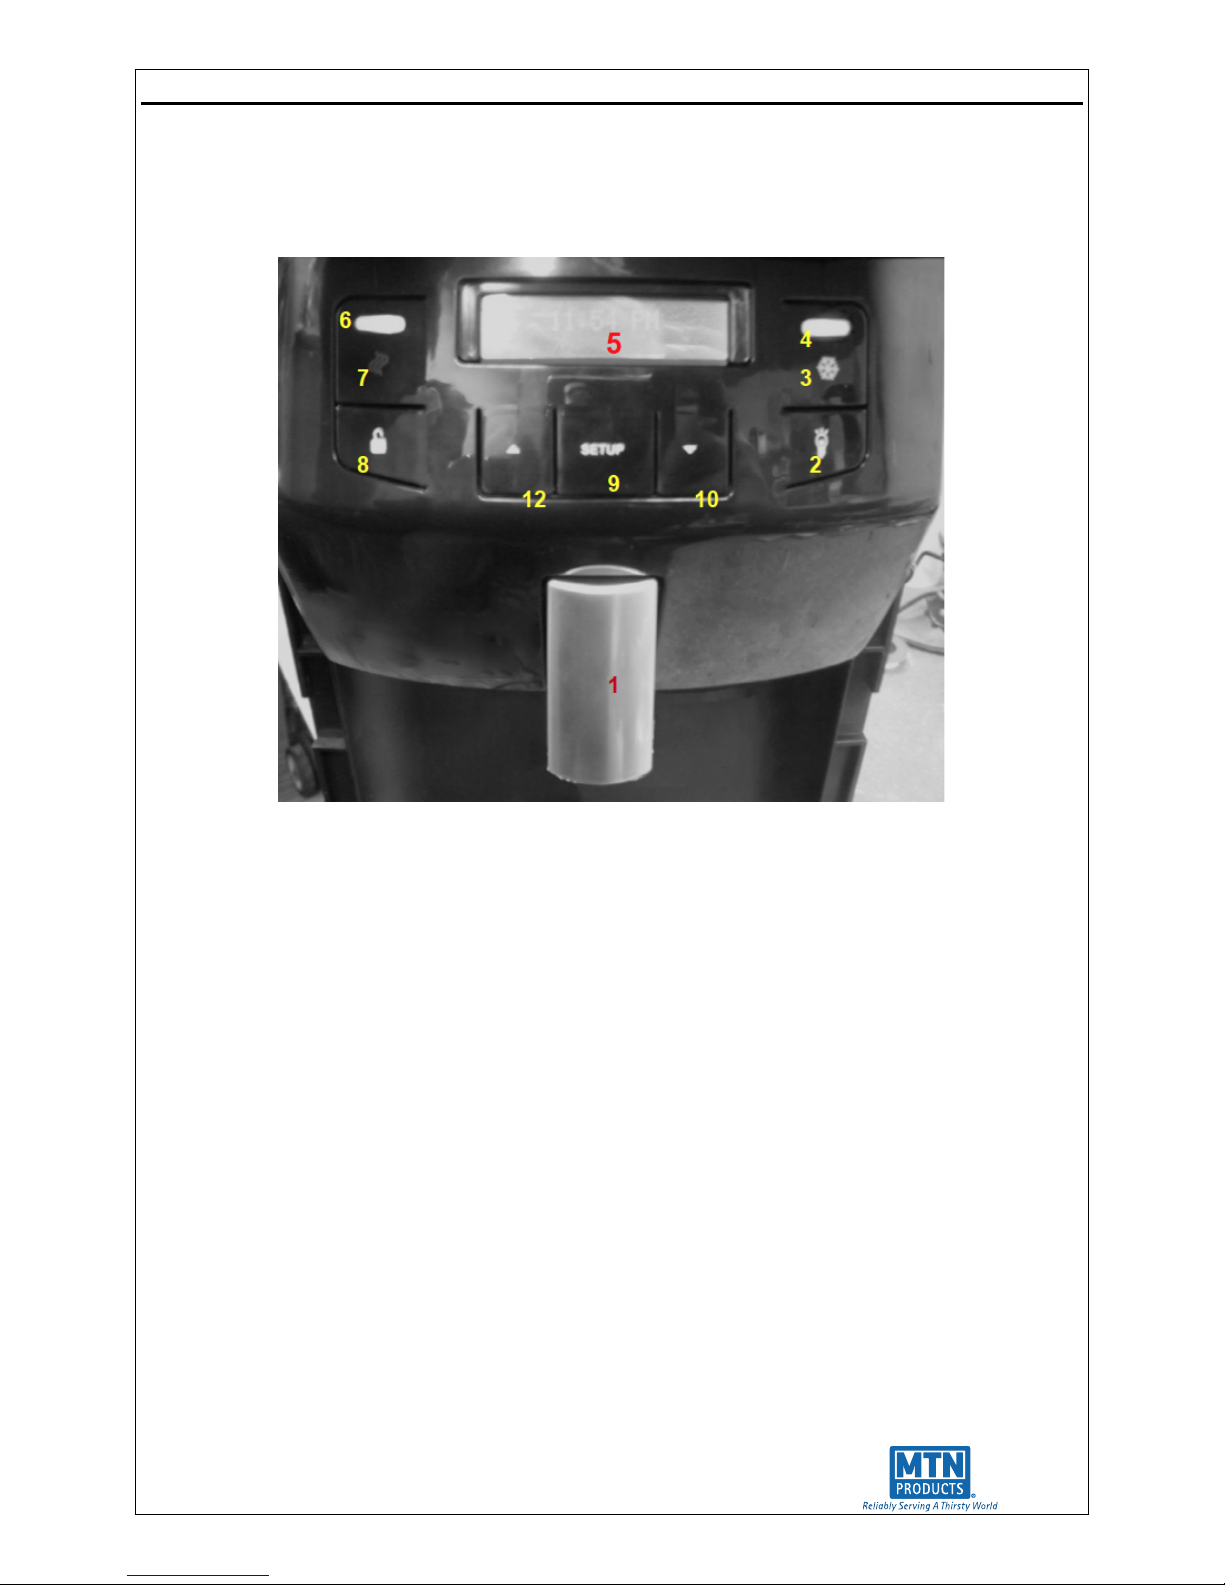
Getting To Know The Interface
1. Dispense nozzle bottom portion LED.
2. Panel brightness adjustment (3 variations).
3. Cold water dispense button.
4. Cold water indicator.
5. LCD information display screen.
6. Hot water indicator.
7. Hot water dispense button.
8. Hot water unlock (push and hold for 3 seconds to unlock).
9. Interface set up button (push and hold for 7 seconds to enter set up screen).
10. Scroll down button.
11. Scroll up button.

Horizons®!Counter!Top!Complete!Manual!
!
!
! ! !
4!
Installing the Horizon Counter Top Unit
Note: Ensure installation complies with all State and Local Plumbing Codes.
• Locate cold water supply line and install suitable access valve with a ¼” outlet with
shutoff. Connect 1/4” waterline to access valve. Tag shutoff valve.
• Install inline pressure regulator.
• Connect filters to 1/4” waterline. Follow the guidelines the filter manufacturer
provides for flushing filters prior to installation.
• Connect waterline to the water inlet fitting on the Horizon® Countertop cooler.
• Slowly open access water valve and allow cold reservoir to fill. Check for leaks while
cold reservoir fills.
• Connect power cord to a three-pronged outlet. Never break off the grounding prong
on the power cord.
Effective June 15, 2012: UL recommends that this unit should be used with a
ground fault circuit interrupting type (GFCI).
• Place a container under the dispense nozzle, and press the cold water dispense
button and hold until a steady stream of water is dispensing from nozzle.
• Press the hot unlock button and hold for 3 seconds, than press the hot dispense
button and hold until a steady stream of water is dispensed.
• Place the hot tank switch located on the rear of cooler to the “ON” position.
Note: Switch is designed to remain lit until the hot tank reaches proper operating
temperature.

Horizons®!Counter!Top!Complete!Manual!
!
!
! ! !
5!
Programming The Horizon® Counter Top Cooler
Note: All programming is accomplished using the three buttons
located directly below the LCD display screen.
VERY IMPORTANT: After each change is made, the “Setup” button
must be pressed for programing to be accepted.
• To access program mode press and hold the “Setup” button for 7 seconds.
• After 7 seconds Time will display on the LCD. Use the “Up” or “Down” buttons to set
the correct time.
• Press “Setup” button again and Date will display on the LCD. Use the “Up” or “Down”
buttons to set the correct date.
• Press “Setup” button again and ES (energy saving) start time will display on the
LCD. Factory default time is 11:00 PM. Use the “up” or “Down” buttons to set the
correct start time.
IMPORTANT: To activate ES push orange button in. This button is located on the
rear of Horizon.
Note: It is not recommended to use this feature if the cooler is set in a facility that
operates 24 hours per day.
• Press “Setup” button again and ES (energy saving) stop time will display on the
LCD. Factory default time is 6:00 AM. Use the “Up” or “Down” button to set time to
deactivate the ES mode.
• Press “Setup” button again and Mute will display on LCD. Factory default is Mute
Off. Use the “Up” or “Down” key to set mute mode.
• Press “Setup” button again and Accu-Temp will appear on the LCD. Factory default
is ACCU.TEMP On. It is recommended to be left in the On position. When either the
hot or cold water button is pressed the water pump comes on for one second and
recirculates the water in tubing back into the tank, pump than comes back on an and
will dispense either colder or hotter water. If Accu-Temp is set the off the
recirculation portion is shut off. . Use the “Up” or “Down” key to set Accu-Temp
mode.
 Loading...