


RK
AIL ING
By MTH Electric Trains
®
RAILKING GS-4 STEAM ENGINE
OPERATING INSTRUCTIONS
Thank you for purchasing the RailKing die-cast Gs-4 steam locomotive.
The engine’s die-cast body and tender are traditionally sized for operation
on any O-27 or larger layout. The engine is compatible with any standard
AC transformer and is completely compatible with most other 3-rail
locomotives, rolling stock and accessories.
The locomotive and tender are equipped with an electronic whistle and
electronic reverse unit that are simple and fun to operate. Each feature is
described among the following pages which should be read before the
engine is operated.
2
RailKing Gs-4 Operating Manual
QUICK START - BASIC OPERATION
The RailKing Gs-4 contains state-of-the art electronics for incredibly
realistic operation. Despite these advanced features, the Gs-4 is easy to
operate with any compatible standard AC transformer. All models are
equipped with an operating smoke system that should be primed with
smoke fluid before operating. Adding 15 -20 drops of fluid through the
smoke stack should be sufficient. If you choose to not prime the units with
fluid, turn the smoke unit switch located under the trailing truck to the
OFF position. (See Figure 1) This will prevent any damage from
occurring to the smoke unit when running the engine without a primed
smoke unit. For more information see the section on page 4 on Smoke Unit
operation.
The Gs-4 is controlled by a
ProtoSound® DCRU® electronic reverse
unit. The reverse unit operates in the
same manner that all reverse units
function by using forward, neutral and
reverse states that are entered each time
the throttle is turned on and off or by
using the transformer direction switch (if
so equipped).
The reverse unit is designed to ignore dirty track, dead spots on switches
or minor short circuits without disrupting the engine operation, even at
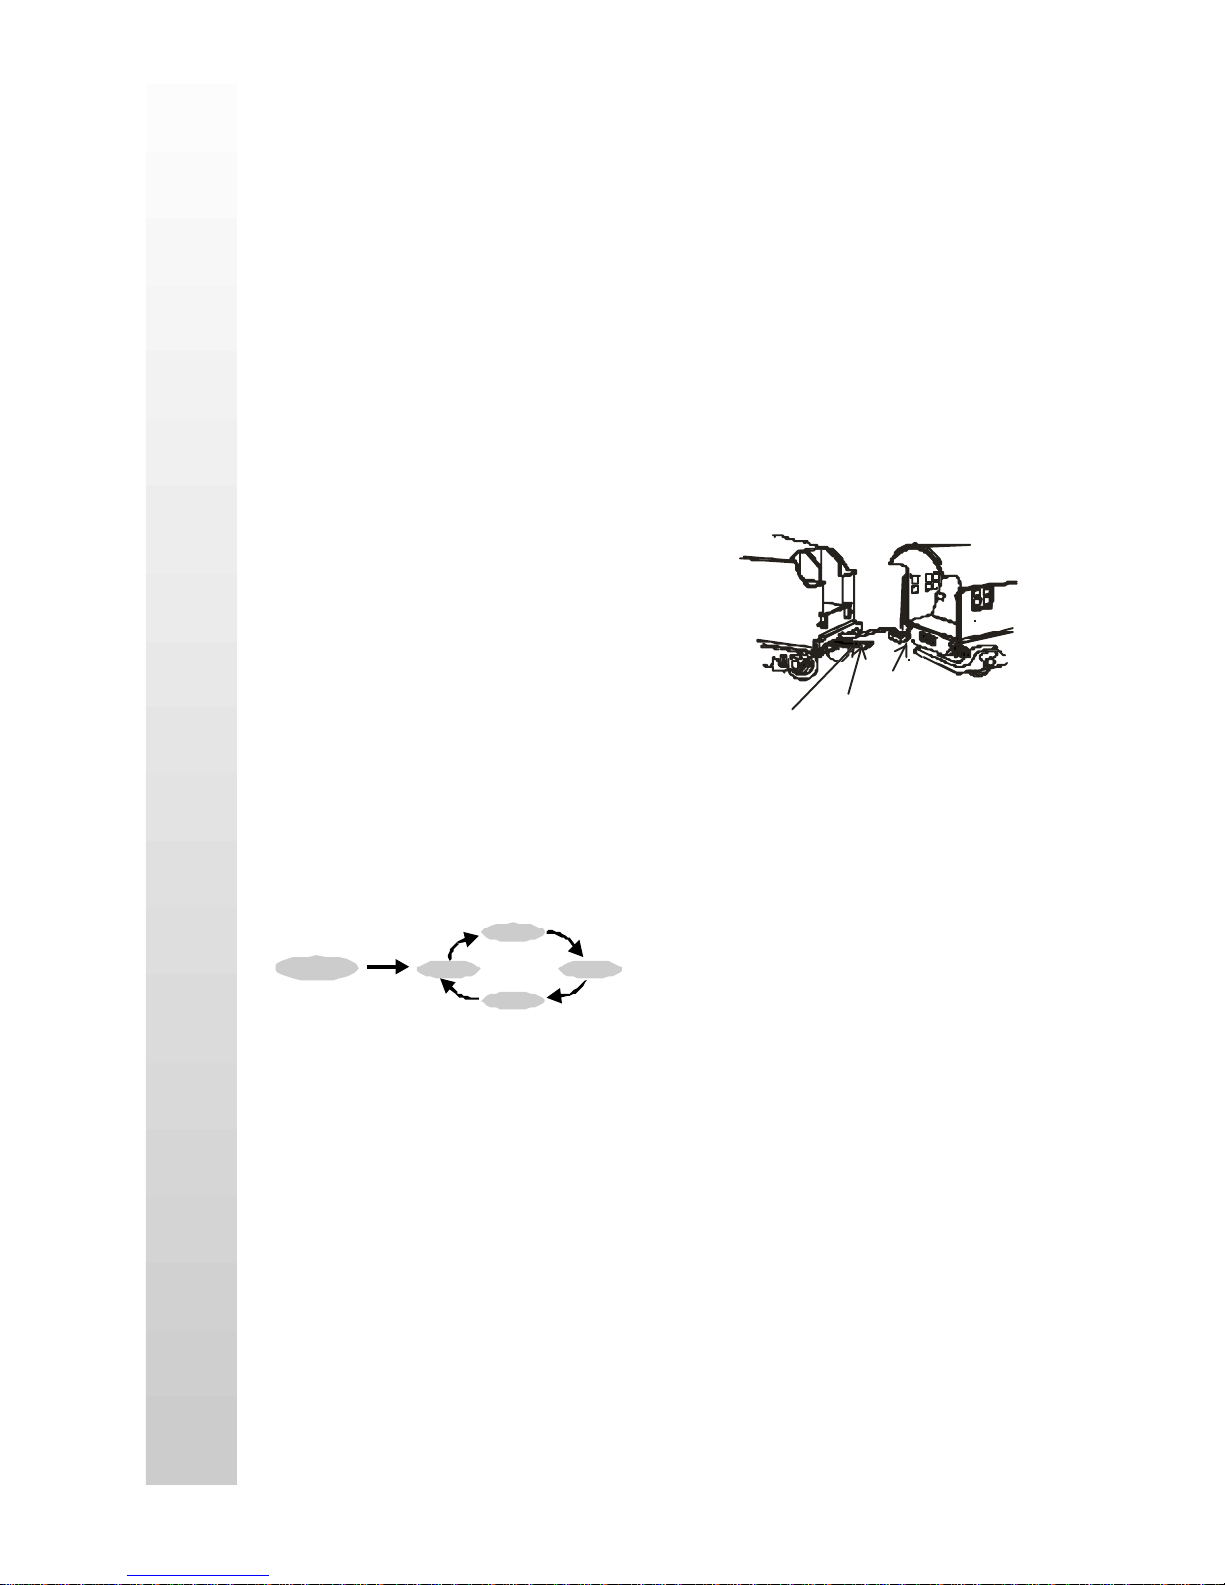
slow, prototypical speeds. Before the
engine can be operated however, the
reverse unit plug that extends out of
the tender must be inserted into the
receptacle at the back of the boiler
cab as seen in Figure 1. Once the
plug is inserted, the throttle on the transformer can be advanced. You will
see that only the engine’s lights come on. The engine does not run. This is
known as the RESET state. The ProtoSound® DCRU® will not power the
motor until the throttle is turned OFF and then ON again. At this point, the
engine will now function just like any other electronic or mechanical E-unit.
Plug Tender Plug Into
Boiler Socket At Back Of Cab
Use First Hole For O-72 Operation
Use 2nd Hole For Display and 96 Inch
or larger diameter curves
Figure 1: Pluggin in the tender harness
RESET
Neutral
Reverse
Neutral
Forward
Figure 2: ProtoSound® DCRU® Cycle Phases
3
RailKing Gs-4 Operating Manual
PROTOSMOKE™ UNIT OPERATION
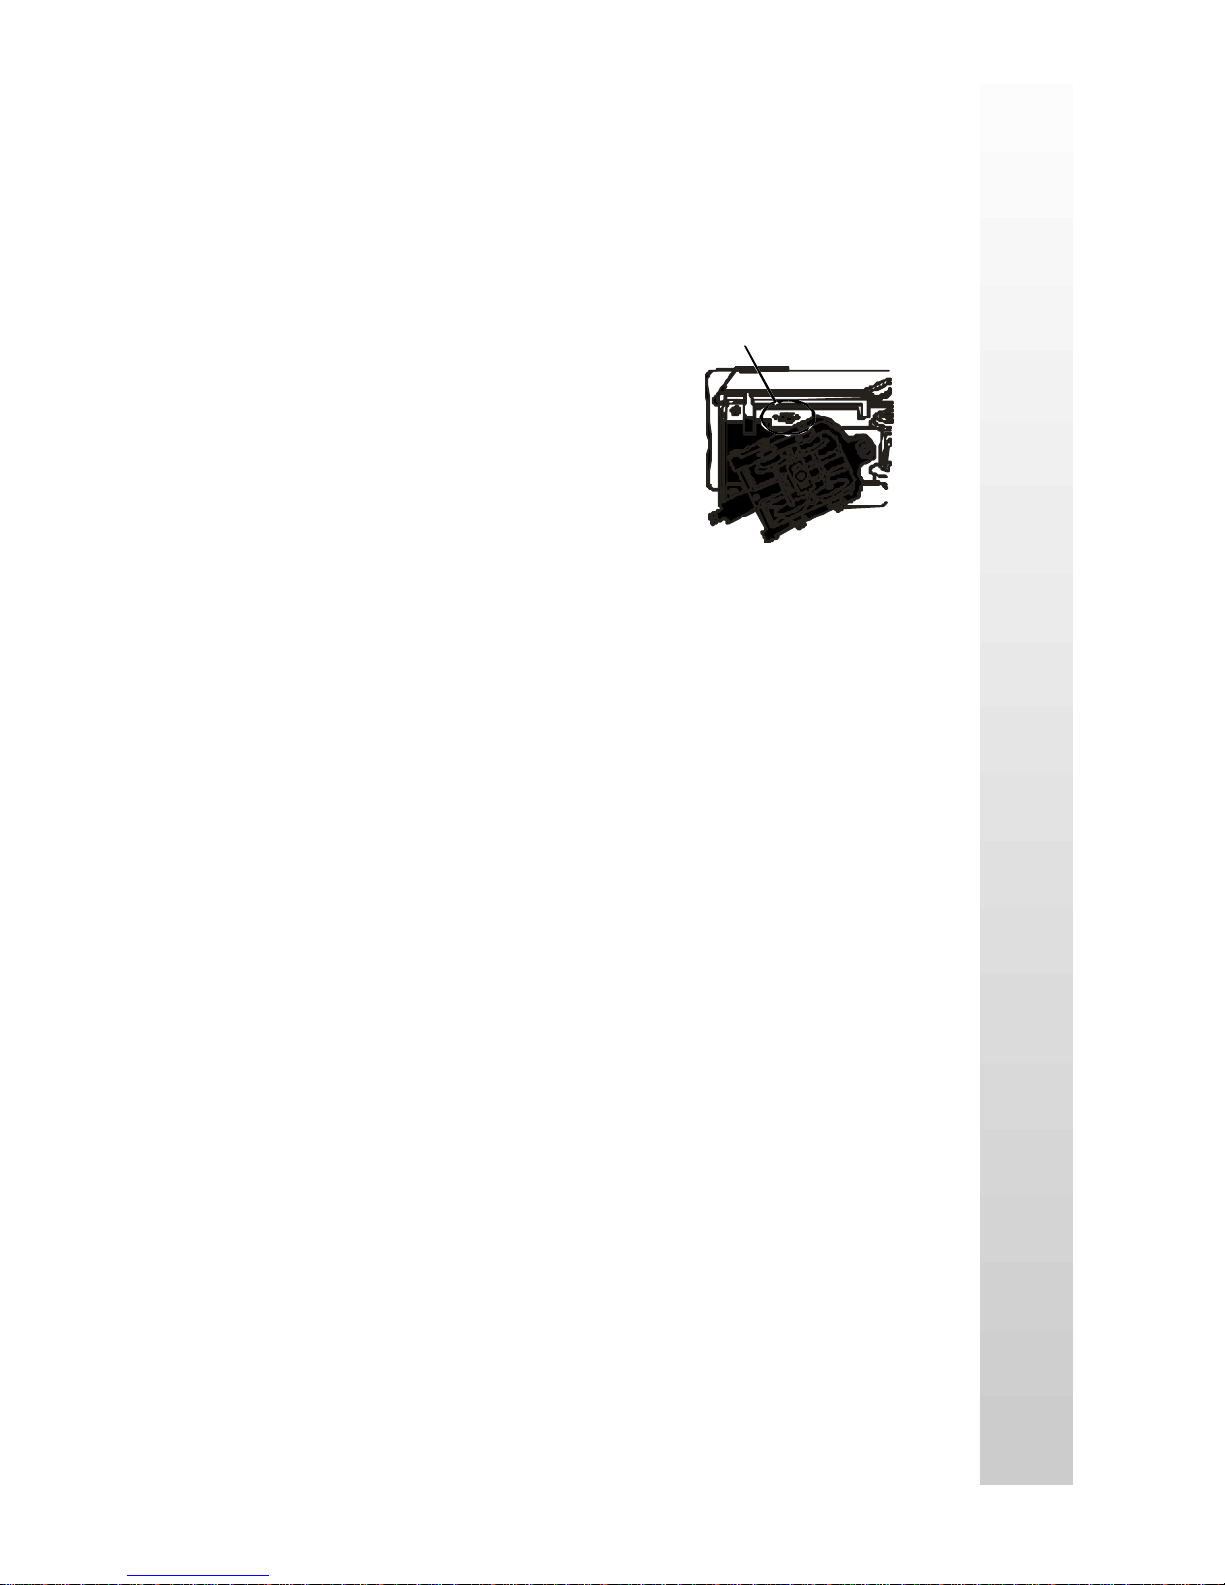
The Gs-4 contains a self-powered smoke unit that outputs a steady stream
of smoke through the smoke stack on the roof of the engine. The ON/OFF
switch located next to the trailing truck must be in the ON position in order
for the smoke unit to function. See Fig. 2 below.
The smoke unit is essentially a small
heating element and wick which soaks up
and then “cooks" a mineral oil-based fluid
that omits a harmless smoke. The smoke
is then forced out of the stack via a small
electric fan which runs at a constant
speed. However, the smoke intensity can
be varied by increasing the transformer
voltage setting. The higher the setting,
the more intense the smoke output.
For best results, we recommend that you add 15 - 20 drops of
ProtoSmoke™, Seuthe, LGB or LVTS fluid before you run the engine. If
you don’t choose to add the fluid, then the smoke unit switch should be
turned off. Failure to either add the fluid or turn the switch off could lead to
damage to the smoke unit heating element and or wicking. Add the fluid
through the smoke stack hole as indicated in Figure 3. After adding the
fluid, gently blow into the stack to eliminate any air bubbles. Do not
overfill the unit as overfilling can cause the fluid to leak out and coat the
interior engine components. When the smoke output begins to diminish
while running the engine, an additional 10-15 drops of smoke fluid should
be added or the smoke unit switch should be turned off.
When storing the engine for long periods of time, you may want to add at
least 15 drops of fluid to keep the wick soaked with fluid and prevent it
from drying out. After removing the engine from storage, it is advisable to
add another 25 drops of fluid, letting the wick soak up the fluid for 15
minutes prior to operation.
SMOKE UNIT MAINTENANCE
CAUTION: Operating the engine without smoke fluid and with the smoke
unit switch in the ON position can damage your smoke unit wick, causing
the wick to become hard, blackened and unabsorbant around the heating
Smoke Unit
On/Off Switch Location
Figure 3: Smoke Unit Switch

4
RailKing Gs-4 Operating Manual
element. When this occurs, it may
be difficult for the wick to soak up
the smoke fluid resulting in poor or
no smoke output. If that occurs,
we recommend that you inspect
and/or replace the wick taking care
to not run the engine without fluid
in the future. You can inspect the
wick to see if it needs replacement
by removing the smoke unit
inspection cover from the body as
seen in Fig.4. After removing the
chassis and inspection cover screws lift the inspection plate away and
inspect the wick. If the wick is darkly discolored and hard, it should be
replaced.
WHISTLE OPERATION
Your Gs-4 engine is equipped with an electronic whistle which can be
activated anytime the engine is in forward, neutral or reverse by pressing
the whistle button on your transformer. The whistle will continue to blow
as long as the whistle button is depressed.
ACTIVATING LOCK-OUT CONTROL
Your Gs-4 engine features a function that allows the operator to “lock” the
engine into forward, neutral or reverse. This is especially useful on layouts
that feature “blocked” track sections. The lockout feature can be activated
by sliding the switch on the bottom of the tender from the ON position to
the OFF position once you enter the desired directional state you wish to
“lock” the engine into (ie: forward, neutral or reverse).
Note: if the engine is locked out in any of the directional states and power to
the track is turned off for an hour or more, the engine may reset to any
directional state when power is reapplied to the track. Should this occur, it
will be necessary to slide the switch back to the ON position and then
“re-lock” the engine back into the desired directional state.
Smoke Unit
Circuit Board
Mounting Screws
Smoke Unit Frame
Mounting Screws
Figure 4: Inspecting The Smoke Unit

5
RailKing Gs-4 Operating Manual
OIL & LUBRICATION INSTRUCTIONS
In order for the engine to perform correctly and quietly, it is important that
the chassis be lubricated before operation. Lubrication should include all
side rods and linkage components and pickup rollers to prevent them from
squeaking. Use light household oil and follow the lubrication points
marked “L" in Fig. 5 below.
The locomotive’s internal gearing has been greased at the factory and
shouldn’t need additional grease until after 50 hours of operation or one
year whichever comes first. Grease can be added by inserting grease into
the gear box inside the locomotive chassis. In order to access the gear box,
the boiler must be removed from the chassis by unscrewing the four chassis
screws as seen in Figure 7 on page 6. Once the boiler is removed, the gear
box can be opened up by unscrewing the two screws on the plate located in
front of the motor. Grease can then be applied into the gear box using a
grease tube dispenser.
OIL
Grease Truck
Pivot Points
OIL
OIL
G - (Grease)
Figure 5: Lubircating Teh Chassis
Tender Body
Mounting Screws
L
L
Figure 6: Lubricating The Tender

6
RailKing Gs-4 Operating Manual
In addition to the internal gearing, it is a good idea to lubricate the leading
and trailing locomotive truck “tongues” to enhance their ability to slide on
the chassis. Follow the grease points as seen in Figure 5 on page 5.
Periodically, check the locomotive wheels and pickups for dirt buildup as
this can significantly affect the engine’s ability to perform properly. Dirty
track and dirty wheels can cause both poor electrical contact as well as poor
traction, especially on elevated track sections. Finally, dirt and oil build up
can prematurely wear out the neoprene traction tires.
TRACTION TIRE REPLACEMENT
INSTRUCTIONS
Your locomotive is equipped with two neoprene rubber traction tires on
the rear set of flanged drivers. While these tires are extremely durable and
long-lasting there may arise a time where they will need to be replaced.
Should this occur, you will need to remove the side rods from the wheels in
order to slip the new tire over the grooved drive wheel.
Before the new tire can be installed, you must make sure the old tire has
been completely removed from the groove in the drive wheel. Use a razor
blade or small flatblade screwdriver pry away any remains left from the old
tire that may still be in the drive wheel groove. Once the old tire has been
completely removed, slip the new tire onto the wheel. You may find it
useful to use two small flatblade screwdrivers to assist you in stretching the
tire over the wheel. Be careful to avoid twisting the tire when stretching it
over the wheel. If a twist occurs, the tire will have to be removed and
Body Mounting
Screws
Body Mounting
Screws
Fiugre 7: Removing The Boiler From The Chassis

7
RailKing Gs-4 Operating Manual
reinstalled or a noticeable wobble in your engine will occur when operating
the locomotive. In addition, it is important to make sure that the tire is
fully seated inside the groove. Any portion of the tire extending out of the
groove can cause the engine to wobble. A razor blade can be used to trim
away any excess tire that doesn’t’t seat itself inside the groove properly.
Replacement tires are available directly from MTH Electric Trains.
HEADLIGHT REPLACEMENT
The locomotive’s headlights are controlled by track voltage and will glow
with greater intensity depending on the transformer voltage setting. The
headlight can be easily removed from its lampholders should the bulb
expire. To remove the bulb, follow the boiler removal instructions found in
the Lubrication section on the proceeding pages. Once the cab has been
separated from the chassis, gently unscrew the bulb from its socket.
Replacement bulbs are available directly from MTH Electric Trains.
O-27 OPERATION
While the Gs-4 engine is more than capable of operating on O-27 curves
and switches, you may find that certain light freight cars are prone to
derailing when being pulled or pushed by the Gs-4 through O-27 switches.
Should this occur, we suggest adding weight to the cars making them
heavier and less likely to derail.

SERVICE AND WARRANTY
INFORMATION
HOW TO GET SERVICE UNDER THE TERMS OF THE
LIMITED ONE YEAR WARRANTY
For warranty repair, do not return your product to the place of purchase. Instead, follow the
instructions below to obtain warranty service as our dealer network is not prepared to service
the product under the terms of this warranty.
1. First, write, call or FAX MTH Electric Trains, 9693-A Gerwig Lane, Columbia, MD
21046, 410-381-2580 (FAX No. 410-381-6122), stating when it was purchased and what
seems to be the problem. You will be given a return authorization number to assure that your
merchandise will be properly handled upon its receipt.
2. CAUTION: Make sure the product is packed in its original factory packaging including its
foam and plastic wrapping material so as to prevent damage to the merchandise. The shipment
must be prepaid and we recommend that it be insured. A cover letter, including your name,
address, daytime phone number, Return Authorization number and a full description of the
problem, must be included to facilitate the repairs. Please include the description regardless
of whether you discussed the problem with one of our service technicians when contacting
MTH for your Return Authorization number.
3. Please make sure you have followed the instructions carefully before returning any
merchandise for service.
LIMITED ONE YEAR WARRANTY
This item is warranted for one year from the date of purchase against defects in material or
workmanship. We will repair or replace (at our option) the defective part without charge for
parts or labor, if the item is returned to the address below within one year of the original date
of purchase. This warranty does not cover items that have been abused or damaged by careless
handling. Transportation costs incurred by the customer are not covered under this warranty.
This warranty gives you specific legal rights and you may have other rights which vary from
state to state.
ProtoSounds™ is a trademark of MTH Electric Trains. DCRU® is a registered copyright of
QS Industries, Inc.
 Loading...