

MTHTrains HO 4-8-4 GS-4, HO 4-8-4 GS-6, HO 4-8-8-4 Big Boy, Bavarian Class S 3/6 Engineer's Manual
M.T.H. HO 4-8-4 GS-4/GS-6
Steam Engine
Congratulations! You've just purchased the most
feature-rich and technically advanced HO Steam
locomotive ever produced! This highly detailed model
includes a broader range of features than you’ll find on
any other HO scale steam, including smooth
performance from a three-scale-mile-per-hour crawl to
full throttle; “cruise control” for steady speeds regardless
of curves, switches and grades; built-in decoders for
DCC and the M.T.H. Digital Command System (DCS);
and a full range of prototypical sounds. If you’re looking
for motive power that’s accurately detailed, smooth
running, and a great deal of fun to operate, it doesn’t get
any better than this!
PLEASE READ BEFORE USE AND SAVE
(PS3E+)
ENGINEER’S GUIDE
** Ps3 E+ model operates on 22” radius
curves or R3 (515mm) radius curves HO
Stud (3-Rail) Track
Passenger/Freight
Announcements

M.T.H. HO 4-8-4 GS-4/ GS-6 Steam Engine
2
This product may be protected by one or more of the following patents: 6,019,289;
6,280,278; 6,281,606; 6,291,263; 6,457,681; 6,491,263; 6,604,641; 6,619,594; 6,624,537;
6,655,640.
©2013, M.T.H. Electric Trains®, Columbia, MD 21046
CAUTION: ELECTRICALLY OPERATED PRODUCT:
WARNING: When using electrical products, basic safety precautions should be observed, including the following:
Read this manual thoroughly before using this device.
l M.T.H. recommends that all users and persons supervising use examine the hobby transformer and other electronic equipment
periodically for conditions that may result in the risk of fire, electric shock, or injury to persons, such as damage to the primary cord,
plug blades, housing, output jacks or other parts. In the event such conditions exist, the train set should not be used until properly
repaired.
l Do not operate your layout unattended. Obstructed accessories or stalled trains may overheat, resulting in damage to your layout.
l This train set is intended for indoor use. Do not use if water is present. Serious injury or fatality may result.
l Do not operate the hobby transformer with damaged cord, plug, switches, buttons or case.
Recommended for Ages 14 and up. Not recommended for children under 14 years of age without adult supervision. As
with all electric products, precautions should be observed during handling and use to prevent electric shock.
Rev.: _ HO GS-4 PS3_6/20/2013
TABLE OF CONTENTS
Unpacking Your Engine . . . . . . . . . . . . . . . . . . . . . . . . . . . . . . . . . . . . . . . .
Product Overview. . . . . . . . . . . . . . . . . . . . . . . . . . . . . . . . . . . . . . . . . . . . . .
Getting to Know Your Engine. . . . . . . . . . . . . . . . . . . . . . . . . . . . .
Engine Diagram . . . . . . . . . . . . . . . . . . . . . . . . . . . . . . . . . . . . . . . .
Set-up/Maintenence . . . . . . . . . . . . . . . . . . . . . . . . . . . . . . . . . . . . . . . . . . . .
Installing Mechanical Couplers . . . . . . . . . . . . . . . . . . . . . . . . . . .
Engine and Tender Connection . . . . . . . . . . . . . . . . . . . . . . . . . . . .
Smoke Unit Preparation and Use . . . . . . . . . . . . . . . . . . . . . . . . . .
Removal/Installation of Drive Wheels . . . . . . . . . . . . . . . . . . . . . .
Lubrication. . . . . . . . . . . . . . . . . . . . . . . . . . . . . . . . . . . . . . . . . . . .
Ps3 Enhancements. . . . . . . . . . . . . . . . . . . . . . . . . . . . . . . . . . . . . . . . . . . . .
DCC-DCS Switch . . . . . . . . . . . . . . . . . . . . . . . . . . . . . . . . . . . . . .
Lighting . . . . . . . . . . . . . . . . . . . . . . . . . . . . . . . . . . . . . . . . . . . . . .
Features and Operation . . . . . . . . . . . . . . . . . . . . . . . . . . . . . . . . . . . . . . . . .
Modes of Operation . . . . . . . . . . . . . . . . . . . . . . . . . . . . . . . . . . . . .
Conventional AC . . . . . . . . . . . . . . . . . . . . . . . . . . . . . . . . . . . . . .
DCC Digital Command Control . . . . . . . . . . . . . . . . . . . . . . . . . .
Start-Up/Shut-Down . . . . . . . . . . . . . . . . . . . . . . . . . . . .
Sounds. . . . . . . . . . . . . . . . . . . . . . . . . . . . . . . . . . . . . . .
PFA . . . . . . . . . . . . . . . . . . . . . . . . . . . . . . . . . . . . . . . . .
Smoke. . . . . . . . . . . . . . . . . . . . . . . . . . . . . . . . . . . . . . .
Forward/Reverse Signal. . . . . . . . . . . . . . . . . . . . . . . . . .
Engine Sounds. . . . . . . . . . . . . . . . . . . . . . . . . . . . . . . . .
F Function List . . . . . . . . . . . . . . . . . . . . . . . . . . . . . . . .
DCS Digital Command System . . . . . . . . . . . . . . . . . . . . . . . . . .
Proto-Sound® 3.0 Expanded DCC Functionality. . . . . . . . . . . . . . . . . . . .
Configuration Variables . . . . . . . . . . . . . . . . . . . . . . . . . . . . . . . . .
Cv29 . . . . . . . . . . . . . . . . . . . . . . . . . . . . . . . . . . . . . . . . . . . . . . . .
Feature/Factory Reset . . . . . . . . . . . . . . . . . . . . . . . . . . . . . . . . . . .
CV Programming (Marklin 6021 Controller) . . . . . . . . . . . . . . . . .
Advanced Consisting . . . . . . . . . . . . . . . . . . . . . . . . . . . . . . . . . . .
Programming Track . . . . . . . . . . . . . . . . . . . . . . . . . . . . . . . . . . . .
Specifications . . . . . . . . . . . . . . . . . . . . . . . . . . . . . . . . . . . . . . . . . . . . . . . .
Recommended Transformers . . . . . . . . . . . . . . . . . . . . . . . . . . . . .
Troubleshooting Guide . . . . . . . . . . . . . . . . . . . . . . . . . . . . . . . . . . . . . . . . .
Service and Warranty Information . . . . . . . . . . . . . . . . . . . . . . . . . . . . . . . .
Limited One-Year Warranty . . . . . . . . . . . . . . . . . . . . . . . . . . . . . . .
4
5
5
7
8
8
9
9
9
11
12
12
12
13
13
14
16
16
16
17
18
19
20
22
23
25
25
26
27
29
34
38
39
40
41
49
49

M.T.H. HO 4-8-4 GS-4/ GS-6 Steam Engine
3
QUICK START GUIDE
Of course, you should read your manual over before running your GS-4/6.
But if you just can’t wait, choose how you want to run below and enjoy!!
Your PS3E+ engine is designed to be run with AC power. However, you can
also use DC power if you prefer. The instructions will only reference AC
power.
I'M A DCC/MOTOROLA OPERATOR….
Step 1: Unpack your GS-4/6 (refer to unpacking instructions on pg 4)…
Step 2: Set the engine on the track …
Step 3: Power up your DCC system…
Step 4: Select engine address 3 and press “F3” to start her up…
Step 5: Turn the throttle and head on down the pike…
I RUN DCS….
Step 1: Unpack your GS-4/6 (refer to unpacking instructions on pg 4)…
Step 2: Set the engine on the track …
Step 3: Power up your DCS system…
Step 4: Add the engine to your system and start her up…
Step 5: Turn the throttle and move out….
I USE AN AC SUPPLY…
Step 1: Unpack your Engine. (refer to unpacking instruction on pg 4)…
Step 2: Set the engine on the track …
Step 3: Apply increasing AC voltage until she starts up and pulls out!

UNPACKING YOUR ENGINE
Removing and Unwrapping Your Engine
Carefully remove and unwrap the model on a soft surface. By nature, models with
high levels of detail have some small fragile parts.
Carefully remove any foam packing pieces that may be surrounding the model.
What Else is in the Box?
The following items are packed with your engine.
Quick Start Guide (1)
For those who can’t wait to get started! This will give you the basic information
to get your engine up and running!
NEM 360/362 Coupler (2)
NEM mechanical couplers along with pocket assemblies
Smoke Fluid Pipette (1)
Enough fluid to get you started, and then some.
Rear Drive Wheel Set without Traction Tires (1)
For Those who prefer not to use traction tires.
3mm Nut Driver (1)
In case you want to install the drivers with traction tires or replace the standard
drive wheels.
M.T.H. HO 4-8-4 GS-4/ GS-6 Steam Engine
4

PRODUCT OVERVIEW
Getting to Know Your M.T.H. HO Locomotive
Key Features
Your new HO is equipped with the exclusive M.T.H. Proto-Sound® 3.0
digital sound and control system. In plain English, this means your locomotive
contains state-of-the-art electronics providing realistic digital sounds, puffing
smoke perfectly synchronized with chuffing sounds and motion, precisely
controlled speed in increments of 1 scale mile per hour, and much, much, more.
Compatibility
The Proto-Sound 3.0 system is universally compatible with track power and/or
signal combinations including Conventional AC (regular AC transformer),
DCC/Motorola (NMRA Digital Command Control), or DCS (MTH Digital
Command System). Simply set your GS-4/6 on the rails, apply any one of these
power/signal sources, and move out! The Proto-Sound 3.0 system automatically
senses the track environment and adapts accordingly. For the PS 3E+ Engines you
will need to ensure that the DCS/DCC switch is in the correct position. A vast
array of realistic operation is automatic when the GS-4/6 is run on conventional
AC. You can expand access to features in a DCC environment. Experience the
most your new locomotive has to offer in the simple to use yet powerful world of
DCS. To be clear, DCS is NOT a proprietary version of DCC, as some other
manufacturers offer. DCS is a comprehensive layout control system designed with
one primary goal: make model trains do amazingly realistic things using a simple
and intuitive controller. We put the complexity on the inside, and the fun in your
hands!
Digital Sound
Your Proto-Sound 3.0 (PS3) equipped GS-4/6 contains over 100 individual
recordings. These recordings are played back dynamically at appropriate times to
create a symphony of realism for your ears. Hear the chuffs automatically
intensify or lighten when speeding up or slowing down, listen to the sounds of
brakes squeaking and squealing as you come to a stop, or enjoy the random
conversations of railmen working as your model sits at idle. It's all there and it's
incredible.
Now, your HO GS-4/6 includes the ultimate in realism Proto-Whistle. With this
incredible new feature you have variable control over the steam whistle sound in
your locomotive (when operated in DCS mode with the DCS Commander or
DCS software version 4.0 or greater).
GS-4/6
M.T.H. HO 4-8-4 GS-4/ GS-6 Steam Engine
5

Digital Control
In standard conventional AC mode, your model still operates under digital control.
The PS 3 advance speed control system converts track voltage into digital speed
commands. Your model will run smoothly and consistently at any speed regardless
of load, hills, or curves. If you are a DCC user, you'll quickly learn to appreciate
the precision of our speed control and linear speed curve. DCS users will enjoy the
added benefits of controlling speeds in increments of 1 scale mile per hour
displayed on DCS controllers or easily changing acceleration and deceleration rates
independently without any discussion of bits or bytes. To be clear, DCS is NOT
DCC.
Lights & Smoke
As you read on, you'll notice there are no instructions for replacing light bulbs in
your GS-4/6. That's because there aren't any. We use specially designed and
controlled LEDs to create realistic lighting effects that occur automatically. Again,
NO PROGRAMMING!! Just come to a stop and watch as the headlight dims
automatically in accordance with rule 17. Of course, as you pull away, the
headlight returns to it's fully bright, yet warm, glow. Your new GS-4/6 includes
realistic Classification lighting with appropriately colored LED's in the boiler. We
even included a light in the cab so the engineer and fireman can see to do their
jobs!
MTH is renowned for our realistic smoke systems. The HO GS-4/6 is no
exception. When the smoke is on, you will experience copious puffs synchronized
precisely with chuffing sounds at 4 times per revolution of the drive wheels. Of
course, when you stop, the smoke wafts out of the stack steadily, just like the real
thing! The smoke behavior applies to all operating modes, conventional AC, DCC,
or DCS. With some DCC controllers, you can turn smoke on and off remotely.
In DCS mode, you can not only toggle smoke on and off with the press of single
button, you can actually select from 3 output levels to keep those smoke alarms
from going off!
M.T.H. HO 4-8-4 GS-4/ GS-6 Steam Engine
6
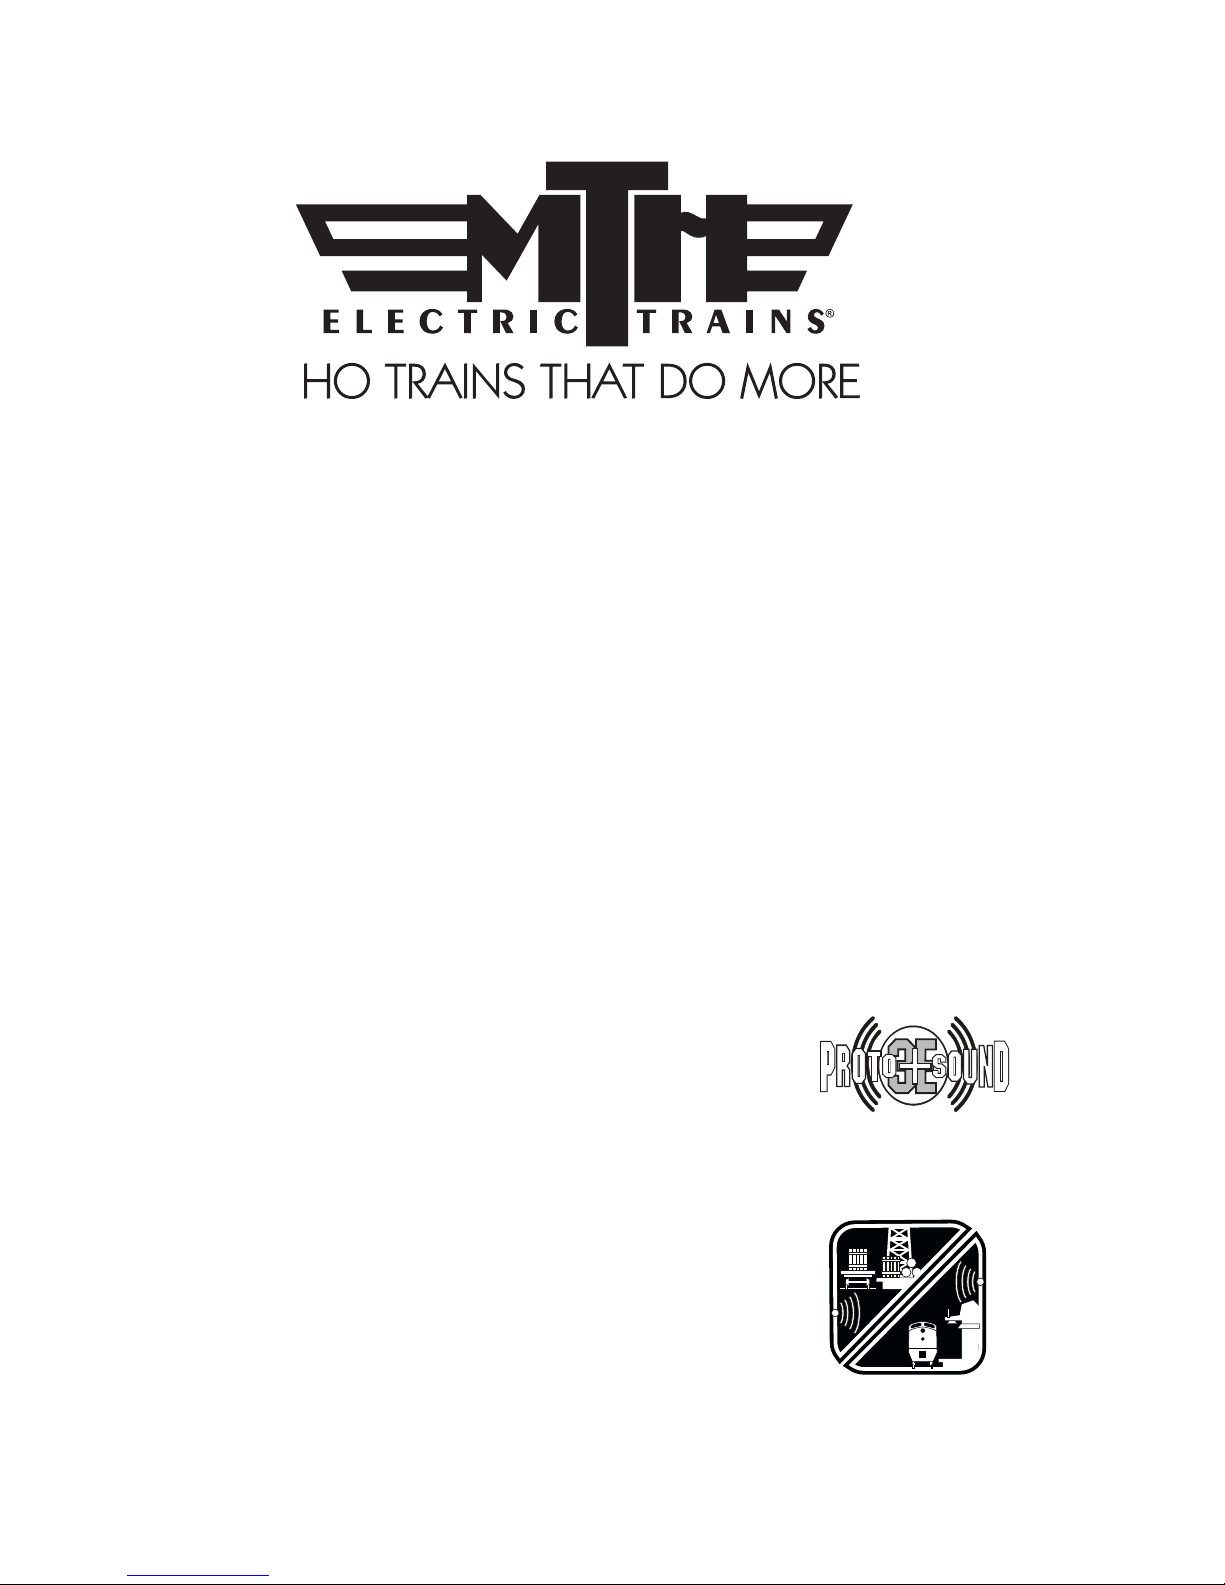
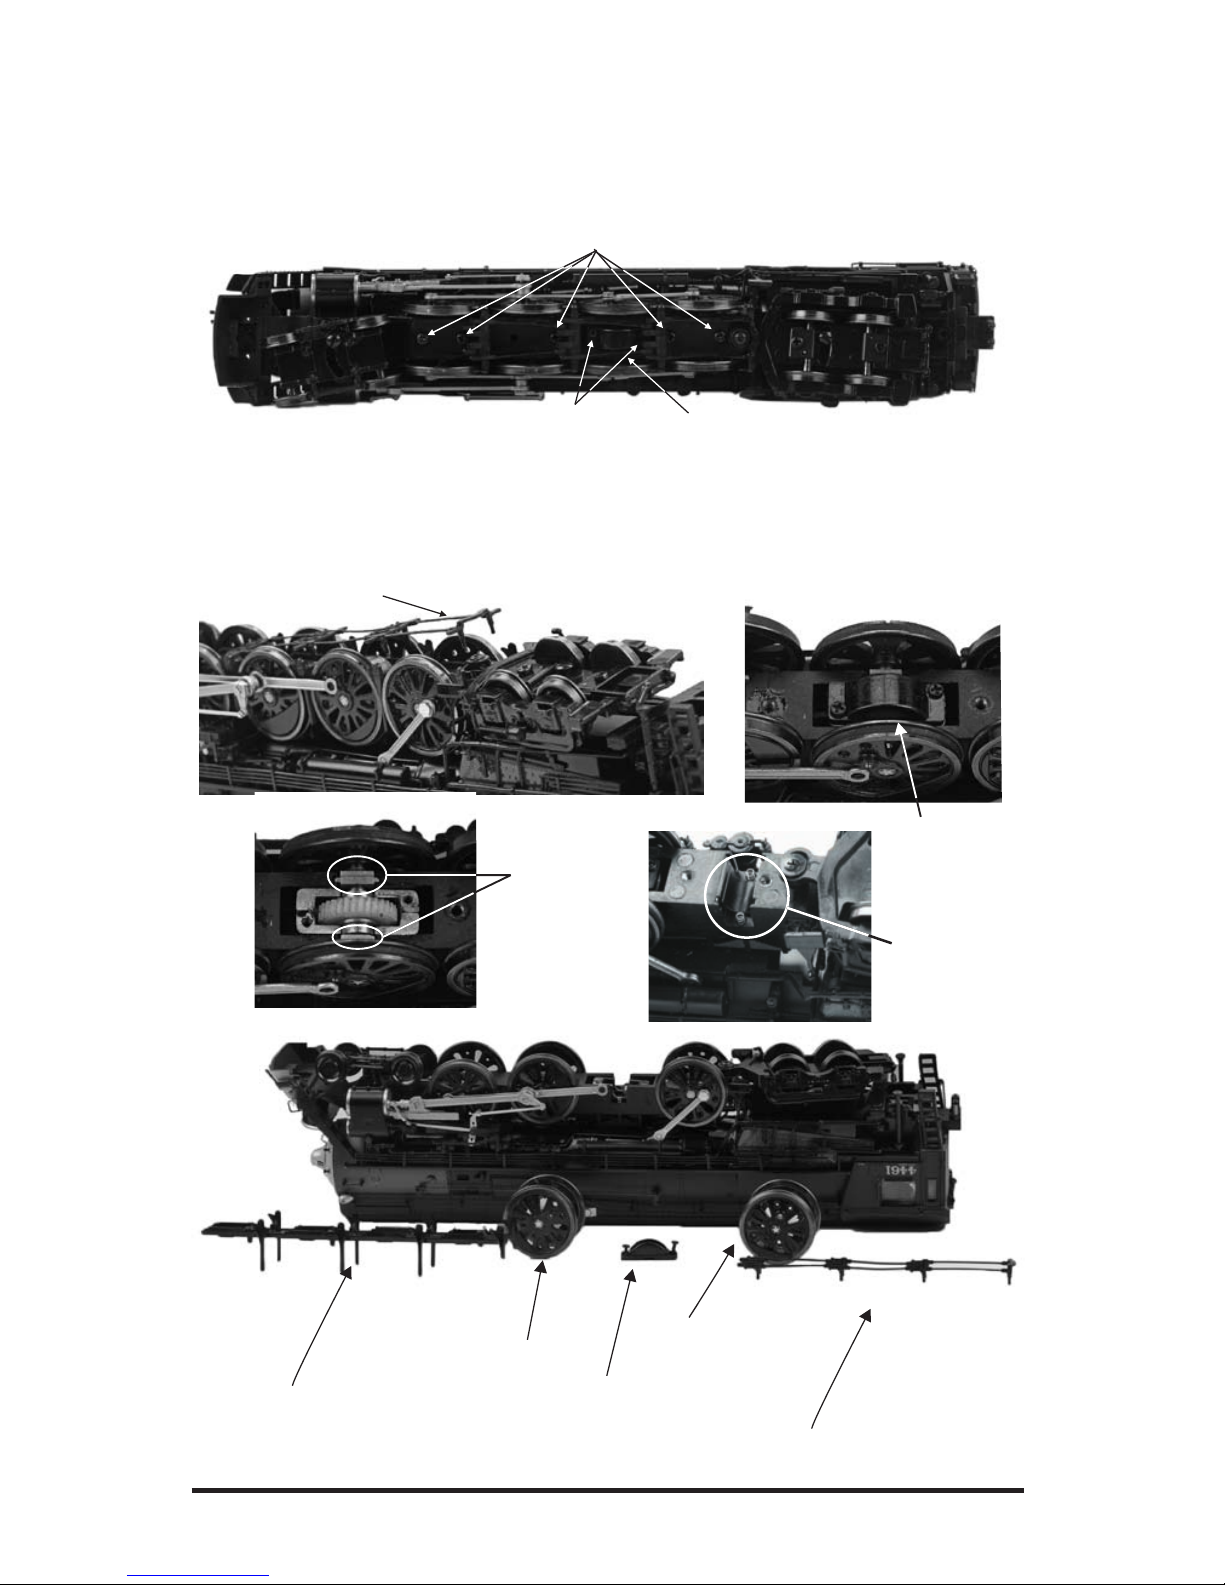
ENGINE DIAGRAM
Boiler
M.T.H. HO 4-8-4 GS-4/ GS-6 Steam Engine
7
Tender
Drive Wheels
Cab Interior
Light
Fireman/
Engineer
Figures
Lighted
Classification
Lights
Sliding Roof Vent
Pilot Truck
Smoke Stack
Wireless Closecoupling Receiver
Drive Wheels
Control Hatch
Wireless Close
coupling drawbar
Wireless Close-Coupling Drawbar
You’re HO GS-4/6 features our all new wireless close-coupling drawbar! To attach
the engine to the tender, simply insert the prongs of the drawbar into the receiver
as depicted in the images above.
Receiver
Close-coupling
Drawbar (prongs)
Coupled
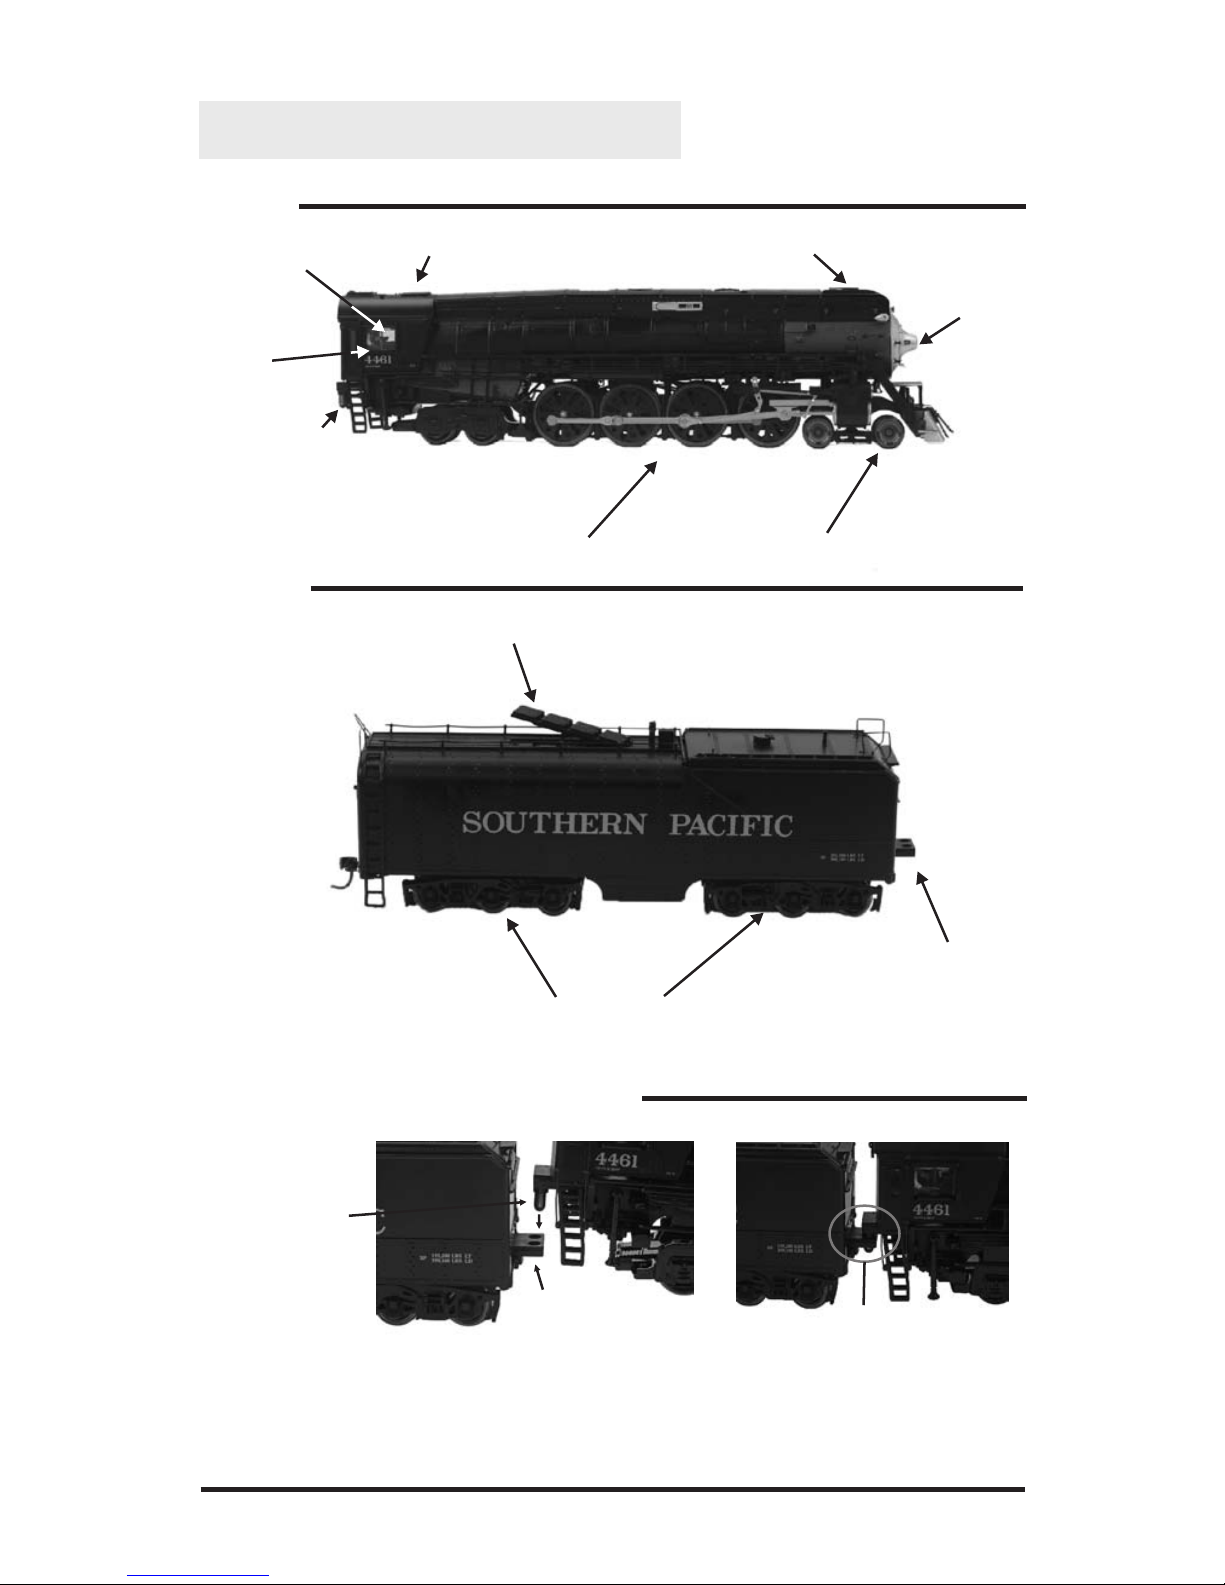
Installing The Mechanical Couplers
Your GS 4/6 comes with a mechanical NEM360/362 coupler and pocket
assembly. To install the coupler onto the rear of the tender, simply push it into
the slot as shown below.
SET-UP
M.T.H. HO 4-8-4 GS-4/ GS-6 Steam Engine
8
SET-UP
M.T.H. HO 4-8-4 GS-4/ GS-6 Steam Engine
9
Connection of the Engine and Tender
Your MTH HO GS-4/6 is presented and packaged as a pre-connected unit, and
features our new wireless close drawbar. Along with providing a mechanical
connection of the tender to the engine, the wireless close coupling drawbar also
provides an electrical connection between the engine and tender. No assembly is
required.
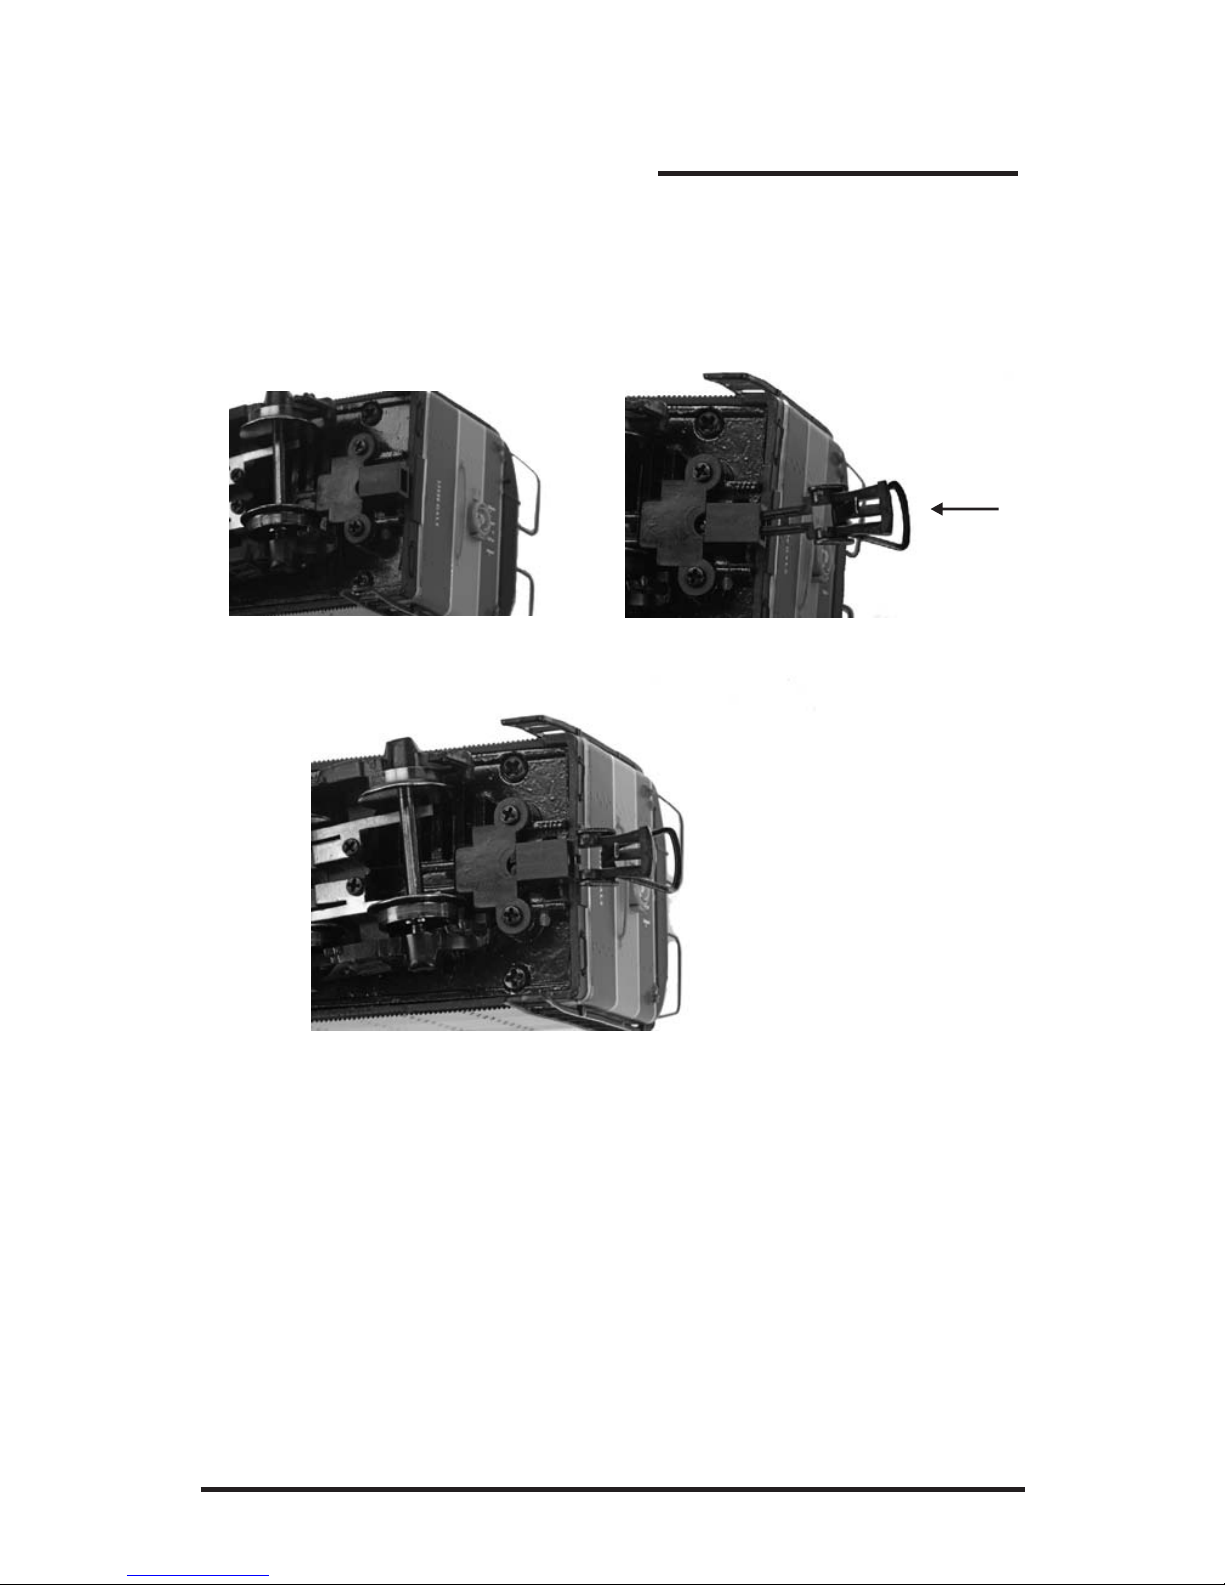
Smoke Unit Preparation and Use
Your GS-4/6 is equipped with a proven fan-driven smoke system design featured
in MTH products for over 10 years. The performance and realism of this system is
unparallel in the model train industry.
Your smoke unit comes primed from the factory however, before running the
smoke unit for more than a few minutes, you should add more fluid. Add
between 10-15 drops initially and whenever smoke output diminishes or if the
engine has been stored for a long period of time. We provided some fluid with
your model to get you started.
The smoke unit is controlled
differently depending upon how your
run your engine so, for particulars on
turning it on or off or setting the
output levels, check out the features
and operation section. You shouldn't
run your smoke unit without fluid. Doing so can cause overheating and reduce
the performance and/or life of the unit. Of course, we recommend using only
MTH ProtoSmoke fluid. Super Smoke and LVTS brands also work fine.
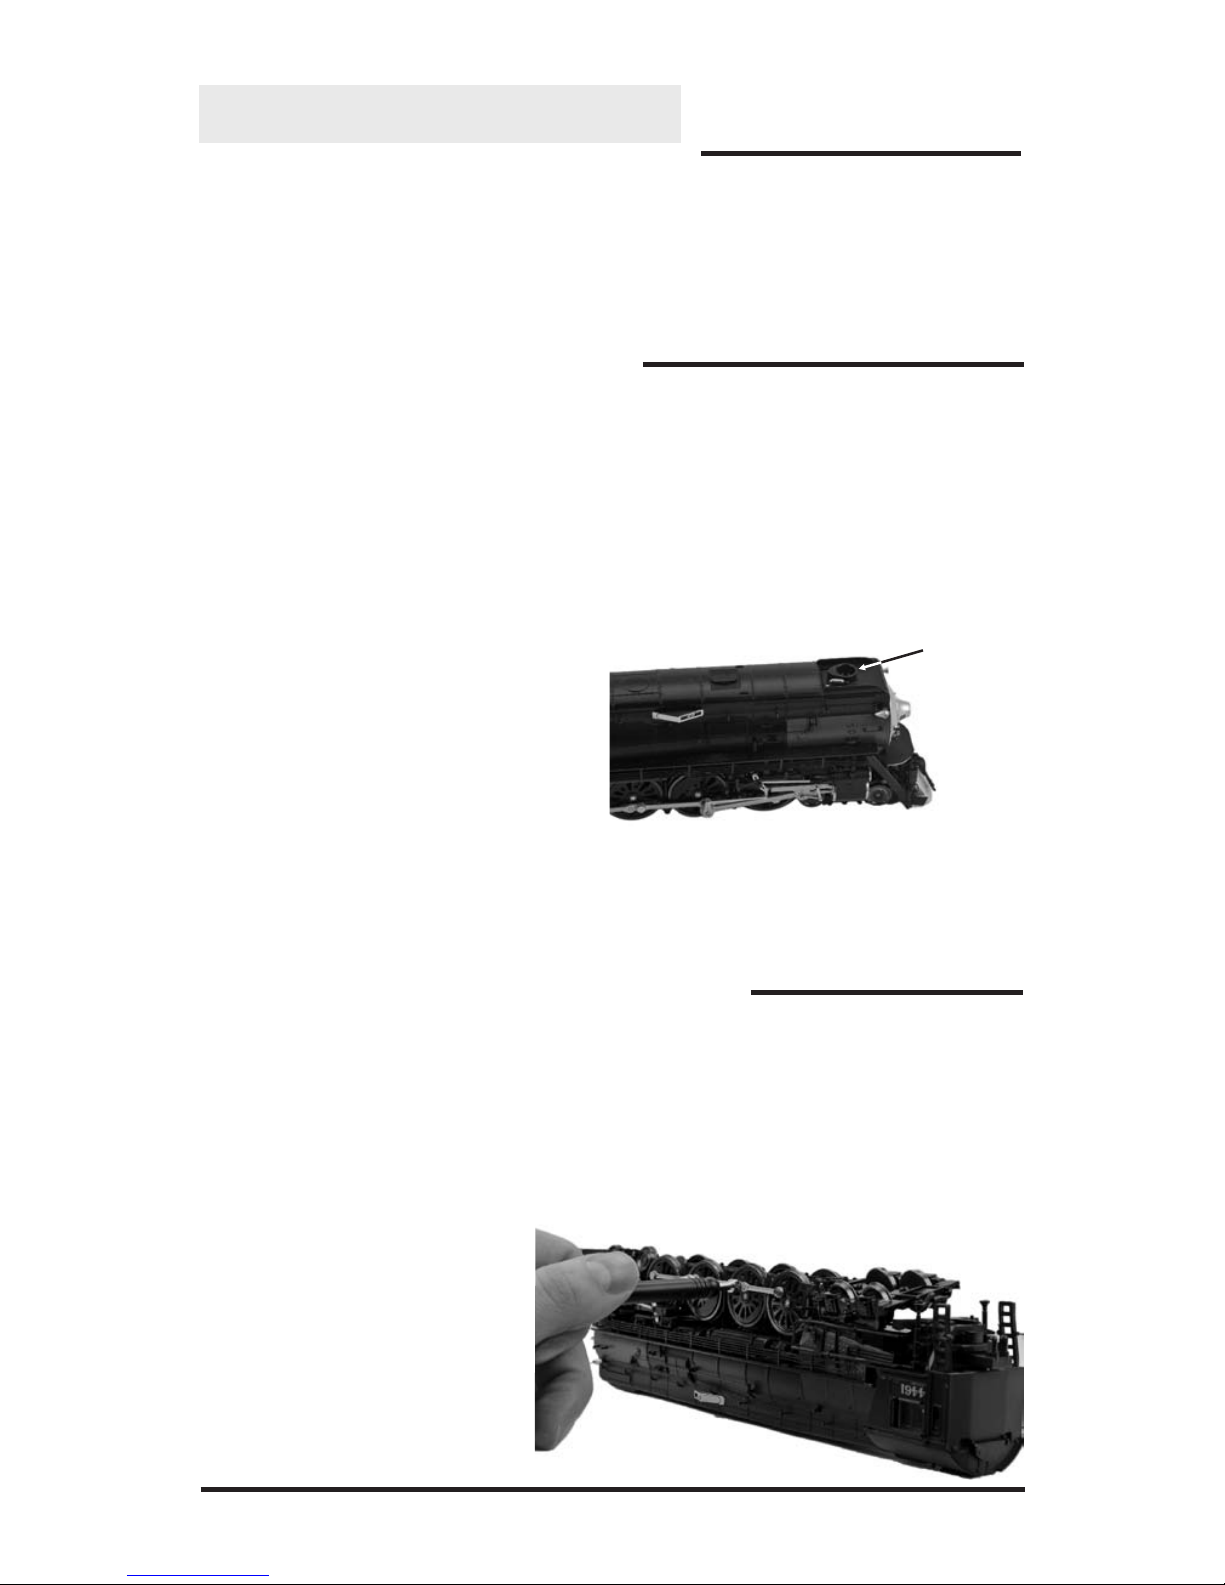
Removal/Installation of Drive Wheel Sets
Your Gs4/Gs6 comes from the factory with traction tire equipped drive wheels
installed and an alternate set without traction tires available separately in the box.
The traction tires provide exceptional pulling power on grades and through curves
but should you prefer the traditional appearance of steel drive wheels, the alternate
set can be easily installed by following the steps below.
First, position the engine upside
down in a foam cradle or other
soft surface. Using the 3mm
nut driver tool we provided in
the box, carefully remove the
drive rod screws (2) on the set
of drive wheels located 2nd
from the rear. There's one on
each side.
Smokestack
Next, remove brake shoe detail by gently prying and pulling up the part and set
aside. Remove the 5 screws holding down the rectangular chassis bottom cover.
Carefully remove the cover... then carefully remove the 2 screws holding down the
gearbox cover, set them aside and then stop. Don’t do anything further until
reading the next step completely.
Before proceeding, there are a couple of important things to know. First, under
the square bushings on each end of the axle are tiny springs. They are critical to
the proper operation of your engine and you don't want to drop them. Next,
look closely at the wheel set and bushings and take note of their orientation.
M.T.H. HO 4-8-4 GS-4/ GS-6 Steam Engine
10
Screws
Brake Shoe Lever & Bellcrank
Traction tire
Nontraction tire
Brake Shoe Detail/bottom plate
Brake Shoe Lever & Bellcrank
Driver springs
Gearbox Cover
Gearbox CoverGearbox Screws
Gearbox cover
Gearbox cover
removed
Bushings

Now, very slowly and carefully lift the wheel set upward. Keep a close eye out for
the driver springs as they sometimes stick to the bushings and lift out. If you drop
one, you'll need some really good eyes or a magnet to find them. If they should
lift out with the wheel set, carefully set them back into cavities from which they
came.
Drop the replacement wheel set into the chassis. Make sure the bushings are in the
correct orientation. The small rectangular tabs on the front and rear must be
upward (with the engine upside down) toward the chassis bottom cover.
Reinstall the gearbox cover with 2 screws...and then reinstall the chassis bottom
cover with 5 screws, gently press the plastic molded brake shoe detail back into
place, and install the rear drive rod screws. See, you've done it.
Lubrication
Using light machine
or household oil,
apply a very small
amount to all drive
rods, linkages, axles,
and other moving
parts as shown.
Your gearbox is properly
greased at the factory and probably never needs service however, if you run
excessive hours pulling heavy loads, it's a good idea to remove the 2 screws from
the gearbox cover and re-grease using MTH gear grease or equivalent.
M.T.H. HO 4-8-4 GS-4/ GS-6 Steam Engine
11
Lubricate Axles (L)
(L)
(L)
(L)
(L)
Driver springs
Lubricate Side Rods and Linkage(Both Sides) (LL)
(L)
(L)
(LL)
PS 3 ENHANCEMENTS
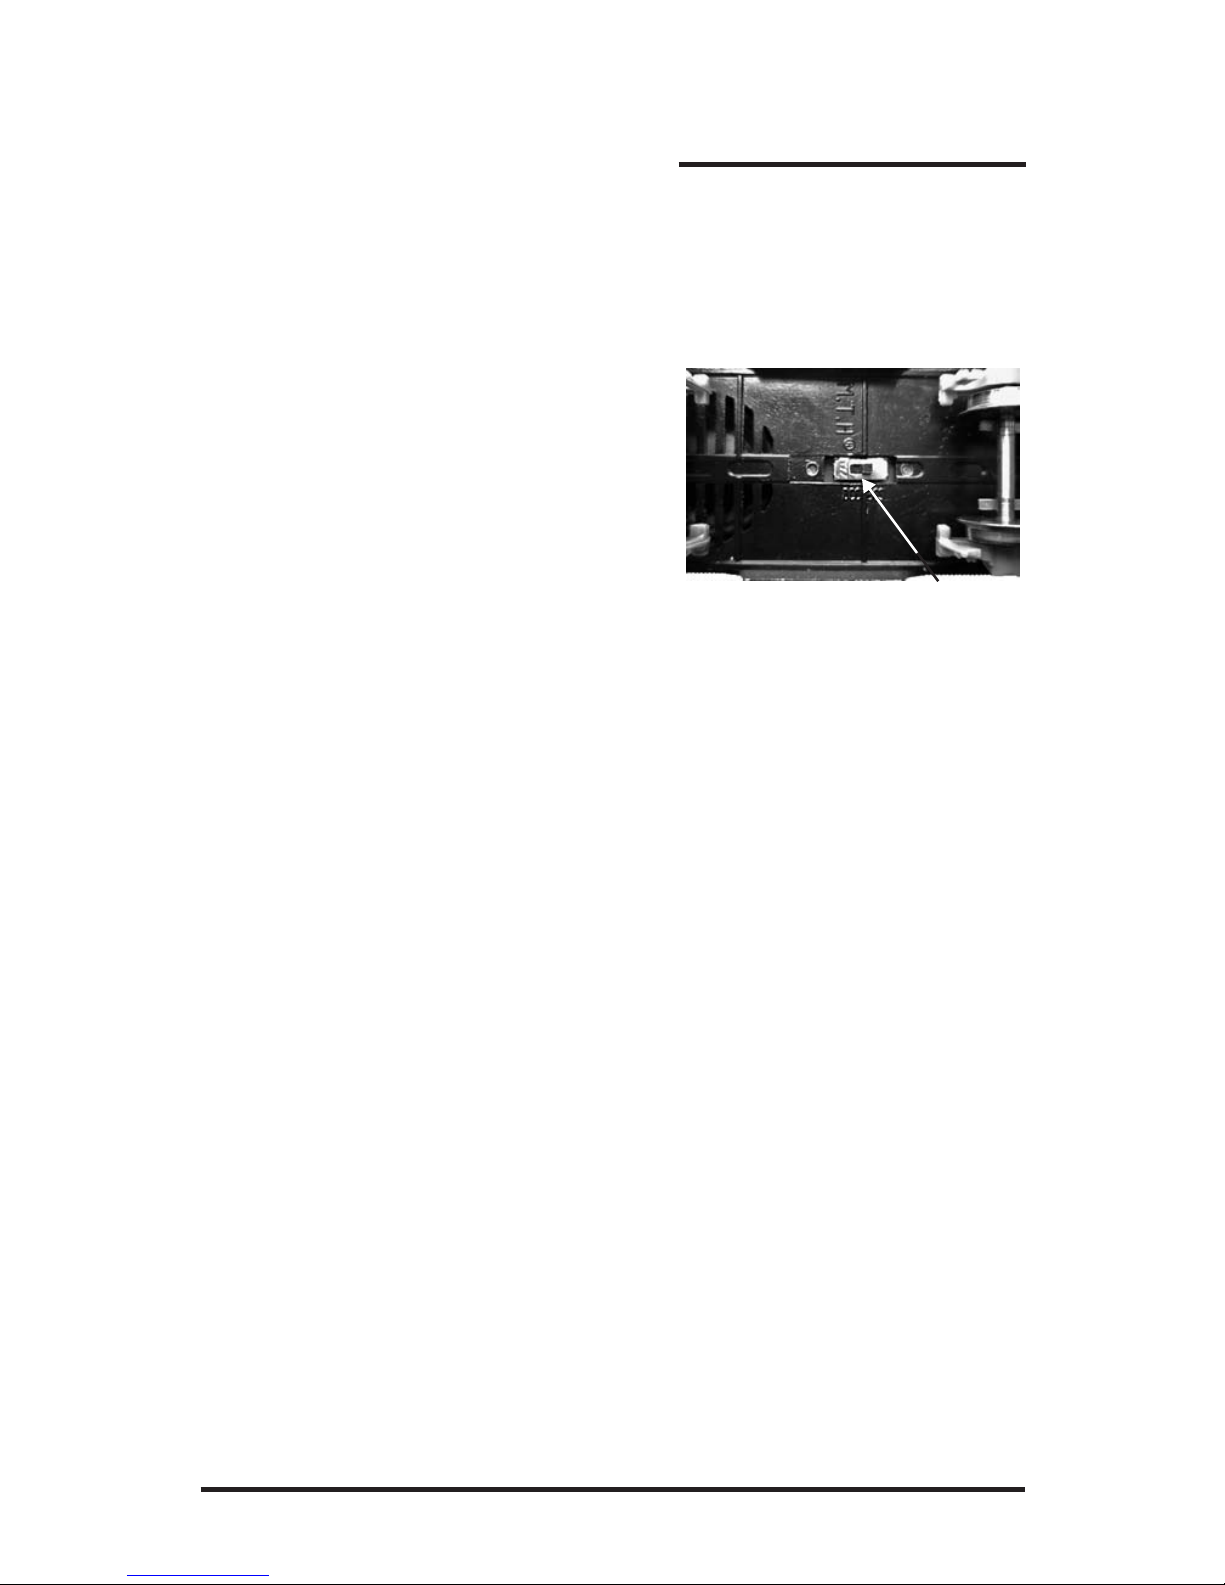
DCC-DCS switch
Secondly, you will notice on the bottom of your tender, that there is a DCC-DCS
switch. To operate the engine in DCS mode, ensure the switch is set to DCS. If
you wish to run the engine in DCC mode,
ensure the switch is set to DCC.
If you inadvertently leave the switch in DCC it
won’t hurt anything, you just won’t be able to
communicate with your engine with your DCS
system. Likewise, if you leave the switch in
DCS and try to operate the engine under DCC
you may notice a humming coming from your
engine and you will likely notice that your
DCC system’s overload light will be on.
LED Lighting
Gone are the incandescent bulbs. Your new PS3.0-equipped engine has LED
lighting. MTH uses various colored LEDs to simulate the correct lighting on your
engines from the warm, yellow-orange colored light coming out of an old lantern
on your favorite steam engine to the high-intensity halogen lamp on the latest
modern diesels, LED's allow for various, correct colors. Also, they require less
power and do not emit as much heat as incandescent bulbs.
DCC/DCS switch
M.T.H. HO 4-8-4 GS-4/ GS-6 Steam Engine
12

FEATURES AND OPERATION
Now, for the fun stuff! Your new MTH HO steam engine has more features and
operating capabilities than any HO engine ever built by any manufacturer. We're
going to walk you through everything she does in general but, you'll probably find a
few we forgot to mention on your own.
Modes of Operation
There are modes of operation with different levels of features accessible in each.
We refer to them as conventional AC, DCC/Motorola, and DCS. Here's a little
more explanation before we get into the features of each mode.
Conventional AC
When using conventional AC power, the engine will respond to changes in track
voltage. An increase in track voltage will increase the locomotive speed and a
reduction in track voltage will reduce the engine speed.
DCC/Motorola or Digital Command Control
DCC is a popular digital command control scheme wherein the track power is also
a digital control signal. That is, using a DCC controller, you can communicate with
multiple engines and have them all moving at different speeds or moving in
opposite directions on the same track at the same time. The power/command signal
remains constant and engines are “commanded” to perform as desired. MTH is
new to DCC but, we recognize it's importance to many HO operators. So, we
loaded our engine with more DCC features easily accessible to the operator than any
HO engine ever built previously. You DCC guys are in for a real treat!
DCS or Digital Control System
While the acronyms are close, this is about where the similarities between DCS and
DCC end. Yes, they are both digital control systems however, MTH DCS is NOT
DCC. There are several proprietary versions of DCC on the market but friend, this
is NOT one of them. MTH's DCS system is proven technology in the O and One
gauge markets and now, we've brought its power and simplicity it to you.
First, the power signal in DCS is NOT the command signal. Next, DCS employs a
fully functional bi-directional communication scheme opening a vast range of
M.T.H. HO 4-8-4 GS-4/ GS-6 Steam Engine
13

advanced features and yet, is so simple and intuitive, you can enjoy them! No
programming tracks, bits and bytes, or conversion of binary to hexadecimal
numbers here! To add an engine in DCS, just press “ADD ENGINE.” After that,
If you want to start your engine, just press “START UP” or, to turn the smoke on
or off, just press “SMOKE.” No combinations of letters or numbers to remember!
We think you're really going to like this!
M.T.H. HO 4-8-4 GS-4/ GS-6 Steam Engine
14
Conventional AC Operation
Speed Control
When using conventional AC power, the engine will respond to changes in track
voltage. An increase in track voltage will increase the locomotive speed and a
reduction in track voltage will reduce the engine speed.
(see pages 29-31 for specifics on the Marklin controller)
When power is first applied to the track, the locomotive will be silent for 1-20
seconds and the headlight will be on, indicating the super capacitors are charging
(The super capacitors provide power to the sound system during direction changes
or intermittent drops in track power due to dirty track switches, when
operating in conventional mode). When the super capacitors are charged, all the
lights will come on and the engine sounds will start up.
There should be no movement, turning the throttle knob on the transformer
counterclockwise past zero and quickly back up again will bring the engine to a
forward motion state, then increasing the throttle will begin to move the engine
forward, and speed will increase as the throttle is advanced. To change direction,
turn the throttle knob on the transformer counterclockwise past zero and quickly
back up again. Then adjust the throttle knob to control the speed of the
locomotive.
Changing Direction (AC)
or on
Smoke Unit Cover
Wick in
Poor
Condition
Wick in
Good
Condition
Sounds
In this mode, sound are pretty much automatic. If you're moving, you'll hear
chuffing sounds. If you increase or decrease the throttle quickly, you'll hear labored
or drift chuffing, respectively. Of course, if the engine has been sitting for a while, the
engineer may open the steam cocks and release the moisture, don't worry, he never
forgets to close them.
When your sitting at idle, there may be some maintenance done. You could hear
someone dopping the siderods or checking the water level in the tender and
filling it if necessary. Don't worry, all of this and more is just a normal part of
everyday operations.
When your moving at a pretty good clip and you reduce the throttle quickly, you
may hear the brakes squeak and squeal as the engineer applies them. Of course,
they'll stop when the engine does. If things get too noisy, just locate the volume
potentiometer on top the tender (underneath the hatch) and adjust the volume
from maximum down to off, whatever suits you. Turn it counterclockwise to reduce
the volume or clockwise to increase it.
When you turn the smoke on, just give it a few seconds
to warm up. It doesn't start instantly. Once you see
smoke gently streaming out (or not if you prefer) snap
the coal detail back in place and away you go.
Once on, like the sounds, the behavior is fully automatic. The model will puff out
smoke in exact synchronization with the chuffing sounds and driver rotation at 4
per revolution. Amazing!
When the output begins to diminish significantly, add 10-12 drops to recharge the
unit. Again, give it a few seconds to warm back up. The cool fluid slows the
action for a few seconds. Also, watch out for bubbles that may block the stack.
You may need to gently blow down the stack to clear it.
M.T.H. HO 4-8-4 GS-4/ GS-6 Steam Engine
15
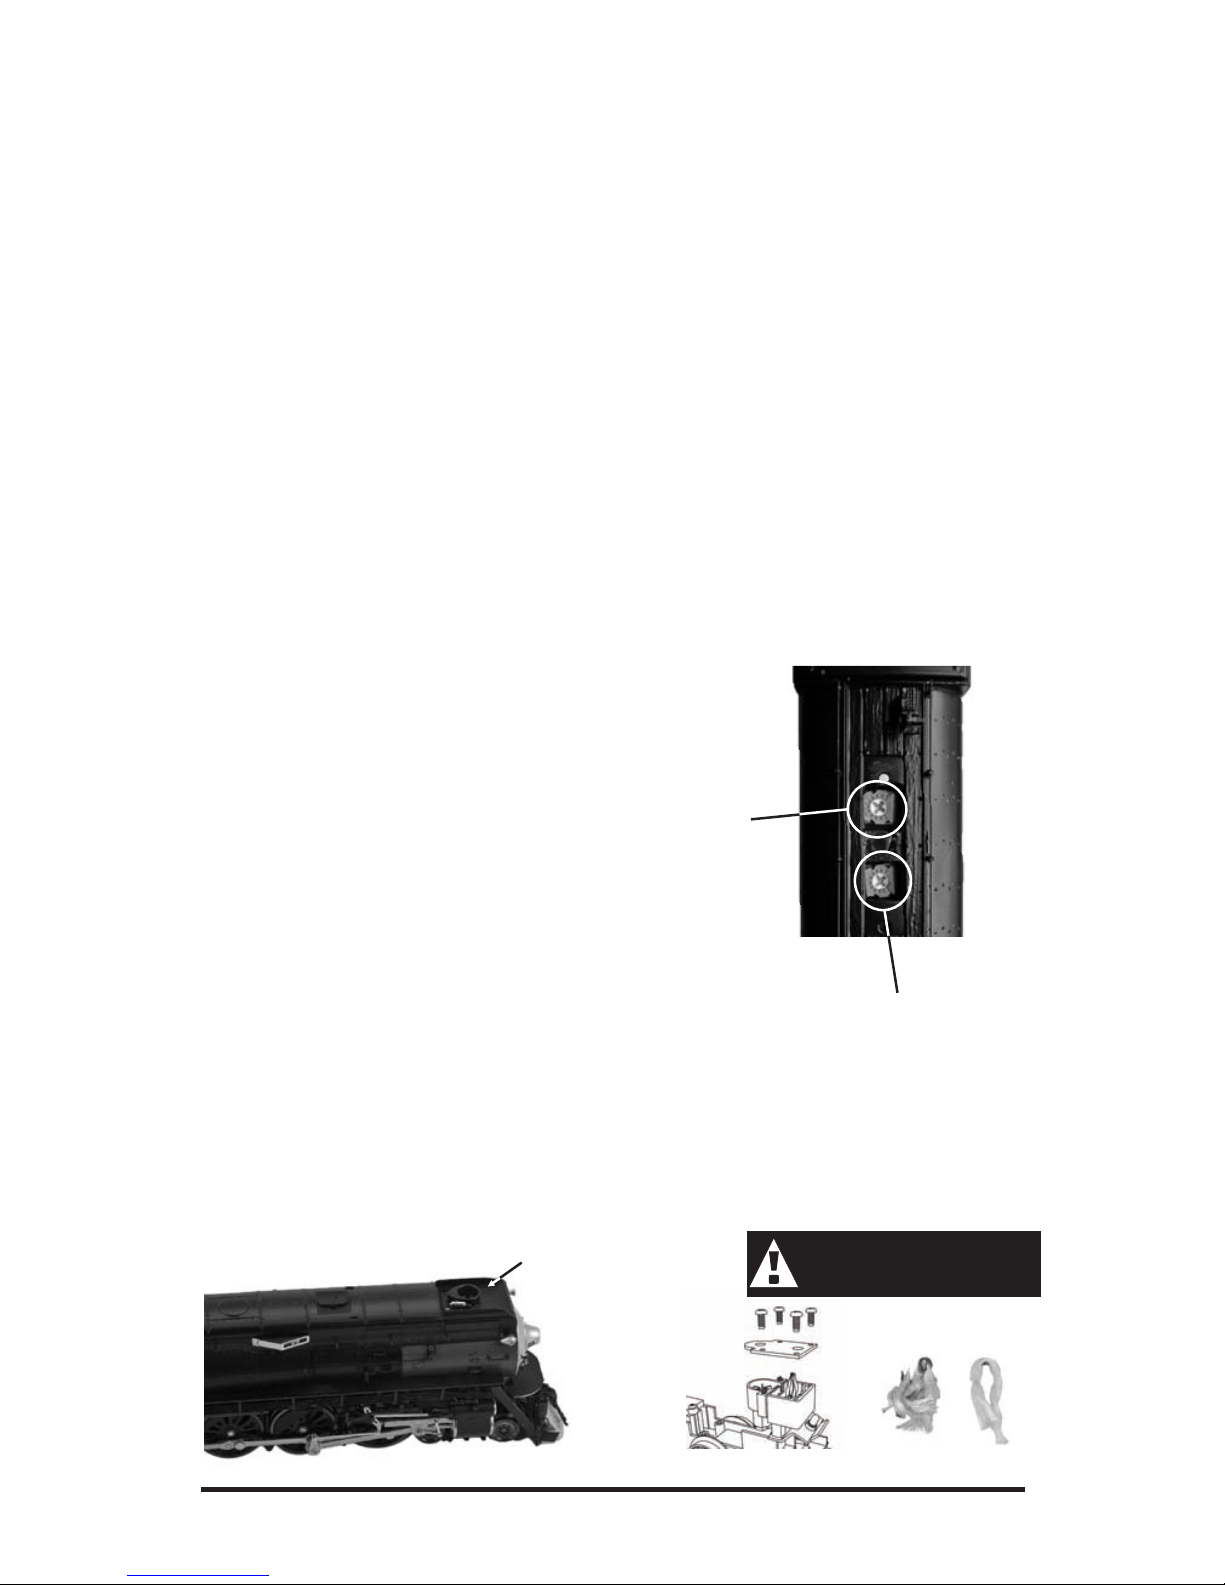
Smoke
Smoke control in the Protosound 3 (2 rail as
well as 3 E+ models) use a potentiometer for
smoke control (exactly like volume control).To
increase or decrease smoke volume, simply use
a Phillips head screwdriver to turn the
potentiometer clockwise (increase output)
or counterclockwise (decrease output).
Running the engine without
a primed smoke unit may
cause damage
Smoke
Potentiometer
Smokestack
Volume
Potentiometer

M.T.H. HO 4-8-4 GS-4/ GS-6 Steam Engine
16
DCC/Motorola Digital Command Control
Now, if your operating in this mode, you may very well know more about DCC
than we do so, we're going to stick to telling you about our engine in this operating
environment. First of all, in DCC mode, we brought all the features of conventional
AC along and of course, added to them. Your new engine has more user features
than any DCC engine ever built. Some of them are even ahead of the world of
DCC!!
Running the Engine
Set the engine on the rails, and apply DCC power. Refer to the Set-Up section of
this guide for instructions on how to connect the boiler and tender.
The first thing you will notice is the engine does absolutely nothing! Don't panic.
This is by design. MTH HO engines never do anything in command mode until
told to do so, regardless of what brand DCC controller you use. In this way, you
could have a fleet of MTH HO engines on the rails and they will remain shutdown
until you command them to start up.
F3 Start up/Shut Down
Select engine address 3 (factory default), press the F3 (Start Up/Shut Down) key, and
your engine will start-up. Lights, sounds, smoke, ACTION!!! Roll the throttle and
away you go. Our models are compatible with 14, 28, and 128 speed steps. We
strongly recommend 128 because in this mode, speed steps correspond directly to
scale speeds. That is, speed step 10 = 10 smph, speed step 47 = 47 smph, etc. You
get the idea. When your done, press the F3 key again, your engine will shut down.
To be clear, pressing F3 when the engine is shut down will start it up. Pressing F3
when the engine is started up will shut it down. Pretty clever, eh?
Sounds
As in conventional AC mode, the default sound arrangement is automatic. So, you
can just run your engine and its sounds will follow the action. But, you operate in
DCC for a reason. You want access to more features, right? Well, depending upon
the capabilities of your DCC controller, you now have access to a range of sound
features including bell, whistle, PFA, engine sounds on/off, master volume, Doppler,
and more.
Here's a brief description of commonly used sound features.
F1 Bell
Toggles bell sounds on/off. Listen to the last half ring of the bell when it stops!
F2 Whistle
Blows the whistle for as long as it's on. There are several different ending
signatures depending on how long you hold the button down. Check it out!

M.T.H. HO 4-8-4 GS-4/ GS-6 Steam Engine
17
F4 PFA
PFA in MTH lingo stands for passenger and freight announcements. Since your
engine provides freight service, you'll hear freight yard sounds.. PFA is a very
popular sound feature that's a staple in almost all MTH products. We had to give
you this!
There are 4 sound sequences or segments in PFA. You advance through them at
your command. Each segment has a minimum time of ~10 seconds but more
sounds play the longer you listen.
When running the engine, simply press the F4 key to activate PFA. When you
bring the engine to a stop, the arrival sequence will play. You can remain in this
segment as long as you like.
Press F4 again, and advance to disembarking sequence. Again, you can listen to
this sequence as long as you like.
Press F4 again, and advance to the embarking sequence. Again, you can listen to
this sequence as long as you like.
Press F4 again, and advance to the departure sequence. After the engineer says
“Just keep the steam up” and the engine will automatically pull out and resume
the speed and direction of when you entered the feature. The bell ring for a short
while and then turn off automatically.
M.T.H. HO 4-8-4 GS-4/ GS-6 Steam Engine
18
Smoke
The smoke system in DCC mode operates exactly as it does in analog DC mode
with the added benefit of being able to turn it on or off remotely. Pressing F12 on
your DCC controller will toggle the smoke unit on and off again.
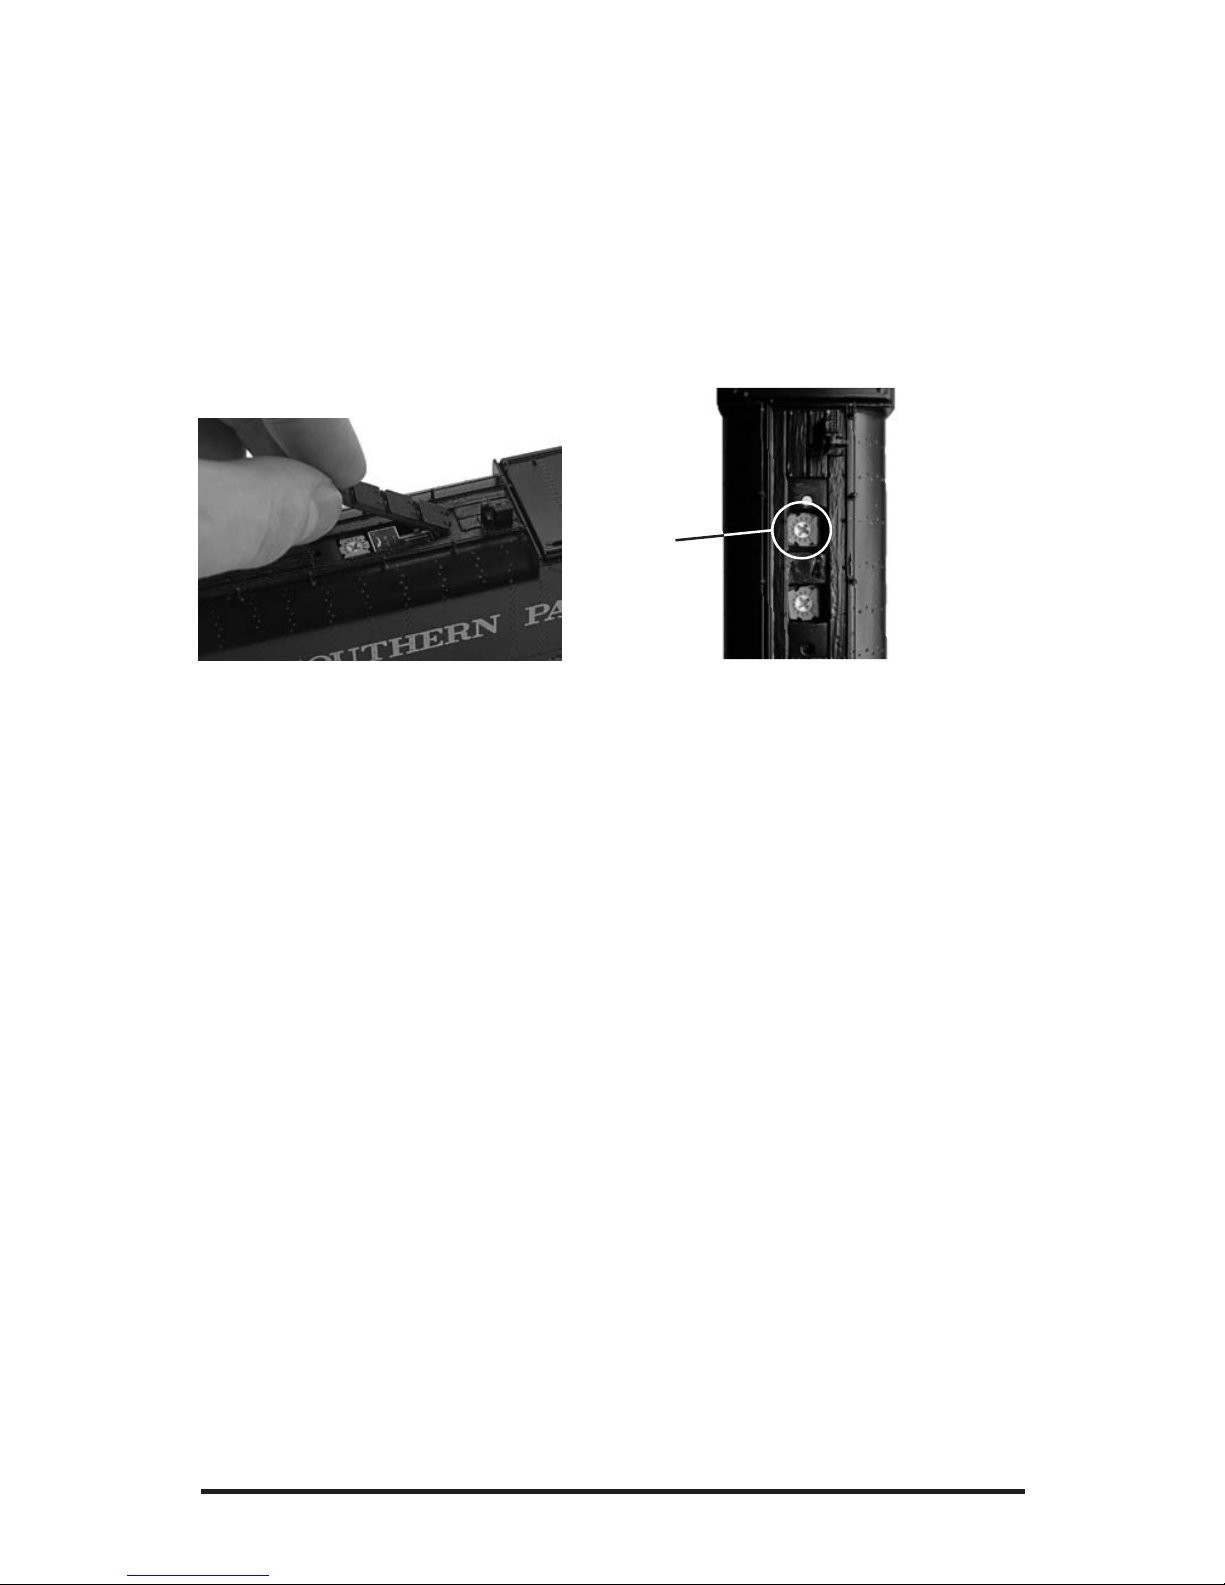
The manual smoke potentiometer under the control hatch (on top of the tender)
must be fully clockwise for the F12 key to function. When the smoke
potentiometer is fully counterclockwise, the smoke is always off.
Lighting
As with other feature categories, lighting in DCC mode operates just like
conventional DC with regard to rule 17, constant brightness and directional
behavior. See that section for details. DCC provides some additional control to
suit your preferences.
F0 Headlight
Toggles the headlight on/off.
F5 Lights
Toggles all lighting (except the head & tail light) on/off, including Marker LED's.
When on, all lighting behaves automatically as described elsewhere. When F5 is
off, all lighting is off.
Smoke
Potentiometer

M.T.H. HO 4-8-4 GS-4/ GS-6 Steam Engine
19
Master Volume
F6 – Master Volume
There are 10 volume levels. Pressing F6 twice (toggling on then off) raises the Master
Volume one level. The Master Volume loops. That is, if you go past the 10th level it
will loop back around to the 1st or lowest volume level.
Forward/Reverse Signal
Just like a real engine, you can announce the direction of intended movement using
your DCC handheld and F9 and F10.
F9 – Forward Signal
Pressing F9 twice (toggling on then off) will sound the Forward Signal. This is two whistle/horn
blasts
F10 – Reverse Signal
Pressing F10 twice (toggling on then off) will sound the Reverse Signal. This is three
whistle/horn blasts
Grade Crossing Signal
Again, just like a real engine, you can trigger the Grade Crossing Signal on your engine.
This is two long, one short, one long whistle/horn blast.
F11 – Grade Crossing Signal
Pressing F11 twice (toggling on then off) will sound your Crossing Signal.
Smoke (if Equipped)
F12 – Smoke On/Off
Enabling F12 will turn the smoke unit on. Disabling F12 will turn your smoke unit off.
F13 – Smoke Volume
There are three smoke volume levels in your MTH PS 3-equipped engine –
Low/Med/High. The default for this is set to High. You can adjust the smoke output
(amount of smoke the generator puts out) by pressing the F13 button twice. This sets the
level to the next step. For example, if you are currently at the High smoke output level,
pressing F13 twice (toggling it on then off) will set the smoke volume to Low. Pressing
F13 twice again will set it to Medium and so on.

M.T.H. HO 4-8-4 GS-4/ GS-6 Steam Engine
20
Engine Sounds
F25 – Engine Sounds
You can turn the Engine Sounds On/Off by pressing the F25 button. Pressing it once
(enabling F25) will cause the Engine Sounds to shut off. TheWhistle/Horn and Bell
sounds will still be active, however. To turn the engine sounds back on press the F25
button again (disable F25).
Additional F Functions
F14-F16 – Idle Sequence
Pressing F14, F15, or F16 twice (toggling on then off) will trigger an Idle Sequence if the engine
is not moving. These vary from engine to engine and may include things like checking the coal
load, checking the water level, using the Alemite grease gun on the drivers, etc. When triggered,
these will run through the sequence that varies in duration.
F17 – Extended Start-Up
If your engine is shut down or you've just applied DCC power pressing F17 twice (toggling it
on then off) will start the Extended Start-Up sounds. This is very similar to F3 except you will
hear the crew talking back and forth about getting the engine ready to run.
F18 – Extended Shut-Down.
If your engine is already up and running you can play the Extended Shut Down
sounds by pressing F18 twice (toggling on then off). The Extended Shut Down is very
similar to F3 in that the engine will ultimately shut down, but in the case of Extended
Shut Down you will hear the crew talking back and forth about how the engine ran,
time schedules, etc.
NOTE – The engine must be sitting still in order to trigger F-Functions
F14 through F18
F19 – Labor Chuff
To force the Labor Chuff sound in a steam engine, press the F19 button once (enable
F19). As long as F19 is enabled the engine will play its Labor Chuff sounds. To set the
sound back to Normal Chuff press the F19 button again (disable F19).
F20 – Drift Chuff
To force the Drift Chuff sound in a steam engine, press the F20 button once (enable
F20). As long as F20 is enabled the engine will play its Drift Chuff sounds. To set the
sound back to Normal Chuff press the F20 button again (disable F20).
F21 – One Shot Doppler
You can set your MTH PS 3-equipped engine to simulate the actual Doppler Effect
sound a real engine makes as it passes you. To do this, press the F21 button once
(enable F21) and then listen as the engine makes that pitch shift that mimics the
Doppler Effect perfectly. Press the F21 button again (disable F21) to shut off the
Doppler Effect. With a little practice in timing and speed you can make this happen
right in front of you.

M.T.H. HO 4-8-4 GS-4/ GS-6 Steam Engine
21
F22 – Coupler Slack
When an engine couples to a train and pulls out, it has to take up the coupler slack.
You can play this sound by pressing F22 twice (toggling on then off). This feature
works two ways – While the engine is sitting still, press F22 twice to enable it. Then,
when you move the engine, it will play the Coupler Slack sound.
The second way is to simply force the sound while the engine is moving. To do this,
simply press F22 twice (toggling it on then off). The sound will play.
F23 – Coupler Close
To play the Coupler Close sound press the F23 button twice (toggling it on then off).
You can play this sound as you're coupling cars together to add realism.
F24 – Single Whistle/Horn Blast
To play a Single Horn Blast press the F24 button twice (toggling in on then off). This
plays a single, short horn blast.
F26 – Brake Sounds
Pressing the F26 button (enable F26) will disable the Brake Sounds for your engine.
The Brake Sounds occur when you reduce the speed of your engine rapidly. To enable
the Brake Sounds press the F26 button (disable F26). Brake Sounds are On by default.
F27 – Cab Chatter
Cab Chatter occurs when the engine is sitting at idle. There are various times when the
crew will talk to each other when the engine is sitting at idle. Pressing the F27 button
(enable F27) will disable the Cab Chatter. Pressing the F27 button again (disable F27)
will enable Cab Chatter. Cab Chatter is On by default.
F28 – Feature Reset
Resets Features to defaults.

M.T.H. HO 4-8-4 GS-4/ GS-6 Steam Engine
22
Function Chart
F0
F1
F2
F3
F4
F5
F6
F7
F8
F9
F10
F11
F12
F13
F14
F15
F16
F17
F18
F19
F20
F21
F22
F23
F24
F25
F26
F27
F28
Headlight
Bell
Horn
Start-Up/Shut Down
PFA
Lights
Master Volume
Front Coupler (Sound Only)
Rear Coupler (Sound Only)
Forward Signal
Reverse Signal
Grade Crossing
Smoke On/Off
Smoke Volume
Idle Sequence 3
Idle Sequence 2
Idle Sequence 1
Extended Start-Up
Extended Shut Down
Labor Chuff
Drift Chuff
One Shot Doppler
Coupler Slack
Coupler Close
Single Horn Blast
Engine Sounds
Brake Sounds On/Off
Cab Chatter On/Off
Feature Reset
Description
Function

DCS Digital Control System
As you may have gathered by now, DCS is an MTH exclusive Digital Control System
that provides easy access to dozens and dozens of features in our models. We
developed DCS to provide a powerful and advanced model train control system that
was simple and enjoyable to use. We've accomplished that goal. DCS further
expands the features available far beyond that of DCC. After all, in DCC, we only
had a limited number of “F” commands to fill.
As with DCC, we'll leave the detailed “how-to” system explanations to the DCS
system manuals. What you should know are all the cool features your engine has
built-in, waiting for you to experience.
Running the Engine
Set the Engine on the track and once the DCS system is connected to your track and
powered up by an AC Power Supply (depending upon which model type you have),
simply press “ADD ENG” and the system will scan the track and automatically
upload your engine into the controller. At this point, you can press “START UP”,
roll the throttle and pull out! That's it!
Speed Control
DCS engines are controlled in scale miles per hour (smph) and increments of one.
So, that means if you dial up 10, you engine will smoothly accelerate to 10 smph.
There is no need to select a speed step setting, there's only one precise linear control
at scale speeds. See, powerful yet simple.
Introducing the ultimate in prototypical operation Proto-Whistle. Your new GS-4/6
includes this amazing feature. It allows you to adjust the pitch of the steam whistle
just like you were sitting the cab pulling the whistle rope yourself. This new feature is
controllable from either your DCS Commander or with your DCS system with
software version 4.0 or greater (see your DCS or DCS Commander instruction
manual for specifics on how to operate this feature)
GS-4/6
Independent Volume Settings
Using DCS, you independently adjust the bell, whistle, engine, and accent sounds
volume. This is like a mixer so you can set up the engine fit your specific tastes and
sense of realism. Oh, they all move relatively up or down with the master volume
settings.
Sounds
Not only that but your also has a Grade Crossing Whistle Feature. So just like
the real engine, with the push of a single button, you can trigger the Grade Crossing
Whistle. To trigger the Grade Crossing Whistle press the A3 button on your DCS
Commander or the SXS softkey on your DCS Remote Handheld.
M.T.H. HO 4-8-4 GS-4/ GS-6 Steam Engine
23

Sounds
Chuff Rate
You can adjust the chuff rate from the default setting of 4 per revolution to
whatever you like between 1 and 16 per rev. Why? Some folks like to run fast and
2 or 3 chuffs per rev keeps chuffing sounds a little more distinct, even though it
isn't prototypical.
Doppler Loop
You can either press the Doppler button on the remote to activate what we refer to
as “one-shot” Doppler or, using DCS, you can program a Doppler loop that will
peak at the same point on your layout, over and over.
Custom Sounds
You can fire any of 10 individual sound bites pre-loaded into your engine. These
are typically, blow downs, steam let-offs, etc., etc. Each one at the press of a single
button. You can also make voice or other audio recordings and play them back on
command with ease.
Proto-Dispatch
Press the “MIC” (microphone) button on your DCS remote and speak. Your voice
will be digitized and played out of the model in real-time. Talk about station
announcements!
Proto-Cast
Another MTH exclusive, you can connect any audio source with a line output to
the DCS TIU and send music, train sounds, or anything you like down the rails to
be played through the engine as it moves along the track. Your holidays may never
be the same!
Smoke
In addition to a simple button labeled, go figure, “SMOKE” to toggle your smoke
on and off, you get the ability to quickly and easily adjust the output volume. In
plain English, you simply select low, med, or hi.
Lighting
As with everything in DCS, this becomes a little more than obvious. Pressing the
“HEADLIGHT” button turns of the directional head and taillight. Pressing the
Interior light will turn off the cab interior light.
M.T.H. HO 4-8-4 GS-4/ GS-6 Steam Engine
24

M.T.H. HO 4-8-4 GS-4/ GS-6 Steam Engine
25
Advanced DCC Operation:
This section of the manual provides more in-depth detail on how to set up and
configure your MTH PS3.0-equipped engine using the NMRA-standard CV's as
well as the manufacturer-specific CV's. It also explains some of the other F
Functions not covered in the Basic DCC Operation section. Please refer to the CV
Data Table on page 28.
Configuration Variables (CV)
Configuration Variables used on MTH PS3.0-equppied engines.
Cv1
Cv2
Cv3
Cv4
Cv5
Cv8
Cv17
Cv18
Cv19
Cv21
Cv22
Cv23
Cv24
Cv25
Cv29
Cv52
Cv53
Cv54
Cv55
Cv56
Cv63
Cv64
Cv66
Cv67Cv94
Cv95
Cv105
Cv106
Cv115CV170
Short Address: 1-127 are the valid addresses
Start Voltage (CV52, bit0 must =1. This will enable PWM Mode)
Acceleration Rate (CV52, bit0 must =1. This will enable PWM Mode)
Deceleration Rate ((CV52, bit0 must =1. This will enable PWM Mode)
Max Voltage (CV52, bit0 must =1. This will enable PWM Mode)
MFG ID. MTH =27. Also used for various resets
High Byte of Extended Address
Low Byte of Extended Address
Consist Address (bit 7=1 on an engine will tell the engine it's reversed in a
consist)
Defines active Function F1-F8 for the active consist
Defines active functions for FL and F9-F12 for the active consist (bit 0=1 will
tell an engine that you want it's FL control to operate under the consist
address – bit1-0/bit2=1 will configure the FL control for a reversed engine in
a consist)
Consist Acceleration Rate
Consist Deceleration Adjustment
Speed Table Select
Decoder Configuration
MTH PWM Mode Configuration
MTH Acceleration (1/8*sMPH/s). For example – a Value of 8 written would
give you 1sMPH/s acceleration
MTH Deceleration Rate (1/8*sMPH/s)
Factory Reset Alternate method: Send a value of 55 to CV55 on address 55
and the model will go back to Factory Default
Motorola Operating Mode (Applies to 3E+ models)
MTH Consist Acceleration Rate (1/8*sMPH/s)
MTH Consist Deceleration Rate (1/8*sMPH/s)
Forward Trim (CV52, bit0 must =1. This will enable PWM Mode)
Speed Table Selection (CV29 bit 4 must be set to 1 then CV25 must be set
to 0 or 1)
Reverse trim (CV52, bit0 must =1. This will enable PWM Mode)
User ID #1 – General Purpose use for customer
User ID #2 – General Purpose use for customer
MTH Function Assignments – See table of supported CV's and manual
section on how to re-arrange them for further information

M.T.H. HO 4-8-4 GS-4/ GS-6 Steam Engine
26
Cv29
CV29 is the basic decoder setup CV that is used by all DCC decoder manufactures.
So, if you are familiar with CV29 from other manufacturer's decoders MTH's is no
different. The most important part of CV29 is the ability to switch between long and
short addressing. By default, CV29 on your MTH PS3.0-equipped engine is set to 2.
Long and Short Addressing
Like most DCC Decoders, your MTH PS3.0-equipped engine can be programmed
with both Long and Short Address. Short addresses are those from 1-127 and Long
addresses are those from 128-9999. You can program the engine address either with
Programming on the Main (PoM) or using a Programming Track. Since it's easiest,
in most cases, to PoM the instructions will show you how to do it this way.
By default, your MTH PS3.0-equipped engine comes programmed with both a long
and short DCC address. The default Short address is always 3. The default Long
address is 3333.
To change your engine's Short Address using PoM:
1. Call up the engine's current address on your DCC handheld
2. Enter Programming on the Main on your DCC handheld]
3. Enter the new address you want – Remember you can only use address 1-127 for
Short Addressing
4. Once you hit Enter the engine will give you a two whistle/horn blast response
5. Call up the engine on its new address and away you go
Alternatively, depending upon the type of DCC system you have, you can enter
PoM and then write the new address in the Address Menu. This only works for
2
short addressing. For example, on an MRC Prodigy Advance system, you would:
1. Call up the engine's current address on your DCC handheld
2. Hit the PROG button twice to enter PoM mode
3. Hit Enter twice so the LCD displays “Adr”
4. Type in the new Short Address (1-127) that you want and hit Enter
5. The engine will give you a two whistle/horn blast response
To change your engine's Long Address using PoM:
1. Call up the current engine's address on your DCC handheld
2. Enter Programming on the Main on your DCC handheld
3. In this step you have to tell the MTH engine that you want it to start looking at
long addresses. You do this in CV29:
a. Bring up the CV menu on your DCC handheld
b. Enter “29” to edit CV29

M.T.H. HO 4-8-4 GS-4/ GS-6 Steam Engine
27
c. Enter “38” to change the value of CV29 and hit Enter
d. The engine will give you a two whistle/horn blast response
4. In the following steps you will now need to write values to CV17 and CV18 to
tell the engine what the long address should be5. Call up CV17 and enter the
value required for CV17. You will get a two whistle/horn blast response
6. Call up CV18 and enter the value required for CV18. You will get a two
whistle/horn blast response
In order to determine your required values for CV17 and CV18 you will need to go
to http://extranet.mth-railking.com/pdfapp/pdfs/instruction/HO%20DCC
%20addressCV17_18%20Converter.xls
Enter in the long address you want then click anywhere else in the spreadsheet and
it will return the values for CV17 and CV18 (it will also return the hex conversion
of the CV17 and CV18 values if your DCC system requires this).
Below is an example for extended address 2011:
Feature/Factory Resetting
If all else fails and you aren't sure of something, never fear. You can always get your
engine back to a known state by either performing a Feature or Factory Reset.
There are a couple of ways to reset your MTH PS 3-equipped engine:
- Factory Resets – Clears everything – takes engine to just like it
was when you got it brand new
- Send a decimal 08 to CV 8 to reset everything entirely back to factory
default
- Send a decimal 192 to reset everything except user speed tables
- Feature Resets – There are a couple of Feature Resets that you can use
- Press F20 twice (toggling on then off). This resets the smoke, volume and
lights back to their defaults
- Send a decimal 64 for a Feature Reset. This resets volumes, smoke and
light settings.
- Send a decimal 128 to reset only address values back to factory default
- This is the same as writing 55 to CV55 to engine address 55
CV 17 and CV 18 Conversion Tool
Hex Conversion C17 Value to Enter C18 Value to Enter
2011 07DB 199 219
Desired 4-Digit
Engine Address
Below is the table of Factory Default MTH supported DCC CV's. This table is
specific to the engine in the title of this manual:
M.T.H. HO 4-8-4 GS-4/ GS-6 Steam Engine
28
Factory Default Values for MTH PS3.0 DCC
Configuration Variables (CV’s)
Decimal
Key
1
2
3
4
5
7
8
17
18
19
21
22
23
24
25
29
52
53
54
63
64
66
67
68
69
70
71
72
73
74
75
76
77
78
79
80
81
82
83
84
85
86
87
88
89
90
91
92
93
94
95
105
106
115
116
3
16
0
0
0
0
0
192
0
0
0
0
0
0
0
2
0
128
64
0
0
0
0
9
19
28
38
47
57
66
76
85
94
104
113
123
132
142
151
161
170
179
189
198
208
217
227
236
246
255
0
03
10
0
0
0
0
0
C0
00
00
00
00
00
00
00
02
00
80
40
00
00
00
0
9
13
1C
26
2F
39
42
4C
55
60
68
71
7B
84
8E
97
A1
AA
B3
BD
C6
D0
D9
E3
EC
F6
FF
0
Short Address
Start Voltage (Cv52 bit 0 must =1)
Accel Adjustment
Decel Adjustment
Max Voltage (Cv52 bit 0 must =1)
NMRA Mfg Version
NMRA Mfg ID
Extended Address High Byte
Extended Address Low Byte
Consist Address
Consist Functions F1-F8
Consist Functions F9-F12
Consist Acceleration Adjustment
Consist Deceleration Adjustment
Speed Table Select
Decoder Configuration
MTH PWM Motor Configuration
MTH Acceleration Rate
MTH Deceleration Rate
MTH Consist Acceleration Rate
MTH Consist Deceleration Rate
Forward Trim
Alternate Speed Curve Step 1
Alternate Speed Curve Step 2
Alternate Speed Curve Step 3
Alternate Speed Curve Step 4
Alternate Speed Curve Step 5
Alternate Speed Curve Step 6
Alternate Speed Curve Step 7
Alternate Speed Curve Step 8
Alternate Speed Curve Step 9
Alternate Speed Curve Step 10
Alternate Speed Curve Step 11
Alternate Speed Curve Step 12
Alternate Speed Curve Step 13
Alternate Speed Curve Step 14
Alternate Speed Curve Step 15
Alternate Speed Curve Step 16
Alternate Speed Curve Step 17
Alternate Speed Curve Step 18
Alternate Speed Curve Step 19
Alternate Speed Curve Step 20
Alternate Speed Curve Step 21
Alternate Speed Curve Step 22
Alternate Speed Curve Step 23
Alternate Speed Curve Step 24
Alternate Speed Curve Step 25
Alternate Speed Curve Step 26
Alternate Speed Curve Step 27
Alternate Speed Curve Step 28
Reverse Trim
User ID #1
User ID #2
Function - Bell High Byte
Function - Bell Low Byte
-
-
-
-
-
-
-
-
-
-
-
-
-
-
-
-
-
-
-
-
-
-
-
-
-
-
-
-
-
-
-
-
-
-
-
-
-
-
-
-
-
-
-
-
-
-
-
-
-
-
-
-
1
1
Default Value
117
118
119
120
121
122
123
124
125
126
127
128
129
130
131
132
133
134
135
136
137
138
139
140
141
142
143
144
145
146
147
148
149
150
151
152
153
154
155
156
157
158
159
160
161
162
163
164
165
166
167
168
169
170
CV Description
Function - Horn High Byte
Function - Horn Low Byte
Function - Start-Up/Shut Down High Byte
Function - Start-Up/Shut Down Low Byte
Function - PFA High Byte
Function - PFA Low Byte
Function - Lights High Byte
Function - Lights Low Byte
Function - Master Volume High Byte
Function - Master Volume Low Byte
Function - Front Coupler High Byte
Function - Front Coupler Low Byte
Function - Rear Coupler High Byte
Function - Rear Coupler Low Byte
Function - Forward Signal High Byte
Function - Forward Signal Low Byte
Function - Reverse Signal High Byte
Function - Reverse Signal Low Byte
Function - Grade Crossing High Byte
Function - Grade Crossing Low Byte
Function - Smoke Volume On/Off High Byte
Function - Smoke Volume On/Off Low Byte
Function - Smoke Volume High Byte
Function - Smoke Volume Low Byte
Function - Idle Sequence 3 High Byte
Function - Idle Sequence 3 Low Byte
Function - Idle Sequence 2 High Byte
Function - Idle Sequence 2 Low Byte
Function - Idle Sequence 1 High Byte
Function - Idle Sequence 1 Low Byte
Function - Extended Start-Up High Byte
Function - Extended Start-Up Low Byte
Function - Extended Shut Down High Byte
Function - Extended Shut Down Low Byte
Function - Labor Chuff High Byte
Function - Labor Chuff Low Byte
Function - Drift Chuff High Byte
Function - Drift Chuff Low Byte
Function - One Shot Doppler High Byte
Function - One Shot Doppler Low Byte
Function - Coupler Slack High Byte
Function - Coupler Slack Low Byte
Function - Coupler Close High Byte
Function - Coupler Close Low Byte
Function - Single Horn Blast High Byte
Function - Single Horn Blast Low Byte
Function - Engine Sounds High Byte
Function - Engine Sounds Low Byte
Function - Brake Sounds On/Off High Byte
Function - Brake Sounds On/Off Low Byte
Function - Cab Chatter On/Off High Byte
Function - Cab Chatter On/Off Low Byte
Function - Feature Reset High Byte
Function - Feature Reset Low Byte
2
2
3
3
4
4
5
5
6
6
7
7
8
8
9
9
10
10
11
11
12
12
13
13
14
14
15
15
16
16
17
17
18
18
19
19
20
20
21
21
22
22
23
23
24
24
25
25
26
26
27
27
28
28
Key
Hex
CV
Description
Function Function

M.T.H. HO 4-8-4 GS-4/ GS-6 Steam Engine
29
CV Programming – Marklin 6021 Controller
Note: There are 4 DIP switches on the back of the Marklin 6021 Controller. For
MTH engines you will want the DIP switches set to the following:
1 - OFF
2 - ON
3 - OFF
4 - OFF
To enter programming mode using a Marklin 6021 controller, perform the
following steps:
1. Press and hold the stop and go buttons simultaneously until the
two digit LED display flashes 99.
2. Ensure that track power is off by pressing the stop button.
3. Enter the engine address or 80 on the keypad. 80 will match any
engine address.
4. Turn the speed knob counter clockwise to the direction change
position and hold it there.
5. Press the go button. The headlight should start to flash. This indicates
that the engine is waiting for the CV number to be entered.
6. Release the speed control knob.
To program a CV, perform the following steps:
1. If the desired CV number is less than 80, enter the CV number on the
keypad, confirm that the function LED is off (pressing the off key if
necessary), and go directly to the next step.
1. If the desired CV number is equal or greater than 80, enter
the hundreds and tens digits of the CV number on the keypad.
For example, to program CV 94, enter 09 on the keypad then
press the function key to tell the engine that a CV number
greater than 79 is being entered
2. Briefly turn the speed knob counter clockwise to the direction
change position. The headlight should shift to a long-short
flash pattern
3. Enter the unit's digit of the CV number preceded by a zero.
For the example of CV 94, enter 04. The state of the function
LED does not matter. Note: use 80 for 00.
2. Briefly turn the speed knob counter clockwise to the direction change
position. The headlight should shift to a single short flash pattern.
3. If the desired CV contents is less than 80, enter the CV contents on the
keypad, confirm that the function LED is off (pressing the off key if
necessary), and go directly to Step 4
1. If the desired CV content is equal or greater than 80, enter the
hundreds and tens digits of the CV contents on the keypad.
For example, to program a CV with the value 128, enter 12 on
the keypad then press the function key to tell the engine that a
number greater than 79 is being entered

M.T.H. HO 4-8-4 GS-4/ GS-6 Steam Engine
30
2. Briefly turn the speed knob counter clockwise to the direction
change position. The headlight should shift to a short-short
flash pattern.
3. Enter the units digit of the CV contents preceded by a zero.
For the example of 128, enter 08. The state of the function
LED does not matter. Note: use 80 for 00.
4. Briefly turn the speed knob counter clockwise to the direction change
position. The headlight illuminates continuously for ~1.5 seconds to
confirm successful programming. If programming was unsuccessful,
the headlight will rapidly flash for ~1.5 seconds. The headlight then
returns to the long flash pattern that indicates that the engine is
waiting for the next CV number to be entered.
5. To program more CVs, return to Step 1. To exit programming mode,
turn off track power by pressing the stop button
Note: When entering values greater than 79, the two entries are actually added
together. This applies to both the CV number and contents. Thus it is theoretically
possible to program a CV number as high as 869 (790 + 79).
Operation
Until the engine receives a packet that is addressed to it that uses the new Märklin
format, the single function key directly controls startup and shutdown. If the
function key is on, the engine will run the startup script. If the function key is off,
the engine will run the shutdown script. This allows the engine to be used with
controllers that only have a single function key, such as the Märklin 6020, or a
Märklin 6021 with DIP switch 2 in the off position.
When the engine receives a packet that is addressed to it using the new Märklin
format, the normal function mapping is used, with the function key
corresponding to function 0(head/tail light).
MTH engines support both New and Old Motorola formats. For the Old
Motorola
format the Function/Off button on the Marklin 6021 controller toggles
Start-up/Shut-Down. For the New Motorola format the Function/Off button on
the Marklin 6021 Controller toggles the Headlight/Taillight and F1-F4 are
supported. Please see page 22 for the engine's F-Function List.
Bit Function
0 Enable 27 speed step mode
1 Enable 28 speed step mode
2 Enable extra functions at engine address + 1 and consist address + 1
3-7 Reserved
 Loading...