

Page 1
M.T.H. HO
F-3
Diesel Engine
Congratulations! You've just purchased the most
technically advanced HO diesel locomotive ever
produced! This highly detailed model includes a
broader range of features than you’ll find on any
other HO scale diesel, including smooth
performance from a 12-Volt 5-Pole Precision
Flywheel Equipped Skew-wound motor; and a
DCC-Ready plug-in receptacle for any DCC
receiver. If you’re looking for modern motive
power that’s accurately detailed, smooth running,
and a great deal of fun to operate, it doesn’t get
any better than this.
PLEASE READ THE MANUAL BEFORE USE AND SAVE
WWW.MTHHOTRAINS.COM
DCC Ready
ENGINEER’S GUIDE
Page 2

TABLE OF CONTENTS
UNPACKING YOUR ENGINE 4
Removing and Unwrapping Your Engine 4
What Else is in the Box? 4
PRODUCT OVERVIEW 5
Getting to Know Your Engine 5
Engine Diagram 6
Removing the Body 6
SET-UP 7
Lubrication 7
FEATURES AND OPERATION 7
Analog DC (standard DC power pack) 8
DCC Digital Command Control 8
Installing your DCC Decoder 10
SPECIFICATIONS 12
CARE AND MAINTENANCE 13
Troubleshooting Guide 13
HOW TO ORDER PARTS 14
SERVICE & WARRANTY INFORMATION 15
Alternate Lighting Supply Jumper 9
Service & Warranty Information 15
Limited One-Year Warranty 15
This product may be protected by one or more of the following patents: 6,019,289;
6,280,278; 6,281,606; 6,291,263; 6,457,681; 6,491,263; 6,604,641; 6,619,594; 6,624,537;
6,655,640.
©2010, M.T.H. Electric Trains®, Columbia, MD 21046
CAUTION: ELECTRICALLY OPERATED PRODUCT:
WARNING: When using electrical products, basic safety precautions should be observed, including the following:
Read this manual thoroughly before using this device.
lM.T.H. recommends that all users and persons supervising use examine the hobby transformer and other electronic equipment
periodically for conditions that may result in the risk of fire, electric shock, or injury to persons, such as damage to the primary cord,
plug blades, housing, output jacks or other parts. In the event such conditions exist, the train set should not be used until properly
repaired.
lDo not operate your layout unattended. Obstructed accessories or stalled trains may overheat, resulting in damage to your layout.
lThis train set is intended for indoor use. Do not use if water is present. Serious injury or fatality may result.
lDo not operate the hobby transformer with damaged cord, plug, switches, buttons or case.
Recommended for Ages 14 and up. Not recommended for children under 14 years of age without adult supervision. As
with all electric products, precautions should be observed during handling and use to prevent electric shock.
Rev: 80dl18571i_12/30/2010
Page 3

M.T.H. HO F-3 Diesel Engine
3
QUICK START GUIDE
I USE A REGULAR DC SUPPLY…
Step 1: Unpack your Engine (refer to unpacking instruction on pg 4)…
Step 2: Set the engine on the track …
Step 3: Apply increasing DC voltage until she starts up and pulls out!
CAUTION: M.T.H. HO engines DO NOT OPERATE ON AC
VOLTAGE. Applying AC power to your locomotive could cause permanent
damage and will void your warranty.
Of course, you should read your manual over before running your engine,
but if you just can’t wait you’re in luck. Your MTH DCC Ready engine is
ready to run out of the box. Follow the three simple steps below to get
your new engine up and running. Now, after a few minutes, shut her down
and read through your engineer’s guide.
.
Page 4

UNPACKING YOUR ENGINE
Removing and Unwrapping Your Engine
Carefully remove and unwrap the model on a soft surface. By nature, models
with high levels of detail have some small fragile parts.
Carefully remove any foam packing pieces that may be surrounding the model.
What Else is in the Box?
The following items are packed with your engine.
Engineer's Guide (1)
You probably know that since you're reading it.
ALT-L Pad Jumper (1)
This is for the ALT-L pad on the MTH DCC Ready Engine Board
M.T.H. HO F-3 Diesel Engine
4
Page 5

PRODUCT OVERVIEW
Getting to Know Your M.T.H. HO Locomotive
Key Features
Your new HO Diesel Engine is equipped with a DCC-Ready receiver receptacle.
In plain English, this means your locomotive is ready-to-run using any DC power
supply and can be quickly updated to command control with any DCC decoder.
Compatibility
This HO model has directionally controlled LED's, has locations for DCC
decoders to drive the Number board LED's (extra F functions on applicable DCC
decoders).
Compatible with any DC power supply
Compatible with DCC decoders that use the standard 8-pin NMRA connection
M.T.H. HO F-3 Diesel Engine
5
Lights
As you read on, you'll notice there are no instructions for replacing light bulbs in
your diesel. That's because there aren't any. We use specially designed and
controlled LEDs to create realistic lighting effects that occur automatically. All
the lights for this model are LED’S (headlight and two number boards) Again,
NO PROGRAMMING!!
More…
No other HO locomotive has features like these. There are so many more things
to learn and enjoy about M.T.H. HO Engines, we could write a book. But, that's
no fun. So, if you haven't already done so, flip to the Quick Start Guide and let's
run your new engine!!
Page 6
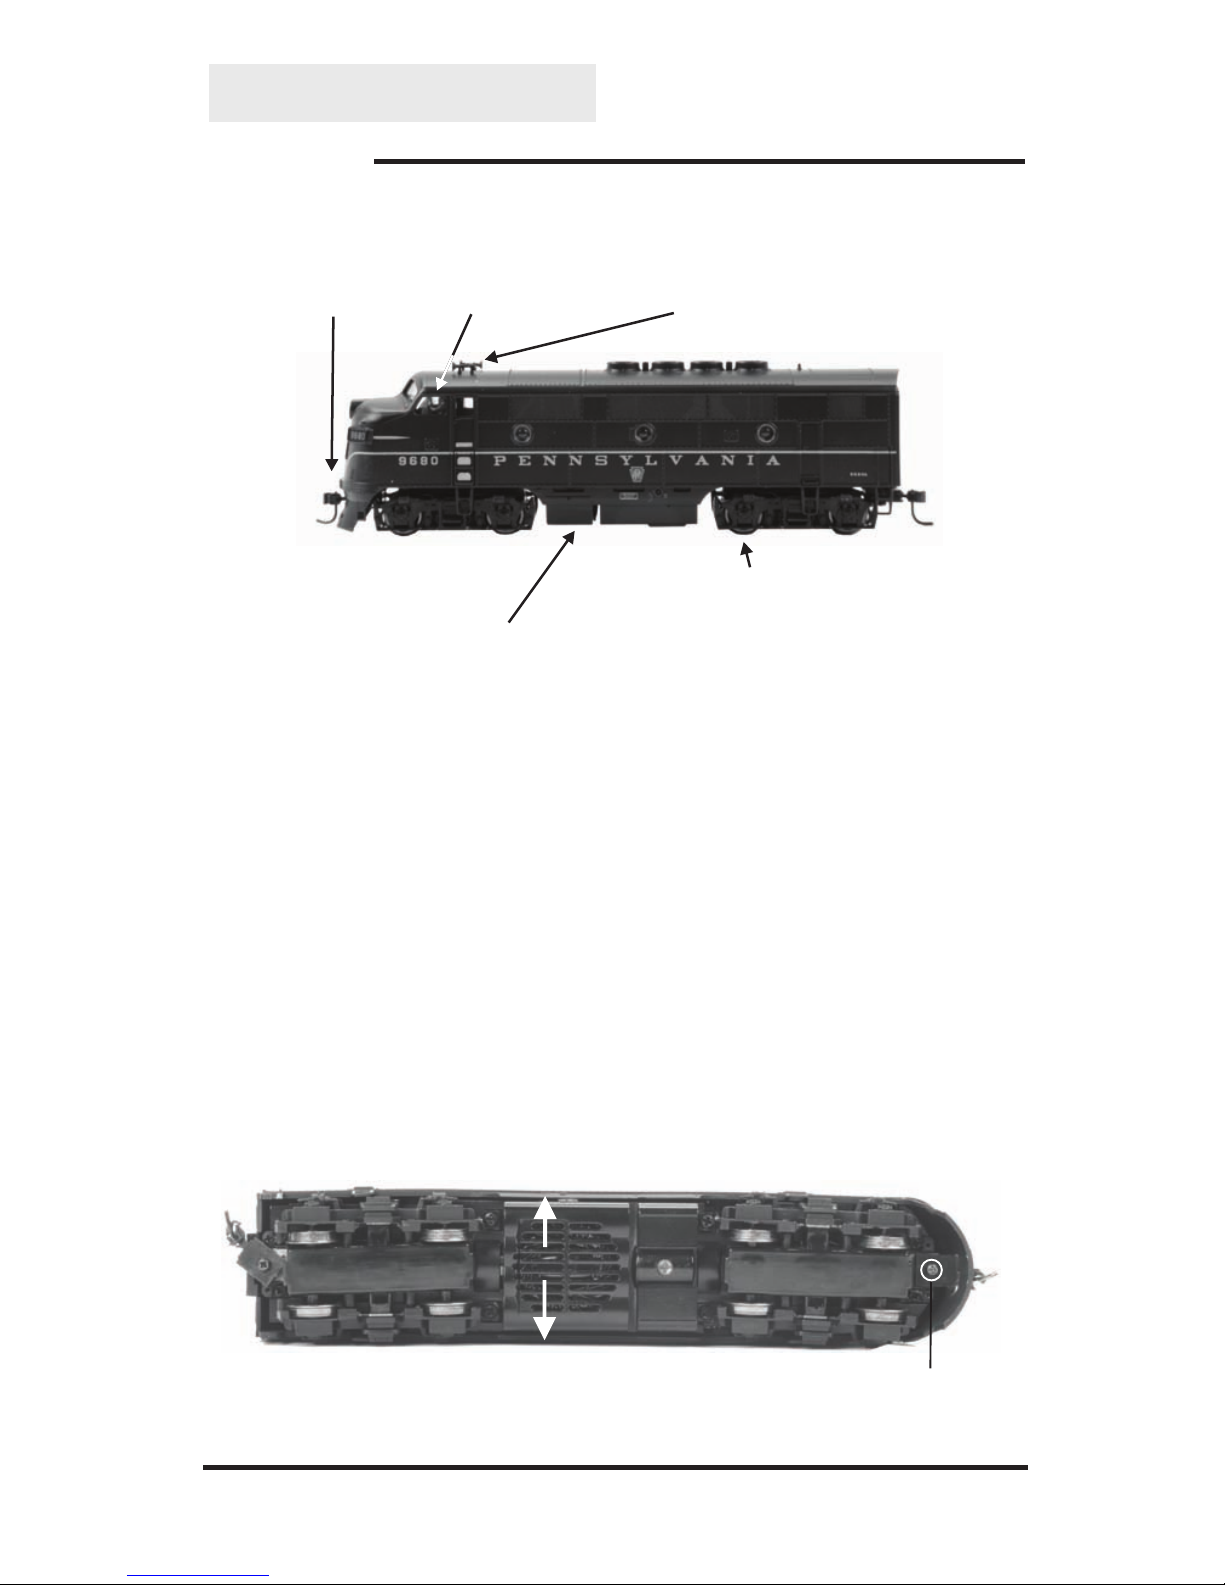
ENGINE DIAGRAM
Locomotive
M.T.H. HO F-3 Diesel Engine
6
Detailed Horn
Magnetic Kadee®
Compatible Couplers
Crew Figures
Die-Cast Fuel Tank
All wheels Powered
Remove the Screw
Removing the Body
-You must first remove the front locomotive coupler in order to pull
the body off of the chassis.
-Remove the screw shown below
-Then slighty pull the body outward of engine in order to slide the
body off.
-Re-assemble in reverse order.
Page 7
M.T.H. HO F-3 Diesel Engine
7
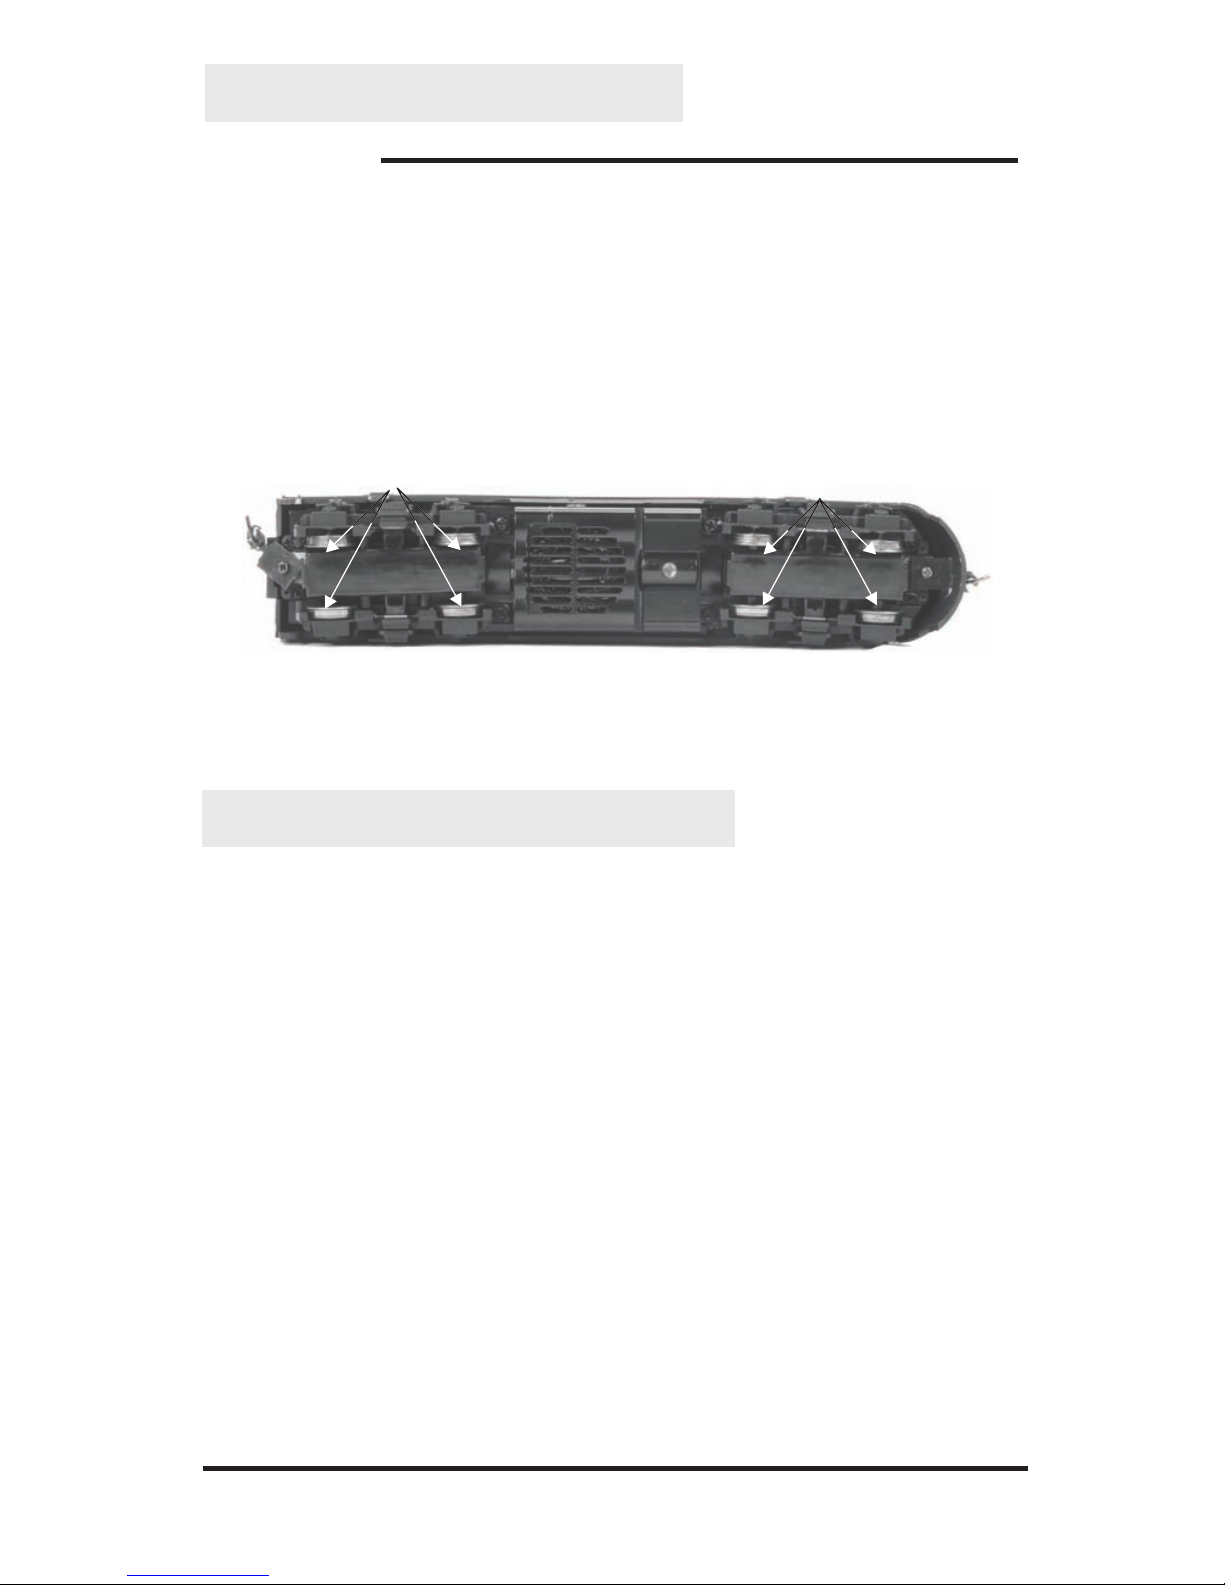
Lubrication
sing light machine or household oil,
apply
a very small amount to all axles points as shown.
Your gearbox is properly greased at the factory and probably never needs
service however, if you run excessive hours pulling heavy loads, it's a good
idea to re-grease the gearbox using M.T.H. gear grease or equivalent. You can
remove the gear box cover by releasing one of the end lockng tabs using a
small flatblade screwdriver.
Lubricate the axles before operating u
(available with M.T.H.'s Maintenance Kit (#30-50010) , sold separately)
SET-UP
FEATURES AND OPERATION
Now, for the fun stuff! Your new M.T.H. HO Diesel Engine has more features
and operating capabilities than any HO engine ever built by any manufacturer.
We're going to walk you through everything she does in general but, you'll
probably find a few we forgot to mention on your own.
Don’t worry. We’ve taken care of the hard part for you. Your MTH DCC Ready
engine already has the jumpers installed at the factory so all you have to do is set
it on the rails, apply DC power and away you go.
Conventional Operation Jumpers
Your MTH DCC Ready engine has pre-installed jumpers that allow for out-ofthe-box operation. However, you can remove these jumpers to change the
lighting to your liking. You can shut off the Number Board Lights by removing
the jumpers on the engine's circuit board. Please refer to Removing Jumpers in
the DCC Operation section of this manual.
It is important to note that there two sets of jumpers that route track power to
your engine's motor. These must be installed when operating in Conventional DC
mode.
Couplers
MTH DCC Ready engine comes with Kadee-compatible couplers already
installed.
Lubricate Axles (L)
Lubricate Axles (L)
Page 8

M.T.H. HO F-3 Diesel Engine
8
FEATURES AND OPERATION
Modes of Operation
Analog DC
This is when there is nothing connected to the rails except a conventional DC
power pack. These power packs generally have at least one variable output
controlled by a throttle of some sort and a means of reversing DC polarity on
the track to change the direction of your engine.
DCC
The user connects their DCC decoder of choice to the MTH DCC Ready
board's 8-pin header following the DCC decoder's manufacturer's instructions.
Analog DC
Not much explanation is required here, and that's exactly why you run your trains
this way! Here's the good news, even if you like to keep it simple, your MTH HO
engine is outfitted with lights, features, that you're going to love.
Running the Engine
Set the engine on the rails, and apply DC power. Refer to the Set-Up section of
this guide for instructions on how to lubricate the chassis.
As you increase power, at about 3 volts, the lights will come on and she'll move
out!
Changing Direction
Lighting
Continue increasing the voltage all the way to 16 volts DC for maximum
speed.
Reduce the throttle until the engine stops, flip the direction switch, and then
increase the throttle again.
Your model is equipped with a headlight and number board lights. In analog DC
mode, lighting operation is fully automatic.
Page 9
M.T.H. HO F-3 Diesel Engine
9
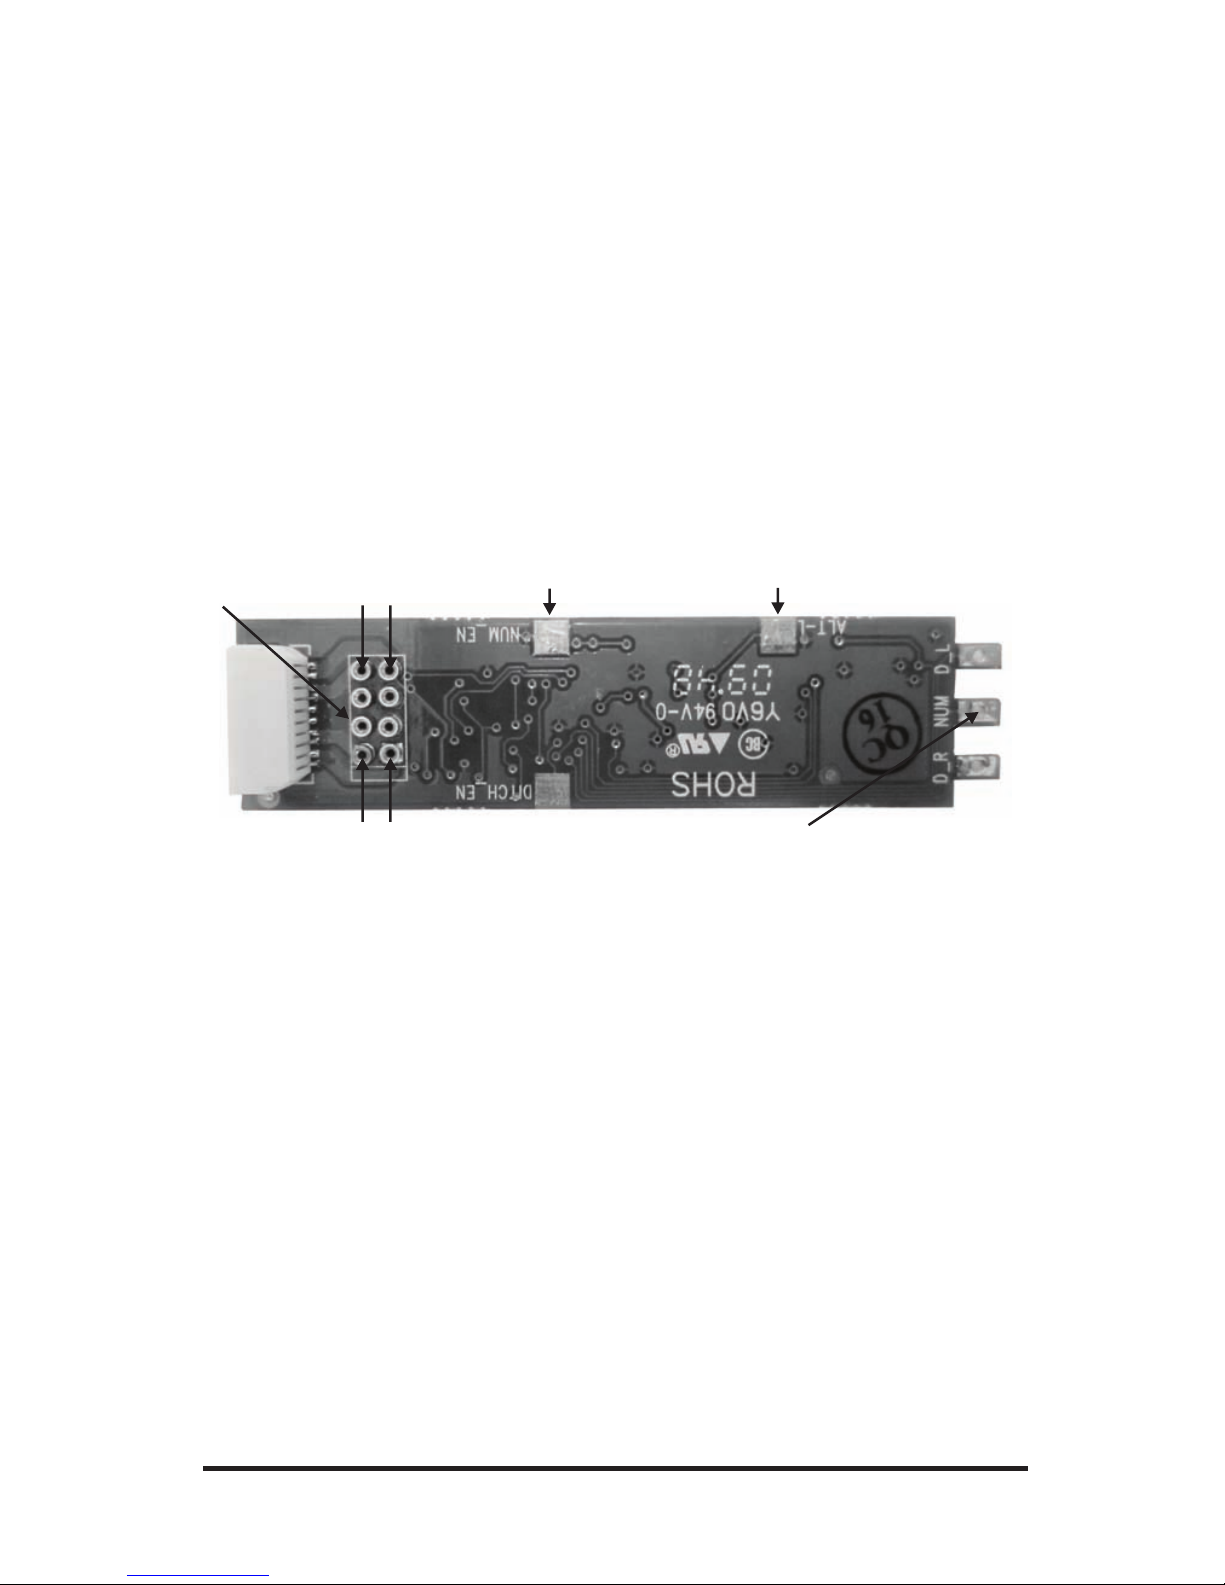
Alternate Lighting Supply Jumper
This exists on your MTH board in case you have a DCC decoder that doesn't
have an appropriate lighting supply line. Most all current DCC decoders have a
lighting supply line so in most cases you won't need this jumper installed. If you
have programmed your DCC decoder correctly and you still have no lights then
you will need to install this jumper. Again, this is why it is recommended that you
operate the model with the body off after installation of any DCC decoder.
DCC Lighting Control Tabs
These tabs provide wiring locations for DCC Decoders that have extra F
functions available. The tabs are labeled on the board – D_R = Ditch Right, D_L
= Ditch Left, NUM = Number Board.
Pin 5
Pin 4
Alternate Lighting Supply
NMRA 8-Pin
Number Board LED
Pin 8
Pin 1
DCC Lighting Control for:
Number Boards”
Page 10

M.T.H. HO F-3 Diesel Engine
10
To install your DCC decoder:
Step 1: Remove the engine's body. (See pages 6&7)
Step 2:
- Number Board
- Alternate Lighting Supply
- NMRA Header (both jumpers)
Step 3: Connect your DCC decoder to the 8-pin NMRA header on your MTH
engine board. Follow your DCC decoder's manufacturer's instructions carefully
NOTE – If your DCC decoder has the extra F – Functions (and wires)
available you can connect the DCC decoder board to the 3 tabs at the end of
the board to control Ditch lights and Number Board lights
If your DCC decoder has only a headlight and a taillight available and you want
to keep your number board lights active, leave the pad jumpers installed for
Number Board on your MTH board. The tabs on the end of the MTH board are
available for you to wire your DCC Decoder’s function control lines to them to
allow control of the Number Board lights. For example, if you want your DCC
Decoder to control the Number Board lights and you have the function control
line to do so, remove the Number Board pad jumper then wire the control line
from your DCC Decoder to the NUM pad on the MTH board.
To mount your DCC Decoder to the MTH board it is recommended that you use
double-sided tape and ensure your DCC decoder board doesn't touch your MTH
board (keep the two boards insulated from one another). There is quite a bit of
room available inside your model so for most DCC decoders you will find it easy
to mount them
Step 4: If you are connecting the extra lighting function wires from the note
above then simply slide the plastic wire clip off the tab on the MTH board and
insert the wire then slide the clip back on. This provides a secure, yet, quick and
easy way to connect the added function wires from your DCC decoder using the
existing LED's on your MTH engine.
Remove the Alternate Lighting Supply jumper removal reference
Page 11

M.T.H. HO F-3 Diesel Engine
11
Step 5: Place the engine back on the track with the engine's body still removed
Step 6: Apply DCC power to the rails and follow your DCC decoder's
manufacturer's instruction for operation. You want to ensure you have the wiring
correct and not shorting to anything on the chassis or the MTH board.
If you have successful operation of your DCC decoder then you can proceed to
the next step:
Step 7: Re-install the engine's body and ensure that it is clipped fully onto the
chassis. You should be able to pick up your model by the body if it's been
installed properly
Page 12

M.T.H. HO F-3 Diesel Engine
12
SPECIFICATIONS
US PATENTS
US 6,457,681 Oct. 2, 2002
US 6,619,594 Sept. 16, 2003
US 6,655,640 Dec. 2, 2003
Electrical Input Voltage 0 - 18 VDC
Current Draw ( lights, sounds)
~100 – 300 mA
unloaded)
Lighting LED - Rule 17
Operating Modes Analog DC Yes
DCC - Digital Command Control
(with user installed DCC Decoder) Yes
DCS - Digital Control System No
Default Addresses DCS N/A
DCC short N/A
DCC extended N/A
Page 13
HO
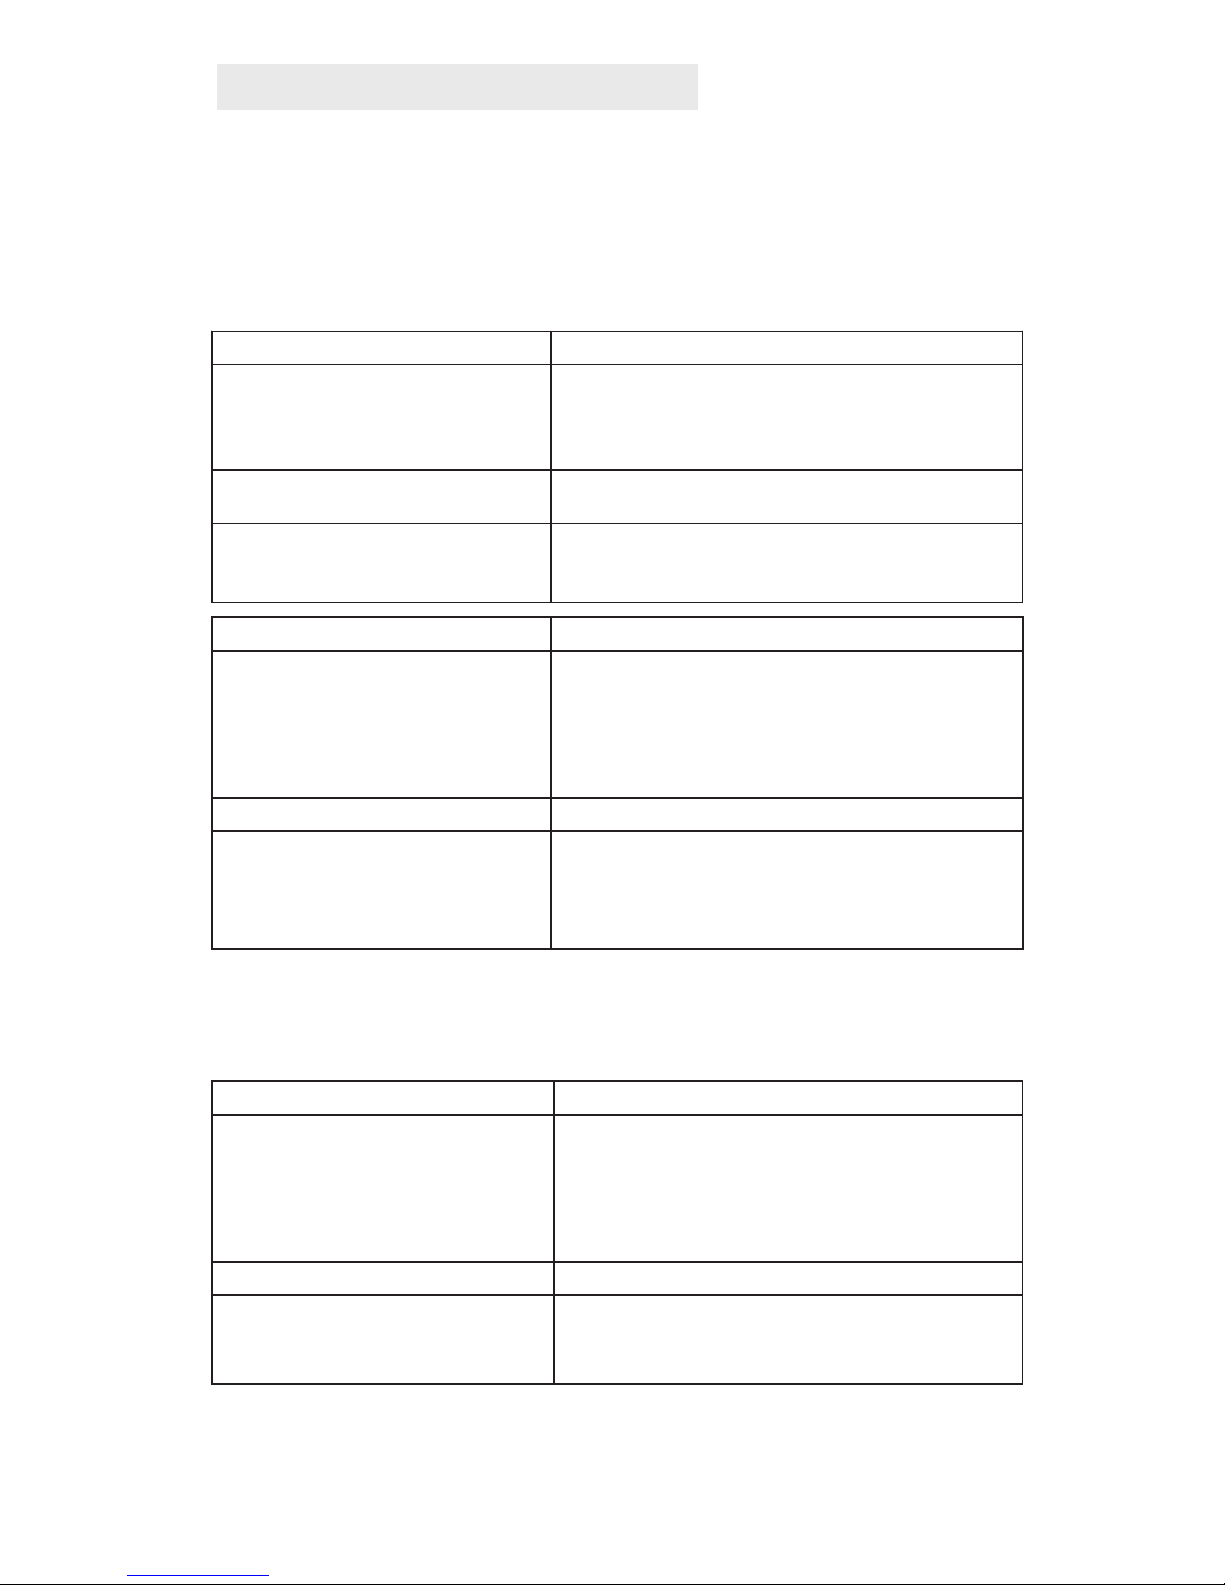
The following Guide will help you trouble shoot your M.T.H. HO engine.
Troubleshooting Guide
M.T.H. HO F-3 Diesel Engine
13
DCC
Start-up Solution
When I apply power to the
track my engine doesn’t do
anything. No lights, no
movement, no nothing.
Check to see if that section of track has
power. Use a voltmeter or a lit passenger
car.
Slide the engine a couple of feet in either
direction, you may have a bad track section
Have you got that section electrically
isolated with a toggle switch or other
device?
CARE AND MAINTENANCE
Analog DC
No Number Board lights are
on
Lights
Solution
Check that the appropriate jumpers are
installed. Remember - the jumpers
must be installed in Analog DC for the
Number Board lights to be active
Check that you have removed the
NMRA header jumper (both jumpers)
Motion
No Movement of the engine
when track power is applied
Check that the NMRA header jumpers
are installed. You must jump pin 1 to pin
8 and also pin 4 to pin 5
Solution
The Number board lights are
not controllable from DCC
Lights
Solution
Check that the you have removed the
jumpers for the Number board
lightslights to be active
Motion
Motor spins at track voltage
Solution
Page 14

M.T.H. HO F-3 Diesel Engine
14
HOW TO ORDER PARTS
Replacement parts are available directly from the M.T.H. Parts
Department (order online: e-mail:
mail: 7020 Columbia Gateway Drive,
Columbia MD 21046-1532, FAX: 410-381-6122).
www.mth-railking.com,
Page 15

Service & Warranty Information
How to Get Service Under the Terms of the Limited One-Year Warranty
When you suspect an item is defective, please check the operator's manual for standard operation and
trouble-shooting techniques that may correct the problem. Additional information may be found on
the M.T.H. Website. Should you still require service, follow the instructions below to obtain warranty
service.
First, e-mail, write, call or fax a M.T.H. Authorized Service Center (ASC) in your area to obtain Repair
Authorization. You can find the list of ASCs on the M.T.H. Website, www.mth-railking.com.
Authorized Service Centers are required to make warranty repairs on items sold only from that store;
all other repairs may-- or may not be done at the store's own discretion. If you did not purchase the
item directly from the ASC, you will need to select a National Authorized Service Center (NASC).
These centers are compensated by M.T.H. to perform warranty service for any customer whose repair
qualifies for warranty service. A list of NASC retailers can be located on the M.T.H. Website or by
calling 410-381-2580. Should the warranty no longer apply, you may choose either an ASC or NASC
retailer to service your M.T.H. Product. A reasonable service fee will be charged.
CAUTION: Make sure the product is packed in its original factory packaging including its foam and
plastic wrapping material to prevent damage to the merchandise. There is no need to return the entire
set if only one of the components is in need of repair unless otherwise instructed by the Service Center. The
shipment must be prepaid and we recommend that it be insured. A cover letter including your
name, address, daytime phone number, e-mail address (if available), Return Authorization
number (if required by the service center, a copy of your sales receipt and a full description
of the problem must be included to facilitate the repairs. Please include the description
regardless of whether you discussed the problem with a service technician when contacting
the Service Center for your Return Authorization.
Please make sure you have followed the instructions carefully before returning any merchandise for
service. Authorized M.T.H. Service Centers are independently owned and operated and are not agents
or representatives of M.T.H. Electric Trains. M.T.H. assumes no responsibility, financial or otherwise,
for material left in their possession, or work done, by privately owned M.T.H. Authorized Service
Centers.
If you need assistance at any time email MTH Service at [email protected], or call 410 381-
2580.
Limited One-Year Warranty
M.T.H. products are warrantied for one year from the date of purchase against defects in material or
workmanship, excluding wear items such as light bulbs, pick-up rollers, batteries, smoke unit wicks,
and traction tires. We will repair, replace, or credit (at our option) the defective part without charge
for the parts or labor, if the item is returned to an M.T.H. Authorized Service Center (ASC) or
M.T.H. National Authorized Service Center (NASC) within one year of the original date of purchase.
This warranty does not cover damages caused by improper care, handling, or use. Transportation
costs incurred by the customer are not covered under this warranty.
Items sent for repair must be accompanied by a return authorization number, a description of the
problem, and a copy of the original sales receipt from an Authorized M.T.H. Train Merchant,
which gives the date of purchase. If you are sending this product to an Authorized Service Center,
contact that Center for their return authorization.
This warranty gives you specific legal rights, and you may have other rights that vary from state to
state. Specific questions regarding the warranty may be forwarded to M.T.H. Directly.
Service Department:
M.T.H. Electric Trains
7020 Columbia Gateway Drive
.Columbia MD 21046-1532
All M.T.H. products purchased from an Authorized M.T.H. Retailer are covered by this warranty.
See our Website www.mthtrains.com to identify an M.T.H. Retailer near you.
 Loading...