

Page 1
M.T.H. HO Dash-9
Diesel Engine
Congratulations! You've just purchased the most
feature-rich and technically advanced HO diesel
locomotive ever produced! This highly detailed
model includes a broader range of features than you’ll
find on any other HO scale diesel, including smooth
performance from a three-scale-mile-per-hour crawl
to full throttle; “cruise control” for steady speeds
regardless of curves, switches and grades; built-in
decoders for DCC and the M.T.H. Digital Command
System (DCS); and a full range of prototypical
sounds. If you’re looking for motive power that’s
accurately detailed, smooth running, and a great deal
of fun to operate, it doesn’t get any better than this.
Operates on 18” radius curves with Code 70, Code 83
or Code 100 rails.
PLEASE READ THE MANUAL BEFORE USE AND SAVE
WWW.MTHHOTRAINS.COM
(PS3)
3
A
R
D
O
B
H
N
O
O
S
M
Y
S
E
T
Engineer's Guide
PFA
Passenger/Freight
Announcements
Page 2

This product may be protected by one or more of the following patents: 6,019,289; 6,280,278;
6,281,606; 6,291,263; 6,457,681; 6,491,263; 6,604,641; 6,619,594; 6,624,537; 6,655,640.
©2014, M.T.H. Electric Trains®, Columbia, MD 21046
CAUTION: ELECTRICALLY OPERATED PRODUCT:
WARNING: When using electrical products, basic safety precautions should be observed, including the following:
Read this manual thoroughly before using this device.
- M.T.H. recommends that all users and persons supervising use examine the hobby transformer and other electronic
equipment periodically for conditions that may result in the risk of fire, electric shock, or injury to persons, such as
damage to the primary cord, plug blades, housing, output jacks or other parts. In the event such conditions exist, the
train set should not be used until properly repaired.
- Do not operate your layout unattended. Obstructed accessories or stalled trains may overheat, resulting in damage
to your layout.
- This train set is intended for indoor use. Do not use if water is present. Serious injury or fatality may result.
- Do not operate the hobby transformer with damaged cord, plug, switches, buttons or case.
Recommended for Ages 14 and up. Not recommended for children under 14 years of age without adult
supervision. As with all electric products, precautions should be observed during handling and use to
prevent electric shock.
TABLE OF CONTENTS
UNPACKING YOUR ENGINE ...............................................................4
Removing and Unwrapping Your Engine.........................................................4
What Else is in the Box?......................................................................................4
PRODUCT OVERVIEW...........................................................................5
Getting to Know Your Engine ...........................................................................5
Engine Diagram ....................................................................................................7
SET-UP ......................................................................................................8
Coupler Installation ..............................................................................................8
Snow Plow Installation.........................................................................................9
Lubrication.............................................................................................................9
MODES OF OPERATION.......................................................................10
FEATURES AND OPERATION .............................................................11
Analog DC (standard DC power pack).............................................................11
DCS Digital Command System ..........................................................................13
15
F-Function Table .................................................................................................20
23
23
31
SPECIFICATIONS ...................................................................................32
CARE AND MAINTENANCE ................................................................33
Troubleshooting Guide........................................................................................33
HOW TO ORDER PARTS........................................................................38
SERVICE & WARRANTY INFORMATION.........................................39
DCC DIGITAL COMMAND CONTROL................................................
Advanced DCC Operation..................................................................................
Configuration Variables .......................................................................................
Advanced Consisting............................................................................................27
Programming Track..............................................................................................
Service & Warranty Information........................................................................39
Limited One-Year Warranty ................................................................................39
Rev: _80dl18109i_HO Dash-9 Ps3 1/14/15
Page 3

QUICK START GUIDE
Of course, you should read your manual over before running your engine. But if
you just can’t wait, choose which control method that you use from the list below.
Follow the steps outlined in your section, run your engine and enjoy! Now, after a
few minutes, shut down the engine and read through your engineer’s guide.
I USE A REGULAR DC SUPPLY…
Step 1: Unpack your Engine. (refer to unpacking instruction on pg 4)…
Step 2: Set the engine on the track
Step 3: Apply 6-8VDC voltage until she starts up and then increase to pull out.
I'M A DCC OPERATOR….
Step 1: Unpack your Engine. (refer to unpacking instructions on pg 4)…
Step 2: Set the engine on the track …
Step 3: Power up your DCC system…
Step 4: Select engine address 3 and press “F3” to start her up…
Step 5: Turn the throttle and head on down the pike…
I RUN DCS….
Step 1: Unpack your Engine. (refer to unpacking instructions on pg 4)…
Step 2: Set the engine on the track …
Step 3: Power up your DCS system…
Step 4: Add the engine to your system and start her up…
Step 5: Turn the throttle and move out….
CAUTION: M.T.H. HO engines DO NOT OPERATE ON AC VOLTAGE.
Applying AC power to your locomotive could cause permanent damage and will
void your warranty.
Please note, when making setting changes in DCS or DCC, such as address, please
wait a minimum of 5 seconds after removing power to insure the settings are
stored in the engines memory. Reapplying power in less than 5 seconds may result
in losing the setting changes.
M.T.H. HO Dash-9 Diesel Engine w/Proto-Sound 3.0
3
Page 4

UNPACKING YOUR ENGINE
Removing and Unwrapping Your Engine
Carefully remove and unwrap the model on a soft surface. By nature, models with
high levels of detail have some small fragile parts.
Carefully remove any foam packing pieces that may be surrounding the model.
What Else is in the Box?
The following items are packed with your engine.
Engineer’s Guide
Mechanical Kadee-Compatible Couplers with mounting hardware
Snow Plow
M.T.H. HO Dash-9 Diesel Engine w/Proto-Sound 3.0
4
Page 5

PRODUCT OVERVIEW
Getting to Know Your M.T.H. HO Locomotive
Key Features
Your new HO Diesel Engine is equipped with the exclusive M.T.H. Proto-Sound®
3.0 digital sound and control system. In plain English, this means your locomotive
contains state-of-the-art electronics providing realistic digital sounds, precisely
controlled speed in increments of 1 scale mile per hour, and much, much, more.
Compatibility
The Proto-Sound 3 system is universally compatible with track power and/or signal
combinations including analog DC (regular DC power pack), DCC (NMRA Digital
Command Control), or DCS (MTH Digital Command System). Simply set your
Engine on the rails, apply any one of these power/signal sources, and move out!
The Proto-Sound 3.0 system automatically senses the track environment and adapts
accordingly. No hidden jumpers, switches, magic wands, or programming required!
A vast array of realistic operation is automatic when the Engine is run on analog
DC. You can expand access to features in a DCC environment. Experience the
most your new locomotive has to offer in the simple to use yet powerful world of
DCS. To be clear, DCS is NOT a proprietary version of DCC, as some other
manufacturers offer. DCS is a comprehensive layout control system
designed with one primary goal: make model trains do amazingly realistic
things using a simple and intuitive controller. We put the complexity on the
inside, and the fun in your hands!
Digital Sound
Your Proto-Sound 3 (PS 3) equipped engine contains over 100 individual
recordings. These recordings are played back dynamically at appropriate times to
create a symphony of realism for your ears. Hear the diesel roar automatically
intensify or lighten when speeding up or slowing down, listen to the sounds of
brakes squeaking and squealing as you come to a stop, or enjoy the random
conversations of railmen working as your model sits at idle. It's all there and it's
incredible.
Your HO diesel includes built-in realistic horn sound effects, including forward
(two blasts) and reverse (three blasts) signaling and crossing signal sounds, all
available with one-touch control from a DCS controller or through any DCC
controller capable of accessing up to F28.
M.T.H. HO Dash-9 Diesel Engine w/Proto-Sound 3.0
5
Page 6

Digital Control
In standard analog DC mode, your model still operates under digital control.
The PS 3 advance speed control system converts track voltage into digital speed
commands. Your model will run smoothly and consistently at any speed regardless
of load, hills, or curves. If you are a DCC user, you'll quickly learn to appreciate
the precision of our speed control and linear speed curve. DCS users will enjoy
the added benefits of controlling speeds in increments of 1 scale mile per hour
displayed on DCS controllers or easily changing acceleration and deceleration rates
independently without any discussion of bits or bytes. To be clear, DCS is NOT
DCC.
Lights
As you read on, you’ll notice there are no instructions for replacing light bulbs in
your diesel. That's because there aren’t any. We use specially designed and
controlled LEDs to create realistic lighting effects that occur automatically.
Again, NO PROGRAMMING! Just come to a stop and watch as the headlight
dims automatically in accordance with rule 17. Of course, as you pull away,
the headlight returns to it’s fully bright, yet warm, glow.
More…
In analog DC operation, just flip the track polarity or direction switch at any speed
and watch your Engine gradually come to stop, turn on the appropriate directional
lighting, and smoothly accelerate back up to speed. No other HO locomotive has
features like these. There are so many more things to learn and enjoy about M.T.H.
HO Engines, we could write a book. But, that's no fun. So, if you haven't already
done so, flip to the Quick Start Guide and let's run your new engine!!
M.T.H. HO Dash-9 Diesel Engine w/Proto-Sound 3.0
6
Page 7
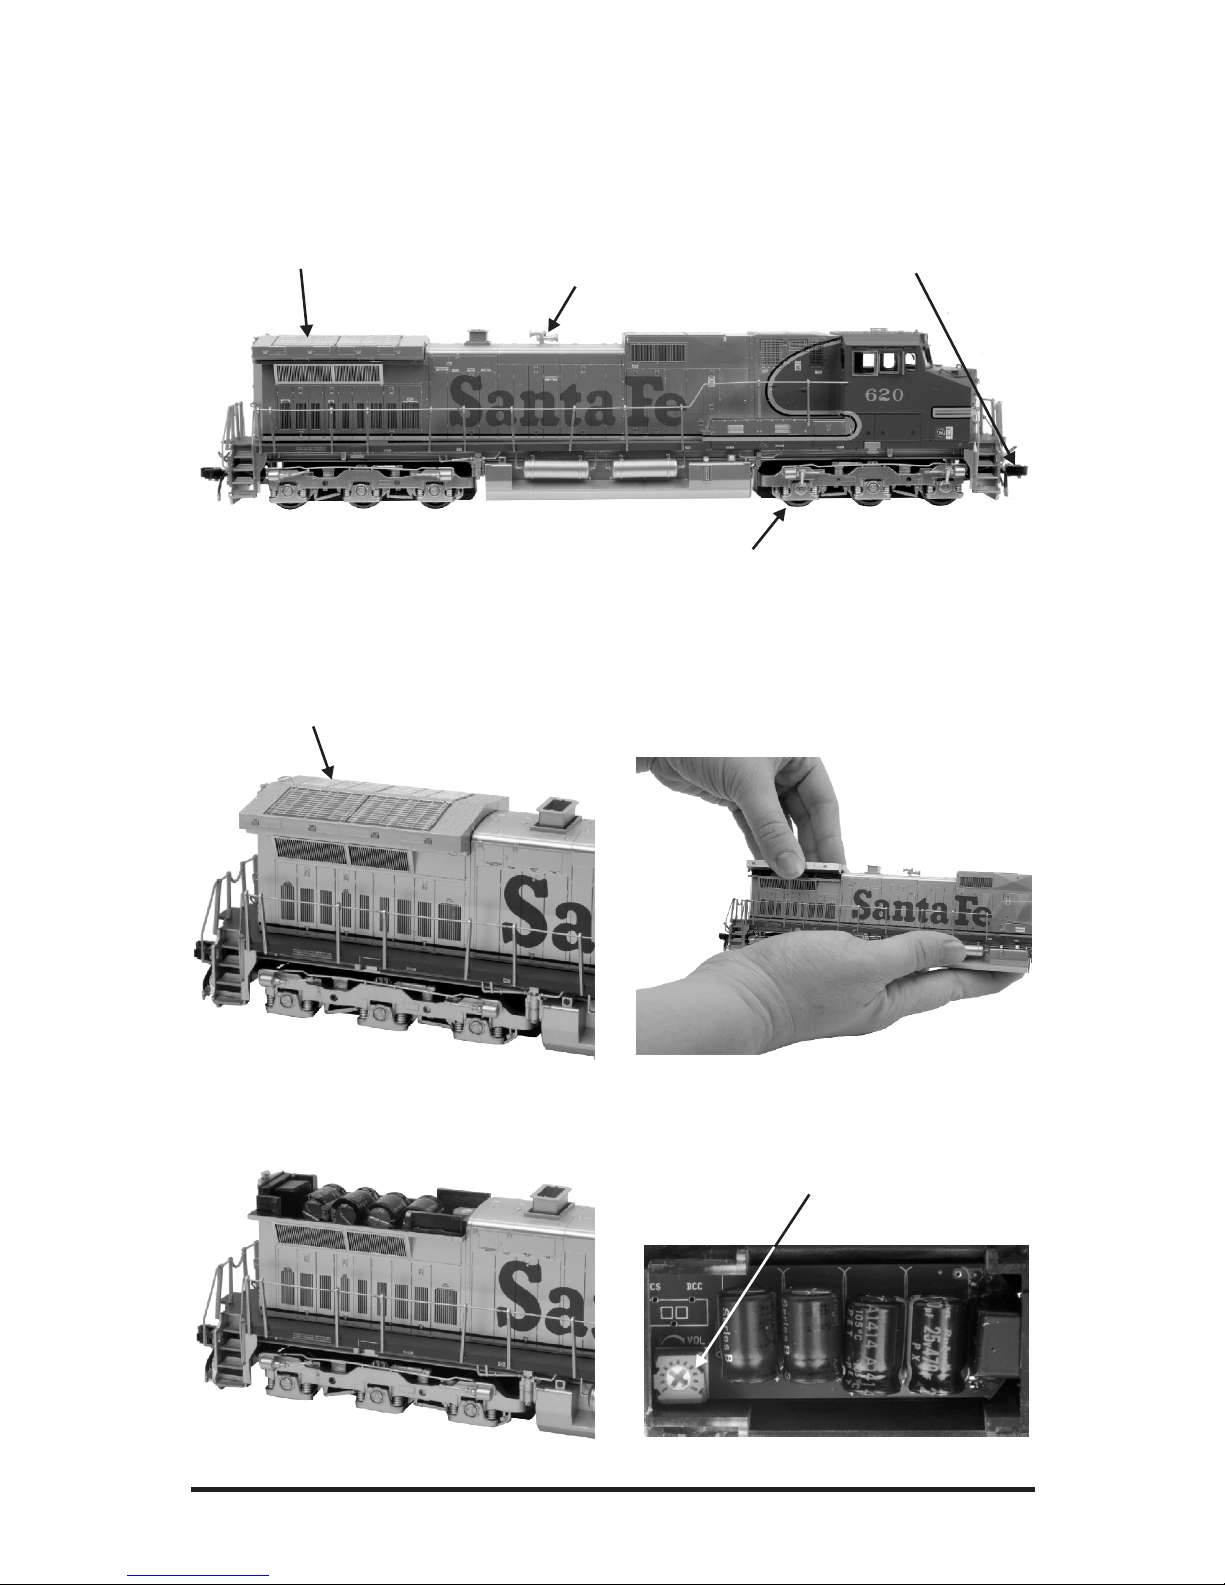
ENGINE DIAGRAM
Locomotive
M.T.H. HO Dash-9 Diesel Engine w/Proto-Sound 3.0
7
Control Hatch
Controls
Volume pot
To remove the Control Hatch,
gently pull it outward and lift it off
from the side.
Includes Remotely Activated
Proto-Coupler™ and
interchangeable magnetic
coupler, both Kadee®
Compatible
All wheels Powered
Detailed Horn
Metal See-Through Fan Vents
Page 8
Installing Couplers
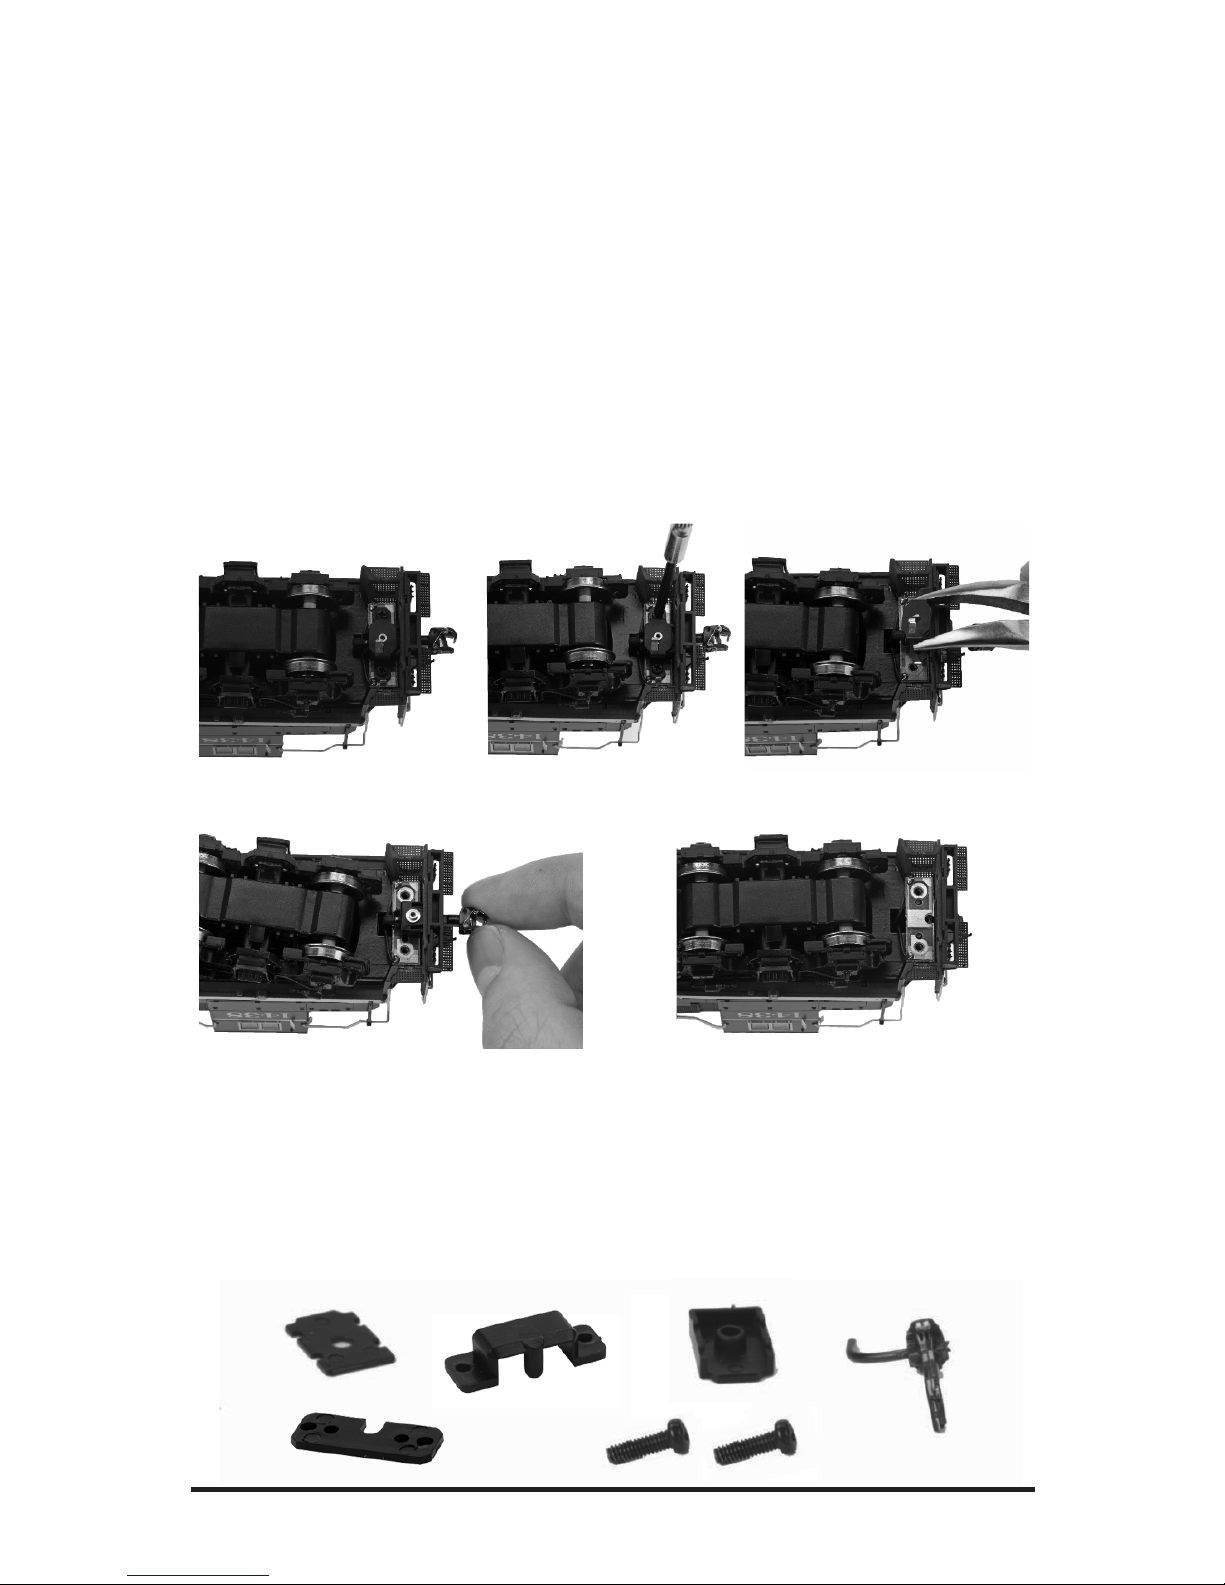
Your locomotive comes equipped with remotely controllable scale proportioned
operating Proto-Couplers that can be triggered from any DCC controller or the
M.T.H. DCS Digital Command System. Both the front and rear couplers can be
individually triggered. These couplers will not work in conventional operation with
magnetic arms.
For those who prefer standard mechanical couplers, we've also included a pair
inside your locomotive's box. Follow the steps below to remove the remote control
couplers and install the mechanical couplers in their place.
Removing The Remote Control Proto-Coupler From The Chassis
SET-UP
M.T.H. HO Dash-9 Diesel Engine w/Proto-Sound 3.0
8
Pull Coupler Mechanism Out Through Pilot Hole
Installing The Mechanical Couplers
If you prefer the mechanical couplers over the remote control Proto-Coupler,
remove the Proto-Couplers by following the steps detailed above and then install
the included mechanical couplers or any other Kadee-compatible couplers by
following the steps below.
Identify & Remove the 2 Mounting Screws
Pull off Cover Plate
Spacer Screws
Coupler
Pocket
Cover
Cover Plate Coupler Pocket Coupler
Page 9
Lubrication
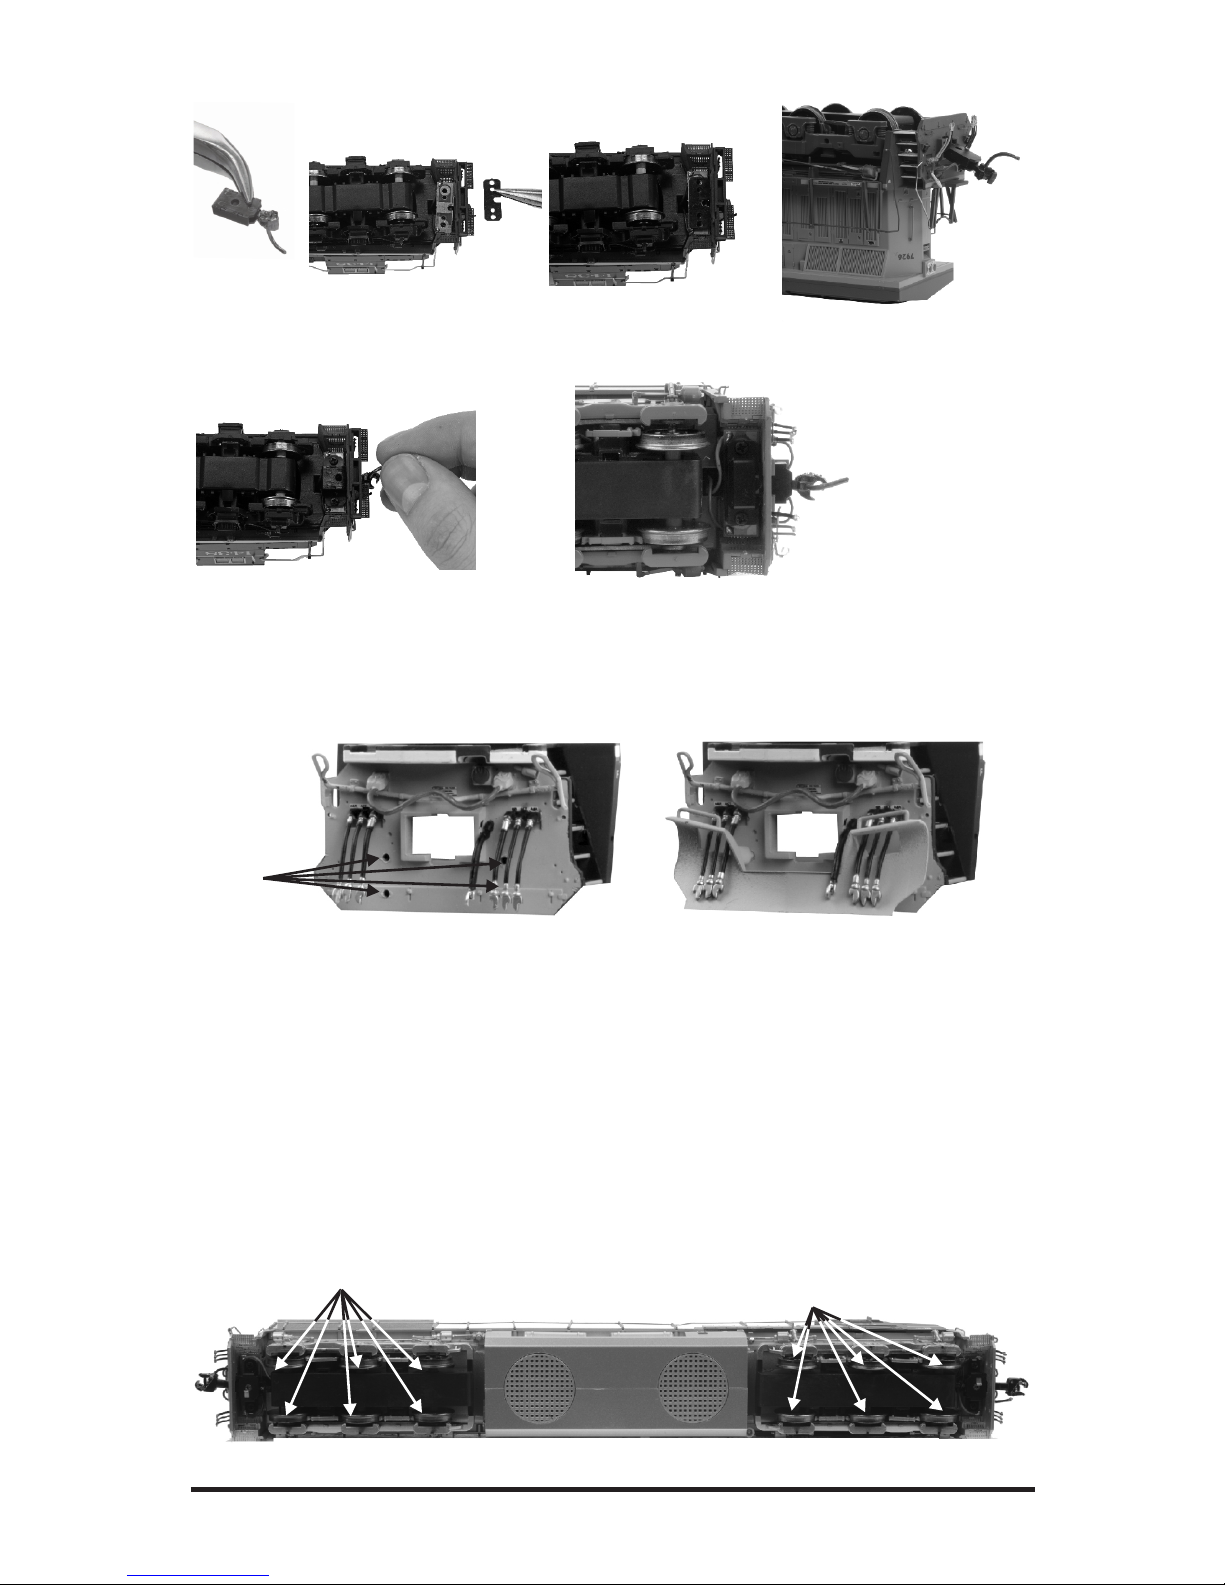
Using light machine or household oil, apply a very small amount to all axles points
as shown.
Your gearbox is properly greased at the factory and probably never needs service,
however, if you run excessive hours pulling heavy loads, it's a good idea to remove
the gearbox cover and re-grease using M.T.H. gear grease or equivalent.
M.T.H. HO Dash-9 Diesel Engine w/Proto-Sound 3.0
9
Lubricate Axles (L)
S E T- U P
Lubricate Axles (L)
Assembled Coupler
(Shown Right Side UP)
Line up Coupler Pocket with
Mounting Holes on Spacer
Apply the Cover Plate and 2 Screws from the
Mechanical Coupler Part Bag and Tighten In Place
Align Spacer with
Mounting Hole
Insert Coupler into Pilot
at an Angle
Installing the Snow Plow
Slide the Snow Plow Up Through The Air Hoses
And Press The Tabs Into The Holes
Completed Snow Plow Installation
Mounting
Holes
Page 10

Modes of Operation
There are 3 modes of operation with different levels of features accessible in each.
We refer to them as Analog DC, DCS and DCC. Here’s a brief explanation before
we get into the features of each mode.
Analog DC
This is when there is nothing connected to the rails except a conventional DC
power pack. These power packs generally have at least one variable output
controlled by a throttle of some sort and a means of reversing DC polarity on
the track to change the direction of your engine.
DCS or Digital Control System
While the acronyms are close, this is about where the similarities between DCS
and DCC end. Yes, they are both digital control systems, however, M.T.H. DCS is
NOT DCC. There are several proprietary versions of DCC on the market, but this
is NOT one of them. M.T.H.’s DCS system is proven technology in the O and One
gauge markets and now, we’ve brought its power and simplicity it to you.
First, the power signal in DCS is NOT the command signal. Next, DCS employs
a fully functional bi-directional communication scheme opening a vast range of
advanced features and yet, is so simple and intuitive, you can enjoy them! No
programming tracks, bits and bytes, or conversion of binary to hexadecimal
numbers here! To add an engine in DCS, just press “ADD ENGINE.” After that,
If you want to start your engine, just press “START UP” or, to turn the sound on
or off, just press “SOUND.” No combinations of letters or numbers to remember!
We think you’re really going to like this!
Please note, when making setting changes in DCS or DCC, such as address, please
wait a minimum of 5 Seconds after removing power to ensure the settings are
stored in the engines memory. Reapplying power in less than 5 seconds may result
in losing the setting changes.
DCC or Digital Command Control
DCC is a popular digital command control scheme wherein the track power is also
a digital control signal. That is, using a DCC controller, you can communicate with
multiple engines and have them all moving at different speeds or moving in
opposite directions on the same track at the same time. The power/command
signal remains constant and engines are “commanded” to perform as desired.
M.T.H. is new to DCC but, we recognize it’s importance to many HO operators.
So, we loaded our engine with more DCC features easily accessible to the operator
than any HO engine ever built previously. You DCC guys are in for a real treat!
M.T.H. HO Dash-9 Diesel Engine w/Proto-Sound 3.0
10
Page 11

FEATURES AND OPERATION
Now, for the fun stuff! Your new M.T.H. HO Diesel Engine has more features
and operating capabilities than any HO engine ever built by any manufacturer.
We're going to walk you through everything she does in general, but you'll probably
find a few we forgot to mention on your own.
Analog DC
Not much explanation is required here, and that's exactly why you run your trains
this way! Here's the good news, even if you like to keep it simple, your MTH HO
engine is packed with cool sounds, lights, and operating features, that you're going
to love.
Running the Engine
Set the engine on the rails, and apply DC power. Refer to the Set-Up section of
this guide for instructions on how to lubricate the chassis.
As you increase power, at about 6 volts, the lights and sounds will come on. Keep
going on up to about 8 and she'll move out! About 16 volts DC is adequate for
prototypical speeds however, your engine can handle up to 24 volts DC if you feel
the need for speed!
Changing Direction
If you flip the direction (polarity) switch on your power pack while the engine is
moving, it will gradually slow to a stop, and slowly accelerate back up to speed in
the opposite direction. This is an exclusive feature of MTH engines that we're sure
you'll enjoy. You can also change direction the old fashioned way by reducing
throttle until the engine stops, flip the direction switch, and then increase throttle
again. Either way is OK, we just thought a graceful transition from any speed
would be cool.
If you switch track polarity too slowly, the engine may stop abruptly and not move
in the reverse direction. This is normal. There is a feature we call “anti-jack
rabbit” that prevents the engine from taking off at high speeds when high voltage
is applied to the track instantly. Some direction switches have a “dead” spot where
the power is completely off during polarity changes. This can invoke the anti-jack
rabbit feature. The solution is to flip the direction switch more quickly or disable
the feature in DCC. Please see page 23 for more information. Don't worry you
won't hurt the engine.
M.T.H. HO Dash-9 Diesel Engine w/Proto-Sound 3.0
11
Page 12

Speed Control
Your engine is equipped with speed control. This feature is always active, even in
analog DC mode. Basically, your engine constantly measures track voltage and
converts this to a digital speed command. You should notice the speed remains
constant up and down grades, around curves, and with varying loads. This is no
accident. You've got the most precise speed control system available today.
Sounds
In this mode, sounds are pretty much automatic. If you’re moving, you’ll hear
diesel sounds.
When your sitting at idle, there may be some maintenance done. You could hear
someone calling for help on the radio. Don’t worry, all of this and more is just a
normal part of everyday operations.
When you’re moving at a pretty good clip and you reduce the throttle quickly, you
may hear the brakes squeak and squeal as the engineer applies them. Of course,
they’ll stop when the engine does.
If things get too noisy, just locate the sound volume pot under the rear roof,
adjust the volume from maximum down to off, whatever suits you. Turn it
counterclockwise to reduce the volume or clockwise to increase it. Refer to page 7
for volume pot location.
Lighting
Now, this is an illuminating section (we couldn’t resist). Your model is equipped
with a headlight, number board lights and ditch lights (where applicable).
The first thing to know about the lighting is there aren’t any bulbs. It’s all LEDs,
so you should never have to replace them. As with sounds, in analog DC mode,
lighting operation is fully automatic. They’re always on and behave appropriately.
The headlight functions under rule 17 and dims when stopped for a time or while
backing up. Of course, just as you begin to move forward, it goes bright to show
the way.
By default your ditch lights are set to ON. That means they are ON as soon as the
engine starts moving in forward. When you sound the horn they will alternately
flash and will continue to flash for 5 seconds after the horn button has been
released. When you set the ditch lights to OFF they will stay off regardless of
movement or horn sounds. NOTE – The Ditch Lights follow Rule 17 lighting.
That means when your engine is stopped the ditch lights will go off. Once you start
moving again in forward (when the headlight goes from dim to bright) they will
come back ON, provided you have them set to ON.
M.T.H. HO Dash-9 Diesel Engine w/Proto-Sound 3.0
12
On the GE Evolution version
of the ES-44 there is a new
lighting feature that existed on
the Demonstrator model -
Charge Lights. These lights
showcase GE's hybrid dynamic
braking. At idle and during
braking these lights chase in
towards the center of the
body. When moving the lights
chase out towards the traction
motors. The LMK softkey in
DCS controls this lighting
effect.
Page 13

DCS Digital Control System
As you may have gathered by now, DCS is an M.T.H. exclusive Digital Control
System that provides easy access to dozens and dozens of features in our models.
We developed DCS to provide a powerful and advanced model train control system
that was simple and enjoyable to use. We've accomplished that goal. DCS further
expands the features available far beyond that of DCC. After all, in DCC, we only
had a limited number of “F” commands to fill.
As with DCC, we'll leave the detailed “how-to” system explanations to the DCS
system manuals. What you should know are all the cool features your engine has
built-in, waiting for you to experience.
Running the Engine
Once the DCS system is connected to your track and powered up by a DC Power
Supply (even though DCS can be controlled by AC and DC power supplies, your
M.T.H. HO locomotive will ONLY run on DC power), you simply place your
engine on the rails, press “ADD ENG” and the system will scan the track and
automatically upload your engine into the controller. At this point, you can press
“START UP”, roll the throttle and pull out! That's it!
Speed Control
DCS engines are controlled in scale miles per hour (smph) and increments of one.
So, that means if you dial up 10, your engine will smoothly accelerate to 10 smph.
There is no need to select a speed step setting, there's only one precise linear
control at scale speeds. See, powerful yet simple.
Sounds
Independent Volume Settings
Using DCS, you independently adjust the bell, horn, engine, and accent sounds
volume. This is like a mixer so you can set up the engine to fit your specific tastes
and sense of realism. They all move relatively up or down with the master volume
settings.
Doppler Loop
You can either press the Doppler button on the remote to activate what we refer to
as “one-shot” Doppler, or, using DCS, you can program a Doppler loop that will
peak at the same point on your layout, over and over.
Custom Sounds
You can fire any of 10 individual sound bites pre-loaded into your engine. These
are typically, diesel idling sounds. Each one at the press of a single button. You
can also make voice or other audio recordings and play them back on command
with ease.
M.T.H. HO Dash-9 Diesel Engine w/Proto-Sound 3.0
13
Page 14

Proto-Dispatch
Press the “MIC” (microphone) button on your DCS remote and speak. Your voice
will be digitized and played out of the model in real-time. Talk about station
announcements!
Proto-Cast
Another MTH exclusive, you can connect any audio source with a line output to
the DCS TIU and send music, train sounds, or anything you like down the rails to
be played through the engine as it moves along the track. Your holidays may never
be the same!
Lighting
As with everything in DCS, this becomes a little more than obvious. Pressing the
“HEADLIGHT” button turns off the directional headlight and reverse light (if
equipped).
M.T.H. HO Dash-9 Diesel Engine w/Proto-Sound 3.0
14
Page 15

DCC - Digital Command Control
DCC is a popular digital command scheme wherein the track power is also a digital
control signal. That is, using a DCC controller, you can communicate with multiple
engines and have all of them moving at different speeds and in varying directions
on the same track at the same time. The power/command signal remains constant
and engines are commanded to perform as desired. Your MTH PS3.0-equipped
engine has the ability to decode and respond to these DCC commands. This allows
you to operate your MTH PS3—equipped engines together with engines from
other manufacturers using DCC decoders. They all can be controlled by DCC
systems from various manufacturers. The best part about your MTH PS3.0equipped engine is that the decoder is built right in. No need to remove the hood
and install speakers or boards. It's all done for you at the factory. Each PS3.0equipped engine has a full complement of lights, sounds, and smoke (if equipped).
Just set the model on the rails, apply DCC power and hit F3 on your DCC
handheld controller and you're off and running.
Basic DCC Operation
Your MTH PS3.0-equipped engine takes full advantage of DCC's capabilities.
Below are the basic commands you'll want to know to get started running quickly.
Please refer to the Advanced DCC Operation section of the manual if you want to
dig into the full capability of DCC.
Each engine type may have a slightly different F Function list. This depends upon
whether it's steam, diesel, or electric and whether it has smoke or not. Please refer
to the table of Default CV Values for your particular engine's F Functions.
A note about enabling/disabling F Functions in DCC - Depending upon the DCC
system you have you may need to toggle a particular F Function on then off to
actually get it to enable. Some DCC systems do this for you automatically and
others allow you to set particular F Function buttons to either be set for
momentary or toggle. Please refer to your DCC control station manufacturer's
manual for more information on how they handle F Function buttons.
Your MTH PS3.0-equipped engine's default short address is 3. So all you have to
do is power up your DCC system and call up Locomotive 3 to begin.
M.T.H. HO Dash-9 Diesel Engine w/Proto-Sound 3.0
15
Page 16

Start-Up/Shut-Down
F3 – Start-Up/Shut-Down
Pressing this twice (toggle on then off) will start up your engine. When you apply
DCC power your MTH PS3.0-equipped engine will remain dark and quiet. Since
you likely don't want to run the engine this way, simply press F3 twice to start your
engine. The lights, sound and smoke (if equipped) will come on.
Note – You are actually able to move the engine in DCC without starting it up. Just
increasing the throttle will cause the engine to move. In order for F3 to function
correctly the engine must NOT be moving
To shut your engine down, press the F3 button twice. This will play the shut down
sounds and then turn the lights and smoke and sounds off. As long as there is DCC
power still on the track the engine can be started up again by pressing the F3
button twice.
Bell/Whistle (Horn)
F1 – Bell
To activate the Bell press F1. To deactivate it, hit F1 again
F2 – Whistle (Horn)
To activate the Whistle/Horn, press F2. To shut it off either let off the F2 button
or press and release it
PFA
F4 – PFA
PFA in MTH lingo stands for Passenger/Freight Announcements. Your engine is
pre-programmed for the appropriate type of sounds based upon the type of
service the real-life engine used in daily operation.
There are five sound sequences or segments in the PFA feature. Each segment is
advanced by you, the operator.
You hit the F4 button twice on the DCC controller to let the engine know you
want it to advance (this toggles the PFA
function on then off to clear the remote for the next sequence). In most PFA
sequences there is a minimum wait time of about 20-30 seconds before it will
advance. So, here is how a typical PFA sequence operates:
1. Press the F4 button twice (toggle F4 on then off) to start the PFA sequence on
the engine. You'll hear “Now arriving…” for passenger sound sets and cab
chatter for freight sound sets. The bell will then begin ringing.
2. Slowly reduce the throttle until the train stops at the desired location and speed
reaches zero. Press the F4 button twice (toggle F4 on then off) again and the bell
will stop ringing. You will hear the engine sounds switch from the cab to the
station or yard with all the ambient sounds you'd hear in the real thing.
3. Press the F4 button twice (toggle F4 on then off) again to advance the sequence.
You'll hear “Now boarding…” for passenger sound sets and freight yard sounds
for freight sound sets.
M.T.H. HO Dash-9 Diesel Engine w/Proto-Sound 3.0
16
Page 17

4. Press the F4 button twice (toggle F4 on then off) again to advance the sequence.
You'll hear “Now departing…” for passenger sound sets and more freight yard
sounds for freight sound sets.
5. Press the F4 button twice (toggle F4 on then off) the last time to advance the
sequence. You'll hear “All aboard…” for passenger sound sets and more freight
yard sounds for freight sound sets. The engine sounds will switch over to the cab
again. When the bell begins to ring, advance the throttle to move the engine out
of the station or yard. The bell will shut off automatically.
Lights
F5 – Lights
This toggles all your lights (except the headlight) on and off
Master Volume
F6 – Master Volume
There are 10 volume levels. Pressing F6 twice (toggling on then off) raises the
th
Master Volume one level. The Master Volume loops. That is, if you go past the 10
st
level it will loop back around to the 1 or lowest volume level.
Couplers
Your MTH PS3.0-equipped engine comes with remotely controlled ProtoCouplers. They can be fired using your DCC handheld at F7 and F8.
F7 – Front Coupler
Pressing F7 twice (toggling on then off) will fire your Front Coupler
F8 – Rear Coupler
Pressing F8 twice (toggling on then off) will fire your Rear Coupler
Forward/Reverse Signal
Just like a real engine, you can announce the direction of travel using your DCC
handheld and F9 and F10.
F9 – Forward Signal
Pressing F9 twice (toggling on then off) will sound the Forward Signal. This is two
whistle/horn blasts
F10 – Reverse Signal
Pressing F10 twice (toggling on then off) will sound the Reverse Signal. This is
three whistle/horn blasts
Crossing Signal
Again, just like a real engine, you can trigger the Crossing Signal on your engine.
This is two long, one short, one long whistle/horn blast.
F11 – Crossing Signal
Pressing F11 twice (toggling on then off) will sound your Crossing Signal.
M.T.H. HO Dash-9 Diesel Engine w/Proto-Sound 3.0
17
Page 18

Engine Sounds
F25 – Engine Sounds
You can turn the Engine Sounds On/Off by pressing the F25 button. Pressing it
once (enabling F25) will cause the Engine Sounds to shut off. The Whistle/Horn
and Bell sounds will still be active, however. To turn the engine sounds back on
press the F25 button again (disable F25).
Additional F Functions
Idle Sequence - F13, F14, F15 and F16
Pressing F13, F14, F15 or F16 twice (toggling on then off) will trigger an Idle
Sequence if the engine is not moving. These vary from engine to engine and may
include things like checking the coal load, checking the water level, using the
Alemite grease gun on the drivers, etc. When triggered, these will run through a
sequence that varies in duration.
Note – The engine must be sitting still in order to trigger these
F17–Extended Start-Up
If your engine is shut down or you've just applied DCC power pressing F17 twice
(toggling it on then off) will start the Extended Start-Up sounds. This is very
similar to F3 except you will hear the crew talking back and forth about getting the
engine ready to run.
F18 – Extended Shut-Down
If your engine is already up and running you can play the Extended Shut Down
sounds by pressing F18 twice (toggling on then off). The Extended Shut Down is
very similar to F3 in that the engine will ultimately shut down but in the case of
Extended Shut Down you will hear the crew talking back and forth about how the
engine ran, time schedules, etc.
F19 – Rev Up
This will force the engine to Rev Up. Press the F19 button twice (toggling on then
off) to Rev Up one notch. There are eight rev levels in a Diesel/Electric.
M.T.H. HO Dash-9 Diesel Engine w/Proto-Sound 3.0
18
Page 19

F20 –Rev Down
This will force the engine to Rev Down. Press the F20 button twice (toggling on
then off) to Rev Down one notch. There are eight rev levels in a Diesel/Electric.
For example, if you set the rev level on a Diesel to notch 6 and start increasing the
speed of the engine it will stay at that rev level until the engine's speed calls for a
higher rev level. Once the engine has gone past that rev level, notch 6 in this
example, the engine will then rev down normally, all the way to idle, as you decrease
the speed.
F21– One Shot Doppler
You can set your MTH PS3.0-equipped engine to simulate the actual Doppler
Effect sound a real engine makes as it passes you. To do this, press the F21 button
once (enable F21) and then listen as the engine makes that pitch shift that mimics
the Doppler Effect perfectly. Press the F21 button again (disable F21) to shut off
the Doppler Effect. With a little practice in timing and speed you can make this
happen right in front of you.
F22–Coupler Slack
When an engine hooks up and pulls a train it has to take up the coupler slack. You
can play this sound by pressing F22 twice (toggling on then off). This feature works
two ways – While the engine is sitting still, press F22 twice to enable it. Then, when
you move the engine, it will play the Coupler Slack sound. The second way is to
simply force the sound while the engine is moving. To do this, simply press F22
twice (toggling it on then off). The sound will play.
F23 – Coupler Close
To play the Coupler Close sound press the F23 button twice (toggling it on then
off). You can play this sound as you're coupling cars together to add realism.
F24 – Single Horn Blast
To play a Single Horn Blast press the F24 button twice (toggling in on then off).
This plays a single, short horn blast.
F26 – Brake Sounds
Pressing the F26 button (enable F26) will disable the Brake Sounds for your engine.
The Brake Sounds occur when you reduce the speed of your engine rapidly. To
enable the Brake Sounds press the F26 button (disable F26). Brake Sounds are On
by default.
F27 – Cab Chatter
Cab Chatter occurs when the engine is sitting at idle. There are various times when
the crew will talk to each other when the engine is sitting at idle. Pressing the F27
button (enable F27) will disable the Cab Chatter. Pressing the F27 button again
(disable F27) will enable Cab Chatter. Cab Chatter is On by default.
F28 – Feature Reset
This resets features to default.
M.T.H. HO Dash-9 Diesel Engine w/Proto-Sound 3.0
19
Page 20

Function Chart
F0
F1
F2
F3
F4
F5
F6
F7
F8
F9
F10
F11
F12
F13
F14
F15
F16
F17
F18
F19
F20
F21
F22
F23
F24
F25
F26
F27
F28
Headlight
Bell
Horn
Start-Up/Shut Down
PFA
Lights
Master Volume
Front Coupler
Rear Coupler
Forward Signal
Reverse Signal
Grade Crossing
Clickety Clack
Idle Sequence 4
Idle Sequence 3
Idle Sequence 2
Idle Sequence 1
Extended Start-Up
Extended Shut Down
Rev Up
Rev Down
One Shot Doppler
Coupler Slack
Coupler Close
Single Horn Blast
Engine Sounds
Brake Sounds On/Off
Cab Chatter On/Off
Feature Reset
*Refer to pages 23, 24 & 25
for CV Data and Function ID
Description
Function
M.T.H. HO Dash-9 Diesel Engine w/Proto-Sound 3.0
20
Page 21

Cv29
CV29 is the basic decoder setup CV that is used by all DCC decoder manufactures.
So, if you are familiar with CV29 from other manufacturer's decoders MTH's is no
different. The most important part of CV29 is the ability to switch between long and
short addressing. By default, CV29 on your MTH PS3.0-equipped engine is set to 2.
Long and Short Addressing
Like most DCC Decoders, your MTH PS3.0-equipped engine can be programmed
with both Long and Short Address. Short addresses are those from 1-127 and Long
addresses are those from 128-9999. You can program the engine address either
with Programming on the Main (PoM) or using a Programming Track. Since it's
easiest, in most cases, to PoM the instructions will show you how to do it this way.
By default, your MTH PS3.0-equipped engine comes programmed with both a long
and short DCC address. The default Short address is always 3. The default Long
address is 3333.
To change your engine's Short Address using PoM:
1. Call up the engine's current address on your DCC handheld
2. Enter Programming on the Main on your DCC handheld]
3. Enter the new address you want – Remember you can only use address 1-127 for
Short Addressing
4. Once you hit Enter the engine will give you a two whistle/horn blast response
5. Call up the engine on its new address and away you go
Alternatively, depending upon the type of DCC system you have, you can enter
PoM and then write the new address in the Address Menu. This works on some
DCC systems, not all. In case it doesn't work on your DCC system below are the
step-by-step instructions to write the extended address using CV17 and CV18:
1. Call up the engine's current address on your DCC handheld
NOTE: The MRC Prodigy Advance2 will allow you to program extended
addresses without having to enter CV17 and CV18. However, for many
other DCC systems they will not and you are forced to use CV17 and
CV18.
2. Hit the PROG button twice to enter PoM mode
3. Hit Enter twice so the LCD displays “Adr”
4. Type in the new Short Address (1-127) that you want and hit Enter
5. The engine will give you a two whistle/horn blast response
To change your engine's Long Address using PoM:
1. Call up the current engine's address on your DCC handheld
2. Enter Programming on the Main on your DCC handheld
3. In this step you have to tell the MTH engine that you want it to start looking at
long addresses. You do this in CV29:
a. Bring up the CV menu on your DCC handheld
b. Enter “29” to edit CV29
M.T.H. HO Dash-9 Diesel Engine w/Proto-Sound 3.0
21
Page 22

c. Enter “38” to change the value of CV29 and hit Enter
d. The engine will give you a two whistle/horn blast response
4. In the following steps you will now need to write values to CV17 and CV18 to
tell the engine what the long address should be5. Call up CV17 and enter the
value required for CV17. You will get a two whistle/horn blast response
6. Call up CV18 and enter the value required for CV18. You will get a two
whistle/horn blast response
In order to determine your required values for CV17 and CV18 you will need to go
to http://extranet.mth-railking.com/pdfapp/pdfs/instruction/
HO%20DCC%20addressCV17_18%20Converter.xls
Enter in the long address you want then click anywhere else in the spreadsheet and
it will return the values for CV17 and CV18 (it will also return the hex conversion
of the CV17 and CV18 values if your DCC system requires this).
Below is an example for extended address 2011:
Feature/Factory Resetting
If all else fails and you aren't sure of something, never fear. You can always get
your engine back to a known state by either performing a Feature or Factory Reset.
There are a couple of ways to reset your MTH PS3.0-equipped engine:
- Factory Resets – Clears everything – takes engine to just like it
was when you got it brand new
- Send a decimal 08 to CV 8 to reset everything entirely back to factory
default
- Send a decimal 192 to reset everything except user speed tables
- Feature Resets – There are a couple of Feature Resets that you can use
- Press F28 twice (toggling on then off). This resets the smoke, volume
and lights back to their defaults
- Send a decimal 64 for a Feature Reset. This resets volumes, smoke and
light settings.
- Send a decimal 128 to reset only address values back to factory default
- This is the same as writing 55 to CV55 to engine address 55
CV 17 and CV 18 Conversion Tool
Hex Conversion C17 Value to Enter C18 Value to Enter
2011 07DB 199 219
Desired 4-Digit
Engine Address
M.T.H. HO Dash-9 Diesel Engine w/Proto-Sound 3.0
22
Page 23

Advanced DCC Operation:
This section of the manual provides more in-depth detail on how to set up and
configure your MTH PS3.0-equipped engine using the NMRA-standard CV's as
well as the manufacturer-specific CV's. It also explains some of the other F
Functions not covered in the Basic DCC Operation section. Please refer to the CV
Data Table on page 24.
M.T.H. HO Dash-9 Diesel Engine w/Proto-Sound 3.0
23
Configuration Variables (CV)
Configuration Variables used on MTH PS3.0-equppied engines.
CV1
CV2
CV3
CV4
Cv5
CV8
CV17
CV18
CV19
CV21
CV22
CV23
Cv24
CV25
CV29
CV52
CV53
CV54
CV55
CV57
CV63
CV64
CV66
CV67CV94
CV95
CV105
CV106
CV115CV170
Short Address: 1-127 are the valid addresses
Start Voltage (CV52, bit0 must = 1. This will enable PWM Mode)
Acceleration Rate (CV52, bit0 must = 1. This will enable PWM Mode)
Deceleration Rate (CV52, bit0 must = 1. This will enable PWM Mode)
Max Voltage (CV52, bit0 must = 1. This will enable PWM Mode)
MFG ID. MTH =27. Also used for various resets.
High Byte of Extended Address
Low Byte of Extended Address
Consist Address (bit 7=1 on an engine will tell the engine it’s reversed in a consist)
Defines active Function F1-F8 for the active consist
Defines active functions for FL and F9-F12 for the active consist
(bit 0=1 will tell an engine that you want it’s FL control to operate under
the consist address – bit1-0/bit2=1 will configure the FL control for a
reversed engine in a consist)
Consist Acceleration Rate
Consist Deceleration Adjustment
Speed Table Select
Decoder Configuration
MTH PWM Mode Configuration
MTH Acceleration (1/8 *sMPH/s). For example - a Value of 8 written
would give you 1sMPH/s acceleration
MTH Deceleration Rate (1/8*sMPH/s)
Factory Address Reset Alternate method. Send a value of 55 to CV55 on address 55
and the model will go back to the Factory Default Address.
MTH Consist Acceleration Rate (1/8*sMPH/s)
MTH Consist Deceleration Rate (1/8*sMPH/s)
Forward Trim(CV52, bit0 must = 1. This will enable PWM Mode)
Speed Table Selection (CV29 bit 4 must be set to 1 then CV25 must be
set to 0 or 1)
Reverse Trim (CV52, bit0 must = 1. This will enable PWM Mode)
User ID #1 – General Purpose use for customer
User ID #2 – General Purpose use for customer
MTH Function Assignments – See table of supported CV’s and manual
section on how to re-arrange them for further information
Note: The engine address has to be something other than address 55
Anti-Jackrabbit Toggle. A value of 7 disables the feature, a value of 0 enables the
feature.
Page 24
Below is the table of Factory Default MTH supported DCC CV's. This table is
specific to the engine in the title of this manual:
M.T.H. HO Dash-9 Diesel Engine w/Proto-Sound 3.0
24
Factory Default Values for MTH PS3.0 DCC
Configuration Variables (CV’s)
Decimal
1
2
3
4
5
7
8
17
18
19
21
22
23
24
25
29
52
53
54
57
63
64
66
67
68
69
70
71
72
73
74
75
76
77
78
79
80
81
82
83
84
85
86
87
88
89
90
91
92
93
94
95
105
106
115
3
16
0
0
0
0
0
192
0
0
0
0
0
0
0
2
0
128
64
0
0
0
0
0
9
19
28
38
47
57
66
76
85
94
104
113
123
132
142
151
161
170
179
189
198
208
217
227
236
246
255
0
03
10
0
0
0
0
0
C0
00
00
00
00
00
00
00
02
00
80
40
00
00
00
00
0
9
13
1C
26
2F
39
42
4C
55
60
68
71
7B
84
8E
97
A1
AA
B3
BD
C6
D0
D9
E3
EC
F6
FF
0
Short Address
Start Voltage (Cv52 bit 0 must =1)
Accel Adjustment
Decel Adjustment
Max Voltage (Cv52 bit 0 must =1)
NMRA Mfg Version
NMRA Mfg ID
Extended Address High Byte
Extended Address Low Byte
Consist Address
Consist Functions F1-F8
Consist Functions F9-F12
Consist Acceleration Adjustment
Consist Deceleration Adjustment
Speed Table Select
Decoder Configuration
MTH PWM Motor Configuration
MTH Acceleration Rate
MTH Deceleration Rate
Anti-Jackrabbit
MTH Consist Acceleration Rate
MTH Consist Deceleration Rate
Forward Trim
Alternate Speed Curve Step 1
Alternate Speed Curve Step 2
Alternate Speed Curve Step 3
Alternate Speed Curve Step 4
Alternate Speed Curve Step 5
Alternate Speed Curve Step 6
Alternate Speed Curve Step 7
Alternate Speed Curve Step 8
Alternate Speed Curve Step 9
Alternate Speed Curve Step 10
Alternate Speed Curve Step 11
Alternate Speed Curve Step 12
Alternate Speed Curve Step 13
Alternate Speed Curve Step 14
Alternate Speed Curve Step 15
Alternate Speed Curve Step 16
Alternate Speed Curve Step 17
Alternate Speed Curve Step 18
Alternate Speed Curve Step 19
Alternate Speed Curve Step 20
Alternate Speed Curve Step 21
Alternate Speed Curve Step 22
Alternate Speed Curve Step 23
Alternate Speed Curve Step 24
Alternate Speed Curve Step 25
Alternate Speed Curve Step 26
Alternate Speed Curve Step 27
Alternate Speed Curve Step 28
Reverse Trim
User ID #1
User ID #2
Function - Bell High Byte
-
-
-
-
-
-
-
-
-
-
-
-
-
-
-
-
-
-
-
-
-
-
-
-
-
-
-
-
-
-
-
-
-
-
-
-
-
-
-
-
-
-
-
-
-
-
-
-
-
-
-
-
-
1
Default Value
116
117
118
119
120
121
122
123
124
125
126
127
128
129
130
131
132
133
134
135
136
137
138
139
140
141
142
143
144
145
146
147
148
149
150
151
152
153
154
155
156
157
158
159
160
161
162
163
164
165
166
167
168
169
170
Function - Bell Low Byte
Horn High Byte
Horn Low Byte
Start-Up/Shut Down High Byte
Start-Up/Shut Down Low Byte
PFA High Byte
PFA Low Byte
Lights High Byte
Lights Low Byte
Master Volume High Byte
Master Volume Low Byte
Front Coupler High Byte
Front Coupler Low Byte
Rear Coupler High Byte
Rear Coupler Low Byte
Forward Signal High Byte
Forward Signal Low Byte
Reverse Signal High Byte
Reverse Signal Low Byte
Grade Crossing High Byte
Grade Crossing Low Byte
Smoke On/Off High Byte
Smoke On/Off Low Byte
Smoke Volume High Byte
Smoke Volume Low Byte
Idle Sequence 3 High Byte
Idle Sequence 3 Low Byte
Idle Sequence 2 High Byte
Idle Sequence 2 Low Byte
Idle Sequence 1 High Byte
Idle Sequence 1 Low Byte
Extended Start-Up High Byte
Extended Start-Up Low Byte
Extended Shut Down High Byte
Extended Shut Down Low Byte
Rev Up High Byte
Rev Up Low Byte
Rev Down High Byte
Rev Down Low Byte
One Shot Doppler High Byte
One Shot Doppler Low Byte
Coupler Slack High Byte
Coupler Slack Low Byte
Coupler Close High Byte
Coupler Close Low Byte
Single Horn Blast High Byte
Single Horn Blast Low Byte
Engine Sounds High Byte
Engine Sounds Low Byte
Brake Sounds On/Off High Byte
Brake Sounds On/Off Low Byte
Cab Chatter On/Off High Byte
Cab Chatter On/Off Low Byte
Feature Reset High Byte
Feature Reset Low Byte
1
2
2
3
3
4
4
5
5
6
6
7
7
8
8
9
9
10
10
11
11
12
12
13
13
14
14
15
15
16
16
17
17
18
18
19
19
20
20
21
21
22
22
23
23
24
24
25
25
26
26
27
27
28
28
Hex
CV
Description
Key
Function
Key
Function
Description
CV
Page 25

User-Settable F-Function List
This feature allows you to take the 28 F-Functions that currently reside in each
MTH Protosound 3.0-equipped HO Engine and change the location of that
function. For example: F18 is currently Extended Shut Down and you'd like that
placed down to F28 which is Feature Reset. The below instructions explain how
you can do this.
Note – When you set a particular F-Function to a numeric location you are
overwriting that existing number's function. Further, you are leaving the location
where the previous function was moved from empty, which means that F-Function
no longer has any function associated with it.
In order to move the F-Functions around you will need to refer to the below table.
Note – The Function Identification number IS NOT the F Function number you'd
use on your DCC handheld. It is used internally in the engine:
M.T.H. HO Dash-9 Diesel Engine w/Proto-Sound 3.0
25
SOUNDS
Bell 1
Brake Sounds 2
Cab Chatter 3
Clickety Clack 4
Coupler Close 5
Coupler Slack 6
Drift Chuff 7
Engine Sounds 8
Forward Signal 9
Grade Crossing Signal 10
Horn 11
Idle Sequence 1 12
Idle Sequence 2 13
Idle Sequence 3 14
Idle Sequence 4 15
Labor Chuff 16
Master Volume 17
Short Horn 18
One Shot Doppler 19
Reverse Signal 20
SCRIPTS
Extended Shut Down 21
Extended Start Up 22
PFA 23
Start Up/Shut Down 24
Train Wreck 25
Trolley Manual Mode 26
Trolley Learn Mode 27
Trolley Auto Mode 28
FUNCTION
IDENTIFICATION
Function Identification Chart
OTHER FUNCTION
FUNCTIONS IDENTIFICATION
Feature Reset 29
Front Coupler 30
Front Pantograph
Up/Down 31
Pantograph
Auto/Manual 32
Rear Coupler 33
Rear Pantograph
Up/Down 34
Rev Down 35
Rev Up 36
Smoke On/Off 37
Smoke Volume 38
MOTOROLA MODE
Disable Momentum (Motorola) 40
Half-Speed (Motorola) 41
Switch—Half-Speed/
Momentum Disable (Motorola) 42
LIGHTS
Lights 39
Marker (Train/No Train) 43
Beacon
(Alt Lighting/Country) 44
ELECTRIC SMOKE
Electric Boiler Start-Up 45
Electric Pressure Release 46
Page 26

The above list includes ALL F functions that an MTH PS3 engine could have. You
are free to change any of the above listed items to any F function position, 1-28.
For example, if you your engine came from the factory without a smoke unit but
you added one at a later date you could swap out any of the F functions, 1-28, for
the Smoke On/Off and the Smoke Volume.
So, using the example of moving F18 (Extended Shut Down) to F28 (Feature
Reset) here are the steps:
1. Refer the MTH Supported CV table to see what CV the destination
Function is assigned to. In doing so, you are looking only for the Low
Byte CV location. In this case it's CV170
2. Using your DCC system, bring up CV programming for CV170
3. Now tell the engine which F-Function you want to write at CV170. So,
looking at the Function ID table above you can see that Extended Shut
Down is a value of 21
4. Using your DCC system, enter a value of 21 for CV170 and hit Enter.
You have just re-assigned the Extended Shut Down sound to F28 on your
DCC controller. The engine will give you a two horn blast indication.
Note – You've also left an empty location where Extended Shut Down
used to be (F13)
5. Now you can fill that location with whichever CV you'd like. For this
example we are just going to move the Feature reset up to F18 (we're just
swapping F18 and F28)
6. Since F18's Low Byte is CV150 then bring up CV programming for
CV150
7. Now tell the engine which F-Function you want to write at CV150. So,
looking at the Function ID table above you can see that Cab Chatter is a
value of 29
8. Using your DCC system, enter a value of 29 for CV150 and hit Enter.
Your engine will give you a two horn blast indication
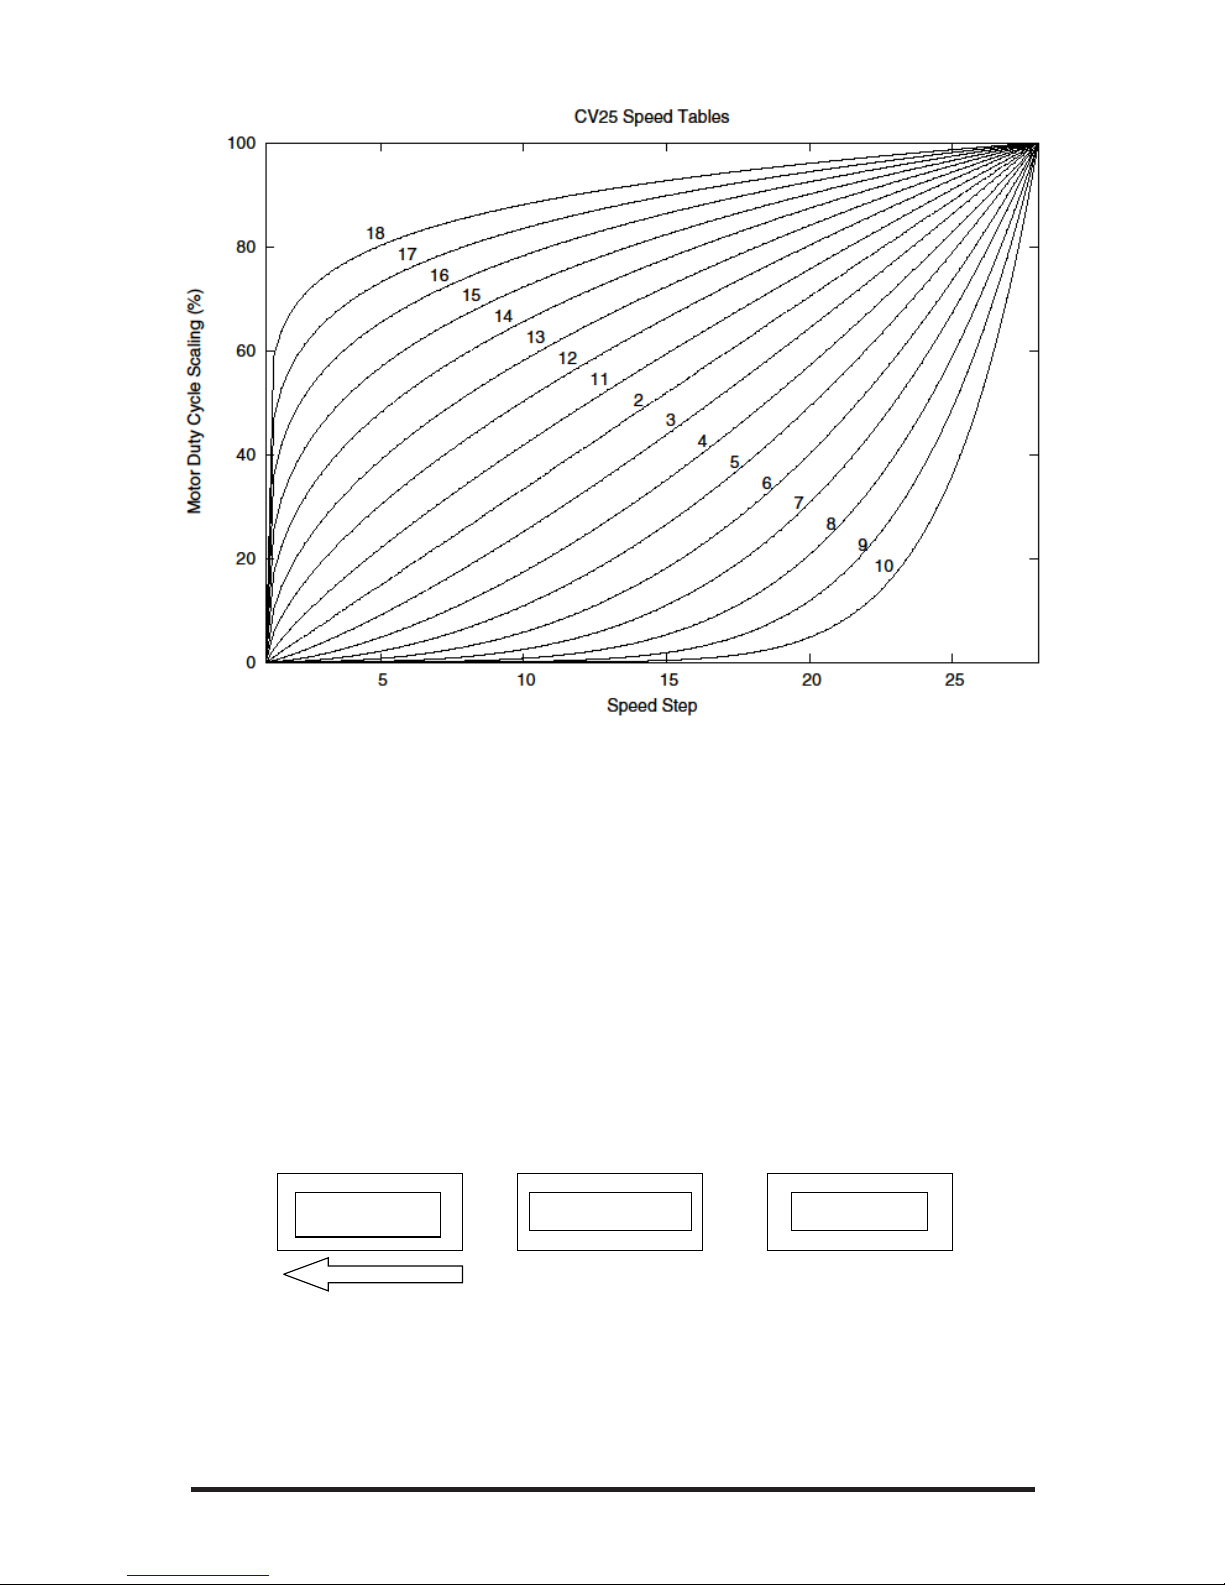
Custom Speed tables
Below is a table that shows the value to write to CV25 to achieve the desired speed
curve. For example, if you would like to use speed curve 18 then:
1. Write a value of 1 to CV52 to enable PWM Mode
2. Write a value of 1 to bit 4 of CV29
3. Write a value of 18 to CV25. Your engine will now use the speed curve
#18 below
4. If you want to create your own speed table using CV's 67-94 then write a
value of 0 or 1 to Cv25
M.T.H. HO Dash-9 Diesel Engine w/Proto-Sound 3.0
26
Page 27
Advanced Consisting
Advanced Consisting follows the NMRA standards. Any values assigned to CV's 2124 are ignored once the consist is removed (CV19 set to 0).
• Setting the MSB (Bit 7) of CV19 tells the engine that it is facing reverse in
the consist
• Setting CV21 and CV22 determine which F Functions the consist
responds to
• See diagram below for example
Normal Forward Direction of Travel
Engine 1 -
Front
Engine 2 -
Middle
Engine 3 -
Rear
F R F R F R
M.T.H. HO Dash-9 Diesel Engine w/Proto-Sound 3.0
27
Page 28

To set this consists up so that:
• The Headlight is ON in the Front engine when going Forward, OFF
when the consist is in Reverse
• The Reverse light and headlight is OFF in the Rear engine when the
consist is going Forward, headlight is ON, reverse light is OFF when the
consist is in Reverse
• The Middle engine has no lights in either direction
Perform the following:
1. Build the consist using your DCC system per the DCC system's
manufacturer's instructions. In many newer systems you have the ability to
tell the system which engine is reversed. Remember the consist address
you told the DCC system to be built at as you'll need to come back to that
address to actually run the consist. The instructions assume only CV19
gets the consists address and nothing more
2. Call up the Front engine on your DCC handheld; address 1 in this
example
3. Select CV22 and write a value of 1. This tells the engine that it's a forward
facing engine and that you want F0 to control the FL function at the
consist address. The engine will give you two horn blasts to announce that
it received the CV change
4. Ensure F0 is deactivated at the Front engine's address. Most systems have
a light bulb icon to indicate whether F0 is active or not. Ensure that it is
OFF
5. Call up the Rear engine on your DCC handheld; address 3 in this example
6. Set CV19 to 128 + the value of your consist address
a. So, if your consist address is 4 you would add 128+4=132. You
would write 132 to CV19. This tells the Rear engine that it's
reversed in the consist. You will get two horn blasts to announce
that it received the CV change. Some DCC systems may already
do this for you but the instructions assume your system does
not. If you are in doubt then go ahead and follow step 5 as it
will do no harm
M.T.H. HO Dash-9 Diesel Engine w/Proto-Sound 3.0
28
Page 29

7. Set CV22 to a value of 2 to the Rear engine's address to tell the Rear
engine that you want to control its FL control with the F0 button at the
consist address. The engine will give you two horn blasts to announce that
it received the CV change
8. Ensure F0 is deactivated at the Rear engine's address. Most systems have a
light bulb icon to indicate whether F0 is active or not. Ensure that it is
OFF
9. Call up the Middle engine on your DCC handheld; address 2 in this
example
10. Ensure F5 and F0 are toggled OFF. You may have to toggle F5 on/off a
couple times to get the lights in sync with the DCC command station.
This will depend upon your DCC system
11. Call up the consist address (address 4 in this example)
12. Press the F0 button to ensure the FL is toggled on. Most systems have a
light bulb icon to indicate whether F0 is active or not. Ensure that it is
ON
Note – The convenient thing about setting up the consist as described above is
that it allows you flexibility in the orientation of an engine in a consist;
particularly the head and tail engines where the FL control is integral. For
example, if you wanted to flip the Rear engine around and make it face
forward in the consist all you'd have to do is go into the Rear engine's address
(address 3 in the example) and clear bit 7 of CV19. In other words, just write
the consist's address to CV19. The FL control will automatically understand
what you've done so there is no need to go in and change CV22.
Below is a table that outlines which bits correspond to what F Functions F0,
F9-F12 are used in a consist:
M.T.H. HO Dash-9 Diesel Engine w/Proto-Sound 3.0
29
F
Function
Not
Used
F12 F11 F10 F9
F0
(Engine
Facing Rev)
F0
(Engine
Facing Fwd)
Not
Used
Bit
(Decimal
Value)
7 (128)
Not
Used
5 (32) 4 (16) 3 (8) 2 (4) 1 (2) 0 (1)
6 (64)
Not
Used
Page 30

Setting Up CV21 for a Consist
Cv21 allows you to set which F Functions you want the consist address to control.
For example, you will likely want all of your MTH consist engines to respond to
Start-Up/Shut Down (F3). Also, you'll likely want at your Front engine to respond
to the Bell and Horn commands (F1 and F2, respectively) and the Front Coupler
(F7 on most MTH models). Likewise, you'll want your Rear engine to respond to
the Rear Coupler command (F8 on most MTH models). Please refer to the table
below to see which bits have what decimal value and which F Function they
correspond to.
To do this:
1. Call up the Front engine on your DCC system
2. To set the Front engine to respond to the Bell (F1), Horn (F2), Start-Up/Shut
Down (F3) and Front Coupler (F7) you will want to write a value of 71 to CV21.
This is setting bits 0, 1, 2, and 6 ON.
a. CV21's bits are shown in the table below – the decimal value is shown
in parenthesis:
NOTE - CV21 is ONLY used when you have some value other than 0
written to CV19. If CV19 = 0 then the values of CV21, CV22, CV23, and
CV24 are not used
1. Call up your Middle engine (address 2 in the example)
2. Since you want to have the Middle engine respond to F3 only then write a
value of 4 (CV21, bit 2 = ON)
3. Call up your Rear engine (address 3 in the example)
4. Since you want to have the Rear engine respond to the Start-Up/Shut
Down (F3) and Rear Coupler (F8) functions you want to write a value of
132 to CV21
Your engines are now set up according to the example above.
You will note that there is no F0 in CV21. This is because that function (FL) is
controlled by CV22. Please refer to the Advanced Consisting section for more
information regarding CV22.
M.T.H. HO Dash-9 Diesel Engine w/Proto-Sound 3.0
30
F
Function
F8 F6 F5 F4 F3
F2 F1
F7
Bit
(Decimal
Value)
7 (128)
5 (32) 4 (16) 3 (8) 2 (4) 1 (2) 0 (1)
6 (64)
Page 31

Programming Track
Your MTH PS3.0-equipped HO engine can function on Programming Track
outputs from DCC systems. Because each DCC system manufacturer's output
capabilities on the Programming Track differ it is recommended that you use a
DCC Programming Track Booster to perform functions on the programming
track. Simply put – try to program or read back the address of an MTH engine on
a programming track. If you can read/write the address then you won't need a
Programming Track Booster. If your DCC system can't read/write then you will
likely need a Programming Track booster. There are a few different manufacturers
of these boosters. Your local dealer can provide you with more information on
these boosters. MTH has used the DCC Specialties Power Pax with some success.
Note – An alternative to writing on a Programming Track is to simply Program on
the Main (PoM). MTH engines support PoM to write any CV on the main.
However, read back is not supported on the main. Check with your DCC system's
manufacturer to see about any limitations they may have to PoM.
DCC Bit Value Decoder
So, in the above example you simply add up the values in the “Decimal Value” row
– 128+64+0+16+8 +0+0+1 = 217. You would write 217 to the CV you were
altering.
The above applies to any CV. Also, if you have a CV that already has a value
assigned that you do not want to alter but need to make additions to it, for example
CV29, you would simply add the additional bits you enabled to the existing value to
obtain the new CV value.
For example, if you had a consist address (CV19) set to 5 and you wanted to alter
this to show an engine reversed in the consist you would need to set bit 7 (decimal
value = 128) for the engine you want to reverse. To do this - take 128 (the new bit
you want to set) + 5 (the existing bit that you do not want to alter) = 133. You
would then write a value of 133 to CV19.
M.T.H. HO Dash-9 Diesel Engine w/Proto-Sound 3.0
31
Decimal
Value
128
0
16
0
0
1
64
8
Example Value (bit 7 -> bit 0) 11011001
Binary
Example
1 (on)
Bit
(Decimal
Value)
7 (128)
5 (32) 4 (16) 3 (8) 2 (4) 1 (2) 0 (1)
6 (64)
1 (on) 1 (on) 1 (on) 1 (on) 1 (on)0 (off) 0 (off)0 (off)
Page 32

SPECIFICATIONS
US PATENTS
US 6,457,681 Oct. 2, 2002
US 6,619,594 Sept. 16, 2003
US 6,655,640 Dec. 2, 2003
Electrical
Operating Modes
Default Addresses
Input Voltage
Current Draw (lights, sounds)
Lighting
0-24 VDC
~230 - 650mA
LED - Rule 17
Analog DC
DCC - Digital Command Control
DCS - Digital Control System
Yes
Yes
Yes
DCS
DCC short
DCC extended
1
3
3333
M.T.H. HO Dash-9 Diesel Engine w/Proto-Sound 3.0
32
Page 33

HO
The following Guide will help you trouble shoot your M.T.H. HO engine. This
guide is broken up into the three operating modes of the engine Analog DC,
DCC, and DCS
Troubleshooting Guide
Analog DC
CARE AND MAINTENANCE
M.T.H. HO Dash-9 Diesel Engine w/Proto-Sound 3.0
33
When I apply power to the track my
engine doesn’t do anything. No lights, no
sound, nothing.
Check to see if that section of track has power.
Use a voltmeter or a lit passenger car.
Slide the engine a couple of feet in either
direction, you may have a bad track section.
Have you got that section electrically isolated
with a toggle switch or other device?
I have no sound from my engine, but my
lights are on and it moves just fine.
There’s a crackling sound from my
engine
Check the volume pot on your locomotive.
Full CW = Max Volume
Check to see if a screw or some other material
hasn’t lodged itself in the underside of the
engine body.
One of my lights is out.
None of my lights are on.
Most likely you had been running the engine in
DCC or DCS mode and toggled that light off.
Put it back into one of those modes and turn
that light back on. The engine will remember
that when you run it again in Conventional DC.
Could be the same reason as “One of my lights
is out.”
Is the engine getting power? Check to see if
there is voltage on the track or move the engine
a few feet in either direction.
When I apply power to the track my
engine starts up (lights and sound) but it
won't move
My engine hesitates at slow speeds.
Lower the track voltage then raise it again. The
engine should start moving. If you apply greater
than 9VDC quickly the engine will just sit there.
Lowering it below 9VDC then raising it will get the
engine moving.
An engine may do this right out of the box if it has
not been lubricated. Follow the lubrication
instructions. Now go ahead and run it.
New engines may take a little bit to get everything
running, even after they are lubricated. Be
patient and let it run for a bit. It should clear up
shortly after lubricating and running.
Solution
Solution
Solution
Solution
Start-Up
Sound
Lights
Motion
Page 34

M.T.H. HO Dash-9 Diesel Engine w/Proto-Sound 3.0
34
DCC
When I apply power to the track my
engine doesn’t do anything. No lights,
no sound, no nothing.
SolutionStart-up
Did you press F3 yet? F3 on your DCC handheld will start your engine up.
Check to see if that section of track has power.
Use a voltmeter or a lit passenger car, not your
tongue.
Slide the engine a couple of feet in either
direction, you may have a bad track section.
Have you got that section electrically isolated
with a toggle switch or other device?
I have no sound on my engine, but my
lights are on and it moves just fine.
When I run Doppler I can hear the
Doppler shift but then the engine
sounds fade out and I can’t get them
back.
SolutionSound
You may have it turned off. Repeatedly press
F6 to cycle through the volume levels (there
are 9 levels, 0-max).
This is normal. You will need to press the F21
button again to turn Doppler off. Your engine
sounds will now return to normal.
Page 35

M.T.H. HO Dash-9 Diesel Engine w/Proto-Sound 3.0
35
One of my lights is out.
None of my lights are on.
Check your F keys. F0 is the headlight (also
controls the Back-up light) and F5 will toggle
the Cab light
Could be the same reason as “One of my
lights is out”
Is the engine getting power? Check to see if
there is voltage on the track or move the
engine a few feet in either direction.
and firebox light.
Lights Solution
Motion Solution
When I apply power and hit F3, my
engine powers up but it won’t move.
My engine hesitates at slow speeds.
An engine may do this right out of the box if it
has not been lubricated. Follow the lubrication
instructions. Now go ahead and run it.
New engines even after they are lubricated
may take a little bit to get everything run in. Be
a little patient and let it run for a bit. It should
clear up shortly after lubricating and running.
This is normal, dial up the speed on your DCC
controller to make your engine move.
PFA
Solution
I hit F4 to start the PFA but the engine
just keeps ringing its bell, that’s all it’ll
do.
Bring the engine speed to 0. Now press F4.
You will now hear the station or yard arrival
sounds (pretty cool, huh?). Pressing F4 will
cycle through the PFA sequence (check out
the PFA section of the manual for more)
Shut Down Solution
Okay, I give up. What do I have to do to
shut it down?
Well, you can either remove power from
the track or press F3 again.
Lost or Unknown Address
Solution
I can't call up my engine on the address
I believe it to be set at
Perform the 55-55-55 Reset instructions on
page 22
If you are trying to talk to an engine on its
short address you may have set CV29 to
activate long addressing. Try to get a hold of
the engine on its last known long address
Place the engine on the Programming Track
output on your DCC system and write a value
of 3 to CV1
DCC
Page 36

M.T.H. HO Dash-9 Diesel Engine w/Proto-Sound 3.0
36
DCS (Remember, it’s NOT DCC
When I apply power to the track my
engine doesn’t do anything. No lights,
no sound, no nothing.
I get an error when I hit Start-Up.
DCS is polarity sensitive when
powered by a DC power supply.
Solution
Start-up
This is normal. You have to hit the Start-Up
button.
Check to see if that section of track has power.
Use a voltmeter or a lit passenger car, not your
tongue.
Slide the engine a couple of feet in either
direction, you may have a bad track section.
Have you got that section electrically isolated
with a toggle switch or other device?
Have you recently changed the engine
address?
Check if there is power on that section of track
the engine is sitting on (there has to be power
for the signal to get to the engine and for the
engine to be able to hear it).
If you have two engines on the track they both
may have the same address. Take one of them
off the rails and try it again.
Check the polarity of the DC power supply
connected to the Fixed 1 or Fixed 2 Inputs.
Shut down power, reverse the inputs and
repower DCS. Hitting the start-up button the
DCS remote should start up the locomotive.
Solution
Sound
I have no sound on my engine, but my
lights are on and it moves just fine.
When I run Doppler I can hear the
Doppler shift but then the engine
sounds fade out and I can’t get them
back.
You may have it turned off. Repeatedly press
VOL + to bring the Master Volume up.
Did you turn off the ENG Sounds? Press the
ENG SND button on your DCS controller.
Check that you haven’t lowered any of the
independent engine volumes (Eng Sounds,
Bell, Whistle, or Accent).
This is normal. You will need to press the
Doppler button again to turn Doppler off. Your
engine sounds will now return to normal.
Page 37

M.T.H. HO Dash-9 Diesel Engine w/Proto-Sound 3.0
37
One of my lights is out.
None of my lights are on.
Check that you haven't turned it off with the
DCS controller. You have independent control
over lights on your engine
Could be the same reason as “One of my
lights is out”
Is the engine getting power? Check to see if
there is voltage on the track or move the
engine a few feet in either direction.
Lights Solution
Motion Solution
When I apply power and hit Start-up, my
engine powers up but it won’t move.
My engine hesitates at slow speeds.
An engine may do this right out of the box if it
has not been lubricated. Follow the lubrication
instructions. Now go ahead and run it.
New engines even after they are lubricated
may take a little bit to get everything run in. Be
a little patient and let it run for a bit. It should
clear up shortly after lubricating and running.
This is normal, dial up the speed on your DCS
Remote to make your engine move.
PFA Solution
When I enter PFA all that happens is the
bell rings. What do I do?
Why does my engine run away all by
itself after the PFA is over?
Press the DIR button. Your engine will stop
and begins the arrival sequence. Pressing the
DIR button will cycle you through the next 3
PFA sequences
This is normal. The engine will leave the
station at the same speed it entered (when hit
the PFA button). The speed setting can be
changed after the bell stops ringing.
Shut Down Solution
Okay, I give up. What do I have to do to
shut it down?
Well, you can either remove power from the
track or press or press Shut-Down. Button on
the DCS Remote
Lost or Unknown Address
Solution
I can't call up my engine on the address
I believe it to be set at
Delete the engine from your DCS remote, and
attempt to re-add it.
On the DCS Remote, hit Menu > System >
Engine Setup > Recover Engine
DCS (Remember, it’s NOT DCC
Page 38

HOW TO ORDER PARTS:
Replacement parts are available directly
from the M.T.H. Parts Department
Order online: www.mthtrains.com
E-mail: [email protected]
Fax: 410-423-0009
Phone: 410-381-2580
Mail: 7020 Columbia Gateway Drive
Columbia MD 21046-1532
M.T.H. HO Dash-9 Diesel Engine w/Proto-Sound 3.0
38
Page 39

Service & Warranty Information
How to Get Service Under the Terms of the Limited One-Year Warranty
When you suspect an item is defective, please check the operator's manual for standard operation and troubleshooting techniques that may correct the problem. Additional information may be found on the M.T.H. Website.
Should you still require service, follow the instructions below to obtain warranty service. First, e-mail, write, call or
fax a M.T.H. Authorized Service Center (ASC) in your area to obtain Repair Authorization. You can find the list
of ASCs on the M.T.H. Website, www.mthtrains.com. Authorized Service Centers are required to make warranty
repairs on items sold only from that store; all other repairs may-- or may not be done at the store's own discretion.
If you did not purchase the item directly from the ASC, you will need to select a National Authorized Service
Center (NASC). These centers are compensated by M.T.H. to perform warranty service for any customer whose
repair qualifies for warranty service. A list of NASC retailers can be located on the M.T.H. Website or by calling
410-381-2580. Should the warranty no longer apply, you may choose either an ASC or NASC retailer to service
your M.T.H. Product. A reasonable service fee will be charged.
CAUTION: Make sure the product is packed in its original factory packaging including its foam and plastic
wrapping material to prevent damage to the merchandise. There is no need to return the entire set if only one of
the components is in need of repair unless otherwise instructed by the Service Center. The shipment must be
prepaid and we recommend that it be insured. A cover letter including your name, address, daytime phone
number, e-mail address (if available), Return Authorization number (if required by the service center, a copy of
your sales receipt and a full description of the problem must be included to facilitate the repairs. Please include
the description regardless of whether you discussed the problem with a service technician when contacting the
Service Center for your Return Authorization.
Please make sure you have followed the instructions carefully before returning any merchandise for service.
Authorized M.T.H. Service Centers are independently owned and operated and are not agents or representatives
of M.T.H. Electric Trains. M.T.H. assumes no responsibility, financial or otherwise, for material left in their
possession, or work done, by privately owned M.T.H. Authorized Service Centers.
If you need assistance at any time email MTH Service at [email protected], or call 410 381-2580.
Limited One-Year Warranty
All M.T.H. products purchased from an M.T.H. Authorized Retailer are covered by this warranty provided the
product was manufactured within five years of the date of purchase. This warranty is for the original purchaser
and is non-transferable.
See our website www.mthtrains.com to identify an M.T.H. Authorized Retailer near you.
M.T.H. products may be registered online in advance of warranty work at www.mthtrains.com/warranty. The
original sales receipt and the conditions below must be met regardless of whether the product is registered on the
M.T.H. website in order to obtain warranty service.
M.T.H. products manufactured within five years from the date of purchase are warrantied for one year against
defects in material or workmanship, excluding wear items such as light bulbs, pick-up rollers, batteries, smoke unit
wicks, and traction tires. We will repair, replace, or credit (at our option) the defective part without charge for the
parts or labor if the following conditions are met: (1) the item is returned to an M.T.H. Authorized Service
Center* (ASC) or M.T.H. National Authorized Service Center (NASC) or M.T.H. Electric Trains Service
Department, (2) was manufactured within the previous five years and (3) was purchased within one year of the
original date of purchase from an M.T.H. Authorized Retailer. Products manufactured after the five year cutoff
from the date of purchase are not covered under any warranty by M.T.H. Electric Trains. The manufacture date
of an item can be verified on the item's detail page “shipping date field” on the M.T.H. website
(www.mthtrains.com). This warranty does not cover damages caused by improper care, handling, or use.
Transportation costs incurred by the customer are not covered under this warranty.
Items sent for repair must be accompanied by a return authorization number, a description of the problem, and a
copy of the original sales receipt from an M.T.H. Authorized Retailer, which gives the date of purchase. If
you are sending this product to an Authorized Service Center, contact that Center for their return authorization.
This warranty gives you specific legal rights, and you may have other rights that vary from state to state. Specific
questions regarding the warranty may be forwarded to M.T.H. Directly.
* Authorized Service Centers (ASC) are only obligated to provide warranty service for any consumer who has
purchased the specific M.T.H. item from them that requires service work.
Service Department:
M.T.H. Electric Trains
7020 Columbia Gateway Drive
Columbia MD 21046-1532
 Loading...