


Premier 4-8-8-4
Big-Boy Steam
Locomotive
OPERATOR’S MANUAL
Compatibility
This engine will operate on any traditional
O-72 Gauge track system, including
M.T.H.’s RealTrax® or ScaleTrax™ or
traditional tubular track. It is also compatible
with most standard AC transformers. (See
page 23 for a complete list of compatible
transformers and wiring instructions.)
PLEASE READ BEFORE USE AND SAVE

Table of Contents
Set Up Checklist...................................................................................................3
Lubrication.............................................................................................3
Priming The Smoke Unit.......................................................................3
Checking The Battery............................................................................4
Basic Operation....................................................................................................5
Activating Features................................................................................5
Proto-Sound 2.0 Operating Instructions...........................................................7
Activating Proto-Sound 2.0 Conventional Mode Features....................7
Freight Station Announcements (FSA)................................................. 8
Proto-Coupler® Operation.................................................................... 9
Speed Control........................................................................................ 10
Locking Locomotive Into A Direction.................................................. 11
Reset To Factory Default.......................................................................11
Automatic Sound Effects.......................................................................11
Maintenance.........................................................................................................12
Lubricating and Greasing Instructions...................................................12
Cleaning The Wheels, Tires and Track..................................................13
Traction Tire Replacement Instructions.................................................14
Headlight Replacement Instructions......................................................14
Self Charging Battery Back-Up.............................................................16
ProtoSmoke® Unit Operation................................................................18
Troubleshooting Proto-Sound® 2.0 Problems.......................................20
Transformer Compatibility and Wiring Chart.......................................23
Additional Features Accessible Of DCS Remote Control System........24
Service & Warranty Information...........................................................25
Limited One-Year Warranty..................................................................25
CAUTION: ELECTRICALLY OPERATED PRODUCT:
Not recommended for children under 10 years of age. M.T.H. recommends adult supervision with children ages 10 - 16.
As with all electric products, precautions should be observed during handling and use to reduce the risk of electric shock.
WARNING: When using electrical products, basic safety precautions should be observed, including the following:
Read this manual thoroughly before using this device.
M.T.H. recommends that all users and persons supervising use examine the hobby transformer and other electronic equipment
l
periodically for conditions that may result in the risk of fire, electric shock, or injury to persons, such as damage to the primary
cord, plug blades, housing, output jacks or other parts. In the event such conditions exist, the train set should not be used until
properly repaired.
Do not operate your layout unattended. Obstructed accessories or stalled trains may overheat, resulting in damage to your layout.
l
This train set is intended for indoor use. Do not use if water is present. Serious injury or fatality may result.
l
l
Do not operate the hobby transformer with damaged cord, plug, switches, buttons or case.

Set Up Checklist
•
Lubricate the locomotive
• Prime the smoke unit
• Check to see whether the battery needs to be charged for full sound effects
• Apply power to run as described in the Basic Operating Section of this manual
Lubrication
You should lubricate the engine to prevent it from squeaking. Use
light household oil and follow the lubrication points marked “L” in
Fig. 1. Do not over-oil. Use only a drop or two on each pivot point.
Lubricate Linkage (L)
Lubricate Wheel Axles (L)
Figure 1. Lubrication Points on the Locomotive
Lubricate Pick Up Rollers (L)
Lubricate Pick Up Rollers (L)
Lubricate Wheel Axles (L)
Priming The Smoke Unit
When preparing to run this engine,
add 15-20 drops of smoke fluid
through the smokestack. We
recommend M.T.H. ProtoSmoke,
Seuthe, LGB, or LVTS fluids. Do
not overfill the unit or the fluid may
leak out and coat the interior engine
components.
Running the engine without a primed
smoke unit may cause damage
DO NOT
OVER OIL
Lubricate Wheel Axles (L)
Smoke Unit
ON/OFF Switch
If you choose not to add the fluid (or have
already added the fluid but choose to run
smoke-free), turn off the smoke unit switch
Premier Big Boy Steam Locomotive 3
Figure 2: Smoke Unit Switch Location

Placing The Engine On The Track
Plug Tender Plug into
Place the engine on the track, then insert the reverse unit plug that extends out of the
tender into the receptacle at the back of the boiler cab (Figure 3. WARNING: DO NOT
CONNECT THIS ENGINE TO A TENDER FROM ANOTHER ENGINE; IT MAY
CAUSE SERIOUS DAMAGE. Look at the bottom of the engine and tender where each
will have a color-coded stamp. If they match you may connect those two pieces; if not,
don’t.
Connect the draw bar between the
engine and tender. The draw bar hole
located farthest from the tender is for
applications such as display. The
second hole is for normal operation on
the track.
At this point, you are ready to begin
running your engine.
Fiugre 3
Boiler Socket at back of cab.
Checking The Battery
You may find, if your locomotive was built several months before you set it up, that the
rechargeable battery has run down and needs to be charged before operating. If you
notice that the sounds are garbled, test and charge the engine as described in the
"Self-Charging Battery Back-Up" on page15.
4 Premier Big Boy Steam Locomotive

Basic Operation
The Throttle knob controls how fast your train will travel.
Turn the throttle knob up ½-way, until the engine and caboose lights shine bright.
Put the engine into motion by pressing the Direction button on your transformer once.
(hold it for approximately 1 second)
If the engine does not begin to move as soon as you firmly press the Direction button,
you may not have sent enough voltage to the track to make the train move. Turn the
throttle up a bit higher until the train begins to move.
Activating Features
Throttle To increase or decrease track voltage, and therefore train speed, turn the
throttle control knob. Turning clockwise will increase voltage and speed, while turning
counterclockwise will decrease voltage and speed. The engine will maintain the speed
you set after you release the throttle until you turn it again to change the voltage and
speed.
Bell - To sound the bell, in an engine equipped with a bell firmly press and release the
Bell button. To turn the bell off, press and release the Bell button again. The bell will
continue to ring from the time you turn it on until you press and release the button again
to turn it off.
Horn/Whistle - To sound the whistle, firmly press the Horn/Whistle button. The whistle
will sound for as long as you continue to depress the button. It will stop when you
release the button.
Direction Your train is programmed to
start in neutral. The train will always
cycle neutral-forward-neutral-reverse with
each press and release of the direction
button. The engine is programmed to
restart in neutral each time the track
voltage is turned off for 25 seconds or
more.
Cycle Phases
Neutral
ForwardReverse
Neutral
Premier Big Boy Steam Locomotive 5

Manual Volume Control
Proto-Sound 2.0
To adjust the volume of all sounds made by this engine, turn the master volume control
knob, located under the water hatch on the tender, clockwise to increase the volume and
counter-clockwise to decrease the volume.
Volume Adjustment Knob
Figure 4: Manually Adjusting The Volume
6 Premier Big Boy Steam Locomotive

Proto-Sound 2.0
Operating Instructions
This manual contains the operating instructions for Proto-Sound 2.0 in conventional
mode only. Instructions for accessing DCS command mode features accompany the DCS
Remote Control System equipment.
Activating Proto-Sound 2.0 Conventional
Mode Features
Proto-Sound 2.0 features are activated by sequences of Bell and Horn button pushes
described below. Please read the full descriptions of each feature before using it. To use
these buttons to activate features rather than to blow the horn or ring the bell, you should
tap the buttons very quickly with a ½-second pause between button presses. You may
need to practice your timing to make this work smoothly.
Timing Chart
Press
Horn
Short &
Firm
½ Sec.
Pause
Total Time Lapse: 1 Seconds½
Press
Bell
Short &
Firm
½ Sec.
Pause
Press
Bell
Short &
Firm
Feature to Be Activated:
Freight Yard Sounds
Fire the Rear Coupler
Fire the Front Coupler
Speed Control On/Off
Lock into a Direction/Unlock
Reset to Factory Defaults
Button Code:
1 Bell, 2 Whistles
1 Bell, 3 Whistles
1 Bell, 4 Whistles
1 Whistle, 2 Bells
1 Whistle, 3 Bells
1 Whistle, 5 Bells (From Neutral Only)
(From Neutral Only)
Premier Big Boy Steam Locomotive 7

Freight Yard Sounds (FYS)
Your engine is equipped with a sound package of freight yard sounds that you can play
when you pull into a yard. Each sequence described below will play as long as it is left
on, randomly generating sounds, but be sure to allow approximately 30 seconds between
the button pushes described below to allow the FYS sufficient time to run through each
sequence.
• To cue the sound system to play the FYS, quickly but firmly tap the Bell button
once followed by 2 quick taps of the Horn button while the engine is moving.
Tap the buttons quickly but allow approximately ½ second between each press.
Press the Direction button once to stop the engine. This will trigger the first
•
sequence of FYS. The reverse unit is temporarily disabled so that the train will
not move as you use the Direction button to trigger the sounds, and Proto-Sound
2.0 has disabled operator control over the Horn and Bell buttons until the full
FYS sequence is complete.
• After waiting about 30 seconds for that sequence to run, press the Direction
button again to trigger the second sequence of FYS.
• After about 30 seconds, press the Direction button again to trigger the third FYS
sequence.
Again, after allowing about 30 seconds for that sequence to run, press the
•
Direction button one more time to trigger the fourth and final FYS sequence.
The FYS will continue, and within a few seconds, the engine will start and move
out on its own at the current throttle setting, in the same direction it was traveling
when you began the sequence. Once the bell turns off, the operator regains
control of the transformer's Bell and Horn buttons and can ring the bell or blow
the horn as usual.
Bell
Station Announcements (FYS)
Horn Horn
Sound System Cued
to Play Passenger
8 Premier Big Boy Steam Locomotive
Direction
+
Sequence
FYS
1st
Direction
+
Sequence
FYS
2nd
Direction
+
Sequence
3rd
FYS
Direction
+
Sequence
FYS
4th
Operator
Controls
=
When Bell
Turns Off

Tips on Using FYS
• You can terminate FYS at any time by turning off power to the track for 15
seconds.
•
You do not have to be in Forward to use FYS. At the conclusion of the full
sequence, the train will pull away from the station in whatever direction you
were going when you activated the feature.
• You can use FYS even if you are double-heading with another engine. If the
second engine is not equipped with Proto-Sound 2.0, you must remember
not to leave the throttle at a high voltage level once you have stopped the
engine to run the FYS. Otherwise, the engine without FYS will begin
vibrating on the track as its motors strain to move the train, since they
cannot be automatically disabled during the FYS cycle (or if an original
Proto-Sound engine, FYS are triggered differently and that engine's
motor-disable feature will not be active when you run FYS in Proto-Sound
2.0).
• FYS can be triggered from Neutral. It will operate the same as if triggered
while in motion except that, at the conclusion of the FYS, the engine will
depart in the next direction of travel, as opposed to the direction it was
traveling before entering Neutral.
Proto-Coupler® Operation
This locomotive is equipped with one or more coil-wound Proto-Couplers for remote
uncoupling action. Because Proto-Couplers are controlled through the Proto-Sound 2.0
microprocessor, they do not require an uncoupling track section or modification to your
layout to function. You can fire a coupler from neutral or while in motion. Use the code
shown below (and in the chart on p. 7) to fire the coupler(s).
Rear Coupler:
To fire the rear coupler, quickly tap the Bell button once followed by three quick taps of
the Horn button, allowing approximately ½ second to lapse between each quick button
press. The sound of the liftbar and air line depletion will play, and the knuckle will be
released.
Bell
Horn Horn
Premier Big Boy Steam Locomotive 9
Horn
=
Fire
Rear
Coupler

Front Coupler:
Coupler
To fire the front coupler (if your engine has one), quickly tap the Bell button once
followed by four quick taps of the Horn button, allowing approximately ½ second to
lapse between each quick button press. The sound of the liftbar and air line depletion
will play, and the knuckle will be released.
Fire
Horn Horn
Horn HornBell
=
Front
Speed Control
M.T.H. engines equipped with Proto-Sound 2.0 have speed control capabilities that allow
the engine to maintain a constant speed up and down grades and around curves, much
like an automobile cruise control. You can add or drop cars on the run, and the engine
will maintain the speed you set.
While the engine is programmed to start with the speed control feature activated, you can
opt to turn it off. This means the engine's speed will fall as it labors up a hill and increase
as it travels downward. It is also affected by the addition or releasing of cars while on the
run. Because the engine will run more slowly at a given throttle voltage when speed
control is on than when it is off, you should adjust the throttle to a lower power level for
operation with speed control off to avoid high-speed derailments. When speed control is
off, the volume will drop to allow for better low voltage operation.
To turn speed control on and off, put the engine in neutral, then quickly tap the
transformer's Horn button one time then quickly tap the Bell button two times, allowing
approximately ½ second to lapse between each quick button press. Two horn blasts will
indicate that the engine has made the change. Repeat the 1 horn, 2 bells code to return it
to the other condition. You will want to do this during the initial neutral upon start-up if
you ever couple this engine to another engine that is not equipped with speed control to
avoid damaging the motors in either engine. Each time you shut down the engine
completely, it will automatically turn speed control on.
Speed Control
Place
Engine into
Neutral
Horn
Bell Bell
Two Horn Blasts
(indicates change is made)
=
Repeat to Return
to Normal Condition
10 Premier Big Boy Steam Locomotive

Locking Locomotive Into A Direction
You can lock your engine into a direction (forward, neutral, or reverse) so that it will not
change directions. To do this, put the engine into the direction you want (or into neutral
to lock it into neutral), run it at a very slow crawl (as slowly as it will move without
halting), and quickly but firmly tap the Horn button once followed by three quick taps of
the Bell button, allowing approximately ½ second to lapse between each quick button
press. Two horn blasts will indicate that the engine has made the change. The engine will
not change direction (including going into neutral) until you repeat the 1 horn, 3 bells
code to return the engine to its normal condition, even if the engine is kept without power
for extended periods of time.
Place
Engine into
Horn
Desired
Direction
Horn
Bell Bell Bell
=
Direction Lock
Two Horn Blasts
(indicates change is made)
Repeat to Return
to Normal Condition
Reset To Factory Default
To override the settings you currently have assigned to the engine and reset it to its
factory defaults, while in Neutral tap the Horn button quickly once, followed by five
quick taps of the Bell button, allowing approximately ½ second to lapse between each
quick button press. Two horn blasts will indicate that the engine has made the change.
Place
Engine in
Neutral
Horn
=
BellBellBellBellBell
Reset
Two Horn Blasts
(indicates change is made)
Repeat to Return
to Normal Condition
Automatic Sound Effects
Certain Proto-Sound 2.0 sound effects automatically play in programmed conventional
mode conditions:
• Squealing Brakes play any time the engine's speed decreases rapidly.
•
Cab Chatter plays at random intervals when the engine idles in neutral.
• Engine Start-up and Shut-down sounds play when the engine is initially powered
on or is powered off for five seconds or more.
Premier Big Boy Steam Locomotive 11

Maintenance
Lubricating and Greasing Instructions
The engine should be well oiled and greased in order to run properly.
You should regularly lubricate all side rods, linkage components and
pickup rollers to prevent them from squeaking. Use light household oil
and follow the lubrication points marked “L” in Fig. 2. Do not
over-oil. Use only a drop or two on each pivot point.
Lubricate Linkage (L)
Lubricate Wheel Axles (L)
Figure 5: Removing The Body
The locomotive’s internal gearing was greased at the factory and should not need
additional grease until after 50 hours of operation or one year, whichever comes first.
To access the gear box and axles, do the following:
1. Turn the engine upside down.
2. Remove the Phillips screws (marked “GREASE”) located at each set of wheels and
under pick up rollers (Fig. 6).
3. Use a grease tube dispenser to put a small amount (approx. 1-2 ml.) of lithium-based
grease into the screw holes.
Lubricate Pick Up Rollers (L)
Lubricate Pick Up Rollers (L)
Lubricate Wheel Axles (L)
DO NOT
OVER OIL
Lubricate Wheel Axles (L)
4. Replace the screws.
12 Premier Big Boy Steam Locomotive

Body Mount Screws
Body Mount Screws
Grease (G)
Figure 6: Removing The Body And Lubricating The Grease Points
Grease (G)
You should also grease the leading and trailing locomotive truck tongues to enhance their
ability to slide on the chassis. Follow the grease points shown on Fig. 6.
Cleaning The Wheels, Tires and Track
Periodically check the locomotive
wheels and pickups for dirt and buildup,
which can cause poor electrical contact
and traction as well as prematurely
wear out the neoprene traction tires.
Wheels and tires can be cleaned using
denatured (not rubbing) alcohol applied
with a cotton swab.
Premier Big Boy Steam Locomotive 13

Traction Tire Replacement Instructions
Your locomotive is equipped with two neoprene rubber traction tires on the rear set of
flanged drivers. While these tires are extremely durable, you may need to replace them at
some point.
1. Remove the side rods from the wheels in order to slip the new tire over the grooved
drive wheel. Make sure to note the position of all rods before removing.
2. Make sure the old tire has been completely removed from the groove in the drive
wheel, using a razor blade or small flathead screwdriver to pry away any remains.
3. Slip the new tire onto the wheel. You may find it useful to use two small flathead
screwdrivers to stretch the tire over the wheel.
4. If you twist the tire while stretching it over the wheel, you will need to remove and
reinstall the tire. Otherwise your engine will wobble while operating.
5. Make sure the tire is fully seated inside the groove. Use a razor blade to trim away any
excess tire that doesn’t seat itself inside the groove properly.
6. Reinstall the side rods in the same positions as noted. Failure to align rods may cause
binding or damage to the drive system.
One set of replacement tires is packaged with your model. Additional sets are available
directly from the M.T.H. Parts Department (phone: 410-381-2580; e-mail:
parts@mth-railking.com; mail: 7020 Columbia Gateway Drive, Columbia MD
21046-1532).
Headlight Replacement Instructions
The locomotive’s lights are controlled by a
constant voltage circuit in the engine. They are
easy to remove and replace when they burn out.
See the diagrams and directions below for
instructions on accessing and replacing the light
bulbs in this locomotive.
You can obtain replacement bulbs directly from
the M.T.H. Parts Department (order online:
www.mth-railking.com, e-mail:
parts@mth-railking.com; mail: 7020 Columbia
Gateway Drive, Columbia MD 21046-1532,
FAX: 410-381-6122).
14 Premier Big Boy Steam Locomotive
Figure 7
Remove the screws in order
to remove pilot platform

To Replace Headlight:
1) Remove the screw in order to remove platform on pilot (Fig. 7).
2) Remove platform on pilot to gain access to the headlight bulb (Fig. 8).
3) Remove wires from front power truck (Fig. 9).
Figure 8
Remove wires from
front power truck
Figure 9
Premier Big Boy Steam Locomotive 15

Self Charging Battery Back-Up
The two special AA size 1.5v NiCad self-charging batteries recharges continuously
during train operation and should last for up to five years. The batteries are dry battery
that should not leak or cause any damage to your engine. Depending upon when your
engine was built, they may need to be charged right out of the box. If engine sounds
seem distorted or garbled at low voltages or become silent when power from the
transformer is turned off, test the batteries to determine whether they should be
recharged or replaced.
Test: Put the engine in neutral and leave the track voltage at 10-12 volts (high enough
for the lights to shine brightly and the engine to move steadily) for 15 minutes.
Recharge: If the sounds are improved at the end of the 15-minute test charge, the
batteries charge has run down and can be recharged. There are a number of ways you can
do this:
• Leave the engine in neutral with track voltage at 10-12 volts for 6-7 hours so the
batteries can fully recharge (if your engine has a smoke unit, be sure it is turned
off).
• Use M.T.H.'s battery recharger (sold separately) that plugs into a wall outlet and
a special port under thewater hatch in the tender to recharge the batteries
overnight without leaving it on the track.
Replace: If the sounds are not improved at the end of the 15-minute test charge, it is
time to replace the batteries. Available through M.T.H. Parts.
DO NOT substitute alkaline batteries for these NiCad batteries. Using alkaline batteries
in this system can result in damamge to the PS 2.0 circuit board and/or the batteries.
**Do not use alkaline batteries for testing or checking purposes for the 3-Volt PS2
boards. Using alkaline batteries will damage the 3-Volt battery charging circuit.**
16 Premier Big Boy Steam Locomotive
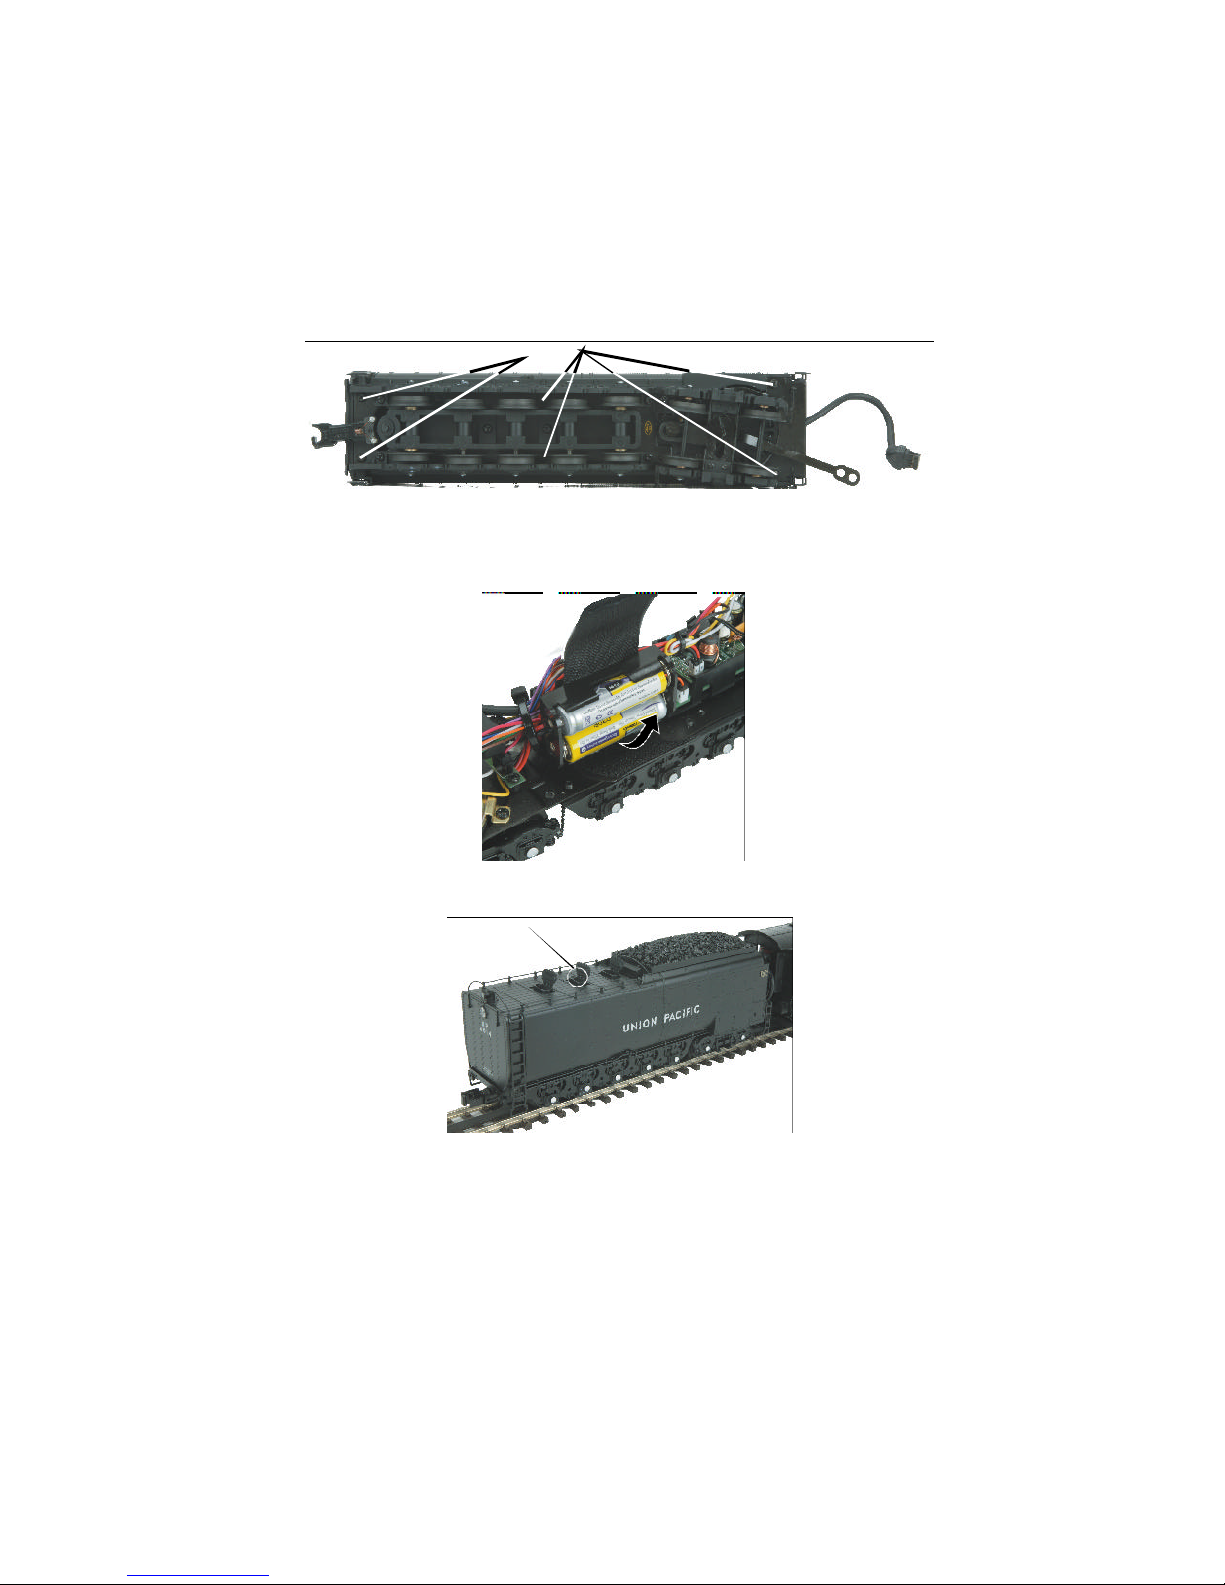
Figure 10
Tender shell screws
AC Battery Recharging Jack
Figure 11
Premier Big Boy Steam Locomotive 17

ProtoSmoke® Unit Operation
This Premier steam locomotive contains a self-powered smoke unit that outputs smoke
through the smokestack on the roof of the engine. The smoke unit is essentially a small
heating element and wick that soaks up and then heats a mineral oil-based fluid that emits
a harmless smoke. The smoke is then forced
out of the stack by a small electric fan.
Smoke volume is controlled by the
Proto-Sound 2.0 system.
With a few easy maintenance steps, you
should enjoy trouble-free smoke unit
operation for years.
When preparing to run this engine, add 15-20
drops of smoke fluid through the smokestack
(see Fig. 12). We recommend M.T.H.
ProtoSmoke, Seuthe, LGB, or LVTS fluids.
Do not overfill the unit or the fluid may leak
out and coat the interior engine components.
If you choose not to add the fluid (or have
already added the fluid but choose to run
smoke-free), turn off the smoke unit switch
located under the water hatch on the tender
(see Fig. 13). Failure either to add fluid to
the unit or to turn it off may damage the
smoke unit heating element and/or wick
material.
Figure 12
Add Smoke Fluid
Smoke Unit
ON/OFF Switch
When the smoke output while running the
engine begins to diminish, add another 10-15
drops of smoke fluid or turn the smoke unit
Figure 13
off.
When storing the unit for long periods of time, you may want to add about 15 drops of
fluid to prevent the wick from drying out.
After removing the engine from storage, add another 25 drops of fluid, letting the wick
soak up the fluid for 15 minutes prior to operation.
If you experience poor or no smoke output when the smoke unit is on and has fluid,
check the wick to see if it has become hard, blackened, and unabsorbent around the
heating element. To remove the smoke unit you will first have to remove the boiler shell
18 Premier Big Boy Steam Locomotive

(by removing the body mounting screws shown in Fig. 5 on pg. 12), board and bracket
Screws
that block the smoke unit assembly from being accessed. To do this, follow these
instructions:
Remove screws to free smoke
1. Unplug the two wiring
harnesses from the board
unit. Then turn smoke unit over
to inspect.
mounted to the inside of
the boiler and behind the
smoke unit.
2. Remove the two
screws securing the
smoke unit inside the
shell as seen in Fig. 14.
3. With the board free of
Figure 14
the mounting screws,
slide the assembly out of
the boiler as seen in
Fig. 14.
4. Once the unit is freed,
remove the inspection
cover (Fig. 15). Inspect
the wick; if it is darkly
discolored and hard, it
should be replaced.
Replacement parts and
wick replacement
instructions are available
directly from the M.T.H.
Parts Department phone:
410-381-2580; e-mail:
parts@mth-railking.comm
Figure 15
ail: 7020 Columbia
Gateway Drive, Columbia MD 21046-1532
Inspection Cover
Premier Big Boy Steam Locomotive 19

Troubleshooting Proto-Sound® 2.0 Problems
Although Proto-Sound 2.0 has been designed and engineered for ease of use, you may
have some questions during initial operation. The following table should answer most
questions. If your problem cannot be resolved with this table, contact M.T.H. for
assistance (telephone: 410-381-2580; fax: 410-423-0009; service@mth-railking.com,
7020 Columbia Gateway Drive, Columbia MD 21046-1532).
Starting Up
When I first turn the power on, the
engine will not begin to run. I have to
turn the throttle off and then on again
to get the engine to operate.
Whistle/Horn
When I press the whistle/horn button,
the bell comes on instead.
I can’t get the horn to blow when I
press the whistle button.
Bell
When I press the whistle button, the
bell sounds.
I can’t get the bell to ring when I press
the bell button.
The bell won’t work on a separate bell
button.
Coupler
When I try to fire the coupler, FYS
starts.
Remedy
This is normal behavior. To prevent
accidental high-speed start-ups,
Proto-Sound 2.0 is programmed to
start up in neutral anytime track power
has been turned off for several
seconds. See the "Basic Operation"
section for more details.
Remedy
Reverse the transformer leads.
You may be pressing the button too
Remedy
quickly. Try pressing the whistle/horn
button more slowly, taking approximately
one full second to fully depress the
button.
Remedy
Reverse the transformer leads.
You may be pressing the button too
quickly. Try pressing the bell button
more slowly, taking approximately one
full second to fully depress the button.
Check the wiring of the separate
button.
Remedy
You are waiting too long between
whistle button presses.
The Proto-Coupler won’t let the engine
uncouple on the fly.
The coupler does not fire or stay
coupled.
20 Premier Big Boy Steam Locomotive
Try lubricating the coupler knuckle
with a dry graphite lubricant. Do NOT
use oil.
The coupler needs to be cleaned.
Wipe with denatured alcohol (not
rubbing alcohol) and let dry.

Cab Chatter
Sometimes the Cab Chatter sounds
don’t play.
Lock-out
I can’t get the engine to run after I
power up the transformer. It sits still
with the engine sounds running.
The engine won’t lock into forward,
neutral, or reverse.
Volume
The sounds seem distorted, especially
when the whistle or bell is activated.
Remedy
Cab Chatter plays only in neutral at
random intervals.
Remedy
The engine is locked into the neutral
position. Follow the procedure in the
“Lock into a Direction” section.
Engine speed must be below 10 scale
mph (approx. 10 volts or less in
conventional mode).
Remedy
Proto-Sound 2.0 volume is set too
high. Turn the volume control knob on
the bottom of the chassis counterclockwise to reduce the volume.
Battery
The engine will not leave the initial
neutral setting.
I get no sounds when the engine shifts
between directions.
After I turn off my transformer, my
engine continues to make sounds
before quitting.
FYS
The FYS sounds occasionally repeat
themselves.
Remedy
Check to be sure the battery is
installed and fully charged. See the
“Self-Charging Battery Back-Up”
section.
The battery may be dead or need to
be charged. See the “Self-Charging
Battery Back-Up” section.
Proto-Sound 2.0 is designed to
continue to sound for a few seconds
after power to the track has been shut
off.
Remedy
Proto-Sound 2.0 has a built-in random
number generator that randomly
selects each sound clip to play.
Because there are a limited number of
sound clips available in each FYS
sequence, it is probable that some of
these sound clips will be repeated
from time to time.
Premier Big Boy Steam Locomotive 21

FYS Remedy
Once in FYS, the engine doesn’t go
into reverse.
So that FYS effects can be as realistic
as possible,
disables the reversing unit
whenever FYS is enabled. This
way the engine remains still at its
stop as the operator cycles
through the FYS sequences.
Proto-Sound 2.0
When the FYS enters its last
sequence the bell automatically
comes on.
When FYS is enabled, pressing the
whistle and bell buttons has no effect.
I push the direction button but the next
sound clip in the sequence does not
play or the engine does not come out
of FYS after fourth press of the
direction button.
FYS is programmed to start
ringing the bell at that point. After
approximately 12 rings of the bell,
it will automatically turn off.
Because FYS must control various
effects in each sequence, ProtoSound 2.0 takes control of these
sound effects until you exit FYS.
Each FYS clip must play for approx.
30 seconds before FYS will advance
to the next step in the FYS cycle.
Wait at least 30 seconds in each FYS
sound clip before pressing the
direction button.
22 Premier Big Boy Steam Locomotive

Transformer Compatibility and Wiring Chart
Proto-Sound 2.0 is designed to work with most standard AC transformers. The chart
below lists the many compatible transformers. Note that many of the operational
commands described in these instructions require a bell button, so if your transformer
does not have its own bell button, you should consider adding one to get the full benefit
of the system. In addition, the chart details how the terminals on these transformers
should be attached to your layout.
Transformer
Model
MTH Z-500 Red Terminal Black Terminal 0-18v 50-Watt Electronic
MTH Z-750 Red Terminal Black Terminal 0-21v 75-Watt Electronic
MTH Z-4000 Red Terminal Black Terminal 0-22v 390-Watt Electronic
Lionel 1032 U A 5-16v 90-Watt Standard
Lionel 1032M U A 5-16v 90-Watt Standard
Lionel 1033 U A 5-16v 90-Watt Standard
Lionel 1043 U A 5-16v 90-Watt Standard
Lionel 1043M U A 5-16v 90-Watt Standard
Lionel 1044 U A 5-16v 90-Watt Standard
Lionel 1053 U A 8-17v 60-Watt Standard
Lionel 1063 U A 8-17v 60-Watt Standard
All-Trol Left Terminal Right Terminal 0-24v 300-Watt Electronic
Dallee Hostler Left Terminal Right Terminal Electronic
Lionel LW A U 8-18v 75-Watt Standard
Lionel KW A or B U 6-20v 190-Watt Standard
Lionel MW
Lionel RS-1 Red Terminal Black Terminal 0-18v 50V.A. Electronic
Lionel RW U A 9-19v 110-Watt Standard
Lionel SW U A Unknown 130-Watt Standard
Lionel TW
Lionel ZW
Lionel Post-War
Celebration
Series ZW
* Conventional Mode Only
Center Rail Outside Rail
Outside Track
Terminal
U A 8-18v 175-Watt Standard
A,B,C or D
A,B,C or D
Inside Track
Terminal
U
Common
Min/Max.
Voltage
5-16v 50V.A. Electronic
8-20v
0-20v
Power
Rating
275-Watt
135/190 Watt
Transformer
Type
Standard
Electronic
Premier Big Boy Steam Locomotive 23

Additional Features Accessible With The DCS
Remote Control System
(Additional equipment required)
While conventional mode operation of a Proto-Sound 2.0 engine yields wonderfully
realistic sound and several train control features, command mode operation allows the
user to access a world of command functions never before accessible to O Gauge
railroaders. With the addition of the DCS Remote Control System (including a DCS
remote handheld and Track Interface Unit) users gain many advanced features, including:
• DCS Proto-Speed Control - Establishes desired locomotive speed in scale miles
per hour increments via a thumbwheel control and allows operator to set
maximum speed and acceleration/deceleration rates
• ProtoSmoke® Variable Output Control - Controls how much smoke each engine
outputs and matches smoke to locomotive speed
•
Locomotive Lighting Control - Controls locomotive headlights, marker and
interior lights, beacon lights, ditch lights, and MARS lights
• Emergency Stop-Single button push stops all Proto-Sound 2.0 trains but does not
turn off the power
• One Touch Global Mute/UnMute-Single button mutes or unmutes all
DCS-controlled locomotives' user-defined actions, including sound, lights, and
smoke
• Proto-Dispatch Operation-Public Address-like feature allows users to speak
through locomotive speaker during operation
• Proto-Cast-Allows users to play audio recordings through locomotive speaker
during operation
• Proto-Doppler Sound Effects Set Up-Users can configure locomotive for
Doppler Operation, including setting distance points for Doppler start, repeat,
and stop modes
• Independent Volume Control of Engine Sounds, Bell, Horn & Whistle for each
Locomotive
• Control up to 50 different DCS-Equipped Locomotives at one time with multiple
TIUs
Proto-Effects™ Set Up-User can select individual Proto-Effects™ operations to
•
be active or inactive, including cab chatter, train wreck sounds, coupler sounds,
and wheel clickety-clack sounds
Direction Control Set Up-User can set initial individual start-up direction (start
•
in forward or reverse) for double-heading operations
• Locomotive Consist Set-up-User can determine locomotive values for consist
make-ups, allowing multiple locomotives belonging to a consist to operate
together
24 Premier Big Boy Steam Locomotive

Service & Warranty Information
How to Get Service Under the Terms of the Limited One-Year Warranty
For warranty repair, follow the instructions below to obtain warranty service.
First, e-mail, write, call or fax an Authorized M.T.H. Service Center in your area or M.T.H. Electric Trains to obtain Repair
Authorization. You can find the list of Authorized Service Centers on the M.T.H. website, www.mth-railking.com. Authorized
Service Centers are required only to make warranty repairs on items sold from that store; all other repairs may or may not be done
at the store's own discretion. Otherwise, contact M.T.H. (fill out the Service Contact form in the Service Section of www.mth-
railking.com; send US mail to the address listed below; tel: 410-381-2580; fax: 410-423-0009), stating when the item was
purchased and describing the problem. If you contact M.T.H., you will be given a return authorization number to assure that your
merchandise will be properly handled upon its receipt.
CAUTION: Make sure the product is packed in its original factory packaging including its foam and plastic wrapping material so
as to prevent damage to the merchandise. The shipment must be prepaid and we recommend that it be insured.
including your name, address, daytime phone number, e-mail address (if available), Return Authorization number, a copy of
your sales receipt and a full description of the problem must be included to facilitate the repairs. Please include the description
regardless of whether you discussed the problem with a service technician when contacting the Service Center or M.T.H. for
your Return Authorization.
lease make sure you have followed the instructions carefully before returning any merchandise for service.
P
A cover letter
Limited One-Year Warranty
All M.T.H. products purchased from an Authorized M.T.H. Train Merchant are covered by this warranty.
See our website at or call 1-888-640-3700 to identify an Authorized M.T.H. Train Merchant near you.
M.T.H. products are warrantied for one year from the date of purchase against defects in material or workmanship, excluding wear
items such as light bulbs, pick-up rollers, batteries, smoke unit wicks, and traction tires. We will repair or replace (at our option)
the defective part without charge for the parts or labor, if the item is returned to an Authorized M.T.H. Service Center or M.T.H.
Electric Trains within one year of the original date of purchase. This warranty does not cover damages caused by improper care,
handling, or use. Transportation costs incurred by the customer are not covered under this warranty.
Items sent for repair must be accompanied by a return authorization number, a description of the problem, and
original sales receipt from an Authorized M.T.H. Train Merchant
item to M.T.H., fill out the Service Contact form in the Service Section of www.mth-railking.com; send US mail to the address
listed below; call 410-381-2580, or fax 410-423-0009 to obtain a return authorization number. If you are sending this product to an
Authorized Service Center, contact that Center for their return authorization.
This warranty gives you specific legal rights, and you may have other rights that vary from state to state.
Service Department
M.T.H. Electric Trains
7020 Columbia Gateway Drive
Columbia MD 21046-1532
www.mth-railking.com
, which gives the date of purchase. If you are sending the
a copy of the
Premier Big Boy Steam Locomotive 25

AUTHORIZED SERVICE CENTER
7020 Columbia Gateway Dr. - Columbia, MD 21046
Information: 410-381-2580 Fax: 410-381-6122
PARTICIPATING N.A.S.C.
CANADA
TOY TRAIN WORKSHOP
CUMBERLAND
613-833-8331
THE TRAIN ROOM
FERGUS
519-787-3280
CALIFORNIA
TIN PLATE JUNCTION
OAKLAND
510-444-4780
COLORADO
MIZELL TRAINS INC
WESTMINSTER
303-429-4811
CONNECTICUT
NEW ENGLAND HOBBY
SUPPLY
MANCHESTER
860-646-0610
FLORIDA
ROUNDHOUSE SOUTH
PORT ORANGE
386-304-7002
MARYLAND
PLAZA HOBBY
CUMBERLAND
301-729-6424
ENGINE HOUSE HOBBIES
GAITHERSBURG
301-590-0816
www.mth-railking.com
RETAILER LIST
CATOCTIN MOUNTAIN TRAINS
& HOBBIES
THURMONT
301-694-8331
MICHIGAN
MICHIGAN MODEL TRAIN
CENTER
PINCKNEY
734-426-1651
BRASSEUR ELECTRIC TRAINS
INC.
SAGINAW
989-793-4753
NEW HAMPSHIRE
TREASURED TOYS
SALEM
603-898-7224
NEW YORK
AURORA RAILS & HOBBIES
EAST AURORA
716-652-5718
OHIO
DAVIS ELECTRONICS
MILFORD
513-831-6425
RICK'S TOY TRAINS
TOLEDO
419-478-0171
PENNSYLVANIA
BUSSINGER TRAINS
AMBLER
215-628-2366
FAIRCHANCE PHARMACY
FAIRCHANCE
724-564-7817
TOBY TYLER'S HOBBY
CENTER
PITTSBURGH
412-653-5030
VIRGINIA
LOCUST GROVE TRAINS
LOCUST GROVE
540-854-8955
DAVIS HOBBY SUPPLIES
PORTSMOUTH
757-397-1983
T S G HOBBIES
WARRENTON
540-347-9212
WISCONSIN
SOMMERFELD'S TRAINS
BUTLER
262-783-7797
GRAMPA'S TRAIN SHOP
RICE LAKE
715-234-2996
26 Premier Big Boy Steam Locomotive

AUTHORIZED SERVICE CENTER
7020 Columbia Gateway Dr. - Columbia, MD 21046
Information: 410-381-2580 Fax: 410-381-6122
PARTICIPATING A.S.C.
CANADA
TOY TRAIN WORKSHOP
CUMBERLAND
613-833-8331
THE TRAIN ROOM
ERGUS
519-787-3280
CREDIT VALLEY RAILWAY
COMPANY
STREETSVILLE
905-826-1306
B H TRAINS
TERREBONNE
450-492-0317
ALABAMA
SOUTHERLAND STATION
HUNTSVILLE
256-533-4720
LIL' BOBBY'S HOBBIES
MONTGOMERY
334-277-1715
ARIZONA
ARIZONA TRAIN DEPOT
MESA
480-833-9486
CALIFORNIA
CENTRAL COAST TRAINS
ATASCEDERO
805-466-1391
TRAIN SHACK
BURBANK
818-842-3330
ROUNDHOUSE
NORTH HOLLYWOOD
818-769-0403
www.mth-railking.com
RETAILER LIST
DOLLHOUSES TRAINS & MORE
NOVATO
415-883-0388
TIN PLATE JUNCTION
OAKLAND
510-444-4780
RON'S WORLD
SAN CLEMENTE
949-361-5596
TRUCKS & TRAINS HOBBIES
SANTA ROSA
707-537-6586
COLORADO
CUSTOM RAILWAY SUPPLY
COLORADO SPRINGS
719-634-4616
CABOOSE HOBBIES
DENVER
303-777-6766
MIZELL TRAINS
WESTMINSTER
303-429-4811
CONNECTICUT
NEW ENGLAND HOBBY
SUPPLY
MANCHESTER
860-646-0610
FLORIDA
HOLLYWOOD STATION
HOLLYWOOD
954-921-2700
DEPOT HOBBY SHOP
LAKE WORTH
561-585-1982
READY TO ROLL
MIAMI
305-688-8868
FRANK'S TRAINS & HOBBIES
OLDSMAR
813-855-1041
COLONIAL PHOTO & HOBBY
ORLANDO
407-841-1485
WARRICK CUSTOM HOBBIES
PLANTATION
954-370-0708
ROUNDHOUSE SOUTH
PORT ORANGE
386-304-7002
ILLINOIS
BIKE & CHOO CHOO
CONNECTION
SCHAUMBURG
847-882-7728
INDIANA
Y. O. R. K. TRAINS
MUNSTER
219-838-9999
SAMUELSON'S TRAIN SHOP
VALPARAISO
219-462-2708
IOWA
CABOOSE STOP HOBBIES
CEDAR FALLS
800-642-7012
KENTUCKY
L&N TRAINS & THINGS
LOUISVILLE
502-897-9005
LOUISIANA
AMERICA'S TRAIN YARD
BATON ROUGE
225-926-5592
Premier Big Boy Steam Locomotive 27

MAINE
WHEELS, WINGS & THINGS
TREASURED TOYS
AMERICANA STORE
LUDLOW
207-532-6277
MARYLAND
PLAZA HOBBY
CUMBERLAND
301-729-6424
HOBBYTOWN U S A
FREDERICK
301-694-7395
ENGINE HOUSE HOBBIES
GAITHERSBURG
301-590-0816
J & B TRAINS
HAGERSTOWN
240-420-4930
THE TRAIN ROOM
HAGERSTOWN
301-745-6681
PURKEY'S TOY TRAINS
SYKESVILLE
410-549-6061
CATOCTIN MOUNTAIN TRAINS
& HOBBIES
THURMONT
301-694-8331
MASSACHUSETTS
NORTHEAST TRAINS
PEABODY
978-532-1615
EAST BAY HOBBIES
SEEKONK
508-336-5573
MICHIGAN
MICHIGAN MODEL TRAIN
CENTER
PINCKNEY
734-426-1651
BRASSEUR ELECTRIC TRAINS
INC.
SAGINAW
989-793-4753
MISSOURI
SWITCH STAND
SAINT LOUIS
314-781-4458
MARK TWAIN HOBBY CENTER
ST. LOUIS
636-946-2816
NEVADA
RENO RAILS
RENO
775-337-6669
NEW HAMPSHIRE
RAILROAD SPECIALTIES
NASHUA
603-801-0801
SALEM
603-898-7224
NEW JERSEY
COUNTRY AND STUFF
ANDOVER
973-786-7086
COLUMBUS TRAIN STATION
COLUMBUS
609-518-1800
ATLANTIC RAILS
HAMMONTON
609-567-8490
GRAND CENTRAL STATION
KEARNY
201-955-6200
J & B TRAINS, INC.
MAPLE SHADE
856-414-0092
HOBBY SHOP
MATAWAN
732-583-0505
HOBBYMASTERS, INC
RED BANK
732-842-6020
RIDGEFIELD HOBBY
RIDGEFIELD
201-943-2636
TOM’S MODEL TRAINS
SCOTCH PLAINS
908-322-6122
TRAINS & THINGS
TRENTON
609-883-8790
COAST TRAINS AND
COLLECTIBLES
WALL
732-556-9005
HOLLY BEACH TRAIN DEPOT
WILDWOOD
609-522-2379
NEW YORK
AURORA RAILS & HOBBIES
EAST AURORA
716-652-5718
NASSAU HOBBY CENTER, INC.
FREEPORT
516-378-9594
HOBBY WORLD
MONTICELLO
845-794-8770
CITY DEPOT, INC.
NEW HAMPTON
845-374-3010
SCAG’S ELECTRIC TRAINS
STATEN ISLAND
718-727-7373
TIVOLI
845-757-4246
KROSS HARDWARE
WEST BABYLON
631-669-3069
NORTH CAROLINA
THE ROUNDHOUSE &
BACKSHOP
CARY
919-465-0810
TRAINS LTD.
CHARLOTTE
704-566-9070
DRY BRIDGE STATION
MOUNT AIRY
336-786-9811
THE FREIGHT YARD
SMITHFIELD
919-934-6229
TRAIN LOFT
WINSTON-SALEM
336-760-9817
OHIO
GLEN'S TRAIN SHOP
AKRON
330-253-6527
E & S TRAINS
AKRON
330-745-0785
T & K HOBBY SHOP
BRIDGEPORT
740-633-6607
PARMA HOBBY
CLEVELAND
216-741-6440
SANDY'S HOBBY'S &
COLLECTIBLES
ELYRIA
440-365-9999
HUDSON TOY, TRAIN &
HOBBY
HUDSON
330-653-2997
CLEARVIEW TRAIN & HOBBY
LORAIN
440-277-4488
DIXIE UNION STATION
MASON
513-459-0460
DAVIS ELECTRONICS
MILFORD
513-831-6425
28 Premier Big Boy Steam Locomotive

TRAINS-N- THINGS
NORTH CANTON
THE STATION
CHESTERFIELD HOBBIES
330-499-1666
GRAND PACIFIC JUNCTION
OLMSTEAD FALLS
440-235-4777
RICK'S TOY TRAINS
TOLEDO
419-478-0171
ERIE RAILWAY DEPOT
TROY
937-440-9972
PENNSYLVANIA
AMERICAN HOBBY CENTER
ALIQUIPPA
724-378-3930
ALLENTOWN TOY TRAIN
SERVICE
ALLENTOWN
610-821-0740
ON THE RIGHT TRACK
ALTOONA
814-942-4345
BUSSINGER TRAINS
AMBLER
215-628-2366
JIM’S HOBBY SERVICE
BERWICK
570-759-2695
YE OLDE TRAIN & CHRISTMAS
SHOPPE
BOYERTOWN
610-369-0755
NICHOLAS SMITH
BROOMALL
610-353-8585
CHARLEROI SWEEPER
CENTER
CHARLEROI
724-483-3397
CRANBERRY HOBBY DEPOT
CRANBERRY TWP
724-776-3640
FAIRCHANCE PHARMACY
FAIRCHANCE
724-564-7817
TOY TRAIN STATION
FEASTERVILLE TREV
215-322-5182
THE CABOOSE
LEHIGHTON
570-386-5352
HOBBY CITY
MC MURRAY
724-942-2557
NEW CUMBERLAND
717-774-7096
FRYER'S STORE
ORWIGSBURG
570-366-2258
CHESTNUT TOYBOX
PHILADELPHIA
215-545-0455
TOBY TYLER'S HOBBY
CENTER
PITTSBURGH
412-653-5030
WILCOX GREENHOUSE &
NURSERY
TITUSVILLE
814-827-3823
EASTERN DEPOT
TROY
570-297-1975
J&J RAILROAD CROSSING
TURTLE CREEK
412-824-6009
TRAINS R FUN
LEESBURG
703-779-8600
SOUTH CAROLINA
EMERALD TRAIN & HOBBY
GREENWOOD
864-223-2247
TENNESSEE
MODEL RAILROAD & HOBBY
SHOP
MEMPHIS
901-384-6500
TEXAS
HOBBY TIME
AMARILLO
806.352.9660
RIVERVIEW TRAINS
ANGLETON
979-848-3895
GREAT TRAINS & HOBBIES
LONGVIEW
903-757-2720
VIRGINIA
LEESBURG HOBBIES
LEESBURG
703-779-8600
LOCUST GROVE TRAINS
LOCUST GROVE
540-854-8955
TRAIN DEPOT
MANASSAS
703-335-2216
MIDLOTHIAN
804-379-9091
DAVIS HOBBY SUPPLIES
PORTSMOUTH
757-397-1983
TOY TRAIN CENTER
RICHMOND
804-288-4475
NUTBUSH EXPRESS
VICTORIA
434-696-1902
T S G HOBBIES
WARRENTON
540-347-9212
NORGE STATION
WILLIAMSBURG
757-564-7623
WASHINGTON
EASTSIDE TRAINS
KIRKLAND
425-828-4098
WEST VIRGINIA
PATRICK'S TRAINS
WHEELING
304-232-0714
WISCONSIN
WOODCRAFTERS SHOP
BURLINGTON
262-763-5239
SOMMERFELD'S TRAINS
BUTLER
262-783-7797
HOBBY OUTLET
FOND DU LAC
920-924-3770
G B T V & TRAINS
GREEN BAY
920-496-9697
GRAMPA'S TRAIN SHOP
RICE LAKE
715-234-2996
THE TRAIN STORE
WAUKESHA
262-650-6675
Premier Big Boy Steam Locomotive 29
 Loading...