

Page 1

www.plusdeck.com
user's guide
Ellim B/D 380-12, Seokyodong, Mapogu,
Seoul, Korea, 121-839
Tel : +82-2-337-2601
Fax : +82-2-332 - 4476
Page 2

Introduction of Plusdeck
A product which enables all the Cassette Deck's function on PC.Operated all of functions
of cassette deck in PC
- Records all the sounds from PC onto Tape
- Records MP3 files, and all the internet streaming from PC onto Tape
- Use general cassette audio. Can be used all the audio.
- Hi quality record/playback as Hi-Fi audio.
- Play tape on PC/Converting sound from PC into MP3 files
- Records all kinds of sound sources on Cassette Tape.
- Records sounds from Internet contents - Web learning, Internet Radio,
Flash movie, etc onto Tape
- Records CD sound onto Cassette Tape
- Dub voice with mic on Tape
1
Now, you can listen all the PC sound from wherever you want
suggestions for installation or usage
If any of the parts are missing or defective, call 080-337-2601 or contact our retailer.
Please consult your manual for precise installation and your safety.
Please visit our web site www.plusdeck.com for more detailed explanation and
updated news.
(The contents of manual would be changed without notice for improvement.)
It's not permitted to change and copy the manual without previous agreement with
BTO Co.,Ltd
Page 3

The parts
Plusdeck bracket 20pin cable
mini-to-mini audio cable 3EA com port serial cable Bolts
2
Software Diskette maunal.
OS support
- MS window 95/98/ME, MS Windows NT 4.0/2000/XP
System requirements
- Pentium 133Mhz or higher CPU
- System memory 16MB or higher
- 1 Slot 5.25 Bay / Soundcard ( or on board soundcard)
*
~
SPEC
Size (W H D) 145 40 215
Tape Speed 4.75cm/sec
Wow & Flutter 0.09%(WRMS)
Frequency Response 30~18,000Hz
Separation 40dB
Signal-to-Noise Ratio 55dB
Power Supply DC 12V / DC 5V
*
*
*
*
Page 4
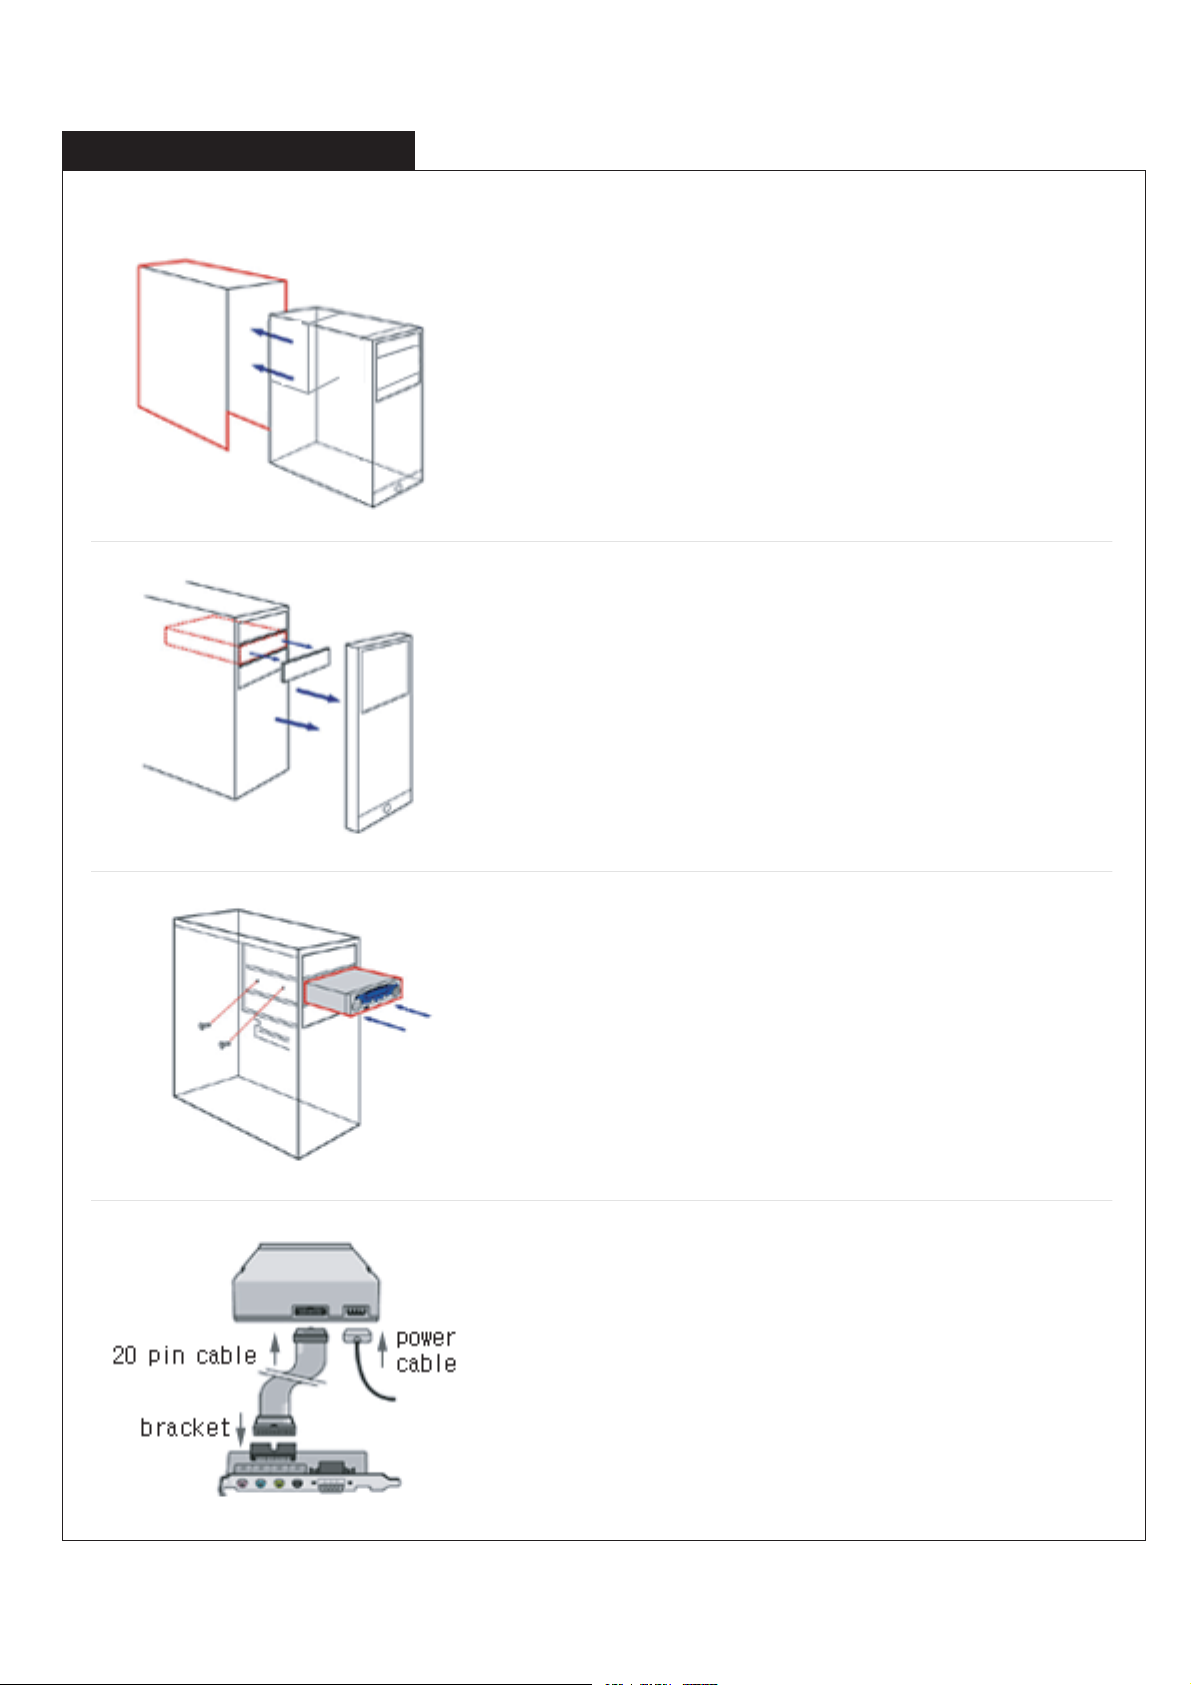
how to install hardware
3
1.Turn off the power on PC and seperate cover of PC
2. Remove the front panel from the bay that will hold the
Plusdeck(In some cases, you may have to remove
the whole front panel from PC)
3. Insert the Plusdeck in the empty space refer to manual
and fix it with included bolt
4. Connect the power cable from PC to the back of
Plusdeck, And connect the Plusdeck and Bracket
with included 20 pin cable.
Page 5

5. Put bracket in empty slot and screw down.
6. Connect the cable of speaker(headphone) to black
jack on bracket.
4
7. Connect the Soundcard of PC to installed bracket by
with included audio cables (You can connect them
with color coding) and connect the serial port with
included serial cable.(If the jack of sound card doesn't
have color coding on jacks, please connect sound
card's Line In with Plusdeck's Line Out, sound card's
Line Out with plusdeck's Line In, sound card's Mic with
plusdeck's Mic jack)
notice : You can connect green cable with orange
speaker out jack if sound card doesn't have
green line-out jack
8. Reassemble Pc and turn on power to install the
software.
Page 6

Installation of Software
To install software, insert included software diskette and run setup.exe on A drive
To run software, double click on icon of screen or select program on Start menu
Confirmation
It is correctly connected if you can hear sound from sound card and playback of Tape
If you can't listen any sound from PC, you may have disabled line-in input on sound control
or wrongly connected audio cables(7.)
5
Notice
If you register your Plusdeck product at www.plusdeck.com, you can get more information
and updated software for free
.
Page 7

Basic Function
num icon function description
6
H/W
S/W
1
2
3
4
5
6
7
8
9
10
11
12
13
14
15
16
17
APlay
BPlay
Pause
Stop
Record
Fast-forwarding
Fast-rewinding
Eject
Headphone
MIC
Volume control
Operation indicator
Operation indicator
Reverse Mode
Plusdeck
Record
REC.LIST
Playback A side
Playback B side
Pause playback or recording
Stop operation of deck.
Ready to record on tape, after choosing the direction
or recording begins
Rewinding tape to the beginning of A side/
fast-forwarding tape to the end of B side
Fast-forwarding tape to the end of A side/ Rewinding
tape to the beginning of A side
Eject tape from Plusdeck or insert tape into Plusdeck
Headphone jack (If connected, sound will hearable
only by headphone)
It's possible to dub and to record voice on tape to
connect a microphone.
Volume control for headphone.
Operation indicator on Plusdeck (2 colors, 3 LED)
Operation indicator on Software
Auto reverse mode selector.(Single-side playback,
Loop playback, Continuous Playback)
Link to www.plusdeck.com
The function of 5 is same as
The function to record the stored MP3 in computer
18
19
20
To File
Volum
Close
in regular order
Encoding a tape into MP3
Volume control for playback.
Exit from the software
Page 8

Extra Function
7
REC. LIST (Tape recording wizard for recording
MP3 on tape in desired order)
21. Tape selection : Select type of tape as your
desired recording time.(60 minutes, 90 minutes,
120 minutes)
22. A Add: Add music file to side A of tape
23. B Add: Add music file to side B of tape
24. Play Time Counter: The front part indicates
estimated recording time of selected music,the
last is a available recording time on tape
25. Displaying selected music file lists on each side.
(The music files of each side can be freely moved
by drag and drop)
26. Before start recording, you can rewind a tape
to ready for recording and adjust the recording
volume on this button
27. You can insert 3 seconds mute between music
files or save recording file list into txt file
28. Start to record selected files on tape
To File (Converting sounds of tape into digital file)
31. Converting sound from tape into digital file.
(Default: wav)
32. Stop converting
33. Pause encoding the sound
34. Playing converted file.
35. Converting WAV to MP3 file.
You can select bitrate by clicking the right button
of mouse.
36. Converting WAV to mp3 file.
(It will be available from next version.)
Sound set-up
1. The recording quality of tape can be affected by volume of master and Line-input.
(The volume of speaker will not affect the recording quality of tape )
Before start important recording, please make sure you have set the optimal volume
set-up through the test.
- Double click on icon of speaker, then adjust the master volume and Line- input volume between
50 ~70% level.
- Too high or low volume on in/output could harm sound quality. The optimal setup of volume is varied
by PC or sound card.
Page 9

8
(Ex: You should disable special 3D Effect, such as Stereo wide, and 3D depth.)
2. In case of some sound card, you may need to change sound card option to
prevent distort of recording sound.
(For more information, please visit our web site www.plusdeck.com.)
Page 10

3. To convert sound from tape into digital file, you have to select Line-input as a recording
input (: Preference Record Select Line-input Check Adjusting recording)
9
TIP : If you set Windows sound setting as 'no sound', you can prevent accidentally recording
windows' sound effect on tape : Start Control panel Sounds and multimedia
Page 11

How to use
Listening the tape
Recording on a tape
10
1. Insert a tape into Plusdeck.
2. Press Play of the direction that you'd like to listen
3. If you want to listen the other side, press the Play button of other side.
1. Insert a tape into Plusdeck.
The upper side of tape will be recognized as A side.
2. Press the Record button, then press the desired direction ( , ) when you start
(Press button when you record A side of tape)
3. Recording will be done as selected reverse mode
4. Press sign to stop recording. Press to pause recording
Tape recording wizard for recording MP3 on tape in desired order
(Warning: It should be installed Winamp on PC)
1. Run the Plusdeck software
2. Press the Rec. List button.
3. Select type of tape as your desired recording time.
(60 minutes, 90 minutes, 120 minutes)
4. Select file to record on A side by press A Add button
5. Estimated recording time of selected music will be shown in playing time
counter (estimated time/recording capacity of a tape side)
6. Select file to record on A side by press A Add button.
7. If needed, change order or files by drag and drop of files.
8. When you press Start, selected files will be automatically start playing and
recording on tape will be begin.
Tip : Check: The function is to confirm the tape condition before recording. It also is
available to tape rewind and the volume check of record.
Option: Auto gap : Automatically insert 3 seconds mute between files
Save file list : Save selected file list into text file.
Page 12

To convert tape sound into digital file.
1. Run Plusdeck software.
2. Press To File button on software.
3. When you press Record button, tape will start playing and converting
to wav. will begin.
4. When you press Stop or Pause, it will stop or pause playing and
converting music.
5. Create new name of converted file. (Default: WAV)
6. press 35 to reconvert MP3
Tip : By pressing MP3 button, you can convert WAVE file into MP3 file
You can select bitrate of MP3 by clicking the right button of mouse
The function of Play is to listen to digital file.
11
Page 13

G
G
G
G
G
G
G
G
G
G
G
 Loading...