

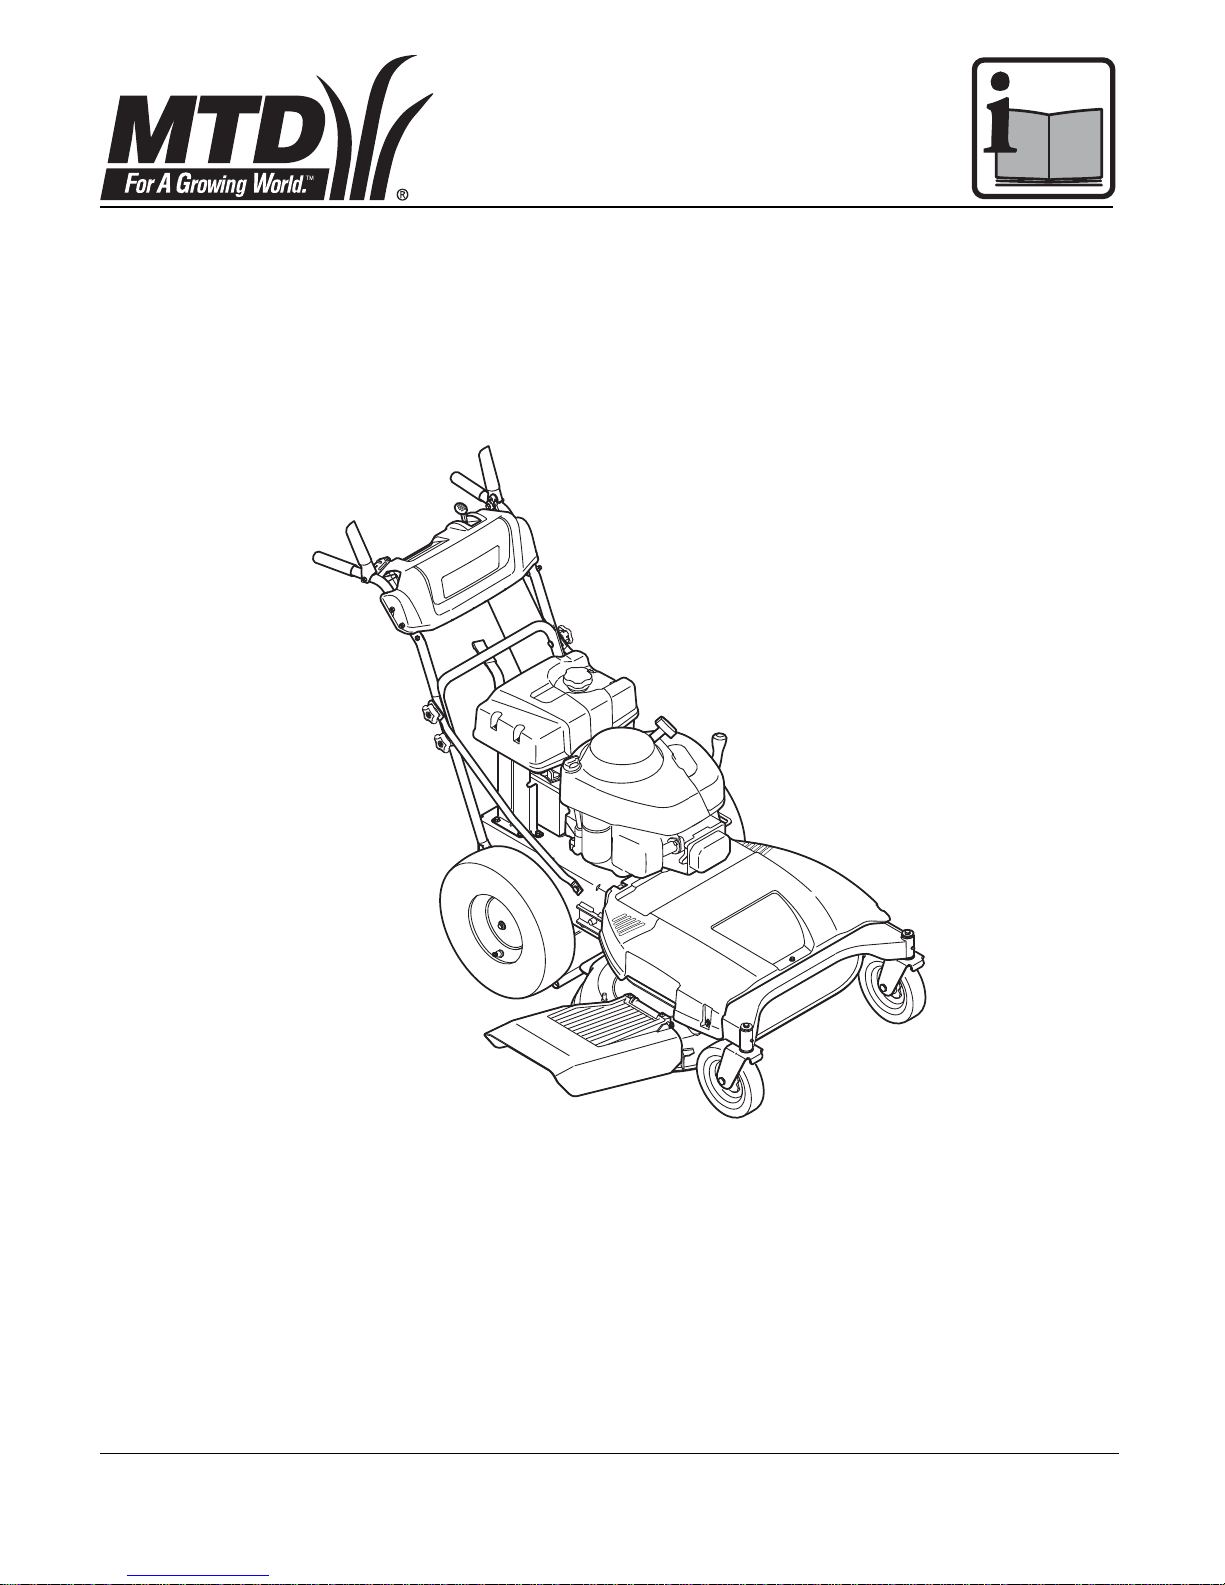
Page 1
jqa=mкзЗмЕнл=^внбЙеЦЙлЙддлЕЬ~Сн=√=p~~êÄêΩÅâÉå=√=dÉêã~åó
J 16
FORM NO. 769-03386E
Page 2

Page 3
1
2
3
4
5
6
Page 4
HEIGHT ADJUSTER
HL
GO
BLADE
CONTROL
1
2
GO
DRIVE
CONTROL
R N 1 2 3 4
1
2
3
4
5
6
7
8
7
8
9
12a
12b
10
11
13 14
Page 5
1.
2.
3.
2.1.2.
1.
15
17
16
19
18
20
Page 6

Page 7

English
(Original operating instructions)
Français
(Notice d'instructions d'origine)
Deutsch
(Originalbetriebsanleitung)
Nederlands
(
Originele gebruiksaanwijzing
)
Español
(lnstrucciones de funcionamiento originales)
Dansk
(Originale driftsvejledning)
Slovensko
(lzvimo navodilo za obratovanje)
Hrvatski
(Originalna uputa za rad)
Srpski
(Originalno uputstvo za rad)
Polski
(Oryginalna instrukcja obslugi)
8
19
31
43
54
66
76
87
98
109
Page 8

English Operating instructions – Lawn mower with combustion engine
8
Contents
For your safety . . . . . . . . . . . . . . 8
Assembling the appliance . . . . 10
Operating and display
elements . . . . . . . . . . . . . . . . . . 11
Operation . . . . . . . . . . . . . . . . . 12
Tips on lawn care . . . . . . . . . . . 14
Transporting . . . . . . . . . . . . . . . 15
Cleaning/servicing . . . . . . . . . . 15
Shutting down the unit . . . . . . . 16
Warranty . . . . . . . . . . . . . . . . . . 16
Engine . . . . . . . . . . . . . . . . . . . 16
Troubleshooting . . . . . . . . . . . . 17
Information on the
identification plate
These details are very important as
they will not only be needed for
identifying your mower when
ordering replacement parts but
they will also be required by Customer Service. You will find the
identification plate in the vicinity of
the engine. Enter all the details on
your mower’s rating plate in the
following fields.
This and other information on the
appliance can be found on the
separate CE Declaration of
Conformity which is a component
of these operating instructions.
Illustrations
Fold out the illustrated pages at the
start of the operating manual.
For your safety
Use the appliance properly
This appliance is approved solely
for use
– in accordance with the
descriptions and safety
instructions specified in this
user's guide
– to mow the lawns of domestic
and leisure gardens.
Any other use is not as intended.
The user is liable for all injuries to
third parties and damage to their
property.
Unauthorised changes to the
mower exclude liability of the
manufacturer for any resulting
damage and/or injury.
Observe the safety and
operating information
As the user of this appliance,
carefully read these operating
instructions before using the
appliance for the first time. Comply
with the operating manual and
keep it for subsequent use. Never
allow children or other people who
do not know this operating manual
to use the mower.
If the mower changes ownership,
hand over the operating manual.
General notes on safety
In this section you will find general
information about safety. Warnings
that apply specifically to individual
parts of the mower, functions or
activities are shown at the corresponding point in this user's guide.
Before working with the mower
Persons who use the mower must
not be under the influence of intoxicants, e.g. alcohol, drugs or
medication.
Do not permit children under the
age of 16 to handle this mower or
perform other tasks such as maintenance, cleaning, adjustment
(local regulations may specify the
minimum age of the user).
Before starting work, familiarise
yourself with all the equipment and
controls as well as their functions.
All persons involved in bringing into
service, operation or maintenance
of the mower must be appropriately
qualified. Do not use the mower if
you have not received appropriate
training or are tired or ill.
Store fuel in permitted containers
only and never near heat sources
(e.g. cooker or hot water tank).
Refuel the mower outdoors only.
Never refuel the mower while the
engine is running or hot.
Replace a damaged exhaust, tank
or tank cap.
Before using the appliance,
– check that the grass catcher
attachment (optional) functions
and the discharge flap closes
properly. Replace damaged,
worn out or missing parts
immediately.
– check for any wearing or damage
to the cutters, fastening pins, and
the whole cutter unit. Have worn
or damaged parts replaced by a
specialist company and only in
sets to exclude imbalances.
Spare parts must fulfil the requirements laid down by the manufacturer. You should therefore only
use original spare parts or those
which have been approved by the
manufacturer. The use of spare
parts or accessories not approved
by the manufacturer can represent
a significant safety risk.
Ensure
repair, maintenance and the
replacement of safety element is
performed by a technician or
appoint a specialist workshop to
perform the work. Ensure maintenance work is always performed
to schedule so that the mower
remains in a safe condition.
Page 9

Operating instructions – Lawn mower with combustion engine English
9
When working with the mower
When working with or on the
appliance you must wear protective
clothing. This includes:
– safety shoes,
– trousers,
– tightly fitting clothing,
– protective goggles.
– Ear protection
Wearing of personal protective
equipment reduces the risk of
injuries. Avoid the wearing of loose
clothing or clothing with hanging
cords or belts. Working without ear
protection may result in loss of
hearing.
All safety devices must be installed
on the appliance, and they must be
complete and in a fully functional
condition.
Do not make any changes to the
safety devices.
Operate the mower only in the
technical condition stipulated and
delivered by the manufacturer.
Avoid open fire, formation of
sparks, and do not smoke.
Before carrying out any work on
this mower
To avoid injury before doing any
working on the mower (e.g. repair
work and adjustments) and before
transporting it (e.g. lifting or carrying):
– switch OFF the engine,
– remove the ignition key (if used),
– wait until all moving parts have
come to a complete stop and
the engine has cooled down,
– remove the spark plug connector
on the engine in order to prevent
the engine from accidentally
being started.
– which takes into account
additional safety information in
the engine manual.
After working with the mower
Never leave the appliance without
switching off the engine and – if
used – without removing the
ignition key (on the dashboard).
Safety devices
Danger
Never use an appliance if it has
damaged safety devices or if there
are no safety devices fitted. These
must be repaired or replaced by a
technician or specialist workshop.
Clutch lever for the cutter deck (3)
Fig. 7
The cutter deck drive switches off if
the user releases this clutch lever.
There must be no attempt to
circumvent this function, which is
crucial for your personal safety.
Clutch lever for the travel drive (7)
Fig. 7
The travel drive switches off if the
user releases this clutch lever.
There must be no attempt to
circumvent this function, which is
crucial for your personal safety.
Discharge flap
Fig. 19
It provides protection against
injuries that could be caused by the
cutting blade(s) or any solid objects
that might be thrown out. The
appliance may be operated with the
discharge flap only.
Symbols on the mower
On the mower you will find various
symbols on adhesive labels. They
have the following meanings:
Caution! Before switching on the unit,
read the operating
instructions!
Keep third parties out
of the danger area!
Before working on the
cutters, remove the
spark-plug connector!
Keep fingers and feet
away from the cutters!
Always switch off the
mower and remove
the spark plug connector before
adjusting, cleaning or
checking it.
Never put your hands
and/or feet in the
vicinity of rotating
parts.
Risk of injury by
losing your footing –
do not work in wet or
damp conditions.
Injury hazard due to
grass or solid objects
thrown out by mower.
Keep people, in par-
ticular children, and
animals away from
the area in which the
mower is being used.
Working on steep
slopes can be
dangerous.
Caution!
Danger of explosion.
Battery acid/
Risk of chemical
burns.
!
Page 10

English Operating instructions – Lawn mower with combustion engine
10
Before beginning any
work on this mower,
remove the ignition
key and observe all
information contained
in these instructions.
Ensure these symbols mounted on
the mower remain legible.
Symbols in the operating
instructions
The following symbols are used in
these operating instructions:
Danger
Draws your attention to sources of
potential danger associated with
the task you are undertaking at the
time which constitute a danger to
persons.
Caution
Draws your attention to potential
hazards associated with the task
you are undertaking at the time
which could result in damage to
the mower.
Note
This indicates important information and application tips.
Location details
Where a position on, or in relation
to, the unit is described (e.g. left,
right), this is always from the perspective of the driver, sitting on the
driver seat and facing forward.
Note
Graphical representations can vary
in detail from the appliance which
has been bought.
Disposal instructions
Dispose of packaging remnants,
old mowers, etc., in accordance
with local regulations.
Assembling the appliance
Attaching the steering
handle
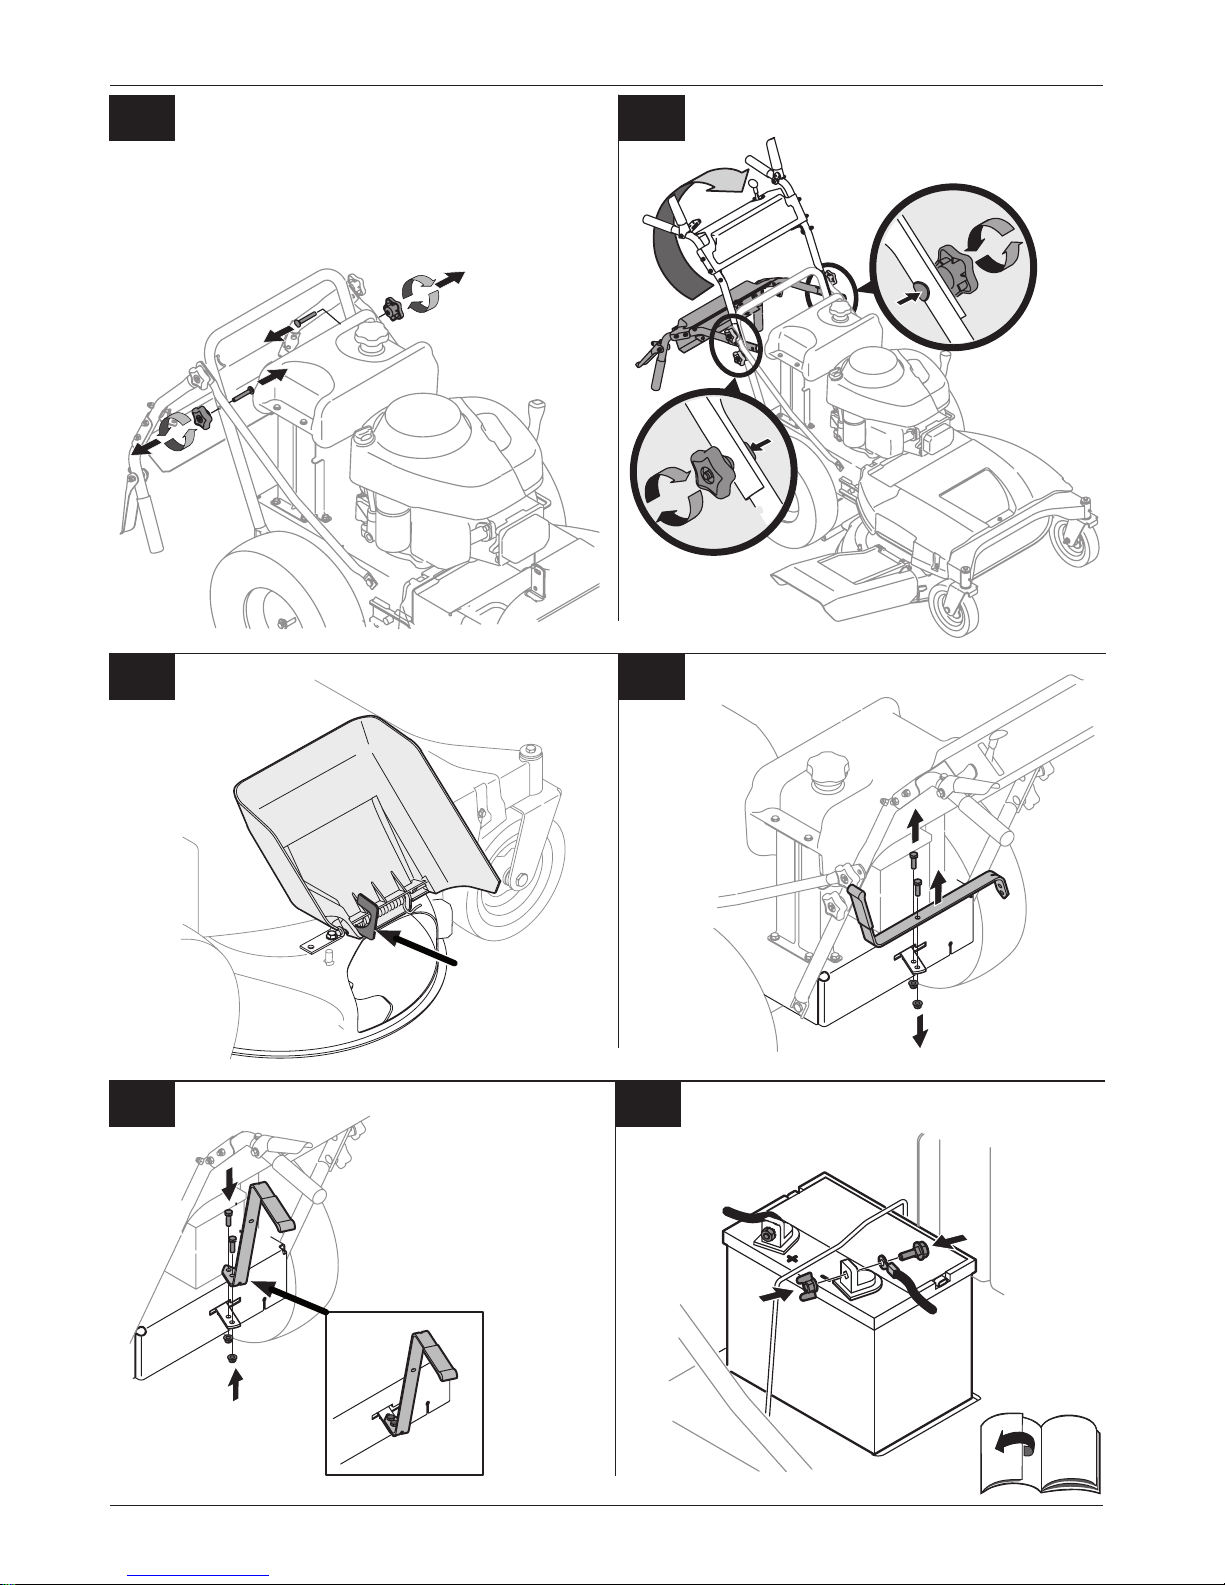
Figs. 1 and 2
Align the steering handle and
screw on tightly as illustrated in
figs. 1 and 2.
Remove transportation
safety device from the
discharge flap
Fig. 3
Remove safety plate or cable tie
(depending on model). The
deflector closes automatically.
Attaching the shift lever
Figs. 4 and 5
Remove bolts and nuts (Fig. 4).
Attach shift lever with bolts and
nuts (Fig. 5).
Preparing the battery
(Only appliances which feature an
electric starter)
Fig. 6
Danger
Risk of poisoning and injury from
battery acid
Wear safety goggles and protective
gloves. Do not allow battery acid to
come into contact with skin. If you
get battery acid on your face or in
your eyes, wash off immediately
with cold water and consult a
doctor.
If you accidentally swallow battery
acid, drink plenty of water and
consult a doctor immediately. Store
batteries out of the reach of
children. Never tilt the battery, as
battery acid may run out.
Bring the remaining, unused
battery acid to your dealer or to a
waste disposal company.
Caution
Risk of fire, explosion and
corrosion caused by battery acid
and gases emitted by battery acid
Immediately clean parts of the unit
splashed by battery acid. Battery
acid is corrosive.
Do not smoke, keep burning and
hot objects away. Charge batteries
in a well ventilated and dry room
only. There is a risk of a possible
short circuit when working with the
battery. Do not place any tools or
metal objects on the battery.
If a “maintenance-free/sealed”
battery is supplied (Type 1)
(battery without sealing plugs)
The battery is filled with battery
acid and sealed at the factory. But
even a “maintenance-free” battery
needs servicing to ensure it has a
certain service life.
Keep the battery clean.
Avoid tilting the battery.
Electrolyte liquid will run out of
even a “sealed” battery if it is
tilted.
If an unfilled battery is supplied
(Type 2)
(battery with sealing plugs)
Remove sealing plugs from the
battery cells.
Slowly fill each cell with battery
acid up to 1 cm below the filling
orifice.
Leave battery to stand for 30
minutes so that the lead can
absorb the battery acid.
Check the acid level and, if
required, top up the battery acid.
Before using the unit for the first
time, charge the battery with a
battery charger (maximum
charging current 12 volts, 6
amps) for 2–6 hours. After
charging the battery, first pull out
the battery charger plug, then
remove the battery (see also
operating instructions for the
battery charger).
!
Page 11

Operating instructions – Lawn mower with combustion engine English
11
Attach sealing plugs to the
battery cells.
Install battery in the appliance.
First connect the red cable (+),
then the black cable (–).
Top up the battery with distilled
water only (check every 2
months).
Keep the battery clean.
Caution
Disconnect and connect the battery
in the correct sequence.
Fitting:
First connect the red cable (+/
positive pole) and then the black
cable (–/negative pole).
Removal:
First disconnect the black cable (–
/negative pole) and then the red
cable (+/positive pole).
Operating and display
elements
Caution
Damage to the mower.
This first describes the control and
display functions. Do not execute
any of these functions yet!
Note:
The operating and control elements
of the engine are described in the
engine manual.
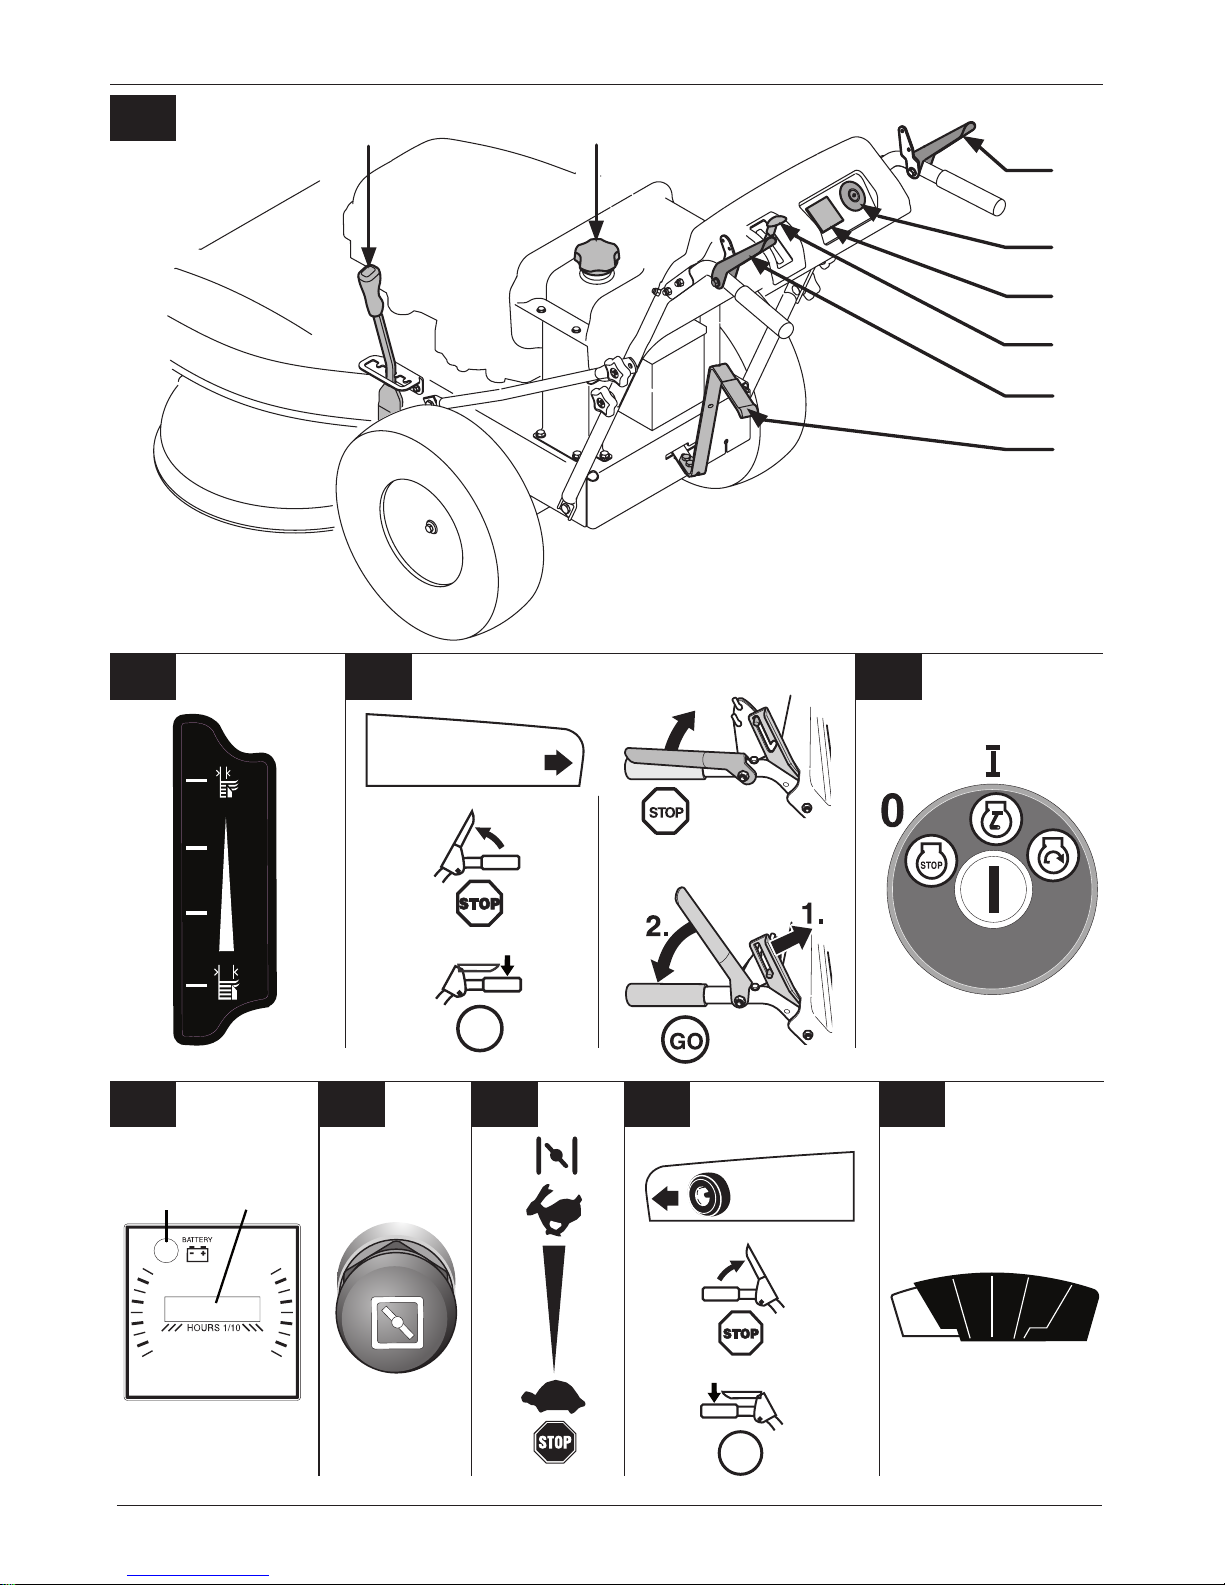
Fig. 7
1 Cutting height adjustment lever
2 Fuel tank
3 Clutch lever for cutter deck
4 Ignition lock (depending on
model)
5 Combination display
(depending on model)
6 Throttle/choke
7 Clutch lever for travel drive
8 Shift lever
Cutting height adjustment
lever (1)
Figs. 7 and 8
Highest cutting height – cutter deck
at top = lever on “H”
Lowest cutting height – cutter deck
at bottom = lever on “L”
Fuel tank (2)
Fig. 7
Is used to hold the fuel.
Clutch lever for the cutter
deck (3)
Figs. 7 and 9
Is used to switch the cutter deck on/
off.
Engage: Push the lock to the front
and hold, then press the lever down
and hold .
Disengage: Release lever .
Ignition lock (4)
(only appliance with electric starter)
Fig. 10
Starting: Turn key to the right
until the engine is running, then
release. Key is set to /I.
Stop = key to /0.
Display cluster (optional)
(only appliance with electric starter)
Fig. 11
According to the model, the
combination indicator can consist
of the following elements.
Battery charge display (1):
If the indicator light lights up when
the engine is running, this means
that the battery is not sufficiently
charged. Where necessary, visit a
garage.
Operating hours counter (2):
Indicates the operating hours in
hours and 1/10 hours on the
display.
Notes:
– When the ignition is switched on,
the battery voltage indicator is
indicated for a short period and
then the operating hours are
indicated. The operating hours
are always counted except for
when the ignition key is in the
“Stop” position or when it is
removed.
– Each time 50 operating hours
have elapsed (according to the
model), the oil change indicator
“CHG/OIL” appears in the display
for five minutes. This message
appears after the next two hours of
operation. See the engine manual
for oil change intervals.
Throttle/choke (6)
Throttle
Fig. 12b
Set engine speed continuously.
Fast engine speed = .
Slow engine speed = .
Stop engine = “Stop” / .
Choke (depending on model)
Figs. 12a and 12b
To start a cold engine, pull the
choke (12a) or set the throttle to
position (12b).
Clutch lever for travel
drive (7)
Figs. 7 and 13
Is used to switch the travel drive on/
off (when forward/reverse gear
engaged).
Switching on : Depress lever and
hold in position .
Disengage: Release lever .
Shift lever (8)
Figs. 7 and 14
Select direction of travel and
speed.
Forwards: Gears 1–4 for forward
travel
Neutral (N): Idling
Reverse (R): Reverse travel
Page 12

English Operating instructions – Lawn mower with combustion engine
12
Pull-starter handle
Fig.15
Is used to start the engine in
appliances which have no electric
starter.
Note:
Can also be used to start
appliances which feature an
electric starter. Set the ignition key
to position /I.
Operation
Also follow the instructions in the
engine handbook.
Danger
Accident
– No person, especially children,
and/or animals should be
allowed to stand close to the
appliance while it is in use. Risk
of injury due to ejected stones or
other objects.
Falling over
– Operate the vehicle at walking
speed only.
– Be particularly careful when
mowing in reverse and pulling
the appliance towards you.
– When mowing on steep slopes,
there is a risk of the appliance
tipping over and you could be
injured as a result. Mow
crossways to the slope, never
upwards and down-wards. Do
not mow on slopes with an incline
greater than 20%.
– Be particularly careful when
changing the direction and
always pay attention to a good
position.
– Mowing along perimeters
involves a risk of injury. Mowing
near edges, hedges, or steep
inclines is dangerous. Keep a
safe distance from perimeters
when mowing.
– If the ground is wet the appliance
could slip due to reduced traction
and overturn. Only cut the grass
when the ground is dry.
– Work only by daylight or in good
artificial lighting.
Injury
– Always observe the safety
distance to the rotating tool
specified by the steering handle.
– Never place your hands, feet,
or other parts of the body near
rotating parts.
– Turn off the engine and wait until
the blade has stopped:
– before tilting the appliance,
– for transporting over surfaces
other than grass,
– Switch off the engine and prevent
the engine from being started
unintentionally, remove ignition
key (if used) and remove spark-
plug terminal,
– before you clear the ejector of
blockages and other
hindrances,
– before you check, clean, or
configure the appliance or
perform any work on it,
– immediately after a foreign
object. Check the appliance for
damage, and have any
damage repaired at a
specialised garage;
– immediately after the appliance
starts to vibrate. With unusual
violence and before you check
the appliance.
– Never lift or carry the appliance
when the engine is running.
– Inspect the ground on which the
mower is going to be used and
remove any loose objects that
could be picked up and thrown
out again by the mower.
– If the cutter strikes a foreign
object (e.g. stone) or if the mower
starts vibrating unusually:
Immediately switch off the
engine.
Check the appliance for damage,
and have any damage repaired
at a specialised garage.
– When rotary mowing, never
stand in front of the grass
discharge openings.
– While the engine is running or
hot, do not check, inspect or
service/adjust the appliance.
– Only use the mower in dry
weather conditions. Keep the
mower away from rain or
dampness. If used on wet grass,
the mower may slip because of
reduced adhesion.
– Do not use the mower if it is
raining or there is a risk of
storms.
Appliances with grass catchers:
– If you remove the grass catcher,
you or other persons might get
injured due to ejected, mowed
materials or foreign bodies.
Never empty the grass sack
while the engine is running.
Switch off the appliance.
Danger of asphyxiation due to
carbon monoxide poisoning
Run the internal combustion engine
outdoors only.
Danger of explosion and fire
– Petrol vapours are explosive and
petrol is highly flammable.
– Fill with fuel before starting the
engine. Keep the tank closed
while the engine is running or still
hot.
– Before refuelling, switch off the
engine and wait until it has
cooled down. Avoid open fire,
formation of sparks, and do not
smoke. Refuel the unit outdoors
only.
– If fuel has overflowed, do not
start the engine. Remove unit
from the fuel-contaminated area
and wait until the fuel vapours
have evaporated.
– To avoid fire hazard, please keep
the following parts free of grass
and escaping oil:
–Engine
– Exhaust
– Batteries/storage batteries
– Petrol tank.
Tripping over
– Operate the mower at walking
speed only.
!
Page 13

Operating instructions – Lawn mower with combustion engine English
13
Caution
Damage to the lawn mower
– Stones, branches or similar
objects lying about may damage
the unit and its mode of
operation. Remove all objects
from the appliance’s path before
every use.
– Do not operate the mower if it is
not in perfect working order.
Before operating the unit, always
carry out a visual inspection.
Check in particular the safety
equipment, controls and
threaded connections for
damage and secure attachment.
Replace damaged parts before
operating the unit.
Operating times
Comply with the national/municipal
regulations concerning the times
when the mower may be used
(if required, contact your local
authority).
Fill up with fuel and check
the oil level
Note
The engine has already been filled
with oil at the factory – please
check the oil, if required refill.
Fill petrol tank with regular
unleaded petrol.
Fill fuel tank up to max. 2.5 cm
below the lower edge of the inlet
nozzle.
Close fuel tank tightly.
Check the oil level. The oil level
must be between the “Full/Max.”
and “Add/Min.” mark (see also
engine manual).
Check tyre pressure
Note
For production reasons the tyre
pressure may be higher than
required, therefore:
Inflate all tyres equally to a
pressure of approx. 1.3 bar.
Start the engine.
Danger
To prevent injury:
– do not start the engine when you
are standing in front of the
ejector,
– Keep hands and feet well away
from the cutting blade,
– never place your hands, feet, or
other parts of the body near
rotating parts; always keep away
from the ejector.
Before starting the engine,
disengage the clutches for all
cutters and drives.
Do not tip the appliance when
starting. Keep the appliance on an
even surface with little or the
shortest possible grass.
Open fuel cock (if one is
available – please see engine
operating instructions).
Release clutch lever for travel
drive and cutter deck
Set shift lever to position “N”.
Move throttle to .
If the engine is cold, pull out the
choke or set the throttle to .
Appliances without electric starter:
Stand on the left side of the
appliance and ensure that there
is an adequate distance between
your feet and the cutter deck.
Slowly pull the starter cable grip
until you feel resistance, and
then pull quickly and strongly. Do
not let the pull-starter handle
spring back, but slowly guide it
back.
For appliances with electric starter:
Stand behind the appliance.
Turn the ignition key to until
the engine is running (start
attempt max. 5 seconds, wait 10
seconds before the next
attempt).
When the engine is running, set
the ignition key to /I.
Note:
If appliances feature electric
starter, the engine (depending on
model) can also be started
manually with the pull-starter
handle. First set the ignition key to
position /I.
When the engine is running:
Slowly push back the choke and
set the throttle to the middle
position until the engine is
running quietly.
Note:
For mowing set the throttle to full
speed.
Stopping the engine
Set the throttle to the middle
position.
Leave the engine running for
approx. 20 seconds
Slowly move throttle to the “Stop”
position or turn the ignition key
(depending on model) to /0.
Notes:
– Before leaving the appliance,
always remove the ignition key
(depending on model) and the
spark-plug terminal from the
engine.
– If you need more information
about operating the engine,
please refer to the engine
manual.
Driving
Danger
Be particularly careful when:
– Reversing,
– Starting up in 3rd or 4th gear –
slowly depress the clutch lever
for the travel drive in order to
switch on the wheel drive.
Caution
The appliance must be at a
standstill before the direction of
travel or gear is changed.
Start the engine (see “Starting
the engine”).
!
!
Page 14

English Operating instructions – Lawn mower with combustion engine
14
Set shift lever to the required
position.
Set throttle to the required
position.
Slowly depress clutch lever for
the travel drive, the appliance
starts moving.
Stopping the mower
Release clutch lever for the travel
drive, the appliance stops.
Changing direction of travel
and speed
Caution
The appliance must be at a
standstill before the direction of
travel or gear is changed.
Release clutch lever for the travel
drive to stop the appliance.
Set shift lever to the required
position.
Mowing
Danger
Always switch off the cutter deck
before reversing.
Start the engine (see “Starting
the engine”).
To ensure adequate power
output, move the throttle to .
Set cutting height adjustment
lever to the required position.
Set shift lever to the required
position.
Activate the clutch lever for the
cutter deck, the cutter deck
operates.
Slowly depress clutch lever for
the travel drive, the appliance
starts moving and mowing.
General information
When adjusting the cutting height
and travel speed, ensure that the
mower is not overloaded.
Depending on the length, type,
and dampness of the grass it may
become necessary to adjust the
cutting height and appliance speed
for the optimum grass catcher performance.
If blockages occur, reduce the
driving speed and increase the
cutting height.
Switching off the mower
Release clutch lever for cutter
deck and travel drive.
Raise the cutters to the top.
Stopping the engine.
Set shift lever to position “N”.
Remove the ignition key (if used).
Pushing the mower
Set shift lever to position “N”.
Depress clutch lever for travel
drive and push the appliance.
Switching the appliance to
mulching
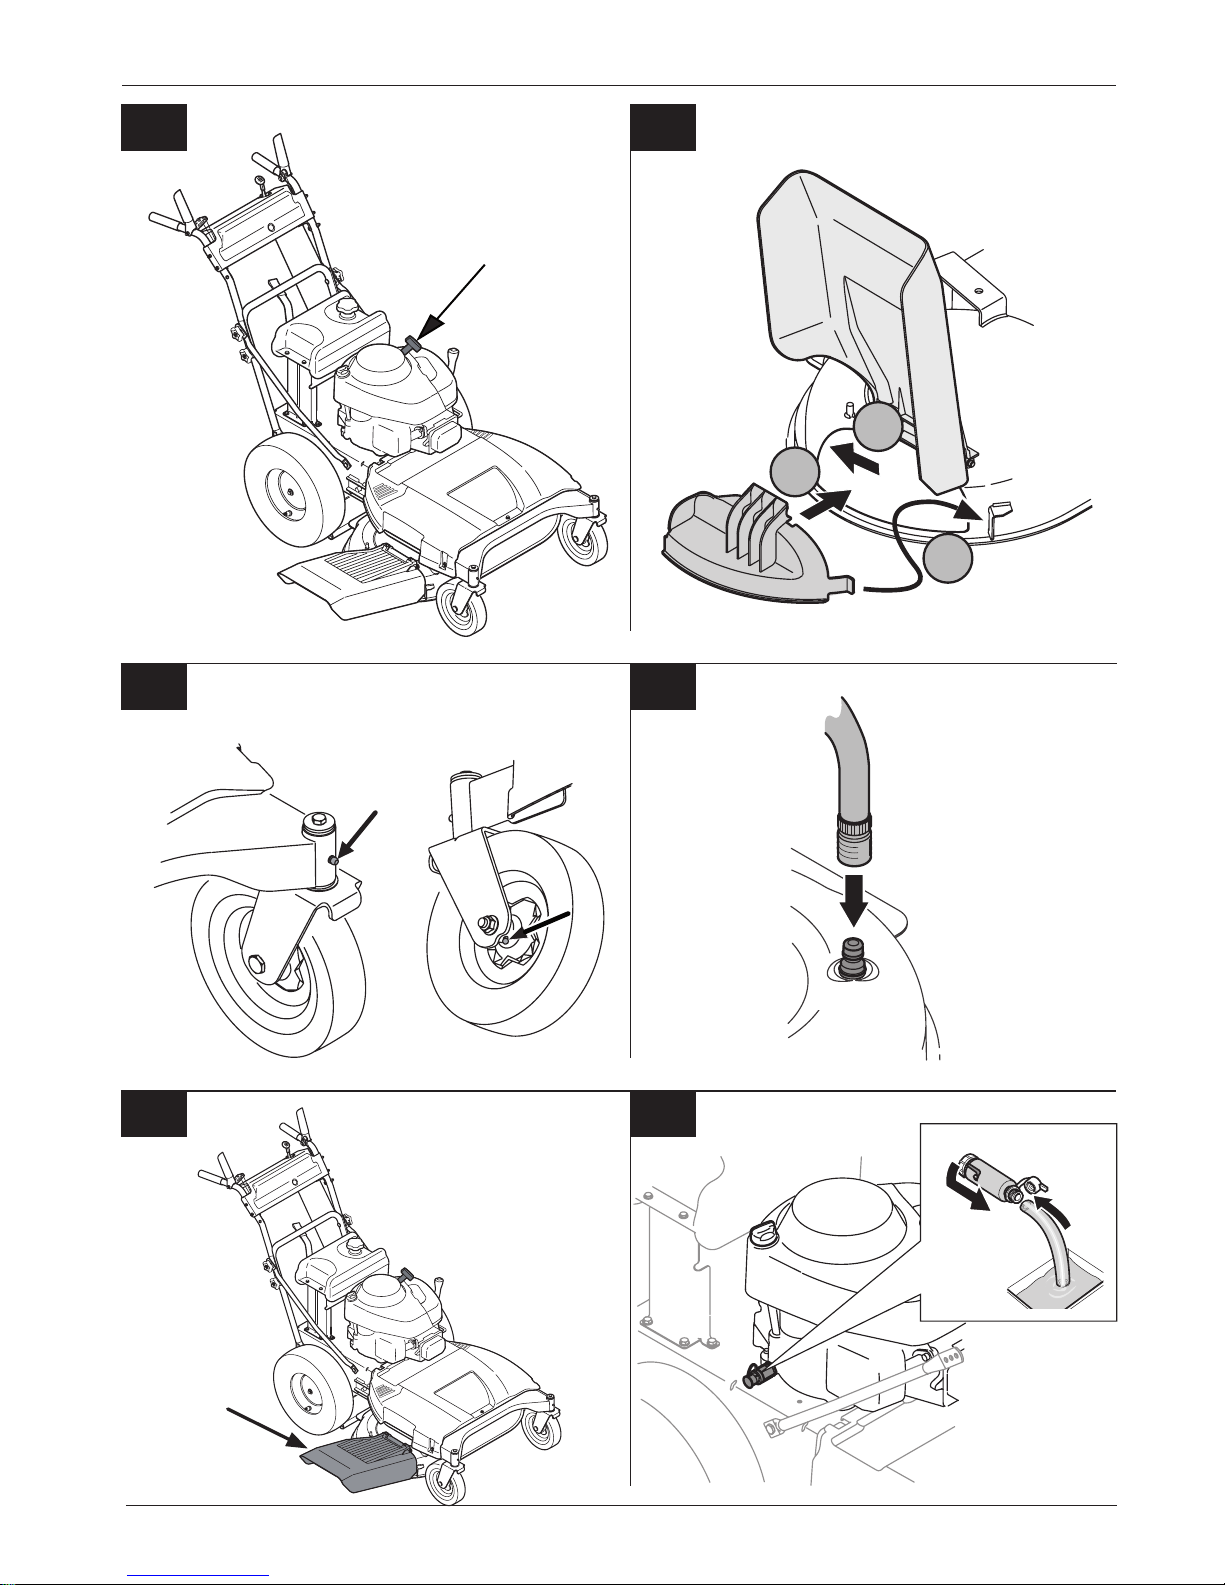
Attach the mulcher (optional).
Fig. 16
Risk of injury
First switch off the engine, remove
the ignition key (depending on
model) and spark-plug terminal.
Lift the ejection flap.
Push retaining plate on the right
side into the holder on the
appliance (1).
Press mulch key into the
discharge opening (2).
Push mulch key in the discharge
opening to the rear until the
mulch key is securely
attached (3).
Lower discharge flap.
Note:
Mulcher is removed in reverse
sequence.
Follow the instructions for mulching
in the section entitled “Tips for
looking after your lawn”.
Tips on lawn care
Here are some tips to help you
keep your lawn looking healthy and
ensure uniform growth.
Mowing
A lawn is made up of various
different types of grass. If you mow
your lawn frequently, those types of
grass which form strong roots and
a firm turf surface will grow better.
If you only rarely cut the grass, you
will encourage the development of
high-growing types of grass and
other weeds, such as clover and
daisies.
The normal height of a lawn is
approx. 4–5 cm. The grass should
only be cut back by 1/3rd of the
overall height at any one time,
i.e. cut the lawn back to its normal
height when it has reached 7–8cm.
Preferably do not cut the lawn
shorter than 4 cm, otherwise the
turf will be damaged in a dry period.
If the grass has grown particularly
high (for example, during a holiday
period), cut it back to its normal
height in stages.
Mulching (using the
accessories)
During mowing the grass is cut into
small pieces (approx. 1 cm) and is
left on the ground. A lot of the nutrients in the cut grass are retained
for the benefit of the lawn.
For the best possible result the
grass must always be kept short,
see also section “Mowing”.
Observe the following mulching
instructions:
– Do not mow wet grass.
– Never mow more than 2 cm.
– Drive slowly.
– Use the maximum engine speed.
– Regularly clean the cutter deck.
!
!
Page 15

Operating instructions – Lawn mower with combustion engine English
15
Transporting
Drive the machine only short
distances otherwise transport
it by vehicle. Transport the
appliance on a vehicle over greater
distances.
Note: The mower is not approved
for public thoroughfares in
accordance with national road
legislation (StVO).
Short distances
Danger
Solid objects may be hit/propelled
by the rotating cutting mechanism
causing damage.
Switch off the cutter deck before
driving the mower.
Long distances
Caution
Damage in transit
The mode of transport used (e.g.
transport vehicle, loading ramp)
must be in accordance with
guidelines (refer to the respective
operating instructions). During
transportation the appliance must
be secured against slipping.
Environmental hazard due
to leaked fuel
The appliance must not be tilted
when it is transported.
Prepare a suitable transport
vehicle.
Attach the loading ramp to the
vehicle.
Manually push the mower in
neutral onto the loading surface.
Secure the power tool against
slipping.
Cleaning/servicing
Danger
Injury hazard if engine is started
inadvertently
Protect yourself against injury.
Before carrying out any work on
this mower
– Switch off the engine,
– Remove the ignition key (if used),
– Wait until all moving parts have
come to a standstill; the engine
must have cooled down,
– Remove the spark plug
connector on the engine in order
to prevent the engine from
accidentally being started.
Cleaning
Clean the unit
Caution
Do not clean the unit with a high-
pressure cleaner.
If possible, clean the machine
directly after mowing.
Park the mower on firm and level
ground.
Cleaning the cutter deck
Danger
Injury hazard due to sharp cutting
blades
Wear protective gloves.
If the unit has more than one
cutting mechanism, moving one
cutting mechanism may cause the
other cutting mechanisms to move
as well. Caution when cleaning the
cutters.
Caution
Engine damage
The mower must not be tilted to an
angle greater than 30°. This might
cause fuel to run into the
combustion chamber and could
lead to engine damage.
Raise the cutter deck fully.
Clean the cutting compartment
with a scrubbing brush, hand
brush or cloth.
Cutters with cleaning nozzle
(optional)
Fig. 18
Park the appliance on flat ground
free of debris, stones, etc.
1.Use a commercially available
quick-release coupling to attach
a water hose.
2.Start the engine.
3.Switch on the mower deck for
several minutes.
4.Switch OFF the cutters and
engine.
5.Remove the water hose.
Repeat steps 1 to 5 for the second
cleaning nozzle (if provided).
At the end of cleaning
(steps1to5):
Start the engine, and switch ON
the cutters for a few minutes to
dry them.
Cleaning the grass sack
(only in the case of appliances with
grass catchers)
The easiest time to clean the grass
catcher is immediately after
mowing.
Detach and empty the grass
sack.
The grass catcher may be
cleaned with a powerful jet of
water (garden hose).
Allow the grass sack to dry out
thoroughly before using it again.
Maintenance
Observe the servicing instructions
in the engine manual.
At the end of the season have the
mower inspected and serviced by a
specialist workshop.
!
!
!
Page 16

English Operating instructions – Lawn mower with combustion engine
16
Caution
Engine oil is hazardous to the
environment
After changing the oil, take the
waste oil to a waste oil collecting
point or to a waste disposal
company.
Batteries are an environmental
hazard
Do not throw used batteries into the
household refuse. Hand over used
batteries to your dealer or to a
waste management company.
Remove the battery before
scrapping the appliance.
Note
Observe the inspection and main-
tenance intervals in the engine
manual.
After 2 operating hours
First engine oil change.
See engine manual for
subsequent intervals.
Use oil channel or quick oil drain
(Fig. 20) (optional) to drain the
oil.
Every 25 operating hours
Lubricate all rotating and bearing
points (operating lever, height
adjustment of the cutter deck,
etc.) with several drops of light
oil.
Every 2 months
Type 2 only:
Top up battery cells with distilled
water up to 1 cm below the filling
orifice.
Inflate tyres according to the
specifications on the tyre walls. If
tyres have no specifications on
the tyre walls, inflate to a
pressure of 1.3 bar.
Every 50 operating hours
Fig. 17
Using a grease gun, lubricate
mower deck wheels via the
grease nipples on the wheel
attachments and the wheel
bearings with a multi-purpose
grease.
If required
Charge the battery:
If you are not using the unit for a
prolonged period, it is recommended to take the battery out of
the unit and charge it before
storage, as well as every 2 months
during storage, and before starting
up the unit again.
Note:
Follow the instructions in the
operating manual for your battery
charger.
Replace fuses:
Replace defective fuses only with
ones of an equal rating.
Once a season
Lubricate all rotating and bearing
points (operating lever, height
adjustment of the cutter deck,
etc.) with several drops of light
oil.
Clean the spark plug and check
the gap between the electrodes
or replace the plug. See engine
handbook.
The rear axles must be lubricated
with a special-purpose (waterrepellent) grease in a specialist
workshop.
The cutting blade must be
sharpened or replaced by a
specialist workshop.
Shutting down the unit
Caution
Damage to mower materials
Keep the appliance only in clean
and dry rooms when the engine is
cold. During prolonged storage,
e.g. in winter, ensure that the
mower is protected against rust.
At the end of the season or when
the mower will not be used for
longer than a month:
Clean the mower and grass
catcher attachment.
Wipe all metal parts with an oily
rag or spray them with oil to
protect them from rust.
Charge battery with a battery
charger.
When shutting down the
appliance for the winter, remove
the battery, charge it and store in
a dry/cool location (protected
from frost). Charge the battery
every 4–6 weeks as well as
before re-installing it.
Drain the fuel tank (out in the
open air only) and service the
engine as described in the
engine handbook.
Inflate tyres according to the
specifications on the tyre walls. If
tyres have no specifications on
the tyre walls, inflate to a
pressure of 1.3 bar.
Store the mower in a clean, dry
room.
Warranty
The warranty terms issued by our
company or importer are valid in
every country.
Faults will be repaired free of
charge within the framework of the
guarantee, provided that they have
been caused by a material defect
or manufacturing error. Should you
need to call upon the warranty,
please apply to the vendor of your
machine or to the nearest agency.
Engine
The engine manufacturer is liable
for all engine-related problems with
respect to power, power measurement, technical specifications,
warranty and service. Information
can be found in the owner’s/user
handbook supplied separately by
the engine manufacturer.
Page 17

Operating instructions – Lawn mower with combustion engine English
17
Troubleshooting
Danger
Injury hazard if engine is started
inadvertently
Protect yourself against injury.
Before carrying out any work on
this mower
– Switch off the engine,
– Remove the ignition key (if used),
– Wait until all moving parts have
come to a standstill; the engine
must have cooled down,
– Pull off the spark plug connector
so that the engine cannot
inadvertently start.
Faults which occur while you are
using your mower often have
simple causes which you should
know and may be able to rectify
yourself. If you are in any doubt
however, your specialist workshop
will be happy to provide assistance.
!
Problem Possible cause(s) Action to take
Starter cable cannot be pulled. Engine defective. Contact a specialist garage
Engine does not start. Throttle is not in the right
position.
Set throttle to position or CHOKE
(if the engine is cold).
Set throttle to /max position or
START (if the engine is warm).
Choke not actuated. Pull out choke.
No fuel in the tank Fill tank with clean, fresh fuel
Engine does not start. Spark-plug lead not connected. Connect spark-plug terminal.
Fuel old or dirty. Replace with new fuel.
Air filter clogged. Clean air filter.
For appliances with electric starting
devices:
Battery discharged. Charge the battery.
Lead damaged. Check whether electric lead OK.
Unusual noises (rattling,, clanging,
knocking).
Bolts, nuts or other mounting
parts slack.
Tighten parts. If the noises persist:
Contact a specialist garage
Shaking, vibrations. Cutter(s) loose. Cutter fastening screw must be
tightened at specialist garage.
Cutter(s) damaged. Cutters must be replaced at
specialist garage.
Cutters not balanced correctly. Cutters must be replaced or
balanced at specialist garage.
Engine not secure. Engine must be secured at
specialist garage.
Ragged cut or engine speed drops. Grass too high. Set larger cutting height, if
necessary mow twice.
Blades blunt. Cutters must be replaced or
reground at a specialist garage.
Travelling speed too high. Set to a lower travelling speed.
Page 18

English Operating instructions – Lawn mower with combustion engine
18
Grass is not being picked up or grass
catcher is not filling (only for
appliances with grass catcher)
Grass too damp. Let the lawn dry.
Ejector clogged. Switch OFF engine, remove
hindrance.
Insufficient power from motor. Mow more often. Select a greater
cutting height.
Grass sack full. Switch off engine. Unload grass
catcher.
Dirty grass sack. Switch off engine. Clean air ducts in
the grass catcher.
Wheel drive does not work. V belt torn or gears defect. Damaged parts must be replaced at
a specialist garage.
Problem Possible cause(s) Action to take
 Loading...