

Page 1
Zebra® TLP 2824-Z™
User Guide
Page 2

© 2004 ZIH Corp.
The copyrights in this manual and the label printer described therein are owned by
Zebra Technologies. Unauthorized reproduction of this manual or the software in
the label printer may result in imprisonment of up to one year and fines of up to
$10,000 (17 U.S.C.506). Copyright violators may be subject to civil liability.
All product names and numbers are Zebra trademarks, and Zebra, the Zebra logo,
ZPL, ZPL II, ZebraNet, ZebraLink, are registered trademarks of ZIH Corp. All
rights reserved.
All other brand names, product names, or trademarks belong to their respective
holders.
Customer Order # 980533-001 A
Page 3

Proprietary Statement
This manual contains proprietary information of Zebra Technologies Corporation and its
subsidiaries (“Zebra Technologies”). It is intended solely for the information and use of parties
operating and maintaining the equipment described herein. Such proprietary information may
not be used, reproduced, or disclosed to any other parties for any other purpose without the
expressed written permission of Zebra Technologies.
Product Improvements
Continuous improvement of products is a policy of Zebra Technologies. All specifications and
designs are subject to change without notice.
FCC Compliance Statement
This device complies with Part 15 rules. Operation is subject to the following two conditions:
1. This device may not cause harmful interference, and
2. This device must accept any interference received, including interference that may
cause undesired operation.
This equipment has been tested and found to comply with the limits for Class B Digital
Devices, pursuant to Part 15 of the FCC Rules. These limi ts are designed to provide reasona ble
protection against harmful interference when the equipment is operated in a residential
environment. This equipment generates, uses, and can radiate radio frequency energy and, if
not installed and used in accordance with the product manuals, may cause harmful in terference
to radio communications. Howe ver, there is no guarantee that interferen ce will not occur in a
particular installation. If this equipment does cause harmful interference to radio or television
reception, the user is encouraged to do one or more of the follow ing measures:
• Reorient or relocate the re ceiving antenna.
• Increase the separation between the equipment and receiver.
• Connect the equipment into an outle t o n a circu it different from that to which the receiver
is connected.
• Consult the dealer or an experienced radio/TV technician for help.
980533-001 A TLP 2824-Z User Guide 3
Page 4

Proprietary Statement
The user is cautioned that any changes or modifications not expressly approved by Zebra
Technologies could void the user’s authority to operate the equipment. To ensure compliance,
this printer must be used with Shielded Communication Cables.
Canadian DOC Compliance Statement
This Class B digital apparatus complies with Canadian ICES-003.
Cet appareil numérique de la classe B est conforme à la norme NMB-003 du Canada.
Liability Disclaimer
Zebra Technologies takes steps to ensure that its published Engineering specifications and
manuals are correct; however, errors do occur. Zebra Technologies reserves the right to correct
any such errors and disclaims liability resulting therefrom.
Limitation of Liability
In no event shall Zebra Technologies or anyone else involved in the creation, production, or
delivery of the accompanying product (including hardware and software) be liable for any
damages whatsoever (including, without limitation, consequential damages including loss of
business profits, business interruption, or loss of business information) arisi ng out of t he use
of, the results of use of, or inability to use such product, even if Zebra Technologies has been
advised of the possibility of such damages. Some jurisdictions do not allow the exclusion or
limitation of incidental or consequential damages, so the abov e limitation or exclusion may
not apply to you.
4 TLP 2824-Z User Guide 980533-001 A
Page 5

Contacts
Preface
This section provides you with contact information, documen t struc ture and organization, and
additional reference documents.
You can contact Zebra Technologies at any of the following:
Visit us at: www.zebra.com
Our Mailing Addresses:
Zebra Technologies Corporation
333 Corporate Woods Parkway
Vernon Hills, Illinois 60061.3109 U.S.A
Telephone: +1 847.634.6700
Fax: +1 847.913.8766
Zebra Technologies Europe Limited
Zebra House
The Valley Centre, Gordon R oad
High Wycombe
Buckinghamshire HP13 6EQ, UK
Telephone: +44 (0)1494 4728 72
Fax: +44 (0)1494 450103
980533-001 A TLP 2824-Z User Guide 5
Page 6
Preface
Environmental Management
Support
You can contact Zebra support at:
Web Address: www.zebra.com/SS/service_support.htm
Note • The web address is case-sensitive.
US Phone Number +1 847.913.2259
UK/International Phone Number +44 (0) 1494 768289
Environmental Management
Do not dispose of this product in unsorted municipal waste. This product is recyclable, and
should be recycled according to your local standards.
For more information, please see our website at:
Web address: www.zebra.com/environment
Document Conventions
The following conventions are used throughout this document to convey certain information:
s
Alternate Color (online only) Cross-references contain links to other sections in this guide.
If you are viewing this guide online, click the blue text
Command Line Examples All command line examples appear in Courier New font.
For example, type the following to get to the Post-Install scripts in the
to jump to its location.
bin directory:
Ztools
Files and Directories All file names and directories appear in Courier New font. For
example, the
Cautions, Important, Note, and Example
Caution • Warns you of the potential for electrostatic discharge.
Caution • Warns you of a potential electric shock situation.
Zebra<version number>.tar file and the /root directory.
6 TLP 2824-Z User Guide 980533-001 A
Page 7

Preface
Related Documents
Caution • Warns you of a situation where excessive heat could cause a burn.
Caution • Advises you that failure to take or avoid a specific action could result in physical
harm to you.
Caution • Advises you that failure to take or avoid a specific action could result in physical
harm to the hardware.
Caution • Advises you need to wear protective eyeware.
Important •
Note • Indicates neutral or positive information that emphasizes or supplements important
Advises you of information that is essential to complete a task.
points of the main text.
Example • Provides an example, often a scenario, to better clarify a section of text.
Tools • Tells you what tools you need to complete a given task.
Video • (online only) Links to a motion picture that demonstrates a procedure.
Related Documents
The following documents might be helpful references:
• ZPL II
• ZebraNet
• ZebraNet 10/100 Print Server User and Reference Guide (part number 47619L-001)
• ZebraNet PrintServer II™ Installation and User Guide (part number 45537L)
• Universal Serial Bus Specification available from the USB Implementation Forum
®
Programming Guide Volume I (part number 45541L) and Vol um e I I (part
number 45542L).
®
Wireless Print Server User Guide (part number 13422L)
980533-001 A TLP 2824-Z User Guide 7
Page 8
Preface
Related Documents
8 TLP 2824-Z User Guide 980533-001 A
Page 9

Contents
Proprietary Statement . . . . . . . . . . . . . . . . . . . . . . . . . . . . . . . . . . . . . . . . . . . . . . . 3
Preface . . . . . . . . . . . . . . . . . . . . . . . . . . . . . . . . . . . . . . . . . . . . . . . . . . . . . . . . . . . 5
Contacts . . . . . . . . . . . . . . . . . . . . . . . . . . . . . . . . . . . . . . . . . . . . . . . . . . . . . . . . . . . . . . . 5
Support . . . . . . . . . . . . . . . . . . . . . . . . . . . . . . . . . . . . . . . . . . . . . . . . . . . . . . . . . . . . . 6
Environmental Management . . . . . . . . . . . . . . . . . . . . . . . . . . . . . . . . . . . . . . . . . . . . . . . . 6
Document Conventions. . . . . . . . . . . . . . . . . . . . . . . . . . . . . . . . . . . . . . . . . . . . . . . . . . . . 6
Related Documents . . . . . . . . . . . . . . . . . . . . . . . . . . . . . . . . . . . . . . . . . . . . . . . . . . . . . . 7
1 • Introduction . . . . . . . . . . . . . . . . . . . . . . . . . . . . . . . . . . . . . . . . . . . . . . . . . . . 11
What’s in the Box? . . . . . . . . . . . . . . . . . . . . . . . . . . . . . . . . . . . . . . . . . . . . . . . . . . . . . . 12
Inspecting the Printer . . . . . . . . . . . . . . . . . . . . . . . . . . . . . . . . . . . . . . . . . . . . . . . . . . . . 13
2 • Getting Started . . . . . . . . . . . . . . . . . . . . . . . . . . . . . . . . . . . . . . . . . . . . . . . . . 17
Modes of Printing . . . . . . . . . . . . . . . . . . . . . . . . . . . . . . . . . . . . . . . . . . . . . . . . . . . . . . . 17
Attaching Power Supply . . . . . . . . . . . . . . . . . . . . . . . . . . . . . . . . . . . . . . . . . . . . . . . . . . 18
Loading Roll Media . . . . . . . . . . . . . . . . . . . . . . . . . . . . . . . . . . . . . . . . . . . . . . . . . . . . . . 19
Adjusting the Roll Holders . . . . . . . . . . . . . . . . . . . . . . . . . . . . . . . . . . . . . . . . . . . . . 19
Placing the Roll in the Media Compartment . . . . . . . . . . . . . . . . . . . . . . . . . . . . . . . . 20
Adjusting the Guides. . . . . . . . . . . . . . . . . . . . . . . . . . . . . . . . . . . . . . . . . . . . . . . . . . 21
Loading Ribbon. . . . . . . . . . . . . . . . . . . . . . . . . . . . . . . . . . . . . . . . . . . . . . . . . . . . . . . . . 22
Install the Ribbon Supply Roll. . . . . . . . . . . . . . . . . . . . . . . . . . . . . . . . . . . . . . . . . . . 22
Install the Take-Up Core . . . . . . . . . . . . . . . . . . . . . . . . . . . . . . . . . . . . . . . . . . . . . . . 22
Attach and Tighten the Ribbon . . . . . . . . . . . . . . . . . . . . . . . . . . . . . . . . . . . . . . . . . . 23
Operator Controls . . . . . . . . . . . . . . . . . . . . . . . . . . . . . . . . . . . . . . . . . . . . . . . . . . . . . . . 24
Printing a Test Label . . . . . . . . . . . . . . . . . . . . . . . . . . . . . . . . . . . . . . . . . . . . . . . . . . . . . 25
Hooking Up the Printer and Computer . . . . . . . . . . . . . . . . . . . . . . . . . . . . . . . . . . . . . . . 26
Interface Cable Requirements . . . . . . . . . . . . . . . . . . . . . . . . . . . . . . . . . . . . . . . . . . 26
Communicating with the Printer . . . . . . . . . . . . . . . . . . . . . . . . . . . . . . . . . . . . . . . . . 27
980533-001 A TLP 2824-Z User Guide 9
Page 10

Contents
Adjusting the Print Width. . . . . . . . . . . . . . . . . . . . . . . . . . . . . . . . . . . . . . . . . . . . . . . . . . 28
Adjusting the Print Quality. . . . . . . . . . . . . . . . . . . . . . . . . . . . . . . . . . . . . . . . . . . . . . . . . 28
3 • Operations & Options . . . . . . . . . . . . . . . . . . . . . . . . . . . . . . . . . . . . . . . . . . . 29
Thermal Printing . . . . . . . . . . . . . . . . . . . . . . . . . . . . . . . . . . . . . . . . . . . . . . . . . . . . . . . . 30
Replacing Supplies . . . . . . . . . . . . . . . . . . . . . . . . . . . . . . . . . . . . . . . . . . . . . . . . . . . . . . 31
Adding a New Transfer Ribbon. . . . . . . . . . . . . . . . . . . . . . . . . . . . . . . . . . . . . . . . . . 31
Replacing a Partially Used Transfer Ribbon . . . . . . . . . . . . . . . . . . . . . . . . . . . . . . . . 31
Printing in Peel-Mode . . . . . . . . . . . . . . . . . . . . . . . . . . . . . . . . . . . . . . . . . . . . . . . . . . . . 32
Printing on Fan-Fold Media. . . . . . . . . . . . . . . . . . . . . . . . . . . . . . . . . . . . . . . . . . . . . . . . 34
Using the Cutter Option . . . . . . . . . . . . . . . . . . . . . . . . . . . . . . . . . . . . . . . . . . . . . . . . . . 35
4 • Maintenance . . . . . . . . . . . . . . . . . . . . . . . . . . . . . . . . . . . . . . . . . . . . . . . . . . . 37
Cleaning . . . . . . . . . . . . . . . . . . . . . . . . . . . . . . . . . . . . . . . . . . . . . . . . . . . . . . . . . . . . . . 37
Print Head Considerations . . . . . . . . . . . . . . . . . . . . . . . . . . . . . . . . . . . . . . . . . . . . . 38
Media Guide Considerations . . . . . . . . . . . . . . . . . . . . . . . . . . . . . . . . . . . . . . . . . . . 39
Platen Considerations. . . . . . . . . . . . . . . . . . . . . . . . . . . . . . . . . . . . . . . . . . . . . . . . . 41
Lubrication . . . . . . . . . . . . . . . . . . . . . . . . . . . . . . . . . . . . . . . . . . . . . . . . . . . . . . . . . . . . 41
Replacing the Platen. . . . . . . . . . . . . . . . . . . . . . . . . . . . . . . . . . . . . . . . . . . . . . . . . . . . . 42
Replacing the Print Head . . . . . . . . . . . . . . . . . . . . . . . . . . . . . . . . . . . . . . . . . . . . . . . . . 43
Thermal-Transfer TLP Model . . . . . . . . . . . . . . . . . . . . . . . . . . . . . . . . . . . . . . . . . . . 44
5 • Troubleshooting . . . . . . . . . . . . . . . . . . . . . . . . . . . . . . . . . . . . . . . . . . . . . . . 47
Resolutions . . . . . . . . . . . . . . . . . . . . . . . . . . . . . . . . . . . . . . . . . . . . . . . . . . . . . . . . . . . . 47
Print Quality Problems . . . . . . . . . . . . . . . . . . . . . . . . . . . . . . . . . . . . . . . . . . . . . . . . . . . 50
Manual Calibration . . . . . . . . . . . . . . . . . . . . . . . . . . . . . . . . . . . . . . . . . . . . . . . . . . . . . . 52
Troubleshooting Tests. . . . . . . . . . . . . . . . . . . . . . . . . . . . . . . . . . . . . . . . . . . . . . . . . . . . 53
Printing a Configuration Label . . . . . . . . . . . . . . . . . . . . . . . . . . . . . . . . . . . . . . . . . . 53
Recalibration. . . . . . . . . . . . . . . . . . . . . . . . . . . . . . . . . . . . . . . . . . . . . . . . . . . . . . . . 53
Resetting the Factory Default Values . . . . . . . . . . . . . . . . . . . . . . . . . . . . . . . . . . . . . . . . 54
Communications Diagnostics . . . . . . . . . . . . . . . . . . . . . . . . . . . . . . . . . . . . . . . . . . . . . . 54
Feed Button Modes. . . . . . . . . . . . . . . . . . . . . . . . . . . . . . . . . . . . . . . . . . . . . . . . . . . . . . 55
Battery. . . . . . . . . . . . . . . . . . . . . . . . . . . . . . . . . . . . . . . . . . . . . . . . . . . . . . . . . . . . . . . . 56
6 • Interfaces . . . . . . . . . . . . . . . . . . . . . . . . . . . . . . . . . . . . . . . . . . . . . . . . . . . . . 57
Universal Serial Bus (USB) Connector . . . . . . . . . . . . . . . . . . . . . . . . . . . . . . . . . . . . . . . 57
Parallel Interface . . . . . . . . . . . . . . . . . . . . . . . . . . . . . . . . . . . . . . . . . . . . . . . . . . . . . . . . 58
ZebraNet® PrintServer II for Ethernet Networks. . . . . . . . . . . . . . . . . . . . . . . . . . . . . . . . 59
Serial (RS-232) Connector . . . . . . . . . . . . . . . . . . . . . . . . . . . . . . . . . . . . . . . . . . . . . . . . 60
10 TLP 2824-Z User Guide 980533-001 A
Page 11

1
Introduction
This section describes what you get in your shipping box and provides an overview of printer
parts. This section also has procedures that describe how to open and close the printer and
report any problems.
Hello!
Thank you for choosing a Zebra® desktop printer, a high-quality on-demand printer
manufactured by the industry leader in quality, service, and value—Zebra Technologies
Corporation. For over 25 years, Zebra Technologies Corporation has provided customers with
the highest caliber of products and support.
Your printer i s a high-quality on-demand printer. The printer provides thermal-transfer
printing (which uses ribbon) and direct-thermal print in g.
This manual provides all of the information you will need to operate your print er on a daily
basis. To create label formats, refer to your programming guide. This guide is available by
contacting your distributor or dealer.
Your printer, when connected to a host computer, functions as a complete system for printing
labels and tags.
Note • Many printer settings may also be controlled by your printer’s driver or label
preparation software. Refer to the driver or software documentation for more information.
980533-001 A TLP 2824-Z User Guide 11
Page 12

Introduction
What’s in the Box?
What’s in the Box?
Save the carton and all packing materials in case you need to ship or store the printer later.
After unpacking, make sure you have all parts. Follow the procedures for inspecting the
printer to familiarize your self with printer parts so yo u can follow the instructions in t his book.
Sample
Labels
Cleaning
Pen
Documentation
and Warranty
Ribbon
Take-Up Core
Printer
Power Supply
and Cords
12 TLP 2824-Z User Guide 980533-001 A
Page 13
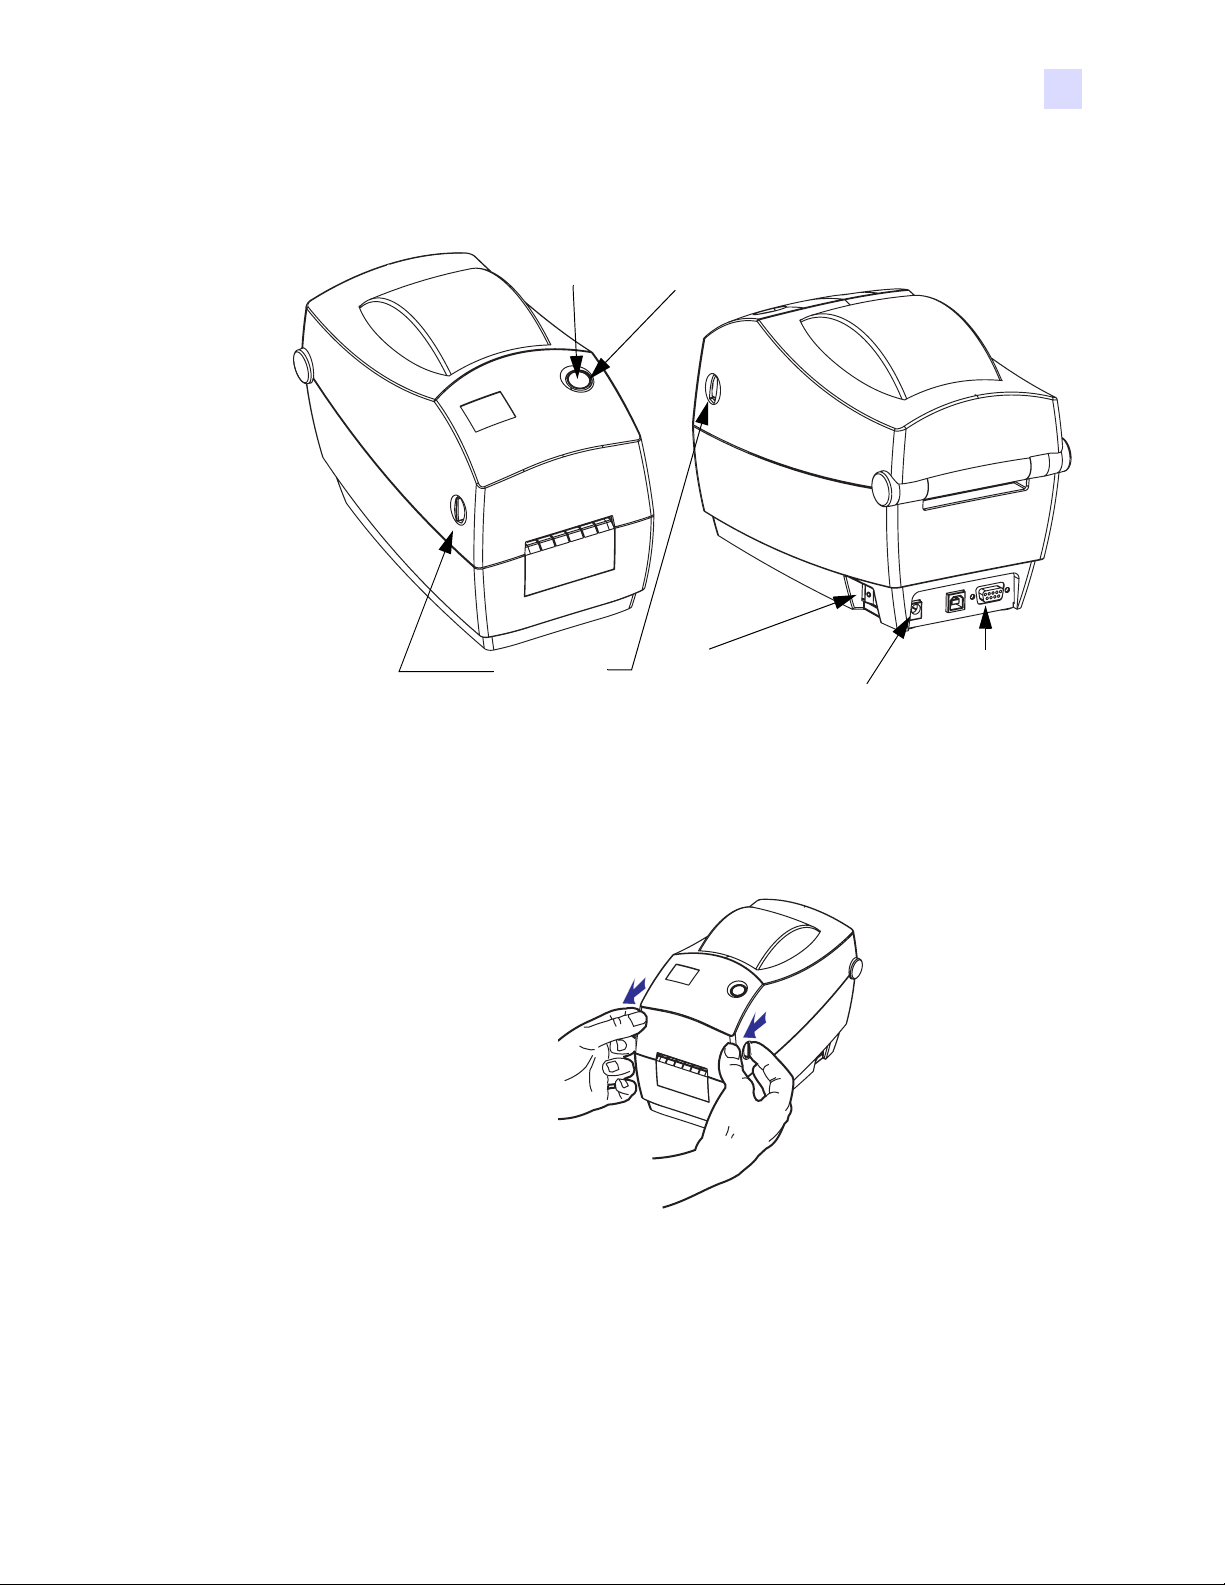
Inspecting the Printer
Look at the outside of the printer and make sure that all parts are present.
Feed
Button
Introduction
Inspecting the Printer
Status
Light
Opening the printer
To access the media compartment, you must open the printer. Pull the release levers towards
you and lift the cover.
Release
Latches
Power
Switch
Power
Supply
Receptacle
Interface
Connectors
(vary by option)
980533-001 A TLP 2824-Z User Guide 13
Page 14

Introduction
Inspecting the Printer
After opening the printer, check the media compartment.
14 TLP 2824-Z User Guide 980533-001 A
Page 15

Closing the printer
1. Hold the top cover and press the “kick-stand” cover lock to release.
2. Lower the top cover. The ribbon carriage automatically folds up into place.
Introduction
Inspecting the Printer
3. Press down until the cover snaps closed.
Reporting Damage
If you discover damage or missing parts:
• Immediately notify and file a damage report with the shipping company. Zebra
Technologies Corporation is not responsible for any damage incurred during shipment of
the printer and will not cover the repair of this damage under its warranty policy.
• Keep the carton and all packing material for inspection.
• Notify the authorized reseller.
980533-001 A TLP 2824-Z User Guide 15
Page 16
Introduction
Inspecting the Printer
16 TLP 2824-Z User Guide 980533-001 A
Page 17

2
Getting Started
This section describes how to set up your printer for the first time and use the most common
operating procedures for loading media in tear-off mode and loading ribbon.
Modes of Printing
You can operate this printer in different modes:
• Standard tear-o ff mode allows you to tear off each label (or a strip of labels) after it is
printed.
• In optional peel-off mode, the backing material is peeled away from the label as it is
printed. After this label is removed, the next one is printed.
• In optional cutter mode, an attached unit cuts through the media.
The printer typically uses roll media, but you can use fan-fold or other continuous medi a as
well.
For procedures to use optional modes and features, refer to the Operation and Options section.
980533-001 A TLP 2824-Z User Guide 17
Page 18
Getting Started
Attaching Power Supply
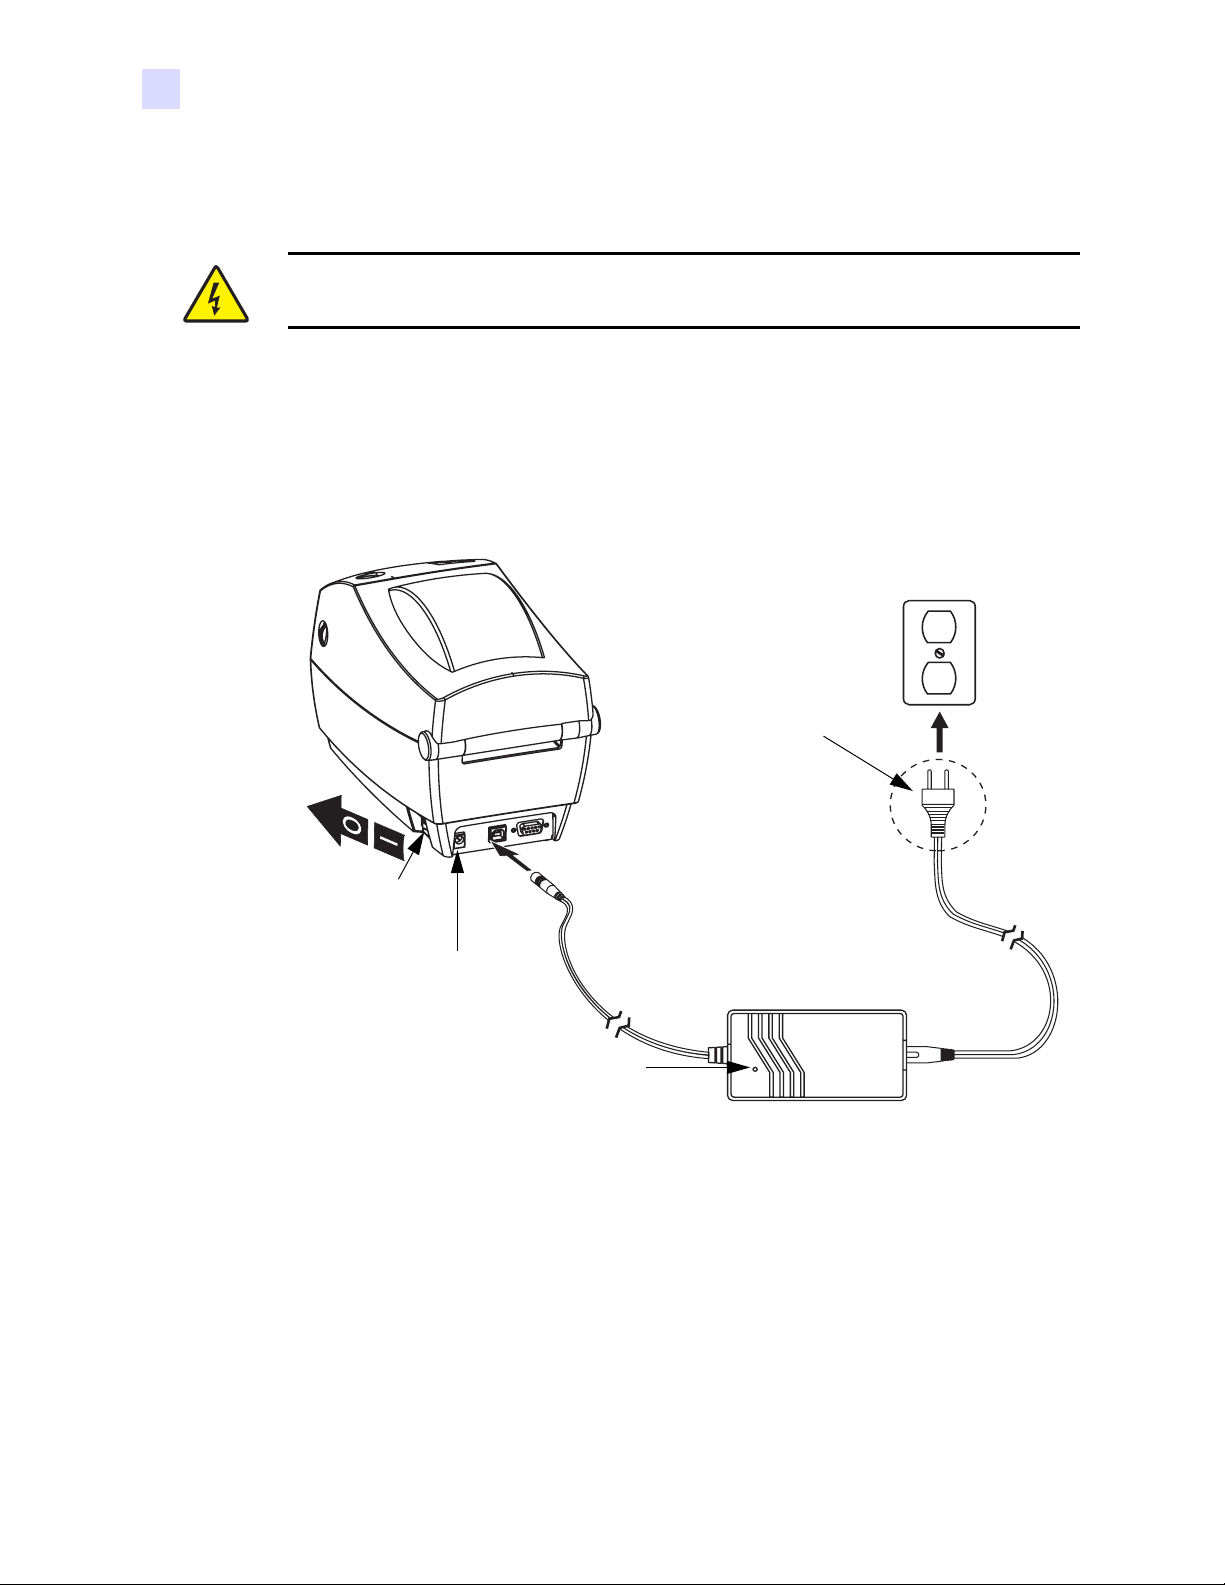
Attaching Power Supply
Check the power supply to make certain it is appropriate fo r your input voltage.
Caution • Use the power supply that came with your printer. Never operate the printer
and power supply in an area where they can get wet. Serious personal injury could result!
1. Make sure the power switch is in the off position (forward).
2. The DC power supply has a barrel connector on one end that must be inserted into the
power supply receptacle on the back of the printer.
3. Insert the separate AC power cord into the power supply.
4. Plug the other end of the cord into an appropriate AC electrical outlet.
Power
Switch
Power
Supply
Receptacle
Barrel
Connector
Power
Indicator
Plug Varies
by Country
AC Power
Cord
Power
Supply
18 TLP 2824-Z User Guide 980533-001 A
Page 19
Loading Roll Media
When you load media, you must place the roll on the me dia hanger s and then adjust the media
guides.
You must use the correct media for the type of printing you require. When printing without a
ribbon, you must use direct thermal media. When using ribbon, you must use thermal transfer
media. The printer's ribbon sensor detects motion of the supply spindle.
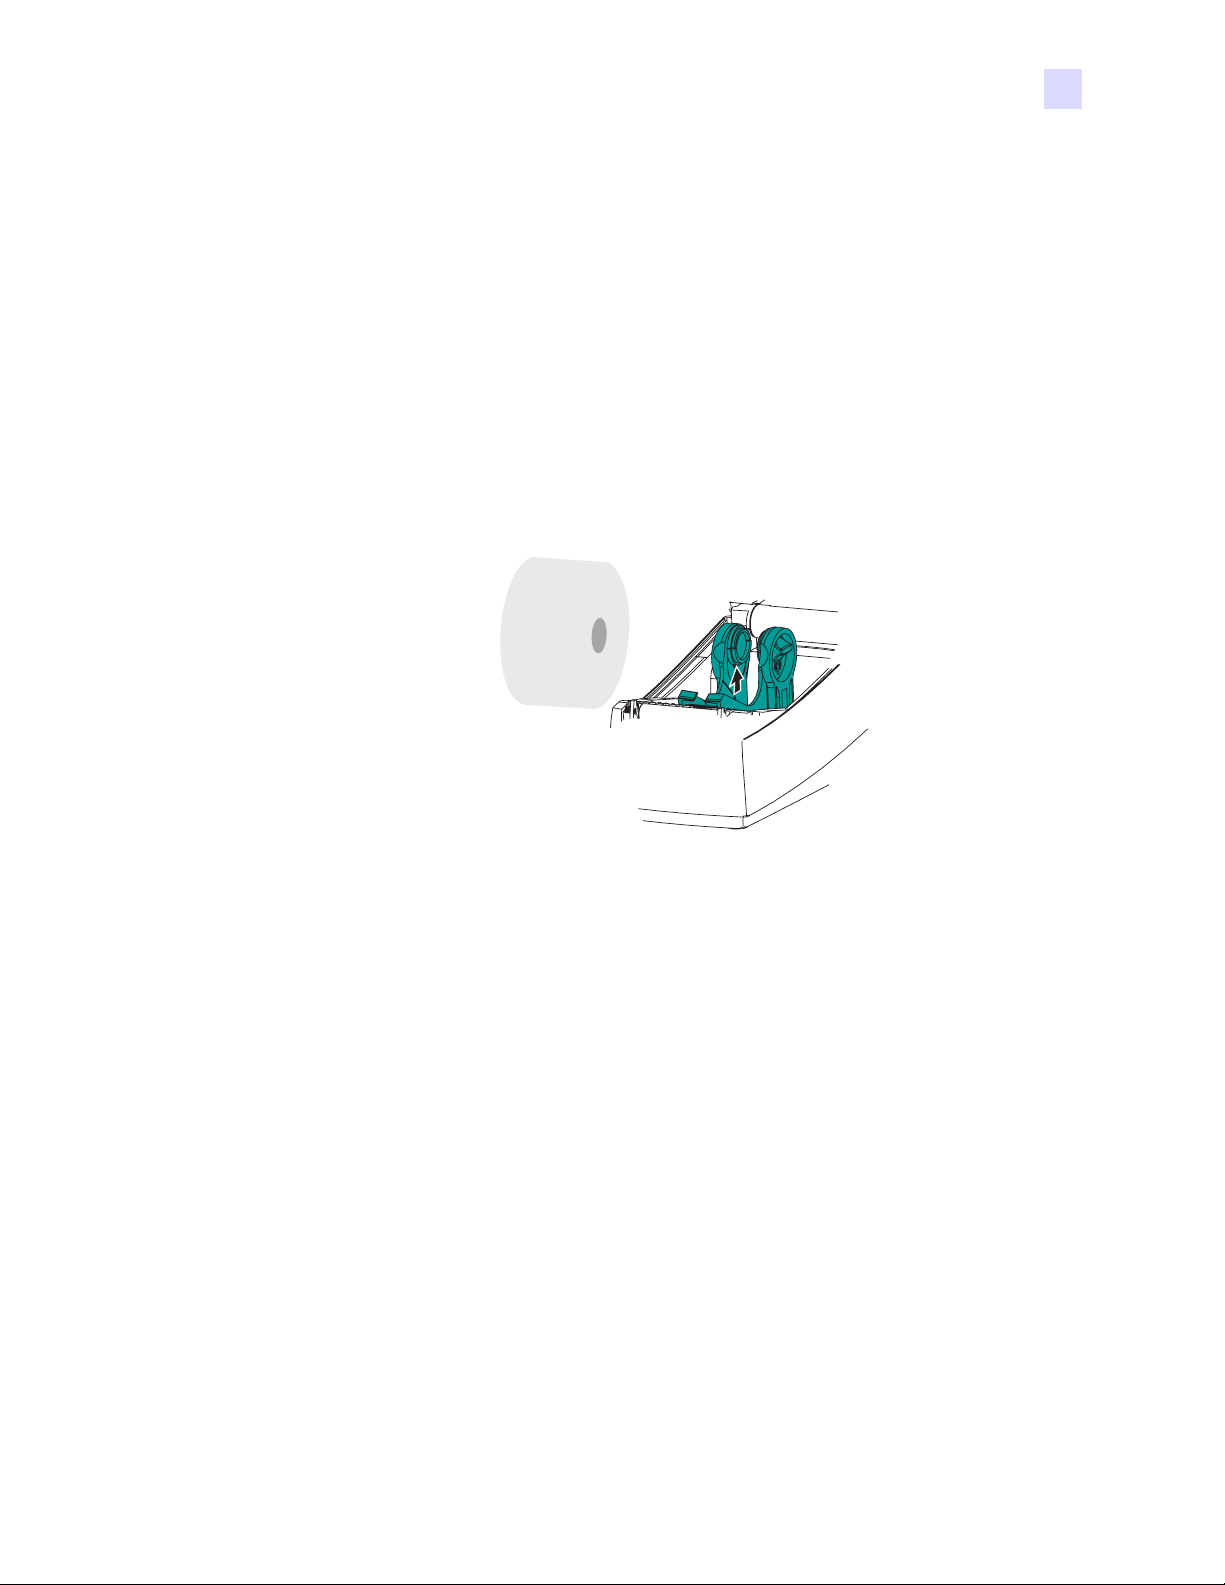
Adjusting the Roll Holders
Check the core of the media roll and adjust the holders if necessary.
• For a narrow core, lift the adjusters up.
• For a wide core, press the adjusters down.
Getting Started
Loading Roll Media
980533-001 A TLP 2824-Z User Guide 19
Page 20
Getting Started
Loading Roll Media
Placing the Roll in the Media Compartment
Whether your roll media is inside or outside wound you load it into the printer the same way.
1. Open the printer. Remember that you need to pull the release levers toward the front of
the printer.
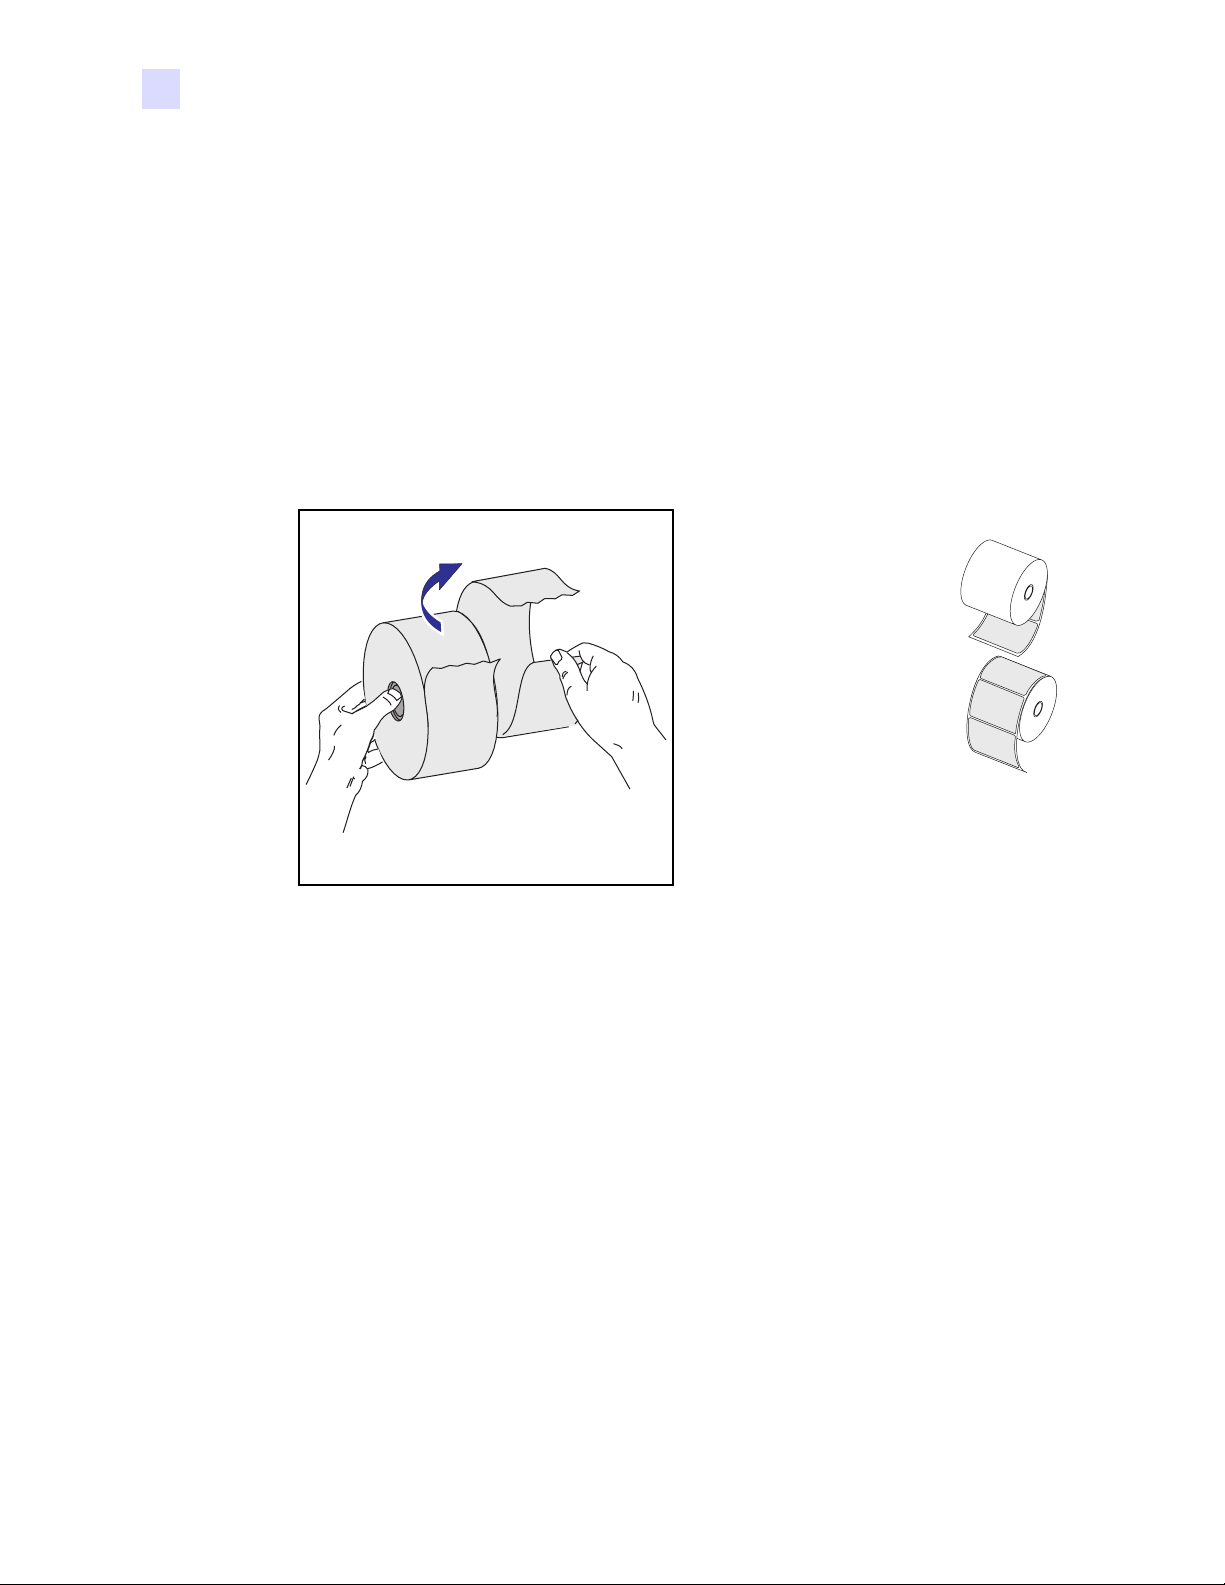
2. Remove the outside length of media. During shipment, the roll may become dirty when
handled or dusty when stored. Removing the outside length avoids dragging adhesive or
dirty media between the print head and platen.
3. Separate and hold open the media hangers.
4. Orient the media roll so that its printing surface will be up as it passes over th e pl aten.
5. Lower the roll between the hange rs and close them onto the core.
20 TLP 2824-Z User Guide 980533-001 A
Page 21

Adjusting the Guides
The adjustable guides direct the media toward the platen and print head.
1. Open the media guides by turning the guide adju ster knob to the rear.
2. Thread the media through the guides.
3. Close the media guides by turning the guide adjuster knob to the front. They should just
touch, but not restrict, the edges of the media.
4. Unless you need to load ribbon, close the top cover. Remember that you need to release
the cover lock, lower the top cover, and press down until the latches snap into place
Getting Started
Loading Roll Media
980533-001 A TLP 2824-Z User Guide 21
Page 22

Getting Started
Loading Ribbon
Loading Ribbon
You must use thermal transfer media (accepts wax and/or resin transferred off a ribbon) when
you use a ribbon. When loading ribbon, you install the supply and take-up rolls, then tighten
the ribbon on the carriage.
Install the Ribbon Supply Roll
Before following these steps, prepare the ribbon by removing its wrapping and pulling its
adhesive strip free.
1. Thread the ribbon through the carriage.
2. Press the right side onto the supply hub.
3. Align the notches on the left side and mount onto the spokes of the left hub.
Install the Take-Up Core
1. Press the right side onto the take-up hub.
2. Align the notches on the left side and mount onto the spokes of the left hub.
You can find your first ribbon take-up core in the packing box. Subsequently, use the empty
supply core to take up the next roll of ribbon.
22 TLP 2824-Z User Guide 980533-001 A
Page 23

Attach and Tighten the Ribbon
You must alig n the ribbon so that it will be taken stra ight onto the core.
1. Attach the ribbon to the take up core. Use the adhesive strip on new rolls; otherwise, use
tape.
2. Turn the ribbon take-up gear counter-clockwise (top moves toward rear) to remove slack
from the ribbon.
3. Close the top cover. Remember that you need to release the cover lock, lower the top
cover, and press down until the latches snap into place.
Getting Started
Loading Ribbon
980533-001 A TLP 2824-Z User Guide 23
Page 24

Getting Started
Operator Controls
Operator Controls
Power Switch
Press backward to turn ON or forward to OFF the printer.
Caution • The power should be turned off before connecting or disconnecting the
communications and power cables.
Feed Button
• Tapping the Feed button forces the printer to feed on e blank label.
• Holding the Feed button forces the printer to feed conti nuously.
• Pressing the Feed button takes the printer out of a “pause” condition. The printer is put
into “pause” by either a programming command or an error condition. See “What the
Status Light is Telling You” in the Troubleshooting chapter.
• Use the Feed button for printer setup and status (see “Feed Button Modes” in the
Troubleshooting chapter).
Status Light
Functions as a printer operational indicator (see “What the Status Light is Telling You” in the
Troubleshooting chapter).
24 TLP 2824-Z User Guide 980533-001 A
Page 25

Printing a Test Label
Before you connect the printer to your computer, make sure that the printer is in proper
working order.
You can do this by printing a configuration label.
1. Make sure the media is properly loaded and the top cover of the printer is closed. Then,
turn the printer power on if you have not already done so.
2. When the status light is solid green, press and hold the feed button until the status light
flashes once.
3. Release the feed button. A configuration label will print.
If you cannot get this label to print, refer to the Troubleshooting chapter.
Getting Started
Printing a Test Label
980533-001 A TLP 2824-Z User Guide 25
Page 26

Getting Started
Hooking Up the Printer and Computer
Hooking Up the Printer and Computer
Your printer will have one of these combinations of interfaces:
• Parallel
• Universal Serial Bus (USB) and DB-9 serial
• Ethernet and RJ-11 serial
Each specific interface option—USB, parallel, ethernet, serial—is discussed in div id ua lly.
You must supply the required interface cable for your application.
Caution • Keep the power switch in the OFF position when attaching the interface cable.
The power supply barrel connector must be inserted into the power supply receptacle on
the back of the printer before connecting or disconnecting the communications cables.
Important •
Equipment, using fully shielded six-foot data cables. Use of longer cables or unshielded
cables may increase radiated emissions above the Class B limits.
This printer complies with FCC “Rules and Regulations,” Part 15, for Class B
.
Interface Cable Requirements
Data cables must be of fully shielded construct ion and fitted with metal or metalized connector
shells. Shielded cables and connectors are required to prevent radiation and reception of
electrical noise.
To minimize electrical noise pickup in the cable:
Keep data cables as short as possible (6’ [1.83 m] recommended).
Do not tightly bundle the data cables with power cords.
Do not tie the data cables to power wire conduits.
USB Interface Requirements
Universal Serial Bus (version 1.1) provides a high-speed interface that is compatible with your
existing PC hardware. USB’s “plug and play” design makes installation easy. Multiple
printers can share a single USB port/h ub .
Parallel Interface Requirements
The required cable (IEEE 1284-compliant is recommended) must have a standard 36-pin
parallel connector on one end, wh ich is plugged into the parallel port located on the back of the
printer. The other end of the parallel interface cable connects to the printer connector at the
host computer.
For pinout information, refer to Parallel Interface on page 58.
26 TLP 2824-Z User Guide 980533-001 A
Page 27

Ethernet Interface Requirements
Ethernet provides a powerful networking capability that can be of use in a variety of internet/
intranet printing solutions. After yo u load media and close the top cover, you can press the test
button next to the connector on the rear of the printer to get an et hernet configuration label.
Serial Interface Requirements
The standard cable must have a nine-pin “D” type (DB-9P) male connect or on one e nd, which
is plugged into the mating (DB-9S) serial port located on the back of the printer.
On Ethernet boards, there is an optional serial interface used for factory tests.
The other end of the signal interface cable connects to a serial port at the host compu ter.
Depending on the specific interface requirements, this will most likely be a straight-through
cable.
For pinout information, refer to Serial (RS-232) Connector on page 60.
Communicating with the Printer
Getting Started
Hooking Up the Printer and Computer
Universal Serial Bus (USB) Communications
The printer is a terminal device when using a universal serial bus interface. You can refer to
the Universal Serial Bus Specification for details regarding this interface.
Parallel Communications
When using the parallel port, typically there is no setup is required once the cable is plugged
in. If you should encounter any problems, consult the user’s guide that came with your
computer.
Internal ZebraNet® PrintServer II™ Ethernet Communications
You can refer to the ZebraNet® PrintServer II™ for Ethernet Networks Installation and
Operation Guide for details regarding this interface.
Serial Communications
Serial communications between the printer and the host computer can be set by either
autobaud synchronization or the
Autobaud
^SC command.
Autobaud synchronization allo ws the printer to automatically ma tc h the communication
parameters of the host computer. To autobaud:
1. Press and hold the feed button until the green status LED flashes once, twice, and then
three times.
2. While the status LED flashes, send a ZPL II form at to the printer.
980533-001 A TLP 2824-Z User Guide 27
Page 28

Getting Started
Adjusting the Print Width
3. When the printer and host are synchronized, the LED changes to solid green. (No labels
will print during autobaud synchronization.)
^SC Command
Use the Set Communications (^SC) command to change the communications settings on the
printer.
4. With the host computer set at the same communications settin gs as the printer, send the
^SC command to change the printer to the desired settings.
5. Change the host computer settings to match the new printer settings.
Refer to the ZPL II Programming Guide for more information about this command.
Default the Serial Parameters
T o reset the communi cations parameters on the printe r to the factory defaults (9600 baud, 8 b it
word length, no parity, 1 stop bit, and XON/XOFF), do the following:
6. Press and hold the feed button until the green status LED flashes once, twice, and then
three times.
7. While the status LED rapidly flashes amber and green, press the feed button.
Adjusting the Print Width
Print width must be calibrated when:
• You are using the printer for the first time.
• There is a change in the width of t he media.
Print width may be set by way of the five-flash sequence in “Feed Button Modes” (see page )
or refer to the Print Width (
^PW) command (consult your ZPL II Programming Guide).
Adjusting the Print Quality
Print quality is influenced by the heat of th e p ri nt hea d, t he speed of the media and the type of
media you are using. Only by experimenting will you find the optimal mix fo r your
application.
The relative darkness setting is controlled by either the six-flash sequence in “Feed Button
Modes” (see page ) or the Set Darkness (
ZPL II Programming Guide).
If you find that the print speed needs t o be a djusted, refer to the Prin t Rate (
the ZPL II Programming Guide.
~SD) ZPL II command (follow the instructions in the
^PR) command in
28 TLP 2824-Z User Guide 980533-001 A
Page 29

Operations & Options
This section helps you get the most from your printer.
You must use programming to control many of the printer’s functions.
Example • The ~JL command controls label length.
3
^XA^MTD^XZ command changes the printing mode to direct thermal; the
The
^XA^MTT^XZ command changes the printing mode to thermal transfer.
^XA^JUS^XZ command saves the new settings to flash memory
The
For detailed information about creating labels using ZPL II, refer to the ZPL II Programming
Guide or visit our web site at www.zebra.com.
T o improve print quality, changing both print speed and density may be required to achieve the
desired results. Your applicatio n’s printer driver provides control of the speed and heat
(density).
980533-001 A TLP 2824-Z User Guide 29
Page 30

Operations & Options
Thermal Printing
Thermal Printing
Caution • The print head becomes hot while printing. To protect from damaging the print
head and risk of personal injury, avoid touching the print head. Use only the cleaning pen
to perform maintenance.
Caution • The discharge of electrostatic energy that accumulates on the surface of the
human body or other surfaces can damage or destroy the print head or electronic
components used in this device. You must observe static-safe procedures when working
with the print head or the electronic components under the top cover.
You must use the correct media for the type of printing you require. When printing without a
ribbon, you must use direct thermal media. When using ribbon, you must use thermal transfer
media. The printer’s ribbon sensor detects motion of the supply spindle.
30 TLP 2824-Z User Guide 980533-001 A
Page 31

Replacing Supplies
If labels or ribbon run out while printing, leave the printer p ower on while re loading (dat a loss
results if you turn off the printer). After you load a new label or ribbon roll, press the Feed
button to restart.
Always use high quality, approved labels, tags and ribbons. If adhesive backed labels are used
that don’t lay flat on the backing liner, the exposed edges may stick to the label guides and
rollers inside the printer, causing the label to peel off from the liner and jam the printer.
Permanent damage to the print head may result if a non-approved ribbon is used as it may be
wound incorrectly for the printer or contain ch emicals corrosive to the print head. Approved
supplies can be ordered from your dealer.
Adding a New Transfer Ribbon
If ribbon runs out in the middle of a print job, the indicator lights red and the printer waits for
you to add a fresh roll.
1. Keep the power on as you change ribbon.
2. Open the top cover, then cut the used ribbon so you ca n remove the cores.
Operations & Options
Replacing Supplies
3. Load a new ribbon roll. If necessary, review the Ribbon Loading steps.
4. Close the top cover.
5. Press the Feed button to restart printing.
Replacing a Partially Used Transfer Ribbon
To remove used transfer ribbon, perform the following steps.
1. Cut the ribbon from the take-up roll.
2. Remove the take-up roll and discard used ribbon.
3. Remove the supply roll and tape the end of any fresh ribbon to prevent it from
unwrapping.
When reinstalling a partially used sup ply roll, tape the cut e nd onto the empty t ake-up ro ll.
980533-001 A TLP 2824-Z User Guide 31
Page 32

Operations & Options
Printing in Peel-Mode
Printing in Peel-Mode
The optional dispenser allows you to print in “peel-mode” where the label backing follows a
different path and the labels are presented one at a time for subsequent placement.
Before using peel-mode, you must send the programming commands t o t he printer.
Refer to your ZPL II Programmer’s Manual.
1. Remove several labels from the backing material.
2. Open the top cover.
3. Open the dispenser door.
4. Using a stylus, switch on the label-taken sensor.
5. Insert the backing in front of the peel bar and behind the peel roller.
6. Close the dispenser door.
7. Close the top cover.
8. Press the Feed button to advance the label.
^XA ^MMP ^XZ
^XA ^JUS ^XZ
9. During the print job, the printer will peel off the backing and present a single label. Take
the label from the printer so it will print the next label.
32 TLP 2824-Z User Guide 980533-001 A
Page 33

Operations & Options
Printing in Peel-Mode
980533-001 A TLP 2824-Z User Guide 33
Page 34

Operations & Options
Printing on Fan-Fold Media
Printing on Fan-Fold Media
Printing on fan-fold media requires you to set both the media hangers and the media guides in
position.
1. Open the top cover.
2. Open the hangers to their widest position.
3. Snap the holder-open lock towards the fron t o f the printer.
4. With a sample of your media, adjust the guides to the width of the media. The guides
should just touch, but not restrict, the edges of the media.
5. Insert the media through the slot at the rear of the printer.
6. Run the media between the hangers and guides.
7. Close the top cover.
34 TLP 2824-Z User Guide 980533-001 A
Page 35

Using the Cutter Option
Printers that have a bezel with a motorized blade can dispense one or more forms that are then
automatically cut from the media su pply. This option cuts through continuous paper from ro lls
and liner between labels. Keep the cutter dry. Never use any solutions or solvents to clean the
blade.
Operations & Options
Using the Cutter Option
Use the
gap distance. See the ZPL II Programmer's Manual.
If the blade cuts through labels, adhesive can jam the cutter.
^MM command to activate the cutter and the ^LL comma nd to set th e form length and
1. Turn OFF (O) printer po wer and unplug the power and interface cables before cl earing the
cutter.
2. After removing debris, plug in the power and interface cables, turn on the printer, then test
for normal operation.
980533-001 A TLP 2824-Z User Guide 35
Page 36

Operations & Options
Using the Cutter Option
36 TLP 2824-Z User Guide 980533-001 A
Page 37

Cleaning
4
Maintenance
When you clean the printer, use one of the following supplies that best suits your needs:
:
Cleaning Supplies
Cleaning pens (12)
Cleaning swabs (25)
The cleaning process takes just a couple of minutes using the steps outlined below.
Printer Part Method Interval
Print head Let the print head to cool for a minute, then use a
new cleaning pen to swab the the thin gray line
on the print head from end to end.
NOTE: You do not have to turn off the printer to
do this.
Platen roller See “Platen Considerations” in the Maintenance
chapter. Manuall y rotate the plat en roller. Clean
it thoroughly with 95% medical-grade alcohol
and a cleaning swab, cleaning card, or lint-free
cloth.
Peel bar Clean it thoroughly with 95% medical-grade
Te a r b a r
Media path
Exterior Water-dampened cloth.
alcohol and a cotton swab.
When using ribbon:
after every roll of
ribbon; when using
direct thermal: after
every roll of media.
As needed.
Interior Brush or air blow.
Cutter Use tweezers to remove scraps.
980533-001 A TLP 2824-Z User Guide 37
Page 38

Maintenance
Cleaning
Caution • Adhesives and coatings of media can over time transfer onto the printer
components along the media path including the platen and print head. This build-up can
accumulate dust and debris. Failure to clean the print head, media path and platen roller
could result in inadvertent loss of labels, label jams and possible damage to the printer.
Important •
Using too much alcohol can result in contamination of the elect ronic components
requiring a much longer drying time before the printer will function pro perly.
Print Head Considerations
Always use a new cleaning pen on the print head (an old pen carries contam in ants from its
previous uses that may damage th e print head).
Caution • The print head becomes hot while printing. To protect from damaging the print
head and risk of personal injury, avoid touching the print head. Use only the cleaning pen
to perform maintenance.
When you load new media, you can also clean the print head.
1. Rub the cleaning pen across the dark area of the print head.
2. Wait one minute before closing the printer.
Do not clean the platen roller.
38 TLP 2824-Z User Guide 980533-001 A
Page 39

Media Guide Considerations
Use a cleaning swab or pen to remove debris, dust or crust that has built-up on the holders,
guides and media path surfaces.
1. Use the alcohol in the cleaning swab or pen to soak the debris so that it breaks up.
2. Wipe the knobs to remove accumulated debris.
3. Wipe the inside edges of both edge guides to remove any built-up residue.
4. Wait one minute before closing the printer.
Discard the cleaning swab or pen after use.
Maintenance
Cleaning
980533-001 A TLP 2824-Z User Guide 39
Page 40

Maintenance
Cleaning
Sensors
Dust can accumulate on the media and head-up sensors.
1. Gently blow away dust; if necessary, use a dry swap to brush away dust. If adhesives or
other contaminates remain, use an alcohol moistened swab to break up.
2. Use a dry swab several times to remove any residue that may be left from the first cleaning
.
40 TLP 2824-Z User Guide 980533-001 A
Page 41

Platen Considerations
The standard platen (drive roller) normally does not require clean ing. Pape r and lin er dust can
accumulate without effecting print operations. Contaminates on the platen roller can damage
the print head or cause the media to slip when printing. Adhesive, dirt, general dust, oi ls and
other contaminates should be cleaned immediately off the platen.
Keep a new platen available as a spare and install it whenever the printer has significantly
poorer performance, print quality or media handling. If sticki ng or jamming continues even
after cleaning, you must replace the platen.
The platen can be cleaned with a fiber-free swab (such as a Texpad swab) or a lint free, clean,
damp cloth very lightly moistened with medical grade alcohol (95% pure or better).
1. Open the media door and remove the media.
2. Remove the platen from the printer (refer to the replacement procedure in this section).
3. Clean the platen surface with the alcohol moistened swab. Rotate the platen while
swabbing. Repeat this process tw o to three times with a new swab to remove residual
contaminates. Adhesives and oils, for example, may be thinned by the initial cleaning but
not completely removed.
4. .Install the platen in the printer (refer to the replacement procedure in this section).
Maintenance
Lubrication
5. Discard the cleaning swab or pen after use.
Allow the printer to dry for one minute before loading labels.
Lubrication
Caution • No lubricating agents of any kind should be used on this printer. Some
commercially available lubricants, if used, will damage the finish and the mechanical parts
inside the printer.
980533-001 A TLP 2824-Z User Guide 41
Page 42

Maintenance
Replacing the Platen
Replacing the Platen
Tools • You will need to use a pointed stylus (such as tweezers, small slot-head screwdriver or
razor-knife during this procedure.
Removal
Open the printer and remove any media.
1. Using a pointed stylus (such as tweezers, small slot-head screwdriver, or razor-knife),
unhook the tabs on the right and left sides. Then rotate them forward.
2. Lift the platen out of the printer’s bottom frame.
Assembly
Make sure the right bearing is on the shaft of the platen.
1. Align the platen with the gear to the left and lower it into the printer’s bottom frame.
2. Rotate the tabs back and snap them into place.
A
42 TLP 2824-Z User Guide 980533-001 A
Page 43

Replacing the Print Head
In the event you need to replace the print head, read the procedure and review the removal and
installation steps before actually replacing the print head.
Caution • Prepare your work area by protecting against static discharge. Your work area
must be static-safe and include a properly grounded conductive cushioned mat to hold the
printer and a conductive wrist strap for yourself.
Caution • Turn the printer power off and unplug the power cord before replacing the print
head.
Tools • You will need to use a #2 Phillips driver during this procedure.
Maintenance
Replacing the Print Head
980533-001 A TLP 2824-Z User Guide 43
Page 44

Maintenance
Replacing the Print Head
Thermal-Transfer TLP Model
Before following the steps in this procedure, open the printer by pulling the release latches
forward then lifting the top cover. Remove any ribbon from the carriage.
Removal
1. Grasp the print head spring and pull it to the left; then, slide it free of the carriage.
2. Use the spring to pry the print head clip off the right side of the carriage.
3. Pull the print head and brac ket forward.
4. Use a #2 Phillips driver to remove the screw that holds the ground wire.
5. Unplug both bundles of print head wires from their conn ect ors.
44 TLP 2824-Z User Guide 980533-001 A
Page 45

Maintenance
Replacing the Print Head
Replacing the TLP Print Head (Continued)
Assembly
The new print head comes with the clip and ground screw attached.
1. Detach the wire cover.
2. Detach the ribbon take-up hub.
3. Align the print head and bracket to plug the left and right connectors into the black and
white wire bundles.
4. Attach the ground wire and secure it with the screw). Use a #2 Phillips driver to tighten it.
5. Insert the bracket pegs into the left side of the carriage.
6. Align the right side of the bracket and insert the print head clip through the right side of
the ribbon carriage into the bracket.
7. Slip the left end of the print head spring into the left side of th e ribbo n carriage ; then slide
the right end into the other side. The angle o f the "v" fits into th e indent o n top of the print
head bracket.
8. Attach the ribbon take-up hub.
9. Attach the wire cover.
10. Clean the print head with the cleaning pen.
Reload media and ribbon. Plug in the power cord. Print a status report to ensure proper
function.
980533-001 A TLP 2824-Z User Guide 45
Page 46

Maintenance
Replacing the Print Head
46 TLP 2824-Z User Guide 980533-001 A
Page 47

5
Troubleshooting
What the Status Light is Telling You
LED Status and Color Printer Status
Off Off 1
Solid Green On 2
Flashing Amber Stopped 3
Flashing Green Normal Operation 4
Flashing Red Stopped 5
Double Flashing Green Paused 6
Solid Amber Various 7
Alternately Flashing Green and Red Needs Service 8
Resolutions
1. The printer is not receiving power.
• Have you turned on the printer power?
• Check power connections from the wall outlet to the power supply, and from the power
supply to the printer.
For a Resolution,
Refer to Number:
2. The printer is on and in an idle state.
No action necessary.
980533-001 A TLP 2824-Z User Guide 47
Page 48

Troubleshooting
Resolutions
3. The printer has failed its power on self test (POST).
• If this error occurs right after you turn on the printer, contact an authorized reseller for
assistance.
There is a shortage of memory.
• If this error occurs after you have been printing, turn the printer power off and on. Then,
resume printing.
4. The printer is receiving data.
• As soon as all of the data has been received, the status LED will turn green; then, the
printer will automatically resume operation.
5. Either the media or ribbon is out.
• Load a roll of media, following the instructions in “Loading the Medi a” in the Getting
Started chapter. Then, press the feed button to resume printing.
• Load a roll of ribbon, following the instructions in “Loading the Ribbon” in the Getter
Started chapter. Then, press the feed button to resume printing.
The print head is open.
• Close the top cover. Then, press the feed button to resume printing.
6. The printer is paused.
• Press the feed button to resume printing.
48 TLP 2824-Z User Guide 980533-001 A
Page 49

7. The print head is under temperature.
• Continue printing while the print head reaches the correct operating temperature.
The print head is over temperature.
• Printing will stop until the print he ad cools to an acceptable printing t emperature. When it
does, the printer will automatically resume operation.
8. FLASH memory is not programmed.
• Return the printer to an authorized reseller.
Troubleshooting
Resolutions
980533-001 A TLP 2824-Z User Guide 49
Page 50

Troubleshooting
Print Quality Problems
Print Quality Problems
No print on the label.
• You must use the correct media for the method of printing you require. When printing
without a ribbon, you must use direct thermal media. When using ribbon, you must use
thermal transfer media. The printer's ribbon sensor detects motion of the supply spindle.
• Is the media loaded correctly? Follow the instructions in “Loading the Media”in the
Getting Started chapter.
The printed image does not look right.
• The print head is dirty. Clean the print head.
• The print head is under temperature.
• Adjust the print darkness and/or print speed. Refer to the six-flash sequence in “Feed
Button Modes” later in this chapter, or the
Programming Guide.
• The media being used is incompatible with the printer. Be sure to use the recommended
media for your application, and always use Zebra-approved label s an d tags.
^PR and ~SD commands in the ZPL II
There are long tracks of missing print (blank vertical lines) on
several labels.
• The print head is dirty. Clean the print head.
• The print head elements are damaged. Replace the print head (se e “Replac ing the Print
Head” in the Maintenance chapter).
The ribbon sensor settings did not print.
• The printer is set for direct thermal prin ting; use the ^XA^MTT^XZ command to reset the
printer for thermal transfer printing and calibrate again.
50 TLP 2824-Z User Guide 980533-001 A
Page 51

Troubleshooting
Print Quality Problems
The printing does not start at the top of the label, or misprinting of
one to three labels.
• The media may not be threaded under the media guides. Refer to “Loading the Media” in
the Getting Started chapter.
• The printer needs to be calibrated. Refer to “Auto Calibration” in the Getting Started
chapter.
• The correct media sensor may not be activated. Manual calibration selects the media
sensing method for the labels being used (refer to the
Programming Guide).
• Verify that the Label T op (
ZPL II Programming Guide).
^LT) command is correctly set for your application (consult the
^MN command in the ZPL II
A label format was sent to, but not recognized by, the printer.
• Is the printer in pause mode? If so, press the feed button.
• If the status LED is on or flashing, refer to “What the Status Light is Telling You” in this
chapter.
• Make sure the data cable is correctly installed.
• A communications problem has occurred. First, make sure that the correct
communications port on the computer is selected. Refer to “Communicating with the
Printer” in the Getting Started chapter.
980533-001 A TLP 2824-Z User Guide 51
Page 52

Troubleshooting
Manual Calibration
Manual Calibration
Manual calibration is recommended whe never you are using pre-printed media or if the printer
will not correctly auto calibrate.
1. Make sure media is loaded.
2. Turn on the printer power.
3. Press and hold the feed button until the green status LED flashes once, then twice.
Release the feed button.
4. The printer will set the media sensor for the label backing being used. After it is done
making this adjustment, the roll will automatically feed until a label is positioned at the
print head.
5. A profile of the media sensor settings (similar to the example below) will print. Upon
completion, the printer will save the new settings in memory and the printer is ready for
normal operation.
6. Press the feed button. One entire blank label will feed. If this does not happen, try
defaulting (refer to the four-flash sequence in “Feed Button Modes” later in this chapter)
and recalibrating the printer.
Note • Performing a manual calibration disables the auto calibration function. To return to
auto calibration, default the printer (see the four-flash sequence in “Feed Button Modes” later
in this chapter).
52 TLP 2824-Z User Guide 980533-001 A
Page 53

Troubleshooting Tests
Printing a Configuration Label
To print out a listing of the printer’s current configuration, refer to the one-flash sequence in
“Feed Button Modes” later in this chapter.
Troubleshooting
Troubleshooting Tests
Recalibration
Recalibrate the printer if it starts to display unusual symptoms, such as skipping labels. See
“Printing a Test Label” in the Getting Started chapter.
980533-001 A TLP 2824-Z User Guide 53
Page 54

Troubleshooting
Resetting the Factory Default Values
Resetting the Factory Default Values
Sometimes, resetting the printer to the factory defaults solves some of the problems. Follow
the four-flash sequence instructions in “Feed Button Modes” later in this chapter
Communications Diagnostics
If there is a problem transferring data between the computer and printer, try putting the printer
in the communications diagnostics mode. The printer will print the ASCII cha racters and th eir
respective hexadecimal values (a sample is shown below) for any data received from the host
computer. To find out how, refer to the power off mode procedure in “Feed Button Modes”
later in this chapter.
54 TLP 2824-Z User Guide 980533-001 A
Page 55

Feed Button Modes
With the printer power off, press and hold the feed button while you turn on the power . The printer prints out a listing of
its current configuration. After printing the label, the printer will automatically enter a diagnostic mode in which the
printer prints out a literal representation of all data subsequently received. To exit the diagnostic mode and resume
printing, turn off and then turn on the printer.
With the printer power on and top cover closed, press and hold the feed button for several seconds. The green status
LED will flash a number of times in sequence. The explanation at the right (Action) shows what happens when you
release the key after the specific number of flashes
Flash Sequence Action
*
*
**
*
**
***
*
**
***
****
*
**
***
****
*****
*
**
***
****
*****
******
Troubleshooting
Feed Button Modes
Power Off Mode (Communications Diagnostics Mode)
Power On Modes
A configuration label prints.
The media sensor calibrates and a media sensor profile prints (see “Manual Calibration”
earlier in this chapter).
To reset the communication parameters. Press and release the feed button while the LED
rapidly flashes amber and green.
For autobaud synchronization: Send a ZPL II format to the printer while the LED rapidly
flashes amber and green. When the printer and h ost are synchron ized, the LED changes to
solid green. NOTE: No labels will print during autobaud synchronization.
Resets the factory defaults, auto calibrates, and saves settings into memory.
The print width calibrates. While the status LED alternately flashes green and amber, a
series of stacking rectangles print on the label. When the rectangle prints to the outer
edges of the label, press and release the feed button. The label width and current
communication parameters will be saved into memory.
The print darkness calibrates. A series of nine samples print, starting with the lightest and
ending with the darkest image. When the desired print darkness is achieved, press and
release the feed button. The print darkness will be saved into memory
If the feed button remains pressed after a 7-flash sequence, the printer will ignore the button when it is
released
980533-001 A TLP 2824-Z User Guide 55
Page 56

Troubleshooting
Battery
Battery
The optional Real Time Clock requires a three-volt lithium battery on the main printed circuit
board. You can discern a low or flat b attery if the printer provides a consistently delayed date
stamp. Only a qualified technician observing precautions against both static discharge and
electric shock can replace the battery.
Caution • Risk of explosion if battery is replaced with an incorrect type.
Important •
Recycle batteries according to local your guidelines and regulations.
56 TLP 2824-Z User Guide 980533-001 A
Page 57

Interfaces
Universal Serial Bus (USB) Connector
The figure below displays the cable wiring required to use the printer’s USB interface.
6
Pin No. Description
1 Vbus
2 D–
3 D+
4 Ground
Shell Shield/Drain Wire
For printer supported operating systems and drivers, see the software and documentation CD
or visit the Zebra printer web site a t :
www.zebra.com
For information on the USB interface, go to the USB web site at:
www.usb.or g
980533-001 A TLP 2824-Z User Guide 57
Page 58

Interfaces
Parallel Interface
Parallel Interface
The maximum current available through the interface port is not to exceed a total of 0.75
amps.
Pin No. Description
1 NStrobe/Host Clk
2-9 Data Bits 1-8
10 nACK/PtrClk
11 Busy/Per Busy
12 PError/ACK Dat Req.
13 Select/Xflag
14 NAuto Fd/Host Busy
15 Not Used
16-17 Ground
18 +5 V @ 0.75 A Fused
19-30 Ground
31 nInit
32 NFault/nData Avail.
33-34 Not Used
35 +5 V throught 1.8 K Ohms Resistor
36 NSelectin/1284 active
58 TLP 2824-Z User Guide 980533-001 A
Page 59

ZebraNet® PrintServer II for Ethernet Networks
ZebraNet® PrintServer II for Ethernet Networks
This interface uses an RJ-45 straight-through cable type. The table below provides the pinout
assignments.
Signal Pin Pin Signal
Tx+ 11Tx+
Tx- 22Tx-
Rx+ 33Rx+
--- 44---
--- 55---
Rx- 66Rx-
--- 77---
--- 88---
Interfaces
The figure above has the perspective looking into the printer RJ-45 modular connector.
You can refer to the ZebraNet® PrintServer IITM for Ethernet Networks Installation and
Operation Guide for details regarding this interface.
The RJ-11 jack on Ethernet boards is used for factory tests only.
980533-001 A TLP 2824-Z User Guide 59
Page 60

Interfaces
Serial (RS-232) Connector
Serial (RS-232) Connector
Pin No. Description
1 Not used
2 RXD (receive data) input to the printer
3 TXD (transmit data) output from printer
4 DTR (data terminal ready) output from the printer -- controls when the
host may send data
5 Chassis ground
6 DSR (data set ready) input to the printer
7 RTS (request to send) output from the printer -- always in the ACTIVE
condition when the printer is turned on
8 CTS (clear to send) input to the prin ter
9 +5 V @ 0.75 A fused
The maximum current available through the serial and/or parallel port is not to exceed a total
of 0.75 Amps.
When XON/XOFF handshaking is selected, data flow is cont rolled by the ASCII control c odes
DC1 (XON) and DC3 (XOFF). The DTR control lead will have no effect.
Interconnecting to DTE Devices —The printer is configured as data terminal equipment
(DTE). To connect the printer to other DTE devices (such as the serial port of a personal
computer), use an RS-232 null modem (crossover) cable.
Interconnecting to DCE Devices —When the printer is connected via its RS-232 interface to
data communication equipment (DCE) such as a modem, a STANDARD RS-232 (straight-
through) interface cable must be used.
60 TLP 2824-Z User Guide 980533-001 A
Page 61

Connecting the Printer to a DTE Device
DB-25S
Connector
to DTE Device (PC)
DB-9P
Connector
to Printer
Connecting the Printer to a DCE Device
DB-25S
Connector
to DCE Device (PC)
DB-9P
Connector
to Printer
Serial (RS-232) Connector
DB-9S
Connector
to DTE Device (PC)
DB-9S
Connector
to DCE Device (PC)
Interfaces
DB-9P
Connector
to Printer
DB-9P
Connector
to Printer
980533-001 A TLP 2824-Z User Guide 61
Page 62

Interfaces
Serial (RS-232) Connector
62 TLP 2824-Z User Guide 980533-001 A
Page 63

Page 64

Zebra Technologies Corporation
333 Corporate Woods Parkway
Vernon Hills, Illino is 60061.3109 U.S.A.
T elephone: +1 847.634.6700
Facsimile: +1 847.913.8766
Zebra Technologies Europe Limited
Zebra House
The Valley Centre, Gordon Road
High Wycombe
Buckinghamshire HP13 6EQ, UK
T elephone: +44 (0) 1494 472872
Facsimile: +44 (0) 1494 450103
Customer Order # 980533-001A
© 2004 ZIH Corp.
 Loading...