

Page 1

Safe Operation Practices • Assembly • Operation • Service • Troubleshooting
OperatOr’s Manual
Self Propelled Mower
Rear Wheel Drive
Model Series Q & R
Record Product Information
Before setting up and operating your new mower, please locate
the model plate on the equipment and record the information
in the provided area to the right. You can locate the model plate
by standing at the operator’s position and looking down at
the rear of the deck. This information will be necessary, should
you seek technical support via our web site, Customer Support
Department, or with a local authorized service dealer.
Model NuMber
Serial NuMber
Table of Contents
Safe Operation Practices ........................................ 2
Assembly ................................................................. 8
Adjustment .............................................................. 9
Operation ................................................................10
Service and Maintenance ......................................12
Troubleshooting .....................................................12
Spanish ....................................................................15
Parts/Warranty .............. See Separate Supplement
WARNING
Read and follow all safety rules and instructions in this manual before attempting to operate this machine. Failure to comply
with these instructions may result in personal injury - SAVE THESE INSTRUCTIONS.
WARNING
CALIFORNIA PROPOSITION 65
Engine Exhaust, some of its constituents, and certain vehicle components contain or emit chemicals known to State of
California to cause cancer and birth defects or other reproductive harm.
NOTE: This Operator’s Manual covers several models. Features may vary by model. Not all features in this manual are applicable to all
models and the model depicted may differ from yours.
Form No. 769-18650A
(January 17, 2019)
Page 2

SAFE OPERATION PRACTICES
WARNING
This symbol points out important safety instructions which, if not followed, could endanger the personal safety and/or property of yourself and
others. Read and follow all instructions in this manual before attempting to operate this machine. Failure to comply with these instructions may
result in personal injury. When you see this symbol. HEED ITS WARNING!
DANGER
This machine was built to be operated according to the safe operation practices in this manual. As with any type of power equipment, carelessness or error on
the part of the operator can result in serious injury. This machine is capable of amputating fingers, hands, toes and feet and throwing debris. Failure to observe
the following safety instructions could result in serious injury or death.
General Information
1. Read, understand, and follow all instructions on the
mower and in the manual(s) before attempting to
assemble and operate. Keep this manual in a safe
place for future and regular reference and for ordering
replacement parts.
2. Be familiar with all controls and their proper operation.
3. Never allow children under 14 years of age to operate this
mower. Children 14 and over should read and understand
the instructions and safe operation practices in this
manual and on the mower and should be trained and
supervised by an adult.
4. Never allow adults to operate this mower without proper
instruction.
5. If situations occur which are not covered in this manual,
use care and good judgment. Contact your customer
service representative for assistance.
6. According to the U.S. Consumer Products Safety
Commission (CPSC) and the U.S. Environmental Protection
Agency (EPA), this product has an estimated useful life of
seven (7) years, under ordinary use conditions. At the end
of its useful life, have the product inspected annually to
ensure all mechanical and safety systems are operating
properly, safely, and are not worn excessively. Failure to
do so may result in accident, injury, or death.
Preparation before Operating
1. Thoroughly inspect the area where the mower is to be
used. Remove all stones, sticks, wire, bones, toys, and
other foreign objects which could be tripped over or
picked up and thrown by the blade(s). Thrown objects can
cause serious personal injury.
2. To help avoid blade contact or a thrown object injury, stay
in the operator zone behind the mower handles. Keep
helpers at least 75 feet (23 meters) from the mower while
it is in operation. Keep bystanders, children and pets
inside while the mower is in operation. Stop mower if
anyone enters the area.
3. Be aware of the mower and attachment discharge
direction and do not point the mower discharge at
anyone.
4. Always wear safety glasses or safety goggles during
operation and while performing an adjustment or repair
to protect your eyes. Thrown objects which ricochet can
cause serious injury to the eyes.
5. Wear sturdy, rough-soled work shoes and close-fitting
slacks and shirts. Loose fitting clothes, jewelry and long
hair can be caught in moving parts. Shirts and pants
that cover the arms and legs and steel-toed shoes are
recommended.
6. Never operate mower in bare feet, sandals, slippery or
light-weight (e.g. canvas) shoes.
7. Never over fill fuel tank. Fill tank to no more than 1” (2.5
cm) below bottom of filler neck to allow space for fuel
expansion.
8. Replace gasoline cap and tighten securely.
9. Use only accessories and attachments approved for this
mower by the mower manufacturer. Read, understand
and follow all instructions provided with the approved
accessory or attachment.
Operating
1. Data indicates that operators, age 65 years and above, are
involved in a large percentage of mower-related injuries.
These operators should evaluate their ability to operate
the mower safely enough to protect themselves and
others from serious injury.
2. Many injuries occur as a result of the mower being pulled
over the foot during a fall caused by slipping or tripping.
Do not hold on to the mower if you are losing your
balance or footing; immediately release the handle.
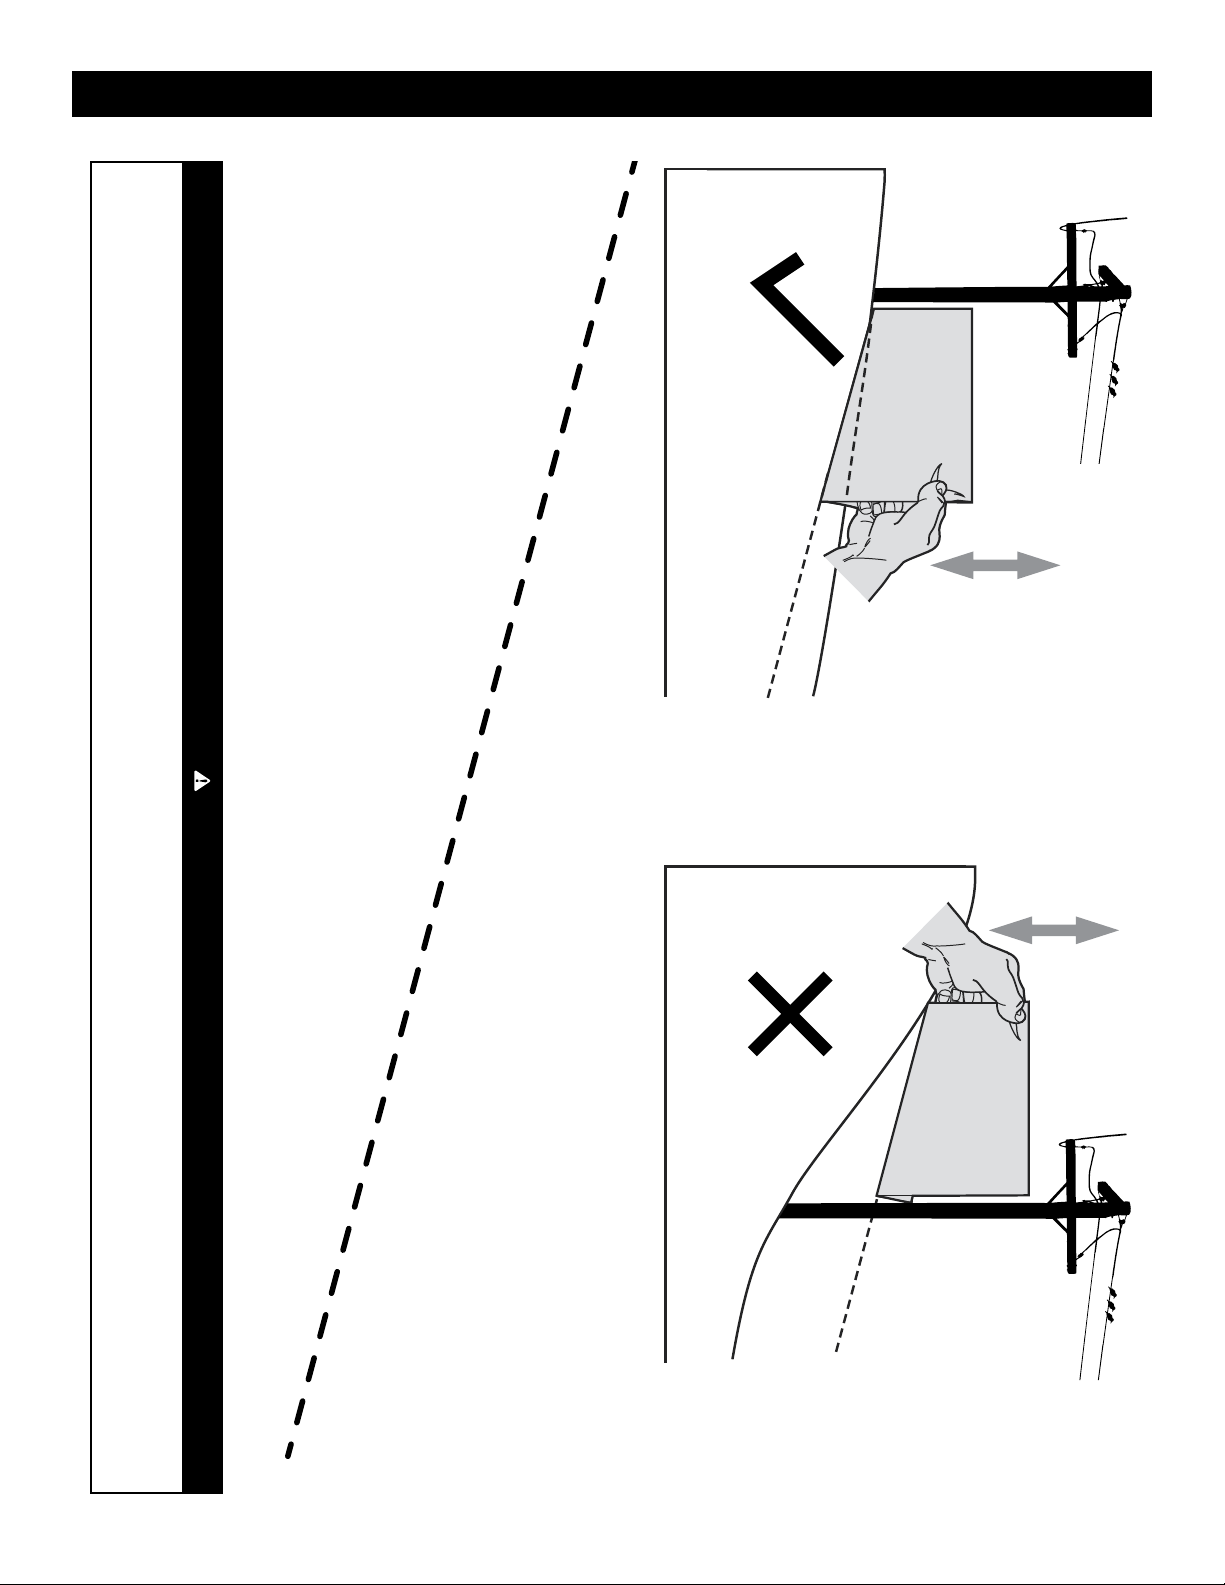
3. Never pull the mower back toward you while you are
walking. If you must back the mower away from a wall or
obstruction first look down and behind to avoid tripping
and then follow these steps:
a. Step back from mower to fully extend your arms.
b. Be sure you are well balanced with sure footing.
c. Pull the mower back slowly, no more than half way
toward you.
d. Repeat these steps as needed.
4. Do not engage the drive control (if equipped) while
starting engine.
2
Page 3

SAFE OPERATION PRACTICES
5. The blade control is a safety device. Never attempt to
bypass its operation. Doing so makes the safety device
inoperative and may result in personal injury through
contact with the rotating blade. The blade control must
operate freely in both directions and automatically return
to the disengaged (off) position when released. The
cutting blade continues to rotate for up to three seconds
after the blade control is released. Never place any part of
the body in the blade area until you are certain the blade
has stopped rotating.
6. If the mower should start to vibrate abnormally, stop the
engine and check immediately for the cause. Vibration is
generally a warning of trouble.
7. Never operate mower without the proper trail shield,
discharge cover, grass catcher, blade control or other
safety protective devices in place and working. Never
operate mower with damaged safety devices. Failure to
do so can result in personal injury.
8. When starting engine, pull cord slowly until resistance
is felt, then pull rapidly. Rapid retraction of starter cord
(kickback) will pull hand and arm toward engine faster
than you can let go. Broken bones, fractures, bruises or
sprains could result.
9. Do not put hands or feet near rotating parts or under the
cutting deck. Contact with the blade(s) can amputate
hands and feet.
10. Watch for holes, ruts, bumps, rocks, or other hidden
objects. Uneven terrain or hidden objects could cause a
slip and/or trip accident. Tall grass can hide obstacles.
11. Your mower is designed to cut normal residential grass
of a height no more than 7” (17.5 cm). Do not attempt
to mow through unusually tall, dry grass (e.g., pasture) or
piles of dry leaves.
12. Plan your mowing pattern to avoid discharge of material
toward roads, sidewalks, helpers and the like. Avoid
discharging material against a wall or obstruction which
may cause discharged material to ricochet back toward
the operator.
13. Shut the engine off and wait until the blade comes to
a complete stop before removing the grass catcher or
unclogging the chute. The cutting blade continues to
rotate for up to three seconds after the blade control is
released. Never place any part of the body in the blade
area until you are certain the engine is off and the blade
has stopped rotating.
14. A missing or damaged discharge door, chute or mulch
plug can cause blade contact or thrown object injuries.
15. Do not operate the mower without the discharge door,
chute, mulch plug or the entire grass catcher in its proper
place.
16. Stop the mower blade when crossing gravel drives, walks,
or roads and while not cutting grass.
17. Mow only in daylight or good artificial light.
18. Do not operate the mower while under the influence of
alcohol or drugs.
19. The muffler and engine become very hot and can cause
serious burn injuries. Do not touch. Allow the mower to
cool for at least five minutes before storing or attempting
any service.
20. Never run an engine indoors or in a poorly ventilated
area. Engine exhaust contains carbon monoxide, an
odorless and deadly gas.
Children
1. Tragic accidents can occur if the operator is not alert to
the presence of children. Children are often attracted
to the mower and the mowing activity. They do not
understand the dangers. Never assume that children will
remain where you last saw them.
2. Keep bystanders, children and pets inside while
the mower is in operation under watchful care of a
responsible adult other than the operator. Stop mower if
anyone enters the area.
3. Be alert and turn mower off if a child or bystander enters
the area.
4. Never allow children under 14 years of age to operate this
mower. Children 14 and over should read and understand
the instructions and safe operation practices in this
manual and on the mower and should be trained and
supervised by an adult.
5. This mower is a precision piece of power equipment, not
a plaything. Therefore, exercise extreme caution at all
times. This mower has been designed to perform one job:
to mow grass. Do not use it for any other purpose.
6. Use extreme care when approaching blind corners,
doorways, shrubs, trees or other objects that may block
your vision of a child who may run into the path of the
mower.
7. Keep children away from hot or running engines. They
can suffer burns from a hot engine or muffler.
8. If your mower is equipped with an Electric Start Push
Key, remove the key when the mower is unattended to
prevent unauthorized operation. Make certain the key is
inaccessible to small children.
Slope Operation for Walk-Behind Mowers
1. Slopes are a major factor related to slip and fall accidents
which can result in severe injury or death. All slopes
require extra caution. If you feel uneasy on the slope, do
not mow it.
2. For your safety, measure any slope before using the
mower on the sloped area. Use a slope measuring device
in addition to the slope gauge included as part of this
manual to measure slopes before operating this mower
on a sloped or hilly area. Smart phone applications can be
also utilized to measure slopes. If the slope is greater than
15 degrees (25%) as shown on the slope gauge or a slope
measuring device, do not operate this mower on that area
or serious injury could result.
3. Do not mow on slopes greater than 15 degrees (25%).
3
Page 4

SAFE OPERATION PRACTICES
4. Only mow across slopes, never mow up and down slopes.
5. The mower may speed up when turning downhill, always
turn uphill. Maintain control of the mower at all times.
6. Do not mow on wet grass. Unstable footing could cause
slipping.
7. Do not operate the mower under any conditions where
traction or stability is in question. Always be sure of your
footing. A slip and fall can cause serious personal injury.
If you feel you are losing your balance or footing, release
the blade control handle immediately and the blade will
stop rotating within three (3) seconds.
8. Stay at least 3 feet (1 meter) from drop-offs, ditches,
embankments or the edge of water. You could lose your
balance or footing.
Fire & Fuel
1. To avoid personal injury or property damage use extreme
care in handling gasoline. Gasoline is extremely
flammable and the vapors are explosive. Serious
personal injury can occur when gasoline is spilled on
yourself or your clothes which can ignite. Wash your skin
and change clothes immediately.
2. Extinguish all cigarettes, cigars, pipes and other sources
of ignition.
3. Only use an approved portable fuel (gasoline) container.
Use only containers certified by EPA, CARB, and/or OSHA.
4. Never remove gas cap or add fuel while the engine is hot
or running. Allow engine to cool at least five minutes
before refueling.
5. Never fuel the mower indoors.
6. Never store the mower or fuel container inside where
there is an open flame, spark or pilot light as on a water
heater, space heater, furnace, clothes dryer or other gas
appliances.
7. If fuel is spilled, wipe it off the engine and mower. Clean
up oil or fuel spillage and remove any fuel soaked debris.
Move the mower to another area. Wait at least 5 minutes
before starting the engine.
8. To reduce fire hazards, keep mower free of grass, leaves,
or other debris build-up. Follow the “Maintenance
Schedule” in the Service and Maintenance section to keep
your mower free of debris.
9. Never over fill fuel tank. Fill tank to no more than 1”
(25mm) below bottom of filler neck to allow space for fuel
expansion.
10. Replace gas cap and tighten securely.
11. Allow a mower to cool at least five minutes before fueling
or storing.
12. Never fill containers inside a vehicle or on a truck or trailer
bed with a plastic liner. Always place containers on the
ground away from your vehicle before filling.
13. When practical, remove gas-powered equipment from
the truck or trailer and refuel it on the ground. If this is not
possible, then refuel such equipment on a trailer with a
portable container, rather than from a gasoline dispenser
nozzle.
14. Keep the nozzle in contact with the rim of the fuel tank or
container opening at all times until fueling is complete.
Do not use a nozzle lock-open device.
Service
1. Keep the mower in good working order. Replace worn or
damaged parts.
2. To avoid serious injury or death, do not modify engine in
any way. Tampering with the governor setting can lead
to a runaway engine and cause it to operate at unsafe
speeds. Never tamper with factory setting of engine
governor. Do not change the engine governor settings
or over-speed the engine. The governor controls the
maximum safe operating speed of the engine.
3. Mower blades are sharp. Wrap the blade or wear gloves,
and use extra caution when servicing them.
4. Before cleaning, repairing, or inspecting, make certain the
blade and all moving parts have stopped. Disconnect the
spark plug wire and ground against the engine to prevent
unintended starting.
5. Ensure the blade comes to a complete stop within (3)
three seconds after operating the blade control. If the
blade do not stop in less than three seconds, your mower
must be serviced professionally by an authorized service
dealer. Check for proper operation per the Maintenance
Schedule in the Service and Maintenance section.
6. Regularly check the safety interlock system for proper
function, as described later in this manual. If the safety
interlock system does not function properly, have your
mower serviced professionally by an authorized service
dealer.
7. Never tamper with the blade control safety interlock or
other safety devices. Check for proper operation per the
Maintenance Schedule in the Service and Maintenance
section.
8. Check the mower blade and engine mounting bolt torque
in accordance to the Maintenance Schedule in the Service
and Maintenance section in this manual. Also, visually
inspect blade for damage (e.g., excessive wear, bent,
cracked). Replace the blade with the original equipment
manufacturer’s (O.E.M.) blade only.
9. Use of service parts which do not meet the original
equipment specifications may lead to improper
performance and compromise safety.
10. Keep all nuts, bolts, and screws tight to be sure the
equipment is in safe working condition. Check all
hardware for tightness per the Maintenance Schedule in
the Service and Maintenance section.
4
Page 5

SAFE OPERATION PRACTICES
11. After striking a foreign object, stop the engine,
disconnect the spark plug wire(s) and ground against the
engine. Thoroughly inspect the mower for any damage.
Repair the damage before starting and operating
12. Never attempt to make wheel cutting height adjustments
or repairs to the mower while the engine is running.
13. Grass catcher components and the discharge cover are
subject to wear and damage which could expose moving
parts or allow objects to be thrown. For safety protection,
frequently check components and replace immediately
with original equipment manufacturer’s (O.E.M.) parts
only, listed in this manual. “Use of parts which do not
meet the original equipment specifications may lead to
improper performance and compromise safety”
14. Maintain or replace safety and instruction labels, as
necessary.
15. Observe proper disposal laws and regulations for gas, oil,
etc. to protect the environment.
Notice Regarding Emissions
Engines which are certified to comply with California and
federal EPA emission regulations for SORE (Small Off Road
Equipment) are certified to operate on regular unleaded
gasoline, and may include the following emission control
systems: Engine Modification (EM) and Three Way Catalyst
(TWC) if so equipped.
When required, models are equipped with low permeation fuel
lines and fuel tanks for evaporative emission control. California
models may also include a carbon canister. Please contact
Customer Support for information regarding the evaporative
emission control configuration for your model.
Spark Arrestor
WARNING
This mower is equipped with an internal combustion engine and should not
be used on or near any unimproved forest-covered, brush-covered or grasscovered land unless the engine’s exhaust system is equipped with a spark
arrestor meeting applicable local or state laws (if any).
If a spark arrestor is used, it should be maintained in effective
working order by the operator. In the State of California the
above is required by law (Section 4442 of the California Public
Resources Code). Other states may have similar laws. Federal
laws apply on federal lands.
A spark arrestor for the muffler is available through your
nearest engine authorized service dealer or contact the service
department, P.O. Box 361131 Cleveland, Ohio 44136-0019.
5
Page 6

SAFE OPERATION PRACTICES
SAFETY SYMBOLS
This page depicts and describes safety symbols that may appear on this mower. Read, understand, and follow all instructions on the mower before attempting to
assemble and operate.
Symbol Description
WARNING – READ THE OPERATOR’S MANUAL(S)
Read, understand and follow all the safety rules and instructions in the manual(s) and on the mower before
attempting to operate this mower. Failure to comply with this information may result in personal injury or
death. Keep this manual in a safe location for future and regular reference.
DANGER — AVOID AMPUTATION INJURY
Do not put hands or feet near or under the cutting deck. Contact with the blade can amputate hands and feet.
DANGER — AVOID CHILD RUNOVER/BLADE INJURY
Do not mow when children or others are around. To help avoid blade contact or a thrown object injury, stay in
the operator zone behind the mower handles. Keep helpers at least 75 feet (23 meters) from the mower while
it is in operation. Keep bystanders, children and pets inside while the mower is in operation. Stop mower if
anyone enters the area.
DANGER — AVOID THROWN OBJECT INJURY
Keep helpers at least 75’ (23 meters) from mower during operation. Remove all stones, sticks, wire, bones,
toys, and other foreign objects which could be picked up and thrown by the blade(s). Do not operate the
mower without the discharge cover or entire grass catcher in its proper place.
DANGER — AVOID SLIP AND FALL ON SLOPES
Slopes are a major factor related to slip and fall accidents which can result in severe injury or death. All slopes
require extra caution. If you feel uneasy on the slope, do not mow it. Do not mow on slopes greater than 15
degrees (25%). Only mow across slopes, never mow up and down slopes.
WARNING—GASOLINE IS FLAMMABLE
Allow the engine to cool at least five minutes before refueling.
WARNING— AVOID BURN INJURY
The muffler and engine become very hot and can cause serious burn injuries. Do not touch. Allow the mower to
cool for at least five minutes before storing or attempting any service.
WARNING
Your Responsibility—Restrict the use of this power machine to persons who read, understand and follow the warnings and instructions in this manual
and on the machine.
SAVE THESE INSTRUCTIONS!
6
Page 7
To check the slope, proceed as follows:
1. Remove this page and fold along the dashed line.
2. Locate a vertical object on or behind the slope (e.g. a pole, building, fence, tree, etc.)
3. Align either side of the slope gauge with the object (See Figure 1 and Figure 2 ).
4. Adjust gauge up or down until the left corner touches the slope (See Figure 1 and Figure 2).
5. If there is a gap below the gauge, the slope is too steep for safe operation (See Figure 2 above).
SLOPE GAUGE
Slopes are a major factor related to slip and fall accidents which can result in severe injury or death. All slopes require extra caution.
If you feel uneasy on the slope, do not mow it. Do not mow on slopes greater than 15 degrees (25%). Only mow across slopes, never
mow up and down slopes.
IF A SLOPE IS TOO STEEP FOR SAFE OPERATION!
USE THIS SLOPE GAUGE TO DETERMINE
(OK) (TOO STEEP)
15°/25% dashed line
Slope Gauge
15°/25% Slope
WARNING
Figure 2Figure 1
15°/25%
Slope
7
Page 8
ASSEMBLY
b
(a)
c
(a)
a
Figure 4
IM PORTANT: This mower is shipped without gasoline or oil in the engine. Be certain
to service engine with gasoline and oil as instructed in the Operation section of the
Engine Manual before starting or operating your mower.
NOTE: Reference to right and left hand side of the Lawn Mower is observed from the
operating position.
Unpacking
Opening Carton
1. Cut each corner of the carton vertically from top to bottom.
2. Remove all loose parts:
• Grass Catcher
• Engine Oil
3. Remove loose packing material.
Removing Mower From Carton
1. Lift mower from the rear to detach it from underlying carton material and roll
mower out of carton.
2. Check carton thoroughly for any other loose parts.
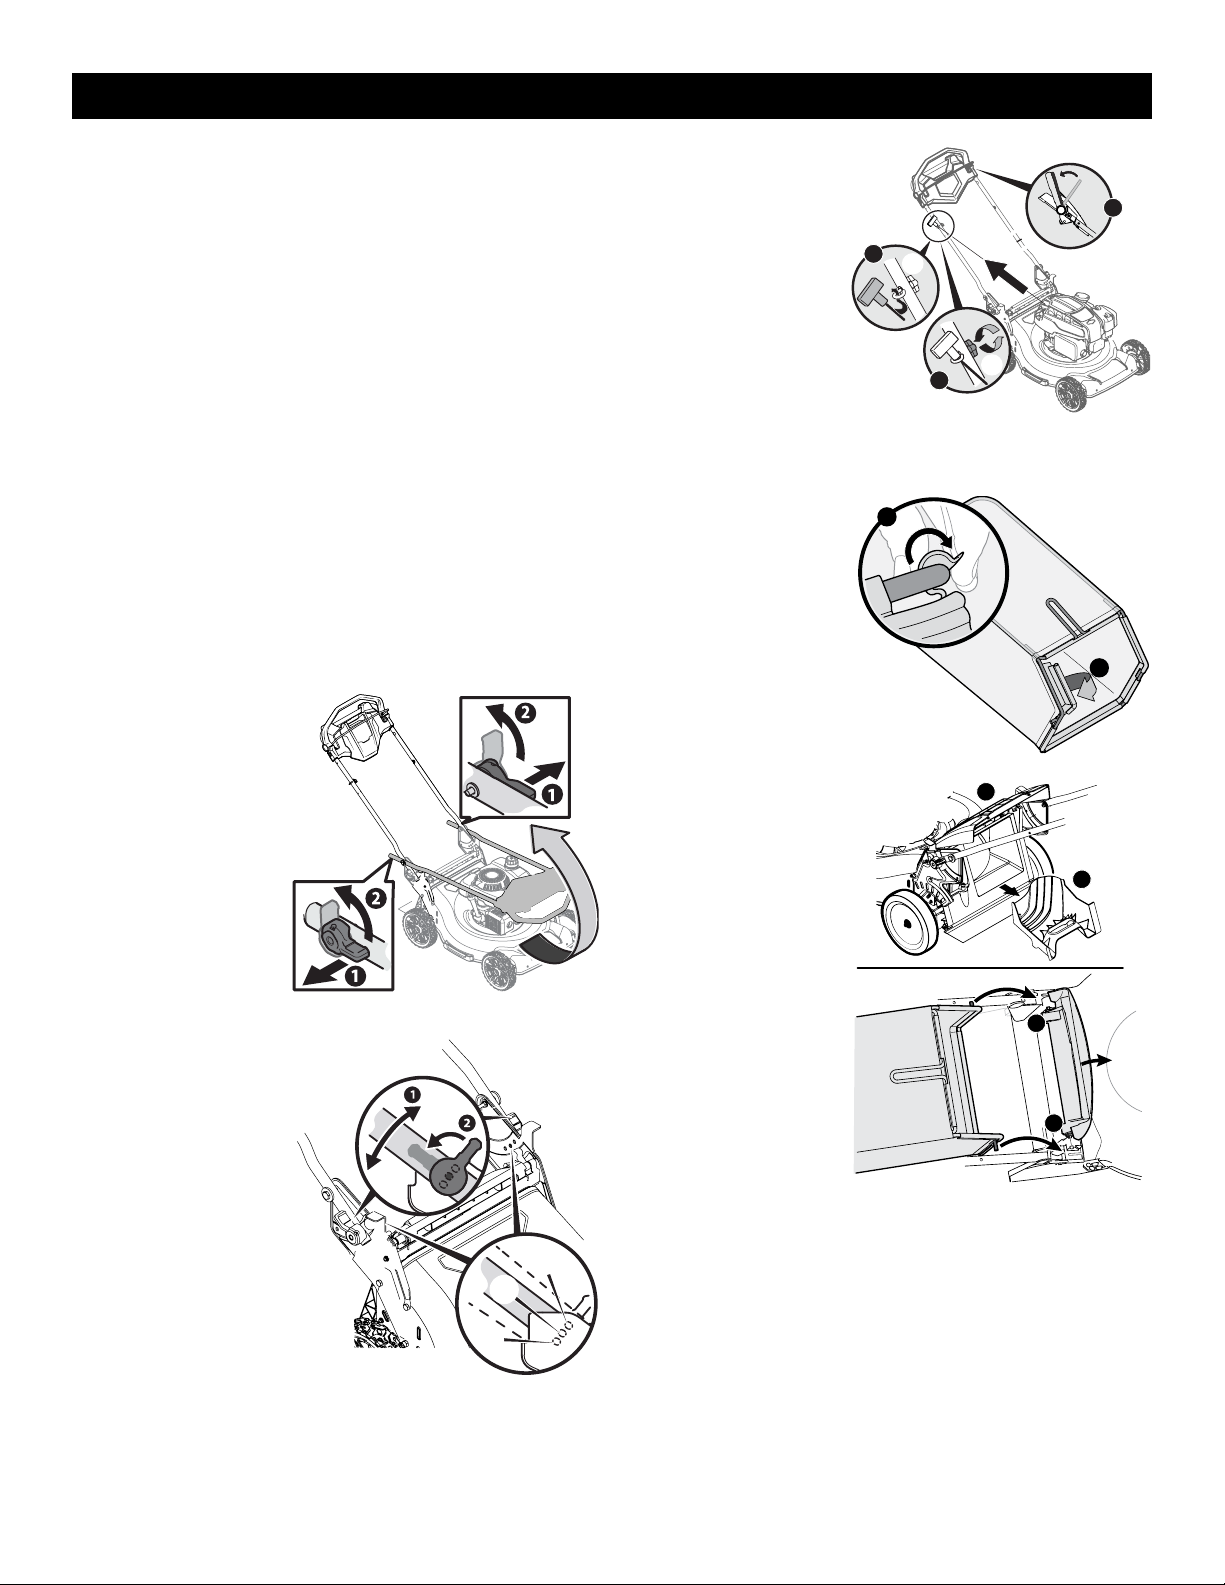
Assembly
Attaching The Handle
1. Remove any packing
material which may be
between upper and lower
handles.
2. Turn the handle
adjustment levers to the
unlocked position to lif t
the handle. See Figure 1.
3. Place the handle into one
of the three handle height
positions, low (a), medium
(b) or high (c), located on
the handle brackets. See
Figure 2.
4. Turn the handle
adjustment levers to the
locked position to secure
the handle.
5. The rope guide is attached
to the right side of the
upper handle. Loosen
the wing knob (a) which
secures the rope guide.
See Figure 3.
Figure 1
(a)
(b)
(c)
a. Hold blade control
against upper handle.
b. Slowly pull recoil
starter rope handle
from engine and slip
starter rope into the
rope guide.
c. Tighten rope guide
wing knob (a).
IM PORTANT: To reduce wear and
allow for proper operation, make
sure to leave some slack in the
Figure 3
upper portion of the cables.
Attaching the Grass Catcher
B
1. Follow steps below to
assemble the grass catcher.
Make certain bag is turned
right side out before
assembling (warning label
will be on the outside). See
Figure 4.
A
a. Place bag over frame
so that its black
plastic side is at the
bottom.
A
b. Slip plastic channel of
grass bag over hooks
on the frame.
2. Follow steps below to
B
attach grass catcher. See
Figure 5.
a. Lift mower rear
discharge door.
b. Remove the mulch
C
plug.
c. Place grass catcher
into the slots
in the handle
C
brackets. Let go of
discharge door so that
it rests on the grass
Figure 5
catcher.
NOTE: To remove grass catcher reverse STEP 2. Lift mower rear discharge door. Lift
grass catcher up and of f the slots in the handle brackets. Reinstall the mulch plug
and lower the rear discharge door.
Figure 2
8
Page 9
ADJUSTMENTS
1
2
3
Lower
Higher
Adjustments
Cutting Height
There are two cutting height adjustment configurations. Refer to the section
applicable to your mower.
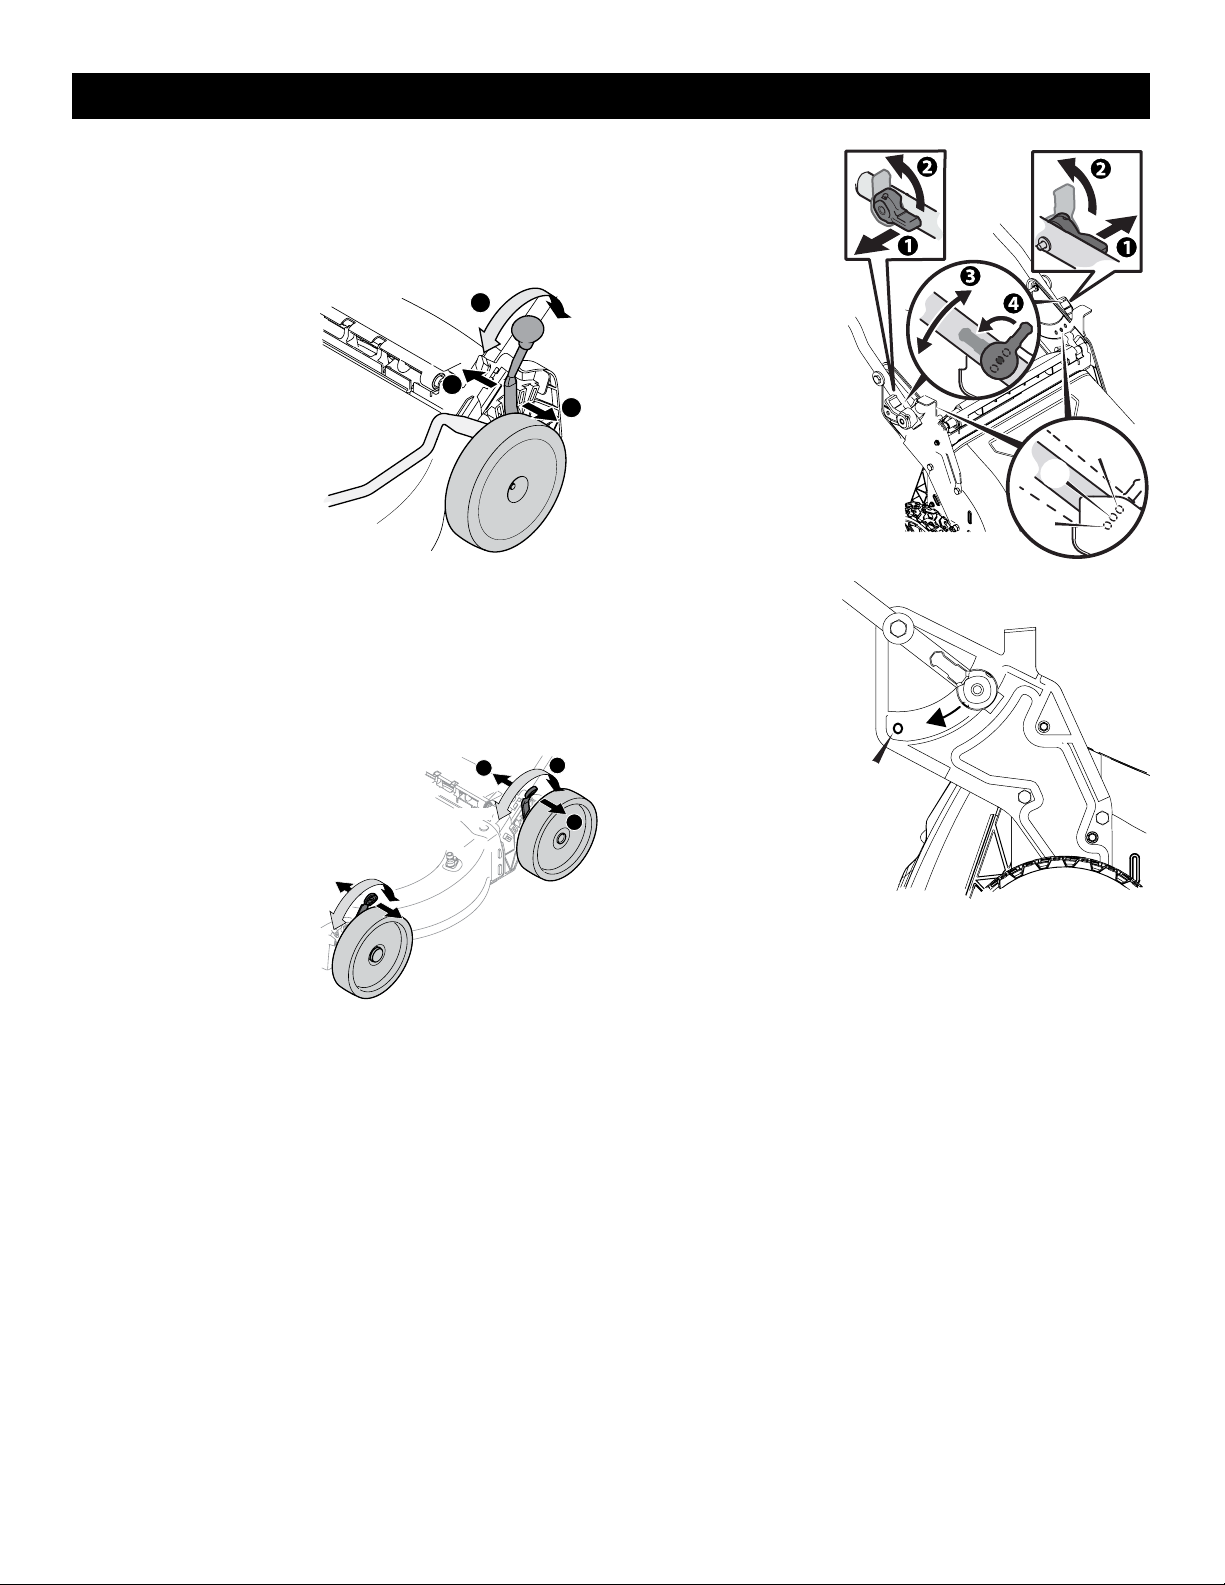
Single Lever
The single lever cutting height
adjustment is located above the rear
left wheel. See Figure 6.
1. Carefully pull the height
adjustment lever outward
towards wheel (mower will
tend to fall when lever is moved
outward).
2. Move lever to desired position
for a change in cutting height.
3. Release lever towards deck.
Dual Lever
The dual lever cutting height adjustment levers are located above the front and rear
left wheel. See Figure 7.
1. Carefully pull the height
adjustment lever outward
towards wheel (mower will
tend to fall when lever is
moved outward).
NOTE: The front and rear
height adjustment levers
move in the opposite
direction to adjust.
2. Move lever to desired
position for a change in
cutting height.
3. Release lever towards deck.
IM PORTANT: All wheels must be placed in the same position. For rough or uneven
lawns, move each height adjustment lever to a higher position. This will prevent you
from cutting the grass too close to the ground.
Lower
r
Higher
Figure 6
Figure 7
Higher
3
2
Lower
1
Handle Pitch
For convenience of operation, you
may adjust the pitch of the handle
as follows:
1. Turn the handle adjustment
levers to the unlocked
position to lift the handle.
See Figure 8.
2. Place the handle into one
of the three handle height
positions, low (a), medium
(b) or high (c), located on
the handle brackets.
3. Turn the handle adjustment
levers to the locked position
to secure the handle.
NOTE: A fourth handle height
position (d) is used for storing
the mower with the handle in the
upright position. See Figure 9.
(a)
(b)
(c)
Figure 8
(d)
Figure 9
9
Page 10

OPERATION
Single Lever Cutting
Height Adjustment*
Blade Control
Mulch Plug
Premium Drive
Control
Rear Discharge
Door
Rear Cutting Height
Adjustment Lever*
Front Cutting Height
Adjustment Lever*
Deck Wash*
Recoil Starter
Grass Catcher
*If Equipped
Blade Control
The blade control is attached to the upper handle of the mower. Depress and squeeze
it against the upper handle to operate the mower. Release it to stop engine and
blade.
WARNING
This blade control is a safety device. Never attempt to bypass its operation.
Premium Drive Control
The premium drive control is located on the upper handle and is used to engage the
drive. Pushing the control for ward will engage the drive. The farther the control is
pushed forward, the faster the mower will propel. Once pressure is released from the
control it will return to the neutral position and the drive will be disengaged.
Cutting Height Adjustment Lever
There are three cutting height adjustment configurations.
Single Lever
The cutting height adjustment lever is located above the rear left wheel. To adjust
the cutting height, refer to Cutting Height Adjustment on page 9.
Dual Lever
The dual lever cutting height adjustment levers are located above the front and rear
left wheels. To adjust the cutting height, refer to Cutting Height Adjustment on page
9.
Figure 10
Grass Catcher
The grass catcher, located at the rear of the mower, is used to collect the grass
clippings for disposal at another site. Once the bag is full, remove it up through the
handles and empty it before any further mowing.
Mulch Plug
The mulch plug is used for mulching purposes. Instead of collecting grass clippings
in a grass catcher the mower has the option of recirculating the clippings back to the
lawn. This is called mulching.
Trail Shield
The trail shield is attached to the rear of the mower and is there to protect the
operator from flying debris. Do not use the mower unless the shield is fully
functional and in place.
Recoil Starter
The recoil starter is attached to the right upper handle. Stand behind the mower and
pull the recoil starter rope to start the mower.
Oil Fill Cap/Dipstick
Refer to the Engine Operator’s Manual packed with your mower for detailed oil
filling, checking and changing instructions.
Deck Wash (If Equipped)
Your mower’s deck may be equipped with a fast attach deck wash nozzle on its
surface as par t of its deck wash system. Use the deck wash to rinse grass clippings
from the deck’s underside.
10
Page 11

OPERATION
GAS AND OIL FILL-UP
IM PORTANT: Refer to the separate Engine Operator’s Manual for additional engine
information.
This mower is shipped without gasoline or oil in the engine. Be certain to service
engine with gasoline and oil as instructed before starting or operating your lawn
mower.
1. Add provided oil before starting mower for the first time as instructed in the
separate Engine Operator’s Manual.
2. Service the engine with gasoline as instructed in the separate Engine
Operator’s Manual.
WARNING
Be sure no one other than the operator is standing near the lawn mower
while starting engine or operating mower. Never run engine indoors or
in enclosed, poorly ventilated areas. Engine exhaust contains carbon
monoxide, an odorless and deadly gas. Keep hands, feet, hair and loose
clothing away from any moving parts on engine and lawn mower.
To Start Engine
Refer to the Engine Operator’s Manual for instructions on starting and stopping the
engine.
To Stop Engine
Release blade control to stop the engine and blade.
WARNING
Wait for the blade to stop completely before performing any work on the
mower or to remove the grass catcher.
Using Your Lawn Mower
Be sure lawn is clear of stones, sticks, wire, or other objects which could damage
lawn mower or engine. Such objects could be thrown by the blade in any direction
and cause serious personal injury to the operator and helpers.
1. Once the engine is running
and while continuing to hold
the blade and drive controls
together, push the drive
control forward to propel
mower. The farther the
control is pushed for ward,
the faster the mower will
propel. See Figure 11.
2. Once pressure is released
from the drive control it will
return to the neutral position
and the mower will stop.
NOTE: For ease of use, while gripping the controls, simply lock your wrist and elbows
and walk - the mower will automatically adjust to your speed.
Fi gur e 11
WARNING
The operation of any lawn mower can result in foreign objects being thrown
into the eyes, which can damage your eyes severely. Always wear safety
glasses while operating the mower, or while performing any adjustments or
repairs.
Using Mower as a Mulcher
For mulching grass, remove the grass catcher from the mower. When you remove the
grass catcher from the mower, ensure the mulch plug (if equipped) is installed and
allow the rear discharge door to close completely. For effec tive mulching, do not cut
wet grass. If the grass has been allowed to grow in excess of four inches, mulching is
not recommended. Use the grass catcher to collect clippings instead.
Using Mower with Grass Catcher
You can use the grass catcher to collect clippings while you are operating the mower.
1. Attach grass catcher following instructions in the Assembly section. Grass
clippings will automatically collect in bag. Operate mower until grass bag is
full.
2. Stop engine by releasing the blade control. Make sure that the engine has
come to a complete stop.
3. Lift rear discharge door and pull grass bag up and away from the mower to
remove the bag. Dispose of the grass clippings and reinstall the bag when
complete.
WARNING
If you strike a foreign object, stop the engine. Disconnec t the spark plug
wire, thoroughly inspect mower for any damage, and repair damage before
restarting and operating. Extensive vibration of mower during operation
is an indication of damage. The mower should be promptly inspected and
repaired.
11
Page 12

MAINTENANCE SCHEDULE
SERVICE AND MAINTENANCE
WARNING
Before performing any type of maintenance/service, disengage all controls
and stop the engine. Wait until all moving parts have come to a complete
stop. Allow the engine to cool. Disconnect spark plug wire and ground it
against the engine to prevent unintended starting.
Check engine oil level
Check that all hardware is in place & secure and tight
Clean grass, chaff and/or accumulated debris from around the engine, exhaust
and the top of the mower.
Check blade stopping time is within 3 seconds
Lube control linkages/pivots and wheels with light oil
Clean underside of mower deck
Check mower blade and engine mounting bolt torque*
Run engine until it stops from lack of fuel, or add stabilizer to a full tank of fresh
fuel prior to storage.
*Mower blade bolt torque: Min. 37.5 ft-lbs (50.8 N-m), Max. 50.0 ft-lbs (67.8 N-m). Engine mounting bolt torque: Min. 29.2 ft-lbs (39.6 N-m), Max. 41.7 ft-lbs (56.3 N-m).
Follow the maintenance schedule given below. This chart describes service guidelines
for the mower only. Use the Service Log column to keep track of completed
maintenance tasks. To locate the nearest Service Center or to schedule service,
contact your dealer or see the service/warranty supplement packed with the mower.
IMPORTANT: See the Engine Operator’s manual packed with the mower for engine
specific service and maintenance schedule.
Each
use
Annually
Before
Storage
Service Log
P
P P
P
P
P
P
P
P
TROUBLESHOOTING
WARNING
Disconnect the spark plug wire and ground it against the engine to prevent unintended starting. Before performing any type of maintenance/service, disengage
all controls and stop the engine. Wait until all moving parts have come to a complete stop. Always wear safety glasses during operation or while performing any
adjustments or repairs.
Problem Cause Remedy
Engine fails to s tart
Engine runs erratic 1. Spark plug boot loose.
Engine overheats 1. Engine oil level lo w.
1. Blade control disengaged.
2. Spark plug boot discon nected.
3. Fuel tank empty or s tale fuel.
4. Engine not primed (If equipped with primer).
5. Faulty spark plug.
6. Engine flooded.
7. Blocked fuel line.
2. Stale fuel.
3. Vent in gas cap plugged.
4. Water or dirt in fuel sy stem.
5. Dirty air cleaner.
6. Blocked fuel line.
2. Air flow restricted.
1. Engage blade control.
2. Connect wire to spar k boot.
3. Fill tank with clean, f resh gasoline.
4. Prime engine as instructed in the Operation section.
5. Clean, adjust gap, or replace.
6. Wait a few minutes to resta rt.
7. Contact yo ur Parts & Repair Center to have f uel line cleaned.
1. Connect an d tighten spark plug boot.
2. Fill tank with clean, fr esh gasoline.
3. Clear vent.
4. Run engine until it stop s from lack of fuel. Ref ill with fresh fuel.
5. Refer to Air Cleaner Maintenance in the Engine Manual.
6. Contact your Part s & Repair Center to have fuel line c leaned.
1. Fill crankcas e with proper oil.
2. Clean area around and on top of e ngine.
Occasional skips (hesitates) 1. Spark plug gap to o close. 1. Adjust gap. Ref er to Spark Plug Maintenance in Engin e Manual.
Idles poorly 1. Spark plug fo uled, faulty, or gap too wide.
2. Dirty air cleaner.
1. Reset gap or re place spark plug.
2. Refer to Air Cleaner Maintenance in the Engine Manual.
12
Page 13

SERVICE AND MAINTENANCE
Figur e 12
Figur e 13
Problem Cause Remedy
Excessive vibration 1. Cutting b lade loose or unbalanced.
2. Bent cutting blade.
Mower will not mulch grass 1. Wet grass.
2. Excessively high grass.
3. Dull blade.
Uneven cut 1. Wheels not positioned correctly.
2. Dull blade.
Mower will not sel f propel 1. Belt not installed properly.
2. Debris clogging drive operation.
3. Damaged or worn belt .
General Recommendations
• Always observe safety rules when performing any maintenance.
• The warranty on this lawn mower does not cover items that have been
subjected to operator abuse or negligence. To receive full value from
warranty, operator must maintain the mower as instructed here.
• Changing of engine-governed speed will void engine warranty.
Lubrication
Blade Control
Lubricate pivot points on the blade control
at least once a season with light oil.
This control must operate freely in both
directions. See Figure 12.
Wheels
Lubricate all wheel hubs/axles at least
once a season with light oil. See Figure 12.
Engine Maintenance
Refer to the Engine Operator’s Manual packed with your mower for a detailed
description of all engine-related service specifications.
Clean Engine
• Daily or before every use, clean grass, chaff or accumulated debris from
engine. Keep linkage, spring, and controls clean. Keep area around and behind
muffler free of any combustible debris.
• Keeping engine clean allows air movement around engine.
• Engine parts should be kept clean to reduce the risk of overheating and
ignition of accumulated debris.
1. Tighten blade a nd adapter. Balance blade.
2. Replace blade.
1. Do not mow when gr ass is wet; wait until later to cut .
2. Mow once at a high cuttin g height, then mow again at desir ed height or make a
narrower cutting path.
3. Sharpen or replace bla de.
1. Adjust cut ting height lever on right f ront and right rear wheel to s ame position.
2. Sharpen or replace blade.
1. Check belt for proper pulley installation and movement.
2. Stop engine, disconnec t spark plug boot, and clean o ut debris.
3. Inspect and, if ne cessary, see your Par ts & Repair Center to have belt replac ed.
Mower Maintenance
Deck Wash (If Equipped)
Your mower’s deck may be equipped with a deck wash system. Use the deck wash to
rinse grass clippings from the deck’s underside and prevent the buildup of corrosive
chemicals. Complete the following steps AFTER EACH MOWING:
1. Push the mower to a level, clear location on your lawn. Ensure your garden
hose can reach your mower.
CAUTION
Make certain the mower’s discharge chute is directed AWAY from your
house, garage, parked cars, etc.
2. Remove the fast attach deck wash nozzle from the mower deck and thread it
onto the end of your garden hose.
3. Attach garden hose with the deck
wash nozzle to the water port on
your deck’s surface. See Figure 13.
4. Turn the water ON.
5. Start the engine as described in the
Engine Operator’s Manual.
6. Run the engine for a minimum
of two minutes, allowing the
underside of the cutting deck to
thoroughly rinse.
7. Release blade control to stop the engine and blade.
8. Turn the water OFF and detach the deck wash nozzle from the water port on
your deck’s surface.
9. After cleaning your deck, restart the mower. Keep the engine and blade
running for a minimum of two minutes, allowing the underside of the cutting
deck to thoroughly dry.
CAUTION
Do not use water to clean engine parts. Water could contaminate fuel
system. Use a brush or dry cloth.
13
Page 14

SERVICE AND MAINTENANCE
Deck Cleaning
At lease once a season clean the underside of the mower deck to prevent build-up of
grass clippings or other debris.
1. Allow the engine to run until it is out of fuel. Do not attempt to pour fuel from
the engine. Disconnect spark plug wire. Refer to Engine Operator’s Manual.
2. Turn mower on its side keeping the muffler side down and making sure that
the air filter and the carburetor are facing up. Hold mower firmly.
3. Scrape and clean the underside of the deck with a suitable tool. Do not spray
with water.
IM PORTANT: Do not use a pressure washer or garden hose to clean your
mower. These may cause damage to bearings, or the engine. The use of water
will result in shortened life and reduce serviceability.
4. Put the mower back on its wheels on the ground.
Drive Adjustment
The drive system consists of pulleys, a belt,
and a cable linking the transmission to the
drive control. As these components wear,
adjustment may be needed. To adjust the
drive perform the following:
1. Weak drive. See Figure 14 a. Loosen jam nut (a).
b. Thread adjustment nut (b)
down, towards the mower base
to lengthen the drive cable.
c. Securely tighten jam nut.
2. Drive control is tight or diff icult to
pull back. See Figure 15 -
a. Loosen jam nut (a).
b. Thread adjustment nut (b) up,
towards the handle to shorten
the drive cable.
c. Securely tighten jam nut.
Fig ure 14
Figur e 15
(a)
(b)
(a)
(b)
Blade Care
6. Remove blade from
the adapter for testing
balance.
a. Balance the blade
on a round shaft
screwdriver to check.
b. Remove metal from
the heavy side until
it balances evenly.
NOTE: When sharpening
the blade, follow the
original angle of grind.
Grind each cutting edge equally to keep the blade balanced.
(d)
(b)
(a)
Fig ure 16
WARNING
An unbalanced blade will cause excessive vibration when rotating at high
speeds. It may cause damage to engine and blade could break causing
personal injury.
7. Lubricate the engine crankshaft and the inner surface of the blade adapter
with light oil. See Figure 16 inset.
a. Slide the blade adapter (d) onto the engine crankshaft.
b. Place the blade on the adapter such that the side of the blade marked
“Grass Side” (or with part number) faces the ground when the mower is
in the operating position.
c. Make sure that the blade is aligned and seated on the blade adapter
flanges.
8. Place blade bell support (b) on the blade (c). Align notches on the blade bell
support with small holes in blade.
9. Replace hex bolt (a) and tighten hex bolt to torque: Min. 37.5 ft-lbs (50.8
N-m), Max. 50.0 ft-lbs (67.8 N-m).
NOTE: To ensure safe operation of your mower, periodically check the blade bolt for
correct torque.
Belt Care
NOTE: Several components must be removed in order to change the mower’s selfpropulsion drive belt. See an authorized Service Center to have your belt replaced.
(c)
WARNING
When removing the cutting blade for sharpening or replacement, protect
your hands with a pair of heavy gloves or use a heavy rag to hold the blade.
Periodically inspect the blade adapter for cracks, especially if you strike a foreign
object. Replace when necessary. Follow the steps below for blade service.
1. Allow the engine to run until it is out of fuel. Do not attempt to pour fuel from
the engine.
2. Disconnect spark plug wire. Refer to Engine Operator’s Manual.
3. Turn mower on its side keeping the muffler side down and making sure that
the air filter and the carburetor are facing up.
4. Remove bolt (a) and blade bell support (b) which hold the blade and the blade
adapter to the engine crankshaft. See Figure 16.
5. Remove blade (c) and adapter (d) from the crankshaft. See Figure 16.
Off-Season Storage
The following steps should be taken to prepare your lawn mower for storage.
• Clean and lubricate mower thoroughly as described in Lubrication section on
page 13.
• Apply a coat of chassis grease to mower’s cutting blade to prevent rusting.
• Refer to Engine Operator ’s Manual for correct engine storage instructions.
• Do not use a pressure washer to clean your mower.
• Store mower in a dry, clean area. Do not store next to corrosive materials, such
as fertilizer.
When storing any type of power equipment in a poorly ventilated or metal storage
shed, care should be taken to rust-proof the equipment. Using a light oil or silicone,
coat the equipment, especially cables and all moving parts of your lawn mower
before storage.
14
Page 15

Prácticas de operación seguras • Montaje • Funcionamiento • Servicio • Solución de problemas
Manual del OperadOr
Cortadora de césped autopropulsada
Transmisión de rueda trasera
Modelo Series Q y R
Registro de información de producto
Antes de configurar y hacer funcionar su nueva cortadora de
césped, por favor localice la placa de modelo en el equipo y
registre la información en el espacio de la derecha. Encontrará
la placa de modelo parándose en la posición del operador y
mirando sobre la parte posterior de la plataforma. Necesitará
esta información si tiene que solicitar soporte técnico a través
de nuestro sitio web, el Servicio de Atención al Cliente, o de un
distribuidor local de servicio autorizado.
NúMero de Modelo
NúMero de Serie
Índice
Prácticas de operación seguras ......................................................................16
Montaje ............................................................................................................ 22
Ajustes ............................................................................................................... 23
Funcionamiento .............................................................................................. 24
Servicio y Mantenimiento .............................................................................. 26
Solución de Problemas ................................................................................... 26
Piezas/Garantía ....... Consulte el suplemento que se adjunta por separado
ADVERTENCIA
Lea y cumpla todas las normas de seguridad y las instrucciones de este manual antes de intentar operar esta máquina. Si no
sigue estas instrucciones, se pueden provocar lesiones personales - GUARDE ESTAS INSTRUCCIONES.
ADVERTENCIA
PROPOSICIÓN 65 DE CALIFORNIA
El escape del motor de este producto, algunos de sus componentes y algunos componentes del vehículo contienen o liberan
sustancias químicas que el estado de California considera que pueden producir cáncer, defectos de nacimiento u otros
problemas reproductivos.
NO TA: Este manual del operador corresponde a varios modelos. Las características pueden variar según los modelos. No todas las
características que se incluyen en este manual se aplican a todos los modelos y el modelo que se ilustra aquí puede diferir del suyo.
Page 16

PRÁCTICAS DE OPERACIÓN SEGURAS
ADVERTENCIA
Este símbolo indica instrucciones de seguridad importantes que, de no seguirse, podría poner en peligro su seguridad personal y/o material y la de
otras personas. Lea y cumpla todas las instrucciones de este manual antes de intentar hacer funcionar esta máquina. Si no sigue estas instrucciones,
se pueden provocar lesiones personales. Cuando vea este símbolo. TENGA EN CUENTA LA ADVERTENCIA.
PELIGRO
Esta máquina está diseñada para ser utilizada respetando las medidas de seguridad contenidas en este manual. Al igual que con cualquier tipo de equipo
motorizado, un descuido o error por parte del operador puede producir lesiones graves. Esta máquina es capaz de amputar dedos, manos y pies y de arrojar
residuos. De no respetar las instrucciones de seguridad siguientes, se pueden ocasionar lesiones graves o la muerte.
Información general
1. Lea, entienda y cumpla todas las instrucciones que
figuran sobre la cortadora de césped y en los manuales
antes de intentar armar la unidad y utilizarla. Guarde
este manual en un lugar seguro para consultas futuras y
periódicas, así como para solicitar repuestos.
2. Familiarícese con todos los controles y su correcto
funcionamiento.
3. No permita nunca que los niños menores de 14 años
utilicen esta cortadora de césped. Los niños de 14 años
en adelante deben leer y entender las instrucciones y
las normas de seguridad contenidas en este manual y
sobre la cortadora de césped, y deben ser entrenados y
supervisados por un adulto.
4. Nunca permita que los adultos operen esta cortadora de
césped sin recibir antes la instrucción apropiada.
5. Si se presentan situaciones que no están previstas en este
manual, tenga cuidado y use el sentido común. Póngase
en contacto con su representante de atención al cliente
para obtener ayuda.
6. De conformidad con la Comisión de Seguridad de
Productos para el Consumidor de los Estados Unidos
(CPSC) y la Agencia de Protección Ambiental de los
Estados Unidos (EPA), este producto tiene una vida útil
estimada de siete (7) años, en condiciones normales
de uso. Al final de su vida útil, se deberá solicitar una
inspección del producto anualmente a fin de asegurarse
de que todos los sistemas mecánicos y de seguridad
funcionen adecuadamente, de manera segura y no
estén excesivamente desgastados. Si no lo hace, puede
ocasionar accidentes, lesiones o la muerte.
Preparativos anteriores al uso
1. Revise minuciosamente el área donde se va a usar la
cortadora de césped. Saque todas las piedras, palos,
cables, huesos, juguetes y otros objetos extraños con los
que podría tropezar o que podrían ser arrojados por la
cuchilla. Los objetos arrojados por la máquina pueden
producir lesiones personales graves.
2. Para evitar lesiones por contacto con la cuchilla o un
objeto arrojado, permanezca en la zona del operador
detrás de las manijas de la cortadora. Indique a los
asistentes que permanezcan al menos a 75 pies (23
metros) de la cortadora mientras está en funcionamiento.
Mantenga a los observadores, los niños y las mascotas en
interiores durante el funcionamiento de la cortadora de
césped. Detenga la cortadora si alguien entra en la zona.
3. Esté atento a la cortadora de césped y a la dirección de
la descarga de los aditamentos y no apunte con ella en
dirección a nadie.
4. Para protegerse los ojos, utilice siempre anteojos o
antiparras de seguridad durante la operación o mientras
realiza ajustes o reparaciones. Los objetos arrojados que
rebotan pueden producir lesiones graves en los ojos.
5. Utilice zapatos de trabajo resistentes, de suela fuerte,
y pantalones y camisas ajustados. Las ropas sueltas,
las alhajas y el cabello largo pueden engancharse en
las piezas móviles. Se recomienda vestir camisas y
pantalones que cubren brazos y piernas y usar zapatos
con puntera de acero.
6. Nunca opere la cortadora descalzo, con sandalias, zapatos
resbalosos o livianos (por ej. de lona).
7. Nunca llene en exceso el depósito de combustible. Llene
el depósito no más de 1" (2.5 cm) por debajo de la base
del cuello de llenado dejando espacio para la expansión
del combustible.
8. Vuelva a colocar la tapa de la gasolina y ajústela bien.
9. Use sólo implementos o accesorios que el fabricante haya
aprobado para esta cortadora de césped. Lea, comprenda
y siga todas las instrucciones incluidas con el accesorio o
implemento aprobado.
Funcionamiento
1. Las estadísticas indican que los operadores mayores de
65 años se ven involucrados en un alto porcentaje de
lesiones relacionadas con cortadoras de césped. Estas
personas deben evaluar su capacidad para operar la
cortadora de césped de manera suficientemente segura
para protegerse a sí mismos y a otros de lesiones graves.
2. Muchas lesiones ocurren como resultado de pasar la
cortadora sobre los pies durante una caída provocada al
patinarse o tropezarse. No se sostenga de la cortadora si
se está cayendo, suelte la manija inmediatamente.
16
Page 17

PRÁCTICAS DE OPERACIÓN SEGURAS
3. Nunca tire la cortadora hacia usted mientras camina. Si
debe retroceder con la cortadora para evitar una pared
u obstáculo, mire primero abajo y atrás para evitar
tropezarse y luego siga estos pasos:
a. Apártese de la cortadora hasta estirar
completamente los brazos.
b. Asegúrese que tiene buen equilibrio y está bien
parado.
c. Jale la cortadora lentamente hacia usted, no más de
la mitad de la distancia entre usted y la cortadora.
d. Repita estos pasos si hace falta.
4. No engrane el control de la transmisión (si viene incluido)
mientras enciende el motor.
5. El mecanismo de control de la cuchilla es un dispositivo
de seguridad. Nunca intente anular su funcionamiento.
De hacerlo, dejarían de operar los dispositivos de
seguridad y podrían producirse lesiones personales por el
contacto con la cuchilla giratoria. El control de la cuchilla
debe funcionar bien en ambas direcciones y regresar
automáticamente a la posición desengranada cuando
se lo suelta. La cuchilla continúa rotando por hasta
tres segundos después de que se suelta el control de la
cuchilla. Nunca coloque ninguna parte del cuerpo en el
área de la cuchilla hasta que esté seguro que la cuchilla
ha dejado de girar.
6. Si la cortadora de césped comienza a vibrar de forma
extraña, detenga el motor y busque inmediatamente la
causa. La vibración generalmente advierte que hay algún
problema.
7. Nunca opere la cortadora sin los escudos apropiados, la
cubierta de descarga, el colector de césped, el control de
la cuchilla u otros dispositivos de seguridad y protección
en su lugar y funcionando. Nunca opere la cortadora si los
dispositivos de seguridad están dañados. De lo contrario
podrían producirse lesiones personales.
8. Para encender el motor, jale de la cuerda lentamente
hasta que sienta resistencia, luego jale rápidamente. El
repliegue rápido de la cuerda de arranque (retroceso o
rebote) le jalará la mano y el brazo hacia el motor más
rápido de lo que usted tarda en soltarla. Puede llegar a
causar huesos rotos, fracturas, hematomas y esguinces.
9. No ponga las manos ni los pies cerca de las piezas
rotatorias ni debajo de la plataforma de corte. El contacto
con la(s) cuchilla(s) puede amputar manos y pies.
10. Esté atento a los hoyos, surcos, baches, rocas, u otros
objetos ocultos. Los terrenos desnivelados u objetos
ocultos pueden causar derrapes y/o caídas. El césped alto
puede ocultar obstáculos.
11. La cortadora está diseñada para cortar césped residencial
normal, con una altura no mayor a 7” (17.5 cm). No
intente cortar césped demasiado crecido, seco (como un
pastizal) ni pilas de hojas secas.
12. Planifique el patrón de corte, para evitar que la descarga
de material se realice hacia los caminos, las veredas, los
asistentes, etc. Evite descargar material contra una pared
u obstrucción, ya que esto podría hacer que el material
descargado rebotara contra el operador.
13. Apague el motor y espere hasta que la cuchilla se detenga
completamente antes de retirar el colector de césped o
de desbloquear el canal. La cuchilla continúa rotando por
hasta tres segundos después de que se suelta el control
de la cuchilla. Nunca coloque ninguna parte del cuerpo
en el área de la cuchilla hasta que esté seguro que el
motor está apagado y la cuchilla ha dejado de girar.
14. Una puerta de descarga, canal o adaptador para abono
faltante o dañado puede provocar lesiones por contacto
con la cuchilla o por objetos arrojados.
15. Nunca opere la cortadora de césped si no están bien
colocados la puerta de descarga, el canal, adaptador para
abono o el colector de césped completo.
16. Detenga la cuchilla de la cortadora de césped cuando
cruce caminos o senderos de gravilla y cuando no esté
cortando el césped.
17. Úsela solamente con luz natural o con buena luz artificial.
18. No opere la cortadora de césped máquina estando bajo
los efectos del alcohol o de drogas.
19. El silenciador y el motor están a temperatura muy alta y
pueden provocar lesiones graves por quemaduras. No
los toque. Deje que se enfríe la cortadora de césped al
menos durante cinco minutos antes de almacenarla o
intentar cualquier tarea de mantenimiento.
20. Nunca haga funcionar un motor en interiores o en un área
mal ventilada. El escape del motor contiene monóxido de
carbono, un gas inodoro y letal.
Niños
1. Se pueden producir accidentes trágicos si el operador
no está alerta a la presencia de niños. Por lo general a los
niños les atraen las cortadoras y la actividad de cortar
el césped. Los niños no son conscientes de los peligros.
Nunca asuma que los niños permanecerán donde los vio
por última vez.
2. Mantenga a los observadores, los niños y las mascotas
en interiores mientras la cortadora de césped está
funcionando bajo la atenta supervisión de un adulto
responsable que no sea el operador. Detenga la
cortadora de césped si alguien entra en la zona.
3. Esté alerta y apague la cortadora si un niño u observador
ingresa al área.
4. No permita nunca que los niños menores de 14 años
utilicen esta cortadora de césped. Los niños de 14 años
en adelante deben leer y entender las instrucciones y
las normas de seguridad contenidas en este manual y
sobre la cortadora de césped, y deben ser entrenados y
supervisados por un adulto.
5. Esta cortadora de césped es un equipo motorizado, no
un juguete. Por lo tanto, tenga mucho cuidado en todo
momento. Esta cortadora de césped fue diseñada para
realizar una sola tarea: cortar el césped. No la utilice para
ningún otro fin.
6. Tenga mucho cuidado al aproximarse a esquinas ciegas,
puertas, arbustos, árboles u otros objetos que puedan
obstaculizarle la vista de un niño que pudiese correr al
encuentro de la cortadora.
17
Page 18

PRÁCTICAS DE OPERACIÓN SEGURAS
7. Mantenga a los niños alejados de los motores calientes o
en funcionamiento. Pueden sufrir quemaduras al tocar un
motor o silenciador caliente.
8. Si su cortadora de césped viene equipada con una Llave
Pulsadora de Encendido Eléctrico, quite la llave cuando
deje sola la cortadora para evitar que una persona sin
autorización la maneje. Asegúrese de que la llave quede
fuera del alcance de los niños pequeños.
Funcionamiento en Pendientes para Cortadoras de
Empuje
1. Las pendientes son un factor importante en los
accidentes ocasionados por derrapes y caídas y
pueden producir lesiones graves. Todas las pendientes
requieren precaución extra. Si no se siente seguro en una
pendiente, no corte el césped.
2. Para su seguridad, mida las pendientes antes de usar
la cortadora de césped en el lugar inclinado. Use un
dispositivo de medición de pendientes además del
indicador de pendiente que se incluye como parte de
este manual para medir las pendientes antes de operar
esta cortadora de césped en una zona inclinada o con
pendientes. Para medir las pendientes, también se
pueden usar aplicaciones de teléfonos inteligentes. Si la
pendiente es de más de 15º (25%) como se muestra en el
indicador de pendiente o un dispositivo de medición de
pendientes, no haga funcionar esta cortadora de césped
en ese sector o podría causar lesiones graves.
3. No corte el césped en pendientes de más de 15° (25%).
4. Siempre corte el césped de forma transversal a la
pendiente, nunca hacia arriba y hacia abajo.
5. La cortadora de césped podría acelerarse al colocarla
cuesta abajo, siempre debe colocarla cuesta arriba.
Mantenga siempre el control de la cortadora de césped.
6. No corte el césped húmedo. Si no está firmemente
parado, puede resbalarse.
7. No opere la cortadora de césped en ninguna condición
en la que se comprometan la tracción o estabilidad.
Asegúrese siempre de estar bien afirmado. Si resbala y
cae puede lesionarse gravemente. Si siente que pierde
el equilibrio o deja de estar bien afirmado, suelte
inmediatamente la manija de control de la cuchilla y la
cuchilla dejará de girar en tres (3) segundos.
8. Manténgase a por lo menos 3 pies (1 metro) de barrancos,
zanjas o terraplenes o del borde del agua. Podría perder
el equilibrio o dejar de estar bien afirmado.
Incendios y combustible
1. Para evitar lesiones personales o daños materiales sea
sumamente cuidadoso al manipular la gasolina. La
gasolina es sumamente inflamable y sus vapores son
explosivos. Si se derrama gasolina encima o sobre la ropa
se puede lesionar gravemente ya que se podría prender
fuego. Lávese la piel y cámbiese de ropa de inmediato.
2. Apague los cigarrillos, cigarros, pipas y toda otra fuente
de combustión.
3. Use sólo un recipiente de combustible (gasolina) portátil
aprobado. Use sólo recipientes certificados por EPA,
CARB y/u OSHA.
4. Nunca saque la tapa del combustible ni agregue
combustible mientras el motor está caliente o en marcha.
Deje que el motor se enfríe por lo menos cinco minutos
antes de volver a cargar combustible.
5. Nunca cargue combustible a la cortadora de césped en
interiores.
6. Nunca guarde la cortadora de césped o el recipiente de
combustible en un espacio cerrado donde haya fuego,
chispas o luz piloto, como por ejemplo de calentadores
de agua, calefactores de ambientes, hornos, secadores de
ropa u otros aparatos a gas.
7. Limpie el combustible que se pueda haber derramado
sobre el motor y la cortadora de césped. Limpie los
derrames de combustible o de aceite y elimine los
residuos empapados con gasolina. Traslade la cortadora
de césped a otra zona. Espere al menos 5 minutos antes
de arrancar el motor.
8. Para reducir el riesgo de incendio mantenga la cortadora
de césped limpia de pasto, hojas y de acumulación de
otros escombros. Siga el "Programa de Mantenimiento"
que figura en la sección Servicio y Mantenimiento para
mantener su cortadora de césped libre de residuos.
9. Nunca llene en exceso el depósito de combustible.
Llene el depósito no más de 1" (25 mm) por debajo de
la base del cuello de llenado, para dejar espacio para la
expansión del combustible.
10. Vuelva a colocar la tapa de la gasolina y ajústela bien.
11. Deje que la cortadora de césped se enfríe por lo menos
cinco minutos antes de cargarle combustible o guardarla.
12. Nunca llene los recipientes en el interior de un vehículo
o camión o caja de remolque con un recubrimiento
plástico. Siempre ubique los recipientes en el piso, lejos
del vehículo antes de llenarlos.
13. Cuando sea factible, retire el equipo a gasolina del
camión o remolque y llénelo en el suelo. Si esto no es
posible, recargue combustible sobre el remolque con un
recipiente portátil, en lugar de una boquilla dosificadora
de combustible.
14. En todo momento, mantenga el pico en contacto con
el borde del depósito de combustible o con la boca
del recipiente, hasta terminar la carga. No utilice un
dispositivo de bloqueo/apertura de boquilla.
Servicio
1. Mantenga la cortadora de césped en buenas condiciones
de funcionamiento. Reemplace las piezas dañadas o
gastadas.
18
Page 19

PRÁCTICAS DE OPERACIÓN SEGURAS
2. Para evitar lesiones graves o la muerte, no modifique el
motor de ninguna manera. Si cambia la configuración
del regulador, el motor podría funcionar a velocidades
inseguras. Nunca modifique el ajuste de fábrica del
regulador del motor. No cambie la configuración del
regulador del motor ni acelere demasiado el motor. El
regulador del motor controla la velocidad máxima de
funcionamiento seguro del motor.
3. Las cuchillas de la cortadora son filosas. Envuelva la
cuchilla o utilice guantes y extreme las precauciones
cuando les haga mantenimiento.
4. Antes de limpiar, reparar o inspeccionar la máquina,
compruebe que la cuchilla y todas las partes móviles
se hayan detenido. Desconecte el cable de la bujía y
póngalo haciendo tierra contra el motor para evitar que
se encienda accidentalmente.
5. Verifique que la cuchilla se haya detenido por completo
dentro de los tres (3) segundos de operar el control de
la cuchilla. Si la cuchilla no se detiene en menos de tres
segundos, su cortadora de césped debe ser revisada por
profesionales de un distribuidor de servicio autorizado.
Consulte el funcionamiento correcto en el Programa
de Mantenimiento que figura en la sección Servicio y
Mantenimiento.
6. Controle periódicamente el funcionamiento del sistema
de interbloqueo de seguridad, tal como se describe más
adelante en este manual. Si el sistema de interbloqueo de
seguridad no funciona correctamente, lleve su cortadora
de césped a hacerle un servicio profesional de un
distribuidor autorizado.
7. Nunca altere el interbloqueo de seguridad del control
de la cuchilla u otros dispositivos de seguridad.
Consulte el funcionamiento correcto en el Programa
de Mantenimiento que figura en la sección Servicio y
Mantenimiento.
8. Controle el par de ajuste del perno de montaje del
motor y cuchilla de la cortadora de césped acuerdo con
el Programa de Mantenimiento que figura en la sección
Servicio y Mantenimiento de este manual. Además,
inspeccione visualmente la cuchilla en busca de daños
(por ejemplo, desgaste excesivo, abolladuras, rajaduras).
Reemplace la cuchilla únicamente por la cuchilla del
fabricante del equipo original (O.E.M.)
9. El uso de piezas de mantenimiento que no cumplen con
las especificaciones del equipo original puede resultar en
rendimiento inadecuado y poner en peligro la seguridad.
10. Mantenga todas las tuercas, pernos y tornillos bien
ajustados para asegurarse de que el equipo está en
condiciones de funcionamiento seguras. Consulte
el ajuste de todos los herrajes en el Programa de
Mantenimiento que figura en la sección Servicio y
Mantenimiento.
11. Después de golpear algún objeto extraño, detenga el
motor, desconecte los cables de la bujía y conéctelos
a tierra con el motor. Inspeccione minuciosamente la
cortadora de césped para determinar si está dañada.
Repare el daño antes de volver a arrancar y operar la
máquina.
12. Nunca intente ajustar una rueda o la altura de corte ni
efectuar reparaciones mientras el motor está en marcha.
13. Los componentes del colector de césped y la cubierta de
descarga están sujetos a desgaste y daños que podrían
dejar expuestas piezas que se mueven o permitir que se
arrojen objetos. Para proteger su seguridad, verifique
frecuentemente los componentes y reemplácelos
inmediatamente únicamente por piezas del fabricante del
equipo original (O.E.M.) que se indican en este manual.
“El uso de piezas que no cumplen con las especificaciones
del equipo original podría producir un rendimiento
inadecuado y además puede comprometer la seguridad”.
14. Mantenga o reemplace las etiquetas de seguridad e
instrucciones según sea necesario.
15. Respete las normas y reglamentaciones sobre la manera
correcta de eliminar gasolina, aceite, etc. para proteger el
medio ambiente.
Aviso sobre las emisiones del motor
Los motores tienen la certificación de cumplimiento de
las reglamentaciones sobre emisiones federales de EPA y
California para SORE (equipo pequeño para uso fuera de
carreteras), funcionan con gasolina normal sin plomo y
pueden incluir los siguientes sistemas de control de emisiones:
Modificación de motor (EM) y catalizador de tres vías (TWC) si
están equipados con esos sistemas.
Cuando sea necesario, los modelos están equipados con
líneas de combustible y depósitos de combustible de baja
penetración para controlar las emisiones por evaporación.
Los modelos de California también pueden incluir un filtro
de carbono. Por favor, póngase en contacto con Atención al
cliente para obtener información sobre la configuración del
control de emisiones por evaporación para su modelo.
Amortiguador de chispas
ADVERTENCIA
Esta cortadora de césped está equipada con un motor de combustión interna
y no debe ser utilizada en o cerca de un terreno agreste cubierto por bosque,
malezas o hierba excepto que el sistema de escape del motor esté equipado
con un amortiguador de chispas que cumpla con las leyes locales o estatales
correspondientes (en caso de existir).
Si se utiliza un amortiguador de chispas el operador lo debe
mantener en condiciones de uso adecuadas. En el Estado
de California, las medidas anteriormente mencionadas son
exigidas por ley (Artículo 4442 del Código de Recursos Públicos
de California). Es posible que existan leyes similares en otros
estados. Las leyes federales se aplican en territorios federales.
Puede conseguir el amortiguador de chispas para el silenciador
a través de su distribuidor autorizado de motores más cercano
o poniéndose en contacto con el departamento de servicios,
P.O. Box 361131 Cleveland, Ohio 44136-0019.
19
Page 20

PRÁCTICAS DE OPERACIÓN SEGURAS
SÍMBOLOS DE SEGURIDAD
En esta página, se presentan y describen los símbolos de seguridad que pueden aparecer en esta cortadora de césped. Lea, comprenda y siga todas las
instrucciones que aparecen sobre la cortadora de césped antes de intentar armarla y hacerla funcionar.
Símbolo Descripción
ADVERTENCIA – LEA LOS MANUALES DEL OPERADOR
Lea, comprenda y siga todas las normas y las instrucciones de seguridad que se incluyen en el manual y en la
cortadora de césped antes de intentar utilizar esta cortadora de césped. Si no cumple con lo que indica esta
información, se pueden provocar lesiones personales o la muerte. Conserve este manual en un lugar seguro
para usarlo como referencia futura habitual.
PELIGRO — EVITE LESIONES DE AMPUTACIÓN
No ponga las manos ni los pies cerca o debajo de la plataforma de corte. El contacto con la cuchilla puede
producir la amputación de manos y pies.
PELIGRO — EVITE LESIONES EN NIÑOS POR ATROPELLAR/CONTACTO CON LA CUCHILLA
No utilice la cortadora de césped cuando haya niños u otras personas alrededor. Para evitar lesiones por
contacto con la cuchilla o un objeto arrojado, permanezca en la zona del operador detrás de las manijas de la
cortadora. Indique a los asistentes que permanezcan al menos a 75 pies (23 metros) de la cortadora mientras
está en funcionamiento. Mantenga a los observadores, los niños y las mascotas en interiores durante el
funcionamiento de la cortadora de césped. Detenga la cortadora de césped si alguien entra en la zona.
PELIGRO — EVITE LESIONES POR OBJETOS ARROJADOS
Indique a los asistentes que permanezcan al menos a 75’ (23 metros) de la cortadora mientras está en
funcionamiento. Saque todas las piedras, palos, cables, huesos, juguetes y demás objetos extraños que
puedan ser recogidos y arrojados por la(s) cuchilla(s). Nunca opere la cortadora de césped si no está bien
colocada la cubierta de descarga o el colector de césped completo.
PELIGRO — EVITE DERRAPES Y CAÍDAS EN PENDIENTES
Las pendientes son un factor importante en los accidentes ocasionados por derrapes y caídas y pueden
producir lesiones graves. Todas las pendientes requieren precaución extra. Si no se siente seguro en una
pendiente, no corte el césped. No corte el césped en pendientes de más de 15° (25%). Siempre corte el
césped de forma transversal a la pendiente, nunca hacia arriba y hacia abajo.
ADVERTENCIA—LA GASOLINA ES INFLAMABLE
Deje que el motor se enfríe por lo menos cinco minutos antes de volver a cargar combustible.
ADVERTENCIA - EVITE QUEMADURAS
El silenciador y el motor están a temperatura muy alta y pueden provocar lesiones graves por quemaduras. No
los toque. Deje que se enfríe la cortadora de césped al menos durante cinco minutos antes de almacenarla o
intentar cualquier tarea de mantenimiento.
ADVERTENCIA
Su responsabilidad: Solo permita que usen esta máquina eléctrica las personas que lean, comprendan y respeten las advertencias e instrucciones que
aparecen en este manual y en la máquina.
¡GUARDE ESTAS INSTRUCCIONES!
20
Page 21

Para comprobar la pendiente, proceda de la siguiente manera:
1. Retire esta página y pliéguela por la línea de guiones.
2. Ubique un objeto vertical que esté sobre la pendiente o detrás de la misma (por ejemplo, un poste, un edicio, un
3. Alinee uno de los dos lados del indicador de pendiente con el objeto (vea las Figuras 1 y 2).
4. Ajuste el indicador hacia arriba o hacia abajo hasta que la esquina izquierda toque la pendiente (vea las Figuras 1 y 2).
5. Si hay una separación debajo del indicador, la pendiente es demasiado empinada para operar con seguridad (vea la
INDICADOR DE PENDIENTE
Las pendientes son un factor importante en los accidentes ocasionados por derrapes y caídas y pueden producir lesiones graves.
Todas las pendientes requieren precaución extra. Si no se siente seguro en una pendiente, no corte el césped. No corte el césped en
pendientes de más de 15° (25%). Siempre corte el césped de forma transversal a la pendiente, nunca hacia arriba y hacia abajo.
Figura 2 anterior).
cerco, un árbol, etc.)
PENDIENTE ES DEMASIADO EMPINADA PARA OPERAR CON SEGURIDAD!
¡UTILICE ESTE INDICADOR DE PENDIENTE PARA DETERMINAR SI UNA
(OK) (DEMASIADO EMPINADA)
Indicador de pendiente
Línea de guiones a 15°/25%
Pendiente de 15°/25%
ADVERTENCIA
Figura 2Figura 1
Pendiente de 15°/25%
21
Page 22

MONTAJE
b
(a)
c
(a)
a
IMP ORTANTE: Esta cortadora de césped se envía sin gasolina ni aceite en el motor.
Antes de poner en marcha u operar su cortadora de césped, asegúrese de cargar el
motor con gasolina y aceite como se indica en la sección Funcionamiento del manual
del motor.
NOTA : Las referencias a los lados derecho e izquierdo de la cortadora de césped se
hacen observando la máquina desde la posición de operación.
Desempaque
Apertura de la caja de cartón
1. Corte cada una de las esquinas de la caja verticalmente, de la parte superior a
la base.
2. Saque todas las piezas sueltas:
• Colector de césped
• Aceite del motor
3. Quite el material de empaque suelto.
Retiro de la cortadora de césped de la caja
1. Eleve la cortadora de césped desde la parte posterior para separarla del
material de la caja que quede debajo y haga rodar la cortadora de césped
fuera de la caja.
2. Verifique cuidadosamente si en la caja queda alguna parte suelta.
Montaje
Montaje de la manija
1. Retire el material de
empaque que pudiera
estar entre las manijas
superior e inferior.
2. Gire las palancas de
ajuste de la manija hasta
la posición de destrabe
para levantar la manija.
Consulte la Figura 1.
3. Coloque la manija en una
de las tres posiciones de
altura, baja (a), mediana
(b) o alta (c), que se
encuentran en los soportes
de la manija. Consulte la
Figura 2.
4. .Gire las palancas de
ajuste de la manija hasta
la posición de traba para
levantar la manija.
5. La guía de la cuerda está
unida al costado derecho
de la manija superior.
Afloje la perilla de aleta
(a) que sujeta la guía de
la cuerda. Consulte la
Figura 3.
Figura 1
Figura 2
(c)
(b)
(a)
a. Sostenga el control
de la cuchilla contra la
manija superior.
b. Lentamente tire
de la manija de la
cuerda de arranque
de retroceso y deslice
la cuerda de arranque
en la guía de la
cuerda.
c. Ajuste la perilla de
aleta de la guía de la
Figura 3
cuerda (a).
IMP ORTANTE: Para reducir el desgaste y permitir la operación adecuada, asegúrese
de dejar un poco de holgura en la porción superior de los cables.
Acople el colector de césped
B
1. Siga los pasos a
continuación para
ensamblar el colector de
césped. Asegúrese que la
bolsa para recortes está
con el lado derecho hacia
afuera antes de ensamblar
A
(la etiqueta de advertencia
estará hacia afuera).
Consulte la Figura 4.
Figura 4
a. Coloque la bolsa
sobre el marco de
A
modo que el lado de
plástico negro quede
en el fondo.
B
b. Deslice el canal
plástico de la bolsa
de césped sobre los
ganchos en el marco.
2. Siga los pasos a
continuación para
C
ensamblar el colector de
césped. Consulte la Figura 5.
a. Levante la puerta de
descarga trasera de la
C
cortadora.
b. Quite el adaptador
para abono.
Figura 5
c. Coloque el colector de césped dentro de las ranuras de los soportes de
la manija. Suelte la puerta de descarga de modo que descanse sobre el
colector de césped.
NOTA : Para quitar el colector de césped invierta el PASO 2. Levante la puerta de
descarga trasera de la cortadora. Levante el colector de césped hacia afuera de las
ranuras en los soportes de la manija. Vuelva a instalar el adaptador para abono y baje
la puerta de descarga trasera.
22
Page 23

AJUSTES
1
2
3
Lower
Higher
Ajustes
Altura de corte
Hay dos configuraciones de ajuste de la altura de corte. Consulte la sección
correspondiente a su cortadora de césped.
Palanca única
El ajuste de altura de corte de palanca
única se ubica por encima de la rueda
izquierda trasera. Consulte la Figura 6.
1. Tire cuidadosamente de la
palanca de ajuste de altura
hacia afuera en dirección a la
rueda (la cortadora de césped
tenderá a caer cuando se mueve
la palanca hacia afuera).
2. Mueva la palanca a la posición
deseada para cambiar la altura
de corte.
3. Libere la palanca hacia la cubierta.
Doble palanca
Las palancas de ajuste de altura
de corte de doble palanca están
ubicadas por encima de la rueda
izquierda delantera y trasera.
Consulte la Figura 7.
1. Tire cuidadosamente de la
palanca de ajuste de altura
hacia afuera en dirección
a la rueda (la cortadora
de césped tenderá a
caer cuando se mueve la
palanca hacia afuera).
NOTA : Las palancas de ajuste de altura delanteras y traseras se mueven en la
dirección opuesta para realizar el ajuste.
2. Mueva la palanca a la posición deseada para cambiar la altura de corte.
3. Libere la palanca hacia la cubierta.
IMP ORTANTE: Todas las ruedas deben ser colocadas en la misma posición. Cuando el
terreno es agreste o irregular, mueva la palanca de ajuste de la altura a una posición
más alta. Esto evitará que corte el césped demasiado cerca del suelo.
Inferior
r
Superior
Figura 6
Figura 7
3
Superior
2
Inferior
1
Inclinación de la manija Handle Pitch
Para conveniencia de
funcionamiento, usted puede
ajustarla inclinación de la manija
como sigue:
1. Gire las palancas de ajuste
de la manija hasta la
posición de destrabe para
levantar la manija.See
Consulte la Figura 8.
2. Coloque la manija en una
de las tres posiciones de
altura, baja (a), mediana
(b) o alta (c), que se
encuentran en los soportes
de la manija.
3. Gire las palancas de
ajuste de la manija hasta
la posición de traba para
asegurar la manija.
NOTA: Una carta posición de
altura de la manija (d) se usa para
guardar la cortadora de césped
con la manija en posición vertical.
Consulte la Figura 9.
(a)
(b)
(c)
Figura 8
(d)
Figura 9
23
Page 24

FUNCIONAMIENTO
Ajuste de la altura de corte de
palanca única*
Control de la cuchilla
Adaptador
para abono
Control de
transmisión
prémium
Puerta de
descarga trasera
Palanca de ajuste de la
altura trasera de corte
Palanca de ajuste de la
altura delantera de corte
Lavado de la
plataforma*
Arrancador de
retroceso
Colector de césped
Si se incluye
Control de la cuchilla
El control de la cuchilla está unido a la manija superior de la cortadora. Presione el
control de la cuchilla contra la manija superior para operar la cortadora de césped.
Suéltelo para detener el motor y la cuchilla.
ADVERTENCIA
El control de la cuchilla es un dispositivo de seguridad.Nunca intente anular
su funcionamiento.
Control de transmisión prémium
El control de transmisión prémium se encuentra ubicado en la manija superior
y se utiliza para activar la transmisión. Al empujar el control hacia adelante, la
transmisión quedará activada. Cuanto más lejos se empuje el control hacia adelante,
más rápido avanzará la cortadora. Cuando se libera la presión del control, éste volverá
a la posición neutra y la transmisión se desactivará.
Palanca de ajuste de la altura de corte
Hay tres configuraciones de ajuste de la altura de cor te.
Palanca única
La palanca de ajuste de altura de corte se ubica por encima de la rueda izquierda
trasera. Para ajustar la altura de corte, consulte el Ajuste de la altura de corte en la
página 9.
Doble palanca
Las palancas de ajuste de altura de corte de doble palanca están ubicadas por encima
de la rueda izquierda delantera y trasera. Para ajustar la altura de corte, consulte el
Ajuste de la altura de corte en la página 23.
Figura 10
Colector de césped
El colector de césped, ubicado en la parte trasera de la cortadora, se usa para
embolsar los recortes del césped para desecharlos. Cuando se llena la bolsa, retírela a
través de las manijas y vacíela antes de seguir cortando.
Adaptador para abono
El adaptador para abono se utiliza únicamente para propósitos de abono. En lugar de
recolectar los recortes de césped en el colector de césped, la cortadora tiene la opción
de recircular los cortes y enviarlos nuevamente al césped. Esto se llama abonar.
Escudo posterior
El escudo posterior se adjunta a la parte trasera de la cortadora para proteger al
operador contra los deshechos expulsados.No utilice la cortadora de césped a menos
que el escudo esté en buen estado e instalado.
Arrancador de retroceso
El arrancador de retroceso está unido a la manija superior derecha.Para encender la
cortadora, párese detrás de la misma y tire de la cuerda del arrancador de retroceso.
Tapón de llenado de aceite/varilla de medición del
nivel de aceite
Consulte el manual del operador del motor entregado con su cortadora para obtener
instrucciones detalladas para el llenado, el control y la carga de aceite.
Sistema de lavado de plataforma (si está incluido)
La plataforma de su cor tadora puede estar equipada con un pico de lavado de
plataforma de sujeción rápida como parte del sistema de lavado de plataforma.Utilice
el sistema de lavado de plataforma para quitar los recortes de césped de la parte
inferior de la plataforma.
24
Page 25

FUNCIONAMIENTO
LLENADO DE GASOLINA Y ACEITE
IMP ORTANTE: consulte en el Manual del operador del motor información adicional
sobre el motor.
Esta cortadora de césped se envía sin gasolina ni aceite en el motor. Antes de poner
en marcha u operar su cortadora de césped, asegúrese de cargar el motor con
gasolina y aceite como se indica.
1. Agregue el aceite provisto antes de arrancar la cortadora de césped la primera
vez, como se indica en el Manual del operador del motor.
2. Llene el motor con gasolina como se indica en el Manual del operador del
motor.
ADVERTENCIA
Asegúrese que ninguna persona aparte del operador permanezca cerca de
la cortadora de césped mientras arranca el motor u opera la misma. Nunca
encienda el motor en espacios cerrados o en una zona con poca ventilación.
El escape del motor contiene monóxido de carbono, un gas inodoro y letal.
Mantenga las manos, los pies, el cabello y la ropa suelta alejados de las
partes móviles del motor y de la cortadora.
Para encender el motor
Consulte el Manual del Operador del motor para obtener instrucciones sobre cómo
arrancar y parar el motor.
Para detener el motor
Suelte la manija de control de la cuchilla para detener el motor y la cuchilla.
ADVERTENCIA
Al hacer funcionar la cortadora de césped puede ser que se arrojen objetos
extraños a los ojos, lo cual puede dañarlos gravemente. Utilice siempre
anteojos de seguridad durante la operación de la cortadora o mientras la
ajusta o repara.
Uso de la cortadora como abonadora
Para abonar el césped, quite el colector de césped de la cortadora. Cuando quite el
colector de césped de la cortadora, asegúrese de que el adaptador para abono (en
cuenta con este elemento) esté instalado y permita que se cierre por completo la
puerta de descarga trasera. Para un abono eficiente, no corte césped húmedo. Si el
césped ha crecido más de cuatro pulgadas, no se recomienda el uso de abono. En ese
caso, use el colector de césped para embolsar los recortes.
Uso de la cortadora de césped como colector de césped
Puede utilizar el colector de césped para recoger recortes mientras opera la
cortadora.
1. Acople el colector de césped siguiendo las instrucciones de la sección de
Montaje. Los recortes de césped son recolectados en la bolsa de forma
automática. Opere la cortadora hasta que la bolsa de recolección esté llena.
2. Detenga el motor soltando la manija de control de la cuchilla. Compruebe que
el motor se haya detenido por completo.
3. Para retirar la bolsa, levante la puerta de descarga trasera y tire de la bolsa de
recolección hacia arriba, apartándola de la cortadora. Deseche los recortes de
césped y vuelva a colocar la bolsa cuando haya terminado.
ADVERTENCIA
Espere a que la cuchilla se haya detenido por completo antes de hacer
cualquier trabajo en la cortadora o de retirar el colector de césped.
Uso de la cortadora de césped
Asegúrese de que el césped está libre de piedras, palos, cables u otros objetos
que pudiesen dañar la cortadora o el motor. Dichos objetos pueden ser arrojados
accidentalmente por la cuchilla en cualquier dirección y provocar lesiones personales
graves al operador y asistentes.
1. Una vez que el motor esté
funcionando y mientras
mantiene juntos los
controles de la transmisión y
la cuchilla, empuje el control
de la transmisión hacia
adelante para propulsar
la cortadora. Cuanto más
lejos se empuje el control
hacia adelante, más rápido
avanzará la cortadora.
Consulte la Figura 11.
2. Cuando se libera la presión del control de la transmisión, éste volverá a la
posición neutra y la cortadora se detendrá.
NOTA : para facilitar el uso, mientras sujeta los controles, simplemente trabe su
muñeca y sus codos y camine - la cortadora se ajustará automáticamente a su
velocidad.
Fi gur a 11
ADVERTENCIA
Si golpea un objeto extraño, detenga el motor. Desconecte el cable de la
bujía, inspeccione detenidamente la cortadora para ver si hay daños, y
repare el daño antes de volver a encenderla y hacerla funcionar. El exceso
de vibración de la cortadora durante el funcionamiento es una indicación de
daño. Se debe inspeccionar y reparar la cortadora lo antes posible.
25
Page 26

SERVICIO Y MANTENIMIENTO
PROGRAMA DE MANTENIMIENTO
ADVERTENCIA
Antes de realizar cualquier tipo de mantenimiento o servicio, desactive
todos los controles y detenga el motor. Espere a que se detengan
completamente todas las piezas móviles. Deje que el motor se enfríe.
Desconecte el cable de la bujía y póngalo haciendo masa contra el motor
para evitar que se encienda accidentalmente.
Revise el nivel de aceite del motor
Comprueb e que todos los herraje s están en su lugar y asegurados
Limpie los r ecortes de césped, la g rasa y/o la suciedad acumul ada alrededor del
motor, escape y la p arte superior de la cortador a.
Comprueb e que el tiempo de detención de la cuchilla esté en 3 segundos
Lubrique l os varillajes/pivotes y l as ruedas con aceite lige ro
Limpie la parte inferi or de la plataforma de la cortador a
Comprueb e el torque del perno de montaje de la cuchilla y el motor d e la cortadora
Haga funcionar el motor ha sta que se detenga por falta de combustible o agre gue el
estabilizador en el depósito lleno de combustible nuevo antes del almacenamiento.
*Torque del perno de la cuchilla de la cortadora: Mín. 37.5 pies-libras (50.8 N-m), Máx. 50.0 pies-libras (67.8 N-m). Torque del p erno de montaje del motor: Mín. 29.2 pies-libras (39.6 N-m), Máx.
41.7 pies-libras (56.3 N-m).
Siga el cronograma de mantenimiento que se presenta a continuación. En esta tabla
se describen pautas de servicio sólo para la cortadora de césped. Utilice la columna
Registro de Servicio para hacer el seguimiento de las tareas de mantenimiento
completadas. Para localizar el Centro de Servicio más cercano o programar un servicio
contáctese con su distribuidor o consulte el suplemento de servicio/garantía que
viene con la cortadora.
IMPORTANTE: Consulte el Manual del Operador del Motor que viene con la cortadora
para ver programas específicos de servicio y mantenimiento de motor.
Cada uso Anualmente
Antes de
almacenar
Registro de servicio
P
P P
P
P
P
P
P
P 2
SOLUCIÓN DE PROBLEMAS
ADVERTENCIA
Desconecte el cable de la bujía y póngalo haciendo masa contra el motor para evitar que se encienda accidentalmente. Antes de realizar cualquier tipo de
mantenimiento o servicio, desactive todos los controles y detenga el motor. Espere a que se detengan completamente todas las piezas móviles. Utilice siempre
anteojos de seguridad durante el funcionamiento o mientras ajusta o repara este equipo.
Problema Causa Solución
El motor no ar ranca
El funcionamiento del motor es
irregular
El motor recalienta 1. El n ivel de aceite del mot or está bajo.
Saltos ocasionales (vacilantes) 1. L a separación de la b ujía es muy peque ña. 2. Ajuste la separación. Consulte el Mantenimiento de la bujía en el Manual del motor.
No ralentiza bien 1. Bujía atorada, fallada o separaci ón demasiado ancha.
1. Control de la cuchilla desenganchado.
2. Se ha de sconectado e l capuchón de la buj ía.
3. El dep ósito de combust ible está vacío o e l combustible s e ha echado a
perder.
4. El motor n o está cebado (si es tá equipado con c ebador).
5. La b ujía no funciona co rrectamen te.
6. Motor ah ogado.
7. La línea del combustible está bloqueada.
1. El c apuchón de la bují a está flojo.
2. El comb ustible se echó a p erder.
3. La ven tilación en la tapa d el combustibl e está obstru ida.
4. Hay agua o su ciedad en el sistem a de combustibl e.
5. El dep urador de aire es tá sucio.
6. La línea del combustible está bloqueada.
2. Flujo de aire restringido.
2. El depu rador de aire est á sucio.
1. En grane el control d e la cuchilla.
2. Conec te el cable al cap uchón de la bujía.
3. Llene el tanque con gasolina limpia y nueva.
4. Cebe el m otor tal como se exp licó en la sección Fun cionamiento.
5. Lím piela, ajuste la sep aración, o cambie l a bujía.
6. Espere unos minutos para reencender.
7. Con tacte con su centr o de piezas y repar aciones para qu e limpien la línea de com bustible.
1. Co necte y ajuste el c apuchón de la bují a.
2. Llene el tanque con gasolina limpia y nueva.
3. Des tape la ventilaci ón.
4. Haga mar char el motor hast a que se detenga por f alta de combust ible. Vuelva a llenar con
combustible nuevo.
5. Consulte la sección de Mantenimiento del filtro de aire del Manual del motor.
6. Conta cte con su centro de p iezas y reparac iones para que lim pien la línea de combu stible.
1. L lene el cárter co n aceite adecuado.
2. Limpi e el área de alrededo r y la parte super ior del motor.
1. Vue lva a ajustar la sep aración o reempl ace la bujía.
2. Consulte la sección de Mantenimiento del filtro de aire del Manual del motor.
26
Page 27

SERVICIO Y MANTENIMIENTO
Figur a 13
Problema Causa Solución
Excesiva vibración 1. Cuchilla de corte f loja o descentrada.
2. Cuchilla de corte doblada.
La cort adora de césped n o
proces a los recortes co mo abono
Corte irregular 1. La posici ón de las ruedas no es c orrecta.
La cort adora no avanza p or sí
misma
1. Sp aced húmedo.
2. Céspe d excesivamente al to.
3. Cuchilla desafilada.
2. Cuchilla desafilada.
1. Corr ea mal instalada.
2. Hay desechos bloqueando el funcionamiento de la transmisión.
3. Correa dañada o desgastada.
Recomendaciones generales
• Respete siempre las reglas de seguridad al realizar tareas de mantenimiento.
• La garantía de esta cortadora no cubre elementos que han estado sujetos al
mal uso o la negligencia del operador. Para recibir el reembolso total de la
garantía, el operador deberá mantener la cortadora como se indica en este
manual.
• El cambio de la velocidad controlada del motor invalidará la garantía del
motor.
Lubricación
Control de la cuchilla
Lubrique con aceite ligero los puntos
de pivote del control de la cuchilla al
menos una vez cada estación. El control
debe funcionar libremente en ambas
direcciones. Consulte la Figura 12.
Ruedas
Lubrique todos los cubos/ejes de las
ruedas con aceite ligero al menos una vez
por temporada. Consulte la Figura 12.
Figur a 12
Mantenimiento del motor
Consulte el manual del operador del motor entregado con su cortadora para obtener
una descripción detallada de todas las especif icaciones de servicio relacionadas con
el motor.
Limpie el motor
• Diariamente o antes de cada uso, limpie el césped, la grasa o los residuos
acumulados en el motor. Mantenga limpios el varillaje, los resortes y los
controles. Mantenga el área que rodea al silenciador y que está detrás del
mismo libre de cualquier residuo combustible.
• Mantenga el motor limpio para permitir el movimiento de aire alrededor del
mismo.
• Las piezas del motor se deben mantener limpias para reducir el riesgo de
sobrecalentamiento y combustión de los residuos acumulados.
PRECAUCIÓN
No use agua para limpiar las piezas del motor. El agua puede contaminar el
sistema de combustible. Use un cepillo o un paño seco.
3. Apriete la cuchilla y el adaptador. Centre la cuchilla.
4. Reemplace la cuchilla.
1. N o corte el césped c uando esté mojad o, espere hasta que s ea más tarde para ha cerlo.
2. Cor te una vez a altura de cor te elevada, lueg o vuelva a corta r a la altura deseada o h aga un
sendero d e corte más angos to.
3. Afile o cambie la cuchilla.
1. Aj uste la palanca de al tura de corte de la r ueda delantera d erecha y traser a derecha en la
misma posición.
2. Afile o cambie la cuchilla.
1. Co mpruebe la corre a para ver si la polea es tá bien instala da y se mueve correc tamente.
2. Deten ga el motor, desconec te el capuchón de l a bujía y limpie los de sechos.
3. Insp eccione y, de ser neces ario, consulte con su C entro de piezas y r eparaciones pa ra hacer
reemplazar la correa.
Mantenimiento de la cortadora
Sistema de lavado de plataforma (si está incluido)
La plataforma de su cor tadora podría venir con un sistema de lavado de plataforma.
Utilice el sistema de lavado de plataforma para lavar la parte inferior de la plataforma
e impedir la acumulación de sustancias corrosivas. Realice los siguientes pasos
DESPUÉS DE CADA CORTE DE CÉSPED:
1. Empuje la cortadora hasta un lugar nivelado y despejado de su jardín o patio.
Asegúrese de que la manguera del jardín pueda llegar a la cortadora.
PRECAUCIÓN
Asegúrese de que la tolva de descarga de la cortadora esté orientada
ALEJADA de la casa, garaje, vehículos estacionados, etc.
2. Retire de la plataforma de la cortadora el pico de lavado de la plataforma de
sujeción rápida y enrósquelo en el extremo de la manguera del jardín.
3. Una la manguera con el pico de
lavado al puerto de agua que se
encuentra en la superficie de la
plataforma. Consulte la Figura 13.
4. Abra el suministro de agua.
5. Encienda el motor, tal como se
indicó anteriormente en el Manual
del operador del motor.
6. Haga funcionar el motor durante dos
minutos por lo menos para permitir
que se seque totalmente la par te
inferior de la plataforma de corte.
7. Suelte la manija de control de la cuchilla para detener el motor y la cuchilla.
8. Desconecte el agua y retire el pico de lavado de la plataforma del puerto de
agua que se encuentra en la superficie de la plataforma.
9. Luego de limpiar la plataforma, vuelva a arrancar la cortadora. Mantenga el
motor y la cuchilla en funcionamiento durante dos minutos por lo menos para
permitir que se seque totalmente la parte inferior de la plataforma de corte.
Limpieza de la plataforma
Al menos una vez por temporada, limpie la parte inferior de la plataforma de la
cortadora de césped para prevenir la acumulación de recortes de césped u otros
desechos.
27
Page 28

SERVICIO Y MANTENIMIENTO
1. Deje el motor en marcha hasta que se acabe el combustible. No intente ver ter
combustible del motor. Desconecte el cable de la bujía. Consulte el Manual del
operador del motor.
2. Gire la cortadora de césped sobre el costado y compruebe que el filtro de
aire y el carburador queden mirando hacia arriba. Sostenga firmemente la
cortadora.
3. Raspe y limpie la parte inferior de la plataforma mediante el uso de una
herramienta adecuada. No la rocíe con agua.
IMP ORTANTE: No utilice una lavadora a presión o manguera de jardín para
limpiar su cortadora. Pueden producir daños a los rodamientos o al motor.
El uso de agua acortará la vida útil de la máquina y reducirá su capacidad de
servicio.
4. Vuelva a colocar la cortadora sobre sus ruedas en el suelo.
Ajuste de la transmisión
El sistema de transmisión consiste de
poleas, una correa y un cable que vincula la
transmisión al control de transmisión. Como
estos componentes se gastan, es posible que
sea necesario practicar ajustes. Para ajustar
la transmisión haga lo siguiente:
1. Debilite la transmisión. Consulte la
Figura 14 -
a. Afloje la contratuerca (a).
b. Enrosque la tuerca de ajuste
(b) hacia abajo, en dirección
hacia la base de la cortadora
para alargar el cable de la
transmisión.
c. Ajuste bien la contratuerca.
2. Control de la transmisión está
apretado o difícil de tirar. Consulte la
Figura 15 -
a. Afloje la contratuerca (a).
b. Enrosque la tuerca de ajuste (b)
hacia arriba, en dirección de la
manija para acortar el cable de
la transmisión.
c. Ajuste bien la contratuerca.
Fig ura 14
Figur a 15
(a)
(b)
(a)
(b)
Cuidado de la cuchilla
ADVERTENCIA
Cuando saque la cuchilla de corte para afilarla o reemplazarla, protéjase las
manos usando un par de guantes gruesos o un trapo grueso para sostener la
cuchilla.
Inspeccione periódicamente el adaptador de la cuchilla en busca de rajaduras,
especialmente cuando golpee un objeto extraño. Reemplace según necesidad. Siga
los siguientes pasos para realizar el mantenimiento de la cuchilla.
1. Deje el motor en marcha hasta que se acabe el combustible. No intente ver ter
combustible del motor.
2. Desconecte el cable de la bujía. Consulte el Manual del operador del motor.
3. Gire la cortadora de césped sobre el costado y compruebe que el silenciador
quede mirando hacia abajo y el f iltro de aire y carburador queden mirando
hacia arriba.
4. Retire el perno (a) y el soporte de la cuchilla (b) que sostienen la cuchilla y el
adaptador al cigüeñal del motor. Consulte la Figura 16.
5. Saque la cuchilla (c) y el
adaptador (d) del cigüeñal.
Consulte la Figura 16.
6. Saque la cuchilla del
adaptador para comprobar
el centrado.
a. Centre la
cuchilla sobre un
destornillador de
eje redondo para
inspeccionarla.
b. Saque metal del lado
pesado hasta que
quede bien centrada.
NOTA : cuando afile la cuchilla, siga el ángulo original de afilado como guía.
Afile cada borde de corte por igual para mantener centrada la cuchilla.
(d)
(b)
(a)
Fig ura 16
ADVERTENCIA
Si la cuchilla está descentrada causará demasiada vibración al rotar a altas
velocidades. Puede producir daños al motor y la cuchilla se puede romper
causando así lesiones personales.
7. Lubrique el cigüeñal del motor y la superficie interna del adaptador de la
cuchilla con aceite ligero. Vea el recuadro de la Figura 16.
a. Deslice el adaptador de la cuchilla (d) sobre el cigüeñal del motor.
b. Instale la cuchilla en el adaptador con el lado marcado “Grass Side” (lado
del césped) (o con el número de parte) hacia el piso cuando la cortadora
de césped está en posición de funcionamiento.
c. Asegúrese que la cuchilla quede alineada y asentada en las bridas del
adaptador.
8. Coloque el soporte de campana (b) sobre la cuchilla (c). Alinee las muescas del
soporte de campana de la cuchilla con los orificios pequeños de la cuchilla.
9. Vuelva a colocar el perno hexagonal (a) y ajústelo según los siguientes valores
de torsión: Mín. 37.5 pies-libras (50.8 N-m), Máx. 50.0 pies-libras (67.8 N-m).
NOTA : para garantizar la operación segura de la cortadora de césped, revise
periódicamente el perno de la cuchilla para determinar si está bien ajustado.
Cuidado de la correa
NOTA : para cambiar la correa de transmisión autopropulsada de la cortadora de
césped, es necesario extraer varios componentes. Solicite a un centro autorizado de
servicio que realice el reemplazo de la correa.
Almacenamiento fuera de temporada
Se deben seguir estos pasos para preparar la cor tadora para almacenarla.
• Limpie y lubrique exhaustivamente la cortadora como se describe en la
sección de Lubricación de la página 27.
• Aplicar una capa de grasa de chasis a la cuchilla de corte de la cortadora para
evitar la oxidación.
• Consulte el Manual del operador del motor para obtener instrucciones sobre
su almacenamiento correc to.
• No limpie la cortadora de césped con una lavadora a presión.
• Almacene la cortadora en una zona limpia y seca. No la almacene cerca de
productos corrosivos, como por ejemplo fertilizantes.
Cuando almacene cualquier tipo de equipo motorizado en un galpón de depósito
metálico o con poca ventilación, tenga especial cuidado de realizarle un tratamiento
antioxidante al equipo. Use aceite ligero o silicona para recubrir el equipo,
especialmente los cables y partes móviles de su cortadora antes de almacenarla.
28
(c)
 Loading...