

Page 1

Operator’s Manual
Triple Rear Bagger
For FastAttach
™
Compatible Garden Tractors
Model
OEM-190-821
MTD PRODUCTS INC. P.O. BOX 368022 CLEVELAND, OHIO 44136-9722
PRINTED IN U.S.A.
(for 46-inch decks)
FORM NO. 770-10207B
(8/98)
Page 2
SECTION 1: FINDING YOUR MODEL NUMBER
This Operator’s Manual is an important part of your new grass collector. It will help you assemble, prepare
and maintain it. Please read and understand what it says.
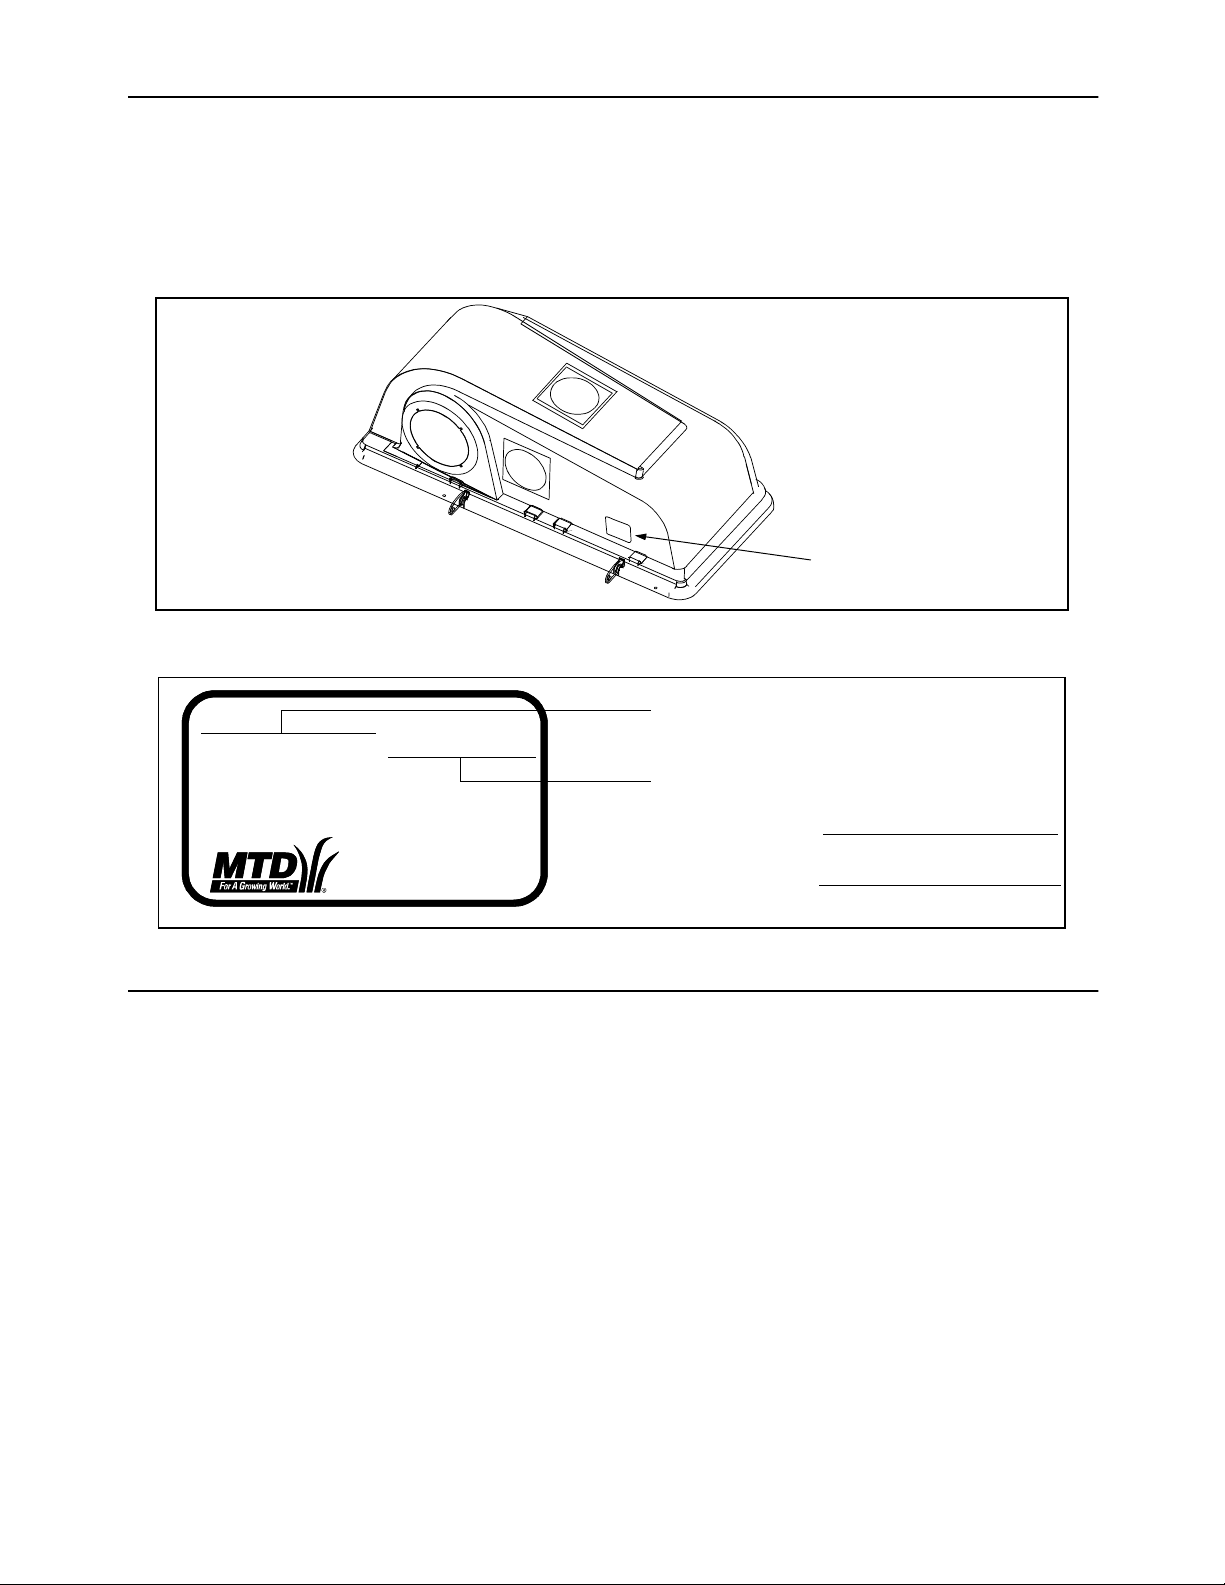
Before you start to assemble this attachment, please locate the model plate and copy the information from it
in this Operator’s Manual for future reference. The information on the model plate is very important if you
need help from our Customer Support Department or your authorized dealer.
• You can locate it by looking on the front, left portion of the plastic grass catcher cover. See Figure 1.
Model Plate
Figure 1
• The model plate will look like Figure 2.
This is where your model number will be.
XXX-X-XXX-X-XXX XXXXXXXXXXX
This is where your serial number will be.
Copy the model number here:
MTD PRODUCTS INC
CLEVELAND, OHIO 44136
Copy the serial number here:
Figure 2
SECTION 2: CALLING CUSTOMER SUPPORT
• LOCATE YOUR MODEL NUMBER AND SERIAL NUMBER — Record this information in the space
provided. To find your unit’s specific model number and serial number, see SECTION 1: FINDING
YOUR MODEL NUMBER.
• If you are having difficulty assembling this product or if you have any questions regarding the controls,
operation or maintenance of this unit, please call the Customer Support Department.
• Customer Support can be reached by dialing: 1- (330) 220-4MTD
(4683)
or
1- (800)-800-7310
• Please have your model number and serial number ready when you call.
• Although both numbers are important, you will be asked to enter only your serial number before your
call can be processed.
2
Page 3

SECTION 3: IMPORTANT SAFE OPERATION PRACTICES
WARNING: THIS SYMBOL POINTS OUT IMPORTANT SAFETY INSTRUCTIONS WHICH, IF
NOT FOLLOWED, COULD ENDANGER THE PERSONAL SAFETY AND/OR PROPERTY OF
YOURSELF AND OTHERS. READ AND FOLLOW ALL INSTRUCTIONS IN THIS MANUAL
BEFORE ATTEMPTING TO OPERATE YOUR LAWN MOWER. FAILURE TO COMPLY WITH
THESE INSTRUCTIONS MAY RESULT IN PERSONAL INJURY. WHEN YOU SEE THIS SYMBOL,
HEED ITS WARNING.
WARNING: The Engine Exhaust from this product contains chemicals known to
the State of California to cause cancer, birth defects or other reproductive harm.
DANGER: Your lawn mower was built to be operated according to the rules for safe operation in
this manual. As with any type of power equipment, carelessness or error on the part of the operator
can result in serious injury. This lawn mower is capable of amputating hands and feet and throwing
objects. Failure to observe the following safety instructions could result in serious injury or death.
1. GENERAL OPERATION
• Read, understand, and follow all instructions in the
operator’s manual and on the machine before
starting. Keep this manual in a safe place for future
and regular reference and for ordering replacement
parts.
• Only allow responsible individuals familiar with the
instructions to operate the machine. Know controls
and how to stop the machine quickly.
• Do not put hands or feet under cutting deck or near
rotating parts.
• Clear the area of objects such as rocks, toys, wire,
etc., which could be picked up and thrown by the
blade. A small object may have been overlooked
and could be accidentally thrown by the mower in
any direction and cause injury to you or a
bystander. To help avoid a thrown objects injury,
keep children, bystanders and helpers at least 75
feet from the mower while it is in operation. Always
wear safety glasses or safety goggles during
operation or while performing an adjustment or
repair, to protect eyes from foreign objects. Stop
the blade(s) when crossing gravel drives, walks or
roads.
• Be sure the area is clear of other people before
mowing. Stop machine if anyone enters the area.
• Never carry passengers.
• Disengage blade(s) before shifting into reverse and
backing up. Always look down and behind before
and while backing.
• Be aware of the mower and attachment discharge
direction and do not point it at anyone. Do not
operate the mower without either the entire grass
catcher or the chute guard in place.
• Slow down before turning. Operate the machine
smoothly. Avoid erratic operation and excessive
speed.
• Never leave a running machine unattended. Always
turn off blade(s), place transmission in neutral, set
park brake, stop engine and remove key before
dismounting.
• Turn off blade(s) when not mowing.
• Stop engine and wait until blade(s) comes to a
complete stop before (a) removing grass catcher or
unclogging chute, or (b) making any repairs,
adjusting or removing any grass or debris.
• Mow only in daylight or good artificial light.
• Do not operate the machine while under the
influence of alcohol or drugs.
• Watch for traffic when operating near or crossing
roadways.
• Use extra care when loading or unloading the
machine into a trailer or truck. This unit should not
be driven up or down a ramp onto a trailer or truck
under power, because the unit could tip over,
causing serious personal injury. The unit must be
pushed manually on a ramp to load or unload
properly.
• Never make a cutting height adjustment while
engine is running if operator must dismount to do
so.
• Wear sturdy, rough-soled work shoes and closefitting slacks and shirts. Do not wear loose fitting
clothes or jewelry. They can be caught in moving
parts. Never operate a unit in bare feet, sandals, or
sneakers.
• Check overhead clearance carefully before driving
under power lines, wires, bridges or low hanging
tree branches, before entering or leaving buildings,
or in any other situation where the operator may be
struck or pulled from the unit, which could result in
serious injury.
3
Page 4

• Disengage all attachment clutches, thoroughly
depress the brake pedal, and shift into neutral
before attempting to start engine.
• Your mower is designed to cut normal residential
grass of a height no more than 10". Do not attempt
to mow through unusually tall, dry grass (e.g.,
pasture) or piles of dry leaves. Debris may build up
on the mower deck or contact the engine exhaust
presenting a potential fire hazard.
2. SLOPE OPERATION
Slopes are a major factor related to loss of control and tipover accidents which can result in severe injury or death.
All slopes require extra caution. If you cannot back up the
slope or if you feel uneasy on it, do not mow it.
For your safety, use the slope gauge included as part of
your tractor’s Operator’s Manual to measure slopes before
operating this unit on a sloped or hilly area. If the slope is
greater than 15° as shown on the slope gauge, do not
operate this unit on that area or serious injury could result.
DO:
• Mow up and down slopes, not across.
• Remove obstacles such as rocks, limbs, etc.
• Watch for holes, ruts or bumps. Uneven terrain
could overturn the machine. Tall grass can hide
obstacles.
• Use slow speed. Choose a low enough gear so that
you will not have to stop or shift while on the slope.
Always keep machine in gear when going down
slopes to take advantage of engine braking action.
• Follow the manufacturer’s recommendations for
wheel weights or counterweights to improve
stability.
• Use extra care with grass catchers or other
attachments. These can change the stability of the
machine.
• Keep all movement on the slopes slow and
gradual. Do not make sudden changes in speed or
direction. Rapid engagement or braking could
cause the front of the machine to lift and rapidly flip
over backwards which could cause serious injury.
• Avoid starting or stopping on a slope. If tires lose
traction, disengage the blade(s) and proceed slowly
straight down the slope.
DO NOT:
• Do not turn on slopes unless necessary; then, turn
slowly and gradually downhill, if possible.
• Do not mow near drop-offs, ditches or
embankments. The mower could suddenly turn
over if a wheel is over the edge of a cliff or ditch, or
if an edge caves in.
• Do not mow on wet grass. Reduced traction could
cause sliding.
• Do not try to stabilize the machine by putting your
foot on the ground.
• Do not use grass catcher on steep slopes.
3. CHILDREN
Tragic accidents can occur if the operator is not alert to the
presence of children. Children are often attracted to the
machine and the mowing activity. Never assume that children will remain where you last saw them.
• Keep children out of the mowing area and in
watchful care of an adult other than the operator.
• Be alert and turn machine off if children enter the
area.
• Before and when backing, look behind and down
for small children.
• Never carry children, even with the blades off. They
may fall off and be seriously injured or interfere with
the safe machine operation.
• Never allow children under 14 years old to operate
the machine. Children 14 years and over should
only operate machine under close parental
supervision and proper instruction.
• Use extra care when approaching blind corners,
shrubs, trees or other objects that may obscure
your vision of a child or other hazard.
• Remove key when machine is unattended to
prevent unauthorized operation.
4. SERVICE
• Use extreme care in handling gasoline and other
fuels. They are extremely flammable and the
vapors are explosive.
• Use only an approved container.
• Never remove fuel cap or add fuel with the engine
running. Allow engine to cool at least two minutes
before refueling.
4
Page 5

• Replace fuel cap securely and wipe off any spilled
fuel before starting the engine as it may cause a
fire or explosion.
• Extinguish all cigarettes, cigars, pipes and other
sources of ignition.
• Never refuel the machine indoors because fuel
vapors will accumulate in the area.
• Never store the fuel container or machine inside
where there is an open flame or spark, such as a
gas hot water heater, space heater or furnace.
• Never run a machine inside a closed area.
• To reduce fire hazard, keep the machine free of
grass, leaves or other debris build-up. Clean up oil
or fuel spillage. Allow machine to cool at least 5
minutes before storing.
• Before cleaning, repairing or inspecting, make
certain the blade and all moving parts have
stopped. Disconnect the spark plug wire, and keep
the wire away from the spark plug to prevent
accidental starting.
• Check the blade and engine mounting bolts at
frequent intervals for proper tightness. Also,
visually inspect blade for damage (e.g., excessive
wear, bent, cracked). Replace with blade which
meets original equipment specifications.
• Keep all nuts, bolts and screws tight to be sure the
equipment is in safe working condition.
• Never tamper with safety devices. Check their
proper operation regularly. Use all guards as
instructed in this manual.
• After striking a foreign object, stop the engine,
remove the wire from the spark plug and thoroughly
inspect the mower for any damage. Repair the
damage before restarting and operating the mower.
• Grass catcher components are subject to wear,
damage and deterioration, which could expose
moving parts or allow objects to be thrown. For
your safety protection, frequently check
components and replace with manufacturer’s
recommended parts when necessary.
• Mower blades are sharp and can cut. Wrap the
blade(s) or wear gloves and use extra caution
when servicing blade(s).
• Check brake operation frequently. Adjust and
service as required.
• Muffler, engine and belt guards become hot during
operation and can cause a burn. Allow to cool
down before touching.
• Do not change the engine governor settings or
overspeed the engine. Excessive engine speeds
are dangerous.
• Observe proper disposal laws and regulations.
Improper disposal of fluids and materials can harm
the environment and the ecology.
• Prior to disposal, determine the proper method to
dispose of waste from your local Environmental
Protection Agency. Recycling centers are
established to properly dispose of materials in an
environmentally safe fashion.
• Use proper containers when draining fluids. Do not
use food or beverage containers that may mislead
someone into drinking from them. Properly dispose
of the containers immediately following the draining
of fluids.
• DO NOT pour oil or other fluids into the ground,
down a drain or into a stream, pond, lake or other
body of water. Observe Environmental Protection
Agency regulations when disposing of oil, fuel,
coolant, brake fluid, filters, batteries, tires and other
harmful waste.
WARNING - YOUR RESPONSIBILITY: Restrict the use of this power machine to persons
who read, understand and follow the warnings and instructions in this manual and on the machine.
DO NOT OPEN THIS
COVER UNLESS THE
ENGINE IS SHUT OFF
Figure 3 Safety labels found on your unit
5
.
Page 6
SECTION 4: TO THE OWNER
Model 821 Triple Rear Bagger Kit is a grass collection system designed for use on FastAttach™ Compatible
Garden Tractors equipped with a 46-inch cutting deck only.
The instructions in this manual are divided into sections. Carefully read all sections and study the illustrations
to ensure proper installation and usage of this attachment. Read and observe all WARNING and CAUTION
statements. They are included to provide for the protection of the equipment installer and user, and to ensure
the prolonged service life of the equipment.
NOTE: References to LEFT and RIGHT indicate the left and right sides of the tractor when facing forward in
the operator’s position. Reference to the FRONT indicates the grille end; to the REAR the drawbar end.
SECTION 5: CONTENTS OF CARTON
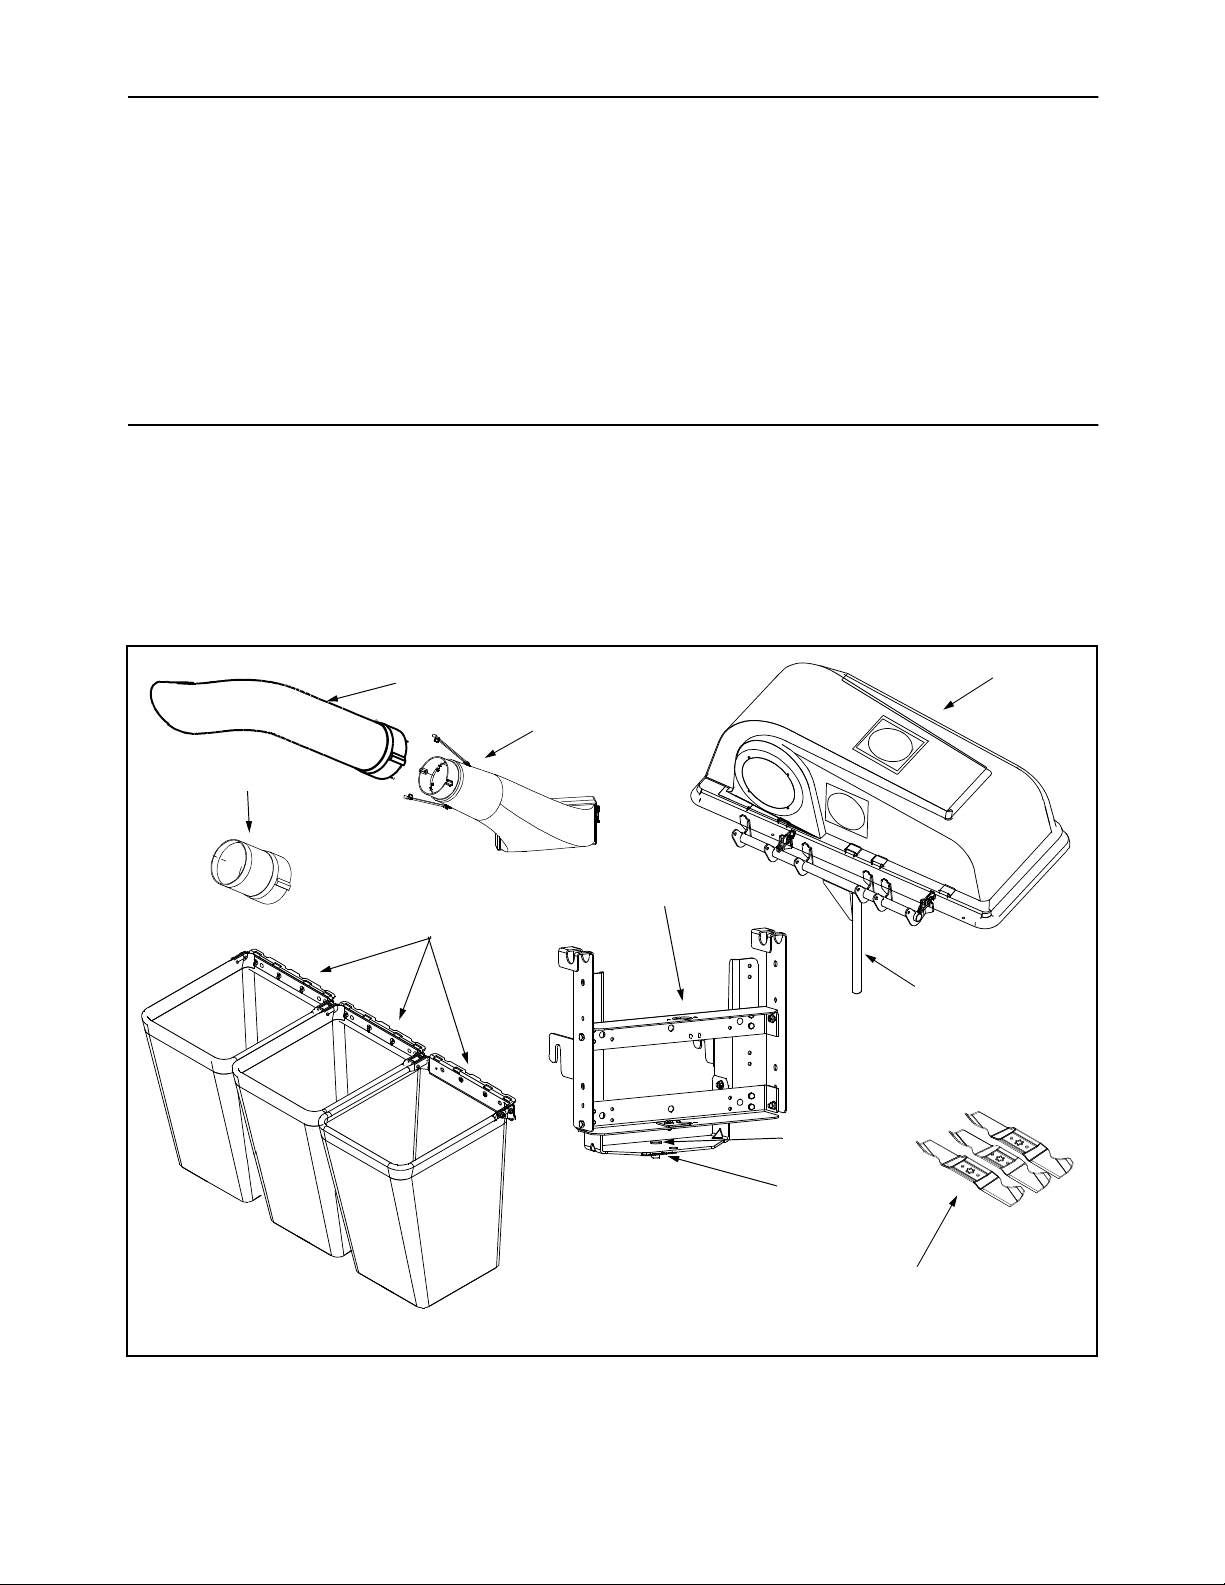
Before beginning installation, remove all parts from the carton to make sure everything is present. Carton
contents are listed below and shown in Figure 4. Hardware part number are shown in parentheses.
One Chute Tube
One Discharge Chute Assembly
One Extension Tube
One set of Blades
Extension Tube
Bag Assemblies
Chute Tube
Three Grass Bag Assemblies
One Grass Catcher Cover Assembly
One Bracket Assembly w/ Clevis Pin (711-0309A)
& Hairpin Clip (714-0117) in place
Cover Assembly
Discharge Chute
Assembly
Bracket Assembly
Support Tube
(attached to cover assembly)
Figure 4
6
Clevis Pin
Hairpin Clip
Blades
Page 7
SECTION 6: ASSEMBLY
Warning: Before beginning installation, place the tractor on a firm and level surface. Place the
PTO in the disengaged (OFF) position, stop the tractor engine and set the parking brake.
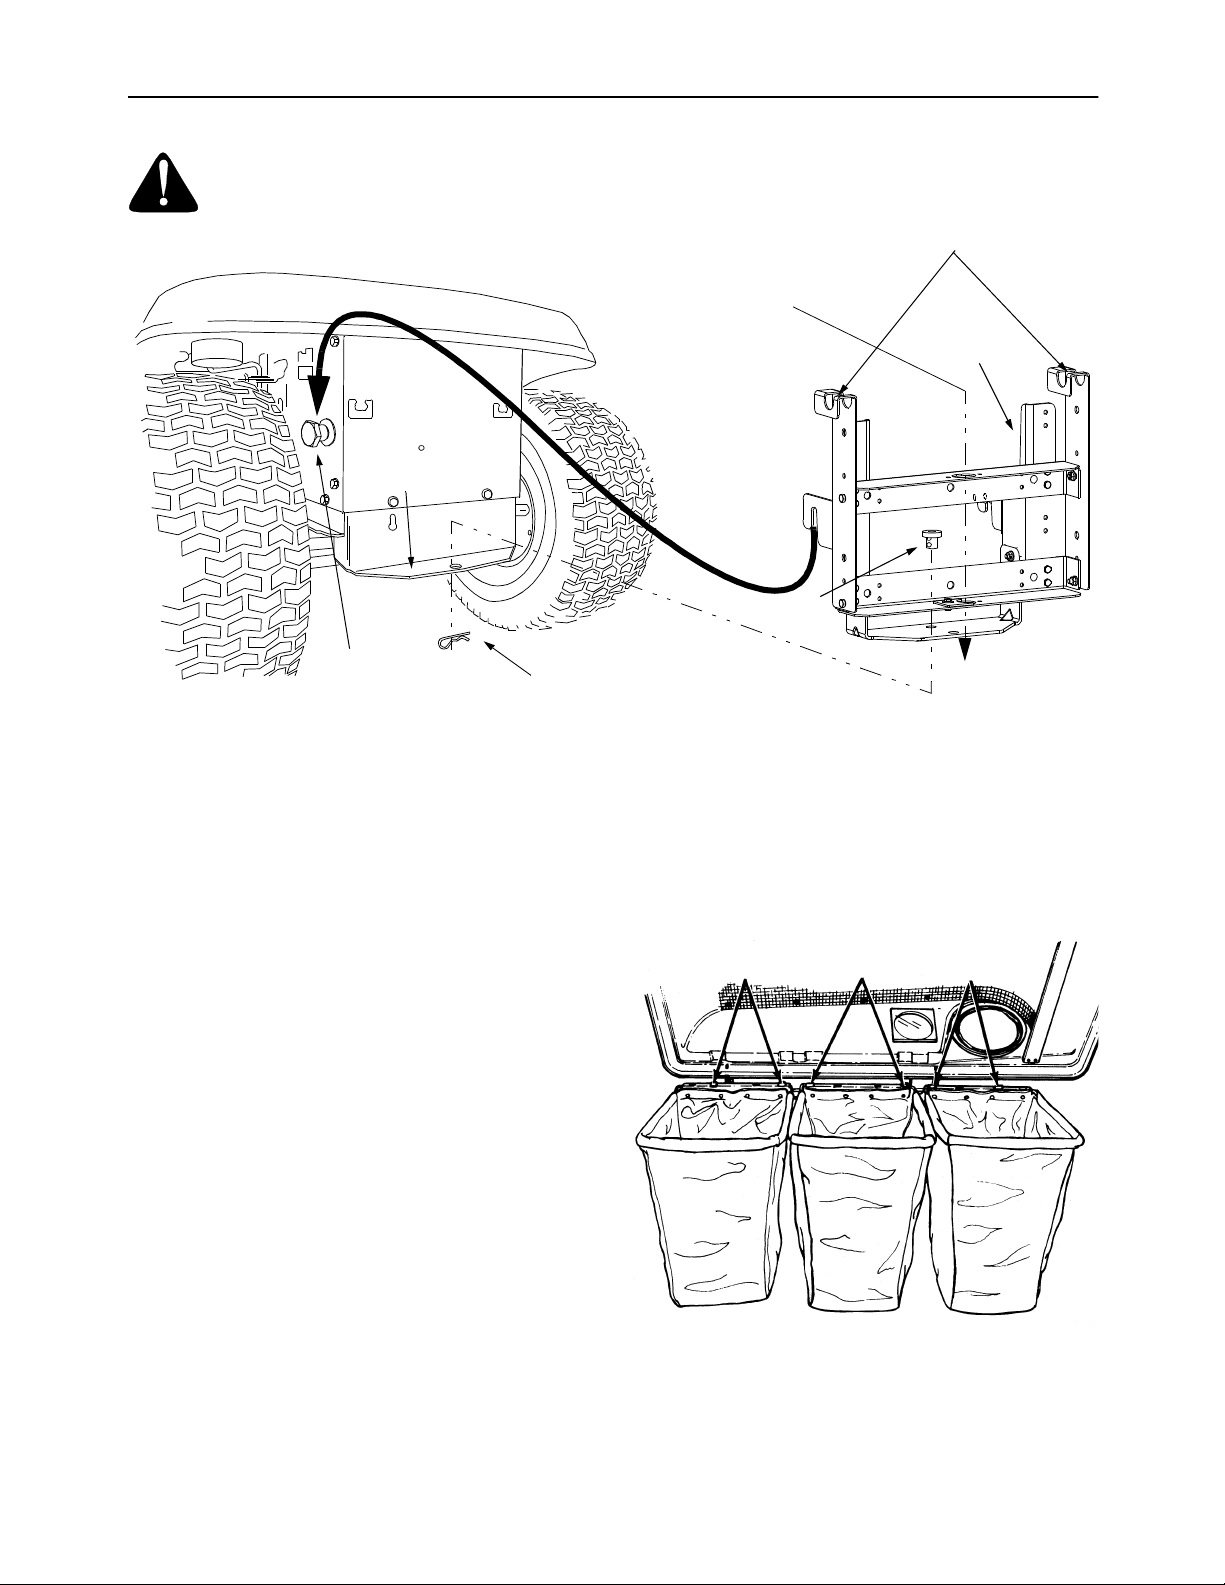
Hitch Plate
Shoulder Bolt
Support Tube Rests Here
Insert Support Tube Here
Bracket
Assembly
Clevis Pin
Hairpin Clip
Figure 5
MOUNTING THE BRACKET ASSEMBLY
1. To ease the following procedures, tilt the seat
forward and leave it in that position until the
grass collector is fully attached.
2. Remove the hairpin clip and clevis pin from the
hole in the rear of the bracket assembly. Refer to
Figure 4
3. Position the hooked ends of the bracket
assembly to the outside of the hitch plate and
over the shoulder bolts. Refer to Figure 5.
4. Reinsert the clevis pin through the aligned holes
in both the bracket assembly and the hitch plate.
Affix with the hairpin clip. Refer to Figure 5.
IMPORTANT: There are two holes found in the
clevis pin. Be certain to insert the hairpin clip in the
UPPER hole to properly secure the bracket
assembly to the hitch plate
ATTACHING THE COVER AND BAGS
1. Place the cover assembly’s support tube (refer
to Figure 4) in position on the rear of unit by
sliding the support tube down through the holes
in the center of the bracket assembly. Refer to
Figure 5.
2. Place the cover assembly in position so that the
support tube rests on both sides of the bracket
assembly. Refer to Figure 5. Allow the plastic
cover to rest in the “open” position on the back
of the tractor’s seat for ease of assembly.
3. Attach the grass bags using the slots as shown
in Figure 6.
Slots
4. Close the cover on the grass collector.
Slots
Figure 6
Slots
7
Page 8
ATTACHING THE CUTTING BLADES
WARNING: Cutting blades are sharp.
Always protect hands by wearing heavy
leather work gloves to grasp blades.
Remove the blades from your tractor’s cutting deck
as follows.
1. Remove the cutting deck from beneath the
tractor, (refer to DECK REMOVAL in the
MAINTENANCE section of your tractor’s
Operator’s Manual for detailed instructions) then
gently flip the deck over to expose its underside.
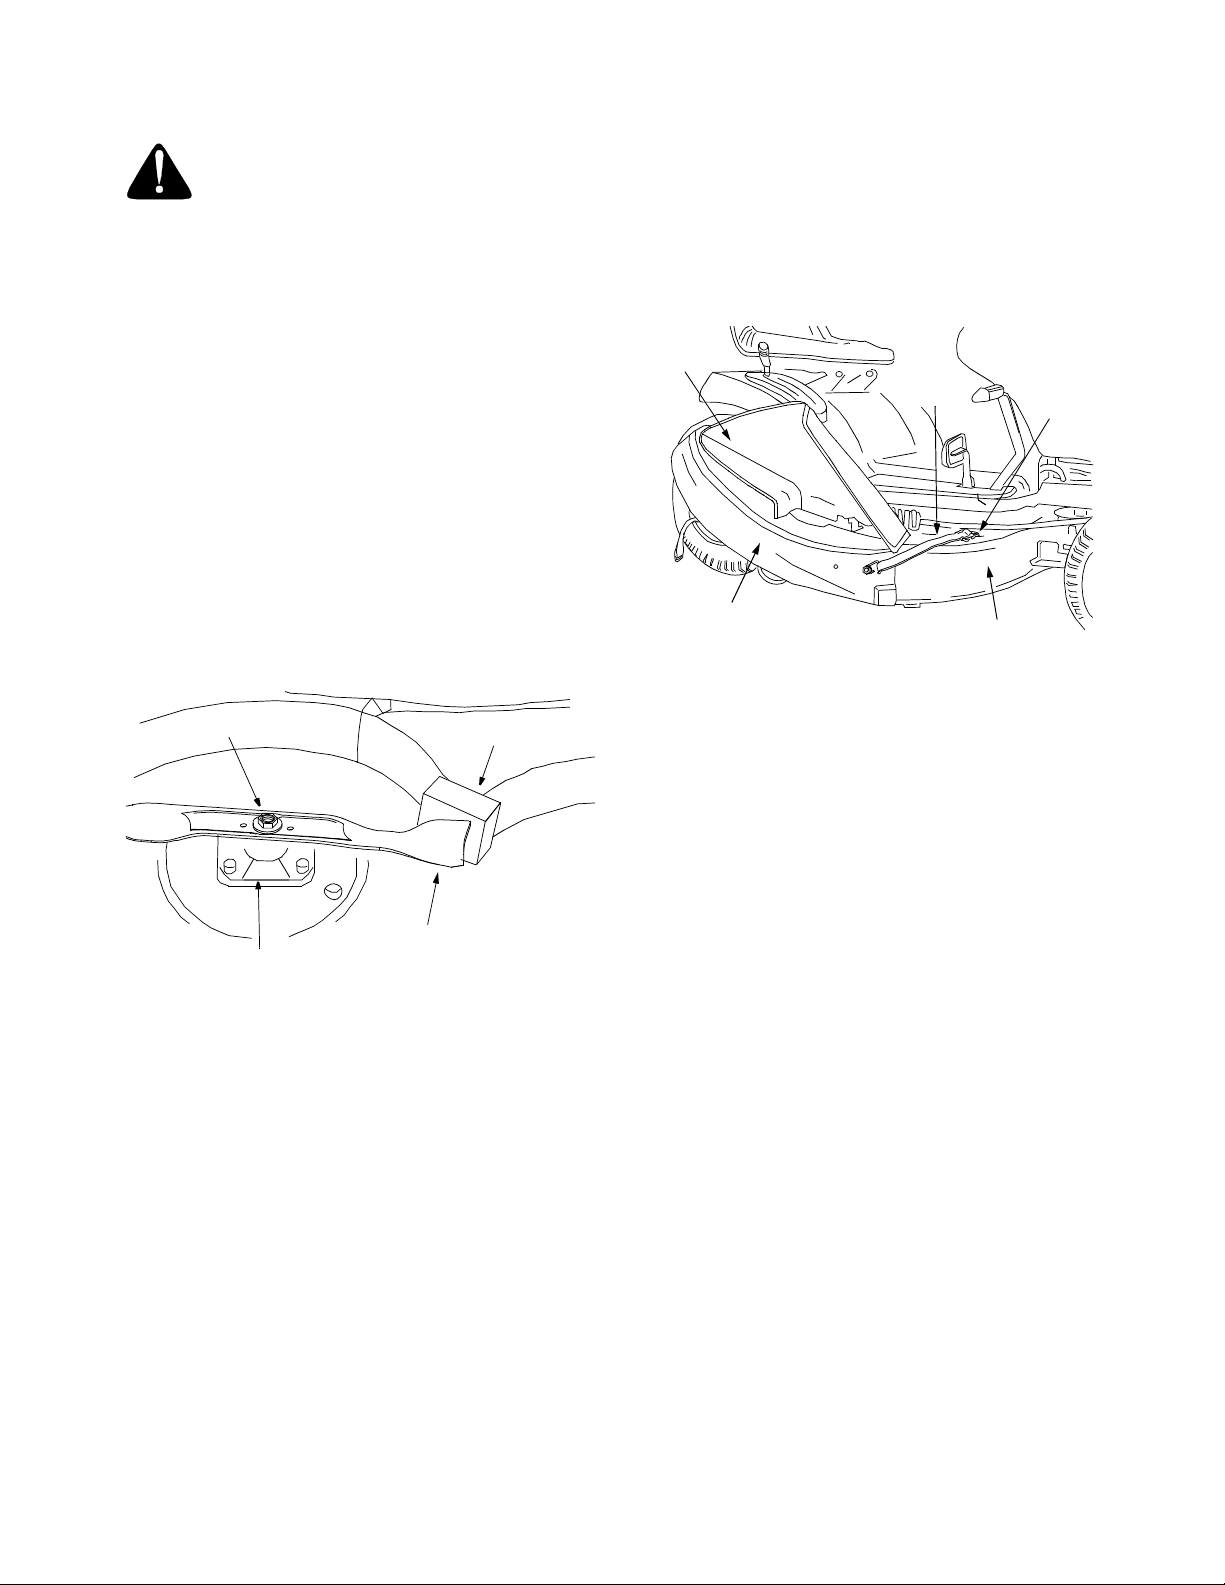
2. Place a block of wood between the center deck
housing baffle and the cutting blade to act as a
stabilizer. See Figure 7.
3. Use a 15/16" wrench to remove the hex flange
nut that secures the blade to the spindle
assembly. See Figure 7.
ATTACHING THE DISCHARGE CHUTE
1. Raise the deck to its highest position by placing
the lift lever in the top notch on the right fender.
Raise the chute deflector on the deck.
2. Place the top edge of the discharge chute in
position over the chute opening on the deck,
then push down on the discharge chute so the
front edge fits snugly around the cutting deck
opening. See Figure 8.
Chute
Deflector
Retainer
Strap
Clip
NOTE: The hex flange nut has a right-handed
thread pattern. Do NOT attempt to force the nut in
the incorrect direction. Doing so may damage the
nut and create a safety hazard.
Hex Flange Nut
Cutting Blade
Spindle
Assembly
Figure 7
4. Install the new blades packed with the bagger.
Be sure to install the blade with the side of the
blade marked ‘‘Bottom’’ (or with a part number
stamped in it) facing the ground when the mower
is in the operating position.
Block of Wood
IMPORTANT: Mount the smaller of the three
blades to the center spindle. The remaining two
blades are interchangeable.
Discharge Chute
Figure 8
3. Fasten the discharge chute in position by
hooking the retainer strap over the retainer clip
on the top* of the deck. See Figure 8.
Cutting Deck
*NOTE: On later model decks, the retainer clip
may be found on the SIDE or on the FRONT SKIRT
area of the deck rather than on the top of it.
4. Insert the upper end of the chute tube into the
hole in the cover assembly, then insert the
extension tube between the discharge chute and
the chute tube as shown in Figure 9.
5. Secure by placing the ends of the retainer straps
on the discharge chute over the clips on the
chute tube. See Figure 9.
IMPORTANT: Use a torque wrench to tighten the
blade spindle hex flange nut to between 70 footpounds and 90 foot-pounds.
5. Remount the cutting deck.
8
Page 9
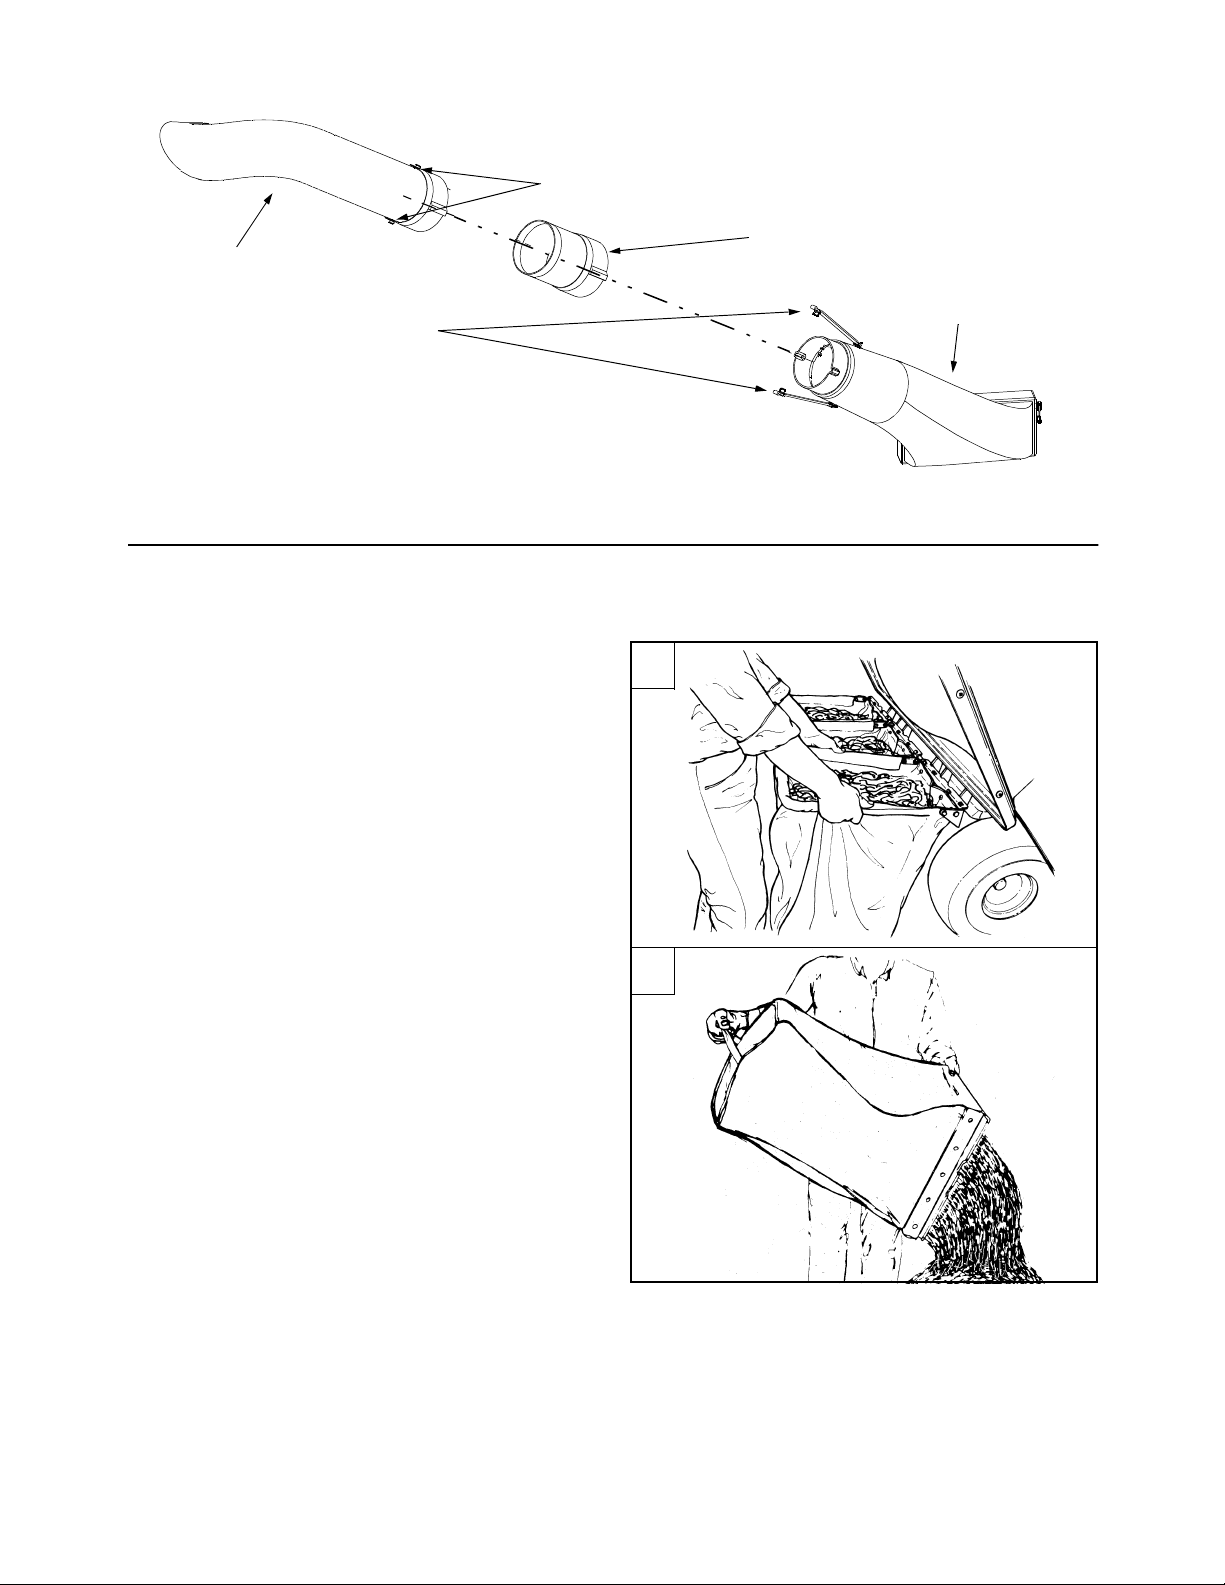
Retainer Clips
Chute Tube
Retainer Straps
Figure 9
SECTION 7: OPERATION
GRASS BAG REMOVAL
1. To open the cover, simply lift up on cover. The
chute tube assembly does not have to be
removed.
2. To remove the grass bags, lift up on bag and
unhook the frame of the bag from the support
tube assembly. See Figure 10A.
3. To empty the grass, use the handle which is
provided on the bottom of each bag. See Figure
10B.
Extension Tube
Discharge Chute
A
NOTE: Under normal usage, the grass collector is
subject to wear and should be checked periodically.
Be certain any replacement bag complies with the
mower manufacturer’s recommendation. Wash
grass bag periodically with water. Allow to air dry. Do
not use heat.
B
Figure 10
9
Page 10
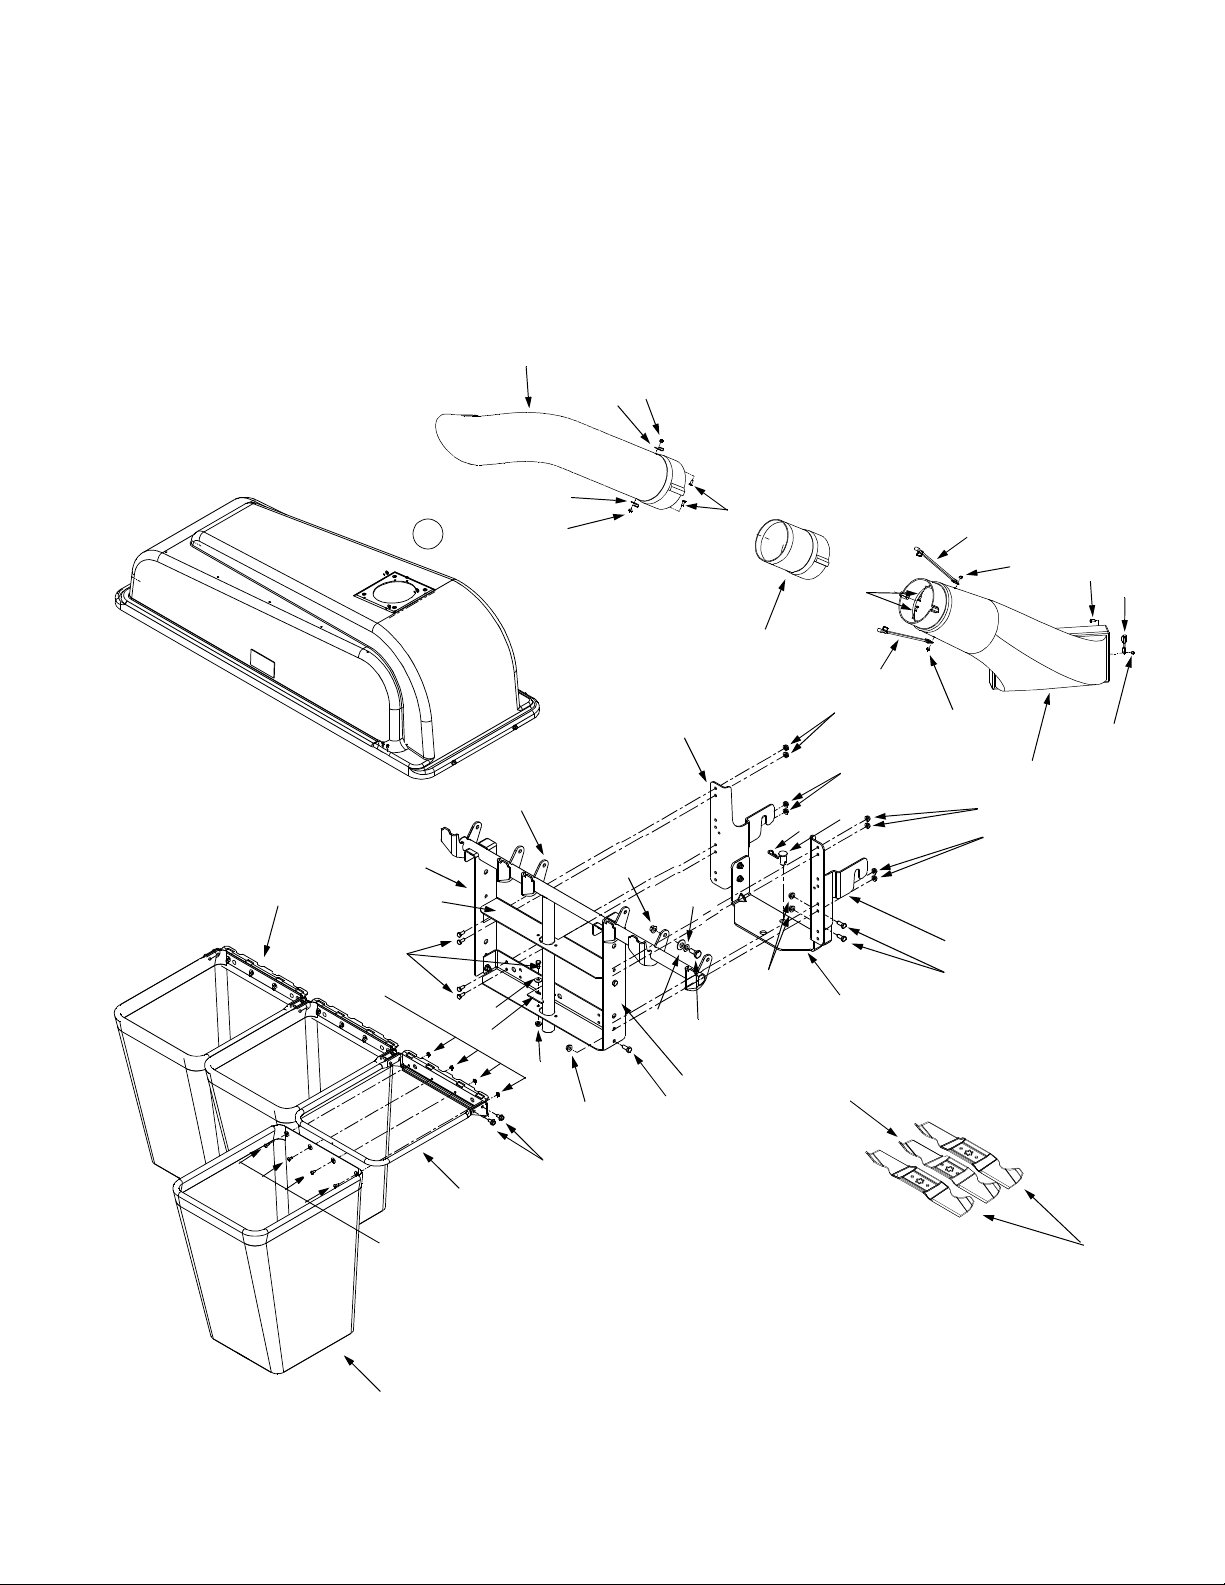
Model 821
19
15
1
1
4
15
23
8
8
32
33
15
15
33
15
8
17
15
15
29
31
3
11
2
8
22
5
15
7
28
6
14
12
21
20
14
24
31
9
16
10
25
9
13
27
18
15
15
26
30
10
Page 11

Model 821
REF.
NO. PART NO. DESCRIPTION
1 16606 Retainer Hook Bracket
2 17200A Catcher Support Bracket
3 17201A Bag Frame Hanger Bracket
4 17204 Cover Assembly Complete
5 17247 Support Tube Bracket
6 710-0473 Screw, #10-24 x .5
7 710-0604 Self Tapping Screw, 5/16-18 x .625
8 710-0751 Hex Cap Screw, 1/4-20 x .62
9 710-3008 Hex Cap Screw, 5/16-18 x .75
10 711-0309A Clevis Pin
11 712-0272 Hex Sems Nut, 10-24
12 712-0431 Hex Flange Lock Nut, 3/8-16
13 783-0765 Support Cross Bracket
14 712-3004A Hex Flange Lock Nut, 5/16-18
15 712-3027 Hex Flange Lock Nut, 1/4-20
16 714-0117 Internal Cotter Pin, .148 x 3
17 723-0383 Retainer Strap Assembly
18 731-0925B Discharge Chute
19 731-0926 Chute Tube
20 736-0108 Flat Washer, .51 x .75 x .033
21 736-0253 Belleville Washer
22 736-0270 Bell Washer, .265 x .75 x .062
23 783-0764 LH Catcher Support Bracket
24 738-0380 Shoulder Screw, .50 x .27, 3/8-16
25 783-0673 RH Catcher Support Bracket
26 742-0644 Star-center Blade, 16.28
27 742-0645 Star-center Blade, 14.88
28 749-0745A Grassbag Frame Tube
29 749-0750 Catcher Support Tube
30 764-0251 Grassbag
31 783-0601 Catcher Support Bracket
32 731-2299 Extension Tube
33 723-0476 Retainer Strap Assembly
11
Page 12

MANUFACTURER’S
LIMITED WARRANTY
The limited warranty set forth below is given by MTD
PRODUCTS INC (“MTD”) with respect to new merchandise
purchased and used in the United States, its possessions
and territories.
MTD warrants this product against defects in material and
workmanship for a period of two (2) years commencing on
the date of original purchase and will, at its option, repair or
replace, free of charge, any part found to be defective in
material or workmanship. This limited warranty shall only
apply if this product has been operated and maintained in
accordance with the Operator’s Manual furnished with the
product, and has not been subject to misuse, abuse, commercial use, neglect, accident, improper maintenance,
alteration, vandalism, theft, fire, water or damage because
of other peril or natural disaster. Damage resulting from the
installation or use of any accessory or attachment not
approved by MTD Products Inc. for use with the product(s)
covered by this manual will void your warranty as to any
resulting damages.
Normal wear parts or components thereof are subject to
separate terms as follows: All normal wear part or component failures will be covered on the product for a period of
90 days regardless of cause. After 90 days, but within the
two year period, normal wear part failures will be covered
ONLY IF caused by defects in material or workmanship of
OTHER component parts. Normal wear parts and components include, but are not limited to, belts, blades, blade
adapters, grass bags, rider deck wheels, seats, snow
thrower skid shoes, shave plates and tires. Batteries are
covered by a 90-day limited replacement warranty.
HOW TO OBTAIN SERVICE: Warranty service is available,
WITH PROOF OF PURCHASE THROUGH YOUR LOCAL
AUTHORIZED SERVICE DEALER. To locate the dealer in
your area, please check for a listing in the Yellow Pages or
contact the Customer Service Department of MTD PRODUCTS INC by calling 1-800-800-7310 or writing to P.O. Box
368022, Cleveland, Ohio 44136-9722.
This limited warranty does not provide coverage in the
following cases:
a. The engine or component parts thereof. These items
carry a separate manufacturer’s warranty. Please refer
to the applicable manufacturer’s warranty on these
items.
b. Log splitter pumps, valves and cylinders have a sepa-
rate one year warranty.
c. Routine maintenance items such as lubricants, filters,
blade sharpening and tune-ups, or adjustments such
as brake adjustments, clutch adjustments or deck
adjustments; and normal deterioration of the exterior
finish due to use or exposure.
d. MTD does not extend any warranty for products sold
or exported outside of the United States of America,
its possessions and territories, except those sold
through MTD’s authorized channels of export distribu-
tion.
No implied warranty, including any implied warranty of
merchantability or fitness for a particular purpose,
applies after the applicable period of express written
warranty above as to the parts as identified. No other
express warranty or guaranty, whether written or oral,
except as mentioned above, given by any person or
entity, including a dealer or retailer, with respect to any
product shall bind MTD. During the period of the Warranty, the exclusive remedy is repair or replacement of
the product as set forth above. (Some states do not
allow limitations on how long an implied warranty lasts, so
the above limitation may not apply to you.)
The provisions as set forth in this Warranty provide the
sole and exclusive remedy arising from the sales. MTD
shall not be liable for incidental or consequential loss
or damages including, without limitation, expenses
incurred for substitute or replacement lawn care services, for transportation or for related expenses, or for
rental expenses to temporarily replace a warranted
product. (Some states do not allow the exclusion or limita-
tion of incidental or consequential damages, so the above
exclusion or limitation may not apply to you.)
In no event shall recovery of any kind be greater than the
amount of the purchase price of the product sold. Alteration
of the safety features of the product shall void this Warranty. You assume the risk and liability for loss, damage, or
injury to you and your property and/or to others and their
property arising out of the use or misuse or inability to use
the product.
This limited warranty shall not extend to anyone other than
the original purchaser, original lessee or the person for
whom it was purchased as a gift.
How State Law Relates to this Warranty: This limited
warranty gives you specific legal rights, and you may also
have other rights which vary from state to state.
 Loading...