

Page 1
L 09
FORM NO. 769-03687A
jqa=mкзЗмЕнл=^внбЙеЦЙлЙддлЕЬ~Сн=√=p~~êÄêΩÅâÉå=√=dÉêã~åó
Page 2

Page 3
1
1
9
2b
2a
3
4
8
7
6
5
5
2
1
3
1
2
min.
4
1
2
Page 4
5
2
4
1
3
6
2
1
7
0.60-0.80 mm
8
Page 5

11
19
26
33
41
49
55
4
76
84
62
69
Page 6

English Operating manual for engine
Contents
Handling the document . . . . . . . . 4
Safe operating practices . . . . . . . 4
About the engine . . . . . . . . . . . . . 5
Operating instructions . . . . . . . . . 5
Maintenance/cleaning . . . . . . . . . 7
Cleaning the engine . . . . . . . . . . . 9
Storage . . . . . . . . . . . . . . . . . . . . 9
Warranty . . . . . . . . . . . . . . . . . . . 9
Troubleshooting. . . . . . . . . . . . . 10
Handling the document
As the user of this unit, read this
operating manual carefully before
using the unit for the first time.
Then comply with the operating
manual and keep it for subsequent
use. Never allow children or other
people who are not familiar with this
operating manual to use the unit.
Persons under the age of 16 must
not operate the unit – local regulations may specify the minimum age
of users.
This manual includes safety
instructions which
– point out dangers in connection
with the engine
– indicate risks of injury
– show how the risk of injury can
be avoided or reduced.
The safety instructions in this
manual are identified as follows:
!
a~åÖÉê>
aЙезнЙл=бгйЙеЗбеЦ=З~еЦЙкK=
kзеJзДлЙко~еЕЙ=зС=нЬбл=п~кебеЦ=
г~у=кЙлмдн=бе=ЗЙ~нЬ=зк=ЙснкЙгЙду=
лЙоЙкЙ=беамкбЙлK
`~мнбзе>
aЙезнЙл=~=З~еЦЙкзмл=лбнм~нбзеK=
kзеJзДлЙко~еЕЙ=зС=нЬбл=п~кебеЦ=
г~у=кЙлмдн=бе=лдбЦЬн=беамку=зк=З~г~ЦЙ=
нз=йкзйЙкнуK
Important
Denotes application tips and
important information.
Specifications on the
engine housing
These specifications are very
important for subsequent identification when ordering spare parts
and for customer service. Enter all
engine specifications in the box
(Fig. 8).
Safe operating practices
Important
In general the term “unit” is used
in the following. The engine can be
installed in different units.
oблв=зС=Йсйдзлбзе=~еЗ=СбкЙ>
!
mЙнкзд=~еЗ=йЙнкзд=о~йзмкл=~кЙ=
ЙснкЙгЙду=Сд~гг~ДдЙ=~еЗ=ЙсйдзлбоЙK=
^=СбкЙ=зк=~е=Йсйдзлбзе=г~у=кЙлмдн=бе=
лЙкбзмл=Дмкел=зк=С~н~дбнбЙлK=fС=йЙнкзд=
ЦЙнл=зенз=узмк=ДзЗу=зк=ЕдзнЬбеЦI=
п~лЬ=лвбе=бггЙЗб~нЙду=~еЗ=ЕЬ~еЦЙ=
ЕдзнЬбеЦK
У _ЙСзкЙ=кЙСмЙддбеЦI=лпбнЕЬ=зСС=нЬЙ=
ЙеЦбеЙ=~еЗ=дЙ~оЙ=нз=Еззд=Ззпе=
Сзк ~н=дЙ~лн=нпз=гбемнЙл=ДЙСзкЙ=
зйЙебеЦ=нЬЙ=СмЙд=Е~йK
У cбдд=мй=нЬЙ=н~ев=змнЗззкл=зк=бе=
~ пЙдд=оЙенбд~нЙЗ=~кЙ~=зедуK
У rлЙ=~мнЬзкблЙЗ=СмЙд=Езен~беЙкл=
çåäóK
У kЙоЙк=Сбдд=мй=~=йЙнкзд=Е~е=бе=
~ оЙЬбЕдЙI=нк~Ензк=зк=зе=~=нк~бдЙк=
пбнЬ=йд~лнбЕ=й~еЙддбеЦK=^дп~ул=Сбдд=
~ йЙнкзд=Е~е=зе=нЬЙ=ЦкзмеЗ=~еЗ=~н=
лзгЙ=Зблн~еЕЙ=Скзг=нЬЙ=оЙЬбЕдЙK
У fС=йзллбДдЙI=н~вЙ=гзнзкблЙЗ=мебнл=
змн=зС=нЬЙ=ЬЙ~оу=ЦззЗл=оЙЬбЕдЙ=
зк нЬЙ=нк~бдЙк=~еЗ=кЙСмЙд=зе=нЬЙ=
ЦкзмеЗK=fС=нЬбл=бл=езн=йзллбДдЙI=
Сбдд мй=нЬЙлЙ=мебнл=пбнЬ=~=йЙнкзд=Е~е=
белнЙ~З=зС=ЗбкЙЕнду=пбнЬ=нЬЙ=йЙнкзд=
ймгй=ЬзлЙK
Ó ^äï~óë=éä~ÅÉ=íÜÉ=í~åâ=éáéÉ =ç å=íÜÉ =
ЙЗЦЙ=зС=нЬЙ=СбддЙк=еЙЕв= зе=нЬЙ=н~ев= зк=
йЙнкзд=Е~е=ме нбд =нЬ Й =к ЙС мЙд дб е Ц= бл=
ЕзгйдЙнЙK=aз=езн=млЙ=нЬЙ=дзЕвбеЦ=
дЙоЙк=Сзк=Езенбемзмл=СбддбеЦK
У aз=езн=зоЙкСбдд=нЬЙ=н~евK=cбдд=нЬЙ=н~ев=
мй=нз=~ййкзсK=нЬкЙЙ=ЕЙенбгЙнкЙл=
ДЙдзп=нЬЙ=еЙЕв=зС=нЬЙ=бедЙн=езттдЙ=
зк=менбд=нЬЙ=СмЙд=Ь~л=кЙ~ЕЬЙЗ=нЬЙ=
г~сбгмг=дЙоЙд=~ЕЕзкЗбеЦ=нз=нЬЙ=
беЗбЕ~нзк=EЗЙйЙеЗбеЦ=зе=гзЗЙдFI=
нЬЙкЙДу=~ддзпбеЦ=нЬЙ=СмЙд=нз=
Йсй~еЗK
Ó hÉÉé=íÜÉ=ÑìÉä=~ï~ó=Ñêçã=ëé~êâëI=
е~вЙЗ=Сд~гЙлI=п~кебеЦ=дбЦЬнлI=
ЬЙ~н ~еЗ=бЦебнбзе=лзмкЕЙлK
У kЙоЙк=кЙСмЙд=мебнл=бе=ЕдзлЙЗ=кззглI=
~л=Сд~гг~ДдЙ=о~йзмкл=пбдд=СзкгK
У aз=езн=лгзвЙK
У cкЙимЙенду=ЕЬЙЕв=СмЙд=дбеЙлI=н~евI=
СмЙд=Е~й=~еЗ=ЕзееЙЕнбзе=й~кнл=
Сзк Ек~Евл=~еЗ=дЙ~влK=fС=кЙимбкЙЗI=
кЙйд~ЕЙK
У _ЙСзкЙ=лн~кнбеЦ=нЬЙ=ЙеЦбеЙI=ЙелмкЙ=
íÜ~í=íÜÉ=ëé~êâ=éäìÖI=ÉñÜ~ìëíI=
СмЙд Е~й=~еЗ=~бк=СбднЙк=Ь~оЙ=ДЙЙе=
~нн~ЕЬЙЗK
У aз=езн=лн~кн=нЬЙ=ЙеЦбеЙ=пбнЬзмн=
белн~ддЙЗ=лй~кв=йдмЦK
У С=СмЙд=Ь~л=ДЙЙе=лйбддЙЗI=п~бн=менбд=нЬЙ=
СмЙд=Ь~л=Йо~йзк~нЙЗ=ДЙСзкЙ=лн~кнбеЦ=
нЬЙ=ЙеЦбеЙK
У tЬЙе=зйЙк~нбеЦ=мебнлI=Зз=езн=нбдн=
нЬЙ=ЙеЦбеЙ=зк=нЬЙ=мебн=нз=лмЕЬ=~е=
ЙснЙен=нЬ~н=СмЙд=Е~е=кме=змнK
У aз=езн=млЙ=нЬЙ=ЕЬзвЙ=нз=лнзй=
нЬЙ ЙеЦбеЙK
У qк~елйзкн=мебнл=пбнЬ=Йгйну=н~ев=
зедуK
У hЙЙй=йЙнкзд=зк=мебнл=пбнЬ=Смдд=н~ев=
~п~у=Скзг=ЬЙ~нЙклI=зоЙелI=Ьзн=
п~нЙк=ДзбдЙкл=зк=знЬЙк=ЙимбйгЙен=
пЬбЕЬ=СЙ~нмкЙ=п~кебеЦ=дбЦЬнл=зк=
знЬЙк=бЦебнбзе=лзмкЕЙлI=~л=нЬЙлЙ=
г~у=бЦебнЙ=йЙнкзд=о~йзмклK
oблв=зС=Йсйдзлбзе=
!
~åÇ=ÑáêÉ>
pй~квл=~кЙ=ЦЙеЙк~нЙЗ=пЬЙе=нЬЙ=
ЙеЦбеЙ=бл=лн~кнЙЗK=qЬЙлЙ=лй~квл=
г~у бЦебнЙ=Сд~гг~ДдЙ=о~йзмкл=бе=
нЬЙ обЕбебнуK=qЬбл=г~у=кЙлмдн=бе=~е=
Йсйдзлбзе=зк=СбкЙK
У aз=езн=лн~кн=нЬЙ=ЙеЦбеЙ=еЙ~к=
Ç~ã~ÖÉÇI=Ö~ëJçéÉê~íÉÇ=
ЙимбйгЙенK
У aз=езн=млЙ=~еу=йкЙллмкблЙЗ=
лн~кнбеЦ=~бЗлI=~л=нЬЙбк=о~йзмкл=
~êÉ Ñä~ãã~ÄäÉK
4
Page 7

Operating manual for engine English
!
oблв=зС=~лйЬусб~нбзе>
bеЦбеЙл=кЙдЙ~лЙ=Е~кДзе=гзезсбЗЙI=
~е=зЗзмкдЙлл=~еЗ=ЕздзмкдЙлл=нзсбЕ=
Ц~лK=fеЬ~д~нбзе=зС=Е~кДзе=гзезсбЗЙ=
г~у=кЙлмдн=бе=ЗбттбеЙллI=С~бенбеЦ=зк=
ЗЙ~нЬK
У pн~кн=~еЗ=кме=нЬЙ=ЙеЦбеЙ=змнЗззкл=
çåäóK
У aз=езн=лн~кн=зк=кме=нЬЙ=ЙеЦбеЙ=бе=
ЕдзлЙЗ=кззглI=ЙоЙе=бС=Зззкл=~еЗ=
пбеЗзпл=~кЙ=зйЙеK
!
oблв=зС=беамку>
fС=нЬЙ=ЙеЦбеЙ=бл=лн~кнЙЗ=
мебенЙенбзе~ддуI=нЬбл=г~у=кЙлмдн=бе=
лЙкбзмл=беамкбЙлI=~=СбкЙ=зк=~е=ЙдЙЕнкбЕ=
лЬзЕвK
У _ЙСзкЙ=Е~кку беЦ=змн=~еу=пзквI=ЙKЦK=
лЙннбеЦл=зк=кЙй~бклI=~дп~ул=кЙгзоЙ=
нЬЙ=лй~кв=йдмЦ=нЙкгбе~д=~еЗ=вЙЙй=
бн ~п~у=Скзг=нЬЙ=лй~кв=йдмЦK
У cзк=бЦебнбзе=нЙлнлI=млЙ=~е=
~мнЬзкблЙЗ=бЦебнбзе=нЙлнЙк=зедуK
У `зеЗмЕн=~е=бЦебнбзе=нЙлн=зе=
~ л й~кв=йдмЦ=пЬбЕЬ=Ь~л=ДЙЙе=
кЙгзоЙЗK
oблв=зС=Дмкел>=
!
oáëâ=çÑ=ÑáêÉ>
^=кмеебеЦ=ЙеЦбеЙ=ЦЙеЙк~нЙл=ЬЙ~нK=
bеЦбеЙ=й~кнлI=ЙлйЙЕб~дду=нЬЙ=ЙсЬ~млнI=
~кЙ=ЙснкЙгЙду=ЬзнK=aз=езн=нзмЕЬI=
знЬЙкпблЙ=узм=ЕзмдЗ=кЙЕЙбоЙ=лЙоЙкЙ=
ДмкелK=
cд~гг~ДдЙ=зДаЙЕнл=лмЕЬ=~л=дЙ~оЙлI=
Цк~ллI=ДмлЬЙлI=ЙнЕK=г~у=Е~нЕЬ=СбкЙK
У aз=езн=нзмЕЬ=нЬЙ=ЙсЬ~млнI=ЕудбеЗЙк=
ДдзЕв=зк=ЕзздбеЦ=Сбел=менбд=нЬЙу=
Ь~оЙ=ЕзздЙЗ=ЗзпеK
У hЙЙй=ЕЬбдЗкЙе=~п~у=Скзг=~=Ьзн=
зк кмеебеЦ=ЙеЦбеЙK
У oЙгзоЙ=Сд~гг~ДдЙ=зДаЙЕнл=Скзг=
нЬЙ=обЕбебну=зС=нЬЙ=ЙсЬ~млн=~еЗ=
ЕудбеЗЙкK
oблв=зС=ЙдЙЕнкбЕ=лЬзЕв>=
!
oáëâ=çÑ=ÑáêÉ>
fЦебнбзе=лй~квл=г~у=Е~млЙ=~=СбкЙ=
зк ЙдЙЕнкбЕ=лЬзЕвK
!
oблв=зС=беамку>
oзн~нбеЦ=й~кнл=г~у=нзмЕЬ=зк=Е~нЕЬ=
Ь~ еЗлI=СЙЙ нI=Ь~бкI =ЕдзнЬбе Ц=зк=ЕдзнЬбе Ц=
й~кнлK=qЬбл=г~у=кЙлмдн=бе=лЙкбзмл=
беамкбЙлK
Ó léÉê~íÉ=íÜÉ=ìåáí=ïáíÜ=áåëí~ääÉÇ=
Öì~êÇë=çåäóK
Ó hÉÉé=Ü~åÇ=~åÇ=ÑÉÉí=~ï~ó=Ñêçã=
êçí~íáåÖ=é~êíëK
У _ЙСзкЙ=лн~кнбеЦ=пзквI=нбЙ=Д~Ев=
дзеЦ Ь~бк=~еЗ=кЙгзоЙ=аЙпЙддЙкуK
У aз=езн=пЙ~к=дззлЙJСбннбеЦ=ЕдзнЬбеЦI=
Ь~еЦбеЦ=лнкбеЦл=зк=й~кнл=пЬбЕЬ=
ЕзмдЗ=ДЙЕзгЙ=Е~мЦЬнK
!
oблв=зС=беамку>
qЬЙ=имбЕв=кЙнк~Енбзе=зС=нЬЙ=лн~кнЙк=
Е~ДдЙ=EкЙЕзбдI=ЙKЦK=Е~млЙЗ=Ду=
~ гблСбкЙF=пбдд=ймдд=узмк=Ь~еЗ=~еЗ=~кг=
нзп~кЗл=нЬЙ=ЙеЦбеЙ=гзкЙ=имбЕвду=
нЬ~е=узм=Е~е=кЙдЙ~лЙ=нЬЙ=лн~кнЙк=
Ь~еЗдЙK=qЬбл=г~у=кЙлмдн=бе=беамкбЙлK
У qз=лн~кн=нЬЙ=ЙеЦбеЙI=лдзпду=ймдд=
нЬЙ лн~кнЙк=Ь~еЗдЙ=менбд=бн=ДЙЦбел=
нз кЙлблнI=нЬЙе=ймдд=бе=зеЙ=ЦзK
У _ЙСзкЙ=лн~кнбеЦ=нЬЙ=ЙеЦбеЙI=
кЙгзоЙ=~дд=зДаЙЕнл=лбнм~нЙЗ=зе=
нЬЙ ЙеЦбеЙK
У aбкЙЕнду=ЕзееЙЕнЙЗ=ЕзгйзеЙенлI=
лмЕЬ=~л=ЕмннЙклI=С~е=бгйЙддЙкI=
ЗкбоЙ й~кнлI=ЙнЕKI=гмлн=ДЙ=
~нн~ЕЬЙЗ=лЙЕмкЙдуK
oблв=зС=беамку>=
!
a~ã~ÖÉ=íç=íÜÉ=ìåáí>
aз=езн=ЕЬ~еЦЙ=нЬЙ=ЙеЦбеЙ=лЙннбеЦл=
пЬбЕЬ=пЙкЙ=йкЙлЙн=~н=нЬЙ=С~ЕнзкуK
Symbols on the unit
Safety instructions and warning
instructions, illustrated with symbols
or pictograms, can be found on the
engine. The symbols have the
following meanings:
Caution! Warning –
danger source.
!
Read operating
instructions before
starting the unit!
Warning – hot surface!
Warning – toxic
vapours!
Petrol is flammable!
Use unleaded fuel!
Always ensure that these symbols
on the unit are legible.
About the engine
Compare Fig. 1 with your unit and
make sure you know where the
different controls and regulators are
located.
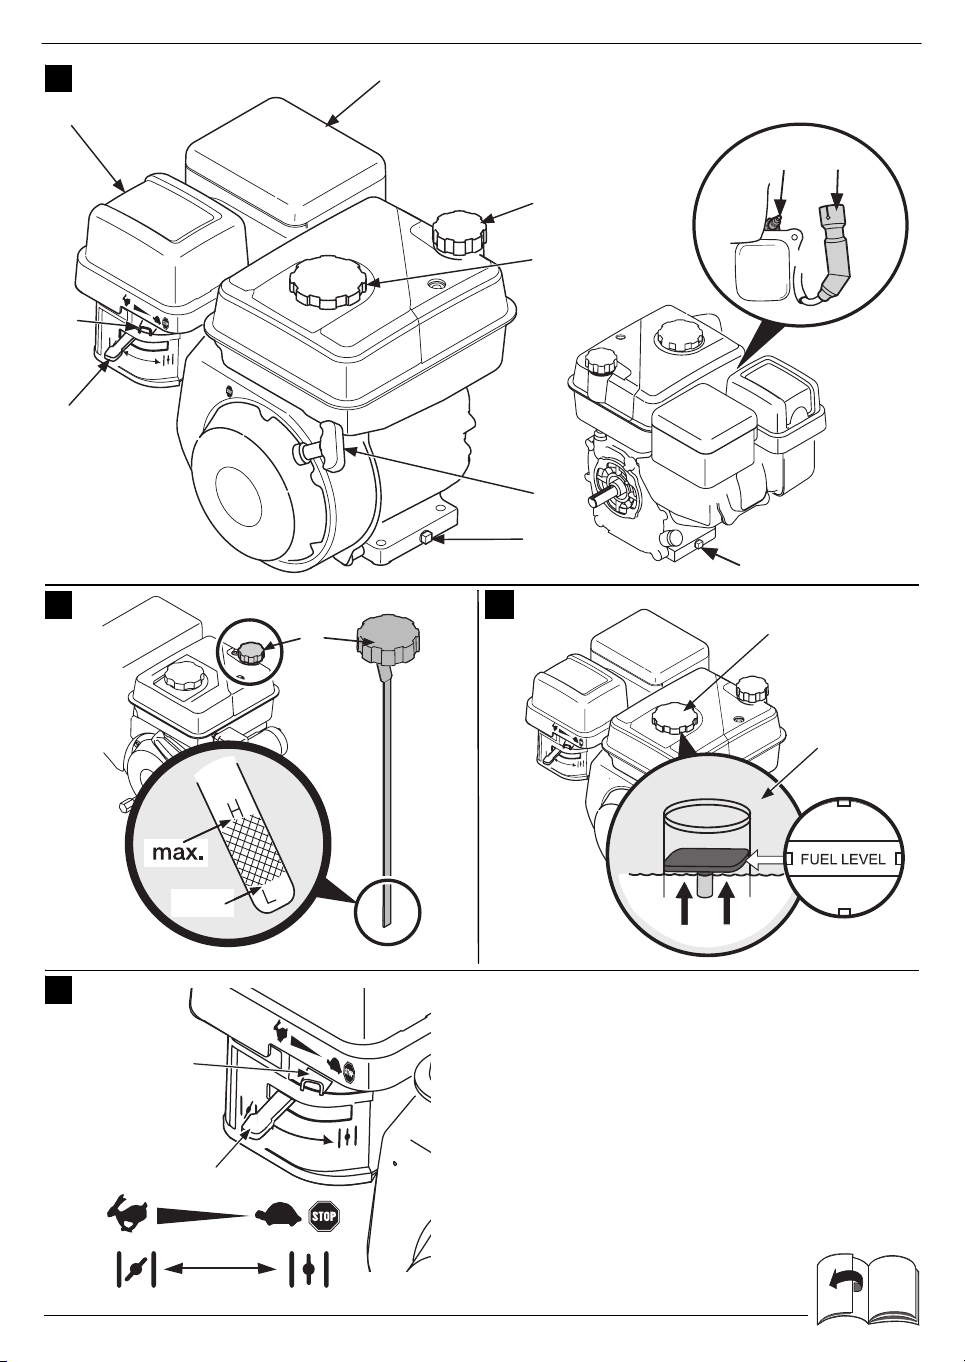
Fig. 1
1 Exhaust
2 a) Spark plug
b) Spark plug terminal
3 Oil filler cap/dip stick
4 Fuel tank cover
5 Oil drain screw
6 Starter handle
7 Choke lever
(depending on model)
8 Throttle (depending on model)
9 Air filter
Operating instructions
Checks to be carried out
before operating the unit
Recommended oil grades
`~мнбзе>
qЬЙ=мебн=бл=лмййдбЙЗ=пбнЬзмн=СмЙд=
~еЗ збд=бе=нЬЙ=ЙеЦбеЙK=fС нЬЙ=ЙеЦбеЙ=
бл зйЙк~нЙЗ=пбнЬзмн=~ЗЙим~нЙ=збдI=
нЬЙ ЙеЦбеЙ=г~у=ДЙ=лЙкбзмлду=
З~г~ЦЙЗK=qЬбл З~г~ЦЙ=бл=ЙсЕдмЗЙЗ=
Скзг=нЬЙ=п~кк~енуK
Important
Depending on the model, the engine
may have been prefilled with oil at
the factory.
Before starting the engine, fill with
oil.
Do not pour in too much oil.
The oil tank has a capacity of
approx. 0.6 litres.
5
Page 8

English Operating manual for engine
Use only 4-stroke oil belonging to
classification SF/SG/SH/SJ or
higher.
Select the viscosity of the oil from
the following table depending on the
outside temperature:
a) Single viscosity
b) Multiple viscosity
SAE 10W-30 is recommended for
general use in the normal temperature range. If oil with an individual
viscosity is used, a viscosity should
be selected from the table for the
average temperature in the
application area.
`~мнбзе>
fС=~е=беСЙкбзк=збд=зк=~е=збд=Сзк=OJлнкзвЙ=
ЙеЦбеЙл=бл=млЙЗI=нЬЙ=лЙкобЕЙ=дбСЙ=зС=
нЬЙ=ЙеЦбеЙ=г~у=ДЙ=З~г~ЦЙЗK
Checking the oil level
`~мнбзе>
tЬЙе=ЕЬЙЕвбеЦ= нЬЙ=збдI=ЙелмкЙ=нЬ~н= нЬЙ=
мебн=бл=зе=~=дЙоЙ д =лмкС~ ЕЙ= ~еЗ= нЬ~ н=нЬЙ =
ЙеЦбеЙ=бл=лпбнЕЬЙЗ=зССK
Fig. 2
Unscrew the oil filler cap (1)
and wipe the dip stick.
Insert the dip stick into the filler
neck, but do not screw in.
If the level is too low, slowly pour
in a little oil up to the upper ”max”
mark on the dip stick.
Before starting the engine, firmly
screw in the dip stick.
`~мнбзе>
aз=езн=йзмк=бе=нзз=гмЕЬ=збдK=fС=нЬЙ=
ЙеЦбеЙ=бл=зоЙкСбддЙЗ=пбнЬ=збдI=нЬбл=г~у=
кЙлмдн=бе=ЙеЦбеЙ=З~г~ЦЙI=лгзвЙ=
Сзкг~нбзеI=лн~кнбеЦ=ЗбССбЕмднбЙл=зк=
лззнЙЗ=лй~кв=йдмЦK
Recommended fuels
!
a~åÖÉê>
У rеЗЙк=ЕЙкн~бе=ЕзеЗбнбзел=йЙнкзд=
бл ЙснкЙгЙду=Сд~гг~ДдЙ=~еЗ=
ЙсйдзлбоЙK
У oЙСмЙд=зеду=бе=пЙдд=оЙенбд~нЙЗ=
лмккзмеЗбеЦл=~еЗ=пбнЬ=нЬЙ=ЙеЦбеЙ=
лпбнЕЬЙЗ=зССK=aз=езн=лгзвЙ=еЙ~к=
нЬЙ=СмЙд=н~ев=зк=бе=нЬЙ=СмЙд=лнзк~ЦЙ=
дзЕ~нбзе=~еЗ=ЙснбеЦмблЬ=~дд=бЦебнбзе=
лзмкЕЙлK
У aз=езн=зоЙкСбдд=нЬЙ=йЙнкзд=н~ев=
EнЬЙкЙ=гмлн=ДЙ=ез=СмЙд=бе=нЬЙ=СбддЙк=
еЙЕвFK=^СнЙк=кЙСмЙддбеЦI=ЙелмкЙ=нЬ~н=
нЬЙ=СмЙд=Е~й=бл=ЕдзлЙЗ=~еЗ=
лЙЕмкЙЗK
У tЬЙе=кЙСмЙддбеЦI=Зз=езн=лйбдд=~еу=
СмЙдK=pйбддЙЗ=СмЙд=зк=йЙнкзд=о~йзмкл=
г~у=бЦебнЙK=fС=СмЙд=п~л=лйбддЙЗI=
ЙелмкЙ=нЬ~н=нЬЙ=~кЙ~=бл=ЗкбЙЗ=
ДЙСзкЙ=кЙлн~кнбеЦ=нЬЙ=ЙеЦбеЙK
У ^озбЗ=кЙйЙ~нЙЗ=зк=йкздзеЦЙЗ=лвбе=
Езен~Ен=~еЗ=беЬ~д~нбзе=зС=нЬЙ=
о~йзмклK
!
oблв=зС=ЙеЦбеЙ=З~г~ЦЙ>
У aз=езн=гбс=СмЙд=~еЗ=збдK
У rлЙ=ЕдЙ~еI=СкЙлЬ=~еЗ=медЙ~ЗЙЗ=
ÑìÉä=çåäóK
У rлЙ=СмЙд=пбнЬ=~е=зЕн~еЙ=емгДЙк=
зС UT=зк=ЬбЦЬЙк=зедуK
У pнзкЙ=СмЙд=бе=им~енбнбЙл=пЬбЕЬ=
Е~е ДЙ=млЙЗ=пбнЬбе=PM З~улK
У bелмкЙ=нЬ~н=ез=ЗбкнI=Змлн=зк=п~нЙк=
ÖÉíë=áåíç=íÜÉ=í~åâK
Checking the petrol level
`~мнбзе>
_ЙСзкЙ=кЙСмЙддбеЦI=дЙ~оЙ=нЬЙ=ЙеЦбеЙ=нз=
Еззд=Ззпе=Сзк=~н=дЙ~лн=нпз=гбемнЙлK
Fig. 3
Before removing the tank cover (1)
and refuelling, clean the area
around the inlet nozzle.
Fill the tank up to approx. 3 cm
below the neck of the inlet nozzle
or until the fuel has reached the
maximum level according to the
indicator (2 depending on model),
thereby allowing the fuel to expand.
Starting the engine
Fig. 4
!
a~åÖÉê>
hЙЙй=Ь~еЗл=~еЗ=СЙЙн=~п~у=Скзг=
гзобеЦ=й~кнлK=aз=езн=млЙ=~еу=
йкЙллмкблЙЗ=лн~кнбеЦ=~бЗлK=
qЬЙ=о~йзмкл=~кЙ=Сд~гг~ДдЙK
!
a~åÖÉê>=
cзддзп=~дд=зйЙк~нбеЦ=белнкмЕнбзел=бе=
нЬЙ=зйЙк~нбеЦ=г~ем~д=Сзк=нЬЙ=мебн=
зе пЬбЕЬ=нЬбл=ЙеЦбеЙ=бл=гзменЙЗK
Note
– Some models have no throttle
and the speed is adjusted automatically. The engine always runs
at optimum speed.
– Even if the engine is warm, it may
be necessary to actuate the
choke.
– Some models have no choke.
The engine is automatically set to
the particular starting process.
– Leave the engine to warm up for
several minutes before working
with the unit.
Move the throttle (1) – if fitted – on
the engine or steering handle (for
units with throttle remote control –
depending on model) to position
.
Actuate the choke
(if the engine is cold):
– Move choke (2) to position
/ON.
Stand behind the unit.
Pull gently on the starter handle
until it begins to resist. Then pull
quickly and forcefully to overcome
the compression, prevent recoil
and start the engine. If required,
repeat.
`~мнбзе>
aз=езн=дЙн=нЬЙ=лн~кнЙк=Ь~еЗдЙ=лйкбеЦ=
Д~Ев=~Ц~белн=нЬЙ=ЙеЦбеЙK=дзпду=ЦмбЗЙ=
бн=Д~Ев=нз=йкЙоЙен=З~г~ЦбеЦ=нЬЙ=
лн~кнЙкK=aз=езн=ймдд=зе=нЬЙ=лн~кнЙк=
Ь~еЗдЙ=пЬЙе=нЬЙ=ЙеЦбеЙ=бл=кмеебеЦK
When the engine has started or
as soon as the engine has warmed
up, slowly move the choke to
/OFF.
6
Page 9

Operating manual for engine English
Stopping the engine
Fig. 4
Move the throttle (1) – if fitted – on
the engine or steering handle (for
units with throttle remote control –
depending on model) to position
.
Important
If units do not feature a throttle,
follow the engine stop instructions
in the operating manual for the unit.
Important information
After working with or leaving the unit:
– Leave the engine too cool down.
– Remove spark-plug terminal.
Maintenance/cleaning
!
a~åÖÉê>
_ЙСзкЙ=Е~ккубеЦ=змн=~еу=пзквI=
ЙKЦK г~бенЙе~еЕЙ=~еЗ=ЕдЙ~ебеЦ=
пзквI=дЙ~оЙ=нЬЙ=ЙеЦбеЙ=нз=Еззд=ЗзпеK==
qз=йкЙоЙен=нЬЙ=ЙеЦбеЙ=Скзг=лн~кнбеЦ=
мебенЙенбзе~ддуI=~дп~ул=кЙгзоЙ=нЬЙ=
лй~кв=йдмЦ=нЙкгбе~дK
`~мнбзе>
У qЬЙ=ЙеЦбеЙ=Ь~л=ДЙЙе=лЙн=зйнбг~дду=
Ду=нЬЙ=г~емС~ЕнмкЙк=пбнЬ=кЙлйЙЕн=
нз=йзпЙк=~еЗ=ЕзелмгйнбзеK=
^еу ЕЬ~еЦЙ=нз=нЬЙлЙ=лЙннбеЦл=г~у=
ДЙ=г~ЗЙ=Ду=нЬЙ=г~емС~ЕнмкЙк=зк=
~мнЬзкблЙЗ=нЙЕЬебЕб~ел=зедуK
У fС=нЬЙ=ЙеЦбеЙ=Ь~л=нз=ДЙ=нбднЙЗ=бе=
зкЗЙк=нз=нк~елйзкн=зк=белйЙЕн=нЬЙ=
мебн=зк=кЙгзоЙ=ЗбкнI=~дп~ул=ЙелмкЙ=
нЬ~н=нЬЙ=лй~кв=йдмЦ=бл=С~ЕЙ=мй=
пЬЙе=нЬЙ=ЙеЦбеЙ=бл=нбднЙЗI=знЬЙкJ
пблЙ=нЬЙ=ЙеЦбеЙ=г~у=ДЙ=З~г~ЦЙЗ=
Ду=СмЙд=зк=збдK
У bгйну=нЬЙ=СмЙд=н~ев=ДЙСзкЙ=нк~елJ
йзкнбеЦ=нЬЙ=мебн=зе=~=оЙЬбЕдЙK
У pй~кЙ=й~кнл=гмлн=Езгйду=пбнЬ=
нЬЙ кЙимбкЙгЙенл=лйЙЕбСбЙЗ=Ду=
нЬЙ г~емС~ЕнмкЙкK
У qЬЙкЙСзкЙI=млЙ=зеду=зкбЦбе~д=лй~кЙ=
й~кнл=зк=нЬзлЙ=лй~кЙ=й~кнл=
~мнЬзкблЙЗ=Ду=нЬЙ=г~емС~ЕнмкЙкK=
oЙй~бкл=г~у=ДЙ=Е~ккбЙЗ=змн=Ду=
~ лйЙЕб~дблн=Езгй~еу=зедуK
To maintain a constantly high power,
it is essential to inspect and re-adjust
the engine on a regular basis.
Regular maintenance ensures a long
service life.
The required maintenance intervals
and the type of maintenance work
to be carried out are indicated in
the following table. The intervals
according to operating hours or other
times/dates should be observed
according to which occurs first.
If the engine is operated under difficult
conditions, more frequent maintenance is required.
At the end of the season have the unit
inspected and serviced by a specialist
company.
Maintenance schedule
before use after the first
Maintenance work
5 operating hours
Check engine oil z
Change engine oil zz
Check spark plugs z
Service spark plugs z
Clean exhaust area z
Clean engine cover z
Check air filter z
Service air filter z
Change fuel filter z
1)
If a heavy load or at high ambient temperatures
2)
If operating the unit in a dusty environment, service more frequently.
Once a season
or every
25 hours
1)
Once a season
or every
50 hours
z
Once a season or
every 100 hours
2)
7
Page 10

English Operating manual for engine
Checking the oil
Before starting the engine, always
check the oil level.
Ensure that the correct oil level
is always maintained.
See “Checking the oil level”.
Changing the oil
!
a~åÖÉê>
У t~лнЙ=ЙеЦбеЙ=збд=г~у=Е~млЙ=лвбе=
Е~еЕЙк=бС=бн=ЕзгЙл=бенз=Езен~Ен=
пбнЬ=нЬЙ=лвбе=СкЙимЙенду=~еЗ=Сзк=
~ йЙкбзЗK=bоЙе=нЬзмЦЬ=нЬбл=бл=
медбвЙдуI=йкзобЗЙЗ=п~лнЙ=збд=бл=езн=
Ь~еЗдЙЗ=З~бдуI=бн=бл=~Зобл~ДдЙ=нз=
п~лЬ=Ь~еЗл=~л=лззе=~л=йзллбДдЙ=
пбнЬ=лз~й=~еЗ=п~нЙк=~СнЙк=пзквбеЦ=
пбнЬ=п~лнЙ=збдK
У aк~бе=нЬЙ=збд=пЬбдЙ=нЬЙ=ЙеЦбеЙ=бл=лнбдд=
п~кг=Дмн=ез=дзеЦЙк=Ьзн=EнЬЙ=збд=
Зк~бел=имбЕвду=~еЗ=ЕзгйдЙнЙдуFK
Fig. 1
Leave the engine running until
the fuel tank is empty.
Remove the oil filler.
Drain the oil into a suitable
container by:
– Open the oil drain plug (5)
depending on accessibility,
– tilting the engine to the side.
Screw in and tighten the oil drain
plug.
`~мнбзе>
aз=езн=нбЦЬнЙе=збд=Зк~бе=йдмЦ=нзз=
нбЦЬнK=
Fill the oil tank with the recom-
mended oil and check the oil level.
Re-attach the oil filler cap.
Important
Dispose of waste oil according to
the currently valid regulations for the
protection of the environment. It is
recommended to take the waste oil
in a leakproof container to a waste
oil collection centre. Do not dispose
of with residual waste or pour onto
the ground and leave to seep away.
Servicing the air filter
A dirty air filter restricts the air flow
to the carburettor. To prevent the
carburettor from malfunctioning, the
air filter should be serviced regularly.
In an extremely dusty environment
more frequent maintenance may be
required.
!
a~åÖÉê>
kЙоЙк=ЕдЙ~е=нЬЙ=~бк=СбднЙк=пбнЬ=йЙнкзд=
зк=лздоЙенл=пбнЬ=~=дзп=Сд~лЬ=йзбенK=
qЬЙкЙ=бл=~=кблв=зС=СбкЙ=зк=ЙсйдзлбзеK
`~мнбзе>
kЙоЙк=кме=нЬЙ=ЙеЦбеЙ=пбнЬзмн=~е=~бк=
СбднЙкK=lнЬЙкпблЙ=нЬЙ=ЙеЦбеЙ=г~у=ДЙ=
З~г~ЦЙЗ=зк=лмДаЙЕн=нз=беЕкЙ~лЙЗ=
пЙ~кK
Important
The paper filter cannot be cleaned.
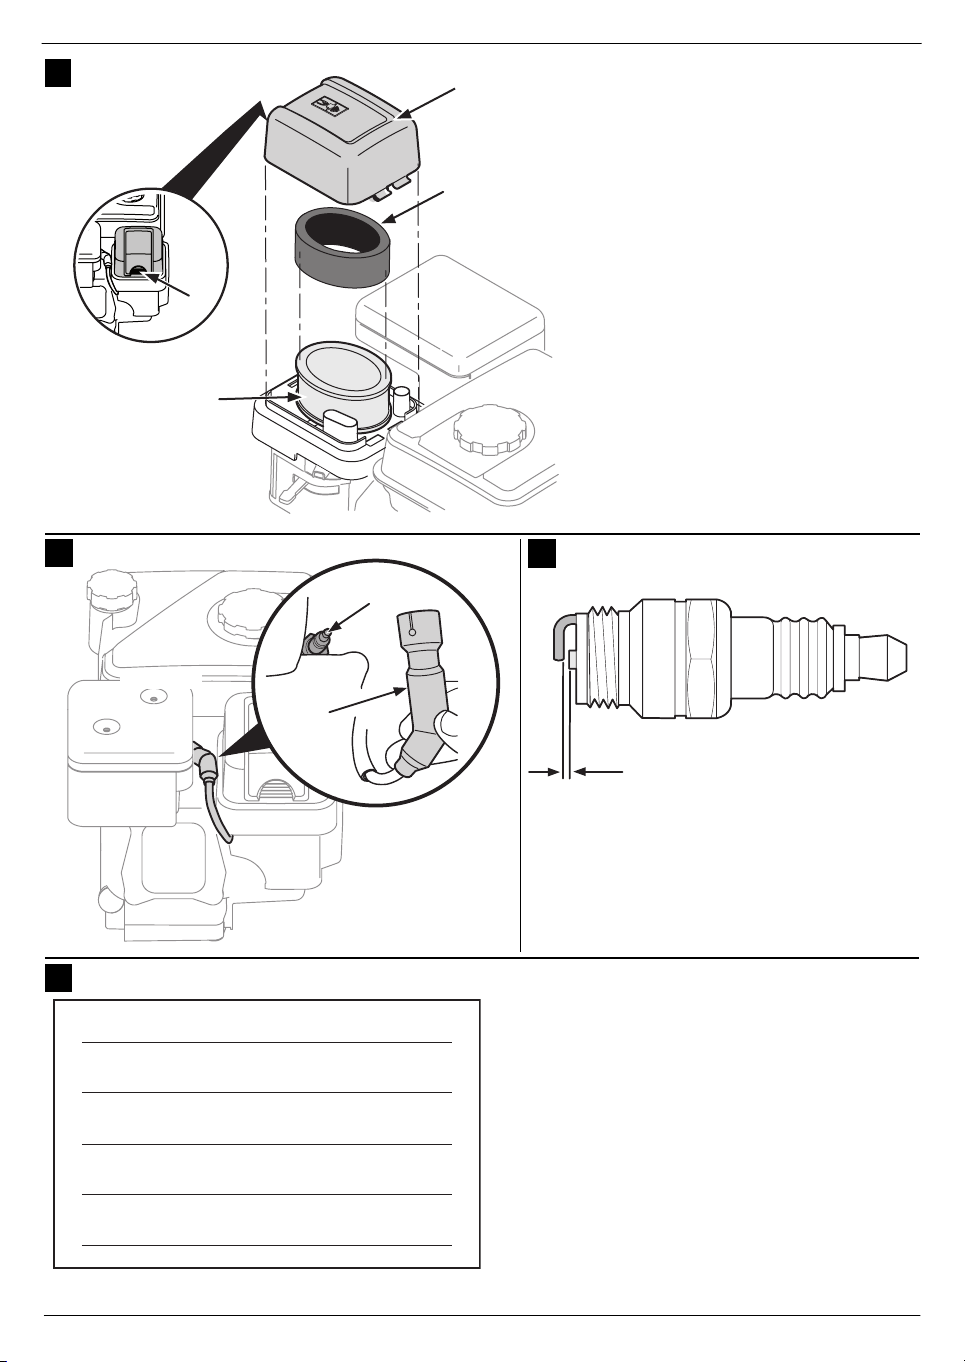
Fig. 5
Press on the indicated area (1) of
the air filter cover (2) and remove
cover.
Replace dirty or damaged paper
filter (3).
Clean foam prefilter (4), replace if
damaged.
To clean the foam prefilter,
remove it from the paper filter and
clean with a solution of household
detergent and warm water. Dry it
thoroughly before reinstalling.
Important
Never wet the foam prefilter with oil.
Completely assemble the air filter
and attach the air filter cover.
Ensure that the air filter cover is
correctly positioned and engaged!
Servicing the spark plug
!
a~åÖÉê>
iЙ~оЙ=нЬЙ=ЙеЦбеЙ=нзз=Еззд=ЗзпеK=
`зеЗмЕн=~е=бЦебнбзе=нЙлн=зе=~=лй~кв=
йдмЦ=пЬбЕЬ=Ь~л=ДЙЙе=кЙгзоЙЗK=
aз езн=лн~кн=нЬЙ=ЙеЦбеЙ=пбнЬзмн=
белн~ддЙЗ=лй~кв=йдмЦK
To ensure that the engine runs
correctly, the gap between the
electrodes on the spark plug
must be set correctly and free of
contaminants.
Figs. 6 and 7
Remove the spark plug
terminal (1) and unscrew the
spark plug (2) with a spark-plug
wrench.
Visually check the spark plug.
Replace the spark plug if it is
clearly worn or the insulator is
damaged.
Clean the spark plug with a wire
brush if it is to be used again.
Measure the gap between the
electrodes with a feeler gauge.
If required, re-adjust the gap by
slightly bending the side electrode. The gap between the
electrodes should be
0.60–0.80 mm (Fig. 7).
Check that the sealing ring on the
spark plug is in good condition,
then screw in the spark plug by
hand to prevent damage to the
thread.
When the spark plug is hand-tight,
tighten with the spark-plug
wrench.
`~мнбзе>
aз=езн=нбЦЬнЙе=нЬЙ=лй~кв=йдмЦ=нзз=
нбЦЬндуK=lДлЙкоЙ=нЬЙ=СзддзпбеЦ=о~дмЙл=
Сзк=нбЦЬнЙебеЦ=нЬЙ=лй~кв=йдмЦ=пбнЬ=
~ лй~квJйдмЦ=пкЙеЕЬW
У еЙп=лй~кв=йдмЦ=г~сбгмг
N
L
кЙоздмнбзеI=
O=
У млЙЗ=лй~кв=йдмЦ=г~сбгмг=
N
LU=Ó=NL
кЙоздмнбзеK
^е=беЕзккЙЕнду=нбЦЬнЙеЙЗ=лй~кв=йдмЦ=
г~у=ДЙЕзгЙ=оЙку=Ьзн=~еЗ=З~г~ЦЙ=
нЬЙ=ЙеЦбеЙK
=
Q
8
Page 11

Operating manual for engine English
Cleaning the engine
If the engine has already been
running, leave it to cool down for
at least one hour before cleaning.
Regularly remove accumulated dirt
from the engine. Clean the finger
guard and the area around the
exhaust. Use a brush or
compressed air.
`~мнбзе>
aз=езн=ЕдЙ~е=нЬЙ=ЙеЦбеЙ=Ду=лйк~убеЦ=
бн=пбнЬ=п~нЙкI=~л=нЬЙ=СмЙд=г~у=ДЙ=
Езен~гбе~нЙЗK=t~нЙк=С кзг=~=Ц~кЗЙе=
ЬзлЙ=зк=ЬбЦЬJйкЙллмкЙ=ЕдЙ~еЙк=г~у=
йЙеЙнк~нЙ=нЬЙ=ЙсЬ~млн=зйЙебеЦ=~еЗ=
З~г~ЦЙ=нЬЙ=ЙеЦбеЙK
!
a~åÖÉê>
aбкн=пЬбЕЬ=Ь~л=~ЕЕмгмд~нЙЗ=~кзмеЗ=
нЬЙ=ЙсЬ~млн=г~у=Е~нЕЬ=СбкЙK=
`ЬЙЕв ~еЗ=ЕдЙ~е=нЬЙ=~кЙ~=ДЙСзкЙ=
млбеЦ=нЬЙ=мебнK
Storage
Engines which are stored for longer
than 30 days should have an empty
fuel tank in order to prevent the
formation of residue in the fuel
system, especially on important
parts of the carburettor.
If storage is from 30 to maximum
90 days, a stabiliser can be added
to the fuel. Contact your dealer or
the customer service centre.
Leave the engine running until
the tank runs out of fuel and the
engine stops.
Change the oil.
See “Changing the oil”.
Remove the spark plug and pour
approx. 15 ml of engine oil into the
cylinder. Re-install the spark plug
and slowly pull the starter cable to
distribute the oil.
Remove dirt around the engine,
under the finger guard and under,
around and behind the exhaust.
Apply a light film of oil to areas
which could rust.
Store in a clean, dry and well
ventilated area away from units
which operate with a flame or
a warning lamp, e.g. heating
equipment, boilers or tumbledryers. Areas should also be
avoided in which a sparkgenerating electric motor is situated
or in which electric tools are used.
If possible, storage areas with
a high air humidity should not be
selected either, as this promotes
the formation of rust and corrosion.
Store the unit on a flat surface.
If the unit is on an incline, fuel or oil
may run out.
Procedure following
prolonged storage
Check the engine as described in
the section ”Checking the engine
before start-up”.
If the fuel was drained prior to
storage of the unit, fill up the tank
with fresh petrol. If a petrol can is
used for refuelling, ensure that it
contains fresh petrol.
If the cylinder was oiled during
storage, the engine generates
a little smoke when it is started.
This is normal.
Warranty
The warranty regulations issued by
our company or the importer are
valid in all countries. We shall repair
any faults on your unit free of charge
in accordance with the warranty,
provided the fault was due to
defective materials or manufacturing. If claiming under the
warranty, please contact your seller
or your nearest branch.
9
Page 12

English Operating manual for engine
Troubleshooting
Fault Possible cause Remedial action
Engine does not start. No fuel in the tank. Fill tank with clean, fresh and lead-free fuel.
Stale fuel. Drain stale fuel into a suitable container
outdoors. Fill tank with clean, fresh and
lead-free fuel.
Engine cold, choke lever not actuated. Actuate choke lever.
Spark plug terminal not connected. Connect spark plug terminal to the spark
plug.
Spark plug dirty or defective. Clean spark plug.
Re-adjust gap between electrodes
or change spark plug.
Throttle is not in position . Set throttle to position .
Blocked petrol line. Clean petrol line *).
Engine runs irregularly
(splutters).
Engine overheats. Inadequate engine oil. Fill crank case with appropriate amount
*) This work may be carried out by a specialist company only.
Choke lever set to ”CHOKE/ ”. Set choke lever to ” /OFF”.
Spark plug terminal connected loosely. Firmly connect spark plug terminal.
Stale fuel.
Water or dirt in fuel system.
Spark plug scorched, defective or gap
between electrodes too wide.
Drain stale fuel into a suitable container
outdoors. Fill tank with clean, fresh and
lead-free fuel.
Re-adjust gap between electrodes
or change spark plug.
of oil.
Important
If repairs exceed the work mentioned above, please contact your
local dealer with customer service
facilities.
10
 Loading...