

Page 1

Safety • Setup • Adjustments • Operation • Maintenance • Troubleshooting • Parts Lists • Warranty
OPERATOR’S MANUAL
21” Self-Propelled Rotary Mower — Model Series 839
IMPORTANT:
READ SAFETY RULES AND INSTRUCTIONS
CAREFULLY BEFORE OPERATING EQUIPMENT.
PRINTED IN U.S.A. MTD Products Ltd., P. O. Box 1386, KITCHENER, ONTARIO N2G 4J1
Page 2

This Operator’s Manual is an important part of your new equipment. It will help you assemble,
-4$02/$5#43,)-)4%$
+)4#(%.%2/..'*
8888888888
88888888888
-ODEL.UMBER
.UM£RODEMODÞLE
3ERIAL.UMBER
.UM£RODES£RIE
WWWMTDCANADACOM
prepare and maintain the unit for best performance. Please read and understand what it says.
Table of Contents
Slope Gauge........................................................ 3
Safe Operation Practices ................................... 4
Set-Up & Adjustments ........................................ 6
Operation ............................................................. 8
Maintenance & Off-Season Storage ................ 10
Finding and Recording Model Number
BEFORE YOU START ASSEMBLING
YOUR NEW EQUIPMENT,
please locate the model plate on the equipment and copy the
the model number and the serial number to the sample model
plate provided to the right. You can locate the model plate by
standing at the operating position and looking down at the rear
of the machine.
Trouble Shooting .............................................. 13
Warranty ............................................................ 14
Safety Labels ....................................................15
Illustrated Parts Lists ....................................... 16
Customer Support
Please do
If you have difficulty assembling this product or have any questions regarding the controls, operation or maintenance of this unit,
you can seek help from the experts. Choose from the options below:
1. Visit www.mtdcanada.ca for many useful suggestions, click on Customer Support button.
2. Call a Customer Support Representative at 1-800-668-1238.
3. The engine manufacturer is responsible for all engine-related issues with regards to performance, power-rating, specifications, warranty and service. Please refer to the engine manufacturer’s Owner’s/Operator’s Manual, packed separately with
your unit, for more information.
Please have your unit’s model number and serial number ready when you call. See previous section to locate this information.
You will be asked to enter the serial number in order to process your call.
NOT
return the unit to the retailer from which it was purchased,
without first contacting Customer Support.
2
Page 3

1
Slope
Gauge
WARNING
Do not mow on inclines
with a slope in excess
of 15 degrees (a rise
of approximately
2-1/2 feet every 10
feet). A riding mower
could overturn and
cause serious injury.
If operating a walkbehind mower on such
a slope, it is extremely
difficult to maintain your
footing and you could
slip, resulting in serious
injury.
Operate RIDING
mowers up and down
slopes, never across
the face of slopes.
Operate
WALK-BEHIND
mowers across the
face of slopes, never
up and down slopes.
3
Page 4

2
Safe
Operation
Practices
WARNING
This symbol points
out important safety
instructions which, if
not followed, could
endanger the personal
safety and/or property
of yourself and others.
Read and follow all
instructions in this
manual before attempting to operate
this machine. Failure
to comply with these
instructions may result
in personal injury. When
you see this symbol.
HEED ITS WARNING!
Your Responsibility
Restrict the use
of this power machine
to persons who read,
understand
and follow the warnings
and instructions
in this manual
and on the machine.
WARNING: Engine Exhaust, some of its constituents, and certain vehicle components contain or
emit chemicals known to State of California to cause cancer and birth defects or other reproductive harm.
DANGER: This machine was built to be operated according to the rules for safe operation in this manual. As with
any type of power equipment, carelessness or error on the part of the operator can result in serious injury. This
machine is capable of amputating hands and feet and throwing objects. Failure to observe the following safety
instructions could result in serious injury or death.
General Operation
1. Read this operator’s manual carefully in its entirety before
attempting to assemble this machine. Read, understand,
and follow all instructions on the machine and in the
manual(s) before operation. Be completely familiar with
the controls and the proper use of this machine before
operating it. Keep this manual in a safe place for future
and regular reference and for ordering replacement parts.
2. This machine is a precision piece of power equipment,
not a plaything. Therefore, exercise extreme caution at all
times. Your unit has been designed to perform one job: to
mow grass. Do not use it for any other purpose.
3. Never allow children under 14 years old to operate this
machine. Children 14 years old and over should read and
understand the instructions in this manual and should
be trained and supervised by a parent. Only responsible
individuals who are familiar with these rules of safe
operation should be allowed to use this machine.
4. Thoroughly inspect the area where the equipment is to
be used. Remove all stones, sticks, wire, bones, toys and
other foreign objects which could be tripped over or picked
up and thrown by the blade. Thrown objects can cause
serious personal injury. Plan your mowing pattern to avoid
discharge of material toward roads, sidewalks, bystanders
and the like. Also, avoid discharging material against a
wall or obstruction which may cause discharged material
to ricochet back toward the operator.
5. To help avoid blade contact or a thrown object injury,
stay in the operator zone behind the handles and keep
children, bystanders, helpers and pets at least 75 feet
from the mower while it is in operation. Stop machine if
anyone enters the area.
6. Always wear safety glasses or safety goggles during
operation and while performing an adjustment or repair
to protect your eyes. Thrown objects which ricochet can
cause serious injury to the eyes.
7. Wear sturdy, rough-soled work shoes and close-fitting
slacks and shirts. Shirts and pants that cover the arms
and legs and steel-toed shoes are recommended. Never
operate this machine in bare feet, sandals, slippery or light
weight (e.g. canvas) shoes.
8. Do not put hands or feet near rotating parts or under the
cutting deck. Contact with the blade can amputate hands
and feet.
9. A missing or damaged discharge cover can cause blade
contact or thrown object injuries.
10. Many injuries occur as a result of the mower being pulled
over the foot during a fall caused by slipping or tripping.
Do not hold on to the mower if you are falling; release the
handle immediately.
11. Never pull the mower back toward you while you are
walking. If you must back the mower away from a wall or
obstruction first look down and behind to avoid tripping
and then follow these steps:
a. Step back from the mower to fully extend your arms.
b. Be sure you are well balanced with sure footing.
c. Pull the mower back slowly, no more than half way
toward you.
d. Repeat these steps as needed.
12. Do not operate the mower while under the influence of
alcohol or drugs.
13. Do not engage the self-propelled mechanism on units so
equipped while starting engine.
14. The blade control handle is a safety device. Never attempt
to bypass its operation. Doing so makes the safety device
inoperative and may result in personal injury through
contact with the rotating blade. The blade control handle
must operate easily in both directions and automatically
return to the disengaged position when released.
15. Never operate the mower in wet grass. Always be sure of
your footing. A slip and fall can cause serious personal
injury. If you feel you are losing your footing, release the
blade control handle immediately and the blade will stop
rotating within three seconds.
16. Mow only in daylight or in good artificial light. Walk, never
run. Stop the blade when crossing gravel drives, walks or
roads.
17. If the equipment should start to vibrate abnormally, stop the
engine and check immediately for the cause. Vibration is
generally a warning of trouble.
18. Shut the engine off and wait until the blade comes to
a complete stop before removing the grass catcher or
unclogging the chute. The cutting blade continues to rotate
for a few seconds after the engine is shut off. Never place
any part of the body in the blade area until you are sure the
blade has stopped rotating.
19. Never operate mower without proper trail shield, discharge
cover, grass catcher, blade control handle or other safety
protective devices in place and working. Never operate
mower with damaged safety devices. Failure to do so, can
result in personal injury.
20. Muffler and engine become hot and can cause a burn. Do
not touch.
21. Only use parts and accessories made for this machine by
the manufacturer. Failure to do so can result in personal
injury.
22. If situations occur which are not covered in this manual, use
care and good judgment. Call customer assistance for the
name of your nearest servicing dealer.
Slope Operation
Slopes are a major factor related to slip and fall accidents which
can result in severe injury. Operation on slopes requires extra
caution. If you feel uneasy on a slope, do not mow it. For your
safety, use the slope gauge included as part of this manual to
measure slopes before operating this unit on a sloped or hilly
area. If the slope is greater than 15 degrees, do not mow it.
4
Page 5
Do:
1. Mow across the face of slopes; never up and down.
Exercise extreme caution when changing direction on
slopes.
2. Watch for holes, ruts, rocks, hidden objects, or bumps which
can cause you to slip or trip. Tall grass can hide obstacles.
3. Always be sure of your footing. A slip and fall can cause
serious personal injury. If you feel you are losing your
balance, release the blade control handle immediately, and
the blade will stop rotating within 3 seconds.
Do Not:
1. Do not mow near drop-offs, ditches or embankments, you
could lose your footing or balance.
2. Do not mow slopes greater than 15 degrees as shown on
the slope gauge.
3. Do not mow on wet grass. Unstable footing could cause
slipping.
Children
Tragic accidents can occur if the operator is not alert to the
presence of children. Children are often attracted to the mower
and the mowing activity. They do not understand the dangers.
Never assume that children will remain where you last saw
them.
1. Keep children out of the mowing area and under the watchful care of a responsible adult other than the operator.
2. Be alert and turn mower off if a child enters the area.
3. Before and while moving backwards, look behind and down
for small children.
4. Use extreme care when approaching blind corners,
doorways, shrubs, trees, or other objects that may obscure
your vision of a child who may run into the mower.
5. Keep children away from hot or running engines. They can
suffer burns from a hot muffler.
6. Never allow children under 14 years old to operate a power
mower. Children 14 years old and over should read and
understand the operation instructions and safety rules in
this manual and should be trained and supervised by a
parent.
Service
Safe Handling Of Gasoline:
1. To avoid personal injury or property damage use extreme
care in handling gasoline. Gasoline is extremely flammable
and the vapors are explosive. Serious personal injury can
occur when gasoline is spilled on yourself or your clothes
which can ignite.
2. Wash your skin and change clothes immediately.
3. Use only an approved gasoline container.
4. Never fill containers inside a vehicle or on a truck or trailer
bed with a plastic liner. Always place containers on the
ground away from your vehicle before filling.
5. Remove gas-powered equipment from the truck or trailer
and refuel it on the ground. If this is not possible, then refuel
such equipment on a trailer with a portable container, rather
than from a gasoline dispenser nozzle.
6. Keep the nozzle in contact with the rim of the fuel tank or
container opening at all times until fueling is complete. Do
not use a nozzle lock-open device.
7. Extinguish all cigarettes, cigars, pipes and other sources of
ignition.
8. Never fuel machine indoors because flammable vapors
will accumulate in the area.
9. Never remove gas cap or add fuel while the engine is
hot or running. Allow engine to cool at least two minutes
before refueling.
10. Never over fill fuel tank. Fill tank to no more than ½ inch
below bottom of filler neck to provide for fuel expansion.
11. Replace gasoline cap and tighten securely.
12. If gasoline is spilled, wipe it off the engine and equipment.
Move unit to another area. Wait 5 minutes before starting
the engine.
13. Never store the machine or fuel container near an open
flame, spark or pilot light as on a water heater, space
heater, furnace, clothes dryer or other gas appliances.
14. To reduce fire hazard, keep mower free of grass, leaves,
or other debris build-up. Clean up oil or fuel spillage and
remove any fuel soaked debris.
15. Allow a mower to cool at least 5 minutes before storing.
General Service:
1. Never run an engine indoors or in a poorly ventilated area.
Engine exhaust contains carbon monoxide, an odorless
and deadly gas.
2. Before cleaning, repairing, or inspecting, make certain the
blade and all moving parts have stopped. Disconnect the
spark plug wire and ground against the engine to prevent
unintended starting.
3. Check the blade and engine mounting bolts at frequent
intervals for proper tightness. Also, visually inspect blade
for damage (e.g., bent, cracked, worn) Replace blade with
the original equipment manufacture’s (O.E.M.) blade only,
listed in this manual. “Use of parts which do not meet the
original equipment specifications may lead to improper
performance and compromise safety! ”
4. Mower blades are sharp and can cut. Wrap the blade or
wear gloves, and use extra caution when servicing them.
5. Keep all nuts, bolts, and screws tight to be sure the
equipment is in safe working condition.
6. Never tamper with safety devices. Check their proper
operation regularly.
7. After striking a foreign object, stop the engine, disconnect the spark plug wire and ground against the engine.
Thoroughly inspect the mower for any damage. Repair the
damage before starting and operating the mower.
8. Never attempt to make a wheel or cutting height adjustment while the engine is running.
9. Grass catcher components, discharge cover, and trail
shield are subject to wear and damage which could
expose moving parts or allow objects to be thrown. For
safety protection, frequently check components and replace immediately with original equipment manufacturer’s
(O.E.M.) parts only, listed in this manual. “Use of parts
which do not meet the original equipment specifications
may lead to improper performance and compromise
safety!”
10. Do not change the engine governor setting or overspeed
the engine. The governor controls the maximum safe
operating speed of the engine.
11. Maintain or replace safety labels, as necessary.
12. Observe proper disposal laws and regulations. Improper
disposal of fluids and materials can harm the environment.
2
Safe
Operation
Practices
WARNING
This symbol points
out important safety
instructions which, if
not followed, could
endanger the personal
safety and/or property
of yourself and others.
Read and follow all
instructions in this
manual before attempting to operate
this machine. Failure
to comply with these
instructions may result
in personal injury. When
you see this symbol.
HEED ITS WARNING!
Your Responsibility
Restrict the use
of this power machine
to persons who read,
understand
and follow the warnings
and instructions
in this manual
and on the machine.
5
Page 6

3
Setup and
Adjust
NOTE: This Operator’s
Manual covers
several models. Lawn
Mower features vary by
model. Not all features
discussed (or engines
pictured) in this manual
are applicable to all
Lawn Mower models.
NOTE: Reference to
right, left, front and rear
of the lawn mower is in
relation to the operating
position.
Make sure to route
cable outside the
lower handle. Do not
crimp cable while
lifting the handle up.
ments
IMPORTANT
Figure 3-1
Figure 3-2
NOTE: The units illustrated may vary slightly from your unit.
1. Remove loose parts and any packing material which
may be between upper and lower handles.
a. Remove star knobs from handle mounting brackets
and pull up and back on the upper handle to raise
the handle from position A into the operating
position B. See Figure 3-1. Make sure the lower
handle is seated securly into the handle mounting
brackets.
b. Tighten star knobs securing upper handle to
lower handle. Make sure that each carriage bolt is
seated properly in the handle.
2. Replace and tighten star knobs removed earlier to
secure lower handle to handle backets. See Figure
3-2.
3. Rope guide Setup as follows, see Figure 3-3:
a. Hold the blade control against the upper handle.
Position A.
b. Slowly pull starter rope out of engine. Position B.
c. Slip starter rope into the rope guide. Position C.
d. Tighten rope guide wing nut. Position D.
4. Secure cables to the lower handle using the cable tie.
Pull cable tie tight and cut off excess.
5. To assemble the grasscatcher:
a. Place bag over frame (black plastic side is the bot-
tom of bag.) Insert the hooks on the frame through
the holes in the side plastic channels of the bag.
b. Secure bag to frame by working the plastic chan-
nels on bag over frame. All of the plastic channels
except center top of bag attach from the outside of
bag. Center top of bag attaches from the inside of
bag.
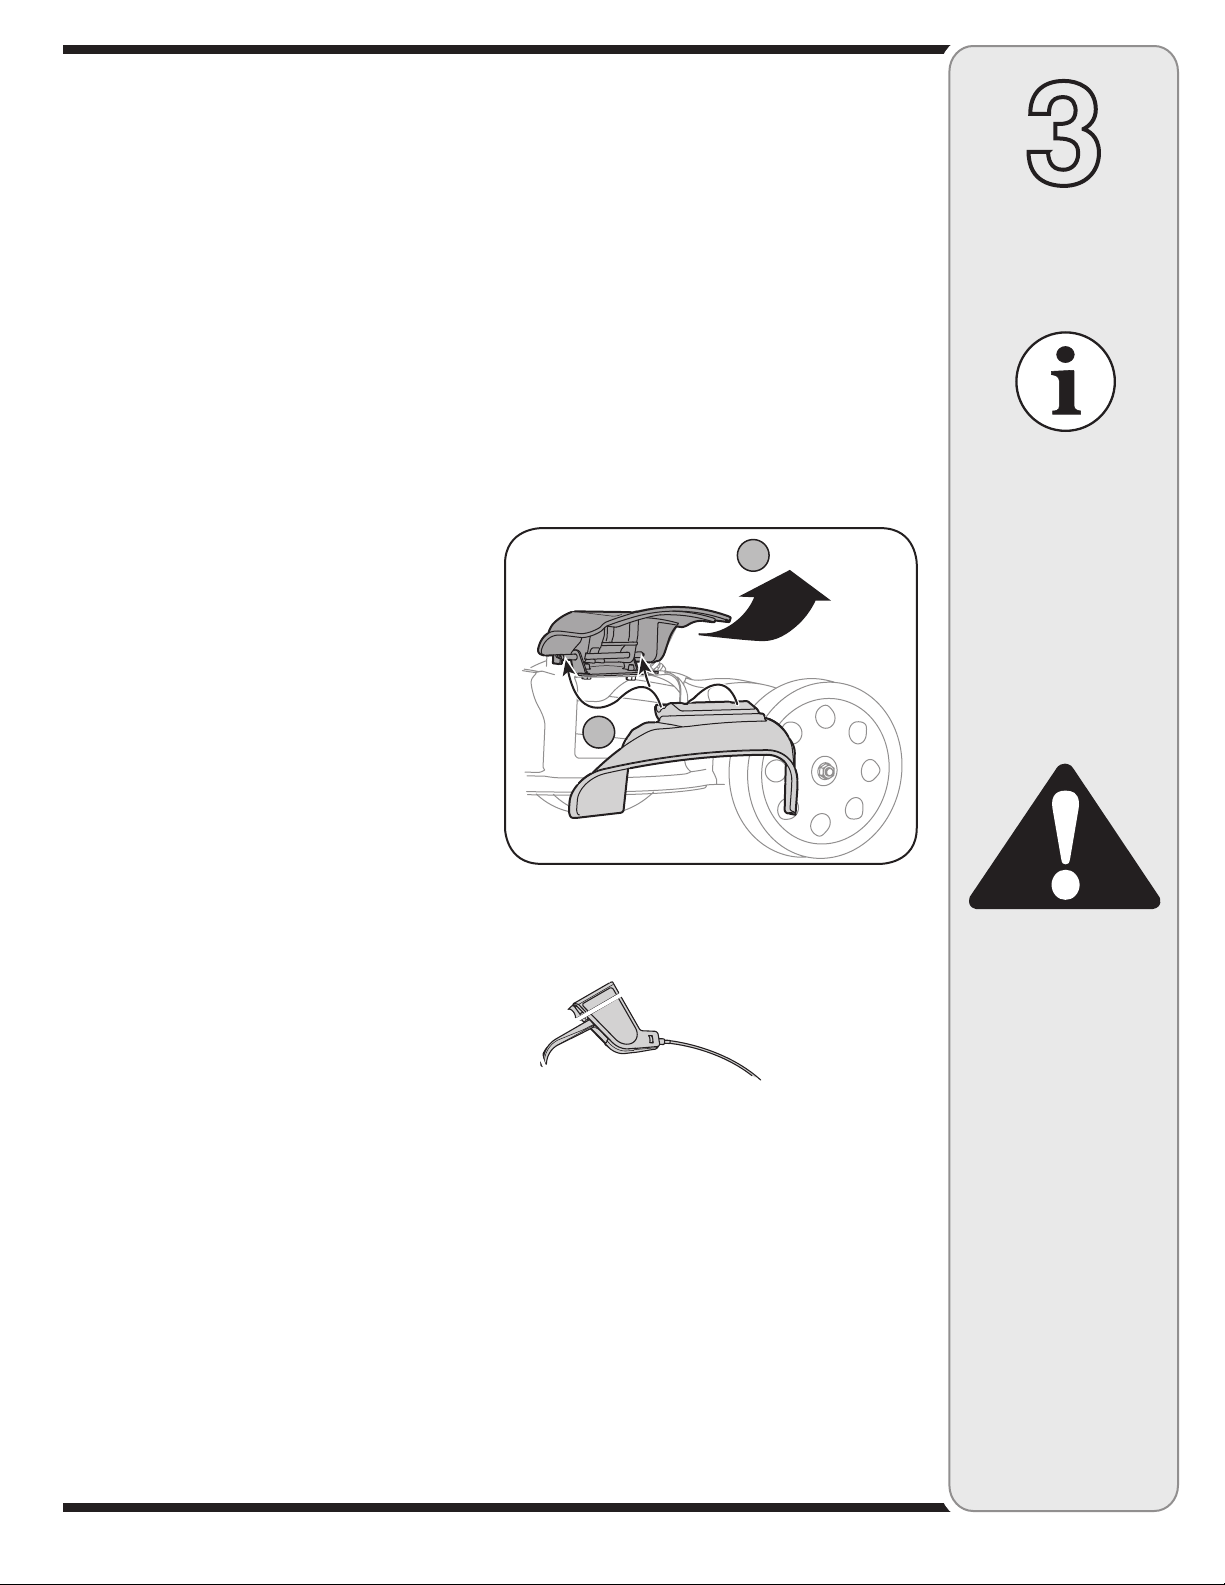
6. Before attaching the grass catcher, the rear mulching
plug must be removed. Refer to Figure 3-4.
a. Lift rear discharge door.
b. Remove rear mulching plug.
IMPORTANT
This unit is shipped
without gasoline or
oil in the engine. Fill
up gasoline and oil
as instructed in the
accompanying engine
manual BEFORE
operating your mower.
Figure 3-3
6
Page 7
7. Attaching Grass Catcher to Mower
a. Lift the rear discharge door.
b. Place the grass catcher on the pivot rod. Let go
of discharge door so that it rests on the grass
catcher. See Figure 3-5.
WARNING: Never operate mower
unless the hooks on the grass
catcher are firmly seated on the pivot
rod, and the rear discharge door
rests firmly against top of the grass
catcher.
8. To install the rear mulching plug.
a. Lift rear discharge door and lift grass catcher up
and out, off of the pivot rod.
b. Insert the rear mulching plug as shown in Figure
3-4 and release the rear discharge door.
9. If converting to side discharge, make sure grass
catcher is off unit and rear mulching plug is in place.
a. On the side of the mower deck, lift the hinged
mulching plug. See Figure 3-6.
b. Slide the two hooks on the side discharge deflec-
tor under the hinge pin on the hinged mulching
plug assembly. Lower the hinged mulching plug.
NOTE: Do not remove the hinged mulching plug at any
time, even when you are not mulching.
3
NOTE: Make certain
bag is turned right side
out before assembling
(warning label will be on
A
B
the outside).
NOTE: Make certain
cables are routed to the
outside of the handle so
they are not in the way
when attaching the grass
catcher.
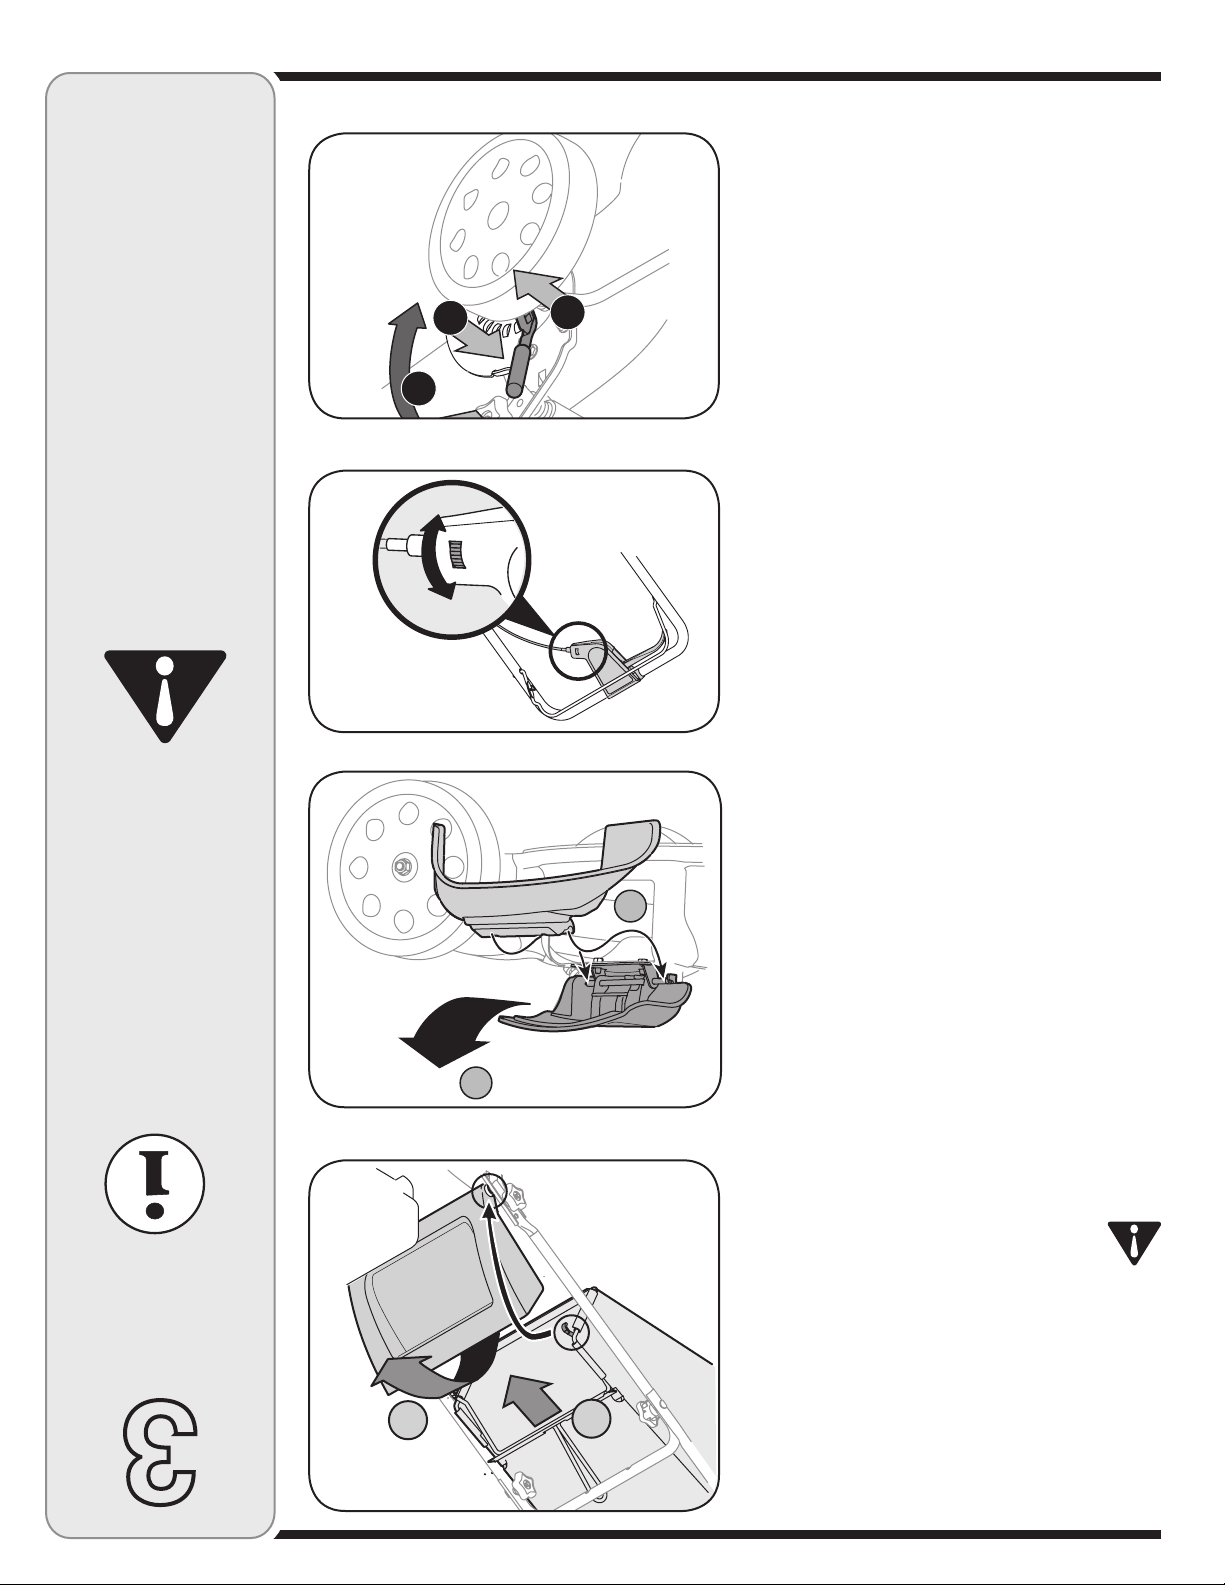
Adjustments
Drive Control
The adjustment wheel is located in the drive control
handle housing and is used to tighten or loosen the
drive belt. You will need to adjust the drive control if
the mower does not propel itself with the drive control
engaged or if the mower’s wheels hesitate with the drive
control engaged. If either of these conditions occur, rotate
the adjustment wheel clockwise to tighten the cable or
counterclockwise to loosen the cable, Figure 3-7.
Figure 3-6
WARNING
Never operate mower
unless the hooks on
the grass catcher are
firmly seated on the
pivot rod, and the
rear discharge door
rests firmly against
top of the grass
catcher.
All mowers are
equipped with a rear
protective guard. The
guard helps eliminate
projectiles thrown
by the blade from
injuring the operator.
DO NOT REMOVE
THIS GUARD.
7
Page 8

4
Operating
Your Lawn
Mower
WARNING
Read, understand,
and follow all instructions and warnings
on the machine and
in this manual before
operating.
This blade control
mechanism is a
safety device. Never
attempt to bypass its
operations.
Use extreme care
when handling
gasoline. Gasoline is
extremely flammable
and the vapors are
explosive. Never fuel
the machine indoors
or while the engine
is hot or running.
Extinguish cigarettes,
cigars, pipes and
other sources of
ignition.
Know Your Lawn Mower
Figure 4-1
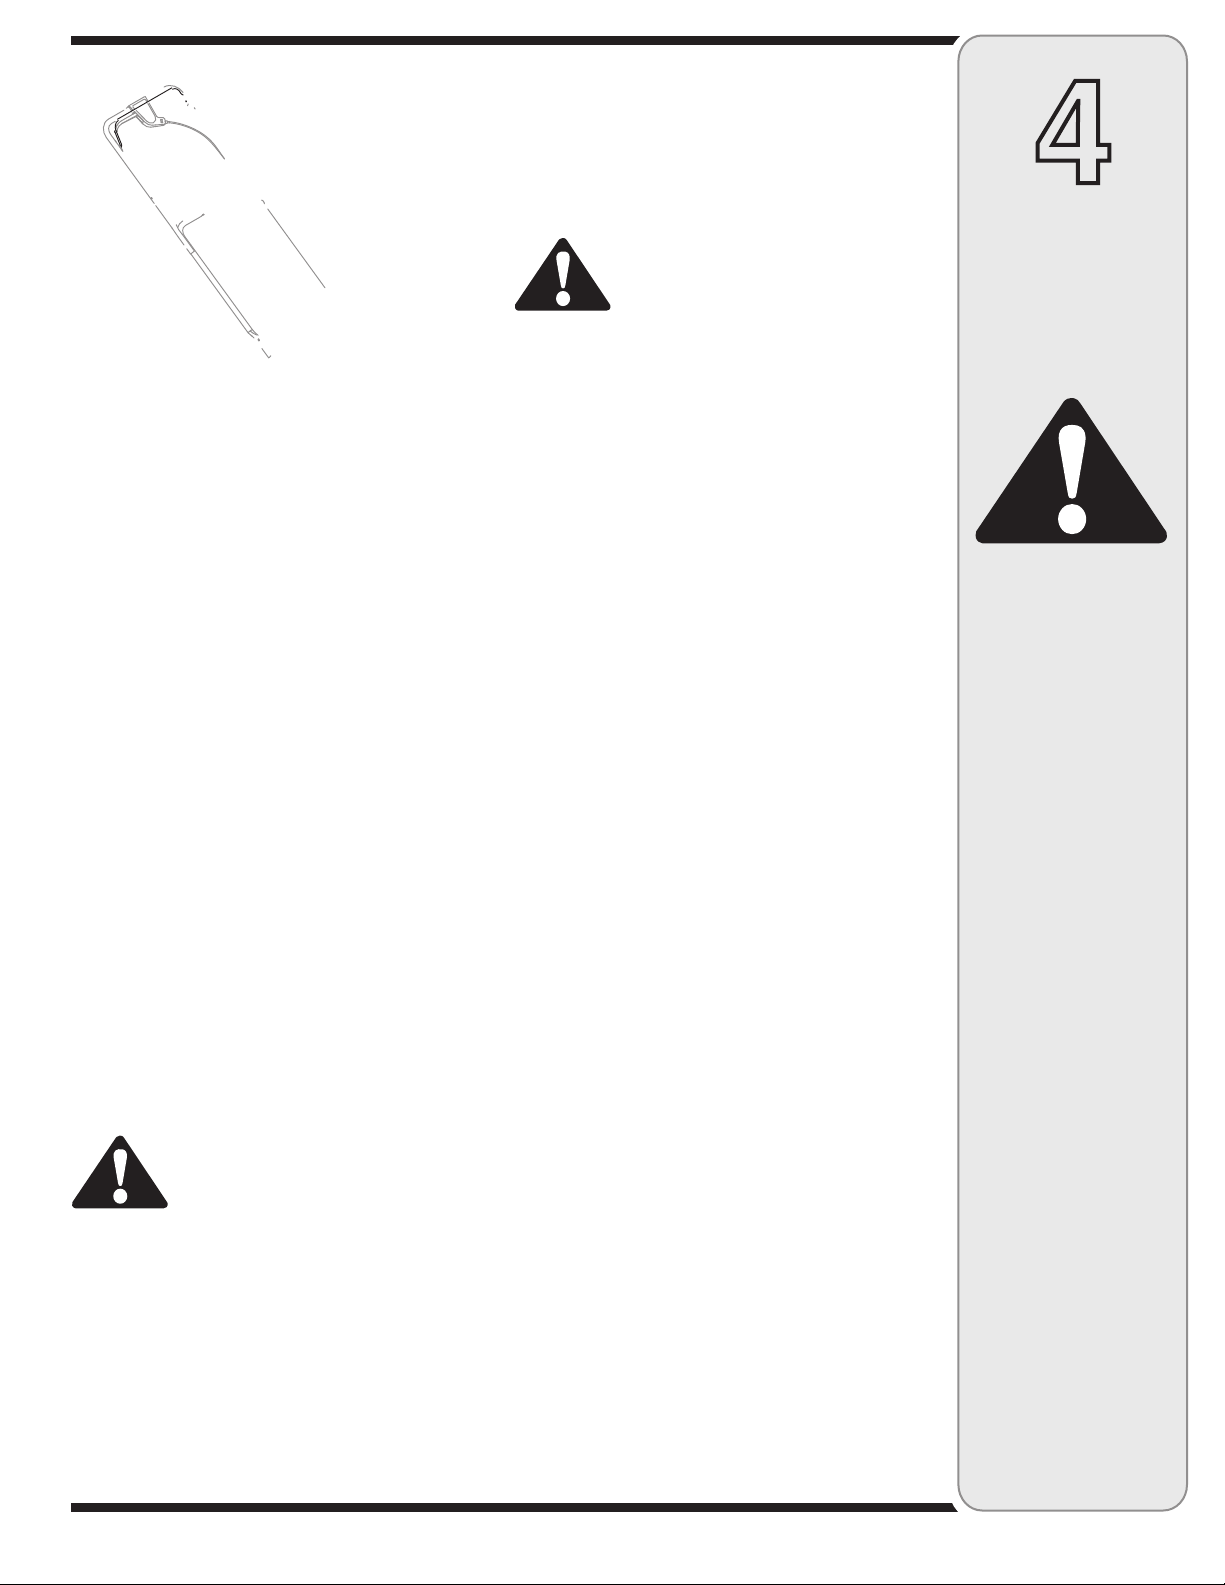
Blade Control Handle
The blade control handle is located on the upper handle
of the mower. See Figure 4-1. The blade control handle
must be depressed in order to operate the unit. Release
the blade control handle to stop the engine and blade.
Drive Control Handle
The drive control handle is located on the upper handle.
Squeeze the drive control handle against the upper
handle to engage drive system. Release the control
handle to disengage the drive system in order to stop,
slow down, or backup.
Recoil Starter
The recoil starter is attached to the right upper handle.
Stand behind the unit and pull the recoil starter rope to
start the unit.
Cutting Height Adjustment Lever
The height adjuster determines the cutting height of the
mower. The adjuster is located above the left rear wheel,
refer to the Adjustment Section.
Before Starting
1. Service the engine with gasoline and oil as instructed
in the separate engine manual.
WARNING: Be sure no one other
than the operator is standing
near the lawn mower while
starting engine or operating mower. Never
run engine indoors or in enclosed, poorly
ventilated areas. Engine exhaust contains
carbon monoxide, an odorless and deadly
gas. Keep hands, feet, hair and loose clothing
away from any moving parts on engine and
lawn mower.
2. Attach spark plug wire to spark plug. If unit is
equipped with a rubber boot over the end of the spark
plug wire, make certain the metal loop on the end of
the spark plug wire (inside the rubber boot) is fastened
securely over the metal tip on the spark plug.
3. Before each use, check for proper drive clutch operation by performing the following before starting the
engine:
a. With the drive control released, push mower
forward. It should move freely. Pull mower backward. It should move with only a small amount of
resistance.
b. If it does not the clutch may not be releasing
completely. Do not start the engine until corrections
have been made. Check the control cable for
severe bend, kinks and binding. Also check for
grass build-up around the belt.
8
Page 9
Using Your Lawn Mower
Be sure the lawn is clear of stones, sticks, wire, or other
objects which could damage the lawn mower or the
engine. Such objects could be accidently thrown by the
mower in any direction and cause serious personal injury
to the operator and others.
4
Figure 4-2
To Start Engine and Engage Blade
Refer to the separate engine manual packed with
your unit.
1. Place the fuel valve lever found on the left side of the
engine into the ON (OPEN) position, Figure 4-2.
2. Move the choke lever all the way backward into the
choke position.
3. Standing behind the mower, squeeze the blade
control against upper handle, Figure 4-2. The choke
will now begin to slowly return to the off choke
position after activating the blade control. Therefore,
quickly move onto step four below.
4. Grasp the starter handle as shown and pull slowly
until resistance is felt, then pull rapidly to start engine
and avoid kickback. Return it slowly to the rope guide.
5. To engage the drive, squeeze the drive control handle
towards the upper handle. Release the drive control
to slow down when negotiating an obstacle, making a
turn, or stopping.
To Stop Engine
1. Release the blade control handle to stop the engine
and blade.
WARNING: The blade continues
to rotate for a few seconds after
the engine is shut off.
2. Disconnect and ground the spark plug wire as
instructed in the separate engine manual to prevent
accidental starting while equipment is unattended.
WARNING: Wait for the blade to
stop completely before doing any
work on the mower or to remove
the grass catcher.
WARNING: If you strike a foreign
object, stop the engine. Remove
wire from the spark plug, thoroughly inspect the mower for any
damage, and repair the damage
before restarting and operating
the mower. Extensive vibration
of the mower during operation is
an indication of damage. The unit
should be promptly inspected
and repaired.
Operating Tips
1. To engage the drive, squeeze the drive control handle
towards the upper handle. Release the drive control
to slow down when negotiating an obstacle, making a
turn, or stopping.
2. For best results do not cut wet grass.
3. New grass, thick grass, or wet grass may require a
narrower cut.
4. For a healthier lawn, never cut off more than one-third
of the total length of the grass.
5. Your lawn should be cut in the fall as long as there
is growth.
6. If the grass has been allowed to grow in excess of 4
inches, mulching is not recommended. Mow using
the side discharge to reduce the grass height to 3-1/4
inches or less before mulching.
Operating
Your Lawn
Mower
WARNING
The operation of any
lawn mower can result
in foreign objects
being thrown into
the eyes, which can
damage your eyes
severely. Always wear
safety glasses while
operating the mower,
or while performing
any adjustments or
repairs on it.
Be sure no one other
than the operator is
standing near the lawn
mower while starting
engine or operating
mower. Never run
engine indoors or
in enclosed, poorly
ventilated areas. Engine exhaust contains
carbon monoxide, an
odorless and deadly
gas. Keep hands, feet,
hair and loose clothing
away from any moving
parts on engine and
lawn mower.
9
Page 10
5
Maintaining
Your Lawn
Mower
WARNING
Always stop engine,
disconnect spark plug,
and ground against
engine before cleaning,
lubricating or doing any
kind of maintenance on
your machine.
Figure 5-1
Engine
1. Refer to the separate engine manual for engine
maintenance instructions.
2. Maintain engine oil as instructed in the separate
engine manual packed with your unit. Read and follow
instructions carefully.
3. Under normal conditions service air cleaner as
instructed in the separate engine manual packed with
your unit. Clean every few hours under extremely
dusty conditions. Poor engine performance and
flooding usually indicates that the air cleaner should
be serviced.
4. The spark plug should be cleaned and the gap reset
once a season. Spark plug replacement is recommended at the start of each mowing season; check
engine manual for correct plug type and gap specifications.
NOTE: This spark ignition system meets all requirements of the Canadian Interference-Causing Equipment
Regulations.
5. Clean the engine regularly with a cloth or brush.
Keep the cooling system (blower housing area) clean
to permit proper air circulation which is essential to
engine performance and life. Be certain to remove all
grass, dirt and combustible debris from muffler area.
Deck
The underside of the mower deck should be cleaned after
each use to prevent a buildup of grass clippings, leaves,
dirt or other matter. If this debris is allowed to accumulate,
it will invite rust and corrosion, and may prevent proper
mulching.
The deck may be cleaned by tilting the mower and scraping clean with a suitable tool (make certain the spark plug
wire is disconnected).
IMPORTANT: Do not
use a pressure washer
or garden hose to clean
your unit. These may
cause damage to electric
components, spindles,
pulleys, bearings, or the
engine. The use of water
will result in shortened life
and reduce serviceability.
Figure 5-2
Lubrication
1. Lubricate the pivot points on the blade control handle
at least once a season with light oil. The blade
control must operate freely in both directions. See
Figure 5-1.
2. If your mower is equipped with ball bearing wheels,
lubricate at least once a season with a light oil, all
other types require no lubrication. However, if the
wheels are removed for any reason, lubricate the
surface of the axle bolt and the inner surface of the
wheel with light automotive oil.
3. Lubricate the torsion spring and pivot point periodically with light oil to prevent rust. See Figure 5-1.
4. The transmission is pre-lubricated and sealed at the
factory and does not require lubrication.
5. Follow the accompanying engine manual for lubrication schedule and instruction.
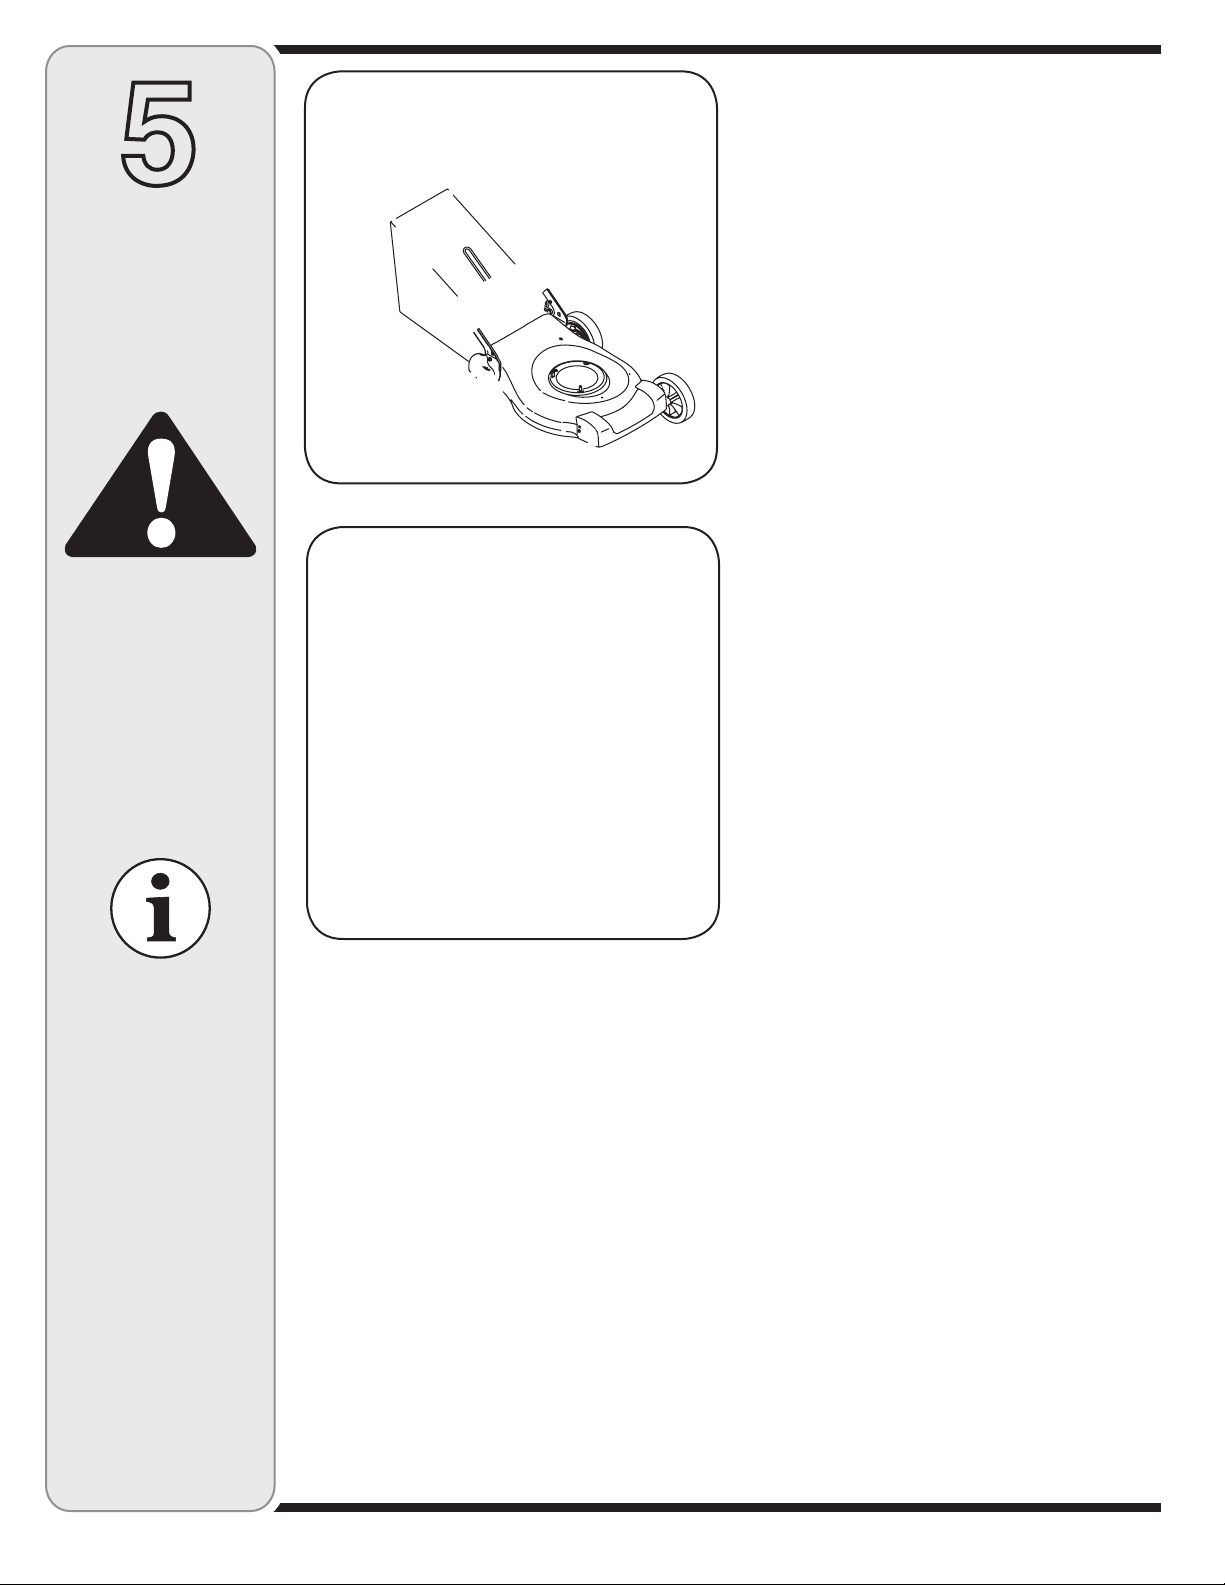
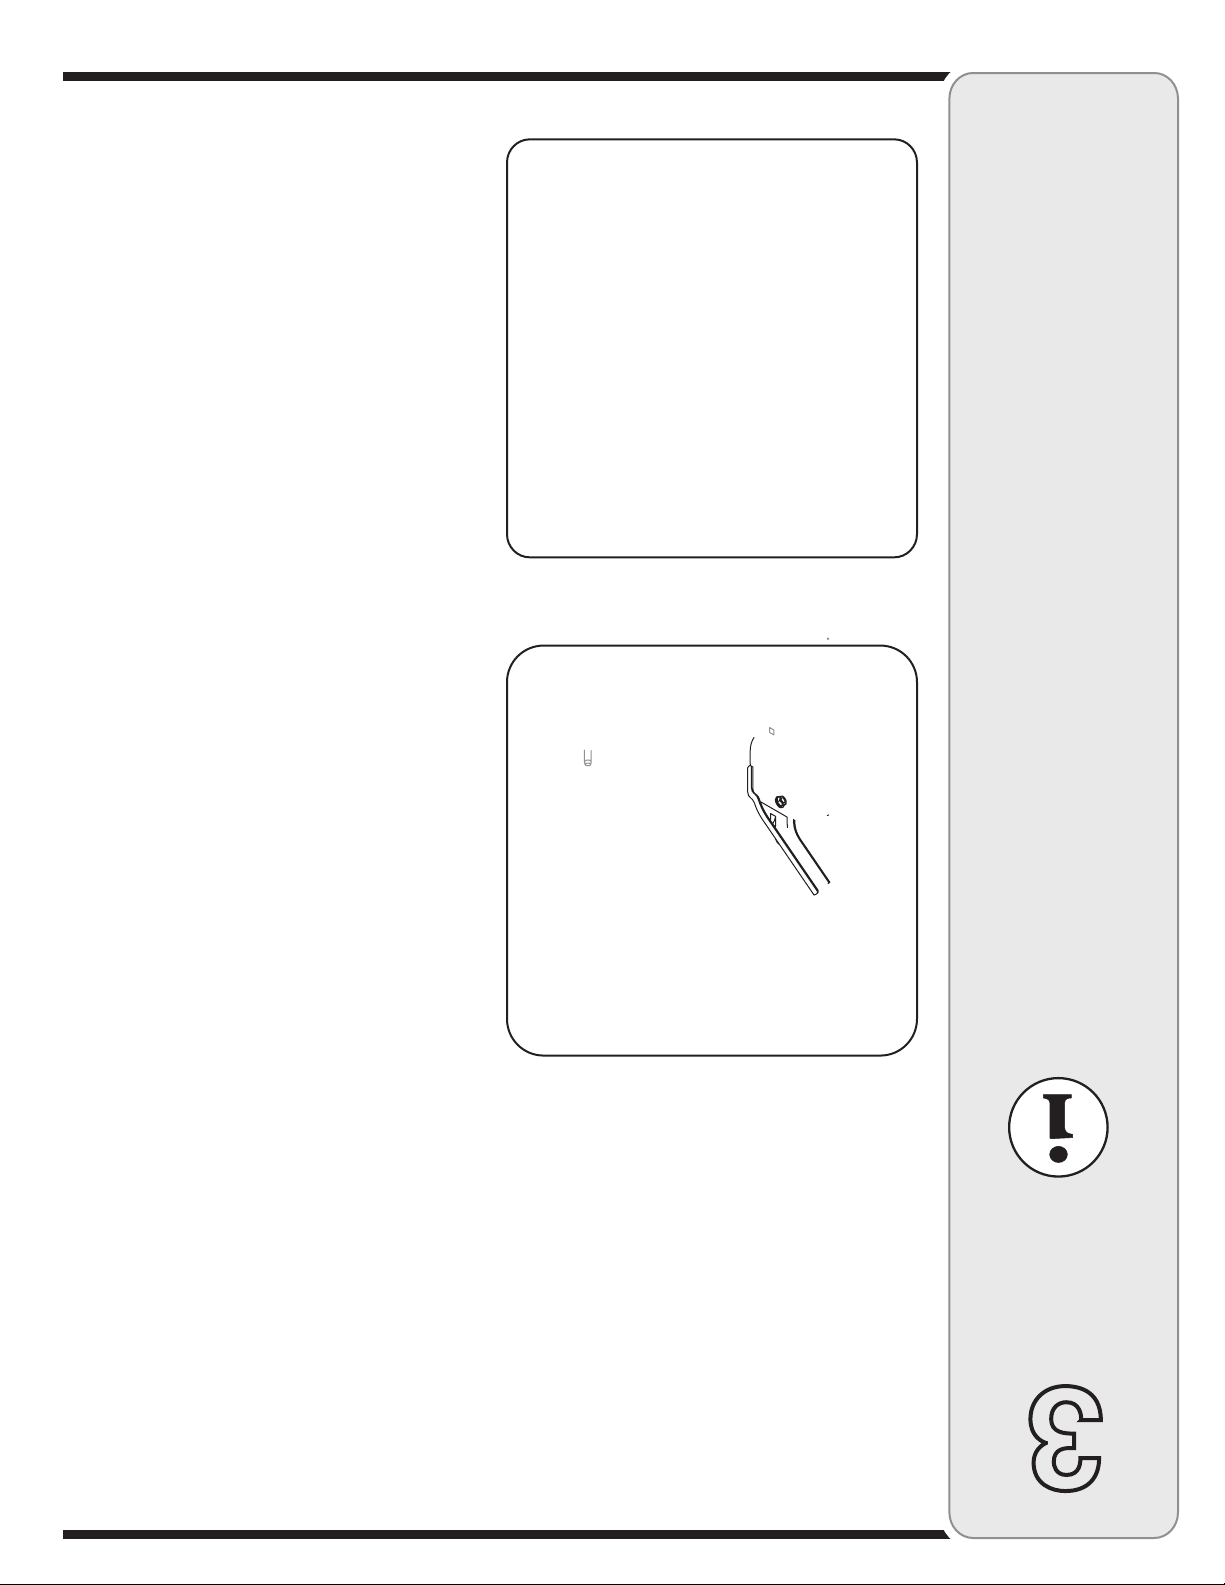
Rear Flap Replacement
The rear flap is attached to the back of the mower deck,
and is designed to minimize the possibility that objects
will be thrown from the rear of the mower toward the
operator. If the rear flap becomes damaged, replace as
follows.
1. To remove the old rear flap, lift rear door, and press
flap in on either side to remove from hole. See Figure
5-2.
2. Remove flap from opposite hole and replace with new
flap following these steps in reverse order.
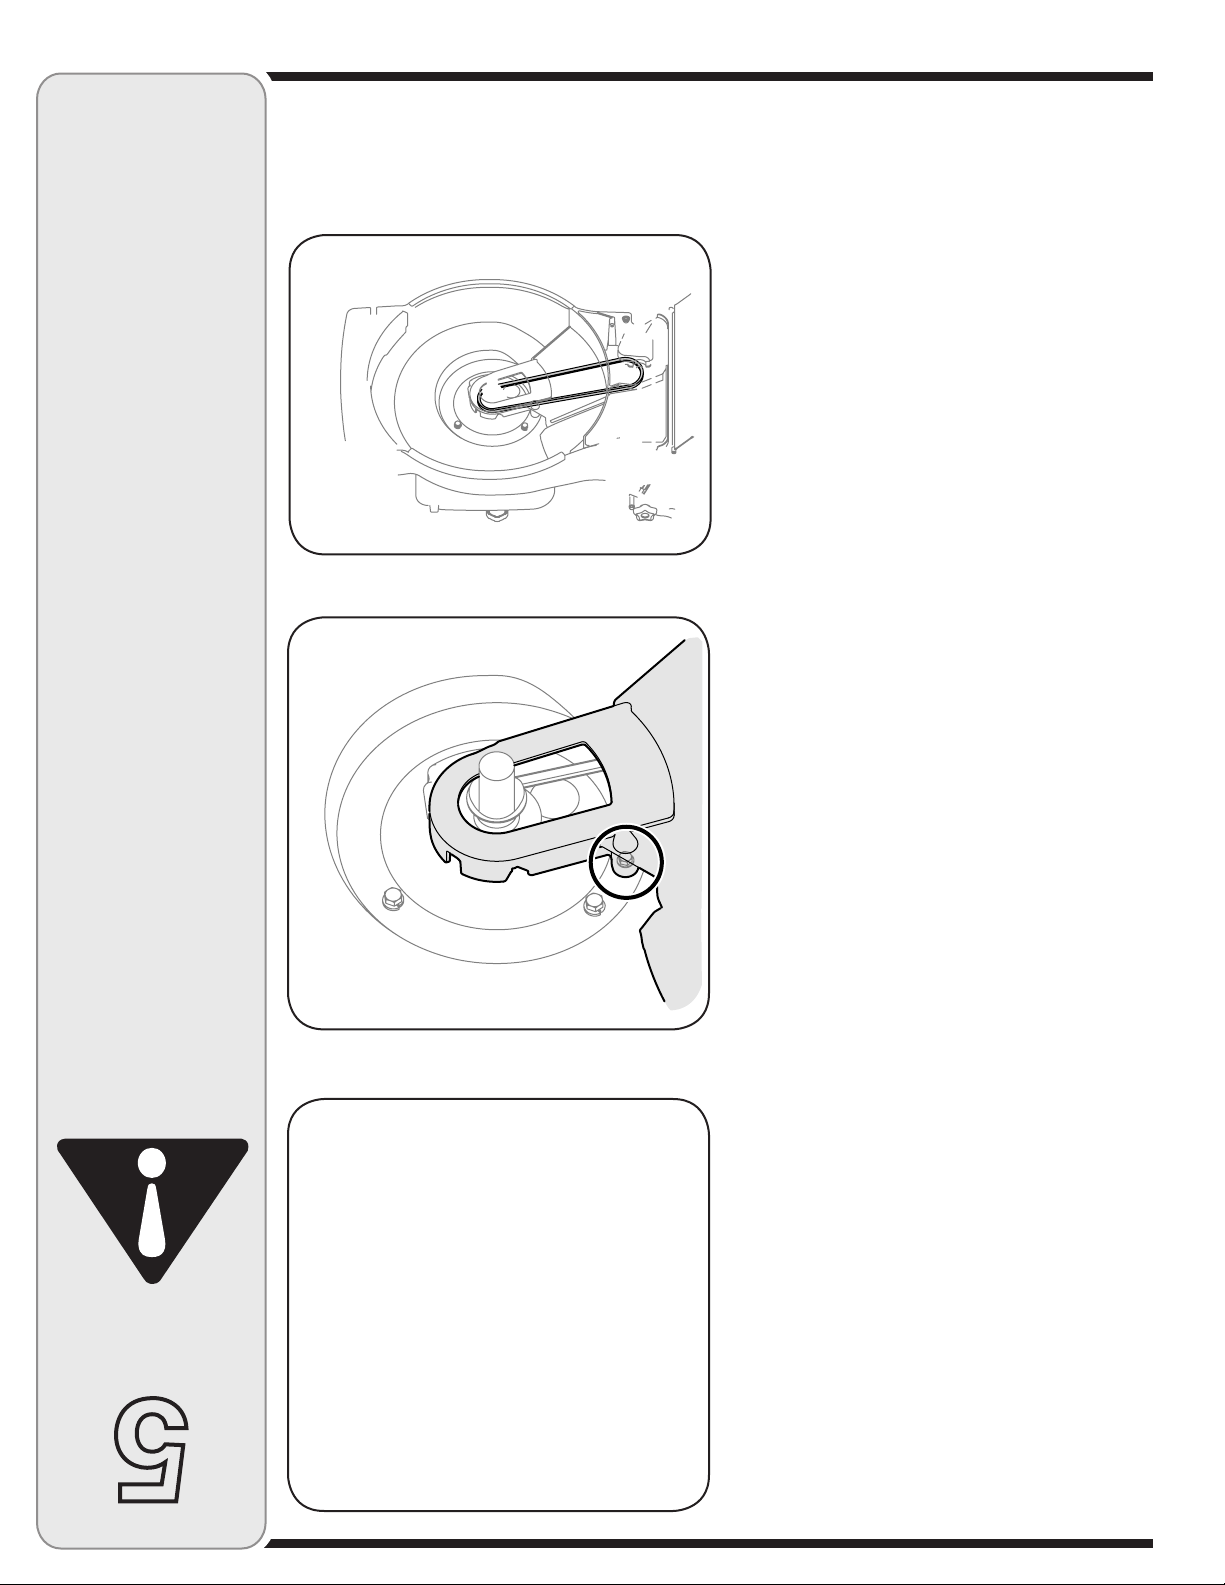
Blade Care
Periodically inspect the blade adapter for cracks,
especially if you strike a foreign object. Replace when
necessary. Follow the steps below for blade service:
1. Remove the bolt and the blade bell support which
hold the blade and the blade adapter to the engine
crankshaft. See Figure 5-3.
2. Remove blade and adapter from the crankshaft.
10
Page 11

5
Maintaining
Your Lawn
Mower
WARNING
When removing
the cutting blade
for sharpening or
replacement or
when sliding the belt
around it, protect
your hands with a
pair of heavy gloves
or use a heavy rag to
hold the blade.
11
An unbalanced blade
will cause excessive
vibration when rotating at high speeds. It
may cause damage
to mower, and could
break causing personal injury.
Page 12

5
Maintaining
Your Lawn
Mower
NOTE: When replacing
the belt, check that the
newly installed belt is
seated correctly and is
riding smoothly on the
engine pulley.
7. Replace with new belt, working it between the deck
and baffle, first around the transmission pulley and
then the engine pulley.
NOTE: Make certain that belt is seated correctly and
that it is riding smoothly on the engine pulley and is not
pinched between the lower and upper pulley halves.
8. Tighten self-tapping screw securing deck baffle
loosened earlier.
9. Replace blade, blade adapter, and associated
hardware. Follow instructions in Blade Care section
for proper assembly.
10. Tip mower back onto its wheels and remove piece of
plastic from under gas cap (if applicable).
General Recommendations
1. Always observe safety rules when performing
any maintenance.
2. The warranty on this lawn mower does not cover
items that have been subjected to operator abuse
or negligence. To receive full value from warranty,
operator must maintain the lawn mower as
instructed here.
3. Changing of engine-governed speed will void
engine warranty.
4. All adjustments should be checked at least once each
season.
5. Periodically check all fasteners and make sure these
are tight.
NOTE: To operate your unit using the grass catcher,
mulcher or optional side discharge refer to page 7.
Off-Season Storage
The following steps should be taken to prepare your lawn
mower for storage.
• Clean and lubricate mower thoroughly as described in
the lubrication instructions.
• We do not recommend the use of a pressure washer
or garden hose to clean your unit.
• Refer to engine manual for correct engine
storage instructions.
• Coat mower’s cutting blade with chassis grease to
prevent rusting.
• Store mower in a dry, clean area. Do not store next to
corrosive materials, such as fertilizer.
When storing any type of power equipment in a poorly
ventilated or metal storage shed, care should be taken to
rust-proof the equipment. Using a light oil or silicone, coat
the equipment, especially cables and all moving parts of
your lawn mower before storage.
12
Page 13

For repairs beyond
the minor adjustments listed here,
contact an authorized
service dealer.
13
Page 14

7
Warranty
Failure to comply
with suggested
maintenance
and lubrication
specifications will
void warranty.
TWO YEAR SUPREME WARRANTY:
For two years from date of retail purchase within Canada, MTD PRODUCTS LIMITED will,
at its option, repair or replace, for the original purchaser, free of charge, any part or parts
found to be defective in material or workmanship. This warranty covers units which have
been operated and maintained in accordance with the owner’s instructions furnished with the
unit, and which have not been subject to misuse, abuse, commercial use, neglect, accident
improper maintenance or alteration. Normal wear parts or components thereof are subject to
special terms as noted below in the Ninety Day Consumer Warranty clause.
The engine, starter motor or component parts thereof carry separate warranties from their
manufacturers. Please refer to the applicable manufacturer’s warranty policy for these items.
Ninety Day Consumer Warranty on Normal Wear Parts: All normal wear part failures
will be covered on this product for a period of 90 days. After 90 days but within the two year
warranty period, normal wear part failures will be covered if caused by defects in material or
workmanship of other component parts. Normal wear parts are defined as batteries, belts,
blades, blade adaptors, grass bags, rider deck wheels, seats, tires and clutch parts (friction
wheels).
Full Ninety Day Warranty on Battery (if equipped): For ninety (90) days from the date
of retail purchase, if any battery included with this unit proves defective in material or workmanship and our testing determines the battery will not hold a charge, MTD PRODUCTS
LIMITED will replace the battery at no charge to the original purchaser.
Additional Limited Thirty Day Warranty on Battery (if equipped): After ninety (90) days
but within one hundred twenty (120) days from the date of purchase, MTD PRODUCTS
LIMITED will replace the defective battery, for the original purchaser, for a cost of one-half
(½) of the current retail price of the battery in effect at the date of return.
Personal use: THE FOREGOING PARAGRAPHS CONSTITUTE THE MANUFACTURER’S
ENTIRE WARRANTY WITH RESPECT TO ANY PRODUCT PURCHASED AND USED
FOR PERSONAL FAMILY, HOUSEHOLD/RESIDENTIAL PURPOSES, AS DISTINGUISHED
FROM COMMERCIAL USAGE.
Commercial use: ALL APPLICATIONS OTHER THAN PERSONAL USE AS OUTLINED
ABOVE, ARE CONSIDERED COMMERCIAL USAGE.
New products purchased for commercial usage are warranted in the same manner and to the
same extend EXCEPT the term of warranty will be 90 DAYS from date of purchase.
How to Obtain Service: Warranty service is available, with proof of purchase, through your
local MTD Authorized Service Dealer. If you do not know the dealer in your area, please
write to the Service Department of MTD PRODUCTS LIMITED, P.O. BOX 1386, KITCHENER, ONTARIO N2G 4J1. The return of a complete unit will not be accepted by the factory
unless prior written permission has been extended by MTD PRODUCTS LIMITED.
Other Warranties: All other warranties, express or implied, including any implied warranty
of merchantability is limited in its duration to that set forth in this express limited warranty.
The provisions as set forth in this warranty provide the sole and exclusive remedy of MTD
PRODUCTS LIMITED obligations arising from the sale of its products. MTD PRODUCTS
LIMITED will not be liable for incidental or consequential loss or damage.
14
06.18.06
Page 15

SAE
AC
3
3015
S
10W30
I22777
8
Safety
Labels
N
F
I200069
MAX 15˚
S32892
MADE IN U.S.A. / FABRIQUÉ AU E.U.
WARNING
This symbol points
out important safety
instructions which, if
not followed, could
endanger the personal
safety and/or property
of yourself and others.
Read and follow all
instructions in this
manual before attempting to operate
this machine. Failure
to comply with these
instructions may result
in personal injury. When
you see this symbol.
HEED ITS WARNING!
15
Your Responsibility
Restrict the use
of this power machine
to persons who read,
understand
and follow the warnings
and instructions
in this manual
and on the machine.
Page 16

16
Page 17

REF PART
NO. NO.
N° DE N° DE
RÉF PIÈCE DE SCRIP TION DE SCRIP TION
1 746-04265A Drive Ca ble Câble de la commande1
2 735-04059 Rub ber Grom met Grummet
3 753-05096A Drive Con trol Ass'y Commande d’embrayage de l’entraînement
4 747-1161A Blade Con trol Han dle Poignée de commande de la lame
5 731-04859 Bail Cover - Black Couvercle - noir
6 746-04213 Con trol Ca ble Câble de commande de la lame
7 749-04037 Lower Han dle Guidon inférieur
8 726-0157 Ca ble Tie Attache câble
9 732-04265 Torsion Spring LH Ressort de torsion CG
10 710-0599 Hex Wash S-Tapp Scr 1/4-20 x .50 Vis autotaraudeuse à rond.hex. 1/4-20 x 0,50
11 787-01341 21" Deck Corps 21 po
12 710-0654A Hex Wash HD Tap Scr 3/8-16 x .88 Vis autotaraudée 3/8-16 x 0,88
13 787-01346 Deck Baf fle Déflecteur 21 po corps
14 756-04157B Up per En gine Pul ley Poulie moteur - supérieur
15 756-04156B Lower En gine Pul ley Poulie moteur - inférieur
16 736-0514 Flat Washer Rondelle plate
17 748-0376C Blade Adapter Adaptateur de la lame
18 710-1044 Hex Bolt 3/8-24 x 1.5" Lg. (Gr 8) Vis à tête hex. 3/8-24 x 1,5 po de lg (Qual. 8)
19 736-0524B Blade Bell Sup port Support de lame
20 742-0741 21" Mulch ing Blade Lame déchiquetage 21 po
21 736-0513 Spg Washer .890 ID x 1.70 OD x .048 Rondelle ressort 0,890 DI x 1,70 DE x 0,048
22 750-1071 Sleeve Spacer .88 ID x 1.13 OD x .12 Entretoise 0,88 DI x 1,13 DE x 0,12
23 710-0653 Hex Wash HD Tapp Scr 1/4-20 x .38 Vis auto-taraudeuse hex. 1/4-20 x 0,38
24 731-05463 Deck Baf fle Déflecteur
25 710-0260A Carriage Bolt 5/16 x 18 x .62" Lg. Boulon ordi naire 5/16 x 18 x 0,62 po de lg
26 712-04063 Hex Flange L-Nut 5/16-18 Gr. F Contre-écrou à embase 5/16-18 Qual. F
27 731-05462 Trail Shield Abattant de pro tection arrière
28 731-05157 Rear Mulch ing Plug Bouchon de déchiquetage arrière
29 731-05017A Rear Dis charge Door Porte d’éjection arrière
30 710-1241 Hex Lock Screw 1/4-15 x 1.0 Vis à tête hex. 1/4-15 x 1,0
31 720-04072 Knob - Star 5/16-18 Bouton - étoile 5/16-18
32 732-04264 Torsion Spring RH Ressort de torsion CD
33 711-04374 Door Pivot Rod Tige de pivotement
34 647-04051 Grass Bag Frame Bâti de sac à herbe
35 664-04046A Grass Bag -Ge neric Sac à herbe -Ge neric
36 710-1174 Carriage Bolt 5/16-18 x 2.0 Boulon ordi naire 5/16-18 x 2,0
37 720-0279 Knob Bou ton
38 710-1205 Rope Guide Bolt Boulon de guidage de cor don
39 749-04206 Up per Han dle Guidon supérieur
40 736-0270 Cup. Wash. .265 ID x .75 OD x .062 Rondelle creuse 0,265 DI x 0,75 DE x 0,062
41 732-1014 Tor sion Spring Ressort de torsion
42 17032A Chute Hinge Charnière de déflecteur
43 747-0710 Hinge Pin Axe de charnière
44 687-02055 Complete Mulch Plug Plaque de déchiquetage complet
45 731-04177 Side Chute De flector Déflecteur de la goulotte
12AV839Q
01.10.08
17
9
Parts List
Pièces
détachées
IMPORTANT
For a proper working
machine, use Factory
Approved Parts.
V-BELTS are specially
designed to engage
and disengage safely.
A substitute (non OEM)
V-Belt can be dangerous by not disengaging
completely.
For parts and/or
accessories refer to
customer support on
page 2.
Adressez-vous au
«Service après-vente»
à la page 2 pour ce qui
concerne les pièces
et/ou accessoires.
Page 18

Model/Modèle V839
18
Page 19

REF PART
NO. NO.
N° DE N° DE
RÉF PIÈCE DE SCRIP TION DE SCRIP TION
1 754-04093 V-Belt Courroie trapézoïdale
2 732-04338 Spring Le ver Levier de ressort
3 720-0230 Foam Grip Poignée de mousse
4 717-04184A Spur Gear 14T LH Engrenage 14 dents gauche
5 710-0599 Hex Wash S-Tapp Scr 1/4-20 x .50 Vis autotaraudeuse à rondelle hex. 1/4-20 x 0,50
6 750-04305A Spacer Entretoise
7 749-04267 Cross Bracket Sup port
8 687-02204 Front Bracket As sembly Sup port avant
9 731-05470 Clip Spacer Entretoise
10 741-04136B Split Hex Flange Bear ing Roulement à bride hex.
11 734-4033 Wheel Ass'y 8 x 2 S-Wave Ensemble de roue 12 x 2,125 S-Wave
12 712-04065 Hex L-FlangeNut 3/8-16 Gr. F, Ny lon Contre-écrou à embase 3/8-16 Qual. F, nylon
13 734-4181B Wheel Ass'y 8 x 2 Gear S-Wave Ensemble de roue 12 x 2,125 Gear S-Wave
14 710-04531 Pan Scr. 1/4-20 x .390 Vis 1/4-10 x 0,390
15 717-04192A Spur Gear 14T RH Engrenage 14 dents droite
16 736-3084 Flat Washer Rondelle plate
17 782-07551A Wheel Dust Cover Courvercle
18 748-04073C Trans mis sion Bear ing Sup port Sup port
19 750-04317 Clip Spacer Entretoise
20 716-0198 Re tain ing Ring .875 Bague de retenue
21 687-02199 Rear Bracket As sembly Sup port
22 732-0320 Ex ten sion Spring Ressort d'extension
23 756-04151A Pulley, 3.36 OD Poulie 3,36 DE
24 736-0105 Cupped Washer Rondelle creuse
25 712-0411 Hex Lockbnut 5/16-24 Contre-écrou 5/16-24
26 687-02205 Handle Bracket Ass'y LH Support de guidon CG
27 715-0221 Dowel Pin Goupille
28 618-04378 Trans mis sion As sem bly Trans mis sion
29 687-02206 Handle Bracket Ass'y LH Support de guidon CG
12AV839Q
01.08.07
19
9
Parts List
Pièces
détachées
IMPORTANT
For a proper working
machine, use Factory
Approved Parts.
V-BELTS are specially
designed to engage
and disengage safely.
A substitute (non OEM)
V-Belt can be dangerous by not disengaging
completely.
For parts and/or
accessories refer to
customer support on
page 2.
Adressez-vous au
«Service après-vente»
à la page 2 pour ce qui
concerne les pièces
et/ou accessoires.
Page 20

NOTES:
For parts and/or
accessories refer to
customer support on
page 2.
Adressez-vous au
«Service après-vente»
à la page 2 pour
ce qui concerne
les pièces et/ou
accessoires.
20
Page 21

16
accessoires.
les pièces et/ou
ce qui concerne
à la page 2 pour
«Service après-vente»
Adressez-vous au
page 2.
customer support on
accessories refer to
For parts and/or
NOTES:
Page 22

15
d’utilisation.
figurent dans cette notice
ments et les instructions qui
respectent les avertissequi comprennent et qui
des personnes qui ont lu,
de cette machine qu’à
Ne permettez l’utilisation
SABILITÉ
VOTRE RESPON-
SYMBOLE !
QUI ACCOMPAGNE CE
L’AVERTISSEMENT
RESPECTEZ
des blessures corporelles.
instructions peut entraîner
Le non-respect de ces
servir de cette machine.
avant d’essayer de vous
cette notice d’utilisation
instructions figurant dans
Prière de lire toutes les
mais aussi ceux d’autrui.
votre personne et vos biens,
en danger non seulement
respectées, peuvent mettre
qui, si elles ne sont pas
de sécurité importantes
attention sur des consignes
Ce symbole attire votre
I200069
AVERTISSEMENT
sécurité
de
Étiquettes
8
MADE IN U.S.A. / FABRIQUÉ AU E.U.
I22777
S32892
F
N
MAX 15˚
S
3015
3
AC
10W30
SAE
Page 23

14
11.1.06
de toute perte ni de tout dommage indirect ou accidentel.
LIMITED découlant de la vente de ses produits. MTD PRODUCTS LIMITED n’est pas responsable
conditions stipulées dans cette garantie représentent les seules obligations de MTD PRODUCTS
tacites de qualité marchande, se limitent à la durée stipulée dans la garantie limitée exprimée. Les
Autres garanties: Toutes les autres garanties, exprimées ou tacites, y compris les garanties
MTD PRODUCTS LIMITED.
ne peut être retournée à l’usine que si elle est accompagnée d’une autorisation écrite préalable de
MTD PRODUCTS LIMITED, C. P. 1386, KITCHENER (ONTARIO) N2G 4J1. Une machine complète
naissez pas le concessionnaire-réparateur de votre localité, adressez-vous au service après-vente,
mesure d’assurer tout service sous garantie sur présentation d’une preuve d’achat. Si vous ne conPour obtenir le service sous garantie: Tout concessionnaire-réparateur agréé par MTD est en
les mêmes conditions, MAIS pour une durée de 90 jours à compter de la date d’achat.
Les machines neuves achetées à des fins commerciales sont garanties de la même manière et dans
NELLE TELLE QUE DÉCRITE CI-DESSUS SONT CONSIDÉRÉES COMMERCIALES.
Utilisation commerciale: TOUTES LES UTILISATIONS AUTRES QUE L’UTILISATION PERSONPERSONNELLES, FAMILIALES. DOMESTIQUES/RÉSIDENTIELLES ET NON COMMERCIALES.
COMPLÈTE DU FABRICANT COUVRANT TOUTE MACHINE ACHETÉE ET UTILISÉE À DES FINS
Utilisation personnelle: LES PARAGRAPHES PRÉCÉDENTS CONSTITUENT LA GARANTIE
initial, pour la moitié (1/2) du prix de détail en vigueur de la batterie à la date du retour de celle-ci.
cent vingt (120) jours à compter de la date d’achat, à remplacer la batterie défectueuse à l’acheteur
s’engage, à l’expiration de la période de quatre-vingt-dix (90) jours et avant la fin d’une période de
Garantie limitée supplémentaire de trente jours sur la batterie (le cas échéant): MTD
maintenir une charge.
raison d’un vice de matière ou de fabrication et après que nos tests aient confirmé qu’elle ne peut
de la date d’achat au détail, toute batterie fournie avec cette machine qui s’avère défectueuse en
remplacer gratuitement à l’acheteur initial, pour une période de quatre-vingt-dix (90) jours à compter
Garantie complète de quatre-vingt-dix jours sur la batterie (le cas échéant): MTD s’engage à
frottement).
de coupe des tondeuses à siège, les sièges, les pneus et les pièces de l’embrayage (roues de
batteries, les courroies, les lames, les adaptateurs de lame, les sacs à herbe, les roues du plateau
résulte du vice de matière ou de fabrication d’une autre pièce. Par pièces courantes, on entend les
la fin de la période de garantie de deux ans, les pièces courantes sont protégées si leur défaillance
pièces courantes sont protégées pendant 90 jours. À l’expiration du délai de 90 jours, mais avant
«Garantie de quatre-vingt-dix jours au consommateur» des pièces courantes: Toutes les
concerne ces pièces.
de leurs fabricants respectifs. Veuillez consulter les conditions de garantie du fabricant en ce qui
Le moteur, le moteur de démarrage ainsi que ses composants font l’objet d’une garantie séparée
jours au consommateur».
l’objet de conditions spéciales énumérées ci-dessous dans la clause «Garantie de quatre-vingt-dix
été accidentées et qui n’ont pas été utilisées à des fins commerciales. Les pièces courantes font
emploi incorrect ou abusif, de négligence, d’un entretien inadéquat ou de modification, qui n’ont pas
tions publiées dans la notice d’utilisation accompagnant la machine, qui n’ont pas fait l’objet d’un
s’applique seulement aux machines qui ont été utilisées et entretenues conformément aux instrucde fabrication dans les deux ans qui suivent la date d’achat au détail au Canada. Cette garantie
l’acheteur initial, la ou les pièces qui s’avèrent défectueuses en raison d’un vice de matière ou
MTD PRODUCTS LIMITED s’engage à réparer ou à remplacer gratuitement, à son choix, à
annule la garantie.
et de lubrification
conseils d’entretien
Le non-respect des
Garantie
7
GARANTIE SUPRÊME DE DEUX ANS
Page 24

13
la transmission.
2. Nettoyez la transmission.
bon sens.
sur la poulie et qu’elle trourne dans le
1. Vérifiez que la courroie est bien installée
2. Des débris gênent le fonctionnement de
1. La courroie n’est pas bien installée.
avancer la tondeuse.
Les roues ne font pas
agréée.
la station technique
ici, adressez-vous à
mineurs énuméré
que les ajustements
réparation autre
Pour toute
6
2. Aiguisez ou remplacez la lame.
hauteur.
3. Aiguisez ou remplacez la lame.
sur une largeur plus étroite.
tondez à nouveau à la hauteur voulue ou
2. Coupez l’herbe à un réglage élevé, puis
lée. Attendez qu’elle sèche.
1. Ne tondez pas quand l’herbe est mouil-
2. Remplacez la lame.
Équilibrez la lame.
moteur.
3. Consultez la notice d’utilisation du
moteur.
2. Consultez la notice d’utilisation du
notice d’utilisation du moteur.
remplacez la bougie. Consultez la
1. Réglez l’écartement à 0,030 po ou
moteur.
2. Consultez la notice d’utilisation du
sultez la notice d’utilisation du moteur.
1. Réglez l’écartement à 0,030 po. Con-
moteur.
4. Consultez la notice d’utilisation du
nettoyez-le.
3. Démontez l’habitacle du ventilateur et
moteur.
2. Consultez la notice d’utilisation du
moteur.
6. Consultez la notice d’utilisation du
moteur.
5. Consultez la notice d’utilisation du
le plein avec une essence fraîche.
4. Videz le réservoir à carburant. Faites
3. Débouchez l’évent.
avec une essence propre et fraîche.
2. Nettoyez la canalisation. Faites le plein
1. Branchez et serrez le fil de la bougie.
sans l’amorcer.
d’essayer de faire démarrer le moteur
7. Attendez quelques minutes avant
6. Nettoyez la canalisation.
replacez la bougie.
5. Nettoyez, réglez l’écartement ou
Dépannage
moteur.
4. Consultez la notice d’utilisation du
et fraîche.
3. Faites le plein avec une essence propre
2. Branchez le fil à la bougie.
la lame.
1. Embrayez la poignée de commande de
2. La lame est émoussée.
positionnées.
1. Les roues ne sont pas bien
3. La lame est émoussée.
2. L’herbe est trop haute.
1. L’herbe est mouillée.
2. La lame est déformée.
1. La lame est desserrée ou mal équilibrée.
3. Le filtre à air est sale.
2. Le carburateur est mal réglé.
l’écartement est trop grand.
1. La bougie est sale, défectueuse ou
réglé.
2. Mélange du ralenti du carburateur mal
1. L’écartement de la bougie est trop petit.
4. La carburateur est mal réglé.
3. La circulation d’air est gênée.
2. Le filtre à air est sale.
1. Niveau d’huile trop bas.
6. Le carburateur est mal réglé.
5. Le filtre à air est sale.
le système.
4. De l’eau ou une saleté est présente dans
bouché.
3. L’évent du capuchon du réservoir est
ou l’essence est eventée.
2. La canalisation de carburant est bouchée
1. Fil de la bougie desserré.
7. Le moteur est noyé.
6. Canalisation de carburant bouchée.
5. La bougie est défectueuse.
4. Moteur non amorcé.
éventée.
3. Le réservoir est vide ou l’essence est
2. Fil de la bougie débranché.
pas embrayée.
1. La poignée de commande de la lame n’est
La coupe est irrégulière 1. Placez les quatre roues à la même
déchiquette pas l’herbe.
La tondeuse ne
Vibrations excessives. 1. Serrez la lame et l’adaptateur.
irrégulièrement.
Le moteur tourne
régime élevé.
Le moteur hésite parfois à
Le moteur surchauffe. 1. Faites le plein d’huile du carter.
irrégulièrement.
Le moteur tourne
démarre pas.
Le moteur ne
CauseProblème Solution
Page 25

12
l’ensemble d’éjection latérale.
avec le sac à herbe, l’ensemble de déchiquetage ou
REMARQUE : Voir la page 7 pour utiliser la tondeuse
bien serrée.
5. Vérifez régulièrement que toute la boulonnerie est
saison.
4. Vérifiez tous les réglages au moins une fois par
modification est apportée au régulateur du moteur.
3. La garantie sera nulle et non avenue si une
conformément aux instructions de cette notice.
la garantie, l’utilisateur doit entretenir la tondeuse
d’une négligence. Pour bénéficier au maximum de
toute pièce qui a fait l’objet d’un emploi abusif ou
2. La garantie de cette tondeuse ne s’applique pas à
entretien.
1. Suivez toujours les consignes de sécurité lors de tout
Recommandations d’ordre général
capuchon du réservoir d’essence.
de plastique qui se trouve, le cas échéant, sous le
10. Remettez la tondeuse d’aplomb et retirez le morceau
une huile légère ou de la silicone.
particulier les câbles et toutes les pièces mobiles, avec
abri métallique non ventilé. Enduisez toute la machine, en
matériel contre la rouille s’il doit être entreposé dans un
REMARQUE: Il est très important de bien protéger le
des engrais.
Ne la remisez pas près de produits corrosifs, comme
5. Entreposez la tondeuse dans un endroit sec et propre.
châssis pour l’empêcher de rouiller.
4. Enduisez la lame de la tondeuse d’une graisse à
instructions d’entreposage du moteur.
3. Consultez la notice d’utilisation du moteur quant aux
d’arrosage pour nettoyer la tondeuse est déconseillée.
2. L’utilisation d’un nettoyeur sous pression ou d’un boyau
les instructions de lubrification.
1. Nettoyez et lubrifiez soigneusement la tondeuse selon
tondeuse pour un entreposage prolongé.
Procédez de la manière suivante pour préparer votre
Remisage hors saison
fournies dans la section « Entretien de la lame ».
boulonnerie annexe en place. Suivez les instructions
9. Remettez la lame, l’adaptateur de la lame et la
plateau de coupe qui a été desserrée plus tôt.
8. Serrez la vis auto-taraudeuse du déflecteur du
entre les deux moitiés de la poulie.
installée sur la poulie motrice et qu’elle n’est pas pincée
REMARQUE : Assurez-vous que la courroie est bien
de la transmission et sur la poulie motrice.
le plateau de coupe et le déflecteur, puis sur la poulie
7. Installez la courroie neuve en la faisant passer entre
coupe. Voir la Figure 5-5.
courroie de la poulie et de dessous le plateau de
pouvoir atteindre la poulie motrice et dégagez la
abaissez le déflecteur du plateau de coupe pour
b. Quand la courroie est dégagée de la transmission,
transmission.
soigneusement la courroie de la poulie de la
6. a. Placez-vous derrière la tondeuse et démontez
de la poulie.
tre les deux moitiés
n’est pas pincée enmotrice et qu’elle
installée sur la poulie
courroie est bien
surez-vous que la
REMARQUE : As-
AVERTISSEMENT
Entretien
5
Page 26
11
Figure 5-4.
déflecteur du plateau de coupe sur celui-ci. Voir la
5. Desserrez la vis auto-taraudeuse qui maintient le
dans la section « Entretien de la lame » ci-dessus.
boulonnerie annexe selon les instructions fournies
4. Démontez la lame, l’adaptateur de la lame et la
vers le haut).
3. Basculez la tondeuse sur son côté (côté du filtre à air
de couler.
plastique sous le capuchon pour empêcher l’essence
2. Videz le réservoir d’essence ou placez un morceau de
contre le moteur.
1. Débranchez le fil de la bougie et mettez-le à la terre
Démontage de la courroie d’une tondeuse
l’utilisateur.
sérieuses blessures à
tourne, et causer de
pendant qu’elle
ou même casser
à la tondeuse
des dommages
pourrait aussi causer
excessive, mais elle
tondeuse de façon
elle fera vibrer la
déséquilibrée,
Si la lame est
tenir la lame.
chiffon épais pour
épais ou utilisez un
toujours des gants
ou la courroie, portez
En enlevant la lame
AVERTISSEMENT
Entretien
de la machine sont bien serrés.
Vérifiez périodiquement que TOUS les écrous et boulons
Boulon centrale 450 po-lb min., 600 po-lb max.
Couple de montage de la lame
ci-dessous:
8. Serrez le boulon hex. au couple recommandé
la lame, puis insérez le boulon hex.
sur celle-ci en enfonçant les pattes dans les trous de
l’opposé de l’adaptateur. Alignez le support de la lame
«Bottom» (ou le numéro de pièce) apparaît, à
5-3. Placez la lame, le côté sur lequel la mention
«l’étoile» à l’opposé du moteur. Voir la Figure
7. Placez l’adaptateur de la lame sur le vilebrequin,
intérieure de l’adaptateur avec une huile légère.
la tondeuse, lubrifiez le vilebrequin et la surface
6. Avant de remonter la lame et son adaptateur sur
parfaitement équilibrée.
du côté le plus lourd jusquà ce que la lame soit
plaçant sur un tournevis à tige ronde. Limez le métal
5. Vous pouvez vérifier l’équilibre de la lame en la
adaptateur pour vérifiez son bon équilibre.
REMARQUE: Démontez toujours la lame de son
de la lame.
responsable des dégâts causés par le mauvais équilibre
aiguisée. Le fabricant de la tondeuse ne peut être tenu
Assurez-vous de bien rééquilibrer la lame après l’avoir
tions qui peuvent endommager le moteur et la tondeuse.
REMARQUE: Une lame déséquilibrée cause des vibra-
également pour ne pas avoir une lame déséquilibrée.
4. Il est essentiel que chaque tranchant soit affûté
tondeuse.
pas d’aiguiser la lame encore installée sur la
aussi près que possible du biseau original. N’essayez
ou limez les bords tranchants en maintenant l’angle
3. Pour l’affûter à nouveau, démontez-la puis meulez
5
pas perdre les pièces annexes à la poulie motrice.
l’adaptateur de la lame, etc., de ne pas retirer ou de ne
REMARQUE: Faites attention, en démontant la lame,
2. Dégagez la lame et l’adaptateur du vilebrequin.
Page 27

10
Voir la Figure 5-3.
maintiennent la lame et l’adaptateur sur le vilebrequin.
1. Enlevez le boulon et le support de la lame qui
comme suit pour l’entretien de la lame:
heurté un objet. Remplacez-le au besoin. Procédez
détecter tout fendillement éventuel, surtout après avoir
Examinez périodiquement l’adaptateur de lame pour y
Entretien et remplacement de la lame
dans l’ordre inverse.
par le déflecteur neuf en appliquant les instructions
2. Dégagez le déflecteur du trou opposé et remplacez-le
pour le dégager des trous. Voir la Figure 5-2.
clapet arrière et pressez sur chaque côté du déflecteur
1. Pour démonter le déflecteur arrière usagé, soulevez le
s’il est endommagé.
conducteur. Remplacez le déflecteur arrière comme suit
but de minimiser les risques de projection d’objets vers le
Il est installé sur l’arrière du plateau de coupe et a pour
Remplacement du déflecteur arrière
coupe.
la bougie est débranchée) pour nettoyer le plateau de
coupe avec un outil approprié (après avoir vérifié que
Inclinez la tondeuse et grattez le dessous du plateau de
efficace.
rouille et la corrosion et peut empêcher le déchiquetage
la saleté de s’y accumuler. Toute accumulation favorise la
utilisation pour empêcher les brins d’herbe, les feuilles ou
Nettoyez le dessous du plateau de coupe après chaque
Plateau de coupe
trouvant à proximité du silencieux.
d’herbe, la saleté et autres débris combustibles se
et à la longévité du moteur. Enlevez tous les brins
circulation d’air essentielle aux bonnes performances
proximité du ventilateur) propre pour assurer la bonne
une brosse. Gardez le système de refroidissement (à
5. Nettoyez le moteur régulièrement avec un linge ou
le matériel brouilleur du Canada.
véhicule respecte toutes les exigences du Règlement sur
REMARQUE: Ce système d’allumage par étincelle de
d’utilisation du moteur.
bougie à utiliser et l’écartement correct dans la notice
bougie au début de chaque saison. Vérifiez le type de
par saison. Il est recommandé de remplacer la
4. Nettoyez la bougie et ajustez l’écartement une fois
sont des indications que le filtre à air doit être nettoyé.
Une mauvaise performance du moteur et sa «noyade»
rapprochés dans des conditions très poussiéreuses.
fournie avec la tondeuse. Nettoyez-le à intervalles plus
recommandée dans la notice d’utilisation du moteur
3. Dans des conditions normales nettoyez le filtre à air
attentivement les instructions et suivez-les.
d’utilisation du moteur fournie avec la tondeuse. Lisez
2. Utilisez l’huile à moteur recommandée dans la notice
qui concerne l’entretien du moteur.
1. Consultez la notice d’utilisation du moteur pour tout ce
Figure 5-1
Moteur
abrasion.
l’usure de la lame par
sablonneux provoque
l’herbe sur un sol
Le fait de couper
machine.
autre entretien sur la
toute lubrification ou
avant tout nettoyage,
contre le moteur
mettez-le à la masse
le fil de la bougie et
moteur et débranchez
Arrêtez toujours le
AVERTISSEMENT
Entretien
5
Page 28

9
/.
/&&
sac à herbe.
la tondeuse.
ment du moteur et de
des pièces en mouveet vêtements lâches
mains, pieds, cheveux
N’approchez pas les
dore très dangereux.
carbone, un gaz inodu monoxyde de
moteur contiennent
d’échappement du
mal aéré, car les gaz
dans un local clos et
fonctioner la machine
Ne faites jamais
son utilisation.
en route ou pendant
moment de sa mise
de la tondeuse au
se trouve à proximité
seul le conducteur
Assurez-vous que
ou toute réparation.
fectuant tout entretien
la tondeuse, ou en efsécurité en utilisant
des lunettes de
Portez toujours
blessures graves.
yeux et causer des
peuvent atteindre les
par une tondeuse
Les objets projetés
AVERTISSEMENT
de déchiqueter l’herbe.
la hauteur de l’herbe à 3-1/4 pouces ou moins, avant
d’abord le déflecteur de la goulotte latéral pour réduire
pouces, le déchiquetage est déconseillé. Utilisez
6. Si l’herbe a été permis de pousser en excès de 4
qu’elle cesse de pousser.
5. Continuez à tondre la pelouse à l’automne jusqu’à ce
d’herbe.
jamais plus d’un tiers de la longueur totale des brins
4. Votre pelouse sera plus saine si vous ne tondez
est nouvelle, drue ou humide.
3. Une tonte plus étroite peut être nécessaire si l’herbe
efficacement, ne coupez pas l’herbe mouillée.
2. Pour obtenir les meilleurs résultats et déchiqueter
arrêter.
ralentir pour contourner un obstacle, tourner ou pour
supérieur. Lâchez la commande de l’embrayage pour
de commande de l’embrayage vers le guidon
1. Pour enclencher l’entraînement, pressez la poignée
Conseil d’utilisation
réparer la machine rapidement.
des dégâts. Faites examiner et
tantes de la tondeuse indiquent
en servir. Des vibrations imporla remettre en marche et de vous
tondeuse et réparez-la avant de
ment tout signe de dégât à la
la bougie, cherchez soigneusequelconque. Débranchez le fil de
moteur si vous heurtez un objet
AVERTISSEMENT: Arrêtez le
conducteur ou toute autre personne présente.
une direction ou une autre et blesser grièvement le
objets pourraient être projetés par la tondeuse dans
risquent d’endommager la tondeuse ou le moteur. Ces
de fils métalliques ou autres objets sur la pelouse, qui
Vérifiez qu’il n’y a plus de pierres, de morceaux de bois,
sur la tondeuse ou de retirer le
immobilisée avant de travailler
la lame se soit complètement
AVERTISSEMENT: Attendez que
obstacle, tourner ou pour arrêter.
de l’embrayage pour ralentir pour contourner un
de commande de la lame. Lâchez la commande
de commande de l’embrayage vers la poignée
5. Pour enclencher l’entraînement, pressez la poignée
de guidage de la corde.
Laissez la poignée revenir lentement jusqu’au boulon
pour faire démarrer le moteur et pour éviter le recul.
sentiez une légère résistance. Tirez alors rapidement
illustrée et tirez-la lentement jusqu’à ce que vous
4. Prenez la poignée du démarreur à lanceur de la façon
ci-dessous.
est actionnée. Passez rapidement au paragraphe 4
la position d’origine quand la commande de la lame
la Figure 4-1. Le volet de départ revient lentement à
mande de la lame contre le guidon supérieur. Voir
3. Placez-vous derrière la tondeuse et pressez la com-
actionner le volet de départ.
2. Poussez la manette du volet de départ à fond pour
(Ouvert). Voir la Figure 4-2.
trouve sur la gauche du moteur) à la position ON
1. Placez la manette du robinet à carburant (qui se
d’utilisation du moteur qui accompagne l’équipment.
Selon les instructions fournies dans la notice
Mise en marche du moteur
courroie.
qu’il n’y a pas d’accumulation d’herbe autour de la
pas plié, pincé ou coincé. Assurez-vous aussi
corrigé. Vérifiez que le câble de commande n’est
le moteur en route tant que ce problème n’est pas
ne se relâche pas complètement. Ne mettez pas
b. Dans le cas contraire il se peut que l’embrayage
Figure 4-2
Utilisation de la tondeuse
Utilisation
moteur s’est éteint.
accidentel lorsque la machine n’est pas surveillée.
contre le moteur pour empêcher tout démarrage
2. Débranchez le fil de la bougie et mettez-le à la masse
quelques secondes après que le
continue à tourner pendant
4
AVERTISSEMENT: La lame
arrêter le moteur et la lame.
1. Lâchez la poignée de commande de la lame pour
Arrêt du moteur
Page 29

8
faut serrer cette poignée contre le guidon pour que la
guidon supérieur de la tondeuse. Voir la Figure 4-1. Il
La poignée de commande de la lame se trouve sur le
Poignée de commande de la lame
Utilisation
4
Page 30
7
B
A
A
B
C
RITÉ.
DISPOSITIF DE SÉCU-
DÉMONTEZ PAS CE
de la tondeuse. NE
blesser l’utilisateur
levés par la lame de
les projectiles souà l’arrière. Il empêche
dispositif de protection
sont équipées d’un
Toutes les tondeuses
haut du sac à herbe.
repose pas contre le
si le clapet arrière ne
tige de pivotement et
pas enfoncés dans la
Pour
desserrer
du sac à herbe ne sont
deuse si les crochets
N’utilisez jamais la ton-
AVERTISSEMENT
herbe.
l’installation du sac à
ne gênent pas lors de
du guidon pour qu’ils
accrochés sur l’extérieur
vous que les câbles sont
REMARQUE: Assurez-
trouver sur l’extérieur).
d’avertissement doit se
l’assemblage (l’étiquette
bien à l’endroit avant
que le sac à herbe est
REMARQUE: Vérifiez
serrer
Pour
A
et réglages
de montage
Instructions
3
Figure 3-8
Figure 3-7
Figure 3-6
Figure 3-5
voulue. Voir la Figure 3-8.
Déplacez-la vers l’avant ou vers l’arrière à la hauteur
la de la tondeuse pour régler la hauteur de coupe.
de la roue arrière gauche. Tirez sur la manette et écartezla tondeuse. La manette de réglage se trouve au-dessus
La manette de réglage détermine la hauteur de coupe de
Hauteur de coupe
montre pour desserrer le cable. Voir la Figure 3-7.
ou tournez-la dans le sens contraire des aiguilles d’une
le sens des aiguilles d’une montre pour serrer le câble
conditions se produit, tournez la roue de réglage dans
mande d’entraînement engagée. Si l’une ou l’autre de ces
ou si les roues de la tondeuse hésitent avec la compropulse pas avec la commande d’entraînement engagée
régler la commande d’entraînement si la tondeuse ne se
ou desserrer la courroie d’entraînement. Vous devrez
commande d’entraînement et est utilisée pour serrer
La roue de réglage est située dans le carter de la
Commande d’entraînement
Réglages
déchiquetez pas.
déchiquetage à charnière, même quand vous ne
REMARQUE: Ne retirez jamais le bouchon de
le bouchon de déchiquetage à charnière.
bouchon de déchiquetage à charnière. Rabaissez
latérale sous la goupille de la charnière du
b. Glissez les deux crochets du déflecteur d’éjection
la Figure 3-6.
qui se trouve sur le côté du plateau de coupe. Voir
a. Relevez le bouchon de déchiquetage à charnière
B
arrière est en place.
de la tondeuse et que le bouchon de déchiquetage
côté, assurez-vous que le sac à herbe a été démonté
9. Si la tondeuse est adaptée pour éjecter l’herbe sur le
d’éjection arrière.
façon illustrée à la Figure 3-4 et relâchez le clapet
b. Installez le bouchon de déchiquetage arrière de la
de pivotement.
sac à herbe vers l’avant pour le dégager de la tige
a. Relevez le clapet d’éjection arrière et basculez le
8. Pour installer le bouchon de déchiquetage arrière:
haut du sac à herbe.
et si le clapet arrière ne repose pas contre le
sont pas enfoncés dans la tige de pivotement
tondeuse si les crochets du sac à herbe ne
AVERTISSEMENT: N’utilisez jamais la
herbe. Voir la Figure 3-5.
Lâchez le clapet pour qu’il repose sur le sac à
b. Placez le sac à herbe sur la tige de pivotement.
a. Relevez le clapet d’éjection arrière de la tondeuse.
7. Assemblage du sac à herbe sur la tondeuse
b. Retirez le bouchon de déchiquetage arrière.
a. Relevez le clapet d’éjection arrière.
d’installer le sac à herbe. Voir la Figure 3-4.
6. Démontez le bouchon de déchiquetage arrière avant
Page 31
6
Figure 3-3
la machine.
moteur fournie avec
notice d’utilisation du
instructions de la
conformément aux
d’essence et d’huile
faites les pleins
Après l’assemblage,
HUILE NI ESSENCE.
expédiée SANS
Cette machine est
s’attache de l’intérieur de celui-ci.
s’accrochent de l’extérieur du sac. Le haut du sac
en plastique, sauf celle du dessus du sac,
glissières sur l’armature. Toutes les glissières
b. Attachez le sac sur l’armature en accrochant les
herbe.
dans les trous des glissières en plastique du sac à
sur le dessous). Enfoncez les crochets de l’armature
a. Glissez le sac sur l’armature (côté en plastique noir
5. Assemblage du sac à herbe:
câble et coupez le surplus.
aménagés dans le guidon inférieur. Serrez l’attache-
4. Enfoncez les taquets des attache-câbles dans les trous
Position D.
d. Serrez l’écrou à oreilles du guide de la corde.
C.
c. Glissez la corde du démarreur dans le guide. Position
moteur. Position B.
b. Sortez lentement la corde du démarreur du
contre le guidon supérieur. Position A.
a. Pressez la manette de commande de la lame
3. Installation du guide de la corde. Voir la Figure 3-3.
Figure 3-2.
et serrez-les pour bien maintenir les guidons. Voir la
2. Replacez les boutons en forme d’étoile retirés plus tôt
enfoncé dans le guidon.
Assurez-vous que le boulon ordinaire est bien
nent le guidon supérieur sur le guidon inférieur.
b. Serrez les boutons en forme d’étoile qui maintien-
dans les supports de montage du guidon.
Vérifiez que le guidon inférieur est bien positionné
tion A à la position de travail B. Voir la Figure 3-1.
supérieur vers vous pour le faire passer de la poside montage du guidon et redressez le guidon
a. Enlevez les boutons en forme d’étoile des supports
supérieur et inférieur.
d’emballage qui peuvent se trouver entre les guidons
1. Retirez les pièces détachées et les garnitures
légèrement différents de votre tondeuse.
REMARQUE: Les modèles représentés peuvent être
Figure 3-2
Figure 3-1
IMPORTANT
vers le haut.
soulevant le guidon
pas le câble tout en
guidon. Ne coincez
sur l’extérieur du
câbles sont accrochés
Assurez-vous que les
IMPORTANT
tondeuse.
position de conduite de la
sont identifiés de la
ou l’arrière de la tondeuse
droite, la gauche, l’avant
d’indications contraires, la
REMARQUE: À moins
et réglages
de montage
Instructions
3
Page 32

5
3. m198.4
2. Rincez votre peau et changez immédiatement de vêtements.
vêtements s’enflammaient.
grièvement blessé si des éclaboussures sur votre peau ou sur vos
inflammable et les vapeurs risquent d’exploser. Vous pouvez être
en manipulant de l’essence. Il s’agit d’un produit extrêmement
1. Pour éviter toute blessure ou dégât matériel, faites très attention
Manipulation de l’essence:
ENTRETIEN
étroite d’un adulte.
apprendre à utiliser la machine et s’en servir sous la surveillance
la machine et respecter les consignes de sécurité. Ils doivent
lire la notice d’utilisation, bien comprendre le fonctionnement de
la tondeuse. Des adolescents âgés de 14 ans ou plus doivent
6. Ne permettez jamais à des enfants de moins de 14 ans d’utiliser
subir des brûlures graves d’un silencieux chaud.
5. Tenir des enfants loin de moteurs chauds ou tournants. Ils peuvent
d’autres objets qui peuvent gêner votre visibilité.
4. Faites très attention en approchant d’angles morts, de buissons,
reculant.
3. Regardez toujours derrière vous et par terre avant de reculer et en
la zone de travail.
2. Restez vigilant et arrêtez la machine si des enfants s’approchent de
surveillance d’un adulte autre que le conducteur de la machine.
1. Éloignez les enfants de la zone de travail et placez-les sous la
dangers. Ne supposez jamais qu’ils vont rester là où vous les avez vus.
attirés par la machine et la tonte de l’herbe. Ils ne comprennent pas les
toujours vigilant en présence d’enfants. Les enfants sont souvent
Un accident grave risque de se produire si le conducteur n’est pas
Enfant
provoquer un dérapage.
3. Ne tondez pas de l’herbe mouillée. La traction réduite peut
2. Ne tondez pas sur une pente supérieure à 15° selon l’inclinomètre.
facilement perdre l’équilibre.
1. Ne tondez pas près d’une falaise ou d’un talus. Le conducteur peut
À NE PAS FAIRE:
lame arrêtera de tourner dans trois secondes.
allez perdre votre équilibre, lâchez immédiatement le guidon, et la
tomber et de vous blesser grièvement. Si vous sentez que vous
3. Vérifier toujours votre équilibre. Vous risquez de glisser et de
obstacles.
sur un terrain accidenté. Des herbes hautes peuvent cacher des
2. Faites attention aux trous et ornières. La machine peut se retourner
Faites très attention en changeant de direction sur une pente.
1. Travailler parallèlement à la pente, jamais perpendiculairement,
À FAIRE:
à 15°, n’utilisez pas la tondeuse pour éviter toute blessure grave.
commencer à travailler. Si selon l’inclinomètre, la pente est supérieure
dans la notice d’utilisation pour mesurer la pente du terrain avant de
Page 33

4
travaillez pas. Par mesure de sécurité utilisez l’inclinomètre fourni
supplémentaires. Si vous ne sentez pas à l’aise sur la pente, n’y
graves. Travailler sur un terrain en pente demande des précautions
produisent souvent sur des pentes, peuvent causer des blessures
Les accidents provoqués par tomber et de glisser, qui se
Utilisation sur une pente
votre concessionaire local.
votre département de service à la clientèles pour le nom de
notice, soyez prudent et faites preuve de bon sens. Contactez
22. En cas de situations qui ne sont pas mentionnées dans cette
blessures graves.
de la machine. Le non-respect de ce consigne peut causer des
21. N’utilisez que des accessoires recommandés par le fabricant
causer des brûlures. Ne les touchez pas.
20. Le silencieux et le moteur deviennent très chauds et peuvent
blessures graves.
endommagés. Le non-respect de ces consignes peut causer des
N’utilisez jamais la tondeuse avec des dispositifs de sécurité
sécurité appropriée, en place et qui fonctionnent correctement.
poignée de commande de la lame ou d’autres dispositifs de
protection arrière, la goulotte d’éjection, un sac à herbe, la
19. N’utilisez jamais la tondeuse sans avoir l’abattant de
que la lame a arrêté de tourner.
corps dans le secteur de lame avant que vous ne soyez sûrs
que le moteur s’est éteint. Ne placez jamais aucune partie du
La lame continue à tourner pendant quelques secondes après
avant de détacher le sac à herbe ou de déboucher la goulotte.
18. Arrêtez le moteur et attendez que la lame se soit immobilisée
général, toute vibration indique un problème.
arrêter le moteur et cherchez-en immédiatement la cause. En
17. Si la machine commence à vibrer d’une manière anormale,
recouverts de gravier.
la lame avant de traverser des allées, trottoirs ou chemins
la bonne lumière artificielle. Marchez, ne courrez pas. Arrêtez
16. Utilisez la tondeuse seulement dans la lumière du jour ou dans
tourner dans trois secondes.
commande de la lame immédiatement et la lame arrêtera de
estimez que vous perdez votre équilibre, lâcher la poignée de
et de ne pas tomber pour éviter des blessures graves. Si vous
toujours bien en équilibre. Faites attention de ne pas glisser
15. N’utilisez jamais la tondeuse si le gazon est mouillé. Soyez
non éclenchée quand on la lâche.
dans les deux sens et revenir automatiquement à la position
La poignée de commande de la lame doit bouger facilement
et peut causer des blessures en cas de contact avec la lame.
empêche le dispositif de sécurité de fonctionner correctement
sécurité. Ne tenez jamais de contourner son rôle. Ceci
14. La poignée de commande de la lame est un dispositif de
moteur.
d’entraînement, le cas échéant, avant de faire démarrer le
13. Dégagez le dispositif d’auto-propulsion ou l’embrayage
des médicaments ralentissant les réactions.
12. N’utilisez jamais la tondeuse en état d’ébriété ou si vous prenez
d. Répétez selon les besoin.
bras seulement.
c. Reculez la tondeuse lentement et d’une demi-longeur de
b. Assurez votre stabilité.
a. Éloignez-vous de la tondeuse à bout de bras.
d’abord par terre et derrière vous, puis procédez comme suit:
reculer la tondeuse près d’un mur d’un autre obstacle, regardez
11. Ne tirez jamais la tondeuse vers vous en marchant. S’il faut faire
tondeuse si vous tombez. Lâchez immédiatement le guidon.
passe sur le pied à la suite d’une chute. Ne retenez pas la
10. De nombreuses blessures se produisent lorsque la tondeuse
ou projeter des objets.
magé peut causer des blessures en cas de contact avec la lame
9. L’absence du clapet de la goulotte d’éjection ou un clapet endom-
mains et pieds.
mouvement ou sous le plateau de coupe. La lame peut amputer
8. Ne placez jamais vos mains ou vos pieds près d’une pièce en
nus ou si vous portez des sandales ou des tennis.
recommandés. N’utilisez jamais la tondeuse si vous êtes pieds
les bras et les jambes et des chaussures à bout d’acier sont
vêtement bien ajustés. Une chemise et un pantalon qui protègent
7. Portez des chaussures robustes à semelle épaisse et des
effet être projeté, ricocher et vous blesser aux yeux.
ou en effectuant un réglage ou une réparation. Un objet peut en
6. Portez toujours des lunettes de sécurité en utilisant la machine
Arrêtez la machine si quelqu’un s’approche.
au moins 75 pieds de la tondeuse pendant qu’elle fonctionne.
par un projectile, éloignez les enfants, passants et autres à
5. Pour éviter tout risque de contact avec la lame ou de blessure
de blesser quelqu’un.
De cette façon, les débris éventuels ne risque pas de ricocher et
Évitez d’éjecter l’herbe en direction d’un mur ou d’un obstacle.
projeter l’herbe vers des rues, des trottoirs, des spectateurs, etc.
causer des blessures graves. Prévoyez de travailler en évitant de
projetés par la lame. Les objets projetés par la machine peuvent
pourraient vous trébuchez ou qui risque d’être ramassés et
les pierres, bâtons, fil métalliques os, jouets et autre objets qui
4. Examiner soigneusement la zone de travail. Ramassez tous
à utiliser cette machine.
connaissance des consignes de sécurité doivent être autorisées
étroite d’un adulte. Seules des personnes mûres ayant pris
apprendre à utiliser la machine et s’en servir sous la surveillance
la machine et respecter les consignes de sécurité. Ils doivent
la notice d’utilisation, bien comprendre le fonctionnement de
servir de la machine. Des adolescents plus âgés doivent lire
3. Ne permettez jamais à des enfants de moins de 14 ans de se
autre but.
machine est de tondre le gazon. Ne l’utilisez jamais dans un
Soyez par conséquent toujours très prudent. Le seul rôle de cette
2. Cette machine motorisée est un outil de précision, pas un jouet.
pour commander des pièces de rechange.
d’utilisation à un endroit sûr pour toute consultation ultérieure et
de la machine avant de vous en servir. Conservez cette notice
miliarisez-vous avec les commandes et les conseils d’utilisation
et dans la notice d’utilisation avant de la mettre en marche. Facomprendre toutes les instructions qui figurent sur la machine
d’assembler la machine. Assurez-vous de lire et de bien
1. Veuillez lire attentivement la notice d’utilisation avant d’essayer
Utilisation en général
de
notice et sur la machine.
qui figurent dans cette
ments et instructions
respecter les avertisselire, comprendre et
personnes qui peuvent
être utilisée que par des
Cette machine ne doit
Votre responsabilité
CE SYMBOLE!
QUI ACCOMPAGNE
L’AVERTISSEMENT
RESPECTEZ
corporelles.
entraîner des blessures
ces instructions peut
Le non-respect de
servir de cette machine.
d’essayer de vous
notice d’utilisation avant
figurant dans cette
toutes les instructions
d’autrui. Prière de lire
biens, mais aussi ceux
votre personne et vos
danger non seulement
peuvent mettre en
ne sont pas respectées,
importantes qui, si elles
consignes de sécurité
votre attention sur des
Ce symbole attire
AVERTISSEMENT
sécurité
le non-respect de ces consignes peut causer des blessures corporelles graves et même mortelles.
Consignes
entraîner des blessures graves. Cette machine peut amputer mains et pieds et projeter des débris. Par conséquent,
d’utilisation. Comme avec tout appareil motorisé, une négligence ou une erreur de la part de l’utilisateur peut
DANGER: Cette machine doit être utilisée conformément aux consignes de sécurité qui figurent dans la notice
d’autres problèmes liés à la reproduction.
reconnus dans l’État de Californie comme causant le cancer, des anomalies congénitales ou
AVERTISSEMENT: Les gaz d’échappement de ce produit contiennent des produits chimiques
2
Page 34

3
jamais parallèlement.
lairement à la pente,
POUSSER perpendicuUtilisez les tracteurs À
travers.
à la pente, jamais en
SIÈGE parallèlement
Utilisez les tracteurs À
blesser.
de glisser et de vous
tondeuse. Vous risquez
en marchant derrière la
conserver un bon appui
également difficile de
gravement blessé. Il est
conducteur peut être
se retourner et son
risque en effet de
Un tracteur à siège
de 2-1/2 pi par 10 pi).
à 15° (soit une déclivité
des pentes supérieures
Ne vous tondez pas sur
1
Inclinomètre
Page 35

2
-4$02/$5#43,)-)4%$
+)4#(%.%2/..'*
8888888888
88888888888
-ODEL.UMBER
.UM£RODEMODÞLE
3ERIAL.UMBER
.UM£RODES£RIE
WWWMTDCANADACOM
tation.
l’emplacement de ces numéros. On vous demandera d’enregistrer le numéro de série avant de pouvoir poursuivre votre consulPréparez vos numéros de modèle et de série avant de téléphoner. Veuillez lire le chapitre précédent pour déterminer
consulter la notice d’utilisation du moteur fournie avec votre machine.
caractéristiques techniques, la garantie et le service après-vente du moteur. Pour plus de renseignements à ce sujet, veuillez
3. Le fabricant du moteur est responsable de toutes les questions concernant les performances, la puissance indiquée, les
2. Appelez un agent du service après-vente au 1-800-668-1238.
1. Visitez le site www.mtdcanada.ca où vous trouverez de nombreuses suggestions utiles.
tionnement ou l’entretien de la machine, les spécialistes sont à votre disposition. Choisissez l’une des options ci-dessous:
Si l’assemblage de cette machine vous pose des problèmes ou pour toute question concernant les commandes, le fonc-
sans vous adresser d’abord au service après-vente.
Veuillez retourner la machine au détaillant qui vous l’a vendue,
Service après-vente
d’utilisation).
de la version anglaise de cette notice
Pièces détachées (voir la page 14
Étiquettes de sécurité ...................................... 15
Garantie ............................................................. 14
Dépannage ........................................................ 13
Table des matières
poste de conduite et regardez à l’arrière de la machine.
plaque signalétique, placez-vous derrière la machine à la
de plaque signalétique fourni sur la droite. Pour localiser la
le numéro de modèle et le numéro de série sur le modèle
localiser la plaque signalétique sur l’équipement, et recopier
NOUVEL ÉQUIPMENT,
AVANT DE PROCÉDER À L’ASSEMBLAGE DE VOTRE
Pour trouver le numéro de modèle
Entretien et Remisage hors saison ................. 10
Utilisation ............................................................ 8
Instructions de montage et réglages ................ 6
Important consignes de sécurité ...................... 4
Inclinomètre ........................................................ 3
vous assurer de bien comprendre toutes les instructions.
nécessaires à l’assemblage, à la préparation et à l’entretien de votre machine. Veuillez donc la lire attentivement et
Cette notice d’utilisation est une pièce importante de votre nouvel équipement. Elle vous fournit les renseignements
Page 36

21 po Tondeuse rotative auto-motrice - Séries 839
 Loading...