

Page 1

OPERATOR’S MANUAL
19” Electric
Lawn Mower
IMPORTANT:
Read safety rules and instructions carefully before operating equipment.
This symbol on the product’s nameplate
means it is listed by
UNDERWRITERS LABORATORIES INC.
MTD PRODUCTS LTD., P.O. BOX 1386, KITCHENER, ON CANADA
769-01445
(10/04)
Page 2

TABLE OF CONTENTS
Content Page
Important Safe Operation Practices................................................................... 3
Slope Gauge ................................................................................................... 6
Unpacking Instructions ...................................................................................... 7
Assembling Your Lawn Mower........................................................................... 7
Know Your Lawn Mower ....................................................................................9
Operating Your Lawn Mower ............................................................................. 10
Making Adjustments ..........................................................................................12
Maintenance ......................................................................................................12
Off-Season Storage ........................................................................................... 14
Troubleshooting ................................................................................................. 15
Parts List............................................................................................................ 16
Warranty ............................................................................................................18
Safety and Decorative Labels ............................................................................19
FINDING MODEL NUMBER
This Operator’s Manual is an important part of your new Lawn Mower. It will help you assemble, prepare
and maintain the unit for best performance. Please read and understand what it says.
Before you start assembling your new equipment, please locate the model plate on the
equipment and copy the information from it in the space provided below. The information on
the model plate is very important if you need help from our Customer Support Department or
an authorized dealer.
• You can locate the model number by standing behind the unit and looking at the rear of the deck. A
sample model plate is explained below. For future reference, please copy the model number and the
serial number of the equipment in the space below.
Model Number
Numéro de modèle
XXXXXXXXXX
www.mtdcanada.com
Serial Number
Numéro de série
XXXXXXXXXXX
MTD PRODUCTS LIMITED
KITCHENER, ON N2G 4J1
1-800-668-1238
Copy the model number here:
Copy the serial number here:
CALLING CUSTOMER SUPPORT
If you have difficulty assembling this product or have any questions regarding the controls, operation or
maintenance of this unit, please call the Customer Support Department.
Call 1- 800-6 68-1238 to reach a Customer Support representative. Please have your unit’s
model number and serial number ready when you call. See previous section to locate this
information. You will be asked to enter the serial number in order to process your call.
2
Page 3

SECTION 1: IMPORTANT SAFE OPERATION PRACTICES
READ ALL INSTRUCTIONS!
WARNING: This symbol points out important safety instructions, which if not followed, could endanger the personal
safety and/or property of yourself and others. Read and follow all instructions in this manual before attempting to operate this machine. Failure to comply with these instructions may result in personal injury. When you see this symbol—
HEED ITS WARNING.
DANGER: This machine was built to be operated according to the rules for safe operation in this manual. As with any
type of power equipment, carelessness or error on the part of the operator can result in serious injury. This machine is
capable of amputating hands and feet and throwing objects. Failure to observe the following safety instructions could
result in serious injury or death.
When using electric lawnmowers, basic safety precautions should always be followed to reduce the risk of fire,
electric shock, and personal injury. These basic precautions include the following:
GENERAL OPERATION
1. Read, understand, and follow all instructions on the
machine and in the manual before attempting to
assemble and operate. Keep this manual in a safe place
for future and regular reference and for ordering
replacement parts.
2. Be familiar with all controls and their proper operation.
Know how to stop the machine and disengage them
quickly.
3. Never allow children under 14 years old to operate this
machine. Children 14 years old and over should read and
understand the operation instructions and safety rules in
this manual and should be trained and supervised by a
parent.
4. Never allow adults to operate this machine without
proper instruction.
5. To help avoid blade contact or a thrown object injury, stay
in the operator zone behind the handles and keep
children and bystanders at least 75 feet from the machine
while it is in operation. Stop motor if anyone enters the
area.
6. Thoroughly inspect the area where the equipment is to
be used. Remove all stones, sticks, wire, bones, toys and
other foreign objects, which could be tripped over or
thrown by the blade. Thrown objects can cause serious
personal injury.
7. Plan your mowing pattern to avoid discharge of material
toward roads, sidewalks, bystanders and the like. Also,
avoid discharging material against a wall or obstruction,
which may cause discharged material to ricochet back
toward the operator.
8. Always wear proper eye protection while operating or
performing an adjustment or repair to protect your eyes.
Thrown objects which ricochet can cause serious injury
to the eyes.
9. Always use a face or dust mask if operating in a dusty
environment.
10. Dress Properly – Do not wear loose clothing or jewelry.
They can be caught in moving parts. Use of rubber
gloves and footwear is recommended when working
outdoors.
11. Ground Fault Circuit Interrupter (GFCI) protection should
be provided on the circuit(s) or outlet(s) to be used for the
lawn mower. Receptacles are available having built-in
GFCI protection and may be used for this measure of
safety.
12. To prevent electric shock use only with a CUL listed
extension cord set suitable for outdoor use, such as Type
SW-A, SOW-A, STW-A, STOW-A, SJW-A, SJOW-A,
SJTW-A, or SJTOW-A.
13. Extension Cord - Make sure your extension cord set is in
good condition, is heavy enough to carry the current your
mower will draw, and is polarized (one blade of plug is
wider than the other). A 100’ length of 14 AWG should be
used. A 50’ length of 16 AWG or a 150’ length of 12 AWG
cord is an acceptable alternative. A longer length or
undersized cord will cause a drop in line voltage resulting
in a loss of power and overheating.
14. To reduce the likelihood of disconnection of the lawn
mower from the extension cord set, be sure to use the
cord restraint provided as shown in the illustration below:
Cord Restraint
Extension Cord
15. To reduce the risk of electric shock, this lawn mower has
a polarized plug (one blade is wider than the other) and
will require the use of a polarized extension cord. The
mower plug will only fit into the polarized extension cord
one way. If the plug does not fit fully into the extension
cord, reverse the plug. If the plug still does not fit, obtain a
correct polarized extension cord. A polarized extension
cord will require the use of a polarized wall outlet. This
plug will fit into the polarized outlet only one way. If the
plug does not fit fully into the wall outlet, reverse the plug.
If the plug still does not fit, contact a qualified electrician
to install the proper wall outlet. Do not change the
equipment plug, extension cord receptacle, or extension
cord plug in any way.
3
Page 4

16. Home circuit – This mower should be operated on a 15
AMP circuit. If you experience difficulty in starting with a
standard 15 AMP fuse or circuit breaker, contact your
nearest authorized service facility. Do not use a higher
rated fuse or breaker without consulting your power
company.
17. Do not abuse the cord by pulling the mower by the cord
or yanking it to disconnect it from the receptacle. Keep
cord from heat, oil, and sharp edges.
18. Many injuries occur as a result of the mower being pulled
over the foot during a fall caused by slipping or tripping.
Never operate this machine in bare feet, sandals,
slippery or lightweight (e.g. canvas) shoes. Do not hold
on to the mower if you are falling; release the handle
immediately.
19. Never pull the mower back toward you while you are
walking. If you must back the mower away from a wall or
obstruction first look down and behind to avoid tripping
and then follow these steps:
• Step back from the mower to fully extend your arms.
• Be sure you are well balanced with sure footing.
• Pull the mower back slowly, no more than half way
toward you.
• Repeat these steps as needed.
20. Do not use lawn mower for any job except that for which it
is intended. Do not force the lawn mower – Cut grass at a
rate, for which the mower is designed, which will not
sacrifice the performance or safety of the machine.
21. Do not operate the mower while under the influence of
alcohol or drugs.
22. Stay Alert – Do not operate the mower when you are
tired. Watch what you are doing. Use common sense.
23. Do not put hands or feet near rotating parts or under the
cutting deck. Contact with the blade can amputate hands
and feet.
24. Never attempt to make a wheel or cutting height
adjustment while the motor is running.
25. Avoid dangerous environments – Never operate the
mower in the rain or in wet or damp grass.
26. Mow only in daylight or in good artificial light. Walk, never
run.
27. Stop the blade when crossing gravel drives, walks or
roads.
28. If the equipment should start to vibrate abnormally, stop
the motor and check immediately for the cause. Vibration
is generally a warning of trouble.
29. Stop the motor and wait until the blade comes to a
complete stop before removing the grass catcher or
unclogging the chute. The cutting blade continues to
rotate for a few seconds after the motor is shut off. Never
place any part of the body in the blade area until you are
sure the blade has stopped rotating.
30. Never operate mower without proper trail shield,
discharge cover, grass catcher, blade/motor control or
other safety protective devices in place and working.
Never operate mower with damaged safety devices.
Failure to do so can result in personal injury.
31. Only use parts and accessories made for this machine by
the manufacturer. Failure to do so can result in personal
injury.
32. If situations occur which are not covered in this manual,
use care and good judgment. Contact your dealer or
telephone 1-800-668-1238 for assistance and the name
of your nearest servicing dealer.
Slope Operation
Slopes are a major factor related to slip and fall accidents
which can result in severe injury. Operation on slopes
requires extra caution. If you feel uneasy on a slope, do not
mow it. For your safety, use the slope gauge included as part
of this manual to measure slopes before operating this unit on
a sloped or hilly area. If the slope is greater than 15 degrees,
do not mow it.
Do:
1. Mow across the face of slopes; never up and down.
Exercise extreme caution when changing direction on
slopes.
2. Watch for holes, ruts, rocks, hidden objects, or bumps
which can cause you to slip or trip. Tall grass can hide
obstacles. Remove all objects such as rocks, tree limbs,
etc., which could be tripped over or thrown by the blade.
3. Always be sure of your footing. A slip and fall can cause
serious personal injury. If you feel you are losing your
balance, release the blade/motor control handle
immediately, and the blade will stop rotating within 3
seconds.
Do Not:
1. Do not mow near drop-offs, ditches or embankments,
you could lose your footing or balance.
2. Do not mow slopes greater than 15 degrees as shown on
the slope gauge.
3. Do not mow on wet grass. Unstable footing could cause
slipping.
Children
1. Tragic accidents can occur if the operator is not alert to
the presence of children. Children are often attracted to
the mower and the mowing activity. They do not
understand the dangers. Never assume that children will
remain where you last saw them.
• Keep children out of the mowing area and under the
watchful care of a responsible adult other than the
operator.
• Be alert and turn mower off if a child enters the area.
• Before and while moving backwards, look behind and
down for small children.
• Use extreme care when approaching blind corners,
doorways, shrubs, trees, or other objects that may
obscure your vision of a child who may run into the
mower.
2. Never allow children under 14 years old to operate a
power mower. Children 14 years old and over should
read and understand the operation instructions and
safety rules in this manual and should be trained and
supervised by a parent.
4
Page 5

Service
1. When servicing use only identical replacement parts
listed in this manual. “Use of parts which do not meet the
original equipment specifications may lead to improper
performance and compromise safety!”
2. Before cleaning, repairing, or inspecting, make certain
the blade and all moving parts have stopped. Disconnect
the power cord when not in use to prevent unintended
starting.
3. Follow instructions for lubricating and changing
accessories.
4. Inspect lawn mower cord and extension cords
periodically and replace immediately, if damaged. Lawn
mower cord should be repaired by an authorized service
facility only.
5. Keep handles dry, clean and free from oil and grease.
6. To reduce a fire hazard, keep the motor free of grass,
leaves and debris build-up.
7. Check the blade and motor mounting bolts at frequent
intervals for proper tightness. Also, visually inspect blade
for damage (e.g., bent, cracked, and worn) Replace
blade with the original equipment manufacturer’s (OEM)
blade only, listed in this manual.
8. Maintain your mower with care – Keep mower blade
sharp and clean for best and safest performance. Mower
blades are sharp and can cut, wrap the blade or wear
gloves and use extra caution when servicing them.
9. Keep all nuts, bolts, and screws tight to be sure the
equipment is in safe working condition.
10. Never tamper with safety devices. Check their proper
operation regularly.
11. After striking a foreign object, stop the motor and
disconnect the power cord. Thoroughly inspect the
mower for any damage. Repair the damage before
operating the mower.
12. Grass catcher components, discharge cover, and trail
shield are subject to wear and damage which could
expose moving parts or allow objects to be thrown. For
safety protection, frequently check components and
replace immediately with original equipment
manufacturer’s (OEM) parts only, listed in this manual.
13. When not in use, store lawn mower indoors in a dry area,
locked-up and/or out of the reach of children.
Double Insulated Lawn Mower
Double insulation is a concept in the safety of electric lawn
mowers, which eliminates the need for the usual three-wire
grounded power cord and grounded power supply system.
Wherever there is electric current in the mower, there are two
complete sets of insulation to protect the user. All exposed
metal parts are isolated from the internal metal motor
components with protecting insulation.
IMPORTANT: Servicing of a lawn mower with double
insulation requires extreme care and knowledge of the
system and should be performed only by a qualified
service technician. For repair service we suggest you
return the lawn mower to your nearest authorized
service dealer. Always use original factory replacement
parts when servicing.
YOUR RESPONSIBILITY
• Restrict the use of this power machine to persons who read, understand, and follow the warnings and
instructions in this manual and on the machine.
5
Page 6
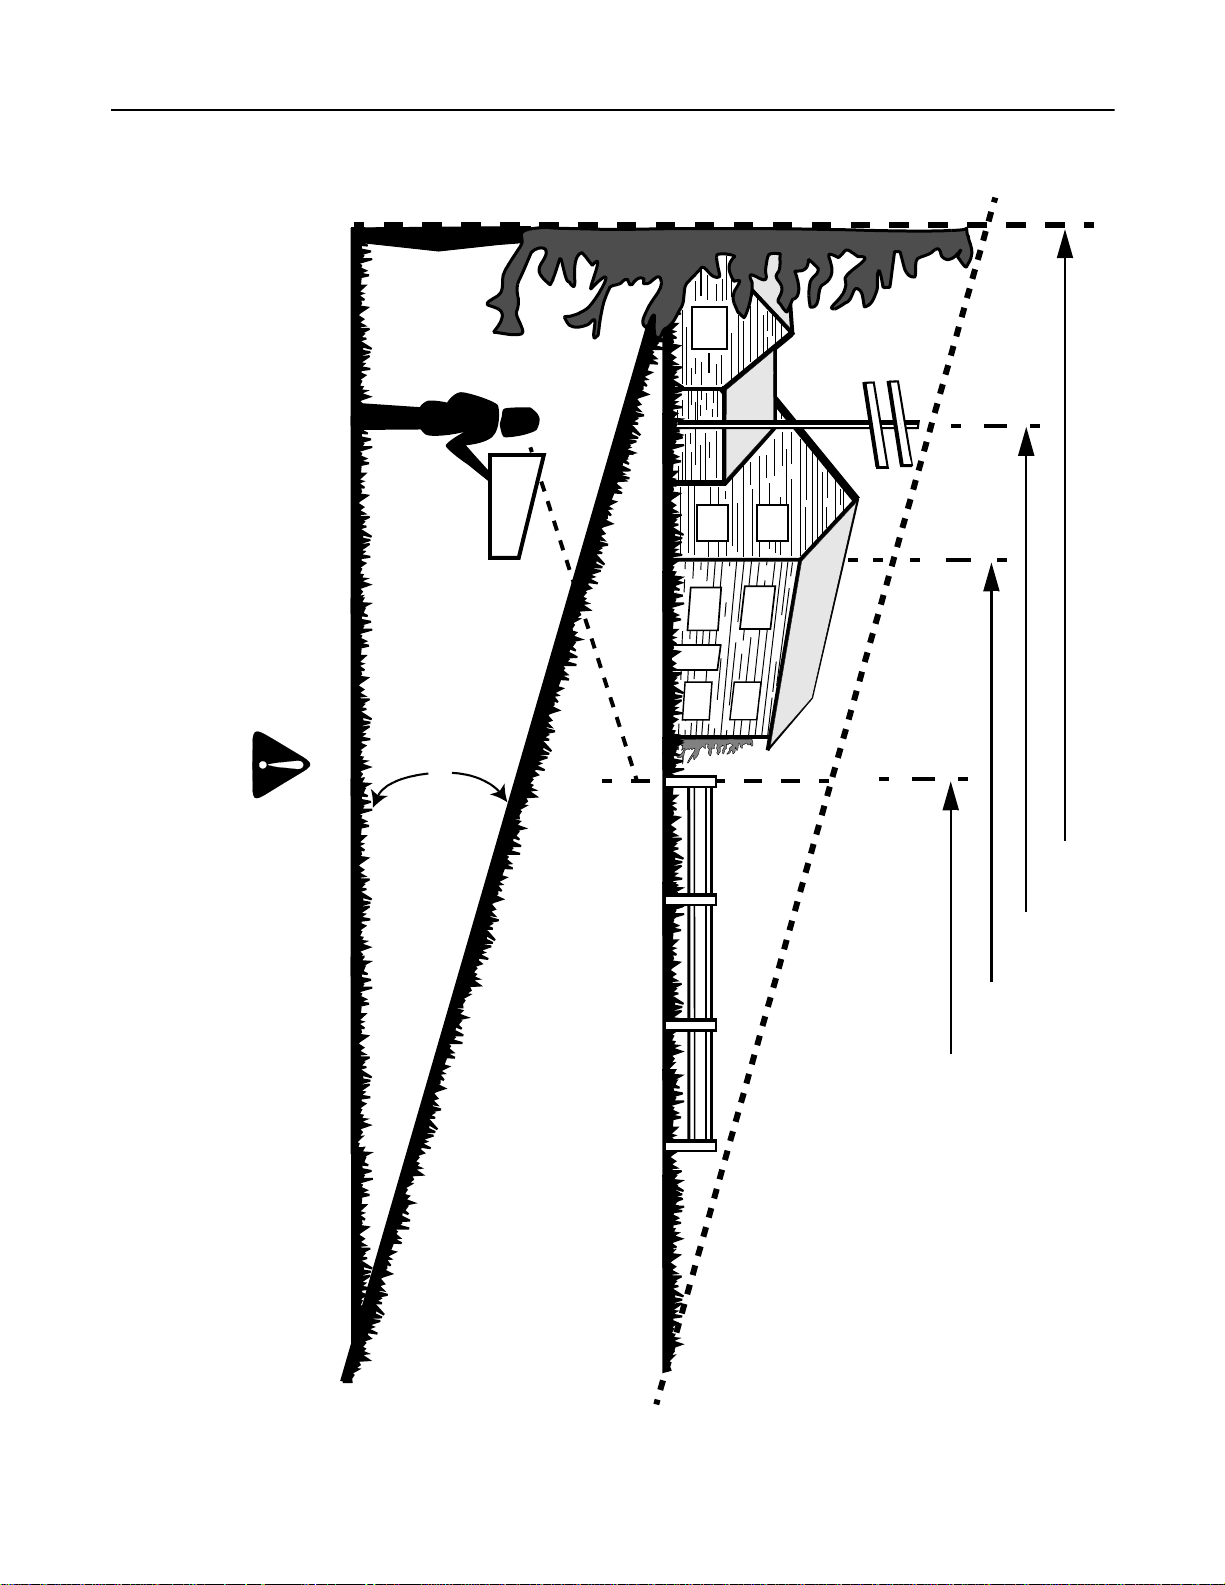
SECTION 2: SLOPE GAUGE
Use this page as a guide to determine slopes where you may not operate safely. Do not operate your lawn mower
on such slopes.
Operate RIDING mowers up and down slopes, never across the face of slopes.
Operate WALK-BEHIND mowers across the face of slopes, never up and down slopes.
Do not mow on inclines with a slope in excess of 15 degrees (a rise of approximately 2-1/2 feet every 10 feet). A riding mower
your footing and you could slip, resulting in serious injury.
could overturn and cause serious injury. If operating a walk-behind mower on such a slope, it is extremely difficult to maintain
F
O
L
D
O
N
D
O
T
T
E
E
P
R
ES
R
E
D
L
I
N
E
,
A CORNER OF A BUILDING
SIGHT AND HOLD THIS LEVEL WITH A VERTICAL TREE
A POWER POLE
WARNING
15°
N
N
T
I
G
E
P
O
A
1
5
°
S
L
OR A FENCE POST
USE THIS PAGE AS A GUIDE TO DETERMINE SLOPES WHERE YOU MAY NOT OPERATE SAFELY.
6
Page 7
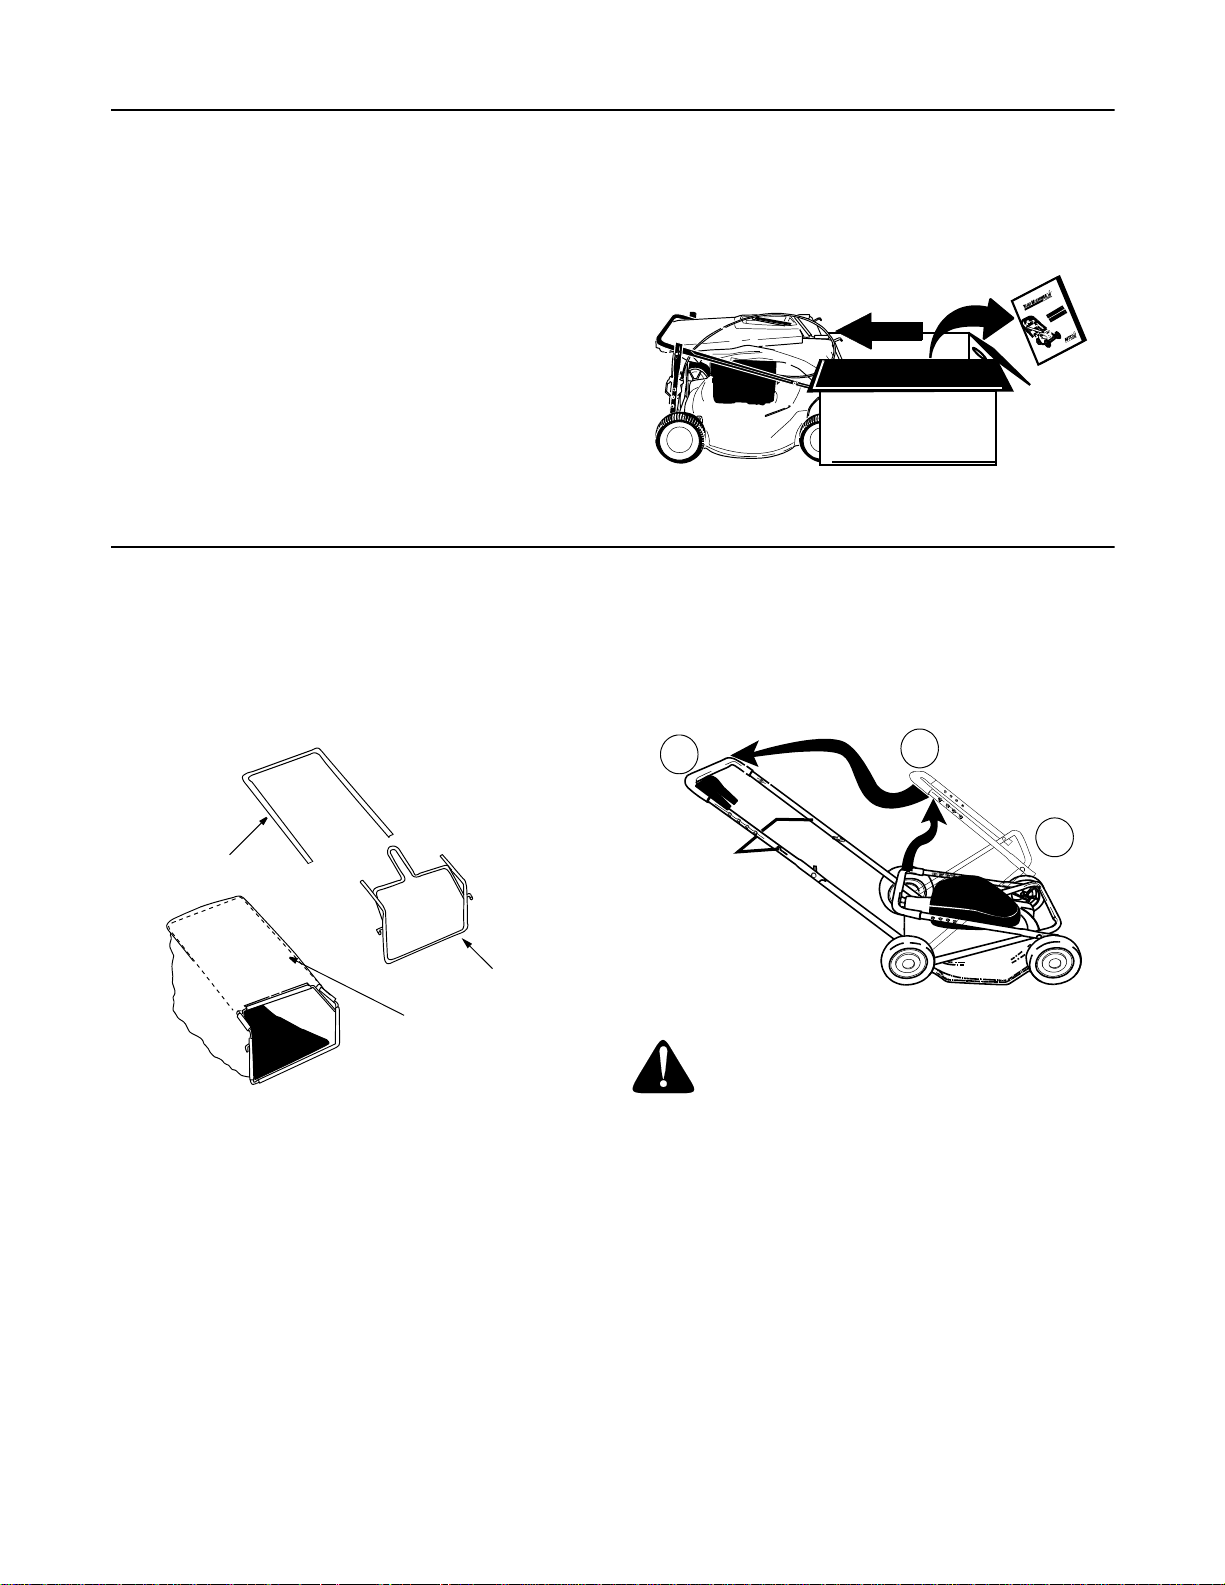
SECTION 3: UNPACKING INSTRUCTIONS
Remove Unit From Carton
NOTE: Reference to the right or left hand side of the
mower is observed from the operating position.
• Remove staples, break glue on the top flaps, or cut
the tape at carton end and peel along top flap to
open the carton.
• Remove any loose parts included with the unit (i.e.,
operator’s manual, etc.).
• Cut the corners and lay the carton down flat.
• Remove packing material.
Roll or slide the unit out of carton. Check the carton
thoroughly for loose parts.
REMOVE MANUAL & LOOSE PARTS
SECTION 4: ASSEMBLING YOUR LAWN MOWER
Loose Parts in Carton
• Grass Catcher Assembly. Refer to Figure 2.
• Owner’s Manual (not shown).
• Pull up and back on the upper handle to raise the
handle into the operating position. Make certain the
lower handle is seated securely into the handle
mounting brackets. Refer to the steps in Figure 3.
3
PUSH
Figure 1
2
Rear Frame
Front Frame
Grass Bag
Figure 2
Tools Required
• A pair of pliers.
Assembling Handle
• Remove any packing material which may be
between the upper and lower handles for shipping
purposes.
1
Figure 3
WARNING: The handle insulators are not only
used to adjust handle height, but are also a
safety device and should never be altered in
any way. If replacement is necessary, use
original equipment parts as shown in the parts
list on page 17.
• The upper handle may be adjusted to three
different height positions. To adjust the handle at
the desired position, align one of the three marks
on the top of the lower handle insulators with the
mark on the upper handle insulators. See Figure 4.
• Tighten the hand knobs on each side of the handle.
Make sure that carriage bolts are seated properly
into the handle insulators.
7
Page 8

Hand Knob
Insulator
1. Slide front frame
into rear frame
Rear Frame
2. Place frame
inside bag
Upper Handle
(Align marks here)
Lower
Handle
Figure 4
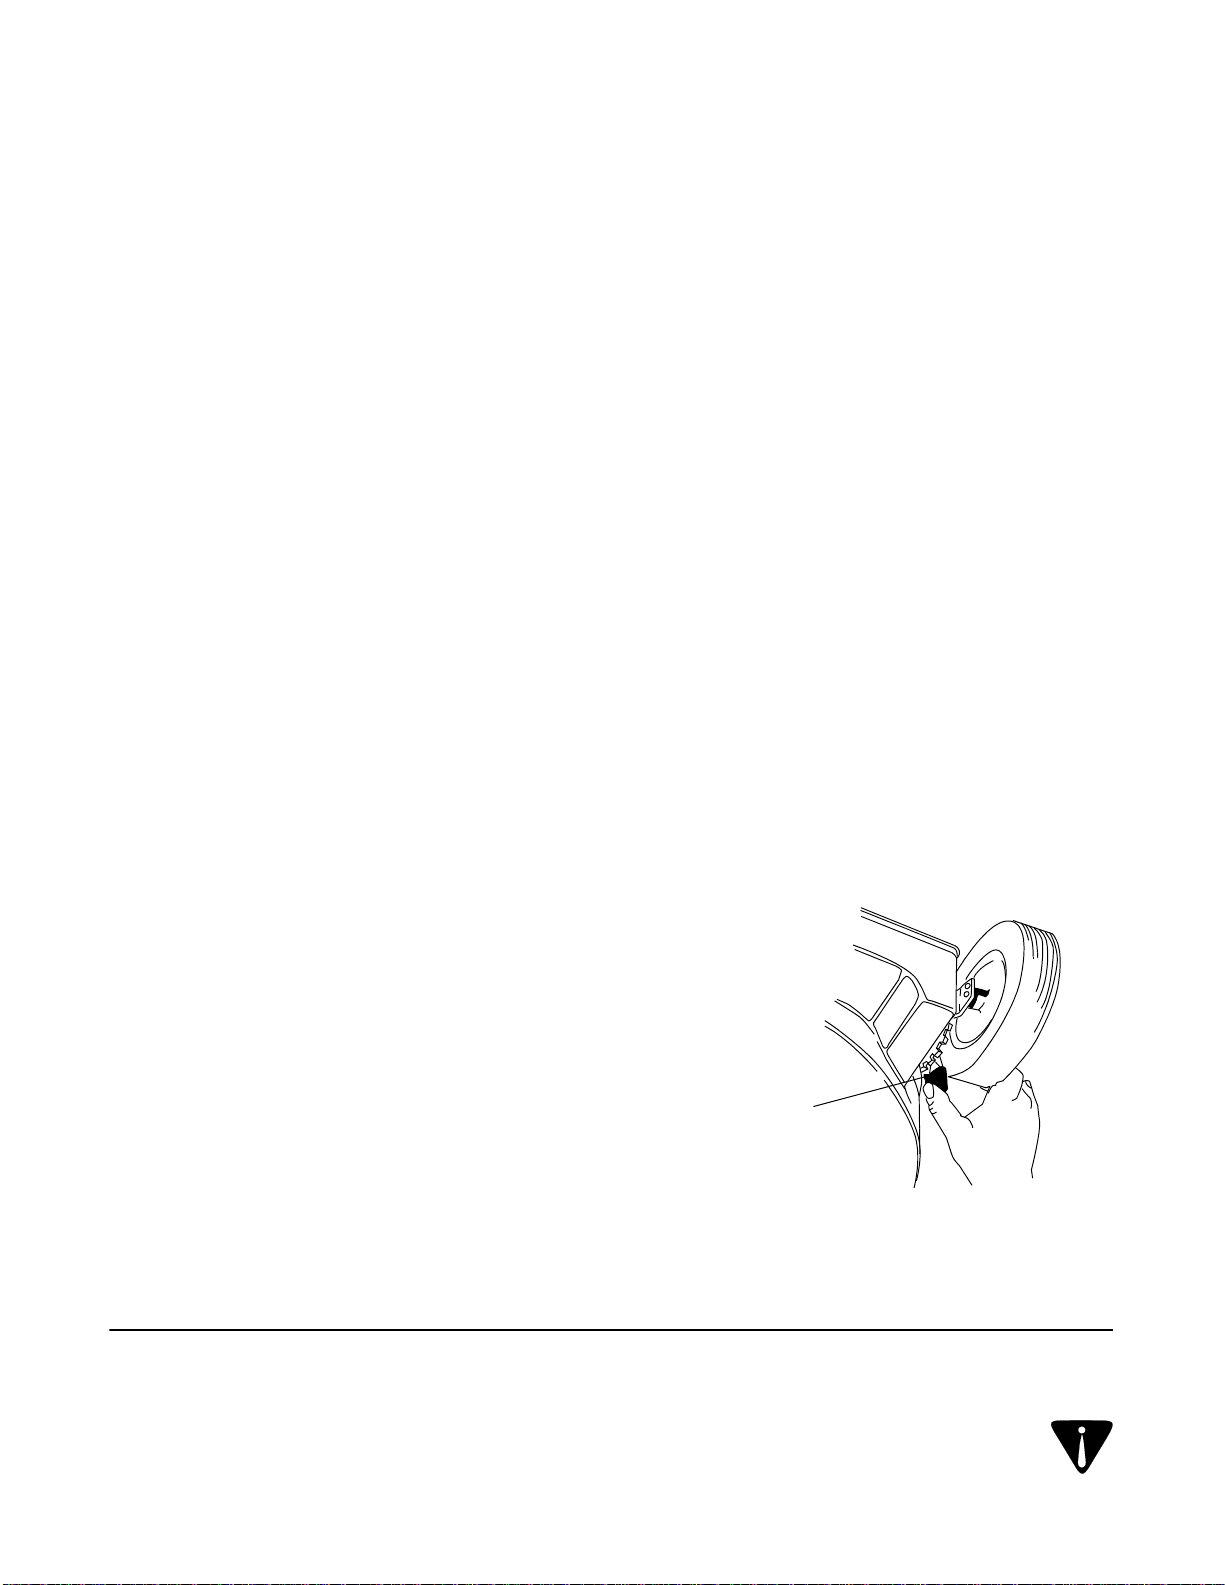
• Remove the hairpin clips from the outer hole in the
weld pins on the handle mounting brackets.
• Using a pair of pliers, squeeze one leg of the lower
handle against the handle mounting bracket. Insert
the hairpin clip into the inner hole on the weld pin.
Repeat on the other side. Refer to Figure 5.
• Make certain all nuts and bolts are tightened
securely.
Inner Hole
Hairpin Clip
Outer Hole
Lower Handle
Handle Mounting
Bracket
Figure 5
Assembling the Grass Catcher
Hook
Hook
Front Frame
3. Slip handle
out of notch
Handle
4. Slip plastic channel
over frame
Notch
Figure 6
• Secure bag to the frame by working the plastic
channels on bag over the frame on the other sides
as shown in Figure 6.
NOTE: All of the plastic channels except the center top
of the bag attach from the outside of the bag. The
center top of the bag attaches from the inside of bag.
WARNING:
the proper trail shield, discharge cover, grass
catcher, blade/motor control or other safety
protective devices in place and working. Never
operate the mower with damaged safety
devices. Failure to do so can result in personal
injury.
Never operate the mower without
NOTE: Before assembling, make sure that the grass
bag is turned right side out with the warning label on the
outside. Also the black plastic side is the bottom of the
bag.
• Insert the front frame into the rear frame as far as it
will go.
• Place frame assembly inside the bag.
• Slip the plastic channel of the bag over the frame
(adjacent to the handle of the grass catcher) as
shown in Figure 6. Make sure that the handle of the
grass catcher protrudes out of the notch in the
plastic channel on bag.
• Insert the two hooks on both sides of the frame
through the openings on both sides of the bag.
Attaching The Grass Catcher
• Lift the rear discharge door on the mower and
remove the mulching baffle. See Figure 7.
Rear Discharge Door
Mulching Baffle
Figure 7
8
Page 9

• Place the hooks of the grass catcher into the slots
in the handle bracket assembly on each side of the
lower handle as shown in Figure 8. Release the
rear discharge door.
To remove the grass catcher, lift the rear discharge
door on the mower. Lift the grass catcher up, out of the
slots in the handle bracket assemblies. Release the
rear discharge door.
WARNING: Do not operate this mower with
the chute door open, unless the complete
grass catcher is properly mounted on the
mower.
SECTION 5: KNOW YOUR LAWN MOWER
Grass Catcher Bag
Figure 8
Rear Discharge Door
Slot On
Hook
Handle
Bracket
Motor/Blade Control Assembly
Handle Insulator
Grass Catcher
Rear Discharge Door
Rear Trailing Shield
Figure 9
Read this operator’s manual and safety rules before
operating your lawn mower. Compare the illustration in
Figure 9 with your lawn mower to familiarize yourself
with the location of various controls and adjustments.
Save this manual for future reference.
WARNING: The operation of any lawn
mower can result in foreign objects being
thrown into the eyes, which can damage
your eyes severely. Always wear safety
glasses while operating the mower, or
while performing any adjustments or
repairs.
Motor/Blade Control Assembly
The motor/blade control is located on the upper handle
of the mower. See Figure 9. The motor/blade control
handle engages and disengages the motor and blade.
Cord Restraint
Handle Insulator
Lower Handle
Electric Motor
Height Adjustment Lever
WARNING:
is a safety device. Never attempt to bypass its
operations.
The motor/blade control assembly
Rear Trailing Shield
The rear trailing shield, attached between the rear
wheels of your mower, is provided to minimize the
possibility of objects being thrown at the operator from
the rear of the mower. See Figure 9.
Circuit Breaker
The mower is equipped with a circuit breaker, located
on the motor/blade control. Refer to Figure 10. This
circuit breaker may trip when too much strain is placed
on the mower. See Making Adjustments Section.
9
Page 10
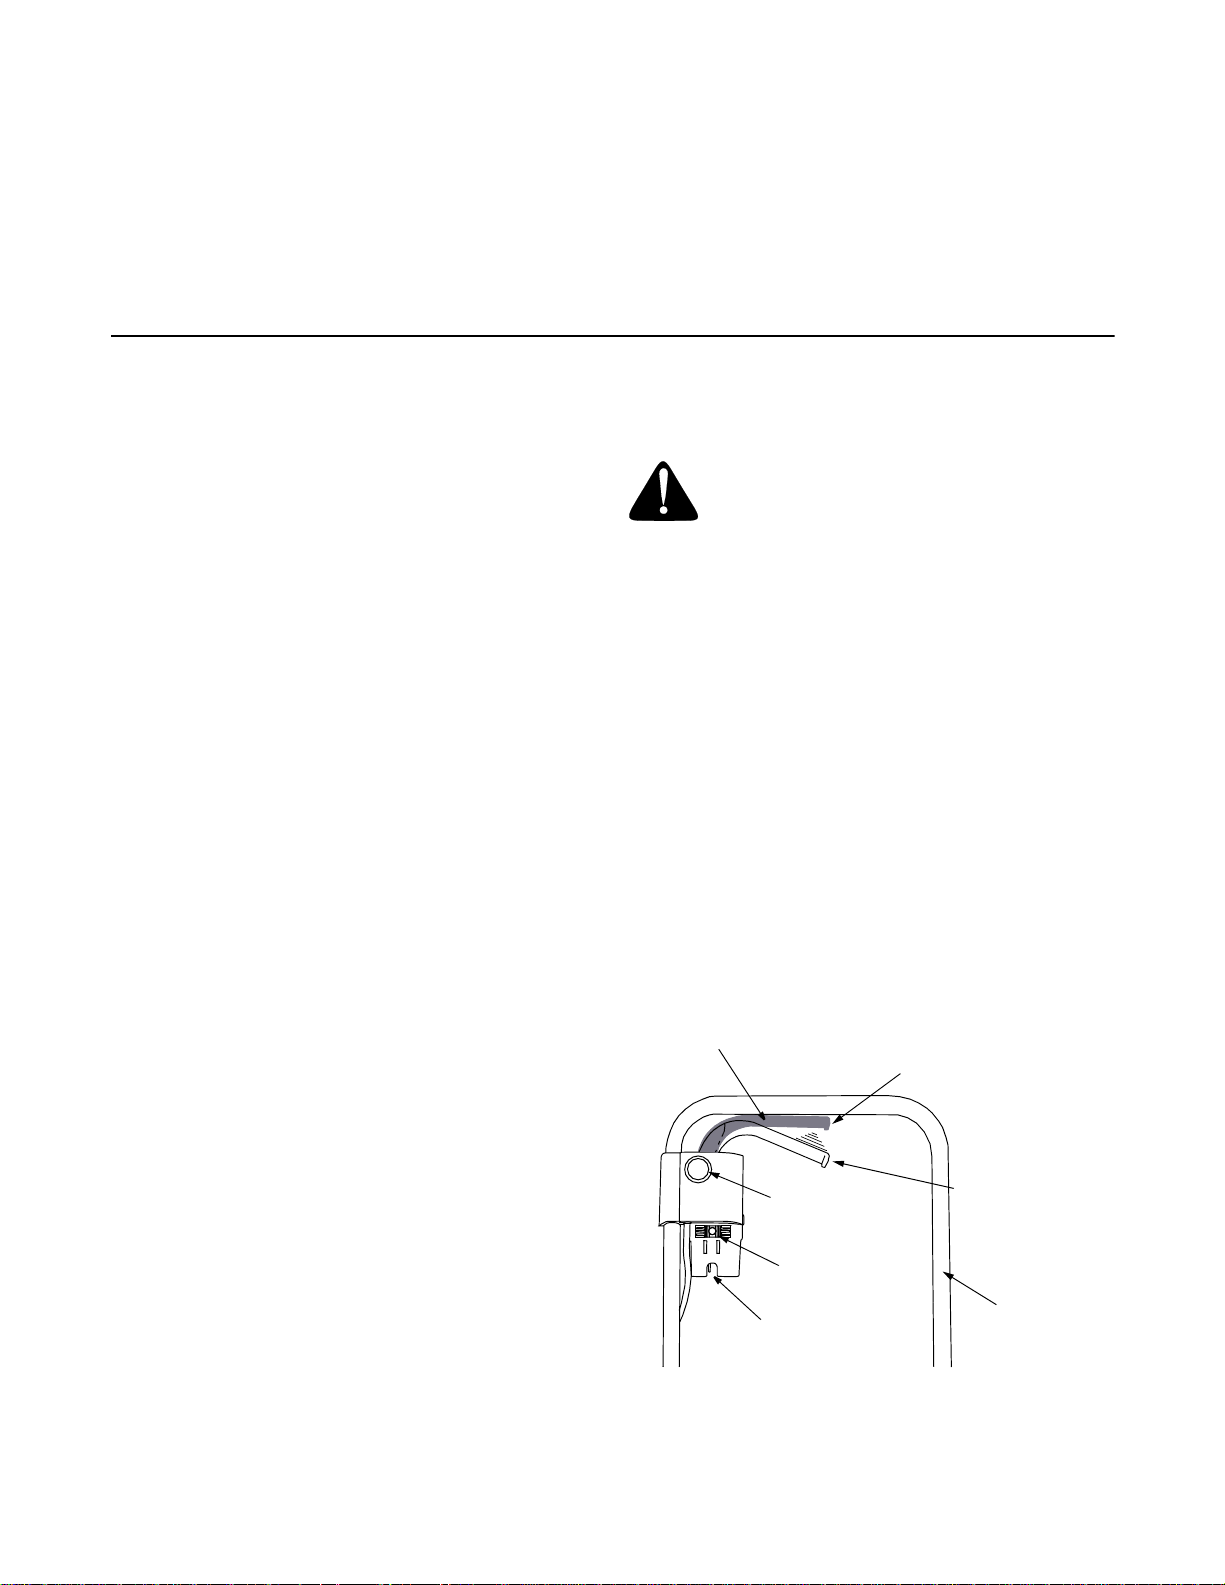
Cord Restraint
The cord restraint is located on the back of the upper
handle and when used properly, helps to protect the
motor/blade control assembly and also the extension
cord powering the unit.
Height Adjustment Lever
A height adjustment lever at each wheel provides
cutting height adjustment. Each adjuster has nine
height positions. Height of cut will be changed when the
lever is moved from one position to another. Simply
depress the lever towards wheel and move wheel and
lever assembly to desired position. All wheels must be
placed in the same relative position.
SECTION 6: OPERATING YOUR LAWN MOWER
Cord Connection
Extension Cord Selection
Shown below is the length of extension cords and its
corresponding acceptable cord ratings.
• 50’ Cord — use 16 AWG
• 100’ Cord — use 14 AWG
• 150’ Cord — use 12 AWG
The extension cord should be a CUL listed cord set
suitable for outdoor use.
IMPORTANT: Using any other length or rating of cord
will diminish the performance and possibly the life of the
electric motor, and may also cause breakers to trip or
fuses to blow in your home’s fuse box.
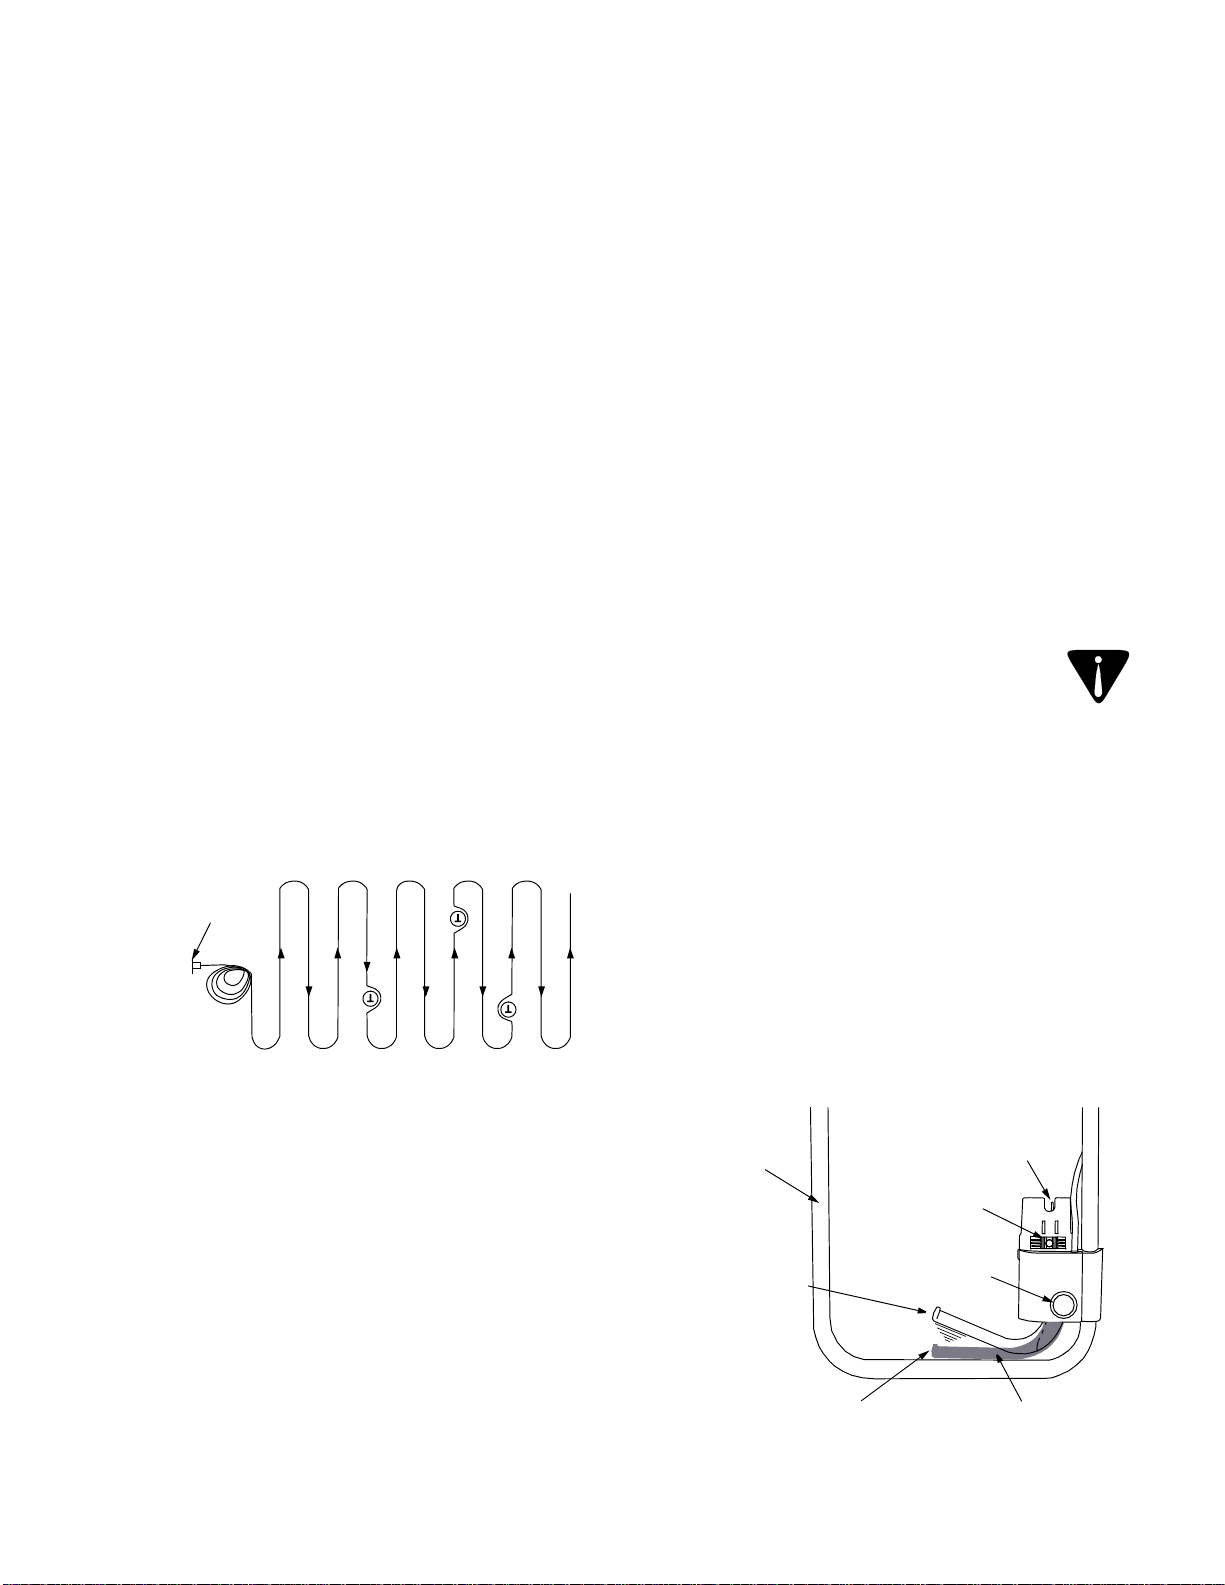
Cord Restraint
• Attach the extension cord (not provided with unit) to
the cord restraint as follows.
• Form a small loop in the extension cord. Allow
enough excess cord to make the connection to the
motor/blade control (approximately 20 inches).
• Slip the loop through the slot on the bottom of the
cord restraint, and up over the tab, to prevent
disconnection from the motor/blade control during
operation.
• Keep the cord restraint as close to the motor/blade
control as possible. See Figure 9.
Connecting to the Motor/Blade Control Assembly
Connecting to the Electric Power Source
WARNING: This mower should be operated on a
15 AMP circuit. If you experience difficulty in
starting with a standard 15 A fuse or circuit
breaker, contact you nearest authorized service
facility. Do not use a higher rated fuse or breaker
without consulting your power company.
Plug the extension cord into any convenient 110-120 V
60 cycle AC outlet or receptacle for your source of
power. This outlet may be located either outdoors or
indoors. To avoid blowing fuses, pick an outlet that is
not overloaded. Your mower will operate satisfactorily
on a circuit that is fused for 15 amperes. Do not use
oversize fuses without consulting an electrician. If an
inside receptacle is used, the extension cord can be
taken out either through the doorway or a window.
Starting the Motor and Blade
NOTE: The wheels on your unit are set in a low cutting
position for shipping purposes. For best results, raise
the cutting position until it is determined which heig ht is
best for your lawn. See cutting height adjustment in the
Making Adjustments section.
Motor/Blade Control Lever
Engaged Position
(Blade Turning)
Locking Button
Released Position
(Blade Stopped)
Connect the plug on the extension cord fully onto the
plug on the mower. The mower is equipped with a
polarized AC power plug (one blade is wider than the
other), which will fit into the plug on the extension cord
only one way. If unable to make a connection, try
reversing the extension cord plug. Should the plugs still
fail to fit, contact your service dealer for assistance. Do
not defeat the safety purpose of the polarized plug.
10
Circuit Breaker
Reset Button
AC Plug
Figure 10
Upper Handle
Page 11
To engage the motor and blade, first be certain to follow
the previous steps for connecting a suitable extension
cord, then referring to Figure 10:
• Stand behind the unit and depress the locking
button.
• While holding the locking button down, pull the
blade/motor control lever and hold it against the
upper handle.
• Release the locking button.
T = Obstacles
Outlet
(Start here)
Stopping the Motor and Blade
WARNING: The blade continues to rotate for a
few seconds after the motor is shut off. If motor
does not come to a stop when the motor/blade
control handle is released, contact an authorized
service dealer.
To stop the motor and blade from spinning:
• Release the motor/blade control lever from its
position against the upper handle and the blade
and motor will quickly come to a stop.
NOTE: A high pitched noise may occur as the electric
motor decelerates and some sparking may occur also
at the same time. This is normal behavior when the
motor and blade is disengaged.
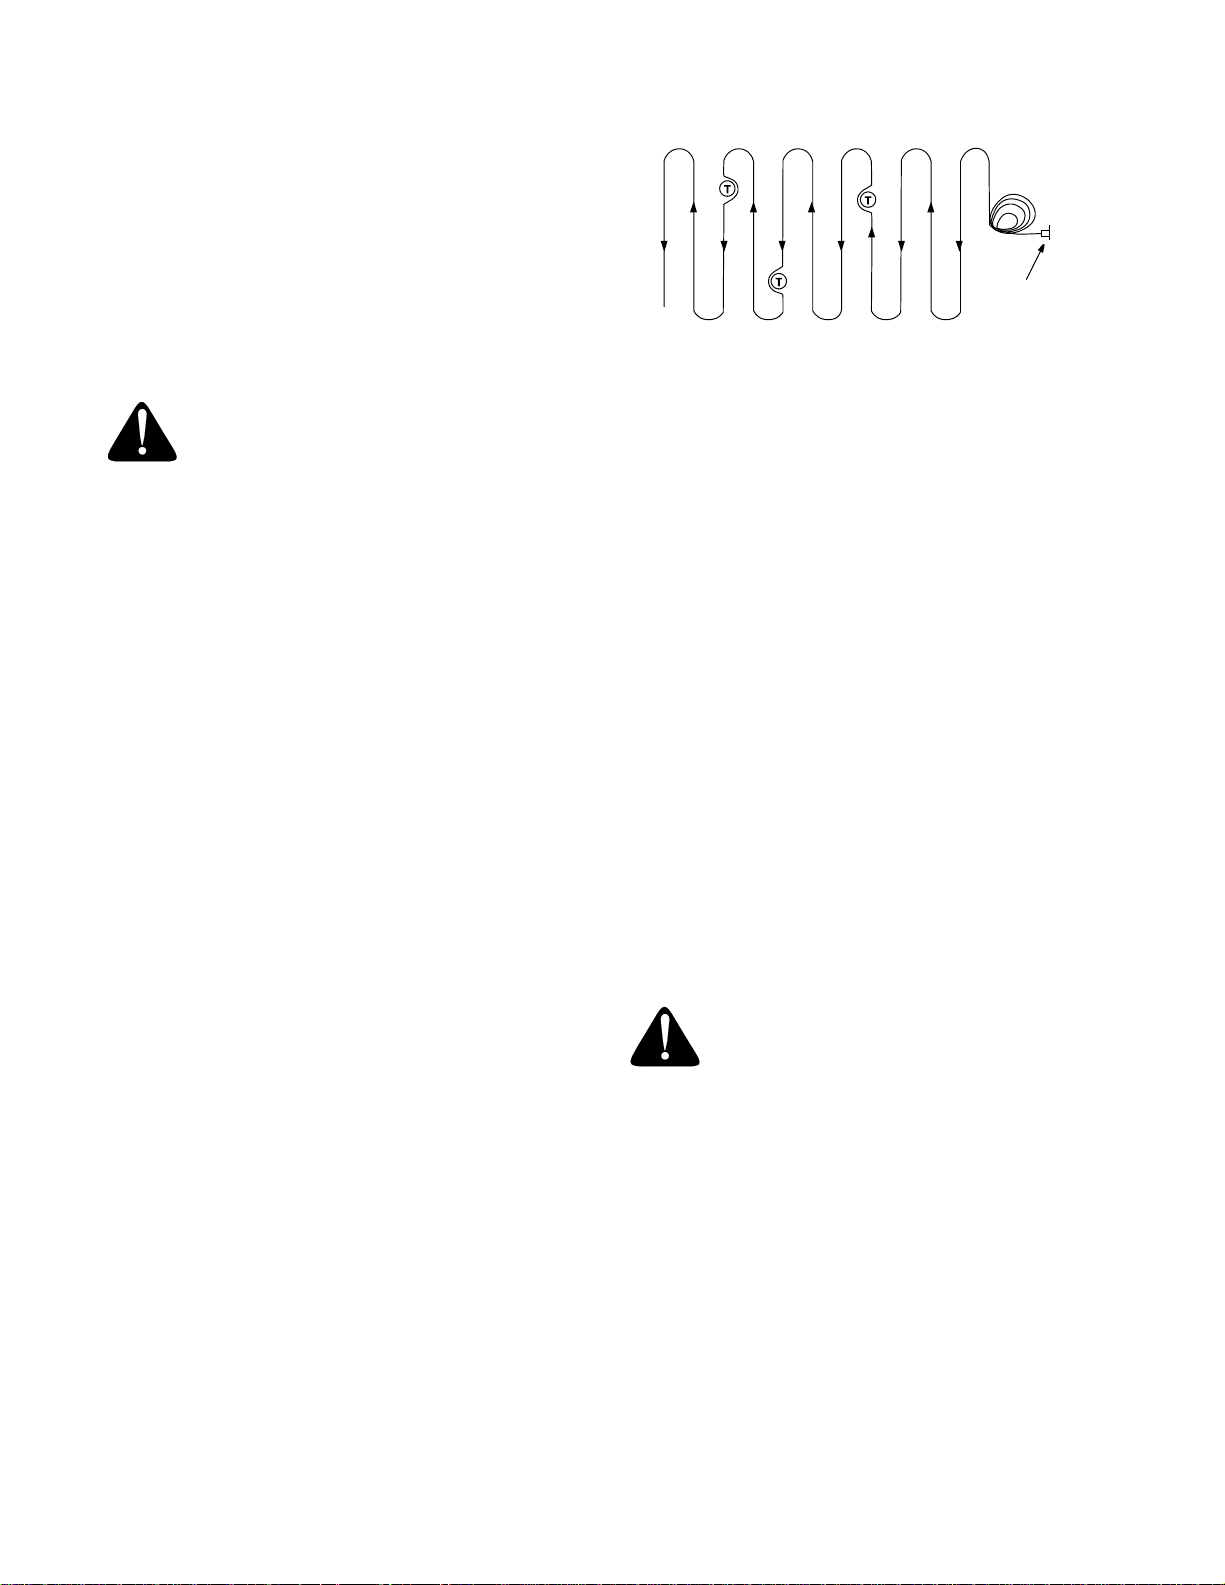
Mowing Your Lawn
NOTE: A sharp blade will greatly increase the
performance of the lawn mower, especially in
conditions of higher grass. Be sure to check the blade
and sharpen it at least once a year as outlined in the
Maintenance section.
• Make sure the lawn is clear of stones, sticks, wires,
or other objects that could damage the lawn mower
or motor. Such objects could be accidentally thrown
by the mower in any direction and cause serious
personal injury to the operator and others.
• To prevent electric shock, do not operate the
mower in damp or wet conditions.
• Always start from the point closest to the power
source where the cord is connected. Never mow
around the lawn in circles; travel back and forth
across the lawn, starting from the point closest to
the outlet and then moving away from the outlet so
the cord lies in the cut portion of the lawn, out of the
way. Refer to Figure 11.
Figure 11
• Do not allow the extension cord to wrap around
trees, shrubs or other obstacles. When picking up
the extension cord, wind the cord in a series of
equal loops on each side of your hand to prevent it
from tangling.
• When cutting heavy grass, reduce walking speed to
allow more effective cut and proper discharge of the
clippings. For a healthy lawn, always cut off onethird or less of the total length of the grass. The
average lawn should be approximately 1-1/2 to 2
inches during the cool season, and over 2 inches
during hot months. For a healthier and better
looking lawn, cut more often and after moderate
growth. The lawn should be cut in the fall as long as
there is growth.
Mulching Tips
• For effective mulching, do not cut wet grass
because it tends to stick to the underside of the
deck, preventing proper mulching of grass
clippings. New or thick grass may require a
narrower cut. The ground speed should be
adjusted to the condition of the lawn. If mowing has
been delayed and the grass has been allowed to
grow in excess of 4", mow twice to reduce the grass
height to 3-1/4" maximum.
WARNING: If you strike a foreign object, stop
the motor, and unplug from the power supply
circuit. Thoroughly inspect the mower for any
damage, and repair the damage before
restarting and operating the mower.
Excessive vibration of the mower during
operation is an indication of damage. The unit
should be promptly inspected and repaired.
11
Page 12

SECTION 7: MAKING ADJUSTMENTS
Cutting Height Adjustment
Cutting Height
Adjustment Lever
Figure 12
A height adjustment lever at each wheel provides
cutting height adjustment. Each adjuster has nine
height positions. Height of cut will be changed when the
lever is moved from one position to another.
• Depress the lever towards wheel and move the
wheel and lever assembly to desired position.
• To raise the height, push the lever towards the front
of the mower on both front wheels, and push the
lever toward the back of the mower on the rear
wheels.
Refer to Figure 12. All wheels must be placed in the
same relative position. For rough or uneven lawns,
move the wheels to a position which will give a higher
cutting height.
Handle Height Adjustment
• The upper handle may be adjusted to three
different height positions. To adjust the handle to
the desired position, align one of the three marks
on the top of the lower handle insulators with the
mark on the upper handle insulators. Refer to
Figure 4.
• Tighten the hand knobs on each side of the handle.
Make sure the carriage bolts are seated properly
into the handle insulators.
Resetting the Circuit Breaker
The mower is equipped with a circuit breaker, located
on the motor/blade control assembly as shown in
Figure 10. This circuit breaker may trip when too much
strain is placed on the mower. The circuit breaker may
have been tripped if the mower will not run.
• If this occurs, unplug the mower, wait
approximately five minutes, then depress the reset
button. Refer to Figure 10.
• Plug the mower back in, restart the mower, but be
sure to reduce the strain on the mower (i.e., mow at
a higher cutting height, slow down cutting speed, or
take a smaller width of cut).
• If the circuit breaker does not reset, or if it trips
repeatedly under normal cutting conditions, unplug
the mower from the extension cord and unplug the
extension cord from the power source. Then check
to make certain your cord is the correct length and
rating as listed in the Operating Your Lawn Mower
section. If the cord is correct and is also not
damaged, take the machine to an authorized
service dealer for repair.
SECTION 8: MAINTENANCE
WARNING: Always stop the motor and
disconnect from the power source before
cleaning, lubricating or performing any
repairs or maintenance on the lawn
mower.
Cutting Blade Replacement
WARNING: Always protect hands by wearing
heavy gloves and/or wrapping cutting edges
with newspapers or other materials when
performing any blade maintenance. Be certain
to disconnect the power supply.
Removing the Blade
• Stop the motor and disconnect the power supply to
the mower. Turn the mower on its side.
• Use a block of wood between blade and mower
deck to prevent the blade from turning when the
bolt is removed.
• Using a 24mm wrench or socket, loosen the blade
bolt and remove the blade.
12
Page 13

Motor Shaft
Cutting Blade
Locking Plate
• Reinstall the blade as described earlier in this
section making certain to torque the cutting blade to
specifications.
1. Insert screwdriver through hole
Blade Bolt
Figure 13
Installing the Blade
WARNING: The blade hardware is not only
used to attach the blade assembly, but is
also an insulated safety device and should
never be altered in any way. I f repla ceme nt
is necessary, use original equipment parts
as shown in the parts list on page 17.
• Place the cutting blade, locking plate, and blade
bolt against the blade hub assembly and thread the
blade bolt on finger tight. Refer to Figure 13.
NOTE: Make certain to replace the parts in the exact
order in which they were removed. When installing the
cutting blade, make sure it is installed with the curved
ends pointing towards the mower deck and not toward s
the ground.
• Torque the blade bolt down using a torque wrench
to assure the bolt is tightened properly. The
recommended torque for the blade bolt is 450-600
in. lbs. To insure safe operation of your unit, all nuts
and bolts must be checked periodically for correct
tightness.
Sharpening the Blade
To sharpen the blade, first remove the blade as outlined
in the previous section. DO NOT attempt to sharpen the
blade while it is attached to the mower. The blade can
be sharpened with a file or on a grinding wheel.
• When sharpening the blade, follow the original
angle of grind as a guide. It is extremely important
that each cutting edge receives an equal amount of
grinding to prevent an unbalanced blade.
• Test the blade by balancing it on a round shaft
screwdriver or a blade balancer. See Figure 14.
• If the blade is not balanced, remove metal from the
heavy side until it balances evenly.
2. Balanced blade will be parallel to ground
Screwdriver
Figure 14
Blade
Ground
Mower Deck
WARNING: To reduce the risk of electric
shock, do not expose the mower to water.
The underside of mower deck should be cleaned after
each use as grass clippings, leaves, dirt and other
debris will accumulate. This accumulation of grass
clippings, etc., is undesirable as it will promote rust and
corrosion.
• Remove any buildup of grass and leaves on or
around the motor cover (do not use water). Wipe
the mower clean with a dry cloth occasionally.
• If debris is allowed to build up on the underside of
the unit, stop the motor and disconnect the power
supply to the mower, tilt the mower forward or on its
side and scrape it clean with a suitable tool.
Lubrication
At the beginning and end of each mowing season:
• Lubricate the springs on the rear discharge door
with a light oil.
• Lubricate the height adjustment levers and related
hardware with light oil.
• Remove the wheels and lubricate the surface of the
axle bolt and the inner surface of the wheel with
light oil.
• Remove the blade and blade hub assembly and
lubricate the motor shaft with light oil or engine oil.
Refer to Figure 13.
WARNING: An unbalanced blade will cause
excessive vibration when rotating at high
speeds. It may also cause damage to the
mower and could break, causing personal
injury.
13
Page 14

SECTION 9: OFF-SEASON STORAGE
The following steps should be taken to prepare the lawn
mower for storage.
• Make certain the power supply is disconnected.
• Clean mower as instructed in previous section.
• Inspect and replace/sharpen blade if required.
Refer to the Maintenance section on page 12.
• Lubricate the mower as instructed on page 13.
• Store mower in a dry, clean area. Do not store next
to corrosive materials, such as fertilizer and rock
salt.
• Wipe extension cord to remove any foreign
substance such as oil or stains. Replace extension
cord if cut or damaged in any way.
• Wind cord in a series of equal loops on each side of
your hand to prevent it from tangling.
• Store mower indoors, in a cool, dry place, out of
reach of children. Do not cover lawn mower with a
solid plastic sheet. Any plastic covering traps
moisture around the mower which promotes rust
and corrosion.
The handle may be folded away completely for
storage.
• Remove grass bag.
• Loosen the hand knobs on the sides of the handle,
and fold the upper handle down.
• Remove the hairpin clips, pull outward on each side
of the lower handle, and lift the sides of the lower
handle past the edges of the handle mounting
brackets. Fold the lower handle forward. Make sure
not to bend or kink the power cord.
14
Page 15

SECTION 10: TROUBLE SHOOTING GUIDE
Trouble Possible Cause(s) Corrective Action
Handle not in position. Carriage bolts not seated in the handle
insulators.
Mower not starting. Cord disconnected from the motor/
blade control.
Adjust the height of the handle and make sure that
the carriage bolts are seated properly into the
handle insulators. Tighten the hand knobs.
Reconnect the cord keeping the cord restraint close
to the motor/blade control.
Motor/blade control switch defective.
Extension cord not connected to the
plug on the mower.
Extension cord not connected to a
source of power.
Circuit breaker on the mower or in the
house receptacle tripped.
Circuit breaker on the mower
tripping.
Mower cutting grass
unevenly.
Mower not mulching properly. Wet grass clippings stick to the
Hard to push. High grass or cutting height too low.
Mower vibrating at higher
speed.
Too much workload on the mower.
Fuse blown; outlet overloaded.
Lawn rough or uneven.
Cutting height not set properly.
underside of the deck.
Rear of mower housing and blade
dragging in heavy grass.
Bent motor shaft.
Replace motor/blade control switch.
Connect the extension cord to the plug on the
mower.
Connect the extension cord to a 110-120 V 60 cycle
A.C. receptacle.
Reset the circuit breaker following instructions in
the Operating Your Lawn Mower section of this
manual.
Raise the cutting height, reset the circuit breaker on
the mower, take a smaller width of cut, and walk
slowly.
Connect to an outlet that is fused for 15 amperes.
Reset the circuit breaker and start the mower again.
Move the wheels to a higher cutting height position.
All wheels must be placed in the same cutting
height for the mower to cut evenly.
Wait till the grass dries before mowing.
Raise cutting height.
Raise cutting height.
Stop the motor, disconnect the power source and
inspect for damage. Repair before restarting. If
vibration persists, take it to a service dealer.
Blade is unbalanced.
Balance the blade by grinding each cutting edge
equally.
15
Page 16
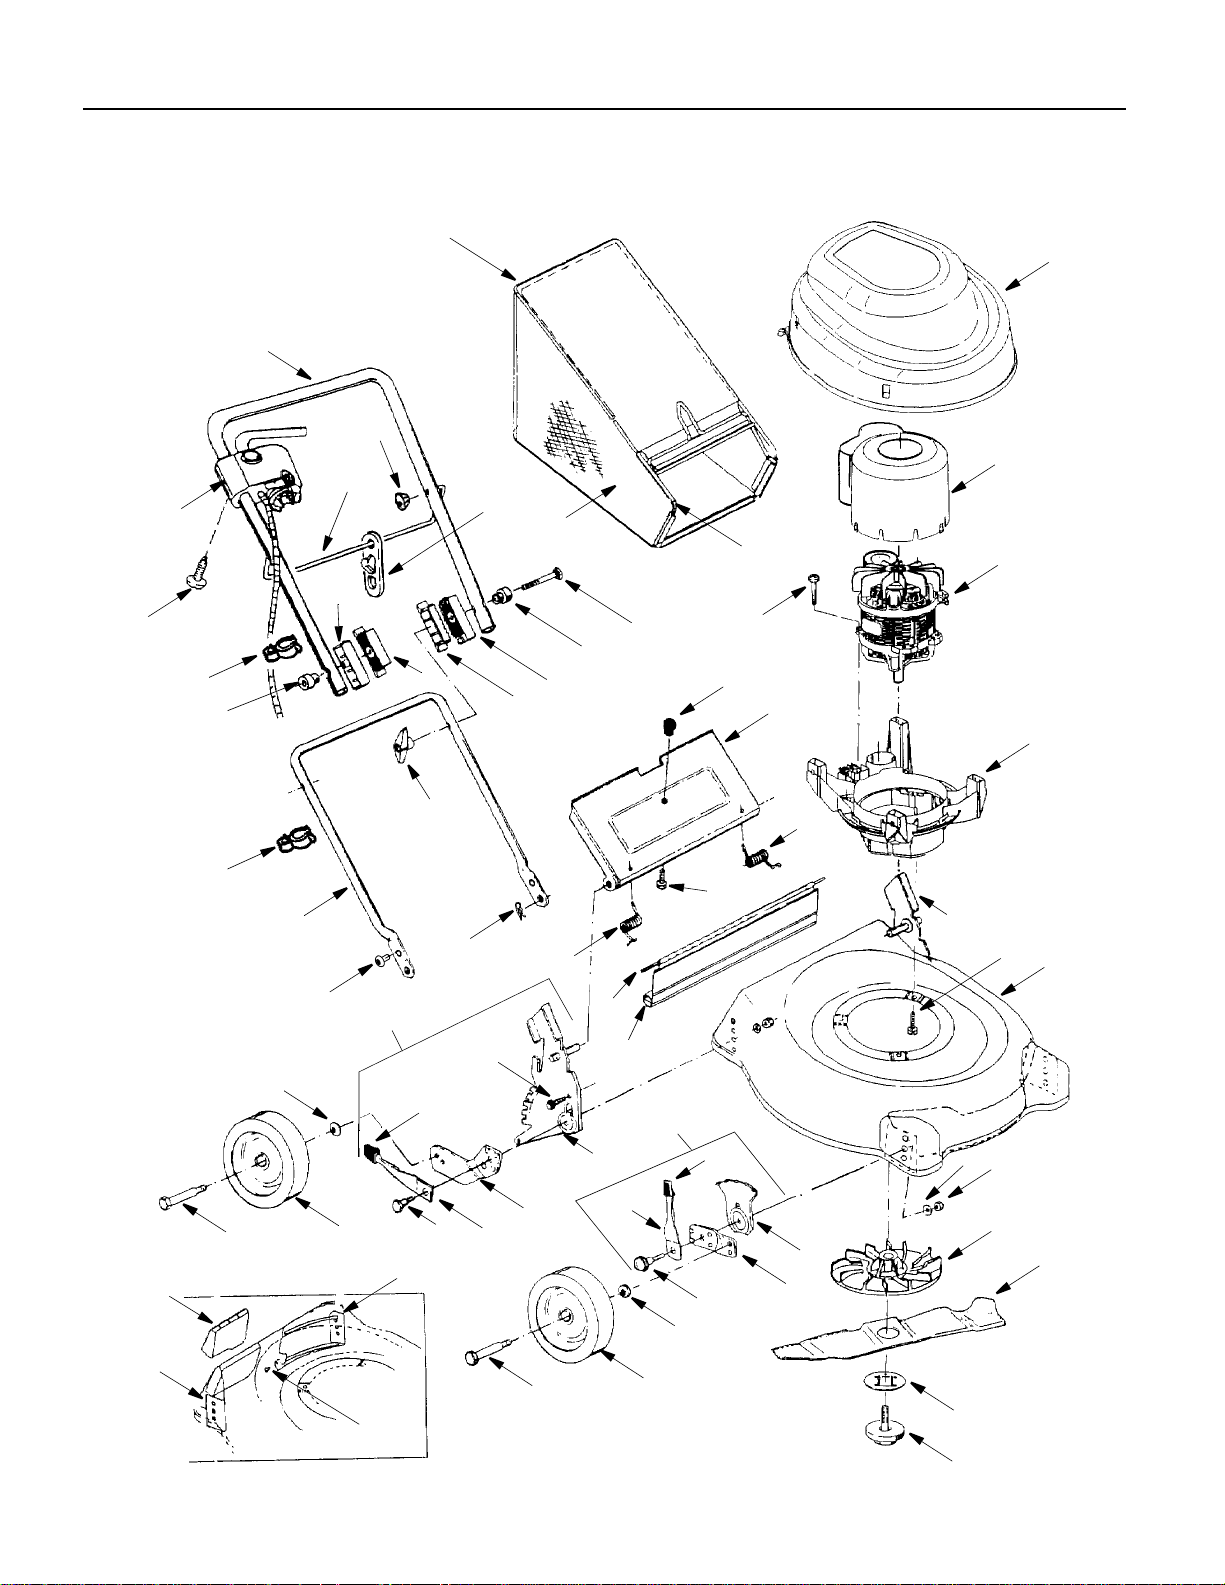
SECTION 11: PARTS LIST/LISTE DES PIÈCES
40
16
43
48
46
47
42
50
51
52
53
45
44
49
52
53
51
15
41
5
7
6
4
14
2
59
60
49
29
27
55
61
28
61
32
58
26
54
37
56
19
35
34
29
17
13
33
12
25
28
21
27
24
16
26
23
18
22
38
30
10
31
8
3
1
9
16
11
Page 17

REF PAR T
NO. NO.
N° DE N° DE
RÉF PIÈCE DE SCRIP TION DE SCRIP TION
1 782-0054B-0638 19" Deck Corps 19 po
2 731-2425 Motor Support Support du moteur
3 710-1756 Screw Vis
4 724-0309 Electric Motor 115V, 1500W Moteur électrique 115V, 1500W
5 710-1756 Screw Vis
6 731-2400 Air Guide Cover Couvercle-guide d’air
7 731-2383-0637 Hood Capot
8 631-0132 Blade Hub Assembly Ensemble de moyeu de la lame
9 742-0826 Blade Lame
10 782-7051 Locking Plate Plaque de blocage
11 624-0078 Screw, Blade Vis-lame
12 731-1261 Rear Flap Clapet arrière
13 732-0712 Rear Flap Wire Fil métallique du clapet arrière
14 782-7025-0637 Chute Door Clapet de la goulotte
15 720-0275 Knob Bouton
16 710-0192 Truss Mach Scr #10-24 X .38 Vis de renforcement usinée no 10-24 X .38
17 732-0678 RH Torsion Spring Ressort de torsion CD
18 732-0677 LH Torsion Spring Ressort de torsion CG
19 710-0896 Hex Index Washer Screw 1/4-14 X .625 Vis taraudée à tête hexagonale 1/4-14 X ,625
21 14578 Height Adj. Ass’y RH (w/knob) Ensemble de réglage de roue-CD (avec bouton)
21 14579 Height Adj. Ass’y LH (w/knob) Ensemble de réglage de roue-CG (avec bouton)
22 15261A Height Adjuster Plate Plaque de réglage de roue
23 15262B Wheel Pivot Bar Barre de pivot
24 738-0507B Shoulder Screw .50 Dia. Vis à épaulement .50 Dia.
25 732-0404 Spring Lever Ass’y w/knob Ensemble de levier de ressort avec bouton
26 720-0190 Knob Bouton
27 736-0105 Bell. Washer .375 ID X .870 OD X .063 Rondelle Bell ,375 DI X ,870 DE X ,063
28 734-1987 Wheel 8" X 1.8", Gray Roue 8 X 1,8 po, gris
29 738-0102 Axle Bolt Boulon de l’essieu
30 736-0356 Bell. Washer .38 ID X 1.38 OD X .06 Rondelle Bell. .38 DI X 1.38 DE X .06
31 712-0798 Hex Nut 3/8-16 Gr. 2 Écrou hex 3/8-16 Qté. 2
32 682-0516 Handle Bracket Ass’y RH Support du poignée-droit
33 682-0514-0637 Handle Brkt. Ass’y-RH Support du guidon-droit
34 14765 Pivot Bar RH SP Barre de pivot - droit
34 14766 Pivot Bar LH SP Barre de pivot - gauche
35 732-0417A Spring Lever SP Ressort de levier
37 738-0507B Shoulder Screw .50 Dia. Vis à épaulement .50 Dia.
38 682-0513-0637 Handle Brkt. Ass’y-LH Support du guidon-gauche
39 682-0515 Handle Bracket Ass’y LH Support du poignée-gauche
40 764-04003 Rear Catcher Frame Armature arrière du sac à herbe
41 764-04004 Front Catcher Frame Armature avant du sac à herbe
42 764-04014 Grasscatcher Bag w/logo Sac récupérateur (avec logo)
43 749-1310-0637 Upper Handle Guidon superieur
44 725-1942 Switch Plug Combination Contacteur-démarreur/Prise de courant combiné
45 710-1757 Screw Vis
46 747-1094 Guide Rod Tige de guide
47 726-0368 Cord Restraint Attache câble
48 720-0279 Knob - ERS Guide 1/4-20 Bouton - 1/4-20
49 731-2422 Cable Guide Guide-câble
50 710-0450 Carriage Bolt 5/16-18 x 3.00 Boulon ordinaire 5/16-18 x 3.00
51 731-1388 Insulator Knob Bouton de l’isolateur
52 731-1268 Upper Handle Insulator Isolateur du guidon supérieur
53 731-1267 Lower Handle Insulator Isolateur du guidon inférieur
54 720-0241 Wing Nut Écrou à oreille
55 749-1318A-0637 Lower Handle Guidon inférieur
56 714-0104 Int. Cotter Pin .072 X 1.13" Lg. Goupille fendue ,072 X 1,13 po. de lg.
57 782-5025-0637 Front Baffle Déflecteur avant
58 782-5026-0637 Rear Baffle Déflecteur arrière
59 782-5004-0637 Right Rear Baffle Déflecteur de arrière droit
60 731-2386 Rear Mulch Plug Obturateur de déchiquetage-arrière
61 710-1017 Torx Mach. AB-Tapp Scr. 1/4-14 X .625" Vis torx AB 1/4-14 X ,625 po de lg
17
18A-V17
10.15.04
Page 18

SECTION 12: TWO YEAR LIMITED WARRANTY
For TWO YEARS from the date of retail purchase within Canada, MTD PRODUCTS LIMITED will, at its option,
repair or replace, for the original purchaser, free of charge, any part or parts found to be defective in material or
workmanship.
This warranty does not cover:
1. Any part which has become inoperative due to misuse, commercial use, abuse, neglect, accident, improper
maintenance or alteration; or
2. The unit if it has not been operated and/or maintained in accordance with the owner’s instructions furnished
with the unit; or
3. The engine or motor or component parts thereof which carry separate warranties from their manufacturers.
Please refer to The applicable manufacturer’s warranty on these items; or
4. Batteries and normal wear parts except as noted below. Log splitter pumps, valves and cylinders or
component parts thereof are covered by a one year warranty; or
5. Routine maintenance items such as lubricants, filters, blade sharpening and tune-ups, or adjustments such
as brake, clutch or deck; or
6. Normal deterioration of the exterior finish due to use or exposure.
Full Ninety Day Warranty on Battery: For ninety (90) days from the date of retail purchase, if any battery
included with this unit proves defective in material or workmanship and our testing determines the battery will not
hold a charge, MTD PRODUCTS LIMITED will replace the battery at no charge to the original purchaser.
Additional Limited Thirty Day Warranty on Battery: After ninety (90) days but within one hundred twenty (120)
days from the date of purchase, MTD PRODUCTS LIMITED will replace the defective battery, for the original
purchaser, for a cost of one-half (1/2) of the current retail price of the battery in effect at the date of return.
Full Sixty Day Warranty on Normal Wear Parts: Normal wear parts are defined as belts, blade adapters, blades,
grass bags, seats, tires, rider deck wheels and clutch parts (friction wheels). These parts are warranted to the
original purchaser to be free from defects in material and workmanship for a period of sixty (60) days from the
date of retail purchase.
How to Obtain Service: Warranty service is available, with proof of purchase, through your local authorized
service dealer or distributor. If you do not know the dealer or distributor in your area, please write to the Service
Department of MTD PRODUCTS LIMITED, P. O. BOX 1386, KITCHENER, Ontario, N2G 4J1. The return of a
complete unit will not be accepted by the factory unless prior written permission has been extended by MTD
PRODUCTS LIMITED.
Transportation Charges: Transportation charges for the movement of any power equipment unit or attachment
are the responsibility of the purchaser. Transportation charges for any part submitted for replacement under this
warranty must be paid by the purchaser unless such return is requested in writing by MTD PRODUCTS LIMITED.
Other Warranties: All other warranties, express or implied, including any implied warranty of merchantability is
limited in its duration to that set forth in this express limited warranty. The provisions as set forth in this warranty
provide the sole and exclusive remedy of MTD PRODUCTS LIMITED obligations arising from the sale of its
products.
MTD PRODUCTS LIMITED will not be liable for incidental or consequential loss or damage.
18
Page 19
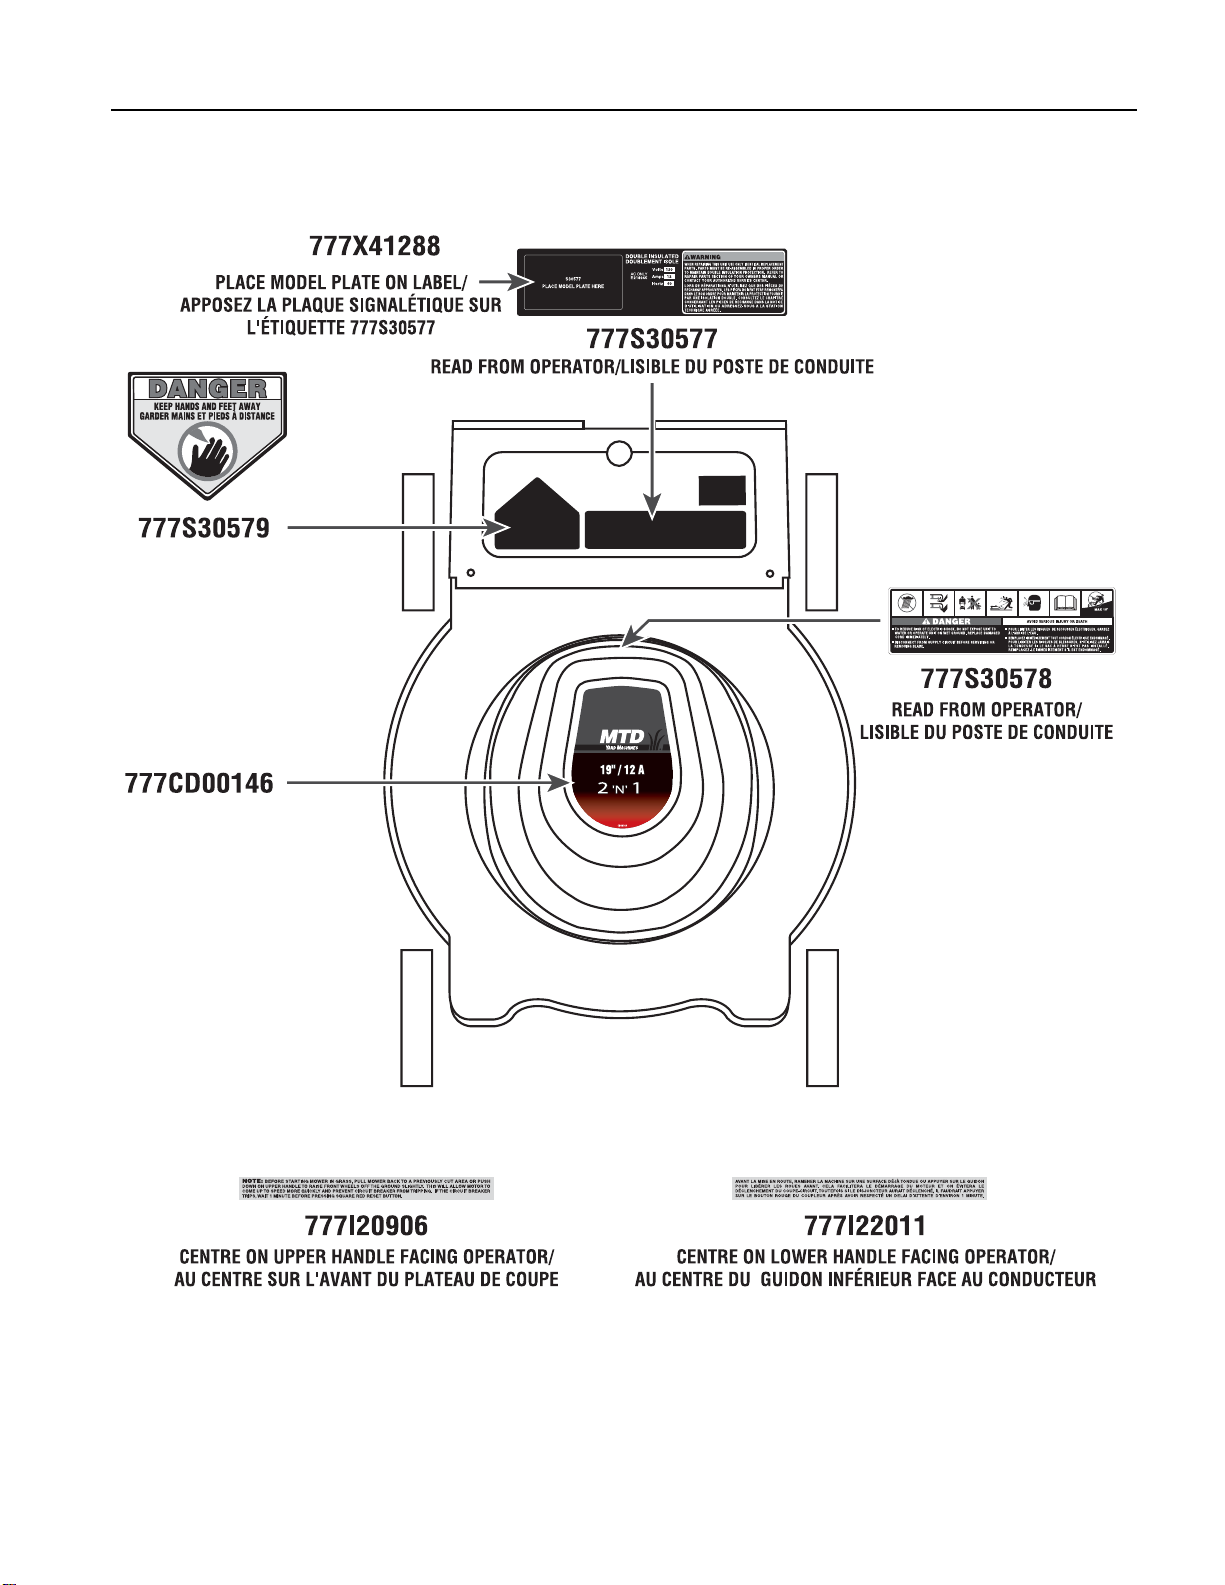
SECTION 13: SAFETY AND DECORATIVE LABELS/ ÉTIQUETTES
19
Page 20

17
indirect.
MTD PRODUCTS LIMITED ne peut être tenue responsable pour toute perte ou tout dommag e accidentel ou
découlant de la vente de ses produits.
dans cette garantie constituent le recours unique et exclusif quant aux obligations de MTD PRODUCTS LIMITED
de qualité marchande, se limitent à la d urée stipulée dans cette garantie limitée expresse. Les conditions stipulées
Autres garanties: Toutes les autres garantie s, qu’elles soient expresses ou tacit es, y compris les garan ties tacites
par MTD PRODUCTS LIMITED.
de cette garantie doivent être pris en charge par l’ach eteur, sauf si le renvoi de la machine est demand é par écrit
charge de l’acheteur. Les frais de transport d’une pièce quelconq ue envoyée à des fins de remplacement en vertu
Frais de transport: Les frais relatifs au tr ansport de toute machine motor isée ou de tout accessoir e sont à la
LIMITED.
accepter le renvoi d’une machine complète si une autorisation n’a pas été accordée pa r écrit par MTD PRODUCTS
service après-vente de MTD PRODUCTS L IMITED, C.P. 1386, Kitch ener (Ontario) N2G 4J1. L’usine ne peut
vous ne connaissez pas l’adresse de l’atelier de réparations ou du distrib uteur de votre région, adressez- vous au
Pour faire honorer la garantie: Présen tez une preuve d’achat à l’ate lier de réparations ou au distributeur agréé. Si
et de fabrication à l’acheteur initial pour une période de soixante ( 60) jours à partir de la date d’achat au détail.
frottement) sont considérés comme des pièces à usure normale. Elles sont garanties exemptes de vices de matière
sacs à herbe, sièges, pneus, roues du plateau de coupe des tondeuses à siège, et pièces d’embrayage (roues de
Garantie complète de soixante jours des pièces à usure normale: Les courroies, adaptateurs de lame, lames,
vigueur au moment du retour de la batterie.
remplacer la batterie défectueuse à l’acheteur initial pour la moitié du prix de vente au détail de la batterie, en
jours, mais dans un délai de cent vingt (120) jours de la date d’achat, MTD PRODUCTS LIMITED s’engage à
Garantie limitée supplémentaire de trente jours de la batterie: A l’expiration du délai de quatre-vingt-dix (90)
de quatre-vingt-dix (90) jours à partir de la date d’achat au détail.
vice de matière ou de fabrication et si nos essais confirment qu’e lle ne peut pas maintenir une charge, dans un d élai
gratuitement la batterie à l’acheteur initial, si la batter ie fournie avec la machine s’avère défectueuse en raiso n d’un
Garantie complète de quatre-vingt-dix jours de la batterie: MTD PRODUCT S LIMITED s’engage à remplacer
intempéries.
6. La détérioration normale de la finition extérieure du fait de l’utilisation de la machine et de son exposition aux
des freins, de l’embrayage ou du plateau de coupe;
5. Les articles d’entretien courant tels que les lubrifiants, filtres, aigu isage de lames et révisions, ou les réglage s
cylindres des fendeuses à bois sont garantis pendant un an;
4. Les batteries et les pièces présentant une usur e normale énumérées plus bas. Le s pompes, soupapes et
Veuillez consulter la garantie qui s’applique à la pièce en particulier;
3. Le moteur, le moteur électrique ou l’un de ses composants car ils sont garantis par leurs fabricants re spectifs.
2. La machine si elle n’a pas été utilisée et/ou entretenue conformément aux instructions qui l’accompagnaient;
négligence, un entretien incorrect ou une modification;
1. Les pièces rendues inutilisables par un emploi incorrect, une utilisation commerciale, un emploi abusif, une
Cette garantie ne couvre pas:
DEUX ANS à partir de la date d’achat au détail au Canada .
pièce ou partie de pièce qui s’avère défectueuse en raison d’un vice de matière ou de fabrication, dans un délai de
MTD PRODUCTS LIMITED s’engage à réparer ou àremplacer gratuitement, à son choix, à l’acheteur initial, toute
SECTION 11: PIÈCES SOUS GARANTIE ET SERVICE APRÈS VENTE
Page 21

16
Équilibrer la lame est meulant le côté le plus lourd.
de service autorisé.
persiste, faire réparer la tondeuse dans un centre
de courant et inspecter la tondeuse. Si la vibration
Arrêter le moteur, débrancher la rallonge de la prise
Accroître la hauteur de coupe.
Accroître la hauteur de coupe.
tonte.
Attendre que l’herbe sèche avant de procéder à la
Régler les quatre roues à la même hauteur.
Accroître la hauteur de coupe.
ou réduire la largeur des rangées de coupe.
du circuit.
circuit d’au moins 15 A. Réenclencher le disjoncteur
S’assurer que la prise de courant fait partie d’un
suivant les instructions de la section Utilisation.
Réenclencher le disjoncteur de la tondeuse en
La lame est déséquilibrée.
tondeuse de façon excessive.
L’arbre du moteur est tordu.
l’herbe haute.
L’arrière de la tondeuse traîne dans
coupe est trop basse.
L’herbe est trop haute ou la hauteur de
le capot.
Les brins d’herbe mouillés collent sous
même sur les quatre roues.
La hauteur de coupe n’est pas la
Le moteur est surchargé. Accroître la hauteur de coupe, réduire la cadence
ou la prise de courrant est surchargée.
Le disjoncteur du circuit est déclenché
déclenché.
Le disjoncteur de la tondeuse est
Le moteur fait vibrer la
pousser.
La tondeuse est difficile à
inadéquat.
Le déchiquetage est
La tonte est inégale. Le terrain est accidenté ou cahoteux.
se déclenche constamment.
Le disjoncteur de la tondeuse
de courant.
Rebrancher la rallonge à la prise de courant.
Rebrancher la rallonge à la fiche de la tondeuse.
lame.
Faire remplacer la commande du moteur et de la
que l’attache-câble est assez près de la fiche.
Rebrancher la rallonge à la tondeuse et s’assurer
Resserrer les boutons de blocage.
boulons sont bien placés dans les isolateurs.
Régler la hauteur du guidon et s’assurer que les
La rallonge est débranchée de la prise
de la tondeuse.
La rallonge est débranchée de la fiche
ne fonctionne pas.
La commande du moteur et de la lame
de la tondeuse.
La tondeuse ne démarre pas. La rallonge est débranchée de la fiche
dans les isolateurs.
Les boulons ne sont pas bien placés
incorrecte.
La position du guidon est
Problème Causes possibles Solutions
SECTION 10: DÉPANNAGE
Page 22

15
pincer le cordon d’alimentation.
complètement le guidon en prenant soin de ne pas
les languettes des supports de montage. Repliez
branches du guidon de façon à les faire dépasser
• Enlevez les goupilles fendues et comprimez les
écrous).
supports de montage (conservez les vis et les
assujettissent la section inférieure du guidon aux
• Enlevez les vis et les écrous à oreilles qui
• Enlevez le sac à herbe.
moins d’espace.
Le guidon peut être replié pour que la tondeuse pren ne
tondeuse.
pourrait faire rouiller des composants de la
plastique, car l’humidité emprisonnée par la bâche
couvrez pas la tondeuse avec une bâche de
frais et sec hors de la portée des enfants. Ne
• Rangez la tondeuse à l’intérieur, dans un endroit
de l'huile à moteur. Voir la Figure 13.
lubrifiez l'arbre du moteur avec de l'huile légère ou
• Démontez la lame et le moyeu de la lame et
avec de l'huile légère.
boulon d'essieu et la surface intérieure de la roue
• Démontez les roues et lubrifiez la surface du
légère.
de coupe et la boulonnerie annexe avec de l'huile
• Lubrifiez les mécanismes de réglage de la haut eur
huile légère.
• Lubrifiez les ressorts sur le clapet arrière avec une
Au début et à la fin de chaque saison de tonte,
Lubrification
s’emmêler.
• Enroulez la rallonge pour l’empêcher de
présente des coupures ou tout autre dommage.
substances étrangères. Remplacez-la si elle
• Essuyez la rallonge pour éliminer les taches et les
l’engrais et du sel à glace.
où il n’y a pas de matières corrosives telles que de
• Rangez la tondeuse dans un endroit sec et propre,
• Lubrifiez la tondeuse tel qu’indiqué ci-haut.
besoin (voir la section Entretien à la page 14).
• Inspectez la lame et remplacez-la ou affûtez-la au
paragraphe précédent.
• Nettoyez la tondeuse en suivant les instructions du
à une prise de courant.
• Assurez-vous que la tondeuse n’est pas branchée
pour l’entreposage hors saison.
Voici comment procéder pour préparer la tondeuse
SECTION 9: ENTREPOSAGE HORS SAISON
pour nettoyer le couvre-moteur.
moteur avec un linge sec. N’utilisez jamais d’eau
• Éliminez toute accumulation d’herbe sur le couvrefavoriser la corrosion.
accumulations d’herbe et d’autres débr is peuvent
nettoyé après chaque utilisation. En effet, les
Le dessous du capot de la tondeuse devrait être
tondeuse à l’eau.
de choc électrique, n’exposez jamais la
MISE EN GARDE: Pour réduire les risques
Entretien du capot
raclant avec un outil adéquat.
reposer la tonde sur le côté et enlevez l’herbe en la
• S’il y a de l’herbe accumulée sous le capot, laissez
est serré au couple prescrit.
paragraphe précédent. Assurez-vous que le boulon
• Réinstallez la lame en suivant les instructions du
Page 23

14
l’utilisateur.
causer de sérieuses blessures à
ou même casser pendant qu’elle tourne, et
aussi causer des dommages à la tondeuse
de façon excessive, mais elle pourrait
déséquilibrée, elle fera vibrer la tondeuse
MISE EN GARDE: Si la lame est
l’horizontale sur la tige du tournevis.
lourd jusqu’à ce que la lame demeure à
• Si la lame est déséquilibrée, meulez le côté le plus
Figure 14 ).
un test d’équilibrage avec un tournevis (voir la
• Pour vous assurer que la lame est équilibrée, faites
de façon égale pour éviter de déséquilibrer la lame.
d’origine du tranchant et affûtez chaque tranchant
• Pour affûter la lame, basez-vous sur l’angle
utiliser une lime ou une meule pour affûter la lame.
les instructions du paragraphe précédent. Vous pouvez
TONDEUSE. Vous devez d’abord l’enlever en suivant
NE TENTEZ JAMAIS D’AFFÛTER LA LAME SUR LA
Affûtage de la lame
Figure 14
Boulon
Plaque de blocage
Figure 13
version anglaise de cet mode d’emploi).
pièces de rechange à la page 16 de la
d’utiliser des modèles identiques (voir
doivent être remplacés, assurez-vous
Si la plaque de blocage et le boulon
et ne doivent être modifiés d’aucune façon.
système d’isolation double de la tondeuse
fixation de la lame ; ils font partie du
le boulon ne servent pas seulement à la
MISE EN GARDE: La plaque de blocage et
Pose de la lame
Sol
Lame
Tournevis
parallèle au sol
2. Une lame équilibrée demeurera
1. Insérez le trounevis dans le trou.
serrage de tous les boulons et toutes les vis.
sûr de la tondeuse, vérifiez régulièrement le
600 pouce-livre. Pour assurer le fonctionnement
couple de serrage recommandé est entre 450 et
• Serrez le boulon avec une clé dynamométrique. Le
tondeuse et non vers le sol.
courbées de la lame doivent pointer vers le capot de la
dans le même ordre qu’à l’origine. Les extrémités
REMARQUE: Réinstallez toutes les pièces exactement
la lame et vissez le boulon à la main (voir figure 11).
• Mettez la lame sur le moyeu, la plaque par-dessus
Lame
Arbre du moteur
(voir Figure 13).
dévissez le boulon de la lame, puis enlevez la lame
• À l’aide d’une clé ou d’une douille de 24 mm,
rotation de la lame avec un morceau de bois.
• Pour permettre le dévissage du boulon, bloquez la
reposer sur le côté.
prise de courant. Tournez la tondeuse et laissez-la
• Arrêtez le moteur et débranchez la rallonge d e la
Dépose de la lame
protecteur.
avec du papier ou tout autre matériau
des gants ou après l’avoir enveloppée
coupures, manipulez toujours la lame avec
remplacement de la lame ; pour éviter les
de la prise de courant avant de procéder au
MISE EN GARDE: Débranchez la rallonge
Remplacement de la lame
d’inspection.
opération de nettoyage, de réparation ou
courant avant de procéder à toute
débranchez la rallonge de la prise de
MISE EN GARDE: Arrêtez le moteur et
SECTION 8: ENTRETIEN
Page 24
13
nouveau.
tondeuse par un technicien avant de l’utiliser à
est adéquate et en bon état, faites vérifier la
suffisant (voir la section Utilisation). Si la rallonge
endommagée et si le calibre des conducteurs est
de courant. Vérifiez ensuite si la rallonge est
débranchez la rallonge de la tondeuse et de la prise
dans des conditions de coupe normales,
ou qu’il se déclenche à plusieurs reprises même
• S’il est impossible de réenclencher le disjoncteur
rangées de coupe.
votre cadence ou en réduisant la largeur des
en accroissant la hauteur de coupe, en réduisant
mais prenez soin de ne pas surcharger le moteur
• Rebranchez la rallonge et redémarrez le moteur,
réenclenchement (voir la Figure 10 ).
une minute et appuyez sur le bouton de
rallonge de la prise de courant, attendez environ
• Si le disjoncteur se déclenche, débranchez la
de la tondeuse ne démarre pas.
disjoncteur est la première chose à vérifier si le moteur
déclencher lorsque le moteur est surchargé. Le
Figure 10 ). Ce disjoncteur est conçu pour se
partie de la commande du moteur et de la lame (voir
La tondeuse est munie d’un disjoncteur qui est fait
Réenclenchement du disjoncteur
plus élevée.
cahoteuse, réglez la hauteur de coupe à une position
à la même hauteur. Si la pelouse est très accidentée ou
Il va sans dire que toutes les roues doivent être réglé es
roues arrière (voir Figure 12).
avant, et vers l’arrière de la tondeuse pour les
levier vers l’avant de la tondeuse pour les roues
• Pour accroître la hauteur de coupe, poussez le
encoche.
levier vers la roue, puis mettez-le dans une autre
• Pour changer la hauteur de coupe, poussez le
être réglée à neuf hauteurs de coupe différentes.
permet de régler la hauteur de coupe. La tondeuse peut
Chaque roue de la tondeuse comport e un levier qui
Figure 12
dans les isolateurs.
vous assurant que les boulons sont bien placés
• Serrez les boutons de chaque côté du guidon en
section supérieure (voir la Figure 4 ).
inférieure avec la marque de l’isolateur de la
des trois marques de l’isolateur de la section
de l’utilisateur. Pour ce faire, il suffit d’aligner l’une
• La hauteur du guidon peut être réglée selon la taille
de coupe
de la hauteur
Levier de réglage
Réglage de la hauteur du guidon
endommagée.
anormale, c’est souvent signe qu’elle a été
de nouveau. Si la tondeuse se met à vibrer de façon
et si tel est le cas, faite s-la réparer avant de l ’utiliser
Réglage de la hauteur de coupe
SECTION 7: RÉGLAGES
déterminer si elle présente des dommages ,
soigneusement la tondeuse pour
rallonge de la prise de courant. Inspectez
objet, arrêtez le moteur et débranchez la
MISE EN GARDE: Si la lame frappe un
Page 25
12
hauteur des brins d’herbe à 8 cm (3 1/4 po).
effectuez deux tontes consécutives pour réduire la
l’herbe mesure plus de 10 cm (4 po) de haut,
coupe si la pelouse est neuve ou très fournie. Si
vous deviez réduire la largeur des rangées de
fonction de l’état de la pelouse. Aussi, il se peut que
la tondeuse. Vous devez réduire votre cadence en
suivant les conseils d’affûtage de la section Entretien.
lame et affûtez-la au moins une fois par année en
dans l’herbe haute. Vérifiez périodiquement l’état de la
considérablement le rendement de la tondeuse , surtout
REMARQUE: Une lame bien affûtée accroît
considérablement la capacité de déchiquetage de
tendance à coller sous le capot, ce qui réduirait
Tonte de la pelouse
l’herbe est mouillée, car les brins d’herbe auraient
• N’utilisez pas la fonction de déchiquetage lorsque
Conseils sur le déchiquetage
printemps.
de 4 à 5 cm (1 1/2 à 2 po) en automne et au
plus de 5 cm (2 po) durant les chaleurs de l’été, et
devriez maintenir votre pelouse à une hauteur de
tiers de la surface foliaire en une seule tonte. Vous
de la tondre souvent et de ne jamais couper plus du
favoriser la santé de la pelouse, il est recommandé
couper l’herbe et de l’éjecter adéquatement. Pour
moins vite pour permettre à la tondeuse de bien
• Si vous devez tondre de l’herbe haute, marchez
s’emmêle.
avec un centre de service autorisé.
d’utiliser la tondeuse et communiquez
relâchez le levier de commande, cessez
n’arrête pas de tourner lorsque vous
que le moteur s’arrête. Si le moteur
tourner pendant quelques secondes après
MISE EN GARDE: La lame continue à
normal quand le moteur et la lame sont débrayés.
survenir quand le moteur électrique ralentit. Ceci est
REMARQUE: Un bruit aigu et des étincelles peuvent
• relâchez le levier de commande.
Pour arrêter le moteur et immobiliser la lame :
l’enrouler dans votre main pour éviter qu’elle
devez ramasser la rallonge, prenez le temps de
Arrêt du moteur
d’arbres, de buissons et d’autres obstacles. Si vo us
• Ne laissez pas la rallonge s’enrouler autour
Figure 11
• Relâchez le bouton de blocage.
contre le guidon.
sur le levier de la commande du moteur et tenez-le
ici)
(commencez
Prise de courant
• Tout en tenant le bouton de blocage enfoncé, tirez
commande du moteur.
fermement sur le bouton de blocage du levier de la
• Tenez-vous derrière la tondeuse et appuyez
à une source de courant.
de sécurité concernant le branchement de la tondeuse
assurez-vous que vous avez suivi toutes les consignes
Avant de faire démarrer le moteur et embrayer la lame,
T = Obstacles
Figure 10
11)
pelouse en décrivant des cercles (voir figure
changeant de direction. Ne tondez jamais la
vos déplacements. Procédez par rangée en
supérieure
Section
du disjoncteur
réenclenchement
Bouton de
Fiche CA
sur la portion tonte de la pelouse et ne gênera pas
que vous progressez. Ainsi, la rallonge reposera
de courant, de façon à vous en éloigner à mesure
arrêtée)
(la lame est
Position débrayée
blocage
Bouton de
• Tondez la pelouse en commençant près de la prise
la tondeuse dans l’herbe humide ou mouillée.
• Pour prévenir les chocs électriques, n’utilisez pas
lame et causer de sérieuses blessures.
endommager la tondeuse ou être projeté pa r la
branches et tout autre objet qui pourrait
procéder à la tonte. Enlevez les roches, les
(la lame tourne)
Position embrayée
moteur et de la lame
Levier de commande du
• Inspectez attentivement la pelouse avant de
Page 26

11
l’encontre du rôle sécuritaire de la fiche polarisée.
avec un centre de service autorisé. N’allez pas à
impossible de brancher la rallonge, communiquez
la et essayez de nouveau. S’il est toujours
n’entre pas entièrement dans la rallonge, inversez-
la section sur les réglages.
détails sur le réglage de la hauteur de coupe, consul tez
d’entreprendre la tonte de la pelouse. Pour plus de
Vous devez donc régler la hauteur de coupe avant
la position de coupe la plus basse pour le transport.
REMARQUE: Les roues de la tondeuse sont réglées à
Démarrage du moteur
une porte ou une fenêtre.
située à l’intérieur, vous pouvez la fa ire passer par
vous branchez la rallonge à une prise de courant
sans d’abord consulter un électricien qualifié. Si
l’intensité nominale est supérieure à celle du circuit
jamais le fusible ou disjoncteur par un modèle dont
adéquatement sur un circuit de 15 A. Ne remplacez
n’est pas surchargé. La tondeuse fonctionnera
déclencher le disjoncteur, optez pour un circuit qui
l’intérieur ou à l’extérieur. Pour éviter de faire
courant de 110 ou 120 volts CA 60 Hz située à
• La rallonge doit être branchée à une prise de
qualifié.
sans d’abord consulter un électricien
du circuit par un modèle de plus de 15 A
remplacez jamais le fusible ou disjoncteur
un centre de service autorisé. Ne
avec un circuit de 15 A, communiquez avec
l’intensité de courant semble insuffisante
pour être branchée à un circuit de 15 A. Si
MISE EN GARDE: La tondeuse est conçue
Branchement de la rallonge à la prise de courant
rallonge polarisée que d’une seule façon. Si la f iche
que l’autre) qui ne peut être branchée à une
(une des lames de la fiche électriqu e est plus large
Cette tondeuse est pourvue d’une fiche polarisée
• Branchez la rallonge à la fiche de la tondeuse.
Branchement de la rallonge à la tondeuse
commande du moteur et de la lame.
• Gardez l’attache-câble le plus près possible de la
figure 10).
câble, puis par-dessus la languette du milieu (voir
• Mettre la boucle dans le trou au bas de l’attachele branchement de la fiche (environ 50 cm).
prenant soin de laisser assez de fil pour permettre
• Faites une petite boucle avec la rallonge en
l’attache-câble.
• Procédez comme suit pour assujettir la rallonge à
Utilisation de l’attache-câble
fusible du circuit.
le moteur et ferait déclencher le disjoncteur ou griller le
entraînerait une perte de puissance, ferait surchauffer
suffisant, il pourrait y avoir une chute de tension qui
IMPORTANT: Si le calibre de la rallonge n’était pas
les LAC et être conçue pour être utilisée à l’extérieur.
Notez aussi que la rallonge doit être h omologuée par
• Calibre 12 si la rallonge mesure 150 pi
• Calibre 14 si la rallonge mesure 100 pi
• Calibre 16 si la rallonge mesure 50 pi
utiliser en fonction de leur longueur.
Voici le calibre préconisé des rallonges que l’on doit
Le choix d’une rallonge
SECTION 6: UTILISATION
roues doivent être réglées à la même hauteur.
une autre encoche. Il va sans dire que toutes les
poussez le levier vers la roue, puis mettez-le dans
différentes. Pour changer la hauteur de coupe,
peut être réglée à neuf hauteurs de coupe
permet de régler la hauteur de coupe. La tondeu se
• Chaque roue de la tondeuse comporte un levier qui
Leviers de réglage de la hauteur de coupe
la commande du moteur et de la lame.
de se détacher accidentellement et a ide à protéger
correctement, l’attache-câble empêche le cordon
section supérieure du guidon. Quand il est utilisé
• L’attache-câble est situé sur la tige qui traverse la
Attache-câble
détails à la section Réglages).
déclencher lorsque le moteur est surchargé (autre s
(voir Figure 10). Ce disjoncteur est conçu pour se
partie de la commande du moteur et de la lame
• La tondeuse est munie d’un disjoncteur qui fait
Disjoncteur
l’utilisateur.
pour empêcher les objets projetés d’atteindre
Page 27

10
contourné.
qui ne doit jamais être modifié ni
et de la lame est un dispositif de sécurité
MISE EN GARDE: La commande du moteur
hauteur de coupe
Leviers de réglage de la
Moteur électrique
entre les deux roues (voir figure 9). EIle est conçue
• La bavette est située à l’arrière de la tondeuse,
Bavette
ainsi qu’à embrayer et débrayer la lame.
9). Elle sert à faire démarrer et arrêter le mote ur
dans le coin supérieur droit du guidon (voir figure
• La commande du moteur et de la lame est située
Commande du moteur et de la lame
Figure 9
réparations ou réglages.
utilisant la tondeuse ou en effectuant des
toujours des lunettes de sécurité en
les blessures peuvent être graves. Portez
projetés. En cas de contact avec les yeux,
d'une tondeuse, des objets risquent d'être
MISE EN GARDE: Lors de l'utilisation
pour consultation ultérieure.
l’illustration de la figure 9. Conservez ce mode d’emploi
diverses commandes, comparez votre tonde use avec
Pour vous familiariser avec l’emplacement des
les consignes de sécurité avant d’utiliser la tondeuse.
Lisez attentivement le présent mode d’emploi et t outes
Bavette
Porte d’éjection arrière
Section inférieure
Isolateur de guidon
Attache-câble
si le sac à herbe n’y est pas installé.
tondeuse avec la porte d’éjection ouverte
MISE EN GARDE: N’utilisez jamais la
guidon
montage du
supports de
Fente des
Sac à herbe
Isolateur de guidon
de la lame
Commande du moteur et
SECTION 5: FAMILIARISATION
porte d’éjection (voir figur e 8).
des supports de montage du guidon. Relâchez la
• Mettez les crochets du sac à herbe dans les fentes
Figure 8
Crochet
Relâchez la porte d’éjection.
dégager les crochets des supports de montage.
d’éjection et soulevez le sac en prenant soin de
Pour enlever le sac à herbe, soulevez la porte
Porte d’éjection
Sac à herbe
Page 28

9
Figure 7
le tour du cadre.
• Emboîtez ensuite les autres cannelures du sac tout
déchiquetage
Couvercle de
cadre par les deux trous du sac.
• Faites passer les deux crochets sur les côtés du
poignée soit à l’extérieur du sac (voir Figure 6).
dans l’encoche de la cannelure, de façon que la
cadre en vous assurant d’enfiler la poignée du sac
• Emboîtez la cannelure du dessus du sac sur le
• Mettez le cadre dans le sac.
fond dans la partie arrière.
Porte d’éjection
• Assemblez le cadre en insérant la partie avant à
l’extérieur et que le côté en plastique est en dessous.
couvercle de déchiquetage (voir Figure 7).
• Soulevez la porte d’éjection arrière et enlevez le
assurez-vous que l’étiquette de mise en garde est à
REMARQUE: Avant de procéder à l’assemblage,
Assemblage du sac à herbe
Installation du sac à herbe
de ces dispositifs ne fonctionnent pas.
l’utilisez pas non plus si l’un ou plusieurs
commande du moteur et de la lame ; ne
déflecteur latéral, le sac à herbe et la
la bavette, le couvercle de déchiquetage, le
sans ses dispositifs de sécurité, y compris
du guidon
Support demontage
de blessures, n’utilisez jamais la tondeuse
MISE EN GARDE: Pour réduire les risques
Figure 5
Trou extérieur
Encoche
tout le tour du cadre.
4. Emboîter les cannelures
dans le sac.
2. Mettre le cadre
être emboîtées de l’extérieur du sac.
emboîtée de l’intérieur du sac ; les trois autres doivent
REMARQUE: La cannelure du dessus du sac doit être
Guidon inférieur
Trou intérieur
Goupille fendue
Figure 6
serrés.
• Vérifiez que tous les écrous et boulons sont bien
montant du guidon. Voir la Figure 7.
montage. Procédez de la même façon pour l’autre
dans le trou intérieur de l’axe du support de
correspondant, puis insérez la goupille fendue
guidon contre le support de montage
• Avec les pinces, poussez l’un des montants du
Poignée
dans l’encoche
3. Enfiler la poignée
Partie avant du cadre
Crochet
Crochet
du cadre
Partie arrière
la partie arrière.
1. Insérer la partie avant dans
inférieur
Guidon
Isolateurs
Figure 4
(Aligner les marques ici)
des axes des supports de montage.
• Retirez les goupilles fendues des trous extérieurs
supérieur
Guidon
Bouton
Page 29

8
extrémités de la section inférieure sont bien sises
façon.
Ils ne doivent être modifiés d’aucune
et ne doivent être modifiés d’aucune façon .
système d’isolation double de la tondeuse
hauteur du guidon ; ils font partie du
ne servent pas seulement au réglage de la
MISE EN GARDE: Les isolateurs du guidon
complètement déployé. Assurez-vous que les
l’arrière, jusqu’à ce que le guidon soit
• Tirez sur la section supérieure vers le haut et vers
guidon.
entre les sections inférieure et supérieure du
• Enlevez tout matériau d’emballage qui se trouve
Assemblage du guidon
dans les isolateurs.
vous assurant que les boulons sont bien placés
• Serrez les boutons de chaque côté du guidon en
section supérieure (voir Figure 4).
inférieure avec la marque de l’isolateur de la
des trois marques de l’isolateur de la section
de l’utilisateur. Pour ce faire, il suffit d’aligner l’une
• La hauteur du guidon peut être réglée selon la taille
Figure 3
cadre
Partie avant du
Figure 2
• Pinces
Outils requis
Sac à herbe
1
du cadre
2
3
3).
sur les supports de montage du guidon (voir Figure
Partie arrière
• Mode d’emploi (non illustrée).
• Sac à herbe (Voir la figure 2)
Pièces détachées
SECTION 4: ASSEMBLAGE DE LA TONDEUSE
Figure 1
POUSSER
vous qu’elle ne contient aucune pièce détachée.
• Avant de vous débarrasser de la boîte, assurez-
boîte.
• Glissez ou roulez la tondeuse pour la sortie de la
en les côtés.
• Coupez les quatre coins de la boîte, puis déployez-
• Sortez d’abord les pièces détachées de la boîte.
adhésif puis décollez les rabats de la boîte.
• Pour ouvrir la boîte, enlevez les agrafes et le ruban
suppose que la tondeuse est vue de l’arrière.
droit de la tondeuse dans le présent mode d’emploi, on
REMARQUE: Lorsque l’on parle du côté gauche ou
Déballage de la tondeuse
SECTION 3: INSTRUCTIONS POUR DÉBALLER
Page 30

È
É
À UN POTEAU ÉLECTRIQUE
TERMINER LES PENTES SUR LESQUELLES IL SERAIT
TRE POUR D
OU À UN POTEAU DE CLÔTURE
AU COIN D’UN BÂTIMENT
P
EZ
I
L
7
°
5
1
E
D
E
GL
N
A
N
U
E
R
I
A
R
OU
E
É
L
L
I
T
N
I
PO
E
N
G
I
L
A
L
R
U
S
E
L
L
I
U
E
F
A
L
15°
MISE EN GARDE
TENEZ LA FEUILLE DE FAÇON QUE LA LIGNE SOIT À LA VERTICALE ET PARALLÈLE À UN ARBRE
SERVEZ-VOUS DE CET INCLINOM
DANGEREUX DE TRAVAILLER
Il est recommandé de ne pas tondre la pelouse dans une pente dont l’inclinaison est supérieure à 15 ° (montée d’environ 75
cm tous les 3 m). En effet, il pourrait être difficile de garder votre équilibre et vous risqueriez de glisser et de vous blesser
sérieusement. Si vous devez tondre la pelouse dans une pente, procédez de gauche à droite et non de haut en bas.
SECTION 2: CALCUL DE LA PENTE DU TERRAIN
Page 31

6
directives qu’elles contiennent.
Toute personne qui veut utiliser la tondeuse doit d’abord lire toutes les étiquettes de mise en garde et suivre les
ÉTIQUETTES DE MISE EN GARDE
Page 32

5
réparation à un technicien qualifié.
réparer une tondeuse à isolation double et confiez la
n’utilisez que des pièces de rechange identiques pour
IMPORTANT: Pour réduire les risques d’électrocution,
de métal du moteur.
exposées de la tondeuse sont isolées des composants
chocs électriques. Toutes les pièces de métal
conçue pour mieux vous protéger contre les risques de
mise à la terre. Cette tonde use à double isol ation est
une rallonge à trois conducteurs ni une pr ise de courant
Avec l’isolation double, il n’est pas nécessaire d’utiliser
Isolation double
portée des enfants.
l’abri, dans un endroit sec et fermé à clé, hors de la
13. Lorsque la tondeuse n’est pas utilisée, rangez-la à
identiques.
endommagés, remplacez-les par des pièces
l’utilisateur. Si certains de ces composants sont
à des objets projetés par la lame d’atteindre
des pièces mobiles de la tondeuse ou de permettre
endommagés, car ils risqueraient alors d’exposer
latéral ou les composants du sac à herbe sont
12. Vérifiez régulièrement si la bavette, le déflecteur
la réparer avant de l’utiliser de nouveau.
tondeuse est endommagée et si c’est le cas, faitesmoteur et débranchez la rallonge. Vérifiez si la
11. Si la lame frappe un objet durant la tonte, arrêtez le
bien.
tondeuse. Vérifiez régulièrement s’ils fonctionnent
10. Ne modifiez jamais les dispositifs de sécurité de la
sont toujours bien serrés.
9. Assurez-vous que tous les boulons et toutes les vis
après l’avoir enveloppée.
manipulez toujours la lame avec des gants ou
rendement optimal. Pour éviter les coupures,
la lame propre et affûtée pour assurer un
8. Entretenez soigneusement votre tond euse. Gardez
nouvelle lame identique.
usure, etc.). Si tel est le cas, remplacez-la pa r une
présente des dommages (déformations, fissu res,
moteur et de la lame. Vérifiez aussi si la lame
7. Vérifiez régulièrement le serrage des boulons du
sur le carter du moteur.
l’herbe, les feuilles et tout autre débris s’accumuler
6. Pour réduire les risques d’incendie, ne laissez pas
vos mains sont bien sèches, sans huile ni graisse.
5. Avant de commencer la tonte, assurez-vous que
doit être remplacé que par un technicien qualifié.
sont endommagés. Le cordon de la tondeuse ne
tondeuse et de la rallonge, et remplacez-les s’ils
4. Vérifiez régulièrement l’état du cordon de la
tondeuse et changer les accessoires.
3. Suivez toujours les instructions pour lubrifier la
marche accidentelle de la tondeuse.
Débranchez aussi la rallonge pour éviter la mise en
nettoyage, de réparation ou d’inspection.
immobilisée avant de procéder à toute opération de
2. Assurez-vous que la lame de la tondeuse s’est
l’utilisateur.
tondeuse et compromettre la sécurité de
pièces pourrait nuire au bon fonctionnement de la
réparer ou entretenir la tondeuse. L’emploi d’aut res
énumérées dans le présent mode d’emploi pour
1. N’utilisez que des pièces de rechange identiques
Entretien
tondeuse.
toujours supervisé par un adulte lorsqu’il utilise la
toutes les instructions et assurez-vous qu’il est
de 14 ans et plus d’utiliser la tondeuse, faites-lui lire
utiliser la tondeuse. Si vous permettez à un enfant
2. Ne laissez jamais un enfant de moins de 14 ans
enfant pourrait se tenir ou d’où il pourrait surgir.
approchez d’obstacles derrière lesquels un
• Procédez avec prudence lorsque vous
n’y a aucun enfant derrière vous.
prenez toujours le temps de vous assurer qu’il
• Avant de commencer à reculer avec la tondeuse,
qu’un enfant s’approche de vous.
• Demeurez vigilant et arrêtez la tondeuse dès
surveillance d’un adulte responsable.
• Gardez les enfants à l’écart et sous la
où ils étaient voilà un instant.
ne jamais présumer que des enfants demeureront
tondeuse n’en est pas conscient. Il est essentiel de
tragiques s’ils sont trop près et que l’utilisateur de la
dangers, ils peuvent être victimes d’accidents
comprennent pas que cette curiosité présente des
comme la tonte de la pelouse. Et comme ils ne
1. Les enfants sont souvent attirés par des acti vités
Utilisation en présence d’enfants
car vous pourriez glisser et tomber.
3. Ne tondez pas la pelouse lorsqu’elle est mouillée,
la page 7).
l’inclinaison est supérieure à 15 ° (voir le guide de
2. Ne tondez pas la pelouse dans les pentes dont
pourriez perdre pied.
fossés, de digues et d’autres endroits où vous
1. Ne tentez pas de tondre la pelouse trop près de
Á ne pas faire
moteur et de la lame.
immédiatement le levier de la commande du
sérieusement. Si vous perdez l’équilibre, lâchez
Page 33

4
pieds, car une chute pourrait vous blesser
3. Assurez-vous toujours que vous êtes stable sur vos
la lame, surtout si vous tondez de l’herbe haute.
pourraient vous faire trébucher ou être projet és par
roches, aux branches et aux autres objets qui
2. Prenez garde aux trous, aux irrégu larités, aux
pelouse dans une pente.
changer de direction lorsque vous tondez la
en bas. Procédez avec grande prudence pour
1. Tondez la pente de gauche à droite et non de haut
Á faire
du guide de la page 7).
pente est supérieure à 15 ° (déterminez l’angle à l’aide
sécurité, ne tondez pas la pelouse si l’inclinaison de la
tonte de cette section du terrain. Pour votre propre
vous manquez de confiance, ne procédez pas à la
recommandé de procéder avec grande prudence. Si
tomber et vous blesser sérieusement. Il est donc
accidenté est plus risquée, car vous pourriez glisser ou
L’utilisation de la tondeuse sur un terrain en pente ou
Utilisation présentant des risques
des détaillants de votre région.
1- 800-668-1238 pour obtenir de l’aid e ou les noms
communiquez avec votre détaillant ou composez le
jugement. Si vous avez besoin d’aide,
présent mode d’emploi, faites preuve de bon
dangereuses qui ne sont pas abordées dans le
32. Si vous devez faire face à des situations
sont conçus pour cette tondeuse.
des accessoires et des pièces de rechange qui
31. Pour réduire les risques de blessures, n’utilisez que
de ces dispositifs ne fonctionnent pas.
lame ; ne l’utilisez pas non plus si l’un ou plusieurs
le sac à herbe et la commande du moteur et de la
y compris la bavette, le couvercle de déchiquetage,
jamais la tondeuse sans ses dispositifs de sécurité,
30. Pour réduire les risques de blessures, n’utilisez
immobile.
jusqu’à ce que vous soyez certain que la lame est
fois le moteur arrêté. Tenez-vous à distance
continue à tourner pendant quelques secondes une
attendez que la lame se soit immobilisée, car elle
bouche d’éjection, arrêtez toujours le moteur et
29. Avant d’enlever le sac à herbe ou de dégorger la
et vérifiez s’il s’agit d’un problème sérieux.
façon anormale, arrêtez immédiatement le moteur
28. Si la tondeuse se met soudainement à vibrer de
un sentier, un trottoir ou une entrée en gravier.
27. Arrêtez toujours le moteur lorsque vous traversez
poussez jamais la tondeuse en courant.
26. Ne tondez jamais la pelouse à la noirceur et ne
couper de l’herbe mouillée ou humide.
25. N’utilisez jamais la tondeuse lorsqu’il pleut, ni pour
pendant que le moteur tourne.
24. Ne tentez jamais de régler la hauteur de coupe
lame pourrait vous blesser sérieusement.
capot lorsque la lame tourne. Le contact avec la
23. Ne mettez jamais vos pieds ni vos mains sous le
pas la tondeuse si vous êtes fatigué.
faites. Faites preuve de bon jugement et n’utilisez
22. Soyez vigilant. Faites attention à ce que vous
l'influence de la drogue ou de l'alcool.
21. N'utilisez jamais la tondeuse si vous êtes sous
performance ou la sécurité de la machine.
tondeuse est conçu, qu’il ne sacrifiera pas la
Tondez le gazon à une vitesse, pour lequel la
qui ne lui convient pas. Ne forcez pas la tondeuse.
20. N'utilisez pas la tondeuse pour effectuer un travail
l’obstacle soit tondue.
• répétez jusqu’à ce que la pelouse entourant
moitié de la distance qui vous en sépare ;
• tirez lentement la tondeuse vers l’arrière, sur la
pieds;
• assurez-vous que vous êtes stable sur vos
d’étendre les bras ;
• faites un pas vers l’arrière pour vous permettre
comme suit :
vous pour éviter de trébucher, puis procédez
pour éviter un obstacle, regardez d’abord derrière
19. Si vous devez reculer et tirer la tondeuse vers vous
perdez pied. Lâchez-le immédiatement.
agrippez pas au guidon de la tondeuse si vous
vous blesser sérieusement. De plus, ne vous
tondeuse vous passe sur les pieds, vous risquez de
de toile, car si vous trébuchez ou glissez et que la
lorsque vous portez des sandales ou des souliers
18. N’utilisez jamais la tondeuse sans chaussures, ni
rebord tranchant.
le laissez pas entrer en contact avec de l’huile ni un
rallonge éloignée de toute source de chaleur et ne
de la tondeuse ou de la prise d e courant. Gardez la
17. Ne tirez jamais sur la rallonge pour la débrancher
consulter un électricien qualifié.
circuit par un modèle de plus de 15 A sans d’abord
Ne remplacez jamais le fusible ou disjoncteur du
communiquez avec un centre de service autorisé.
courant semble insuffisante avec un circuit de 1 5 A,
être branchée à un circuit de 15 A. Si l’intensité de
16. Intensité du circuit : la tondeuse est conçue pour
prise de courant de quelque façon que ce soit.
fiche de la tondeuse ou celles de la rallonge, ni la
par un électricien qualifié. Ne modifiez jamais la
l'enfoncer dans la prise, faites remplacer la prise
de nouveau. S’il est toujours impossible de
de l'enfoncer dans la prise, inversez-la et essayez
polarisée d'une certaine façon. S'il est impossible
peut être branchée qu’à une prise de cour ant
modèle muni de fiches polarisées. La rallonge ne
de la brancher, remplacez la rallonge par un
essayez de nouveau. S’il est toujours impossible
brancher la fiche dans la rallonge, inve rsez-la et
Page 34
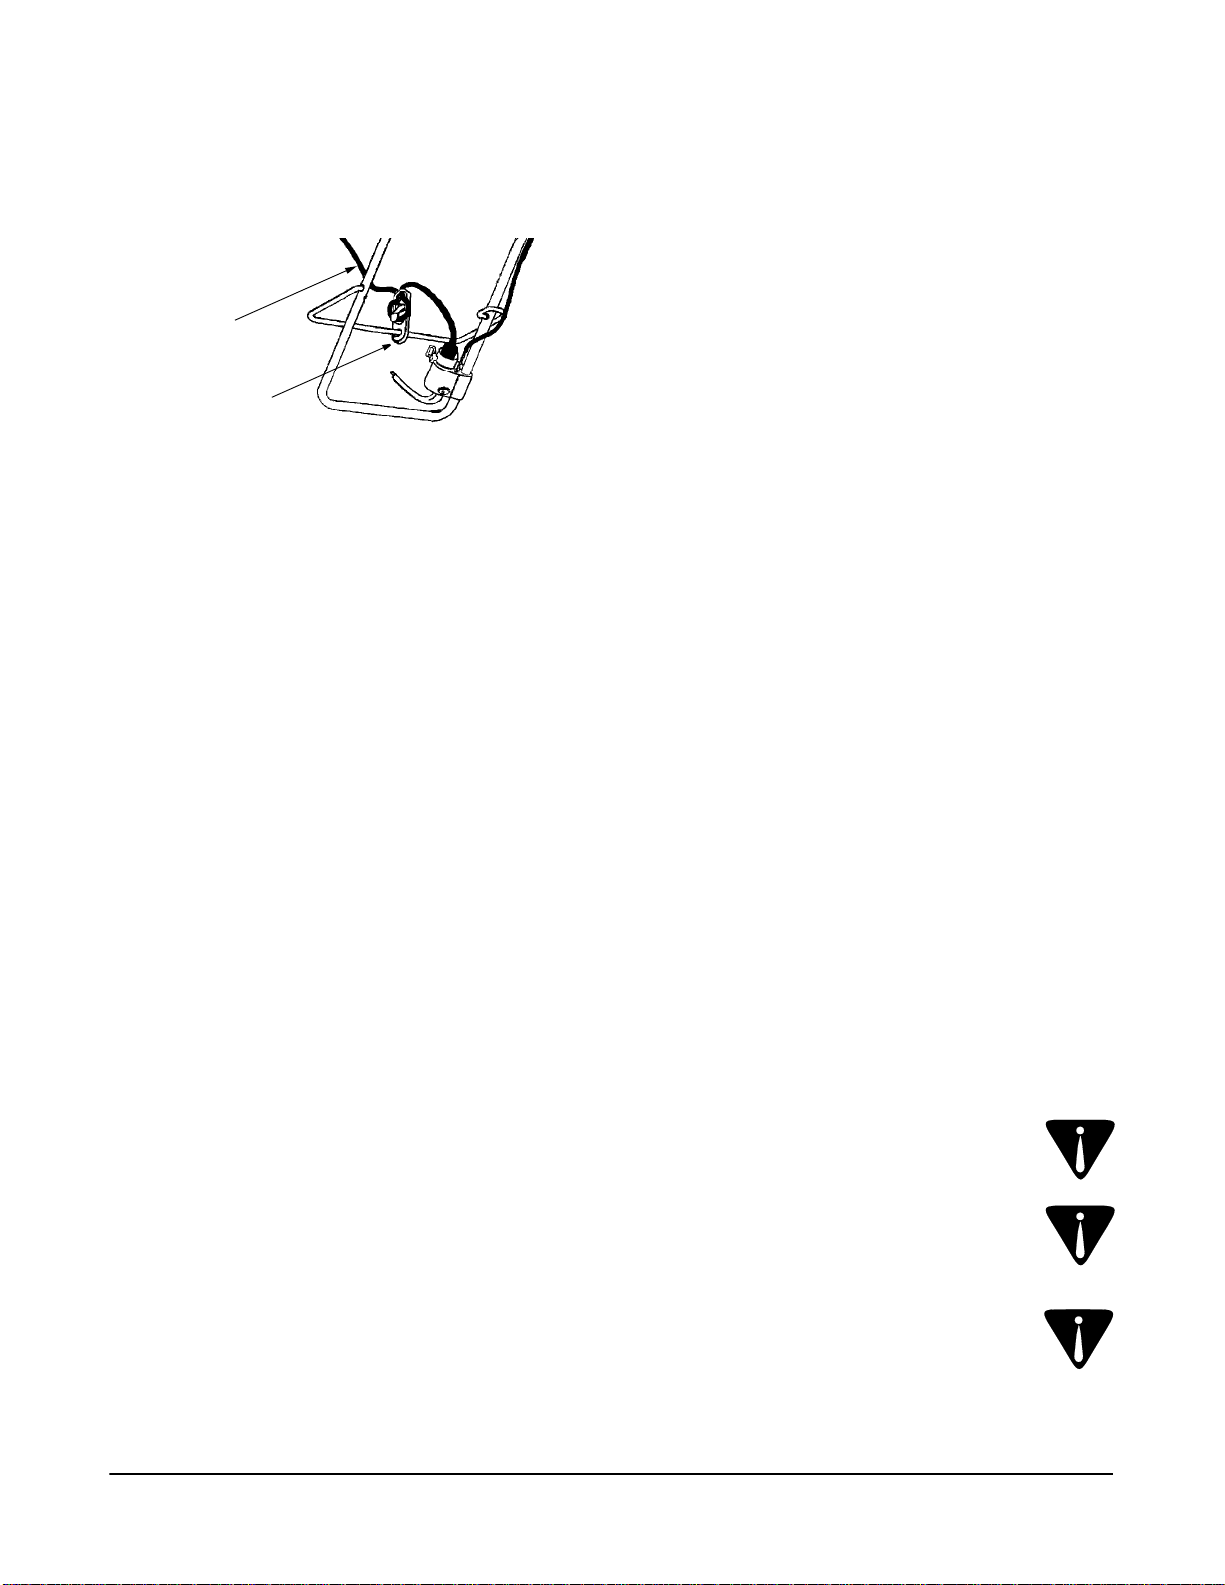
3
Rallonge
Attache-câble
assortie d'une certaine façon. S'il est impossible de
fiche ne peut être branchée qu’à une rallonge
comporte une lame plus large que l’autre. Cette
tondeuse est munie d’une fiche polarisée qui
15. Pour réduire les risques de choc électrique, cette
tel qu’illustré ci-dessous.
rallonge durant l’utilisation, utilisez l’attache-câble
14. Pour éviter le débranchement accidentel de la
perte de puissance et fera surchauffer le moteur.
aura une chute de tension, ce qui entraînera une
Si le calibre de la rallonge n'est pas suffisant, il y
mesure 50 pi et de calibre 12 si elle mesure 150 pi.
calibre 14 si elle mesure 100 pi, de calibre 16 si elle
large que l’autre). Optez pour une rallonge de
doit aussi être polarisée (une des lames est plus
consommé par la tondeuse. La fiche de la rallonge
son calibre convient à l'intensité du courant
13. Assurez-vous que la rallonge est en bon état et que
SJTW-A ou SJTOW-A).
A, SOW-A, STW-A, STOW-A, SJW-A, SJOW-A,
conçues pour être utilisées à l’extérieur (types SWdes rallonges homologuées par les LAC qui sont
12. Pour prévenir les chocs électriques, n’utilisez que
comporte un disjoncteur de fuite à la terre.
terre, ou que la prise de courant elle-même
utilisée est protégé par un disjoncteur de fuite à la
11. Assurez-vous que le circuit de la prise de courant
lorsque vous travaillez à l’extérieur.
des chaussures et des gants de caoutchouc
prendre dans les pièces mobiles. Portez toujours
de vêtements amples ni de bijoux qui pourraient se
10. Portez des vêtements appropriés : ne portez pas
travailler dans un milieu poussiéreux.
9. Portez un masque antipoussière si vous devez
yeux.
pourrait vous causer de sérieuses lésions aux
utilisez ou réparez la tondeuse, car un objet projeté
8. Portez des lunettes protectrices lorsque vous
pourraient ricocher et vous blesser.
les obstacles sur lesquels des objets projetés
Évitez aussi l’éjection de l’herbe vers les murs et
l’herbe vers la rue, le trottoir et les personnes.
7. Planifiez la tonte de façon à éviter l’éjection de
sérieuses blessures.
par la lame. Les objets projetés peuvent causer de
vous pourriez trébucher ou qui pourrait être projeté
branches, les jouets et tout autre objet sur lequel
procéder à la tonte. Enlevez les roches, les
6. Inspectez attentivement la pelouse avant de
qu’une personne s’approche de la tondeuse.
lorsqu’elle est utilisée. Arrêtez le moteur dès
personne à au moins 25 m de la tondeuse
lorsque le moteur tourne, et g ardez toute au tre
projeté, demeurez toujours derrière la tond euse
5. Pour éviter d’être blessé par la lame ou par un o bjet
instructions du mode d’emploi.
sans qu’il ait d’abord lu et compris toutes les
4. Ne laissez jamais un adulte utiliser la tondeuse
tondeuse.
toujours supervisé par un adulte lorsqu’il utilise la
toutes les instructions et assurez-vous qu’il est
de 14 ans et plus d’utiliser la tondeuse, faites-lui lire
utiliser la tondeuse. Si vous permettez à un enfant
3. Ne laissez jamais un enfant de moins de 14 ans
comment arrêter la tondeuse.
commandes et leur fonctionnement, et de savoir
2. Assurez-vous de bien connaître toutes les
d’emploi pour consultation ultérie ure.
d’utiliser la tondeuse. Conservez le présent mode
toutes les instructions avant d’assembler ou
1. Assurez-vous de lire, de comprendre et de suivre
Utilisation courante
ou même mortelles.
consignes de sécurité suivantes doivent absolume nt être respectées po ur éviter les blessures sérieuses
Elle peut facilement amputer une main ou un pied, ou encore projete r des objets à vive allure. Les
causer de sérieuses blessures à l’utilisateur s’il est négligent ou imprudent.
du présent mode d’emploi. Comme c’est aussi le cas de nombreux outils motorisés, cette tondeuse peut
MISE EN GARDE: Cette tondeuse a été conçue pour être utilisée conformément aux règles de sécurité
bien, sans quoi vous pourriez vous blesser sérieusement.
attentivement toutes les instructions du présent mode d’emploi et vous assurer que vous les comprenez
ou des dommages matériels si elle n’était pas respectée. Avant d’utiliser la tondeuse, veuillez lire
MISE EN GARDE: Ce symbole désigne une mise en garde qui pourrait entraîner de série uses blessu res
SECTION 1: CONSIGNES DE SÉCURITÉ
Page 35
2
acheminé.
modèle de la tondeuse. Vous devrez composer ces numéros pour que votre appel soit
Avant d’appeler, veuillez vous assurer que vous avez le numéro de série et le numéro de
clientèle en composant le 1-800-668-1238.
commandes, l’utilisation ou l’entretien de la tondeuse, n’hésitez pas à communiquer avec le service à la
Si vous avez de la difficulté à assembler la tondeuse ou si vous avez des questions concernant les
SERVICE À LA CLIENTÈLE
1-800-668-1238
KITCHENER, ON N2G 4J1
MTD PRODUCTS LIMITED
Inscrire le numéro de série ici :
XXXXXXXXXXX
Inscrire le numéro de modèle ici :
Numéro de série
Serial Number
tondeuse dans un centre de service autorisé.
essentiels si vous devez communiquer avec le service à la clientèle ou faire réparer la
inscrire ci-dessous le numéro de série et le numéro de modèle. Ces renseignements sont
Avant de procéder à l’assemblage, veuillez situer la plaque signalétique de la tondeuse et
www.mtdcanada.com
XXXXXXXXXX
Numéro de modèle
Model Number
l’espace ci-dessous qui est prévu à cet effet.
d’éjection arrière.Veuillez inscrire le numéro de série et le numéro de modèle de la tondeuse dans
• Vous pouvez trouver la plaque signalétique, à l’arrière de la tondeuse, sur le corps, ou sur le clapet
ARRÊT
instructions qu’il contient.
entretenir votre tondeuse. Veuillez le lire attentivement et vous assurer que vous comprenez bien les
Le mode d’emploi est un document important conçu pour vous montrer comment assembler, utiliser et
NUMÉRO DE MODÈLE
Liste des pièces (Consultez la page 16 de la version anglaise de cette notice d’utilisation.)
Consultez la page 19 de la version anglaise de cette notice d’utilisation.)
Étiquettes (
Garantie ............................................................................................................... 17
Dépannage........................................................................................................... 16
Entreposage hors saison...................................................................................... 15
Entretien............................................................................................................... 14
Réglages .............................................................................................................. 13
Utilisation.............................................................................................................. 11
Familiarisation ...................................................................................................... 10
Assemblage ......................................................................................................... 8
Instructions pour déballer ..................................................................................... 8
Calcul de la pente du terrain................................................................................. 7
Consignes de sécurité .......................................................................................... 3
TABLE DES MATIÈRES
Page 36

(10/04)
769-01445
MTD PRODUCTS LTD., P.O. BOX 1386, KITCHENER, ON CANADA
les Laboratoires des assureurs du Canada (LAC).
Ce symbole signifie que l’outil est homologué par
IMPORTANT: Lisez attentivement les consignes de sécurité et les instructions avant d’utiliser la tondeuse.
de 19 po
Tondeuse électrique
NOTICE D’UTILISATION
 Loading...