

MTD 520-MOWER, 12A-238B062 Owner’s Manual

YARDMACHINES
®
OPERATOR'S MANUAL
Model Series
230 and 520
22" SELF-PROPELLED
ROTARY MOWERS
(520 Series Shown)
IMPORTANT: READ SAFETY RULES AND INSTRUCTIONS CAREFULLY
Warning: This unit is equipped with an internal combustion engine and should not be used on or near any unimproved forest-
covered, brush-covered or grass-covered land unless the engine's exhaust system is equipped with a spark attester meeting
applicable local or state laws (if any). If a spark arrester is used, it should be maintained in effective working order by the operator. In
the State of California the above is required by law (Section 4442 of the California Public Resources Code). Other states may have
similar laws. Federal laws apply on federal lands. A spark arrester for the muffler is available through your nearest engine authorized
service dealer or contact the service department, P.O. Box 368022 Cleveland, Ohio 44136*9722.
MTD PRODUCTS INC. P.O. BOX 368022 CLEVELAND, OHIO 44136-9722
PRINTED IN U.S.A. FORM NO.770-10013
(11/98)

SECTION 1: FINDING YOUR MODEL NUMBER
This Operator's Manual is an important part of your new walk behind lawn mower. It will help you assemble,
prepare and maintain your machine. Please read and understand what it says.
Before you start to prepare your walk behind lawn mower for its first use, please locate the model plate and
copy the information from it in this Operator's Manual. The information on the model plate is very important if
you need help from your dealer or the MTD customer support department.
• Every walk behind lawn mower has a model plate. You can locate it by standing behind the unit in the
operating position and looking down at the rear of the deck between the rear wheels.
• The model plate will look like.
I
XXX-X-XXX-X-XXX XXXXXXXXXXX
I
_MTD PRODUCTS INC
P.o.Box3B8022
•..... CLEVELAND, OHIO 44136
Copy the model number here:
Copy the serial number here:
Figure 1
This is where your model number will be.
This is where your serial number will be.
SECTION 2: CALLING CUSTOMER SUPPORT
• LOCATE YOUR MODEL NUMBER AND SERIAL NUMBER -- Record this information in the space
provided. To find your unit's specific model number and serial number, see SECTION 1: FINDING
YOUR MODEL NUMBER.
• If you are having difficulty assembling this product or if you have any questions regarding the controls,
operation or maintenance of this unit, please call the Customer Support Department.
• Customer Support can be reached by dialing: 1- (330) 220-4MTD
(4683)
or
1- (800)-800-7310
• Please have your model number and serial number ready when you call.
• Although both numbers are important, you will be asked to enter only your serial number before your
call can be processed.
SECTION 3: IMPORTANT SAFE OPERATION PRACTICES
WARNING: This symbol points out important safety instructions which, if not followed, could
endanger the personal safety and/or property of yourself and others, read and follow all instructions
in this manual before attempting to operate your lawn mower, failure to comply with these
instructions may result in personal injury, when you see this symbol, heed its waming.
California to cause cancer, birth defects or other reproductive harm.
WARNING: The Engine Exhaust from this product contains chemicals known to the State of
DANGER: Your lawn mower was built to be operated according to the rules for safe operation in
this manual. As with any type of power equipment, carelessness or error on the part of the operator
can result in serious injury. This lawn mower is capable of amputating hands and feet and throwing
objects. Failure to observe the following safety instructions could result in serious injuryor death.
1. GENERAL OPERATION
• Read this operator's manual carefully in its entirety
before attempting to assemble this machine. Read,
understand, and follow all instructions on the
machine and in the manual(s) before operation. Be
completely familiar with the controls and the proper
use of this machine before operating it. Keep this
manual in a safe place for future and regular
reference and for ordering replacement parts.
• Your rotary mower is a precision piece of power
equipment, not a plaything. Therefore, exercise
extreme caution at all times. Your unit has been
designed to perform one job: to mow grass. Do not
use it for any other purpose.
• Never allow children under 14 years old to operate
a power mower. Children 14 years old and over
should only operate mower under close parental
supervision. Only responsible individuals who are
familiar with these rules of safe operation should be
allowed to use your mower.
• Keep the area of operation clear of all persons,
particularly small children and pets. Stop engine
when they are in the vicinity of your mower to help
prevent blade contact or thrown object injury.
Although the area of operation should be
completely cleared of foreign objects, an object
may have been overlooked and could be
accidentally thrown by the mower in any direction
and cause serious personal injury to the operator or
any others allowed in the area.
• Wear sturdy, rough-soled work shoes and close-
fitting slacks and shirts, Shirts and pants that cover
the arms and legs and steel-toed shoes are
recommended. Do not wear loose fitting clothes or
jewelry. They can be caught in moving parts. Never
operate a unit in bare feet, sandals, slippery or light
weight (e.g. canvas) shoes.
• Always wear safety glasses or safety goggles
during operation or while performing an adjustment
or repair, to protect eyes from foreign objects that
may be thrown from the machine in any direction.
• Thoroughly inspect the area where the equipment
is to be used. Remove all stones, sticks, wire,
bones, toys and other foreign objects which could
be picked up and thrown by the mower in any
direction and cause serious personal injury to the
operator or any others allowed in the area. Plan
your mowing pattern to avoid discharge of material
toward roads, sidewalks, bystanders and the like.
To help avoid a thrown objects injury, keep
children, bystanders and helpers at least 75 feet
from the mower while it is in operation.
• Do not put hands or feet near or under rotating
parts. Keep clear of discharge opening at all times
as the rotating blade can cause injury.
• Many injuries occur as a result of the mower being
pulled over the foot during a fall. Do not hang on to
the mower if you are falling; release the handle
immediately.
• Never pull the mower toward you while you are
walking. If you must back the mower away from a
wall or obstruction first look down and behind, and
then follow these steps:
• Step back from the mower to fully extend your
arms.
• Be sure you are well balanced with sure
footing.
• Pull the mower back slowly, no more than half
way toward you.
• Repeat these steps as needed.
• Do not operate the mower while under the
influence of alcohol or drugs.
• Donotengagetheself-propelledmechanismon
unitssoequippedwhilestartingengine.
• Thebladecontrolhandleisasafetydevice.Never
attempttobypassitsoperation.Doingsomakes
thesafetydeviceinoperativeandmayresultin
personalinjurythroughcontactwiththerotating
blade.The bladecontrolhandlemustoperate
easilyinbothdirectionsandautomaticallyreturnto
thedisengagedpositionwhenreleased.
• Neveroperatethemowerinwetgrass.Alwaysbe
sureof yourfooting.A slipandfallcancause
seriouspersonalinjury.Keepafirmholdonthe
handleandwalk,neverrun.Ifyoufeelyouare
losingyour footing,RELEASETHE BLADE
CONTROLHANDLEIMMEDIATELYandtheblade
willstoprotatingwithinthreeseconds.
• Mowonlyindaylightorgoodartificiallight.
• Stopthebladewhencrossinggraveldrives,walks
orroads.
• Iftheequipmentshouldstarttovibrateabnormally,
stoptheengineandcheckimmediatelyfor the
cause.Vibrationisgenerallyawarningoftrouble.
• Shuttheengineoffandwaituntilthebladecomes
to a completestopbeforeremovingthe grass
catcheroruncloggingthechute.Thecuttingblade
continuesto rotatefor a fewsecondsafterthe
engineisshutoff.Neverplaceanypartofthebody
inthebladeareauntilyouaresurethebladehas
stoppedrotating.
• Neveroperatemowerwithoutproperguards,grass
catcher,platesorothersafetyprotectivedevicesin
place.
• Mufflerandenginebecomehotandcancausea
burn.Donottouch.
• Onlyuseaccessoriesapprovedforthismachineby
themanufacturer.Read,understand,andfollowall
instructionsprovidedwiththeapprovedaccessory.
• If situationsoccurwhicharenotcoveredin this
manual,usecareandgoodjudgment.Contactyour
dealerforassistance.Telephone1-800-800-7310
forthenameofyournearestdealer.
2. SLOPE OPERATION
For your safety, use the slope gauge included as part of
this manual to measure slopes before operating this unit
on a sloped or hilly area. If the slope is greater than 15
degrees as shown on the slope gauge, do not operate this
unit on that area or serious injury could result.
DO:
• Mow across the face of slopes; never up and down.
Exercise extreme caution when changing direction
on slopes.
• Watch for holes, ruts, hidden objects, or bumps.
Tall grass can hide obstacles.
• Always be sure of your footing. A slip and fall can
cause serious personal injury. If you feel you are
losing your balance release the blade control
handle immediately and the blade will stop in less
than 3 seconds.
DO NOT:
• Do not mow near drop-offs, ditches or
embankments. The operator could lose footing or
balance.
• Do not mow slopes greater than 15 degrees as
shown on the slope gauge.
• Do not mow on wet grass. Reduced footing could
cause slipping.
3,
CHILDREN
Tragic accidents can occur if the operator is not alert to the
presence of children. Children are often attracted to the
mower and the mowing activity. Never assume that
children will remain where you last saw them.
• Keep children out of the mowing area and under
the watchful care of a responsible adult other than
the operator.
• Be alert and turn mower off if a child enters the
area.
• Before and while moving backwards, look behind
and down for small children or other objects.
• Never allow children under age 14 to operate the
mower. Children 14 years of age and above
should read and understand the operation
instructions and safety rules in this manual.
• Use extreme care when approaching blind corners,
shrubs, trees, or other objects that may obscure
your vision of a child or hazard.
4,
SERVICE
• Use extreme care in handling gasoline and other
fuels. They are extremely flammable and the
vapors are explosive.
• Use only an approved gasoline container.
• Never remove gas cap or add fuel while the engine
is running. Allow engine to cool at least two
minutes before refueling.
• Replace gasoline cap securely and wipe off any
spilled gasoline before starting the engine as it may
cause a fire or explosion.
• Extinguish all cigarettes, cigars, pipes and other
sources of ignition.
• Never refuel machine indoors because flammable
vapors will accumulate in the area.
• Never store the machine or fuel container inside
where there is an open flame or spark such as a
gas water heater, space heater, or furnace.
• Never run an engine inside a closed area.
• Toreducefirehazard,keepmowerfreeof grass,
leaves,orotherdebrisbuild-up.Cleanupoilorfuel
spillage.Allowmowertocoolat least5 minutes
beforestoring.
• Beforecleaning,repairing,or inspecting,make
certainthe bladeand all moving parts have
stopped. Disconnect the spark plug wire, and keep
the wire away from the spark plug to prevent
accidental starting.
• Check the blade and engine mounting bolts at
frequent intervals for proper tightness. Also,
visually inspect blade for damage (e.g., bent,
cracked or worn). Replace with blade which meets
original equipment specifications listed in this
manual.
• Keep all nuts, bolts, and screws tight to be sure the
equipment is in safe working condition.
• Never tamper with safety devices. Check their
proper operation regularly.
After striking a foreign object, stop the engine,
remove the wire from the spark plug, and
thoroughly inspect the mower for any damage.
Repair the damage before starting and operating
the mower.
• Never attempt to make a wheel or cutting height
adjustment while the engine is running.
• Grass catcher components are subject to wear,
damage and deterioration, which could expose
moving parts or allow objects to be thrown. For
safety protection, frequently check components and
replace with manufacturer's recommended parts,
when necessary.
• Mower blades are sharp and can cut. Wrap the
blade(s) or wear gloves, and use extra caution
when servicing them.
• Do not change the engine governor setting or
overspeed the engine. Excessive engine speeds
are dangerous.
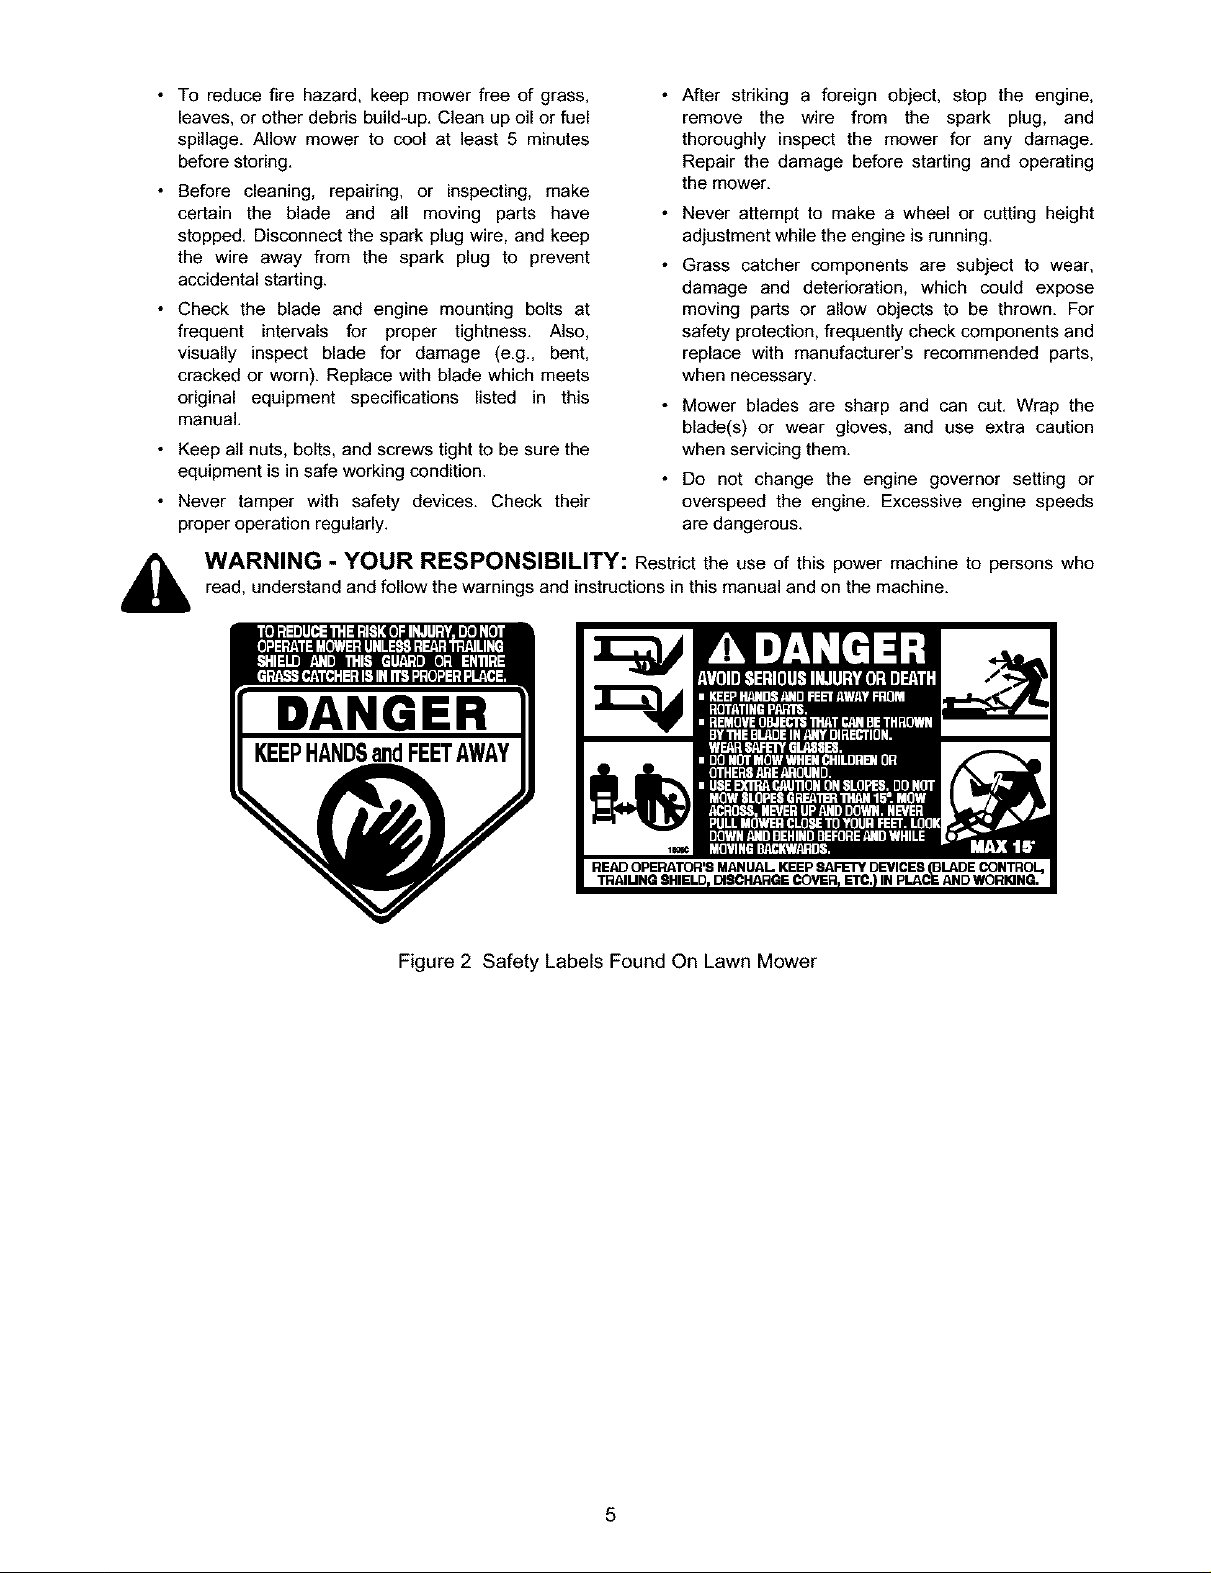
i_b WARNING - YOUR RESPONSIBILITY: Restrict the use of this power machine to persons who
read, understand and follow the warnings and instructions in this manual and on the machine.
DANGER
READ OPERATOR'S MANUAL KEEP SAFETY DEVICES (BLADE CONTROL,
Figure 2 Safety Labels Found On Lawn Mower
,IN PLACE AND WORKING.
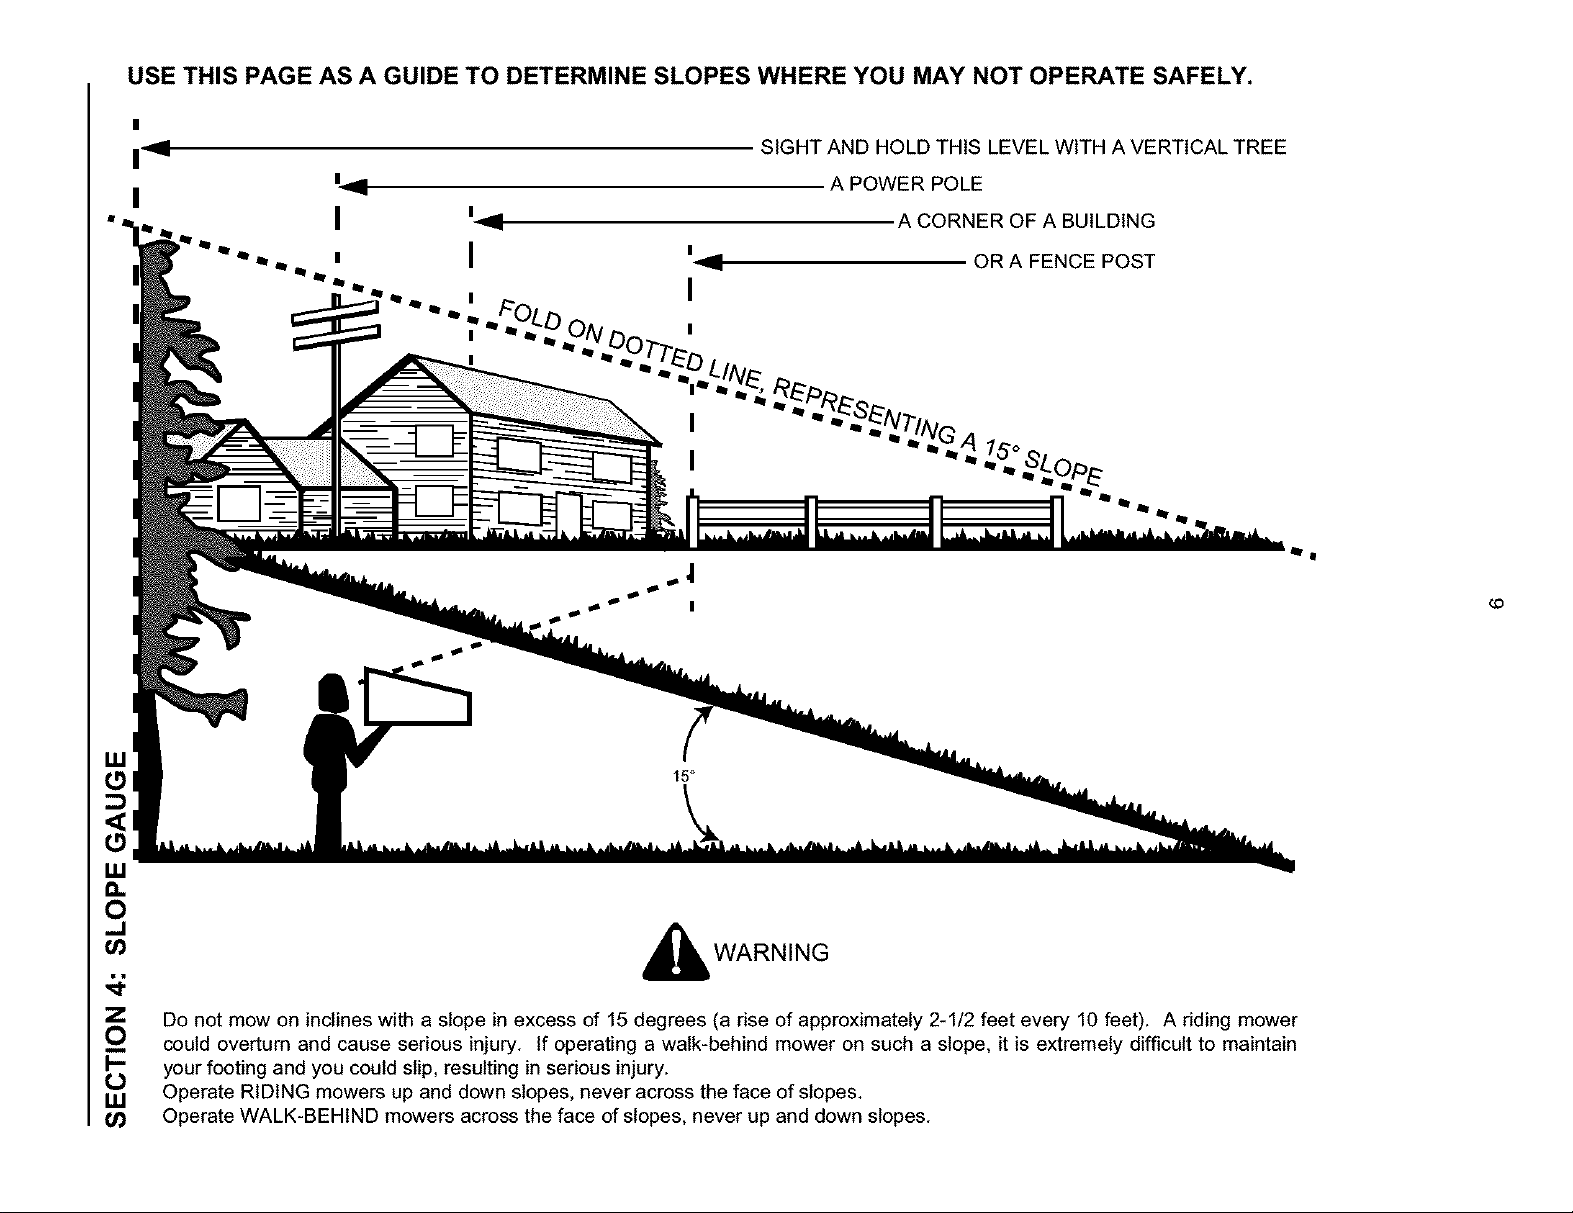
USE THIS PAGE AS A GUIDE TO DETERMINE SLOPES WHERE YOU MAY NOT OPERATE SAFELY.
i'<l
SIGHT AND HOLD THIS LEVEL WITH A VERTICAL TREE
A POWER POLE
I
19 A CORNER OF A BUILDING
I ' .ii OR A FENCE POST
I
"'"
,4 1_o
¢0
15°
_J
WARNING
Do not mow on inclines with a slope in excess of 15 degrees (a rise of approximately 2-1/2 feet every 10 feet), A riding mower
could overturn and cause serious injury. If operating a walk-behind mower on such a slope, it is extremely difficult to maintain
your footing and you could slip, resulting in serious injury.
b
Operate RIDING mowers up and down slopes, never across the face of slopes,
Operate WALK-BEHIND mowers across the face of slopes, never up and down slopes.
SECTION 5: UNPACKING
REMOVING UNIT FROM CARTON
Remove staples, break glue on top flaps, or cut tape at carton end and peel along top flap to open carton.
Remove loose parts if included with unit (i.e., operator's manual, etc.).
Make sure the cables are straight and not crimped while removing loose parts or the unit from the carton.
Cut along dotted lines and lay carton down flat.
Remove packing material.
Roll or slide unit out of carton. Check carton thoroughly for loose parts.
TOOLS REQUIRED
Pair of Pliers (Not necessary, but helpful).
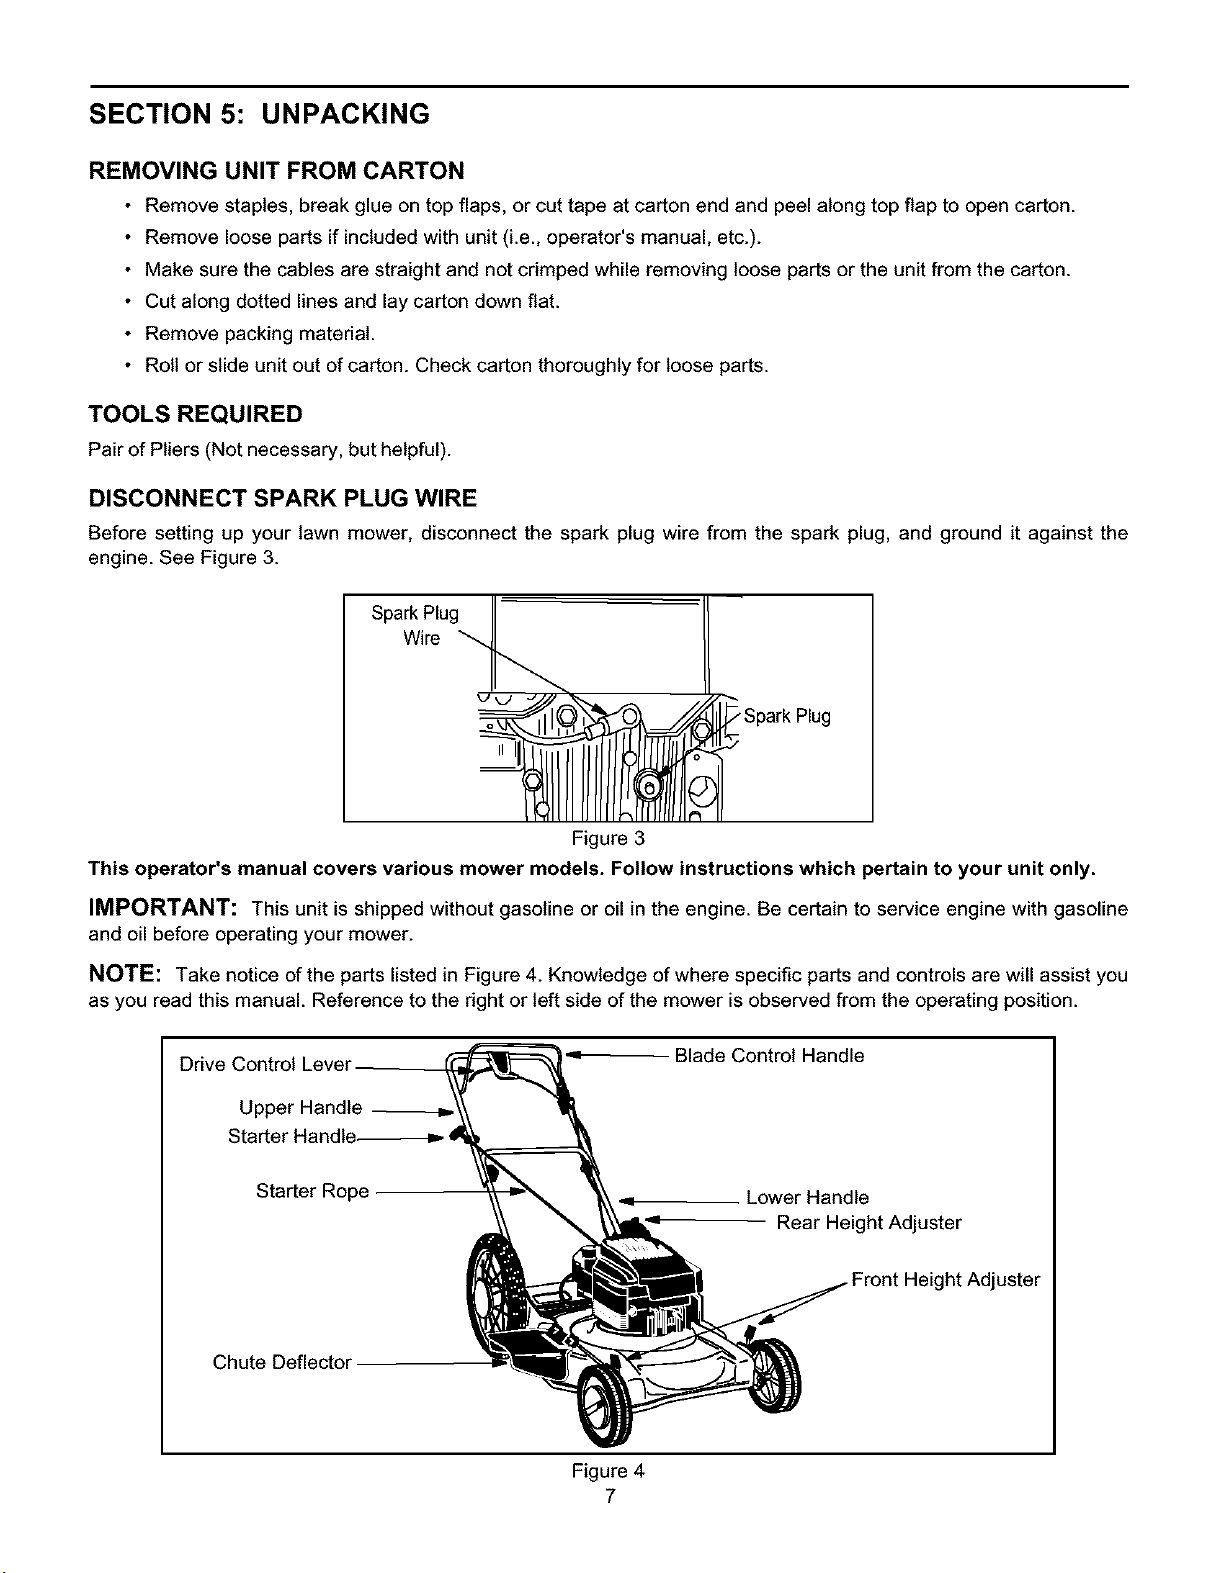
DISCONNECT SPARK PLUG WIRE
Before setting up your lawn mower, disconnect the spark plug wire from the spark plug, and ground it against the
engine. See Figure 3.
Spark Plug
Wire
Figure 3
This operator's manual covers various mower models. Follow instructions which pertain to your unit only.
IMPORTANT: This unit is shipped without gasoline or oil in the engine. Be certain to service engine with gasoline
and oil before operating your mower.
NOTE: Take notice of the parts listed in Figure 4. Knowledge of where specific parts and controls are will assist you
as you read this manual. Reference to the right or left side of the mower is observed from the operating position.
Drive Centre
Upper Handle --=
Starter
Starter Rope
Chute Deflector
Blade Control Handle
Lower Handle
Rear Height Adjuster
Height Adjuster
Figure 4
7
Starter
Rope
Height Bracket
Handle Mounting
Adjuster
Lever
Guide
Hairpin Clip Weld
Carria_
HandKnob
A
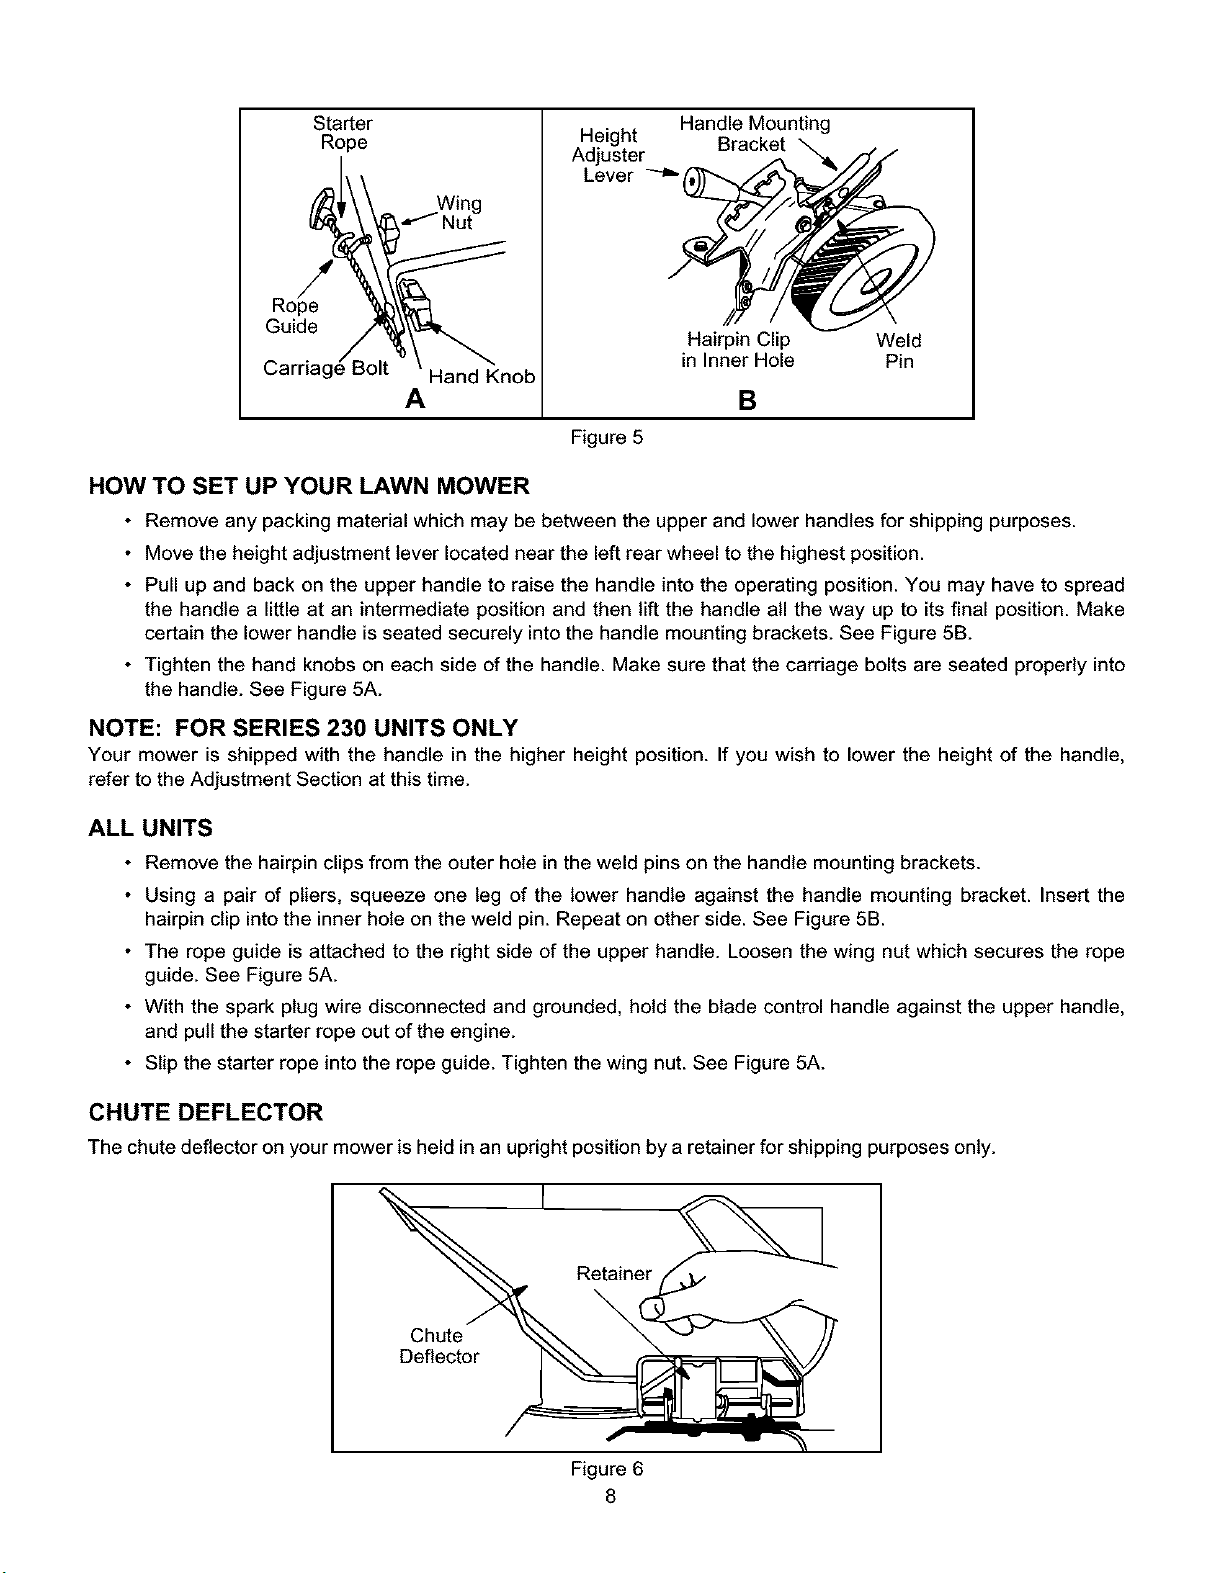
Figure 5
HOW TO SET UP YOUR LAWN MOWER
• Remove any packing material which may be between the upper and lower handles for shipping purposes.
• Move the height adjustment lever located near the left rear wheel to the highest position.
• Pull up and back on the upper handle to raise the handle into the operating position. You may have to spread
the handle a little at an intermediate position and then lift the handle all the way up to its final position. Make
certain the lower handle is seated securely into the handle mounting brackets. See Figure 5B.
• Tighten the hand knobs on each side of the handle. Make sure that the carriage bolts are seated properly into
the handle. See Figure 5A.
NOTE: FOR SERIES 230 UNITS ONLY
Your mower is shipped with the handle in the higher height position. If you wish to lower the height of the handle,
refer to the Adjustment Section at this time.
ALL UNITS
• Remove the hairpin clips from the outer hole in the weld pins on the handle mounting brackets.
• Using a pair of pliers, squeeze one leg of the lower handle against the handle mounting bracket. Insert the
hairpin clip into the inner hole on the weld pin. Repeat on other side. See Figure 5B.
• The rope guide is attached to the right side of the upper handle. Loosen the wing nut which secures the rope
guide. See Figure 5A.
• With the spark plug wire disconnected and grounded, hold the blade control handle against the upper handle,
and pull the starter rope out of the engine.
• Slip the starter rope into the rope guide. Tighten the wing nut. See Figure 5A.
in Inner Hole Pin
B
CHUTE DEFLECTOR
The chute deflector on your mower is held in an upright positionby a retainer for shipping purposes only.
Retainer
\
Chute
Deflector
Figure 6
8
• To remove this retainer, move the spring-loaded chute toward the engine by pushing above the retainer.
• Remove the retainer and carefully lower the chute into operating position, keeping fingers out of the way. See
Figure 6.
_, WARNING: The shipping chute retainer must be removed and discarded before operating the mower.
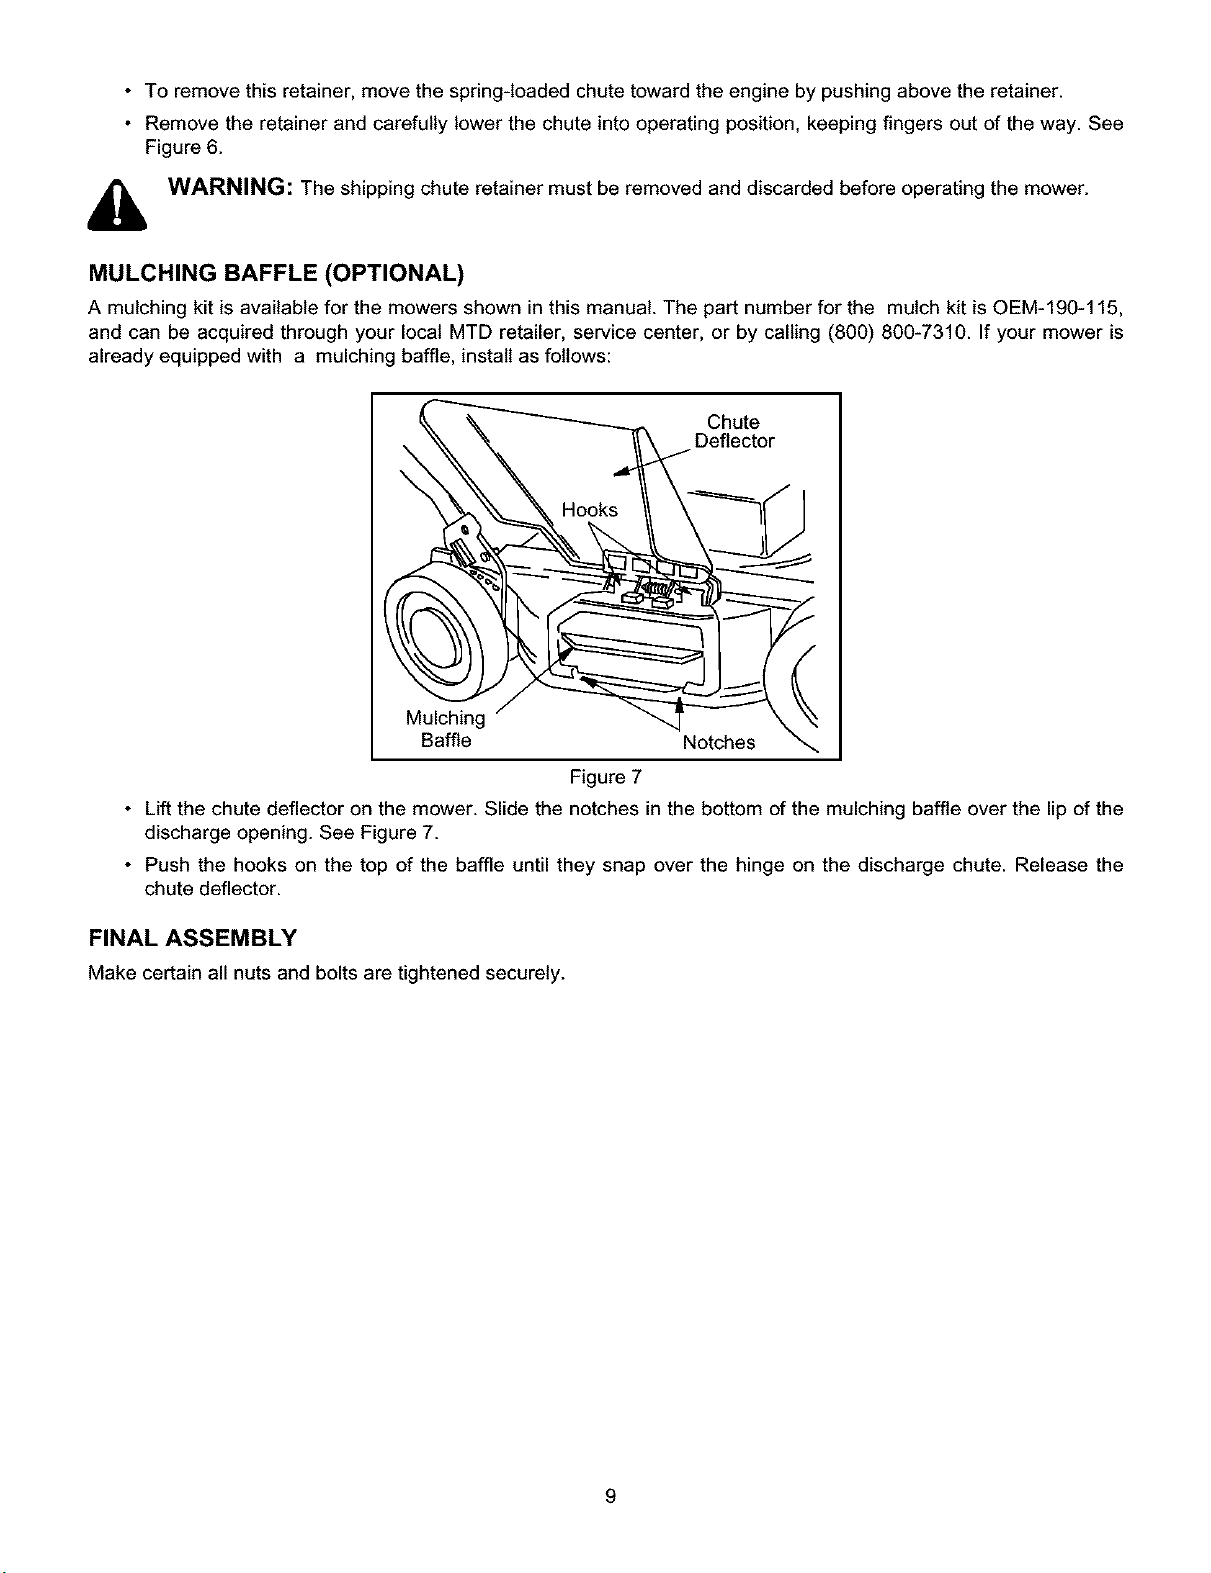
MULCHING BAFFLE (OPTIONAL)
A mulching kit is available for the mowers shown in this manual. The part number for the mulch kit is OEM-190-115,
and can be acquired through your local MTD retailer, service center, or by calling (800) 800-7310. If your mower is
already equipped with a mulching baffle, install as follows:
DCheUtc_'or
Mulching ""4
Baffle Notches
Figure 7
• Lift the chute deflector on the mower. Slide the notches in the bottom of the mulching baffle over the lip of the
discharge opening. See Figure 7.
• Push the hooks on the top of the baffle until they snap over the hinge on the discharge chute. Release the
chute deflector.
FINAL ASSEMBLY
Make certain all nuts and bolts are tightened securely.
 Loading...