

Page 1
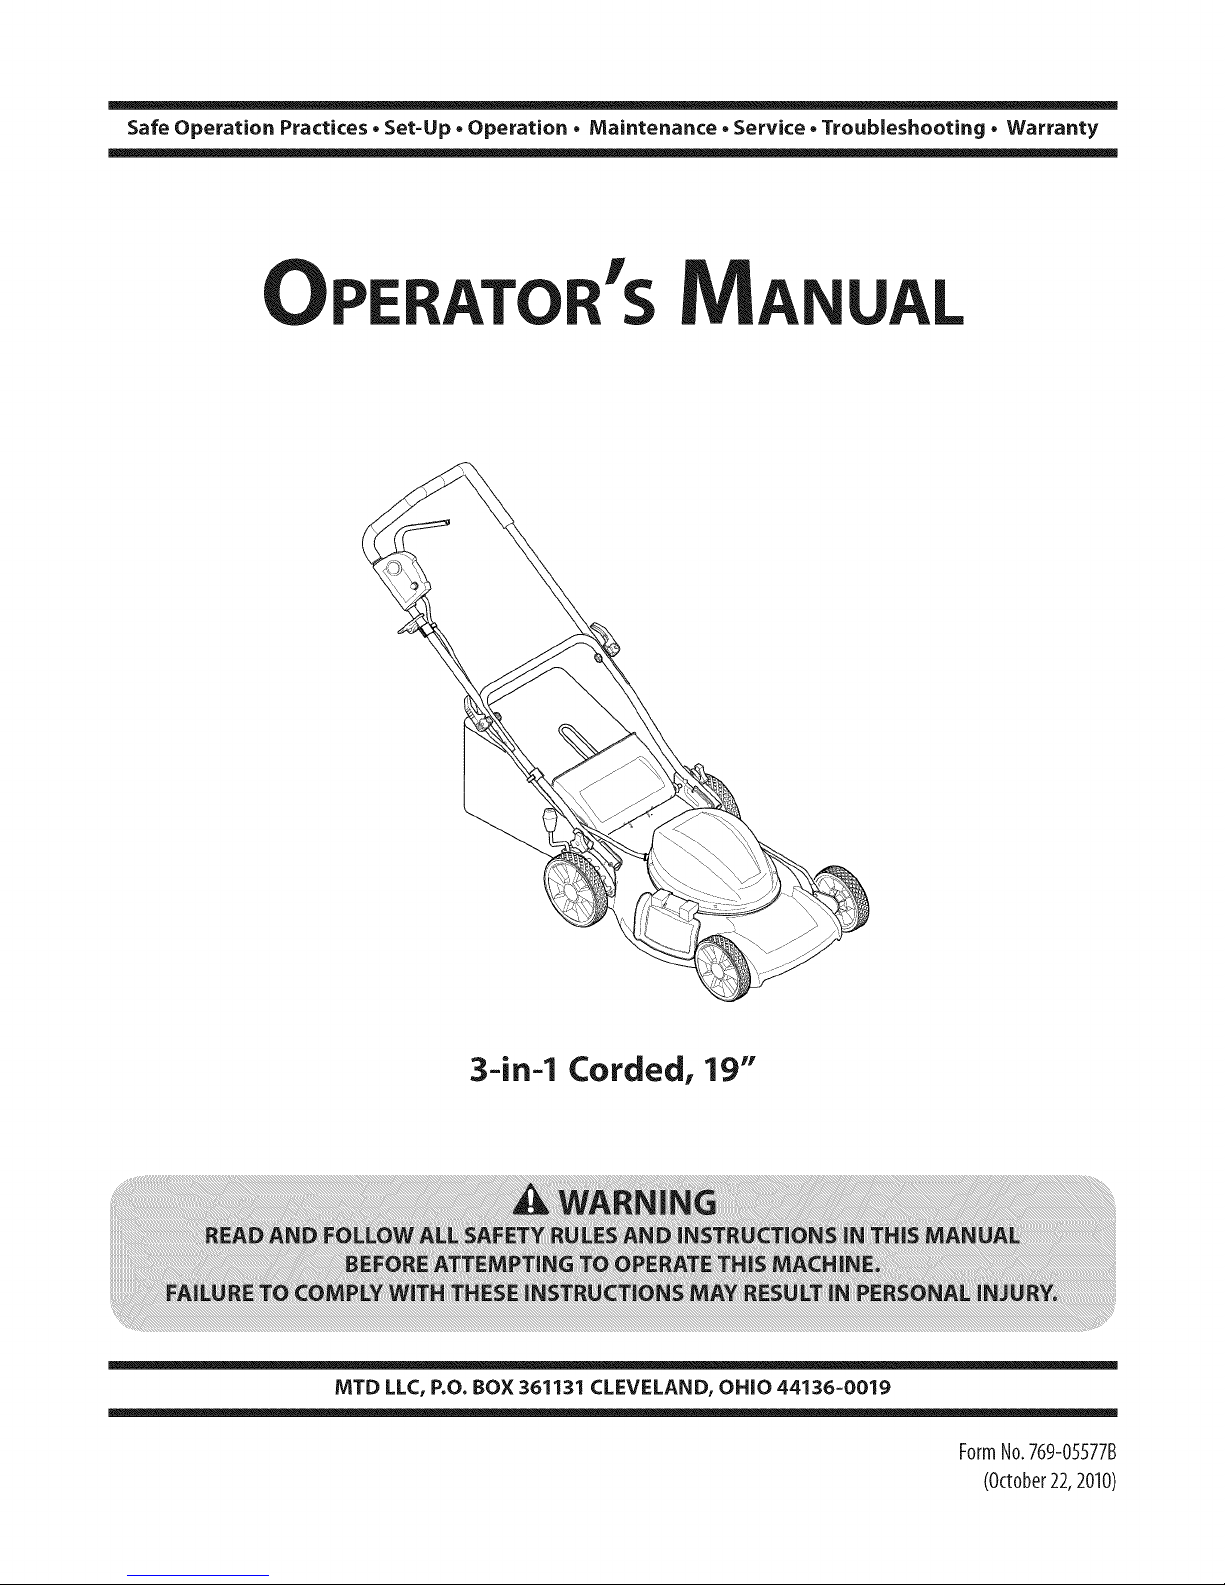
Safe Operation Practices • Set-Up • Operation • Maintenance • Service • Troubleshooting • Warranty
L
MTD LLC, P.O. BOX 361131 CLEVELAND, OHiO 44136-0019
3-in-1 Corded, 19"
FormNo.769-05577B
(October22,2010)
Page 2
ToTheOwner
Thank¥ou
1
Thank you for purchasing an Electric Mower manufactured
by MTD. It was carefully engineered to provide excellent
performance when properly operated and maintained.
Please read this entire manual prior to operating the equipment.
It instructs you how to safely and easily set up, operate and
maintain your machine. Please be sure that you, and any other
persons who will operate the machine, carefully follow the
recommended safety practices at all times. Failure to do so could
result in personal injury or property damage.
All information in this manual is relative to the most recent
product information available at the time of printing. Review
this manual frequently to familiarize yourself with the machine,
its features and operation. Please be aware that this Operator's
Tableof Contents
Safe Operation Practices ........................................ 3
Assembly & Set-Up .................................................. 8
Con trois ................................................................... 12
Opera tion ................................................................ 13
Maintenance & Adjustment ................................. 15
Manual may cover a range of product specifications for various
models. Characteristics and features discussed and/or illustrated
in this manual may not be applicable to all models. We reserve
the right to change product specifications, designs and
equipment without notice and without incurring obligation.
If you have any problems or questions concerning the machine,
phone your local authorized MTD service dealer or contact us
directly. MTD's Customer Support telephone numbers, website
address and mailing address can be found on this page. We want
to ensure your complete satisfaction at all times.
Throughout this manual, all references to fightand left side of the
machine are observed from the operating position
Service ..................................................................... 17
Troubleshooting ..................................................... 19
Parts List ................................................................. 20
Warranty .................................................. Back Cover
RecordProductinformation
Before setting up and operating your new equipment, please
locate the model plate on the equipment and record the
information in the provided area to the right. You can locate the
model plate by standing at the operator's position and looking
down at the rear of the deck. This information will be necessary,
should you seek technical support via our web site, Customer
Support Department, or with a local authorized service dealer.
MODEL NUMBER
EF-IEF-IEF-IEF-IEF-IE
SERIALNUMBER
EDEDEDEDEDE
CustomerSupport
Please do NOT retum the machine to the retailer or dealer without first contacting our Customer Support Department.
If you have difficulty assembling this product or have any questions regarding the controls, operation, or maintenance of
this machine, you can seek help from the experts. Choose from the options below:
Visit us on the web at www.mtdproducts.com
Call a Customer Support Representative at (800) 800-7310 or (330) 220-4683
Write us at MTD LLC • P.O. Box 361131 • Cleveland, OH • 44136-0019
Page 3

ImportantSafeOperationPractices
WARNING: This symbol points out important safety instructions which, if not followed,
could endanger the personal safety and/or property of yourself and others. Read and follow
all instructions in this manual before attempting to operate this machine. Failure to comply
with these instructions may result in personal injury.
When you see this symbol, HEED ITS WARNING!
DANGER: This machine was built to be operated according to the safe operation practices in
this manual. As with any type of power equipment, carelessness or error on the part of the
operator can result in serious injury. This machine is capable of amputating fingers, hands,
toes and feet and throwing objects. Failure to observe the following safety instructions could
result in serious injury or death.
WARNING: When using electric lawnmowers, basic safety precautions should always be
followed to reduce the risk of fire, electric shock, and personal injury. These basic
precautions include the following:
READ ALL INSTRUCTIONS
DoubleInsulated LawnMower
2
Double insulation is a concept in the safety of electric lawn mowers, which eliminates the need for the usual
three-wire grounded power cord and grounded power supply system. Wherever there is electric current in the
mower, there are two complete sets of insulation to protect the user. All exposed metal parts are isolated from
the internal metal motor components with protecting insulation.
Servicing of a lawn mower with double insulation requires extreme care and knowledge of the system and should
be performed only by a qualified service technician. For repair service we suggest you take the lawn mower to
your nearest authorized service dealer. Always use original equipment manufacturer's (OEM) replacement parts
when servicing.
Operation s.
GeneralOperation:
1. Read this operator's manual carefully in its entirety before
attempting to assemble this machine. Read, understand,
and follow all instructions on the machine and in the
manual(s) before operation. Keep this manual in a safe
place for future and regular reference and for ordering
replacement parts.
2. Be completely familiar with the controls and the proper use
of this machine before operating it.
3. This machine is a precision piece of power equipment,
not a plaything. Therefore, exercise extreme caution at all
times. This machine has been designed to perform one job:
to mow grass. Do not use it for any other purpose.
4. Never allow children under 14 years of age to operate this
machine. Children 14 and over should read and understand
the instructions and safe operation practices in this manual
and on the machine and be trained and supervised by an
adult.
6. Thoroughly inspect the area where the equipment is to be
7. Plan your mowing pattern to avoid discharge of material
8. To help avoid blade contact or a thrown object injury,
9. Always wear safety glasses or safety goggles during
Only responsible individuals who arefamiliar with these
rules of safe operation should be allowed to use this
machine.
used. Remove all stones, sticks, wire, bones, toys and other
foreign objects which could be tripped over or picked up
and thrown by the blade. Thrown objects can cause serious
personal injury.
toward roads, sidewalks, bystanders and the like. Also,
avoid discharging material against a wall or obstruction
which may cause discharged material to ricochet back
toward the operator.
stay in operator zone behind handles and keep children,
bystanders, helpers and pets at least 7Sfeet from mower
while it is in operation. Stop machine if anyone enters area.
operation and while performing an adjustment or repair
to protect your eyes. Thrown objects which ricochet can
cause serious injury to the eyes.
Page 4

10. Dressproperly-Donotwearlooseclothingorjewelry.
Theycanbecaughtinmovingparts.Wearsturdy,rough-
soledworkshoesandclose-fittingslacksandshirts.Shirts
andpantsthatcoverthearmsandlegs,rubbergloves,and
rubbersoledsteel-toedshoesarerecommended.Never
operatethismachineinbarefeet,sandals,slipperyorlight
weight(e.g.canvas)shoes.Alwaysusefaceordustmaskif
operationisdusty.
11. Donotputhandsorfeetnearrotatingpartsorunder
cuttingdeck.Contactwithbladecanamputatehandsand
feet.
12. Amissingordamageddischargechutecancauseblade
contactorthrownobjectinjuries.
13. Manyinjuriesoccurasaresultofthemowerbeingpulled
overthefootduringafallcausedbyslippingortripping.
Donotholdontothemowerifyouarefalling;releasethe
handleimmediately.
14. Neverpullthemowerbacktowardyouwhileyouare
walking.Ifyoumustbackthemowerawayfromawallor
obstructionfirstlookdownandbehindtoavoidtripping
andthenfollowthesesteps:
a. Stepbackfrommowertofullyextendyourarms.
b. Besureyouarewellbalancedwithsurefooting.
c. Pullthemowerbackslowly,nomorethanhalfway
towardyou.
d. Repeatthesestepsasneeded.
15. Donotoperatethemowerwhileundertheinfluenceof
alcoholordrugs.
16. Stayalert--Watchwhatyouaredoing.Usecommon
sense.Donotoperatelawnmowerwhenyouaretired.
17. Themotor/bladecontrolhandleisasafetydevice.Never
attempttobypassitsoperation.Doingsomakesthe
safetydeviceinoperativeandmayresultinpersonalinjury
throughcontactwiththerotatingblade.Themotor/blade
controlhandlemustoperateeasilyinbothdirectionsand
automaticallyreturntothedisengagedpositionwhen
released.
18.
Never operate the mower in the rain or in damp or wet
grass. Always be sure of your footing. A slip and fall can
cause serious personal injury. If you feel you are losing
your footing, release the motor/blade control handle
immediately and the blade will stop rotating within three
seconds.
19.
Mow only in daylight or good artificial light. Walk, never
run. Don't force the lawn mower- It will do the job better
and safer at the rate for which it was designed.
20.
Stop the motor/blade when crossing gravel drives, walks or
roads.
21.
If the equipment should start to vibrate abnormally, stop
the motor and check immediately for the cause. Vibration
is generally a warning of trouble.
22.
Shut the motor off and wait until the blade comes to a
complete stop before unclogging the chute or removing
the grass catcher (if provided). The cutting blade continues
to rotate for a few seconds after the motor is shut off. Never
place any part of the body in the blade area until you are
sure the blade has stopped rotating.
23. Never operate mower without proper trail shield, discharge
chute, grass catcher (if provided), motor/blade control
handle or other safety protective devices in place and
working. Never operate mower with damaged safety
devices. Failure to do so, can result in personal injury.
24. Ground Fault Circuit Interrupter (GFCI) protection should
be provided on the circuit(s) or outlet(s) to be used for the
lawn mower. Receptacles are available having built-in GFCl
protection and may be used for this measure of safety.
25. To prevent electric shock use only with a UL listed
extension cord set suitable for outdoor use, such as Type
SW-A, SOW-A, STW-A, STOW-A, SJW-A, SJOW-A, SJTW-A, or
SJTOW-A.
26.
Extension Cord--Make sure your extension cord set is in
good condition and is heavy enough to carry the current
load your lawn mower will draw. If in doubt, use the next
heavier gauge cord. The smaller the gauge number, the
heavier the cord. An undersized cord will cause a drop in
line voltage resulting in loss of power and overheating.
MINIMUM WIRE SIZE FOR EXTENSION CORDS
FOR 120 VOLTAPPLIANCES USING 10- 12AMPS
Cord Length (ft.) 25 50 100 150
Wire Size (AWG) 16 16 14 12
27. To reduce the likelihood of disconnection of the extension
cord set from the mower, be sure to use the cord restraint
provided as well as a modern, tightly fitting extension cord.
28. To reduce the risk of electric shock, this lawn mower has a
polarized plug (one blade is wider than the other) and will
require the use of a polarized extension cord. The mower
plug will only fit into the polarized extension cord one way.
If the plug does not fit fully into the extension cord, reverse
the plug. If the plug still does not fit, obtain a correct
polarized extension cord. A polarized extension cord will
require the use of a polarized wall outlet. This plug will fit
into the polarized outlet only one way. If the plug does not
fit fully into the wall outlet, reverse the plug. If the plug
still does not fit, contact a qualified electrician to install
the proper wall outlet. Do not change the equipment plug,
extension cord receptacle, or extension cord plug in any
way.
29. If extension cord is damaged in any manner during use,
disconnect extension cord from house receptacle before
unplugging mower.
30. Circuit Breaker/Fuses--The mower should be operated
on a 15AMP or 20 AMP circuit. If difficulty in starting
is experienced with a standard 15 AMP fuse or circuit
breaker or the mower's built-in overload protection switch
frequently trips, contact your nearest authorized service
dealer. Do not use a higher rated circuit breaker or fuse
without consulting your power company.
31. Do not abuse the cord by pulling the mower by the cord or
yanking it to disconnect it from the receptacle. Keep cord
from heat, oil, and sharp edges.
32. Only use parts and accessories made for this machine by
manufacturer. Failure to do so can result in personal injury.
4 I SECTION 2 -- IMPORTANT SAFE OPERATION PRACTICES
Page 5
33. If situations occur which are not covered in this manual, use
care and good judgment. Contact Customer Support for
assistance or the name of the nearest service dealer.
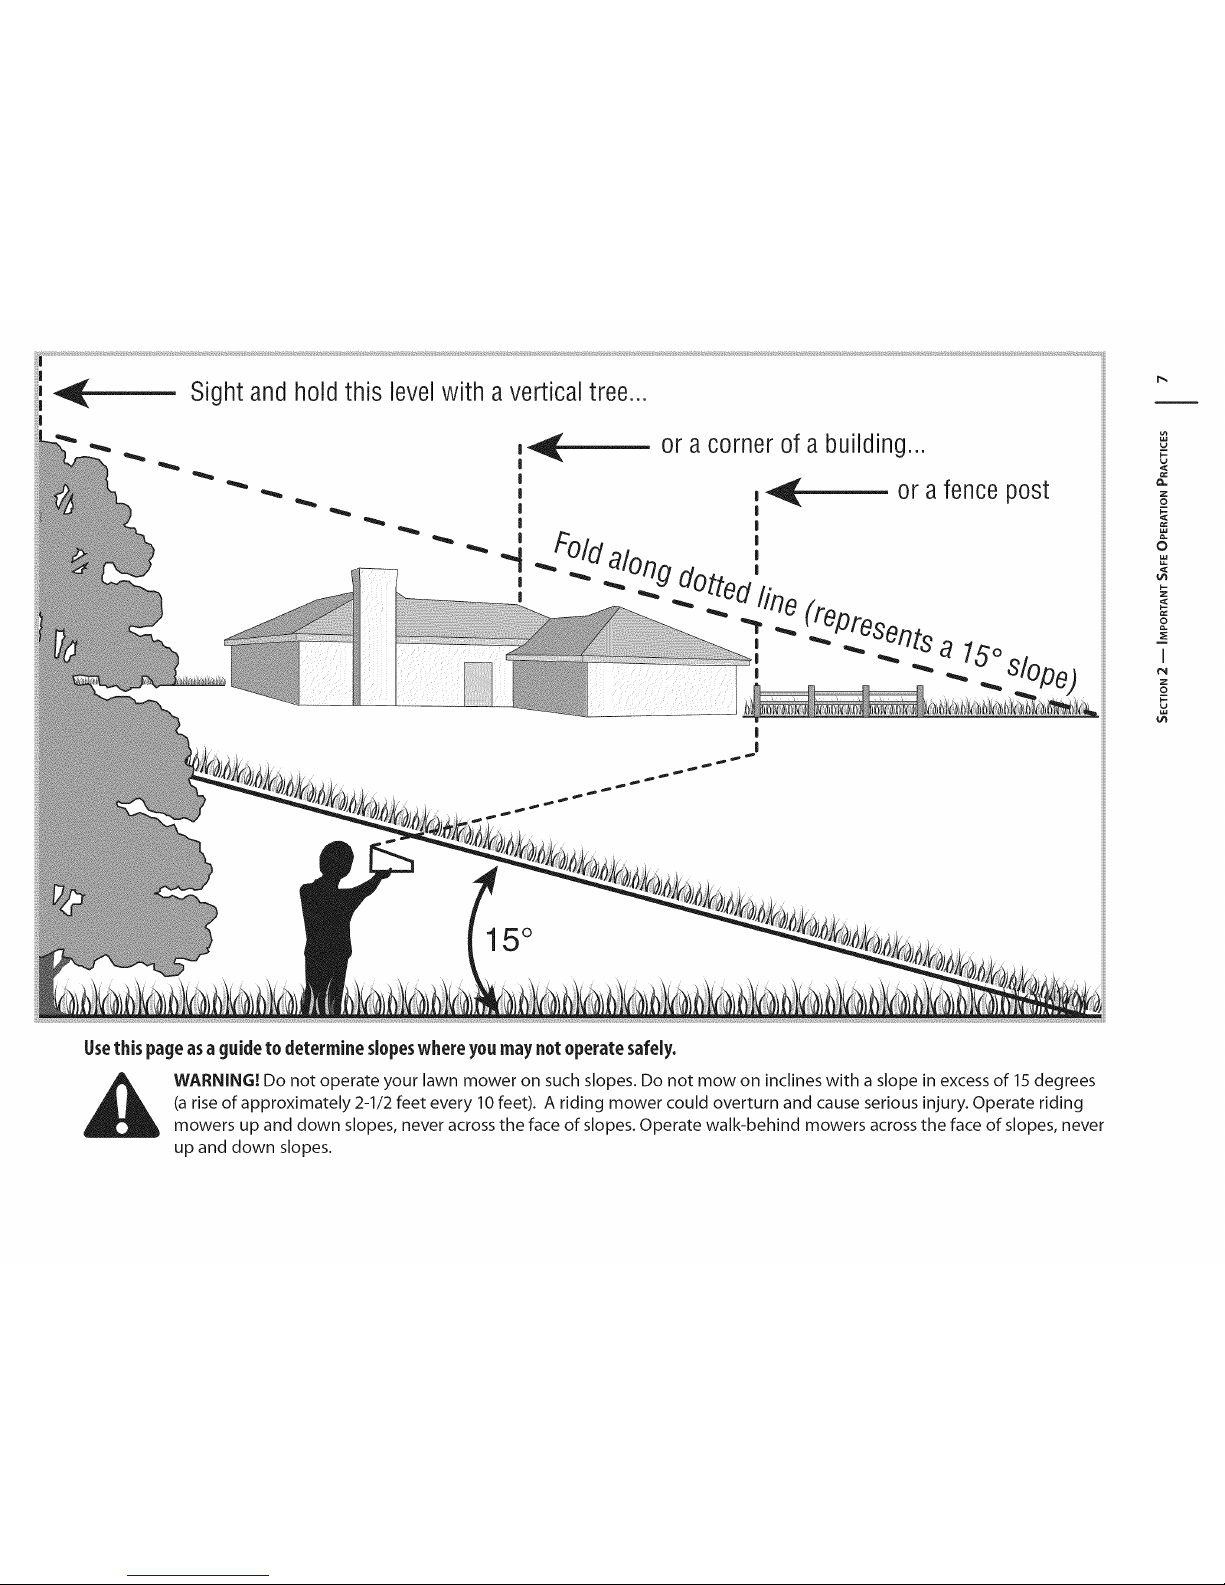
SlopeOperation:
Slopes are a major factor related to slip and fall accidents which
can result in severe injury. Operation on slopes requires extra
caution. If you feel uneasy on a slope, do not mow it. For your
safety, use the slope gauge included as part of this manual to
measure slopes before operating this machine on a sloped or
hilly area. If the slope is greater than 15 degrees, do not mow it.
Do:
1.
Mow across the face of slopes; never up and down. Exercise
extreme caution when changing direction on slopes.
2.
Watch for holes, ruts, rocks, hidden objects, or bumps
which can cause you to slip or trip. Tall grass can hide
obstacles.
3.
Always be sure of your footing. A slip and fall can
cause serious personal injury. If you feel you are losing
your balance, release the motor/blade control handle
immediately, and the blade will stop rotating within three
(3) seconds.
Do Not:
1. Do not mow near drop-offs, ditches or embankments, you
could lose your footing or balance.
2. Do not mow slopes greater than 15 degrees as shown on
the slope gauge.
3. Do not mow on wet grass. Unstable footing could cause
slipping.
Children
Tragic accidents can occur if the operator is not alert to the
presence of children. Children are often attracted to the mower
and the mowing activity. They do not understand the dangers.
Never assume that children will remain where you last saw them.
1.
Keep children out of the mowing area and under watchful
care of a responsible adult other than the operator.
Be alert and turn mower off if a child enters the area.
2.
3.
Before and while moving backwards, look behind and
down for small children.
4.
Use extreme care when approaching blind corners,
doorways, shrubs, trees, or other objects that may obscure
your vision of a child who may run into the mower.
Never allow children under 14 years of age to operate this
machine. Children 14 and over should read and understand the
instructions and safe operation practices in this manual and on
the machine and be trained and supervised by an adult.
Service
1. When servicing mower, use original equipment
manufacturer (OEM) replacement parts listed in this
manual. "Use of parts which do not meet the original
equipment specifications may lead to improper
performance and compromise safety!"
2. Before cleaning, repairing, or inspecting, make certain the
blade and all moving parts have stopped. Disconnect the
power cord when not in use and to prevent unintended
starting.
3.
Follow instructions for lubricating and changing
accessories.
4.
Inspect lawn mower cord and extension cords periodically
and replace immediately, if damaged. Lawn mower cord
should be repaired by an authorized service dealer only.
5. Keep handles dry, clean and free from oil and grease.
6. To reduce a fire hazard, keep the motor free of grass, leaves
and debris build-up.
7. Check the blade and motor mounting bolts at frequent
intervals for proper tightness. Also, visually inspect blade
for damage (e.g., bent, cracked, and worn) Replace blade
with the original equipment manufacturer's (OEM) blade
only, listed in this manual.
8. Maintain your mower with care -- Keep mower blade sharp
and clean for best and safest performance. Mower blades
are sharp and can cut, wrap the blade or wear gloves and
use extra caution when servicing them.
9. Keep all nuts, bolts, and screws tight to be sure the
equipment is in safe working condition.
10. Never tamper with safety devices. Check their proper
operation regularly.
11. After striking a foreign object, stop the motor and
disconnect the power cord. Thoroughly inspect the mower
for any damage. Repair the damage before operating the
mower.
12. Grass catcher components (if provided), discharge cover,
and trail shield are subject to wear and damage which
could expose moving parts or allow objects to be thrown.
For safety protection, frequently check components
and replace immediately with original equipment
manufacturer's (OEM) parts only, listed in this manual.
13. When not in use, store lawn mower indoors in a dry area,
locked-up and/or out of the reach of children.
14. Maintain or replace safety and instructional labels, as
necessary.
15. According to the Consumer Products Safety Commission
(CPSC) and the U.S. Environmental Protection Agency (EPA),
this product has an Average Useful Life of seven (7) years,
or 140 hours of operation. At the end of the Average Useful
Life have the machine inspected annually by an authorized
service dealer to ensure that all mechanical and safety
systems are working properly and not worn excessively.
Failure to do so can result in accidents, injuries or death.
SECTION 2 -- IMPORTANT SAFE OPERATION PRACTICES S
Page 6
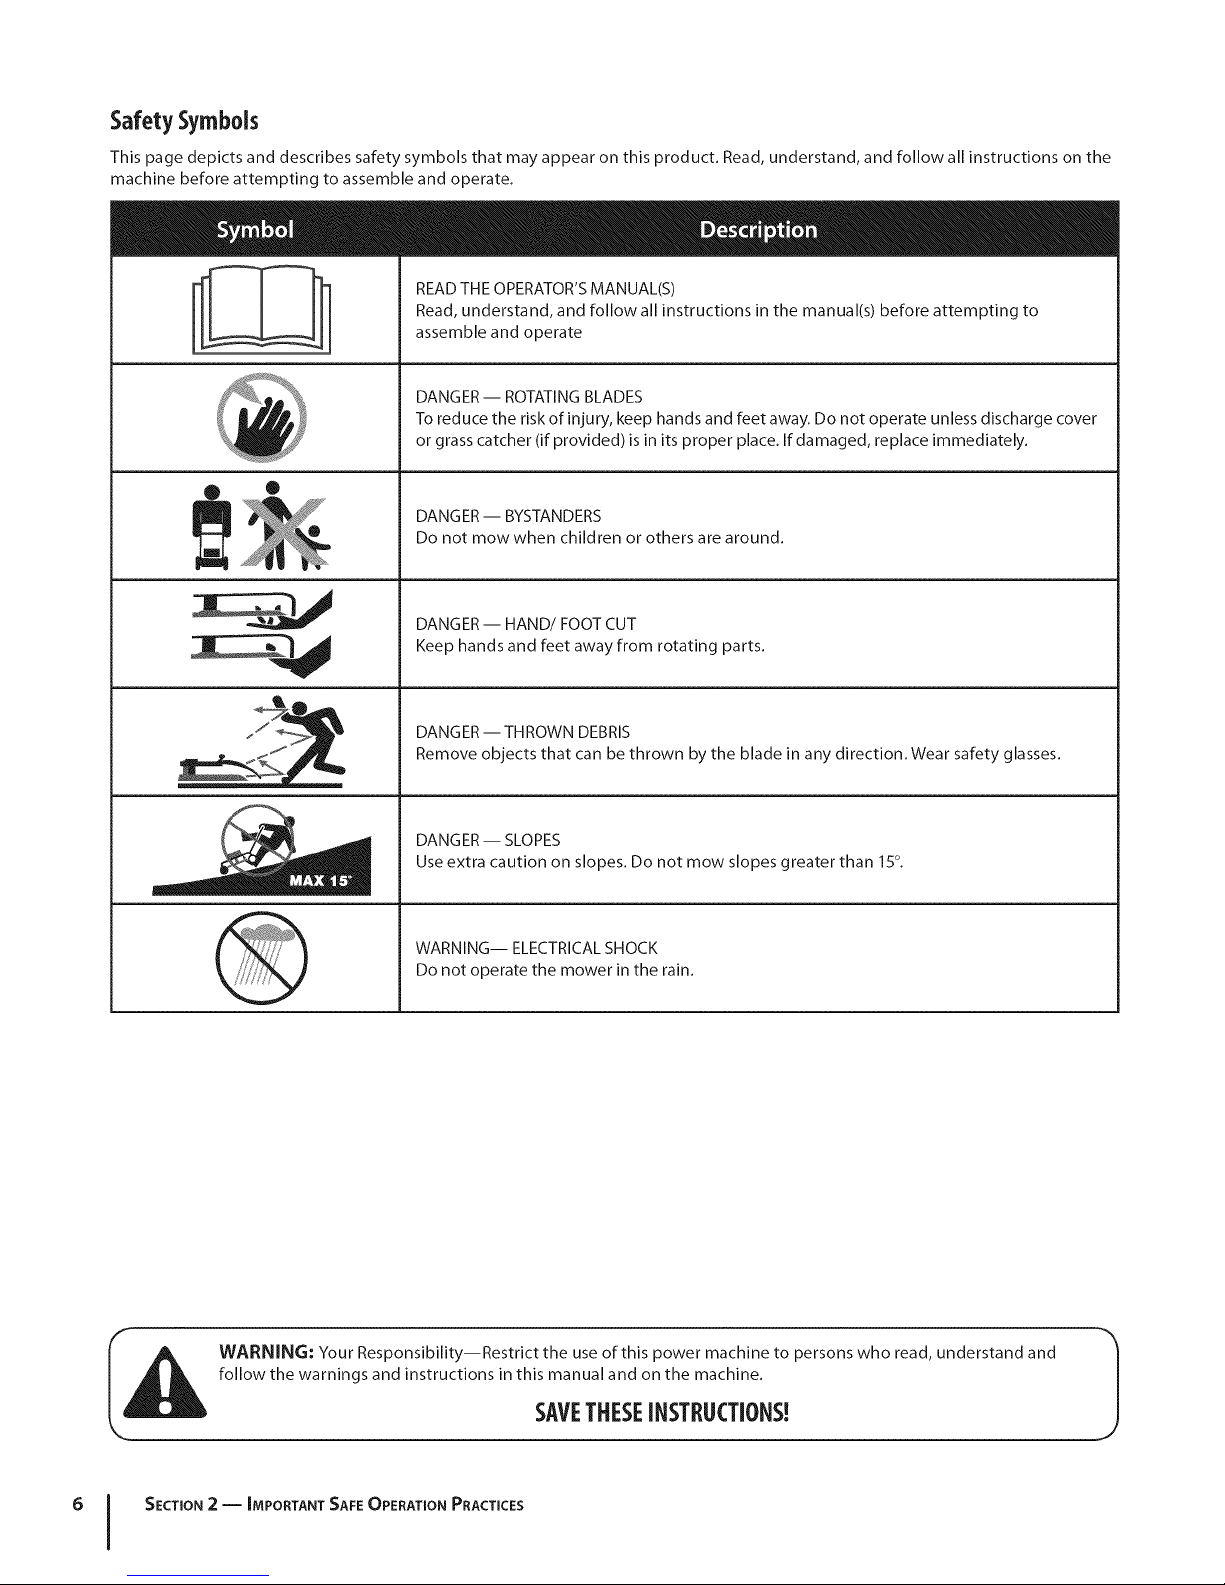
Safety Symbols
This page depicts and describes safety symbols that may appear on this product. Read, understand, and follow all instructions on the
machine before attempting to assemble and operate.
° "I
® ®
Iml_ .
,z,e
READ THE OPERATOR'S MANUAL(S)
I
I
Read, understand, and follow all instructions in the manual(s) before attempting to
assemble and operate
DANGER- ROTATING BLADES
To reduce the risk of injury, keep hands and feet away. Do not operate unless discharge cover
or grass catcher (if provided) is in its proper place. If damaged, replace immediately.
DANGER-- BYSTANDERS
Do not mow when children or others are around.
DANGER-- HAND/FOOT CUT
Keep hands and feet away from rotating parts.
DANGER -- THROWN DEBRIS
Remove objects that can be thrown by the blade in any direction. Wear safety glasses.
DANGER-- SLOPES
Use extra caution on slopes. Do not mow slopes greater than 15°.
WARNING-- ELECTRICAL SHOCK
Do not operate the mower in the rain.
WARNING: Your Responsibility--Restrict the use of this power machine to persons who read, understand and
follow the warnings and instructions in this manual and on the machine.
SAVETHESEINSTRUCTIONS!
6 I SECTION 2 -- IMPORTANT SAFE OPERATION PRACTICES
Page 7
or a corner of a building...
!
|
15 °
I-
v
Z
0
0
!--
Z
Q.
I
¢N
Z
o
In
Usethis page as a guide to determine slopeswhere you may not operate safely,
WARNING! Do not operate your lawn mower on such slopes. Do not mow on inclines with a slope in excess of 15 degrees
(a rise of approximately 2-1/2 feet every 10 feet). A riding mower could overturn and cause serious injury. Operate riding
mowers up and down slopes, never across the face of slopes. Operate walk-behind mowers across the face of slopes, never
up and down slopes.
Page 8
Assembly& Set-Up
Contentsof Carton
3
One Electric Mower
One Operator's Manual
NOTE: All references to the left and right side of the mower are
from the operator's position behind the mower.
NOTE: Cord guides and cord retainer may already be installed.
One Side Discharge Chute
Two Toggle Clamps
Unpacking the Unit
1. Cut the corners of the carton and lay the sides flat on the
ground. Remove all packing inserts.
2. Move the mower out of the carton.
3. Make certain the carton has been completely emptied
before discarding it.
Cutting Height Adjustment
The cutting height adjustment lever is located above the rear
right wheel. See Fig. 3-1.
1. Pull the lever out and away from the mower.
2. Move the lever forward or back for desired cutting height.
3. Release lever towards mower deck.
Two Cord Guides
One Cord Retainer
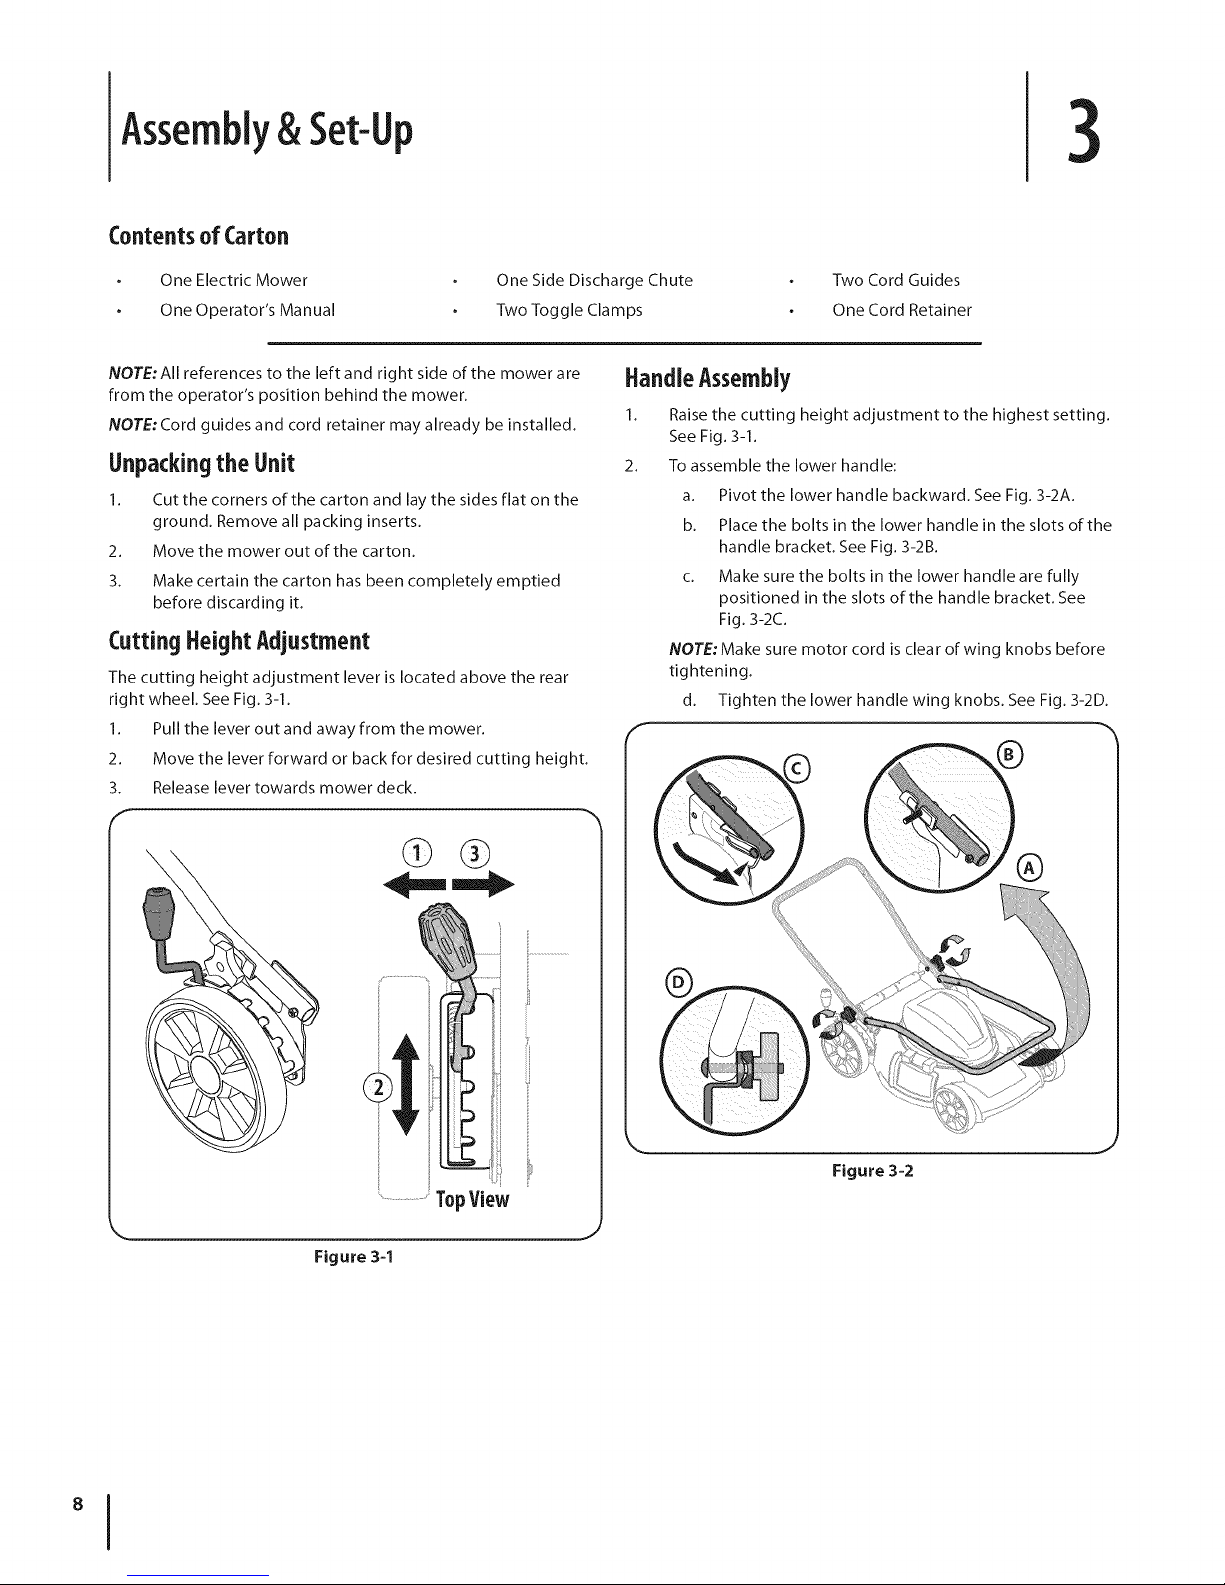
HandleAssembly
1. Raise the cutting height adjustment to the highest setting.
See Fig. 3-1.
2. To assemble the lower handle:
a. Pivot the lower handle backward. See Fig. 3-2A.
b. Place the bolts in the lower handle in the slots of the
handle bracket. See Fig. 3-2B.
c. Make sure the bolts in the lower handle are fully
positioned in the slots of the handle bracket. See
Fig. 3-2C.
NOTE: Make sure motor cord is clear of wing knobs before
tightening.
d. Tighten the lower handle wing knobs. See Fig. 3-2D.
...................TopView
Figure 3-1
Figure 3-2
Page 9

NOTE:Cord retainer may already be installed.
2.
Slide the cord retainer (if packed separately) onto the
right hand side of the upper handle with the motor/blade
control handle. See Fig. 3-3.
NOTE:The clip will be facing down toward the motor.
Figure 3-3
3.
Place the upper handle onto the lower handle, keeping the
motor cord over the handles. See Fig. 3-4.
4.
Insert toggle clamps packed separately with the mower
into the holes for the selected height. See Fig. 3-4.
5.
Tighten the clamps. See Fig. 3-5.
NOTE: Leave space between clamp and clamp seat. If
clamp will not tighten, loosen wing knob half turn. If clamp
is not firmly seated when engaged, tighten wing knob half
turn until clamp is firmly seated when engaged.
F
Figure 3-5
CordGuide
Figure 3-4
a. Forthe Iowestsetting, line upthetop holes ofthe upper
handle with the holes on the lower handle.
b. For the medium setting, line up the middle holes
of the upper handle with the holes on the lower
handle.
c. For the highest setting, line up the bottom holes
of the upper handle with the holes on the lower
handle.
NOTE: Make certain the clips on the clamp retainers are
inside the grooves of the clamp seats. See Fig. 3-4 inset.
NOTE: Cord guides may already be installed. Proceed to step 3 if
installed.
Make sure the cord between the motor/blade control lever
and the mower sits in the cord holders on the upper and lower
handles.
1.
Snap one cord guide onto the lower handle. See Fig. 3-6.
2.
Snap the other cord guide onto the upper handle below
the cord retainer. See Fig. 3-6.
3.
Secure the motor cord in the cord guide clamps.
f
Figure 3-6
SECTION3 -- ASSEMBLY& SET-UP 9
J
Page 10

CordConnection
GrassCollection
NOTE: Do not plug your extension cord into the power source
receptacle (outlet) prior to routing it through the cord retainer
and connecting the extension cord to the mower's cord outlet
receptacle.
To properly route your extension cord through the cord retainer:
1. Approximately 14 to 16-inches from its end, crease your
extension cord to form a tight loop.
2. Push the loop through the bottom hole in the cord
retainer. See Fig. 3-7.
3. Position the loop over the clip found on the cord retainer
and pull down until the cord fits snugly into the clip. See
Fig. 3-7.
NOTE: Use a Ul_-approved extension cord. A 100-foot,
14-gauge cord is recommended. A 50-foot, 16-gauge
cord is acceptable. Refer to the small chart found in Safe
Operation Practices.
NOTE:The cord retainer secures your extension cord and
safely limits its movement.
1. To assemble the grass bag, secure the plastic channels of
grass bag over frame rods. See Fig. 3-8.
Frame Rod"
Plastic Channels
Figure 3=8
2. Follow steps below to attach grass catcher:
a. Lift rear discharge door.
b. Remove rear mulching baffle. See Fig. 3-9.
NOTE: Swing the mulching baffle to the right side of the
mower and then slide out.
Figure 3-7
SECTION 3 -- ASSEMBLY& SET-UP
'°1
Figure 3-9
Page 11

c. Place grass catcher on the pivot rod. Let go of
discharge door so that it rests on the grass catcher.
See Fig. 3-10.
To remove grass catcher, lift rear discharge door on the mower.
Lift grass catcher up and out, off of the pivot rod. Release rear
discharge door to allow it to close rear opening of mower.
on the grass catcher are firmly seated on the pivot
i_ll WARNING: Never operate mower unless the hooks
rod and the rear discharge door rests firmly against
top of the grass catcher.
\
SideDischarge
For side discharge, you will need to have the rear mulching baffle
installed below the rear discharge door.
1. On the right side of the mower, lift the mulch baffle.
2. Slide the hooks of the side discharge chute under hinge pin
on mulch baffle assembly. See Fig. 3-11.
3. Secure the tabs of the side discharge chute onto the hooks
below the side mulching baffle. See Fig. 3-11.
NOTE:Make sure the side discharge chute sits tightly
against the mower deck.
NOTE: Do not remove side mulch baffle at any time, even
when you are not mulching.
Figure 3-10
Figure 3-11
SECTION3 -- ASSEMBLY& SET-UP 11
Page 12

ControlsandFeatures
F
Starter
Button
Overload
Switch
Cord Retainer
Cutting Height
Adjustment Lever
4
\
Motor/Blade
Control Lever
Figure 4-1
WARNING: Read, understand, and follow all OverloadProtection Switch
instructions and warnings on the machine and in
this manual before operating, located on the motor/blade control. This overload protection
Motor/Blade Control Lever
safety device. Never attempt to bypass its
_ ARNING: The motor/blade control lever is a
The motor/blade control lever is located on the upper handle
of the mower. The motor/blade control lever engages and
disengages the motor and blade.
operations.
CordRetainer
The cord retainer is located on the upper handle of the mower.
The cord retainer secures your extension cord and safely limits its
movement.
The mower is equipped with an overload protection switch,
switch may pop out when too much strain is placed on the
motor. Refer to the Maintenance & Adjustments Section to reset
this switch.
CuttingHeight Adjustment Lever
The cutting height adjustment lever is located above the right
rear wheel. To adjust the cutting height, refer to the Assembly
Section.
Starter Button
The starter button is located on the upper handle of the mower.
Engaging the motor/blade control lever with the starter button
pressed will start the mower.
Page 13

Operation
Starting Motor
WARNING: Avoid accidental starting. Make sure
you are in the operating position behind the mower
when using it. To avoid serious injury, the operator
and unit should be in a stable position while
starting.
Connectingto an ElectricalPowerSource
or 20 AMP circuit. If you experience difficulty in
i,_ WARNING:This mower should be operated on a 15
NOTE: Connect your extension cord to the mower as instructed
in the Set Up section prior to plugging your extension cord into
an electrical outlet. See Fig. 5-1.
starting with a standard 15 AMP fuse or circuit
breaker, contact an authorized service dealer. Do not
use a higher rated fuse or breaker without
consulting your power company.
q
3.
Press the (orange) starter button and hold it in. See Fig. 5-2.
NOTE: Starting the mower's motor also engages the blade.
Figure 5-1
1. Plug your extension cord into any convenient (indoor or
outdoor) 120-volt, 60 hertz A.C. outlet or receptacle. Your
mower will operate satisfactorily on a circuit with a 15
ampere breaker.
NOTE:To avoid tripping circuit breakers, select an outlet
on a circuit that is not overloaded. Do NOT select an outlet
that is on a circuit hosting appliances such as a refrigerator.
2. Stand behind the mower, in the operating position.
Figure 5-2
4. While holding the starter button in, squeeze the motor/
blade control lever against the upper handle to start the
motor and engage the blade. See Fig. 5-2.
NOTE:The mower's motor will NOT start if you fail to
hold the starter button in while pivoting the motor/blade
control handle upward.
5. Release the (orange) starter button.
Stopping the Motor
WARNING: The blade continues to rotate for a few
seconds after the motor is shut off. If motor does not
come to a stop when the motor/blade control
handle is released, unplug the mower from the
outlet, and contact an authorized service dealer.
Release the blade/motor control lever to stop the motor and
blade.
13
Page 14

UsingYourLawnMower
Be sure that lawn is clear of stones, sticks, wires, or other objects
which could damage the lawn mower or motor. Such objects
could be accidentally thrown by the mower in any direction and
cause serious personal injury to the operator and others.
_ ARNING: If you strike a foreign object, stop the
motor, and unplug from the power supply circuit.
Thoroughly inspect the mower for any damage, and
repair the damage before restarting and operating
the mower. Excessive vibration of the mower during
operation is an indication of damage. The unit
should be promptly inspected and repaired.
To prevent electric shock, do not operate the mower in
damp or wet conditions.
Always start from the point closest to the power source
where the cord is connected. Never mow around the lawn
in circles; travel back and forth across the lawn, starting
from the point closest to the outlet and then moving away
from the outlet so the cord lies in the cut portion of the
lawn, out of the way.
Do not allow the extension cord to wrap around trees,
shrubs or other obstacles. When picking up the extension
cord, wind the cord in a series of equal loops on each side
of your hand to prevent snarling.
UsingasMulcher
For mulching grass, remove the side discharge chute and grass
catcher from the mower. Make sure that the rear mulch plug is
inserted. For effective mulching, do not cut wet grass. If the grass
has been allowed to grow in excess of four inches, mulching is
not recommended.
UsingGrassCatcher
You can use the grass catcher to collect clippings while you are
operating the mower.
1. Attach grass catcher following instructions in the
"Assembly & Set-Up" section. Grass clippings will
automatically collect in bag as you run mower. Operate
mower till grass bag is full.
2. Stop motor completely by releasing the blade/motor
control handle. Make sure that the unit has come to a
complete stop.
3. Lift discharge door and pull grass bag up and away from
the mower to remove the bag. Dispose of the grass
clippings and reinstall the bag when complete.
SECTION 5-- OPERATION
Page 15

Maintenance&Adjustments
6
GeneralRecommendations
Always observe safety rules when performing any
maintenance.
The warranty on this lawn mower does not cover items that
have been subjected to operator abuse or negligence. To
receive full value from warranty, operator must maintain
the lawn mower as instructed here.
All adjustments should be checked at least once each
season.
Periodically check all fasteners and make sure these are
tight.
WARNING: Always stop the motor and disconnect from the
power source before cleaning, lubricating or performing any
repairs or maintenance on the lawn mower.
Lubrication
1.
Lubricate the wheels at least once a season with light oil (or
motor oil). If wheels are removed for any reason, lubricate
surface of the pivot arm and inner surface of the wheel
with light oil. See Fig. 6-1.
DeckCare
WARNING: To reduce the risk of electric shock, do not expose
the mower to water.
The underside of mower deck should be cleaned after each use
as grass clippings, leaves, dirt and other debris will accumulate.
This accumulation of grass clippings, etc., is undesirable as it will
promote rust and corrosion.
1. Remove any buildup of grass and leaves on or around the
motor cover (do not use water). Wipe the mower clean with
a dry cloth occasionally.
2. If debris has built up on the underside of the unit, tilt the
mower forward or on its side and scrape it clean with a
suitable tool.
iMPORTANT: Do not use a pressure washer or garden
hose to clean your unit. These may cause damage to electric
components, or the electric motor. The use of water will result in
shortened life and reduce serviceability.
Resetting Overload ProtectionSwitch
This mower is equipped with an overload protection switch to
prevent overheating damage to the motor.
If the overload protection switch pops out:
1. Release the motor/blade control handle and do NOT restart
the mower for at least one minute, allowing the electric
motor time to cool.
2. Press the overload protection switch inward to reset. See
Fig. 6-2.
Figure 6-1
2. Lubricatethetorsion springonthesidemulch plug periodically
with light oil to prevent rust. See Fig. 6-1.
nJ
Figure 6-2
15
Page 16

Ifthe
overload protection switch pops out shortly after resetting:
1.
Release the motor/blade control handle and do NOT restart
the mower for at least 15 minutes to allow the electric
motor extra time to cool.
2. Press the overload protection switch inward to reset.
3. Restart unit.
NOTE: If the overload protection switch pops out
repeatedly during operation or will not remain in when
attempting to reset, contact an authorized service center
to arrange for repair.
ReplacingTrail Shield
shield is in place and working. Never operate mower
WARNING: Never operate mower unless the trail
with damaged safety devices. Failure to do so, can
result in personal injury.
The trail shield is subject to wear and damage which could
expose moving parts or allow objects to be thrown. For safety
protection, frequently check the trail shield and replace
immediately with original equipment manufacturer's (OEM) part
only, listed in this manual.
1. To remove trail shield, remove screws holding trail shield in
place.
Press shield in on either side to remove from hole.
See Fig. 6-3.
/ \
/
(z ..........
Figure 6-3
3_
Removeshield fromoppositeholeand repla cewith newshield in
the opposite order and manner of removal.
J
SECTION 6-- MAINTENANCE & ADJUSTMENTS
Page 17

Service
7
BladeCare
WARNING: When removing the cutting blade for
sharpening or replacement, protect your hands with
a pair of heavy gloves or use a heavy rag to hold the
blade. Be certain to disconnect the power supply.
Periodically inspect the blade assembly for cracks, especially if
you strike a foreign object. Replace when necessary. Follow the
steps below for blade service.
1. Stop the motor and disconnect the power supply to the
mower. Turn the mower on its side.
2. Usea block of wood between blade and mower deckto
prevent the blade from turning when the bolt is removed.
3. Loosen and remove the blade bolt, locking plates, and
blade. See Fig. 7-1.
BladeInstallation
1. Place the cutting blade, locking plates, and blade bolt on
the motor shaft and thread the blade bolt in finger tight.
See Fig. 7-1.
NOTE:Make certain to replace the parts in the exact order
in which they were removed. When installing the cutting
blade, be sure it is installed with the curved ends pointing
towards the mower deck and not towards the ground.
2. Torque the blade bolt down using a torque wrench to
assure the bolt is tightened properly. The recommended
torque for the blade bolt is 309 in. Ibs.
attach the blade assembly, but is also an insulated
_ ARNING: The blade hardware is not only used to
Toinsure safe operation of your unit, all nuts and bolts must be
checked periodically for correct tightness.
safety device and should never be altered in any
way. If replacement is necessary, use original
equipment parts as shown in the parts list.
BladeSharpening
To properly sharpen the cutting blades, remove equal amounts
of metal from both ends of the blades along the cutting edges,
parallel to the trailing edge, at a 25 ° to 30 ° angle. See Fig. 7-2.
NOTE: It is important that each cutting blade edge be ground
equally to maintain proper blade balance. A poorly balanced
blade will cause excessive vibration and may cause damage to
the mower and result in personal injury. The blade can be tested
by balancing it on a round shaft screwdriver. Grind metal from
the heavy side until it balances evenly.
@
k. j
Figure 7-1
4.
The blade can be sharpened with a file or on a grinding
wheel. Do not attempt to sharpen the blade while it is still
on the mower. When sharpening the blade, follow the
original angle of grind and grind each cutting edge equally
to keep the blade balanced. Balance the blade on a round
shaft screwdriver. Remove metal from the heavy side until
it balances evenly.
WARNING: An unbalanced blade will cause
excessive vibration when rotating at high speeds. It
may cause damage to mower, and could break
causing personal injury.
J
Figure 7-2
17
Page 18

Off-SeasonStorage
The following steps should be taken to prepare your lawn mower
for storage.
Clean and lubricate mower thoroughly as described in the
lubrication instructions.
We do not recommend the use of a pressure washer or
garden hose to clean your unit.
Make certain the power supply is disconnected.
Coat mower's cutting blade with chassis grease to prevent
rusting.
Store mower in a dry, clean area. Do not store next to
corrosive materials, such as fertilizer.
Wipe extension cord to remove any foreign substance such
as oil or stains. Replace extension cord if cut or damaged in
any way.
Wind cord in a series of equal loops on each side ofyour
hand to prevent snarling.
SECTION7-- SERVICE
Page 19

Troubleshooting
Problem Cause i Remedy
Circuit breaker on the
mower tripping
Mower not mulching
properly
Mower vibrating at higher
speed
1. Too much workload on the mower.
2. Fuse blown; outlet overloaded.
1. Wet grass clippings stick to the underside of
the deck.
1. Bent motor shaft.
2. Cutting blade is unbalanced.
3. Blade is loose.
1. Raise the cutting height, resetthe circuit
breaker on the mower, take a smaller width
of cut, and walk slowly.
2. Connect to an outlet that is fused for 15
amperes. Reset the circuit breaker and start
the mower again.
1. Wait till the grass dries before mowing.
1. Stop the motor, disconnect the power source
and inspect for damage. Have repaired by an
authorized service dealer.
2. Balance the blade by grinding each cutting
edge equally.
3. Tighten blade bolt to 309 in. Ibs.
19
Page 20

Moclel18A-212A
45
46
48
58
56
65
8 66 67
\
68
74
oO
38
79
69
34
35
®
Page 21

Model18A-212A
Ref. I
1
2
3
4
5
6
7
8
9
10
11
12
13
14
15
16
17
18
19
2O
21
22
23
24
25
26
27
28
29
3O
31
32
33
34
35
36
37
38
39
4O
Part Number
787-01823A
731-07618
731-07619
731-07620
731-07621
734-04537
734-04548
731-07512
721-04378
731-07622
731-07623
731-07624
711-05358
732-04733
732-04734
787-01824A
787-01825A
711-05325
787-01813
711-05326
732-04713
611-04176
741-04464
731-07511
611-04177
741-04465
732-04735
732-04715
720-04143
787-01826
724-04088
736-04486
731-07515
742-04317
731-07598
736-04487
712-04237
731-07516
731-07520
725-05071
Description
Deck
Shroud
Mulch Door
Discharge Chute
Trail Shield
Front Wheel
Rear Wheel
Wheel Cap
Shroud Seal
Rear Door
Rear Baffle
Mulch Plug
Pin
Spring
Spring
Left Bracket
Right Bracket
Trailshield Rod
Mulch Door Bracket
Mulch Door Rod
Mulch Door Spring
Front Shaft Assembly
Spacer Bushing
Wheel Bushing
Rear Shaft Assembly
Spacer Bushing
Height Adjust Handle
Height Adjust Spring
Height Adjust Knob
Height Adjust Rod
Motor
Flange
Electric Motor Fan
Blade
Washer
Washer
Nut
Strain Relief Bracket
Strain Relief Cap
Resistor
Ref, [
41
42
43
44
45
46
47
48
49
50
51
52
53
54
55
56
57
58
59
6o
61
62
63
64
65
66
67
68
69
70
71
72
73
74
75
76
77
78
79
8o
Part Number
725-05119
731-07599
725-05072
749-04670A
731-07522
749-04688A
731-07523
720-04145
736-04488
720-04146
714-04086
715-04107
712-04257
712-04251
720-04147
710-05082
736-04489
731-07524
714-04088
731-07513
625-04125
725-05115
725-05116
747-05304
764-04096
712-04251
736-04497
710-05123
710-05117
710-05118
712-04251
716-04163
725-05121
725-05127
710-05123
710-05123
710-05118
736-04505
714-04086
787-01841
Description
Resistor Holder
Resistor Bracket
Resistor Base
Upper Handle
Handle Grip
Lower Handle
Cord Retainer
Quick Release Handle
Washer
Quick Release Knob
Quick Release Pin
Pin
Nut
Nylock Nut
Wing Knob
Screw, M8
Washer
Cord Clip
Shoulder Bolt
Cap
Switch Box Assembly
AC Power Cord
Motor Cord
Grassbag Frame
Grassbag
Lock Nut
Washer
Screw, St, M4.8 x 16
Screw
Screw, MSx12
Nut, Lock, M4
Ring, Snap, lOmm
Base, Electric-Bridge
Electric, Bridge
Screw, St, M4.8 x 16
Screw, St, M4.8 x 16
Screw, MSx12
Washer, Spring
Pin, Cotter
Bracket, Wheel
21
Page 22

11
Page 23

SECTION11 -- NOTES 23
Page 24

MANUFACTURER'S LiMiTED WARRANTY FOR
The limited warranty set forth below is given by MTD LLC with
respect to new merchandise purchased and used in the United States
and/or its territories and possessions, and by MTD Products Limited
with respect to new merchandise purchased and used in Canadaand/
or its territories and possessions (either entity respectively, "MTD").
"MTD" warrants this product (excluding its Normal WearParts and
Attachments as described below) against defects in material and
workmanship for a period of two (2) years commencing onthe date
of original purchase and will, at its option, repair or replace,free of
charge, any part found to be defective in materials or workmanship.
This limited warranty shall only apply if this product has been
operated and maintained in accordance with the Operator's Manual
furnished with the product, and has not been subject to misuse,
abuse, commercial use, neglect, accident, improper maintenance,
alteration, vandalism, theft, fire, water, or damage because of other
peril or natural disaster. Damage resulting from the installation or use
of any part, accessory or attachment not approved by MTD for use
with the product(s) covered by this manual will void your warranty as
to any resulting damage.
Normal WearPartsare warranted to befree from defects in material
andworkmanship for a period of thirty (30) days from the dateof
purchase. Normal wear parts include, but are not limited to items
such as: batteries, belts, blades, bladeadapters, tines, grass bags,
wheels, rider deck wheels, seats, snow thrower skid shoes,friction
wheels, shaveplates, auger spiral rubber and tires.
Attachments-- MTD warrants attachments for this product against
defects in material and workmanship for a period of one (1) year,
commencing on the date of the attachment's original purchase or
lease.Attachments include, but are not limited to items such as:
grass collectors and mulch kits.
HOWTO OBTAINSERVICE:Warranty service is available, WITH
PROOFOFPURCHASE,through your local authorized service dealer.
Tolocate the dealer in your area:
In the U.S.A.
Checkyour Yellow Pages,or contact MTD LLC at RO. Box 361131,
Cleveland, Ohio 44136-0019, or call 1-800-800-7310, 1-330-220-
4683 or log on to our Web site at www.mtdproducts.com.
In Canada
Contact MTD Products Limited, Kitchener, ON N2G4J1, or call 1-800-
668-1238 or log on to our Web site at www.mtdcanada.com.
This limited warranty does not provide coverage in the following
cases:
a. Theengine or component parts thereof. These items may carry a
separate manufacturer's warranty. Referto applicable manufac-
turer's warranty for terms and conditions.
b. Log splitter pumps, valves, and cylinders havea separate one-
yearwarranty.
c. Routine maintenance items such as lubricants, filters, blade
sharpening, tune-ups, brake adjustments, clutch adjustments,
deck adjustments, and normal deterioration of the exterior finish
dueto use or exposure.
d. Service completed by someone other than an authorized service
dealer.
e. MTD does not extend any warranty for products sold or exported
outside of the United States and/or Canada, and their respective
possessions and territories, except those sold through MTD's
authorized channels of export distribution.
f. Replacement parts that are not genuine MTD parts.
g. Transportation charges and service calls.
h. MTD does not warrant this product for commercial use.
No implied warranty, including any implied warranty of
merchantability or fitness for a particular purpose, applies after
the applicable periodof express written warranty above as to the
parts as identified. No other express warranty, whether written or
oral, except as mentioned above, given by any personor entity,
includinga dealer or retailer, with respect to any product,shall
bind MTD. Duringthe period of the warranty, the exclusive remedy
is repair or replacement of the productas set forth above.
The provisions as set forth inthis warranty providethe sole and
exclusive remedy arising from the sale. MTD shall not be liable
for incidental or consequential loss or damage including, without
limitation, expenses incurred for substitute or replacement lawn
careservices or for rental expenses to temporarily replace a
warranted product.
Some states do not allow the exclusion or limitation of incidental
or consequential damages, or limitations on how long an implied
warranty lasts, so the above exclusions or limitations may not apply
to you.
In no event shall recovery of any kind begreater than the amount of
the purchase price of the product sold. Alteration of safety features of
the product shall void this warranty. You assume the risk and liability
for loss, damage, or injury to you and your property and/or to others
andtheir property arising out of the misuse or inability to use the
product.
This limited warranty shall not extend to anyone other than the
original purchaser or to the person for whom it was purchased as a
gift.
HOWSTATELAW RELATESTOTHIS WARRANTY: This limited
warranty givesyou specific legal rights, and you may also have other
rights which vary from state to state.
IMPORTANT:Owner must present Original Proof of Purchase to
obtain warranty coverage.
MTD LLC, P.O. BOX 361131 CLEVELAND, OHiO 44136=0019; Phone: 1=800=800=7310, 1=330=220=4683
MTD Canada Limited =KITCHENER, ON N2G 4J1; Phone 1=800=668=1238
GDOO-lO0015 REV. B
 Loading...