

Page 1
perator_s nual
I:RRFrgMRN°
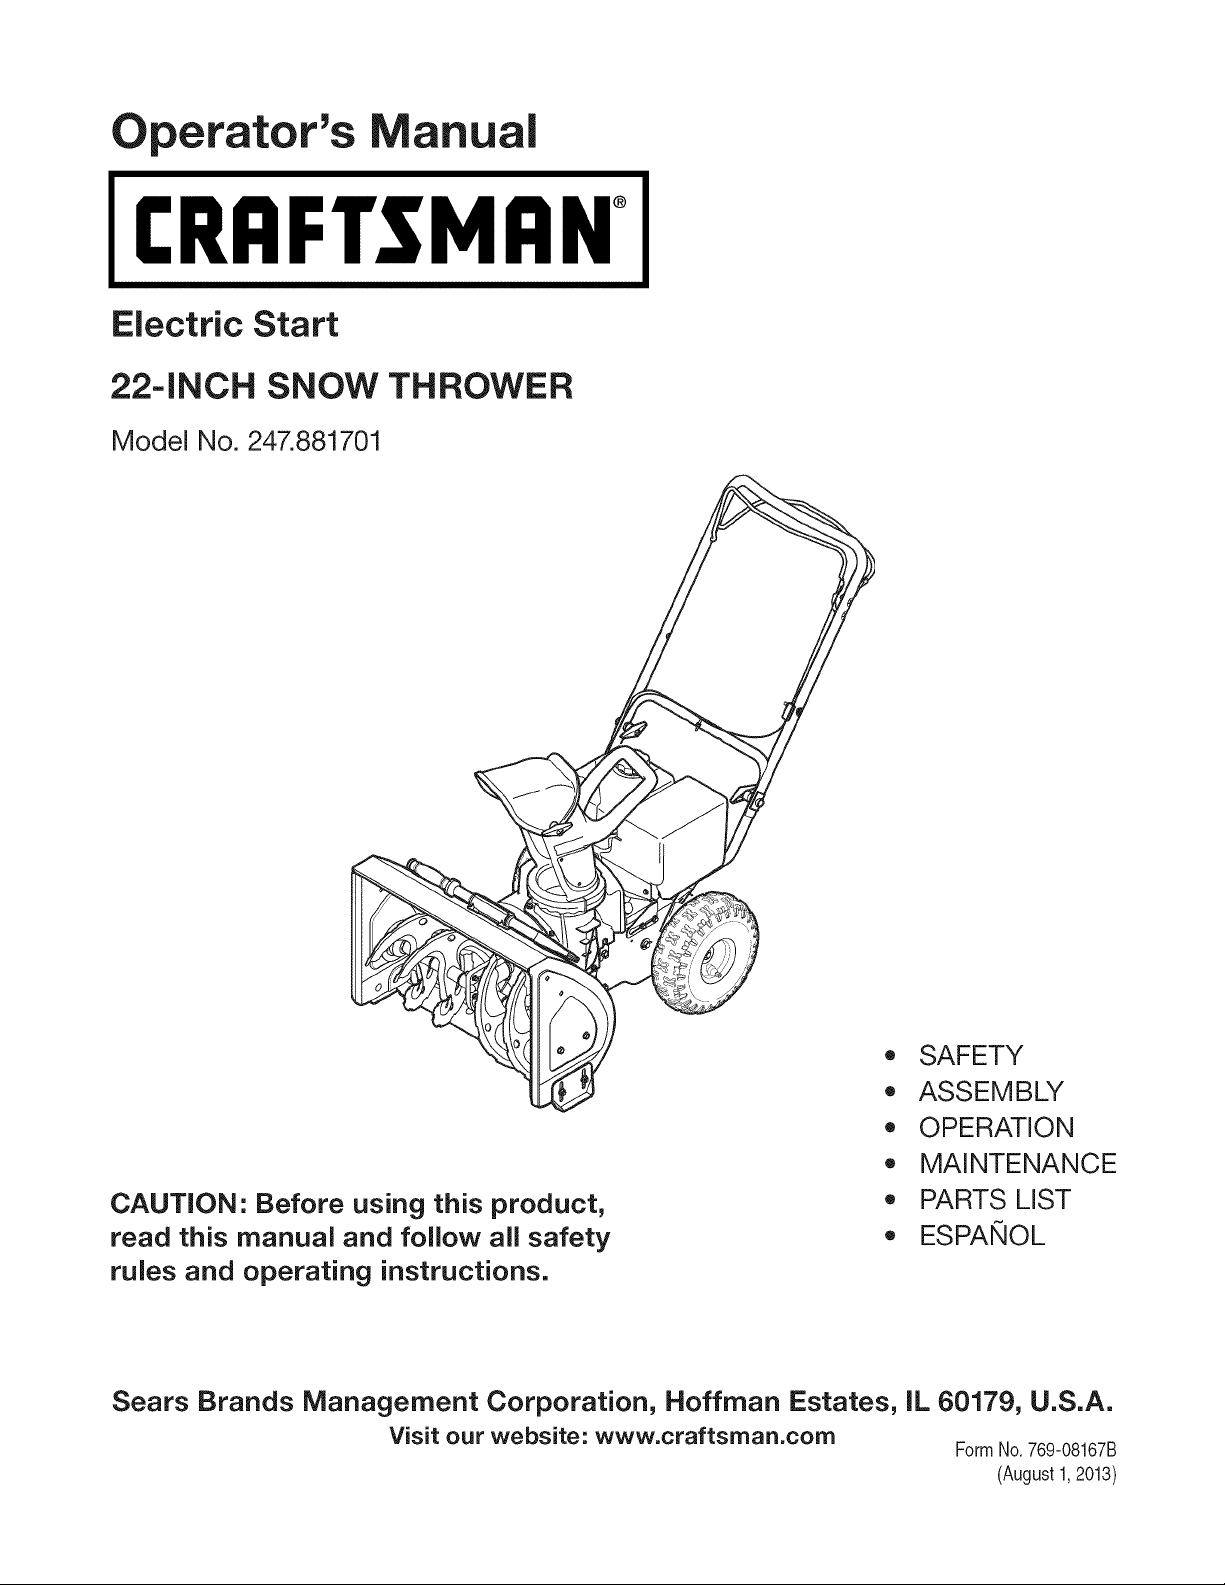
Electric Start
-INCH SNOW THROWER
Model No. 247.881701
,, SAFETY
o ASSEMBLY
OPERATION
MAINTENANCE
CAUTION: Before using this product,
read this manual and follow all safety
rules and operating instructions.
Sears Brands Management Corporation, Hoffman Estates, IL 60179, U.S.A.
Visit our website: www.craftsman.corn
PARTS LIST
o ESPANOL
FormNo.769-08167B
(August1,2013)
Page 2
WarrantyStatement.................... Page2
SafeOperation Practices ................ Page 3
Assembly ............................ Page 7
Operation ........................... Page 11
Maintenance & Service ................. Page 15
Off-Season Storage ................... Page 20
Troubleshooting ...................... Page 21
Parts List ............................ Page 22
Repair Protection Agreement ............ Page 41
Espa_ol ............................. Page 42
Contact Numbers .................. Back Cover
CRAFTSMANTWOYEAR FULLWARRANTY
FORTWOYEARSfromthe dateof purchase,this productiswarrantedagainstanydefectsin materialor workmanship.A defective
productwillreceivefreerepairor replacementif repairisunavailable.
Forwarranty coverage details to obtain freerepairorreplacement,visittheweb site: www.craftsman.com
Thiswarranty coversONLYdefects in materialandworkmanship. Warrantycoverage does NOTinclude:
• Expendableitemsthatcanwearoutfromnormalusewithinthewarrantyperiod,includingbutnot limitedtoaugers,augerpaddles,
driftcutters,skidshoes,shaveplate,shearpins,sparkplug,aircleaner,belts,andoilfilter.
• Standardmaintenanceservicing,oilchanges,or tune-ups.
Tirereplacementor repaircausedbypuncturesfromoutsideobjects,suchasnails,thorns,stumps,or glass.
Tireor wheelreplacementorrepairresultingfromnormalwear,accident,or improperoperationormaintenance.
Repairsnecessarybecauseof operatorabuse,includingbutnotlimitedto damagecausedbyover-speedingtheengine,or from
impactingobjectsthatbendtheframe,augershaft,etc.
• Repairsnecessarybecauseof operatornegligence,includingbutnot limitedto,electricalandmechanicaldamagecausedby
improperstorage,failureto usethepropergradeandamountof engineoil,or failureto maintaintheequipmentaccordingto the
instructionscontainedintheoperator'smanual.
• Engine(fuelsystem)cleaningorrepairscausedbyfueldeterminedto becontaminatedoroxidized(stale).Ingeneral,fuelshouldbe
usedwithin30 daysof itspurchasedate.
Normaldeteriorationandwearof theexteriorfinishes,orproductlabelreplacement.
Thiswarrantyisvoidif thisproductisever usedwhileprovidingcommercialservicesor if rentedtoanotherperson.
Thiswarrantygivesyouspecificlegalrights,andyou mayalsohaveotherrightswhichvaryfromstatetostate.
SearsBrands ManagementCorporation, HoffmanEstates,IL 60179
EngineOilType: 5W-30
EngineOilCapacity: 20ounces
FuelCapacity: 2.3Quarts
SparkPlug: F6RTC(F6TC)
SparkPlugGap: .020"to.030"
© SearsBrands,LLC
ModelNumber.................................................................
Serial Number .................................................................
Dateof Purchase.............................................................
Recordthemodelnumber,serialnumber
anddateof purchaseabove
2
Page 3
Thissymbolpointsout importantsafety instructionswhich,ifnot
followed,couldendangerthe personalsafetyand/orproperty of
yourselfandothers.Readandfollow allinstructions inthismanual
beforeattempting to operatethis machine.Failureto complywith these
instructionsmayresultinpersonalinjury.Whenyouseethis symbol,HEED
ITSWARNING!
Thismachinewasbuilt tobeoperatedaccordingto thesafeoperation
practicesinthis manual.Aswith anytype of powerequipment,
carelessnessorerroronthe part of the operatorcanresultinseriousinjury.
Thismachineiscapableof amputatingfingers, hands,toesandfeet and
throwingdebris.Failuretoobservethefollowing safetyinstructionscould
resultinseriousinjuryor death.
CALIFORNIA PROPOSITION 65
EngineExhaust,someof its constituents,and certainvehiclecomponents
containor emit chemicalsknownto Stateof Californiatocausecancerand
birth defectsorother reproductiveharm.
TRAINING
Read,understand,andfollowall instructionsonthemachineandinthe
manual(s)beforeattemptingtoassembleandoperate.Failuretodosocan
resultinseriousinjurytotheoperatorand/orbystanders.Keepthis manual
inasafeplaceforfutureandregularreferenceandfororderingreplacement
parts.
Befamiliarwithallcontrolsandtheirproperoperation.Knowhowto stop
themachineanddisengagethemquickly.
Neverallowchildrenunder14yearsofagetooperatethismachine.Children
14andovershouldreadandunderstandtheinstructionsandsafeoperation
practicesinthismanualandonthemachineandbetrainedandsupervised
byanadult.
Neverallowadultsto operatethismachinewithout properinstruction.
Thrownobjectscancauseseriouspersonalinjury.Planyoursnow-throwing
patterntoavoiddischargeof materialtowardroads,bystandersandthelike.
Keepbystanders,petsandchildrenatleast75feetfromthemachinewhileit
isin operation.Stopmachineif anyoneentersthearea.
Exercisecautiontoavoidslippingorfalling,especiallywhenoperatingin
reverse.
PREPARATION
Thoroughlyinspecttheareawheretheequipmentistobeused.Removeall
doormats,newspapers,sleds,boards,wiresandotherforeignobjects,which
couldbetrippedoverorthrownbytheauger/impeller.
Alwayswearsafetyglassesoreyeshieldsduringoperationandwhile
performinganadjustmentor repairto protectyoureyes.Thrownobjects
whichricochetcancauseseriousinjurytotheeyes.
Donotoperatewithout wearingadequatewinteroutergarments.Donot
wearjewelry,longscarvesorotherlooseclothing,whichcouldbecome
entangledinmovingparts.Wearfootwearwhichwill improvefootingon
slipperysurfaces.
Useagroundedthree-wireextensioncordandreceptacleforallmachines
with electricstartengines.
Your Responsibility--Restrict theuseofthis powermachineto
personswhoread,understandandfollow the warningsand instructionsin
thismanualandonthe machine.
SAVETHESEINSTRUCTIONS!
Disengageallcontrolleversbeforestartingtheengine.
Adjustcollectorhousingheighttocleargravelorcrushedrocksurfaces.
Neverattempttomakeanyadjustmentswhileengineisrunning,except
wherespecificallyrecommendedintheoperator'smanual.
Letengineandmachineadjusttooutdoortemperaturebeforestartingto
clearsnow.
Safe Handling of Gasoline:
Toavoidpersonalinjuryor property damageuseextremecareinhandling
gasoline.Gasolineisextremelyflammable andthe vaporsareexplosive.
Seriouspersonalinjurycanoccurwhengasolineisspilledonyourselforyour
clotheswhichcanignite.Washyour skinandchangeclothesimmediately.
Useonlyanapprovedgasolinecontainer.
Neverfillcontainersinsidea vehicleorona truckortrailerbedwithaplastic
liner.Alwaysplacecontainersonthegroundawayfromyourvehiclebefore
filling.
Whenpractical,removegas-poweredequipmentfromthetruckor
trailerandrefuelitontheground.Ifthisis notpossible,thenrefuelsuch
equipmentonatrailerwith aportablecontainer,ratherthanfromagasoline
dispensernozzle.
Keepthenozzleincontactwiththerimofthefueltankorcontaineropening
atalltimesuntilfuelingiscomplete.Donotuseanozzlelock-opendevice.
Extinguishallcigarettes,cigars,pipesandothersourcesofignition.
Neverfuelmachineindoors.
Neverremovegascaporaddfuelwhiletheengineishotorrunning.Allow
enginetocoolatleasttwo minutesbeforerefueling.
Neveroverfill fueltank.Filltankto nomorethan1/2inchbelowbottomof
fillernecktoallowspacefor fuelexpansion.
Replacegasolinecapandtightensecurely.
Ifgasolineisspilled,wipeit offthe engineandequipment.Moveunitto
anotherarea.Wait.5minutesbeforestartingtheengine.
Page 4
Toreducefirehazards,keepmachinefreeofgrass,leaves,orotherdebris
build-up.Cleanupoilorfuelspillageandremoveanyfuelsoakeddebris.
Neverstorethemachineorfuelcontainerinsidewherethereisanopen
flame,sparkorpilotlightasonawaterheater,spaceheater,furnace,clothes
dryerorothergasappliances.
OPERATION
Donotputhandsorfeetnearrotatingparts,intheauger/impellerhousing
orchuteassembly.Contactwiththerotatingpartscanamputatehandsand
feet.
Theauger/impellercontrolleverisasafetydevice.Neverbypassits
operation.Doingsomakesthemachineunsafeandmaycausepersonal
injury.
Thecontrolleversmustoperateeasilyin bothdirectionsandautomatically
returntothedisengagedpositionwhenreleased.
Neveroperatewith amissingordamagedchuteassembly.Keepallsafety
devicesinplaceandworking.
Neverrunanengineindoorsor inapoorlyventilatedarea.Engineexhaust
containscarbonmonoxide,anodorlessanddeadlygas.
Donotoperatemachinewhileundertheinfluenceofalcoholordrugs.
Mufflerandenginebecomehotandcancauseaburn.Donottouch.Keep
childrenaway.
Exerciseextremecautionwhenoperatingonorcrossinggravelsurfaces.Stay
alertforhiddenhazardsortraffic.
Exercisecautionwhenchangingdirectionandwhileoperatingonslopes.Do
notoperateonsteepslopes.
Planyoursnow-throwingpatterntoavoiddischargetowardswindows,
walls,carsetc.Thus,avoidingpossiblepropertydamageorpersonalinjury
causedbyaricochet.
Neverdirectdischargeatchildren,bystandersandpetsor allowanyonein
frontofthemachine.
Donotoverloadmachinecapacitybyattemptingtoclearsnowattoofastof
arate.
Neveroperatethismachinewithoutgoodvisibilityorlight.Alwaysbesureof
yourfootingandkeepafirm holdonthehandles.Walk,neverrun.
Disengagepowertotheauger/impellerwhentransportingornotin use.
Neveroperatemachineathightransportspeedsonslipperysurfaces.Look
downandbehindandusecarewhenbackingup.
Ifthemachineshouldstarttovibrateabnormally,stoptheengine,
disconnectthesparkplugwireandgrounditagainsttheengine.Inspect
thoroughlyfordamage.Repairanydamagebeforestartingandoperating.
Disengageallcontrolleversandstopenginebeforeyouleavetheoperating
position(behindthehandles).Waituntiltheauger/impellercomesto
acompletestopbeforeuncloggingthechuteassembly,makingany
adjustments,orinspections.
Neverputyourhandinthedischargeorcollectoropenings.Donotunclog
chuteassemblywhileengineis running.Shutoff engineandremainbehind
handlesuntilallmovingpartshavestoppedbeforeunclogging.
Useonlyattachmentsandaccessoriesapprovedbythemanufacturer(e.g.
wheelweights,tirechains,cabsetc.).
Whenstartingengine,pull cordslowlyuntil resistanceisfelt,thenpull
rapidly.Rapidretractionofstartercord(kickback)will pullhandandarm
towardenginefasterthanyoucanletgo.Brokenbones,fractures,bruisesor
sprainscouldresult.
Ifsituationsoccurwhicharenotcoveredinthismanual,usecareandgood
judgment.
CLEARING A CLOGGED DISCHARGE CHUTE
Handcontactwith therotatingimpellerinsidethedischargechuteisthemost
commoncauseofinjuryassociatedwithsnowthrowers.Neveruseyourhandto
cleanoutthedischargechute.
Toclearthechute:
a. SHUTTHEENGINEOFF!
b. Wait10secondsto besuretheimpellerbladeshavestopped
rotating.
c. Alwaysuseaclean-outtool,notyourhands.
MAINTENANCE & STORAGE
Nevertamperwith safetydevices.Checktheirproperoperationregularly.
Referto themaintenanceandadjustmentsectionsof thismanual.
Beforecleaning,repairing,orinspectingmachinedisengageallcontrol
leversandstoptheengine.Waituntil theauger/impellercometo acomplete
stop.Disconnectthesparkplugwireandgroundagainsttheengineto
preventunintendedstarting.
Checkboltsandscrewsforpropertightnessat frequentintervalsto keepthe
machineinsafeworkingcondition.Also,visuallyinspectmachineforany
damage.
Donotchangetheenginegovernorsettingorover-speedtheengine.The
governorcontrolsthemaximumsafeoperatingspeedoftheengine.
Snowthrowershaveplatesandskidshoesaresubjecttowearanddamage.
Foryoursafetyprotection,frequentlycheckallcomponentsandreplace
with originalequipmentmanufacturer's(OEM)partsonlyaslistedinthe
Partspagesofthisoperator'smanual.Useof partswhichdonot meetthe
originalequipmentspecificationsmayleadto improperperformanceand
compromisesafety!
Checkcontrolleversperiodicallyto verifytheyengageanddisengage
properlyandadjust,if necessary.Refertotheadjustmentsectioninthis
operator'smanualfor instructions.
Maintainorreplacesafetyandinstructionlabels,asnecessary.
Observeproperdisposallawsandregulationsforgas,oil,etc.to protectthe
environment.
Priorto storing,runmachineafewminutesto clearsnowfrommachineand
preventfreezeupof auger/impeller.
Neverstorethemachineorfuelcontainerinsidewherethereisanopen
flame,sparkorpilotlightsuchasa waterheater,furnace,clothesdryeretc.
Alwaysrefertotheoperator'smanualforproperinstructionsonoff-season
storage.
4
Page 5
Checkfuelline,tank,cap,andfittingsfrequentlyfor cracksor leaks.Replace
if necessary.
Donotcrankenginewithsparkplugremoved.
AccordingtotheConsumerProductsSafetyCommission(CPSC)andthe
U.S.EnvironmentalProtectionAgency(EPA),thisproducthasan Average
Useful Lifeof seven(7)years,or60hoursofoperation.Attheendof
theAverage Useful Lifehavethemachineinspectedannuallybyan
authorizedservicedealerto ensurethat allmechanicalandsafetysystems
areworkingproperlyandnotwornexcessively.Failureto dosocanresultin
accidents,injuriesordeath.
DO NOT MODIFY ENGINE
Toavoidseriousinjuryordeath,donotmodifyengineinanyway.Tampering
with thegovernorsetting canleadto arunawayengineandcauseit to
operateat unsafespeeds.Nevertamperwith factorysetting ofengine
governor.
NOTICE REGARDING EMiSSiONS
Engineswhichare certifiedto complywith CaliforniaandfederalEPA
emissionregulationsfor SORE(SmallOff RoadEquipment)arecertified
tooperateonregularunleadedgasoline,and mayincludethe following
emissioncontrolsystems:EngineModification (EM),OxidizingCatalyst(0C),
SecondaryAirinjection(SAI)andThreeWayCatalyst(TWC)ifsoequipped.
SPARK ARRESTOR
e
Thismachineisequippedwith aninternalcombustionengineandshould
not beusedonornearanyunimprovedforest-covered,brushcoveredor
grass-coveredland unlessthe engine'sexhaustsystemisequippedwith a
sparkarrestormeetingapplicablelocalorstatelaws(if any).
Ira sparkarrestoris used,it shouldbemaintainedin effectiveworking order
bythe operator.In theStateofCaliforniatheaboveisrequiredbylaw (Section
4442ofthe CaliforniaPublicResourcesCode).Otherstates mayhavesimilar
laws.Federallawsapplyonfederallands.
Asparkarrestorfor the muffler isavailablethroughyour nearestSearsParts
andRepairServiceCenter.
Page 6
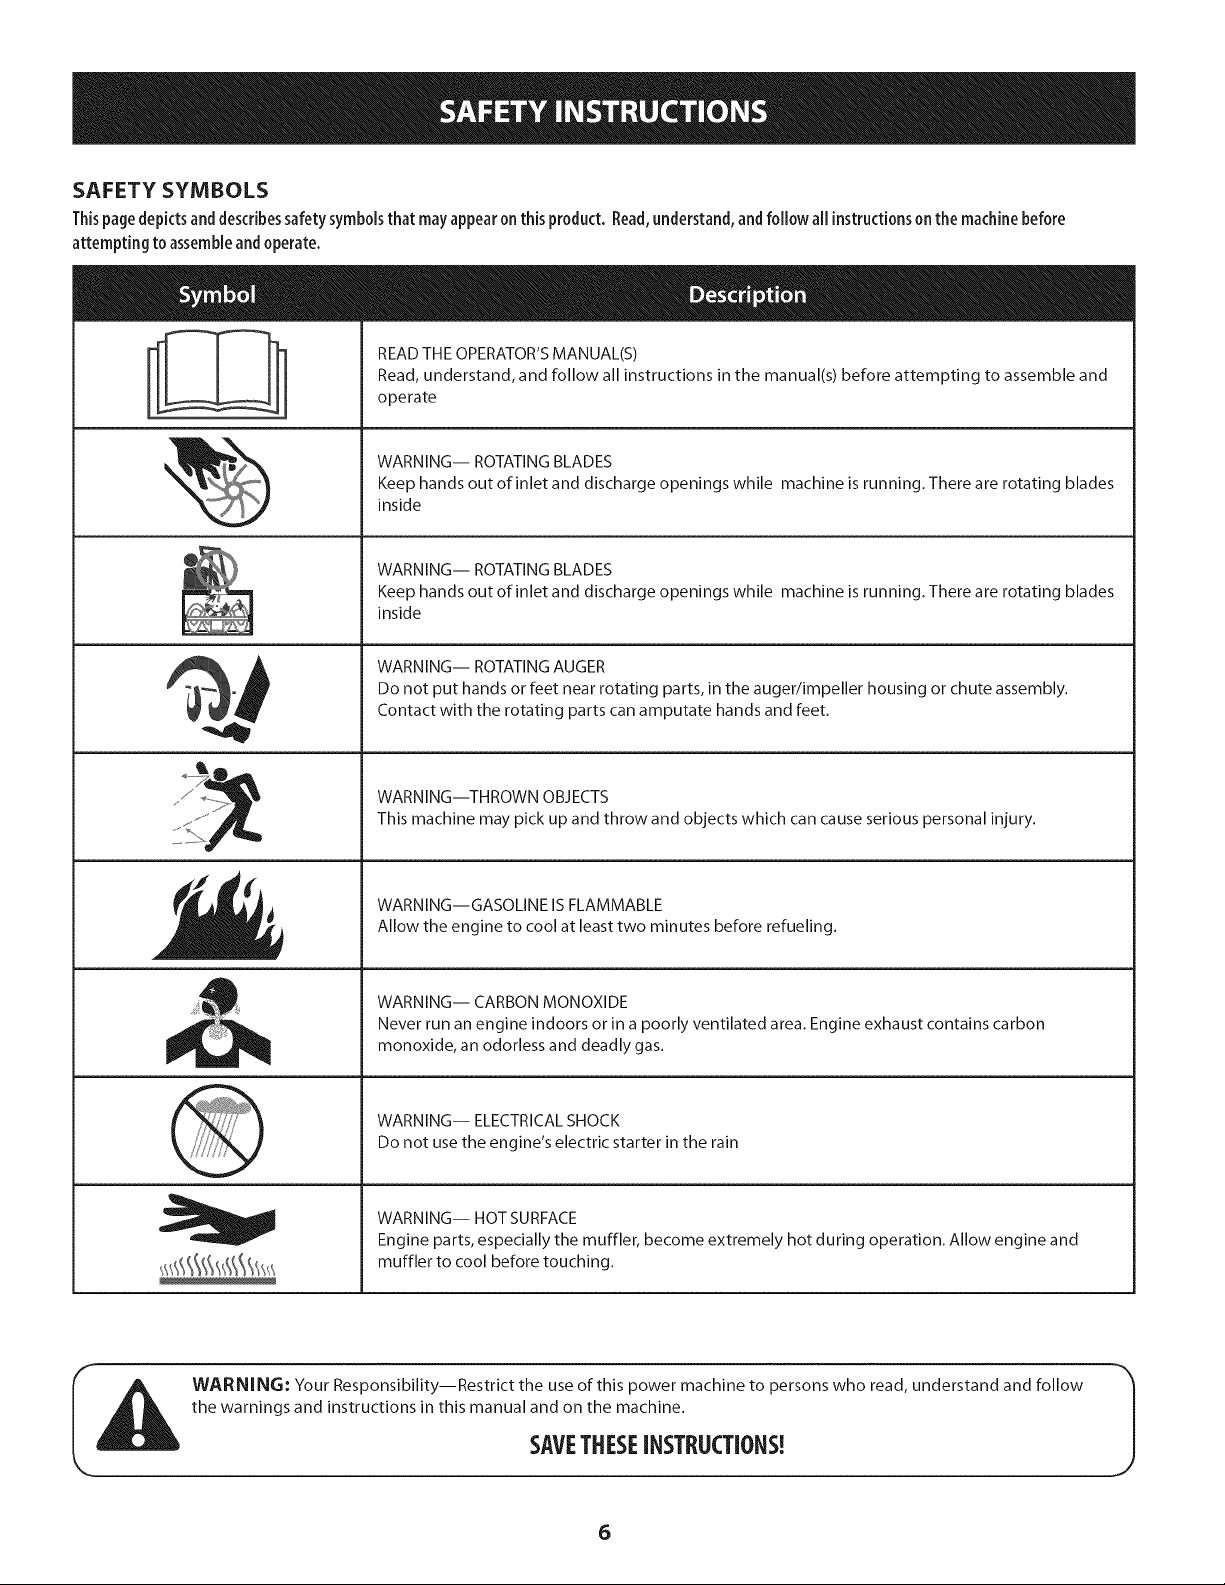
SAFETY SYMBOLS
Thispage depicts and describes safety symbols that may appear on this product. Read,understand, and follow all instructions on the machine before
attempting to assemble and operate.
READ THE OPERATOR'S MANUAL(S)
Read, understand, and follow all instructions in the manual(s) before attempting to assemble and
operate
WARNING-- ROTATING BLADES
Keep hands out of inlet and discharge openings while machine is running. There are rotating blades
inside
WARNING-- ROTATING BLADES
Keep hands out of inlet and discharge openings while machine is running. There are rotating blades
inside
WARNING-- ROTATING AUGER
Do not put hands or feet near rotating parts, in the auger/impeller housing or chute assembly.
Contact with the rotating parts can amputate hands and feet.
WARNING--THROWN OBJECTS
This machine may pick up and throw and objects which can cause serious personal injury.
WARNING--GASOLINE IS FLAMMABLE
Allow the engine to cool at least two minutes before refueling.
WARNING-- CARBON MONOXIDE
Never run an engine indoors or in a poorly ventilated area. Engine exhaust contains carbon
monoxide, an odorless and deadly gas.
WARNING-- ELECTRICAL SHOCK
Do not use the engine's electric starter in the rain
WARNING-- HOT SURFACE
Engine parts, especially the muffler, become extremely hot during operation. Allow engine and
muffler to cool before touching.
WARNING: Your Responsibility--Restrict the use of this power machine to persons who read, understand and follow
the warnings and instructions in this manual and on the machine.
SAVETHESEiNSTRUCTIONS!
6
Page 7

IMPORTANT: This unit isshipped with the engine full of oil. After
assembly, see page 10for fuel and oil details.
RemovingFromCarton
1. Cutthecornersof thecartonandlaythesidesflat ontheground.Removeall
packinginserts.
2. Movethesnowthroweroutof thecarton,
3. Makecertainthecartonhasbeencompletelyemptiedbeforediscardingit.
DoNOTlift the snowthrower bythe chutehandle.
Before Assembly
flOTE:Referencetoright, left,frontorrearoftheunit isfromtheoperating
position,facingforward,unlessotherwisestated.
Setting UpTheHandle
flOTE:Beawareofthethreelooselyfitted cabletiesattachedto thelowerhandle
thatwill beutilizedlatertosecurethecables.
1. Loosenandremovethewingknob,saddlewasher,handletabandcarriage
screwoneachsideofthelowerhandle.SeeFigure1.
2. Slidethelooselyfitted cabletiefromtherightsideofthelowerhandleupto
thecrossmemberof thelowerhandle.Leavethesecondcabletiein placeon
therightsideofthelowerhandle.SeeFigure3forreference.
IMPORTANT: Itwill be necessary to lift the upper handle while
sliding up this cable tie to prevent damage to the cable.
3. Lifttheupperhandleupandpositionit overthelowerhandle,aligningthe
holeswherethewingknobswereremoved(1).SeeFigure2.
Becarefulnotto bend orkinkthe cables.
4. Inserta carriagescrewfromtheoutsidethroughahandletab,theupperand k,,,
lowerhandles,asaddlewasherandintothewingknob(2).Repeatonthe
otherside. ,,-
5. Tightenthewingknobsoneachsideof thehandle.Referto Figure2.
flOTE:Theaugercableroutesdowntheleft lowerhandleandthedrivecable
isroutedacrossthetopofthe lowerhandleanddowntherightsideof the
lowerhandle.SeeFigure3.
6. Twocabletieshavebeenusedto looselytiethecontrolcablesto the lower
handle.Apushclipisalsoincludedonthelowerdrivecable.Positioncable
tiesnow,asinFigure3,andtightentosecurecablesto thelowerhandle.
Trimoff excessmaterialofcableties.Installthepushclipintotheholeinthe
handleprovidedasshownin theleftinsetin Figure3.
7
Figure2
/
DRIVE Cable
Cable
PUSH Clip
Figure3
Page 8
SkidShoe
Thesnowthrowerskidshoesareadjustedupwardatthefactoryforshipping
purposes.Adjustthemdownward,if desired,priorto operatingthesnowthrower.
Itisnotrecommendedthat youoperatethissnowthrower ongravelas
itcaneasilypickupandthrow loosegravel,causingpersonalinjuryor
damageto the snowthrowerand surroundingproperty.
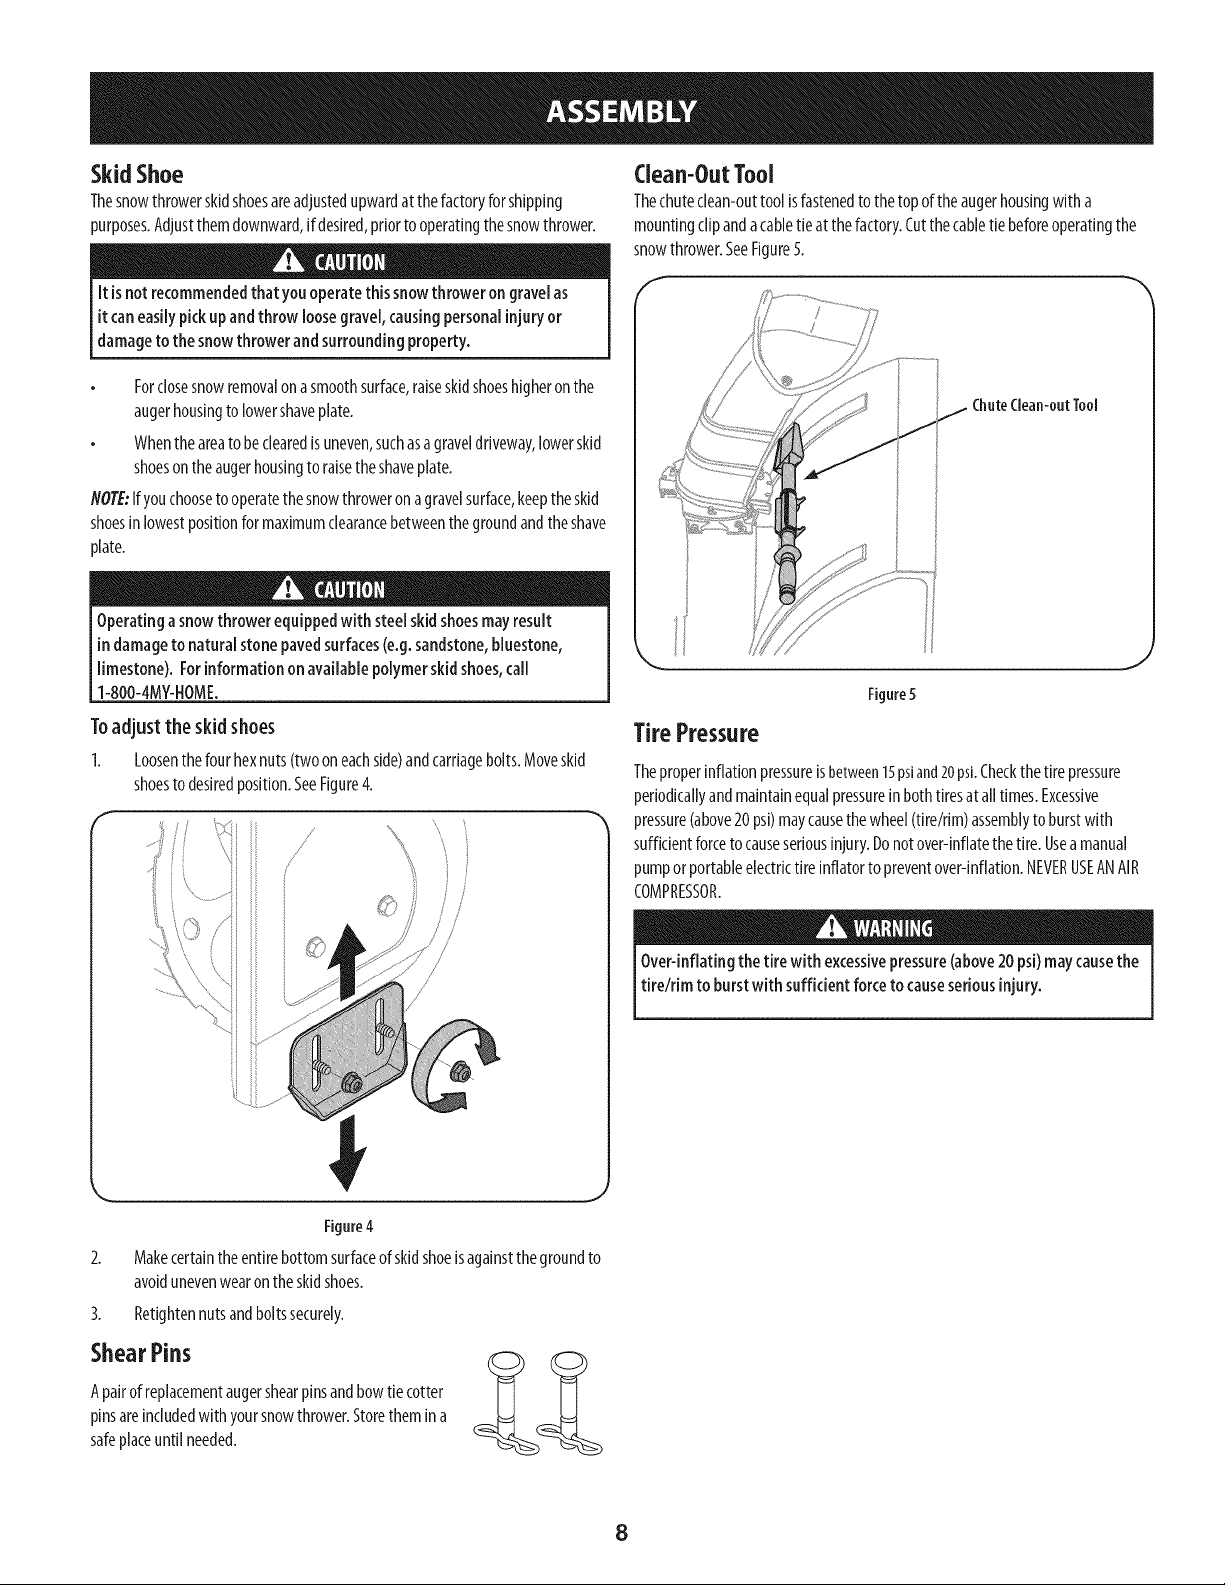
Clean-OutTool
Thechuteclean-outtool isfastenedto thetopoftheaugerhousingwitha
mountingclipandacabletie atthefactory.Cutthecabletiebeforeoperatingthe
snowthrower.SeeFigure5.
Forclosesnowremovalonasmoothsurface,raiseskidshoeshigheronthe
augerhousingtolowershaveplate.
Whentheareato beclearedisuneven,suchasagraveldriveway,lowerskid
shoesontheaugerhousingtoraisetheshaveplate.
NOTE:Ifyouchoosetooperatethesnowthroweronagravelsurface,keeptheskid
shoesinlowestpositionfor maximumclearancebetweenthegroundandtheshave
plate.
Operatingasnowthrower equippedwith steelskidshoesmayresult
indamageto natural stonepavedsurfaces(e.g.sandstone,bluestone,
limestone). Forinformationonavailablepolymerskidshoes,cail
1-800-4M¥-EIOME.
Toadjust the skid shoes
I. Loosenthefourhexnuts(twooneachside)andcarriagebolts.Moveskid
shoestodesiredposition.SeeFigure4.
//
iii
/
/
//
ChuteClean-out Tool
Figure5
TirePressure
Theproperinflationpressureisbetween15psiand20psi.Checkthetirepressure
periodicallyandmaintainequalpressureinbothtiresatalltimes.Excessive
pressure(above20psi)maycausethewheel(tire/rim)assemblytoburstwith
sufficientforcetocauseseriousinjury.Donotover-inflatethetire.Usea manual
pumporportableelectrictire inflatorto preventover-inflation.NEVERUSEANAIR
COMPRESSOR.
Over-inflatingthe tire with excessivepressure(above20psi)maycausethe
tire/rim to burstwith sufficient forceto causeseriousinjury.
Figure4
2. Makecertaintheentirebottomsurfaceof skidshoeisagainstthegroundto
avoidunevenwearontheskidshoes.
3. Retightennutsandboltssecurely.
ShearPins
Apairofreplacementaugershearpinsandbowtiecotter
pinsareincludedwith yoursnowthrower.Storethemina
safeplaceuntilneeded.
8
Page 9
Fuel Recommendations
Useautomotivegasoline(unleadedorlowleadedto minimizecombustionchamber
deposits)witha minimumof87octane.Gasolinewith upto10%ethanolor15%
MTBE(MethylTertiaryButylEther)canbeused.Neveruseanoil/gasolinemixture
ordirtygasoline.Avoidgettingdirt,dust,orwaterinthefueltank.DONOTuseE85
gasoline.
Refuelinawell-ventilatedareawith theenginestopped.Donotsmokeor
allowflamesorsparksintheareawheretheengineisrefueledorwhere
gasolineisstored.
Donotoverfillthefueltank.Afterrefueling,makesurethetankcapisclosed
properlyandsecurely.
Becarefulnotto spillfuelwhenrefueling.Spilledfuelorfuelvapormay
ignite.Ifanyfuelisspilled,makesuretheareaisdrybeforestartingthe
engine.
Avoidrepeatedorprolongedcontactwith skinorbreathingofvapor.
AddingFuel
Useextremecarewhen handlinggasoline.Gasolineisextremelyflammable
andthevaporsare explosive.Neverfuel themachineindoorsorwhile the
engine ishotor running.Extinguishcigarettes,cigars,pipesandother
[sourcesof gnt on.
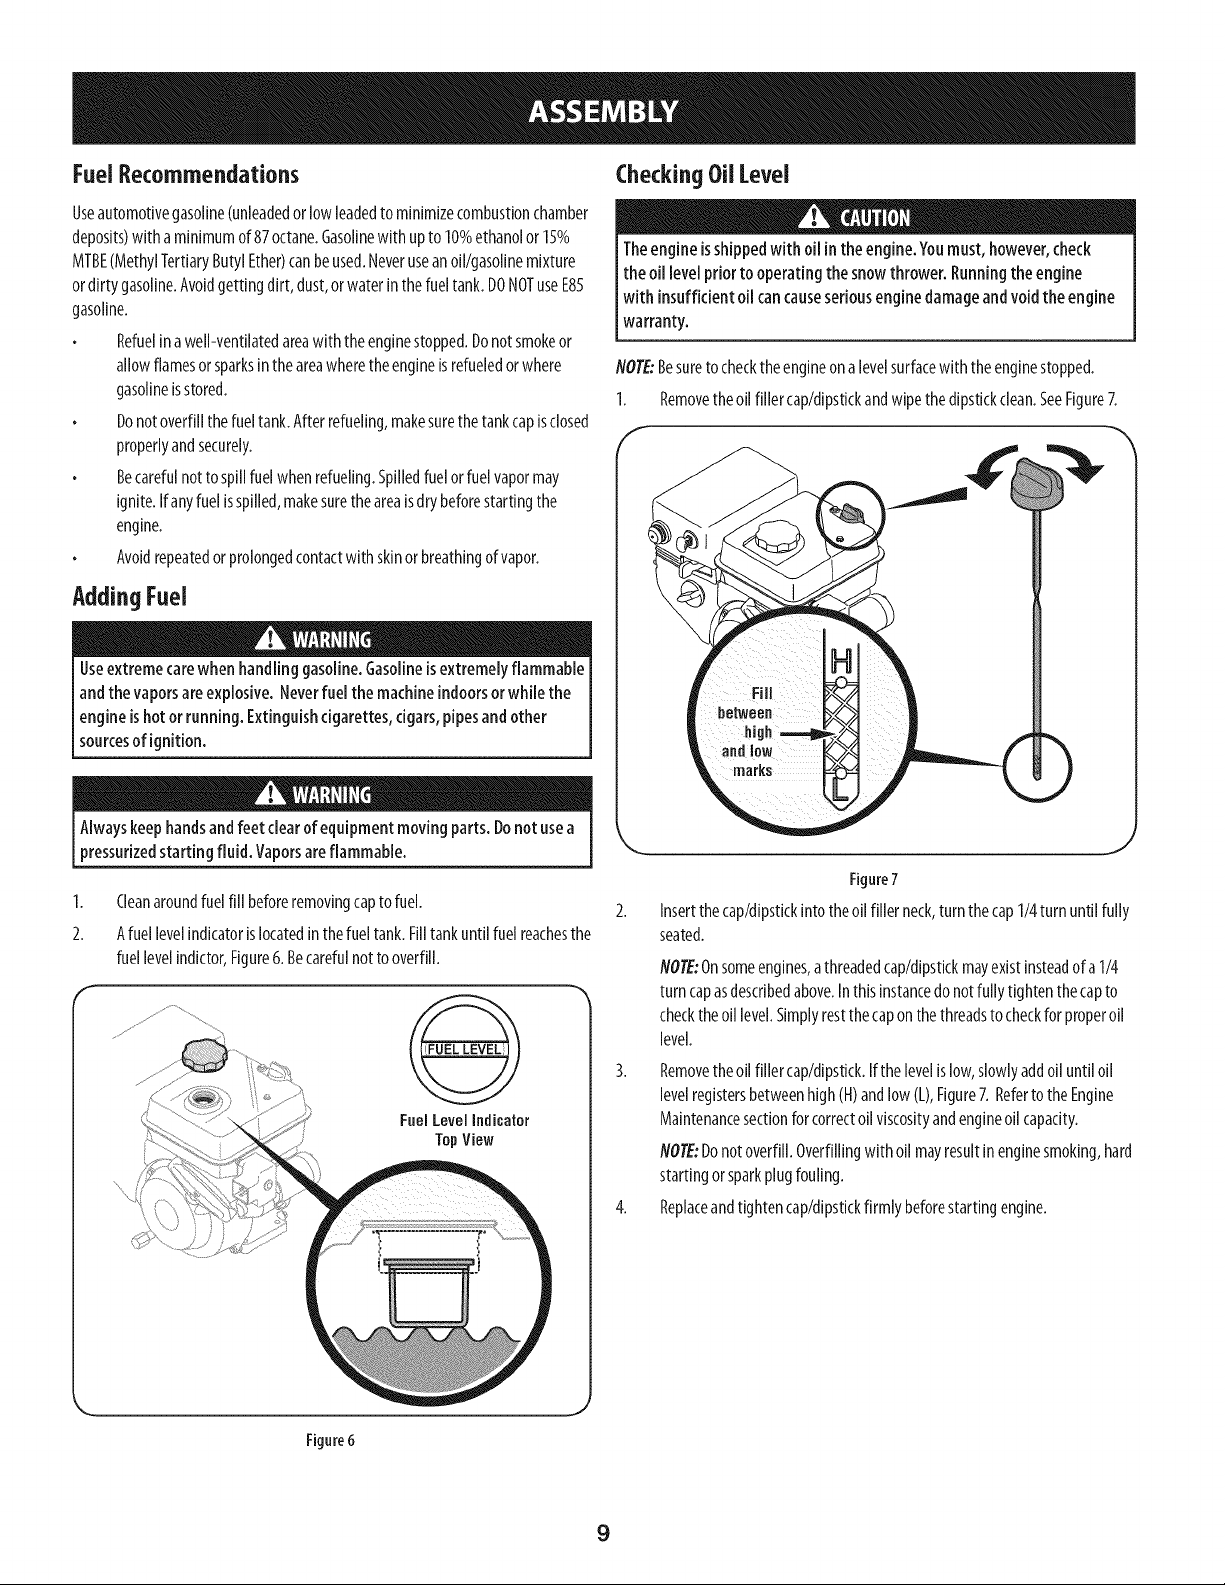
CheckingOilLevel
Theengineisshippedwith oil intheengine.Youmust,however,check
the oil levelpriorto operatingthe snowthrower. Runningtheengine
with insufficientoil cancauseseriousenginedamageandvoidthe engine
warranty.
flOTE:Besuretochecktheengineona levelsurfacewith theenginestopped.
1. Removetheoil filler cap/dipstickandwipethedipstickclean.SeeFigure7.
Alwayskeephandsandfeet clearof equipmentmoving parts. Donotusea
pressurizedstarting fluid. Vaporsareflammable.
I.
Cleanaroundfuelfill beforeremovingcapto fuel.
2.
Afuel levelindicatorislocatedinthefueltank.Filltankuntilfuel reachesthe
fuellevelindictor,Figure6.Becarefulnottooverfill.
Fuel Level Indicator
TopView
j
Figure7
Insertthecap/dipstickintotheoil filler neck,turnthecap1/4turnuntil fully
seated.
NOTE:Onsomeengines,athreadedcap/dipstkkmayexistinsteadofa 1/4
turncapasdescribedabove.Inthisinstancedonotfullytightenthecapto
checktheoil level.Simplyrestthecaponthethreadsto checkforproperoil
level.
3. Removetheoil filler cap/dipstick.Ifthe levelislow,slowlyaddoil untiloil
levelregistersbetweenhigh(H)andlow(L),Figure7.RefertotheEngine
Maintenancesectionforcorrectoil viscosityandengineoilcapacity.
NO?E:Donotoverfill.Overfillingwithoil mayresultinenginesmoking,hard
startingorsparkplugfouling.
4. Replaceandtightencap/dipstickfirmly beforestartingengine.
Figure6
9
Page 10
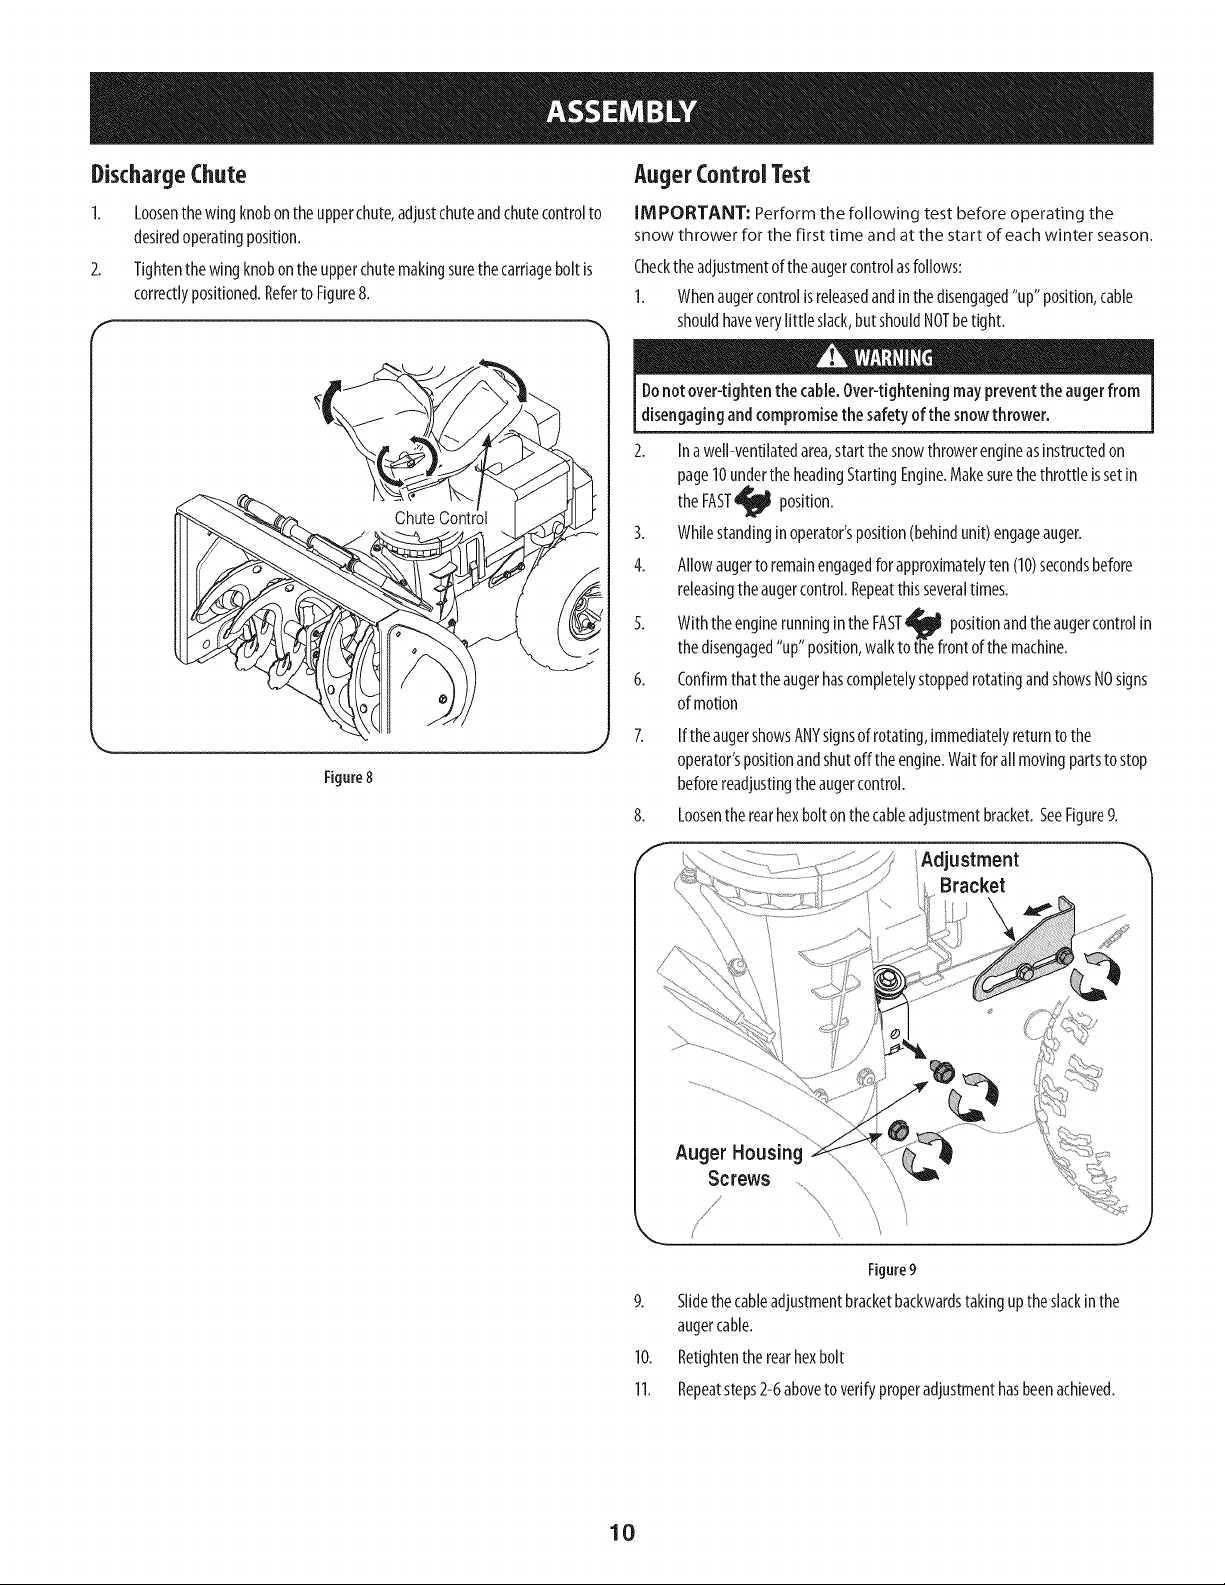
DischargeChute
Loosenthewing knobontheupperchute,adjustchuteandchutecontrolto
desiredoperatingposition.
2.
Tightenthewingknobontheupperchutemakingsurethecarriageboltis
correctlypositioned.RefertoFigure8.
F
AugerControlTest
IMPORTANT: Perform the following test before operating the
snow thrower for the first time and at the start of each winter season.
Checktheadjustmentoftheaugercontrolasfollows:
1. Whenaugercontrolisreleasedandinthedisengaged"up" position,cable
shouldhaveverylittle slack,butshouldNOTbetight.
Donotover-tighten the cable.Over-tighteningmaypreventthe augerfrom
disengagingandcompromisethesafetyofthe snowthrower.
2. Inawell-ventilatedarea,startthesnowthrowerengineasinstructedon
page10undertheheadingStartingEngine.Makesurethethrottle issetin
the FAST_I position.
3. Whilestandinginoperator'sposition(behindunit)engageauger.
4. Allowaugertoremainengagedforapproximatelyten(10)secondsbefore
releasingtheaugercontrol.Repeatthisseveraltimes.
5. WiththeenginerunningintheFAST_ positionandtheaugercontrolin
thedisengaged"up"position,walktothefrontofthemachine.
6. ConfirmthattheaugerhascompletelystoppedrotatingandshowsNOsigns
ofmotion
\
Figure8
7. IftheaugershowsANYsignsofrotating,immediatelyreturntothe
operator'spositionandshutoff theengine.Waitforall movingpartsto stop
beforereadjustingtheaugercontrol.
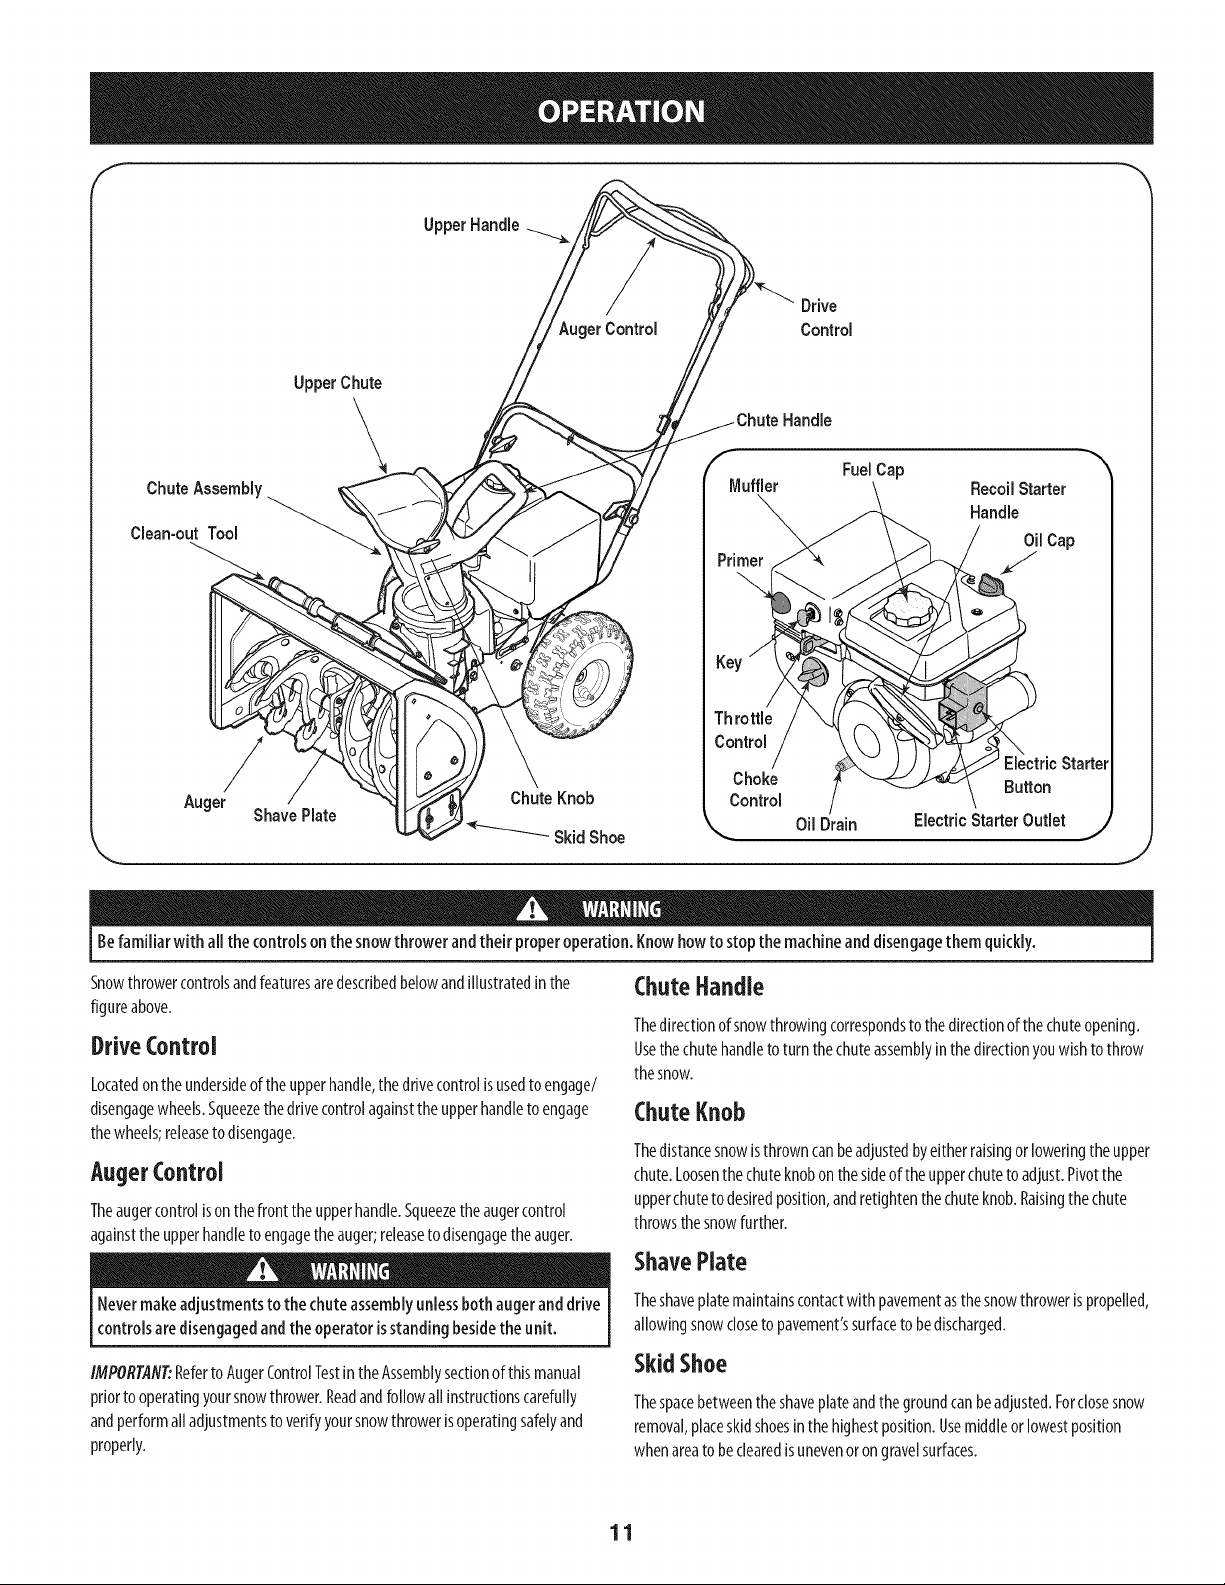
8. Loosentherearhexboltonthecableadjustmentbracket.SeeFigure9.
F i Adjustment
Bracket
Auger Housing
Screws
Figure9
9. Slidethecableadjustmentbracketbackwardstakinguptheslackinthe
augercable.
10. Retightenthe rearhexbolt
11. Repeatsteps2-6aboveto verifyproperadjustmenthasbeenachieved.
10
Page 11
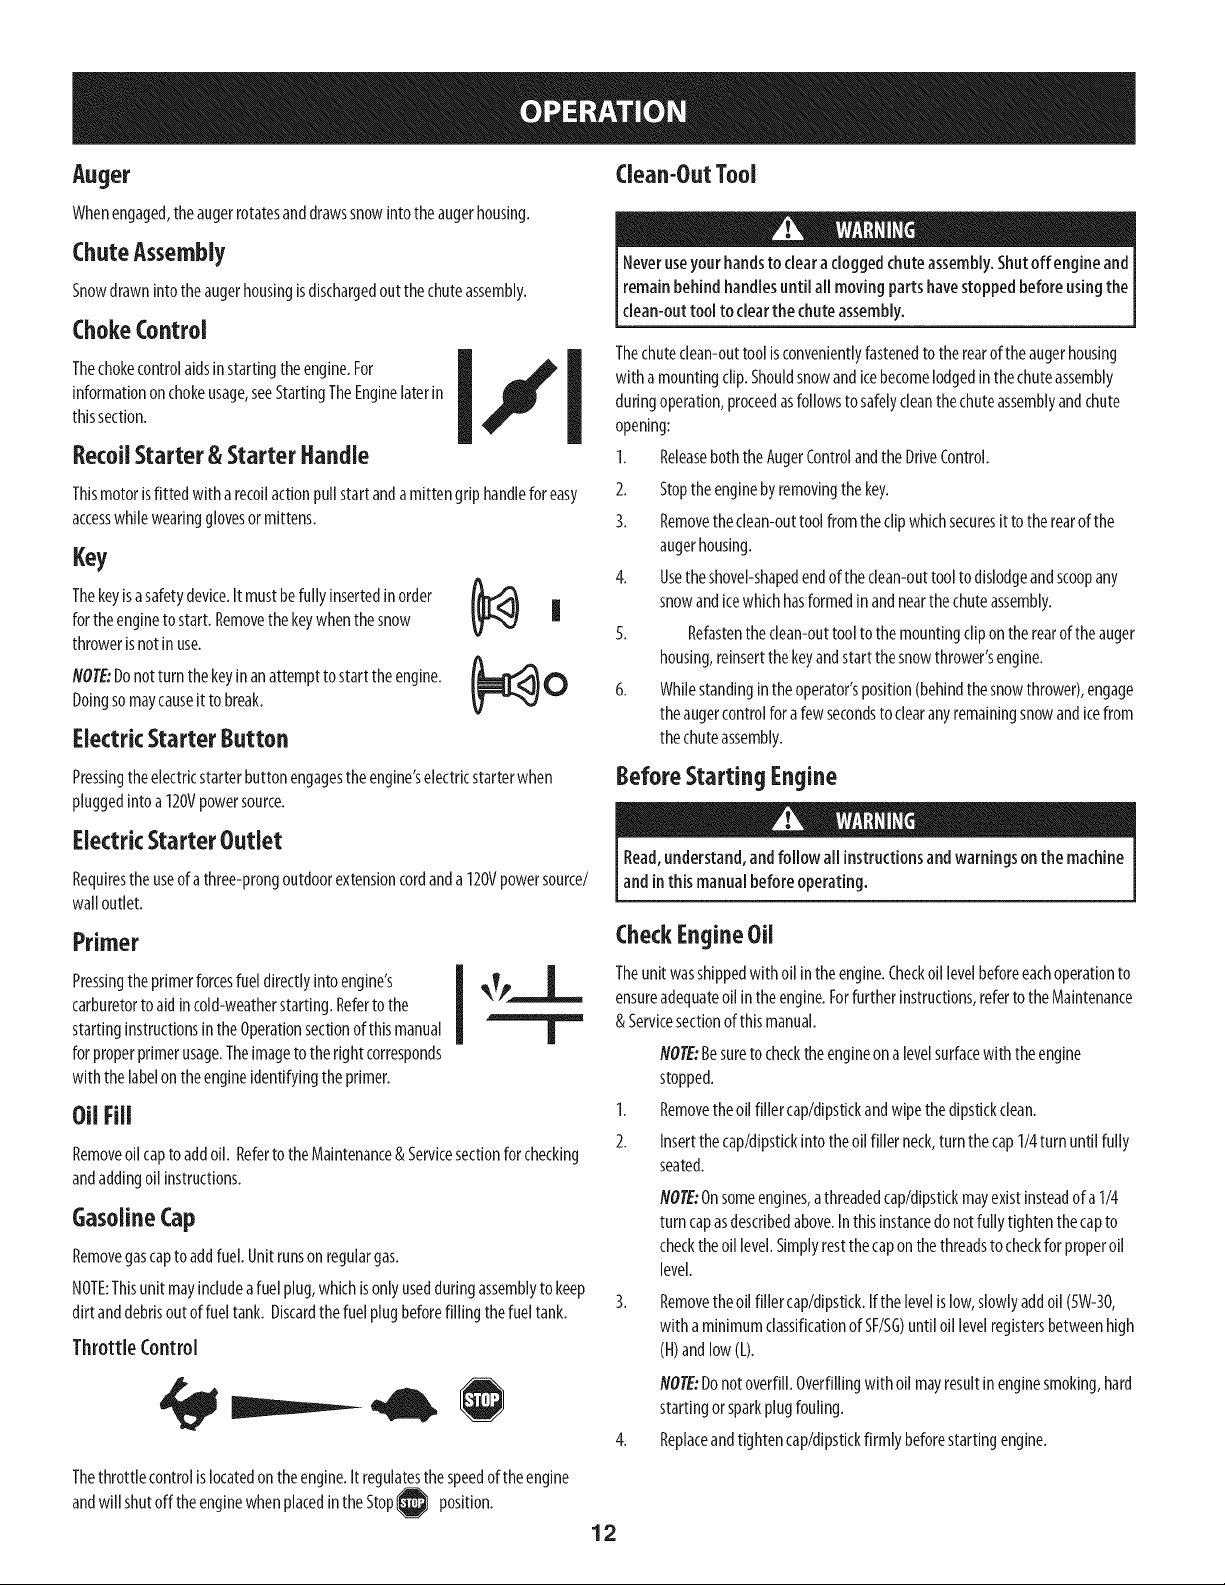
UpperChute
Upper Handle
Drive
AugerControl Control
ChuteAssembl
Clean-out Tool
Auger
Befamiliarwith all thecontrolsonthesnow throwerandtheirproperoperation.Knowhowto stopthemachineanddisengagethemquickly.
Snowthrowercontrolsandfeaturesaredescribedbelowandillustratedinthe
figureabove.
DriveControl
Locatedontheundersideoftheupperhandle,thedrivecontrolisusedtoengage/
disengagewheels.Squeezethedrivecontrolagainsttheupperhandleto engage
thewheels;releaseto disengage.
AugerControl
Theaugercontrolisonthefronttheupperhandle.Squeezetheaugercontrol
againsttheupperhandleto engagetheauger;releasetodisengagetheauger.
ShavePlate
ChuteHandle
Thedirectionofsnowthrowingcorrespondsto thedirectionofthechuteopening.
Usethechutehandletoturnthechuteassemblyinthedirectionyouwishtothrow
thesnow.
ChuteKnob
Thedistancesnowisthrowncanbeadjustedbyeitherraisingorloweringtheupper
chute.Loosenthechuteknobonthesideoftheupperchutetoadjust.Pivotthe
upperchutetodesiredposition,andretightenthechuteknob.Raisingthechute
throwsthesnowfurther.
FuelCap
RecoilStarter
Handle
Oil Drain Electric StarterOutlet
ShavePlate
Nevermakeadjustmentsto thechute assemblyunlessboth augeranddrive
controlsaredisengagedandtheoperatorisstandingbesidethe unit.
IMPORTANT:Referto AugerControlTestintheAssemblysectionofthismanual
priortooperatingyoursnowthrower.Readandfollowallinstructionscarefully
andperformalladjustmentsto verifyyoursnowthrowerisoperatingsafelyand
properly.
Theshaveplatemaintainscontactwithpavementasthesnowthrowerispropelled,
allowingsnowclosetopavement'ssurfacetobedischarged.
SkidShoe
Thespacebetweentheshaveplateandthegroundcanbeadjusted.Forclosesnow
removal,placeskidshoesinthehighestposition.Usemiddleorlowestposition
whenareato beclearedisunevenorongravelsurfaces.
11
Page 12
Auger
Whenengaged,theaugerrotatesanddrawssnowintotheaugerhousing.
Clean-OutTool
ChuteAssembly
Snowdrawnintotheaugerhousingisdischargedoutthechuteassembly.
ChokeControl
Thechokecontrolaidsinstartingtheengine.For
informationonchokeusage,seeStartingTheEnginelaterin
thissection.
If _ Thechuteclean-outtoolisconvenientlyfastenedtotherearoftheaugerhousing
RecoilStarter& StarterHandle
Thismotorisfitted with arecoilactionpull startandamittengriphandleforeasy
accesswhilewearingglovesormittens.
Key
Thekeyisasafetydevice.It mustbefullyinsertedinorder
fortheenginetostart.Removethekeywhenthesnow U,,j Ii
throweris notinuse.
flOTE:Donotturnthekeyinanattempttostarttheengine, i_ 0
Doingsomaycauseit to break.
A
V-,,a
ElectricStarterButton
Pressingtheelectricstarterbuttonengagestheengine'selectricstarterwhen
pluggedintoa 120Vpowersource.
Neveruseyourhandsto cleara cloggedchuteassembly.Shutoffengineand
remainbehind handlesuntil all movingpartshavestoppedbeforeusngthe|
clean-outtool to clearthe chute assembly.
with amountingclip.Shouldsnowandicebecomelodgedinthechuteassembly
duringoperation,proceedasfollowstosafelycleanthechuteassemblyandchute
I
opening:
1. ReleaseboththeAugerControlandtheDriveControl.
2. Stoptheenginebyremovingthekey.
3. Removetheclean-outtoolfromtheclipwhichsecuresit totherearof the
augerhousing.
4. Usetheshovel-shapedendoftheclean-outtooltodislodgeandscoopany
snowandicewhichhasformedinandnearthechuteassembly.
5. Refastentheclean-outtool tothemountingclipontherearoftheauger
housing,reinsertthekeyandstart thesnowthrower'sengine.
6. Whilestandingintheoperator'sposition(behindthesnowthrower),engage
theaugercontrolforafewsecondstoclearanyremainingsnowandicefrom
thechuteassembly.
Before Starting Engine
J
ElectricStarter Outlet
Requirestheuseofathree-prongoutdoorextensioncordanda 120Vpowersource/
walloutlet.
Primer
Pressingtheprimerforcesfueldirectlyintoengine's
carburetorto aidincold-weatherstarting.Refertothe
startinginstructionsintheOperationsectionof thismanual
forproperprimerusage.Theimageto therightcorresponds
with thelabelontheengineidentifyingtheprimer.
OilFill
Removeoilcaptoaddoil. RefertotheMaintenance& Servicesectionfor checking
andaddingoil instructions.
GasolineCap
Removegascapto addfuel.Unitrunsonregulargas.
NOTE:Thisunitmayincludeafuelplug,whichisonlyusedduringassemblytokeep
dirtanddebrisoutoffueltank. Discardthefuelplugbeforefillingthefueltank.
ThrottleControl
ram----.dli
Read,understand,andfollow all instructionsand warningsonthe machine
andinthis manualbeforeoperating.
CheckEngineOil
Theunitwasshippedwith oil intheengine.Checkoil levelbeforeeachoperationto
ensureadequateoil intheengine.Forfurtherinstructions,refertotheMaintenance
&Servicesectionofthismanual.
flOTE:Besuretochecktheengineona levelsurfacewith theengine
stopped.
1.
Removetheoil fillercap/dipstickandwipethedipstickclean.
2.
Insertthecap/dipstickintotheoil filler neck,turnthecap1/4turnuntil fully
seated.
NOTE:Onsomeengines,athreadedcap/dipstkkmayexistinsteadofa 1/4
turncapasdescribedabove.Inthisinstancedonotfullytightenthecapto
checktheoil level.Simplyrestthecaponthethreadsto checkforproperoil
level.
Removetheoil fillercap/dipstick.Ifthelevelislow,slowlyaddoil(5W-30,
with aminimumclassificationof SF/SG)untiloil levelregistersbetweenhigh
(N)andlow(L).
flOTE:Donotoverfill.Overfillingwithoil mayresultinenginesmoking,hard
startingorsparkplugfouling.
Replaceandtightencap/dipstickfirmly beforestartingengine.
Thethrottlecontrolislocatedontheengine.It regulatesthespeedof theengine
andwillshutoff theenginewhenplacedintheStop
position.
12
Page 13
Gasoline
Useautomotivegasoline(unleadedorlowleadedto minimizecombustionchamber
deposits)witha minimumof87octane.Gasolinewithupto10%ethanolor15%
MTBE(MethylTertiaryButylEther)canbeused.Neveruseanoil/gasolinemixture
ordirtygasoline.Avoidgettingdirt, dust,orwaterinthefueltank.DONOTuseE85
gasoline.
Refuelinawell-ventilatedareawith theenginestopped.Donotsmokeor
allowflamesorsparksintheareawheretheengineisrefueledorwhere
gasolineisstored.
Donotoverfillthefueltank.Afterrefueling,makesurethetankcapisclosed
properlyandsecurely.
Becarefulnotto spillfuelwhenrefueling.Spilledfuelorfuelvapormay
ignite.Ifanyfuelisspilled,makesuretheareaisdrybeforestartingthe
engine.
Avoidrepeatedorprolongedcontactwith skinorbreathingofvapor.
Useextremecarewhenhandling gasoline.Gasolineisextremelyflammable
andthevaporsareexplosive.Neverfuelthe machineindoorsor whilethe
engine ishotor running.Extinguishcigarettes,cigars,pipesandother
sourcesof ignition.
Cleanaroundfuelfill beforeremovingcaptofueltoavoiddirtanddebris
fallingintofueltank.
2.
Afuel levelindicatorislocatedin thefueltank.Filltankuntilfuelreachesthe
fuellevelindictor.SeeFigure10inset.Becarefulnotto overfill.
Determinethatyourhome'swiringisathree-wiregroundedsystem.Askalicensed
electricianif youarenotcertain.
Ifyouhaveagroundedthree-prongreceptacle,proceedasfollows.If youdonot
havetheproperhousewiring,DONOTusetheelectricstarterunderanyconditions.
1. Plugtheextensioncordintotheoutlet locatedontheengine'ssurface.Plug
theotherendofextensioncordintoathree-prong120-volt,grounded,AC
outletinawell-ventilatedarea.
2. MovethrottlecontroltoFAST(rabbit)_ position.
3. Movechokecontro,totheCNO,Epos t onI,"1/co,denginestart).If
engineiswarm,placechokecontrolinRUNposition.
4. Pushprimerthree(3)times,makingsureto coverventholewhenpushing.
Ifengineiswarm,pushprimeronlyonce.Alwayscoverventholewhen
pushing.Coolweathermayrequireprimingto berepeated.
5. Pushandholdstarterbuttondowntostartengine.Oncetheenginestarts,
immediatelyreleasestarterbutton.Electricstarterisequippedwiththermal
overloadprotection;systemwill temporarilyshutdowntoallowstarterto
coolifelectricstarterbecomesoverloaded.
6. Astheenginewarms,slowlyrotatethechokecontrolto RUNposition.If
theenginefalters,restartengineandrunwith chokecontrolathalf-choke
positionforashortperiodoftime,andthenslowlyrotatethechokeintoRUN
position.
7. Afterengineisrunning,disconnectpowercordfromelectricstarter.When
disconnecting,alwaysunplugtheendatthewalloutletbeforeunplugging
theoppositeendfromtheengine.
RecoilStarter
StartingTheEngine
Alwayskeephandsandfeet clearof moving parts.Donotuseapressurized
starting fluid. Vaporsareflammable.
Theextensioncordcanbeanylength, but must be ratedfor 15ampsat 125
volts,groundedand ratedforoutdoor use.
NOTE:Allowtheenginetowarmupforafew minutesafterstarting.Theenginewill
notdevelopfullpoweruntilit reachesoperatingtemperatures.
1. Makecertainboththeaugercontrolanddrivecontrolareinthedisengaged
(released)position.
2. Insertkeyintoslot.Makesureitsnapsintoplace.Donotattempttoturnthekey.
NOTE:Theenginecannotstartwithoutthekeyfullyinsertedintotheswitch.
ElectricStarter
Theoptional electricstarter isequippedwith agroundedthree-wirepower
plug,and isdesignedto operateon120volt AChouseholdcurrent.It mustbe
usedwith a properlygroundedthree-prongextensioncordandreceptacle
atall timesto avoidthe possibilityof electricshock.Followall instructions
carefullypriorto operatingthe electric starter.DONOTuseelectricstarterin
the rain.
Donotpull the starter handlewhiletheenginerunning.
1. MovethrottlecontroltoFAST(rabbit)_ position.
2. MovechokecontroltotheCHOKEposition1,,'1(coldenginestart).If
engineiswarm,placechokecontrolinRUNposition.
3. Pushprimerthree(3)times,makingsureto coverventholewhenpushing.
Ifengineiswarm,pushprimeronlyonce.Alwayscoverventholewhen
pushing.Coolweathermayrequireprimingto berepeated.
4. Pullgentlyonthestarterhandleuntil it beginsto resist,thenpullquickly
andforcefullytoovercomethecompression.Engineshouldstart.Donot
releasethehandleandallowitto snapback.ReturnropeSLOWLYto original
position.If required,repeatthisstep.
5. Astheenginewarms,slowlyrotatethechokecontrolto RUNposition.If
theenginefalters,restartengineandrunwith chokecontrolathalf-choke
positionforashortperiodoftime,andthenslowlyrotatethechokeintoRUN
position.
Toavoidunsupervisedengineoperation,neverleavethe machine
unattendedwith theenginerunning.Turnthe engineoff after useand
removeignitionkey.
13
Page 14

Stopping TheEngine
Runenginefor afewminutesbeforestoppingtohelpdryoffanymoistureonthe
engine.
1. MovethrottlecontroltoSTOP_-_
2. Removethekey.Removingthe keywill reducethepossibilityof
unauthorizedstartingoftheenginewhileequipmentisnotinuse.Keepthe
keyina safeplace.Theenginecannotstartwithoutthekey.
3. Wipeanymoistureawayfromthecontrolsontheengine..
position.
ToStopTheSnowThrower
1. Tostopthewheels,releasethedrivecontrol.
2. Tostopthrowingsnow,releasetheaugercontrol.
3. Tostopengine,movethrottlecontrollevertoOFF_ andpulloutthekey.
Donotturn key.
Thetemperatureof muffler andthe surroundingareasmayexceed150 F.
Avoidthese areas.
o
UsingSnowThrowerto ClearSnow
CAUTION:Checktheareatobeclearedforforeignobjects.Removeforeignobjects,
if any.
1. Starttheenginefollowingstartinginstructions.
2. Allowtheengineto warmupforafewminutesastheenginewill not
developfull poweruntil it reachesoperatingtemperature.
3. Rotatethechuteassemblyto thedesireddirection,awayfrombystanders
and/orbuildings.
4. Makingcertainnobystandersorobstaclesareinfrontoftheunit,squeeze
theaugercontrolcompletelyagainsttheupperhandletofully engagethe
auger.
5. Whiletheaugercontrolisengaged,squeezethedrivecontrolcompletely
againsttheupperhandleto engagethewheels.Donot"feather"thedrive
control.
6. Asthesnowthrowerstartstomove,maintainafirm holdonthe handle,and
guidethesnowthroweralongthepathtobecleared.
7. Releasetheaugeranddrivecontrolstostopthesnowthrowingactionand
forwardmotion.
Donotliftthe snowthrower atanytime bythe chutehandle.
Operating Tips
1. Formostefficientsnowremoval,removesnowimmediatelyafteritfalls.
2. Dischargesnowdownwindwheneverpossible.Slightlyoverlapeachprevious
path.
3. Settheskidshoes1/4"belowtheshaveplatefor normalusage.Theskid
shoesmaybeadjustedupwardfor hard-packedsnow.
NOTE:It isnotrecommendedthatyouoperatethissnowthrowerongravel
asloosegravelcanbeeasilypickedupandthrownbytheaugercausing
personalinjuryand/ordamageto thesnowthrower.
4. Ifyouchoosetooperatethesnowthrowerongravel,keeptheskidshoein
thelowestpositionfor maximumclearancebetweenthegroundandthe
shaveplate.
.5. Cleanthesnowthrowerthoroughlyaftereachuse.
ReplacingShearPins
Theaugerissecuredtothespiralshaftwithtwo shearpinsandbow-tieclips.If
theaugershouldstrikeaforeignobjectorkejam, thesnowthrowerisdesigned
sothattheshearpinsmayshear.Ifaugerwill notturn,checkto seeifthepinshave
sheared.SeeFigure10.
NEVERreplacethe augershearpinswith anything other thanOEMPartNo.
738-04124replacementshearpins.SeePartsListinthis Operator'sManual.
Anydamagetothe snowthrower asaresultoffailing todo sowillNOTbe
coveredbyyoursnowthrower'swarranty.
Alwaysturn off the snowthrower's engineand removethekey priorto
replacingshearpins.
f
..............
NOTE:Yourunit isequippedwith aclutchinthetransmission.Ifthewheels
stopturningwhiletryingto dischargelargevolumesofsnow,immediately
disengagethedrivecontrolandallowtherotatingaugertodischargesnow
fromthe housing.Reducetheclearingwidthandcontinueoperation.
8.
Oneachsucceedingpass,readjustthechuteassemblyto thedesiredposition
andslightlyoverlapthepreviouslyclearedpath.
PositioningDischargeChute
Loosenthechuteknobandpivotupperchuteto desiredposition.Tightenthechute
knobmakingsurethecarriageboltiscorrectlypositioned.Raisingthechutethrows
snowfurther.
1. Rotatechutehandletodesiredoperatingposition.
14
Figure10
/ /
/ /
J
Page 15
Beforeservicing,repairing,lubricatingorinspecting,disengageallcontrols
andstopengine.Waitunti}allmovingpartshavecometoacomp}etestop.
Removethekeytopreventunintendedstarting.Alwayswearsafetyglasses
duringoperationorwhile performinganyadjustmentsorrepairs.
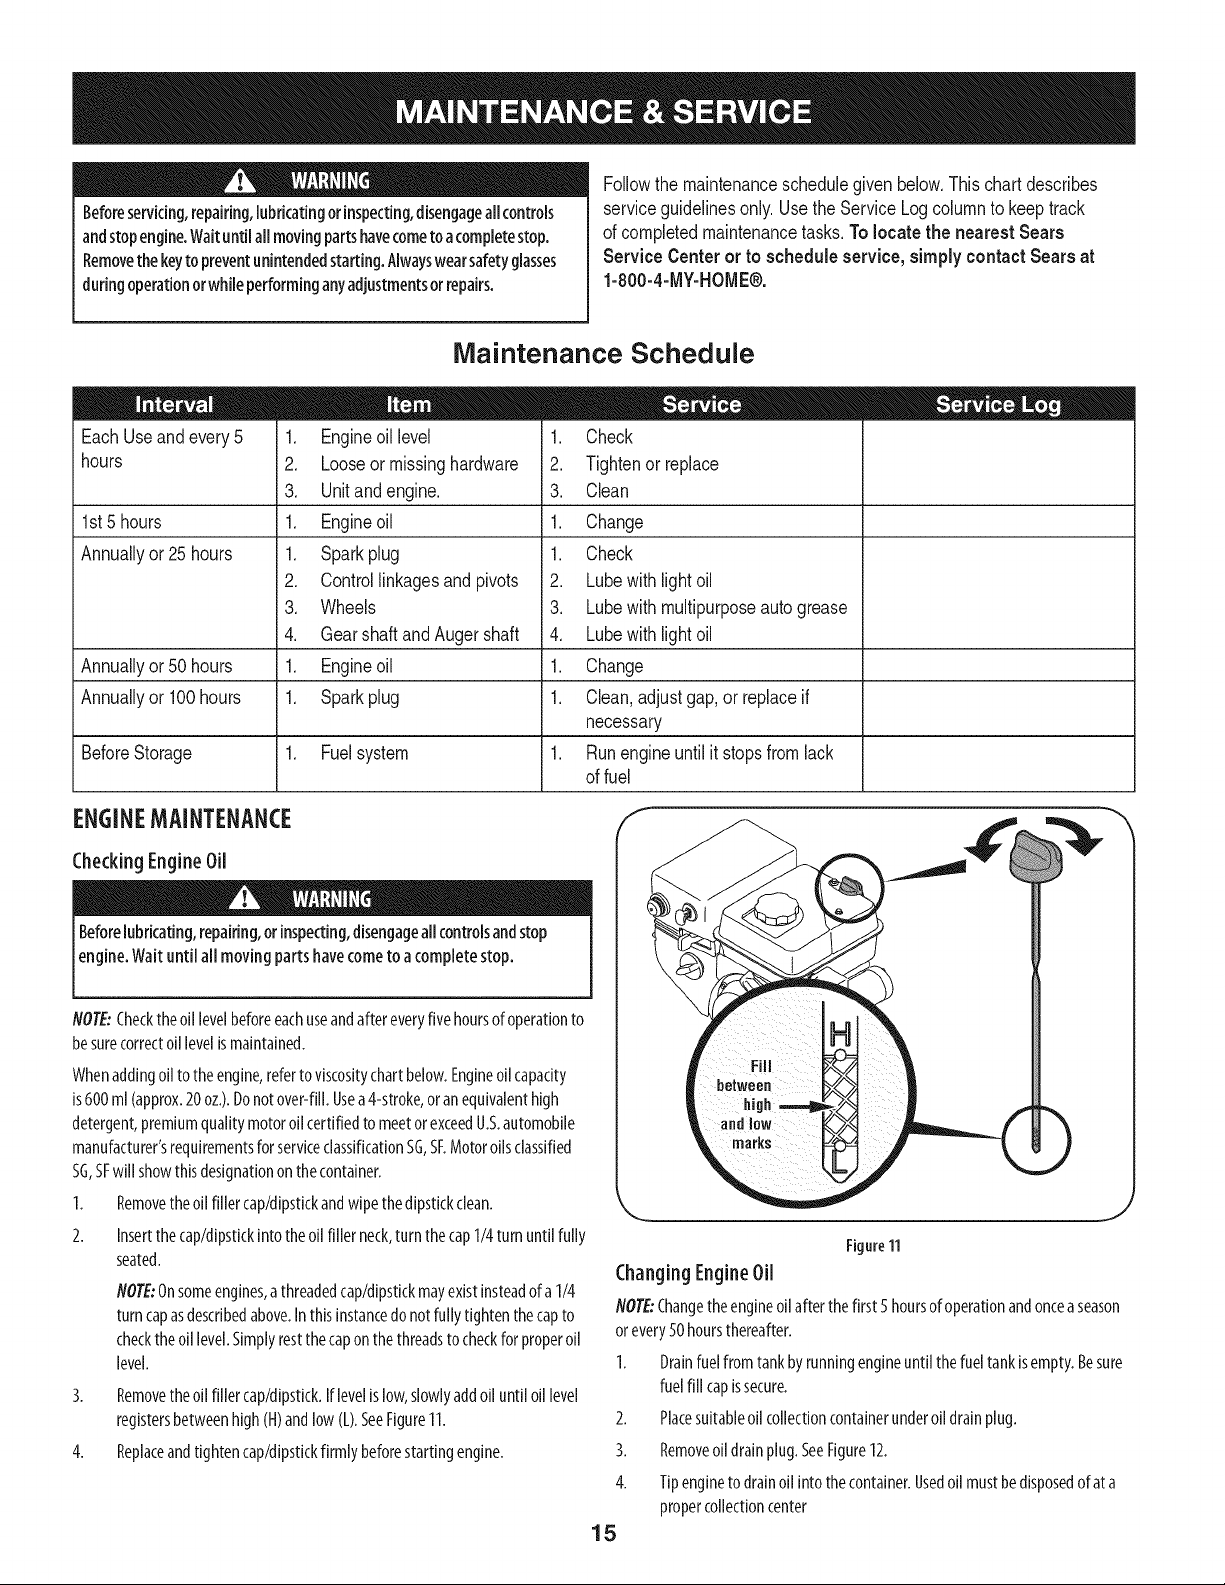
Maintenance Schedule
Followthemaintenanceschedulegivenbelow.Thischartdescribes
serviceguidelinesonly.UsetheServiceLogcolumnto keeptrack
ofcompletedmaintenancetasks.Tolocate the nearest Sears
Service Centeror to schedule service,simplycontactSearsat
1-800-4-MY-HOME®.
Each Useand every 5
hours
1st5 hours
Annuallyor25hours
Annually or 50 hours
Annually or 100 hours
1. Engineoillevel
2. Looseormissinghardware
3. Unitandengine.
1. Engineoil
1. Sparkplug
2. Controllinkagesand pivots
3. Wheels
4. GearshaftandAugershaft
1. Engineoil
1. Sparkplug
1. Check
2. Tightenor replace
3. Clean
1. Change
1. Check
2. Lubewithlightoil
3. Lubewithmultipurposeautogrease
4. Lubewithlightoil
1. Change
1. Clean,adjustgap,or replaceif
necessary
Before Storage 1. Fuel system 1.
Runengineuntilit stopsfromlack
offuel
ENGINEMAINTENANCE f
CheckingEngineOil
Beforelubricating,repairing,orinspecting,disengageallcontrolsandstop
enghe.Wat unt a mov ngpartshavecometoa compete stop.
NOTE:Checktheoillevelbeforeeachuseandaftereveryfive hoursofoperationto
besurecorrectoillevelismaintained.
Whenaddingoilto theengine,refertoviscositychartbelow.Engineoilcapacity
is600ml(approx.20oz.).Donotover-fill.Usea4-stroke,oranequivalenthigh
detergent,premiumqualitymotoroilcertifiedto meetorexceedU.S.automobile
manufacturer'srequirementsforserviceclassificationSG,SF.Motoroilsclassified
SG,SFwill showthisdesignationonthecontainer.
1. Removetheoilfiller cap/dipstickandwipethedipstickclean.
2. Insertthecap/dipstickintotheoilfillerneck,turnthecap1/4turnuntilfully
seated.
NOTE:Onsomeengines,athreadedcap/dipstkkmayexistinsteadofa1/4
turncapasdescribedabove.Inthisinstancedonotfully tightenthecapto
checktheoillevel.Simplyrestthecaponthethreadstocheckforproperoil
level.
3. Removetheoilfiller cap/dipstick.Iflevelislow,slowlyaddoiluntiloillevel
registersbetweenhigh(H)andlow(L).SeeFigure11.
4. Replaceandtightencap/dipstickfirmlybeforestartingengine.
,, j
Figure11
ChangingEngineOil
NOTE:Changetheengineoilafterthefirst5 hoursofoperationandonceaseason
orevery50hoursthereafter.
1. Drainfuelfromtankbyrunningengineuntilthefueltankisempty.Besure
fuelfill capissecure.
2. Placesuitableoil collectioncontainerunderoildrainplug.
3. Removeoildrainplug.SeeFigure12.
4. Tipengineto drainoilintothecontainer.Usedoil mustbedisposedofata
propercollectioncenter
15
Page 16
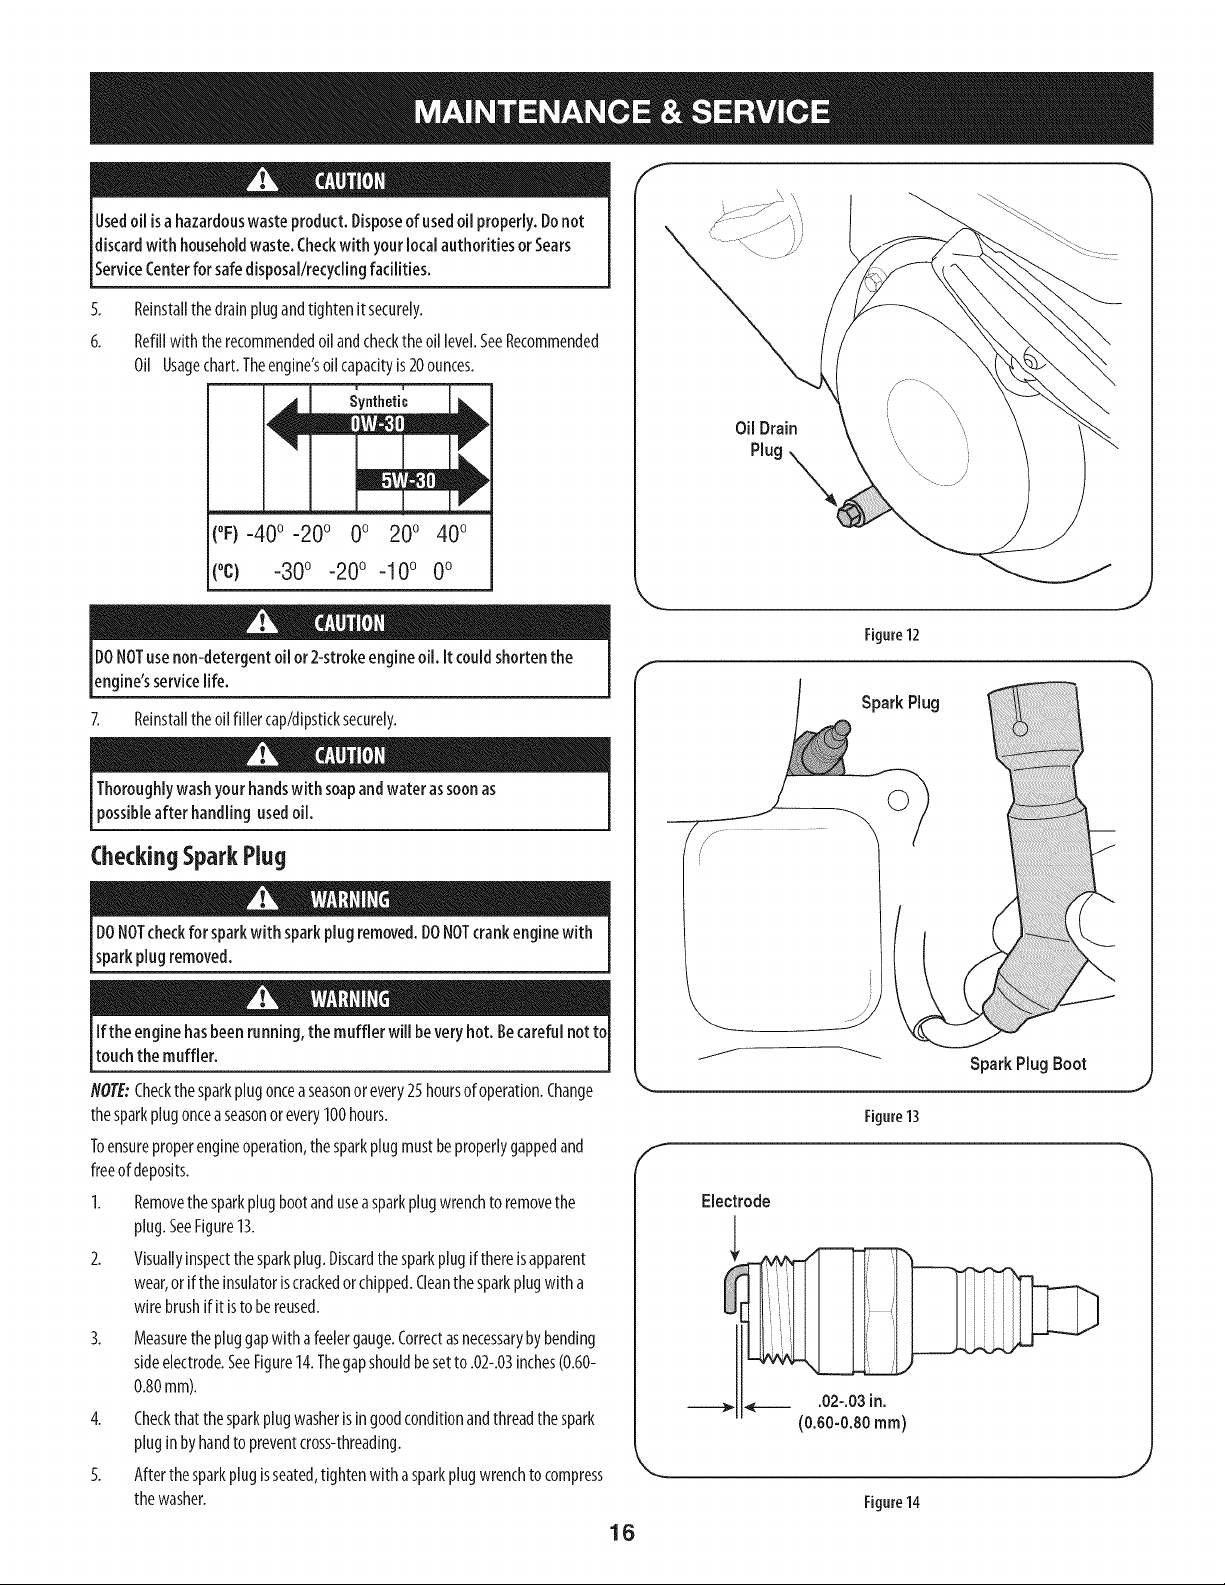
Usedoil isahazardouswasteproduct.Disposeof usedoil properly.Donot
discardwith householdwaste.Checkwith yourlocalauthoritiesor Sears
ServiceCenterfor safedisposal/recyclingfacilities.
5. Reinstallthedrainplugandtightenit securely.
6. Refillwith therecommendedoilandchecktheoil level.SeeRecommended
Oil Usagechart.Theengine'soilcapacityis20ounces.
i i
Synthetic
(oF)-40o-20 o 0o 200 400
(oc) -30° -20° -10° 0°
DONOTusenon-detergent oil or2-strokeengineoil. It couldshortenthe
engine'sservicelife.
7. Reinstalltheoilfiller cap/dipsticksecurely.
Thoroughlywashyourhandswith soapandwaterassoonas
possibleafterhandling usedoil.
Oil Drain
Plug
Figure12
SparkPlug
CheckingSparkPlug
DONOTcheckfor sparkwith sparkplugremoved.DONOTcrankenginewith
sparkplugremoved.
Ifthe enginehasbeenrunning,the muffler willbeveryhot.Becarefulnot to
touchthe muffler.
NOTE:Checkthesparkplugonceaseasonor every25hoursofoperation.Change
thesparkplugonceaseasonorevery100hours.
Toensureproperengineoperation,thesparkplugmustbeproperlygappedand
freeofdeposits.
1. Removethesparkplugbootandusea sparkplugwrenchtoremovethe
plug.SeeFigure13.
2. Visuallyinspectthesparkplug.Discardthesparkplugif thereisapparent
wear,orif theinsulatoriscrackedorchipped.Cleanthesparkplugwith a
wirebrushifit istobereused.
3.
Measurethepluggapwith afeelergauge.Correctasnecessarybybending
sideelectrode.SeeFigure14.Thegapshouldbesetto .02-.03inches(0.60-
0.80mm).
4. Checkthatthesparkplugwasherisingoodconditionandthreadthespark
pluginbyhandtopreventcross-threading.
5. Afterthesparkplugisseated,tightenwith asparkplugwrenchtocompress
thewasher.
SparkPlug Boot
Figure13
Electrode
___,. ___ .02-.03in.
(0.60-0.80ram)
Figure14
16
Page 17
NOTE:Wheninstallinganewsparkplug,tighten1/2-turnafterthesparkplugseats
tocompressthewasher.Whenreinstallingausedsparkplug,tighten1/8- to1/4-
turnafterthesparkplugseatstocompressthewasher.GeneralRecommendations.
1. Alwaysobservesafetyruleswhenperforminganymaintenance.
2. Thewarrantyonthissnowthrowerdoesnotcoveritemsthat havebeen
subjectedtooperatorabuseor negligence.Toreceivefullvaluefromthe
warranty,operatormustmaintainthesnowthrowerasinstructedinthis
manual.
3. Periodicallycheckallfastenersandhardwaretomakesurethesearetight.
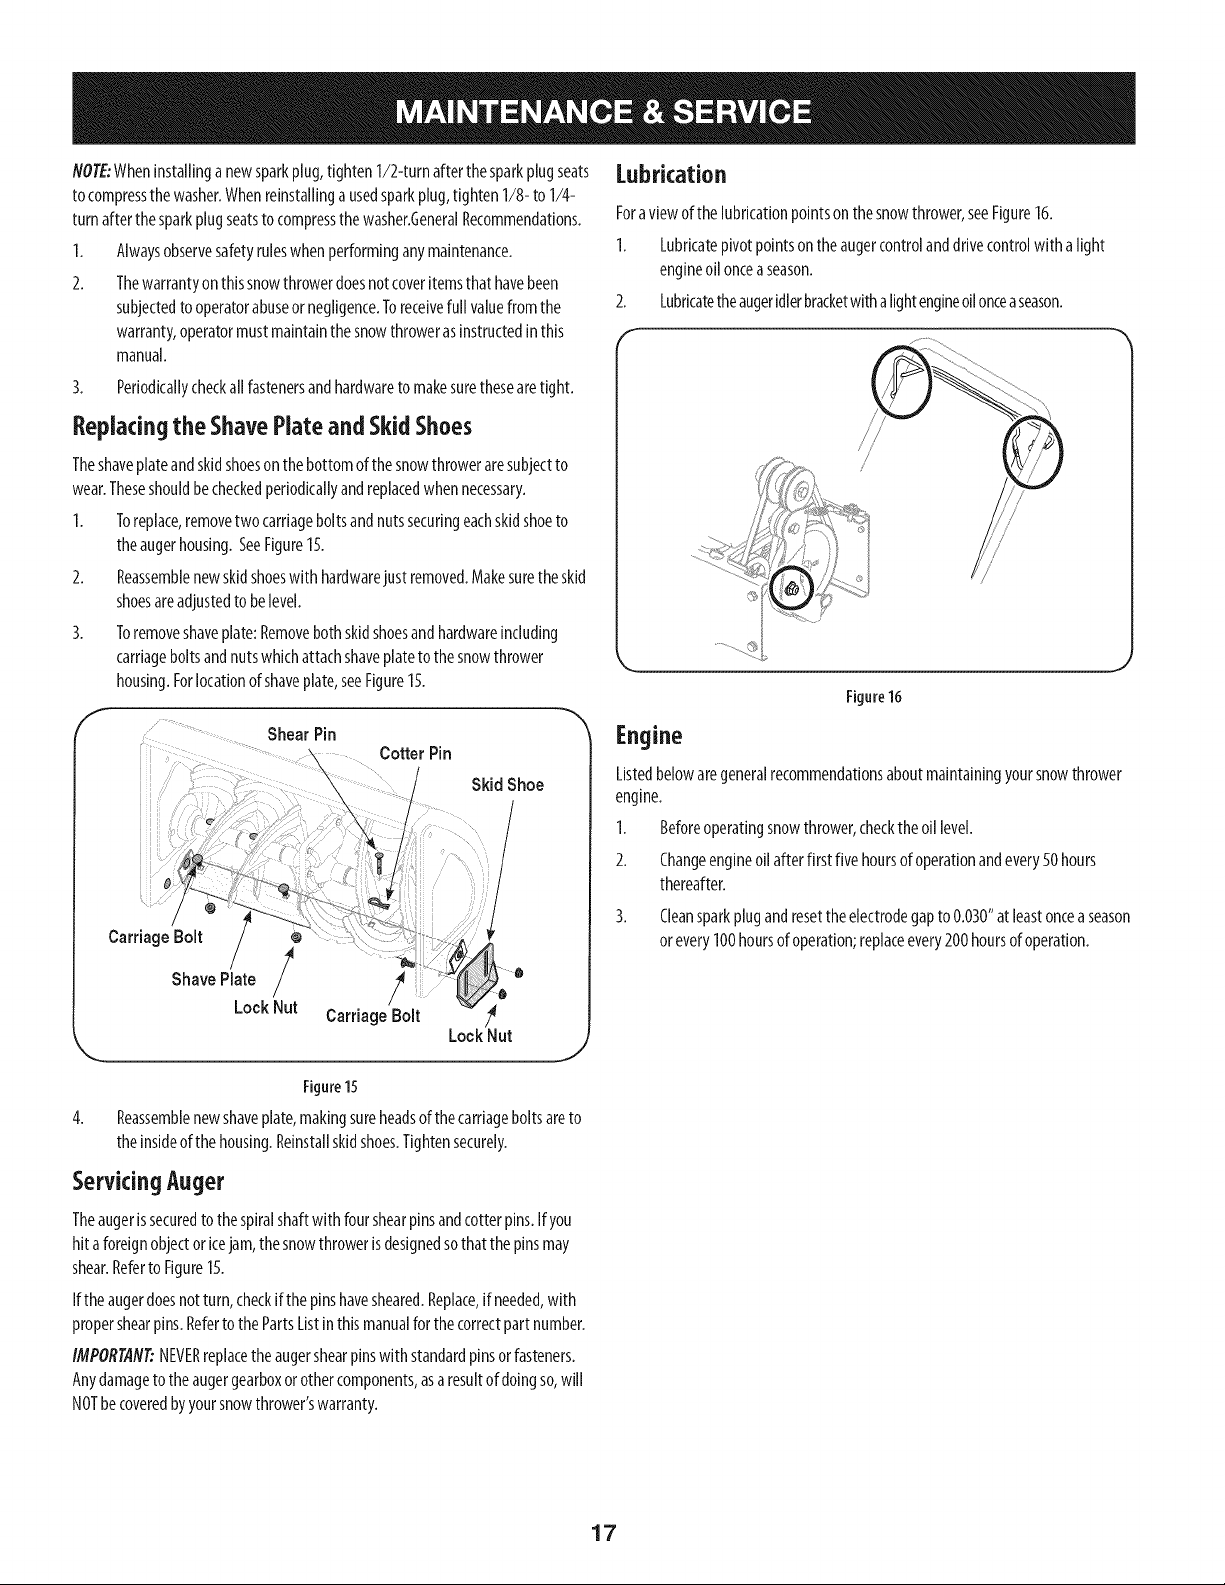
Replacingthe ShavePlateand SkidShoes
Theshaveplateandskidshoesonthebottomofthesnowthroweraresubjectto
wear.Theseshouldbecheckedperiodicallyandreplacedwhennecessary.
1. Toreplace,removetwocarriageboltsandnutssecuringeachskidshoeto
theaugerhousing.SeeFigure15.
2. Reassemblenewskidshoeswith hardwarejustremoved.Makesuretheskid
shoesareadjustedto belevel.
3. Toremoveshaveplate:Removebothskidshoesandhardwareincluding
carriageboltsandnutswhichattachshaveplatetothesnowthrower
housing.Forlocationofshaveplate,seeFigure15.
Lubrication
Foraviewofthelubricationpointsonthesnowthrower,seeFigure16.
1. Lubricatepivotpointsontheaugercontrolanddrivecontrolwith alight
engineoilonceaseason.
2. Lubricatetheaugeridlerbracketwithalightengineoilonceaseason.
Figure16
ShearPin
i iii
Carriage Bolt
ShavePJate / /
Lock Nut
Figure15
4.
Reassemblenewshaveplate,makingsureheadsofthecarriageboltsareto
theinsideofthehousing.Reinstallskidshoes.Tightensecurely.
Cotter Pin
SkidShoe
Carriage Bolt /_
Lock Nut
ServicingAuger
Theaugerissecuredtothespiralshaftwith fourshearpinsandcotterpins.Ifyou
hitaforeignobjectoricejam,thesnowthrowerisdesignedsothatthe pinsmay
shear.RefertoFigure15.
Iftheaugerdoesnotturn,checkif thepinshavesheared.Replace,if needed,with
propershearpins.RefertothePartsListinthismanualforthecorrectpartnumber.
IMPORT4N_NEVERreplacetheaugershearpinswith standardpinsorfasteners.
Anydamageto theaugergearboxorothercomponents,asaresultofdoingso,will
NOTbecoveredbyyoursnowthrower'swarranty.
Engine
Listedbelowaregeneralrecommendationsaboutmaintainingyoursnowthrower
engine.
1. Beforeoperatingsnowthrower,checktheoillevel.
2. Changeengineoilafterfirstfivehoursof operationandevery50hours
thereafter.
3. Cleansparkplugandresettheelectrodegapto0.030"atleastonceaseason
orevery100hoursof operation;replaceevery200hoursofoperation.
17
Page 18

CheckV-Belts
AugerBelt
Followinstructionsbelowto checkconditionofdrivebeltsevery.50hoursof
operation.
1. Removetheplasticbeltcoveronthefrontoftheenginebyremovingthe
self-tappingscrewandpressingthe plastictabsto releasethe beltcover.
2. Visuallyinspectfor frayed,cracked,orexcessivelywornoutbelts.Replace,if
necessary,andfollowinstructionsbelow.
ReplacingBelts
NOTE:Therearetwobeltsonthissnowthrower:anaugerbeltanddrivebelt.Itis
recommendedthatbothbeltsbereplacedatthesametime.
1. Removethesparkplugwirefromsparkplugandgrounditagainstthe
enginetopreventaccidentalstarting.
2. Runtheengineuntilthefueltankisdryto preventgasolineleakagewhen
replacingbelts.
Performbelt maintenanceoutdoorsassomegasmaypossibJyleakfrom the
carburetor.
3.
Removetheself-tappingscrewshownin Figure17,andpresstheplastic
tabstoreleasethebeltcover.Pullthebeltcoverupandoutfromaroundthe
engineandchuteassembly.Setitasideandsave.
IMPORTANEBecausegascouldleakfromthecarburetorwhenservicingaugerbelt,
runtheengineuntilthefueltankisdry,aspreviouslyinstructedinReplacingBelts.
1. Tipthesnowthrowerupandforwardsothatitrestsontheaugerhousing.
Removethebeltkeeperascalledoutin Figure19.Returnthesnowthrower
to itsuprightpositiontocompletethefollowingsteps.
2. Slipthefrontaugerbeltoffof theenginepulley,pushingit forwardand
rollinginoffof thepulley.SeeFigure18.
3. Squeezetheaugercontrolhandleto releasetheaugerbrake,whichisthetab
thatholdsthebeltontotheaugerpulley.Removethe belt.
4. Replacewithnewbeltafterreplacingthedrivebelt.
Belt
Engine
Pulley
Drive
Belt-
Auger
Pulley
\
Figure17
Belt Keeper
Idler Bracket
/
/
J
Figure18
18
Page 19
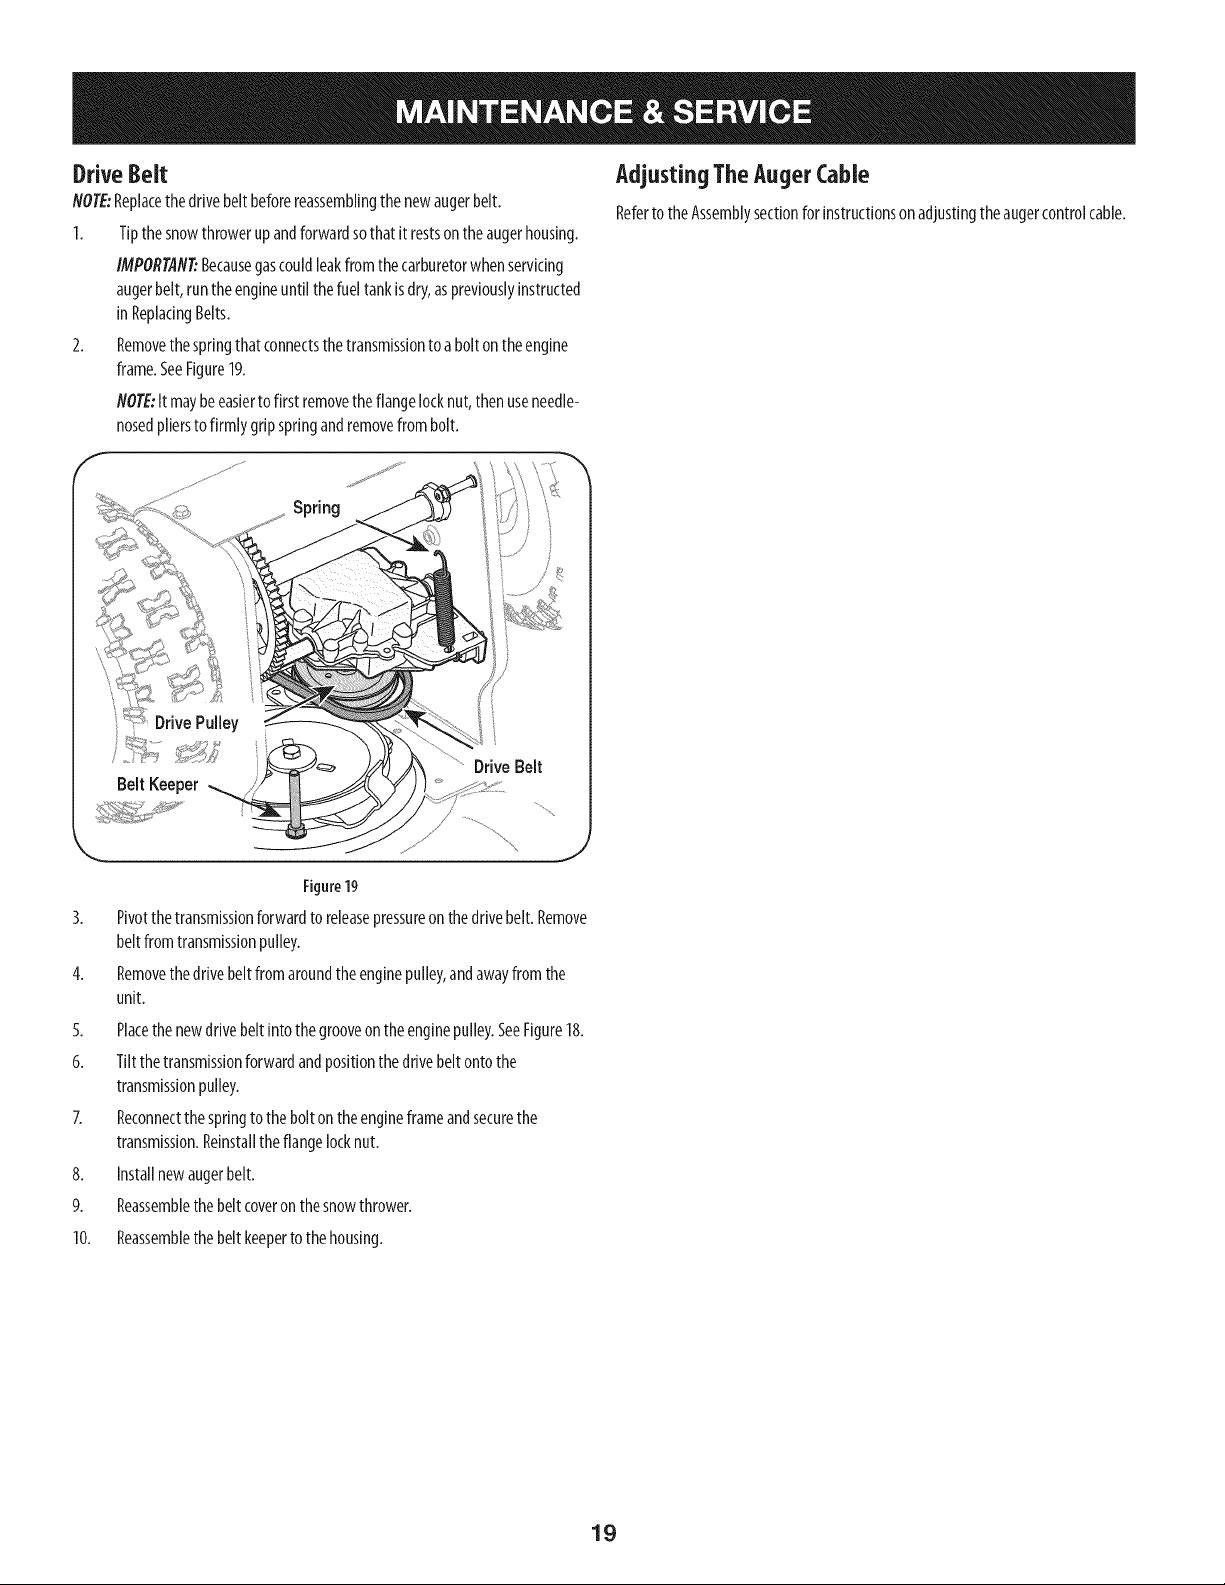
Drive Belt
NOTE:Replacethedrivebeltbeforereassemblingthe newaugerbelt.
1. Tipthesnowthrowerupandforwardsothatit restsontheaugerhousing.
IMPORTANT:Becausegascouldleakfromthecarburetorwhenservicing
augerbelt,runtheengineuntilthefueltankisdry,aspreviouslyinstructed
in ReplacingBelts.
2. Removethespringthatconnectsthetransmissiontoaboltontheengine
frame.SeeFigure19.
NOTE:It maybeeasiertofirst removetheflangelocknut,thenuseneedle-
nosedpliersto firmly gripspringandremovefrombolt.
Spring
AdjustingTheAugerCable
Referto theAssemblysectionfor instructionsonadjustingtheaugercontrolcable.
Figure19
3. Pivotthetransmissionforwardtoreleasepressureonthedrivebelt.Remove
beltfromtransmissionpulley.
4. Removethedrivebeltfromaroundtheenginepulley,andawayfromthe
unit.
5. Placethenewdrivebeltintothegrooveontheenginepulley.SeeFigure18.
6. Tiltthetransmissionforwardandpositionthedrivebeltontothe
transmissionpulley.
7. Reconnectthespringtothe bolton theengineframeandsecurethe
transmission.Reinstalltheflangelocknut.
8.
Installnewaugerbelt.
9.
Reassemblethebeltcoveronthesnowthrower.
10.
Reassemblethebeltkeepertothehousing.
19
Page 20
Ifthesnowthrowerwill notbeusedfor 30daysorlonger,orifit istheendofthesnowseasonwhenthelastpossibilityofsnowisgone,theequipmentneedsto bestored
properly.Followstorageinstructionsbelowtoensuretopperformancefromthesnowthrowerformanymoreyears.
PreparingEngine
Enginesstoredover30daysneedtobedrainedoffuelto preventdeteriorationand
gumfromforminginfuelsystemoronessentialcarburetorparts.If thegasolinein
yourenginedeterioratesduringstorage,youmayneedto havethecarburetor,and
otherfuelsystemcomponents,servicedorreplaced.
1. Removeallfuelfromtankbyrunningengineuntilit stops.Donotattemptto
pourfuelfromtheengine.
2. Changetheengineoil.
3. Removesparkplugandpourapproximately1oz.(30ml)ofcleanengineoil
intothecylinder.Pulltherecoilstarterseveraltimestodistributetheoil,and
reinstallthesparkplug.
4. Cleandebrisfromaroundengine,andunder,around,andbehindmuffler.
Applya lightfilm ofoilonanyareasthat aresusceptibletorust.
Storeinaclean,dryandwellventilatedareaawayfromanyappliancethat
operateswith aflameorpilotlight,suchasafurnace,waterheater,or
clothesdryer.Avoidanyareawitha sparkproducingelectricmotor,orwhere
powertoolsareoperated.
Ifpossible,avoidstorageareaswith highhumidity.
Keeptheenginelevelinstorage.Tiltingcancausefueloroil leakage.
!
Neverstoresnowthrower with fuel intank indoorsor inpoorlyventilated J
areas,wherefuel fumesmayreachanopenflame, sparkorpilotlight asonaJ
fumace,water heater,cothesdryeror gasapp ante. j
PreparingSnowThrower
Whenstoringthesnowthrowerin anunventilatedormetalstorageshed,
careshouldbetakento rustprooftheequipment.Usinga lightoil orsilicone,
coattheequipment,especiallyanychains,springs,bearingsandcables.
Removealldirtfromexteriorof engineandequipment.
Followlubricationrecommendations.
Storeequipmentinaclean,dryarea.
InflatethetirestothemaximumPSI.Refertotire sidewall.
I
20
Page 21
Beforeperforminganytypeofmaintenance/service,disengageallcontrolsandstop
theengine.Waltuntilallmovingpartshavecometoacompletestop.Removethekey
topreventunintendedstarting.Alwayswearsafetyglassesduringoperationorwhile
performinganyadjustmentsorrepairs.
Thissectionaddressesminorserviceissues.TolocatethenearestSearsService
Centerortoscheduleservice,simplycontactSearsat 1-800-4-MY-HOME®.
Enginefailsto start
1. Chokecontrolnotin Chokeposition.
2. Sparkplugwiredisconnected.
3. Faultysparkplug.
4. Fueltankemptyorstalefuel.
5. Enginenotprimed.
6. Safetykeynotinserted.
Extensioncordnotconnected(whenusingelectric
startbutton)
Enginerunningerratically/
inconsistentRPM(huntingor
1. Enginerunningonchoke.
2. Fuellineblocked,orstalefuel.
surging)
3. Waterordirt infuelsystem.
4. Carburetoroutofadjustment.
5. Over-governedengine
Engineoverheats
Excessivevibration
1. Carburetornotadjustedproperly.
1. Loosepartsordamagedauger.
Lossofpower 1. Sparkplugwireloose. 1.
2. Gascapventholeplugged. 2.
Unitfallsto propelitself 1. Drivecableinneedof adjustment. 1.
1. Movechokecontrolto Chokeposition.
2. Connectwiretosparkplug.
3. Clean,adjustgap,orreplace.
4. Filltankwith clean,freshgasoline.
5. Primeengineasinstructedin theOperationSection.
6. Insertkeyfullyintotheswitch.
7. Connectoneendoftheextensioncordto theelectric
starteroutlet andtheotherendto athree-prong120-volt,
grounded,ACoutlet.
1. MovechokelevertoRUNposition.
2. Cleanfuel lineandfill tankwith fresh,cleangasoline.
3. Runengineuntil it stops.Refillwithfreshfuel.
4. Contacta SearsServiceCenter.
5. Contacta SearsServiceCenter.
1. ContactyourSearsParts& RepairCenter.
1. Stopengineimmediatelyanddisconnectsparkplugwire.
Tightenall boltsandnuts.Ifvibrationcontinues,haveunit
servicedbyaSearsParts& RepairCenter.
Connectandtightensparkplugwire.
Removeiceandsnowfromgascap.Becertainventholeis
clear.
Adjustdrivecontrolcable.RefertoServiceandMaintenance
section.
2. Drivebeltlooseordamaged. 2.
Unitfallstodischargesnow 1. Chuteassemblyclogged. 1.
2. Foreignobjectlodgedin auger.
3. Augercablein needofadjustment.
4. Augerbeltlooseordamaged.
5. Shearpin(s)sheared.
NEED MORE HELP?
o Find this and all your other product raanua[s online.
oGet answers from ou_ team of home experts.
Get a personalized maintenance plan for your home.
o Find information and toots to help with home projects.
21
Replacedrivebelt.Referto Service& Maint.section.
Stopengineimmediatelyanddisconnectsparkplugwire.
Cleanchuteassemblyandinsideofaugerhousingwith clean-
outtoolorastick.
2. Stopengineimmediatelyanddisconnectsparkplugwire.
Removeobjectfromaugerwith clean-outtoolora stick.
3. Adjustaugercontrolcable.Referto Assemblysection.
4. Replaceaugerbelt.Referto ServiceandMaintenancesection.
5. Replacewithnewshearpin(s).
Page 22

Craftsman Snow Thrower IViodel 247.881701
22
Page 23

Craftsman Snow Thrower IViodel 247.881701
m
M
1
2
3
4
5
6
7
8
9
lO
11
12
13
14
15
16
17
18
19
2o
21
22
23
24
984-04037
71o-o4o71
71o-o451
710-0260A
720-04072A
731-04388A
731-04426A
936-0267
931-04127
931-04353
931-2636A
932-04111
712-04064
931-2643
731-2635
725-0157
710-0134
710-0520
710-04484
712-04063
712-04065
750-04852
715-04020
926-04012
ChuteAssembly
CarriageBolt5/16-18x1.0"
CarriageBolt5/16-18
CarriageBolt5/16-18x.62
WingKnob5/16-18
ChuteHandle
UpperChute
FiatWasher.385x .87x .06
LowerChute
ChuteRing
ChuteAdapter5" Dia.
ChuteAdjustmentSpring
FlangeLockNut 1/4-20
Clean-outTool
Clean-outToolMount
CableTie
CarriageScrew 1/4-20x 0.62"
HexBolt3/8-16x 1.50"
ABScrew5/16-18x .750
FlangeLockNut, 5/16-18
FlangeLockNut, 3/8-16
ShoulderSpacer
SpiralPin
PushOnNut
m
M
731-04218B
25
26
932-0611
27
736-0174
28
938-0281
29
941-0245
30
941-0309
31
950-04191
32
684-04358
33
784-0434-0637
34
790-00075
35
918-04292B
36
684-04113A-0637
37
684-04114A-0637
38
684-04166A-4043
39
714-04040
40
731-04870
41
936-0351
42
738-04124A
43
741-0493A
44
790-00087A-0637
45
790-00117-0637
46
784-5580-4043
47
710-04606A
Impeller
ExtensionSpring
WaveWasher
ShoulderScrew3/8-16
Hex FlangeBearing
BallBearing
Spacer
FlatIdler
AugerIdlerBracket
BearingHousing
AugerGearboxAssembly
AugerAssembly- LH
AugerAssembly- RH
AugerHousing,22"
BowTieCotterPin72
Spacer,1.25x.75x 1.00
FlatWasher
ShearPin,.25x 1.50
FlangeBushing
Hex BearingHousing
ShavePlate2.25x21.66LG
SkidShoe
Belt Keeper
23
Page 24

Craftsman Snow Thrower Model 247.881701
24
Page 25

Craftsman Snow Thrower IViodel 247.881701
m
1
71o-o572
2
71o-o6o5
3
71o-o4484
4
712-o4o64
5
720-04072A
6
725-0157
7
946-04642
8
946-04640
9
747-04394A-0637
lO
747-04405-0637
11
749-04147
12
749-04495-0637
13
990-00053
14
918-04296B
15
710-0809
16
710-1652
17
711-1364
18
914-0115
19
714-04040
2o
915-0249
717-04066A
21
22
917-04073A
932-0429A
23
24
936-0192
738-04184A
25
738-0924A
26
27
941-0245
28
741-04108
29
756-0625
CarriageScrew5/16-18x 2.25
Mach.Screw 1/4-20x 1.825
Screw5/16-18x .75
FlangeLockNut 1/4-20
WingKnob5/16-18
CableTie
DriveCable
AugerCable
AugerControl
DriveControl
LowerHandle
UpperHandle
HandleTab
TransmissionAssembly
TTScrew1/4-20x 1.25
Screw1/4-20x .625
ClevisPin
CotterPin1/8x 1.0
BowTie CotterPin72
RollPin
Pinion14T
Gear70T
ExtensionSpring
FlatWasher
ShoulderScrew1/4-20
ShoulderScrew1/4-28
Hex FlangeBearing
Hex FlangeBearing
CableRoller
m
M
784-o419C-4O43
30
31
790-00223A-0637
32
790-00224
934-04282B
33
734-04322
34
710-0627
35
736-0242
36
738-04321
37
910-0224
710-0654A
38
39
710-0696
710-1245B
4o
41
931-04162A
42
736-0247
43
736-0505
44
748-04067A
45
950-1355
46
950-1356
47
954-04013
48
954-04014
49
956-04024
5o
756-0569
51
729-04035
52
731-05672A
53
936-0160
54
936-0451
55
731-06749
56
952Z265-SUA
DriveHousingFrame
AugerCable Bracket
AugerCable Adj.Bracket
WheelAssySnowHogGray
Tube,Tire,4.10/3.50-4.0
LockBolt5/16-24x .75
BellWasher.34x .872x .06
Axle
HexScrew#10-16x.500
TT SemsScrew3/8-16x 1.0
HexBolt3/8-24x .875
LockBolt5/16-24x .875
BeltCover
FlatWasher.406IDx 1.25OD
FlatWasher.34IDx 1.50OD
Pulley:Adapter.75Dia.
Spacer.876x 1.25x .19
Spacer.876x 1.25x .86
V-Belt3/8 x 21.108Lg.
V-Belt3/8 x 26.680Lg.
AugerPulley
PulleyHalf
AmpSealedConnector
Spacer
FlatWasher.53x .93x .05
SaddleWasher
CableClip
Engine
25
Page 26

Craftsman Snow Thrower IViodel 247.881701
777S32636
f
IOOJLJLg0=NV313
"WRNVt_S,U01VU3d0OV3U"_;
"S33VJHRS13AVU9NO9NllVid3d0
N3HMNOllflV3VU1X33Sn"SU30NVISABlV 39UVHOSIQ
IO3UIOH3A3N'S3IUNFNJS1331'80NMOUHIQIOAVOl "_
"3NIH3V_I9NIOIAU::ISH0 9NI99013Nll
3HO_3B03ddOlS3MH SlUVd9NIAO_llVlilNnS310NVH
ONIH:t8NIV_BUQNV':INIDN]dOlS'SUBA3IH31nl3:IDVgNBSIO"_
"31nH339UVH3SIO501ONROlI001 IRO-NV3103SR "Z
"133dONV SONVH31Vlrld_V NV3U39nVUOU_113d_iHIiM
1OVlN0O"U39fiV0NVH3"l'13d_l9NilVl0_l _0U:I IVMVd33H"L
777X43688
..................eONOT
USEE85 ORFUEL...........
COHTAiHiHGMOBE
THAH 10% ETHAHOL
777122164
777S32236
777i23249
i/
122164 AC
777i22138
S
777D19075
777D16340
777D18033
26
Page 27

CraftsmanEngineModel 265-SUAFor SnowModel 247.881721
23
24
m
D _ o w
19
951-11282
20
710-05001
20
751-14190
21
951-11289
22
712-04214
23
710-04915
24
951-I0642B
Muffler Assembly
Stud M8x36
Muffler Stud Kit
Exhaust Pipe Gasket
Nut, M8
Bolt M6x12
Muffler Shield
27
Page 28

CraftsmanEngineModel265-SUAForSnowModel 247.881721
41 _42
34
35
36
37
39
4O
41
42
43
951-10634
712-04213
951-11284
951-10757
951-10637
731-05632
951-10640
951-10635
710-04943
°0
Air Cleaner Housing
Nut
Choke Knob
Throttle Control Knob
Key Switch
Key
Choke Push Rod
Heater Box
Bolt M6x28
37
35
D _ o 0
28
Page 29

CraftsmanEngineModel265-SUAForSnowModel 247.881721
132- GasketKit-Complete
133- GasketKit-External
134-CompleteEngine
63
62
29
Page 30

CraftsmanEngineModel 265-SUAForSnowModel 247.881721
52
951-11900
53
951-11901
54
710-04915
55
56
57
58
59
60
61
62
63
64
65
66
67
68
69
70
71
73
74
75
76
77
78
79
131
132
133
134
951-11113
951-11573
951-14053
736-04461
951-11902
714-04078
951-11575
951-11369
951-10307
951-11247A
951-11576
715-04092
715-04096
951-11371
951-12125
951-11246
710-04932
951-11283
951-11577
951-11368
951-11248A
951-11062B
951-11350
736-04440
710-04906
951-11370
951-10641
951-11061A
951-10661B
952Z265-SUA
Air Shield
Connecting Rod Assembly
Governor Arm Shaft
Washer 5.2xl.9
Governor Seal
Cotter Pin
Camshaft Assembly
Woodruff Key
Crankshaft Kit (Incl.62-64,74,79)
Governor Gear/Shaft Assembly
Crankcase Cover Gasket
Crankcase Cover
Crankcase Cover Kit (Incl. 62,68-74)
Oil Fill Plug Assembly
O-Ring 15.8x2.5
Oil Seal, 25x41.25x6
Crankcase Kit (Incl.59,62,74,75,79)
Short Block Assembly
(Incl. 4,21,27-29,32,44, 46,47,80-53,56-79)
Oil Drain Pipe Assy.
Washer 10x16x1.5
Oil Drain Plug
Oil Seal 25x41.25x6
Oil Drain Assembly
Gasket Kit - Complete
(Incl.4,21,27-29,32,44, 58,59,68,74,77,79)
Gasket Kit - External (Incl. 4,21,27-
29,32,77)
Complete Engine
D - ® 0
Piston
Piston Pin
Bolt M6x12
Radial Ball Bearing, 6205
Dowel Pin 7x14
Dowel Pin 9x14
Bolt M8x32
3O
Page 31

CraftsmanEngineModeJ265-SUAFor SnowModeJ247.881721
13
48
15 44
10
17
132- GasketKit-CompJete
133-GasketKit-External
134- CompleteEngine
\6
31
Page 32

CraftsmanEngineModel 265-SUAForSnowModel 247.881721
1
710-04968
2
951-11054A
3a
731-07059
3b
726-04101
4
951-11565
5
951-12000
6
951-11892
7
751-11124
8
751-11123
9
951-11893
10
710-04902
11
951-12002
12
951-12003
13
951-12004
14
951-11894
15
710-04933
16
951-11895
17
751-14195
18
951-10292
44
951-11898
45
951-10648
46
951-11899
47
715-04108
48
951-10647A
49
951-10647A
130
951-12626
132
951-11061A
133
951-10661B
134
952Z265-SUA
D - o o
Bolt M6x16
Valve Cover
Breather Hose
Breather Hose Clamp
Valve Cover Gasket
Valve Spring Retainer (Intake)
Rocker Arm Assembly
Nut, Pivot Locking
Adjusting Nut ,Valve
Rocker Arm
Bolt, Pivot
Exhaust Lash Cap
Valve Spring Retainer (Exhaust)
Valve Spring
Valve Seal (Intake)
Bolt M8x55
Push Rod Guide
Cylinder Head Assembly
(Incl.4-14,16,17,21,27, 29,44,48,49)
Spark Plug/F6Rtc
Gasket, Cylinder Head
Push Rod Kit
Tappet
Dowel Pin 10x16
Valve Kit
Valve Kit
Valve Cover Kit
Gasket Kit - Complete
(Incl.4,21,27-29,32,44, 58,59,68,74,77,79)
Gasket Kit - External (Incl. 4,21,27-
29,32,77)
Complete Engine
32
Page 33

CraftsmanEngineModel265-SUAForSnowModel 247.881721
27
28
135- CarburetorKit
3O
w
31_
33
Page 34

CraftsmanEngineModel 265-SUAForSnowModel 247.881721
25
710-04939
26
710-04910
27
951-11567
28
951-11896
29
951-11569A
30
951-10639A
30
951-11824
31
951-12705
32
951-11897
33
951-11112
135
951-14050
a
n/a
b
n/a
n/a
C
d
n/a
e
710-05469
f
736-04638
n/a
g
h
n/a
I
n/a
n/a
J
k
951-11699
I
951-11906
m
n/a
n
n/a
n/a
0
951-12875
P
n/a
q
r
n/a
n/a
s
t
951-11589
U
n/a
951-11348
V
710-04945
W
X
951-11349
710-04938
Y
D _ o 0
Stud M6x117
Stud M6x105
Carburetor Insulator Gasket
Carburetor Insulator
Carburetor Gasket
Primer Assembly
Primer Bulb
Carburetor Assembly
Carburetor Gasket Plate
Choke Control
Carburetor Kit
(Incl.h,n,o,p,q,r,s,t,v,x)
Choke Shaft
Choke Plate
Throttle Shaft
Throttle Plate
Screw M3x6
LockWasher
Gasket, Throttle Plate
Idle Jet Assembly (0.34)
Idle Speed Adjusting Screw
Primer Pipe
Primer Hose
Hose Clamp
Carburetor Body
Float Pin
Emulsion Tube (P18-019)
Needle Valve
Main Jet (#73)
Needle Valve Spring
Float
Fuel Bowl O-Ring
Fuel Bowl
Fuel Bowl Mounting Bolt Gasket
Fuel Bowl Mounting Bolt
Fuel Bowl Drain Bolt Gasket
Fuel Bowl Drain Bolt
34
Page 35

CraftsmanEngineModel 265-SUAFor SnowModel 247.881721
82
8O
81
82
83
85
86
87
88
89
91
92
93
94
951-10646
951-11110
710-04940
710-04919
951-12416
951-10934
951-10911
712-04209
710-04915
951-10663A
736-04455
710-04974
951-14151
D - o o
Ignition Coil Assembly
Air Flow Shield
Bolt M6xlO
Bolt M6x25
Flywheel
Cooling Fan
Starter Cup
Nut, Special, M14x1.5
Bolt M6x12
Blower Housing
Gasket 6
Bolt M6xlO
Recoil Starter
35
Page 36

CraftsmanEngineModel 265-SUAForSnowModel 247.881721
96 103 _117
_115
116
m
95
96
97
98
99
100
102
103
104
105
106
107
951-10758
710-05103
951-11108
951-11935
951-10664
951-10665
951-11106
712-04212
710-04908
951-11700
951-10650
710-04915
96- 9s 99
95
D _ o o
Primer Bracket
Bolt M6x12
Governor System Shield
Governor Spring
Throttle Linkage Spring
Throttle Linkage
Governor Arm
NutM6
Governor Arm Bolt
Fuel Hose Clamp
Fuel Line Kit
Bolt M6x12
105
107
108
109
110
111
112
113
114
115
116
117
118
951-11914
710-04905
710-04915
951-11913
951-11381
951-10656
951-11904
951-12482
951-12533
951-11933
951-10653B
D _ o o
Dipstick Decoration Cover
Bolt
Bolt M6x12
Oil Fill Tube Assembly
O-Ring
Oil Fill Tube
O-Ring
Dipstick Assembly
Fuel Cap Assembly
Fuel Level Indicator
Fuel Tank Assembly
36
Page 37

CraftsmanEngineModel 265-SUAFor SnowModel 247.881721
119
120
121
122_
m
119
120
121
122
123
124
125
126
127
128
129
122
710-04914
951-11680
951-11114
712-05015
710-04935
710-04965
710-05182
715-04088
951-I0645A
710-04915
951-11109
123
_i _128
29
D - o e
Bolt M6xlO
Wire Clip
Switch Housing Mounting Bracket
Nut, M6
Bolt M4x60
Bolt M4x55
Bolt M6x32
Dowel Pin 8x8
Electric Starter
Bolt M6x12
Blower Housing Shield
37
Page 38

38
Page 39

FEDERALand/or CALIFORNIAEMISSIONCONTROLWARRANTYSTATEMENT
YOURWARRANTYRIGHTSANDOBLIGATIONS
MTD Consumer Group Inc, the United States Environmental Protection Agency (EPA), and for those products certified for sale in the state of
California, the California Air Resources Board (CARB) are pleased to explain the emission (evaporative and/or exhaust) control system (ECS)
warranty on your 2013 and later small off-road spark-ignited engine and equipment (outdoor equipment engine). In California, new outdoor
equipment engines must be designed, built and equipped to meet the State's stringent anti-smog standards (in other states, outdoor
equipment engines must be designed, built, and equipped to meet the U.S. EPA small off-road spark ignition engine regulations). MTD
Consumer Group Inc must warrant the ECSon your outdoor equipment engine for the period of time listed below, provided there has been no
abuse, neglect, or improper maintenance of the outdoor equipment engine.
Your ECS may include parts such as the carburetor, fuel-injection system, ignition system, catalytic converter, fuel tanks, fuel lines, fuel caps,
valves, canisters, filters, vapor hoses, clamps, connectors, and other associated emission-related components.
Where a warrantable condition exists, MTD Consumer Group Inc will repair your outdoor equipment engine at no cost to you including
diagnosis, parts, and labor.
MANUFACTURER'SWARRANTYCOVERAGE:
This emission control system is wa rranted for two years. If any emission-related part on your outdoor equipment engine is defective, the
part will be repaired or replaced by MTD Consumer Group Inc. In the event that a component is covered for longer than two years by the
Manufacturer's equipment warranty, the longer coverage period will apply.
/
OWNERSWARRANTYRESPONSIBILITIES:
As the outdoor equipment engine owner, you are responsible for performance of the required maintenance listed in your owner's manual. MTD
Consumer Group Inc recommends that you retain all receipts covering maintenance on your outdoor equipment engine, but MTD Consumer
Group Inc cannot deny warranty solely for the lack of receipts.
As the outdoor equipment engine owner, you should however be aware that MTD Consumer Group Inc may deny you warranty coverage if
your outdoor equipment engine or a part has failed due to abuse, neglect, improper maintenance, or unapproved modifications.
You are responsible for presenting your outdoor equipment engine to MTD Consumer Group Inc's distribution center or service center as soon
as the problem exists. The warranty repairs should be completed in a reasonable amount of time, not to exceed 30 days. If you have a question
regarding your warranty coverage, you should contact the MTD Consumer Group Inc Service Department at 1-800-800-7310 or at
http://su pport.mtd prod ucts.com.
GENERALEMISSIONSWARRANTYCOVERAGE:
MTD Consumer Group Inc warrants to the ultimate purchaser and each subsequent purchaser that the outdoor equipment engine is: (1)
designed, built, and equipped so as to conform with all applicable regulations; and (2) free from defects in materials and workmanship that
cause the failure of a warranted part for a period of two years.
The warranty period begins on the date the outdoor equipment engine is delivered to an ultimate purchaser or first placed into service.
Subject to certain conditions and exclusions as stated below, the warranty on emission-related parts is as follows:
1. Any warranted part that is not scheduled for replacement as required maintenance in the written instructions supplied is warranted for
the warranty period stated above. If the part fails during the period of warranty coverage, the part will be repaired or replaced by MTD
Consumer Group Inc according to subsection (4) below. Any such part repaired or replaced under warranty will be warranted for the
remainder of the period.
2. Any warranted part that is scheduled only for regular inspection in the written instructions supplied is warranted for the warranty period
stated above. Any such part repaired or replaced under warranty will be warranted for the remaining warranty period.
3. Any warranted part that is scheduled for replacement as required maintenance in the written instructions supplied is warranted for the
period of time before the first scheduled replacement date for that part. If the part fails before the first scheduled replacement, the part
will be repaired or replaced by MTD Consumer Group Inc according to subsection (4) below. Any such part repaired or replaced under
warranty will be warranted for the remainder of the period prior to the first scheduled replacement point for the part.
4.
Repair or replacement of any warranted part under the warranty provisions herein must be performed at a warranty station at no charge
to the owner.
5. Notwithstanding the provisions herein, warranty services or repairs will be provided at all of our distribution centers that are franchised to
service the subject engines or equipment.
6. The outdoor equipment engine owner will not be charged for diagnostic labor that is directly associated with diagnosis of a defective,
emission-related warranted part, provided that such diagnostic work is performed at a warranty station.
7. MTD Consumer Group Inc is liable for damages to other engine or equipment components proximately caused by a failure under
warranty of any warranted part.
8. Throughout the off-road engine and equipment warranty period stated above, MTD Consumer Group Inc will maintain a supply of
warranted parts sufficient to meet the expected demand for such parts.
9. Any replacement part may be used in the performance of any warranty maintenance or repairs and must be provided without charge to
the owner. Such use will not reduce the warranty obligations of MTD Consumer Group Inc.
Page 40

10. Add-onormodifiedpartsthatarenotexemptedbytheAirResourcesBoardmaynotbeused.Theuseofanynon-exemptedadd-onor
modifiedpartsbytheultimatepurchaserwillbegroundsfordisallowingawarrantyclaims.MTDConsumerGroupIncwillnotbeliableto
warrantfailuresofwarrantedpartscausedbytheuseofanon-exemptedadd-onormodifiedpart.
WARRANTEDPARTS:
The repair or replacement of any warranted part otherwise eligible for warranty coverage may be excluded from such warranty coverage if
MTD Consumer Group Inc demonstrates that the outdoor equipment engine has been abused, neglected, or improperly maintained, and that
such abuse, neglect, or improper maintenance was the direct cause of the need for repair or replacement of the part. That notwithstanding,
any adjustment of a component that has a factory installed, and properly operating, adjustment limiting device is still eligible for warranty
coverage. Further, the coverage under this warranty extends only to parts that were present on the off-road engine and equipment purchased.
The following emission warranty parts are covered (if applicable):
1. Fuel Metering System
Cold start enrichment system (soft choke)
Carburetor and internal parts (or fuel injection system)
Fuel pump
Fuel tank
2. Air Induction System
Air cleaner
Intake manifold
3. Ignition System
Spark plug(s)
Magneto ignition system
4. Exhaust System
Catalytic converter
SAI (Reed valve)
5. Miscellaneous Items Used in Above System
Vacuum, temperature, position, time sensitive valves and switches
Connectors and assemblies
6. Evaporative Control
Fuel hose
Fuel hose clamps
Tethered fuel cap
Carbon canister
Vapor lines
050790 Rev.A
Page 41

Congratulations on making a smart purchase. Your new Craftsman® product is designed and
manufactured for years of dependable operation. But like all products, it may require repair
from time to time. That's when having a Repair Protection Agreement can save you money and
aggravation.
Here's what the Repair Protection Agreement* includes:
[] Expert service by our 10,000 professional repair specialists
[] Unlimited service and no charge for parts and labor on all covered repairs
[] Product replacement up to $1500 if your covered product can't be fixed
[] Discount of 25% from regular price of service and related installed parts not covered by the
agreement; also, 25% off regular price of preventive maintenance check
[] Fast help by phone - we call it Rapid Resolution - phone support from a Sears representative.
Think of us as a "talking owner's manual."
Once you purchase the Repair Protection Agreement, a simple phone call is all that it takes for you
to schedule service. You can call anytime day or night, or schedule a service appointment online.
The Repair Protection Agreement is a risk-free purchase. If you cancel for any reason during the
product warranty period, we will provide a full refund. Or, a prorated refund anytime after the
product warranty period expires. Purchase your Repair Protection Agreement today!
Some limitations and exclusions apply. For prices and additional information in the U.S.A.
call 1=800=827=6655.
*Coverage in Canada varies on some items. For full details call Sears Canada at 1=800=361=
6665.
Sears Installation Service
For Sears professional installation of home appliances, garage door openers, water heaters, and
other major home items, in the U.S.A. or Canada call 1=800=4=MY=HOME®.
31
Page 42

Declaraci6n de garantia ............................ Pagina 42
Practicas operaci6n seguras ..................... Pagina 43
Montaje ...................................................... Pagina 47
Operaci6n .................................................. Pagina 51
Servicio y Mantenimiento .......................... Pagina 56
GARANTiA COMPLETA CRAFTSMAN POR DOS AltOS
PORDOSANOSapartir dela fechade lacornpra,esteproductoest,.garantizadopordefectosenlos rnaterialesyla rnanodeobra.
Losproductosdefectuososser_.nreparadossin costooreernplazadossin costosi la reparaci6nnoest,.disponiNe.
La presentegarantiaseanulasiseutilizaesteproductoalgunavezparaprestarservicioscornercialeso siseIoalquilaa otra persona.
Paraobtener informaci6nsobreel alcancede la garantiay solieitar lareparaci6no el reemplazo,visite elsitio Web:www.craftsman.com
Esta garantiaeubre0NICAMENTElosdefectos en los rnaterialesy enla manode obra. Estagarantia NOcubre:
• Elernentosno renovablesquepuedendesgastarsepor eluso normal,duranteelplazodela garantia,incluyendoentreotros,lasbarrenas,
laspaletasdelas barrenas,loscortadoresde desplazarniento,laszapatasantideslizantes,la placade raspado,lospasadoresdecuchilla,
la bujia,elfiltrode aire,lascorreasy el filtrodeaceite.
• Serviciosde rnantenirnientoest_.ndar,carnbiosdeaceiteo afinaci6n.
• Carnbiode neurn_.ticoso reparacionesporpinchadurasconobjetosexternoscornoclavos,espinas,toconeso vidrios.
Reernplazoo reparaci6nde neurn_.ficoso ruedascornoresultadodel desgastenormal,unaccident&ofuncionarniento
o rnantenirnientoincorrectos.
• Reparacionesrequeridascornoresultadodel usoinadecuadopot partedeloperador,incluyendoentreotrosel da_oocasionadoporobjetos
queirnpactanla rn_.quinay quetuercenel bastidor,el ejede labarrena,etc.,odebidoaqueelmotorrueaceleradoenexceso.
• Reparacionesnecesariasdebidoanegligenciadeloperador,incluyendoentreotros,da_osrnec_.nicoyel_ctricoocasionadopor
unalrnacenarnientonoapropiado,fallaporel usodeaceitede gradoy/o cantidadnoapropiadoso fallapornodar rnantenirniento
alequipodeacuerdoconlasinstruccionescontenidasenel manualdeloperador.
• Lirnpiezao reparacionesdel motor(sisternade combustible)debidasa combustiblequesedeterrninaest,.contarninadou oxidado(viejo).
Engeneral,elcombustibledebeutilizarseen unperiodono mayorde 30dias a partirdesuadquisici6n.
• Eldeterioroydesgastenormalde losacabadosexteriores,oreernplazode laetiquetadelproducto.
Almacenamiento fuera de temporada ....... Pagina 61
Soluci6n de problemas .............................. Pagina 62
Lista de piezas ........................................... Pagina 22
Acuerdo de protecci6n para reparaciones .... Pagina 67
NOmero de servicio ................................ 01tima pagina
Estagarantialeotorgaderechoslegalesespecificos,peroustedpodriagozardeotrosderechosenraz6ndesulugarde residencia.
Sears Brands Management Corporation, Hoffman Estates, IL 60179
Tipodeaceitedelmotor:
Capacidadde aceitedel motor:
Capacidadde combustible:
Bujias:
Separaci6ndelas bujias:
©SearsBrands,LLC
5W-30
20onzas
2.3cuartos
FeRTC(F6TC)
.020"to.030"
N_mero de rnodelo ..........................................................
N_mero de sede..............................................................
Feehadeeompra .............................................................
RegistrearribaelnOrnerodel rnodelo,el nOrnerode serieyla fecha
de cornpra
42
Page 43

Lapresenciadeeste sfrnboloindicaque setratadeinstrucciones
irnportantesde seguridadquesedebenrespetarparaevitar
ponerenpeligrosuseguridadpersonaly/omaterialy lade otras
personas.Leay sigatodaslas instruccionesdeestemanualantes
de poneren funcionarnientoestarn_.quina.Si no respetaestas
instruccionespodrfaprovocarlesionespersonales.Cuandoveaeste
sfrnbolo,ipresteatenci6nala advertencia!
Estarn_.quinarueconstruidaparaseroperadadeacuerdocon
lasreglasde seguridadcontenidasenestemanual.AIigualque
concualquiertipodeequipornotorizado,undescuidooerrorpor
partedeloperadorpuedeproducirlesionesgraves.Estarn_.quina
escapazde arnputarrnanosy piesy dearrojarobjetoscongran
fuerza.Deno respetarlasinstruccionesde seguridadsiguientesse
puedenproducirlesionesgraveso larnuerte.
PROPOSICION 65 DE CALIFORNIA
Elescapedel motordeesteproducto,algunosde suscornponentes
y algunoscornponentesdelvehfculocontieneno liberansustancias
qufrnicasqueelestadodeCaliforniaconsideraque puedenproducir
c_.ncer,defectosde nacirnientouotrosproblernasreproductivos.
CAPACITACI6N
• Lea,entiendaycurnplatodaslas instruccionesincluidasen
la rn_.quinayen losrnanualesantesdernontarlay utiNzarla.
Guardeestemanualenun lugarseguroparaconsultasfuturasy
peri6dicas,asf cornoparasolicitarrepuestos.
• Leael ManualdelOperadorysigatodaslasadvertenciase
instruccionesdeseguridad.Elfracasode hacerasf puedecausar
la heridaseriaal operadory/o personaspresentes.
• Farniliarfcesecontodosloscontrolesycon el usoadecuado
delosrnisrnos.Sepac6rnodetenerlarn_.quinaydesactivarlos
controlesr_.pidarnente.
• No perrnitanuncaque los ni_osrnenoresde 14a_osutilicen
estarn_.quina.Losni_osde 14a_osen adelantedebenleery
entenderlasinstruccionesde operaci6ny norrnasdeseguridad
contenidaseneste manual,yen la rn_.quinaydebenserentrena-
dosy supervisadosporun adulto.
• Nuncaperrnitaquelosadultosoperenestarn_.quinasin recibir
antesla instrucci6napropiada.
• Losobjetosarrojadosporla rn_.quinapuedenproducirlesiones
graves.Planifiqueel patr6nenel queva air arrojandonievepara
evitarque ladescargade materialse realicehacialoscarninos,
losobservadores,etc.
• Mantengaalosobservadores,ayudantes,rnascotasy ni_ospor
Iornenosa 75piesde larn_.quinarnientrasla rnisrnaest,.en
funcionarniento.Detengalarn_.quinasialguienseacerca.
• Seaprecavidoparaevitarpatinarseocaerseespecialrnente
cuandooperala rn_.quinaenreversa.
Su responsabilidad--Restrinja el usode estarn_.quina
rnotorizadaalas personasquelean,cornprendany respetenlas
advertenciase instruccionesqueaparecenenestemanualyen la
rn_.quina.
iGUARDEESTASINSTRUCCIONES!
PR E PARATIVO S
Inspeccionerninuciosarnenteel_.readondeutilizar_,el equipo.Saque
todoslosfelpudos,peri6dicos,trineos,tablas,cablesy otrosobjetos
extra_osconlosquepodrfatropezaro quepodrfanserarrojadospor
labarrena/irnpulsor.
• Paraprotegerselosojosutilicesiernpreanteojosoantiparras
de seguridadrnientrasoperala rn_.quinao rnientraslaajusta
o repara.Losobjetosarrojadosquerebotanpuedenproducir
lesionesocularesgraves.
• Nooperelarn_.quinasin la vestirnentaadecuadaparaestaral
airelibreen invierno.Noutilicealhajas,bufandaslargasuotras
prendassueltasquepodrfanenredarseenlas partesrn6viles.
UtiNceun calzadoespecialparasuperficiesresbaladizas.
• Useun prolongadory untornacorrientedetrescablescon
conexi6na tierraparatodaslas rn_.quinasconrnotoresde
encendidoel_ctrico.
• Ajustelaalturade lacajadeltornacorrienteparaNrnpiarla grava
o lassuperficiesconpiedrastrituradas.
• Desengranetodaslaspalancasdecontrolantesde arrancarel
motor.
• Nuncaintenterealizarajustesrnientrasel motorest,.enrnarcha
exceptoenlos casosespecfficarnenterecornendadosen el
manualdeloperador.
• Dejequeelmotory la rn_.quinaseadaptena laternperatura
exteriorantesde cornenzara sacarla nieve.
43
Page 44

Manejoseguro de lagasolina
Paraevitarlesionespersonales0 daSosrnaterialestengarnucho
cuidadocuandotrabajecongasolina.Lagasolinaessurnarnente
inflarnabley susvaporespuedencausarexplosiones.Si sederrarna
gasolinaencirna0 sobrelaropasepuedelesionargravernenteya que
sepuedeincendiar. L&vesela piely c&rnbiesede ropade inrnediato.
• Utilices610los recipientesparagasolinaautorizados.
• Apaguetodoslos cigarrillos,cigarros,pipasyotrasfuentesde
cornbusfi6n.
• Nuncacarguecombustibleen larn&quinaen unespaciocerrado.
• Nuncasaquela tapadelcombustibleniagreguecombustible
rnientrasel motorest&caliente0en rnarcha.
• Dejequeel motorseenfrieporI0rnenosdosrninutosantesde
volvera cargarcombustible.
• Nuncalleneenexcesoel dep6sitodecombustible.Lleneel
tanqueano rn&sde1/2pulgadapordebajode la basedelcuello
de Ilenadodejandoespacioparaladilataci6ndeIcombustible.
• Vuelvaa colocarla tapadelagasoiinay aj_stelabien.
• Lirnpieelcombustiblequese hayaderrarnadosobreel motoryel
equipo.Trasladela rn&quinaa otrazona.Espere5rninutosantes
deencenderelmotor.
• Nuncaalrnacenela rn&quina0 el recipientedecombustibleen
unespaciocerradodondehayafuego,chispas0luzpiloto(por
ejernplo,hornos,calentadoresdeagua,calefactores,secadores
de ropa,etc.).
• Dejequela rn_.quinaseenfrieporIornenos5rninutosantesde
guardarla.
• NuncaIlenelosrecipientesenel interiordeunvehiculoocarni6n
ocajade rernolquecon recubrirnientospl_.sticos.Coloque
siernprelosrecipientesenel pisoy lejosdelvehiculoantesde
Ilenarlos.
• Sies posible,retireelequipoa gasolinadelcarni6no rernolque
yII_neloenel suelo.Siestonoes posible,Ileneelequipoen un
rernolqueconcontenedorport_.til,envezdedesdeunaboquilla
dispensadoradegasolina.
• Mantengalaboquilladispensadoraen contactoconel hordedel
dep6sitode combustibleo con la aberturadelrecipienteentodo
rnornento,hastaterrninarlacarga.No utiliceundispositivode
apertura/cierrede boquilla.
FUNCIONANIIENTO
• No pongalasrnanoso lospiescercadelaspiezasrotatorias,
en lacajade labarrena/ irnpulsoro en el rnontajedelcanalde
descarga.Hacercontactocon piezasgiratoriaspuederesultaren
laarnputaci6ndernanosopies.
• La palancadecontrolde la barrena/ irnpulsores un dispositivo
de seguridad.Nuncaevitesufuncionarniento.Dehacerlola
operaci6nde la rn_.quinaesriesgosay puedeocasionarlesiones.
• Las palancasdecontroldebenfuncionarbienen arnbasdirec-
cionesy regresarautorn_.ticarnentea la posici6nde desengrane
cuandose lassuelta.
• Nuncaoperela rn_.quinasifaltaunrnontajedelcanalosiel
rnisrnoest,.daSado.Mantengatodoslosdispositivosde seguri-
daden sulugaryen funcionarniento.
• Nuncaenciendaelmotorenespacioscerradoso en unazona
conpocaventilaci6n.Elescapedel motorcontienernon6xidode
carbono,ungasinodoroy letal.
• Noutilicela rn_.quinabajolainfluenciadelalcohololas drogas.
• Elsilenciadoryel motorsecalientany puedencausarquernadu-
ras.Nolos toque.Mantengaa losniSosalejados.
• Seasurnarnenteprecavidocuandooperelarn_.quinasobreuna
superficiecongravaocuandola cruce.Mant_ngasealertaporsi
sepresentanpeligrosocultosotr_.nsito.
• Tengacuidadocuandocarnbiededirecci6nocuandoopere
la rn_.quinaenpendientes.Nouselarn_.quinaen pendientes
pronunciadas.
• Planifiqueel patr6nenel quevaair arrojandonieveparaevitar
que ladescargade materialse produzcahacialasventanas,
lasparedes,losautorn6viles,etc.y evitarasi posiblesdaSos
rnaterialeso lesionesproducidasporlos rebotes.
• Nuncadirijaladescargahacialos niSos,losobservadoreso las
rnascotasni dejequenadieseparedelantedela rn_.quina.
• Nosobrecarguelacapacidaddela rn_.quinatratandodesacarla
nievernuyr_.pidarnente.
• Nuncaopereestarn_.quinasinbuenavisibilidadoilurninaci6n.
Siernpredebeestarsegurodequeest,.bienafirrnadoy su-
jetandofirrnernentelas rnanijas.Carnine,nuncacorra.
• Cortela corrienteala barrena/ irnpulsorcuandotransportela
rn_.quinao cuandolarnisrnanoest,.en uso.
• Nuncaoperela rn_.quinaaaltavelocidadde desplazarniento
sobresuperficiesresbaladizas.Mirehaciaabajoy haciaatr_.sy
tengacuidadocuandovayarnarchaatr_.s.
• Si la rn_.quinacornenzaraavibrarde rnaneraanorrnal,detengael
motor,desconecteel cablede labujiay p6ngalade rnaneraque
hagarnasacontrael motor.Inspeccionela rn_.quinarninuciosa-
rnenteparaver siest,.daSada.Reparetodoslos daSosantesde
encenderyoperarla rn_.quina.
• Desengranetodaslaspalancasdecontroly detengaelmotor
antesdedejarla posici6nde operaci6n(detr_.sdelas rnanijas).
Espereaque labarrena/ irnpulsorse detengaporcornpleto
antesdedestaparelrnontajedelcanalo realizarajustese
inspecciones.
• Nuncapongalasrnanosenlasaberturasdedescargaode
recolecci6n.Utilicesiernprela herrarnientadelirnpiezaquese
adjuntaparadestaparla aberturadedescarga.Nodestapeel
rnontajedelcanal rnientrasel motorest,.en funcionarniento.
Antesde destaparlo,apagueel motory perrnanezcadetr_.sdelas
rnanijashastaquetodaslas partesrn6vilessehayandetenido.
• Uses61ounionesyaccesoriosaprobadospotelfabricante(por
ejernplo,pesasparalas ruedas,cadenasparalosneurn_.ticos,
cabinas,etc.).Paraobtenerrn_.sinforrnaci6nacercadeestos
ternas,Ilarneal 1-800-469-4663.
44
Page 45

• Paraencenderel motor,jale delacuerdalentarnentehastaque
sientaresistencia,luegojaler_.pidarnente.Elreplieguer_.pidode
la cuerdadearranque(tensi6nderetroceso)lejalar_,la rnanoy
el brazohaciael motorrn_.sr_.pidodeIoqueustedpuedesoltar.
El resultadopuedenserhuesosrotos,fracturas,hernatornaso
esguinces.
• Si se presentansituacionesquenoest_.nprevistasen este
manual,seacuidadosoyuseel sentidocornOn.
• Parapedirrepuestoso serviciohorarioparaesteproducto,Ilarne
a 1-800-469-4663.
MANTENIMIENTO Y ALMACENAMIENTO
• Nuncaalterelosdispositivosde seguridad.Controleperi6dica-
rnentequefuncionencorrectarnente.Rernitasealas secciones
demantenirnientoy ajustede estemanual.
• Antesde realizarla lirnpieza,repararo revisarlarn_.quina,
desengranetodaslaspalancasdecontroly detengael motor.
Espereaquela barrena/ irnpulsorsedetengaporcornpleto.
Desconecteel cabledela bujfayp6ngalohaciendornasacontra
el motorparaevitarqueseenciendaaccidentalrnente.
• Controlefrecuenternentequetodoslospernosytornillosest_n
bienajustadosparacornprobarquela rn_.quinaseencuentra
encondicionessegurasde funcionarniento.Adern_.s,hagauna
inspecci6nvisualde larn_.quinaparaverificarsiest,.da_ada.
• No carnbielaconfiguraci6ndel reguladordelmotorni acelere
dernasiadoelrnisrno.Elreguladordelmotorcontrolala velocidad
rn_.xirnaseguradefuncionarnientodelmotor.
• Las placasde raspadoy las zapatasantideslizantesquese
usancon la rn_.quinaquitanievesedesgastanyseda_an.
Paraprotegersu seguridad,verifiquefrecuenternentetodoslos
cornponentesy reernpl_.celoss61oconpartesde los fabricantes
deequiposoriginales(OEM).iEIusode piezasquenocurnplen
conlasespecificacionesdelequipooriginalpuederesultaren
rendirnientoinadecuadoadern_.sde poneren riesgola seguridad!
• Reviselaspalancasdecontrolperi6dicarnenteparaverificar
queengranenydesengranenadecuadarnentey ajOstelossies
necesario.Consultela secci6ndeajustesdeeste manualdel
operadorparaobtenerinstrucciones.
• Mantengaoreernplacelasetiquetasde seguridade instrucciones
segQnseanecesario.
• Respetelasnorrnasreferentesa ladisposici6ncorrectay las
reglarnentacionessobregasolina,aceite,etc. paraprotegerel
medicarnbiente.
• Antesdealrnacenarlarn_.quinaenci_ndalaunosrninutospara
sacarla nievequehayaquedadoen larnisrnay paraevitarasi
quesecongelela barrena/irnpulsor.
• SegOnlaCornisi6nde Seguridadde Productosparael Consurni-
dorde losEstadosUnidos(CPSC)y laAgenciade Protecci6n
Arnbientalde los EstadosUnidos(EPA),esteproductotieneuna
vidaQtilmediadesiete(7)a_os,660 horasdefuncionarniento.
AI finalizarlavida Otilmedia,adquieraunarn_.quinanuevao
hagainspeccionaranualrnente_staporun distribuidordeservicio
autorizadoparacerciorarsede quetodoslossisternasrnec_.nicos
y deseguridadfuncionancorrectarnentey notienenexcesivo
desgaste.Si no Iohace,puedenproducirseaccidentes,lesiones
o rnuerte
• Nuncaalrnacenelarn_.quinao el recipientedecombustibleenun
espaciocerradodondehayafuego,chispasoluzpilotocornopor
ejernplo,calentadoresde agua,hornos,secadoresde ropa,etc.
• Consultesiernpreel manualdeloperadorparaobtener
instruccionesadecuadasparaelalrnacenarnientofuerade
ternporadaVerifiquefrecuenternentelaIfneade combustible,el
tanque,el tap6n,y losaccesoriosbuscandorajaduraso perdidas.
Reernplacede sernecesario.
• Nod_ arranquealmotorsi noest,. labujiade encendido.
NO MODIFIQUE EL MOTOR
Paraevitarlesionesgraveso larnuerte,nornodifiqueel motorbajo
ningunacircunstancia.Si carnbialaconfiguraci6ndel reguladorel
motorpuededescontrolarsey operara velocidadesinseguras.Nunca
carnbielaconfiguraci6ndef_.bricadelreguladordel motor.
AVISO REFERIDO A EMISIONES
Losrnotoresqueest&ncertificadosycurnplenconlasregulaciones
de ernisionesfederalesEPAyde CaliforniaparaSORE(Equipos
peque_ostodoterreno)est_.ncertificadosparaoperarcongasolina
cornOnsinplornoy puedenincluirlossiguientessisternasde control
de ernisiones:Modificaci6ndemotor(EM) ycatalizadorde tresvias
(TWO)si est_.nequipadosde esarnanera.
GUARDACHISPAS
Estarn&quinaest,.equipadacon unmotorde cornbusti6ninternay
nodebeserutilizadaeno cercade unterrenoagrestecubiertopor
bosque,rnalezaso hierbaexceptosiel sisternade escapedelmotor
est,.equipadoconunarnortiguadorde chispasquecurnplaconlas
leyeslocaleso estatalescorrespondientes,encasodehaberlas.
Siseutilizaun arnortiguadordechispasel operadorIo debernantener
en condicionesde usoadecuadas.Enel Estadode Californialas
rnedidasanteriorrnenternencionadassonexigidasporley(Arficulo
4442del C6digodeRecursosPOblicosde California).Esposible
queexistanleyessirnilaresenotrosestados.Lasleyesfederalesse
aplicanenterritoriosfederales.
Puedeconseguirelarnortiguadordechispasparael silenciadora
travesde sudistribuidorautorizadodernotoreso poni_ndoseen
contactoconeldepartarnentodeservicios.
45
Page 46

SiMBOLOS DE SEGURIDAD
Estap_ginadescribelossimbolosy figurasde seguridadinternacionalesquepuedenaparecerenesteproducto.Leael manualdeloperador
)araobtenerla informaci6nterminadasobreseguridad,reunirse,operaci6ny mantenimientoy reparaci6n.
i
i
LEA ELMANUAL DEL OPERADOR (S)
Lea, entienda, y siga todas las instrucciones en el manual (es) antes de intentar reunirse y funcionar.
LA ADVERTENCIA -- PLATOS ROTATORIOS
Guarde manos de entrada y aperturas de la descarga mientras la m_iquina corre. Alli ellos hacen para
girar platos dentro.
LA ADVERTENCIA- LAMINAS ROTATIVAS
Guarde manos de entrada y aperturas de descarga mientras la m_iquina corre. Alli hacen girar I_iminas
dentro.
LA ADVERTENCIA -- TALADRO ROTATIVO
No ponga manos o pies cerca del giro de partes, en el alojamiento de taladro/aspa o asamblea de
tolva. Contacto con las partes rotativas puede amputar manos y pies.
OBJETOS LANZADOS POR ADVERTENCIA
Esta m_iquina puede recoger y lanzar objetos que pueden causar la herida personal seria.
GASOLINA DE ADVERTENCIA ESINFLAMABLE
Permita que el motor se enfrie al menos dos minutos antes del reabastecimiento de combustible.
ADVERTENCIA -- MONOXIDO DE CARBONO
Nunca dirijas un motor dentro o en un _irea mal ventilada. Los gases de combusti6n de motor
contienen el mon6xido de carbono, un gas inodoro y mortal.
ADVERTENCIA -- ELECTROCHOQUE
No use eljuez de salida el_ctrico del motor en laIluvia.
46
Page 47

IMPORTANTE:EstaunldadseenviaconelmotorIlenode aceite.Despu_sdel
montaje,consultelap_gina10paralosdetallesdelcombustibley elaceite.
Extracd6nde ia unidadde ia caja
1. Cortelasesquinasdelacajadecart6nyextiendalosladosdemaneraque
quedenpianossobreel pisoQuitetodoslosseparadoresdeempaque.
2. Saquelam_quinaquitanievedelacaja.
3. Aseguresedevaciarcompletamentelacajaantesdetirarla.
NOeieve[em_quinaquitanievetom_ndoiade[amanija de[canal.
Antesdel montaje
NOTA:Lasreferenciasquecontieneestemanualsobrelosladosderechooizquierdo
delam_quinaquitanievesehacenobservandolamismadesdelaposici6nde
operaci6namenosqueseindiqueIocontrario.
Configuraci6n de ia manija
NOTA:Tengaencuentalastresunlonesdecableflojasqueest_nunldasa labarra
decontrolinferioryseutilizar_nposteriormenteparasujetarloscables.
1. Aflojelaperilladealetas,laarandelac6ncava,laleng_Jetadelabarrade
controlyeltornillodelcarroqueest_naambosladosdelabarradecontrol
inferioryretirelos.Veala Figure20.
2. Desliceunadelasunionesdecableflojasdesdeelladoderechodelabarra
decontrolinferiorhastael travesaffodelamisma.Dejelasegundauni6nde
cableensusitioa laderechadelabarradecontrolinferior.VealaFigure22
comoreferencia.
IMPORTANTE:Paraevitarquesedaffeelcableresultar_necesariolevantarlabarra
decontrolsuperiormientrassedeslizaestauni6ndecablehaciaarriba.
3. Elevelabarradecontrolsuperioryubiquelasobrelabarrainferior,alineando
losorificiosdeloscualesseextrajeronlasperillasdealetas(1).VealaFigure21.
Tengacuidadodenodobiar nitorcer loscables.
4. Inserteuntornillodecarrodesdeelexteriora tray,sdeunalengGetadela
barradecontrol,lasbarrassuperioreinferior,unaarandelac6ncava,yal
interiordelaperilladealetas(2).RepitaIomismoenelotrolado.
5. Ajustelasperillasdealetasacadaladodelabarradecontrol.Consultela
Figure21.
NOTA:Elrecorridodelcabledelabarrenapasapotdebajodelabarrade
controlinferiorizquierdayelcabledetransmisi6npasaatrav_sdelaparte
superiordelabarradecontrolinferiorypordebajodelladoderechodela
misma.YealaFigure22.
6. Doscablesdesujeci6nsehanutilizadoparaatarsinapretarloscablesde
controldelamanijainferior.Unclipdepresi6ntambi_nseinduyeenel cable
delaunidadinferior.Posid6nde [asatadurasdecablesahora,comoenla
Figure22,yaprieteparafijarloscablesa[amanijainferior.Recorteelexceso
dematerialde[asatadurasdecables.Instaleelclipdepresi6nenelorifido
enelmangocomoelindicadoenelrecuadroalaizquierdaenlaFigure22.
Figure20
Figure21
Cabledelabarrena
ImpulsarClip
47
Figure22
Page 48

Zapata antideslizante
Pasadoresdecuchiila
Laszapatasantideslizantesdelam_quinaquitanieveseajustanhaciaarribaen
f_brica,paraelenvio.SiIodesea,puedeajustarlashaciaabajoantesdehacer
fundonarlam_quinaquitanieve.
Serecomiendanooperarestam_quinaquitanievesobregravayaque[a
unidadpuederecogery[anzargravasueltaf_dlmente, causando[esiones
personalesodaffosa [am_quinay losobjetosque[arodean.
Sideseaquitarlanievealrasenunasuperfidelisa,eleveamayoralturalas
zapatasantideslizantesdelacajadelabarrenaparabajarrasuradaplato.
Uselasposicionesintermediao bajacuandolasuperficiequedeseelimpiar
esdespareja,porejemploenuncaminodegravaparalevantarel platode
rasurada.
NOTA:Sideddeusarlam_quinaquitanievesobreunasuperfidedegrava,
mantengalaszapatasantideslizantesenlaposid6nquepermitaIograruna
separad6nm_ximaentreelsueloylaplacaderaspado.
Operaraun [anzadordenieveequipadoconaceropatinazapatospueden
tener comoresuitadodaffoasuperficiesdepiedranatura[esdepaver(por
ejemp[oarenisca,bluestone,[a piedracaliza).Para[ainformaci6nenel
pol(merodisponiblepatinazapatos,la llamada1-800-4M¥-HOME.
Sum_quinaquitanievetraeunpardepasadoresdecuchilla
delabarrenay pasadoresdechavetaconuni6ncurvade
reemplazo.Almac_nelosenunlugarsegurohastaquelos
necesite.
Herramienta de iimpieza
Laherramientadelimpiezadelcanalvieneajustadadef_bricaalapartesuperiordelacaja
delabarrenaconunpasadordeensambladoyunauni6ndecable.Cortelauni6ndecable
antesdeoperarlam_quinaquitanieve.VealaFigure24.
f
Herlamieutade
limpi_zadelcanal
Para ajustar las zapatas antideslizantes
Afloje[ascuatrostuercashexagonales(dosacada[ado)ylospernosdelcarro.
Muevalaszapatasantideslizantesalaposid6ndeseada.VealaFigure23.
f
Figure23
2. Compruebequetodalasuperfideinferiordelaszapatasantideslizantesest_
contraelsueloparaevitareldesgastedesparejodelasmismas.
3. Vuelvaaajustarbienlastuercasylospernos.
J
Figure24
Presi6nde los neum&ticos
Lapresi6ndeinfladoadecuadaesdeentre15psiy20psi.Verifiquela presi6n
delosneum_ticosregularmenteymantengasiemprelamismapresi6nenlos
dosneum_ticos.Unapresi6nexcesiva(potencimade20psi)puedehacerque
el conjuntodelarueda(neum_tico/llanta)exploteconunafuerzasufidente
comoparacausarlesionesgraves.Noinfledemasiadoelneum_tico.Utiliceuna
bombamanualouninfladordeneum_ticosel_ctricoport_tilparaevitarinflarlo
excesivamente.NOUSENUNCAUNCOMPRESORDEAIRE
Elinfladoe×cesivodelosneum_ticosconuna presi6nexcesiva(potendma
de20psi)puedehater queelconjunto delarueda(neum_ticolllanta)
exploteconunafuerzasuficientecomoparacausarlesionesgraves.
48
Page 49

Eecomendacionessobreel combustible
Utilicegasolinaparaautom6viles(sinplomoobajocontenidodeplomoparaminimizar
losdep6sitosenlac_maradecombusti6n)conunminimode87octanos.Sepuedeusar
gasolinaconhastaun10%deetanoloun15%deMTBE(_termetilicoterciario-butilico).
Nuncauseunamezcladeaceiteygasolinanigasolinasuda.Evitequeseintroduzca
suciedad,polvooaguaeneldep6sitodecombustible.NOutilicegasolinaE85.
Carguecombustibleenun_reabienventiladayconelmotorapagado.No
fumenipermitallamaso chispasenellugardondesecargacombustibleo se
almacenalagasolina.
NoIleneenexcesoeldep6sitodecombustible.Despudsdecargar
combustible,aseguresedequeeltap6ndeldep6sitoestdbiencerradoy
asegurado.
Tengacuidadodenoderramarcombustiblealrealizarlarecarga.El
combustiblederramadoo susvaporessepuedenincendiar.Sisederrama
combustible,aseguresedequeel_reaest_secaantesdearrancarel motor.
Eviteel contactorepetidoo prolongadoconla pielolainhalaci6ndelos
vapores.
Cargadecombustible
Vistasuperiordeliudicadorde
uiveldecombustible
Figure25
Verificaci6ndel nivei de aceite
Tengamucbocuidadoaltrabajar congasolina.Lagasolinaessumamente
inflamableysusvaporespuedencausarexplosiones.Nuncaagregue
combustiblealam_quinaeninterioresni mientrasel motor est_caliente
oenfu ncionamiento.Apaguedgarrillos, dgarros, pipasyotrasfuentesde
combusti6n.
Siempremantengalasmanosy lospiesalejadosdelaspiezasm6viles
delequipo.Noutilicefluidos comprimidosparaarrancar.Losvaporesson
inflamables.
I.
Antesdesacareltap6nparacargarcombustible,limpiealrededor.
2.
Eneldep6sitodecombustiblehayunindicadordenivel.Lleneel dep6sito
hastaIlegaralniveldecombustibledelindicador;vealaFigure25.Tenga
cuidadoparanoIlenareldep6sitoenexceso.
Elmotorseenviaconaceiteen elmotor.Sinembargo,debecontrolarel
niveldeaceiteantesdehacerfundonar la m_quinaquitanieve.Sisehace
funcionarel motorsinsuficienteaceitepuededaffarsegravementeyse
anulalagarantia.
NOTA:Paracomprobarelmotoraseguresedequeest_apagadoysobreuna
superfidenivelada.
Retireeltap6ndeIlenadodeaceite/lavarillademedki6nylimpielavarilla
demedid6ndeaceite.VealaFigure26.
Figure26
2. Insertelatapa/varillademedici6nenelcuellodellenadodeaceite,girela
tapaI/4 vueltahastaqueest_completamenteasentada.
49
Page 50

NOTA:Enalgunosmotores,un tap6nderosca/ varillademedJd6npueden
existirenlugardeunatapade1/4vueltacomosedescribeanteriormente.En
estecasonoapretarlatapaparaverificarel niveldeaceite.Simplerestode
laPACenlasroscasparacomprobarelniveldeaceitecorrecto.
3. Saqueel tap6n/la varillademedici6ndeaceite.Sielnivelesbajo,agregue
aceitelentamentehastaqueelregistromarqueentrenivelalto(H)ybajo
(L),Figure26.Consuitelasecd6nMantenimientodelmotorparaverla
viscosidadycapaddaddeaceitedelmotorcorrectas.
NO@:NoIoIleneenexceso.ElIlenadoexcesivodeaceitepuedehacerqueel
motorgenerehumo,quecuestearrancarlooquefallelabujia.
4. Vuelvaacolocareltap6n/la varillademedici6ndeaceitebienajustados
antesdeporterenmarchael motor.
Canaldedescarga
Aflojelaperilladealetasdelcanalsuperior,ajusteelcanalyelcontroldel
canalalaposid6ndefundonamlentodeseada.
2.
Aprletelaperilladealetasdelcanalsuperiorasegur_ndosedequeelperno
delcarroseencuentrecorrectamentecolocado.Consulte
laFigure27.
F
2. Enun_reabienventilada,arranqueel motordelam_quinaquitanievesegt_n
seindicaenlap_gina10bajoelencabezado"Encendidodelmotor".
j_ resedequeel reguladorseencuentreenlaposici6nFAST(r_pida)
3. Paradoenlaposici6ndeloperador(detr_sdelaunidad),engranelabarrena.
4. Dejelabarrenaengranadaduranteaproximadamentediez(10)segundos
antesdesoltarelcontroldelamisma.Repitaestaoperaci6nvariasveces.
5. Conel motorfuncionandoenposici6nFAST(r_pida)_ y elcontroldela
barrenaenposici6ndesengranadaarriba,caminehaciaelfrentedela
m_quina.
6. Confirmequelabarrenahadejadodegirarporcompletoynomuestra
NINGUNsignodemovimiento.
7. SilabarrenamuestraALGONsignoderotaci6n,vuelvainmediatamentea
la posid6ndeloperadoryapagueelmotor.Espereaquetodaslaspartes
m6vllessedetenganantesdereajustarelcabledecontroldelabarrena.
8. Aflojelatuercahexagonalposteriorenelsoportedeajustedelcable.Veala
Figure28.
f
Soportedeajustedel
cabledelabarrena
Figure27
Pruebadecontrolde la barrena
IMPORTANTE:Realicelapruebasiguienteantesdeoperarlam_quinaquitanieve
porprimeravezyalprincipiodecadainvierno.
Compruebeelajustedel controldelabarrenadelasiguienteforma:
I. Cuandosesueltaelcontroldelabarrenayest_enposici6ndesengranada
arriba,elcabledebetenermuypocojuego,peroNOdebeestarajustado.
Noajustedemasiadoelcable.Elajusteexcesivopuedeimpedirquela
barrenasedesengraney porterenpeligrola seguridaddelam_quina
quitanieve.
Tomillodelacajade........................
labarrenainferior
'I/ ...... Tomillodelacaja
//
J _ delabarrenasuperior .J
Figure28
Desliceelsoportedeajustedelcablehaciaatr_sreduciendoeljuegodel
cabledelabarrena.
10.
Vuelvaaajustarlatuercahexagonalposterior.
11.
Endendaelmotoryverifiquequeelcontroldelabarrenaseengranay
desengranaadecuadamente.
NO@:Silabarrenacontinuagirandoconelcontroldesengranado,apagueel
motoryreajusteelsoportedelcablehaciaadelante.Luegovuelvaacontrolar
elfuncionamientodelabarrena.
5O
Page 51

Controldela
barreua
Cuerdade Tapadela
arranque, gasolina
j Barradecontrolsuperior
Controldela
transmisi6n
\
Canalsuperior _, ] delcanal
f Tap6nde
Montajedelcanal Sileudador combustible Manijadelarrancador
Herramieuladelimpieza _ Tap6nde
Cebador _- aceite
Llaved,
eucendido
/ arranque
Barreua
Perilladelcanal
Plataderaspado
Zapata
antidesiizante
Cebador, el_ctrico
Tubodedrenaje deaceite el_ctrico
deretroceso
Bot6nde
Salidadel arrancador
J
Familiariseconel usodetodosloscontrolesdela m_quinaquitanieveyconsucorrectofuncionamiento.Sepac6modetenerla m_quinaydesactivarlos
controlesr_pidamente.
NOTA:ComparelaFiguraconsuequipoysigaladescripci6ndeloscontroles,quese
ofrecenacontinuaci6n,parafamiliarizarseconsuoperaci6n.
Controlde ia transmisi6n
Ubicadoenlaparteinferiordelgauchosuperior,elcontroldelatransmisi6nseutiliza
paraengranar/desengranarlasruedas.Aprieteelcontroldelatransmisi6ncontrala
barradecontrolsuperiorparaengranarlasruedas,ysu_lteloparadesengranarlas.
Control deiabarrena
Elcontroldelabarrenaest_alladodelabarradecontrolsuperior.Aprieteelcontrol
Manijadeicanal
Ladirecd6nenquesearrojalanievecorrespondealadirecci6ndeaperturadel
canal.Uselamanijadelcanalparagirarelmontajedelcanalenladirecci6nenla
quedeseearrojarlanieve.
Periiladelcanal
Esposibleajustarladistandaalacualsearrojala nieveelevandoo bajandoelcanal
superior.Aflojelaperilladelcanaldelladodelcanalsuperiorparaajustarlo.Gireel
canalsuperiorhastalaposid6ndeseadayvuelvaaajustarlaperilladelcanal.
delabarrenacontralabarradecontrolsuperiorparaengranarlasbarrenas,y
su_lteloparadesengranarlas.
Nuncarealiceajustesalmontajedel canalamenosqueloscontrolesdela
barrenay latransmisi6nest_ndesengranadosyeloperadorest_parado
juntoa la unidad.
IMPORTANTE:ConsultelaInformaci6nsobrelapruebadecontroldelabarrenaen
lasecci6nMontajeyAjustesdeestemanualantesdehacerfuncionarlam_quina
quitanieve.Leaycumplatodaslasinstruccionesconcuidado,yrealicetodoslos
ajustesparaverificarquesum_quinaquitanieveest_funcionandodeformasegura
yadecuada.
Plataderaspado
Laplacaderaspadomantieneelcontactoconelpavimentoamedidaquese
impulsalam_quinaquitanieve,permitiendoquesedescarguelanievequeest_
cercadelasuperfidedelpavimento.
Zapataantideslizante
Sepuedeajustarelespadoqueexisteentrelaplacaderaspadoyelsuelo.S[desea
quitarnievealrasdelsuelo,coloquelaszapatasantideslizantesenlaposici6nbaja.
Uselasposicionesmediaoaltacuandolasuperficiequedesealimpiarseadespareja
oest_cubiertadegrava.
51
Page 52

Barrenas
@andoest_nengranadas,lasbarrenasgkany mandanlanievehaciaelinteriorde
lacajadelabarrena.
Montajedei canal
Lanieveempujadaalinteriordelacajadelabarrenasedescargaporelmontajedel
canal.
Controldel cebador
AIactivarelcontroldelcebadorsecierralaplatade
cebadodelcarburadoryseayudaaencenderel motor.Por
informaci6nacercadelusodelcebador,consulteArranque
delMotorm_isadelanteenestasecci6n.
Arrancadorderetrocesoymanijadelarrancador
Estemotorcuentaarranqueporestiramientoconacci6nderetrocesoymanijadela
empuffadurademit6nparaun f_icilaccesousandoguantesomitones.
[.lavede encendido
LaIlavedeencendidoesundispositivodeseguridad.Debe [[[_'_!
estarcompletamenteinsertadaparaqueel motorarranque.
RetirelaIlavedeencendidocuandonouselam_quina
quitanieve. _0
NOTII:NogirelaIlavedeencendidoparaintentararrancarel
motor.AIhacerlopodr[aromperla.
I
Bot6ndel arrancador el_ctri¢o
Sioprimeelbot6ndelarrancadorel_ctrkoseengranaelarrancadorel_ctricodelmotor
cuandoseIoenchufaaunafuentedeenergiade120V.
Salida del arrancador el_ctri¢o
Esnecesariousaruncord6nprolongadorparaexterioresdetresparas(seincluye)y
unafuentedeenergia/ tomacorrientedeparedde120V.
Cebador
AIpresionarelcebadorseenviacombustibledirectamente
alcarburadordelmotorparafacilitarelarranquecuando
hacefifo.Consultelasinstruccionesdeencendido
enlasecci6ndeoperad6ndeestemanualparausar
correctamenteelcebador.Laimagenqueapareceacontinuad6nalaizquierda,
coincideconlaetiquetaqueidentifkaal cebadorenelmotor.
Llenado deaceite
Saqueel tap6ndeaceiteparaagregaraceite.Consultelasecd6nMantenimientoy
Servicioparaobtenerinstruccionessobrecontroly Ilenadodeaceite.
Tapa de la gasolina
Saquelatapadelagasolinaparaagregarcombustible.Launidadoperacon
combustiblenormal.
NOTA:Estaunidadpuedeincluiruntap6ndecombustible,queunicamentese
utilizaduranteelmontajeparamantenereldep6sitodecombustiblelibrede
suciedadyresiduos.Descarteeltap6ndecombustibleantesdeIlenareldep6sitode
combustible.
riD..-- ,al
Controldel regulador
Elcontroldelreguladorest_ubicadoenelmotor.Regulalavelocidaddelmotor,y
Ioapagacuandosepresionahadaabajocompletamente.Laimagendeladerecha
representalasveloddadesdelcontroldelreguladorycoincideconlaetiquetaubkada
enelmotor.Lasim_genesacontinuaci6nilustranladefinici6ndecadas[mbolo.
Herramienta de limpieza
Nuncauselasmanosparadespejarunmontaje decanaltapado.Apagueel
motory permanezcadetkis delasmanijasbasraquetodaslaspartesm6viles
sehayandetenidoantesdeutilizar laherramienta delimpiezaparadespejar
elconjuntodel canal.
Laherramientadelimpiezadelcanalest_ajustadaconvenlentementealaparteposterior
delacajadelabarrenaconunpasadordeensamblado.Siseacumulannieveyhieloen
elcanaldedescargadurantelaoperad6n,procedacomoseindkaacontinuaci6npara
limpiardemaneraseguraelmontajedelcanalylaaberturadelcanal:
1. Suelteelcontroldelabarrenayelcontroldelatransmisi6n.
2. Paradetenerel motorsaquelaIlavedeencendido.
3. Saquelaherramientadelimpiezadelahorquillaquelaajustaala parte
posteriordelacajadela barrena.
4. Useelextremoconformadepaladelaherramientadelimpiezapara
desplazary recogerlanieveyelhieloqueseformendentroycercadel
montajedelcanal.
5. Vuelvaaajustarlaherramientadelimpiezaal pasadordeensamblado
ubicadoenlaparteposteriordelacajadelabarrena,insertedenuevola
Ilavedeencendidoyendendaelmotordelam_quinaquitanieve.
6. Paradoenlaposici6ndeloperador(detr_sdelam_quinaquitanieve),
engraneelcontroldelabarrenaduranteunossegundosparaeliminarla
nieveoelhieloquehayanquedadoenelmontajedelcanal.
Antesdeencenderel motor
Lea,comprendaysigatodaslasinstruccionesy advertenciasqueaparecen
enla m_iquinayen estemanualantesdeoperarla.
Aceitedel motor
Estaunidadseenvi6conaceiteenel motor.Controleelniveldeaceiteantesde
cadaoperaci6nparaasegurarsedequehayaaceitesuficienteenel motor.Porm_s
instrucciones,consultelasecci6nMantenimientoyServiciodeestemanual.
NOTA:Paracomprobarel motorasegt_resedequeest_apagadoysobreuna
superfidenivelada.
1. Retireeltap6nde [[enadodeaceite/lavarillade medki6nyIimpielavarilla
demedici6ndeaceite.
Insertelatapa/varillademedid6nenelcuellodeIlenadodeaceite,girelatapa
1/4vueltahastaqueest_completamenteasentada.
52
Page 53

3. Saqueel tap6n/la varillademedici6ndeaceite.Sielnivelesbajo,agregue
aceitelentamente(5W-30,conunaclasificaci6nminimadeSF/SG)hastaque
elnivelregistradoestdentrelospuntosalto(H)ybajo(L).
flO@:NoIoIleneenexceso.ElIlenadoexcesivodeaceitepuedehaterqueel
motorgenerehumo,quecuestearrancarlooquefallelabujia.
4. Vuelvaacolocareltap6n/la varillademedici6ndeaceitebienajustados
antesdeponerenmarchaelmotor.
Gasolina
Arrancadorei ctrico
E[arrancadorel_ctricoopcionalest_equipadoconuncabledeaiimentaci6nde
treshilosconectadoatierrayunenchufeyest_diseffadoparaoperarconcorriente
dom_sticaCA,120voltios.Debeserutilizadoconunrecept_culoparatrespatas
correctamenteconectadoatierraentodomomentoparaevitarlaposibilidadde
descargasel_ctricas.Sigatodaslasinstruccionescuidadosamenteantesdeoperarel
arrancadorel_ctrico.NOutiiiceelarrancadorel_ctricoen lalluvia.
Utilicegasolinaparaautom6viles(sinplomoobajocontenidodeplomopara
minimizarlosdep6sitosenlac_maradecombusti6n)conunminimode87octanos.
Sepuedeusargasolinaconhastaun10%deetanoloun15%deMTBE(_termetilico
terdario-butilico).Nuncauseunamezcladeaceiteygasolinanigasolinasucia.Evite
queseintroduzcasuciedad,polvoo aguaeneldep6sitodecombustible.NOutilice
gasolinaE85. 3.
Carguecombustibleenun_ireabienventiladayconelmotorapagado.No
fumenipermitallamasochispasenellugardondesecargacombustibleose
almacenalagasollna.
Nolleneenexcesoeldep6sitodecombustible.Despu_sdecargarcombustible,
aseguresedequeeltap6ndeldep6sitoest#blencerradoyasegurado.
Tengacuidadodenoderramarcombustiblealreallzarlarecarga.Elcombustible5.
derramadoosusvaporessepueden[ncendlar.Sisederramacombustible,
asegOresedequeel_reaest_secaantesdearrancarelmotor. 6.
Eviteelcontactorepetidoo prolongadoconlapielola[nhalacl6ndelosvapores.
Tengamucbocuidadoaltrabajarcongasolina.Lagasolinaessumamente
inflamableysusvaporespuedencausarexplosiones.Nuncaagreguecombustible
alam_quinaeninterioresomientrasel motorest_calienteoenfundonamiento.
Apaguecigarrillos,dgarros,pipasyotrasfuentesdecombusti6n.
].
Antesdesacareltapbnparacargarcombustible,limpiealrededor.
2.
Eneldep6sitodecombustiblehayunindicadordenivel.Lleneeldep6sitohasta
Ilegaralniveldecombustibledelindicador.YeaelrecuadrodelaFigura10.
TengacuidadodenoIlenarenexceso.
Encendidodel motor
Siempremantengalasmanosylospiesalejadosdelaspartesm6viles.No
utilicefluidos comprimidosparaarrancar.Losvaporessoninflamables.
DeterminesJelcableadodesuhogaresunsistemadetrescablesconectadoatlerra.
Consulteconunelectridstamatriculadoslnoest_seguro.
S[tieneunrecept_culodetrestermlnalesconconexi6natierra,procedadelasiguiente
manera:S[elcableadodesuhogarnoeseladecuado,NOuseelarrancadorel_ctrlcoen
nlngunadrcunstanda.
Conecteelprolongadoralasalidasituadaenlasuperfidedelmotor.Conecte
elottoextremodelprolongadorauntomacorrientedeCA,120voltioscon
conexi6natierra,paratresparas,enun_reabienventilada.
4.
Muevalapalancadecontroldelreguladorhastalaposid6nFAST(r_pido,
representadoporunaliebre)_ .
Muevalapalancadel cebadorhastalaposlci6nCHOKE(encendido)I,,1.
S[el motorest_callente,ublqueelcebadorenlaposld6nRUN(apagado).
Presioneel bot6ndel cebadortres(3)veces,asegur_ndosedecubr#el
orifido deventilaci6ncuandoIohaga.SIelmotorest4caliente,presione
el bot6ndelcebadorunasolavez.Cubrasiempreelorifidodeventilaci6n
cuandooprimael bot6ndelcebador.SIhacefrio puederesultarnecesario
repetirelcebado.
7.
Presioneel bot6ndel arrancadorparaarrancarelmotor.Unavezencendido
el motor,suelteinmediatamenteelbot6ndelarrancador.Elarrancador
el_ctricotieneunaprotecd6ncontrasobrecargat_rmica;elsistemase
apagar_transitoriamenteparapermit#queseenfrieel arrancadorencaso
quesesobrecargue.
8. A medidaquesecalientaelmotor,rotelentamenteelcontroldelcebador
hastalaposid6nRUN(apagado).SIelmotorsedetiene,vuelvaaencenderlo,
h_galofundonarconelcebadorensuposid6nmediaduranteunlapsobreve
y luegogirelentamenteelcebadorhastalaposid6nRUN(apagado).
9. Unavezqueel motorest_enfundonamiento,desconectedelarrancador
el_ctricoel cabledealimentad6n.Paradesconectarlo,desenchufe
siempreelextremoqueest_enchufadoaltomacorrientedeparedantesde
desenchufarelextremoopuestoqueest_conectadoalmotor.
H _
Elcabledeextensi6npuedetenercualquier longitud,perodebeestar
clasificadopara15amperiosa125voltios,tierra y clasificadoparasuuso
al airefibre.
NOTA:Dejequeel motorsecalienteduranteunosminutostraselarranque.Elmotor
nodesarrollar_todasupotendahastaquealcancetemperaturasoperativas.
1. Asegt#esedequeelcontroldelabarrenayelcontroldelatransmisi6nest_n
enposid6ndesengranada(sinpresionar).
2. InsertelaIlavedeencendidoenlaranura.Asegt_resedequeentreapresi6n
ensulugar.NointentegirarlaIlave.
NOTA:ElmotornopuedearrancarsilaIlavenoest_completamenteinsertadaenel
interruptordeencendido.
Arrancadorde retroceso
Notirede lamanijadelarrancadormientrasel motorest_en marcba.
1. Muevalapalancade controldelreguladorhastalaposid6nFAST(r_pido,
representadoporunaliebre)_ .
2. Muevalapalancadelcebadorhastalaposld6nCHOKE(encendido)I,"1
(encendidoconelmotorenfrio).SIelmotorest_caliente,ubiqueelcebador
enlaposid6nRUN(apagado).
53
Page 54

3. Presioneelbot6ndelcebadortres(3)veces,asegur_ndosedecubrirel
orifidodeventilad6ncuandoIo haga.Siel motorest_caliente,presione
elbot6ndelcebadorunasolavez.Cubrasiempreelorifido deventilad6n
cuandooprimaelbot6ndelcebador.Sihatefriopuederesultarnecesario
repetirelcebado.
4. Jalesuavementelamanijadelarrancadorhastaquecomienceaofrecer
resistenda,luegoj_lelar_pidamenteyconfuerzaparasuperarla
compresi6n.Nosueltelamanijanipermitaquesedesenganche.Vuelvala
sogaLENTAMENTEasuposiddnoriginal.Desernecesario,repitaestepaso.
5. Amedidaquesecalientael motor,rotelentamenteelcontroldelcebador
hastalaposki6nRUN(apagado).Sielmotorsedetiene,vuelvaaencenderlo,
h_galofundonarconelcebadorensuposkidnmediaduranteunlapsobreve
yluegogirelentamenteelcebadorhastalaposiddnRUN(apagado).
Paraevitar queelmotorfundone sincontrol,nuncadejelam_quinasin
vigilancia mientrasest_enmarcha.Apagueel motor luegodeusarloy saque
la Ilavedeencendido.
Detenci6n del motor
Dejeencendidoelmotordurantealgunosminutosantesdedetenerloparapermitir
quesesequelahumedadenelmismo.
1. Muevaelcontroldelreguladorhastalaposid6nSTOP(detend6n)@.
2. RetirelaIlavedeencendido.AIretirarlaIlavesereducelaposibilidaddequeel
motorseapuestoenmarchasinautorizad6nmientraselequiponoest_enuso.
Guardelallaveenunlugarseguro.Elmotornopuedearrancarsinlallavede
encendido.
3. Eliminelahumedaddeloscontrolesdelmotor.
Antesde detener ia m quina
1. Dejeencendidoelmotordurantealgunosminutosparapermitirquese
sequelahumedadenel mismo.
2. Paraevitarunposiblecongelamientodelarrancadorderetroceso,sigaestos
pasos:
Arrancadorde retroceso
Procedimientoparaguitarlanieve
Revisela zonaquedesealimpiar paradetectarla presendadeobjetos
extraffos.Retirelossiloshay.
1. Enciendaelmotorsiguiendolasinstruccionesdeencendido.
2. Dejequeelmotorsecalienteunosminutosyaqueelmismonodesarrollala
potenciam_ximahastaquealcanzalatemperaturadefundonamiento.
3. @eelconjuntodelcanalhacialadirecd6ndeseada,lejosdetransetinteso
edificios.
4. Asegt]resedequenohayaningLintranseLinteni ningLinobjetoenfrentede
launidad,presioneelcontroldelabarrenacompletamentecontralabarra
superiorhastaengranartotalmentelasbarrenas.
5. Mientrasengranael controldelabarrena,presioneelcontroldela
transmisi6ncompletamentecontralamanijasuperiorparaengranarlas
ruedas.Nopongahorizontalelcontroldetransmisi6n.
6. A medidaquelam_quinaquitanievecomienzaa moverse,sostenga
firmementelamanijaygu[elam_quinaaIolargodelcaminoquedesea
limpiar.
7. Suelteloscontrolesdelabarrenaylatransmisi6nparaquelam_quinadeje
dequitarnieveydedesplazarsehadadelante.
NOTA:Suunidadest_equipadaconunembragueenlatransmisi6n.Silasruedasse
detienenmientrastratadedescargargrandesvoltimenesdenieve,inmediatamente
desengraneelcontroldelatransmisi6nydejequelasbarrenasqueest_ngirando
descarguenlanievedelacaja.Reduzcalaanchuradeseparad6nycontint]ela
operad6n.
8. Conlaspasadassucesivasreajusteelconjuntodelcanalenlaposid6ndeseada
ytraslapelevementelapasadaquelimpi6previamente.
Ubicaci6ndelcanaldedescarga
Aflojelaperilladelcanaly gireelcanalsuperiorhastalaposid6ndeseada.Ajuste
la perilladelcanalcomprobandoqueelpernodecarroest_ubicadocorrectamente
Gire la manija del canal a la posici6nde operaci6ndeseada.
1. Conelmotorenmarcha,tiredelacuerdadelarrancadorconmovimientor_pido
ycontinuodelbrazotresocuatroveces.
Procedimientoparadeteneria m quina quitanieve
1. Paradetenerlasruedas,suelteelcontroldelatransmisi6n.
2. Paradejardequitarlanieve,sueltee[controldelabarrena.
3. Paradetenere[motorpresione[apa[ancadecontroldelregu[adorhasta[aposid6n
OFF(apagado)_ ysaquelaIlave.NogirelaIlave.
Latemperaturadelsilenciadoryde las_reasqueIo rodeanpuedesuperar
los1500FoEvitedichas_reaso
Noelevenuncalam_quinaquitanievetom_ndola delamanijadel canal.
Consejosde operaci6n
1. Paraqueelquitadodelanieveseam_sefidentedebehacerlo
inmediatamentedespu_sdelaca[dadelamisma.
2. EnIoposible,descarguelanieveenladirecci6ndelviento.Traslape
levementecadapasadaanterior.
3. Configurelaszapatasantideslizantes1/4"pordebajodelaplacade raspado
paraunusonormal.Laszapatasantideslizantessepuedenajustarhacia
arribacuandolanieveest_muycompactada.
NO@:Noserecomiendalaoperaci6ndeestam_quinaquitanievesobre
grava,yaqueesposiblequelam_quinaquitanievetomelagravasueltay
labarrenalaexpulse,Iocualpodr[acausarlesionespersonalesodaffarla
m_quinaquitanieve.
54
Page 55

4. Siporalgt_nmotivotienequeusarlam_quinaquitanievesobregrava,
mantengalazapataantideslizanteen[aposici6nm_selevadaparaIograr
unaseparad6nm_ximaentreelsueloylaplacaderaspado.
5. Limpiecuidadosamentelam_quinaquitanievedespu_sdecadauso.
Reemplazode lospasadoresdecuchiila
Lasbarrenasest,_najustadasalejeespiralcondospasadoresdecuchfllaypasadores
dechaveta.Lam_quinaquitanievehasidodisefiadaparaquelospasadoresse
quiebrensilabarrenagolpearaunobjetoextrafioountrozodehielo.Silasbarrenas
nogiran,verifiquesilospasadoressehanquebrado.VealaFigure29.
NUNCAcambielospasadoresdecucNllade[asbarrenasporotra cosaque
lospasadoresdecucNiiaderepuestodel fabrkante de[equipooriginal, No
de pieza-738-04124.Cualquierdaffoquesufra [acajadeengranajesde[a
barrenaocuaiquierotto componenteporrespetar[aindicaci6nprecedente,
NOestar_cubiertopor [agarant[adesum_quinaquitanieve.
Siempredebeapagare[motor delam_quina quitanieveyretirar [aHave
antesdecambiarlospasadoresdecuchiiia.
Figure29
55
Page 56

MANTENIMIENTODELMOTOR f
Jletamentetodaslas)iezasm6viles.
Controldei aceite del motor
NOTA:Verifiqueel niveldeaceiteantesdecadausoydespu_sdecadadncohoras
defuncionamientoparacerciorarsequesemantieneelhive[deaceiteindicado.
Cuando[eagregueaceitea[motor,consulte[asiguientetabladeviscosidad.La
capaddaddeaceitedelmotores600ml(aprox.20onzas).No[[eneexcesivamente.
Useunaceiteparamotordecuatrotiempos,ounaceitedetergentedeca[idad
premiumequivalenteconcertificadoquecubrao excedalasexigenciasdelos
fabricantesdeautomdviiesamericanosrespectode[aclasificaci6ndeservicioSGy
SELosaceitesparamotorconlaclasificad6nSG,SFtienenest_designad6nenel
envase.
Retireeltap6ndeIlenadode aceite/lavarillademedicidny limpielavarilla
demedicidndeaceite.
2. Insertelatapa/ varillademedici6nenel cuellodeIlenadodeaceite,girela
tapa1/4vueltahastaqueest_completamenteasentada.
NOTA:Enalgunosmotores,untap6nderosca/ varillademedid6npueden
existirenlugardeunatapade1/4vueltacomosedescribeanteriormente.
Enestecasonoapretarlatapaparaverificarelniveldeaceite.Simplemente
descansarlatapaenlasroscasparacomprobarelniveldeaceitecorrecto.
3. Saqueeltap6n/[a varillademedici6ndeaceite.Sielnivelesbajo,agregue
lentamenteaceitehastaqueelnivelregistradoest_enunpuntointermedio
entrealto(H)ybajo(L).YealaFigure30.
4. Vuelvaacolocareltap6n/la varillademedici6ndeaceitebienajustados
antesdeponerenmarchaelmotor.
Cambiode aceitedel motor
J
Figure30
f
Tap6nde
drenajede
aceite
NOTA:Cambieelaceitedelmotordespu_sdelasprimerasdncohorasde
funcionamientoy,enIosucesivo,unavezportemporadaocadadncuentahoras.
1. Vacieelcombustibledeldep6sitohaciendofuncionarelmotorhastaqueel
dep6sitodecombustibleest_vac[o.Cerci6resedequeeltap6ndeIlenadodel
combustibleest_bienajustado.
2. Pararecolectarelaceitecoloqueunrecipienteadecuadobajoeltap6nde
drenajedeaceite.
3. Saqueeltap6ndedrenajedelaceite.VealaFigure31.
4. Inclineelmotorparadrenarelaceiteenelrecipiente.Elaceiteusadosedebe
descartarenuncentroderecolecci6nadecuado.
instalacionesJarala eliminaci6n/redcla ura(o)delaceiteusado.
5. Vuelvaacolocareltap6ndedrenajeyajustelobien.
J
Figure31
Vuelvaacargarelaceiterecomendadoycontroleel niveldeaceite.Consulte
elgr_ficodeusodeaceiterecomendado.Lacapacidaddeaceitedelmotores
de20onzas.
NOutilice aceitessindetergenteo paramotordedostiempos.Podria
reducirselavida utildel motor.
7. Vuelvaacolocaryajustareltap6ndeIlenado/lavarilladeniveldeaceite.
L_vesebienlasmanosconaguayjab6n inmediatamentedespu_sdetocar
aceiteusado.
56
Page 57

i i
Synthetic
(%-40 °-20 o 0o 20o 40o
(oc) -30° -20° -10° 0°
Control deiabujia
NOpruebela chispasi noest_labujiadeencendido.NOd_arranqueal
motorsi noest_[abujiadeencendido.
Sieimotor haestadofuncionando,ei siienciadorestar,_muycaiiente.Tenga
cuidadodenotocarel silenciador.
flOTA:Controlelabujiaunavezportemporadaocada25horasdefuncionamiento.
Cambielabujiaunavezportemporadaocada100horasdefuncionamiento.
Paraasegurarsedequeelmotorfuncionebien,labujiadebetenetunaseparaci6n
correctaydebeestarlibrededep6sitos.
1. RetireiafundadebujiayutiliceunaIlaveparabujiasparaextraerlabujia.
VealaFigure32.
Electrodo
--9 .e-------0,02-0,03pulgadas
(0,60-0,80ram)
Figure33
Verifiquequelaarandeladelabujiaest_enbuenascondidonesyenrosque
la bujiahaciaadentromanualmenteparaevitarqueseenrosquecruzada.
Unavezquelabujiaest_colocadaensulugar,aprieteconunaIlavepara
bujiaparacomprimirlaarandela.
flOTA:Cuandoinstaleunabujianueva,apriete1/2vuelta,despudsquela
bujiaseencuentracolocadaensulugar,paracomprimirlaarandela.Cuando
reinstaleunabujiausada,ajuste1/8-a1/4degiro,despudsquelabujiase
encuentracolocadaensulugar,afindecomprimirlaarandela.
Bujiade
encendido
©
Fundadebujia
Figure32
2. Inspeccionevisualmentelabujia.Eliminelabujiasipresentamucho
desgaste,osielaislanteest_agrietadoo astillado.Limpielabujiaconun
cepillodealambresisevaa reutilizar.
3. Midalaseparaci6ndebujiaconuncalibrador.Corrijadesetnecesario
torciendoelelectrodolateral.Veala Figure33.Laseparaci6ndebe
establecerseentre0,02y0,03pulgadas(0,60-0,80mm).
Labujiadebeestarbienajustada.Sila bujiaest_floja puederecalentarsey
daffarelmotor.
57
Page 58

Eecomendadonesgenerales
Respetesiemprelasreglasdeseguridadcuandorealicetareasde
mantenimiento.
2. Lagarant[adeestam_quinaquitanievenocubreelementosquehanestado
sujetosalmalusoonegligendadeloperador.Pararedbirelreembolso
totaldelagarant[a,eloperadordeber_darmantenimientoalam_quina
quitanievecomoseindicaenestemanual.
3. Reviseperi6dicamentetodoslossujetadoresyloselementosdeferreteria
paracomprobarqueest_nbienajustados.
Realiceel mantenimientode lacorreaalairelibre,ya queesposibleque
hayap_rdidasdecombustiblede[carburadorindusocuandoseubicaun
trozodepl_sticobajolatapa deIlenadodecombustibleparaevitar que
_stesufrap_rdidas.
Cambiode ia plata deraspadoy iaszapatas
antidesiizantes
Laplataderaspadoylaszapatasantideslizantesubicadasen[abasede[a
m&quinaquitanieveest&nsujetasadesgaste.Debecontrolarlasperi6dicamentey
reemplazarlascuandoseanecesario.
1. Paracambiarias,quitelospernosdecarroy lastuercasqueasegurancada
zapataantideslizantea[acajade[am&quinaquitanieve.Vea[afigura15.
2. Vuelvaaensamblarnuevaszapatasantideslizantesconloselementosde
ferreteriaqueacabaderetirar.Compruebeque[aszapatasantideslizantes
est&najustadasparaquequedenparejas.
3. Pararetirar[a plataderaspado:Retireambaszapatasantideslizantesylos
elementosdeferreteria,induyendolospernosdelcarroylastuercasque
unen[a plataderaspadoa[acajade[am&quinaquitanieve.Por[aubicacidn
de[aplataderaspado,consulte[aFigure34.
4. Vuelvaaensamblar[aplataderaspadonueva,asegur&ndosedequelas
cabezasdelospernosdelcarroseencuentrende[[adointeriorde[acaja.
Vuelvaa instalar[aszapatasantideslizantes.Ajustebien.
Serviciodeiasbarrenas
Lasbarrenasest_nsujetasalejeespiralconcuatropasadoresdecuchillay
pasadoresdechaveta.Lam&quinaquitanieveest&diseffadademaneraquelos
pasadoressequiebransigolpeaunobjetoextraffoounabarradehie[o.Consulte[a
Figure34.
Silasbarrenasnogiran,verifiquesilospasadoressequebraron.Siesnecesario,
reempl_celosporpasadoresdecuchillaadecuados.Consulteelnt_merodepieza
correctoenlalistadepiezasdeestemanual.
IMPORTANTE:NoreemplaceNUNCAlospasadoresdecuchilladelasbarrenaspor
pasadoresosujetadoresest_ndar.Cualquierdaffoquesufraelengranajedela
barrenao cualquierotrocomponenteporel usodepasadoresest_ndarNOestar_
cubiertoporlagarantiadesum_quinaquitanieve.
Lubricad6n
Paraubicarlospuntosdelubricaci6ndela m&quinaquitanieve,consultela Figure
35.
Unavezportemporada,lubriquelospuntosdegirodelcontroldelabarrena
yelcontroldelatransmisi6nconunaceitelivianoparamotor.
/_- PasadordecucNlla Pasadorde
chaveta
Zapataantideslizante
Pernodel
carro
Platade ;
raspado Tuercade
seguridad
Figure34
Figure35
Unavezportemporada,lubriqueelsoporteintermediodelabarrenaconun
aceiteliviano.
!
Pernodelcarro
Tuercade
Motor
Acontinuaci6nseenumeranrecomendacionesgeneralessobreelmantenimiento
delmotordesum_quinaquitanieve.
I. Antesdeoperarlam_quinaquitanieve,controleelniveldeaceite.
2. Cambieelaceitedelmotordespu_sdelasprimerascincohorasde
funcionamientoyapartirdeahicada50horas.
3. Limpielabujiayreajustelaseparad6ndeelectrodosa0,030"almenosuna
vezportemporadaocada100horasdefuncionamiento;reempl_celacada
200horasdefuncionamiento.
VerifiqueiascorreasenV
Sigalasinstruccionesquesesuministranacontinuad6nparaverificarelestadode
lascorreasdetransmisi6ncada50horasdefuncionamiento.
5aquelacubiertapl_sticadelacorreaubicadaenelfrentedelmotor.Para
ellosaquelostornillosautorroscantesypresionelaslengiJetaspl_sticaspara
soltarlacubiertadelacorrea.
Verifiquevisualmentelaexistendadecorreasraidas,agrietadaso
excesivamentegastadas.Encasodesernecesario,reemplacesegt_nlas
58
instruccionesqueaparecenacontinuaci6n.
Page 59

Reemplazodeias¢orreas
NOTA:Estamfiquinaquitanievevieneequipadacondoscorreas:unacorreade
labarrenayunacorreadetransmisi6n.Serecomiendaqueambascorreassean
reemplazadasalmismotiempo.
1. Retiredelabujiaelcabledelamisma,yp6ngalodemaneraquehagamasa
contrael motorparaevitarqueseenciendademaneraaccidental.
2. Hagafuncionarel motorhastaqueeldep6sitode combustiblesevadepara
evitarunap_rdidadegasolinadurantelossiguientespasos.
Antesderealizartareasdeservicio,reparaci6n,[ubricaci6no inspecci6n,
desengranetodosloscontrolesydetengael motor. Espereaquese
detengancompietamentetodas[aspiezasm6viles.Desconecteel cable
delabujiay p6ngalohaciendomasacontrael motor paraevitarquese
enciendaaccidentalmente.Utilicesiempreanteojosdeseguridaddurante
laoperaci6nomientrasrealizaajusteso reparaciones.
3.
Retireeltornil[oautorroscantequesemuestraenlaFigure36,ypresionelas
lengiietaspl_sticasparasoltarlacubiertadelacorrea.Tiredelacubiertade
lacorreahaciaarribay hadaafuerasac_ndoladealrededordelmotoryel
montajedel canal.Ddjelaseparadaygu_rdela.
F
Correade barrena
Poleade[
motor
M_nsulaintermedia
Figure37
3. Apriete[abarradecontroldelabarrenaparasoltare[frenodelabarrena,
queeslaleng_ietaquesujetalacorreasobrelapoieadela barrena.Retirela
correa.
4. Reempl_celapotla nuevacorreadespu_sdereemplazarlacorreadela
transmisi6n.
Correadeia transmisi6n
Figure36
Correa de barrena
/MPORTANTE:Recuerdequepuedehaberp_rdidadegasolinadelcarburador
enestepunto;debehaberbecbofuncionarel motorhastavaciarel dep6sitode
combustiblecomoseindic6previamente.
1. Inclinelam_quinaquitanievehaciaarribay haciaadelantedemaneraque
quedeapoyadasobrelacajadelabarrena.Retireelguardacorreacomose
indicaenlaFigure38.Regreselam_quinaquitanieveasuposici6nvertical
paracompletarlossiguientespasos.
2. Deslicelacorreadelabarrenafrontalfueradelapoleadel motor
empuj_ndolahaciaadelanteyhaci_ndolarodarfueradelapolea.Veala
Figure37.
NOTA:Reemplacelacorreadelatransmisi6nantesdevolveraensamblarlanueva
correadelabarrena.
1. Inclinelam_quinaquitanievehadaarribayhaciaadelantedemaneraque
quedeapoyadasobrelacajadelabarrena.
IMPORTANTE:Recuerdequepuedehaberpdrdidadegasolinadelcarburador
enestepunto;debehaberbecbofuncionarelmotorhastavaciareldep6sitode
combustiblecomoseindic6previamente.
2. Quiteel resortequeconectalatransmisi6naunpernoenelcuadrodel
motor.VealaFigure38.
Poleadetrausmisi6u
Correadela
Guardacorrea
trausmisi6u
59
Figure38
Page 60

NOTA:Puedeserm_sf_cilretirarlatuercadesegufidadbfidadaenprimerlugar,y
luegousarpinzasdepuntadeagujaparasujetarconfirmezael resorteyretirarlo
delperno.
8. Coloquelacorreadebarrenanueva.
9. Vuelvaamontarlacubiertadelacorreaenlam_quinaquitanieve:
10. Vuelvaamontarelguardacorreaalacaja.
3. Girelatransmisi6nhadaadelanteparasoltarlapresi6nenlacorreade
transmisi6n.Retirelacorreadelapoleadetransmisi6n.
4. Quitelacorreadetransmisi6ndealrededordela poleadelmotorys_quela
delaunidad.
5. Instaleunanuevacorreadetransmisi6ndentrodelaranuradelapoleadel
motor.VealaFigura18.
6. Inclinelatransmisi6nhaciaadelanteyubiquelacorreadetransmisi6nenla
poleadetransmisi6n.
7. Vuelvaaconectarelresorteal pernoenelmarcodelmotoryajustela
transmisi6n.Vuelvaainstalarlatuercadesegufidadbfidada.
Sigael cronogramademantenimientoquesepresentaacontinuad6n.Algunosajustesdebenserrealizadosperibdicamenteparaelmantenimientoadecuadode[aunidad.
Reviseperi6dicamentetodoslossujetadoresycompruebequeest_nbienajustados.Controlesucalendariodemantenimientocompletandoelcampo"Fechasdelos
servidos"queapareceacontinuadbn.
Antesdereaiizartareasdeservicio,reparaci6n,[ubricaci6no inspecci6n,desengranetodosloscontroiesydetengae[motor.Espereaquesedetengan
completamentetodaslaspiezasm6viles.Desconecteel cablede labujiay p6ngalohaciendomasacontraelmotor paraevitar queseencienda
accidentalmente.Utilicesiempreanteojosdeseguridaddurante laoperad6no mientrasrealizaajusteso reparaciones.
Ajustedeicabledeia barrena
Esposiblequeserequieranajustesperi6dicosdelcabledecontroldelabarrena
debidoalestiramientoy aldesgastenormaldelacorrea.Senecesitar_najustess[
lasbarrenasparecentemblarmientrasgiranperoelmotormantienesuveloddad,o
sisiguegirandoconelcontroldelabarrenadesengranado.Refi_rasea lasecd6nde
laAsambleaparAjustedelcabledelabarrena.
Programa de mantenimiento
Antesdecadauso 1. Reviseelniveldeaceitedel
motor.
Despu_sdecadauso 1. Verifiqueel equipo.
2. Verifiqueel estadodelas
zapatas.
lras5 horas 1. Aceitedelmotor
Luegode25horas 1. CompruebelascorreasenV.
Antesdealmacenar
Unavezportemporada
1. Sistemadecombustible.
1. Puntosdepivote.
2. Sistemadetransmisi6nyejede
engranajehexagonal.
3. Ejede lasruedas.
4. Bujiadeencendido.
1. Carguadeaceitesielnivelest,_bajo
1. Limpieza
2. Limpieza
1.
Cambio.
1.
Ajusteoreparaddnsegt_nresulte
necesafio.
I. Vadado.
I. Lubricad6n.
2. Lubricad6n.
3. Engrasado.
4. Cambiodesernecesafio.
60
Page 61

SinosevaautiiJzaelequipodurante30diaso m_s,osieselfinaldelatemporadadenievey yanoexisteposibi[idaddequenieve,esnecesarioalmacenarelequipode
maneraadecuada.Siga[asinstrucdonesdea[macenamientoqueseindicanacontinuaddnparagarantizarelrendimientom_ximode[am_quinaquitanievedurante
muchosafros.
Preparad6ndelmotor
Losmotoresquesealmacenandurantem_sde30diasnecesitanserdrenados
decombustibleparaevitarquesedeteriorenyseformegomaenelsistemade
combustibleoenlaspiezasprindpalesdel carburador.Silagasolinade sumotorse
deterioraduranteel almacenamiento,esposiblequedebarepararoreemplazarel
carburadoryotroscomponentesdelsistemadecombustible.
1. Eliminetodoelcombustibledeltanquehadendofundonarelmotorhasta
quesedetenga.Nointentedecombustibleparaelmotor.
2. Cambleel aceltedelmotor.
3.
Extraigalabujiadeencendidoyviertaenelciiindroaproximadamente1
onza(30ml)deaceiteparamotorlimpio.Tirevariasvecesdel arrancadorde
retrocesoparadistribuirelaceitey reinstalelabujia.
4.
Limpielosresiduosdealrededordelmotor,ydebajo,alrededor,ydetr_s
delsilendador.Apliqueunacapadelgadadeaceiteentodaslas_reasque
puedenIlegaraoxidarse.
Almaceneenunsectorlimp[o,secoybienventilado,lejosdecualquier
artefactoquefuncioneconunallamao luzpilotocomounhomo,calentador
deaguaosecadorderopa.Evitecualquiersectorconunmotorel#ctricoque
produzcachispasodondeseutilicenherramientasel#ctricas.
Nuncaaimacenelam_quinaquitanieveconcombustibleeneltanque en
unespaciocerradooen_reasconpocaventilaci6n,dondelosgasesdel
combustiblepuedanalcanzarelfuego,cNspaso unaluzpiloto comolaque
tienenalgunoshornos,calentadoresdeagua,secadoresderopao algun
otrodispositivoagas.
Preparad6n de ia m_quina quitanieve
1. Cuandoalmacenelam_qulnaquitanleveenungalpbndedepbsltomet_lico
oconpocaventilad6n,tengaespecialcuidadoderealizarleuntratamiento
anti-oxidanteal equipo.Useaceiteligeroosilic6npararecubrirel equipo,
especialmentelascadenas,losresortes,loscojinetesy loscables.
2. Eliminetodoelpolvodelexteriordelmotorydelequipo.
3. Sigalasrecomendacionesdelubricaci6nenlasecci6ndemantenimientode
estemanual.
4. Almaceneelequipoenun_readespejadayseca.
5. Inflarlosneum_ticosa lapresi6nde psim_xima.Consulteelcostadodel
neum_tlco.
Siesposible,evitesectoresdealmacenamientoconmuchahumedad.
Mantengaelmotorniveladoenelalmac_n.Lainclinad6ndelmotorpuede
causarp_rdidasdecombustibleo aceite.
61
Page 62

Antesderealizarcuaiquiertipo demantenimiento oservicio,desenganche
todosloscontrolesydetengael motor.Espereaquesedetengan
completamentetodaslaspiezasm6viles.Desconectee[cabledela bujia
yp6ngalohaciendomasacontrael motor paraevitar queseencienda
accidentalmente.Utilicesiempreanteojosdeseguridaddurante la
operaci6nomientrasrealizaajustesoreparaciones.
Estasecci6nanaliza problemasmenoresdeservido. Paraubkar elCentrodeServido Searsm_scercanooparaprogramarun servkio, simplemente
comuniqueseconSearsal tel_fono 1-800-4-MY-HOME_.
Elmotornoarranca
Motorenmarcha
err_tica/RPM
incompatibles(o
aumentodelacaza)
Elmotorrecalienta
Vibrad6nexcesiva
P_rdidadepotencia
Launidadnose
autoimpulsa
Launidadnodescarga
lanieve
1. Elcontroldelcebadornoest_enlaposid6nON(encendido).
2. Sehadesconectadoelcabledelabuj[a.
3. Labuj[anofundonacorrectamente.
4. Eldep6sitodecombustibleest_vac[oo elcombustibleseha
echadoaperder.
5. Elmotornoest_cebado.
6. LaIlavedeseguridadnosehainsertado.
1. Elmotorest_fundonandoenlaposici6n"choke"(c.
2. Lalineadelcombustibleest_tapadao elcombustibleesviejo.
3. Hayaguaosuciedadenelsistemadecombustible.
4. Esnecesarioregularelcarburador.
5. M_sgobernadosmotor
1. Elcarburadornoest_bienregulado.
1. Haypiezasqueest_nflojasolabarrenaest_daffada.
1.
Elcabledela bujiaest_flojo.
2.
Elorifidodeventilad6ndeltap6ndecombustibleest_
obstruido.
Elcabledelatransmisi6nnecesitaunajuste.
Lacorreadetransmisi6nest_flojaodaffada.
1. Elconjuntodelcanalest_tapado.
2. Hayunobjetoextrafioenlabarrena.
3. Elcabledela barrenanecesitaunajuste.
4. Lacorreadelabarrenaest_floja odafiada.
5. Elolospasadoresdecuchillaest,(n)quebrado(s).
1. Pongaelcontroldelcebadorenlaposid6nON(encendido).
2. Conecteelcablealabuj[a.
3. Limpiela,ajusteladistancladisruptivaoc_mbiela.
4. Lleneeltanquecongasolinalimpiayfresca.
5. Cebeel motortalcomoseexplic6enlasecci6nFundonamiento.
6. InsertelaIlavetotalmentedentrodelinterruptor.
1. Muevalapalancadelcebadoralaposici6nRUN.
2. Limpielalineadelcombustibley Ileneeldep6sitocongasolina
limpiaynueva.
3. Ponerenmarchael motorhastaquesedetengaparavadar
eldep6sitodecombustible.VuelvaaIlenareldep6sitocon
combustiblenuevo.
4. Comun[queseconuncentrodeservidoSears.
5. Comun[queseconuncentrodeservidoSears.
1. Contacteconsucentrodepartesy reparadonesSears.
1. Detengael motordeinmediatoydesconecteelcabledela
bujia.Ajustetodoslospernosylastuercas.Silavibrad6n
continua,Ilevelaunidadarepararauncentrode partesy
reparad6nSears.
1. Conecteyajusteel cabledelabujia.
2. Retireelhieloylanievedeltap6ndecombustible.Compruebe
queelorificiodeventilad6nnoest_obstruido.
1. Ajusteelcabledelcontroldetransmisi6n.Consultelasecd6n
deServidoyMantenimiento.
2. Reemplacelacorreadetransmisi6n.Consultelasecd6nde
ServidoyMant.
1. Detengael motordeinmediatoydesconecteelcabledela
bujia.Limpieel montajedelcanalyelinteriordelacajadela
barrenaconlaherramientadelimpiezaounavarilla.
2. Detengael motordeinmediatoydesconecteelcabledela
bujia.Retireelobjetodelabarrenaconlaherramientade
limpiezaounavarilla.
3. Ajusteelcabledelcontroldelabarrena.Consultelasecd6n
Montaje.
4. Reemplacelacorreade labarrena.Consultelasecd6nde
ServicioyMantenimiento.
5. Reemplaceconnuevo(s)pasador(es)decuchilla.
626364
Page 63

Page 64

Page 65

DECLARACI6NFEDERALy/o DECALiFORNiASOBREGARANTiASENELCONTROLDEEMISIONES
SUSDERECHOSY OBLIGACIONESENCUANTOALAGARANTiA
MTD Consumer Group Inc, la Agencia de Proteccidn Medioambiental de los Estados Unidos (EPA), y para aquellos productos certificados para su
venta en el estado de California, el Departamento de los Recursos del Aire de California (CARB) se complacen en explicar la garantia que cubre
al sistema de control (ECS) de emisiones (evaporativas y/o de escape) de su equipo y motor (motor de equipos de exteriores) de encendido por
chispa para todo terreno, peque_o, de exteriores del a_o 2013 y ahos posteriores En California, los nuevos motores de equipos de exteriores
deben estar dise_ados, construidos y equipados para cumplir con las estrictas normas antipolucidn del Estado (en otros estados, los equipos
del aho 1997 y modelos posteriores deben ser estar dise_ados, construidos y equipados para cumplir con las regulaciones de motores de
encendido por chispa para todo terreno peque_os de la Agencia de Proteccidn Medioambiental de los Estados Unidos, (EPA). MTD Consumer
Group Inc. debe garantizar el sistema de control de emisiones (ECS) de su motor de equipos de exteriores por el periodo de tiempo indicado
m_is abajo, siempre y cuando no exista uso incorrecto, negligencia o mantenimiento inadecuado de dicho motor.
Su ECS puede incluir piezas tales como el carburador, el sistema de inyeccidn de combustible, el sistema de encendido, el convertidor catalitico,
los depdsitos de combustible, las lineas de combustible, los tapones de combustible, las wilvulas, contenedores, filtros, mangueras de vapor,
abrazaderas, conectores y otros componentes afines relacionados con las emisiones.
Donde exista una condicidn cubierta por la garantia, MTD Consumer Group Inc. reparar_i su motor de equipos de exteriores sin costo alguno
incluyendo el diagn6stico, las piezas y la mano de obra.
COBERTURADELAGARANTiADELFABRICANTE:
Este sistema de control de emisiones se garantiza por el t_rmino de dos a_os. Si alguna pieza relacionada con las emisiones de su motor de
equipos de exteriores es defectuosa, MTD CONSUMER GROUP INC. reparar_i o sustituir_i dicha pieza. En caso de que un componente est,1
cubierto pot m_is de dos ahos pot la garantia del equipo del fabricante, el periodo de cobertura ya no se aplicar_i.
RESPONSAI31LIDADESDELPROPIETARiOSEGUNLAGARANTiA:
En su car_icter de propietario del motor de equipos de exteriores, usted es responsable del mantenimiento requerido que se especifica en el
manual del propietario. MTD Consumer Group Inc le recomienda que conserve todos los recibos que cubren el mantenimiento de su motor, no
obstante Io cual MTD Consumer Group Inc no podr_i denegar el cumplimiento de la garantia 0nicamente pot la falta de los recibos.
Como propietario del motor de equipos de exteriores, usted debe saber que MTD Consumer Group Inc. puede denegar la cobertura de
la garantia si su motor o una pieza del mismo fallan debido a uso incorrecto, negligencia, mantenimiento indebido o a modificaciones no
aprobadas.
Usted es responsable de presentar su motor al centro de distribuci6n o servicio t_cnico de MTD Consumer Group Inc. tan pronto como
aparezca el problema. Las reparaciones cubiertas por la garantia se deben Ilevar a cabo en un lapso razonable que no exceda de 30 dias.
Si tiene alguna pregunta respecto de la cobertura de la garantia, p6ngase en contacto con el Departamento del Servicio T_cnico de MTD
Consumer Group Inc. al tel_fono 1-800-800-7310 o pot correo electr6nico en http://support.mtdproducts.com
COBERTURADELAGARANTiADEEMISIONESGENERALES:
MTD Consumer Group Inc garantiza al comprador final y a cada comprador subsiguiente que el motor de equipos de exteriores: est,1 dise_ado,
construido y equipado de modo de cumplir con todas las regulaciones aplicables y que se encuentra libre de defectos de materiales y de
fabricaci6n que pudieren causar la falla de una pieza garantizada id_ntica, en todos los aspectos materiales a la pieza descripta en la solicitud
de certificacidn de MTD Consumer Group Inc.
El periodo de garantia comienza en la fecha de entrega del motor al comprador final o en la fecha en que la m_iquina se pone en
funcionamiento pot primera vez. El periodo de garantia es de dos ahos.
Sujeto a ciertas condiciones y exclusiones que se indican a continuaci6n, la garantia de las piezas relacionadas con las emisiones es la siguiente:
1. Cualquier pieza garantizada que no est_ programada para set reemplazada como parte del mantenimiento requerido en las instrucciones
escritas suministradas segarantiza pot el periodo de garantia arriba mencionado. Si la pieza falla durante el periodo de cobertura de la
garantia, la misma ser_i reparada o reemplazada pot MTD Consumer Group Inc. de acuerdo con el p_irrafo (4) a continuaci6n. Cualquier
pieza reparada o reemplazada seg0n la garantia se garantizar_i por el resto del periodo de garantia.
2. Cualquier pieza garantizada que est_ programada solamente para inspecci6n regular en las instrucciones escritas suministradas se
garantiza pot el periodo de garantia arriba mencionado. Cualquier pieza reparada o reemplazada seg0n la garantia se garantizar_i pot el
resto del periodo.
3. Cualquier pieza garantizada que est_ programada para reemplazo seg0n el mantenimiento requerido de conformidad con las
instrucciones escritas suministradas, se garantiza pot el periodo de tiempo anterior a la primera fecha de reemplazo programada para esa
pieza. Si la pieza falla antes del primer reemplazo programado, la misma ser_i reparada o reemplazada pot MTD Consumer Group Inc. de
acuerdo con el p_irrafo (4) a continuaci6n. Cualquier pieza reparada o reemplazada bajo garantia se garantizar_i pot el resto del periodo
anterior al primer reemplazo programado puntual para esa pieza.
4. La reparaci6n o el reemplazo de cualquier pieza garantizada de conformidad con las disposiciones de la garantia que aqui se estipula se
deben realizar en un centro de garantia sin costo alguno para el propietario.
5. No obstante las disposiciones que aqui se estipulan, los servicios o reparaciones bajo garantia se suministrar_in en todos nuestros centros
de distribuci6n bajo franquicia de mantenimiento para los motores o equipos en cuesti6n.
Page 66

6. Elpropietariodelmotordeequiposdeexterioresnodeber_pagareltrabajodediagndsticodirectamenteasociadoconunapieza
garantizadadefectuosaenrelaci6nconlasemisiones,siempreycuandodichotrabajodediagn6sticoserealiceenuncentrocubiertopot
lagarantia.
7. MTDConsumerGroupIncesresponsablepotdahoscausadosaotroscomponentesdemotoresoequiposderivadosdelafallabajo
garantiadecualquierpiezagarantizada.
8. Durantelatotalidaddelperiododegarantiadelmotoryequipoparatodoterrenoarribamencionado,MTDConsumerGroupInc
mantendr_unsuministro
depiezasbajogarantiasuficienteparasatisfacerlademandaesperadadetalespiezas.
9. Cualquierpiezadereemplazosepodr_usarparaelcumplimientodelmantenimientoolasreparacionesbajogarantiaysesuministraran
sincargopara
elpropietario.Dichousonoreducir_lasobligacionesdegarantiadeMTDConsumerGroupInc.
]0. Nosepodr_nusarpiezasadicionalesnimodificadasquenoest_nexentasdeacuerdoconelDepartamentodelosRecursosdelAire
(AirResourcesBoard).Elusodecualquierpiezaadicionalomodificadanoexentapotelcompradorfinalser_causaldeinvalidezdelos
reclamosbajogarantia.MTDConsumerGroupIncnotendr_responsabilidadpotlagarantiadefallasdepiezasgarantizadasquefueren
causadaspotelusodeunapiezaadicionalnoexenta
omodificada.
PIEZAS GARANTIZAi)AS:
La reparaci6n o el reemplazo de cualquier pieza garantizada que de otro modo pudiese estar cubierta por la garantia podr_ ser excluida de
tal cobertura de garantia si MTD Consumer Group Inc demuestra que el motor es objeto de uso incorrecto, negligencia o mantenimiento
inadecuado, y que tal uso incorrecto, negligencia o mantenimiento inadecuado rue causa directa de la necesidad de reparaci6n o reemplazo de
dicha pieza. No obstante Io antedicho, cualquier ajuste de un componente con un dispositivo de limitaci6n de ajuste instalado en f_brica y que
funcione adecuadamente, podr_ set cubierto pot la garantia. Adem_s,
la cobertura bajo esta garantia se extiende solo a piezas que estuvieron presentes en el motor y equipo todo terreno adquiridos.
Est_n cubiertas las siguientes piezas con garantia para emisiones (de corresponder):
1. Sistema de medici6n de combustible
Sistema de mejora para inicio en frfo (cebado suave)
Carburador y piezas internas (o sistema de inyecci6n pot combustible)
Bomba de combustible
Dep6sito de combustible
2. Sistema de inducci6n de aire
Purificador de aire
Colector de admisi6n
3. Sistema de encendido
Bujia(s) de encendido
Sistema de encendido pot magneto
4. Sistema de encendido
Convertidor catalitico
SAI (v_lvula Reed)
5. Componentes varios utilizados en el sistema anterior
Wlvulas e interruptores de vacio, temperatura, posici6n sensibles al tiempo
Conectores y montajes
6. Control evaporativo
Manguera de combustible
Abrazaderas de la manguera de combustible
Tap6n del combustible atado pot correa
Caja de carbono
Lineas de vapor
050790Rev.A
Page 67

Felicitaciones por haber realizado una adquisici6n inteligente. El producto Craftsman® que ha
adquirido esta diseSado y fabricado para brindar muchos aSos de funcionamiento confiable. Pero
como todos los productos a veces puede requerir de reparaciones. Es en ese momento cuando el
disponer de un Acuerdo de protecci6n para reparaciones le puede ahorrar dinero y problemas.
A continuaci6n se detallanlos puntos incluidos en el Acuerdo:
[] Servicio experto prestadopor nuestros 10,000especialistasen reparacionesprofesionales
[] Servicio ilirnitado sin cargo para las piezasy lamanode obraentodas lasreparacionescubiertas
[] Reernplazo del producto hasta 1500d61aressi no es posible repararelproducto cubierto
[] Descuento de 25% del precionormal delservicio y de las piezas relacionadascon el mismo que no estencubiertas
por elacuerdo;ademas,25% del precionormal de laverificaci6nde mantenimientopreventivo
[] Ayuda r_pida pot tel_fono - Io IlamamosResoluci6n RApida- el apoyo telef6nico de un Chamusca alrepresentante.
Pienseen nosotroscomo elmanual "de un dueSohablador."
Una vezadquiridoel Acuerdo, puede programarel serviciocon tans61orealizaruna Ilamadatelef6nica. Puede Ilamaren
cualquier momentodeldia o de la nocheo programar un servicio en linea.
ElAcuerdode Protecci6nde Reparaci6nes unacompra sinriesgo. Si ustedanulapor alguna raz6nduranteel periodo de
garantiade producto,proporcionaremosun reembolso Ileno.O, un reembolsoprorrateadoen cualquier momentodespues
del periodode garantiade producto expira, iAdquiera hoysu acuerdode protecci6n para reparaciones!
Se aplican determinadas limitaciones y exclusiones. Paraobtener informaciTn adicional y precios en los Estados
Unidos Ilame al 1-800-827-6655.
El *Coverage en Canad_ivaria en algunos articulos. Para detalles Ilenos la Ilamada Chamusca Canad_ien 1-800-
361-8885.
Servicio de instalaci6nde Sears
Sidesea solicitarla instalaci6n profesionalde Sears de aparatosdomesticos,dispositivos paraabrir portones,calentado-
resde aguay otrosarticulos domesticosimportantes,en los Estados Unidos o Canada flameal 1-800-4-MY-HOME®.
67
Page 68

Your Home
For troubleshooting, product manuals and expert advice:
managernylife
www.managemylife.com
For repair - in your home - of all major brand appliances,
lawn and garden equipment, or heating and cooling systems,
no matter who made it, no matter who sold it!
For the replacement parts, accessories and
owner's manuals that you need to do-it-yourself.
For Sears professional installation of home appliances
and items like garage door openers and water heaters.
1-800-4-MY-HOME ® (1-800-469-4663)
Call anytime, day or night (U.S.A. and Canada)
www.sears.com www.sears.ca
Our Home
For repair of carry-in items like vacuums, lawn equipment,
and electronics, call anytime for the location of your nearest
Sears Parts & Repair Service Center
1-800-488-1222 (U.S.A.) 1-800-469-4663 (Canada)
www.sears.com www.sears.ca
To purchase a protection agreement on a product serviced by Sears:
1-800-827-6655 (U.S.A.) 1-800-361-6665 (Canada)
Para pedir servicio de reparaci6n
a domicilio, y para ordenar piezas:
1-888-SU-HOGAR ®
(1-888-784-6427)
www.sears.com
® Registered Trademark / TMTrademark of KCD IP, LLC in the United States, or Sears Brands, LLC in other countries
® Marca Registrada ! TMMarca de Fabrica de KCD IP, LLC en Estados Unidos, o Sears Brands, LLC in otros paises
MCMarque de commerce ! MDMarque deposee de Sears Brands, LLC
Au Canada pour service en frangais:
1-800-LE-FOYER Mc
(1-800-533-6937)
www.sears.ca
 Loading...