

Page 1
Safety ,, Assembly ,, Operation ,,Tips & Techniques ,, Maintenance ,,Troubleshooting ,, Parts Lists ,,Warranty
OF A O A AL
i I
i I I
i I l /
r I
III j '
II/
rI /
I /
/
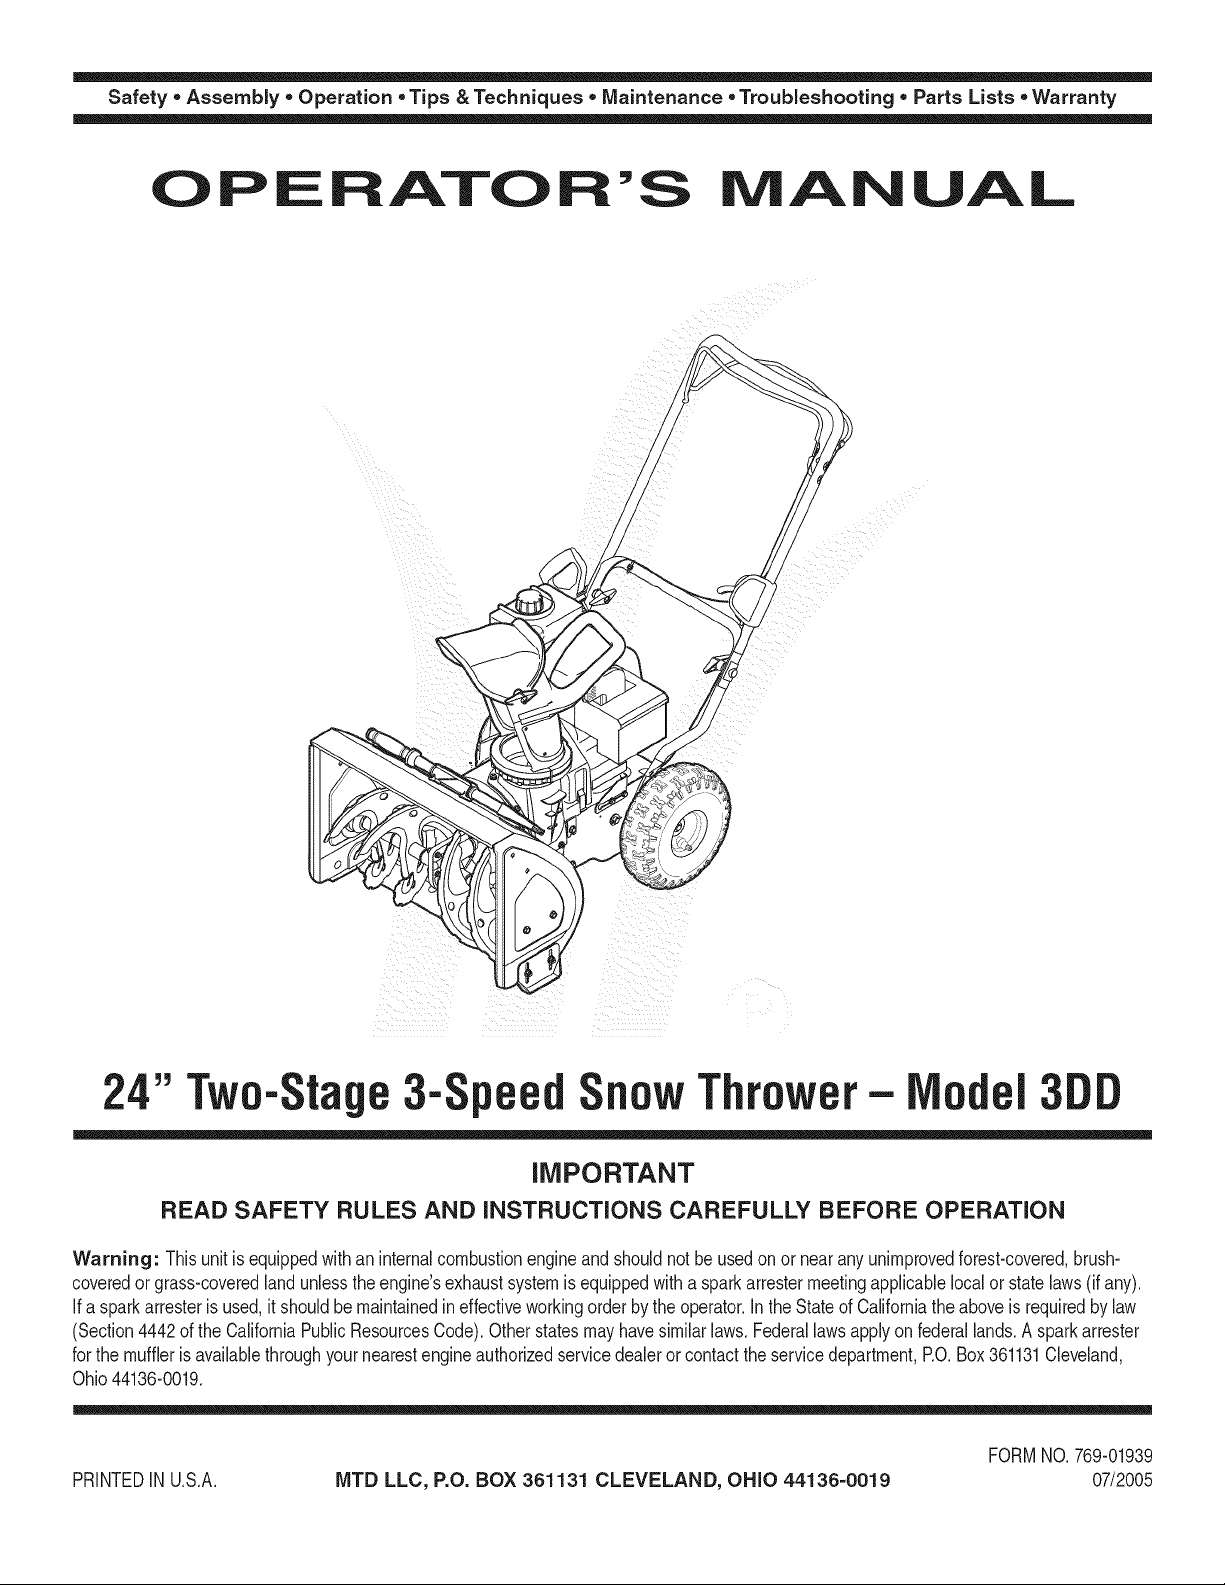
"Tw0-Stage 3- peed n0wThr0wer- el
iMPORTANT
READ SAFETY RULES AND iNSTRUCTiONS CAREFULLY BEFORE OPERATION
Warning: Thisunit isequippedwithan internalcombustionengineandshouldnot beusedon or nearanyunimprovedforest-covered,brush-
coveredor grass-coveredlandunlesstheengine'sexhaustsystemisequippedwithasparkarrestermeetingapplicablelocalorstatelaws(if any).
If a sparkarresterisused,it shouldbemaintainedineffectiveworkingorderbytheoperator.IntheStateofCaliforniatheaboveisrequiredbylaw
(Section4442ofthe CaliforniaPublicResourcesCode).Otherstatesmayhavesimilarlaws.Federallawsapplyonfederallands.A sparkarrester
forthe mufflerisavailablethroughyournearestengineauthorizedservicedealeror contacttheservicedepartment,RO.Box361131Cleveland,
Ohio44136-0019.
FORMNO.769-01939
PRINTEDIN U.S.A.
MTD LLC, P.O. BOX 361131 CLEVELAND, OHIO 44136-0019
07/2005
Page 2
This Operator's Manual is an important part of your new snow thrower, it will help you assemble,
prepare and maintain the unit for best performance. Please read and understand what it says.
Table of Contents
.
Safety Labels ............................................... 3
2.
Safe Operation Practices ........................... 4
3.
Setting Up Your Snow Thrower .................. 6
4.
Know Your Snow Thrower .......................... 8
5.
Operating Your Snow Thrower ................. 10
6.
Maintenance & Service ............................ 13
7. Off-Season Storage .................................. 16
8. Troubleshooting ........................................ 17
g. Parts List ................................................... 18
10. Notes .......................................................... 22
Warranty .................................... Back Cover
Finding and Recording Model Number
BEFOREYOU STARTASSEMBLING
YOURNEW EQUIPMENT,
please locatethe modelplate onthe equipmentand copy the
informationto the sample modelplate providedtothe right.
Youcan locatethe model plateby standingat the operating
position and lookingdown atthe rearofthe snow thrower.
Thisinformationwill be necessaryto use the manufacturer's
website and/or obtain assistancefromthe CustomerSupport
Departmentoran authorizedservice dealer.
Model Number
_www. rntdprod ucts.corn
Serial Number
MTD LLC
P.O. BOX 361131
CLEVELAND, OH 44136
330-220-4683
800-800-7310j
Customer Support
Please do NOTreturn the unit to the retailer from which it was
purchased, without first contacting Customer Support.
If you have difficulty assemblingthis product orhave any questions regardingthe controls, operation,ormaintenanceof this
unit,you canseek help fromthe experts.Choose from the options below:
1. Visit mtdproducts.com Clickonthe Service & Support menuoption.
2. Phonea Customer Support Representative at 1 (800) 800-7310.
3. The engine manufacturer is responsiblefor all engine-relatedissueswith regardsto performance,power-rating,specifica-
tions,warranty andservice. Pleasereferto theengine manufacturer'sOwner's/Operator's Manual,packedseparatelywith
your unit, for moreinformation.
MTD _rit_r_fi_a_
Award Winning _rod_f_ O,_rCc,mp_y
Ser,_ice 8_Supper±
Product. Registration
Priwey P_y
2
Page 3
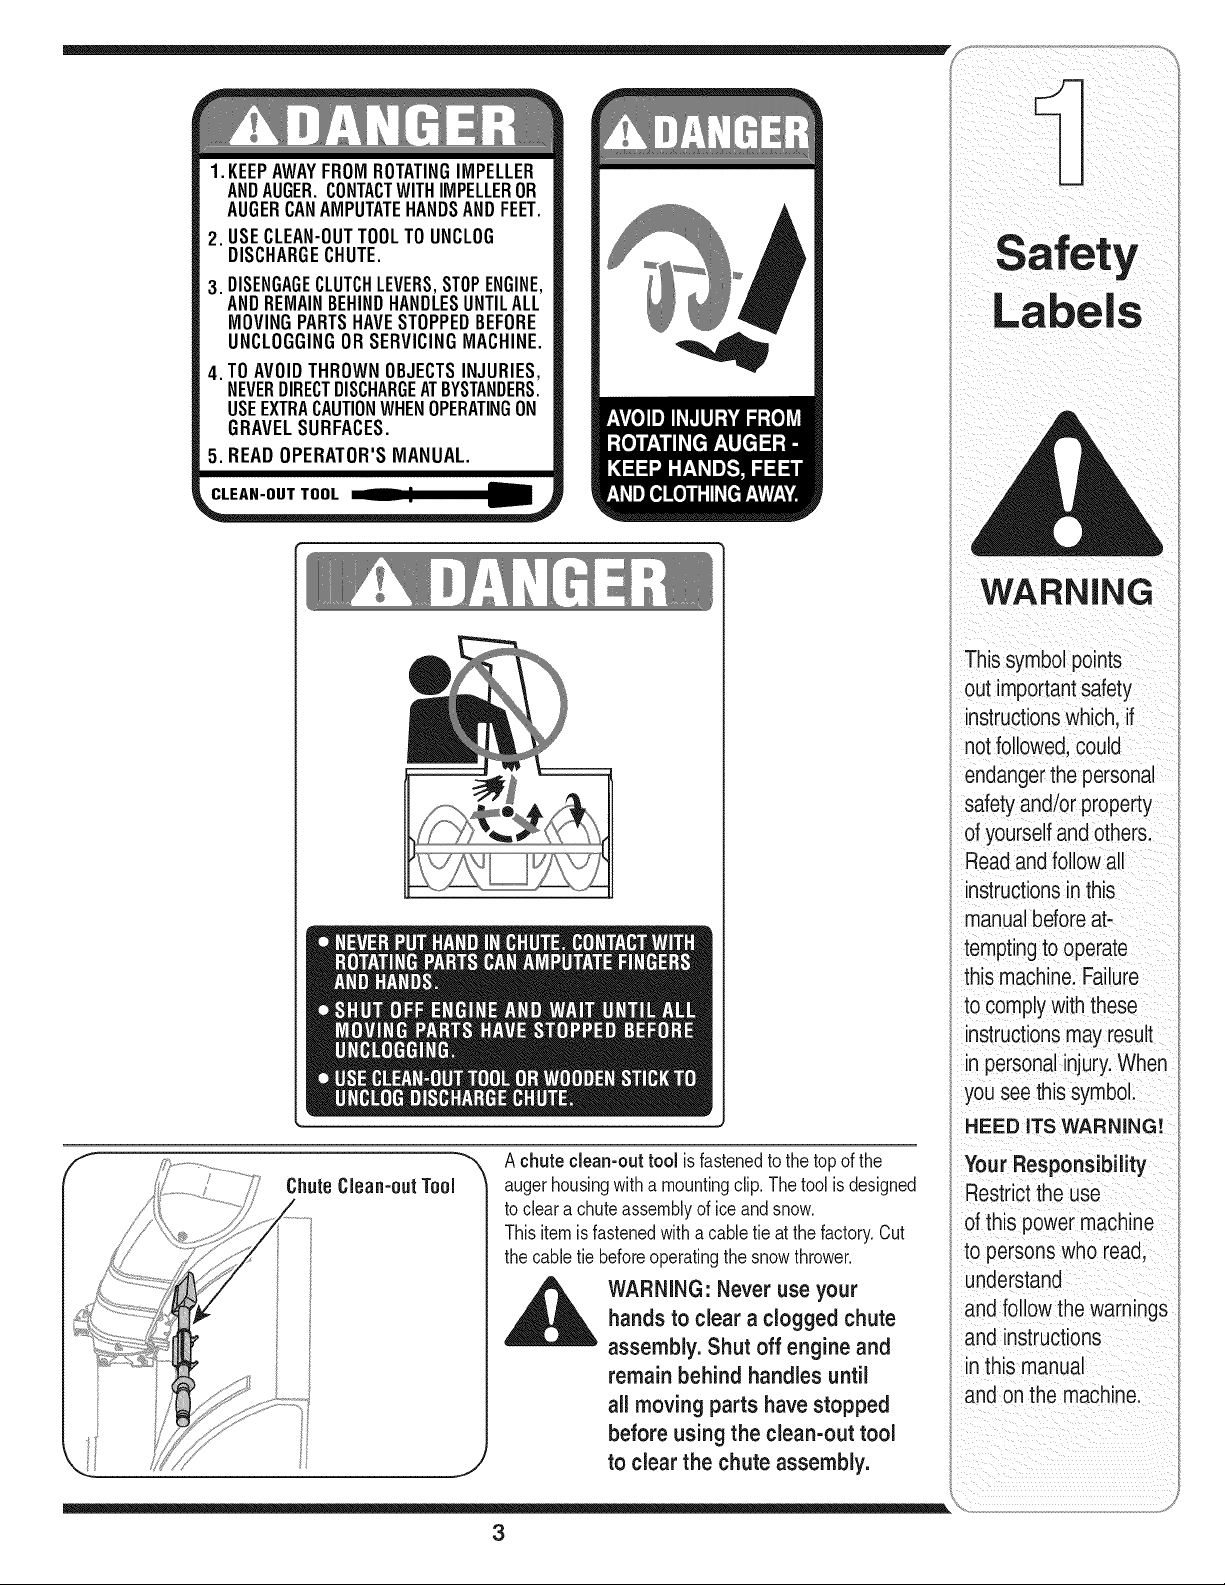
1.KEEPAWAYFROMROTATINGIMPELLER
ANDAUGER.CONTACTWITHIMPELLEROR
AUGERCANAMPUTATEHANDSANDFEET.
USECLEAN-OUTTOOLTOUNCLOG
,
DISCHARGECHUTE.
DISENGAGECLUTCHLEVERS,STOPENGINE,
3.
ANDREMAINBEHINDHANDLESUNTILALL
MOVINGPARTSHAVESTOPPEDBEFORE
UNCLOGGINGORSERVICINGMACHINE.
TOAVOIDTHROWNOBJECTSINJURIES,
,
NEVERDIRECTDISCHARGEATBYSTANDERS.
USEEXTRACAUTIONWHENOPERATINGON
GRAVELSURFACES.
5. READOPERATOR'SMANUAL.
WARNING
Thissymbolpoints
out importantsafety
instructionswhich,if
notfollowed,could
endangerthepersonal
safetyand/or property
of yourselfandothers.
Readandfollowall
instructionsinthis
manualbeforeat-
temptingto operate
this machine.Failure
to complywiththese
instructionsmayresult
in personalinjury.When
youseethis symbol.
HEED ITS WARNING!
ChuteClean-out Tool
Achuteclean-outtool is fastenedtothetop ofthe
augerhousingwitha mountingclip.Thetoolis designed
tocleara chuteassemblyofice andsnow.
Thisitemisfastenedwitha cabletie atthe factory.Cut
thecabletiebeforeoperatingthesnowthrower.
_ ARNING: Never use your
hands to clear a clogged chute
assembly. Shut off engine and
remain behind handles until
all moving parts have stopped
before using the clean-out tool
to clear the chute assembly.
3
Your Responsibility
Restrictthe use
ofthis power machine
to persons who read,
understand
and follow thewarnings
and instructions
in this manual
and onthe machine.
Page 4
WARNING: EngineExhaust,some of itsconstituents,andcertain vehiclecompo-
nentscontain or emit chemicals knownto State of Californiato cause cancer and
birth defects or other reproductiveharm.
DANGER: This machinewas builtto be operatedaccordingto the rulesfor safe operationinthis
manual.As with anytype of powerequipment,carelessness or erroronthe part ofthe operatorcan
result in seriousinjury.This machineiscapableof amputatinghands andfeet andthrowing objects.
Failureto observethe followingsafety instructionscould resultin serious injury or death.
WARNING
Thissymbolpoints
out importantsafety
instructionswhich,if
notfollowed,could
endangerthe personal
i safetyand/or property
I ofyourselfand others.
Readandfollowall
instructionsinthis
manualbeforeat-
temptingto operate
i this machine.Failure
I to complywiththese
instructionsmayresult
i inpersonalinjury.When
youseethis symbol.
i HEED ITS WARNING!
Your Responsibility
Restrictthe use
ofthis powermachine
to personswho read,
_understand
ano followthe warnings
and instructions
inthis manual
and on the machine.
Training
1. Read,understand,andfollowall instructionson the 1.
machineandin themanual(s)beforeattemptingto
assembleandoperate.Keepthis manualina safe placefor
futureandregularreferenceandfor orderingreplacement
parts. 2.
2. Befamiliarwithall controlsandtheirproperoperation.
Knowhowto stopthe machineanddisengagethemquickly.
3. Neverallowchildrenunder14yearsoldto operatethis
machine.Children14yearsold andovershouldreadand
understandtheoperationinstructionsand safetyrulesin 3.
thismanualand shouldbetrainedand supervisedbya
parent.
4. Neverallowadultsto operatethis machinewithoutproper
instruction.
5. Thrownobjectscancauseseriouspersonalinjury.Plan 4.
yoursnow-throwingpatternto avoiddischargeof material
towardroads,bystandersandthe like.
6. Keepbystanders,helpers,petsandchildrenat least75feet 5.
fromthe machinewhileit isin operation.Stopmachineif
anyoneentersthearea. 6.
7. Exercisecautiontoavoidslippingor falling,especially 7.
whenoperatingin reverse.
Preparation
Thoroughlyinspecttheareawheretheequipmentisto be
used.Removealldoormats,newspapers,sleds,boards,
wiresand otherforeignobjects,whichcouldbetripped over
orthrownbythe auger/impeller.
Alwayswearsafetyglassesor eyeshieldsduringoperation
andwhile performinganadjustmentorrepairto protectyour
eyes.Thrownobjectswhichricochetcancause serious
injurytothe eyes.
Do notoperatewithoutwearingadequatewinterouter
garments.Donotwearjewelry,longscarvesorother
looseclothing,whichcould becomeentangledin moving
parts.Wearfootwearwhich willimprovefootingonslippery
surfaces.
Useagroundedthree-wireextensioncordand receptacle
forall unitswithelectric startengines.
Adjustcollectorhousingheighttocleargravelorcrushed
rocksurfaces.
Disengageallcontrolleversbeforestartingthe engine.
Neverattemptto makeanyadjustmentswhileengineis
running,exceptwherespecificallyrecommendedinthe
operator'smanual.
8,
Letengineandmachineadjusttooutdoortemperature
beforestartingtoclearsnow.
9.
Toavoidpersonalinjuryorpropertydamageuseextreme
careinhandlinggasoline.Gasolineisextremelyflammable
andthe vaporsare explosive.Seriouspersonalinjurycan
occurwhengasolineis spilledonyourselforyourclothes,
whichcanignite.Washyourskinand changeclothes
immediately.
a. Useonlyanapprovedgasolinecontainer.
b. Extinguishallcigarettes,cigars, pipesandothersources
ofignition.
c. Neverfuel machineindoors.
d. Neverremovegascap oradd fuelwhilethe engineis hot
or running.
e. Allowengineto coolat leasttwo minutesbeforerefuel-
ing.
f. Neveroverfillfuel tank.Filltankto nomorethanY2inch
belowbottomoffiller neckto providespacefor fuel
expansion.
g. Replacegasolinecap andtightensecurely.
h. If gasolineis spilled,wipe itoff theengineandequip-
ment.Movemachinetoanotherarea.Wait5minutes
beforestartingtheengine.
i. Neverstorethe machineorfuel containerinsidewhere
there isan openflame,sparkor pilotlight(e.g.furnace,
waterheater,spaceheater,clothesdryeretc.).
j. Allowmachinetocool at least5 minutesbeforestoring.
4
Page 5
Operation
1. Donot puthandsorfeetnearrotatingparts,inthe
auger/impellerhousingor chuteassembly.Contactwiththe
rotatingpartscanamputatehandsandfeet.
2. The auger/impellercontrolleveris asafetydevice.Never
bypassitsoperation.Doingso makesthe machineunsafe
andmaycausepersonalinjury.
3. The controlleversmustoperateeasilyin bothdirections
andautomaticallyreturntothe disengagedpositionwhen
released.
4. Neveroperatewitha missingor damagedchuteassembly.
Keepall safetydevicesinplaceandworking.
5. Neverrunan engineindoorsor in apoorlyventilatedarea.
Engineexhaustcontainscarbonmonoxide,anodorlessand
deadlygas.
6. Donotoperatemachinewhileunderthe influenceofalcohol
or drugs.
7. Mufflerandenginebecomehotandcan causea burn.Do
nottouch.
8. Exerciseextremecautionwhenoperatingonorcrossing
gravelsurfaces.Stayalertfor hiddenhazardsortraffic.
9. Exercisecautionwhenchangingdirectionandwhileoperat-
ingonslopes.
10.Planyoursnow-throwingpatternto avoiddischargetowards
windows,walls,carsetc.Thus,avoidingpossibleproperty
damageor personalinjury causedby aricochet.
11.Neverdirectdischargeatchildren,bystandersand petsor
allow anyoneinfrontofthe machine.
12.Donotoverloadmachinecapacitybyattemptingto clear
snowattoofast of arate.
13.Neveroperatethis machinewithoutgoodvisibility or light.
Alwaysbe sureofyourfootingandkeepa firmholdonthe
handles.Walk,neverrun.
14.Disengagepowerto the auger/impellerwhentransportingor
notinuse.
15.Neveroperatemachineat hightransport speedsonslippery
surfaces.Lookdownand behindandusecare when
backingup.
16.Ifthe machineshouldstartto vibrateabnormally,stopthe
engine,disconnectthesparkplugwireandgroundit against
the engine.Inspectthoroughlyfordamage.Repairany
damagebeforestartingandoperating.
17.Disengageallcontrolleversandstopenginebeforeyou
leavethe operatingposition(behindthe handles).Wait
untilthe auger/impellercomestoa completestop before
uncloggingthe chuteassembly,makinganyadjustments,or
inspections.
18.Neverputyourhandin thedischargeor collectoropenings.
Alwaysuse theclean-outtoolprovidedtounclogthe dis-
chargeopening.Donot unclogchuteassemblywhileengine
isrunning.Shut offengineandremainbehindhandlesuntil
all movingpartshavestoppedbefore unclogging.
19.Useonly attachmentsandaccessoriesapprovedbythe
manufacturer(e.g.wheelweights,tirechains,cabsetc.).
20. Ifsituationsoccurwhichare notcoveredinthis manual,
usecareand goodjudgment.Contactyourdealeror call
(800)800-7310forassistanceandthe nameofyournearest
servicingdealer..
Maintenance & Storage
1. Nevertamperwithsafetydevices.Checktheir proper
operationregularly.Refertothe maintenanceandadjust-
mentsectionsofthis manual.
2. Beforecleaning,repairing,orinspectingmachinedisen-
gageall controlleversandstopthe engine.Wait untilthe
auger/impellercometoa completestop. Disconnectthe
sparkplugwireand groundagainstthe engineto prevent
unintendedstarting.
3. Checkbolts andscrewsfor propertightnessatfrequent
intervalstokeepthe machineinsafeworkingcondition.
Also,visuallyinspectmachinefor anydamage.
4. Do notchangetheenginegovernorsettingor over-speed
theengine.The governorcontrolsthemaximumsafe
operatingspeedoftheengine.
5. Snowthrowershaveplatesandskidshoesaresubjectto
wearanddamage.Foryoursafetyprotection,frequently
checkallcomponentsandreplacewith originalequipment
manufacturer's(OEM) partsonly."Useof partswhichdo
notmeetthe originalequipmentspecificationsmayleadto
improperperformanceandcompromisesafety!"
6. Checkcontrolsperiodicallytoverify theyengageand
disengageproperlyandadjust,if necessary.Referto the
adjustmentsectioninthis operator'smanualfor instructions.
7. Maintainor replacesafetyandinstructionlabels,as neces-
sary.
8. Observeproperdisposallawsandregulationsfor gas,oil,
etc.toprotectthe environment.
9. Priorto storing,run machineafew minutestoclearsnow
frommachineandpreventfreezeupof auger/impeller.
10.Neverstorethemachineorfuel containerinsidewhere
thereisan openflame,sparkor pilotlightsuchas a water
heater,furnace,clothesdryeretc.
11.Alwaysreferto theoperator'smanualforproperinstructions
onoff-seasonstorage.
Do not modify engine
Toavoidseriousinjuryordeath,donot modifyengineinany
way.Tamperingwiththegovernorsettingcan leadto a runaway
engineandcauseit tooperateat unsafespeeds.Nevertamper
withfactorysettingofenginegovernor.
Notice regarding Emissions
Engineswhicharecertifiedto complywithCaliforniaandfederal
EPAemissionregulationsfor SORE(SmallOff RoadEquipment)
arecertifiedto operateonregularunleadedgasoline,andmay
includethefollowingemissioncontrolsystems:EngineModifica-
tion(EM)andThreeWayCatalyst(TWO)ifso equipped.
Your Responsibility
Restrictthe useofthis powermachineto personswhoread,un-
derstandandfollowthe warningsandinstructionsin thismanual
andon themachine.
Operation
WARNING
Thissymbol points
out importantsafety
instructions,which if
notfollowed,could
endangerthe personal
safety and/or property
of yourselfand others.
Readand followall
instructions inthis man-
ual before attemptingto
operatethis machine.
Failureto comply with
these instructionsmay
result in personalinjury.
Whenyou seethis
symbol.
HEED IT'S WARNING!
YourResponsibility
Restrictthe use
of this powermachine
to personswho read.
understand
and followthe warnings
and instructions
in this manua
and on the machine.
5
Page 6
Adjustment
IMPORTANT:Thisunit isshippedwiththeenginefull of
oil.Afterassembly,seethe EngineOwner'smanualfor
fuelandoil details.
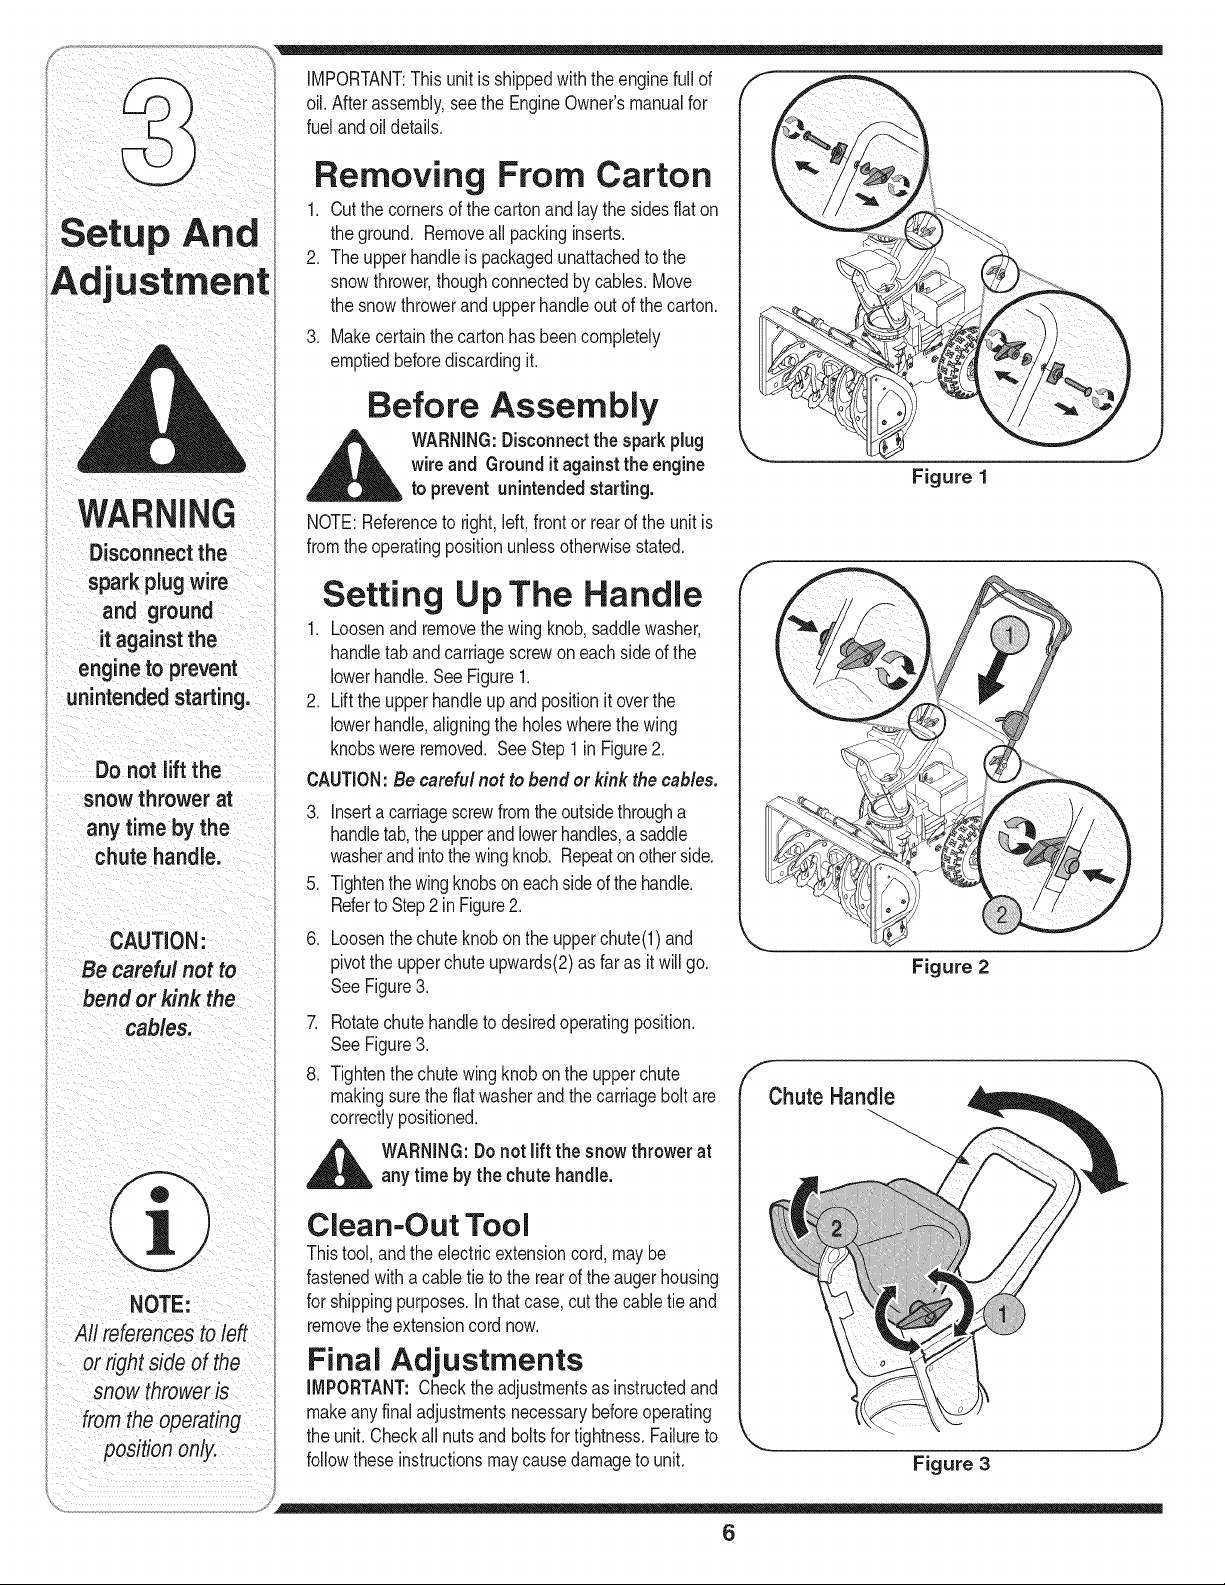
Removing From Carton
1. Cutthecornersofthecartonandlaythesidesfiaton
theground. Removeall packinginserts.
2. Theupperhandleispackagedunattachedtothe
snowthrower,thoughconnectedbycanes. Move
thesnowthrowerandupperhandleout ofthecarton.
3. Makecertainthecartonhasbeencompletely
emptiedbeforediscardingit.
Before Assembly
WARNING
Disconnectthe
sparkplugwire
and ground
itagainst the
engine to prevent
unintended starting.
Do not lift the
snowthrower at
any time by the
i chute handle.
CAUTION:
Be careful not to
bend or kink the
cables.
__lh WARNING:Disconnectthe sparkplug
NOTE:Referencetoright,left,frontor rearofthe unitis
fromtheoperatingpositionunlessotherwisestated.
wireand Ground it againstthe engine
to preventunintendedstarting.
Setting Up The Handle
1. Loosenandremovethewingknob,saddlewasher,
handletabandcarriagescrewoneach sideof the
lowerhandle.SeeFigure1.
2. Liftthe upperhandleupandpositionitoverthe
lowerhandle,aligningtheholeswherethewing
knobswereremoved.SeeStep1inFigure2.
CAUTION:Be careful not to bendor kink the cables.
.
Insertacarriagescrewfromtheoutsidethrougha
handletab,theupperandlowerhandles,a saddle
washerandintothewingknob. Repeatonotherside.
.
Tightenthewingknobsoneachsideofthe handle.
Referto Step2 inFigure2.
6.
Loosenthechuteknobonthe upperchute(l)and
pivottheupperchuteupwards(2)as faras itwillgo.
SeeFigure3.
7. Rotatechutehandletodesiredoperatingposition.
SeeFigure3.
8. Tightenthechutewingknobon theupperchute
makingsurethe flatwasherandthecarriageboltare
correctlypositioned.
Figure 1
f
Figure 2
f
Chute Handle
NOTEI
AIi referencestoleft
orright Sideof the
snow thrower is
theopera#g
position on8
,d_ WARNING:Donot liftthe snow thrower at
any time by thechute handle.
Clean-Out Tool
Thistool,andtheelectricextensioncord,maybe
fastenedwithacable tieto therearof theaugerhousing
forshippingpurposes.Inthatcase,cutthecabletieand
removetheextensioncordnow.
Final Adjustments
IMPORTANT:Checktheadjustmentsasinstructedand
makeanyfinaladjustmentsnecessarybeforeoperating
theunit.Checkall nutsandboltsfortightness.Failureto
followtheseinstructionsmaycausedamagetounit.
'_. j
Figure 3
6
Page 7
F
f
DriveCable
//
J
Figure 4
Figure 5
\\
i j
i '
; i
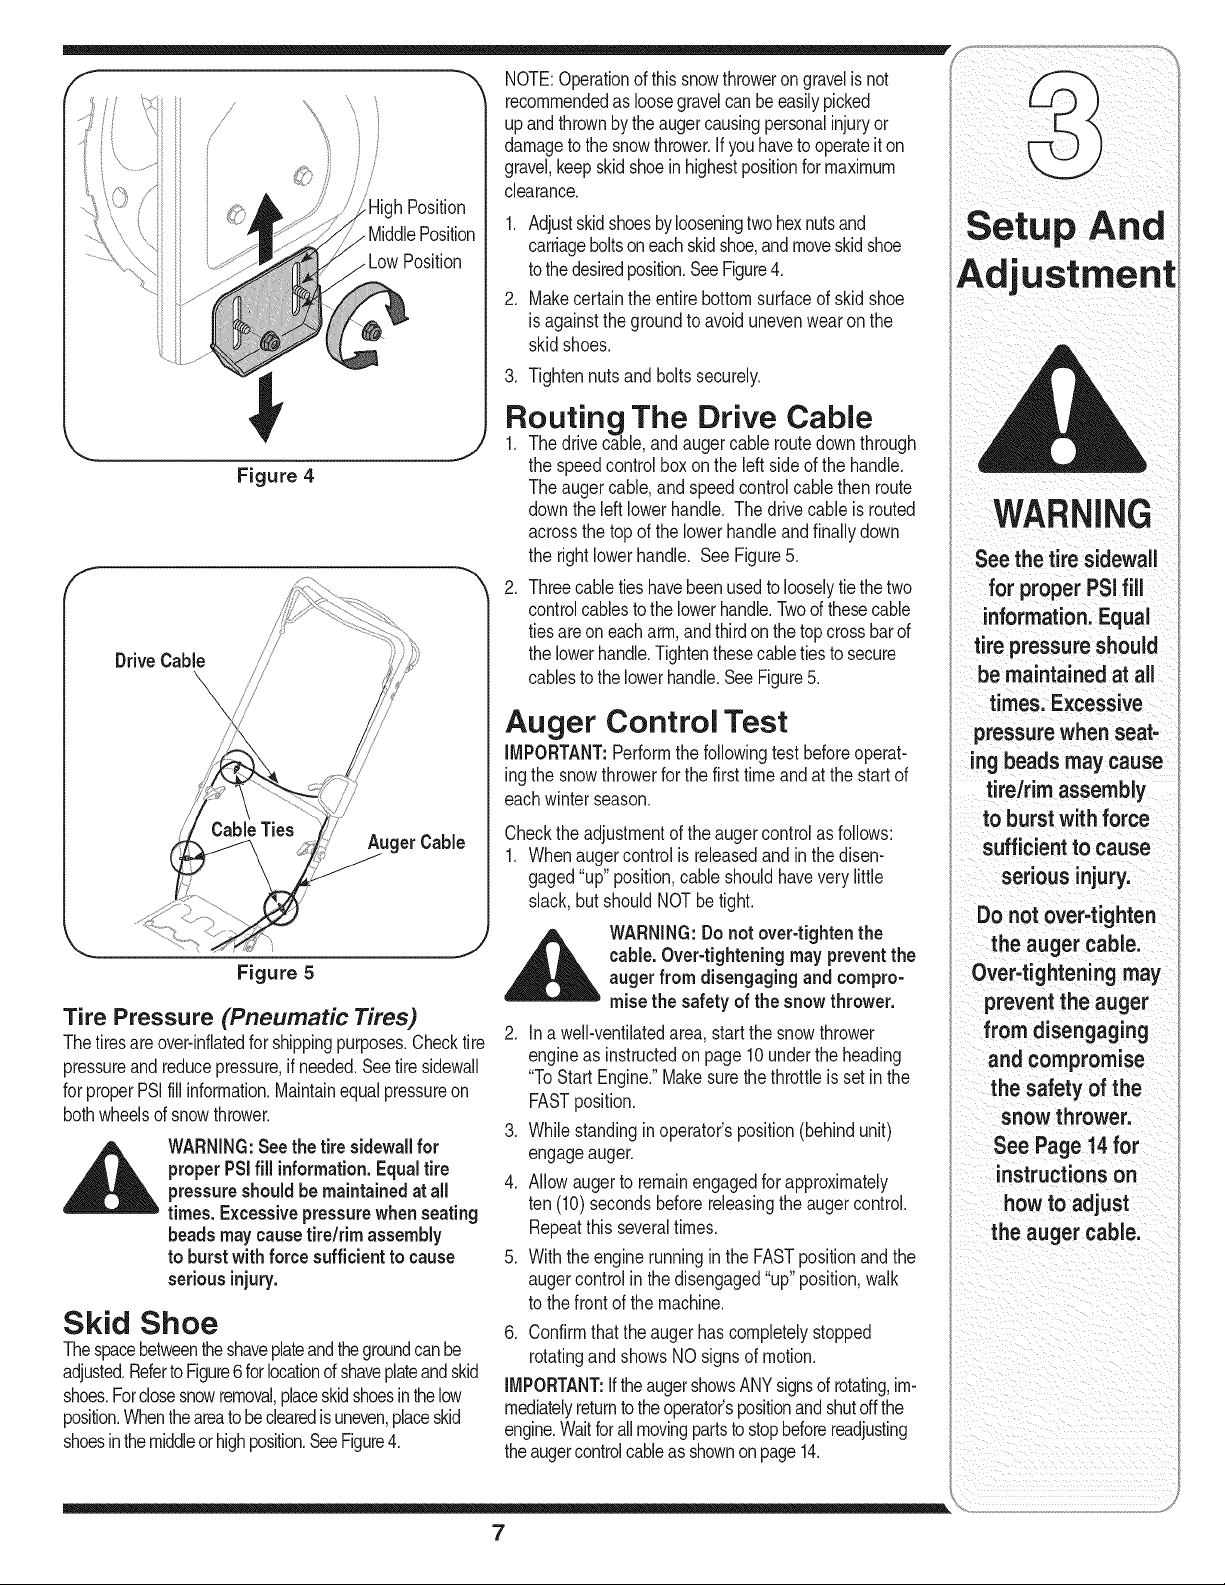
HighPosition
MiddlePosition
LowPosition
Tire Pressure (Pneumatic Tires)
Thetiresareover-inflatedforshippingpurposes.Checktire
pressureandreducepressure,ifneeded.Seetiresidewall
forproperPSIfillinformation.Maintainequalpressureon
bothwheelsofsnowthrower.
WARNING:Seethe tire sidewallfor
properPSIfill information.Equaltire
pressureshouldbemaintainedat all
times. Excessivepressurewhen seating
beadsmaycausetire/rim assembly
to burstwith force sufficientto cause
seriousinjury.
Skid Shoe
Thespacebetweentheshaveplateandthegroundcanbe
adjusted.Referto Figure6forlocationd shaveplateandskid
shoes.Forclosesnowremoval,placeskidshoesinthelow
position.Whentheareatobeclearedisuneven,placeskid
shoesinthemiddleorhighposition.SeeFigure4.
NOTE:Operationofthissnowthrowerongravelisnot
recommendedas loosegravelcanbeeasilypicked
upandthrownbythe augercausingpersonalinjuryor
damageto thesnowthrower.If youhavetooperateiton
gravel,keepskidshoeinhighestpositionformaximum
clearance.
1. Adjustskidshoesbylooseningtwohexnutsand
carriageboltsoneachskidshoe,andmoveskidshoe
tothedesiredposition.SeeFigure4.
2. Makecertainthe entirebottomsurfaceof skidshoe
isagainstthe groundtoavoidunevenwearonthe
skidshoes.
3. Tightennutsandboltssecurely.
Routing The Drive Cable
1. Thedrivecable,andaugercable routedownthrough
thespeedcontrolboxonthe leftsideofthe handle.
Theaugercable,andspeedcontrolcablethenroute
downthe leftlowerhandle.The drivecable isrouted
acrossthetopof thelowerhandleandfinallydown
therightlowerhandle. SeeFigure5.
.
Threecabletieshavebeenusedtolooselytiethetwo
controlcablestothe lowerhandle.Twoofthesecable
tiesareoneacharm,andthirdonthetopcrossbarof
thelowerhandle.Tightenthesecabletiestosecure
cablestothe lowerhandle.SeeFigure5.
Auger Control Test
IMPORTANT:Performthefollowingtestbeforeoperat-
ingthesnowthrowerfor thefirsttimeandatthestartof
eachwinterseason.
Checktheadjustmentofthe augercontrolasfollows:
1. Whenaugercontrolisreleasedand inthedisen-
gaged"up"position,cableshouldhaveverylittle
slack,butshouldNOTbetight.
WARNING:Do notover-tighten the
cable.Over-tightening maypreventthe
auger from disengagingand compro-
misethe safetyof thesnowthrower.
2. In a well-ventilatedarea,start thesnowthrower
engineasinstructedonpage10undertheheading
"ToStartEngine."Makesurethethrottleissetin the
FASTposition.
3. Whilestandinginoperator'sposition(behindunit)
engageauger.
4. Allowaugerto remainengagedforapproximately
ten(10)secondsbeforereleasingtheaugercontrol.
Repeatthisseveraltimes.
5. WiththeenginerunningintheFASTpositionandthe
augercontrolinthedisengaged"up"position,walk
tothe frontofthe machine.
6. Confirmthattheaugerhas completelystopped
rotatingandshowsNOsignsofmotion.
IMPORTANT:IftheaugershowsANYsignsofrotating,im-
mediatelyreturntotheoperator'spositionandshutoffthe
engine.Waitforallmovingpartstostopbeforereadjusting
theaugercontrolcableasshownonpage14.
WARNING
See the tire sidewall
for proper PSifill
information.Equal
tire pressureshould
be maintained at all
times. Excessive
pressurewhen seat-
ingbeads may cause
tire/rim assembly
to burstwith force
sufficientto cause
seriousinjury.
Do not over-tighten
the auger cable.
Over-tightening may
preventthe auger
from disengaging
and compromise
the safety of the
snowthrower.
See Page 14for
instructionson
how to adjust
the auger cable.
7
Page 8

Gasoline Cap
Upper Chute
IMPORTANT:
Refer tOAuger Control
TeSton page7 priorto
operatng your snoW
throweriRead and
folloW aii instructions
Carefullyandperform
all adjuStmentsto
verifyyoursnow
thrower iSoperating
safey and properly;
l
sh ft gears;theun t
must be runningand
the drive control must
bereleased:
I
Clean-out Tool
ChuteAssembly.
_- Chute Handle
Knob
//
Shave Plate
Auger
SkidShoe
Figure 6
_ ARNING:Befamiliar with all the controls on the snowthrower andtheir properoperation. Know
NOTE:CompareFigures6&7 withyourequipmentand
followdescriptionof controls,givenbelow,togetfamiliar
withtheiroperation.
Drive Control
Locatedon theundersideof the upperhandle,thedrive
controlisusedtoengage/disengagewheels.Squeeze
thedrivecontrolagainsttheupperhandletoengagethe
wheels;releasetodisengage.
Auger Control
Theaugercontrolis adjacenttothe upperhandle.
Squeezethe augercontrolagainsttheupperhandleto
engagetheaugers;releasetodisengagetheaugers.
_lll/i ARNING:Nevermakeadjustments to
IMPORTANT:Referto AugerControlTestonpage7
priortooperatingyoursnowthrower.Readandfollow
all instructionscarefullyandperformalladjustments
toverifyyoursnowthroweris operatingsafelyand
properly.
Chute Handle
Thedirectionof snowthrowingcorrespondsto the
directionof the chuteopening.Usethe chutehandle
how to stop the machineand disengage themquickly.
Chute Knob
Thedistancesnowisthrowncan beadjustedbyeither
raisingorloweringtheupperchute.Loosenthechute
knobon thesideof theupperchutetoadjust.Pivotthe
upperchutetodesiredposition,andretightenthechute
knob.
Speed Selection Lever
Yoursnowthrowerisequippedwitha3-speedpower
propelleddrivesystem.The speedis controlledbythis
speedselectionlever,locatedontheleft sideofthe
upperhandle. Threespeedsareprovided.Withthelever
allthewaydown,towardstheengine,speed1isyour
slowestspeed.
the chute assembly unless both auger
and drive controlsare disengaged and
the operator isstanding beside the unit.
IMPORTANT:Toshiftgears,the unitmustberunning
andthedrivecontrolmustbe released.
Shave Plate
Theshaveplate maintainscontactwithpavementas
thesnowthroweris propelled,allowingsnowcloseto
pavement'ssurfaceto bedischarged.
Skid Shoe
Thespacebetweentheshaveplateandthegroundcan
beadjusted.Forclosesnowremoval,placeskidshoesin
thelowposition.Usemiddleor highpositionwhenareato
beclearedis unevenoron gravelsurfaces.
toturnthechuteassemblyinthe directionyouwishto
throwthesnow.
8
Page 9

/_Muffler Spark Oil Fill GasolineCap
Ign,tionl \b/Y \Starter
Key/ "Handle
Figure7
Clean Out Tool
Thecleanouttool isprovidedto unclogthedischarge
opening.Donotunclogdischargechutewhileengineis
running.
,_llhlk WARNING:Before unclogging, shut
Choke Control
Activatingchokecontrolclosesthechokeplateon
carburetorandaidsin startingengine.Theimagebelow
representsthe speedsof thethrottlecontrol. Forinforma-
tiononchokeusage,see page10ofthismanual.
off engineandremain behind handles
until all movingpartshavestopped
completely.Neverput yourhandinthe
discharge or collectoropenings.Always
usethe clean-outtool provided.
iii
Recoil Starter & Starter Handle
Thismotorisfitted witha recoilactionpull startanda
mittengriphandlefor easyaccesswhilewearinggloves
or mittens.
Electric Starter Button
Pressingtheelectricstarterbuttonengagesthe
engine'selectricstarterwhenpluggedintoa 120V
powersource
Electric Starter Plug
Requiresuseof atwo-prongoutdoorextensioncord
(packedwiththe snowthrower)anda 120Vpower
source/walloutlet.
Ignition Key
Theignitionkeyisnecessaryfortheengineto start.
Insertkeyandsnapin place;do notturn it to start/stop
theunit.Removekeywhenthe unitisnotinuse.
Primer
Depressingprimerforcesfueldirectlyinto
engine'scarburetortoaid incold-weather
starting.Refertothe startinginstructions
inthe Operationsectionof thismanualfor
properprimerusage.
Oil Fill
Removeoil cap toaddoil. Refertothe EngineOwner's
manualforcheckingandaddingoil instructions.
Gasoline Cap
Removegas capto addfuel.Unitrunson regulargas.
NOTE:Thisunit mayincludea fuel plug,whichisonly
usedduringassemblyto keepdirt anddebrisoutof fuel
tank. Discardthefuelplugbeforefillingthefueltank.
Throttle Control
Thethrottlecontrolislocatedonthe engine.
It regulatesthespeedofthe engineandalso
stopsthe engine.The imageto the right
representsthe speedsofthe throttlecontrol.
O
PUSH FOR A
©
WARNING
Before unclogging,
shut off engine
and remain behind
handles untilall
moving parts have
stopped completely.
Never put your hand
in the discharge or
collector openings.
Always use the clean-
out tool provided.
@
9
Page 10

WARNING
Gasolineisflammable
i and cautionmust be
used when handling
or storing it. Donot
fill fuel tank while
the snowthrower is
running,when it is
hotor when itis inan
enclosed area.
Keepyour snow
thrower awayfrom
any openflame or an
electricalsparkand
do notsmokeduring
fueling.
Besurenooneother
thanthe operatoris
standingnearthe
snowthrowerwhile
startingoroperating,
Donotoperatethis
i snowthrowerunless
i thechuteassembly
hasbeenproperly
installedandis
secured.
The electricstarter
must be properly
groundedat all
i times to avoidthe
i possibilityofelectric
i shock to the operator.
i if your house wiring
systemis nota
i three=wire grounded
system,do not use
this electricstarter
underanyconditions.
Before Starting Engine
Engine Oil
Theengineisshippedwithoil init.Checktheoillevel
beforefirstuse.
Stopengineandwaitseveralminutesbeforecheck-
ingoillevel.Removeoilfillcap anddipstick.
.
Wipedipstickclean,insertitintooil fillholeand
tightensecurely.
.
Withengineonlevelground,oil mustbe to FULL
markon dipstick.Ifoil levelislow,addoil.
FULL MaintainOilLevel
_ BetweenFULLandADD
ADD
Adding Engine Oil
Besureto usethegradeofengineoilspecifiedin
enginemanual.Toaddoil:
1. Removethedipstickfromtheoilfill.Pourfreshoil
slowlythroughtheplug.Replacedipstick.
2. Checkandmakesurethatthe levelof oil isupto the
FULLmarkonthedipstick.
IMPORTANT:Forcompletedetailedengineinformation,
seetheseparateengineowner'smanualincludedwith
thisunit.
Gasoline
,_ WARNING:Gasolineis flammable and
__L WARNING:Keepyoursnowthrower
1. Neverfillthefueltankcompletely.Fill thetankto
nomorethan 1/2inchbelowbottomoffiller neckto
providespaceforexpansionoffuel.
NOTE:Thisunit mayincludea fuel plug,whichis only
usedduringassemblyto keepdirt anddebrisoutoffuel
tank. Discardthefuelplugbeforefillingthefueltank.
2. Alwaysuseclean,fresh,unleadedgradeautomotive
gasoline.Fillthe fueltankoutdoorsanduseafunnel
orspouttopreventspilling.Makesurethatthe
containerfromwhichyoupourthegasolineisclean
andfreefromrustor otherforeignparticles.Make
caution must be usedwhen handling
or storing it.Donot fill fuel tank while
the snow thrower is running, when itis
hot or when it is inanenclosedarea.
awayfrom anyopenflameoranelectrical
sparkanddo notsmokeduringfueling.
sureto wipeoff any spilledfuelbeforestartingthe
engine.
3. At theendof thejob, emptythefueltank ifthesnow
throwerisnotgoingtobe usedfor30daysorlonger.
Storegasolineina cleancontainerandkeepthecap
in placeonthe container.
CAUTION:Never useengine or carburetor cleaner
products in thefuel tank.
To Start Engine
_ ARNING:Be sure nooneother than
NOTE:Forlocationofallthe enginecontrolsreferredtoin
thissection,referto Figure7.
the operator is standing near thesnow
thrower while starting or operating. Do
not operate this snow thrower unless
the chute assembly has beenproperly
installed andis secured.
For A Cold Start
Electric Starter
Somemodelsof thesnowthrowermaybeequipped
withanoptional120voltA.C.electricstarter.This
electricstarter,witha three-wirepowercordandplug, is
designedtooperateon120voltAC householdcurrent.
Followthestepsbelowto usethe electricstarter.
_ ARNING:Theelectricstarter must
-- avoid the possibilityof electric shock.
.
Determinethatyour housewiringisa three-wire
groundedsystem.Aska licensedelectricianifyouare
notcertain.
2. If your homewiring system is not a three-wire
grounded system, do notusethiselectricstarter
underanyconditions.
3. If your homeelectricalsystem isgrounded, but
a three-holereceptacleisnot available,oneshould
beinstalledby a licensedelectricianbeforeusingthe
electricstarter.
4. If youhavea grounded three-prong receptacle,
proceedasfollows.
5. MoveChokeControlto the"Full"position.
6. PushPrimerthree(3)times,makingsureto cover
ventholewhenpushing.
7. Connectpowercordtoswitchboxondashpanel.
Plugtheotherendof powercordintoa three-prong
120-volt,grounded,ACreceptacle.
8. Pushstarterbuttonto crankengine.
9. Whenenginestarts,releasestarterbutton,andmove
chokegraduallyto 1/2Chokeuntil theengineruns
smoothly.NextmoveChoketoOFE If enginefalters,
be used with a properlygrounded
three-prong receptacleat all times to
Followall instructionscarefullypriorto
operating the electric starter.
10
Page 11

movechokeimmediatelyto FULLandthengradually
to 1/2thento OFF.
10.Disconnectthepowercord.Alwaysunplugfromthe
outletfirst,andthenfromthe snowthrower.
Recoil Starter
1. MovechokelevertoFULLchokeposition(coldengine
start).
2. Ifengineiswarm,placechokeinOFFpositioninstead
of FULL.
3. PushPrimerthree(3) times,makingsureto cover
ventholewhenpushing.
4. Ifengineiswarm,push primerbuttononlyonce.
NOTE:Alwayscoverventholein primerbuttonwhen
pushing.Additionalprimingmaybenecessaryforfirst
startif temperatureis below15degreesFahrenheit.
5. Graspstarterhandleand pullropeout slowly,untilit
pullsslightlyharder.Letroperewindslowly.
6. Pullstarterhandlerapidly.Donotallowhandleto snap
back.Allow itto rewindslowlywhilekeepinga firm
holdon thestarterhandle.
7. Asenginewarmsupandbeginstooperateevenly,rotate
chokeleverslowlytothe 1/2Chokeposition.Whenthe
enginebeginsto runsmoothly,movethechoketothe
OFFposition.Ifenginefalters,returntoFULLchoke,then
slowlymoveto 1/2thenOFFposition.
For A Warm Start:
1. If restartingan engineafteratemporaryshut-down,
rotatechoketoOFFinsteadof FULLanddonotprime.
Useelectricstart featureor pullthestarterhandleas
instructedbefore.
Clearing The Snow
CAUTION:Checkthearea tobe clearedfor foreign
objects. Removeforeign objects, if any.
1. Startthe enginefollowingstartinginstructions.
2. Allowtheengineto warmup fora fewminutesas
theenginewill notdevelopfullpoweruntilit reaches
operatingtemperature.
3. Rotatethechuteassemblytothedesireddirection,
awayfrombystandersand/orbuildings.
4. Makingcertainno bystandersor obstaclesarein
frontof the unit,squeezetheaugercontrolcom-
pletelyagainsttheupperhandleto fullyengagethe
augers.
5. Whiletheaugercontrolisengaged,squeezethedrive
controlcompletelyagainsttheupperhandletoengage
thewheels.Donot"feather"thedrivecontrol.
6. As thesnowthrowerstartsto move,maintaina firm
holdonthehandle,andguidethesnowthrower
alongthepathto becleared.
7. Releasetheaugeranddrivecontrolstostopthe
snowthrowingactionandforwardmotion.
NOTE:Yourunitisequippedwithaclutch inthe
transmission.If thewheelsstopturningwhiletryingto
dischargelargevolumesofsnow,immediatelydisen-
gagethedrivecontrolandallowthe rotatingaugersto
dischargesnowfromthehousing.Reducetheclearing
widthandcontinueoperation.
8. Oneach succeedingpass,readjustthechute
assemblytothe desiredpositionandslightlyoverlap
thepreviouslyclearedpath.
WARNING
temperature
of muffler and the
surrounding areas
may exceed 150° F.
Avoidthese areas:
Before Stopping
1. Runengineforafew minutesto helpdryoff any
moistureonengine.
2. Toavoidpossiblefreeze-upof thestarter,followthese
steps:
Recoil Starter
a. Withtheenginerunning,pullthe starterropewitha
rapid,continuousfullarm strokethreeorfourtimes.
To Stop The SnowThrower
1. Tostopthewheels,releasethedrivecontrol.
2. To stopthrowingsnow,releasetheaugercontrol.
3. To stopengine,pushthrottlecontrollevertoOFFand
pulloutthe key.Do notturn key.
_ WARNING:Thetemperatureof muffler
andthesurroundingareasmayexceed
150°F.Avoidtheseareas.
11
Page 12

WARNING
Stopengine by
movingthrottle lever
to stop position and
wait for all moving
parts to stop before
usingthe
cleanoout tool.
Never use your
handsto clean snow
and ice from the
chute assembly or
auger housing.
Speed Selector Lever
Yourunitisequippedwitha 3-speedpowerpropelled
drivesystem. Speedposition1,whentheleveris
depressedallthewaydowntowardthe motor,isslow.
Speedposition2 isa littlefasterand3 isthe fastest.
SeeFigure8.
Tooperatethisfunction,followtheseinstructions:
1. Shiftyoursnowthroweronlywhileengineisrunning.
2. Releasedrivecontrolhandlebeforeshifting.
Operating Tips
1. Formostefficientsnowremoval,removesnow
immediatelyafteritfalls.
2. Dischargesnowdownwindwheneverpossible.
Slightlyoverlapeachpreviousswath.
3. Settheskidshoes1/4"belowtheshaveplatefor
normalusage.Theskidshoesmaybeadjusted
upwardforhard-packedsnow.
NOTE:Itis notrecommendedthatyouoperatethis
snowthrowerongravelas loosegravelcanbeeasily
pickedupandthrownbythe augercausingpersonal
injuryand/or damagetothesnowthrower.
.
Iffor somereason,youhavetooperatethesnow
throweron gravel,keepthe skidshoeinthe highest
positionformaximumclearancebetweentheground
andtheshaveplate.
5. Cleanthesnowthrowerthoroughlyaftereach use.
Cleaning The
/
Speed
Selector
Lever
Figure8
Chute
Clean-out
Tool
Chute Assembly
Theclean-outtool isconvenientlyfastenedtothe auger
housingwitha mountingclip.
Whensnowandice collectin the chuteassemblyduring
operation,usethis toolto safelycleanthe chuteand
chuteopening.Followthestepsbelowtooperateit.
__k WARNING:Stop engineby moving
1. Releasebothaugeranddrivecontrols.
2. Stoptheengineby movingthrottleleverto stop
position.
3. Removetheclean-outtool fromtheclip which
securesittothe rearoftheaugerhousing.
4. Usethe shovel-shapedendof theclean-outtool to
dislodgeandscoopanysnowandicewhichhas
formedinand nearthechuteassembly.
_ ARNING:Neveruse yourhands to
throttle leverto stop positionandwait
for all moving partsto stop before
using the clean-outtool.
clean snow and icefrom thechute
assembly oraugerhousing.
\
Figure9
5. Re-fastentheclean-outtoolto themountingclipon
theaugerhousing.Youcan startoperatingyoursnow
throwernow. SeeFigure9.
NOTE:The handleofthe clean-outtoolshouldbeplaced
withthehandleto theRightsideonthesnowthrower
augerhousing.
Housing
J
12
Page 13

ShearPin
Cotter Pin
.
Toreplace,removetwocarriageboltsand hexnuts
securingeachskidshoetothe augerhousing. See
Figure10.
2. Reassemblenewskid shoeswith hardwarejust
removed.Makesure shoesareadjustedtobe level.
3. To removeshave plate: Removeboth skidshoes
andhardwareincludingcarriagebolts,andhex
nutswhichattachshaveplateto thesnowthrower
housing.Forlocationof shaveplate,seeFigure10.
4. Reassemblenewshaveplate,makingsureheads
ofthe carriageboltsareto theinsideofthehousing.
Reinstallskidshoes.Tightensecurely.
Bolt HexNut
Figure10
Lubricate
Figure 11
General Recommendations
1. Alwaysobservesafetyruleswhenperformingany
maintenance.
2. The warrantyonthis snowthrowerdoesnotcover
itemsthat havebeensubjectedtooperatorabuseor
negligence.Toreceivefullvaluefromthe warranty,
operatormustmaintainthesnowthroweras instructed
in thismanual.
3. Periodicallycheckallfastenersandhardwareto make
surethesearetight.
lubricatingor inspecting,disengage all
_ WARNING: Before servicing, repairing,
controls and stop engine. Wait until all
moving parts have come to a complete
stop. Disconnect spark plug wire and
ground it against the engine to prevent
unintended starting. Alwayswearsafety
glassesduring operation or while per-
forming anyadjustments or repairs.
Replacing the Shave
Plate and Skid Shoes
Theshaveplateandskidshoeson thebottomofthe
snowthrowerare subjecttowear.Theseshouldbe
checkedperiodicallyand replacedwhennecessary
Servicing Augers
Theaugersaresecuredtothe spiralshaftwithfour
shearpinsandcotterpins.If youhita foreignobjector
icejam,the snowthrowerisdesignedsothatthepins
mayshear.Referto Figure10.
If theaugersdo notturn,checkifthe pinshavesheared.
Replace,ifneeded,withpropershearpins. Referto
item42on page19forpart number.
IMPORTANT:NEVERreplacetheaugershearpinswith
standardpinsorfasteners.Anydamagetotheauger
gearboxorothercomponents,as a resultofdoingso,
willNOTbecoveredby yoursnowthrower'swarranty.
Lubrication
Fora viewof thelubricationpointsonthe snowthrower,
seeFigure11.
1. Lubricatepivotpointsonthe augercontrolanddrive
controlwitha lightengineoiloncea season.
2. Lubricatetheaugeridlerbracketwithalight engine
oiloncea season.
Engine
Listedbelowaregeneralrecommendationsabout
maintainingyoursnowthrowerengine.Forfurther
details,refertothe accompanyingenginemanual.
1. Beforeoperatingsnowthrower,checkthe oil level.
2. Changeengineoil afterfirsttwo hoursofoperation
andevery25 hoursthereafter.
3. Cleansparkplugand resettheelectrodegapto
0.030"atleastonceaseasonorevery100hoursof
operation;replaceevery200hoursofoperation
Check V-Belts
Followinstructionsbelowtocheckconditionofdrive
beltsevery50 hoursofoperation.
1. Removetheplasticbeltcoveronthe frontofthe
enginebyremovingthe self-tappingscrewand
pressingtheplastictabsto releasethebeltcover.See
Figure13.
2. Visuallyinspectforfrayed,cracked,orexcessivelyworn
outbelts.Replace,ifnecessary,followinstructions
beginningonpage14.
WARNIN
Beforeservicing
repairing,lubricating
or inspecting,
disengage allcontrols
and stop engine.
Wait until all moving
parts havecome
to a completestop,
DisconneCt spark
plug wire and ground
it aga!nst the engine
to preventunintended
starting: Alwayswear
safety glassesduring
OpEration or
while performing
any adjustments
NOTE:
NEVERreplacethe
auger shear pins
with standardpinsor
fasteners.Anydamage
totheaugergearboxor
other components,as
a resultofdoingsO;Wil
NOT beCoveredbyyour
snowthrower'swarrantyl
13
Page 14

Maintenance
Replacing Belts
NOTE:Therearetwo beltson thissnowthrower:an
augerbeltanddrivebelt. Itis recommendedthat both
beltsbe replacedat thesametime.
1. Removethesparkplugwirefromsparkplugandground
itagainsttheenginetopreventaccidentalstarting.
2. Draingasolinefromthe gastankbelow1/2tankor
runthemachinebelowhalfa tank,or placea piece
ofplasticsheetunderneaththe gascap toprevent
gasolineleakage.
Bracket
\
WARNING
Performbelt
maintenanceoutdoors
assomegasmay
possiblyleakfrom
thecarburetoreven
thoughyouplaced
asheetof plastic
underneath the gas
i capto preventthe gas
capfrom leaking.
_|11 ARNING: Performbelt maintenance
outdoors assomegas maypossibly
leakfrom the carburetoreventhough
you placedasheetof plasticunder-
neaththe gascapto preventthe gas
capfrom leaking.
Adjusting The Auger Cable
Periodicadjustmentto theaugercontrolcablemaybe
requireddueto normalstretchandwearon the belt.
Adjustmentisneededif theaugersseemtohesitate
whileturning,buttheenginemaintainsspeed,or
continueturningwiththe augercontroldisengaged.
1. Loosentherearhexboltonthe cableadjustment
bracket.SeeFigure12.
2. Slidethecableadjustmentbracketbackwardstaking
outthe slackin theaugercable.
3. Retightenthe rearhexbolt
4. Startengineandverifyaugercontrolengagesand
disengagesproperly.
NOTE:if augercontinuesto rotatewiththecontrol
disengaged,shutoff engineandreadjust.
Auger Belt
1. Loosentherearscrewontheaugercableadjustment
bracketusinga 3/8" wrenchand slidethebracket
allthewayforwardto providemaximumslackinthe
augercable. SeeFigure12.
2. Removethebelt coverscrewusinga 5/16socket
withextensionand slightlyraisebeltcover.Youmust
alsouncliptheplastictabonthe othersidetoraise
thisup.Do notattemptto removethebeltcoverfrom
theunitatthistime. SeeFigure13.
3. Loosenthebottomaugerhousingmountingscrew
oneachsideonefullturn usinga 1/2"socket.See
Figure12.
4. Usingthe samesocketwrench,removethetopauger
housingmountingscrewsoneach side.
NOTE:The topaugerhousingscrewonthe leftside
alsosecurestheaugercablebracketandcableroller.
Payattentiontoits locationandhowit is positionedfor
referenceduringreassembly.SeeFigure12.
5. Pushdownonthe unit'shandle,thiswillallowthe
beltcoverto beeasilyremovedandwillgiveaccess
forthefollowingbeltmaintenanceprocedures.
Figure12
Figure 13
WoodBlock
J
Figure14
14
Page 15

fControl
Ar
Figure15
Belt LocatorPin
6. Afterremovingthebeltcover,slipthe frontauger
beltoff of theenginepulleybypushingit forwardand
rollingin offof the pulley.
7. Pushdownonthe unit'shandlefurtheropeningthis
areaand providingbetteraccesstotheaugerpulley.
Youmaywishtoplaceawoodblockundertheauger
housingtoholdtheunit open.SeeFigure14 Maintenance
8. Pushtheaugerbelt idlerpulleyin releasingthe
augerbrake,whichisthe tabthatholdsthebeltonto
theaugerpulley.Removethebelt.
9. Replacewithnewbeltafter replacingthedrivebelt.
NOTE: Ifnot replacingdrivebelt,thenproceedtoStep
5 inthe DriveBeltsection.
Drive Belt
NOTE:ToreplacetheDriveBelt,youmustfirstfollow
AugerBeltinstructions.Replacethe drivebelt before
reassemblingthe newaugerbelt.
1. Removehairpinclipand pivotrodfromunit. See
Steps1and2 in Figure15.
2. Maneuvercontrolarmoutanddisconnectdrive
cable.SeeStep3.
3. Pullidlerpulleyon righthandside out,releasing
tensionondrivebelt. Removedrivebeltfromidler
pulleyandtransmissionpulley. SeeSteps1thru3 in
Figure15.
4. Rotatecontrolarminorderto maneuverbeltfrom
unit. Removebeltandreplacewithnewbelt.
NOTE: Besuretomaintainpositionof themulti-speed
pulleyassemblysothatthebelt Iocatorpininthetop
position. SeeFigure16.
5. Reassembleinthe exactoppositeorder.
6. Afterreassemblyiscompleted,be sureto adjustthe
augercable.Refertothe "AdjustingAugerCable"
instructionson Page14of this manual.
ToreplacetheDrive
Belt,youmustfirstfollow
AugerBeltinstructions.
Replacethe drivebelt
beforereassemblingthe
Besureto maintain
positionofthe multi-
speedpulleyassembly
sothat thebeltIocator
pin inthetopposition.
NOTE:
newaugerbelt.
Figure16
15
Page 16

WARNING
Never store snow
thrower withfuel
in tank indoors or
in poorlyventilated
areas, where fuel
fumes may reach an
open flame, spark
or pilot light as on a
furnace, water heater,
clothes dryer or
gas appliance.
Drainfuel intoan
, approved container
i outdoors, away from
any open flame. Be
certain engine is
cool. Do notsmoke.
Fuelleft in engine
duringwarmweather
deteriorates and
i will causeserious
starting problems.
Donot drain
carburetor if using
fuel stabilizer.
Never use engine or
I carburetor cleaning
products inthe fuel
tank or permanent
damage may occur.
Ifthe snowthrowerwillnotbe usedfor30 daysor
longer,orifitistheendof thesnowseasonwhenthe
lastpossibilityof snowis gone,the equipmentneedsto
bestoredproperly.Followstorageinstructionsbelowto
ensuretopperformancefromthe snowthrowerformany
moreyears.
Preparing Engine
NOTE:Referto theenginemanualformoredetailed
informationon preparingthesnowthrowerenginefor
storage.
_ ARNING:Neverstore snowthrower
NOTE:Itis importantto preventgumdepositsfrom
forminginessentialfuelsystempartsof theenginesuch
asthe carburetor,fuel filter,fuelhoseor tankduring
storage.
CAUTION:Alcohol blended fuels (calledgasohol
or using ethanol ormethanol) canattract moisture
which leads to separation andformation ofacids
during storage.Acidic gas can damagethe fuel
system of anenginewhile in storage.
Toavoidengineproblems,thefuelsystemshouldbe
emptiedbeforestoragefor30daysor longer.Follow
theseinstructionstoprepareyoursnowthrowerfor
storage:
_ ARNING:Drainfuel intoan approved
1. Removeallgasolinefromthecarburetorandthefuel
tanktopreventgumdepositsfromformingonthese
partsandharmingtheengine.
2. Runtheengineuntilthefuel tankisemptyandit
stopsdueto lackoffuel.
3. Draincarburetorbypressingupwardon bowldrain,
locatedbelowthecarburetorcover. SeeFigure17.
f Carburetor _"
with fuel intank indoorsor in poody
ventilated areas,wherefuel fumes
may reachan open flame, spark or
pilotlightas on a furnace, water
heater,clothes dryer or gas appliance.
container outdoors, awayfrom any
openflame. Becertain engineiscool.
Donot smoke.Fuelleft in engine
during warmweatherdeteriorates and
will cause serious starting problems.
0ow0 anv =,r --
Figure17
_ ARNING:Donotdrain carburetorif
NOTE:Fuelstabilizer(suchas STA-BIL)is anaccept-
ablealternativein minimizingtheformationoffuelgum
depositsduringstorage.Addstabilizertogasolineinfuel
tankorstoragecontainer.Alwaysfollowmixratiofound
onstabilizercontainer.Runengineat least10minutes
afteraddingstabilizertoallowit to reachthecarburetor.
Donotdraincarburetorifusingfuelstabilizer.
4. Removethesparkplugandpourone(1)ounce
ofengineoil throughthesparkplugholeintothe
cylinder.Coversparkplugholewitha ragandcrank
theengineseveraltimestodistributetheoil. Replace
sparkplug.
NOTE:Referto theenginemanualformoreinformation
onpreparingthe snowthrowerenginefor storage.
usingfuel stabilizer.Neveruse engineor
carburetorcleaningproducts in thefuel
tankor permanentdamagemayoccur.
Preparing Snow Thrower
1. Whenstoringthesnowthrowerinan unventilatedor
metalstorageshed,careshouldbetakento rustproof
theequipment.Usinga lightoilor silicone,coatthe
equipment,especiallyanychains,springs,bearings
andcables.
2. Removealldirtfromexteriorof engineandequipment.
3. Followlubricationrecommendationson page13.
4. Storeequipmentina clean,dryarea.
16
Page 17

Problem Possible Cause(s) Solution
Engine fails tostart tankempty,or stalefuel tankwith cleanfreshgasoline:
21 Blockedfuelline 2: Cleanfuelline:
& Keynotsnappedintopiace
4. Spark plugw redisconnected 4, Connectwireto sparkp!ug.
& Fau!tyspaikplug c!ean sparkplug, readjustgap;or
replace:
6: Enginenotprimed 61Prime enginefourtimeSl
7:Eng nefoodedfromexcessive 7: waitat easttenminutesbefore
priming starting.
Enginerunserratic
1. Unitrunningonchoke
2. Fuellineblocked,orstalefuel
3. Waterordirt in fuelsystem
4. Carburetoroutofadjustment
1. MovechokelevertoOFFposition.
2. Cleanfuellineandfill tankwith
fresh,cleangasoline.
3. Referto enginemanualfor remedy.
4. Referto enginemanualfor remedy.
I Engineoverheats 1. Carburet rout ofadjustment-- 1. Referto enginemanualfor instructio.i
Lossof power 1. Sparkplugwireloose 1. Firmlyconnectsparkplugwire.
2. Ventingascap plugged 2. Clearvent.
Excessivevibration
Unitfails to self-propel
Augerscontinueto rotate
Unit fails to discharge
snow
1. Loosepartsor damagedauger 1. Stopengineimmediatelyand
disconnectsparkplugwire.Check
forpossibledamage.Tightenall
boltsand quts.Repairasneeded.If
theproblempersists,takeunitto an
authorizedservicedealer.
1. Drivebelt looseordamaged 1. Replacedrivebelt.
1. Cableoutof adjustment. 1. Adjustaugercontrolcableas
shownin "AdjustingTheAuger
Cable"on page14.
1 Chuteassemblyclogged.
2. Shearpinsheared.
3. Foreignobjectlodgedinauger
4 Augercontrolcableoutof
adjustment.
5. Augerbelt looseordamaged.
1. Stopengineanddisconnectspark
plugwire.Cleanchuteandinside
ofaugerhousingwithclean-out
toolor stick.
2. Replaceshearpin.
3. Stopengineimmediatelyand
disconnectthesparkplugwire.
Removeobjectfromauger.
4. Adjustaugercontrolcable
5. Replaceaugerbelt.
P easeao,VOr
returntheunit to the
retailerfrom which it
was purchase&
without first contacting
Customer Sup_rti
onto
www,mtdproducts;com
or call a customer
service representative
at 1(800)800,7310 or
(330)220,4683,
You wi// need the
model number and
serial number ff
and when calling
Customer Support,
loggingonto
manual
NOTE:Forrepairsbeyondtheminoradjustmentslistedabove,contactyournearestauthorizedservicerepresentativeor
call1-800-800-7310fortheCustomerSupportCenter.Refertotheenginemanualformoreenginerelatedinformation.
17
regarding locating
and recording your
model and serial
number&
Page 18

For parts and/or
accessories
please call
1-800-800-7310,or
1-330-220-4683.
www.mtdproducts.com
18
Page 19

1 684-04037 ChuteAssembly 1
2 710-04071 CarriageBolt5/16-18x1.0" 1
3 710-0451 CarriageBolt5/16-18 11
4 712-3068 FlangeLockNut,5/16-18 1 28 738-0281
5 720-04032 NutKnob5/16-18 1 29 741-0245
6 731-04388A ChuteHandle 1 30 741-0309
7 731-04426A UpperChute 1 31 750-04191
8 736-0159 FiatWasher.349x .879x .063 2 32 756-04035
9 731-04127 LowerChute 1 33 784-0434
10 731-04353 ChuteRing 1 34 790-00075
11 731-2636A ChuteAdapter5" Dia. 1 35 618-04293
12 732-04111 ChuteAdjustmentSpring 1 36 684-04113
13 712-04064 FlangeLockNut1/4-20 5 37 684-04114
14 731-2643 Clean-outTool 1 38 684-04165
15 731-2635 Clean-outToolMount 1 39 714-04040
16 725-0157 CableTie 1 40 731-04870
17 710-0134 CarriageScrew1/4-20x 0.62" 5 41 736-0351
18 710-0520 HexBolt3/8-16x 1.50" 1 42 738-04124A
19 710-0604A ABScrew5/16-18x.625 4 43 741-0493A
20 712-04063 FlangeLockNut,5/16-18 10 44 790-00087A
21 712-04065 FlangeLockNut,3/8-16 1 45 790-00120
22 712-0266 HexLockNut3/8-16 1 46 784-5580
23 715-04020 Spiral Pin 2 47 746-04246
24 726-04012 PushOnNut 2 48 736-0258
25 731-04218B Impeller 1
26 732-0611 ExtensionSpring 1
27 736-0174 WaveWasher 1
ShoulderScrew3/8-16 1
Hex FlangeBearing 2
BallBearing 1
Spacer 1
FlatIdler 1
AugerIdler Bracket 1
BearingHousing 1
AugerGearboxAssembly 1
AugerAssembly- LH 2
AugerAssembly- RH 2
AugerHousing,24" 1
BowTieCotterPin72 4
Spacer,1.25x.75x 1.00 4
FlatWasher 2
ShearPin,.25x 1.50 4
FlangeBushing 8
HexBearingHousing 2
ShavePlate2.25x23.66 LG 1
SkidShoe 2
AugerCable 1
FlatWasher 1
For parts and/or
accessories
please call
1-800-800-7310,or
1-330-220-4683.
www.mtdproducts.com
19
Page 20

Model Series 3DD
i i
[]
[]
2O
Page 21

1 710-0449 CarriageScrew5/16-18x2.25" 2
2 710-0106 HexScrew1/4-20x 1.25" 2
3 710-1260A Screw,5/16-18x .75" 4
4 712-04064 FlangeLockNut 1/4-20 2
5 720-0284 Lock NutKnob5/16-18 2
6 725-0157 CableTie 3
7 746-04256 DriveCable
8 746-04246 AugerCable
9 711-04478 PivotRod
10 747-04405 DriveControl
11 749-04147 LowerHandle
12 749-04236 UpperHandle 1
13 790-00053 HandleTab 2
14 618-04296 TransmissionAssembly 1
15 710-0604A ABScrew5/16-18x.625 4
16 710-0809 Screw,1/4-20x 1.25" 2
17 711-1364 ClevisPin
18 714-0115 CotterPin,1/8x 1.0
19 714-04040 BowTie CotterPin72
20 715-0249 RollPin
21 717-04066 Pinion14T
22 717-04073A Gear70T 1
23 732-0409 ExtensionSpring 1
24 736-0192 FiatWasher 2
25 738-04184 ShoulderScrew1/4-20 1
26 738-0924 CarriageScrew1/4-28 1
27 741-0245 HexFlangeBearing 2
28 741-04108 HexFlangeBearing 2
29 756-0625 CableRoller 1
30 784-0419B DriveHousingFrame 1
31 790-00223 AugerCableBracket 1
32 790-00224 AugerCableAdj.Bracket 1
33 634-0232A WheelAssblySnowHogGray 2
34 710-0627 LockBolt5/16-24x0.75" 5
35 736-0242 BellWasher 2
36 738-1231 Axle 1
37 710-0224 HexScrew,#10-16x.500 1
38 710-0654A TTSemsScrew3/8-16x 1.0" 4
39 710-0696 HexBolt3/8-24x 0.875" 1
40 710-1245B LockBolt5/16-24x0.875" 1
41 731-05364 BeltCover 1
42 736-0247 FlatWasher,.4061Dx 1.250D 1
43 736-0505 FiatWasher,.341Dx 1.500D 1
44 748-04067 Pulley:Adapter,.75Dia. 1
45 748-0234 ShoulderSpacer 1
1
46 750-04568 ShoulderSpacer 1
1
47 754-04102 V-Belt,3Lx 25.00LG 1
1
48 754-04014 V-Belt,3/8 x 26.680Lg. 1
1
49 756-04024 Auger Pulley 1
50 756-0569 PulleyHalf 2
51 710-0456 Screw,#10-16x.500 1
52 790-00064 HeatShield 1
53 710-1667A Screw#10-16 3
54 731-05358 SpeedSelectorHousing- Lwr 1
1
55 731-05359 SpeedSelectorHousing- Upr 1
2
56 731-05360 SpeedSelectorHousing-Lever 1
2
57 732-0627 6 SpeedShiftLeverSpring 1
1
58 746-04244 SpeedControlCable 1
59 710-04329 Screw.159x.610 2
1
60 736-3092 FiatWasher.265x1.0x .030 2
61 782-7596A 6-SpeedControlArm 1
62 790-00234 ActuatorMountingBracket 1
63 790-00235 DriveWheel IdlerBracket 1
64 656-0613 Multi-SpeedPulleyAssembly 1
65 682-7527 6 SpeedAssemblyCup 1
66 741-0545 BallBearing 1
67 756-0613 PulleyHalf 1
68 756-0612A DrivePulleyHalf 1
69 684-04168 IdlerPulleyAssembly 2
70 747-04394 AugerControlBail 1
71 736-0451 SaddleWasher 2
72 736-0232 WaveWasher.531x .781x .013 1
73 750-04571 ShoulderSpacer.60x.790x.538 2
74 710-1652 Screw,1/4-20x 1.25" 1
75 753-05426 PressureLimitingValveKit
PartList:
Stage
lOW
Thrower
For parts and/or
accessories
please call
1-800-800-7310,or
1-330-220-4683.
www.mtdproducts.com
21
Page 22

For parts and/or
accessories
please call
1-800-800-7310,or
1-330-220-4683.
www.mtdproducts.com
22
Page 23

iii!iiiii _ i!il _ i
NOTES:
Use this page to make
notes and write down
For parts and/or
accessories
please call
1-800-800-7310,or
1-330-220-4683.
www.mtdproducts.com
23
Page 24

MANUFACTURER'S LiMiTED WARRANTY FOR
Thelimitedwarrantysetforthbelowisgivenby MTDLLCwithrespectto
newmerchandisepurchasedandusedin the UnitedStates,itsposses-
sionsandterritories.
"MTD"warrantsthisproductagainstdefectsin materialandworkmanship
fora periodof two(2) yearscommencingonthedateoforiginalpurchase
andwill,atits option,repairor replace,freeofcharge,anypartfoundto
bedefectiveinmaterialsorworkmanship.Thislimitedwarrantyshallonly
applyif this producthasbeenoperatedandmaintainedinaccordance
withtheOperator'sManualfurnishedwiththeproduct,andhasnotbeen
subjectto misuse,abuse,commercialuse,neglect,accident,improper
maintenance,alteration,vandalism,theft,fire,water,ordamagebecause
ofotherperilor naturaldisaster.Damageresultingfromthe installationor
useof anypart,accessoryorattachmentnotapprovedbyMTDforuse
withtheproduct(s)coveredbythis manualwillvoidyourwarrantyasto
anyresultingdamage.
Normalwearpartsarewarrantedto befreefromdefectsinmaterialand
workmanshipfora periodof thirty(30)daysfromthe dateof purchase.
Normalwearpartsinclude,butare notlimitedto itemssuchas: batteries,
belts,blades,bladeadapters,grassbags,riderdeckwheels,seats,snow
throwerskidshoes,shaveplates,augerspiralrubberandtires.
HOW TO OBTAIN SERVICE: Warrantyservice isavailable,WITH
PROOFOF PURCHASE, throughyour localauthorized service
dealer.To locate the dealer in your area, check yourYellowPages,or
contact MTD LLC at RO. Box 361131,Cleveland,Ohio 44136-0019,or
call 1-800-800-7310or 1-330-220-4683or log on to ourWeb site at
www.mtdproducts.com.
Thislimitedwarrantydoesnot providecoverageinthefollowingcases:
a. Theengineor componentpartsthereof.Theseitemsmaycarrya
separatemanufacturer'swarranty.Refertoapplicablemanufacturer's
warrantyfortermsandconditions.
b. Logsplitterpumps,valves,andcylindershavea separateoneyear
warranty.
c. Routinemaintenanceitemssuchaslubricants,filters,blade
sharpening,tune-ups,brakeadjustments,clutchadjustments,deck
adjustments,andnormaldeteriorationof theexteriorfinishdueto use
orexposure.
d. Servicecompletedbysomeoneotherthananauthorizedservice
dealer.
e. MTDdoesnotextendanywarrantyforproductssoldor exported
outsideofthe UnitedStates,itspossessionsandterritories,except
thosesoldthroughMTD'sauthorizedchannelsofexportdistribution.
f. ReplacementpartsthatarenotgenuineMTDparts.
g. Transportationchargesandservicecalls.
No impliedwarranty,includinganyimpliedwarranty of merchant-
ability of fitness for aparticularpurpose,applies after the applicable
periodof expresswritten warranty above as to the partsas identi-
fied. Noother expresswarranty, whether written or oral, exceptas
mentionedabove,givenby any personor entity,includinga dealer
or retailer,with respect to anyproduct,shallbind MTD.Duringthe
periodof the warranty, the exclusiveremedyisrepairor replacement
of the productassetforth above.
Theprovisionsas set forth inthis warranty providethe sole and
exclusive remedyarising from the sale.MTDshall not be liable
for incidentalorconsequential loss or damageincluding,without
limitation, expensesincurredfor substitute or replacementlawncare
services or for rentalexpensesto temporarily replaceawarranted
product.
Somestatesdo not allowtheexclusionorlimitationofincidentalor
consequentialdamages,or limitationson howlonganimpliedwarranty
lasts,sothe aboveexclusionsor limitationsmaynotapplyto you.
Innoeventshall recoveryof anykind begreaterthantheamountof the
purchasepriceof theproductsold.Alterationof safetyfeatures of the
productshall void this warranty. Youassumetheriskandliabilityfor
loss,damage,orinjurytoyouandyourpropertyand/ortoothersandtheir
propertyarisingout ofthe misuseorinabilityto usetheproduct.
Thislimitedwarrantyshallnotextendto anyoneotherthantheoriginal
purchaseror tothe personforwhomitwaspurchasedasa gift.
HOWSTATELAWRELATESTOTHISWARRANTY: Thislimitedwar-
rantygivesyouspecificlegalrights,andyoumayalsohaveotherrights
whichvaryfromstateto state.
IMPORTANT:OwnermustpresentOriginalProofofPurchasetoobtain
warrantycoverage.
MTD LLC, P.O. BOX 361131 CLEVELAND, OHIO 44136-0019; Phone: 1-800-800-7310, 1-330-220-4683
 Loading...