

MTD 31AS3CAD799 Owner’s Manual
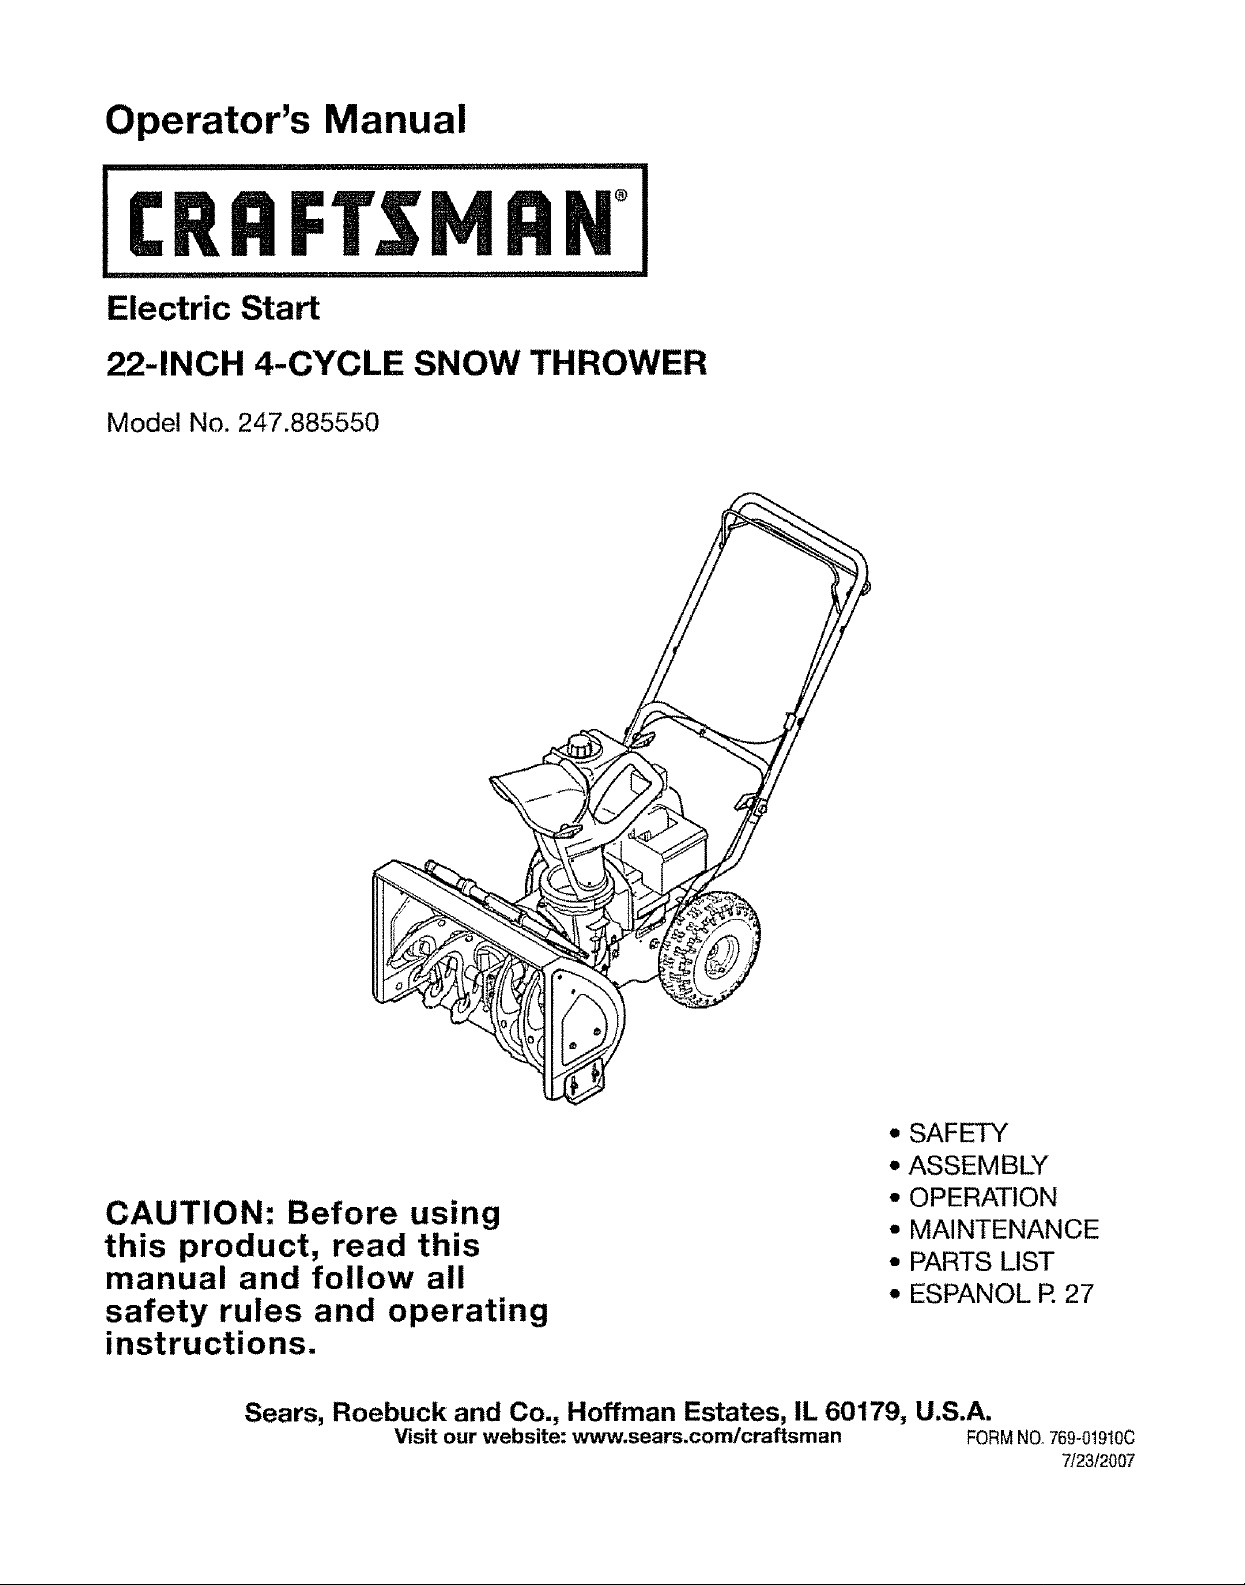
Operator's Manual
®
Electric Start
22-INCH 4-CYCLE SNOW THROWER
Model No. 247.885550
CAUTION: Before using
this product, read this
manual and follow all
safety rules and operating
instructions.
Sears, Roebuck and Co., Hoffman Estates, IL 60179, U.S.A.
Visit our website: www.sears.com/craftsman FORMNO,,769-0t910C
• SAFETY
• ASSEMBLY
• OPERATION
• MAINTENANCE
• PARTS LIST
• ESPANOL P. 27
7/23/2007

WarrantyStatement.........................................................................Page2
SafetyLabels.......................................................................................Page3
RulesofSafeOperation...........................................................Pages4-5
SetUp&Adjustment......................................................Pages6-7
KnowYourSnowThrower............................................Pages8-9
Maintenance and Service ..........................................................Pages 12-15
Off Season Storage & Troubleshooting ...............Page 16-17
Parts List .....................................................................Pages 18-25
EspaEol ............................................................................Page 27
Service Numbers ......................................................................Back Cover
Operation..............................................................................Pages10-11
Two-YearWarrantyonCraftsmanSnowThrower
Fortwoyearsfromthedateof purchase,whenthisCraftsmanSnowThrowerismaintained,fubricatedandtunedupaccordingtotheinstructions
intheowner'smanual,Searswirlrepair,freeofcharge,anydefectinmaterialandworkmanship.IfthisCraftsmansnowthrowerisusedfor
commercialor rentalpurposes,thiswarrantyappliesforonly30daysfromthedateofpurchase..
Thiswarrantydoesnotcover:.
• Expendableitemswhichbecomewornduringnormaluse,suchas skidshoes,shaveplateandsparkplugs.
• Repairsnecessarybecauseof operatorabuseornegligence,includingbentcrankshaftsandthefailureto maintaintheequipmentaccording
totheinstructionscontainedintheowner'smanual.
WARRANTYSERVICEISAVAILABLEBYRETURNINGTHECRAFTSMANSNOWTHROWERTOTHENEAREST
SEARSPARTS& REPAIRCENTERiNTHEUNITEDSTATES..
ThiswarrantyappliesonlywhilethisproductisinuseintheUnitedStates
TOLOCATETHENEARESTSEARSPARTS&REPAIRCENTERORTOSCHEDULESERVICE,
SIMPLYCONTACTSEARSAT1-800-4-MY-HOME®
ThiswarrantygivesyouspecificIegalrightsandyoumayalsohaveotherrightswhichmayvaryfromstatetostate
SEARS,ROEBUCKANDCO.,D/817WA,HOFFMANESTATES,IL 60179
RepairProtectionAgreements
CongratulationsonmakingasmartpurchaseYournewCraftsman®
productis designedandmanufacturedforyearsofdependableopera-
tion.Butlikeallproducts,itmayrequirerepairfromtimetotime.That's
whenhavinga RepairProtectionAgreementcan saveyoumoneyand
aggravation
Here'swhat'sincludedintheAgreement:
, Expertserviceby our12,000professionalrepairspecialists
, Unlimitedserviceandnochargeforpartsandlaboronallcovered
repairs
• Productreplacementifyourcoveredproductcan'tbefixed
, Discountof 10%fromregularpriceofserviceandservice-related
partsnotcoveredbytheagreement;also,10%offregularpriceof
preventivemaintenancecheck
• Fasthelpbyphone- phonesupportfromaSearstechnicianon
productsrequiringin-homerepair,plusconvenientrepair
scheduling
Engine Oil:
Fue!:
Spark Plug:
Engine:
SAE 5W-30
Unleaded Gasoline
Champion® RJ19LM
Tecumseh LH195SP
Purchasea RepairProtectionAgreementnowandprotectyourself
fromunexpectedhassleandexpense
OnceyoupurchasetheAgreement,a simprephonecall isalfthatit
takesforyouto scheduleserviceYoucancallanytimedayornight,or
scheduleaserviceappointmentonline.
Searshasover12,000professionalrepairspecialists,whohave
accessto over4 5millionqualitypartsandaccessoriesThat'sthe
kindof
professionalismyoucancountontohelpprolongthelifeofyournew
purchaseforyearstocome.PurchaseyourRepairProtectionAgree-
menttodayt
Somelimitations andexclusionsapply,Forprices andadditional
informationcall1-800-827-6655,
SearsInstallationService
ForSearsprofessionalinsta!lationofhomeappliances,garagedoor
openers,waterheaters,andothermajorhomeitems,intheUSA. call
I_800-4-MY-HOME@
Record the model number, serial number
and date of purchase above
I I
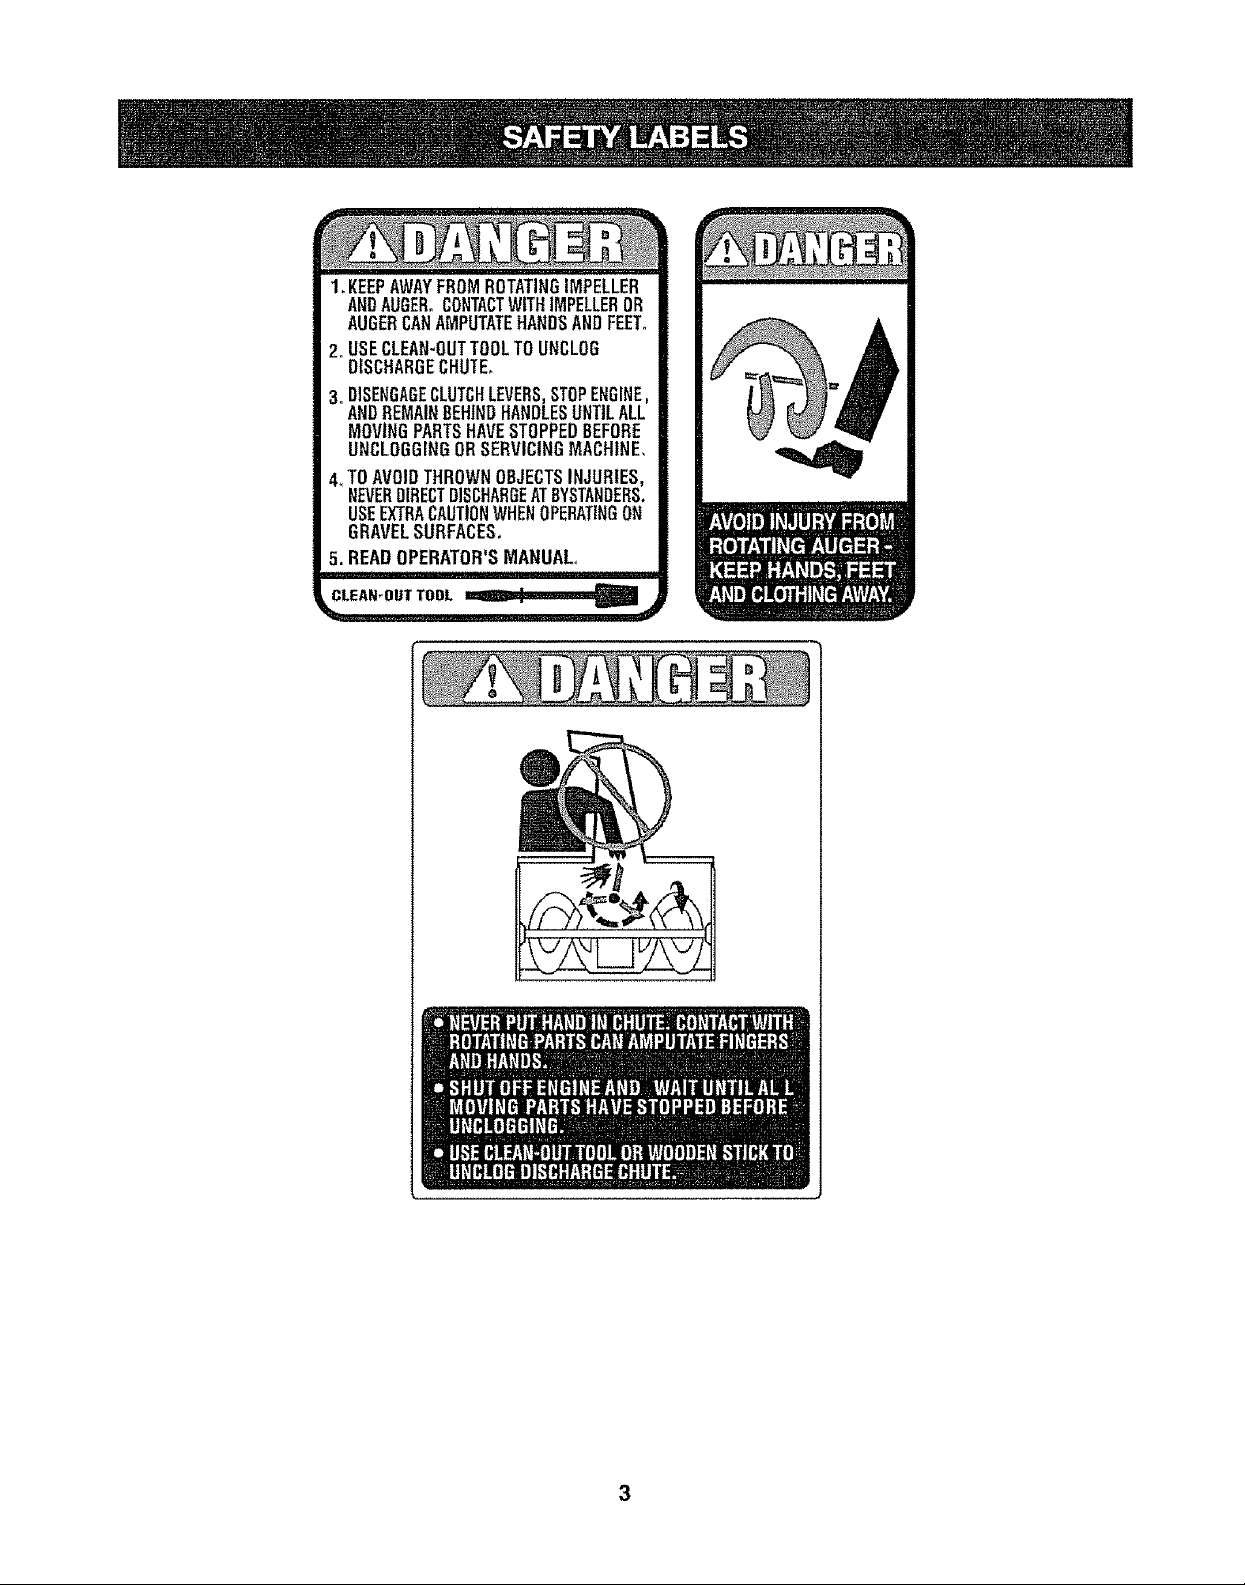
1.KEEPAWAYFROMROTATINGIMPELLER
ANDAUGER°CONTACTWITHIMPELLEROR
AUGERCANAMPUTATEHANDSANDFEET.
2. USECLEAN-OUTTOOLTOUNCLOG
DISCHARGECHUTE.
3. DISENGAGECLUTCHLEVERS,STOPENGINE,
ANDREMAINBEHINDHANDLESUNTILALL
MOVINGPARTSHAVESTOPPEDBEFORE
UNCLOGGINGORSERVICINGMACHINE.
4_TOAVOIDTHROWNOBJECTSINJURIES,
NEVERDIRECTDISCHARGEATBYSTANDERS.
USEEXTRACAUTIONWHENOPERATINGON
GRAVELSURFACES.
5. READOPERATOR'SMANUAL.,
CLEAN-OUTTOOL
lIIj Igr.llhl_ _l+:_!ql_I_IH:I_+;'_
Ii_ii_]H I1.,1,1t.lI_Iitii -_i!_']_II_I!!:|_I[i]liII|i]i]IIJ};Ir_!Jt]t]t]_I_I_ii[_]_'IIIII

which,ifnotfollowed,couldendangerthepersonal
_IL Thissymbolpointsoutimportantsafetyinstructions
safetyand/orpropertyofyourselfandothers Read
andfollowallinstructionsinthismanualbefore
attemptingtooperatethismachineFailuretocomplywiththese
instructionsmayresultinpersonalinjuryWhenyouseethissymbol,
HEED ITSWARNING!
Thismachinewasbuilttobeoperatedaccordingto the rulesfor
safeoperationinthismanualAswithanytypeof powerequipment,
carelessnessorerroronthepartoftheoperatorcanresufIinserious
injury,Thismachineis capableof amputatinghandsandfeetand
throwingobjectsFailuretoobservethefollowingsafetyinstructions
couldresultinseriousinjuryordeath
YourResponsibility: Restricttheuseofthispowermachineto
personswhoread,understand,andfollowthewarningsandinstruc-
tionsinthismanualandonthemachine
TRAINING
• Road, understand, and follow air instruclionsonthe machine and in
the manual(s) before attempting to assembfe and operate Keep this
manual in a safe place for future and regular reference and for ordering
replacementparts
• Be familiar with afl controls andtheir proper operation Know how to stop
the machine and disengage them quickly
• Never atlow children under t4 years old to operate this machine Chi!-
dren 14years old and over should read and understand the operation
instruclions and safety rules in lhis manual and should be trained and
supervised by aparent
• Never allowadults to operate this machine withoutproper instruction
• Thrown objects cancause serious personalinjury Planyour snow°
Ihrowing pattern to avoid discharge of material toward roads, byslanders
and thelike
" Keep bystanders, helpers, pets and children atleast 75 feet from the
machine while itis in operation, Stop machine if anyone enters the area
• Exercise caution to avoid slipping or falling, especially when operating in
reverse
EngineExhaust,someof itsconstituents,andcertainvehicle
componentscontainoremil chemicalsknowntoStateofCaliforniato
Icausecancerandbirthdefectsorolherreproductiveharm
PREPARATION
Thoroughly inspect the area wherethe equipment istobe used Removeall
doormats, newspapers,sleds, boards, wires and other foreign objects, which
could betrippedover or thrownby the augeriimpeller
• Always wear safety glasses oreyeshieldsduring operation andwhiEe
performing an adjuslmenl or repair to protect your eyes Thrown obiects
which ricochet can cause serious injurytotheeyes
• Donot operate withoutwearingadequate winlerouter garments Do not
wearjewelry, Iongscarves or other loose clothing,whichcould become
entangledinmoving pads Wear 'footwearwhichwill improvefooling on
slippery surfaces
,, Use a grounded three-wire extension cord and receptacle for all units
withelectric start engines
• Adjust collectorhousing height to clear gravel or crushed rocksurfaces,
• Disengage all control 1oversbefore starling the engine
• Neverattempt to make any adjustmentswhile engine isrunning, except
where specifically recommendedin the operalor's manual
• Letengine andmachine adjust to outdoor temperature before starling to
cleer SNOW,
Safe Handling of Gasoline
To avoid personal injury or property damage use extremecare in handling
gasoline Gasoline is extremely flammable and thevapors are explosive
Sedeus personal injury can occur whengasoline is spilled on yourself or your
clothes, whichcanignile Wash your skin and change clothes immediately
• Useonty an approved gasoline container
• Exlinguish sit cigarettes,cigars, pipes and other sources ofignilion
• Neverfuel machine indoors
• Neverremove gas cap or add fuel whilethe engine is hot or running
• Allow engine to coolatleast two minutes before refueling
• Neverover fltlfuel tank Fitltank to no more than _hinch below bottom of
filter neck to provide space for fuel expansion
• Replace gasoline cap andtighten securely
• Ifgasoline is spiIled,wipe it off the engine and equipment, Move
machine to another area Wail 5 minutes before starting the engine
• Neverstore the machine OFfuel containerinside where there is an open
flame, spark or pilot light (e g furnace, water heater, space heater,
clothes dryer ere,r),,
• Allow machine to cool atleast 5 minutes before storing
4

OPERATION
" Do not putbands orfeet near rotating parts,in the auger!impeller
housing or chute assembly Contact wilb the rotatingparts can amputate
hands and feet.
• The augedimpeUer control lever is a safety device Never bypass its
operetion_Doingso makes the machine unsafe and may cause personal
injury
• The control levers must operate easily in both directionsand automatl-
calty return to the disengaged position whenreleased
• Never operatewith a missing or damaged chute assembly Keep all
safety devices in place and working
• Never run an engineindoorsor in a poorlyvenlitated area Engine
exhaustcontains carbon monoxide, an odorless anddeadly gas
,, Do not operate machine while under the influence of a!eohol or drugs
• Muffler and engine become hot andcan cause a bum Do nat touch
. Exercise extremecaution when operatingonor crossing gravel surfaces
Stay alert for hidden hazards or traffic
,, Exercise cautionwhen changing direction and whiteoperatingon slopes
• Ran your snow-throwing patternto avoiddischarge towards windows,
wails, cars eta Thus, avoiding possible propertydamage or personal
injury caused by a ricochet
• Never direct discharge at children, bystanders and pets or allow anyone
infront ofthe machine
• Do not evedoad machine capacity by attempting to clear snow attoo fast
of a rate.
• Never operate thismachine withoutgood visibility or light Always be
sure of your footing and keep a firm hold on the handles Walk, never
tun,
• Disengage powerto the augedimpeller when transporting or not inuse
,, Never operate machine at high transport speeds on slipper] surfaces
Look down and behind and use care when backing up
• If the machine should start to vibrate abnormally, slop the engine.
disconnect the spark plugwire end ground itagainst the engine Inspect
theroughfyfordamage Repair any damage before starting and operat-
ing
• Disengage all control levers and stop enginebefore you Ieave the
operating position(behind the handles) Wait until the auger/impel}or
comes to a cempiete stop before unclogging the chuteassembly,making
any adjustments, or inspections
,, Never put your hand in the discharge orcollector openings, Always
use the clean-outtoolprevldedtounclog the discharge opening Do
not unclog chute assembly while engine is running Shut off engine
and remain behind handles until ell moving parts have stepped before
unclogging
• Use only attachments and accessories approved by 1hemanufacturer
(e g whoa!weights, tire chains, cabs etc )
• ffsituafions occur which are not covered inthis manual, use care and
good judgment Conlact your Sears Service Center for assistance_
MAINTENANCE & STORAGE
• Never tamper withsafety devices Check theirproperoperation
regufarly Refertothe maintenance end adjustment sections ofthis
manual
• Before cleaning, repairing, or inspecting machine disengage all control
levers and stop the engine Wait until the auger_mpeller cometoa
complete stop Disconnect the spark plug wire and ground against the
engine to prevent unintended starting
• Check bo_tsand screws for propertightness at frequent intervalsto keep
the machine insafe workingcondition Also, visually inspectmachine for
any damage
. Donotchange the engine governor setting or over-speed the engine
The governorcontrolsthe maximumsafe operating speed ofthe engine
• Snow thrower shave plates and skid shoes are subject to wear and
damage For your safety protection, frequentlycheck al!components
end replace with original equipmenlmanufacturer's (OEM) parts only
"Use of partswhich do not meet the origina! equipment specifications
may lead toimproper performanceand compromise safety!"
• Check controls periodically to verify they engage and disengage
properlyand adjust, if necessary Refer to the adjustment section inth;s
operators manual for instructions
• Maintain or replace salety and instruction labels, as necessary
,, Observe proper disposal laws and regulations for gas, oil, etc to protest
the environment
• Pdor to storing, run machine a few minutes to clear snow from machine
and prevent freeze up of auger/impeller
• Never store the machine orfuelcontainer inside where there is an open
flame, spark or pilol fight suchas a waterheater,furnace,clothes dryer
etc
• Always refertotheoperalor's manual for proper instructions on
off-season storage
Do not modify engine
Toavoidseriousinjuryordeath,donotmodifyengineinanywayTampering
withthegovernorsettingcanleadtoa runawayengineandcauseittooperate
atunsafespeedsNevertamperwithfactoryself!rigofenginegovernor
Notice Regarding Emissions
Engines which erecertifiedtocomply with Cafilornia and federal EPAemission
regulations forSORE (Small Off Road Equipment) are certified to operate on
reguiarunleadedgasoline, and mayincludethefollowing emission controlsys-
tems: Engine Modification (EM) and Throe WayCatalysl (TWC)i! so equipped
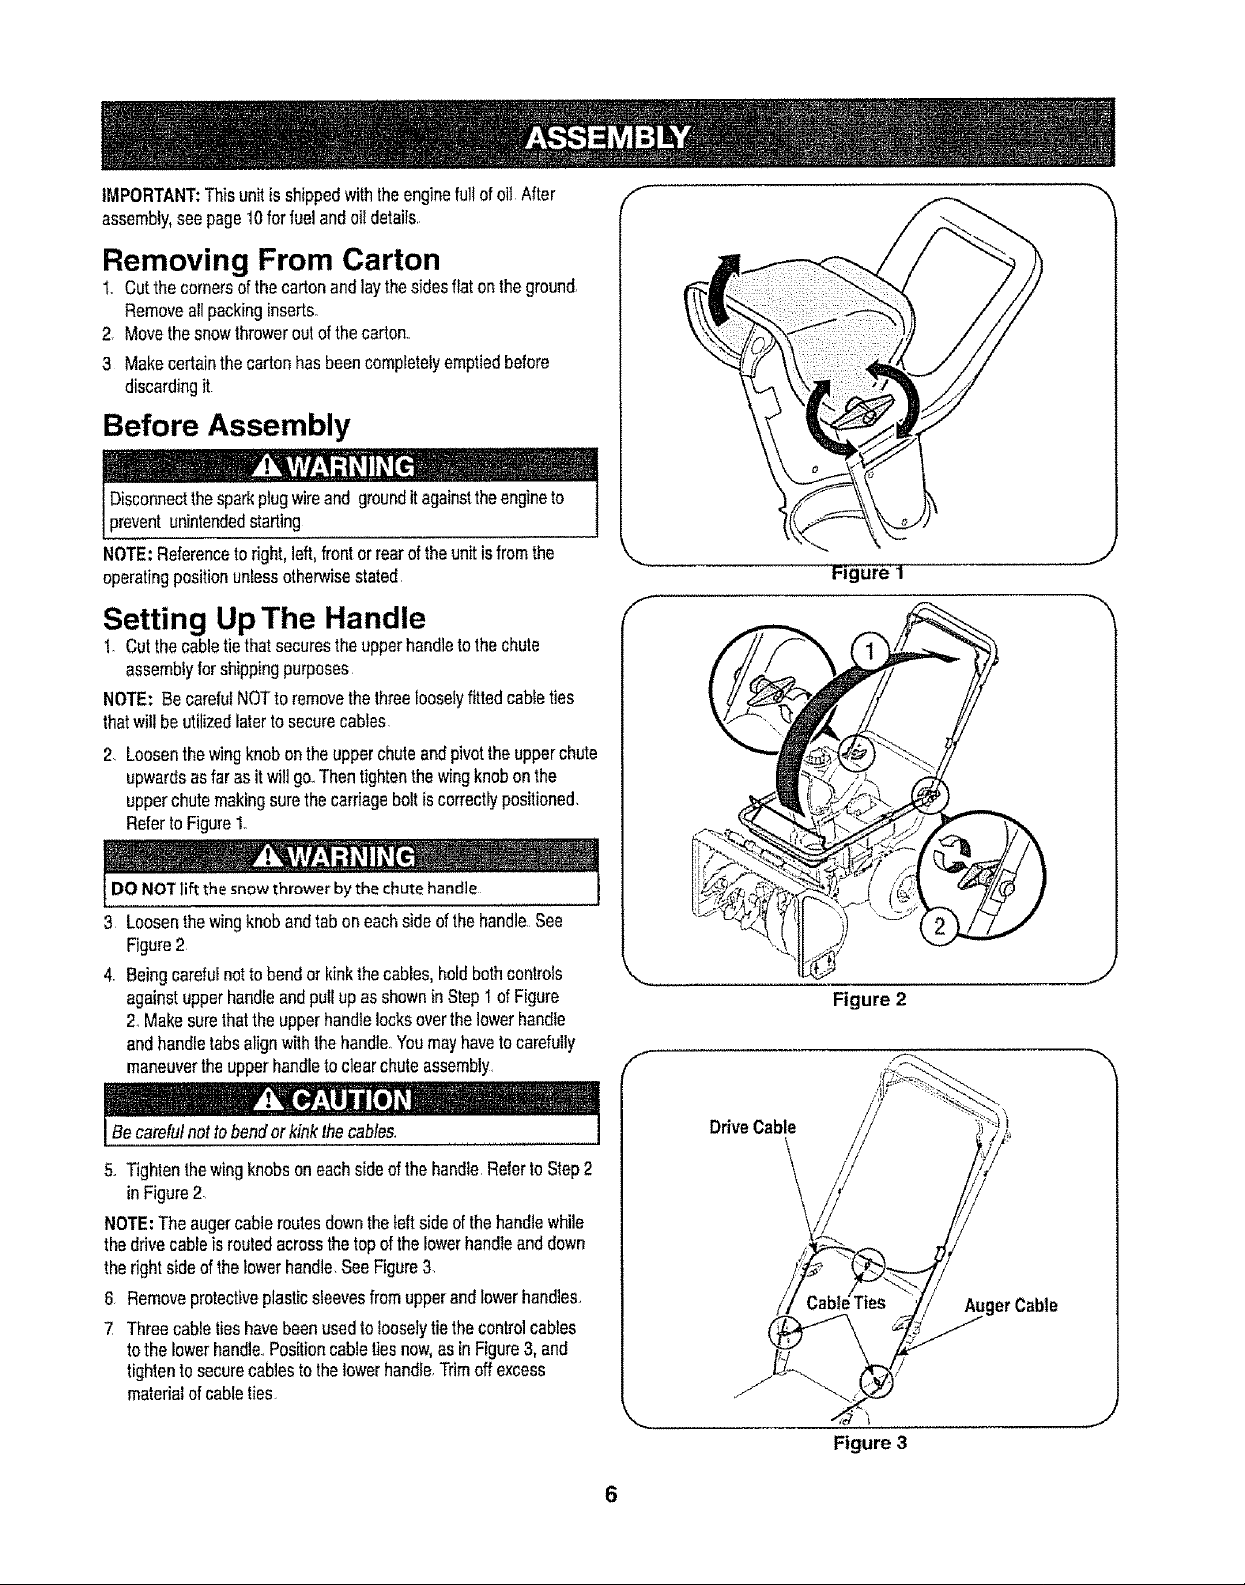
IMPORTANT:Thisunitisshippedwiththeenginefullofoft After
assembly,seepage10forfuelandoildetails
Removing From Carton
t.. Cutthe cornersof thecartonandlaythesidesflatontheground
Removeallpackinginserts.
2 Movethe snowthroweroutofthecarton_
3 Makecertainthecartonhasbeencompletelyemptiedbefore
discardingit
Before Assembly
'';1Ill
Disconnectthesparkplugwireand grounditagainsttheengineto
preventunintendedstarting J
NOTE;Referencetoright,left,frontorrearoftheunitisfromthe
operatingpositionunlessotherwisestated
Setting Up The Handle
1_Cutthecabletiethatsecurestheupperhandletothechute
assemblyforshippingpurposes
NOTE:BecarefuINOTtoremovethethreelooselyfittedcableties
thatwillbeutilizedlatertosecurecables
2. Loosenthewingknobontheupperchuteandpivottheupperchute
upwardsasfarasitwiltgo_Thentightenthewingknobonthe
upperchutemakingsurethecarriageboltiscorrectlypositioned.
Referto Figure1.
Figure i
f
DO NOTlift thesnowthrowerby thechutehandle
3 Loosenthewingknobandtaboneachsideof thehandle.See
Figure2
4. Beingcarefulnottobendorkinkthecables,holdbothcontrols
againstupperhandleandpullupasshowninStept ofFigure
2.Makesurethattheupperhandlelocksoverthelowerhandle
andhandletabsalignwiththe handle.Youmayhavetocarefully
maneuvertheupperhandletoclearchuteassembly.
Becarefulnottobendorkinkthecables.
5. TightenthewingknobsoneachsideofthehandleRefertoStep2
in Figure2
NOTE:Theaugercableroutesclowntheleftsideofthehandlewhile
thedrivecableisroutedacrossthetopofthelowerhandleanddown
therightsideof thelowerhandleSeeFigure3
6 Removeprotectiveplasticsleevesfromupperandlowerhandles.
7 Threecabletieshavebeenusedtolooselytiethecontrolcables
tothelowerhandle..Positioncabletiesnow,asinFigure3,and
tightento securecablestothelowerhandle.Trimoffexcess
materialofcableties.
Figure 2
f
Drive Cable
erCable
J
Figure 3

J
/
/
/
Figure 4
\
Position
Skid Shoe
Thespacebetweentheshaveplateandthegroundcanbeadjusted.Refer
toFigure5onpage8forlocationofshaveplateandskidshoes.Forclose
snowremoval,placeskidshoesinlowpositionWhenareatobeclearedis
uneven,placeskidshoesinthemiddleorhighposition_SeeFigure4
NOTE:Operationof thissnowthrowerongravelisnotrecommendedas
loosegravelcanbeeasilypickedupandthrownbytheaugercausing
personalinjuryordamagetothesnowthrowerIfyouhavetooperateit
ongravel,keepskidshoein highestpositionfor maximumclearance.
1. Adjustskidshoesbylooseningtwonutsandcaniageboltsoneach
skidshoe,andmovingskidshoetothedesiredposition,SeeFigure4.
2. Makecertaintheentirebottomsurfaceof skidshoeisagainstthe
groundtoavoidunevenwearontheskidshoes
3 Tightennutsandboltssecurely.
Auger Control Test
IMPORTANT:Performthefollowingtestbeforeoperatingthesnow
throwerforthefirsttimeandatthestartofeachwinterseason.
Checktheadjustmentof theaugercontrolasfollows:
I Whenaugercontrolisreleasedandinthedisengaged"up"posi-
tion,cableshouldhaveverylittleslack,but shouldNOTbetight
Donotover4ightenthecable.Over-tighteningmaypreventtheauger
fromdisengagingandcompromisethe safetyofthesnowthrower.
2 Inawell-ventilatedarea,startthesnowthrowerengineasin-
structedonpage10undertheheadingStartingEngineMakesure
thethrottleissetintheFAST position..
3. Whilestandinginoperator'sposition(behindunit)engageauger.
4. Allowaugertoremainengagedforapproximatelyten(10)seconds
beforereleasingtheaugercontrolRepeatthissevera!times
5 WiththeenginerunningintheFAST_ positionandtheauger
controlinthedisengaged"up"pesitionTwalktothefrontof the
machine
6 Confirmthattheaugerhascompletelystoppedrotatingandshows
NOsignsofmotion
IMPORTANT:IftheaugershowsANYsignsofrotating,immediatelyreturn
totheoperatorspositionandshutofftheengineWaitforatlmovingparis
tostopbeforereadiustingtheaugercontrolrableasshownonpage14.
Clean-Out Tool
Thistoolhasbeenfastenedwithacabletietotherearoftheaugerhousing
forshippingpurposesCutandremovecabletie
Final Adjustments
IMPORTANT:Checktheadjustmentsasinstructedandmakeany
finaladjustmentsnecessarybeforeoperatingtheunffCheckallnuts
andboltsfortightness.Failureto followlheseinstructionsmaycause
damagetounit..
Tire Pressure
Theproperinflationpressureis 20psi Checkthetirepressureperiodi-
rallyandmaintainequalpressureinbothtiresat alltimes.Excessive
pressure(wellabove20psi)maycausethewheel(tire/rim)assembly
toburstwithsufficientforceto causeseriousinjury..Donotover-inflate
thetire.Useamanualpumporportableelectrictireinflatortoprevent
over-inflation.NEVERUSEANAIRCOMPRESSOR.
7
f
Drive
Control
SkidShoe
Figure 5
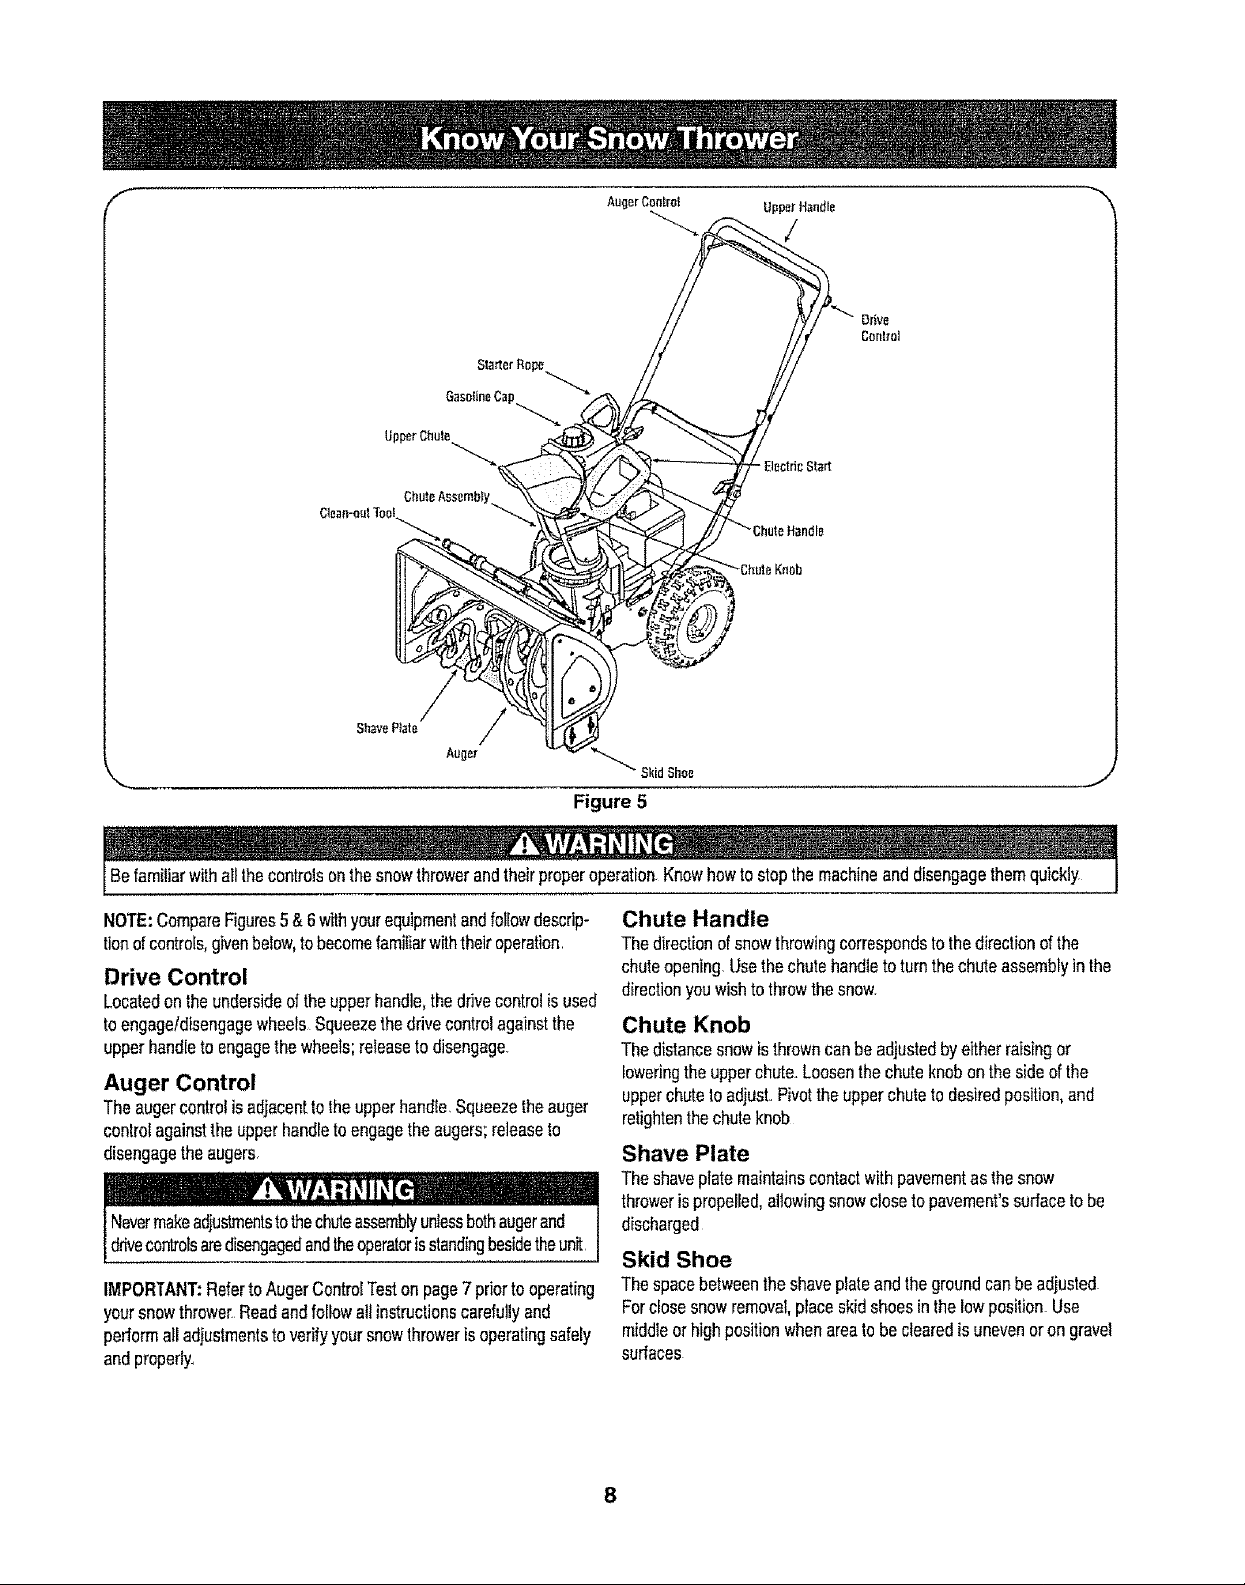
BefamiliarwithallthecontrolsonthesnowthrowerandtheirproperoperationKnowhowIDstopthemachineanddisengagethemquickly
NOTE:CompareFigures5 &6withyourequipmentandfollowdescrip-
tionofcontrols,givenbelow,tobecomefamiliarwiththeiroperation
Drive Control
Locatedontheundersideoftheupperhandle,thedrivecontrolisused
toengageldisengagewheelsSqueezethedrivecontrolagainstthe
upperhandletDengagethewheels;releasetodisengage.
Auger Control
Theaugercontrolisadjacenttotheupperhandle.Squeezetheauger
conlrolagainsttheupperhandletoengagetheaugers;releaseto
disengagetheaugers.
Chute Handle
ThedirectionofsnowthrowingcorrespDndstothedirectionofthe
chuteopening.Usethechutehandletoturnthechuteassembtyin the
directionyouwishtothrowthesnow.
Chute Knob
Thedistancesnowis throwncanbe adjustedbyeitherraisingor
[Dwedngtheupperchute.Loosenthe chuteknobonthesideofthe
upperchutetoadjust.PivottheupperchutetDdesiredposition,and
retightenthechuteknob
Shave Plate
Theshaveplatemaintainscontactwithpavementasthesnow
throweris propelled,allowingsnowclosetopavement'ssurfacetobe
discharged
Skid Shoe
IMPORTANT:RefertoAugerContrD!Testonpage7priortooperating
yoursnowthrDwe_Readandfollowall instructionscarefullyand
performalladjustmentstoverifyyoursnowthrowerisoperatingsafely
andpropedy_
Thespacebetweentheshaveplateandthegroundcanbeadjusted
Forclosesnowremoval,placeskidshoesinthelowposition.Use
middleorhighpositionwhenareatobeclearedisunevenorongravel
surfaces

Starter
Choke
Control Primer Starter
Threttie / Recoit
OilDrain
Figure6
Handle
Clean Out Tool
Thecleanouttool isprovidedto unclogthedischargeopening.Donot
unclogdischargechutewh{leengineisrunning
Recoil Starter & Starter Handle
Thismotoris fittedwitharecoilactionpullstartandamittengrip
handleforeasyaccesswhileweadngglovesor mittens
Ignition Key
Theignitionkeyisnecessaryfortheengineto start Insertkeyand
snapinplace;donotturnitto start/stoptheunit.Removekeywhen
theunitisnotinuse.
Electric Starter Button
Pressingtheelectricstarterbuttonengagestheengine'setectric
starterwhenpluggedintoa 120Vpowersource.
Electric Starter Outlet
Requirestheuseofathree-prongoutdoorextensioncord(included)
anda 120Vpowersource/walloutlet
Primer
Depressingprimerforcesfueldirectlyintoengine'scarburetorto
aidincold-weatherstarting.Refertothestartinginstructionsinthe
Operationsectionofthismanualfor properprimerusageTheimage
belowleft,correspondswiththelabelontheengineidentifyingthe
primer..
Oil Fill
Removeoilcaptoaddoil Refertopage14forcheckingandadding
0ilinstructions.
Beforeunclogging,shutoffengineandremainbehindhandlesuntil
allmovingpartshavestoppedcompletelyNeverputyourhandinthe
dschargeorcolectoropenings.Alwaysusetheclean-outtoolprovided..
Choke Control
Activatingchokecontrolbyturningitallthewaytotherightclosesthe
chokeplateoncarburetorandaidsinstartingengine.Forinforma-
tiononchokeusage,seepage10ofthismanual..Theimageabove
correspondswiththelabelontheengineidentifyingtheChokecontrol
Off On
Gasoline Cap
Removegascaptoaddfuel.Unitrunsonregulargas.
NOTE:Thisunitmayincludeafuelplug,whichisonlyusedduring
assemblytokeepdirtanddebrisoutoffueltank Discardthefuelplug
beforefillingthefueltank.
Throttle Control
Thethrottlecontrolislocatedonthe engineitregulates
thespeedoftheengineandwiflshutofftheengine
whenpusheddowncompletelyThe imageto the
rightrepresentsthespeedsof thethrottlecontroland
correspondswiththelabelontheengineTheimages
belowillustratethedefinitionofeachsymbol
Start/Run/ Slow/Idle Engine Off
Fast

Before Starting Engine
Engine Oil
Theengineisshippedwithoilinit.Checktheo11levefbeforefirstuse.
Forsubsequenl_Fups,usethegradeofengineoilspecifiedonpage
14.Toaddoil:
1. Removethedipstickfromtheoilfill.,Pourfreshoilslowlythrough
theplug,Replacedipstick
2 CheckandmakesurethatthelevelofoilisuptotheFULLmarkon
thedipstick.
Gasoline
Gasolineisflammableandcautionmustbeusedwhenhandling
I orsloringit, Donotfillfueltankwhitethesnowthroweris running,
[whenitishotorwhenitis in anenclosedarea.
! - ,
I o anel trica I
L_moke duringfuek'ng I
1, Neverfillthefueltankcompletely.Fillthetanktonomorethan112
inchbeJowbottomoffillernecktoprovidespaceforexpansionoffuel
NOTE:Thisunitmayincludeafuetplug,whichis onlyusedduring
assemblytokeepdirtanddebrisoutoffueltanK,Discardthefuelplug
beforefillingthefueltank,
2, Alwaysuseclean,fresh,unleadedgradeautomotivegasolineFill
thefueltankoutdoorsanduseafunnelorspouttopreventspilling
Makesurethatthecontainerfromwhichyoupourthegasolineis
cleanandfreefromrustorotherforeignparticlesMakesureto
wipeoffanyspilledfuelbeforestartingtheengine,
3 Attheendofthejob,emptythefueltankif thesnowthrowerisnot
goingtobeusedfor30daysorlongerStoregasolinein aclean
containerandkeepthecapinplaceonthecontainer,
Neveruseengineorcarburetorcleanerproductsin thefueltank,
Starting Engine
line!! A ._ _L _ .... -
Besurenooneotherthantheoperatorisstandingnearthesnow
throwerwhilestartingoroperating°Donotoperatethissnowthrower
unassthechuteassemblyhasbeenproperlyinstalledandissecured
NOTE:Forlocationof alltheenginecontrolsreferredtointhissection,
refertoFigure6
Electric Starter
1,, Determinethatyourhome'swidngisa three-wiregroundedsystem,
AskaI]censedelecfdcianifyouarenotcertain.
Theoptionalelectricstarteris equippedwithagroundedthree-wire
_ewercordandplug,andisdesignedtooperateon120voltAC
householdcurrenLItmustbeusedwithaproperlygroundedthree_
prongreceptacleat alltimestoavoidthe possibilityofelectricshock
Ifyourhome'swiringsystemis notathree-wiregroundedsystem,
donotusethiselectricstarterunderanyconditions,Ifyourhome
electricalsystemisgrounded,butathree-holereceptacleisnot
available,do notuseyoursnowthrower'selectricstarterFollowall
instructionscarefullypriortooperatingthe electricstartez
youhaveagroundedthree-prongreceptacle,proceedasfollows:
1.,Plugtheextensioncordintotheoutletlocatedontheengine's
surface,,Plugtheotherendof extensioncordintoathree-prong
120-volt,grounded,ACoutletinawelFventilaledarea
2 Movethrottlecontrolto FAST
3, PushkeyintotheignitionslotsothatitsnapsintoplaceDonottumkey
4, RotatechokecontroltoFULL ],_1 chokeposition(foracolctStart)r.
NOTE:Iftheengineis alreadywarm,placechokecontrolintheOFF
(chokeknobturnedallthewaytoleft)positioninsteadof FULL!,#'1 ,
5 Pushtheprimertwoorthreetimesforcoldenginestart,making
suretocoverventholeinthecenteroftheprimerwhenpushing
NOTE:DONOTusepdmertorestartawarmengineafterashortshutdown
6, Pushstarterbuttontostartengine.
7 Oncetheenginestarts,releasestarterbutton
8. Astheenginewarms,slowlyrotate(left)thechokecontroltothe
OFFpositionIfthe enginefalters,quicklyrotatethechokecontrol
backtoFLILLI.,#1andthenslowlyintotheOFFpositionagain
9 Whendisconnectingtheextensioncord,alwaysunplugtheendat
thethree-prongwalloutletbeforeunpluggingtheoppositeendfrom
thesnowthrower,
position_
Recoil Starter
1,, Rotatechokecontrol(right)to FULL l.#l chokeposition(cold
enginestart)°
NOTE:{ftheengineis alreadywarm,placechokecontrolinthe OFF
(knobturnedaftthe waytotheleft)positioninsteadof FULLIJ(I
2., MovethrottlecontroltoFAST
3, PushkeyintotheignitionslotsothatitsnapsintoplaceDonottumkey
4_ Pushthe primertwoorthreetimesforcoldenginestart,making
suretocoverventholeinthecenteroftheprimerwhenpushing,
NOTE:DONOTuseprimertorestartawamlengineafterashortshutdown
NOTE:Additionalprimingmaybenecessaryifthetemperatureis
below15°Fahrenheit
5. Grasptherecoilstarterhandleandslowlypulltheropeout Atthe
pointwhereit becomesslightlyharderto pulltherope,slowlyallow
theropeto recoil,,
6 Pullthe starterhandlewithafirm,rapidstrokeDonotreleasethe
handleandallowitto snapback,Keepafirmholdonthestarter
handleandallowittoslowlyrecoil,,
position,
10

7, Astheenginewarms,slowlyrotate(left)thechokecontrolto the
OFFpositioniftheenginefalters,quicklyrotatethechokecontrol
backtotheFULL IJl positionandthenslowlyintotheOFF
positionagain
NOTE:Allowthe enginetowarmupforafewminutesafterstarting
Theenginewillnotdevelopfull poweruntilit reachesoperating
temperatures,
Before Stopping
1..Runengineforafewminutestohelpdryoffanymoistureonengine
2 Toavoidpossiblefreeze-upofthestarter,followthesesteps:
Recoil Starter
a Withtheenginerunning,pullthestarterropewitharapid,
continuousfull armstrokethreeorfourtimes
To Stop The Snow Thrower
1. Tostopthewheels,releasethedrivecontrol.
2 Tostopthrowingsnow,releasetheaugercontrol.
3. Toslopengine,pushthrottlecontrollevertoOFF_ andpullout
thekey Do notturnkey
........................... ,i
Thetemperatureofmufflerandthesurroundingareas y
t50°EAvoidtheseareas
Clearing The Snow
CAUTION:Checktheareatobeclearedforforeignobjects_Remove
foreignobjects,ifany
1 Starttheenginefollowingstartinginstructions.
2 Allowtheenginetowarmupfor afewminutesastheenginewill
notdevelopfull poweruntilitreachesoperatingtemperature.
3. Rotatethechuteassemblyto thedesireddirection,awayfrom
bystandersand/orbuildings
4 Makingcertainnobystandersorobstaclesareinfrontoftheunit,
squeezetheaugercontrolcompieletyagainsttheupperhandleto
fullyengagetheaugers.
5 Whiletheaugercontrolisengaged,squeezethedrivecontrol
completelyagainsttheupperhandletoengagethewheelsDonot
=feather"theddveconlrol_
6 Asthesnowthrowerstartstomove,maintainafirmholdonthe
handle,andguidethe snowthroweralongthepathtobecleared
7 Releasetheaugeranddrivecontrolstostopthesnowthrowing
actionandforwardmotion
NOTE:Yourunitisequippedwilhaclutchinthetransmission..If the
wheelsstopturningwhiletryingtodischargelargevolumesofsnow,
immediatelydisengagethe drivecontrolandallowtherotatingaugers
todischargesnowfromthehousing.Reducetheclearingwidthand
continueoperation.
8 Oneachsucceedingpass,readjustthechuteassemblytothe
desiredpositionandslightlyoverlapthepreviouslyclearedpath
Positioning Discharge Chute
Loosenthechuteknobandpivotupperchutetodesiredposition..Tighten
thechuteknobmakingsurethecarriageboltiscorrectlypositioned
Rotatechutehandletodesiredoperatingposition
Donot liftthesnowthroweratanytimebythechutehandle..
Operating Tips
1. Formostefficientsnowremoval,removesnowimmediatelyafteritfalls.
2.. DischargesnowdownwindwheneverpossibleSlightlyoverlap
eachpreviouspath
3 Settheskidshoes1/4"belowtheshaveplatefornormalusage
Theskidshoesmaybeadjustedupwardforhard-packedsnow.
NOTE:itis netrecommendedthatyouoperatethissnowthroweron
gravelasloosegravelcanbeeasilypickedupandthrownbytheauger
causingpersonalinjuryandtordamagetothesnowthrower
4 Iffor somereason,youhaveto operatethesnowthrowerongravel,
keeptheskidshoeinthehighestpositionformaximumclearance
betweenthegroundandtheshaveplate.
5. Cfeanthesnowthrowerthoroughlyaftereachuse
Cleaning The Chute Assembly
Theclean-outtoolisconvenientlyfastenedtotheaugerhousingwitha
mountingclip,
Whensnowandicecollectinthechuteassemblyduringoperation,
usethistooltosafelycleanthechuteandchuteopeningFollowthe
stepsbelowtooperateit..
Stopenginebymovingthrottlelevertostop_ positionandwaitfor
allmovingpartsto stopbeforeusingtheclean-outtool.
1 Releasebothaugeranddrivecontrols
2 Stoplheenginebymovingthrottleleverto stop_ position
3 Removetheclean-outtoolfromtheclipwhichsecuresit totherear
ofthe augerhousing.
4. Usetheshovel-shapedendoftheclean-outtoolto dislodgeand
scoopanysnowandicewhichhasformedin andnearthe chute
assembly
Neveruseyourhandstocleansnowandicefromthechuteassembty1
Ioraugerhousng_ 1
5 Re-fastentheclean-outtool,withthehandleontherightsideofthe
housing,to themountingcliponthe augerhousingYoucanstart
operatingyoursnowthrowernow
11
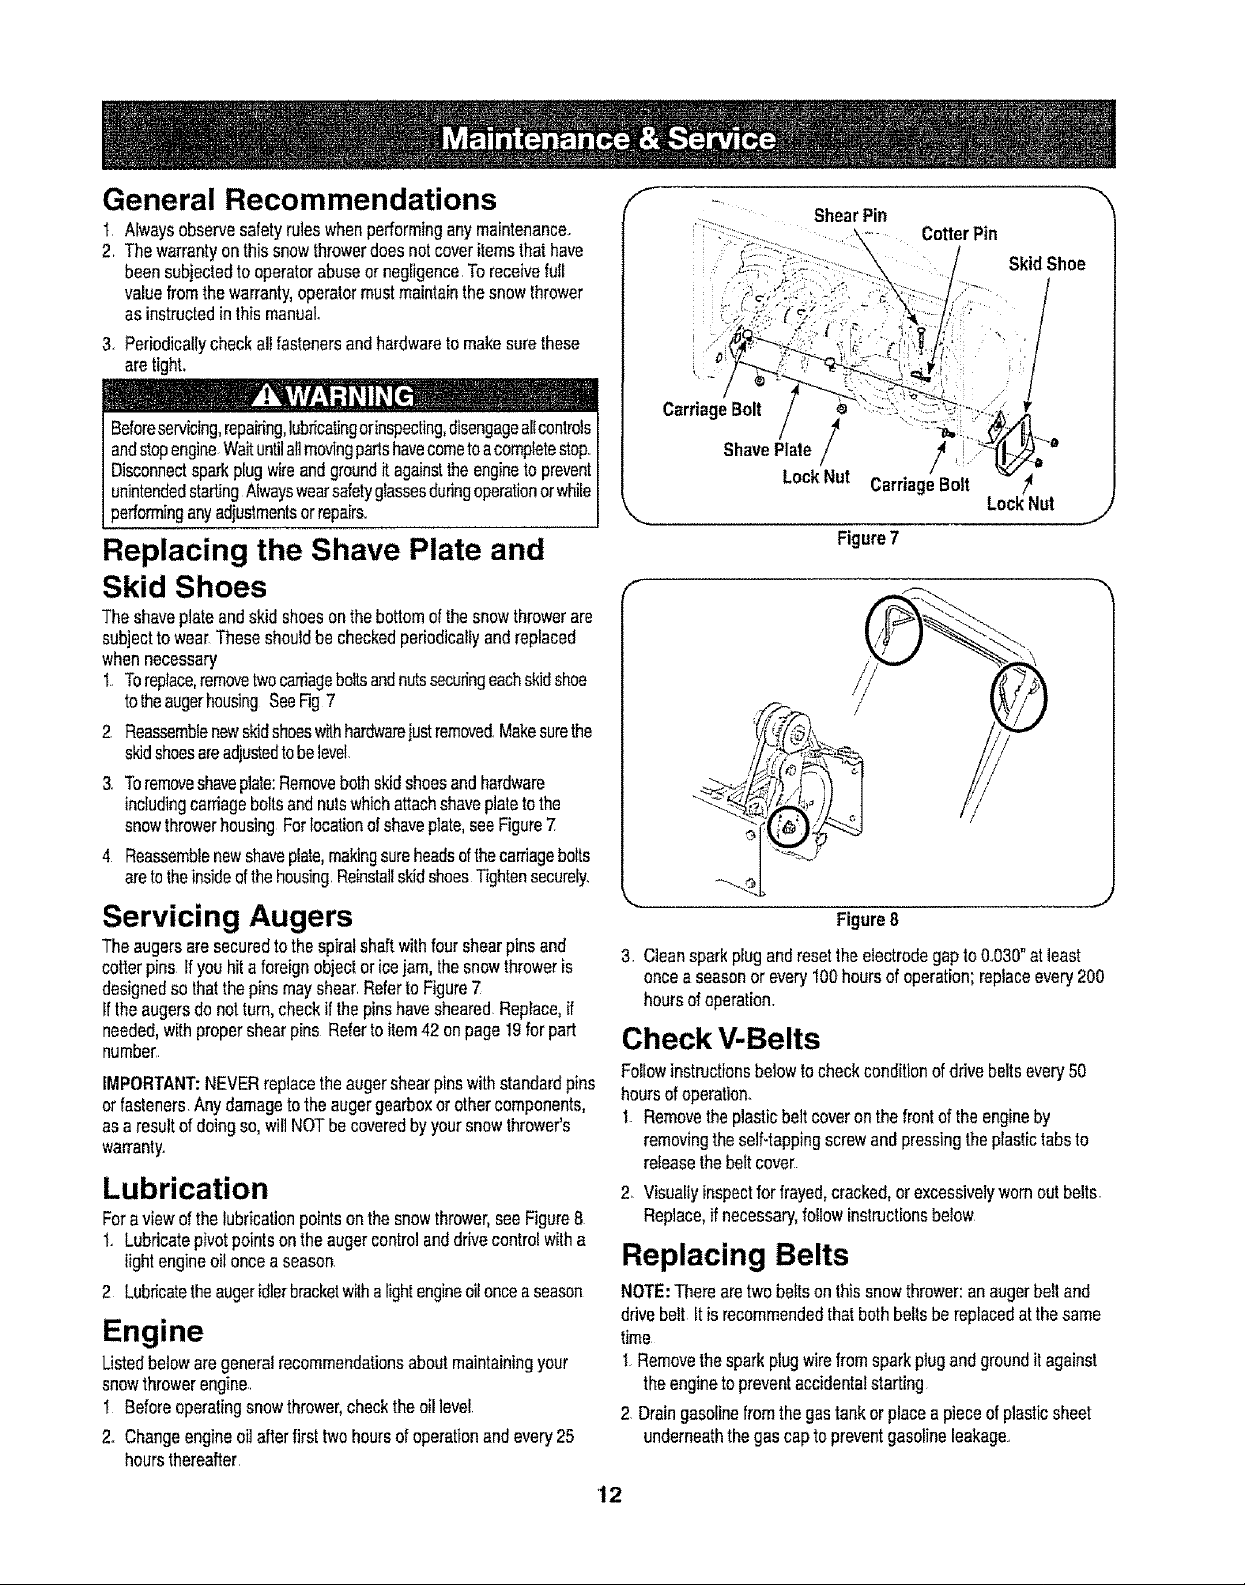
General Recommendations
I. Alwaysobservesafetyruleswhenperforminganymaintenance..
2. Thewarrantyonthissnowthrowerdoesnotcoveritemsthathave
beensubjectedtooperatorabuseornegligenceToreceiveful_
valuefromthewarranty,operatormustmaintainthe snowthrower
asinstructedinthismanual°
3. Periodicattycheckallfastenersandhardwaretomakesurethese
aretight.
Cotter Pin
SkidShoe
Beforeservicing,repairing,lubricatingorinspecting,disengageaI{controls
andstopengineWaituntilallmovingpartshavecometoacompletestop.
Disconnectsparkplugwkeandgroundit againsttheenginetoprevent
unintendedstartingAlwayswearsafetygiassesduringoperationorwhile
performinganyadiustmentsorrepair&
Replacing the Shave Plate and
Skid Shoes
Theshaveplateandskidshoesonthebottomofthesnowthrowerare
subjecttowear Theseshouldbecheckedperiodicallyandreplaced
whennecessary
1..Toreplace,removetwocarriageboilsandnutssecuringeachskidshoe
tot,.heaugerhousingSeeFig7
2 Reassemblenewskidshoeswithhardwarejustremoved.Makesurethe
skidshoesareadjustedtobelevel.
3. Toremoveshaveplate:Removebothskidshoesandhardware
includingcarriageboltsandnutswhichattachshaveplatetothe
snowthrowerhousingFortocationofshaveplate,seeFigure7
4 Reassemblenewshaveplate,makingsureheadsofthecarriagebolts
aretotheinsideofthehousing.ReinstallskidshoesTightensecurely.
Servicing Augers
Theaugersaresecuredto thesplratshaftwithfourshearpinsand
cotterpinsIfyouhit aforeignobjectoricejam,thesnowthroweris
designedsothatthepinsmayshear.RefertoFigure7
Iftheaugersdonotturn,checkifthepinshavesheared.Replace,if
needed,withpropershearpins Referto item42onpage19forpart
number
IMPORTANT:NEVERreplacetheaugershearpinswithstandardpins
or fastenersAnydamagetothe augergearboxorothercomponents,
asaresultof doingso,willNOTbecoveredbyyoursnowthrower's
warranty..
Lubrication
Foraviewofthe lubricationpointsonthesnowthrower,seeFigure8
t. Lubricatepivotpointsontheaugercontrolanddrivecontrolwitha
lightengineoiloncea season.
2 Lubricatetheaugeridlerbracketwithalightengineoilonceaseason
Engine
Listedbelowaregeneralrecommendationsaboutmaintainingyour
snowthrowerengine.
I Beforeoperatingsnowthrower,checktheoillevel
2. Changeengineoilafterfirsttwohoursofoperationandevery25
hoursthereafter
Carriage Bolt
ShavePlate / /
LockNut CarriageBolt
LockNut
Figure7
/
""-4
Figure8
3. CleansparkplugandresettheelectrodegaptoO.r030natleast
onceaseasonor every100hoursof operation;replaceevery200
hoursofoperation.
Check V-Belts
FoIlowinstructionsbelowtochockconditionofdrivebeltsevery50
hoursofoperation.
1. Removethe plasticbeltcoveronthe frontoftheengineby
removingtheself-tappingscrewandpressingtheplastictabsto
releasethebeltcove[
2. Visuallyinspectfor frayed,cracked,orexcessivelywornoutbelts.
Replace,ifnecessary,followinstructionsbelow
Replacing Belts
NOTE:Therearetwobeltsonthissnowthrower:anaugerbo!land
drivebelt Itis recommendedthatbothbeltsbereplacedat thesame
time
1.Removethesparkplugwirefromsparkplugandgrounditagainst
theenginetopreventaccidentalstarting
2 Draingasolinefromthegastankorplaceapieceofplasticsheet
underneaththegascapto preventgasolineleakage.
12

f
f
BeltKeeper
\
Engine
Pulley
Drive
Belt----T-_
Figure9
Figure10
Figure11
Belt
Auger
Pulley
_'X BeltKeeper
IdlerBracket
! £ L_L L
Performbeltmaintenanceoutdoorsassomegasmaypossibly
leakfromthecarburetoreventhoughyouplacedasheetofplastic
underneaththegascaptopreventthegascapfromleaking.
3 Removetheself+tappingscrewshowninFigure8,andpressthe
plastictabstoreleasethebeltcover+Pullthebeltcoverupandout
fromaroundthe engineandchuteassembly.Setit asideandsave+
Auger Belt
IMPORTANT:Gascouldleakfromthecarburetoratthispoint,thegas
capshouldhavebeencoveredwithplasticaspreviouslyinstructed.
1+Tipthesnowthrowerupandforwardsothatitrestsontheauger
housing Removethe beltkeeperascalledoutin FigureI1+Return
thesnowthrowertoitsuprightpositiontocompletethefollowing
J
steps+
2. Slipthefrontaugerbeltoffofthe enginepulieypushingitforward
androllinginoffofthepulley,SeeFigure10
3. Squeezetheaugercontrolhandletoreleasetheaugerbrake,
whichisthetabthatholdsthebeltontotheaugerpulleyRemove
thebeit
4. Replacewithnewbeltafterreplacingthedrivebelt.
Drive Belt
NOTE:Replacethedrivebeltbeforereassemblingthenewaugerbelt
I Tipthesnowthrowerupandforwardsothatitrestsontheauger
housing.
IMPORTANT:Remember,gascouldleakfromthecarburetorat this
point,thegascapshouldhavebeencoveredwithplasticaspreviously
instructed+
2 Removethespringthatconnectsthetransmissiontoa boltonthe
J
engineframe SeeFigure11.
NOTE:itmaybeeasiertofirstremovetheflangelocknut,thenuse
needle+nosedplierstofirmlygripspringandremovefromboll
3 Pivotthetransmissionforwardtoreleasepressureonthedrivebelt.
Removebeltfromtransmissionpu!tey.
4+Removethedrivebeltfromaroundtheenginepulley,andaway
fromthe unit
5. Placethenewdrivebeltintothegrooveonthe enginepulley,See
Figure10.
6+Tiltthetransmissionforwardandpositionthedrivebeltontothe
transmissionpulley
7 Reconnectthespringtotheboltontheengineframeandsecure
thetransmissionReinstalltheflangelocknut..
8. Installnewaugerbeltr
9. Reassemblethebeltcoveronthesnowthrower
J
10Reassemblethebeltkeeperto thehousing.
13

Adjusting The Auger Cable
Periodicadjustmenttotheaugercontrolcablemayberequireddue
tonormalstretchandwearonthebeR1Adjustmentisneededif the
augersseemto hesitatewhileturning,buttheenginemaintainsspeed,
orcontinueturningwiththeaugercontroldisengaged..
1. Loosentherearhexboltonthe cableadjustmenlbracket.See
Figure12.
2 SIidethecableadjustmentbracketbackwardstakingouttheslack
intheaugercable
3 Retightentherearhexbolt
4. Startengineandverifyaugercontrolengagesanddisengages
properly.
NOTE:Ifaugercontinuesto rotatewiththecontroldisengaged,shut
offtheengineandreadjustthecablebracketforwardThenrecheck
theaugeroperation
Checking Oil Level
Beforeoperatingsnowthrower,checktheoil]evetbyfollowingsteps
below..
1. Withengineonlevelground,oilmustbetoFULLmarkondipstick
SeeFigure13
2. Stopengineandwaitseveralminutesbeforecheckingoillevel
Removeoilfillcapanddipstick
3. Wipedipstickclean,insertitintooilfillholeandtightensnugly
4 Removedipstickandcheck IfoilisnotuptotheFULLmarkon
dipstick,addoil
Changing Oil
Changeengineoilafterfirsttwohoursofoperationandevery25hours
thereafter.Inordertochangeoil,youwillhavetofirstdraintheused
engineo1Ifromtheengineandthenrefillwithfreshoil
1 DrainoilwhileengineiswarmRemoveoiidrainpluglocatedatthebot-
tomoftherecoilstarteroftheengine.Catchoilinasuitablecontainer
2 Whenengineisdrainedofelioil,replacedrainplugsecurety
3 RemovethedipstickfromtheoilIibLForiocationoftheoilfill,see
Figure6.Pourfreshoilslowlythroughtheplug Replacedipstick
4. CheckandmakesurethatthelevelofoilisuptotheFULLmarkon
thedipstick.
NOTE:Althoughmulti-viscosityoils (5W30,10W30,etc.)improve
startingincoldweather,theycouldalsoresultinhigheroilconsump-
tionwhenusedabove32' E Checkyoursnowthrower'sengineoil
levelmorefrequentlyto avoidpossibleenginedamagefromrunning
lowonoil. SeetheViscosityChartinFigureI4
F
HousingScrew _\
FULL
_ BetweenFULLandADD
ADD
I
I
I
I
\
\
Figure12
Figure13
R_commcndcdOiLU_g_
Auger Cabie_
Adjustment
Bracket
TopAuger _=
HousingScrew
MaintainOil Level
'14
Sy_thelicMultiSr_d_]
SAE0W-30
J
Figure14
 Loading...