

Page 1
Safety • Assembly • Operation • Adjustments • Maintenance • Troubleshooting • Parts Lists • Warranty
OF A O A AL
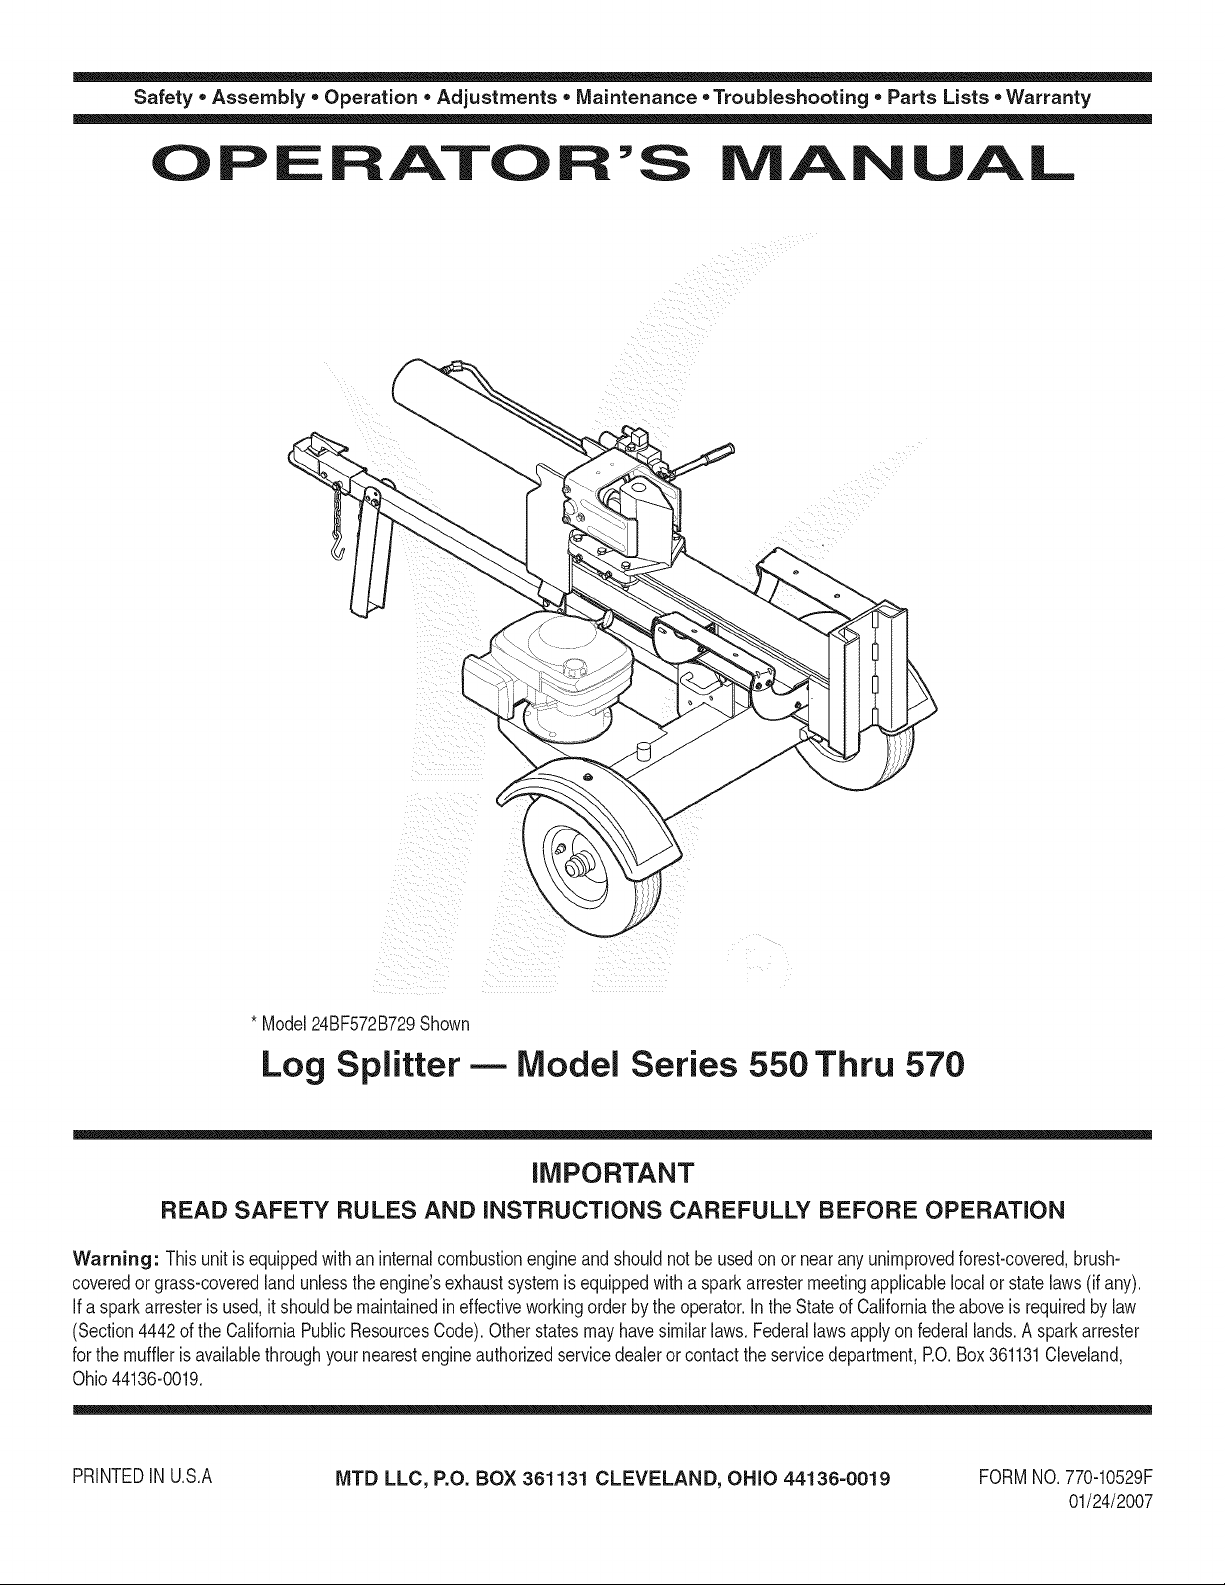
* Model24BF572B729Shown
Log Splitter -- Model Series 550 Thru 570
IMPORTANT
READ SAFETY RULES AND iNSTRUCTiONS CAREFULLY BEFORE OPERATION
Warning: Thisunitisequippedwithan internalcombustionengineandshouldnot beusedon ornearany unimprovedforest-covered,brush-
coveredorgrass-coveredlandunlesstheengine'sexhaustsystemisequippedwitha sparkarrestermeetingapplicablelocalor statelaws(if any).
If a sparkarresterisused,itshouldbemaintainedineffectiveworkingorderbytheoperator.IntheStateofCaliforniatheaboveisrequiredbylaw
(Section4442oftheCaliforniaPublicResourcesCode).Otherstatesmayhavesimilarlaws.Federallawsapplyonfederallands.A sparkarrester
forthemufflerisavailablethroughyournearestengineauthorizedservicedealeror contactthe servicedepartment,RO.Box361131Cleveland,
Ohio44136-0019.
PRINTEDIN U.S.A
MTD LLC, P.O. BOX 361131 CLEVELAND, OHIO 44136=0019
FORMNO.770-10529F
01/24/2007
Page 2

This Operator's Manual is an important part of your new log splitter, it will help you assemble,
prepare and maintain the unit for best performance. Please read and understand what it says.
Table of Contents
Safety Labels ......................................... Page 3
Safe Operation Practices ...................... Page 4
Setting UpYour Log Splitter ................. Page 6
Operating Your Log Splitter .................. Page 8
Finding and Recording Model Number
BEFOREYOU STARTASSEMBLING
YOURNEW EQUIPMENT
Pleaselocatethe modelplate on the equipment andcopy the
informationto the sample modelplate provided to the right.
You can locatethe modelplate bystanding behind the unit
and lookingdown at the hydraulictank. This informationwill be
necessaryto use the website or obtain assistance from your
MTDdealer.
Maintaining Your Log Splitter ............ Page 12
Troubleshooting ................................... Page 16
illustrated Parts List ............................ Page 18
Warranty ......................................... Back Cover
F
Model Number
, www, rntdproducts.com
Serial Number
MTD LLC
P.O. BOX 361131
CLEVELAND, OH 44136
330-220-4683
800-800-731 0 /
Customer Support
Please do IVOTreturn the unit to the retailer from which it was
purchased, without first contacting Customer Support.
Ifyou have difficultyassemblingthis product or have any questions regardingthe controls,operation,or maintenance ofthis
unit,you can seek helpfrom the experts.Choosefrom the options below:
1. Visit mtdproducts.com. Click on Yardmachinesand then the CustomerSupport menu option.
2. Phonea Customer Support Representative at 1 (800) 800-7310.
3. The engine manufacturer is responsiblefor allengine-relatedissueswith regardsto performance,power-rating,specifica-
tions,warranty andservice. Pleasereferto the engine manufacturer'sOwner's/Operator's Manual,packedseparatelywith
your unit, for more information.
2
Page 3
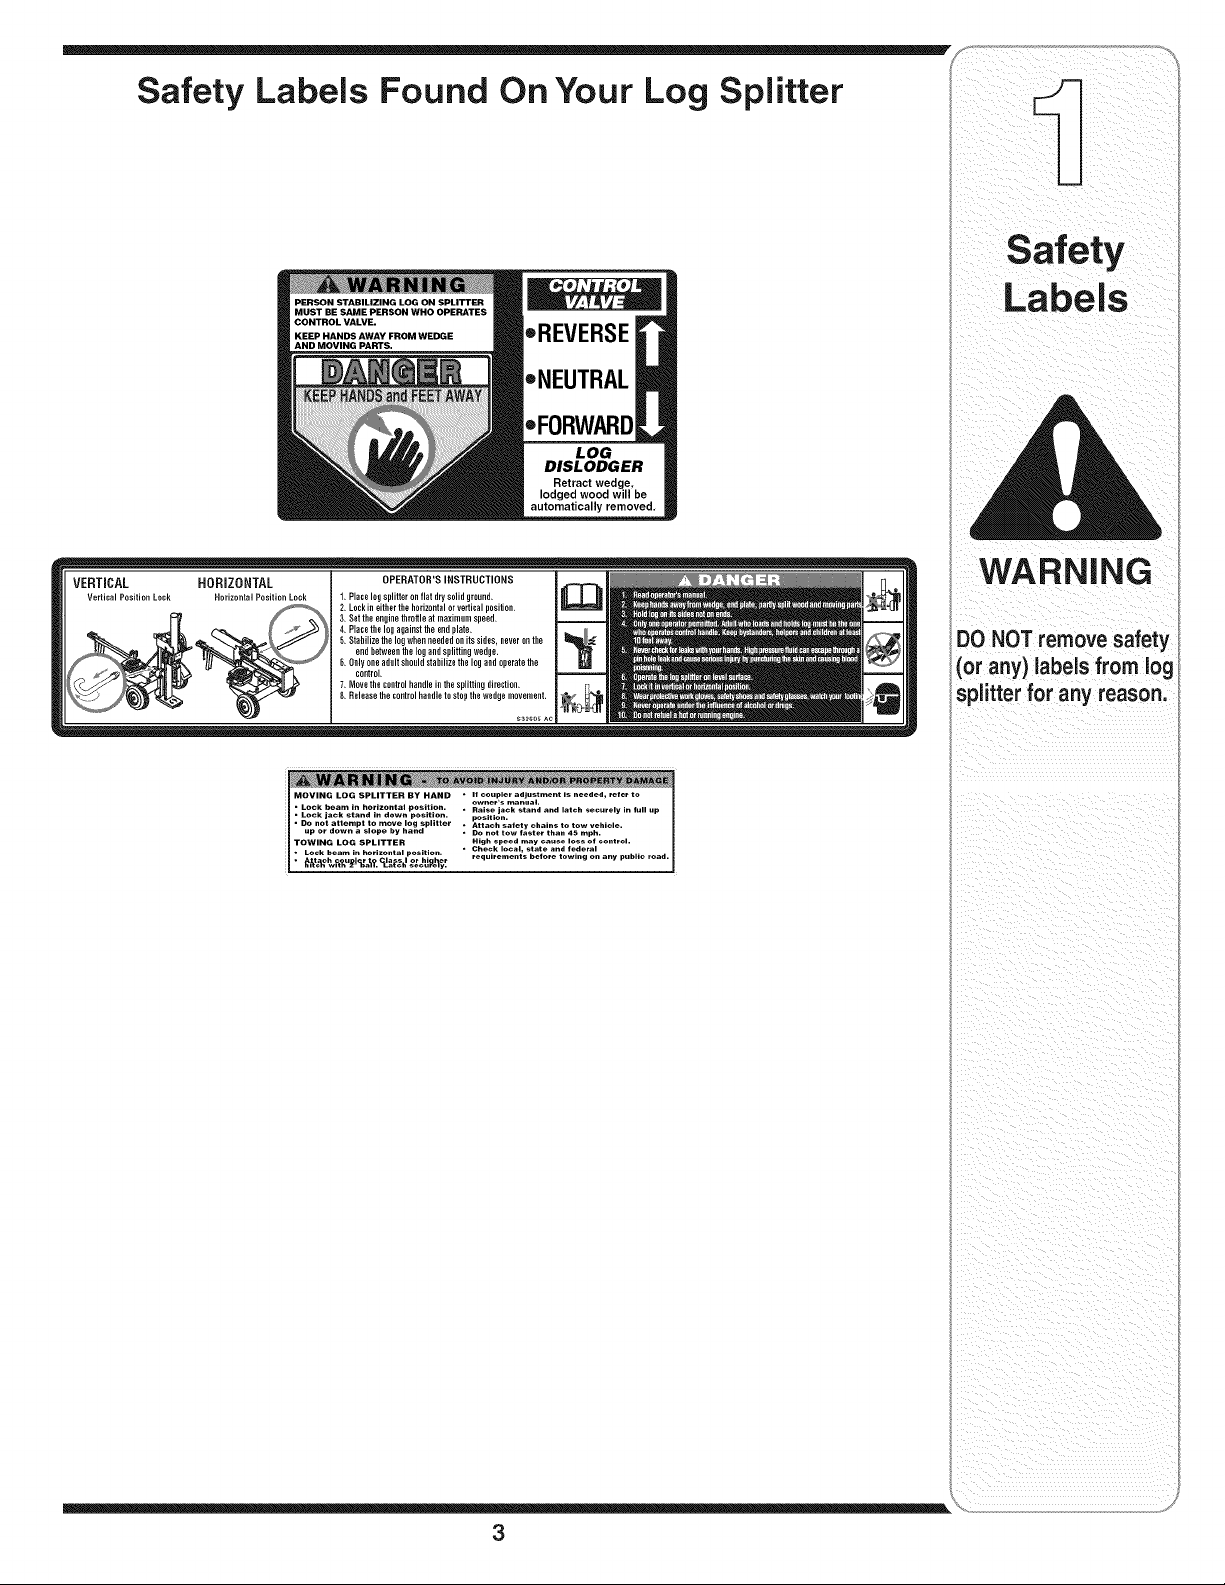
Safety Labels Found On Your Log Splitter
oREVERSE
INEUTRAL
IFORWARD
LOG
DISLODGER
Retract wedge,
lodged wood will be
automatically removed.
WARNING
DO NOT remove safety
{orany) labelsfromlog
;plitterfor any reason.
m_AIMOVING LOG SPLITTER BY HAND • coup er a jus men is nee e , re er o
• oc jac s an n own pus on, position,
• Do not attempt to move log splitter . Attach safety ohains to tow vehiole,
up or down a slope by hand . Do not tow faster than 45 mph.
TOWING LOG SPLITTER High speed may cause loss of control.
Lock beam in horizontal osition. " Check Iooal, state and federal .
J__" Lock beakh _ _" hd°;iz _ ........ _t]i_ ........ j ................................
_/_" requirements be ore towing on any pub io road.
3
Page 4
WARNING: EngineExhaust,some of its constituents, andcertain vehicle compo-
nentscontain or emit chemicals knownto Stateof Californiato cause cancer and
birth defects or otherreproductiveharm.
DANGER: This machinewas builtto beoperatedaccordingto the rulesfor safe operation in this
manual.As with any type of power equipment,carelessnessor error on the part ofthe operator can
result in serious injury.This machineis capableof amputatinghands andfeet andthrowing objects.
Failureto observethe followingsafety instructionscould resultin serious injury or death.
i WARNING
Thissymbol points
outimportant safety
instructionswhich, if
notfollowed,could
endangerthe personal
Soafetyand/or property
f yourselfand others.
i Readand follow all
I instructionsinthis man-
ualbeforeattempting to
operatethis machine.
Failureto complywith
i these instructionsmay
I resultin personalinjury.
Whenyou seethis
symbol -
HEED ITS WARNING
Your
I = = w
i Responsubuluty
Restrictthe use
i of this power machine
i to personswho read,
understand
and followthe warnings
and instructions
inthis manual.
General Practices
1. Read,understand,andfollowall instructionson the
machineandinthe manual(s)beforeattempting
toassembleandoperate.Keepthismanualin a
safeplaceforfutureandregularreferenceandfor
orderingreplacementparts.
2. Befamiliarwithall controlsandproperoperation.
Knowhowtostopthemachineanddisengagethem
quickly.
3. Neverallowchildrenunder16yearstooperatethis
machine.Children,16yearsandover,shouldread
andunderstandinstructionsandsafetyrulesinthis
manualandshouldbetrainedandsupervisedbya
parent.
4. Neverallowadultstooperatethismachinewithout
properinstruction.
5. Manyaccidentsoccurwhenmorethanoneperson
operatesthe machine.If a helperisassistinginload-
inglogs,neveractivatethecontroluntilthehelperis
a minimumof 10feetfromthe machine.
6. Keepbystanders,helpers,pets,andchildrenat least
20feetfromthe machinewhileitisinoperation.
7. Neverallowanyoneto rideon thismachine.
8. Nevertransportcargoonthis machine.
9. Hydrauliclogsplittersdevelophighfluidpressures
duringoperation.Fluidescapingthrougha pin hole
openingcanpenetrateyourskinandcauseblood
poisoning,gangrene,or death.Giveattentiontothe
followinginstructionsatalltimes:
a. Donotcheckfor leakswithyourhand.
b. Donotoperatemachinewithfrayed,kinked,
cracked,ordamagedhoses,fitting,ortubing.
c. Stopthe engineand relievehydraulicsystem
pressurebeforechangingoradjustingfittings,
hoses,tubing,orothersystemcomponents.
d. Donotadjustthepressuresettingsofthe pumpor
valve.
10.Leakscanbedetectedbypassingcardboardor
wood,whilewearingprotectiveglovesand safety
glasses,overthesuspectedarea.Lookfordiscolor-
ationof cardboardorwood.
11.
If injuredby escapingfluid,seea doctorimmediately.
Seriousinfectionor reactioncandevelopifproper
medicaltreatmentis not administeredimmediately.
12.Keeptheoperatorzoneandadjacentareaclearfor
safe,securefooting.
13.If yourmachineisequippedwithan internalcom-
bustionengineanditisintendedfor usenearany
unimprovedforest,brush,or grasscoveredland,
theengineexhaustshouldbeequippedwitha spark
arrester.Makesureyoucomplywithapplicablelocal,
state,andfederalcodes.Takeappropriatefirefighting
equipmentwithyou.
14.Thismachineshouldbeusedforsplittingwoodonly,
donotuseitfor anyotherpurpose.
15.Followtheinstructionsinthe manual(s)providedwith
anyattachment(s)forthismachine.
Preparation
1. Alwayswearsafetyshoesorheavyboots.
2. Alwayswearsafetyglassesorsafetygogglesduring
operatingthismachine.
3. Neverwearjewelryor looseclothingthatmight
becomeentangledinmovingor rotatingpartsofthe
machine.
.
Makesuremachineis on levelsurfacebeforeoperat-
ing.
5.
Alwaysblockmachineto preventunintendedmove-
ment,andlockineitherhorizontalor verticalposition.
6.
Alwaysoperatethis machinefromtheoperator
zone(s)specifiedinthemanual.
Z
Logsshouldbecutwith squareendspriorto splitting.
8.
Uselogsplitterindaylightor undergoodartificiallight.
9.
Toavoidpersonalinjuryor propertydamageuse
extremecareinhandlinggasoline.Gasolineis
extremelyflammableandthevaporsareexplosive.
Seriouspersonalinjury canoccurwhengasolineis
spilledonyourselforyourclotheswhichcanignite.
Washyourskinandchangeimmediately.
a. Useonlyan approvedgasolinecontainer.
b. Extinguishallcigarettes,cigars,pipes,andother
sourcesofignition.
c. Neverfuelmachineindoors.
d. Neverremovegascaporaddfuel whiletheengine
ishot or running.
e. Allowenginetocoolat leasttwo minutesbefore
refueling.
4
Page 5
f. Neveroverfillthefueltank.Filltanktono more
than1/2inch belowbottomof filler neckto provide
spaceforfuelexpansion.
g. Replacegasolinecapandtightensecurely.
h. Ifgasolineis spilled,wipeit offtheengineand
equipment,movemachinetoanotherarea.Wait5
minutesbeforestartingtheengine.
i. Neverstorethemachineor fuelcontainerinside
wherethereisan openflame,sparkor pilotlightas
on a waterheater,spaceheater,furnace,clothes
dryeror othergasappliances.
j. Allow machinetocool5 minutesbeforestoring.
Operation
1. Beforestartingthismachine,reviewthe"Safety
instructions".Failuretofollowtheserulesmayresultin
seriousinjurytothe operatoror bystanders.
2. Neverleavethismachineunattendedwiththeengine
running.
3. Donotoperatemachinewhileundertheinfluenceof
alcohol,drugs,or medication.
4. Neverallowanyonetooperatethismachinewithout
properinstruction.
5. Alwaysoperatethismachinewithall safetyequipment
inplaceandworking.Makesureallcontrolsare
properlyadjustedforsafeoperation.
6. Donotchangetheenginegovernorsettingsor
overspeedthe engine.Thegovernorcontrolsthe
maximumsafeoperatingspeedofthe engine.
7. Whenloadingalog,alwaysplaceyourhandsonthe
sidesofthelog,noton theends,andneveruseyour
footto helpstabilizea log.Failuretodo so,mayresult
incrushedoramputatedfingers,toes,hand,orfoot.
8. Useonly yourhandto operatethecontrols.
9. Neverattemptto splitmorethanonelogat a time
unlesstheramhasfullyextendedanda secondlogis
neededtocompletetheseparationofthe first log.
10.Forlogswhicharenot cutsquare,theleastsquare
endandthe longestportionofthelogshouldbe
placedtowardthe beamand wedge,andthe square
end placedtowardtheendplate.
11.Whensplittingintheverticalposition,stabilizethe log
beforemovingthecontrol.Splitasfollows:
a. Placelog ontheendplateandturnuntilit leans
againstthebeamandis stable.
b. Whensplittingextralargeor unevenlogs,thelog
mustbestabilizedwithwoodenshimsor splitwood
betweenthe logandendplateor ground.
12.Alwayskeepfingersawayfromanycracksthatopen
inthelogwhilesplitting.Theycanquicklycloseand
pinchoramputateyourfingers.
13.Keepyourworkareaclean,immediatelyremovesplit
woodaroundthe machineso youdo notstumbleover
it.
14.Nevermovethismachinewhiletheengineisrunning.
15.Thismachineshouldnotbetowedon anystreet,
highwayorpublicroadwithoutcheckingtheexisting
federal,state,or localvehiclerequirements.Any
licensingor modificationssuchastaillights,etc.,
neededtocomply,is thesoleresponsibilityofthe
purchaser.If a"Statementof Origin"isrequiredin
yourstate,seeyourlocaldealer.
16.Donottowmachinefasterthan45mph.
17.SeeTransportingthe LogSplittersectionin this
manualforpropertowinginstructionsonceall
federal,local,or staterequirementsare met.
Maintenance and Storage
1. Stoptheengine,disconnectthe sparkplugand
grounditagainstthe enginebeforecleaning,or
inspectingthemachine.
2. Stoptheengineand relievehydraulicsystem
pressurebeforerepairingor adjustingfittings,hoses,
tubing,orothersystemcomponents.
3. Topreventfires,cleandebrisandchafffromthe
engineandmufflerareas,if theengineis equipped
witha sparkarrestermuffler,cleanand inspectit
regularlyaccordingtomanufacturersinstructions.
Replaceifdamaged.
4. Periodicallycheckthatall nutsandbolts,hose
clamps,andhydraulicfittingsaretightto besure
equipmentisinsafeworkingcondition.
5. Checkall safetyguardsandshieldsto besure
theyareintheproperposition.Neveroperatewith
safetyguards,shields,orotherprotectivefeatures
removed.
6. The pressurereliefvalveispresetatthefactory.Do
notadjustthevalve.
7. Neverattemptto movethismachineoverhillyor
uneventerrainwithouta towvehicleor adequate
help.
8. Foryoursafety,replaceall damagedor wornparts
immediatelywithoriginalequipmentmanufacturer's
(O.E.M.)partsonly."Useof partswhichdo notmeet
theoriginalequipmentspecificationsmayleadto
improperperformanceandcompromisesafety!"
9. Do notalterthismachineinany manner,alterations
suchasattachinga ropeor extensiontothecontrol
handle,oraddingtothe widthor heightofthewedge
mayresultin personalinjury.
Your Responsibility
Restricttheuseofthispowermachinetopersonswho
read,understandandfollowthe warningsandinstruc-
tionsinthis manualandonthemachine.Alwaysfollow
directionsonsafetylabelsfoundon yourequipment.
Safe.
o,o,a.,,oo
Practices
WARNING
Thissymbol points
out importantsafety
instructionswhich, if
notfollowed, could
endangerthe personal
safety and/or property
of yourself and others.
Readand followall
instructions inthis man-
ual before attempt ngto
operatethis machine.
Failureto comply with
these instructionsmay
result in personalinjury.
Whenyou seethis
symbol-
HEED ITS WARNING
Your
Responsibility
Restrictthe use
ofthis powermachine
to personswho read,
understand
and followthe warnings
and instructions
in this manual.
5
Page 6
YourLog
Splitter
i
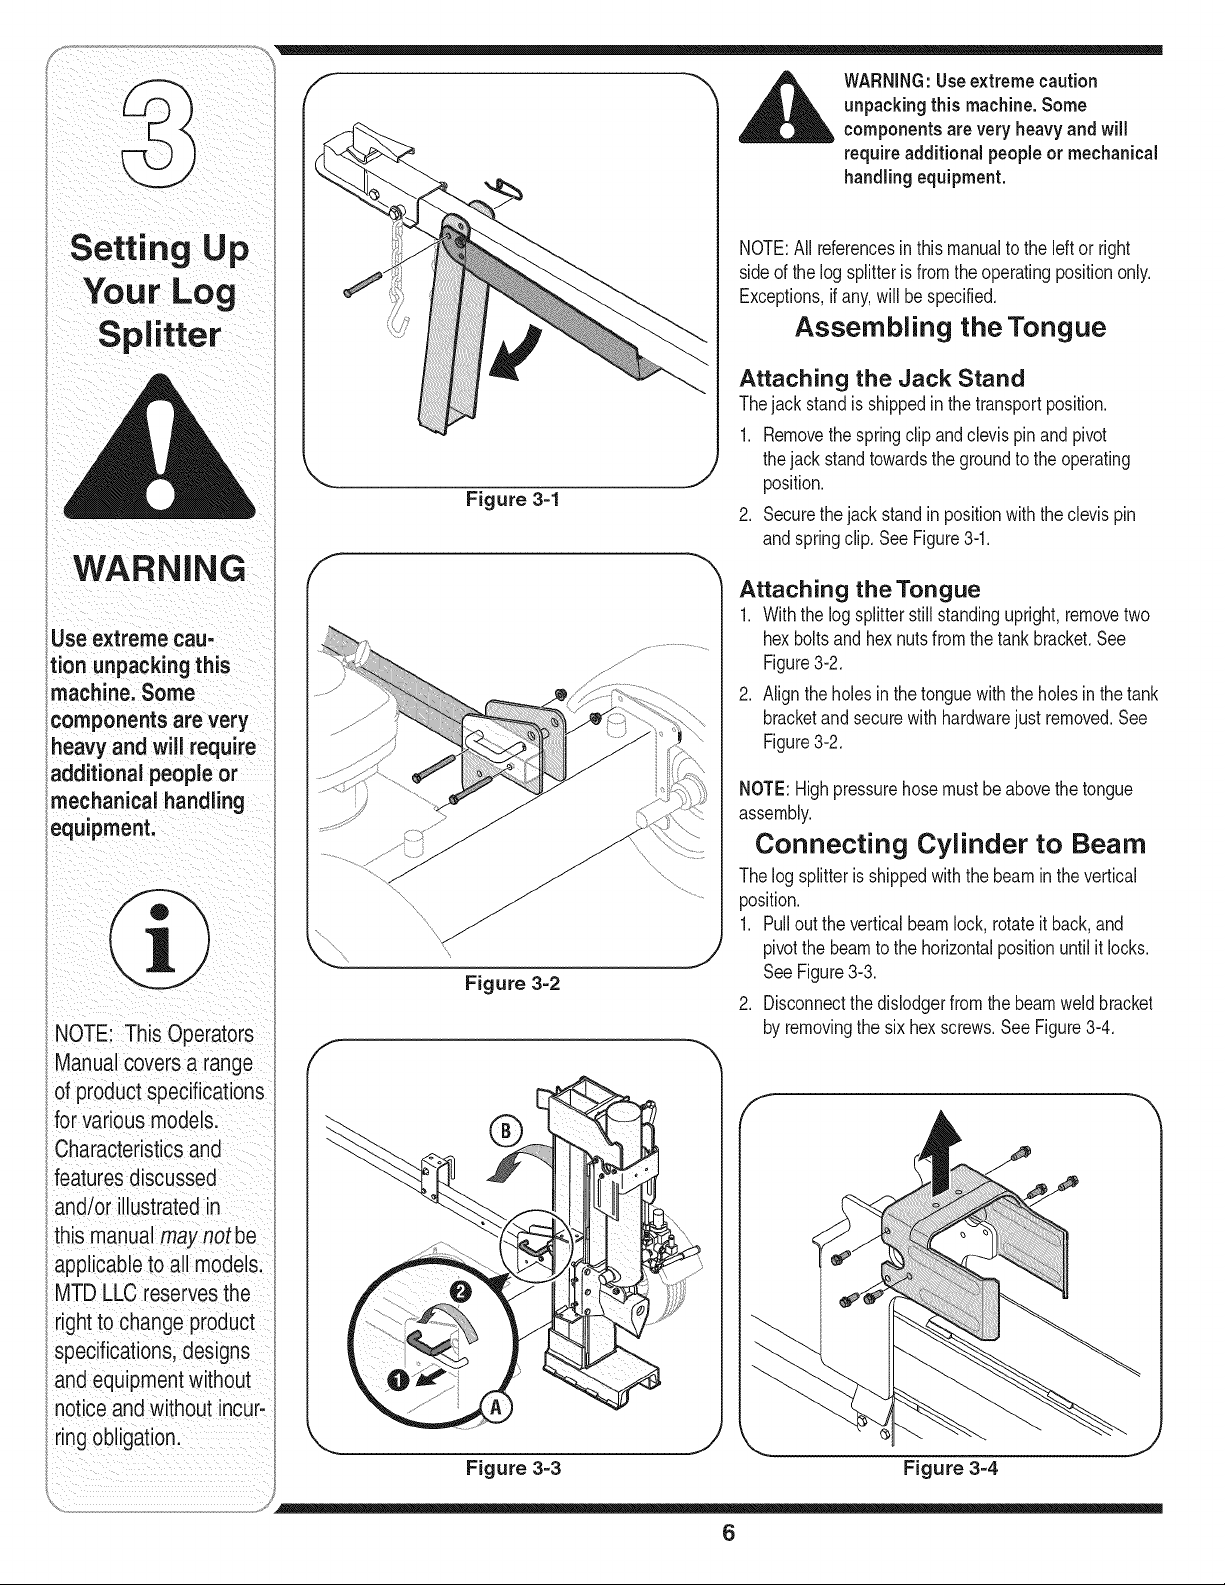
Figure 3-1
"_ ,_ WARNING:Useextreme caution
unpacking this machine.Some
__ components arevery heavy and will
require additional people or mechanical
handlingequipment.
NOTE:Allreferencesin thismanualtotheleft or right
sideof thelog splitterisfromtheoperatingpositiononly.
Exceptions,ifany,willbespecified.
Assembling the Tongue
Attaching the Jack Stand
Thejackstandisshippedinthetransportposition.
1. Removethespringclipandclevispinand pivot
thejack standtowardsthegroundto the operating
position.
2. Securethejackstandin positionwiththeclevispin
andspringclip.SeeFigure3-1.
WARNING
tion unpackingthis
machinei Some
componentsare,e y
heavy and will require
additional people or
mechanical handling
equipmenL
Manual coversa range
of productspecifications
for Variousmodels:
Characteristicsand
featUresdiscussed
and/or illustratedin
this manual
applicableto a!l models:
MTD LLC reSerVesthe
Figure 3=2
Attaching the Tongue
1. Withthelogsplitterstillstandingupright,removetwo
hexboltsandhexnutsfromthetankbracket.See
Figure3-2.
2. Aligntheholes inthetonguewiththe holesin thetank
bracketandsecurewithhardwarejust removed.See
Figure3-2.
NOTE:Highpressurehosemustbeabovethetongue
assembly.
Connecting Cylinder to Beam
Thelogsplitterisshippedwiththebeaminthevertical
position.
1. Pulloutthe verticalbeamlock,rotateit back,and
pivotthebeamto the horizontalpositionuntilitlocks.
SeeFigure3-3.
2. Disconnectthedislodgerfromthe beamweldbracket
byremovingthe sixhexscrews.SeeFigure3-4.
right to ChangeProduct
specifiCatiOns:designs
and equipment Without
notice andwith0ut inCur:
ring obligation:
,... j k,,
Figure 3=3 Figure 3-4
6
Page 7

3. Disconnectthelogcradlefromthe beamontheside
ofthecontrolvalve.SeeFigure3-5.
4. Liftandslidethe cylinderuptothetopofbeamand
intotheweld brackets.SeeFigure3-6.
5. Attachthedislodgeroverthewedgeassemblyand
securewith hardware,previouslyremoved,to the weld
brackets.
NOTE:Oncethesix hexscrewsaretightened,there
maybea slightgapbetweenthedislodgerandtheweld
brackets.Thisgapis normal.
6. Reattachthelogcradletothesideof the beamwith
thecontrolvalve,aligningtheendsofthecradlewith
thebeamflanges.
7. Rolllogsplitteroff the bottomcrate.
Preparing the Log Splitter
,
Lubricatethe beamarea(wherethe splittingwedge
willslide)withengineoil;donotusegrease.
2.
Removeventedreservoirdipstick,whichislocatedin
frontoftheengineon topofthe reservoirtank.See
Figure3-7.
IMPORTANT:Thelogsplittermayhavebeenshipped
and primedwithhydraulicfluidinthe reservoirtank.
However,you MUSTcheckthefluidlevelbeforeoperat-
ing.If notfilled,proceedwiththefollowingsteps:
3. Fillthereservoirtankwith hydraulicfluid includedwith
this unit(if equipped)orapprovedfluidswhichinclude
Dexron®III/ Mercon®IIIautomatictransmissionfluid,
a 10WeightAWhydraulicoilor Pro-MixTM AW-32
HydraulicOil.
4. Checkfluidlevelusingthedipstick.SeeFigure3-7.Do
notoverfill.
5. Replaceventeddipsticksecurely,tighteningit untilthe
topofthe threadsareflushwithtopof the pipe.
6. Disconnectthesparkplugandprimethepumpby
pullingthe recoilstarterasfarasit willgo.Repeat
approximately10times.
7. Reconnectthesparkplugwireandstart engine
followinginstructionsin the OPERATIONsection.
8. Usecontrolhandleto engagethewedgeto the
farthestextendedposition.Thenretractthe wedge.
9. Refilltankasspecifiedonthe dipstick.
Figure 3=5
f
Muchofthe original
fluidhas beendrawn
intothe cylinder
hoses: Make certain to
refillthe reservoirto
preventdamage to the
hydraulicpump.
Figure 3-6
ii _i_i _ii_!iii_iiiii_ TM iii_
IMPORTANT:
The logsplitter may
have been shipped and
primedWithhydraulic
fluid inthe reservoir
tan If noL proceed
with the following
steps:
NOTE:Failureto refillthetankwillvoidunit'swarranty.
10.Extendandretractthewedge12completecycles
to removetrappedairinthesystem(thesystemis
"self-bleeding").
11.Refillreservoirwithinrangemarkedonthe dipstick.
_ ARNING:Muchof the original
fluid has beendrawn into the cylinder
and hoses. Makecertainto refill the
reservoirto preventdamageto the
hydraulicpump.
Figure 3=7
NOTE:Somefluidmayoverflowfromtheventplugas
thesystembuildsheatandthe fluidexpandsandseeks
a balancedlevel.
7
NOTE!Some fluid may
overflow from the vent
plugas the system
builds heat andthe
fluid expandsand
seeks abalanced level:
i_ ii i
Page 8

i_i_i_iii_i iiii _iiii_i__ ii_i_!i_
Know Your Log Splitter
Cylinder
Control Handle
fislod
BeamAssembly
IMPORTANT
i Yourlogsplitter may
be shippedwith motor
I oil inthe engine. You
MUSTcheckthe oil
levelbefore operat-
ing.Be careful notto
overfill.
/
JackStand
Tongue
Vertical
Beam
Lock
TailLight
(If Equipped)
LogCradle
Horizontal Beam Lock
Figure 4=1
Beam Locks
Thesetwolocks,astheirnamesuggests,areused
tosecurethebeaminthe horizontalorthevertical
position.Theverticalbeamlockis locatednextto theoil
filter.Thehorizontalbeamlockis locatedon the beam
supportlatchbracket.See Figure4-1.
J_
VerticalBeamLock
Engine Controls
Seetheaccompanyingenginemanualforthe location
andfunctionofthecontrolsontheengine.
8
J
Page 9

Control Handle
Thecontrolhandlehasthreepositions.See Figure4-2.
• FORWARD:MovecontrolhandleFORWARDor
DOWNtomovewedgeto splitwood.
NOTE:Controlhandlewill returntoneutralpositionas
soonashandleisreleased.(ForwardPosition only)
NEUTRAL:Releasethecontrolhandleor movethe
leverto neutralpositiontostopthewedgemovement.
REVERSE:MovecontrolhandleBACKorUPto return
thewedgetowardthecylinder.Thecontrolhandle
staysinthe return(Reverse)positionand returnsto
neutralautomaticallywhen fullyretracted.
NOTE:Reversepositionmayalsobeoperatedbackto
neutralpositionmanually,if necessary.
Stopping Engine
1. Movethrottlecontrol(ifequipped)to STOPor OFF
position.
2. Turnoffthe engineswitch,if soequipped.
3. Disconnectsparkplugwireand groundagainstthe
engineto preventunintendedstarting.
,_ WARNING:Read,understand,and
__ WARNING:Wearleather work gloves,
follow all instructions and warnings on
the machineand in this manual before
operating.
safetyshoes, ear protection,and safety
glasseswhen operating a log splitter.
Ensuresafe footing.
Gas and Oil Fill=Up
1. Servicethe enginewith gasolineandoilas instructed
in the enginemanualpackedwithyourlog splitter.
Readinstructionscarefully.
WARNING:Useextremecarewhenhan-
dling gasoline.Gasolineis extremely
flammableand the vapors are explosive.
Neverfuel machine indoorsor while the
engine is hot or running.
IMPORTANT:Yourlogsplittermaybeshippedwithmotor
oil in theengine.YouMUSTcheckthe oil levelbefore
operating.Becarefulnottooverfill.
To return
wedge
To stop
wedge
)
To split wood
Figure 4=2
NOTE:Gasolinecanbe addedtotheenginewhenthe
logsplitterisin eitherthehorizontalorverticalposition.
However,thereare lessobstructionswhenthe unitis in
theverticalposition.
Starting Engine
1. Attachsparkplugwireto sparkplug. Makecertain
themetalcapontheendofthesparkplugwire is
fastenedsecurelyovermetaltipofthe sparkplug.
2. Turnfuelvalve(or engineswitch),ifequipped,tothe
ONposition.
3. Movechokelever,ifequipped,toCHOKEposition.
4. If theengineisequippedwitha primer,follow
instructionsin the enginemanualtoprimeit.
5. Turnthethrottlecontrol(if equipped)to the FAST
position.
6. Graspstarterhandleandpullropeout slowlyuntil
enginereachesstartof compressioncycle(ropewill
pullslightlyharderatthispoint).
7. Pullropewitha rapid,fullarm stroke.Keepfirmgrip
on starterhandle.Let roperewindslowly.Repeat
untilenginecranks.
8. Afterenginestarts,movechokelever(ifequipped)
toOFFposition.Placethrottlelevertothe speed
desired.
9. In coldweather,runwedgeupor downbeam6 to 8
timesto circulatethehydraulicfluid.
_ WARNING:Whenstarting awarm
engine,the muffler and surrounding
areasare hot and can causea burn.
Donottouch.
WARNING
Read, understand, and
follow all instructions
and warnings on the
machine and inthis
manual before operat-
ing.
Wear leather work
gloves,safety shoes,
ear protection,and
safety glasseswhen
operating a log splitter.
Ensure safe footing.
Use extreme carewhen
handlinggasoline.
Gasoline isextremely
flammable and the
vapors are explosive.
Never fuel machine
indoorsor while the
engine is hotor run-
ning.
When starting a warm
engine, the muffler and
surrounding areas are
hot and can cause a
burn. Do not touch.
9
Page 10

Coo,ro,.and,o
// I 1. MovecontrolhandleFORWARDor DOWNtosplit
Z_I 1_1 , wood.
2. Releasethecontrolhandleto stopthewedgemove-
ment.
3. MovecontrolhandleBACKorUPto returnthewedge.
Log Dislodger
Thelog dislodgerisdesignedtoremoveanypartially
splitwoodfromthewedge.Thismayoccurwhilesplitting
largediameterwoodorfreshlycutwood.
Neverremove partially
split wood from the
wedgewith your
hands. Fingers may be-
come trapped between
split wood.
Figure 4=3
Before Each Use
1. Removethedipstickand checkhydraulicfluidlevel.
Refillifnecessary.ApprovedfluidsincludeDexron®
III/ Mercon®IIIautomatictransmissionfluid,a
10WeightAWhydraulicoilor Pro-MixTM AW-32
HydraulicOil.
2. Check engineoil level.Refillifnecessary.
3. Fill upgasolineifnecessary.
4. Lubricatethebeamareawheresplittingwedgewill
slidewithengineoil. Donotusegreasetolubricate.
Makesureto lubricateboththe frontandthebackof
thebeamface.
5. Attachsparkplugwireto thesparkplug.
_ ARNING:Neverremove partiallysplit
1. Toremovepartiallysplitwoodfromwedge,move
controlhandleto REVERSEpositionuntilwedgeis
fullyretractedtoallowsplitwoodportiontocontactthe
logdislodger.
2. Onceremovedfromwedgewithlogdislodger,split
woodfromoppositeendor inanotherlocation.
Vertical Position
1. Pullthehorizontalbeamlockout to releasethebeam
andpivotthe beamtothe verticalposition.
2. Tolockthe beamin theverticalposition,pullout
ontheverticalbeamlockandrotateittosecurethe
beam.SeeFigure4-1.
3. Standinfrontoftheunit to operatethecontrolhandle
andtostabilizethelog.SeeFigure4-3.
Horizontal Position
1. Pulltheverticalbeamlockoutand rotateit down.See
Figure4-1.Pivotbeamtothehorizontalposition.The
beamwill lockautomaticallyinhorizontalposition.
2. Standbehindthereservoirtanktooperatecontrol
handleandtostabilizethelog.
wood from the wedge with your hands.
Fingersmaybecometrapped between
split wood.
Using the Log Splitter
1. Placethelogsplitteronlevel,dry ground.
2. Placethebeamineitherthe horizontalorvertical
positionandlockinplacewiththeappropriate
lockingrod.
3. Blockthe frontandbackof bothwheels.
4. Placethelogagainsttheendplateandonlysplit
woodinthedirectionof the grain.
5. Tostabilizethelog,placeyourhandonlyon sidesof
log.Neverplacehandon theend betweenthe log
and the splittingwedge.
6. Onlyoneadult shouldstabilizethelogandoperate
thecontrolhandle,sotheoperatorhasfullcontrol
overthe logandthesplittingwedge.
Operating Tips
Always:
1. Usecleanfluidandcheckfluidlevelregularly.
2. Useanapprovedhydraulicfluid.Approvedfluids
includeDexron®III/Mercon®IIIautomatictransmis-
sionfluid,a 10WeightAWhydraulicoilor Pro-MixTM
AW-32HydraulicOil.
3. Useafilter (cleanorreplaceregularly).
4. Usea breathercapon fluidreservoir.
5. Makesure pumpismountedandalignedproperly.
10
Page 11

6. Usea flexible"spider"typecouplingbetweenengine
and pumpdriveshafts.
7. Keephosesclearand unblocked.
8. Bleedairoutof hosesbeforeoperating.
9. Flushandcleanhydraulicsystembeforerestarting
afterservicing.
10.Use"pipedope"onall hydraulicfittings.
11.Allowtimeforwarm-upbeforesplittingwood.
12.Primethepumpbeforeinitialstart-upbyturningover
theenginewithsparkplugdisconnected(ifnotalready
doneatfactory).
13.Splitwoodalongthe grain(lengthwise)only.
Never:
1. Usewhenfluidisbelow200Forabove1500R
2. Usea solidengine/pumpcoupling.
3. Operatethroughreliefvalveforlong.
4. Attemptto adjustunloadingor reliefvalvesettings
withoutpressuregauges.
5. Operatewithair in hydraulicsystem.
6. Useteflontapeon hydraulicfittings.
7. Attemptto cutwoodacrossthegrain.
8. Attemptto removepartiallysplitwoodfromthewedge
withyourhands.Fullyretractwedgetodislodgewood
withlog dislodger.
Raising and Lowering Beam
1. Usecontrolhandleto runwedgeupanddownbeam
6 to 8 timestocirculatethehydraulicfluid,whichwill
warmandthinthefluid.
2. Placelog splitteron a firm,levelsurface.
Toraisethe beamforverticaloperation:
3. Pullout the horizontalbeamlockonthetongue.
4. Pivotbeamlockdowntoreleasethebeam.
5. Move thebeamto theverticalposition.Secureitwith
thebeamlockonthe reservoirtankassembly.
Figure 4-4
Transporting the Log Splitter
IMPORTANT:Alwaysturnfuelvalveto OFFposition
beforetransportingthe logsplitter.
.
Lowerthebeamto its horizontalposition.Makecer-
tainthe beamislockedsecurelywiththehorizontal
beamlock.
2. Removespringclipandclevispin fromjack stand.
3. Supportthetongueandpivotthejackstandup
againstthetongue.See Figure4-4.
4. Securewiththespringclipandclevispinpreviously
removed.See Figure4-4.
5. Attachcouplerhitchtoa class I orhigher2" ballon a
towingvehicle;latchsecurely.
a. If couplerhitchdoesnotfit on ball:Turn
adjustmentnutoneturn counter-clockwise.
b. If couplerhitch istoo loose on ball: Turn
adjustmentnutoneturn clockwise.
6. Connectthesafetychainsto thetowingvehicle.
7. Pluginthetaillights,ifso equipped,tothe tail light
connectoron the towvehicle.
Operatin
Do not tow faster than
45mph and check
local, state, and federal
requirements before
towing on any public
road.
_ ARNING:Alwaysusethe logsplitter
Tolowerthebeam:
1. Pullout the verticalbeamlockonthereservoirtank.
2. Pivotbeamlockdowntoreleasethebeam.
3. Carefullypullbackon beamandlowerit tothe
horizontalposition.Thehorizontalbeamlockwilllock
automatically.SeeFigure4-1.
inthe verticalpositionwhen splitting
heavy logs.
,__i= WARNING:Do not tow faster than
NOTE:Usecautionwhen backingup.It isrecom-
mendedtousea spotteroutsidethevehicle.
45mphand checklocal, state,and
federal requirementsbefore towing on
any publicroad.
11
Page 12

WARNING
Donotat anytime
make any adjustments
without first stopping
engine, disconnecting
spark plugwire, and
grounding it against
,the engine. Always
iwear safety glasses
during operation or
while performing any
iadjustments or repairs.
Before cleaning,
i!ubricating, repair=
rag,or inspecting,
,disengage the control
ileverand stop engine.
iDisconnect the spark
plugwire and ground
itagainst the engine
to prevent unintended
starting. Always wear
safety glasses during
operation or while
iperforming any adjust-
iments or repairs.
Lock Nut
Figure 5=1
__i WARNING:Donot at any time make
any adjustmentswithout first stopping
engine,disconnecting sparkplug wire,
and groundingit against the engine.
Alwayswear safety glassesduring
operationor while performingany
adjustments or repairs.
Wedge Assembly Adjustment
Asnormalwearoccursandthereisexcessive"play"
betweenthe wedgeandbeam,adjustthe boltsonthe
sideof thewedgeassemblytoeliminateexcessspace
betweenthe wedgeandthe beam.
1. Loosenthejam nutson thetwoadjustmentboltson
thesideof the wedge.SeeFigure5-1.
2. Turntheadjustmentboltsin untilsnugandthenback
themoffslowly(approximately1.5turns)untilthe
wedgeassemblywillslideonthebeam.
3. Re-tightenthejam nutssecurelyagainsttheside
ofthewedgeto securetheadjustmentboltsin this
position.
Gib Adjustment
Periodicallyremoveand replacethe "gibs"(spacers)
betweenthe wedgeassemblyandthebackplate.
NOTE:Thegibsmayberotatedand/orturnedoverfor
evenwear.
1. Loosenthelocknutsundereach backplateand slide
thegibsout.See Figure5-1.
2. Turnor replacethegibs.
3. Reassemblethebackplateandsecurewiththe lock
nuts.
4. Readjusttheboltson the sideofthewedgeassembly.
WARNING:Beforecleaning,lubricating,
repairing,or inspecting,disengage
the control lever and stop engine.
Disconnectthe spark plug wire and
ground itagainst theengine to prevent
unintended starting. Always wear
safety glassesduring operation orwhile
performingany adjustments or repairs.
Conditions that Will Void Warranty
1. Failuretomaintainproperfluidlevel inreservoir
2. Changingthe reliefvalvesettingorpressureadjust-
mentofcontrolvalvewithoutproperknowledgeand
instructionfromthefactory
__ WARNING:Nigher pressurecould
3. Disassemblingthepump
4. Useofincorrecthydraulicfluid
5. Allowingtheflexiblepumpcouplertodeteriorate
withoutproperandregularinspection
6. Lackoflubricationor improperlubricationof the beam
orunit
7. Improperadjustmentofsplittingwedge
8. Excessiveheatingof the hydraulicsystem
9. Attemptingtostartunitin temperaturesunder20°F
withoutpre-heatingfluidin reservoir
10.Unattendedleaksinhydraulicsystem
cause the hoses to burst, cylinder
to rupture,and intensefluid to be
released,which could resultinserious
personalinjury.
iHigher pressurecould
icause the hoses to
burst, cylinderto rup-
iture, and intensefluid
to be released, which
could result inserious
ipersonal injury.
12
Page 13

Hydraulic Fluid and Inlet Filter
• Checkthehydraulicfluidlevelinthelogsplitter
reservoirtankbeforeeachuse.Maintainfluidlevel
withintherangespecifiedonthedipstickat alltimes.
• Changethe hydraulicfluidinthereservoirevery100
hoursof operation.Followthe stepsbelow:
1. Disconnectthesuctionhosefromthebottomof the
reservoirtank.
2. Carefullyunthreadtheinletfilterandcleanitwith
penetratingoil. SeeFigure5-2.
3. Allowthefluidto drainintoa suitablecontainer.
4. Reinsertthefilterand refillthereservoirwiththree(3)
gallonsof oil. ApprovedfluidsincludeDexron®III/
Mercon®IIIautomatictransmissionfluid,a 10Weight
AWhydraulicoilor Pro-MixTM AW-32HydraulicOil.
• Maintainfluidlevelwithintherangespecifiedonthe
dipstickat alltimes.Whencheckingthefluid,always
makesuretotightenthe dipstickuntilthetopofthe
threadsareflushwiththe topof the pipe.
NOTE:Alwaysdisposeofused hydraulicfluidandengine
oil at approvedrecyclingcentersonly.
Contaminantsinfluidmaydamagethehydraulic
components.Flushingthe reservoirtankandhoses
withkerosenewheneverserviceisperformedon
thetank,hydraulicpumpor valveisrecommended.
Contactan authorizedservicedealer.
Figure 5=2
• Makecertainto readjusttheadjustmentboltsso
wedgemovesfreely,butnoexcessspaceexists
betweenthe wedgeplateandthebeam.
Hose Clamps
• Check,beforeeachuse,ifhoseclampsonthe
suctionhose(attachedtothesideofthepump)are
tight.Checkthehoseclampson the returnhoseat
leastoncea season.
WARNING
Hydraulic Filter
• Changethe hydraulicfilterevery50hoursofopera-
tion. Useonly a 10micronhydraulicfilter.Orderpart
number723-0405.
Beam and Splitting Wedge
• Lubricatebothsidesof the beam(whereitcomesinto
contactwiththesplittingwedge),beforeeachuse,
withengineoil.Thewedgeplateon the logsplitteris
designedsothegibson the sideof thewedgeplate
canbe removedand rotatedand/orturnedoverfor
evenwear.
Engine
Refertotheseparateenginemanualforallmaintenance
instructions.
Flexible Pump Coupler
Theflexiblepumpcouplerisa nylon"spider"insert,
locatedbetweenthe pumpandthe engineshaft.Over
time,the couplerwillhardenanddeteriorate.
Replacethecouplerifyoudetectvibrationor noise
comingfromtheareabetweentheengineandthe
pump.If the couplerfailscompletely,youwillexperience
a lossofpower.
NOTE:Alwaysdispose
of used hydraulic
fluidand engineoil at
approvedrecycling
centersonly.
IMPORTANT
Neverhit the engine
shaft inany manner,
as a blowwill cause
permanentdamageto
the engine.
13
Page 14

Figure 5=3
6. Installpumpcouplinghalfand keyon pumpshaft.
Rotatecouplinghalfuntil setscrewfacesopeningin
shield.Donottightensetscrew.
7. Installnylon"spider"ontoenginecouplinghalf.
8. Alignpumpcouplinghalfwith nylon"spider"byrotat-
ingengineusingstarterhandle.Slidecouplinghalf
intoplacewhileguidingthreemountingboltsthrough
holesin pumpsupportbracket.
9. Securewithnuts removedearlier.
10.Set.010"to.060"clearance/gapbetweenthe nylon
"spider"andtheenginecouplinghalfbyslidinga
feelergaugeor matchbookcoverbetweenthenylon
"spider"andtheenginecouplinghalfand moving
pumpcouplinghalfas needed.Securepumpcoupling
halfwith setscrew.SeeFigure5-3.
NOTE:Makecertainproperclearance/gapisobtained
beforetighteningsetscrew.
WARNING
'Excessive pressure
when seating beads
_maycausetire/rim
_assembly to burst
with force sufficientto
cause serious injury.
Referto sidewall of
,tire for recommended
;pressure.
IMPORTANT:Neverhittheengineshaftinanymanner,
asa blowwillcausepermanentdamagetotheengine.
1. Removethreenutsthat securethepumptothe
couplingshield.Twonutsareat the bottomcorners
andoneisin thetopcenter.SeeFigure5-3.
2. Removethepump.
3. Rotatetheenginebyslowlypullingstarterhandle
untilenginecouplinghalfset screwisvisible.Loosen
setscrewusingallenwrenchandslidecouplinghalf
offengineshaft.
4. Loosenset screwon pumpcouplinghalfand remove
couplinghalf.
5. Slidenewenginecouplinghalfontothe engine
shaftuntil theendofthe shaftisflushwiththe inner
portionof the couplinghalf.(Theremustbespace
betweenthe endoftheenginesupportbracketand
couplinghalf).Tightensetscrew.
Tires
Seesidewalloftireforrecommendedpressure.Under
anycircumstancesdo notexceedmanufacturer'srecom-
mendedpsi.Maintainequalpressureonalltires.
,_l_k,, WARNING:Excessivepressurewhen
seatingbeads may causetire/rim as-
sembly to burst with force sufficient to
cause serious injury.Referto sidewall
of tire for recommendedpressure.
14
Page 15

Storing Your Log Splitter
Prepareyourlog splitterforstorageattheendof the
seasonor ifthelog splitterwillnotbeusedfor30 daysor
more.
_ WARNING:Neverstoremachine with
1. Cleanthelog splitterthoroughly.
NOTE:Wedo notrecommendtheuseof pressurewash-
ersor gardenhosetocleanyourunit.Theymaycause
damageto bearingsortheengine.Theuseofwaterwill
resultinshortenedlifeand reduceserviceability.
2. Wipe unitwithanoiled ragto preventrust,especially
on thewedgeandthebeam.
3. Drainfueltank.Alwaysdrainfuelintoapproved
containeroutdoors,awayfromopenflame.Besure
thatengineiscoolbeforedrainingthefuel. Donot
smokewhilehandlingfuel.
fuel inthe fuel tank insideof building
where fumes may reach an open flame
or spark,or where ignitionsources are
presentsuchas hotwater and space
heaters,furnaces, clothesdryers,
stoves,electricmotors, etc.
4. Starttheengineandletitrununtilthefuellinesand
carburetorareempty.
5. Removesparkplug.Holdingaragoverthecylinder
hole,pourapproximately1/2ounce(approximately
onetablespoon)ofengineoil intocylinderandcrank
slowlyto distributetheoil.
6. Replacesparkplug.
7. Do not storegasolinefromoneseasonto another.
8. Replaceyourgasolinecanif it startsto rust.Rust
and/ordirt inthegasolinewillcauseproblems.
9. Storeunitina clean,dryarea.Donotstorenextto
corrosivematerials,suchasfertilizer.
NOTE:if storinginan unventilatedor metalstorage
shed,becertainto rustprooftheequipmentby coating
witha lighto11orsilicone.
Maintaining
WAR
Neverstor
with fuel in the fuel
tank insideofbuilding
where fumes may
reach an open flame
r sparki 0r where
ignitionsources are
presentsuchashot
water and space heat'
ers, furnaces, clothes
dryers; stoves, electric
motors, etc,
15
NOTEi we do not
recommendtheuse of
pressure washersor
gardenhoseto Clean
your UniLThey may
cause damageto bear,
ngSOrthe engine;The
useof waterwill result
in shortened lifeand
reduce serviceability.
Page 16

For repairsbeyond
the minor ad/ust-
merits listed hem
Problem Cause Remedy
Enginefails to start 1. Sparkplugwiredisconnected. 1. Connectwireto sparkplug.
2. Fueltankemptyor stalefuel. 2. Filltankwithclean,freshgasoline.
3. Choke if equippednotinCHOKE 3. Movechoketo CHOKEposition.
position.
4. Faultysparkplug. 4 Clean,adjustgap,or replace.
5. Blockedfuelline. 5. Cleanfuelline.
6. Engine(if equippedwitha primer)not 6. Primeengine.
primedproperly. 7. Movethrottleleverto FASTposi-
7. Throttlecontrollevernotin correct tion.
startingposition
Engineruns erratic
equipped.
2. Sparkplugwireloose.
3. Blockedfuellineor stalefuel.
4. Waterordirt infuel system.
1. MovechokelevertoOFFposition.1. UnitrunningwithCHOKEapplied,if so
2. Connectandtightenspark
plugwire.
3. Cleanfuelline;fill tankwith clean,
fresh(lessthan30 daysold)
gasoline.
4. Drainfueltank.Refillwith
freshfuel.
I ¸
I i iii_
I i i i i
I_ _ i i
I i i i i
I i i_ i
5. Dirty aircleaner. 5. Cleanorreplaceaircleaner.
6. Carburetornotadjustedproperly. 6. Seeauthorizedservicedealer.
EngneOverheats EngineOillevel owl 11 FillCrankcaseWithproperoil.
2. Dirty aircleaner. 2. Cleanorreplaceair cleaner.
31 carburetornotadjustedproperlyl 3. Seeauthoiizedservicedealeil
Problem
Cylinder rodwill not
move
1. Brokendriveshaft.
2. Shippingplugsleft inhydraulichoses.
3. Set screwsincouplingnotadjusted
properly.
4. Looseshaftcoupling.
5. Gearsectionsdamaged.
6. Damagedreliefvalve.
7. Hydrauliclinesblocked.
8. Incorrectoil level.
9. Damageddirectionalvalve.
10.Blockeddirectionalvalve.
Cause
Remedy
1. Seeauthorizedservicedealer.
2. Disconnecthydraulichoses,
removeshippingplugs,reconnect
hoses.
3. Seeoperator'smanualforcorrect
adjustment.
4. Correctengine/pumpalignmentas
necessary.
5. Seeauthorizedservicedealer.
6. Seeauthorizedservicedealer.
7. Flushandcleanhydraulicsystem.
8. Checkoil level.
9. Seeauthorizedservicedealer.
lO.Flushandcleanhydraulicsystem.
16
Page 17

Problem Cause Remedy
Slowcy indershaft I 1, Gearsectionsdamaged• I 1.Seeauthorizedservicedealer•
speedwhile extending 2. Excessivepumpinletvacuum. 2. Makecertainpumpinlethosesare
and retractng cearandunblocked-useshort,
LeakingCylinder 1. Brokenseals. 1. Seeauthorizedservicedealer.
Engineruns but wood 1. Smallgearsectiondamaged. 1. Seeauthorizedservicedealer.
will not split or wood 2. Pumpcheckvalveleaking. 2. Seeauthorizedservicedealer.
splits too slowly 3. Excessivepumpinletvacuum. 3. Makecertainpumpinlethosesare
Enginestalls during 1. Lowhorsepower/weakengine. 1.
splitting 2. Overloadedcylinder. 2.
I
3. Slowenginespeed
4. Damagedreliefvalve•
5 Incorrectoillevel•
6. Contaminatedoil.
7. Directionalvalveleakinginternally•
I 8. Internallydamagedcylinder.
2. Scoredcylinder. 2. Seeauthorizedservicedealer.
4 Incorrectoillevel. 4. Checkoillevel.
5. Contaminatedoil. 5. Dran o c eanreservor,and ref .
6. Directionalvalveleaknginternally. • i i .
• y . •
I 7 Overloadedc linder I 7 Donotattempttosp twood
8. nternallydamagedcylinder.
!
largediameterinlethoses,
3 Seeauthorzedservcedeaer
4 Seeauthorzedservce deaer
5 ChecKo eve
6 Dran o c eanreservor and ref
7Seeauthorzedservce deaer
8.Seeauthorzedservce deaer.
clearandunblocked
6 Seeauthorzedservcedeaer
I aganstthe gran
8. Seeauthorzedservcedeaer.
Seeauthorizedservicedealer.
Donotattemptto splitwood
againstthegrainor seeauthorized
servicedealer.
ydraulic
Trouble
Shootin
ments listed here,
contact an authorized
service dealer.
Engine wil! not turn Or Engine!PumPmisallgnmenL 1! Collect alignmentas necessa[y!
stalls under low load 2: Frozenorseizedpump. 2 See authorizedservicedealer.
conditions 31 LowhorsepOwer/weakengine, see authorizedservicedealerl
Hydrau!ic!inesbloCk_d Flushandcleanhydrau!icsyste_
5,Blocked directionalvalve: 5: Flush andclean hydraulicsystem.
Leakingpump shaft
seal
1. Brokendriveshaft.
2. Engine/pumpmisalignment.
3. Gearsectionsdamaged.
4. Poorlypositionedshaft seal.
5. Pluggedoilbreather.
1. Seeauthorizedservicedealer.
2. Correctalignmentas necessary.
3. Seeauthorizedservicedealer.
4. Seeauthorizedservicedealer.
5. Makecertainreservoiris properly
vented.
17
Page 18

Model Series 550 Thru 570
i
'L4_, :4_
A
18
To secure
ground wire
Page 19

Ref. PartNo. Description
No.
1. 718-0769A HydraulicCylinder
2. 727-04166 HydraulicTube
3. 710-1018 HexCapScrew1/2-20x 2.75
4. 737-0192 90 DegreeSolidAdapter
5. 718-0481A ControlValve
6. 737-0153 ReturnElbow
7. 737-0238 NipplePipe1/2-14
8. 710-1806 HexCapScrew1/2-13x 3.25
9. 719-0550A WedgeAssembly
10. 712-3058 HexLockNut,1/2-20
11. 712-0711 HexJamNut3/8-24
12. 710-0459A HexCapScrew3/8-24x 1.5
13. 781-0351 AdjustableGib
14. 736-0116 FlatWasher.635x.93x.06
15. 712-3022 HexLockNut1/2-13
16. 681-04071A BeamAssembly
17. 710-3056 HexScrew,5/16-18x 3.25
18. 710-0654A HexWasherScrew3/8-16x 1.0
19. 781-1048A DislodgerBracket
20. 781-0790 BackPlate
21. 737-04093 inletFilter
22. 727-0443 ReturnHose3/4" IDx44" Lg.
23. 726-0132 HoseClamp5/8"
24. 737-0316 FilterHousing
25. 723-0405 Oil Filter
26. 734-0873 HubCap
27. 714-0162 CotterPin
28. 712-0359 SlottedNut3/4-16
29. 634-0186 WheelAssembly
30. 736-0351 FiatWasher.760IDx.500OD
31. 737-0312 Adapter3/4-14
32. 781-0526At HoseGuard
33. 737-0348A VentedDipstick
34. 711-1587 ClevisPin
35. 781-0690 LockRod
36. 714-0470 CotterPin
37. 726-0214 PushCap
38. 732-0583 CompressionSpring
39. 781-04180 LogTrayBracket
40. 710-0650 TT Screw,5/16-18x.875
41. 712-04065 FlangeLockNut,3/8-16
42. 781-04179 LogTray
Ref. PartNo. Description
No.
43. 681-04040A FrameAssembly
44. 710-0521 HexBolt3/8-16x3"
45. 719-0353 CouplingShield
46. 714-0122 SquareKey3/16"x.75
47. 718-04145 FlexibleCoupling
48. 712-04063 FlangeLockNut,5/16-18
49. 781-0097 RearCouplingSupportBracket
50. 781-1024 FenderMountingBracket
51. 727-04130 Hose
52. 718-04127 GearPump
53. 737-0329 45 DegreeElbowFitting
54. 727-0502 HighPressureHydraulicHose
55. 781-0788 TongueAssembly
56. 747-1261 LatchRod
57. 781-1045 Latch
58. 732-3127 CompressionSpring
59. 736-0371 FiatWasher
60. 781-0538At HoseGuard
61. 710-3085 HexCapScrew,3/8-16x3.50
62. 736-0185 FlatWasher,.375x.738x.063
63. 747-04539 HydraulicValveControl
64. 681-04030 HitchCouplingAssembly
65. 713-0433A Chain
66. 731-2496A Fender(Black)
731-2499A Fender(Red)
67. 711-0813 ClevisPin
68. 720-04088 Grip
69. 732-0194 SpringPin
70. 781-0789 JackStand
71. 715-0120 SpiralPin
72. 710-0650 TT Screw,5/16-18x0.875"
73. 710-0602 TT Screw,5/16-18x 1.00
74. 625-0062t LightKit
75. 681-0164t LightBracket- LH
781-1027At LightBracket- RH
76. 710-0874t Screw,5/16-18x1.25
77. 712-3008t Jam Nut,3/8-16
78. 726-0201t SpeedNut, .3125ID
79. 711-04585 ClevisPin
80. 713-04036 ValveHandleLink
81. 714-0111 CotterPin
82. 710-0376 HexScrew,5/16-18x1.00
t If Equipped
ENUiNE
_FACTORY PARTS
Toorder replacement
parts, call
1-800-800-7310
or visit
www.mtdproducts.com
19
Page 20

MANUFACTURER'S LiMiTED WARRANTY FOR
ThelimitedwarrantysetforthbelowisgivenbyMTDLLCwithrespect
tonewmerchandisepurchasedandusedin theUnitedStates,its
possessionsandterritories.
"MTD"warrantsthisproductagainstdefectsinmaterialandworkman-
shipfor a periodoftwo (2)yearscommencingonthedateoforiginal
purchaseandwill,at itsoption,repairor replace,freeofcharge,any
partfoundto bedefectiveinmaterialsorworkmanship.Thislimitedwar-
rantyshallonlyapplyifthisproducthasbeenoperatedand maintained
inaccordancewiththe Operator'sManualfurnishedwiththeproduct,
andhasnotbeensubjectto misuse,abuse,commercialuse,neglect,
accident,impropermaintenance,alteration,vandalism,theft,fire,water,
ordamagebecauseof otherperilor naturaldisaster.Damageresulting
fromthe installationor useofany part,accessoryor attachmentnot
approvedby MTDforusewiththeproduct(s)coveredbythis manual
willvoid yourwarrantyastoanyresultingdamage.
Normalwearpartsarewarrantedto befreefromdefectsinmaterialand
workmanshipfor a periodofthirty(30)daysfromthe dateof purchase.
Normalwearpartsinclude,butare notlimitedto itemssuchas: batter-
ies,belts,blades,bladeadapters,grassbags,riderdeckwheels,seats,
snowthrowerskidshoes,shaveplates,augerspiralrubberandtires.
HOW TO OBTAINSERVICE: Warrantyservice isavailable,WITH
PROOFOF PURCHASE, through your localauthorized service
dealer.Tolocate the dealer in yourarea, check yourYellowPages,
or contact MTD LLC at RO. Box361131,Cleveland, Ohio 44136-
0019,or call 1-800-800-7310or 1-330-220-4683 or log on to our
Website at www.mtdproducts.com.
Thislimitedwarrantydoesnot providecoverageinthefollowingcases:
a. Theengineor componentpartsthereof.Theseitemsmaycarrya
separatemanufacturer'swarranty.Referto applicablemanufacturer's
warrantyfortermsandconditions.
b. Logsplitterpumps,valves,andcylindershavea separateoneyear
warranty.
c. Routinemaintenanceitemssuchaslubricants,filters,blade
sharpening,tune-ups,brakeadjustments,clutchadjustments,deck
adjustments,andnormaldeteriorationoftheexteriorfinishdueto
useor exposure.
d. Servicecompletedbysomeoneotherthananauthorizedservice
dealer.
e. MTDdoesnotextendanywarrantyforproductssoldor exported
outsideoftheUnitedStates,its possessionsandterritories,except
thosesoldthroughMTD'sauthorizedchannelsofexportdistribution.
f. ReplacementpartsthatarenotgenuineMTDparts.
g. Transportationchargesandservicecalls.
Noimpliedwarranty,includingany impliedwarranty of mer-
chantabilityof fitness for a particular purpose,applies after the
applicable periodof expresswritten warranty aboveasto the
partsasidentified.Nootherexpresswarranty,whetherwrittenor
oral, exceptas mentioned above,givenby any personor entity,
includingadealeror retailer, withrespect to any product,shall
bindMTD.Duringthe periodof the warranty,the exclusiveremedy
isrepairor replacementof the productas setforth above.
Theprovisionsasset forth inthis warrantyprovidethesoleand
exclusiveremedy arising from the sale.MTDshallnot be liable
for incidentalor consequentiallossor damageincluding,without
limitation, expensesincurredfor substituteor replacementlawn
careservicesor for rentalexpensesto temporarily replacea
warranted product.
Somestatesdo notallowthe exclusionor limitationofincidentalor
consequentialdamages,orlimitationsonhowlongan impliedwarranty
lasts,sotheaboveexclusionsorlimitationsmaynotapplytoyou.
Innoeventshallrecoveryofanykindbegreaterthantheamountofthe
purchasepriceof the productsold.Alterationof safetyfeaturesof
the productshallvoid this warranty.Youassumetheriskandliability
forloss,damage,orinjurytoyou andyourpropertyand/ortoothersand
theirpropertyarisingoutofthemisuseorinabilitytousethe product.
Thislimitedwarrantyshallnotextendtoanyoneotherthantheoriginal
purchaserorto the personforwhomitwas purchasedas a gift.
HOWSTATELAWRELATESTOTHISWARRANTY:This limited
warrantygivesyouspecificlegalrights,andyoumayalsohaveother
rightswhichvaryfromstatetostate.
IMPORTANT:OwnermustpresentOriginalProofof Purchasetoobtain
warrantycoverage.
IVITDLLC, P.O. BOX 361131 CLEVELAND, OHiO 44136-0019; Phone: 1=800=800-7310, 1-330=220-4683
GDOO-lO0015 REV.A
 Loading...