

Page 1

Operator's Manual
I:Rl FI'SlVl N
1450 Series Engine
Chipper Shredder
Model No. 247.77638
* SAFETY
* ASSEMBLY
* OPERATION
* MAINTENANCE
Before using this equipment,
read this manual and follow
all safety rules and operating
instructions.
Sears Brands Management Corporation, Hoffman Estates, iL 60179 U.S.A.
Visit our website: www.craftsman.com
* PARTS LIST
* ESPANOL
FORMNO.769-05040B
07/25/2011
Page 2
WarrantyStatement..................................Pac
SafeOperationPractices..........................Pac
SafetyLabels............................................Pac
Assembly..................................................Pac
Operation..................................................Pac
ServiceandMaintenance.........................Pac
Off-SeasonStorage..................................Pac
CRAFTSMAN TWO YEAR FULL WARRANTY
FORTWOYEARSfromthe dateof purchase,thisproductis warrantedagainstany
defectsin materialor workmanship.Adefectiveproductwill receivefreerepairor
replacementif repairisunavailable.
Forwarrantycoveragedetailstoobtainfreerepairor replacement,visitthewebsite:
www.craftsman.com
ThiswarrantycoversONLYdefectsin materialandworkmanship.Warrantycoverage
doesNOTinclude:
• Expendableitemsthatcanwearoutfromnormalusewithinthewarranty
period,suchas theblades, sparkplug,aircleaner,flail screenandcatcher
bag.
e2
e3
e7
e8
e12
e14
e18
TroubleShooting.......................................Page19
PartsList...................................................Page20
LabelMap.................................................Page31
RepairProtectionAgreement...................Page34
Espa_ol.....................................................Page35
ServiceNumbers......................................BackCover
Productdamageresultingfromuserattemptsatproductmodificationor
repairorcausedbyproductaccessories.
Repairsnecessarybecauseof accidentorfailuretooperateor maintainthe
productaccordingtoall suppliedinstructions.
• Preventivemaintenance,orrepairsnecessarydueto improperfuelmixture,
contaminatedor stalefuel.
Thiswarrantyisvoidif this productisever usedwhileprovidingcommercialservicesor if
Thiswarrantygivesyou specificlegalrights,andyou mayalsohaveotherrightswhich
Sears Brands ManagementCorporation, Hoffman Estates,IL60179
EngineSeries: 1450
EngineOilType: SAE30
EngineOilCapacity: 28ounces
Fuel: UnleadedGasoline
SparkPlug: Champion®RC-12YC
SparkPlugGap: .030"
rentedtoanotherperson.
varyfromstateto state.
Model Number.................................................................
Serial Number .................................................................
Dateof Purchase.............................................................
Recordthemodelnumber,serialnumber
anddateof purchaseabove
KCDIRLLC 2
Page 3

Thissymbolpointsout importantsafetyinstructionswhich,if not
followed,couldendangerthe personalsafetyand/orpropertyof
yourselfandothers. Readandfollowall instructionsin thismanual
beforeattemptingtooperatethismachine.Failuretocomplywith
theseinstructionsmayresultin personalinjury.Whenyouseethis
symbol,HEEDITSWARNING!
Thismachinewasbuiltto beoperatedaccordingtothe safeopera-
tionpracticesinthismanual.Aswithanytypeof powerequipment,
carelessnessorerroronthepart ofthe operatorcan resultin
seriousinjury.Thismachineis capableof amputatingfingers,hands,
toesandfeetandthrowingdebris.Failureto observethefollowing
safetyinstructionscouldresultin seriousinjuryordeath.
CALIFORNIA PROPOSITION 65
EngineExhaust,someof itsconstituents,andcertainvehicle
componentscontainoremitchemicalsknownto StateofCalifornia
tocausecancerandbirthdefectsorotherreproductiveharm.
TRAINING
• Read,understand,andfollowall instructionson themachineand
in themanual(s)beforeattemptingto assembleandoperate.
Keepthis manualina safeplaceforfutureand regularreference
andfororderingreplacementparts.
• Readthe Operator'sManualand followallwarningsand safety
instructions.Failuretodosocan resultin seriousinjuryto the
operatorand/orbystanders.
• Befamiliarwithall controlsandtheir properoperation.Knowhow
tostopthe machineanddisengagethemquickly.
• Neverallowchildrenunder16yearsofageto operatethis
machine.Children16andovershouldreadandunderstandthe
instructionsandsafeoperationpracticesin thismanualandon
themachineandbe trainedandsupervisedbyanadult.
• Neverallowadultsto operatethismachinewithoutproper
instruction.
• Keepbystanders,pets,andchildrenatleast75feetfromthe
machinewhileit isin operation.Stopmachineifanyoneenters
thearea.
• Neverrunanengineindoorsorina poorlyventilatedarea.Engine
exhaustcontainscarbonmonoxide,anodorlessanddeadlygas.
• Donot puthandsandfeetnearrotatingpartsor inthefeeding
chambersanddischargeopening.Contactwiththe rotating
impellercanamputatefingers,hands,andfeet.
• Neverattempttounclogeitherthe feedintakeordischarge
opening,removeor emptybag,or inspectandrepairthe machine
whilethe engineisrunning.Shutthe engineoff andwaituntilall
movingpartshavecometo a completestop.Disconnectthespark
plugwireandgroundit againsttheengine.
Your Responsibility--Restrict theuseofthispowermachineto
personswhoread,understandandfollowthewarningsand instruc-
tionsinthismanualandon the machine.
SAVETHESEINSTRUCTIONS!
PREPARATION
• Thoroughlyinspecttheareawheretheequipmentistobeused.
Removeall rocks,bottles,cans,or otherforeignobjectswhich
couldbepickedupor thrownandcausepersonalinjuryor
damageto themachine.
• Alwayswearsafetyglassesorsafetygogglesduringoperation
andwhileperformingan adjustmentor repair,to protectyour
eyes.Thrownobjectswhichricochetcancauseseriousinjuryto
theeyes.
• Wearsturdy,rough-soledworkshoesandclose-fittingslacksand
shirts.Loosefittingclothesorjewelrycan becaughtin movable
parts.Neveroperatethismachineinbarefeetorsandals.Wear
leatherworkgloveswhenfeedingmaterialinthe chipperchute.
• Beforestarting,checkallboltsandscrewsforpropertightnessto
besurethe machineisinsafeworkingcondition.Also,visually
inspectmachineforany damageatfrequentintervals.
• Maintainor replacesafetyandinstructionslabels,asnecessary.
3
Page 4
SafeHandling of Gasoline:
Toavoidpersonalinjuryor propertydamageuseextremecarein
handlinggasoline.Gasolineisextremelyflammableandthe vaporsare
explosive.Seriouspersonalinjurycanoccurwhengasolineis spilled
onyourselforyourclotheswhichcan ignite.Washyourskinand
changeclothesimmediately.
• Useonlyan approvedgasolinecontainer.
• Neverfillcontainersinsidea vehicleor ona truckortrailerbed
witha plasticliner.Alwaysplacecontainersonthe groundaway
fromyourvehiclebeforefilling.
• Whenpractical,removegas-poweredequipmentfromthe truck
ortrailerand refuelitonthe ground.Ifthisis notpossible,then
refuelsuchequipmentona trailerwitha portablecontainer,rather
thanfroma gasolinedispensernozzle.
• Keepthenozzleincontactwiththe rimof thefuel tankor
containeropeningatalltimes untilfuelingiscomplete.Donotuse
a nozzlelock-opendevice.
• Extinguishallcigarettes,cigars,pipesandothersourcesof
ignition.
• Neverfuelmachineindoors.
• Neverremovegascapor addfuelwhiletheengineishotor run-
ning.Allowenginetocool atleasttwo minutesbeforerefueling.
• Neveroverfill fueltank. Filltankto nomorethan1/2inchbelow
bottomoffillerneckto allowspacefor fuelexpansion.
• Replacegasolinecapandtightensecurely.
• Ifgasolineisspilled,wipeitoff theengineandequipment.Move
unitto anotherarea.Wait5 minutesbeforestartingtheengine.
• Toreducefirehazards,keepmachinefreeofgrass, leaves,or
otherdebrisbuild-up.Cleanupoil orfuelspillageand removeany
fuelsoakeddebris.
• Neverstorethemachineorfuel containerinsidewherethereisan
openflame,sparkor pilotlightas on awaterheater,spaceheater,
furnace,clothesdryer orothergas appliances.
OPERATION
• Donot puthandsandfeetnearrotatingpartsor in thefeeding
chambersanddischargeopening.Contactwiththe rotating
impellercanamputatefingers,hands,andfeet.
• Beforestartingthemachine,makesurethe chipperchute,feed
intake,andcuttingchamberare emptyandfreeof all debris.
• Thoroughlyinspectall materialtobe shreddedandremoveany
metal,rocks,bottles,cans,or otherforeignobjectswhichcould
causepersonalinjuryor damagetothemachine.
• If itbecomesnecessaryto pushmaterialthroughtheshredder
hopper,usea smalldiameterstick. Donotuseyour handsorfeet.
• Iftheimpellerstrikesa foreignobjectorifyourmachineshould
startmakinganunusualnoiseorvibration,immediatelyshut
theengineoff. Allowthe impellerto cometoa completestop.
Disconnectthesparkplugwire,grounditagainsttheengineand
performthefollowingsteps:
a. Inspectfor damage.
b. Repairor replaceanydamagedparts.
c. Checkforanyloosepartsandtightento assurecontinued
safeoperation.
• Donotallowanaccumulationof processedmaterialto buildupin
thedischargearea.Thiscanpreventproperdischargeandresult
inkickbackof materialthroughthefeedopening.
• Donotattempttoshredorchipmateriallargerthanspecified
on themachineorinthis manual.Personalinjuryor machine
damagecouldresult.
• Neverattempttounclogeitherthefeedintakeor discharge
openingwhilethe engineisrunning.Shuttheengineoff,waituntil
all movingpartshavestopped,disconnectthesparkplugwireand
grounditagainsttheenginebeforeclearingdebris.
• Neveroperatewithouttheshredderhopper,chipperchute,or
chutedeflectorproperlyattachedtothe machine.Neveremptyor
changedischargebagwhiletheengineis running.
• Keepallguards,deflectorsand safetydevicesinplaceand
operatingproperly.
• Keepyourfaceandbodybackandtothe sideof thechipper
chutewhilefeedingmaterialintothemachineto avoidaccidental
kickbackinjuries.
• Neveroperatethismachinewithoutgoodvisibilityorlight.
• Donotoperatethismachineona paved,gravelor non-level
surface.
• Donotoperatethismachinewhileundertheinfluenceof alcohol
or drugs.
• Mufflerandenginebecomehotandcancausea burn.Donot
touch.
• Neverpick uporcarrymachinewhiletheengineisrunning.
• Ifsituationsoccurwhichare notcoveredinthismanual,usecare
andgoodjudgement.Contact1-800-4-MY-HOMEfor thelocation
ofthe nearestSearsParts& RepairServiceCenter.
MAINTENANCE & STORAGE
• Nevertamperwith safetydevices.Checktheirproperoperation
regularly.
• Checkboltsandscrewsfor propertightnessat frequentintervals
to keepthemachineinsafeworkingcondition.Also,visually
inspectmachinefor anydamageandrepair,ifneeded.
• Beforecleaning,repairing,or inspecting,stoptheengineand
makecertaintheimpellerandall movingpartshavestopped.
Disconnectthesparkplugwireandgrounditagainsttheengine
to preventunintendedstarting.
• Donotchangetheenginegovernorsettingsoroverspeedthe
engine.Thegovernorcontrolsthe maximumsafeoperatingspeed
ofthe engine.
4
Page 5
• Maintainor replacesafetyandinstructionlabels,asnecessary.
Followthismanualforsafeloading,unloading,transporting,and
storageof thismachine.
Neverstorethemachineorfuel containerinsidewherethereisan
openflame,sparkorpilot lightsuchas a waterheater,furnace,
clothesdryer,etc.
Allowmachinetocoolat least5 minutesbeforestoring.
• Alwaysrefertothe operator'smanualforproperinstructionson
off-seasonstorage.
• If thefuel tankhasto bedrained,dothisoutdoors.
• Observeproperdisposallawsand regulationsforgas,oil,etc.to
protecttheenvironment.
• Accordingtothe ConsumerProductsSafetyCommission(CPSC)
andtheU.S.EnvironmentalProtectionAgency(EPA),thisproduct
hasan AverageUsefulLifeofseven(7)years,or 60hoursof
operation.At theendof theAverageUsefulLife havethe machine
inspectedannuallybyan authorizedservicedealerto ensurethat
allmechanicalandsafetysystemsareworkingproperlyand not
wornexcessively.Failuretodosocanresultinaccidents,injuries
ordeath.
DO NOT MODIFY ENGINE
Toavoidseriousinjuryordeath,donot modifyenginein anyway.
Tamperingwiththegovernorsettingcan leadto a runawayengineand
causeitto operateat unsafespeeds.Nevertamperwithfactorysetting
ofenginegovernor.
NOTICE REGARDING EMISSIONS
EngineswhicharecertifiedtocomplywithCaliforniaandfederal
EPAemissionregulationsforSORE(SmallOffRoadEquipment)are
certifiedto operateonregularunleadedgasoline,and mayinclude
thefollowingemissioncontrolsystems:EngineModification(EM),
OxidizingCatalyst(CO),SecondaryAirInjection(SAI)and ThreeWay
Catalyst(TWO)if soequipped.
SPARK ARRESTOR
Thismachineis equippedwithan internalcombustionengineand
shouldnotbe usedonor nearanyunimprovedforest-covered,
brushcoveredorgrass-coveredlandunlesstheengine'sexhaust
systemisequippedwitha sparkarrestormeetingapplicablelocalor
statelaws(if any)
Ifa sparkarrestorisused,it shouldbe maintainedin effectiveworking
orderbytheoperator.Inthe StateofCaliforniatheaboveis required
bylaw (Section4442ofthe CaliforniaPublicResourcesCode).Other
statesmayhavesimilarlaws. Federallawsapplyonfederallands.
A sparkarrestorforthe muffleris availablethroughyournearestSears
PartsandRepairServiceCenter.
Page 6
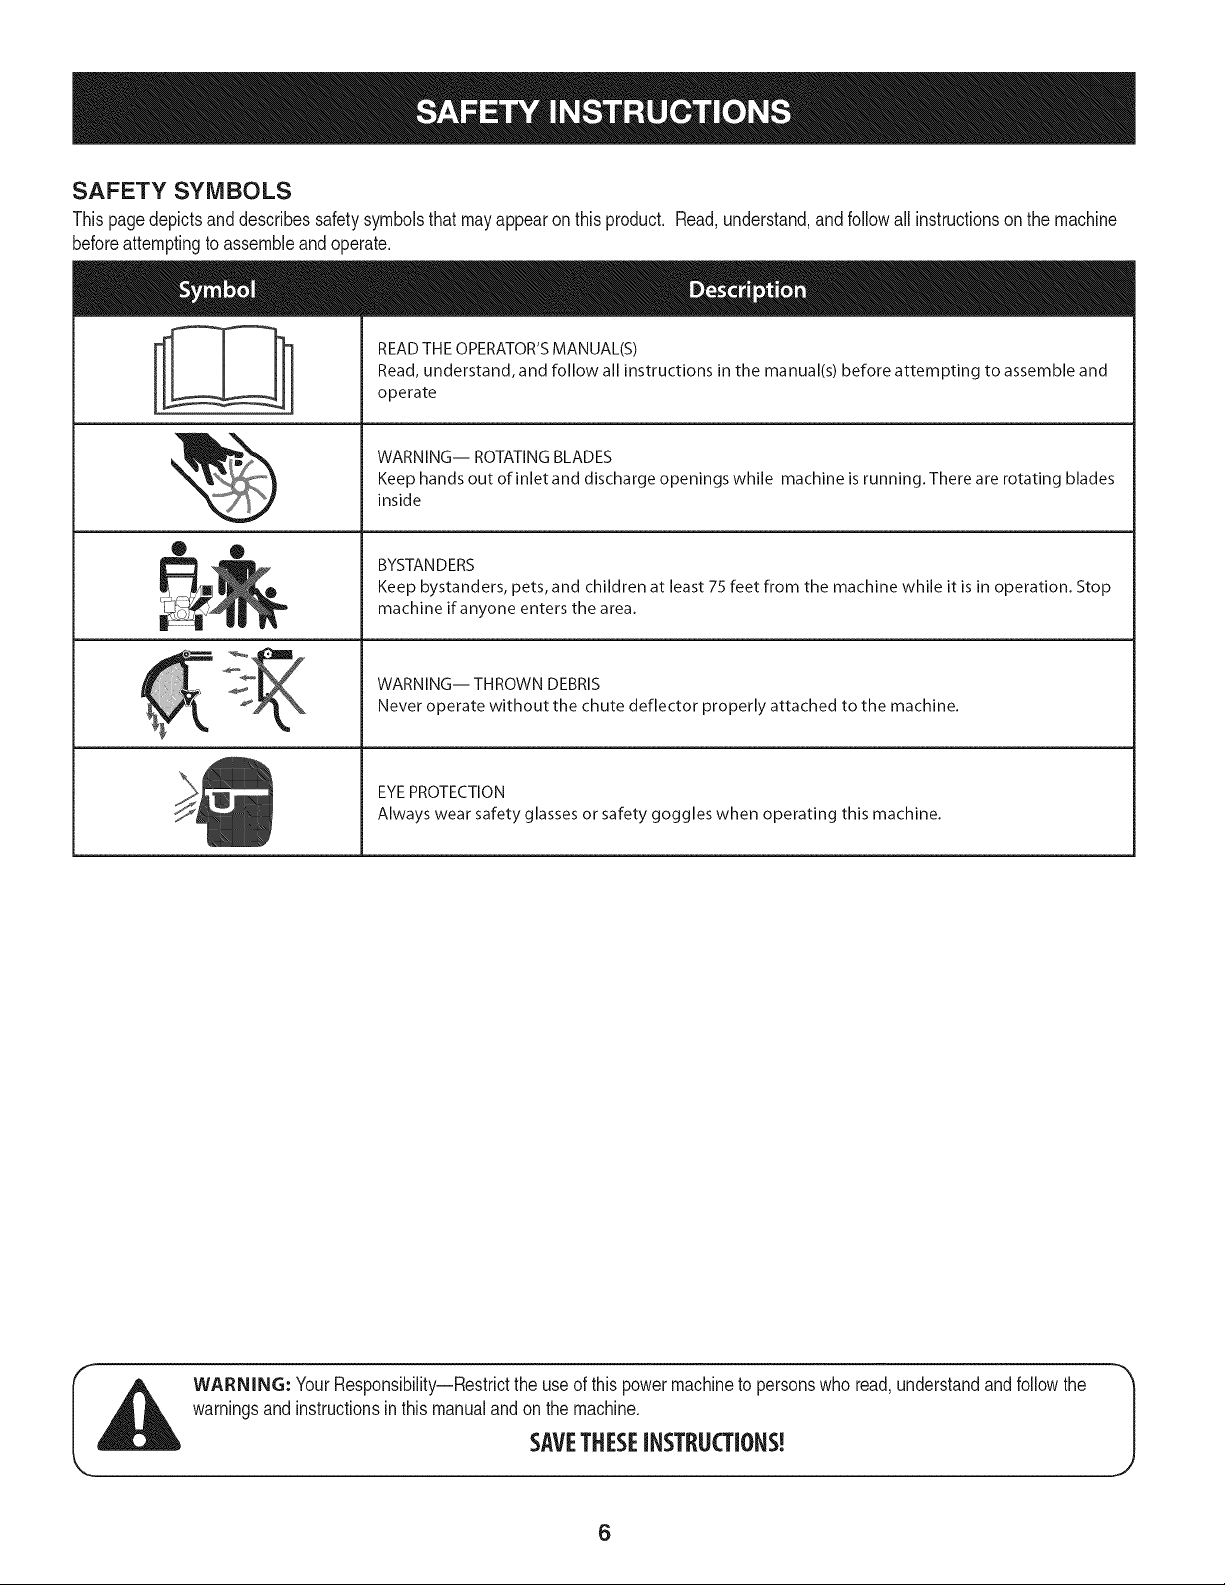
SAFETY SYMBOLS
Thispagedepictsanddescribessafetysymbolsthatmayappearonthisproduct. Read,understand,andfollowall instructionson themachine
beforeattemptingtoassembleandoperate.
READ THE OPERATOR'S MANUAL(S)
i
i
Read, understand, and follow all instructions in the manual(s) before attempting to assemble and
operate
WARNING-- ROTATING BLADES
Keep hands out of inlet and discharge openings while machine is running. There are rotating blades
inside
• ®
il
BYSTANDERS
Keep bystanders, pets, and children at least 75 feet from the machine while it is in operation. Stop
machine if anyone enters the area.
WARNING-- THROWN DEBRIS
Never operate without the chute deflector properly attached to the machine.
EYEPROTECTION
Always wear safety glasses orsafety goggles when operating this machine.
warningsand instructionsinthis manualandonthe machine.
I_ ARNING: YourResponsibility--Restrictthe useof this powermachineto personswho read,understandandfollowthe
SAVETHESEINSTRUCTIONS!
6
J
Page 7
r
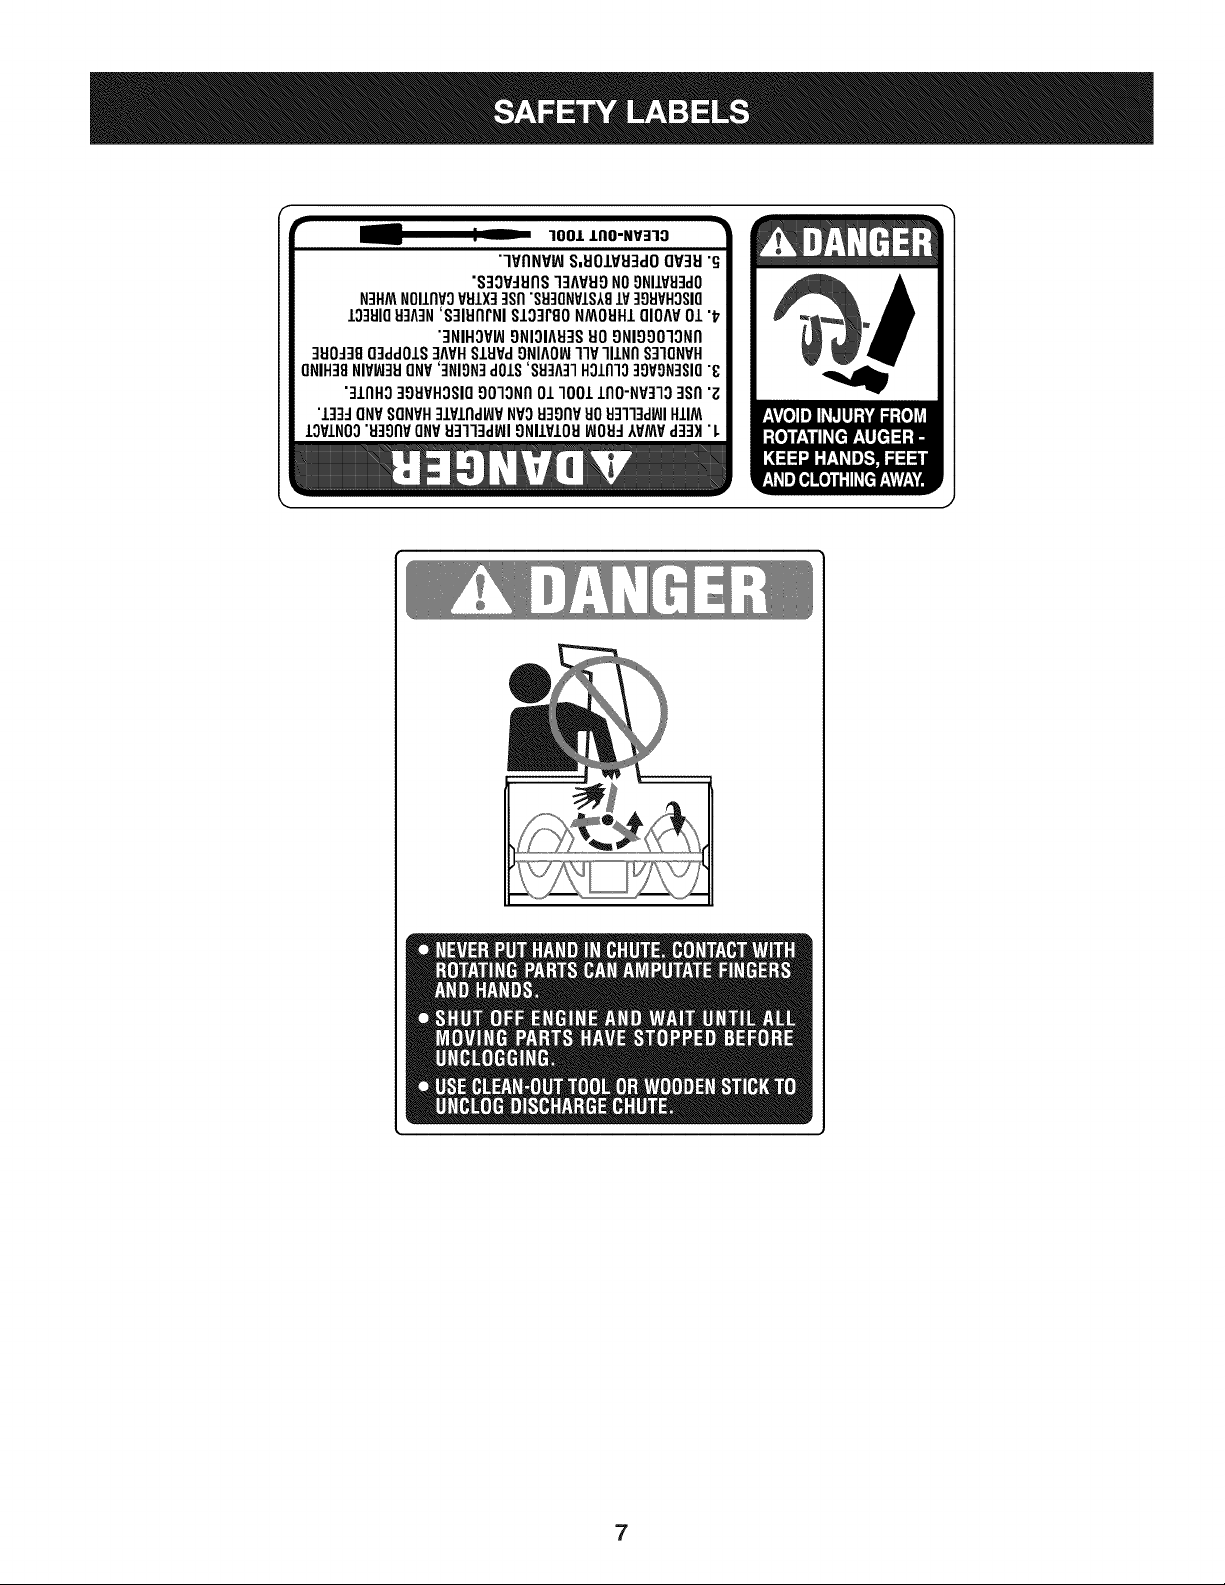
100/.LIIO-NV:IIO
"lVflNV_ S,UOIVU3dOQV3H"G
"S3OV_IJflS]3AVUONO9NIIV_J3dO
N3HMNOIIflVOVSIX]qsfl"S9]ONVIS181V]98VHOSIO
10381083A3N'S]IUflrNI SI03PgoNMOUHIQIOAV01 "_
"3NIHOV_ONIOIA83SUOONIOOO]ONfl
]UO_38O3ddOIS]AVHSlHPd9NIAOW11VlllNfl S]IQNVH
ONIH]8NIVW3UONV']NION]dOlS'88]A]1HOlnlo]9VON]SIO"8
"]lnHg ]gHVHOSIO9010Nfl01 1001lflO-NP]lO ]Sfl "Z
"l]]d ONVSONVH]lPlnd_P NVOH3onvuoHq]l]d_JIHIIM
IOVINO0"u39npONV_J3113dWI9NllVIOU_JOH_IVMVd]3H "L
7
Page 8
IMPORTANT:Thisunitisshippedwithoutgasolineoroil intheengine.
Becertaintoserviceenginewithgasolineandoilas instructedinthe
Operationsectionof this manualbeforeoperatingyourmachine.
NOTE:Referenceto rightandlefthandsideoftheChipperShredder
isobservedfromthe operatingposition.
OPENING CARTON
1. Cuteachcornerofthecartonverticallyfromtopto bottom.
2. Removeall looseparts.
3. Removeloosepackingmaterial.
REMOVING UNiT FROM CARTON
1. Liftunitfromthereartodetachitfromunderlyingcartonmaterial
androllunitout ofcarton.
2. Checkcartonthoroughlyforanyotherlooseparts.
LOOSE PARTS IN CARTON
• HopperAssembly
• Bag
• ChuteDeflector
• ChipperChute
• Tamper
• SafetyGlasses
• EngineOil
• Operator'sManual
f
J
Figure1
f
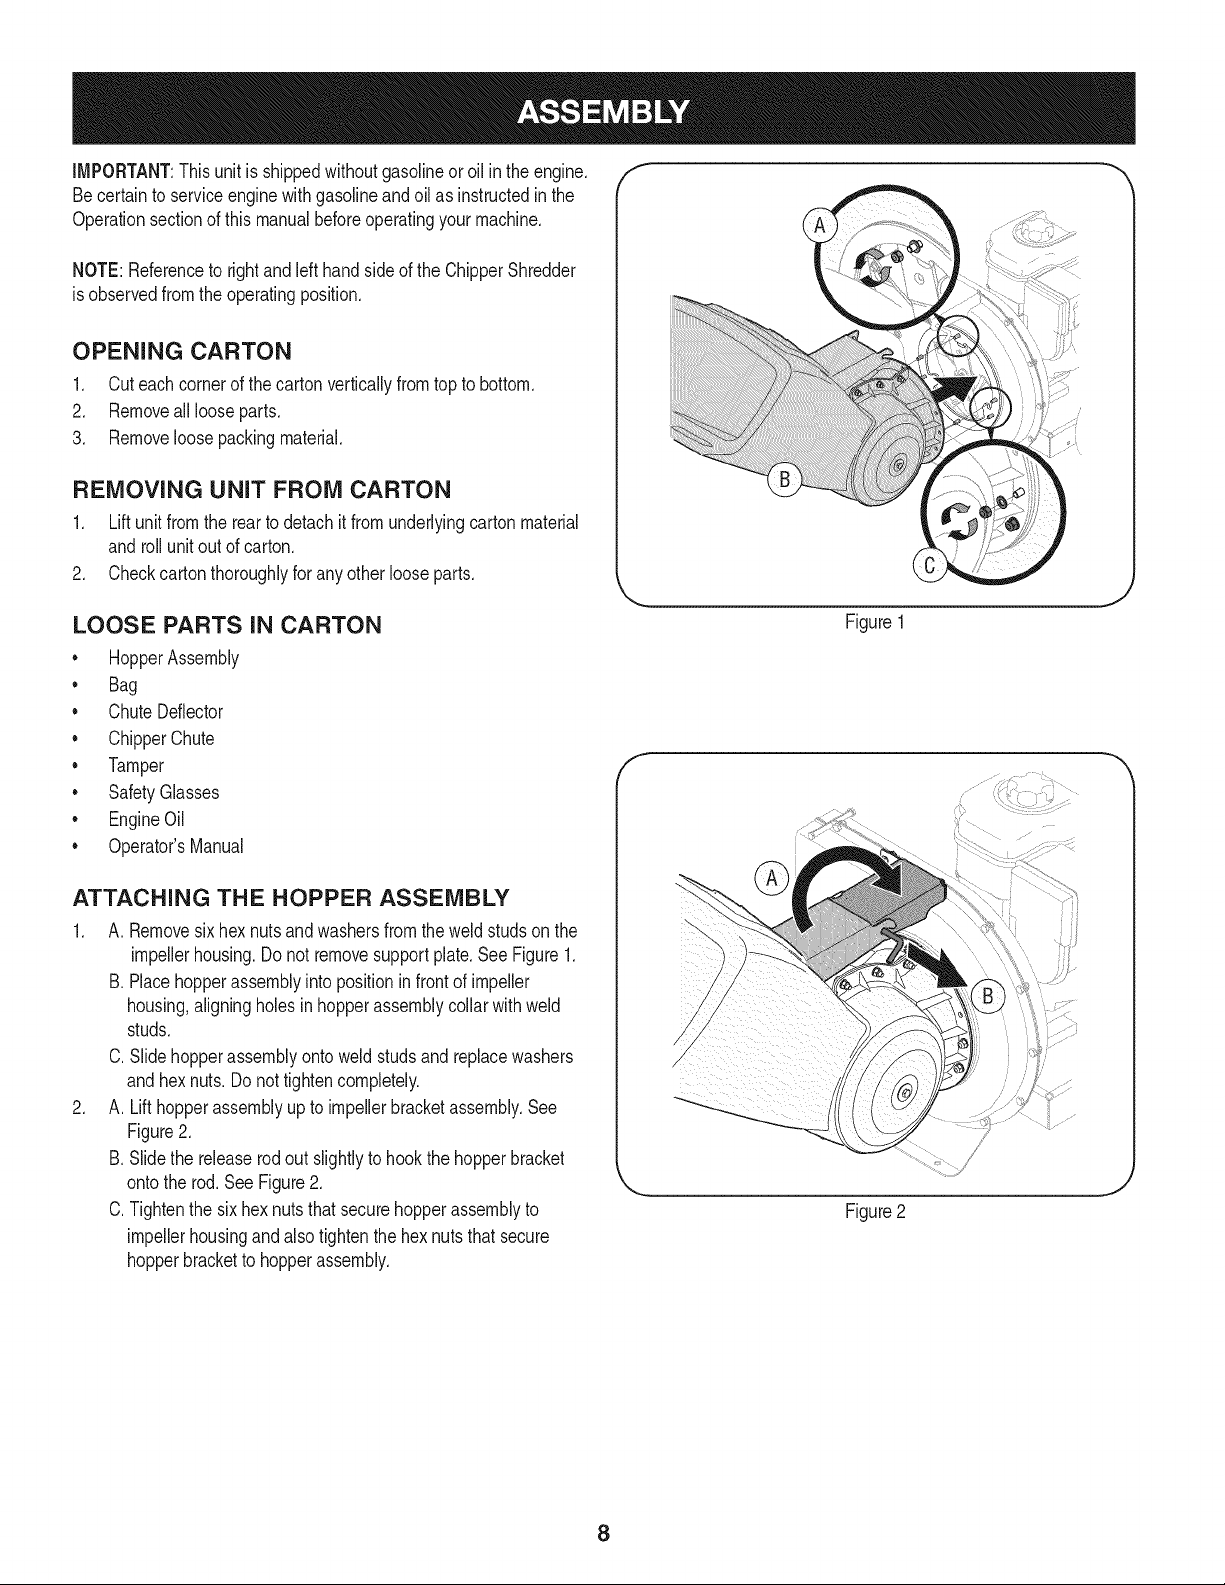
ATTACHING THE HOPPER ASSEMBLY
1. A. Removesixhex nutsandwashersfromthe weldstudson the
impellerhousing.Donotremovesupportplate.SeeFigure1.
B. Placehopperassemblyinto positioninfrontofimpeller
housing,aligningholesinhopperassemblycollarwithweld
studs.
C. Slidehopperassemblyontoweldstudsand replacewashers
andhexnuts.Donottightencompletely.
2. A. Lifthopperassemblyuptoimpellerbracketassembly.See
Figure2.
B.Slidethe releaserodout slightlyto hookthe hopperbracket
ontothe rod.SeeFigure2.
C.Tightenthesixhex nutsthatsecurehopperassemblyto
impellerhousingandalsotightenthe hexnutsthat secure
hopperbracketto hopperassembly.
Figure2
8
Page 9
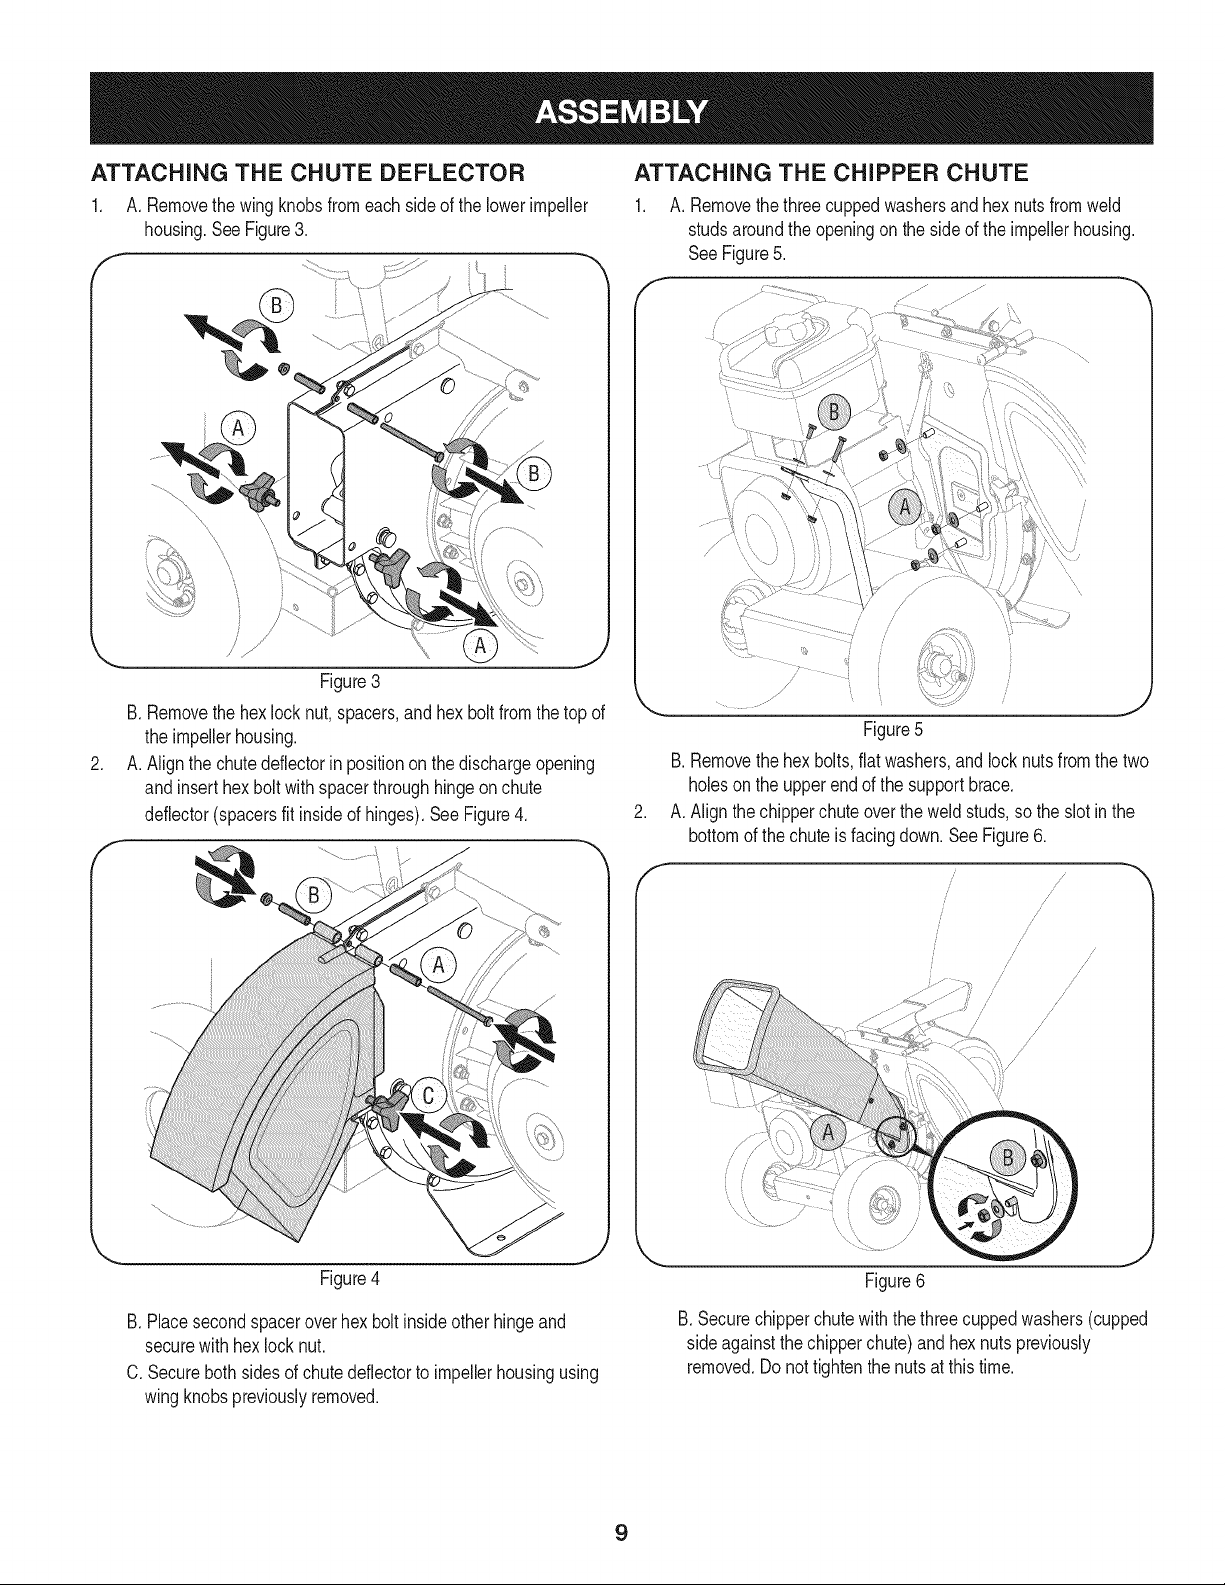
ATTACHING THE CHUTE DEFLECTOR
1. A. Removethewingknobsfromeachsideof thelowerimpeller
housing.SeeFigure3.
Figure3
B.Removethehexlocknut,spacers,andhexboltfromthetopof
theimpellerhousing.
.
A.Alignthe chutedeflectorinpositiononthe dischargeopening
andinserthexbolt withspacerthroughhingeonchute
deflector(spacersfit insideofhinges).SeeFigure4.
f
ATTACHING THE CHIPPER CHUTE
1. A. Removethe threecuppedwashersand hexnutsfromweld
studsaroundtheopeningontheside ofthe impellerhousing.
SeeFigure5.
Figure5
B.Removethehex bolts,flatwashers andlocknutsfromthetwo
holesonthe upperendofthe supportbrace.
A.Alignthechipperchuteovertheweldstuds,sothe slotinthe
bottomofthechuteis facingdown.SeeFigure6.
f
i
i
/
i
/
/
/ i"
/ ,/
/ /s
/
/
/
/
/
/
/
/
/
/ /
i
/
/
/
J
Figure4
B.Placesecondspaceroverhex boltinsideotherhingeand
securewithhexlocknut.
C. Securebothsidesofchutedeflectorto impellerhousingusing
wingknobspreviouslyremoved.
/
/ ,
/ /
J
Figure6
B.Securechipperchutewiththethreecuppedwashers(cupped
sideagainstthe chipperchute)andhex nutspreviously
removed.Donottightenthe nutsatthistime.
9
Page 10
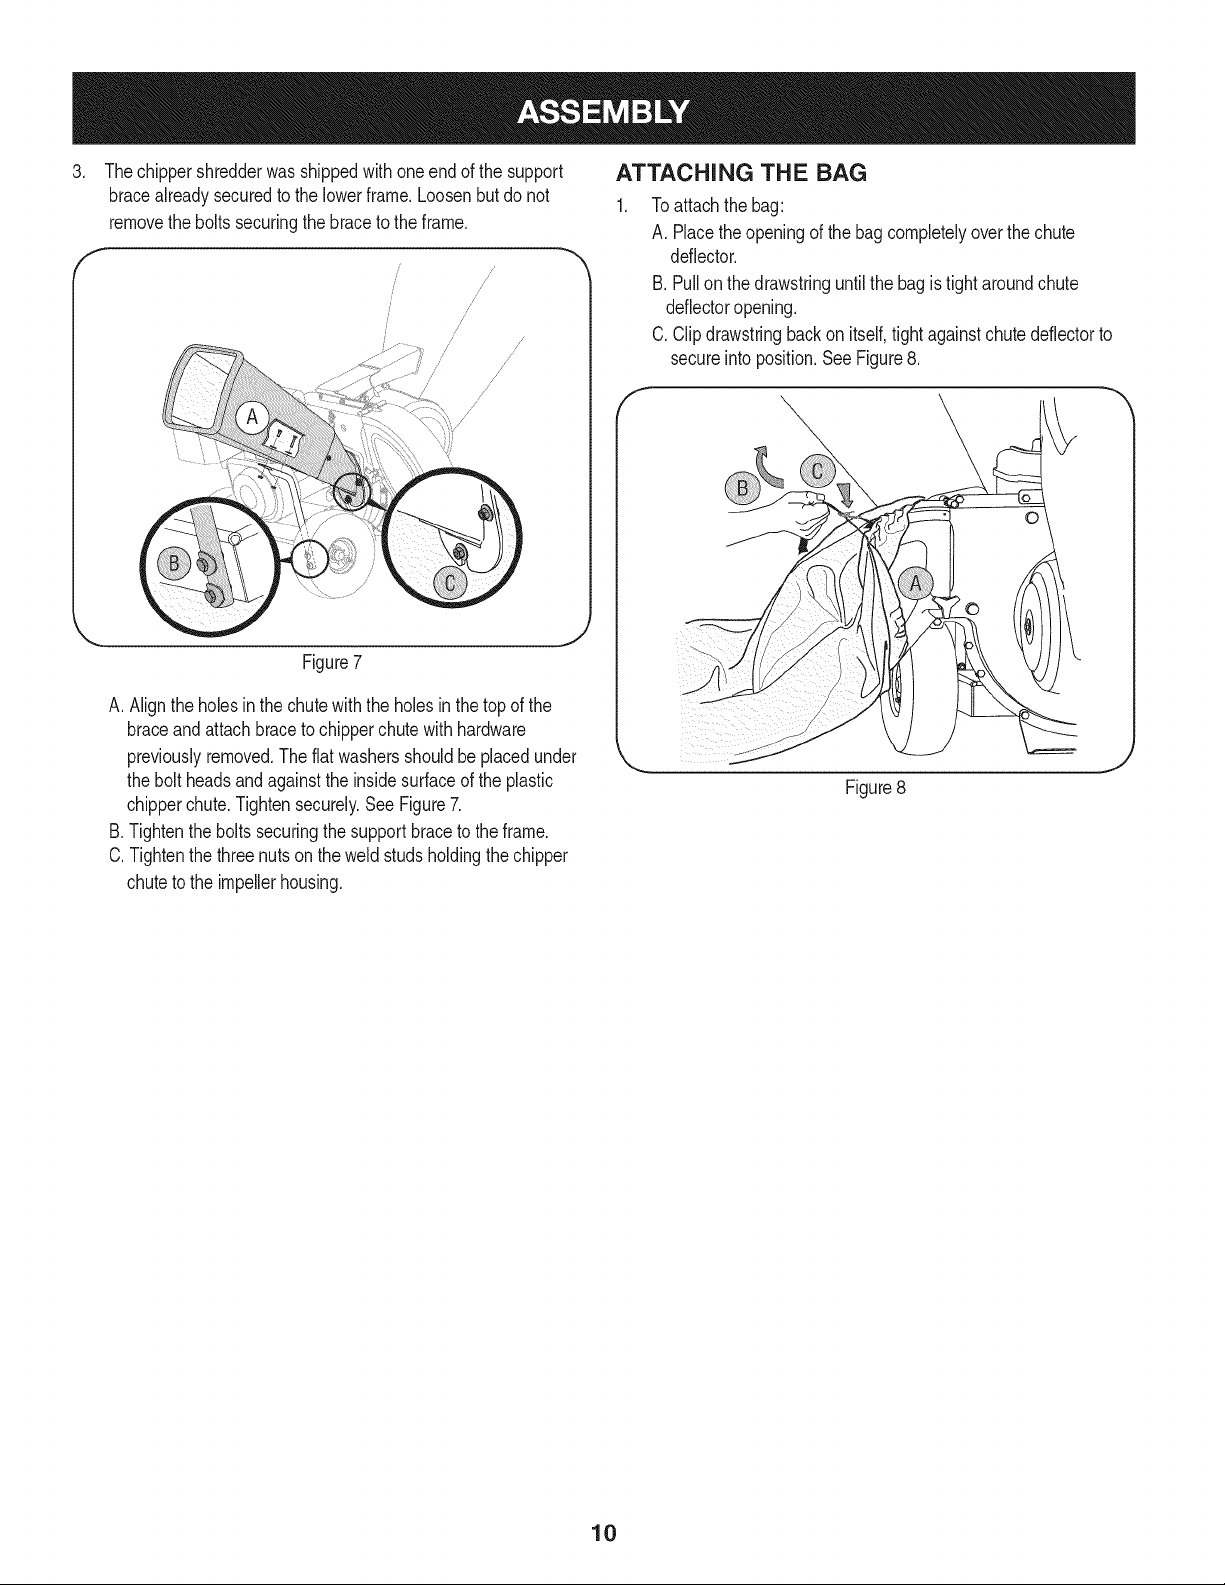
.
Thechippershredderwasshippedwithoneendofthesupport
bracealreadysecuredto thelowerframe.Loosenbutdo not
removetheboltssecuringthe braceto theframe.
Figure7
A.Alignthe holesinthe chutewiththeholesinthetop ofthe
braceandattachbraceto chipperchutewithhardware
previouslyremoved.Theflatwashersshouldbeplacedunder
thebolt headsandagainstthe insidesurfaceofthe plastic
chipperchute.Tightensecurely.SeeFigure7.
B.Tightenthe boltssecuringthe supportbraceto theframe.
C.Tightenthethreenutsontheweld studsholdingthechipper
chutetothe impellerhousing.
ATTACHING THE BAG
Toattachthebag:
A. Placetheopeningof thebagcompletelyoverthechute
deflector.
B.Pullon the drawstringuntilthebagistightaroundchute
deflectoropening.
C.Clipdrawstringbackon itself,tightagainstchutedeflectorto
secureintoposition.SeeFigure8.
f
J
Figure8
10
Page 11
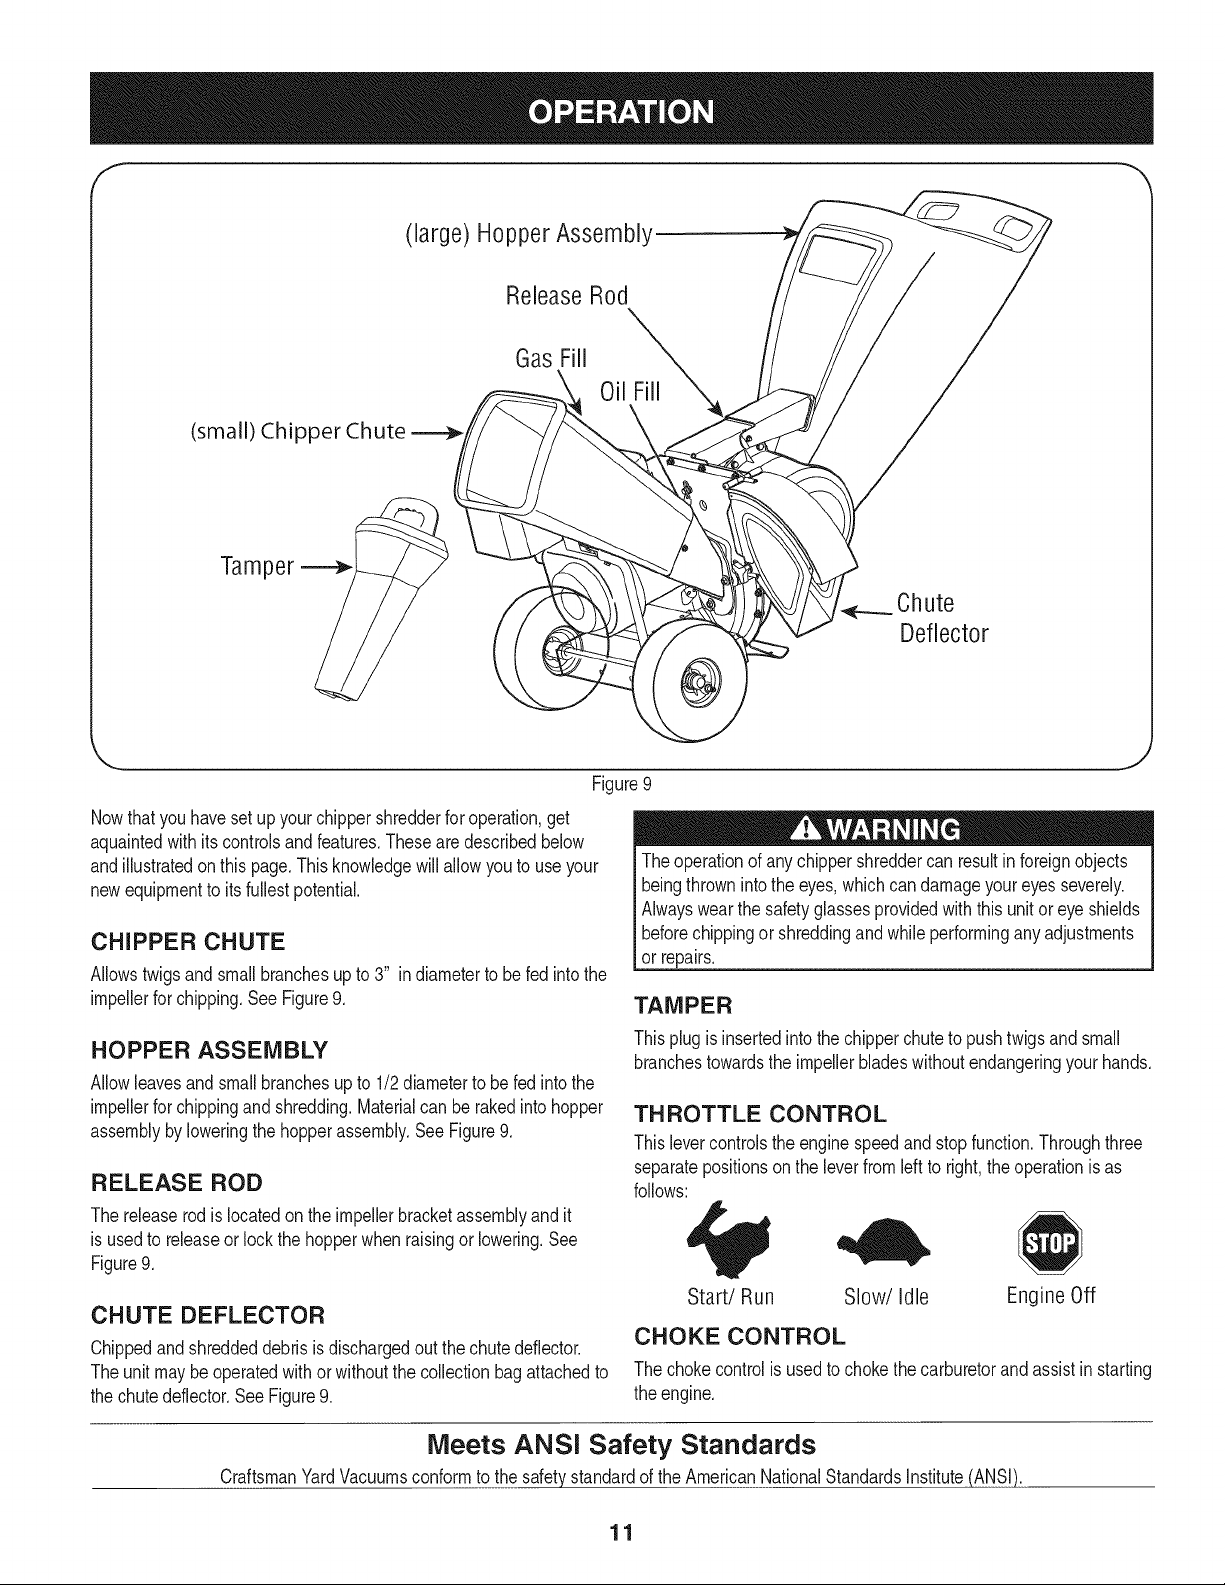
(large) Hopper Assembly
ReleaseRod
GasFill
(small) Chipper Chute
Tamper--=_
Figure9
Nowthatyouhavesetupyourchippershredderforoperation,get
aquaintedwithits controlsandfeatures.Thesearedescribedbelow
andillustratedon thispage.Thisknowledgewillallowyou touseyour
newequipmenttoits fullestpotential.
CHIPPER CHUTE
Allowstwigsandsmallbranchesupto 3" indiametertobefed intothe
impellerforchipping.SeeFigure9.
HOPPER ASSEMBLY
Allowleavesandsmallbranchesupto 1/2diameterto befedintothe
impellerforchippingandshredding.Materialcanberakedintohopper
assemblybyloweringthehopperassembly.SeeFigure9.
RELEASE ROD
Thereleaserodislocatedon the impellerbracketassemblyandit
isusedto releaseorlockthehopperwhen raisingorlowering.See
Figure9.
CHUTE DEFLECTOR
Chippedandshreddeddebrisis dischargedout thechutedeflector.
Theunit maybeoperatedwithorwithoutthecollectionbagattachedto
thechutedeflector.SeeFigure9.
Chute
Deflector
@
Theoperationof anychippershreddercan resultinforeignobjects
beingthrownintothe eyes,whichcan damageyoureyesseverely.
Alwayswearthesafetyglassesprovidedwiththisunitor eyeshields
beforechippingor shreddingandwhileperforminganyadjustments
or repairs.
TAMPER
Thisplugisinsertedinto thechipperchuteto pushtwigsandsmall
branchestowardstheimpellerbladeswithoutendangeringyour hands.
TH ROTTLE CONTROL
Thislevercontrolstheenginespeedandstopfunction.Throughthree
separatepositionsontheleverfromleftto right,theoperationis as
follows:
Start/Run Slow/Idle Engine Off
CHOKE CONTROL
Thechokecontrolis usedto chokethecarburetorand assistinstarting
theengine.
Meets ANSI Safety Standards
CraftsmanYardVacuumsconformtothesafetystandardof theAmericanNationalStandardsInstitute(ANSI).
11
Page 12
GAS AND OIL FILL-UP
Oil (one bottle shipped with unit)
FirstTimeUse
1. Removeoil fillplug.
2. Withthechippershredderonlevelground,useafunneltoempty
entirecontentsofoil bottleprovidedintotheengine.
3. Replaceoil fill plugandtighten.
Subsequent Uses
Onlyuse highqualitydetergentoil ratedwithAPIserviceclassification
SF,SG,or SH.Selectthe oil'sSAEviscositygradeaccordingto the
expectedoperatingtemperature.Followthechartbelow.
_older _ 32°F _Warmer'_
OilViscosity Chart
Althoughmulti-viscosityoils(5W30,10W30,etc.)improvestarting
incoldweather,theywill resultinincreasedoil consumptionwhen
usedabove32°E Checkyourengineoillevelmorefrequentlyto avoid
possibleenginedamagefromrunninglowon oil.
1. Checktheoillevelbyremovingthe oilfillplugand lookinginto
theoil fill hole.Oil shouldbevisibleup tothethreadsof theoil fill
plug,almosttothe pointof overflowing.Fillifnecessary.Capac-
ity isapproximately28oz.Overfillingcancausea hazardous
situation,be suretowipeup anyspilledor excessoil.
2. Replaceoil fill plugandtighten.
3. KeepoillevelatFULL.Runningtheenginewithtoolittleoilcan
resultinpermanentenginedamage.
Gasoline
J
Alcoholblendedfuels(calledgasoholorusingethanolormethanol)
canattractmoisturewhichleadsto separationand formationof acids
duringstorage.Acidicgascandamagethefuel systemofanengine
whileinstorage.
Toavoidengineproblems,thefuelsystemshouldbeemptiedbefore
storagefor30daysorlonger.Drainthegastank,starttheengine
andletit rununtilthe fuellinesandcarburetorare empty.Use
freshfuelnextseason.See STORAGEInstructionsfor additional
information.
Neveruseengineorcarburetorcleanerproductsinthe fueltankor
permanentdamagemayoccur.
NOTE:Checkthefuel levelperiodicallytoavoid runningoutof gaso-
linewhileoperatingthe chippershredder.Ifthe unitrunsoutof gasas
itischipping,itmaybe necessarytounclogthedischargeareabefore
itcan be restarted.RefertoSERVICEANDMAINTENANCEsection.
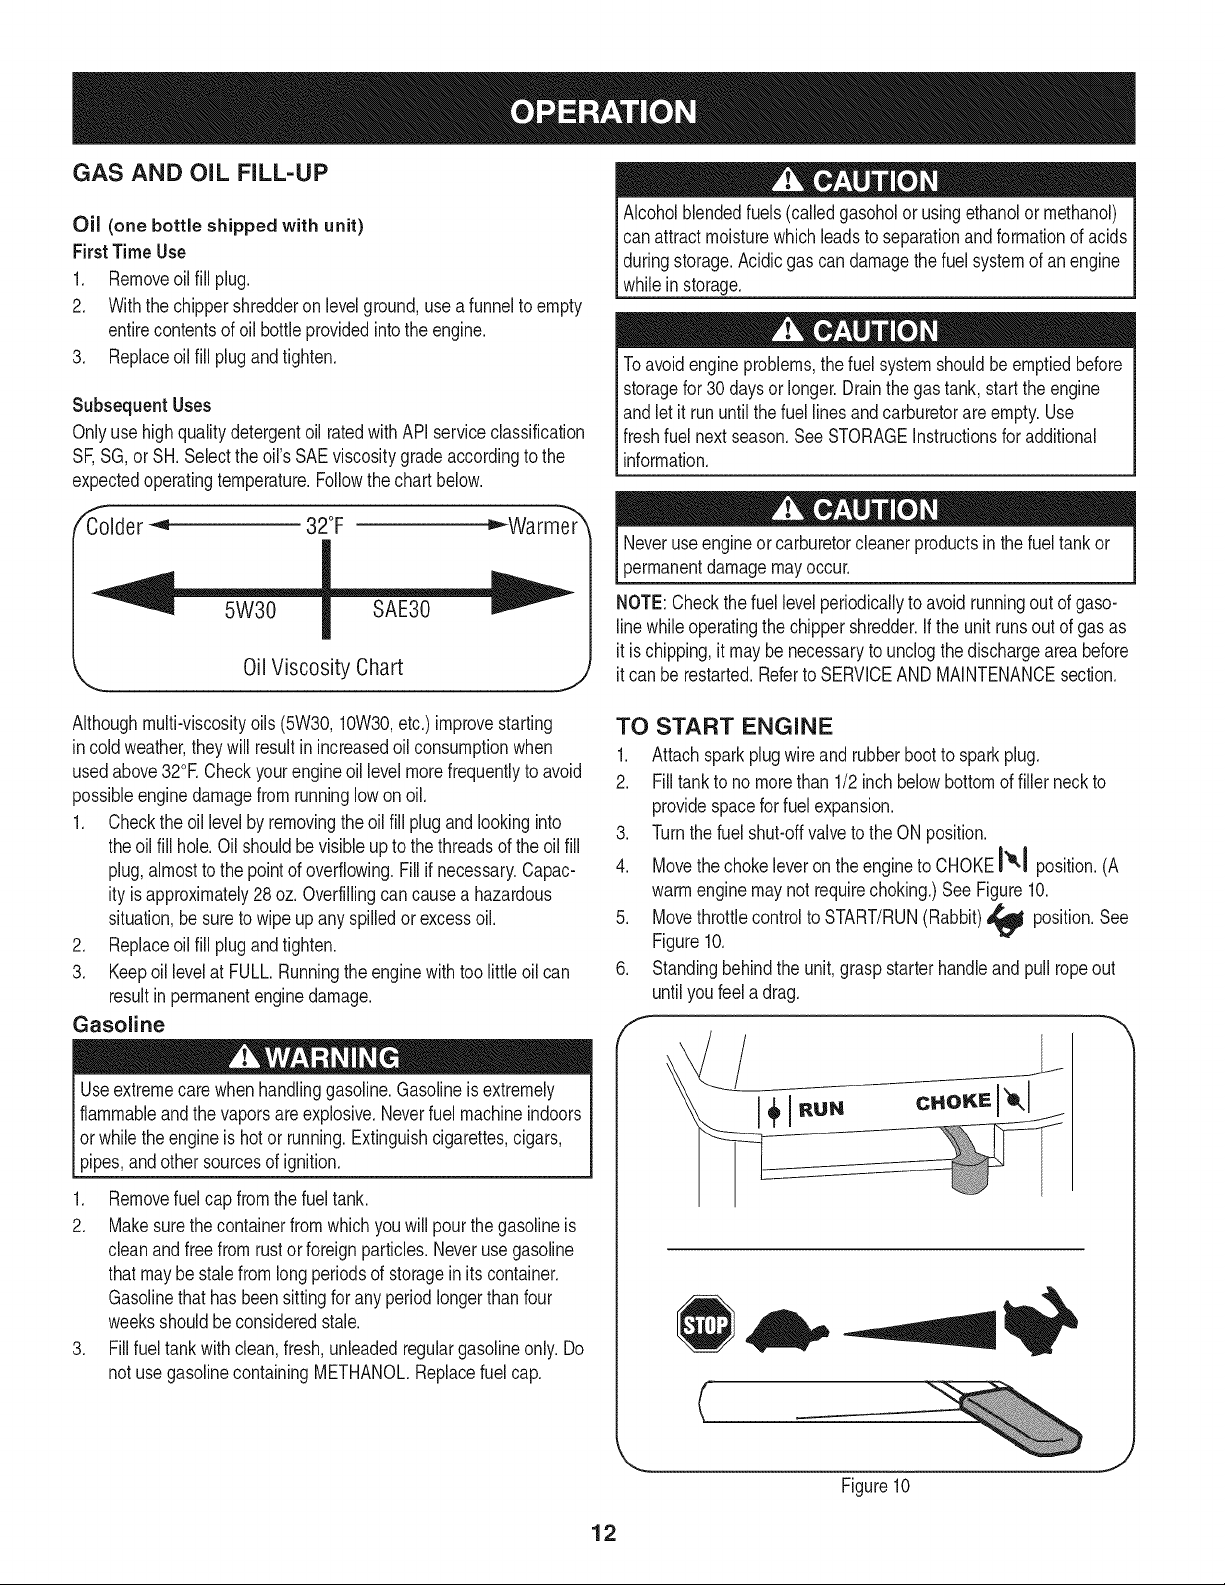
TO START ENGINE
1. Attach sparkplugwireand rubberboottosparkplug.
2. Filltankto nomorethan 1/2inchbelowbottomoffiller neckto
providespaceforfuelexpansion.
3. Turnthefuelshut-offvalvetotheONposition.
4. MovethechokeleverontheenginetoCHOKEI'_1 position.(A
warmenginemaynotrequirechoking.)See Figure10.
5. MovethrottlecontroltoSTART/RUN(Rabbit)_ position.See
Figure10.
6. Standingbehindtheunit,graspstarterhandleandpullropeout
untilyoufeela drag.
f
Useextremecarewhenhandlinggasoline.Gasolineis extremely
flammableandthevaporsareexplosive.Neverfuelmachineindoors
orwhilethe engineishotor running.Extinguishcigarettes,cigars,
pipes,andothersourcesof ignition.
1. Removefuelcap fromthefuel tank.
2. Makesurethecontainerfromwhichyouwillpourthegasolineis
cleanandfreefromrustor foreignparticles.Neverusegasoline
thatmaybestalefromlongperiodsofstorageinitscontainer.
Gasolinethathasbeensittingfor anyperiodlongerthanfour
weeksshouldbeconsideredstale.
3. Fillfueltankwithclean,fresh,unleadedregulargasolineonly.Do
notusegasolinecontainingMETHANOL.Replacefuelcap.
J
Figure10
12
Page 13
NOTE:Youwill heara noiseas theenginefindsthe startof the
compressioncycle.Thenoiseiscausedbythechippingandshredding
flails,andyouwillhearit untiltheengineimpellerreachesfullspeed.
7. Pulltheropewitha rapid,continuous,fullarmstroke.Keepa firm
griponthestarterhandle.Lettheroperewindslowly.
8. Repeat,ifnecessary,untilenginestarts.Whenenginestarts,
movechokecontrolgraduallytowardtheRUNI JtIposition..
9. Ifenginefalters,movechokecontrolbacktowardtheCHOKE
I'o,I positionandrepeatsteps5 though8.
10. ALWAYSkeepthe throttlecontrolinthe START/RUNposition
whenoperatingthe chippershredder.
TO STOP ENGINE
1. Movethrottlecontrolleverto slow(turtle)'_ position.
Wheneverpossible,graduallyreduceenginespeedbefore
stoppingengine.
2. MovethrottlecontrollevertoSTOPI or OFFposition.
3. Turnthefuelshut-offvalvetotheOFFposition.
4. Disconnectsparkplugwireandgrounditagainsttheengineto
preventaccidentalstartingwhilethe equipmentis unattended.
SHREDDING
Yardwastesuchas leavesandpineneedlescanbe placedinthe
hopperforshredding.Aftermaterialhasbeenprocessedbythe shred-
derbladeandflails,it willbeforcedout ofthe chutedeflector,and, if
attached,into adebriscollectionbag.
Observethefollowingguidelineswhenshreddingyarddebris:
• Neverattempttoshredmaterialotherthannormalyarddebris
(leaves,twigs,pinecones,etc.).
• Avoidshreddingfibrousplantssuchas tomatovines,palmfronds,
etc.,untiltheyare thoroughlydriedout.Freshvinesdo notshred
wellandtend towrapthemselvesaroundtheimpellerandflails.
• Placereasonableamountsofdebrisintothe hopperata time. Do
notoverloadthe hopper.
• Allowthe materialin thehopperto bedrawnintothebladesand
shreddedbeforeaddingadditionaldebristo thehopper.Failureto
duesomayresultin acloggedhopper,cloggedchutedeflectoror
a stalledengine.
CHIPPING
Branchesupto3" in diametercanbefedintothechipperchute.
Observethefollowingguidelineswhenchippingbranches:
• Keepbothhandsfirmlyonthe branchas youfeed itintothe
chipperchute.
• Neverfeedmorethanonebranchintothechipperchuteat a time.
• Neverfeedanythingotherthanbranches(orwood)intothe
chipperchute.
• Applyintermittentpressure(force,inshortpulses)whilefeeding
larger(3-inchdiameter)branchesintothechipperchute,toavoid
boggingor stallingtheengine.
IMPORTANT:Neverfeed brancheswitha diametergreaterthan
three(3)inchesintothechipperchute.Doingsocan resultin serious
damageto yourunit'schipperblades,flailsor impeller.
NOTE:Forbestperformance,alwaysoperatetheunitwith sharp
chipperblades.If a noticeablelossin performanceisencountered
whilechippingbranches,thechipperbladesshouldbe replaced.
LOWERING THE HOPPER ASSEMBLY
1. Withonehandgraspthehandleat thetopofthe hopperassem-
blyandlift slightly.
2. Withtheotherhandpulloutonthereleaserodandlowerthe
hopperassemblytotheground.
TO EMPTY BAG
1. Un-clipdrawstringandloosenbagfromchutedeflectoropening.
2. Emptybagandreattachtothedischargechuteopening.Pullon
thedrawstringuntilthe bagistightaroundthe chuteopeningand
clipthe drawstringtightagainstthechutedeflector.
IMPORTANT:The flailscreenis locatedinsidethe housinginthe
dischargearea.Ifthe flailscreenbecomesclogged,removeand
cleanas instructedintheServiceandMaintenancesection.For best
performance,itisalsoimportanttokeepthechipperbladessharp.
13
Page 14
MAINTENANCE SCHEDULE
Beforeperforminganytypeof maintenance/service,disengageall
controlsandstoptheengine.Waituntilallmovingpartshavecometo
acompletestop.Disconnectsparkplugwireandgrounditagainstthe
enginetopreventunintendedstarting.Alwayswearsafetyglassesduring
operationor whileperforminganyadjustmentsor repairs.
EachUse
1st5 - 8 hours
25 hours
Annuallyor50hours
Annuallyor100hours
BeforeStorage 1. Fuelsystem
Underheavyloador inhightemperatures
.
Engineoillevel
2.
Looseormissinghardware
3.
Unitandengine.
1.
Engineoil
1.
Engineoill-
2.
Aircleaner
3.
Controllinkagesand pivots
1.
Engineoil
2.
Muffler
1.
Sparkplug
1. Check
2. Tightenorreplace
3. Clean
1. Change
1. Change
2. Replace
3. Lubewithlightoil
1. Change
2. Inspect
1. Clean,checkand resetgap,or
1. Runengineuntilit stopsfromlackof
Followthemaintenanceschedulegivenbelow.Thischartdescribes
serviceguidelinesonly.UsetheServiceLogcolumnto keeptrackof
completedmaintenancetasks.Tolocatethe nearest SearsService
Centeror toscheduleservice,simplycontactSearsat
1-800-4-MY-HOME®.
replacesparkplug.
fueloradda gasolineadditivetothe
gasin thetank.
Alwaysstopengineanddisconnectsparkplugwire beforeperforming
Ianymaintenanceoradjustments.Alwayswearsafetyglassesduring
_operationorwhileperforminganyadjustmentsor repairs.
GENERAL RECOMMENDATIONS
• Alwaysobserveallsafetyrulesfoundonproductlabelsandin
thisoperator'smanualwhenperforminganymaintenance.Safety
rulescan befoundonthe productlabelsandin thisOperator's
Manualbeginningon page3.
• Thewarrantyon thischippershredderdoes notcoveritemsthat
havebeensubjectedto operatorabuseor negligence.To receive
fullvalue fromwarranty,operatormustmaintainthe equipmentas
instructedhere.
• Someadjustmentswillhaveto be madeperiodicallytomaintain
yourunit properly.
• Periodicallycheckallfastenersand makesurethesearetight.
ENGINE MAINTENANCE
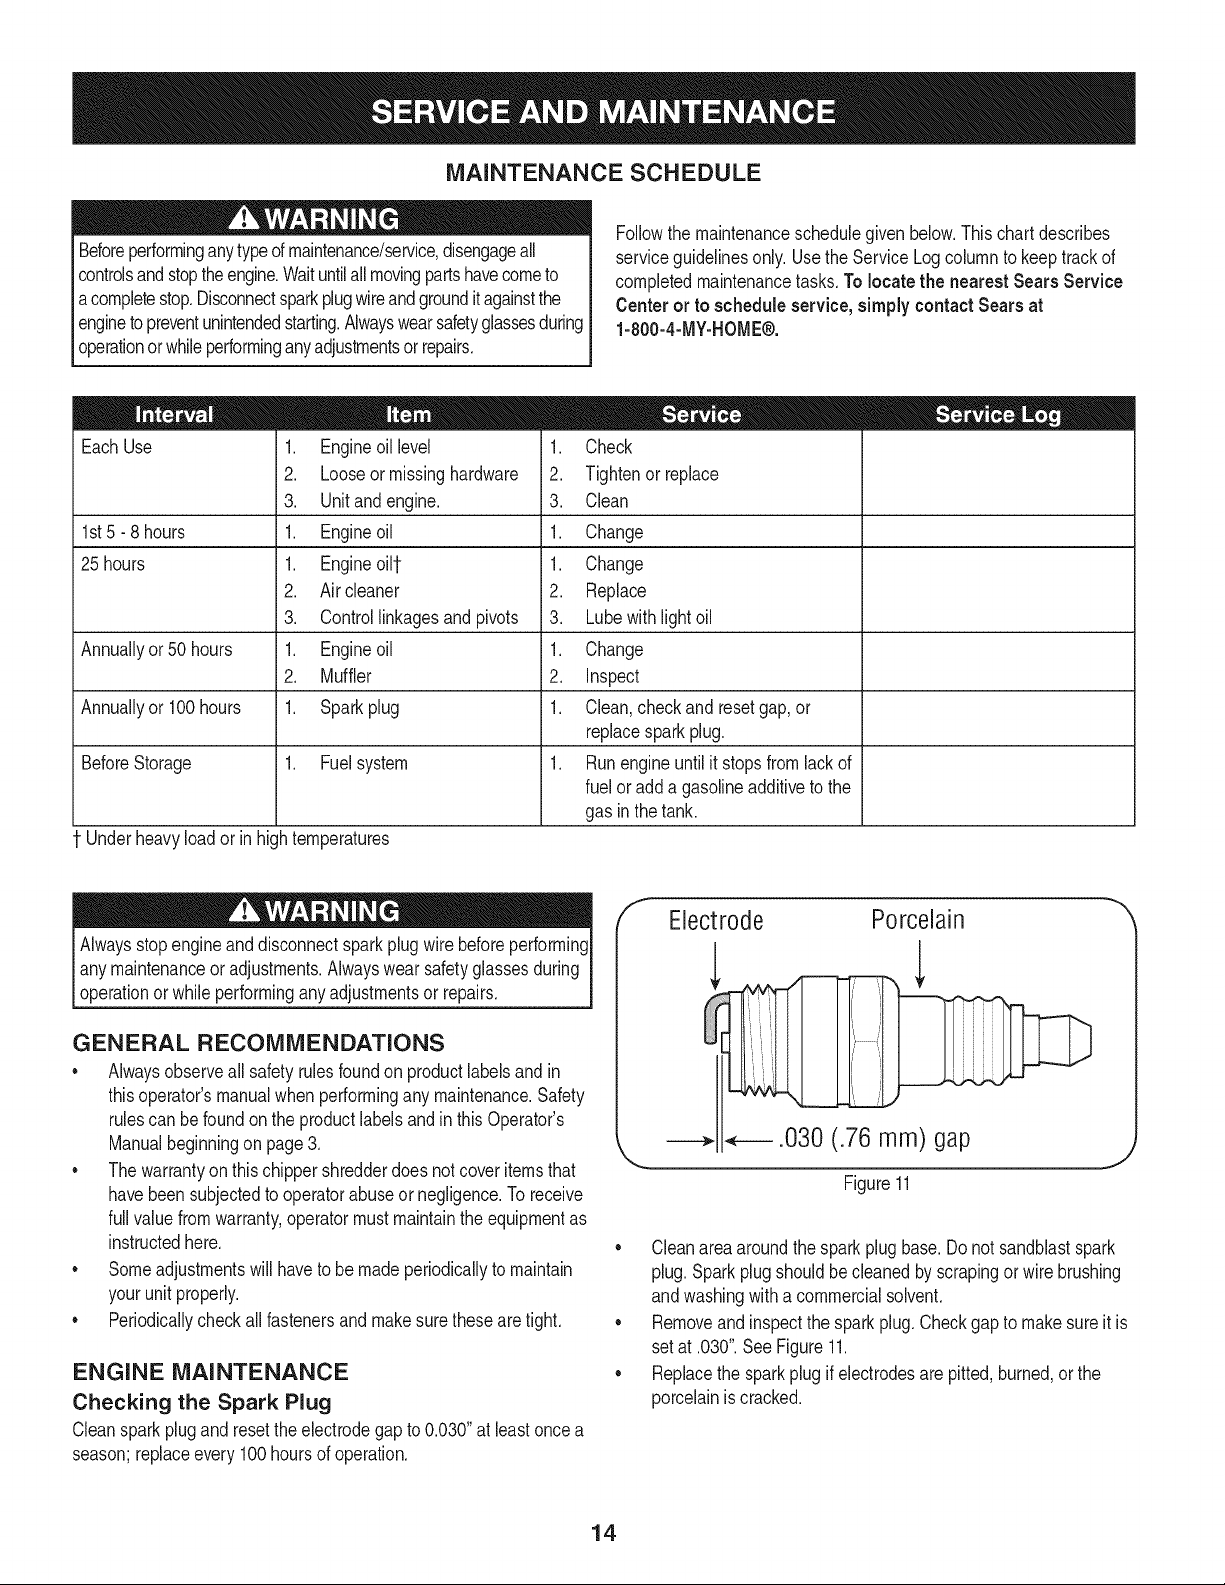
Checking the Spark Plug
Cleansparkplugandresettheelectrodegapto0.030"atleastoncea
season;replaceevery100hoursof operation.
f
Electrode
Porcelain
,L
.030 (.76 mm) gap
Figure 11
• Cleanareaaroundthe sparkplugbase.Donot sandblastspark
plug.Sparkplugshouldbecleanedbyscrapingorwirebrushing
andwashingwitha commercialsolvent.
Removeandinspectthe sparkplug.Checkgaptomakesureitis
setat .030".SeeFigure11.
Replacethesparkplugif electrodesare pitted,burned,or the
porcelainiscracked.
14
Page 15
Servicing the Air Cleaner
Donotusepressurizedairor solventsto cleanthe aircleaner
cartridge.
Theair cleanerpreventsdamagingdirt, dust,etc.,fromenteringthe
carburetorand beingforcedintotheengineandisimportanttoengine
lifeandperformance.Neverruntheenginewithoutan aircleaner
completelyassembled.
Replacetheaircleanerevery25 hoursof operation.
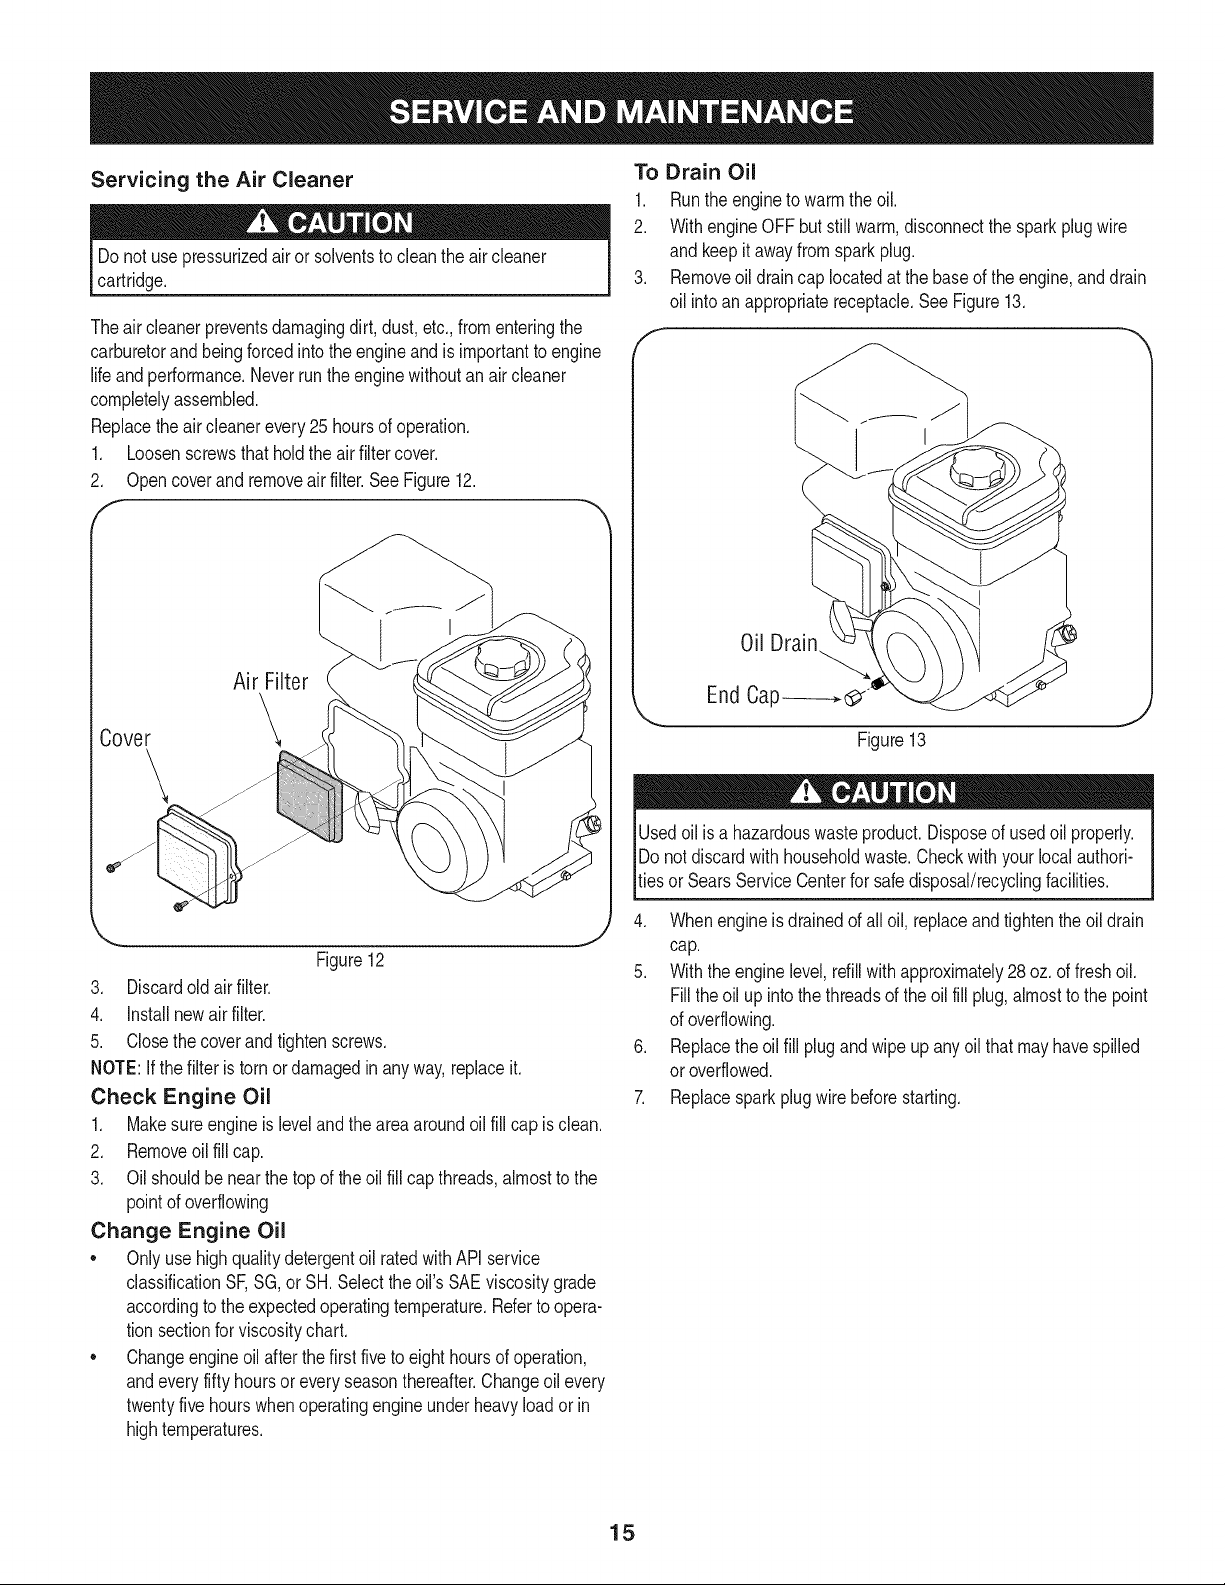
1. Loosenscrewsthatholdtheairfiltercover.
2. Opencoverandremoveair filter.See Figure12.
f
To Drain Oil
1. Runtheengineto warmtheoil.
2. WithengineOFFbutstillwarm,disconnectthe sparkplugwire
and keepitawayfromsparkplug.
3. Removeoil draincaplocatedat thebaseofthe engine,anddrain
oil intoan appropriatereceptacle.SeeFigure13.
Oil Drain
Air Filter
Cover
3. Discardoldairfilter.
4. installnewairfilter.
5. Closethecoverandtightenscrews.
NOTE:Ifthe filteristorn ordamagedinanyway,replaceit.
Check Engine Oil
1. Makesureengineislevelandtheareaaroundoil fill capis clean.
2. Removeoilfillcap.
3. Oilshouldbe nearthetopoftheoil fillcapthreads,almosttothe
pointof overflowing
Change Engine Oil
* OnlyusehighqualitydetergentoilratedwithAPIservice
classificationSF,SG,orSH.Selecttheoil'sSAEviscositygrade
accordingtothe expectedoperatingtemperature.Refertoopera-
tionsectionforviscositychart.
. Changeengineoil afterthefirst fivetoeighthoursof operation,
andeveryfifty hoursoreveryseasonthereafter.Changeoilevery
twentyfivehourswhenoperatingengineunderheavyloadorin
hightemperatures.
\
y
Figure12
End Cap _"
J
Figure13
e
Usedoil isa hazardouswasteproduct.Disposeof usedoil properly.
IDo notdiscardwithhouseholdwaste.Checkwithyour localauthori-
_tiesorSearsServiceCenterforsafedisposal/recyclingfacilities.
4. Whenengineisdrainedofall oil,replaceandtightentheoildrain
cap.
5. Withtheenginelevel,refillwithapproximately28oz. offreshoil.
Fillthe oil upintothe threadsofthe oilfill plug,almosttothepoint
ofoverflowing.
6. Replacethe oilfill plugandwipe upanyoil thatmayhavespilled
or overflowed.
7. Replacesparkplugwire beforestarting.
15
Page 16
Service IVluffler
REMOVING THE FLAIL SCREEN
Temperatureof mufflerandnearbyareasmayexceed150°F (65°C).
Avoidtheseareas.
• Inspectmufflerevery50 hours,andreplaceif necessary.
Replacementpartsforthemufflermustbethe sameandinstalled
inthe samepositionas theoriginalparts.
Clean Engine
Dailyor beforeeveryuse,cleangrass,chaffor accumulated
debrisfromengine.Keeplinkage,spring,andcontrolsclean.
Keepareaaroundandbehindmufflerfreeofanycombustible
debris.
• Keepingenginecleanallowsairmovementaroundengine.
• Enginepartsshouldbekeptcleanto reducetheriskof overheat-
ingandignitionofaccumulateddebris.
Donot usewaterto cleanengineparts.Watercouldcontaminatefuel
system.Usea brushor dry cloth.
Carburetor Adjustment
Thecarburetoronthis engineisnotadjustable.
Engine Speed
LUBRICATION
Beforeperforminganytypeofmaintenanceonthe machine waitfor
all partsto stopmovinganddisconnectthesparkplugwire. Failure
tofollowthis instructioncouldresultinpersonalinjuryor property
damage.
Ifthedischargeareabecomesclogged,removethe flailscreenand
cleanareaas follows:
Stopthe engine.Makecertainthe chippershredderhascometo
a completestop.
.
Disconnectsparkplugwirefromsparkplugandgroundagainst
theengine.
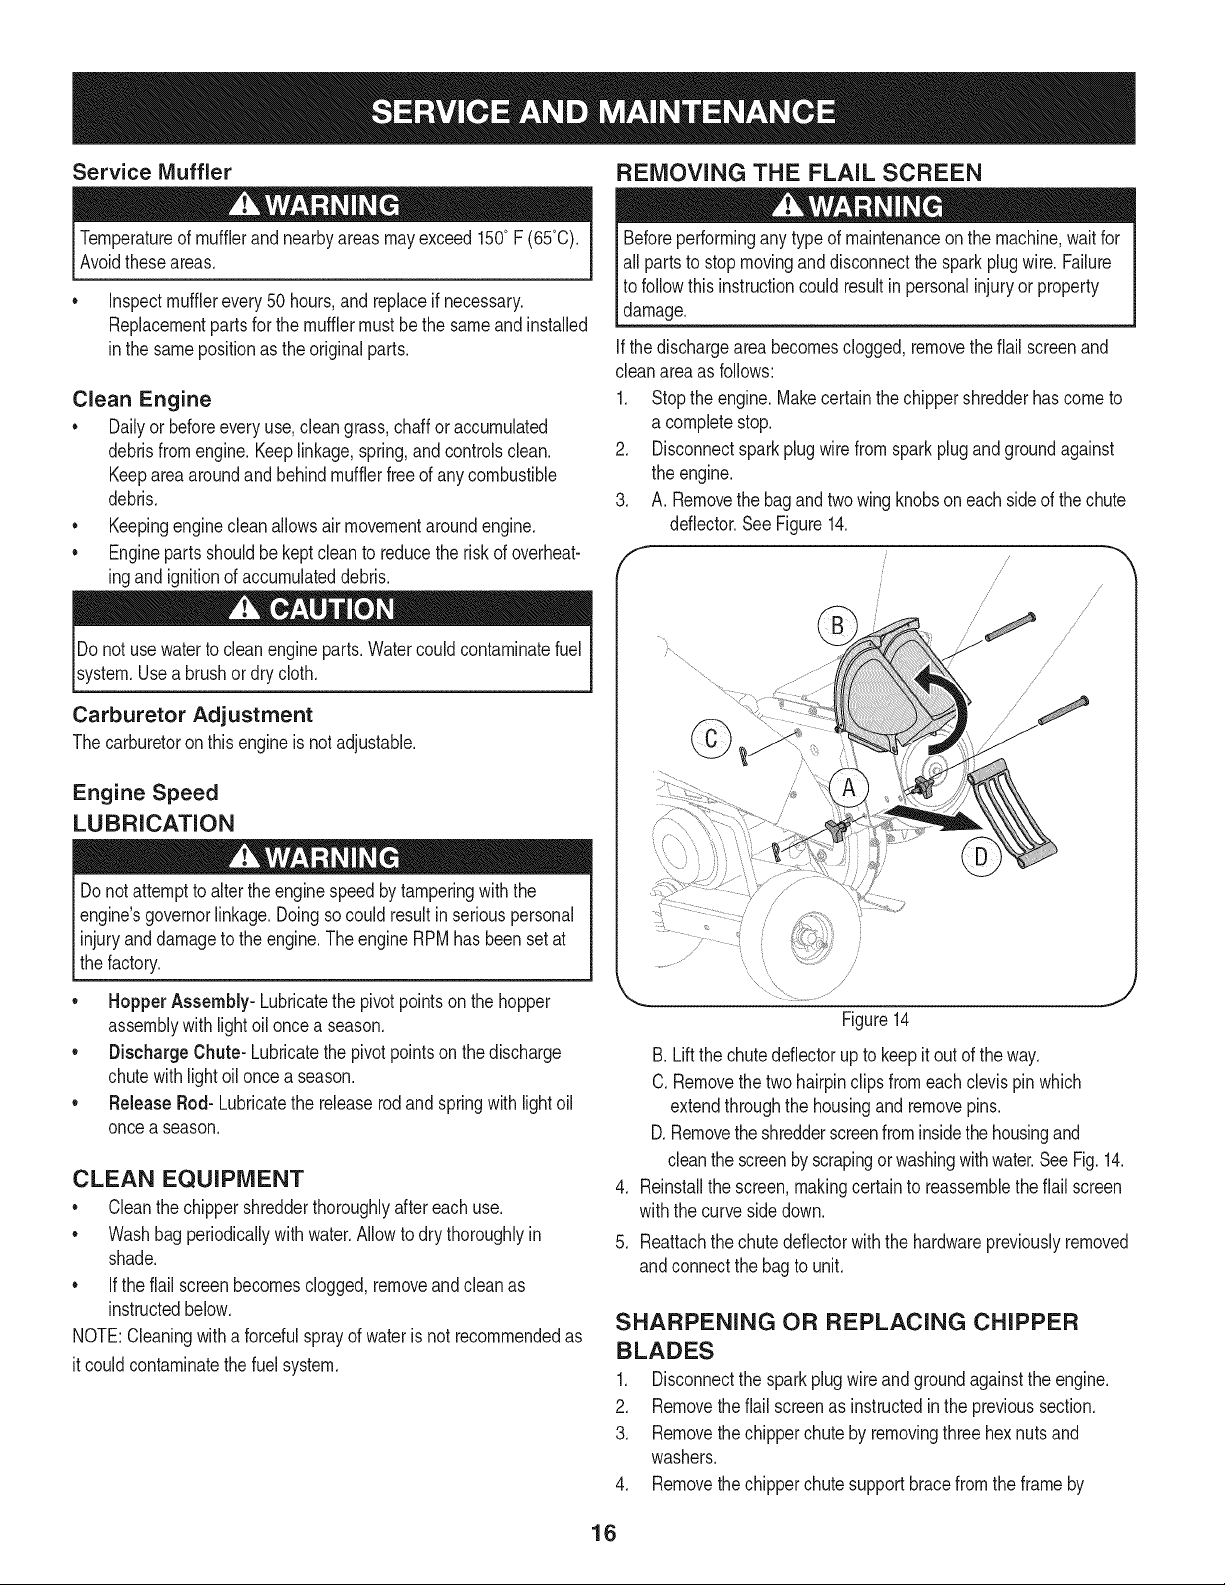
3.
A. Removethebagandtwowingknobsoneachsideofthechute
deflector.SeeFigure14.
f
/
s /
/ /
//
/
s'
/
Donot,attempttoaltertheenginespeedbytamperingwiththe
engines governorlinkage.Doingsocould resultin seriouspersonal
Iinjuryanddamagetotheengine.TheengineRPMhasbeensetat
thefactory.
• HopperAssembly- Lubricatethe pivotpointson thehopper
assemblywithlightoiloncea season.
• DischargeChute- Lubricatethepivotpointsonthedischarge
chutewithlightoilonce a season.
• ReleaseRod-Lubricatethereleaserodand springwith lightoil
oncea season.
CLEAN EQUIPMENT
• Cleanthechippershredderthoroughlyaftereachuse.
• Washbagperiodicallywithwater.Allowto drythoroughlyin
shade.
• Iftheflail screenbecomesclogged,removeandcleanas
instructedbelow.
NOTE:Cleaningwitha forcefulsprayofwaterisnotrecommendedas
itcouldcontaminatethefuelsystem.
j
Figure14
B.Liftthe chutedeflectorupto keepit outof theway.
C.Removethetwo hairpinclipsfromeachclevispinwhich
extendthroughthehousingandremovepins.
D.Removetheshredderscreenfrominsidethehousingand
cleanthe screenbyscrapingorwashingwithwater.SeeFig.14.
4. Reinstallthescreen,makingcertaintoreassembletheflail screen
withthecurvesidedown.
5. Reattachthechutedeflectorwiththehardwarepreviouslyremoved
andconnectthe bagto unit.
SHARPENING OR REPLACING CHIPPER
BLADES
1. Disconnectthesparkplugwireandgroundagainsttheengine.
2. Removetheflail screenasinstructedinthe previoussection.
3. Removethechipperchutebyremovingthreehexnutsand
washers.
4. Removethechipperchutesupportbracefromthe frameby
16
Page 17
removingthehexbolts.
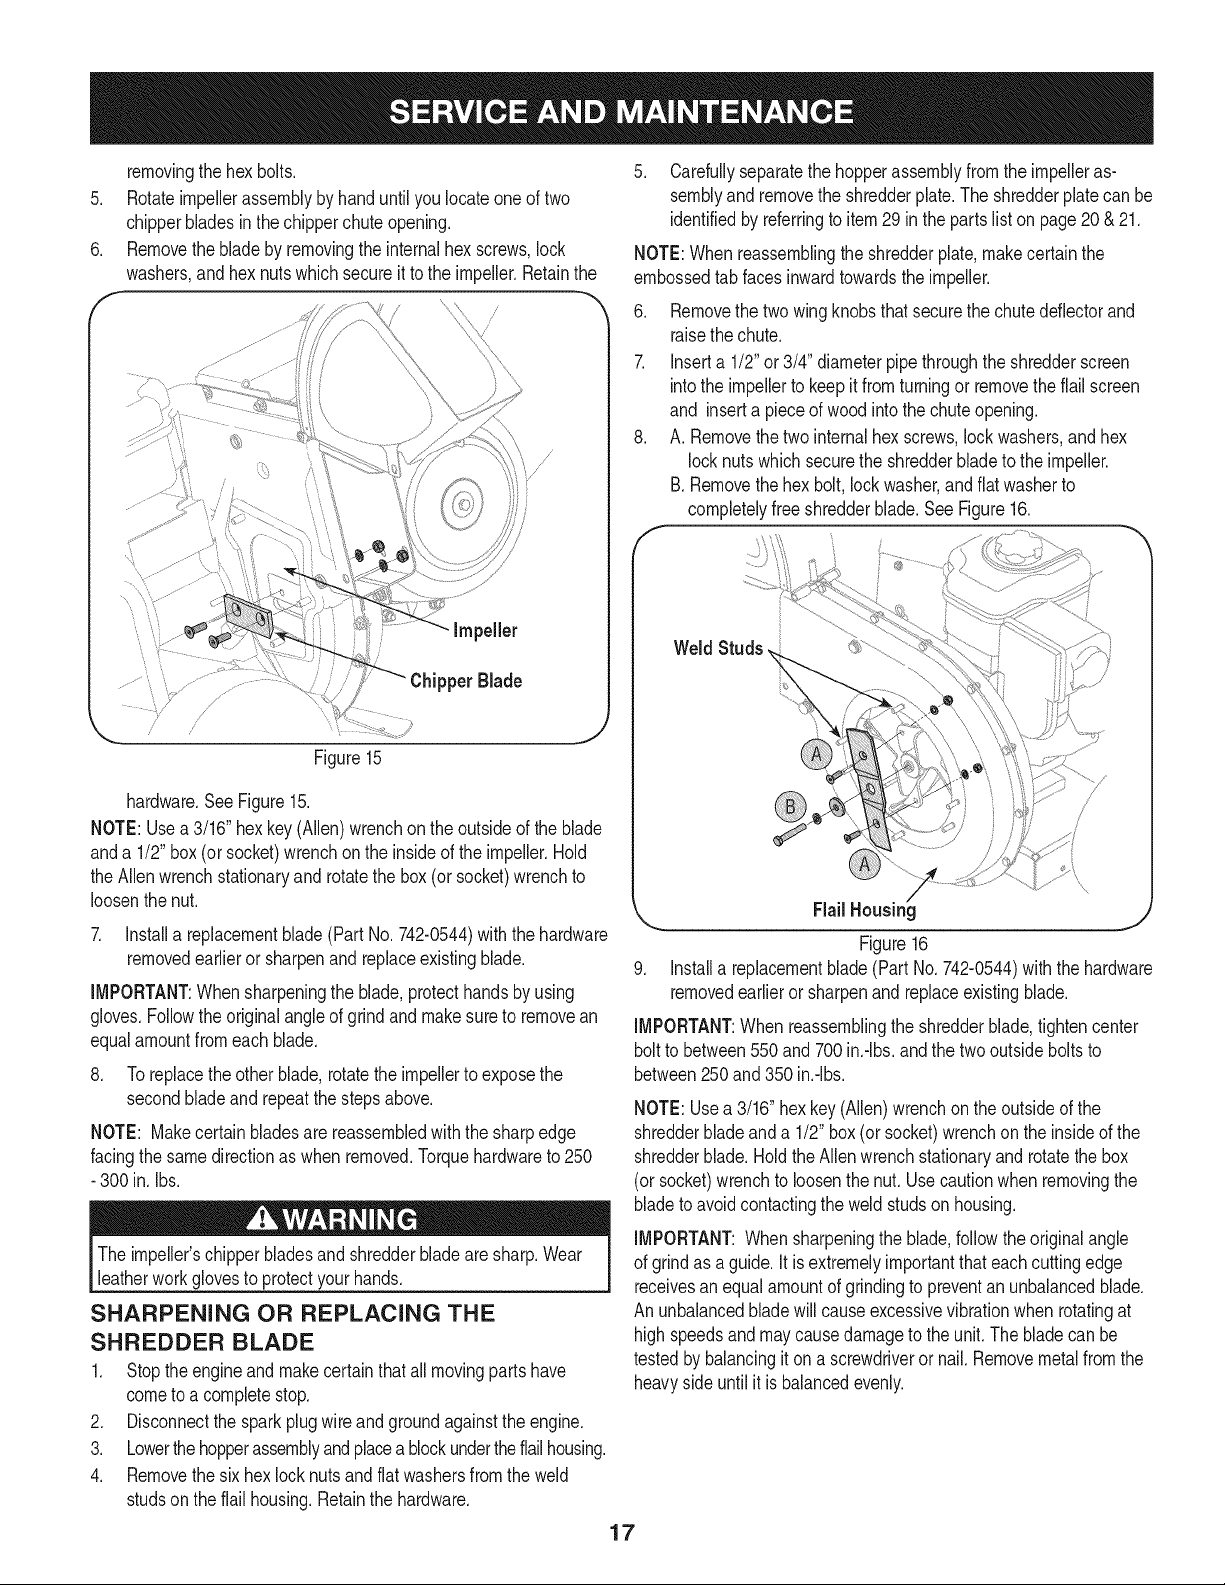
5. Rotateimpellerassemblyby handuntilyoulocateone oftwo
chipperbladesin thechipperchuteopening.
6. Removethebladebyremovingtheinternalhexscrews,lock
washers,andhexnutswhichsecureit tothe impeller.Retainthe
/
/
5. Carefullyseparatethehopperassemblyfromthe impelleras-
semblyandremovetheshredderplate.Theshredderplatecanbe
identifiedby referringtoitem29 in thepartslistonpage20& 21.
NOTE:Whenreassemblingtheshredderplate,makecertainthe
embossedtabfacesinwardtowardstheimpeller.
6. Removethetwowingknobsthatsecurethechuteddlector and
raisethechute.
7. Inserta 1/2"or 3/4"diameterpipethroughtheshredderscreen
intothe impellertokeepit fromturningor removetheflailscreen
and inserta pieceofwoodintothechuteopening.
8. A. Removethe twointernalhexscrews,lockwashers,andhex
locknutswhichsecuretheshredderbladetothe impeller.
B.Removethehex bolt,lockwasher,andflatwasherto
completelyfreeshredderblade.SeeFigure16.
f
Weld
Figure15
hardware.SeeFigure15.
NOTE:Usea3/16"hexkey(Allen)wrenchon theoutsideoftheblade
anda 1/2"box(orsocket)wrenchontheinsideoftheimpeller.Hold
theAllenwrenchstationaryandrotatethe box(or socket)wrenchto
loosenthenut.
7. Installareplacementblade(Part No.742-0544)withthehardware
removedearlieror sharpenandreplaceexistingblade.
IMPORTANT:Whensharpeningthe blade,protecthandsby using
gloves.Followtheoriginalangleofgrindandmakesuretoremovean
equalamountfromeachblade.
8. Toreplacetheotherblade,rotatetheimpellertoexposethe
secondbladeand repeatthestepsabove.
NOTE: Makecertainbladesare reassembledwiththesharpedge
facingthesamedirectionas whenremoved.Torquehardwareto250
- 300in.Ibs.
Theimpeller'schipperbladesandshredderbladearesharp.Wear
leatherworkglovesto protectyourhands.
SHARPENING OR REPLACING THE
SHREDDER BLADE
1. Stoptheengineandmakecertainthatallmovingpartshave
cometoa completestop.
2. Disconnectthesparkplugwire andgroundagainsttheengine.
3. Lowerthehopperassemblyandplacea blockundertheflailhousing.
4. Removethesixhexlocknutsandflatwashersfromtheweld
studsonthe flailhousing.Retainthehardware.
FlailHousing
Figure16
9. Installa replacementblade(PartNo.742-0544)with thehardware
removedearlierorsharpenandreplaceexistingblade.
IMPORTANT:When reassemblingtheshredderblade,tightencenter
boltto between550and700in.-Ibs,andthe twooutsideboltsto
between250and350in.-Ibs.
NOTE:Usea 3/16"hexkey(Allen)wrenchontheoutsideofthe
shredderbladeanda 1/2"box(or socket)wrenchon the insideof the
shredderblade.HoldtheAllenwrenchstationaryandrotatethebox
(orsocket)wrenchtoloosenthenut. Usecautionwhen removingthe
bladetoavoidcontactingthe weldstudson housing.
IMPORTANT:Whensharpeningtheblade,followtheoriginalangle
ofgrindas a guide.It is extremelyimportantthateachcuttingedge
receivesan equalamountofgrindingto preventan unbalancedblade.
An unbalancedbladewillcauseexcessivevibrationwhenrotatingat
highspeedsandmaycausedamagetothe unit.Thebladecan be
testedby balancingiton ascrewdriverornail. Removemetalfromthe
heavysideuntil itis balancedevenly.
17
Page 18

Neverstorechippershredderwithfuelintankindoorsorinpoorly
ventilatedareaswherefuelfumesmayreachanopenflame,spark,
orpilotlightasonafurnace,waterheater,clothesdryer,orgas
appliance.
PREPARING THE ENGINE
Forenginesstoredover30 days:
1. To preventgumfromforminginfuel systemoroncarburetor
parts,runengineuntilit stopsfromlackof fuelor adda gasoline
additivetothe gasinthe tank.Ifyou usea gas additive,runthe
engineforseveralminutestocirculatetheadditivethroughthe
carburetor--afterwhichtheengineandfuel canbestoredup to
six months.
2. Whileengineis stillwarm,changetheoil. SeeChangeEngineOil
in SERVICEANDMAINTENANCEsection.
3. Removesparkplugand pourapproximately1oz. (30ml)ofclean
engineoil intothe cylinder.Pullthe recoilstarterseveraltimesto
distributetheoil,andreinstallthe sparkplug.
4. Cleanengineofsurfacedebris.
PREPARING THE CHIPPER SHREDDER
* Whenstoringthechippershredderinan unventilatedor metal
storageshed,careshouldbetakento rustproofthe non-painted
surfaces.Usinga lightoil orsilicone,coatthe equipment,
especiallyanysprings,bearings,andcables.
, Removealldirt fromexteriorof engineandequipment.
, Followlubricationrecommendations.
o Storeequipmentina clean,dry area.Do notstorenextto
corrosivematerials,suchasfertilizer.Donotstoreinan area
whereequipmentispresentthatmayusea pilot lightor hasa
componentthatcancreatea spark.
18
Page 19

Beforeperforminganytyped maintenance/service,disengageall
controlsandstoptheengine.Waituntilallmovingpartshavecometo
acompletestop.Disconnectsparkplugwireandgrounditagainstthe
enginetopreventunintendedstarting.Alwayswearsafetyglassesduring
operationorwhileperforminganyadjustmentsor repairs.
Enginefailstostart
1. Throttlelevernot incorrectstartingposition
2. ChokenotintheCHOKEposition
3. Sparkplugwiredisconnected
4. Faultysparkplug
5. Fueltankemptyorstalefuel
6. Cannotpullrecoilcord
7. Engineflooded
Enginerunserratically
1. UnitrunningonCHOKE
2. Sparkplugwireloose
3. Stalefuel
4. Waterordirtinfuel system
5. Dirtyair cleaner
6. LowengineRPM
7. Carburetoroutofadjustment
Engineoverheats
1. Engineoillevellow
2. Airflowrestricted
Enginehesitatesat highRPMs 1. Sparkpluggap settooclose
Engineidlespoorly 1. Fouledsparkplug
2. Dirtyair cleaner
Excessivevibration 1. Loosepartsor damagedimpeller
Unitdoesnotdischarge 1. Chuteddlector clogged
2. Foreignobjectlodgedin impeller
3. LowengineRPM
Rateofdischargeslows
considerablyorcompositionof
1. LowengineRPM
2. Chipperbladedull
dischargedmaterialchanges
1. Movethrottleleverto START/RUNposition.
2. MoveCHOKEto theCHOKEposition.
3. Connectwiretosparkplug.
4. Clean,adjustgap,or replace.
5. Filltankwithclean,freshgasoline.
6. Obstructionlodgedinimpeller.Disconnectspark
plugwireandremovelodgedobject.
7. Waitafewminutestorestart.
1. MovechokelevertotheRUNposition.
2. Connectandtightensparkplugwire.
3. Filltankwithfreshgasoline.
4. Refillwithfreshfuel.
5. Cleanor replaceair cleanerfilter.
6. Alwaysrunengineatfullthrottle.
7. ContactyourSearsParts&RepairCenter.
1. Fillenginewith properamountandtype ofoil.
2. Cleandebrisfromaroundtheengine'scoolingfins
and blowerhousing.
1. Removesparkplugandadjustgap.
1. Replacesparkplugandadjustgap.
2. Replaceair cleanercartridge.
1. Stopengineimmediatelyanddisconnectsparkplug
wire.ContactyourSearsParts& RepairCenter.
1. Stopengineimmediatelyanddisconnectspark
plugwire.Cleanflail screenandinsided discharge
opening.
2. Stopengineanddisconnectsparkplugwire.
Removelodgedobject.
3. Alwaysrunengineatfullthrottle.
1. Alwaysrunengineatfull throttle.
2. Replaceor sharpenchipperbladeor contactyour
SearsParts& RepairCenter.
NEED MORE HELP?
Find tMs and a[[ your other product rnanuats online.
Get answers from our team of home experts.
Get a personal}zeal rnaintenance p[an for your home,
Find information and tools to help with home projects.
b_te_ght te ye_ by $¢alts
19
Page 20

Craftsman Chipper Shredder -- Model No. 247.77638
/ ;/
/ /
; /
/
_ ....
/
2O
Page 21

Craftsman Chipper Shredder B IViodel No. 247.77638
936-0217 LockWasher,3/8 710-3008
2. 914-0149B CotterPin 23. 736-0247
3. 720-0170 WingKnob5/16-18 24. 942-0571
4. 681-0094A-4044 ChuteDeflectorAssembly 25. 710-1254
5. 911-0835 ClevisPin 26. 681-0004A-4044
6. 781-0457-0637 ShredderScreen 27. 710-0825
7. 926-0211 U-Nut5/16-18 28. 781-0515-0637
8. 950-0793 Spacer 29. 781-0574-0637
9. 912-3027 HexLockNut,1/4-20 30. 681-0104-4044
10. 712-3004A HexLockNut5/16-18 31. 932-0306A
11. 936-0119 LockWasher5/16 32. 936-0117
12. 681-04116 innerImpellerHousingAssembly 33. 914-0104
13. 710-3025 HexCapScrew5/16-18x.625 34. 936-0264
14. 710-0157 HexCapScrew5/16-24x .75 35. 710-0376
15. 942-0544B ChipperBlade 36. 748-0453
16. 710-1054 HexCapScrew5/16-24x 1.0 37. 731-1707A
17. 681-04095 ImpellerAssembly 38. 912-0429
18. 912-0411 HexLockNut5/16-24 39. 731-1710A
19. 712-0266A Nut,JamLock,3/8-16 40. 681-0123-4044
20. 719-04308 FlailBlade 41. 711-1128
21. 738-04286A ShoulderPin, .5x 2.625
HexCapScrew5/16-18x .75
FiatWasher3/8 x 1.25
ShredderBlade
HexCapScrew3/8-24 x2.25
OuterimpellerHousingAssembly
HexCapScrew1/4-20x3.75
FrontSupportBracket
ShredderPlate
RearHopperBracketAssembly
CompressionSpring1.75
FlatWasher
CotterPin
FlatWasher.330IDx.630 OD
HexCapScrew5/16-18x 1.0
Spacer,.375IDx 2.50LG
HopperAssembly
HexLockNut5/16-18
HopperCollar
FrontHopperBracketAssembly
LockRod
21
Page 22

Craftsman Chipper Shredder B IViodel No. 247.77638
22
Page 23

Craftsman Chipper Shredder B IViodel No. 247.77638
728-0175 PopRivet
2 753-05094 ChipperShredderChute 17
3 735-0249A ChuteFlap 18
4 781-0633 ChuteFlapStrip 19
5 681-04119-4044 ChipperChuteAssembly 20
6 710-0751 HexCapScrew1/4-20x.620 21
7 712-04064 HexLockNut1/4-20 22
8 710-0809 HexCapScrew1/4-20x 1.25 23
9 736-0173 FlatWasher.28 IDx .74OD 24
10 736-0242 BellWasher.340IDx .872OD 25
11 912-3010 HexNut5/16-18 26
12 749-1004-4044 SupportBrace
13 712-3004A HexLockNut5/16-18
14 710-3180 HexCapScrew5/16-18x 1.75
15 936-0170 BellWasher5/16x 1.0
27 731-1617 Tamper
28 20T212-O835-F1 ReplacementEngine
29 710-0106 HexScrew,1/4-20x 1.25
950-0786 Spacer
738-0813 AxleAssembly
737-0298 Pipe,OilDrain
934-04009 WheelComplete,10.0x 4.0 Gray
726-0214 PushCap
681-0183B-4044 Frame
936-0451 Washer,.320IDx.93OD
710-0502A Screw,3/8-16x 1.250
723-0400 SafetyGlasses(NotShown)
964-04024 ChipperBagAss'y(NotShown)
737-0132 Oil DrainEndCap
23
Page 24

Craftsman Engine Model 204312=0529 For Chipper Shredder Model No. 247.77638
110_8OPERATORSMA,0A']I 48S,OmB.OOKI I1329_EP.AOEMENTENG,NEII 13_9_E_A'_A"0A']
529 _,
396
615 _)
616
5o5 _
397
24_j
746
742 _
12
'Y 718 __b
J
...."_ 718A
1427 _
1194
22
32
30
358 ENGINE GASKET SET
2O
12
163
12
868
24
51A
1022
Page 25

Craftsman Engine IViodel 204312-0529 For Chipper Shredder IViodel No. 247.77638
632
_o9_
1095 VALVE GASKET SET
51A
_22
1O22
188 (_
25
Page 26

Craftsman Engine IViodel 204312-0529 For Chipper Shredder IViodel No. 247.77638
121 CARBURETOR OVERHAUL KiT
633 3 C:-._
130
95@
127°
117@
118 _@
51A(
127 0
163
633 (o_
51A(
369 i_
137
1127 _
105 0
\
53
_%_.. 967
I _ 445
161I'i_'_s
957 _,."'t_,_- _"s
613
i_72A]
24O
190 _?'
26
Page 27

Craftsman Engine IViodel 204312=0529 For Chipper Shredder IViodel No. 247.77638
356
37
78 _ 306
363
1005
1070
334
332
774
635
356A ........... C_
12
1211
592 @) 55
65
27
Page 28

Craftsman Engine IViodel 204312=0529 For Chipper Shredder IViodel No. 247.77638
D = O
1
2
3
5
7
11
12
794849
698340
391086s.
794870
694872.+
696796
694953.
CylinderAssembly
Kit-Bushing/Seal(MagnetoSide)
Seal-Oil(MagnetoSide)
Head-Cylinder
Gasket-CylinderHead
Tube-Breather
Gasket-Crankcase
13 794829 Screw(CylinderHead)
15 697757 Plug-OilDrain
16 794874 Crankshaft
18 791965 Cover-Crankcase
19 698340 Kit-Bushing/Seal(PTOSide)
20 391086s• Seal-Oil(PTOSide)
21 281658s Cap-OilFill
22 794825 Screw(CrankcaseCover/Sump)
23 794814 Flywheel
24 222698s Key-Flywheel
25 792117 PistonAssembly(Standard)
792144 PistonAssembly(.020"Oversize)
26 793561 RingSet (Standard)
792073 RingSet(.020"Oversize)
27 690975 Lock-PistonPin
28 696581 Pin-Piston
29 691691 Rod-Connecting
30 694692 Dipper-ConnectingRod
32 690976 Screw(ConnectingRod)
33 499596 Valve-Exhaust
34 792200 Valve-Intake
35 694865 Spring-Valve(Intake)
36 694865 Spring-Valve(Exhaust)
37 790730 Guard-Flywheel
42 499586 Keeper-Valve
45 690977 Tappet-Valve
46 790958 Camshaft
48 N/A Short Block
D = O I
51
51A
53
55
58
59
6948740.+
6948750.+
794830
695288
693389
805957
Gasket-Intake
Gasket-Intake
Stud(Carburetor)
Housing-RewindStarter
Rope-Starter
Insert-Grip
60 490652 Grip-StarterRope
65 699228 Screw(RewindStarter)
78 795026 Screw(FlywheelGuard)
81 794817 Lock-MufflerScrew
95 690718 Screw(ThrottleValve)
97 696387 Shaft-Throttle
98 6954080 KiNdle Speed
104 6949180 Pin-FloatHinge
105 6961360 Valve-FloatNeedle
108 696143 Valve-Choke
109 790149 Shaft-Choke
117 696134 Jet-Main(Std.)(InclO-RingSeal)
118 696135 Jet-Main(HighAIt.)(InclO-RingSeal)
121 696146 Kit-CarburetorOverhaul
122 694876 Spacer-Carburetor
125 699966 Carburetor
127 6907270 Plug-Welch
130 696139 Valve-Throttle
133 694914 Float-Carburetor
135 696142 Tube-FuelTransfer
137 6954260 Gasket-FloatBowl
141 696145 Kit-ChokeShaft
146 690979 Key-Timing
161 794768 Base-AirCleaner
163 6922770. Gasket-AirCleaner
187 791766 Line-Fuel(CutToRequiredLength)
188 699479 Screw(ControlBracket)
190 699220 Screw(FuelTank)
192 690083 Adjuster-RockerArm
28
Page 29

Craftsman Engine IViodel 204312=0529 For Chipper Shredder IViodel No. 247.77638
m = I! II
209
211
219
220
694867
695307
693578
691724
Spring-Governor(Red)
Spring-GovernedIdle
Gear-Governor
Washer(GovernorGear)
222 794799 Bracket-Control
227 694864 Lever-GovernorControl
240 298090s Filter-Fuel
265 691024 Clamp-Casing
267 699492 Screw(CasingClamp)
271 695381 Lever-Control
278 792008 Washer(GovernorControlLever)
281 697268 Panel-Control
300 794806 Muffler
304 791478 Housing-Blower
305 699480 Screw(BlowerHousing)
306 697240 Shield-Cylinder
307 794822 Screw(CylinderShield)
332 794824 Nut(Flywheel)
333 492341 Armature-Magneto
334 699477 Screw(MagnetoArmature)
337 491055s Plug-Spark
356 692603 Wire-Stop
356A 692390 Wire-Stop
356B 695815 Wire-Stop
356C 695295 Wire-Stop
358 695438 GasketSet-Engine
363 19203 Puller-Flywheel
369 695422 Spring-FloatBowl
383 19374s Wrench-SparkPlug
410 695382 Link-Control
415 691363 Plug(Cylinder)
425 794835 Screw(AirCleanerCover)
445 491588s Filter-AirCleanerCartridge
446 794941 Spring-Retainer
455 794867 Cup-Flywheel
D = I! It
456
459
493
5O4
5O5
529
692299
281505s
691177
695383
691251
791822
Plate-PawlFriction
PawI-Ratchet
Bracket-Mounting
WasherSet-Friction
Nut(GovernorControlLever)
Grommet(Cylinder)
552 694674 Bushing-GovernorCrank
562 793216 Bolt(GovernorControlLever)
592 690800 Nut(RewindStarter)
597 691696 Screw(PawlFrictionPlate)
601 791850 Hose-Clamp
608 695287 Starter-Rewind
613 794846 Screw(Muffler)
613A 794848 Screw(Muffler)
615 694676 Retainer-GovernorShaft
616 694675 Crank-Governor
621 692310 Switch-Stop
632 695917 Spring/Link-MechanicalGovernor
633O 690998 Seal-Choke/ThrottleShaft
635 691909 Boot-SparkPlug
663 699492 Screw(ControlPanel)
663A 795026 Screw(ControlPanel)
668 694257 Spacer(ControlBracket)
689 691855 Spring-Friction
718 690959 Pin-Locating(Cylinder)
718A 695178 Pin-Locating(CylinderHead)
741 691288 Gear-Timing
742 692564 Retainer-ERing
746 694679 Gear-Idler
773 694258 Retainer
774 695447 Screw(StopWire)
798 697890 Screw(RockerArm)
832 795035 Guard-Muffler
836 794845 Screw(MufflerGuard)
836A 710023 Screw(MufflerGuard)
29
Page 30

Craftsman Engine IViodel 204312=0529 For Chipper Shredder IViodel No. 247.77638
I = O O
851
868
883
914
951
957
967
968
692424
690968.+
794818.
794827
699961
792647
491435s
794785
Terminal-SparkPlug
Seal-Valve
Gasket-Exhaust
Screw(RockerCover)
Lever-Choke
Cap-FuelTank
Filter-PreCleaner
Cover-AirCleaner
972 694260 Tank-Fuel
975 696138 Bowl-Float
998 696683 Pipe-Oil
1005 794815 Fan-Flywheel
1022 690971.+ Gasket-RockerCover
1023 697691 Cover-Rocker
1026 695177 Rod-Push
1029 690972 Arm-Rocker
1036 Label-Emissions
1058 MS3797 Operator'sManual
1070 794821 Screw(FlywheelFan)
1095 695440 GasketSet-Valve
1100 791959 Pivot-RockerArm
1127 695407 Screw(FloatBowl)
1138 694255 Nut(ControlBracket)
• 1194 691876 Seal-ORing(Plug)
1210 498144 Pulley/SpringAssembly(Pulley)
1211 498144 Pulley/SpringAssembly(Spring)
1329 2043120536e9 ReplacementEngine
1330 272147 RepairManual
1427 695757 Cap-Pipe
• IncludedinEngineGasketSet,KeyNumber358
0 IncludedinCarburetorOverhaulKit,KeyNumber121
+ IncludedinValveGasketSet,KeyNumber1095
3O
Page 31

Craftsman Chipper Shredder Model No. 247.77638
777333113 777333200 777332036
®ROTATING CUTTING BLADES. KEEP HANDS AND
FEET OUT OF OPENING WHILE MACHINE mS
RUNNING.
=DO NOT OPERATE THiS MACHINE UNLESS THE
CHUTE DEFLECTOR HAS BEEN PROPERLY
iNSTALLED ANDJS SECURED WiTH THE HAND
KNOBS.
777S30185
777S30181
ROTATING CUTTING BLADES.
KEEP HANDS AND FEET OUT
OF OPENINGS WHILE MACHINE
iS RUNNING.
777S32282
DONOTOPERATETHISMACHINE
UNLESSTHECHUTEDEFLECTOR
Operatien Of This Equipment May Create
Sparks That Can Start Fires Around Dry
Vegetation. A Spark Arrestor May Be
Required. The Operator Should Contact
Local Fire Agencies For Laws Or ReguJa=
ionsTo Fire Prevention Requirements.
777X43688
.................DOHOT...................
USEE85 ORFUEL ......
CONTAiNiNGMORE
THAN10% ETHANOL
TO AVOID SERIOUS iNJURY:
• Read the operator's manuaJ(s) before starting and
using unit.
• Keep ag shieJds and guards in place and secureJy
attached.
• Keep hands, feet, face, cJothing and Jong hair out of
Shredder Hopper, Chipper Chute and Discharge
Chute whge the engine is running. Rotating cutting
bJades inside these openings wiJJcause serious
personal injury if contacted. Material being processed
may bounce back from inJetopenings or be thrown
from the discharge chute. Long hair or Jeose clothing
may be puJJedor sucked into the inlet openings.
• Do not pJace branches over 1/2 inch diameter into
the Jarge Shredder Hopper. Branches over 1/2 inch in
diameter sheuJd be pJaeed in the SmaJJChipper
Chute.
• if the chipped shredder jams or becomes clogged,
immediateJy shut off the engine and wait for ail
moving parts to come to a complete stop before
cJearing.
• Do not instaJJ,remove, adjust, or service the
discharge screen or any other part whiJe the engine
is running. Blade contact can occur.
$32O36 AC
777332037
TO AVOID SERIOUS iNJURY:
DO not operate on uneven ground where unit is
unstabJe. Do net operate on pavement, gravel or
other hard surfaces since objects can ricochet
and cause injury.
To avoid a fire hazard, keep Jeaves, grass, and other
combustible materiaJs away from hot engine and
muffler.
• Keep children and ethers away from area of
operation,
, Wear approved safety glasses, gloves and ear
protection.
777D12676
31
Page 32

(Thispageapplicableinthe U.S.A.and Canadaonly.)
Sears Brands Management Corporation (Sears), the California Air Resources Board (CARD)
and the United States Environmental Protection Agency (U.S. EPA)
Emission Control System Warranty Statement (Owner's Defect Warranty Rights and Obligations)
EMISSIONCONTROLWARRANTYCOVERAGEISAPPLICABLETOCERTI-
FIEDENGINESPURCHASEDINCALIFORNIAIN1995ANDTHEREAF-
TER,WHICHAREUSEDINCALIFORNIA,ANDTOCERTIFIEDMODEL
California and United States Emission
TheCaliforniaAirResourcesBoard(CARD),U.S.EPAand Searsare pleased
toexplainthe EmissionControlSystemWarrantyonyour modelyear2000and
latersmalloff-roadengine(SORE).InCalifornia,newsmalloff-roadengines
mustbe designed,builtand equippedto meettheState'sstringentanti-smog
standards.Elsewherein theUnitedStates,newnon-road,spark-ignition
enginescertifiedformodelyear1997and latermustmeetsimilarstandardsset
forthbythe U.S.EPA.Searsmustwarranttheemissioncontrolsystemonyour
YEAR1997ANDLATERENGINESWHICHAREPURCHASEDANDUSED
ELSEWHEREINTHEUNITEDSTATES(ANDAFTERJANUARY1,2001 IN
CANADA).
Control Defects Warranty Statement
enginefortheperiodsoftime listedbelow,providedtherehasbeennoabuse,
neglector impropermaintenanceofyour smalloff-roadengine.Youremis-
sioncontrolsystemincludespartssuchasthecarburetor,aircleaner,ignition
system,mufflerandcatalyticconverter.Also includedmaybeconnectorsand
otheremissionrelatedassemblies.Wherea warrantableconditionexists,Sears
will repairyoursmalloff-roadengineatnocostto youincludingdiagnosis,parts
andlabor.
Sears Emission Control Defects Warranty Coverage
Smalloff-roadenginesarewarrantedrelativeto emissioncontrolpartsdefects
fora periodofone year,subjecttoprovisionssetforthbelow.Ifanycovered
Owner's Warranty
Asthe smalloff-roadengineowner,youare responsiblefor theperformanceof
therequiredmaintenancelistedinyourOperatingand MaintenanceInstruc-
tions.Searsrecommendsthatyouretainallyourreceiptscoveringmaintenance
onyoursmalloff-roadengine,butSearscannotdenywarrantysolelyforthe
lackofreceiptsorforyourfailuretoensuretheperformanceof allscheduled
maintenance.As the smalloff-roadengineowner,youshouldhoweverbe
awarethat Searsmaydenyyouwarrantycoverageifyoursmalloff-roadengine
ora parthasfaileddueto abuse,neglect,impropermaintenanceor unap-
parton yourengineis defective,the partwillbe repairedorreplacedbySears.
Responsibilities
provedmodifications.Youareresponsiblefor presentingyour smalloff-road
engineto anAuthorizedSearsServiceDealerassoonas aproblemexists.The
undisputedwarrantyrepairsshouldbecompletedina reasonableamountof
time,notto exceed30days.Ifyouhaveanyquestionsregardingyourwarranty
rightsandresponsibilities,youshouldcontacta SearsServiceRepresentative
at 1-800-469-4663.Theemissionwarrantyisa defectswarranty.Defectsare
judgedonnormalengineperformance.Thewarrantyisnotrelatedtoan in-use
emissiontest.
Sears Emission Control Defects Warranty Provisions
ThefollowingarespecificprovisionsrelativetoyourEmissionControlDefectsWarrantyCoverage.ItisinadditiontotheSearsenginewarrantyfornon-regulated
enginesfoundin theOperatingandMaintenanceInstructions.
1. WarrantedParts
Coverageunderthiswarrantyextendsonlytothe partslistedbelow(the
emissioncontrolsystemsparts)to the extentthesepartswerepresenton
theenginepurchased.
a. FuelMeteringSystem
• Cold startenrichmentsystem
• Carburetorandinternalparts
• FuelPump
b. AirlnductionSystem
• Aircleaner
• Intakemanifold
c. IgnitionSystem
• Sparkplug(s)
• Magnetoignitionsystem
d. CatalystSystem
• Catalyticconverter
• Exhaustmanifold
• Air injectionsystemorpulsevalve
e. MiscellaneousItemsUsedin AboveSystems
• Vacuum,temperature,position,timesensitivevalves
andswitches
• Connectorsandassemblies
2. Lengthof Coverage
Searswarrantsto theinitialownerand eachsubsequentpurchaserthat
theWarrantedPartsshallbefree fromdefectsin materialsandworkman-
shipwhich causedthefailureofthe WarrantedPartsfor aperiodof one
yearfromthe datetheengineis deliveredtoa retailpurchaser.
Inthe USAandCanada,a 24hourhotline,1-800-469-4663,hasamenuof pre-recordedmessagesofferingyouenginemaintenanceinformation.
3. NoCharge
Repairorreplacementof anyWarrantedPartwillbe performedat no
chargeto the owner,includingdiagnosticlaborwhichleadstothe
determinationthata WarrantedPartisdefective,ifthediagnosticwork is
performedatanAuthorizedSearsServiceDealer.Foremissionswarranty
servicecontact yournearestAuthorizedSearsServiceDealeras listedin
the "YellowPages"under"Engines,Gasoline,""GasolineEngines,""Lawn
Mowers,"orsimilarcategory.
4. Claimsand CoverageExclusions
Warrantyclaimsshallbefiled inaccordancewiththe provisionsof the
SearsEngineWarrantyPolicy.Warrantycoverageshallbeexcludedfor
failuresof WarrantedPartswhicharenotoriginalSears partsor because
ofabuse,neglector impropermaintenanceassetforth intheSears
EngineWarrantyPolicy.Searsisnotliableto coverfailuresof Warranted
Partscausedby theuseof add-on,non-original,or modifiedparts.
5. Maintenance
AnyWarrantedPartwhichis notscheduledforreplacementasrequired
maintenanceor whichis scheduledonlyfor regularinspectiontothe effect
of"repairor replaceasnecessary"shallbe warrantedasto defectsfor the
warrantyperiod.AnyWarrantedPartwhichis scheduledfor replacement
asrequiredmaintenanceshallbewarrantedas todefectsonly forthe
periodoftime uptothe firstscheduledreplacementfor that part.Any
replacementpartthat isequivalentinperformanceanddurabilitymay
beusedinthe performanceofanymaintenanceor repairs.Theowneris
responsiblefortheperformanceof all requiredmaintenance,as definedin
the SearsOperatingandMaintenanceInstructions.
6. ConsequentialCoverage
Coveragehereundershallextendto thefailure ofanyenginecomponents
causedbythefailureofanyWarrantedPartstill underwarranty.
GDOC-100188Rev.B
32
Page 33

Look For Relevant Emissions Durability Period and
Air index information On Your Engine Emissions Label
Engines that are certified to meet the California Air Resources Board (CARB) Tier 2 Emission Standards must
display information regarding the Emissions Durability Period and the Air Index. Sears Brands Management
Corporation makes this information available to the consumer on our emission labels.
The Emissions Durability Period describes the number of hours of actual running time for which the engine is
certified to be emissions compliant, assuming proper maintenance in accordance with the Operating & Mainte-
nance Instructions. The following categories are used:
Moderate: Engine is certified to be emission compliant for 125 hours of actual engine running time.
Intermediate: Engine is certified to be emission compliant for 250 hours of actual engine running time.
Extended: Engine is certified to be emission compliant for 500 hours of actual engine running time.
For example, a typical walk-behind lawn mower is used 20 to 25 hours per year. Therefore, the Emissions
Durability Period of an engine with an intermediate rating would equate to 10 to 12 years.
The Air index is a calculated number describing the relative level of emissions for a specific engine family. The
lower the Air Index, the cleaner the engine. This information is displayed in graphical form on the emissions label.
After July 1,2000, Look For Emissions Compliance Period
On Engine Emissions Compliance Label
After July 1, 2000 certain Sears Brands Management Corporation engines will be certified to meet the United
States Environmental Protection Agency (USEPA) Phase 2 emission standards. For Phase 2 certified engines, the
Emissions Compliance Period referred to on the Emissions Compliance label indicates the number of operating
hours for which the engine has been shown to meet Federal emission requirements.
For engines less than 225 cc displacement, Category C = 125 hours, B = 250 hours and A = 500 hours.
For engines of 225 cc or more, Category C = 250 hours, B = 500 hours and A = 1000 hours.
This is a generic representation of the emission label typically found on a certified engine.
FAMILYYBSXS.3192VA 274812
33
GDOC-100182Rev.B
Page 34

Congratulations on making a smart purchase. Your new Craftsman® product is designed and
manufactured for years of dependable operation. But like all products, it may require repair
from time to time. That's when having a Repair Protection Agreement can save you money and
aggravation.
Here's what the Repair Protection Agreement* includes:
[] Expert service by our 10,000 professional repair specialists
[] Unlimited service and no charge for parts and labor on all covered repairs
[] Product replacement up to $1500 if your covered product can't be fixed
[] Discount of 25% from regular price of service and related installed parts not covered by the
agreement; also, 25% off regular price of preventive maintenance check
[] Fast help by phone - we call it Rapid Resolution - phone support from a Sears representative.
Think of us as a "talking owner's manual."
Once you purchase the Repair Protection Agreement, a simple phone call is all that it takes for you
to schedule service. You can call anytime day or night, or schedule a service appointment online.
The Repair Protection Agreement is a risk-free purchase. If you cancel for any reason during the
product warranty period, we will provide a full refund. Or, a prorated refund anytime after the
product warranty period expires. Purchase your Repair Protection Agreement today!
Some limitations and exclusions apply. For prices and additional information in the U.S.A.
call 1=800=827=6655.
*Coverage in Canada varies on some items. For full details call Sears Canada at 1=800=361=
6665.
Sears Installation Service
For Sears professional installation of home appliances, garage door openers, water heaters, and
other major home items, in the U.S.A. or Canada call 1=800=4=MY=HOME®.
34
Page 35

Declaraci6n de garantia ....................... Pagina 35
Practicas operacion seguras ............... Pagina 36
Montaje ................................................ Pagina 40
Operacion ............................................ Pagina 44
Servicio y Mantenimiento .................... Pagina 46
Almacenamiento fuera de temporada .... Pagina 50
Solucion de problemas ...................... Pagina 51
ARTESANODEDOSAI/OS DEGARANT{A
PORDOSAI_OSSapartirdelafechadecompra,esteproductoestAgarantizadocontracualquier
defectodematerialo manodeobra.Unproductodefectuosorecibir&lareparacbnola sustitucbnsila
reparaci6nnoest&disponible.
Paraobtenerinformacbndetalladacoberturadela garanfiaparaobtenerlareparaci6no sustitucbn
gratuita,visiteelsitioweb:www.craftsman.com
EstagarantiacubrelosdefectosSOLOdernaterialesy fabricaci6n.Lagarantianoinduye:
• BementosreutilizaNesque puedengastarseporeluso normaldentrodel periodode
garanfia,talescomolascuchillas,bujias,filtrodeaire, pantalladedesgranadoy una
bolsa.
Etiquetas de seguridad ....................... Pagina 7
Lista de piezas ..................................... Pagina 20
Acuerdo de Proteccion Para
Reparaciones ....................................... Pagina 55
Labels .................................................. Pagina 31
NOmero de servicio ..................... Cubierta posterior
• ProductodaSosresultantesde losintentosdel usuariodernodificaci6ndel producto,
reparaci6nocausadosporaccesoriosdeproductos.
• Reparacionesnecesariasdebidoal accidenteopornooperaromantenerel producto
segQnlasinstruccionesprovistas.
• Elmantenimientopreventivoo reparacionesnecesariasdebidoa unamezclaincorrectade
combustible,combustiblecontaminadoo pasado.
Estagarantiaes inv_Jidasiesteproductose utilizaal mismotiempola prestaci6nde servicios
comercialeso sise alquilaa otrapersona.
Estagarantialeotorgaderechoslegalesespecificos,y ustedtambi_npuedetenerotrosderechos
quevariandeestadoa estado.
SearsBrands ManagementCorporation, Hoffman Estates,IL 60179
Serie: 1450
Tipodeaceitedelmotor: SAE30
Capacidadde aceitedel motor: 28onzas
Elcombustible: GasolinasinPIomo
Bujias: Champion®RC-12YC
Separaci6ndelasbujias: .030"
NSrnerode modelo ..........................................................
N_mero de serie..............................................................
Fechade compra .............................................................
RegistrearribaelnOmerodel modelo,el nOmerode serieyla fecha
de compra
KCDIRLLC 35
Page 36

Lapresenciade estesirnboloindicaquesetratadeinstrucciones
irnportantesdeseguridadque sedebenrespetarparaevitar
poneren peligrosuseguridadpersonaly/o materialyla deotras
personas.Leay sigatodaslas instruccionesdeestemanualantes
deponeren funcionarnientoestarn_.quina.Sinorespetaestas
instruccionespodriaprovocarlesionespersonales.Cuandoveaeste
sirnbolo,ipresteatenci6na laadvertencia!
Estarn_.quinarueconstruidaparaseroperadade acuerdocon
lasreglasdeseguridadcontenidaseneste manual.AIigualque
concualquiertipo de equipornotorizado,undescuidoo errorpor
partedel operadorpuedeproducirlesionesgraves.Estarn_.quina
escapazde arnputarrnanosypiesy dearrojarobjetoscongran
fuerza.De norespetarlas instruccionesde seguridadsiguientesse
puedenproducirlesionesgravesolarnuerte.
PROPOSICION 65 DE CALIFORNIA
Elescapedel motorde esteproducto,algunosdesuscornponentes
y algunoscornponentesdelvehiculocontieneno liberansustancias
quirnicasqueelestadode Californiaconsideraquepuedenproducir
c_.ncer,defectosde nacirnientouotrosproblernasreproductivos.
CAPACITACiON
• Lea,entienday curnplatodaslasinstruccionesincluidasen
la rnAquinay enlosrnanualesantesde rnontarlayutilizarla.
Guardeestemanualenun lugarseguroparaconsultasfuturasy
regulares,asicornoparasolicitarrepuestos.
• Leael ManualdelOperadory sigatodaslas advertenciase
instruccionesdeseguridad.El fracasodehacerasi puedecausar
la heridaseriaal operadory/opersonaspresentes.
• Farniliaricesecontodosloscontrolesysuoperaci6nadecuada.
Sepac6rnodetenerla rn_.quinay c6rnodesengranarloscontroles
r_.pidarnente.
• Noperrnitanuncaquelosnifos rnenoresde 16afrosutilicen
estarn_.quina.Los nifos de 16afrosy rn_.srnayoresdeben
leerycornprenderlas instruccionesde operaci6nylasreglas
de seguridadcontenidasen estemanual,ytarnbi_ndebenser
capacitadosy estarsupervisadosporunode lospadres.
• Nuncaperrnitaquelos aduitosoperenestarn_.quinasin recibir
antesla instrucci6napropiada.
• Mantengaa lostranseQntes,ayudantes,rnascotasy nifos al
rnenosa75piesde la rn_.quinarnientrasest,.operando.Detenga
la rn_.quinasi alguienentraenla zona.
• Nuncaenciendaunmotorenespacioscerradoso enunazona
conpocaventilaci6n.Elescapedel motorcontienernon6xidode
carbono,un gasinodoroy letal.
• Nopongalas rnanosolos piescercadelas piezasrotatoriaso
en lasc_.rnarasde alirnentaci6nnien laaberturadedescarga.El
contactocon el motorrotatoriopuedeproducirlaarnputaci6nde
dedos,rnanosopies.
• Nuncatratededestapar[atornade alirnentaci6no la aberturade
descarga,nitratede sacaro vaciarla bolsade laaspiradora,ni
de revisary repararlarn_.quinarnientrasel motorest,.enrnarcha.
Apagueel motory esperehastaquetodaslaspiezasrn6vilesse
hayandetenidoporcornpleto.Desconecteel cablede la bujiay
p6ngalodernaneraque hagarnasacontrael motor.
Su responsabilidad--Restrinja el uso deestarn_.quina
rnotorizadaalas personasque lean,cornprendany respetenlas
advertenciase instruccionesqueaparecenenestemanualyen la
rn_.quina.
iGUARDEESTASINSTRUCCIONES!
PREPARATIVOS
* Inspeccionerninuciosarnenteel _.readondeutilizar_,el equipo.
Retiretodaslaspiedras,botellas,latasu otrosobjetosextrafos
que puedanserlevantadoso arrojadoscausandolesiones
personaleso dafos a larn_.quina.
, Paraprotegerselosojosutilicesiernpreanteojosoantiparras
de seguridadrnientrasoperalarn_.quinao rnientrasla ajusta
o repara.Losobjetosarrojadosquerebotanpuedenlesionar
gravernentelavista.
, Utilicezapatosde trabajoresistentes,desuelafuerte,asicorno
pantalonesy carnisasajustados.Lasprendassueltasolas
alhajaspuedenquedaratrapadasen laspiezasrn6viles.Nunca
utilicela rn_.quinadescaizoocon sandalias.Utiiiceguantesde
trabajodecuerocuandoalirnentematerialporelcanal dela
cortadora.
, Antesde encenderla rn_.quinacontrolequetodoslospernosy
tornillosest_nbienajustadosparacornprobarquela rn_.quinase
encuentraen condicionessegurasdeoperaci6n.Adern_.s,realice
una inspecci6nvisualde la rn_.quinaa intervalosfrecuentespara
controlarsila rnisrnaest,.dafada.
, Mantengao reernplacelasetiquetasdeseguridadeinstrucciones
segQnseanecesario.
36
Page 37

Manejoseguro de la gasolina
Paraevitarlesionespersonaleso daSosrnaterialesseasurnarnente
cuidadosoal rnanipularla gasolina.Lagasolinaesaltarnenteinflarno
ableysusvaporespuedencausarexplosiones.Se puedelesionar
gravernentesiderrarnagasolinasobreustedosobrela ropayaquese
puedeencender.L_veselapiely c&rnbiesede ropadeinrnediato.
• Utilices61orecipientesparagasolinaautorizados.
• NuncaIlenelos contenedoresenelinteriordeun vehiculo
o carni6nocaja decarnionetacon recubrirnientospl&sticos.
Coloquesiernprelos recipientesenel pisoy lejosdelvehiculo
antesde Ilenarlos.
• Retireel equipoa gasolinadelcarni6no rernolquey II_neloen
el piso.Si estonoesposible,entoncesIlenedichoequipoenun
rernolqueconun recipienteport&til,en vezdedesdeundispen-
sadordegasolina.
• Mantengala boquillade Ilenadoencontactoconel bordedela
entradadeltanquedegasolinao contenedorentodornornento
hastaqueest_Ileno.Noutiliceundispositivoparaabrir/cerrarla
boquilla.
• Apaguetodosloscigarrillos,cigarros,pipasy otrasfuentesde
cornbusti6n.
• Nuncacarguecornbustibben la rn&quinaen unespaciocerrado.
• Nuncasaquelatapa delgasni agreguecombustiblernientrasel
motorest&calienteo enrnarcha.Dejequeel motorseenfriepor
Iornenosdosrninutosantesdevolvera cargarcombustible.
• Nuncarecargueel tanquedecombustible.Lleneel tanqueno
rn&sde1/2 pulgadapordebajode la basedelcuellodelfiltro
paradejarespacioparala dilatacbndelcornbustibb.
• Vuebaa colocarla tapade lagasolinay aj_steb bien.
• Lirnpielagasolinaderrarnadasobreelmotory elequipo.Trasbde
la rn&quinaa otrazona.Espere5rninutosantesdeencenderel
motor.
• Nuncaalrnacenela rn&quinao el recipientede combustibleen
unespaciocerradodondehayafuego,chispasoluzpiloto(por
ejernplo,hornos,calentadoresdeagua,calefactores,secadores
de ropa,etc.)
• Parareducirelriesgodeincendiornantengalarn_.quinalirnpia
depasto,hojasyde acurnulaci6ndeotrosdesechos.Lirnpielos
derrarnesdeaceiteo combustibley saquetodoslosdesechos
ernbebidosconcombustible.
OPERACION
• Nopongalas rnanosolos piescercadelas piezasrotatoriaso
enlasc_.rnarasdealirnentaci6nni en laaberturade descarga.El
contactocon el motorrotatoriopuedeproducirlaarnputaci6nde
dedos,rnanosopies.
• Antesdeencenderlarn_.quinacornpruebequeel canaldela
cortadora,latornade alirnentaci6ny lac_.rnarade corteest_.n
vacbs y sindesechos.
• Inspeccionerninuciosarnentetodoel materialquedeseatriturar
ysaquelosobjetosrnet_.licos,piedras,botellas,latasuotros
objetosextraSosquepuedenocasionarlesionesodaSarla
rn_.quina.
• Siesnecesarioernpujarelmaterialporlatolvade latrituradora
useunpalode di_.rnetropequeSo.No utilicelasrnanosni los
pies.
• Siel motorgolpeaunobjetoextraSoo silarn_.quinaernpieza
a producirunsonidopococornQno unavibraci6n,apagueel
motordeinrnediato.Dejequeel motorsedetengaporcornpleto.
Desconecteelcablede la bujia,p6ngalodernaneraque haga
rnasacontraelmotory sigaestospasos:
a. Inspeccionela rn_.quinaparaversi est,.daSada.
b. RepareoreernplacelaspiezasdaSadas.
c. ControlesihaypiezasflojasyajQstelasparaasegurarquela
rn_.quinafuncionede rnaneraseguray continua.
• Noperrnitaqueseacurnulematerialprocesadoen lazonade
descarga.Elrnisrnopuedeobstaculizarladescargaadecuada
y provocarelretornodel materiala travesdelaaberturade
alirnentaci6n.
• NointentetriturarnipicarmaterialdemayortarnaSoal espe-
cificadoen larn_.quinao enestemanual.Sepodrianproducir
lesioneso daSos.
• Nuncatratede destaparla tornadealirnentaci6no laabertura
de descargarnientrasel motorest,.en rnarcha.Apagueel motor
y esperehastaquetodaslaspiezasque sernuevensehayan
detenidoporcornpleto,desconecteel cabledelabujiay p6ngalo
de rnaneraquehagarnasacontraelmotorantesde sacarlos
escornbros.
• Nuncaoperela rn_.quinasinque latolvadela trituradora,el canal
de lacortadorao el canaldeflectorest_ncorrectarnenteconecta-
dosa la rn_.quina.Nuncavacienicarnbielabolsade descarga
rnientrasel motorest,.en rnarcha.
• Mantengatodoslos protectores,desviadoresy dispositivosde
seguridadensu lugaryen buenascondiciones.
• Mientrasalirnentamaterialdentrode la rn_.quinarnantengasu
rostroysu cuerpodetr_.syhaciaun costadodelcanalde la
cortadoraparaevitarlesionesporretrocesosaccidentales.
• Nuncaopereestarn_.quinasin buenavisibilidado ilurninaci6n.
• Noopereestarn_.quinaensuperficiescon grava.
• Noopereestarn_.quinaestandobajolosefectosdelalcoholode
drogas.
• Elsilenciadoryelmotorsecalientany puedenproducirquerna-
duras.Nolos toque.
• Nuncalevanteo transportelarn_.quinacuandoel motorest,.
encendido.
• Sisepresentansituacionesquenoest_.nprevistaseneste
manualseacuidadosoy useelsentidocornQn.Marquepara
contactareldepartarnentodeatenci6nalclienteyobtenerel
nornbredesudistribuidorrn_.scercano.
37
Page 38

MANTENIMIENTO Y ALMACENAMIENTO
• Nuncarnanipulelos dispositivosde seguridadde rnanera
irnprudente.Controleperi6dicarnentequefuncionendeforrna
adecuada.
• Controlefrecuenternentequetodoslospernosytornillosest_n
bienajustadosparacornprobarquela rn_.quinaseencuentraen
condicionessegurasdefuncionarniento.Adern_.s,realiceuna
inspecci6nvisualdelarn_.quinaparacontrolarsi larnisrnaest,.
da_adayrep_.reladesernecesario.
• Antesde lirnpiar,repararo inspeccionarla rn_.quina,detengael
motorycornpruebequeel rnisrnoyquetodaslas piezasrn6viles
sehallandetenido.Desconecteel cabledelabujiay p6ngalo
de rnaneraquehagarnasacontrael motorparaevitarquese
enciendadernaneraaccidental.
• Nocarnbielaconfiguraci6ndel reguladordel motorni acelere
dernasiadoel rnisrno.El reguladorcontrolalavelocidadrn_.xirna
seguradeoperaci6ndelmotor.
• Mantengao reernplacelasetiquetasde seguridade instrucciones
segQnseanecesario.
• Sigalasinstruccionesde estemanualparacargar,descargar,
transportary alrnacenardernaneraseguraestarn_.quina.
• Nuncaalrnacenela rn_.quinao elrecipientedecombustibleenun
espaciocerradodondehayafuego,chispaso luzpilotocornopor
ejernplo,calentadoresdeagua,hornos,secadoresde ropa,etc.
• Dejequela rn_.quinaseenfriepotIornenos5rninutosantesde
guardarla.
• Consultesiernpreel manualdeloperadorparaconocerlas
instruccionesadecuadasparael alrnacenarnientofuerade
ternporada.
• Seg_nla Cornisi6ndeSeguridadde Productosparael Consu-
rnidorde losEstadosUnidos(CPSC)y laAgenciadeProteccidn
Arnbientalde losEstadosUnidos(EPA),esteproductotieneuna
vidaOtilmediade siete(7)a_os,6 60horasde funcionarniento.
AI finalizarla vida Otilmedia,adquieraunarn_.quinanuevao
hagainspeccionaranualrnente_staporundistribuidorde servicio
autorizadoparacerciorarsede quetodoslossisternasrnec_.nicos
yde seguridadfuncionancorrectarnenteynotienenexcesivo
desgaste.Si noIohace,puedenproducirseaccidentes,lesiones
o rnuerte
• Sidebevaciarel tanquedecombustible,h_.galoal airelibre.
• Respetelasnorrnasreferentesa ladisposici6ncorrectay las
reglarnentacionessobregas,combustible,etc.paraprotegerel
medicarnbiente.
NO MODIFIQUE EL MOTOR
Paraevitarlesionesgraveso larnuerte,nornodifiqueel motorbajo
ningunacircunstancia.Si carnbialaconfiguracidndel reguladorel
motorpuededescontrolarseyoperaravelocidadesinseguras.Nunca
carnbielaconfiguracidndef_.bricadel reguladordelmotor.
AVISO REFERIDO A EMISIONES
Losrnotoresqueest&ncertificadosy curnplenconlasregulaciones
de ernisionesfederalesEPAydeCaliforniaparaSORE(Equipos
peque_ostodoterreno)est_.ncertificadosparaoperarcongasolina
cornOnsinplornoy puedenincluirlos siguientessisternasdecontrol
de ernisiones:Modificacidnde motor(EM) ycatalizadorde tresvias
(TWO)siest_.nequipadosde esarnanera.
GUARDACHISPAS
Estarn_.quinaest,.equipadacon unmotordecornbusti6ninternay
nodebeserutilizadaenocercade unterrenoagrestecubiertopor
bosque,rnalezaso hierbaexceptosielsisternadeescapedelmotor
est,.equipadocon unarnortiguadorde chispasquecurnplaconlas
leyeslocaleso estatalescorrespondientes,encasode habedas.
Si seutilizaunarnortiguadorde chispaseloperadorIo debernantener
en condicionesde usoadecuadas.Enel Estadode Californialas
rnedidasanteriorrnenternencionadassonexigidasporIcy (Arficulo
4442del C6digodeRecursosPt_blicosde California).Esposible
queexistanleyessirnilaresenotrosestados.Lasleyesfederalesse
aplicanenterritoriosfederales.
Puedeconseguirelarnortiguadordechispasparael silenciadora
travesdesu distribuidorautorizadode rnotoreso poni_ndoseen
contactoconel departarnentodeservicios,RO.Box361131Cleve-
land,Ohio44136-0019.
38
Page 39

SilVIBOLOS DE SEGURIDAD
Estap&ginarepresentay describelaseguridadlossimbolosquepuedenpareceren esteproducto.Lea,comprenda,y sigatodasinstrucciones
enla m_.quinaantesprocurarparareuniry operar.
LEA ELMANUAL(S) DEL OPERADOR
Lea, comprenda, y siga todas instrucciones en el manual (manuales) antes procurar para
reunir y operar
ADVERTENCIA-- GIRANDO HOJAS
Mantenga manos fuera de aperturas de cala y descarga mientras m_iquina corre. Alli giran
hojas adentro
ESPECTADORES
Mantenga a espectadores, los animales favoritos, y los niffos por Io menos 75 pies de la
m_iquina mientras est,1 en la operaci6n. Pare m_iquina si cualquiera entra el _irea.
ADVERTENClA-- ESCOMBROS TIRADOS
Nunca operar sin el deflector de tobog_in conect6 apropiadamente a la m_iquina.
PROTECClON DE OJO
Siempre Ileve gafas de seguridad o gafas de seguridad al operar esta m_iquina.
39
Page 40

IMPORTANTE:Estaunidadseentregasingasolinao aceiteenel
motor.AsegQresede servMoconmotordegasolinay aceitesegQn
lasinstrucdonesenla operad6nde estemanualantesde operarsu
rn_.quina.
NOTA:Referenciaa la derechay laizquierdadelaTrituradoraChip-
perseobservadesdelaposici6nde funcionarniento.
APERTURA DE LA CAJA DE CARTON
1. Cortecadaunade lasesquinasde la cajaverticalrnente,dela
partesuperiora la base.
2. Saquetodaslaspiezassueltas.
3. Quiteel materialdeempaquesuelto.
COIVIO SACAR LA UNIDAD DE LA CAJA
1. Elevelaunidaddesdelaparteposteriorparasepararladel
materialde la cajaquequededebajo,yhagarodarla unidad
fuerade lacaja.
2. Verifiquecuidadosarnentesi enla cajaquedaalgunapartesuelta.
PIEZAS SUELTAS DENTRO DE LA CAJA
• Montajede tolva
• Bolsa
• Canaldeflector
• Pis6n
• Anteojosde seguridad
• Canaldela cortadora
• Aceitede motor
• ManualdeOperador
INSTALACION DE LA TOLVA IVIONTAJE
/
.......
Figura1
1. A.Saqueseistuercashexagonalesy arandelasde losesp_.r
ragosdela soldadurade lacajadelmotor.Nosaquelaplaca
de sost_n.Veala Figura1.
B.Coloqueel rnontajedela tolvaen posici6ndelantede lacaja
del motor,alineandolosagujerosdel rnontajedelarc de la
tolvaconlosesp_.rragosde lasoldadura.
C. Desliceelrnontajede latolvasobrelos esp_.rragosde la
soldadurayvuelvaa colocarlasarandelasylas tuercas
hexagonales.Nolas ajustepor cornpleto.
2. A. Levanteelrnontajedelatolvahastaelrnontajedelsoportede
motor.Wase lafigura2.
B. Deslicelavarillade liberaci6nhaciaafueralevernentepara
engancharelsoportedetolvaen la varilla.Veaia Figura2.
C.Ajustelasseistuercashexagonalesqueunenel rnontajedela
tolvaa lacajadelmotory ajustetarnbi_nlasarandelas
hexagonalesqueunenel soportedela tolvaal rnontajedela
rnisrna.
J
Figura2
40
Page 41

COLOCACl6N DEL CANAL DEFLECTOR r'
A.Saquelas perillasamariposadelos costadosde la caja
inferiordelmotor.
B.Saquela tuercade seguridadhexagonal,losseparadoresy el
bul6nhexagonalde lapartesuperiordela cajadel motor.Vea
la Figura313.
.
A. PongaenIfneaelcanal deflectoren suposici6nenla abertura
de descargae inserteel bul6nhexagonalconel separadora
travesdela bisagradel canaldeflector(losseparadoresvan
dentrodelas bisagras).Veala Figura314.
B.Coloqueel segundoseparadorsobreelbul6nhexagonal
dentrode laotra bisagray ajOsteloconlatuercadeseguridad
hexagonal.
C.Ajusteamboscostadosdel canaldeflectoraa lacaja del
motorutiNzandolas periNasa mariposaque habfasacado
anteriormente.
COLOCACl6N DEL CANAL
DE LA CORTADORA
A. Saquelastresarandelascurvasylas tuercashexagonales
delosesp_.rragosdela soldaduraqueest_.nalrededordela
aberturaenel costadode lacajadelmotor.Veala Figura5.
B.Saquelos buloneshexagonales,lasarandelasplanasy las
tuercasdeseguridadde losdosagujerosdelextremo
superiordela trabade sosten.
........................................
Figura4
/ • i
,/
i
i
Figura5
41
Page 42

2, f
A,Pongaen Ifneaelcanalde lacortadoraporencimade los
esp_.rragosde la soldadurade maneraquelaranuraen
la basedelcanalmirehaciaabajo,
B.Ajusteelcanal dela cortadoracon tresarandelascurvas
(conel ladocurvocontrael canalde la cortadora)ycon las
tuercashexagonalesquehabfasacadoanteriormente,No
ajustelastuercasen estemomento.Veala Figura6.
,
Lacortadoratrituradorafueenviadaconun extremodela
trabadesost@nyaunidoal bastidorinferior.Aflojeperono
saquelosbulonesqueunenla trabaal basfidor,
A,Pongaen Ifnealosagujerosdelcanalconlos agujerosdela
partesuperiorde latrabay unala mismaalcanalde la
cortadoraconlos elementosde ferreterfapreviamente
retirados,Lasarandelaslianasdeberianser colocadas
bajolascabezasdecerrojoy contrala superfMeinteriordel
pl&sficochippertolva.Ajustebien.Veala Figura7.
B.Ajustelos bulonesqueunenlatrabade sost@nal bastidor.
C,Ajustelastrestuercasde losesp_.rragosde la soldaduraque
sostienenel canaldelacortadoraa la cajadelmotor,
COLOCAClON DE LA BOLSA
1. Paraadosarla bolsa:
A.Coloquela aberturadelabolsacompletamentesobreel
canaldeflector.
B.Tirede latirade extracci6nhastaquelabolsaquede
ajustadaalrededordela aberturadelcanaldeflector.
C.Vuelvaasujetarlatira de extracci6nsobresi misma,
apri@telacontrael canaldeflectorparaque quedefirmeen su
lugar.Veala Figura8.
Ahoraqueyahaajustadosu cortadoratrituradoraparasufunciona-
miento,familiariceseconsuscontrolesycaracterfsticas.Estosse
describeny se ilustranen estap_.gina.Esteconocimientole permitir_.
utilizarsunuevoequipoa sum_.ximacapacidad.
/ /
/ /
7 /
i /
/
/ /
/
/
/ /
/ /
/
/
/
J
Figura6
/ /
/
/
/
Figura7
42
J
Figura8
Page 43

Montaje de la tolva
Varilla de liberaci6n
Llenadode aceite
Llenadode combustible
Canalde
cortadora
Pis6n
Figura9
CANAL DE LA CORTADORA
Permitequelas ramaspeque_asde hasta3" dedi_.metroingresenal
motorparaserpicadas.Veala Figura9.
MONTAJE DE LA TOLVA
Permitaque lashojasy las ramaspeque_asde hasta1/2dedi_metro
ingresenalmotorparaserpicadasytrituradas.Bajandoelmontaje
dela tolvasepuederastrillarmaterialeintroducirlodentrodel mismo.
Veala Figura9.
VARILLA DE LIBERACION
Lavarillade liberaci6nest,. ubicadaenel montajedelsoportedel
motory se usaparaliberaro trabarlatolvaal momentode subiro
bajar.Veala Figura9.
DEFLECTOR DEL CANAL
Losdesechoscortadosy trituradossedescarganfueradeldeflector
delcanal.Launidadpuedeseroperadacono sinla bolsade recolec-
ci6nadosadaal deflectordelcanal.Veala Figura9.
PIS6N
Esteenchufeesinsertadoenla tolvachipperparaempujarramitasy
peque_asramashacialasI_.minasde aspasinponeren peligrosus
manos.
Deflector
del canal
AIoperarunacortadoratrituradorapuedeserqueobjetosextra_os
seanarrojadosa losojosIocualpuededa_arlosgravemente.Utilice
siemprelosanteojosdeseguridadprovistosconestaunidado
protectoresparaojos antesde picaro triturarelmaterialo mientras
[rea zaajustesoreparacones.
CONTROL DEL ESTRANGULADOR
Estapalancacontrolalavelocidaddelmotory la funci6ndedetenci6n.
Mediantetresposicionesindependientesde la palanca,deizquierdaa
derecha,la operaci6nse realizadela siguienteforma:
CONTROL DE OBTURACION
Elcontroldeobturaci6nseutiNzaparacebarelcarburadory ayudara
queel motorarranque.
Arranque/
funcionamiento
lento / Motor apagado
marcha lenta
Cumple con los estandares de seguridad de ANSI
LasaspiradorasparapatiosdeCraftsmancumplenconlosestAndaresdeseguridaddelinstitutoestadounidensedeestAndaresnacionales(ANSI).
43
Page 44

LLENADO DE GASOLINA Y ACEITE
Aceite (se env(a una botella junto con la unidad)
Primeruso
1. Quitartap6ndeIlenadode aceite.
2. Conlatrituradoraa niveldelsuelo,el uso deun embudopara
vaciartodoel contenidodela botellade aceiteestablecidasen el
motor.
3. Sustituirtap6ndeIlenadode aceitey apriete.
Usosposteriores
Usesolamenteunaceitedetergentede alta calidadcuyaclasificaci6n
de servicioAPIseaSF,SGo SH.Seleccioneelgradodeviscosidad
SAEdel aceitesegQnla temperaturade operaci6nesperada.Cumpla
latablaqueaparecea continuaci6n.
_s frio -'_ 32°
MAscaliente
3. Lleneeltanquede combustibles61ocongasolinanormalsin
plomo,limpiay fresca.NousegasolinaquecontengaMETANOL.
Vuelvaacolocarlatapade combustibleensu lugar.
Loscombustiblesconmezcladealcohol(queseIlarnangasohol,
o queutilizanetanolo metanol)puedenatraerhumedad,Ioque
conducea la separaci6nyformaci6nde_cidosduranteelalmace-
namiento.Elgasaddico puededa_arel sistemadecombustibledel
motormientraslam_q_uinaest_almacenada.
Paraevitarproblemasconel motor,sedebevaciarel sistemade
combustibleantesdealmacenarla m_quinadurante30dfaso m_.s.
Vade eltanquede nafta,enciendaelmotory d_jelofuncionarhasta
quelaslineasdecombustibley el carburadorest_nvados.La
siguientetemporadausecombustiblefresco.ConsultelasInstruc-
clonesde ALMACENAMIENTOsideseainformaci6nadicional.
Tabladeviscosidad delaceite
AunquelosaceitesdeviscosidadmQltiple(5W30,10W30,etc.)
mejoranelencendidocuandoelclimaestAfrio,losmismosincremen-
tanel consumode aceitecuandose usana m_sde 32°ECompruebe
el niveldeaceitecon mayorfrecuenciaparaevitarda_osdebidoa que
el motortrabajeconun niveldeaceitebajo.
1. Comprobarel niveldeaceitequitandoel tap6ndeIlenadode
aceitey mirarhaciaelorificiode Ilenadode aceite.Deaceite
debeservisiblea laparteinferiordeltapdndeIlenadodeaceite
hilos.Lleneel rondode lostemastap6ndeIlenadodeaceite,
sifueranecesario.Lacapacidadesde aproximadamente28oz
Llenadoexcesivohar_queel motoral humoprofusamentey se
traducir_en el rendimientodel motorpobres.
2. SustituirtapdndeIlenadode aceitey apriete.
3. Mantengael nivelde aceiteen la marcaFULL.Siponeel motor
en marchaconmuypocoaceitelepuedecausarda_osperman-
entes.
Tengaextremocuidadocuandomanipulegasolina.Lagasolinaes
altamenteinflamabley susvaporespuedencausarexplosiones.
Nuncacarguecombustibleen lam_quinaenunespaciocerrado
o cuandoel motorestacalienteoen march&Apaguecigarrillos,
cigarros,pipasyotrasfuentesdecombustidn.
Nouse nuncaproductosde limpiezaparamotoresocarburadores
enel dep6sitodecombustible,sepuedenocasionarda_osperma-
nentes.
NOTA:Verifiqueperi6dicamenteel nivelde combustibleparaevitar
quedarsesingasolinamientrasest&operandolacortadoratrituradora.
Si la unidadsequedasin combustiblemientrasestatriturando,puede
resultarnecesariodestaparel &teadedescargaantesdepodervolver
a encenderla.Consultelasecci6nSERVlCIOY MANTENIMIENTO.
PARA ENCENDER EL MOTOR
1. Conecteel cablede la bujiay la mangadegomaa lamisma.
2. Lleneeltanqueno m&sde 1/2pulgadapordebajode la basedel
cuellodel filtroparadejarespacioparaladilataci6ndelcombus-
tible.Vealafigura10.
f
GASOLINA
1. Saquelatapadelcombustibledeldep6sitodel mismo.
2. Verifiquequeelrecipientedelquevaa verterlagasolinaest_
limpioy librede6xidoodeobjetosextra_os.Nousenunca
gasolinaquepuedaestarviejaporhaberestadoalmacenadaen su
recipienteporlargosperiodos.Lagasolinaquehaestadoestacio-
nadapotunperiodosuperioracuatrosemanasdebeconsiderarse
vieja.
C
Figura10
44
Page 45

3. Girelav_.lvuladecierredecombustiblea la posici6nEN.
4. Muevaelcontroldelobturadorhaciaelcontroldelregulador!'o,I
paraobturarelcarburadordelmotor.(Siel motorest,.tibio
la obturaci6npuedeno sernecesaria).
5. Muevalapalancadecontroldel estranguladora la posici6n ,_
START/RUN(encendido/ funcionarniento,representadopor
unaliebre).Veala figura 10.
6. Situadodetr&sde la unidad,tomela rnanijadelarrancadorytire
dela cuerdahastaquesientauntir6n.
NOTA:Escuchar_.un sonidocuandoalcanceelcornienzodelciclode
cornpresi6n.Estesonidoes causadoporel descebadoylos topesque
sonparte delrnecanisrnodela trituradorayes de esperarhastaqueel
motoralcancela rn_.xirnavelocidad.
7. Tirede lacuerdadernanerar_.piday continua.Aprietebienla
rnanijadelarrancador.Dejequelacuerdase enrosque
lentarnente.
8. Repitaestepaso,de sernecesario,hastaquese enciendael
motor.Cuandose enciendeelmotorrnuevaelcontrolde
obturacidngradualrnentelejosdelcontroldelestrangulador.
9. Siel motorfalla,rnuevaelcontroldel obturadorhaciaatr_.s,en
direccidnal controldelestrangulador,y repitalospasos5 a8.
10. MantengaSIEMPREelcontroldelestranguladorenposicidn
START/RUN(encendido/funcionarniento)rnientrasoperela
cortadoratrituradora._lJ
PARA DETENER EL MOTOR
1. El reguladorde movirnientocontrolala palancaparareducirla
rnarcha(tortuga)_ de laposici6n.Siernpreque posible,
gradualrnentereduzcala velocidaddemotorantesde pararel
motor.
2. Muevalaspalancasdecontroldel reguladora la posici6n
STOP(detencidn)uOFF(apagado).
3. Girelav_.lvuladecierredecombustiblea la posicidnOFR
4. Desconecteel cabledela bujfaytierracontrael motorparaevitar
el arranqueaccidentalrnientraselequipoest,.desatendido.
TRITURACION
Eldesechoqueseacurnulaen los patioscornoporejernplolashojas
ylas agujasdelos pinospuedeser colocadoenla tolvaparatriturarlo.
Despu_sdeprocesarel materialconlacuchillade latrituradoray
dedesgranar,esernpujadofueradel deflectordelcanaly,si est,.
instalada,haciael interiordela bolsade recolecci6nde desechos.
Respetelassiguientespautascuandotrituredesechosquese
acurnulanen lospatios:
• $61outilicela rn_.quinaparatriturarel materialquese encuentra
enun pationormal(hojas,rarnas,picasde los pinos,etc.).
• Evitarla trituracidnlasplantasfibrosas,cornolasvidesde
tornate,hojasde palrna,etc,hastaqueest_ncornpletarnente
secos.Frescasvisasnotriturebienytiendenaenvolverseen
todoel irnpulsory flails.
• Coloquecantidadesrazonablesde desechosen la tolvaporvez.
Nosobrecarguelatolva.
Perrnitaqueel materialque seencuentraen latolvaseaatrafdo
hastalascuchillasytrituradoantesde agregarrn_.sdesechos
dentrode larnisrna.Deno hacerlosepuedetaparla tolva,el
deflectordelcanalo detenerelmotor.
CORTE
Sepuedeperrnitirelingresode rarnasdehasta3" de di_.rnetroen el
canalde la cortadora.Respetelassiguientespautasparaelcortede
lasrarnas:
• Mantengaarnbasrnanosfirrnernenteen la rarnaarnedidaquela
colocadentrodelcanaldela cortadora.
• Noponganuncarn_.sdeunararnadentrodelcanaldelacortadorapor
vez.
• Enelcanaldelacortadoras61osepuedecolocarrarnas(de
rnadera).
• Apliquepresi6ninterrnitente(fuerza,enirnpulsoscortos)cuando
coloquerarnasrn_.slargas(de3pulgadasdedi_.rnetro)dentro
del canaldela cortadoraparaevitarinundaroahogarel motor.
IMPORTANTE:Nuncacoloquerarnasconundi_.rnetrosuperioratres
(3)pulgadasdentrodelcanalde lacortadora.Dehacerlosepueden
daSargravernentelascuchillasde corte,eldesgranadoo el motorde
launidad.
NOTA:Pararnejoresresultados,operesiernprela unidadcon
cuchillasdecorteafiladas.Si seproduceunareducci6napreciable
en el rendirnientornientrasse cortanrarnas,sedebereernplazarlas
cuchillasdela cortadora.
C6MO BAJAR EL MONTAJE DE LA TOLVA
1. Conunarnanotomela rnanijaqueseencuentraenla parte
superiordel rnontajede la tolvay lev_.ntelalevernente.
2. Conlaotrarnanotirehaciaafuerade lavarilladeliberaci6ny
bajeel rnontajede la tolvahastael piso.
C6MO DESCARGAR LA BOLSA
1. Sueltelacuerdadeextracci6ny aflojela bolsade laaberturadel
canaldeflector.
2. Vacfelabolsayvuelvaacolocarlaenlaaberturadelcanalde
descarga.Tiredela cuerdahastaquela bolsaest_ajustada
alrededordela aberturadelcanaly sujetela cuerdaapret_.ndola
contraelcanaldeflector.
IMPORTANTE:Lapantalladedesgranadoest,. ubicadadentrodela
cajaenla zonadedescarga.Sise tapala pantallade desgranado,
s_.quelayIfrnpielacornose indicaen lasecci6nServicioy Man-
tenirniento.Paraobtenerelrnejorresultadotarnbi_nesirnportante
rnantenerafiladala cuchilladela cortadora.
45
Page 46

LISTA DE iVlANTENIIVllENTO
Antesde realizarcualquiertipodel rnantenirniento/servicio,suelte
todoslosrnandosypareel motor.Esperehastaquetodaslas partes
de rnovirnientohayanvenidoa unaparadacornpleta.Desconecteel
alarnbredebujiay b_.selocontraelmotorparaprevenirel cornienzo
involuntario.SiernpreIlevepuestoscristalesinastillablesdurantela
operaci6norealizandocualquierajusteo reparaciones.
CadaUso
los 5- 8 horas
25 horas
1. Niveldelaceitedemotor
2. Hardwaresueltooausente
3. Unidadymotor
1. Elaceitedemotor
1. Elaceitedernotort
2. Filtrodeaire
3. Encadenarnientosde control
1. Cornprobar
2. Aprieteo sustituir
3. Lirnpio
1. Carnbio
1. Carnbio
2. Sustituyen
3. Lubricaci6nconpetr61eoligero
ypivotes
Anualrnenteo50horas
Anualrnenteo 100horas
Antesde Alrnacenaje
1. Elaceitedemotor
2. Elsilenciador
1. Bujia
1. Sisternadecombustible
1. Carnbio
2. Inspeccionar
1. Clean,checkand resetgap,or
1. Elmotordirigidohastaqueestose
Bajocargapesadao enternperaturasaltas
Siernpredetengaelmotory desconecteelcable dela bujiaantes
de hacercualquiertipodemantenirnientoo ajustes.Utilicesiernpre
pnteojos de seguridaddurantelaoperaci6no rnientrasajustao
[reparaesteequipo.
Sigalalistade rnantenirnientodadaabajo.Estacartadescribepautas
de servicios61o.Usela colurnnade TroncodeServicioparaguardar
la pistade tareasdernantenirnientocornpletadas.Localizarel rn_.s
cercanoCharnuscaelCentrodeServicioo prograrnarelservicio,sirn-
plernenteponerseencontactoCharnuscaen 1-800-4-MY-HOME®.
replacesparkplug.
parea faltadelcombustibleoaSada
un aditivodegasolinaalgas enel
tanque.
f
2
3
RECOMENDACIONES GENERALES
• Alwaysobserveallsafetyrulesfoundonproductlabelsandin
thisoperator'smanualwhenperforminganymaintenance.Safety
rulescan befoundonthe productlabelsandin thisOperator's
Manualbeginningon page36.
• Lagarantiadeestacortadoratrituradoranocubreelernentosque
banestadosujetosalrnalusoo negligenciadel operador.Para
recibirel reernbolsototalde lagarantia,el operadordeber_,dar
rnantenirnientoal equipotalycornoseindicaenestemanual.
• Algunosajustesdebenser realizadosperi6dicarnenteparael
mantenirnientoadecuadodela unidad.
• Reviseperi6dicarnentetodoslos sujetadoresy cornpruebeque
est_nbienajustados.
iVlANTENIlVlIENTO DE MOTOR
Servicio A La Bujia
Lirnpielabujiayajusteelespacioa 0.030"alrnenosunavezpor
estaci6n;sustituyacada100horasde la operaci6n.
1,
Espaciode0,030pulg(0,76mm)
2.
Electrodo
3.
Porcelana
\
Figura11
• Arealirnpiaalrededorde labasede bujia.Nolije labujfa.Se
debenlirnpiarlasbujfasrnedianteraspadootalladoconcepillo
de alarnbrey lavadoconunsolventecornercial.
• Quitee inspeccionelabujfa.Cornpruebeelhuecoparaasegu-
rarsequees puestoen .030".Veala Figura11.
• Sustituyalabujiasi loselectrodossonpicados,quernados,ola
porcelanaesrajada.
46
J
Page 47

Servicio Del Filtro De Aire f
Nouse akepresurizadoo solventesparalimpiarelcartuchode filtro
de aire,
Elfiltrode aireevitael ingresoalcarburadorde suciedad,polvo,etc,
perjudicialesy evitaque losmismosseanintroducidosdentrodelmo-
tor.Adem_.s,dichofiltroesimportanteparalavidaQtilyel rendimiento
delmotor.Noponganuncaenfuncionamientoelmotorsinhaber
montadototalmenteelfiltrode ake.
Sustituyenel filtrode airecada25horasde laoperaci6n.
1. Sueltetornillosquesosfienenlatapadefiltrode aire.
2, Latapaabiertay quitaFiltrodeaire,Veala Figura12,
3. DesecheelviejoFiltrodeaire.
4. InstaleelnuevoFiltrodeake.
5. Qerrelatapay aprietetornillos.
Filtrode aire
La )a
NOTA:Siel filtroestArotoo darado,cAmbielo,
Compruebe El Aceite Del Motor
1. Compruebeel petr61eoantesdecadauso. Detengael motory
esperevariosminutosantesde verificarelniveldeaceite.Conel
motorubicadoensueloparejo,elaceitedebeestaren la marca
FULL(lleno)dela varilladelniveldeaceite.
2. Saquelavarilladelniveldeaceiteylimpielimpioconlatel&
3. Sustituyay aprietela varillade aceite.Quitey compruebeelnivel
delaceite.Elniveldeberiaestaren laserialLLENA.
4. Deset necesario,arada el petr61eodespacio-nuevocontrol.No
sobrellenar.
5. Limpielavarilladeaceitelimpia,sustituyayapretar.Quitey
compruebeelniveldel aceite.Elniveldelaceitedeberiaestaren
la lineaLLENAenla varillade aceite.
Nohagaoverfil.Elsobrellenoconel petr61eopuedehacerqueel
motornocomience,o confuerzacomienzo.Sisobrelaseral LLENA
en la varilladeaceite,dreneel petr61eoparareducirel niveldel
aceitea la seral LLENAen la varilladeaceite.
Cambio Del Aceite Del Motor
• Usesolamenteun aceitedetergentede altacalidadcuya
clasificaci6nde servicioAPIseaSF,SGo SH.Seleccioneel
gradode viscosidadSAEdel aceitesegQnlatemperaturade
operaci6nesperada.Consultelasecci6ndeoperaci6nparavetla
tablade viscosidad.
• Cambieelpetr61eode motordespu6sdelas cincoa ocho
primerashorasde laoperaci6n,y cadacincuentahoraso
cadatemporadaapartirdeentonces.Cambieel petr61eocada
veinticincohorascuandomotordeoperacionesbajolacarga
pesadaoentemperaturasaltas.
Figura12
2. Conel motorLEJOSperotodaviacalientan,desconectanla bujia
Ioalambranyguardanlejosde labujia.
3. Quiteel enchufededesag(Jedel aceitecuadradoIocalizadoenla
basedelmotor,ydreneel petr61eoen un recept_.culoapropiado.
Veala Figura13en lap_.gina15.
4. Sustituyay aprieteelenchufededesagQedel aceite.
5. Cuandoelmotoresdrenadodetodoel petr61eo,niveldemotor
de lugar.Recambioconaproximadamente28onz.depetr61eo
fresco.LI6nesea lalineaLLENAen lavarilladeaceite. No
El petr61eousadoes undesechoarriesgado.Elimineelpetr61eo
usadocorrectamente.Nodesecheconlabasurade la casa.
CompruebeconsusautoridadeslocalesoChamuscaelCentrode
Servicioparainstalacionesdedisposici6n/reciclajeseguras.
sobrellenar.Consultecomprobarel aceitedel motoreneste
SERVlCIOY MANTENIMIENTOsecci6n.
6. Sustituyael alambredebujiaantesdelcomienzo.
Servicio AI Silenciador
Inspeccioneel silenciadorcada50horasy reempl_.celode ser
necesario.Losrepuestosparaelsilenciadordebenserel mismoe
instaladoenla mismaposici6nquelaspartesoriginales.
Latemperaturadel silenciadory las_.reascercanaspuedesuperar
los 1500F(650F).Eviteesaszonas.
C6mo Vaciar El Aceite
1. Vacieel combustibledeltanquehaciendofuncionarel motor
hastaqueel tanquedecombustibleest6vacio.
47
Page 48

Limpieza Del Motor
• Diariarnenteoantesdecadauso,lirnpiehierba,barciao
escornbrosacurnuladosdelmotor.Guardeencadenarniento,
prirnavera,y rnandoslirnpios.Guardeel &reaalrededorydetr&s
delsilenciadorsincualesquieraescornbroscombustibles.
• Elcuidadodelmotorlirnpioperrniteel rnovirnientoa_reoaired-
edordelmotor.
• Laspartesde motordeberfanserguardadaslirnpiasparareducir
el riesgoderecalentarsey la ignici6ndeescornbrosacurnulados.
Estees sobretodoirnportantecortandola altahierba.
Nouseel aguaparaNrnpiarpartesdemotor.Elaguapodrfa
contarninarel sisternadecombustible.UseuncepiNoo latelaseca.
Ajuste de Carburador
Elcarburadorenestemotornoes ajustable.
f
/
/
/
/ /
i /
©
//
Velocidad de Motor
Nointentecarnbiarla velocidadde motorrnanipulandoelencade-
narnientodegobernadordelmotor.Haciendotanpodrfacausarla
heridapersonalseriay da_aral motor.LasREVOLUCIONESPOR
IM NUTOdemotorbans do puestasen a f_brca.
LUBFIICACI6N
• Montajede latoIva- Lubricalospuntosde pivoteen larnontaje
de latolvaconel petr61eoNgerounavezunaternporada.
• Deflector del canal- Lubricalospuntosdepivoteen eldeflector
delcanalcon el petr61eoNgerounavezunaternporada.
• La Varade Liberaci6n - Lubricalavaradeliberaci6nyla
prirnaveraconel petr61eoligerounavez unaternporada.
LIMPIEZA DEL EQUIPO
• Lirnpiecuidadosarnentelacortadoratrituradoradespu_sdecada
USO.
• Lavela bolsaconaguaperi6dicarnente.Perrnitaqueseseque
bienenun sitioa lasornbra.
• Si setapa la pantalladedesgranado,s&quelay Ifrnpielacornose
indicaabajo.
NOTA:LaNrnpiezaconun chorrodeaguaapresi6nnose recornien-
da,yaque elsisternadecombustiblepodrfaresultarcontarninado.
Antesde realizarcualquiertipo del rnantenirnientoenlarn&quina,
esperetodaslaspartesa dejarde rnoversey desconectarel alarnbre
de bujfa.El fracasodeseguirestainstrucci6npodrfacausarla herida
)ersonaloel da_oa lapropiedad.
EXTRACCION DE LA PANTALLA DE DES-
GRANADO
Si lazonade descargasetapa,saquelapantaNadedesgranadoy
Nrnpielazonacornoseindicaacontinuaci6n:
/
Figura13
1. Detengael motory cornpruebequela cortadoratrituradorase
hayadetenidopotcornpleto.
2. Desconecteel cablede la bujfay p6ngalohaciendornasacontra
el motor.
3. A. Retirela bolsaydosperillasarnariposaacadaladodel canal
deflector.Veala Figura13.
B.Levanteelcanaldeflectorpararnantenerlofueradelpaso.
C.Saquelosdos brochesde horquiNade cadapasadorde
horquiNaquese extiendecruzandola cajay saquelos
pasadores.
D.Saquela pantaNadedesgranadodel interiorde lacajay Nrnpie
la pantallacepiN_ndolao lav_ndolaconagua.Veala Figura13.
4. VuelvaacolocarlapantaNay asegOresedereensarnblarlacon el
ladocurvohaciaabajo.
5. Vuelvaa unirel canaldeflectorconloselernentosde ferreterfa
previarnentesacadosy conectelabolsaa la unidad.
AFILADO O RECANIBIO DE LAS CUCHILLAS
DE LA CORTADORA
1. Desconecteel cablede la bujfay p6ngalodernaneraquehaga
rnasacontrael motor.
2. Saquelapantallade desgranadoconforrneseindicaenla
secci6nanterior.
3. Saqueelcanalde lacortadoraquitandotrestuercashexagonales
y arandelas.
4. Saquedelbastidorlatrabade sost_ndelcanaldela cortadora
quitandolosbuloneshexagonales.
5. Gireelrnontajedelmotoren forrnamanualhastaubicarunade
lasdos cuchiNasde lacortadoraenla aberturadelcanalde la
cortadora.
6. ParasacarlacuchillasaquelostorniNoshexagonalesinternos,
lasarandelasde seguridadylas tuercashexagonalesque la
sujetanal motor.Guardeloselernentosdeferreterfa.Veala
Figura14.
48
Page 49

NOTA:UseunaIlavehexagonalde3/16" (Allen)enel exteriorde la
cuchillayunaIlavede tubode 1/2"(ocubo)enelinteriordel motor.
Sostengala IlaveAllenfirrnernenteygirelaIlavedetubo(o cubo)para
aflojarlatuerca.
7. Coloqueunacuchillade repuesto(NQrnerodepieza742-0544)
conloselernentosdeferreteriaqueextrajoanteriorrnenteo
af[lela.
IMPORTANTE:Cuandoafilala cuchilla,prot_jaselas rnanosutilizando
guantes.Sigael_.ngulooriginalde afiladoy asegQresedeextraeruna
cantidadigualde cadacuchilla.
8. Parareernplazarla otracuchilla,gireel motorparaexponerla
segunacuchillay repitalos pasosanteriores.
NOTA:AsegQresede quelashojassevolvieronconel hordeafilado
enla rnisrnadirecci6ncornocuandose retiran.Parde hardwarea
250- 300pulgadasIbs.
AFILADO O CANIBIO DE LA CUCHILLA DE
LA TRITURADORA
1. Detengaelmotory verifiquequetodaslaspiezasrn6vilesse
hayandetenidoporcornpleto.
/
/
Figura14
Lascuchillasde trituraci6nyla cuchilladecortedel motorsonfilosas.
Utiliceguantesdetrabajode cueroparaprotegerselasrnanos.
2. Desconecteel cabledela bujiay p6ngalode rnaneraquehaga
rnasacontrael motor.
3. Bajeelrnontajede latolvaytrabela caja.
4. Saquelasseistuercashexagonalesde seguridady lasarandelas
planasdelos esp_.rragosde la soldadurade lacajadedes-
granado.Guardeloselernentosde ferreteria.
5. Conrnuchocuidadosepareelrnontajedela tolvadel rnontajedel
motory retirelaplacade sost_n.
NOTA:Cuandovuelvaa rnontarla placadesost_ncornpruebeque la
aletagrabadamirehaciaadentrohaciael motor.
6. Saquelasdosperillasarnariposaque unenel canaldeflectory
lev_.ntelo.
7. Inserteuntubode1/2"o 3/4"de di_.rnetroa travesde la pantalla
dedesgranadohaciaelinteriordelmotorparaevitarqueel
rnisrnogireo saquelapantalladedesgranadoe inserteuntrozo
de rnaderaenla aberturadelcanal.
8. A.Saquelosdostornilloshexagonalesinternos,lasarandelasde
seguridadylastuercasde seguridadhexagonalesque sujetan
la cuchillade latrituradoraal motor.
B.Saqueel pernohexagonal,laarandelade seguridady la
arandelaplanaparaliberartotalrnentelacuchillade la
trituradora.Veala Figura15.
IMPORTANTE:Cuandovuelvaarnontarlacuchilladetrituraci6n
ajusteel bul6ncentralentre550y 700pulgadaslibrasylos dos
bulonesextedoresentre250y350pulgadaslibras.
SueldeStuds
,_. Mayal ......... j
Figura15
NOTA:UseunaIlavehexagonalde 3/16"(Allen)en elexteriorde
lacuchillade latrituradoray unaIlavedetubo de 1/2"(o cubo)en
el interiorde la cuchilladela trituradora.SostengalaIlaveAllen
firmernenteygirelaIlavedetubo(o cubo)paraafiojarla tuerca.Tenga
precauci6ncuandosaquelacuchillaparaevitarel contactoconlos
esp_.rragosde lasoldadurade lacaja.
IMPORTANTE:Cuandoafilelacuchilla,sigael_.ngulooriginalde
afiladocornogala.Es desurnairnportanciaquecadaextrernode
corteseadesbastadodeigualrnaneraparaevitarque lacuchilla
quededesequilibrada.Si lacuchillaest,.desequilibradaproducir_.
unavibraci6nexcesivacuandogirea altavelocidady puededa_arla
unidad.Sepuedeprobarlacuchillabalance_.ndolasobreundestornil-
ladoro clavo.Saquemetaldelladopesadohastaquequedebien
balanceada.
49
Page 50

Nuncaalrnacenecortadoratrituradoraconelcombustibleenel
tanquedentroo en _.reasrnalventiladasdondelos vaporesde
combustiblepuedenalcanzarunallamaabierta,la chispa,o el
pilotocornoenun homo,calentadordeagua, secadorde ropa,o
aplicaci6nde gas.
PREPARACI6N DEL MOTOR
Yaquelosrnotoresalrnacenaronrn_.sde 30dfas:
1. Parairnpedira lagornaforrnarseenel sisternadecombustible
oen partesde carburador,dirijaselmotorhastaqueestose
parea faltadel combustibleo aSadirunaditivodegasolinaal
gasen el tanque.Siustedusaunaditivode gas,dirigeelmotor
durantevariosrninutosparaponeren circulaci6nel aditivoporel
carburador-- despu_squeel motory elcombustiblepuedenser
alrnacenadoshastaseisrneses.
2. Mientraselmotorest,.todavfacaNente,carnbiarel aceite.Wase
Carnbiode aceitedel motorenla secci6nSERVICIOY MANTEN-
IMIENTO.
3. Retirelabujfayviertaaproxirnadarnente1oz.(30 rnl)de aceite
de motorlirnpioen elcilindro.Saqueel arranquevariasveces
paradistribuirel petr61eo,y volvera instalarlabujfa.
4. Lirnpieel motorde escornbrossuperficiales.
LA PREPARACION LA CORTADORA
TRITURADORA
• Alrnacenandocortadoratrituradoraen uncobertizodealma-
cenajenoventiladoornet_.lico,el cuidadodeberfasertornado
a inoxidablelassuperficiesno pintadas.Usandoun petr61eo
ligeroo silicona,cubrael equipo,sobretodocualquierprirnavera,
portes,y cables.
• Quitetodalasuciedaddel exteriordemotory equipo.
• Sigarecornendacionesde lubricaci6n.
• Equipodetiendaen un_.realirnpia,seca.Noalrnaceneen un
_.readondeelequipoest,.presentequepuedeusar unpilotoo
tieneuncornponentequepuedecreeunachispa.
5O
Page 51

hayanvenidoa unaparadacornpleta.Desconecteel alarnbrede bujfayb_.selocontrael motorparaprevenirel cornienzoinvolun-
SiernpreIlevepuestoscristalesinastillablesdurantelaoperaci6no realizandocualquierajusteo reparaciones.
Elmotornoarranca
Elmotorfuncionade rnanera
err_.tica
1. Lapalancadel reguladornoest,.en la
posici6nde arranquecorrecta
2. Lapalancade obturaci6nnoest,.en la
posici6nON(encendido)
3. Sehadesconectadoelcablede labujia
4. Labujianofuncionacorrectarnente
5. Eltanquedecombustibleest,.vadooel
combustibleesviejo
6. Nosepuedetirarde lacuerdaderetroceso
7. Elmotorsedesbord6.
1. Launidadest,.funcionandoenla posici6n
CHOKE(obturaci6n)
2. Elcablede la bujfaest,.fiojo
3. EIcombustibleesviejo
4. Aguaosuciedaden el sisternadel combus-
tible
5. Elfiltrodeaireest,.sucio
6. RPMdelmotorbajas
7. Esnecesarioajustarelcarburador
1. Muevalapalancadel reguladora la posici6nSTART
(inicio)/RUN(dirigido).
2. Pongaelinterruptoren laposici6nCHOKE(obtura-
ci6n).
3. Conecteelcablealabujfa.
4. Lirnpie.ajusteladistanciadisruptivao carnbie.
5. Lleneeltanquecongasolinalirnpiayfresca.
6. Hayunaobstrucci6nen el motor.Desconecteel
cablede labujiay retireelobjetoatascado.
7. Espereunosrninutosparareactivarse.
1. Carnbielapalancadeobturaci6na la posici6nOFF
(apagado).
2. Conecteyajusteelcablede la bujia.
3. Lleneeltanquecongasolinalirnpiayfresca.
4. Vacieel tanquedelcombustible.Vuelvaa Ilenarlo
concombustiblelirnpio.
5. Lirnpieo carnbieel filtrodeaire.
6. Siernpreaccioneelmotorcon el estranguladoral
m_.xirno.
7. Contactecon sucentrode partesy reparaciones
Sears.
51
Page 52

tuiertipodel rnantenirniento/servicio,sueltetodoslosrnandosy pareel motor.Esperehastaquetodaslaspartesde
yan venidoa unaparadacornpleta.Desconecteel alarnbrede bujfayb_.selocontrael motorparaprevenirel cornienzoinvolun-
SiernpreIlevepuestoscristalesinastillablesdurantelaoperaci6norealizandocualquierajusteo reparaciones.
El motorrecalienta
1. Elnivelde aceitedel motoresbajo
2. Flujodeairerestringido
Saltosocasionales(pausas)a 1. Ladistanciadisruptivade labujiaesrnuy
altavelocidad poca
El motorfuncionaen vado rnal 1. Bujiaensuciada 1.
2. Elfiltrodeaireest,.sucio 2.
Dernasiadavibraci6n 1. Haypartesqueest_.nfiojasoelmotorest,. 1.
da_ado
La unidadnodescarga 1. El_.readedescargaest,.tapada 1.
2. Hayunobjetoextra_oen el motor
3. RPMdelmotorbajas
Latasade descargase reduce
1. RPMdelmotorbajas
de rnaneraconsiderableo
carnbialacornposici6ndel
2. Lahojadelacortadoraest,.desafilada
materialdescargado
1. Lleneelc_.rterconla adecuadaselecci6nde aceite.
2. Recortesde peri6dicodehierbalirnpiosyescorn-
brosdealrededordelas aletasde refrigeraci6ndel
motoryalojarnientodesoplador.
1. Quitela bujiay ajusteel hueco.
Sustituyala bujiay ajusteel hueco.
Lirnpieo carnbieelfiltrodeaire.
Detengael motordeinrnediatoydesconecteel
cabledela bujfa.Contacteconsucentrode partesy
reparacionesSears.
Detengael motordeinrnediatoydesconecteel
cabledela bujfa.Lirnpielapantalladedesgranadoy
elinteriordela aberturade descarga.
.
Detengael motorydesconecteelcabledelabujia.
Saqueelobjetoextra_odel motor.
3.
Siernpreaccioneel motorconel estranguladoral
rn_.xirno.
1. Siernpreaccioneel motorconel estranguladoral
rn_.xirno.
2. Reernplacela hojade la cortadorao contacteasu
centrode reparacionesy partesSears.
52
Page 53

(Esta p_.ginase aplica s61oen EE.UU. y Canada.).
Sears Brands Management Corporation, el Consejo de Recursos Ambientales de California (CARB)
y la Agencia de Protecci6n Ambiental de los Estados Unidos (EPA)
Declaraci6n de garantia del sistema de control de emisiones (derechos y obligaciones de la garanfia de defectos del propi=
LACOBERTURADE LAGARANTJADECONTROLDEEMISIONESES Y PARALOSMODELOSCERTIFICADOSDELANO 1997YPOSTERIORES,
APLIOABLEA LOSMOTORESCERTIFICADOSCOMPRADOSENCALIFOR- QUESECOMPRENY UTILICENENCUALQUIERPARTEDE LOSESTADOS
NIAEN1995Y POSTERIORMENTE,QUESE UTILIZANENCALIFORNIA, UNIDOS(Y A PARTIRDEL1 DE ENERODE2001ENCANADA).
Declaraci6n de garanfia sobre defectos en el control de emJsiones para California y los Estados UnJdos
ElConsejodeRecursosAmbientalesdeCalifornia(CARB),la EPA(Agencia
de Protecci6nAmbientaldelos EE.UU.)y Searstienenel gustodeexplicarla
garantiadelsistemadecontroldeemisionesparamotoresdela_o 2000y para
elfuturoconrelaci6na motorespeque_ostodo terreno(SORE).EnCalifornia,
los nuevosmotorespeque_ostodo terrenodebenestardise_ados,construidos
y equipadosparacumplirconlas rigurosasnormasanti-smogdelestado.En
el restodelos EstadosUnidos,losmotoresnuevostodoterrenodeencendido
porchispacertificadosparaela_o 1997debencumplirest_ndaressimilares
establecidospot la EPA.Searsdebegarantizarelsistemadecontroldeemi-
Cobertura de la garantJa Sears para defectos en el control de emJsiones
Losmotorestodoterrenopeque6osest_ngarantizadosenIo relativoalcontrol alas disposicionesque seindiquenacontinuaci6n.Si una partedesumotor
deemisionesparadefectosenpiezasduranteunperiododedosa_os,sujeto cubiertapot lagaranfiaesdefectuosa,Searsreparar_o sustituir_dichaparte.
Responsabilidades del propietario en relacibn con la garantia
Comopropietariodelmotortodoterrenopeque_o,Ud.esresponsabledela
realizaci6ndel mantenimientorequeridoqueseincluyeenlas instrucciones
deoperaci6ny mantenimiento.Searsrecomiendaquese conserventodoslos
recibosrelativosalmantenimientodesu motortodoterrenopeque_o,pero
nopudedenegarla garantiasimplementeporla faltade los mismos,opor su
incumplimientodelmantenimientoprogramatic.Comopropietariodelmotor
peque_otodoterrenodebesaberque,sinembargo,Searslepuedenegar
lacoberturade lagarantiasi su motortodoterrenopeque6oouna piezadel
mismohanfalladodebidoa abuso,negligencia,mantenimientoindebidoo
Disposiciones de la garantJa Sears para defectos en el control de emJsiones
Lassiguientessondisposicionesespecificasrelacionadasconla coberturade lagarantiaparadefectosenel controldeemisiones.Esuna_adidoa lagarantiade
motorSearsparamotoresnoreguladosque seencuentraen lasinstruccionesde funcionamientoy mantenimiento.
1. Piezascongarantia
Lacoberturadeesta garantiase extiendeL]nicamentealas piezas
queaparecena continuaci6n(las partesde lossistemasdecontrolde
emisiones),siemprequedichaspiezasestuvieranya enelmotoren el
momentodesucompra.
a. Sistemademedici6ndecombustible
•Sistemadeenriquecimientoparaarranqueen frio
•Carburadory partesinternas
• Bombade combustible
b. Sistemadeinducci6nde aire
• Filtrodeaire
•Colectordeadmisi6n
c. Sistemadeencendido
• Bujia(s)deencendido
•Sistemadeencendidomagneto
d. Sistemadelcatalizador
•Convertidorcatalitico
•Colectordeescape
•Sistemadeinyecci6nde aireov_lvulade impulsos
e. Elementosvariadosusadosenlossistemasanteriores
•Wlvulas devacio,sensiblesa temperatura,posici6ny tiempo
einterruptores
•Conectoresy montajes
2. AIcancedela cobertura
Searsgarantizaal poseedorinicialy a loscompradoressubsiguientes
quelas piezascongarantianotendr_ndefectosen materialesnimano
deobraque provoquenla falla delasmismasduranteun periodode
dosaSosa partirdela fechaen queel motorse entregaa uncomprador
particular.
3. Sincargo
Lareparaci6no reemplazodecualquierpartecongarantiase realizar_
Enlos EstadosUnidosy Canad_hayunalineadeatenci6nde24 horas,1-800-469--4GG3,quecuentacon unmenL]conmensajespre-grabadosquecontienen
informaci6nparael mantenimientodemotores.
etario)
sionesdesumotorparalosperiodosdetiempoenumeradosa continuaci6n,
siemprequenohayaabuso,negligenciao mantenimientoindebidodesu
motortodoterrenopeque_o.Susistemade controldeemisionespuedeincluir
piezastalescomoel carburador,el filtrodeaire, elsistemadeencendido,el
silenciadoryelconversorcatalitico.Tambienpuedeincluirconectoresyotras
unidadesrelacionadasconlasemisiones.Dondeexistaunacondici6ncubierta
porla garantia,Searsreparar_supeque6omotortodoterrenosin costoalguno
incluyendodiagn6stico,piezasymanode obra
a modificacionesnoaprobadas.Ud.es responsabledepresentarsumotor
todoterrenopeque6oaundistribuidordeserviciosSearsautorizadotan pronto
comoaparezcaunproblema.Lasreparacionesde lagarantiasinconfiicto
debencompletarseen un plazodetiemporazonable,nosuperiora 30dias.Si
tienealgunapreguntarespectoasusderechosyresponsabilidadesreferentes
a lagarantia,debecontactarconun representantedeserviciosSearsal 1--
800--469--4663.Lagarantiadeemisioneses unagarantiapotdefectos.Los
defectossejuzgandeacuerdoconelfuncionamientonormalde unmotor.La
garantiano est_relacionadaconunapruebade emisionesenuso.
sin cargoalgunoparael poseedor,incluyendotareasdediagn6sticoque
permitandeterminarsi una partecongarantiaes defectuosa,siempreque
dichodiagn6sticose realiceenundistribuidordeserviciosSearsautoriza-
do. Parael serviciode lagarantiadeemisiones,contacteal distribuidorde
serviciosSearsautorizadom_scercanoincluidoen las"P_ginasamarillas"
en lascategorias"Motores,gasolina","Motoresdegasolina","Podadoras
de cesped",o similares.
4. Reclamacionesyexclusionesa la cobertura
Las reclamacionesde lagarantiadebenenviarsedeacuerdocon las
disposicionesdela politicadegarantiaparamotoresSears.Lacobertura
de lagarantiaexcluir_defectosen piezascongarantiaquenoscan partes
originalesSears,o abuso,negligenciao mantenimientoincorrecto,tal y
comose estableceen lapolitica degarantiaparamotoresSears.Searsno
es responsablede lasfallasenpiezascongarantiaprovocadasporel uso
de partesa6adidas,que noscanoriginalesoquesehayan modificado.
5. Mantenimiento
Cualquierpartecongarantiaquenoesteprogramadaparasetreempla-
zadacomo mantenimientorequerido,o ques61odeba inspeccionarse
regularmentealefecto de"inspeccioneoreemplacesegL]nsea necesario",
estar_garantizadacontradefectosduranteel periodode la garantia.Todas
las piezasgarantizadasqueesten programadasparasu reemplazopara
cumplirconlos requisitosdemantenimientoestar_ngarantizadass61o
porel periodoanterioral primerreemplazoprogramaticparadicha pieza.
Cualquierpiezade recambioqueseaequivalenteenfuncionamientoy
durabilidadpuedeusarsepararealizarmantenimientoo reparaciones.El
propietarioes responsablederealizartodoel mantenimientorequerido,tal
y comose defineenlas instruccionesdefuncionamientoy mantenimiento
Sears
6. Coberturaindirecta
Porla presente,la coberturaseextiendea lafalla decualquiercomponente
de motorprovocadapot lafallade unapiezacongarantiaque estetodavia
en periododegarantia.
Page 54

Busque el periodo de duraci6n de emisiones importantes yla informaci6n de clasificaci6n de aire en
la etiqueta de emisiones de su motor
Los motores cuyo cumpiimiento con los estAndares de emisi6n Tier 2 de la Comisi6n de Recursos Ambientales de California (CARB)
est6 certificado deben exhibir la informaci6n relacionada con el periodo de duraci6n de ias emisiones y la clasificaci6n de aire. Sears
Brands Management Corporation ponen esta informaci6n a disposici6n del consumidor en nuestras etiquetas de emisiones.
Ei Periodo de Duraci6n de las Emisiones describe el nQmero de horas de tiempo real de funcionamiento para el cuai se certifica que
el motor cumpie con ias reglas de emisi6n, descontando el mantenimiento adecuado del mismo segQn las instrucciones de oper-
aci6n y mantenimiento. Se utilizan las siguientes categonas:
Moderado:Se certifica que el motor cumpie con las reglas de emisi6n durante 125 horas de tiempo real de funcionamiento del motor.
Inmediato:Se certifica que el motor cumpie con las reglas de emisi6n durante 250 horas de tiempo real de funcionamiento del motor.
Extendido:Se certifica que el motor cumpie con las reglas de emisi6n durante 500 horas de tiempo real de funcionamiento del motor.
Por ejemplo, una cortadora de c6sped tJpica que se empuja desde arras se usa entre 20 y 25 horas por aSo. Por Io tanto, el Periodo
de Duraci6n de Emisiones de un motor con una clasificaci6n intermedia sena equivaiente aentre 10 y 12 aSos.
Laciasificaci6n de aire es un nQmero calculado para describir el nivel relativo de emisiones para un grupo de motores en particular.
Cuanto menor sea la clasificaci6n de aire, mayor es la limpieza del motor. La informaci6n se presenta de forma grAfica en la etiqueta
de emisiones.
Despu_s del 1 de julio de 2000, busque el periodo de cumplimiento de las reglas de
emisiones en la etiqueta de cumplimiento de las reglas de emisiones del motor
Despu6s del 1 de julio de 2000 se certificarA que determinados motores Sears Brands Management Corporation cumplen
con los estAndares de emisiones de la fase 2 de la Agencia de Protecci6n Ambientai de los Estados Unidos (USEPA). Para
los motores certificados para la etapa 2, el periodo de cumplimiento con ias reglas de emisiones al cual se hace referencia
en la etiqueta de cumplimiento con las reglas de emisiones indica el nQmero de horas de funcionamiento para el cual se ha
demostrado que el motor cumple con los requerimientos federales de emisi6n.
Para los motores con desplazamiento inferior a 225 cc, Categoria C = 125 horas, B = 250 horas y A = 500 horas.
Para los motores con desplazamiento de 225 cc o mAs, Categoria C = 250 horas, B = 500 horas y A = 1000 horas.
El desplazamiento de los motores de la serie modelo 150112 es 249 cc.
La presente es una representaci6n gen_rica de la etiqueta de emisi6n que se encuentra generaimente en un
motor certificado.
FAMILYYBSXS.3192VA 274812
54
GDOC-100182Rev.A
Page 55

Felicitaciones por haber realizado una adquisici6n inteligente. El producto Craftsman® que ha
adquirido esta diseSado y fabricado para brindar muchos aSos de funcionamiento confiable. Pero
como todos los productos a veces puede requerir de reparaciones. Es en ese momento cuando el
disponer de un Acuerdo de protecci6n para reparaciones le puede ahorrar dinero y problemas.
A continuaci6n se detallanlospuntosincluidos en el Acuerdo:
[] Servicio experto prestadopor nuestros10,000especialistasen reparacionesprofesionales
[] Servicio ilirnitado sin cargo paralaspiezasy la manode obraentodas lasreparacionescubiertas
[] Reernplazo del producto hasta 1500 d61aressi no es posible reparar el producto cubierto
[] Descuento de 25% del precionormal delservicioy de las piezas relacionadascon el mismo que no estencubiertas
por el acuerdo;ademas,25% del precio normal de laverificaci6n de mantenimientopreventivo
[] Ayuda r_pida pot tel_fono - Io IlamamosResoluci6n RApida- el apoyotelef6nico de un Chamusca al representante.
Pienseen nosotroscomo el manual "de un dueSohablador."
Una vezadquirido el Acuerdo, puede programar el serviciocon tan s61orealizaruna Ilamadatelef6nica. Puede Ilamaren
cualquier momentodeldia o de la noche o programarunservicioen linea.
ElAcuerdode Protecci6nde Reparaci6nes unacompra sin riesgo.Si ustedanulapor alguna raz6n duranteel periodode
garantiade producto,proporcionaremosunreembolso Ileno.O, un reembolsoprorrateadoencualquier momentodespues
del periodode garantia de producto expira,iAdquiera hoysu acuerdode protecci6n para reparaciones!
Se aplican determinadas limitaciones y exclusiones. Para obtener informaciTnadicional y precios en los Estados
Unidos Ilame al 1-800-827-6655.
El *Coverage en Canad_ivaria en algunos articulos. Para detalles Ilenos la Ilamada Chamusca Canad_ien 1-800-
361-8885.
Servicio de instalaci6nde Sears
Sidesea solicitar la instalaci6n profesionalde Sears de aparatosdomesticos, dispositivos paraabrir portones,calentado-
resde aguay otrosarticulos domesticosimportantes, en los EstadosUnidoso Canadaflameal 1-800-4-MY-HOME®.
55
Page 56

Your Home
For troubleshooting, product manuals and expert advice:
managernylife
www.managemylife.com
For repair - in your home - of all major brand appliances,
lawn and garden equipment, or heating and cooling systems,
no matter who made it, no matter who sold it!
For the replacement parts, accessories and
owner's manuals that you need to do-it-yourself.
For Sears professional installation of home appliances
and items like garage door openers and water heaters.
1-800-4-MY-HOME ® (1-800-469-4663)
Call anytime, day or night (U.S.A. and Canada)
www.sears.com www.sears.ca
Our Home
For repair of carry-in items like vacuums, lawn equipment,
and electronics, call anytime for the location of your nearest
Sears Parts & Repair Service Center
1-800-488-1222 (U.S.A.) 1-800-469-4663 (Canada)
www.sears.com www.sears.ca
To purchase a protection agreement on a product serviced by Sears:
1-800-827-6655 (U.S.A.) 1-800-361-6665 (Canada)
Para pedir servicio de reparaci6n
a domicilio, y para ordenar piezas:
1-888-SU-HOGAR ®
(1-888-784-6427)
www.sears.com
® Registered Trademark / TMTrademark of KCD IP, LLC in the United States, or Sears Brands, LLC in other countries
® Marca Registrada ! TMMarca de Fabrica de KCD IP, LLC en Estados Unidos, o Sears Brands, LLC in otros paises
MCMarque de commerce ! MDMarque deposee de Sears Brands, LLC
Au Canada pour service en frangais:
1-800-LE-FOYER Mc
(1-800-533-6937)
www.sears.ca
 Loading...