

MTD 24A-020E762 Owner’s Manual

Safety • Assembly • Operation • Maintenance •Troubleshooting • Parts Lists •Warranty
OF A O AL
\
\
\
Chipper Shredder Vacuum - IVlodel Series 020
iMPORTANT
READ SAFETY RULES AND iNSTRUCTiONS CAREFULLY BEFORE OPERATION
Warning: Thisunitisequippedwithan internalcombustionengineandshouldnotbeusedonor nearanyunimprovedforest-covered,brush-
coveredor grass-coveredlandunlesstheengine'sexhaustsystemisequippedwitha sparkarrestermeetingapplicablelocalor statelaws(if any).
If a sparkarresterisused,itshouldbemaintainedineffectiveworkingorderbytheoperator.IntheStateofCaliforniatheaboveisrequiredbylaw
(Section4442oftheCaliforniaPublicResourcesCode).Otherstatesmayhavesimilarlaws.Federallawsapplyonfederallands.A sparkarrester
forthemufflerisavailablethroughyournearestengineauthorizedservicedealeror contacttheservicedepartment,RO.Box361131Cleveland,
Ohio44136-0019.
FORMNO.769-03188
PRINTEDIN U.S.A.
MTD LLC, P.O. BOX 361131 CLEVELAND, OHIO 44136=0019
5/30/2007

This Operator's IVlanual is an important part of your new chipper shredder vacuum, it will help you assem=
ble, prepare and maintain the unit for best performance. Please read and understand what it says.
Table of Contents
Customer Support .............................................. 2
Safety Labels ...................................................... 3
Safe Operation Practices ................................... 4
Setting UpYour Chipper Shredder Vacuum ..... 6
Operating Your Chipper Shredder Vacuum .... 10
Finding and Recording Model Number
BEFOREYOUSTARTASSEMBLING
YOURNEW EQUIPMENT,
pleaselocate themodel plateon the equipment and copy
the informationto the samplemodel plate providedto the
right.Youcan locatethe model plate by standing behindthe
unitand looking downat the frame belowthe engine.This
informationwill benecessary to usethe manufacturer'sweb
site and/or obtain assistancefrom the Customer Support
Departmentor an authorizedservice dealer.
Maintaining Your Chipper Shredder Vacuum. 14
Troubleshooting ................................................ 18
Parts List ........................................................... 20
Warranty ............................................................ 24
Espa_ol .............................................................. 25
Model Number
®
www.mtdproducts.com
Serial Number
MTD LLC
P.O. BOX 361131
CLEVELAND, OH 44136
330 =220 =4683
800=800=731 0
Customer Support
Please do NOTreturn the unit to the retailer from which it was
purchased, without first contacting Customer Support.
Ifyou havedifficulty assemblingthis productor haveany questionsregardingthe controls,operation,or maintenanceof this
unit,you can seek helpfrom the experts.Choosefrom the optionsbelow:
1. Visitmtdproducts.com. Clickonthe CustomerService tab.
2. Phonea Customer Support Representativeat 1.800.800.7310. Spanishspeakingagents are available.
3. Theengine manufacturer isresponsible for allengine-relatedissueswith regards to performance,power-rating,specifica-
tions,warrantyand service. Pleaserefer tothe enginemanufacturer'sOwner's/Operator'sManual, packedseparatelywith
your unit,for more information.
2

Safety Labels Found On
Your Chipper Shredder
Vacuum
READ OPERATOR'S MANUAL.
KEEP HANDS OUT OF iNLET AND DISCHARGE OPENINGS WHILE MACHINE
iS RUNNING. ROTATING BLADES ARE iNSiDE
TURN ENGINE OFF AND ALLOW iMPELLER TOCOME TO COMPLETE STOP
BEFORE REMOVING BAG.
DO NOT ATTEMPT TO CLEAR A CLOG OR JAMWITH THE ENGINE RUNNING.
DO NOT OPERATE UNiT WITHOUT BAG OR OPTIONAL RLOWER CHUTE iN
DO N(_" S'I_ND ORWALK IN FRONT OF IE_WER CHUTE OR AIM I[_T BYSTANDERS.
• PLACE.
OBJECTSTHROWN OUT OF DISCHARGE CAN CPJSE PERSONAL iNJURY, i _
I " DONOTOPERATEWHENCNILDRENOROTHERSAREAROUND.
• WEAR APPROVED SAFETYGLASSES.
TO AVOID SERIOUS iNJURY
FRONT WHEEL / VACUUM NOZZLE HEIGHT
ADJUSTER
HiGH LOW
For use in To pick up wet
grass to pick material, pine
up leaves cones, acorns
and debris or material on
pavement.
WARNING
DO NOT removesafety
(or any) labels from
chippershredder
vacuumfor any reason.
3
WARNING: EngineExhaust,some of its constituents, andcertain vehiclecompo-
nentscontain or emit chemicals knownto Stateof Californiato cause cancerand
birth defectsor other reproductiveharm.
DANGER: This machinewas builtto beoperated accordingto the rulesfor safeoperation in this
manual.As with anytype of powerequipment,carelessness or error on the part ofthe operator can
result inseriousinjury.This machine iscapable of amputatinghands andfeet andthrowing objects.
Failureto observethe followingsafetyinstructionscould resultinserious injuryor death.
WARNING
Thissymbolpoints
out importantsafety
instructionswhich,if
notfollowed,could
endangerthe personal
i safetyand/or property
I ofyourselfandothers.
Readandfollowall
instructionsinthis
manualbeforeat-
temptingto operate
i this machine.Failure
I to complywith these
instructionsmayresult
i in personalinjury.When
youseethis symbol.
i HEED ITS WARNING!
i Your Responsibility
Restrictthe use
ofthis powermachine
to personswho read.
i understand
andfollow thewarnings
and instructions
i inthis manual
and on the machine.
Training
1. Read,understand,and followall instructionsonthe ma- 1.
chineandin the manual(s)beforeattemptingtoassemble
andoperate.Keepthis manualina safe placefor future
andregularreferenceandfor orderingreplacementparts.
2. Befamiliarwith allcontrolsandtheir properoperation. 2.
Knowhowtostopthe machineanddisengagethem
quickly.
3. Neverallowchildrenunder 16yearsoldto operatethis
machine.Children16yearsoldandovershouldreadand 3.
understandthe operationinstructionsandsafetyrulesin
thismanualand shouldbetrainedandsupervisedbya
parent.
4. Neverallowadultstooperatethismachinewithoutproper
instruction. 4.
5. Keepbystanders,helpers,pets,and childrenat least
75feetfromthe machinewhile it isin operation.Stop
machineif anyoneentersthe area.
6. Neverrunan engineindoorsor in a poorlyventilatedarea. 5.
Engineexhaustcontainscarbon monoxide,anodorless
anddeadly gas. 6.
7. Do notputhands andfeet nearrotatingpartsorin the
feedingchambersanddischargeopening.Contactwith
the rotatingimpellercanamputatefingers,hands,and
feet.
8. Neverattemptto unclogeitherthefeed intakeordis-
chargeopening,removeor emptyvacuumbag,or inspect
andrepairthe machinewhilethe engineis running.Shut
theengineoffand waituntilall movingparts havecome
toa completestop.Disconnectthe sparkplugwireand
groundit againstthe engine.
Preparation
Thoroughlyinspecttheareawherethe equipmentisto
beused.Removeallrocks,bottles,cans,orotherforeign
objectswhichcouldbe pickedupor thrownandcause
personalinjuryor damageto themachine.
Alwayswearsafetyglassesorsafetygogglesduringopera-
tionor whileperforminganadjustmentor repair,to protect
eyes.Thrownobjectswhichricochetcancauseserious
injurytothe eyes.
Wearsturdy,rough-soledworkshoesand close-fitting
slacksandshirts. Loosefittingclothesorjewelrycan be
caughtinmovableparts.Neveroperatethis machine
in barefeet or sandals.Wearleatherworkgloveswhen
feedingmaterialin thechipperchute.
Beforestarting,checkallboltsandscrewsfor propertight-
nessto besurethe machineisin safeworkingcondition.
Also,visuallyinspectmachinefor anydamageatfrequent
intervals.
Maintainorreplacesafetyandinstructionslabels,as
necessary.
Toavoidpersonalinjuryor propertydamageuseextreme
careinhandlinggasoline.Gasolineisextremelyflammable
andthe vaporsareexplosive.Seriouspersonalinjurycan
occurwhengasolineis spilledonyourselforyourclothes
whichcanignite.Washyour skinandchangeclothes
immediately.
a. Useonlyanapprovedgasolinecontainer.
b. Extinguishallcigarettes,cigars, pipes,andother
sourcesofignition.
c. Neverfuelmachineindoors.
d. Neverremovegascap oradd fuelwhiletheengineis hot
or running.
e. Allowengineto coolat leasttwo minutesbeforerefuel-
ing.
f. Neveroverfillfueltank. Filltankto nomorethan1/2
inchbelowbottomoffiller neckto providespacefor fuel
expansion.
g. Replacegasolinecap andtightensecurely.
h. If gasolineis spilled,wipeitoff theengineandequip-
ment.Movemachinetoanotherarea.Wait5 minutes
beforestartingtheengine.
i. Neverstorethe machineorfuel containerinsidewhere
there is an openflame,spark,orpilotlight (e.g.furnace,
waterheater,spaceheater,clothesdryer,etc.).
j. Toreduceafire hazard,keepmachinefreeofgrass,
leaves,orotherdebrisbuild-up.Cleanupoilor fuel
spillageandremoveanyfuel soakeddebris.
k. Allowmachinetocoolat least5 minutesbeforestoring.
4

Operation
1. Donotputhandsandfeetnearrotatingpartsor in the
feedingchambersanddischargeopening.Contactwith the
rotatingimpellercanamputatefingers,hands,andfeet.
2. Beforestartingthe machine,makesurethechipperchute,
feedintake,andcuttingchamberare emptyandfreeofall
debris.
3. Thoroughlyinspectallmaterialto beshreddedandremove
any metal,rocks,bottles,cans,orotherforeignobjects
whichcouldcausepersonalinjuryordamageto the
machine.
4. Ifthe impellerstrikesa foreignobjector ifyour machine
shouldstart makinganunusualnoiseor vibration,
immediatelyshuttheengineoff.Allowthe impellertocome
to a completestop.Disconnectthesparkplugwire,ground
itagainstthe engineandperformthe followingsteps:
a. Inspectfordamage.
b. Repairorreplaceanydamagedparts.
c. Checkfor anyloosepartsand tightento assure
continuedsafeoperation.
5. Donotallow anaccumulationof processedmaterialtobuild
upinthedischargearea.Thiscan preventproperdischarge
andresult in kickbackofmaterialthroughthefeedopening.
6. Donotattemptto shredorchipmateriallargerthan
specifiedonthe machineor inthismanual.Personalinjury
or machinedamagecouldresult.
7. Neverattemptto unclogeitherthefeed intakeordischarge
openingwhilethe engineisrunning.Shuttheengineoff,
wait until all movingpartshavestopped,disconnectthe
sparkplugwireandgrounditagainsttheenginebefore
clearingdebris.
8. Neveroperatewithoutvacuumbagand dischargechute
properlyattachedto the machine.Neveremptyor change
vacuumbagwhilethe engineisrunning.Zipperedend
of vacuumbag mustbekeptclosedatalltimes during
operation.
9. Neveroperatewithouteitherthe inlet nozzleoroptional
hoseattachmentproperlyattachedto the machine.Never
attemptto attachorchangeeitherattachmentwhilethe
engineis running.
10.Keepall guards,deflectorsandsafetydevicesinplaceand
operatingproperly.
11.Keepyourface andbodybackand to theside ofthe chipper
chutewhilefeedingmaterialintothe machineto avoid
accidentalkickbackinjuries.
12.Neveroperatethis machinewithoutgoodvisibility or light.
Alwaysbe sure ofyourfootingand keepafirm holdonthe
handles.
13.Donotoperatethismachineon a gravelsurface.
14.Donotoperatethismachinewhile undertheinfluenceof
alcoholordrugs.
15.Mufflerandenginebecomehotandcan causea burn.Do
nottouch.
16.Neverpickupor carrymachinewhilethe engineis running.
Maintenance & Storage
1. Nevertamperwithsafetydevices.Checktheirproper
operationregularly.
2. Checkboltsand screwsfor propertightnessatfrequent
intervalstokeepthe machinein safeworkingcondition.
Also,visuallyinspectmachinefor anydamageand repair,
if needed.
3. Beforecleaning,repairing,or inspecting,stoptheengine
andmakecertaintheimpellerand all movingpartshave
stopped.Disconnectthesparkplugwire and groundit
againsttheengineto preventunintendedstarting.
4. Do notchangetheenginegovernorsettingsor overspeed
theengine.The governorcontrolsthemaximumsafe
operatingspeedoftheengine.
5. Maintainor replacesafetyandinstructionlabels,as
necessary.
6. Followthismanualforsafe loading,unloading,transport-
ing,andstorageofthis machine.
7. Neverstorethemachineorfuel containerinsidewhere
thereisan openflame,sparkor pilotlightsuchasa water
heater,furnace,clothesdryer,etc.
8. Alwaysreferto theoperator'smanualforproperinstruc-
tionsonoff-seasonstorage.
9. Ifthefueltank hasto be drained,do this outdoors.
10.Observeproperdisposallawsandregulationsfor gas,oil,
etc.toprotecttheenvironment.
Do not modify engine
Toavoidseriousinjuryordeath,donotmodifyengineinany
way.Tamperingwiththegovernorsettingcan leadto arunaway
engineandcauseit tooperateatunsafespeeds.Nevertamper
withfactorysettingofenginegovernor.
Notice regarding Emissions
Engineswhicharecertifiedto complywithCaliforniaand
federalEPAemissionregulationsforSORE(SmallOff Road
Equipment)arecertifiedto operateonregularunleadedgaso-
line,and mayincludethefollowingemissioncontrolsystems:
EngineModification(EM)andThreeWayCatalyst(TWO)ifso
equipped.
Your Responsibility
Restrictthe useofthispowermachineto personswhoread,
understandandfollowthe warningsandinstructionsinthis
manualandonthe machine.
Practices
WARNING
Thissymbol points
out importantsafety
instructions,which if
notfollowed,could
endangerthe personal
safety and/or property
of yourselfand others.
Readand followall
instructions inthis man-
ual beforeattemptingto
operatethis machine.
Failureto comply with
these instructionsmay
result inpersonalinjury.
Whenyou seethis
symbol.
HEED iT S WARNING!
Your Responsibility
Restrictthe use
of this power machine
to personswho read.
understand
and followthe warnings
and instructions
in this manua
and on the machine.
5
IMPORTANT
This unit is shipped
without gasoline or
oil in the engine.Be
certainto service
enginewith gasoline
and oil as instructed
inthe separateengine
manual beforeoperat-
ingyour machine.
NOTE:All references
in this manualto the
left or rightside of
thechipper shredder
vacuum isfrom the
operatingposition only.
Exceptions,if any,will
i be specified.
f
RopeGuide
WingNutJ
Lower Handle
SafetyGlasses Bottleof EngineOil
_'_ _ _ Operator'sManual
1-If Equipped Ih_ll
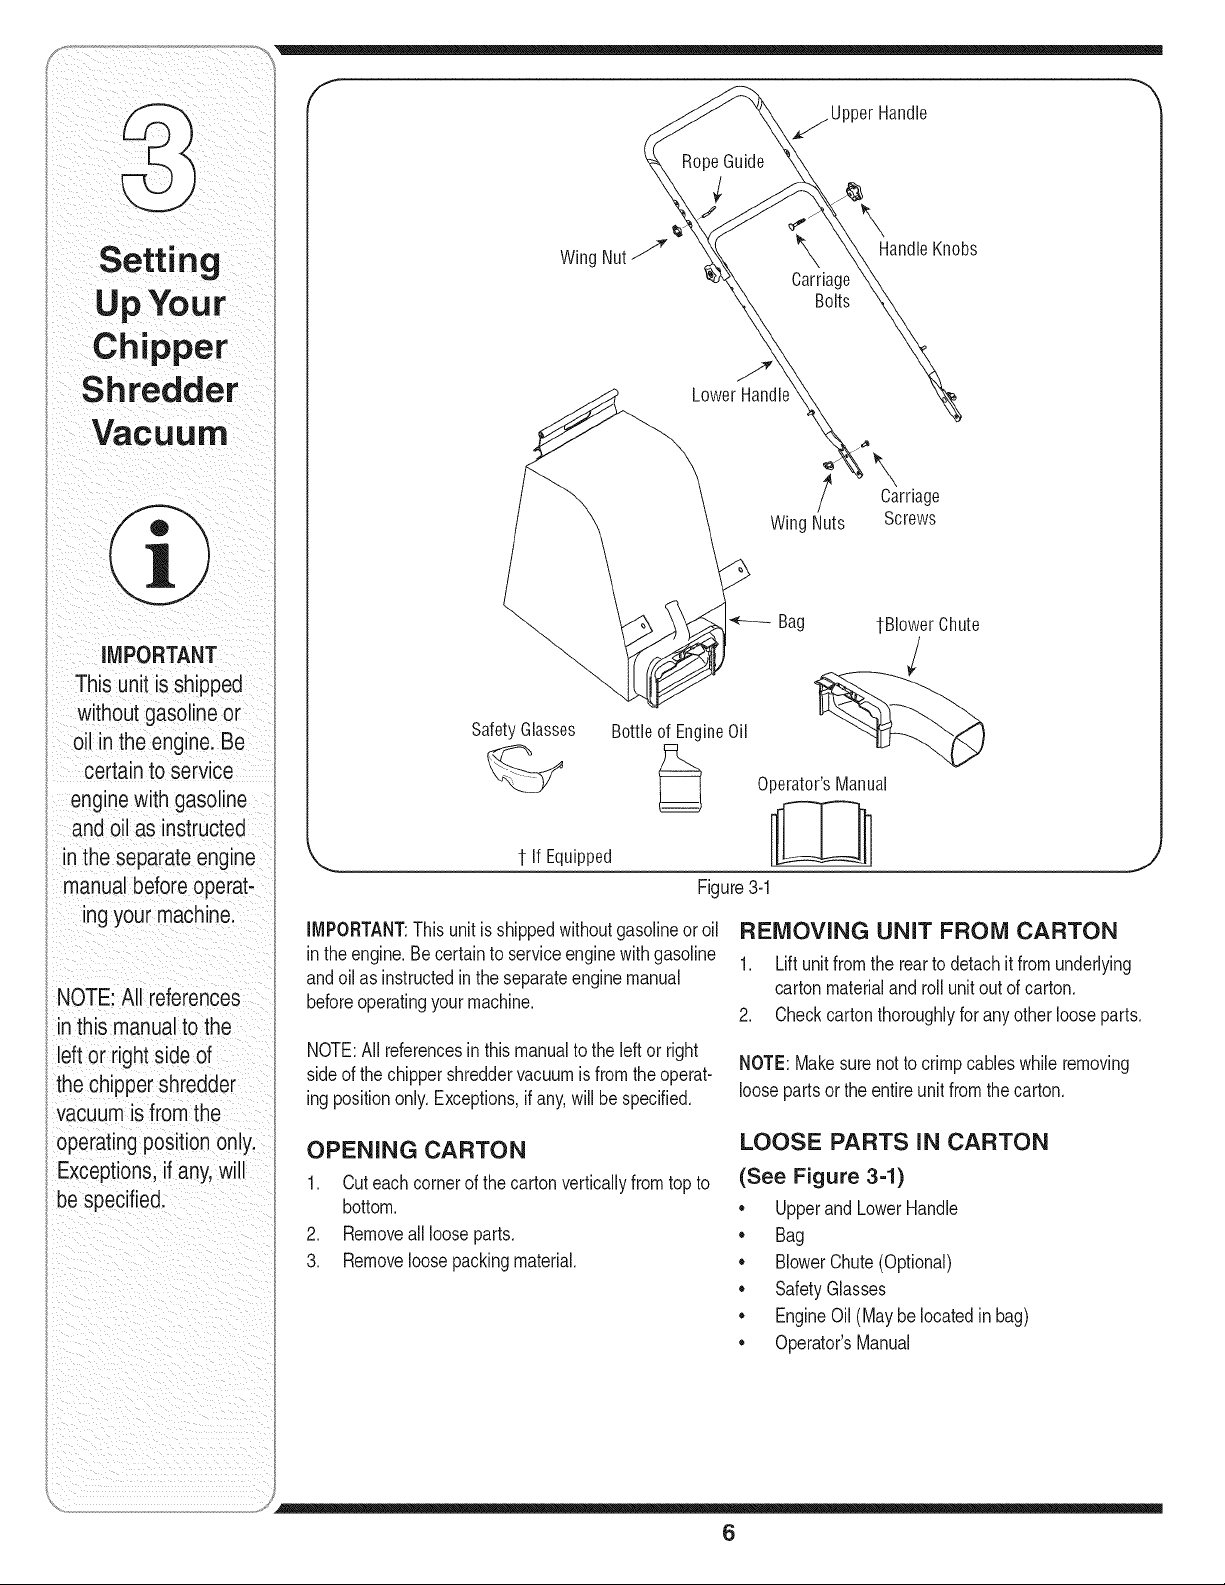
Figure3-1
IMPORTANT:Thisunitis shippedwithoutgasolineoroil
in theengine.Becertainto serviceenginewithgasoline
andoilas instructedintheseparateenginemanual
beforeoperatingyourmachine.
NOTE:Allreferencesinthismanualtotheleft or right
sideof thechippershreddervacuumisfromtheoperat-
ingpositiononly.Exceptions,ifany,willbe specified.
OPENING CARTON
1. Cuteachcornerofthecartonverticallyfromtopto
bottom.
2. Removealllooseparts.
3. Removeloosepackingmaterial.
,_j Upper Handle
J_
\
_X, HandleKnobs
Carriage
Bolts
/_ Carriage
WingNuts Screws
4F--_ Bag tBIower Chute
REMOVING UNIT FROM CARTON
1. Lift unitfromthe reartodetachitfromunderlying
cartonmaterialandrollunitoutofcarton.
2. Checkcartonthoroughlyforanyother looseparts.
NOTE:Makesure notto crimpcableswhileremoving
loosepartsortheentireunitfromthecarton.
LOOSE PARTS IN CARTON
(See Figure 3-1)
• UpperandLowerHandle
• Bag
• BlowerChute(Optional)
• SafetyGlasses
• EngineOil(Maybe locatedinbag)
• Operator'sManual
6
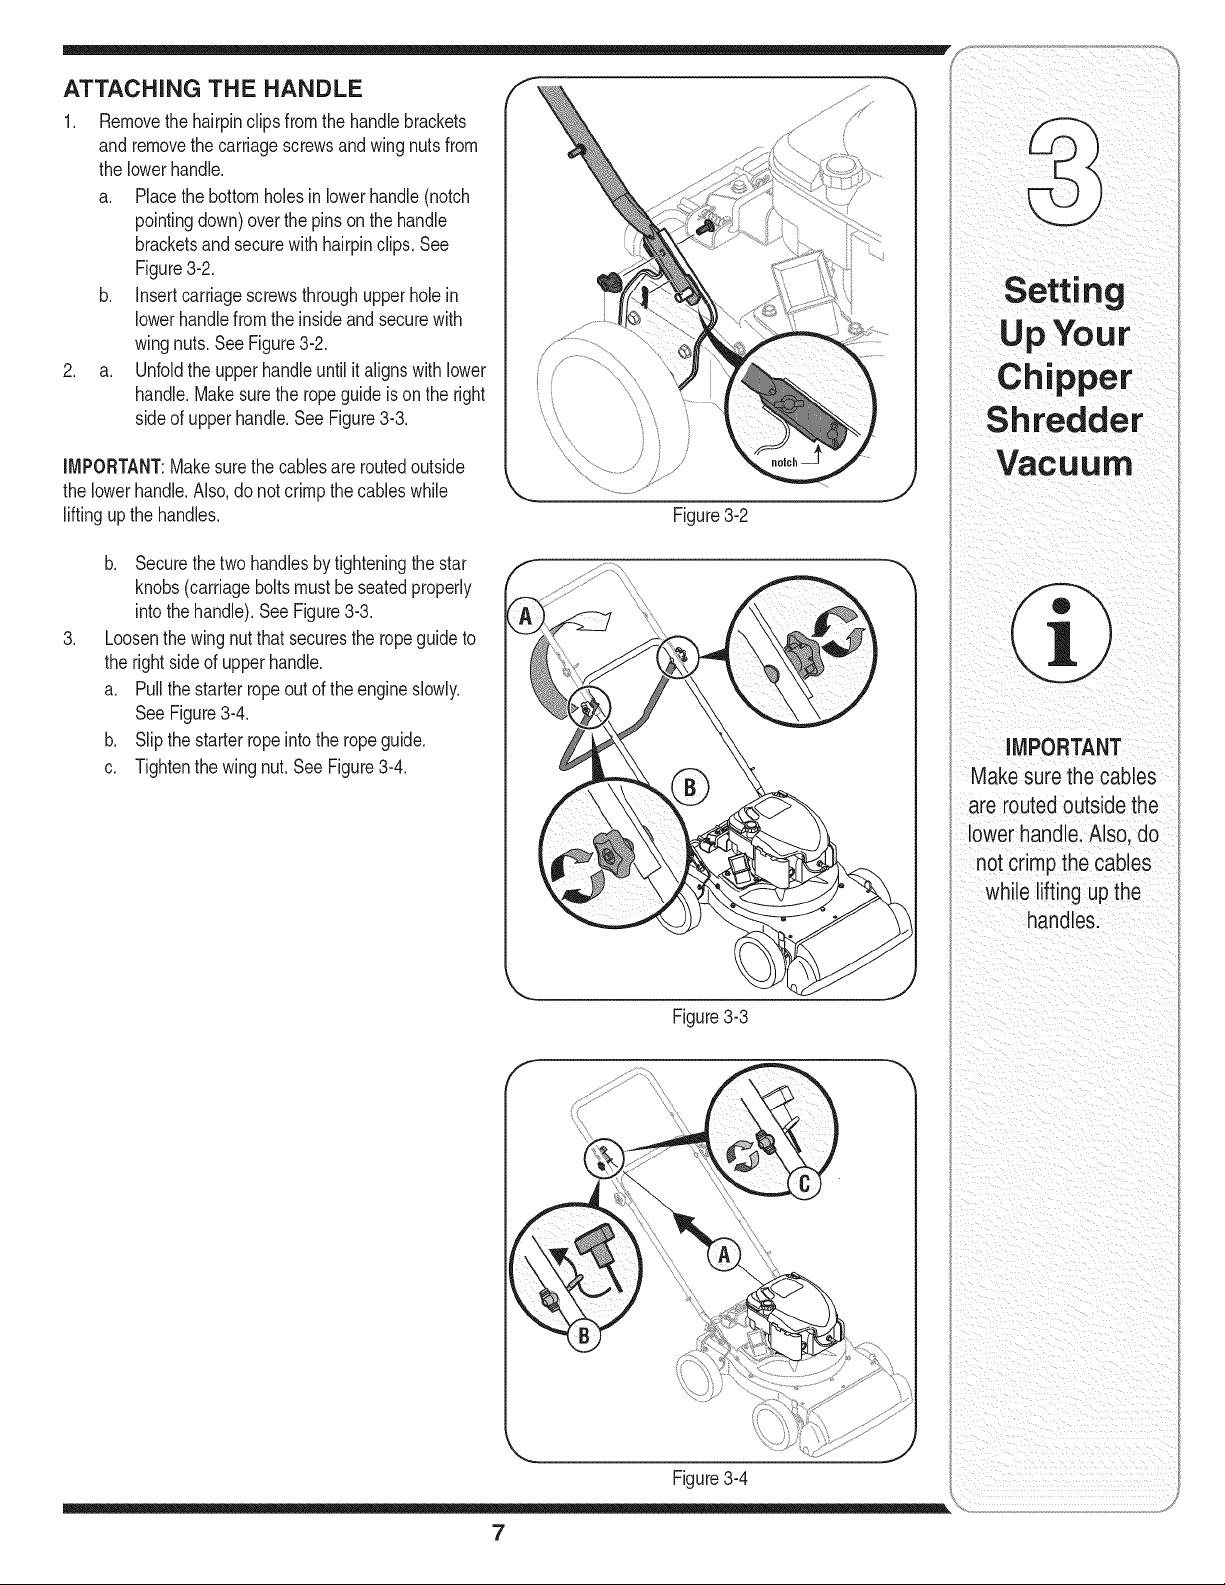
ATTACHING THE HANDLE
1. Removethe hairpinclipsfromthehandlebrackets
and removethecarriagescrewsandwingnutsfrom
thelowerhandle.
a. Placethebottomholesinlowerhandle(notch
pointingdown)overthepinsonthehandle
bracketsandsecurewithhairpinclips.See
Figure3-2.
b. insertcarriagescrewsthroughupperholein
lowerhandlefromtheinsideandsecurewith
wingnuts.SeeFigure3-2.
2. a. Unfoldthe upperhandleuntilitalignswithlower
handle.Makesuretheropeguideisonthe right
sideofupperhandle.SeeFigure3-3.
iMPORTANT:Makesurethe cablesare routedoutside
thelowerhandle.Also,donotcrimpthecableswhile
lifting upthehandles.
b. Securethetwohandlesbytighteningthe star
knobs(carriageboltsmustbeseatedproperly
intothehandle).SeeFigure3-3.
.
Loosenthewingnutthatsecuresthe ropeguideto
therightsideofupperhandle.
a. Pullthestarterropeout oftheengineslowly.
See Figure3-4.
b. Slipthestarterropeintothe ropeguide.
c. Tightenthe wingnut.See Figure3-4.
f
........
upyo,.,
Chipper
Shredder
\
Figure3-2
IMPORTANT
Makesure the cables
are routedoutsidethe
lowerhandle. Also do
not crimpthe cables
while lifting upthe
handles.
Figure3-3
Figure3-4
7

Up Your
f
_, ATTACHING THE BAG
1. Graspbaghandlewithonehandandslidelocking
rodonmountingbracketwithotherhandtoward
engine.Usethe endofmountingbracketas leverage
whenslidingthelockingrod.
2. Slipbagovertherimof thedischargeopeningand
releaselockingrodtosecurebaginplace.See
Figure3-5.
3. Snapbagcliptothe topof thelowerhandle.
4. Placelowerstrapsonthebagoverthetopof lower
handle,hookingthemonthe studs.SeeFigure3-6.
Chipper
Shredder
NOTE: The bag/chute
i switchbuttona_tachedto
themountingbracketmust
befullydepressedby the
i tipof fronttab ontheblower
chuteor enginewillnot
sta"t.
NOTE:Thebag/chuteswitchbuttonattachedtothe
mountingbracketmustbefullydepressedbythetip of
fronttabon baghandlewhensecuringthe bagor engine
willnotstart.
Figure3-6
8
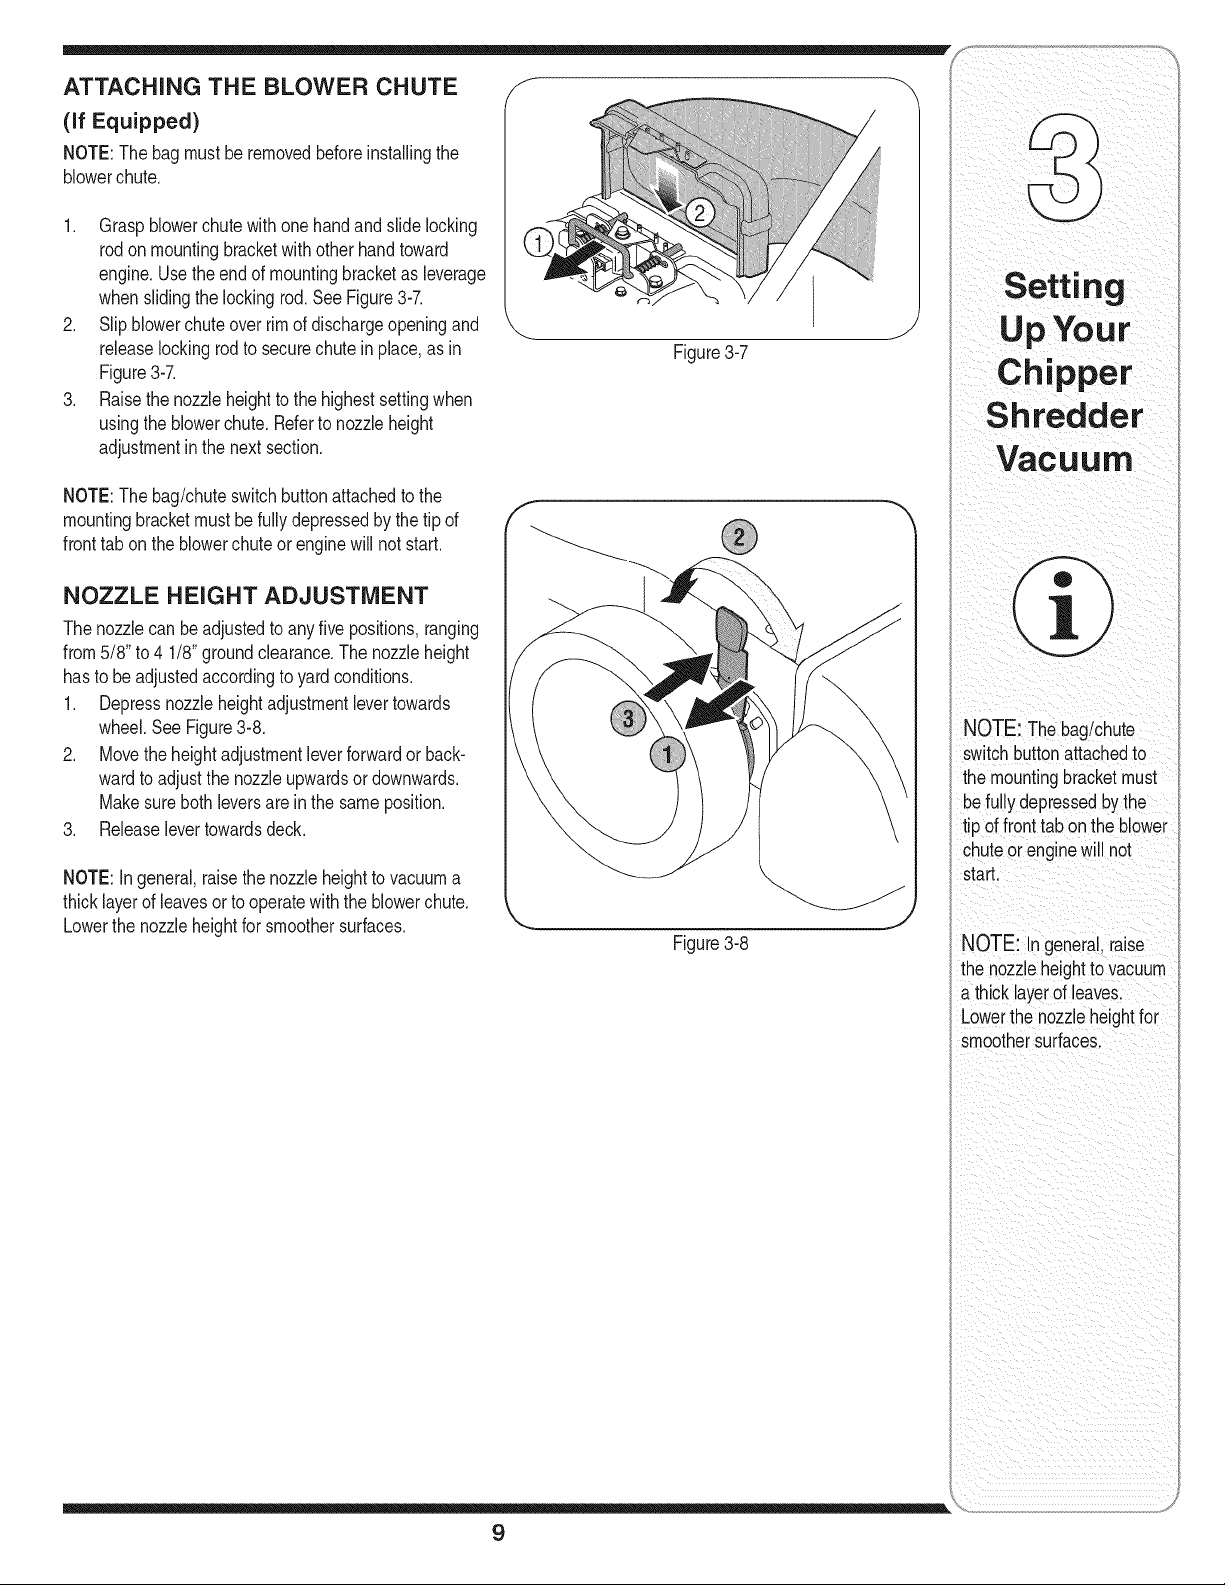
(if Equipped)
NOTE:The bagmustbe removedbeforeinstallingthe
blowerchute.
1. Graspblowerchutewithonehandandslidelocking
rodonmountingbracketwithotherhandtoward
engine.Usetheendof mountingbracketasleverage
whenslidingthelockingrod.SeeFigure3-7.
2. Slip blowerchuteoverrimof dischargeopeningand
releaselockingrodto securechutein place,asin
Figure3-7.
3. Raisethenozzleheighttothehighestsettingwhen
usingthe blowerchute.Referto nozzleheight
adjustmentin thenextsection.
NOTE:The bag/chuteswitchbuttonattachedtothe
mountingbracketmustbefullydepressedby thetip of
fronttabontheblowerchuteorenginewill notstart.
NOZZLE HEIGHT ADJUSTMENT
Thenozzlecanbeadjustedto anyfivepositions,ranging
from5/8"to 4 1/8"groundclearance.Thenozzleheight
hastobeadjustedaccordingto yardconditions.
1. Depressnozzleheightadjustmentlevertowards
wheel.SeeFigure3-8.
2. Movetheheightadjustmentleverforwardorback-
wardto adjustthenozzleupwardsor downwards.
Makesurebothleversareinthe sameposition.
3. Releaselevertowardsdeck.
NOTE:Ingeneral,raisethenozzleheighttovacuuma
thicklayerofleavesortooperatewiththe blowerchute.
Lowerthenozzleheightforsmoothersurfaces.
Figure3-7
Figure3-8
J
Chipper
Shredder
c
NOTE: The bag/chute
switchbuttonattachedto
the mountingbracketmust
uefullydepressedby the
tip of fronttabon theblower
chuteor enginewillnot
start.
NOTE: In general,raise
thenozzleheighttovacuum
athicklayerofleaves.
Lowerthenozzleheightfor
smoothersurfaces.
9

Know Your Chipper Shredder Vacuum
Bag
WARNING
i The operation of any
chipper shredder
vacuum can result
inforeign objects
being thrown into
the eyes, whichcan
damage your eyes
severely. Alwayswear
the safety glasses
providedwith this
unit or eye shields
while operating or
while performing
i any adjustments or
repairs.
Starter
Handle
Blower
Chutet
"_ Chipper
Chute
_" NozzleHeight
Adjustment Lever
tlf Equipped
Figure4-1
Nowthatyouhavesetupyouryardvacuumfor
operation,getacquaintedwithits controlsandfeatures.
Thesearedescribedbelowandillustratedonthis page.
Thisknowledgewillallowyoutouseyournewequip-
mentto itsfullestpotential.
_ WARNING:Theoperation of any
which candamageyour eyesseverely.Always wear
the safety glasses providedwith this unit or eye
shields whileoperating or while performingany
adjustments or repairs.
CHIPPER CHUTE
Allowstwigsandsmallbranchesupto 1-1/2"in diameter
tobefedinto theimpellerforchipping.SeeFigure4-1.
NOZZLE
Yardwastesuchas leavesor pineneedlescanbe
vacuumedupthroughthenozzleforshredding.
BAG
Collectsshreddedmaterialfedthroughthechipper
chuteor vacuumedthroughthe nozzle.
chipper shreddercanresultinforeign
objects being thrown intothe eyes,
J
BagHandle
Fill
GasolineFill
BLOWER CHUTE
(if Equipped)
Whenattachedtounit,theblowerchuteisusedto
dischargeyardwastesuchasleaves,pineneedle,or
smalltwigsacrossyard.
BAG HANDLE
Usedtograspbagin ordertoassistinattaching,remov-
ing,andemptyingbag.SeeFigure4-1.
NOZZLE HEIGHT ADJUSTMENT
LEVER
Usedtoadjustthenozzlegroundclearanceranging
approximatelyfrom5/8" to4 1/8".
STARTER HANDLE
Thestarterhandleisattachedtotherightupperhandle.
Standbehindunitandpullthe starterhandleto start
engine.SeeFigure4-1.
ENGINE CONTROLS
Seetheseparateenginemanualforthelocationand
functionofthecontrolsonthe engine.
10

,__ WARNING:Useextremecarewhenhan-
the engineis hotor running.Extinguishcigarettes,
cigars,pipes,andothersourcesof ignition.
dlinggasoline. Gasolineisextremely
flammableand the vaporsare explosive.
Neverfuel machineindoorsor while
GAS AND OiL FILL-UP
1. Checkoil levelandaddoil ifnecessary.Followengine
manualforthis.SeeFigure4-1for locationofthe oil
fill.
2. Servicethe enginewith gasolineasinstructedinthe
enginemanual.SeeFigure4-1forlocationofgas fill.
f
ChokeControl
_ WARNING:Neverfill fuel tank indoors
with enginerunningor until the engine
hasbeen allowed to coolfor at leasttwo
minutesafterrunning.
TO START ENGINE
IMPORTANT:Thebag/chuteswitchbuttonmustbefully
depressedbythetipoffronttabonbaghandleorblower
chuteforenginetostart.
1. Attachsparkplugwireand rubberbootto sparkplug.
2. Makesuresafetyswitchwireisconnectedtoengine
and properlygroundedto mountingbracket.
3. Engineswith chokelever:
Movechokeleveronengineto CHOKEposition.(A
warmenginemaynotrequirechoking).
Engineswithprimer:
Primeengineasinstructedinseparateenginemanual.
4. The throttlecontrolleverislocatedontheengine.
MoveenginethrottlecontrollevertoFASTor START
position.SeeFigure4-2.
5. Standingbehindthe unit,graspstarterhandleandpull
ropeoutslowlyuntilenginereachesstartofcompres-
sioncycle(ropewillpullslightlyharderatthis point).
See Figure4-3.
6. Pullropewitharapid,continuous,fullarmstroke.
Keepa firmgriponstarterhandle.Let roperewind
slowly.
7. Repeatthepreviousstepsuntilenginefires.When
enginestarts,movechokecontrol(ifequipped)
graduallyto RUNposition.
Figure4-2
Figure4-3
8. If enginefalters,movechokecontrolbacktowardthe
throttlecontrolandrepeatsteps5 through7.
9. ALWAYSkeepthe throttlecontrolinthe START/RUN
positionwhenoperatingtheYardVacuum.
__i= ARNING:Neverrun the engine
monoxide,anodorless and deadly gas.
indoorsor ina poorly ventilated area.
Engineexhaustcontainscarbon
WARNING
Useextreme care
when handling
gasoline.Gasoline is
extremely flammable
and the vapors are
explosive. Never fuel
machine indoors
or while the engine
is hot or running.
Extinguish cigarettes,
cigars, pipes, and
other sources of
ignition.
Never fill fuel tank
indoors with engine
running or until the
engine has been
allowed to cool for
at least two minutes
after running.
Never run the engine
indoors or ina poorly
ventilated area. En-
gine exhaust contains
carbon monoxide, an
odorless and deadly
gas.
11
Operating
WARNING
When movingthrottle
I control lever,be care-
i ful of heated surfaces
Figure4-4
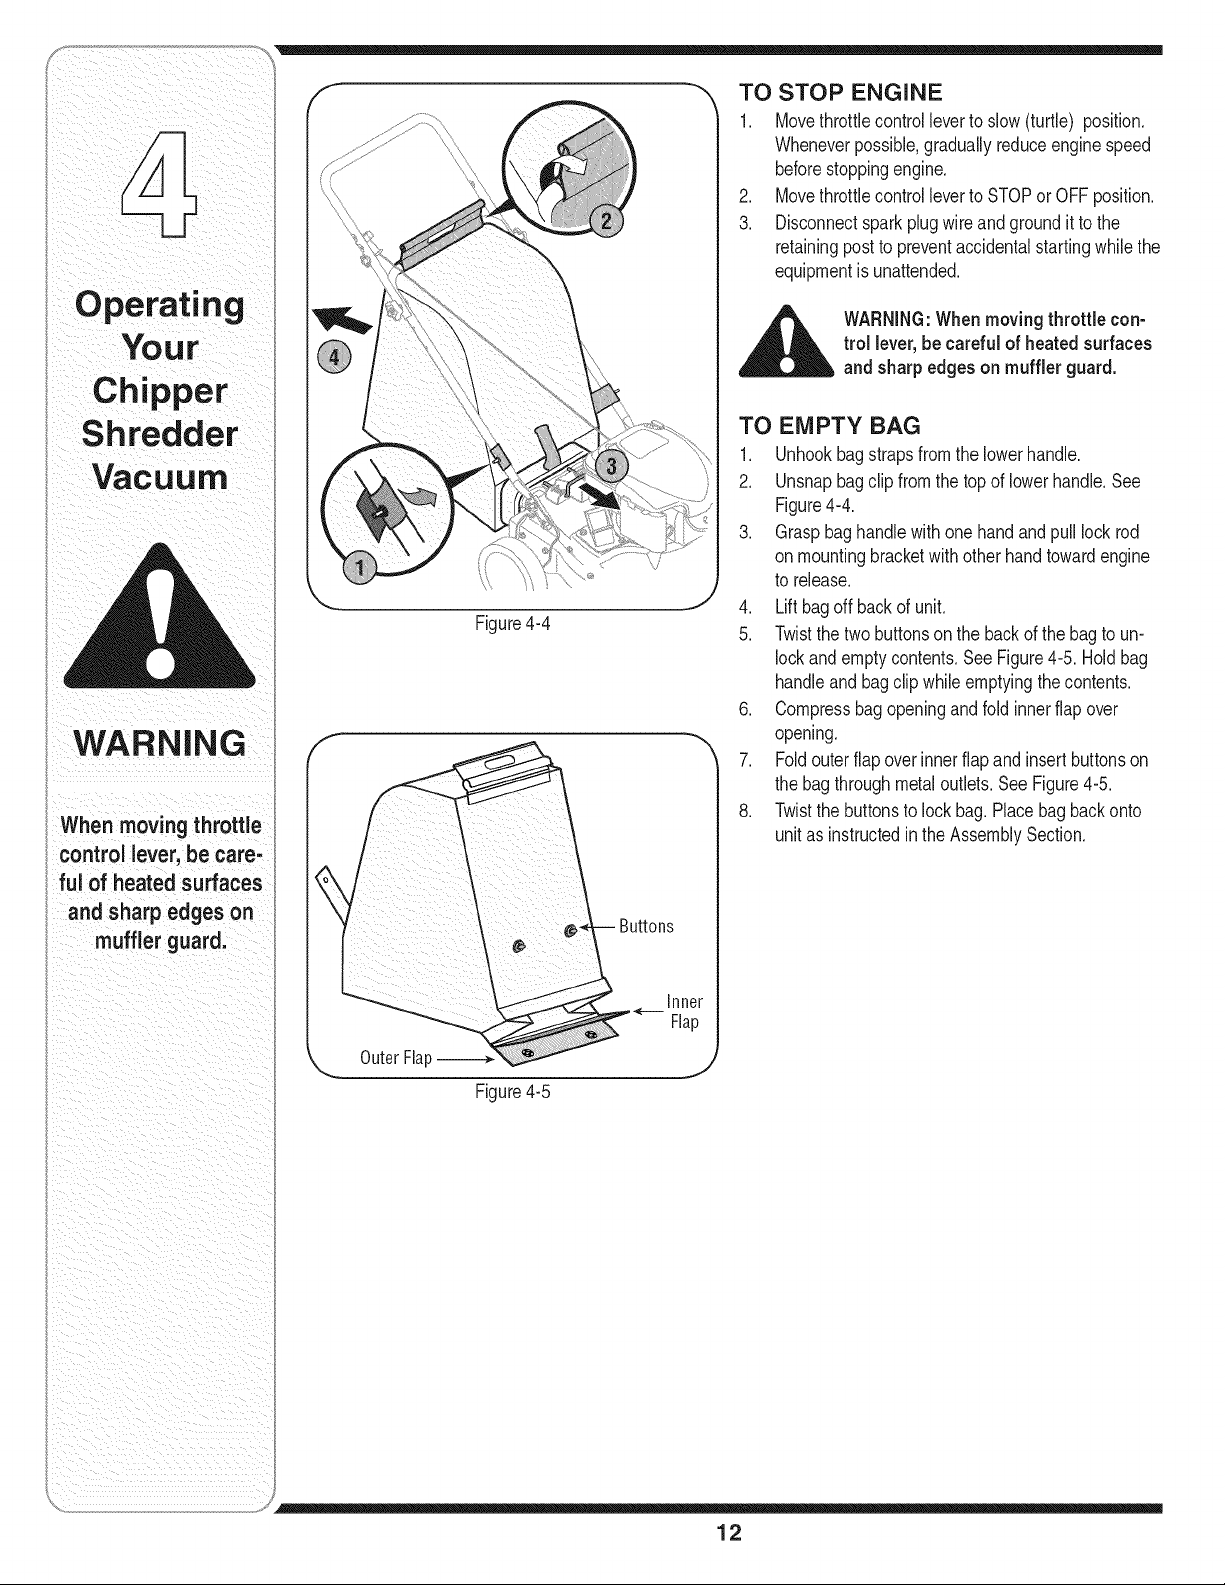
TO STOP ENGINE
1. Movethrottlecontrollevertoslow(turtle) position.
Wheneverpossible,graduallyreduceenginespeed
beforestoppingengine.
2. MovethrottlecontrollevertoSTOPorOFFposition.
3. Disconnectsparkplugwireandgroundit to the
retainingpostto preventaccidentalstartingwhilethe
equipmentisunattended.
__k WARNING:Whenmoving throttle con-
trol lever,becarefulof heatedsurfaces
and sharpedgeson mufflerguard.
TO EMPTY BAG
1. Unhookbagstrapsfromthelowerhandle.
2. Unsnapbagclipfromthetop oflowerhandle.See
Figure4-4.
3. Graspbaghandlewithonehandandpulllockrod
onmountingbracketwithotherhandtowardengine
torelease.
4. Lift bagoff backofunit.
5. Twistthetwo buttonson thebackofthebagtoun-
lockandemptycontents.SeeFigure4-5.Hold bag
handleandbagclipwhileemptyingthecontents.
6. Compressbagopeningand foldinnerflapover
opening.
7. Foldouterflapoverinnerflap andinsertbuttonson
thebagthroughmetaloutlets.SeeFigure4-5.
8. Twistthebuttonstolockbag.Placebagbackonto
unitas instructedintheAssemblySection.
i and sharpedges on
muffler guard.
Buttons
Outer Fla
Figure4-5
12

TO REMOVE BLOWER CHUTE
(if Equipped)
1. Graspblowerchutewithonehandandpulllock rod
on mountingbracketwithother handtowardengine
to release.Referto Figure4-6.
2. Removeblowerchutefromovertherimofthe
dischargeopening.
Placebothhandson topof upperhandleto pushunitover
yardwaste.Yardwastesuchasleavesandpineneedles
canbevacuumedupthroughthe nozzlefor shredding.
Aftermaterialhasbeenshreddedbytheflail bladeson
theimpellerassembly,itwillbedischargedintocatcher
bagorthroughblowerchute.Donotattempttoshredor
chipanymaterialotherthanvegetationfoundina normal
yard(i.e.branches,leaves,twigs,etc.)Avoidfibrous
plantssuchastomatovinesuntiltheyarethoroughly
driedout.Materialssuchasstalksor heavybranchesup
to 1-1/2"in diametermaybefedintothe chipperchute.
0 perat ing
Figure4-6
__i= ARNING:Donot attempt to shred,
manual. Personalinjuryor damageto the machine
couldresult.
IMPORTANT:Theflailscreenislocatedinsidethe
housinginthe dischargearea.Iftheflail screenbecomes
clogged,removeandcleanasinstructedintheMainte-
nancesection.Forbestperformance,it isalso important
to keepthechipperbladesharp.
__i= WARNING:Donot at anytime make
chip,or vacuumany materiallarger
thanspecifiedon the machineor inthis
anyadjustments without first stopping
engineand disconnecting sparkplug
wire.
Do not attempt
to shred,chip, or
vacuum any material
larger than specified
on the machine or in
this manual. Personal
injury or damageto
the machine could
result.
Do notat any time
makeany adjust-
ments withoutfirst
stoppingengine and
disconnecting spark
plugwire.
13

WARNING
I Alwaysstop engine,
disconnectspark
plug, and ground
} against engine before
i cleaning, lubricating
} or doing any kind of
i maintenance onyour
machine.
A_. WARNING:Alwaysstop engine, LUBRiCATiON
disconnect sparkplug, and ground
against enginebeforecleaning, (rearwheel)andpivotarmaxle(frontwheel)oncea
lubricating or doing any kindof
maintenanceonyourmachine.
GENERAL RECOMMENDATIONS
• Alwaysobservesafetyruleswhenperforming
anymaintenance.
• Thewarrantyon thisyardvacuumdoesnotcover
itemsthathavebeensubjectedtooperatorabuse
ornegligence.Toreceivefullvaluefromwarranty,
operatormustmaintaintheequipmentas
instructedhere.
• Someadjustmentswill havetobe madeperiodi-
callytomaintainyourunitproperly.
• Periodicallycheckallfastenersand makesure
thesearetight.
• Wheels:Lubricateeachwheelshoulderscrew
seasonwithlightoil.
• Nozzleheight adjustment levers:Lubricatethe
pivotpointsofthenozzleheightadjustmentlevers
oncea seasonwithlightoil.
• Locking Rod: Lubricatethe lockingrodwith lightoil
toeasetheapplicationofattachingonor removing
bag.
• Engine: Followtheseparateenginemanualpacked
withyourunitforlubricationinstructions.
EQUIPMENT CARE
• CleantheYardVacuumthoroughlyaftereachuse.
• Washbagperiodicallywithwater.Allowtodry
thoroughlyinshade.
• If the flailscreenbecomesclogged,removeand
cleanas instructedbelow.
NOTE:Cleaningwithaforcefulsprayofwaterisnot
recommendedasitcould contaminatethefuelsystem.
ENGINE CARE
RefertotheMaintenancesectionofthe EngineOwner/
Operatormanualpackedwithyourunit. Readandfollow
instructionscarefully.
• Checkengineoil levelbeforeeachuseas
instructedin theseparateenginemanual.
Cleanor replaceair cleanerevery25 hoursunder
normalconditions.Cleaneveryfewhoursunder
extremelydustyconditions.Toservicetheair
cleaner,refertotheseparateenginemanual.
• Thesparkplug shouldbe cleanedandthegap
resetoncea season.Refertotheseparateengine
manualforcorrectplugtypeandgapspecifications.
• Cleanengineregularlywitha clothorbrush.Keep
areaaroundenginecleantopermitproperair
circulation.Removeall grass,dirtandcombustible
debrisfrommufflerarea.
14
 Loading...