

Page 1
(f
OUTDOOR POWER EQUIPMENT
for all seasons
.75
8 TON MANUAL
LOG SPLITTER
Important:
Read Safety Rules and
Instructions Carefully
PRINTED IN U.S.A.
Model Numbers
245-632-000
24632S
Thank you for purchasing
an American-built product.
FORM NO. 770-3956
Page 2

INDEX
Safe Operation Practices........................................... 3
Assembly Instructions............................................ ... 4
Operation .............................................................. ... 5
Maintenance
♦
♦
♦
♦
♦
♦
♦
.........................................................
LIMITED WARRANTY
For one year from the date of original retail purchase, MTD PRODUCTS INC will either
repair or replace, at its option, free of charge, F.O.B. factory or authorized service firm, any
part or parts found to be defective in material or workmanship. Transportation charges for
the movement of any power equipment unit or attachment are the responsibility of the pur
chaser. Transportation charges for an / parts submitted for replacement under this warran
ty must be paid by the purchaser unk ss such return is requested by MTD PRODUCTS INC.
This warranty will not apply to any part which has become inoperative due to misuse, ex
cessive use, accident, neglect, improDer maintenance, alterations, or unless the unit has
been operated and maintained in accoi dance with the instructions furnished.
... 6
Illustrated Parts
Repair Parts List.............................................9
Seal-Kit...........................................................9
.............................................
8
♦
♦
♦
♦
♦
♦
♦
♦
♦
♦
♦
♦
♦
♦
V
This warranty will not apply where the unit has been used commercially.
Warranty service is available through /our local authorized service dealer or distributor. If
you do not know the dealer or distribi tor in your area, please write to the Customer Service
Department of MTD.
The return of a complete unit will net be accepted by the factory unless prior written per
mission has been extended by MTD.
This warranty gives you specific lega rights. You may also have other rights which vary
from state to state.
£k
THIS UN T SHOULD NOT BE
TOWED OSI ANY STREET, HIGH
WAY OR PUBLIC ROAD. ANY
LICENSING NEEDED TO COMPLY
WITH THE EXISTING FEDERAL,
LOCAL OR STATE VEHICLE
REQUIREMENTS IS THE SOLE
RESPONSIBILITY OF THE PUR
CHASER.
CAUTION
t
♦
♦
♦
♦
♦
♦
Page 3

IMPORTANT
It is suggested that this manual be read in its entirety before attempting to assemble or operate. Keep this manual
'n a safe place for future reference and for ordering replacement parts.
Your log splitter is a precision piece of equipment, not a plaything. Therefore exercise extreme caution at all times.
A
TRAINING
1. Do not allow children to operate. Do not allow
adults to operate it without proper instruction.
Only persons well acquainted with these rules of
safe operation should be allowed to use your log
splitter.
2. Never use your splitter for any other purpose than
splitting wood. It is designed for this use only
and any other use may cause an injury.
3. Only the operator is to be near your log splitter
during use. Keep all others, including pets, a
minimum of 20 feet away from your work zone.
Flying wood can be hazardous.
-PREPARATION
1. Do not wear loose fitting clothing that could get
caught on the moving parts.
2. Do not operate equipment when barefoot or
wearing open sandals. Always wear safety shoes or
heavy boots. A dropped log can seriously injure
your foot.
SAFE OPERATION PRACTICES FOR LOG SPLITTERS
2. Never place hands or feet between log and splitting
wedge or between log and ram during forward or
reverse stroke. To do so may result in crushed or
amputated fingers or toes, or worse, you may lose
an arm or foot.
3. Never try to split two logs on top of each other.
One may fly out an injure you.
4. Never attempt to split wood across the grain.
Some types of wood may burst or fly out of your
splitter and result in injury to you or a bystander.
5. Only use your hand to operate the ram or control
lever. Never use your foot or a rope or any other
extension device. This could result in your inability
to stop your splitter quickly enough and cause an
injury.
6. Only operate your splitter on the level ground and
not on the side of a hill. It could tip, or rolling logs
or poor footing could cause an accident.
3. Use only in daylight or in good artificial light.
4. Never operate your splitter on slippery, wet,
muddy, or icy surfaces. Safe footing is essential
in preventing accidents.
5. Always wear safety glasses or goggles while
operating your log splitter. A piece of splitting
log could fly off and hit your eyes.
6. Both ends of each log must be cut square. This
will prevent the log from flying out of the splitter
while under pressure.
OPERATION
1. No one should operate this unit while intoxicated
or while taking medication that impairs the senses
or reactions.
7. When loading log splitter, place your hands on the
side of the log, not at the ends.
8. For logs that are not cut square, the longest
portion of the log should be rotated down and the
most square end placed against the ram.
MAINTENANCE and STORAGE
1. Don't operate your splitter in poor mechanical
condition or when in need or repair.
2. Keep all nuts, bolts and screws tight to be sure
equipment is in safe working condition.
3. Replace all damaged or worn parts with manu
facturer approved replacement parts.
4. Never store outside without a waterproof cover.
Rain will cause rust on the inside of the cylinder.
Page 4
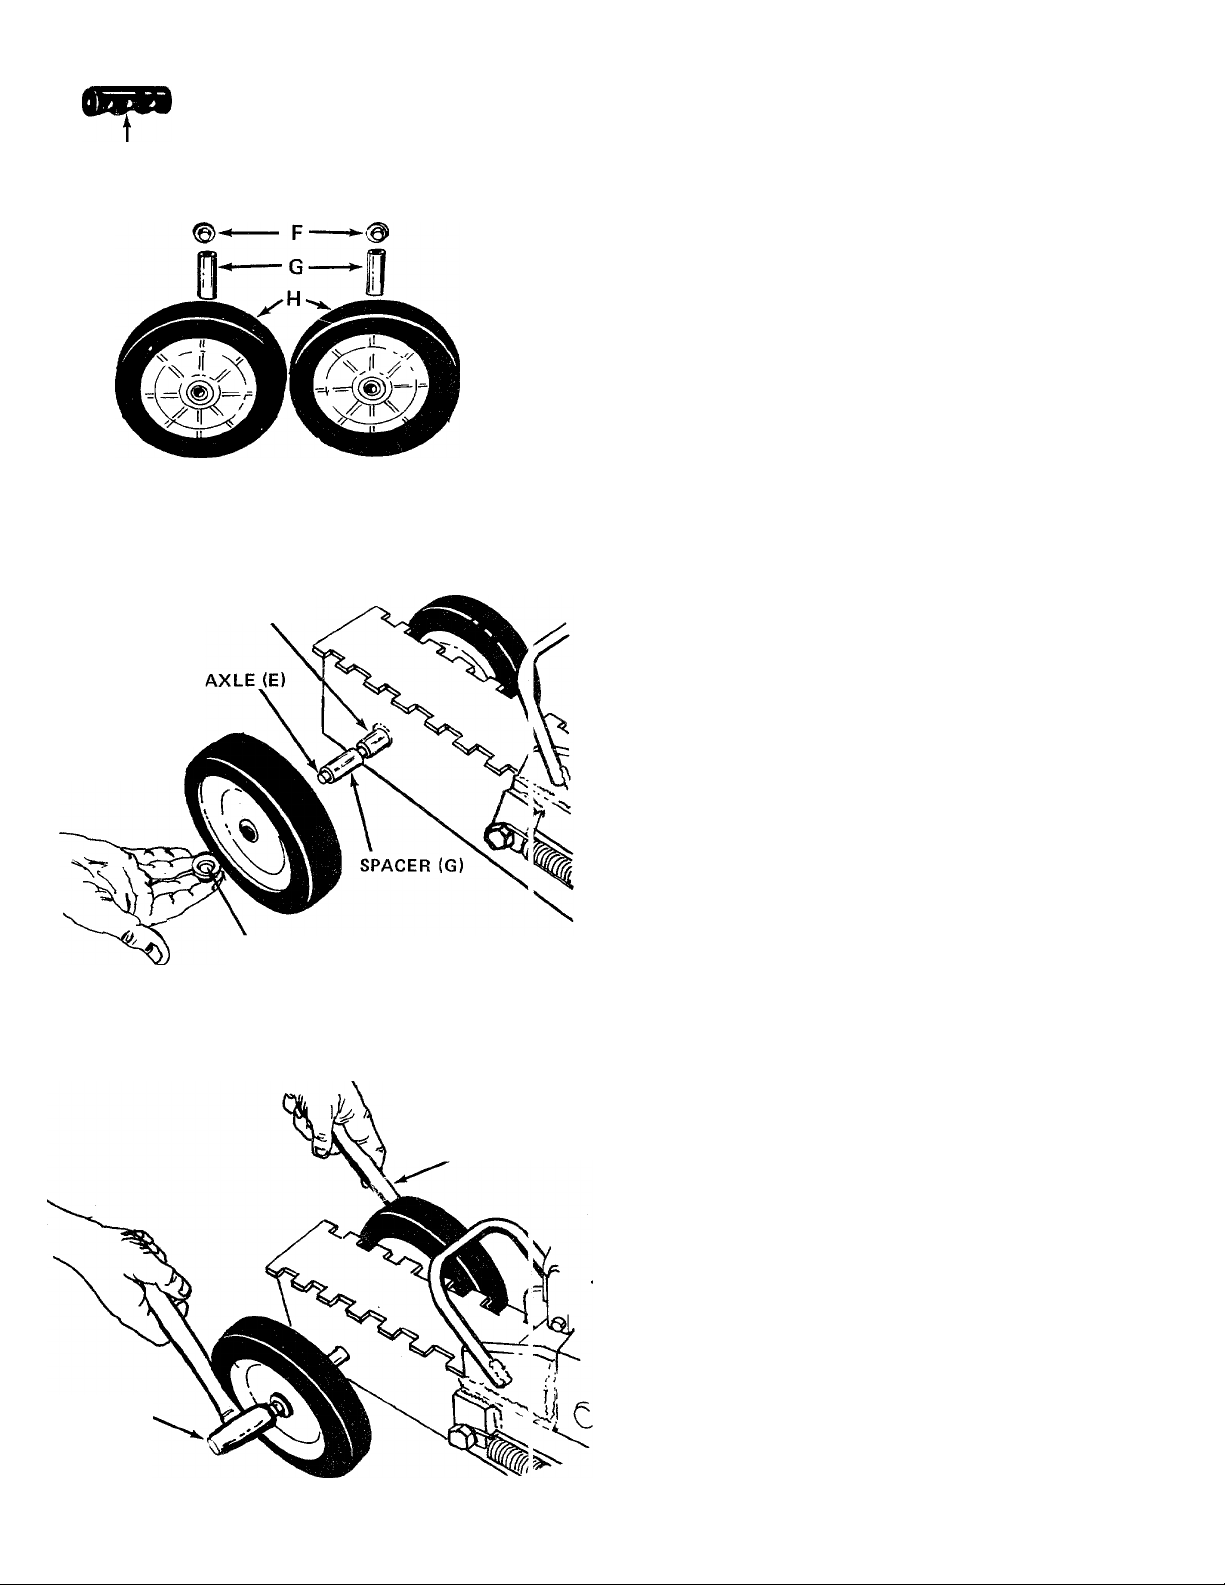
FIGURE 1
I—D
WELDED TUBE
ASSEMBLY INSTRUCTIONS
I
B
CONTENTS OF HARDWARE PACK AND LOOSE
- PARTS: (See Figure 1)
A (1) Handle Grip
B (1) Handle
C (1) Hairpin Cotter (may be rings)
D (1) Clevis Pin (may be pin)
E (1) Axle
F (2) Push on caps 1/2" Dia.
G (2) Spacers
H (2) Wheels
WHEEL (H)
FIGURE 2
\
PUSH ON CAP (F)
USE A SECOND
HAMMER, OR E LOCK
OF WOOD
1. Remove the log splitter, loose parts and literature
from carton. Check to be sure all parts are removed
from carton before discarding the carton.
2. Place the axle (E) through the welded tube on
splitter. See figure 2.
3. Next, place spacers (G) on each side of splitter,
over axle. See figure 2.
Next, place wheels (H) over each end of axle.
4.
See figure 3.
Secure wheels to axle with push on caps (F). A
5.
hammer and block of wood will be required to
hammer on the caps. See figures 2 and 3.
HAMMER'
FIGURE 3
Page 5

FIGURE 4
HANDLE ON
CYLINDER MOUNTING
ASSEMBLY
5. Lift the handle socket up so that the hole lines up
with the hole in plunger shaft. See figure 4.
6. Secure handle socket to plunger shaft with hair pin
(C) and clevis pin (D). See figure 4.
7. Place the handle grip (A) over one end of handle
(B). Warm soapy water will aid in assembly. Tap
grip on.
8. Place handle over handle socket.
OPERATION
This 8 ton capacity hydraulic unit is a special design,
manufactured for use one log splitter only.
1. This splitter can be adjusted manually for logs 8"
to 24" long. There are twelve different settings.
Settings are approximately 1-1/2" apart. See
figure 5.
2. Simply lift up on handle of cylinder mounting
assembly and slide the unit forward or backward
for the correct log length. See figure 5.
FIGURE 5
FIGURE 6
3. Pull the release valve up and back to lock. Then
-- handle can be pumped to split logs. See figure 6.
Page 6

Push the release valve down and forward to release
pressure. Cylinder will return, with the aid of two
return springs. See figure 7 and copy of label below.
FIGURE 7
FIGURES
CYLINDER RESEIIVOIR
SCREW AND WASHER
SCREWDRIVER HiVNDLE
HANDLE
DOWN TO .
RELEASE /
PRESSURE ^
/^A UP TO LOCK
/ 1 PUMP AND
------
y SPLIT
—5052
MAINTENANCE
RESERVOIR OIL
1. Lift the handle on the cylinder mounting assembly
and pull cylinder assembly all the way back to the
last notch. See figure 8.
2. Remove the pump handle.
3. Release the pressure in the cylinder.
4. Tip the log splitter up so it rests on the wheels and
handle on cylinder assembly. See figure 8.
5. With a standard screwdriver, remove screw anc
washer from cylinder reservoir. See figure 8. If oil
is up to hole, do not add any oil. If not, add oil to
bring level up to hole. Oil capacity is 10 fluid
ounces. Nuto H grade 32, or Exxon L.P.
conventional #150 Hydraulic oil.
6
Page 7

Notes
Page 8

Model 632
IF YOU WRITE TO US ABOUT THIS ARTICLE
OR IF YOU ORDER REPLACEMENT PARTS AL
WAYS MENTION THIS MODEL & SERIAL NO
Specifications subject to change without notice
or obligation.
MODEL
NOTE
Page 9

Model 632
J.
PART NO.
QUAN.
PARTS LIST FOR MODEL 632 LOG SPLITTER
NEW
DESCRIPTION
PART
REF.
NO.
PART NO. QUAN.
DESCRIPTION
NEW
PART
1
01166
2 747-0488 1
3 HW-66713
4 711-0599 1 Clevis Pin (Service
HW-66727 2
5
HW-66722
6
7 717-0614 1
781-0050 1
8
9 710-0925 2
10 781-0057 1 Cylinder Mounting
11
736-0169 2
1 Handle Grip
Handle 3/8" Dia. Rod N
1 Handle Socket
Only)
Pin & Ring Assembly N
2
Link N 17
Hydraulic Pump &
Cylinder
Push Plate Ass'y-
Socket Hd. Bolt 1/2-
13x .75" Lg. 21 712-0384 2
L.-Wash. 3/8" I.D.* 22 714-0149
13 732-0466
N 14 710-0820 2
734-1079 2
15
726-0221 2 1/2" Push Cap
16
750-0151
738-0584 1
18
N 19
20
781-0066
726-0221 2 1/2" Push Cap
2
Extension Spring .75"
O.D. X 10.75" Lg. N
Hex L.-Bolt 3/8-16 x
.75" Lg.*
Wheel 7.0" x 1.75"
2
Spacer
Axle 1/2" Dia. x 12"
Lg.
1
Tube and Rail Ass y. N
Hex Cent. L.-Nut 1/2-
13Thd.
1
Hair Pin Cotter (Service
12 710-0926 Socket Hd. Bolt 3/8- Only)
16 X .75" Lg.
*For faster service order standard nuts, bolts, and washers locally. If these items cannot be obtained locally, order by part number and size as shown on
parts list.
X
....
753-0389 1
Kit-Seal (See Below) N
N
PARTS IN SEAL-KIT 753-0389
REF.
NO.
1
Quad Ring
DESCRIPTION
2 Cup
Hair Pin Clip
Pin Ring
Back-Up Washer
5
"0"-Ring
6
REF.
NO.
Ball Retainer
7
Ball
8
9 Spring
Packing
10
Ball
11
Ball Retainer
12
Spring
13
DESCRIPTION
Page 10

Page 11

Page 12

MTD PRODUCTS INC
.................
P.O. BOX 36900 • CLEVELAND OHIO 44136
.................................
YaRD-MaN COMPANY
 Loading...