

MTD 241-521-000 User Manual

OWN№S GUIDE
ASSEMBLY • OPERATION • MAINTENANCE • PARTS
LOG SPLITTER
$1.00
Model Number
241-521-000
Important: Read Safety Rules and Instructions Carefully
WARNING: This unit is equipped with an internal combustion engine and should not be used
on or near any unimproved forest-covered, brush-covered or grass-covered land unless the
engine’s exhaust system is equipped with a spark arrester meeting applicable local or stats
laws (if any). If a spark arrester is used, it should be maintained in effective working order
by the operator.
In the State of California the above is required by law (Section 4442 of the California Public
Resources Code). Other states may have similar laws. Federal laws apply on federal lands.
In
AMERICA
A spark arrester for the muffler is available through your nearest engine authorized service
dealer or contact the service department, P.O. Box 360900, Cleveland, Ohio 44136.
PRINTED IN U.S.A.
FORM NO. 770-7386F
R910611

IMPORTANT INFORMATION
ALWAYS:
Use dean fluid and check fluid level regularly
Use Dexron II Automatic Transmission Fluid or
10W non-foaming hydraulic fluid.
Use a filter (clean or replace regularly)
Use a breather cap on fluid reservoir
Keep end of reservoir return tube below fluid level
Make certain pump is mounted and aligned properly
Use a flexible “spider" type coupling betweer engine
and pump driveshafts
Keep hoses clear and unblocked
Bleed air out of hoses before operating
Flush and clean hydraulic system before start up after
any malfunction or servicing
Use "pipe dope" on all hydraulic fittings
Allow time for warmup before splitting wood
Prime the pump before initial startup by turni ng over
the engine with spark plug disconnected
Split wood with the grain (lengthwise) only
FOR LOG SPLITTER USERS
NEVER;
Use fluid below 0® F., or above 150* F.
Use a solid engine/pump coupling
Force pump when mounting
Operate through relief valve for more than several
seconds
Attempt to adjust unloading or relief valve settings
without pressure gauges
Operate with air in hydraulic system
Use Teflon tape on hydraulic fittings
Warm up engine apart from pump in cold weather
Attempt to cut wood across the grain
CONDITIONS WHICH WILL VOID YOUR WARRANTY
Failure to maintain proper fluid level la reservoir will void your warranty, causing permanent damage to
1.
pump by allowing air to be drawn into piimp. Fluid will become foamy. Refer to “Initial Preparation" in the
Operation Section of this manual.
2. Changing the relief vaive setting or prc ssure adjustment of control valve without proper knowledge and
instruction from the factory will void your warranty. A very minor adjustment could destroy the structural and
safety limits for which the unit was designed. The system will produce more power than the structure will
withstand. Higher pressure could cause the hoses to burst, cylinder to rupture and intense fluid releases,
which could result in serious personal injury.
3. Disassembling the pump will void your warranty. If replacment is necessary, merely disconnect and replace.
Do not attempt to adjust pump settings, as they are adjusted by the manufacturer at the factory.
4. Use of incorrect hydraulic fluid will void your warranty. Use only Dexron II automatic transmission fluid or
10W non-foaming hydraulic fluid.
5. The flexible pump coupler must be ins pected regularly. Allowing the coupler to deteriorate will void your
warranty. Deterioration of spider insert and prolonged use after deterioration will destroy pump bearings and
engine bearings, along with total destru ction of coupler hubs.
Improper beam lubrication will cause premature wear and looseness. Lubricate the beam regularly. Lack
6
of lubrication will void your warranty.
Improper adjustment of splitting wedg»will void your warranty. Become familiar with the proper tolerance
7.
required for adjustment of the splitting v/edge as instructed in the adjustment section of this manual.
a. If wedge is too loose, cylinder beam and wedge wear will result. Allowing the wedge to loosen and be
used under operating stress will cauüe damage which will not be covered under warranty.
b. If wedge is too tight, severe beam damage will result which will not be covered under warranty.
8. Warranty card must be mailed or deliv ered directly to factory. Proper information must be completed and
mailed as per instructions. No warranty records on file may result in delay.
Do not overheat the hydraulic system. E xcessive heat will destroy the hydraulic system with hardened 0-rings
9.
and excessive friction.
Do not attempt to start in temperatun^s under 20* F. without pre-heating fluid in reservoir. Excessively
10.
cold fluid cannot circulate and draw intd pump. Warranty will be void.
Repair any leaks in hydraulic system iinmediately. Unattended leaks will cause air to enter system and/or
11
decre8ise fluid level in reservoir, causing c amage to the hydraulic system which will not be covered by warranty.

A
IMPORTANT
RULES FOR SAFE OPERATION
THIS SYMBOL POINTS OUT IMPORTANT SAFETY INSTRUCTIONS WHICH, IF NOT FOLLOWED, COULD ENDANGER THE PERSONAL
SAFETY AND/OR PROPERTY OF YOURSELF AND OTHERS. READ AND FOLLOW ALL INSTRUCTIONS IN THIS MANUAL BEFORE AT
TEMPTING TO OPERATE YOUR LOG SPLITTER. FAILURE TO COMPLY WITH THESE INSTRUCTIONS MAY RESULT IN PERSONAL IN
JURY. WHEN YOU SEE THIS SYMBOL-A HEED ITS WARNING.
▲
Your log splitter was built to be operated according to the rules for safe operation in this manual. As
with any type of power equipment, carelessness or error on the part of the operator can result in serious
injury, if you violate any of these rules, you may causa serious injury to yourself or others.
TRAINING
A
Before operating this splitter, read and understand this manual
completely. Become familiar with it for your own safety. To fail
to do so may cause serious injury. Do not allow anyone to operate
your splitter who has not read this manual. Keep this manual in
a safe place for future and regular reference and for ordering
replacement parts.
2. Never use your splitter for any other purpose than splitting wood.
It is designed for this use and any other use may cause an injury.
Your log splitter is a precision piece of power equipment, not a
playtoy. Therefore, excercise extreme caution at all times.
3. Never allow children to operate your log splitter. Do not allow adults
to operate it without proper instruction. Only persons well ac
quainted with these rules of safe operation should be allowed to
use your log splitter.
4. Only the operator is to be near your log splitter during use. Keep
all others, including pets and children, a minimum of 20 feet away
from your work zone. Flying wood can be hazardous. If a helper
is assisting in loading logs, never activate the control until the helper
is clear of the area. More accidents occur when more than one
person operates the log splitter than at any other time.
5. No one should operate this unit while intoxicated or while taking
medication that impairs the senses or reactions. A clear mind is
essential for safety. Never allow a person who is tired or other
wise not alert to use your splitter.
AC
DANGER
A
8. Only operate your splitter on level ground and not on the side of
a hill. It could tip, or rolling logs or poor footing could cause an
accident. Operating the splitter on level ground also prevents the
spillage of gasoline from the fuel tank.
9. Never attempt to move the log splitter over hilly or uneven terrain
without a tow vehicle or adequate help.
10. Always block the wheels to prevent movement of log splitter while
in operation.
11. Check the fuel before starting the engine. Gasoline is an extreme
ly flammable fuel. Do not fill the gasoline tank indoors, when the
engine is running, or while the engine is still hot. Replace gasoline
cap securely and wipe off any spilled gasoline before starting the
engine as it may cause a fire or explosion.
12. Both ends of each log must be cut as square as possible to help
prevent the log from riding out of the splitter during operation.
OPERATION
1. Stand behind the reservoir tank'when operating. See illustrations.
A
PREPARATION
1. Never wear loose clothing or jewelry that can be caught by mov
ing parts of your log splitter and puil you into it. Keep clothing
away from all moving parts of your log splitter.
2. Wear proper head gear to keep hair away from moving parts.
Always wear protective hearing devices as needed.
3. Always wear safety shoes. A dropped log can seriously injure your
foot.
4. Always wear safety glasses or goggles while operating your spiit-
ter. A piece of splitting log could fly off and hit your eyes.
5. If you wear gloves, be sure they are tight fitting without loose cuffs
or draw strings.
6. Use your log splitter in daylight, or under good artificial light.
7. Never operate your splitter on slippery, wet, muddy or icy sur
faces. Safe footing is essential in preventing accidents. Never
operate your splitter while attached to a towing vehicle.

2. Know how to stop the unit and disengage the controls.
3. Never place hands or feet between log and splitting wedge or be
tween log and end plate during forward or reverse stroke. To do
so may result in crushed or amputated fingers or toes, or worse,
you may lose an arm or foot.
4. Do not straddle the splitter when using it. A slip in any position
could result in a serious injury.
5. Do not step over your log splitter when the engine is runnir g. You
may trip or accidentally activate the splitting wedge if y( u step
over. If you need to get to the other side, walk around.
6. Never try to split two logs on top of each other. One may fly out
and injure you.
7. When loading the log splitter, place your hands on the sid< i of the
log, not at the ends. Never attempt to load your splitter w tile the
splitting wedge is in motion. You may get caught by the wedge
and injured.
8. Only use your hand to operate the splitting wedge or contrr I lever.
Never use your foot or a rope or any other extension devk e. This
could result in your ability to stop your splitter quickly mough
and cause injury.
9. Always keep fingers away from any cracks that open in the log
during splitting operation. They can quickly close and p nch or
amputate your fingers.
10. Never attempt to split woods across the grain. Some types i if wood
may burst or fly out of your splitter and result in injury to you
or a bystander.
11. For logs that are not cut square, the longest portion of the log
should be rotated down and the most square end placed against
the splitting wedge.
12. Keep your work area clean, immediately remove split wood around
your splitter so that you do not stumble over it. Clean chips and
dirt off end plate (wood platform) after each log is split, or w lenever
necessary to maintain flat contact between wood and end plate
(platform).
13. Never move the log splitter while the engine is running.
14. Never leave your log splitter unattended with the engine i unning.
Shut off the engine if you are leaving your splitter, even foi a short
period of time. Someone could accidentally activate the splitting
wedge and be injured.
15. Do not run engine in an enclosed area. Exhaust gases con :ain car
bon monoxide. This odorless gas can be deadly when nhaled.
16. Be careful not to touch the muffler after the engine has bi len run
ning as it is HOT.
17. If the equipment should start to vibrate abnormally, stop th i engine
and check immediately for the cause. Vibration is generallv a warn
ing of trouble.
18. When cleaning, repairing or inspecting, make certain ail moving
parts have stopped. Disconnect the spark plug wire and ieep the
wire away from the plug to prevent accidental starting
MAINTENANCE
A.
Do not operate your splitter in poor mechanical conditi( in or when
in need of repair.
2. Periodically check that all nuts, bolts, screws, hose clamps and
hydraulic fittings are tight to be sure equipment is in Sc fe working
condition. Where appropriate, check all safety guards and shields
to be sure they are in the proper position. Never operati your split
ter with safety guards, shields or other protective feature 3 removed.
These safety devices are for your protection.
3. Replace all damaged or worn parts such as hydraulic hoses and
fittings immediately with manufacturer approved replacement parts.
4. Do not change the engine governor settings or overspeed the
engine. This increases the hazard of personal injury. The max
imum engine speed is preset by the manufacturer and is withir
safety limits.
5. Do not alter your splitter in any manner such as attaching a rope
or extension to the control lever or adding to the width or height
of the wedge. Such alterations may cause your splitter to be unsafe.
6. Perform all recommended maintenance procedures before you use
your splitter.
7. Do not service or repair your log splitter without disconnecting
the spark plug wire.
8. Never store the equipment with gasoline in the tank Inside of a
building where ignition sources are present, such as hot water
and space heaters, clothes dryers and the like. Allow the engine
to cool before storing in any enclosure.
9. Always store gasoline in an approved, tightly sealed container.
Store the container in a cool, dry place. Do not store in a building
where ignition sources are present.
To reduce fire hazard, keep engine free of grass, leaves, wood
10
chips, and excessive grease and oil.
11. The hydraulic system of your log splitter requires careful inspec
tion, ¿ong with the mechanical parts. Be sure to replace frayed,
kinked, or otherwise damaged hydraulic components.
12. Fluid escaping from a very small hole can be almost invisible. Do
not check for leaks with your hand. Escaping fluid under pressure
can have sufficient force to penetrate skin, causing serious per
sonal injury. Leaks can be located by passing a piece of card
board or wood over the suspected leak and looking for
discoloration.
13. Should it become necessary to loosen or remove any hydraulic
fitting or line, be sure to relieve all pressure by shutting off th
engine and moving the control handle back and forth several times.
14. Do not remove the cap from the hydraulic tank or reservoir while
your log splitter is running. Hot oil under pressure could cause
injury.
15. The pressure relief valve on your splitter is preset at the factory.
Do not adjust the valve. Only a qualified service technician should
perform this adjustment.
Completely drain fuel tank prior to storage. This guards against
16
accumulation of fuel fumes which could result in a fire hazard.
17.
Never store log splitter outside without a waterproof cover. Rain
will cause rust on the inside of the cylinder.
A
TOWING
1. ‘ This unit should not be towed on any street, highway or public
road without checking the existing federal, local or state vehicle
requirements. Any licensing or modifications such as taillights,
etc., needed to comply with the existing federal, local or state
vehicle requirements is the sole responsibility of the purchaser.
2. Before towing, be certain the log splitter is correctly and securely
aiiaChed to the towing vehicle, and the safety chains are in place.
Leave slack in chains for turning allowance.
3. Do not allow anyone to sit or ride on your splitter. They can easily
fall off and be seriously injured.

ASSEMBLY INSTRUCTIONS
IMPORTANT: This unit has been shipped without
gasoiine or oil in the engine. After assembly, refer
S
to separate engine manual for proper fuel and
engine oil information.
Reservoir
•s
UNPACKING
Remove the log splitter parts from the carton by cut
ting the corners of the carton. Make certain all parts
and literature have been removed from the carton
before the carton is discarded.
All hardware for assembly of the log splitter has been
placed in position on the various parts.
■Parts in Carton (See figure 1)
Reservoir Tank Assembly
Engine and Pump Assembly (Bolted to bottom of
carton)
Tongue Assembly
Wedge, Beam and Cylinder Assembly
Hitch Assembly
Wheels
Tools Required for Assembly
(1) Rubber Mallet or Plastic Hammer
(2) 9/16" Wrenches*
(2) 1/2" Wrenches*
(1) Adjustable Wrench
(1) Screwdriver
*Ad]ustable Wrenches may be used.
Other Materials Required for Assembly:
Engine Oil
Unleaded Gasoline (regular grade gasoiine is an
acceptable substitute)
Approximately 4 Gallons of Dexron II Automatic
Transmission Fluid or 10W Non-Foaming Hydraulic
Fluid
INSTALLATION OF WHEELS
Attach the wheels to the reservoir tank assembly as
follows. See figure 2.
1.
Pry off the hub caps and dust covers which are at
tached to the wheels. Discard the dust covers (us
ed for shipping only).
Remove one tapered roller bearing from inside
2.
each wheel. See inset.
3.
Remove the cotter pin, hex slotted nut and flat
washer from each axle. Place one wheel on each
axle, with the valve stem facing outward.
4.
Pack the tapered roller bearings with wheel bear
ing grease, and place one on each axle.
■5.
Place one flat washer removed in step 2 on each
axle. Secure with hex slotted nut. Tighten sloted
nut until snug, then back off approximately 1 /3 turn
or until one of the slots on the slotted nut lines up
with the hole in the axle.
6.
Check the assembly of the wheels. There should
be no side to side play, and the wheel should spin
freely.
7.
Place hub caps in position on wheels and tap on
with a rubber mallet or plastic hammer.
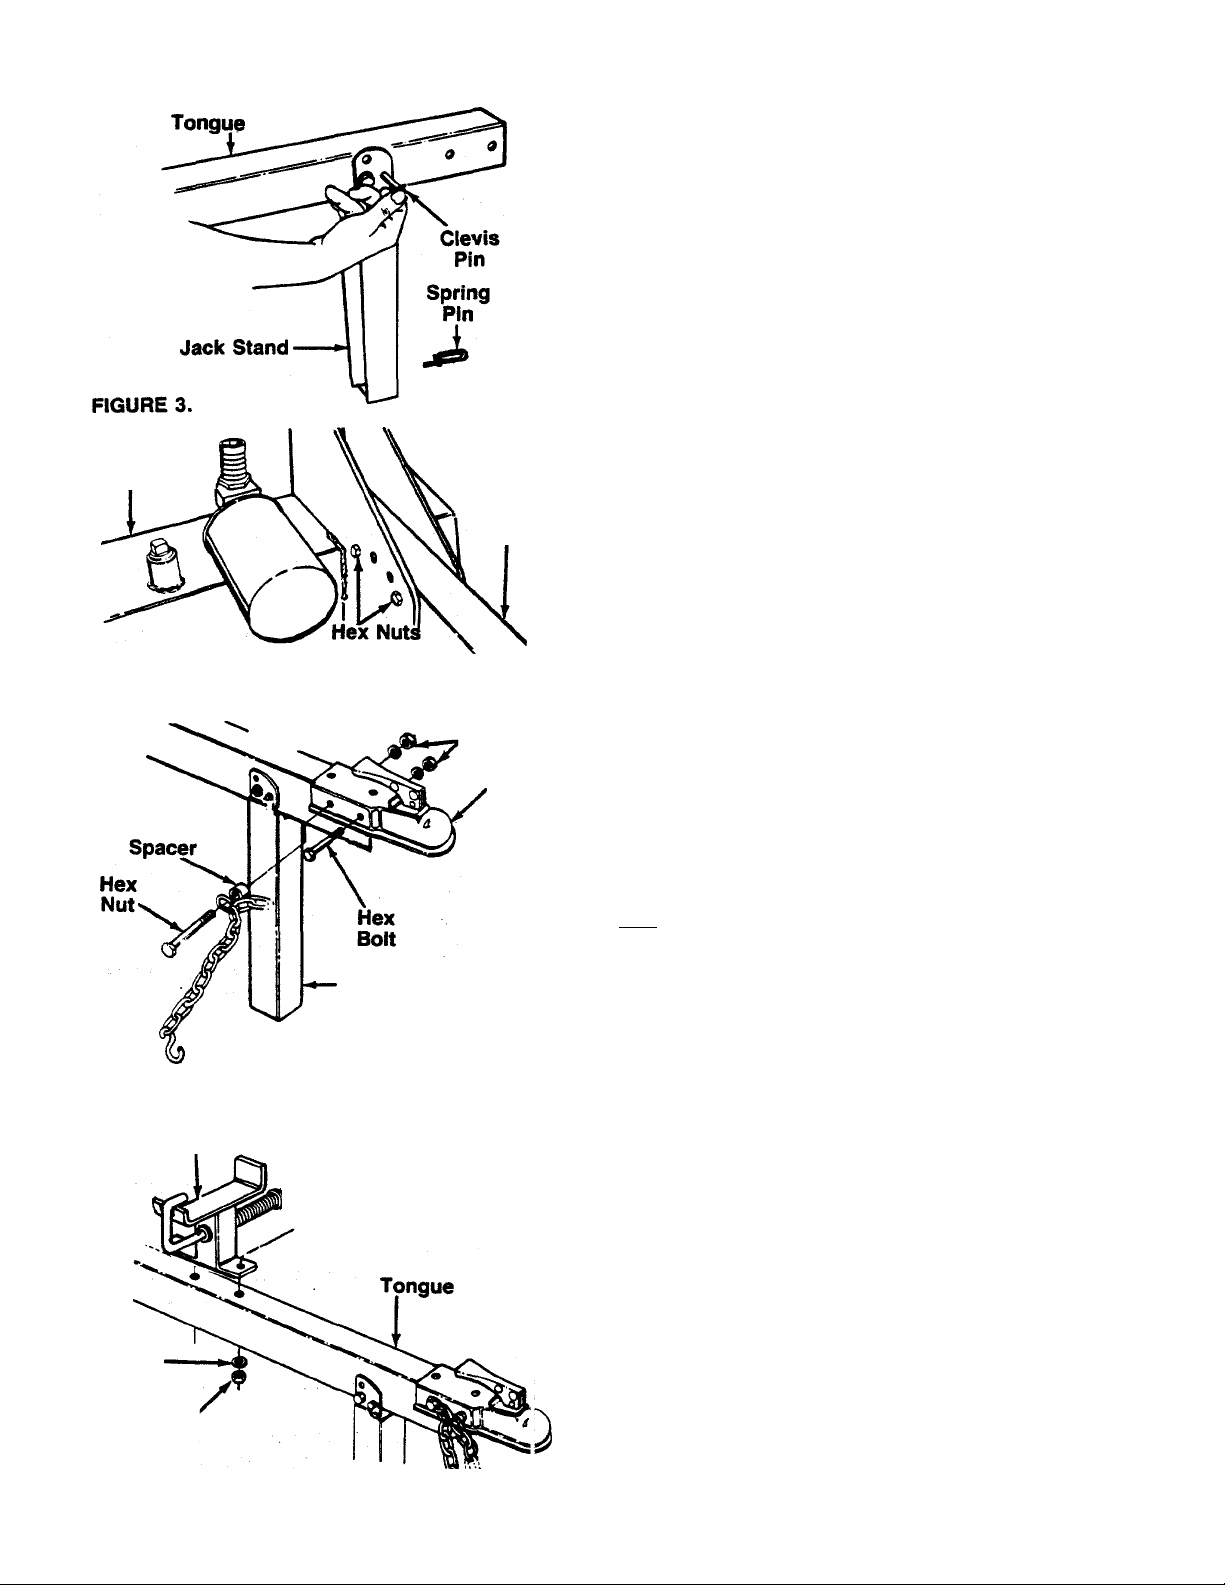
AHACHING TONGUE TO RESERVOIR TANK
1. The tongue is shipped with the jack stand already
attached to the tongue. The jack stand is in the
transport position. Remove the spring pin and
clevis pin. Pivot the jack stand to the operating
position (90®), and secure with the clevis pin and
---------
spring pin. See figure 3.
Reservoir
Tank
FIGURE 4.
FIGURE 5.
Beam Support/
Latch Bracket
Hex Bolts
Lock Washers
Jack Stand
Bolt
Ton 3ue
Hex Nuts
Lock Wasliers
Hitcf!
Remove the two hex bolts, lock washers and hex
nuts on the front of the reservoir tank. Two 9/16"
wrenches are required. Place the tongue in posi
tion, and secure with hardware just removed. See
-figure 4.
INSTALLING THE HITCH
1. Using two 9/16" wrenches, remove the two long
hex bolts, lock washers and hex nuts which are
assembled through the sides of the hitch. Do not
remove the chain and spacer from the one hex
bolt.
2.
....
Place the hitch in position on the end of the tongue
.........
-as shown in figure 5. Secure with hardware just
removed.
AHACHING THE WEDGE, BEAM AND CYLINDER ASSEMBLY
1. Stand the wedge, beam and cylinder assembly
upright.
2. Remove the cotter pin from the hinge pin, located
on top of the reservoir tank assembly. Move the
reservoir tank assembly in position against the
beam.
3. Insert hinge pin just removed through welded
brackets on beam and reservoir tank assembly.
Secure with cotter pin, bending the ends of the pin
in opposite directions.
Lock
Washer
Hex
Nut
FIGURE 6.
AHACHING THE BEAM SUPPDRT/LATCH BRACKET
1. Remove the two hex bolts, lock washers and hex
nuts from the tongue, using two 9/16" wrenches.
2. Place the beam support/latch bracket on the
tongue as shown in figure 6. Secure with hex bolts,
lock washers and hex nuts just removed. Tighten
securely.
 Loading...