

Page 1

Safe Operation Practices • Set-Up • Operation • Maintenance • Service • Troubleshooting • Warranty
L
Automatic Lawn Tractor m Model Series 760
MTD LLC, P.O. BOX 361131 CLEVELAND, OHiO 44136-0019
PrintedIn USA FormNo.769-05684
(December11,2009)
Page 2
ToTheOwner
ThankYou
1
Thank you for purchasing a lawn tractor manufactured by
MTD LLC. It was carefully engineered to provide excellent
performance when properly operated and maintained.
Please read this entire manual prior to operating the equipment.
It instructs you how to safely and easily set up, operate and
maintain your machine. Please be sure that you, and any other
persons who will operate the machine, carefully follow the
recommended safety practices at all times. Failure to do so could
result in personal injury or property damage.
All information in this manual is relative to the most recent
product information available at the time of printing. Review
this manual frequently to familiarize yourself with the machine,
its features and operation. Please be aware that this Operator's
Manual may cover a range of product specifications for various
models. Characteristics and features discussed and/or illustrated
in this manual may not be applicable to all models. MTD LLC
reserves the right to change product specifications, designs and
equipment without notice and without incurring obligation.
1"able of Contents
Safe Operation Practices ........................................ 3
Assembly & Set-Up .................................................. 9
Controls & Features ................................................ 12
Operation ................................................................ 13
Maintenance & Adjustment. ................................. 18
Service .................................................................... 22
If you have any problems or questions concerning the machine,
phone your local authorized MTD service dealer or contact us
directly. MTD's Customer Support telephone numbers, website
address and mailing address can be found on this page. We want
to ensure your complete satisfaction at all times.
Throughout this manual, all references to right and left side of the
machine are observed from the operating position
The engine manufacturer is responsible for all engine-related
issues with regards to performance, power-rating, specifications,
warranty and service. Please refer to the engine manufacturer's
Owner's/Operator's Manual, packed separately with your
machine, for more information.
Troubleshooting .................................................... 27
Replacement Parts ................................................ 28
Attachments & Accessories .................................. 29
CA. Emission Control Statement .......................... 30
Warranty ................................................................ 32
RecordProductinformation
Before setting up and operating your new equipment, please
locate the model plate on the equipment and record the
information in the provided area to the right. You can locate the
model plate by looking beneath the seat. This information will
be necessary, should you seek technical support via our web
site, Customer Support Department, or with a local authorized
service dealer.
MODEL NUMBER
DNDNDNDNDND
SERIALNUMBER
DFI[3FI[3FI[3FI[3F1D
CustomerSupport
Please do NOT return the machine to the retailer or dealer without first contacting our Cu;tomer Support Department.
If you have difficulty assembling this product or have any questions regarding the controls, operation, or maintenance of
this machine, you can seek help from the experts. Choose from the options below:
0 Visit us on the web at www.mtdproducts.com
0 Call a Customer Support Representative at (800) 800-7310 or (330) 220-4683
0 Write us at MTD LLC • RO. Box 361131 • Cleveland, OH • 44136-0019
Page 3
ImportantSafeOperationPractices
WARNING! This symbol points out important safety instructions which, if not followed,
could endanger the personal safety and/or property of yourself and others. Read and follow
all instructions in this manual before attempting to operate this machine. Failure to comply
with these instructions may result in personal injury.
When you see this symbol. HEED ITS WARNING!
CALIFORNIA PROPOSITION 65
WARNING! Engine Exhaust, some of its constituents, and certain vehicle components
contain or emit chemicals known to State of California to cause cancer and birth defects
or other reproductive harm.
WARNING! Battery posts, terminals, and related accessories contain lead and lead
,A
compounds, chemicals known to the State of California to cause cancer and reproductive
harm. Wash hands after handling
DANGER! This machine was built to be operated according to the safe operation practices in
this manual. As with any type of power equipment, carelessness or error on the part of the
operator can result in serious injury. This machine is capable of amputating hands and feet
and throwing objects. Failure to observe the following safety instructions could result in
serious injury or death.
2
GeneralOperation
1. Read, understand, and follow all instructions on the
machine and in the manual(s) before attempting to
assemble and operate. Keep this manual in a safe place for
future and regular reference and for ordering replacement
parts.
2. Be familiar with all controls and their proper operation.
Know how to stop the machine and disengage them
quickly.
3. Never allow children under 14 years of age to operate this
machine. Children 14 and over should read and understand
the instructions and safe operation practices in this manual
and on the machine and should be trained and supervised
by an adult.
4. Never allow adults to operate this machine without proper
instruction.
5_
To help avoid blade contact or a thrown object injury,
keep bystanders, helpers, children and pets at least 75 feet
from the machine while it is in operation. Stop machine if
anyone enters the area.
6. Thoroughly inspect the area where the equipment is to be
used. Remove all stones, sticks, wire, bones, toys, and other
foreign objects which could be picked up and thrown by
the blade(s). Thrown objects can cause serious personal
injury.
7. Plan your mowing pattern to avoid discharge of material
toward roads, sidewalks, bystanders and the like. Also,
avoid discharging material against a wall or obstruction
which may cause discharged material to ricochet back
toward the operator.
8. Always wear safety glasses or safety goggles during
operation and while performing an adjustment or repair
to protect your eyes. Thrown objects which ricochet can
cause serious injury to the eyes.
9. Wear sturdy, rough-soled work shoes and close-fitting
slacks and shirts. Loose fitting clothes and jewelry can be
caught in movable parts. Never operate this machine in
bare feet or sandals.
10. Be aware of the mower and attachment discharge direction
and do not point it at anyone. Do not operate the mower
without the discharge cover or entire grass catcher in its
proper place.
11. Do not put hands or feet near rotating parts or under the
cutting deck. Contact with the blade(s) can amputate
hands and feet.
Page 4

12. Amissingordamageddischargecovercancauseblade
contactorthrownobjectinjuries.
13. Stoptheblade(s)whencrossinggraveldrives,walks,or
roadsandwhilenotcuttinggrass.
14. Watchfortrafficwhenoperatingnearorcrossing
roadways.Thismachineisnotintendedforuseonany
publicroadway.
15. Donotoperatethemachinewhileundertheinfluenceof
alcoholordrugs.
16. Mowonlyindaylightorgoodartificiallight.
17. Nevercarrypassengers.
18. Disengageblade(s)beforeshiftingintoreverse.Backup
slowly.Alwayslookdownandbehindbeforeandwhile
backingtoavoidaback-overaccident.
19. Slowdownbeforeturning.Operatethemachinesmoothly.
Avoiderraticoperationandexcessivespeed.
20. Disengageblade(s),setparkingbrake,stopengineandwait
untiltheblade(s)cometoacompletestopbeforeremoving
grasscatcher,emptyinggrass,uncloggingchute,removing
anygrassordebris,ormakinganyadjustments.
21. Neverleavearunningmachineunattended.Alwaysturn
offblade(s),placetransmissioninneutral,setparking
brake,stopengineandremovekeybeforedismounting.
22. Useextracarewhenloadingorunloadingthemachineinto
atrailerortruck.Thismachineshouldnotbedrivenupor
downramp(s),becausethemachinecouldtipover,causing
seriouspersonalinjury.Themachinemustbepushed
manuallyonramp(s)toloadorunloadproperly.
23.
Mufflerandenginebecomehotandcancauseaburn.Do
nottouch.
24.
Checkoverheadclearancescarefullybeforedrivingunder
lowhangingtreebranches,wires,dooropeningsetc.,
wheretheoperatormaybestruckorpulledfromthe
machine,whichcouldresultinseriousinjury.
25.
Disengageallattachmentclutches,depressthebrake
pedalcompletelyandshiftintoneutralbeforeattempting
tostartengine.
26.
Your machine is designed to cut normal residential grass of
a height no more than 10". Do not attempt to mow through
unusually tall, dry grass (e.g., pasture) or piles of dry leaves.
Dry grass or leaves may contact the engine exhaust and/
or build up on the mower deck presenting a potential fire
hazard.
27. Use only accessories and attachments approved for this
machine by the machine manufacturer. Read, understand
and follow all instructions provided with the approved
accessory or attachment.
28. Data indicates that operators, age 60 years and above, are
involved in a large percentage of riding mower-related
injuries. These operators should evaluate their ability
to operate the riding mower safely enough to protect
themselves and others from serious injury.
29. If situations occur which are not covered in this manual, use
care and good judgment. Contact your customer service
representative for assistance.
SlopeOperation
Slopes are a major factor related to loss of control and tip-over
accidents which can result in severe injury or death. All slopes
require extra caution. If you cannot back up the slope or if you
feel uneasy on it, do not mow it.
For your safety, use the slope gauge included as part of this
manual to measure slopes before operating this machine on
a sloped or hilly area. If the slope is greater than 15 degrees as
shown on the slope gauge, do not operate this machine on that
area or serious injury could result.
Do:
1. Mow up and down slopes, not across. Exercise extreme
caution when changing direction on slopes.
2. Watch for holes, ruts, bumps, rocks, or other hidden
objects. Uneven terrain could overturn the machine. Tall
grass can hide obstacles.
3. Use slow speed. Choose a low enough speed setting so
that you will not have to stop or shift while on the slope.
Tires may lose traction on slopes even though the brakes
are functioning properly. Always keep machine in gear
when going down slopes to take advantage of engine
braking action.
4. Follow the manufacturer's recommendations for wheel
weights or counterweights to improve stability.
5. Use extra care with grass catchers or other attachments.
These can change the stability of the machine.
6. Keep all movement on the slopes slow and gradual. Do
not make sudden changes in speed or direction. Rapid
engagement or braking could cause the front of the
machine to lift and rapidly flip over backwards which could
cause serious injury.
7. Avoid starting or stopping on a slope. If tires lose traction,
disengage the blade(s) and proceed slowly straight down
the slope.
DoNot:
1. Do not turn on slopes unless necessary; then, turn slowly
and gradually downhill, if possible.
2. Do not mow near drop-offs, ditches or embankments. The
mower could suddenly turn over if a wheel is over the edge
of a cliff, ditch, or if an edge caves in.
3. Do not try to stabilize the machine by putting your foot on
the ground.
4. Do not use a grass catcher on steep slopes.
5. Do not mow on wet grass. Reduced traction could cause
sliding.
6. Do not shift to neutral and coast downhill. Over-speeding
may cause the operator to lose control of the machine
resulting in serious injury or death.
7. Do not tow heavy pull behind attachments (e.g. loaded
dump cart, lawn roller, etc.) on slopes greater than 5
degrees. When going down hill, the extra weight tends
to push the tractor and may cause you to loose control
(e.g. tractor may speed up, braking and steering ability are
reduced, attachment may jack-knife and cause tractor to
overturn).
4 I SECTION 2 -- IMPORTANT SAFE OPERATION PRACTICES
Page 5
Children
1.
Tragic accidents ca n occur if the operator is not alert to the
presence of children. Children are often attracted to the
machine and the mowing activity. They do not understand
the dangers. Never assume that children will remain where
you last saw them.
a. Keep children out of the mowing area and in
watchful care of a responsible adult other than the
operator.
b. Be alert and turn machine off if a child enters the
area.
c. Before and while backing, look behind and down for
small children.
d. Never carry children, even with the blade(s) shut off.
They may fall offand be seriously injured or interfere
with safe machine operation.
e. Use extreme care when approaching blind corners,
doorways, shrubs, trees or other objects that may
blockyour vision of a child who may run into the
path of the machine.
f. To avoid back-over accidents, always disengage
the cutting blade(s) before shifting into Reverse.
If equipped, the "Reverse Caution Mode" should
not be used when children or others are around.
g. Keep children away from hot or running engines.
They can suffer burns from a hot muffler.
h. Remove key when machine is unattended to
prevent unauthorized operation.
2.
Never allow children under 14 years of age to operate this
machine. Children 14 and over should read and understand
the instructions and safe operation practices in this manual
and on the machine and should be trained and supervised
by an adult.
Towing
1. Tow only with a machine that has a hitch designed for
towing. Do not attach towed equipment except at the
hitch point.
2. Follow the manufacturers recommendation for weight
limits for towed equipment and towing on slopes.
3. Never allow children or others in or on towed equipment.
4. On slopes, the weight of the towed equipment may cause
loss of traction and loss of control.
5. Always use extra caution when towing with a machine
capable of making tight turns (e.g. "zero-turn" ride-on
mower). Make wide turns to avoid jack-knifing.
6. Travel slowly and allow extra distance to stop.
7. Do not shift to neutral and coast downhill.
Service
SafeHandling of Gasoline:
1. To avoid personal injury or property damage use extreme
care in handling gasoline. Gasoline is extremely
flammable and the vapors are explosive. Serious
personal injury can occur when gasoline is spilled on
yourself or your clothes which can ignite. Wash your skin
and change clothes immediately.
a. Use only an approved gasoline container.
b. Never fill containers inside a vehicle or on a truck
or trailer bed with a plastic liner. Always place
containers on the ground away from your vehicle
before filling.
c. When practical, remove gas-powered equipment
from the truck or trailer and refuel it on the ground.
If this is not possible, then refuel such equipment on
a trailer with a portable container, rather than from a
gasoline dispenser nozzle.
d. Keep the nozzle in contact with the rim of the fuel
tank or container opening at all times until fueling is
complete. Do not use a nozzle lock-open device.
e. Extinguish all cigarettes, cigars, pipes and other
sources of ignition.
f. Never fuel machine indoors.
g. Never remove gas cap or add fuel while the engine
is hot or running. Allow engine to cool at least two
minutes before refueling.
h. Never over fill fuel tank. Fill tank to no more than 1/2
inch below bottom of filler neck to allow space for
fuel expansion.
i. Replace gasoline cap and tighten securely.
j. If gasoline is spilled, wipe it off the engine and
equipment. Move machine to another area. Wait 5
minutes before starting the engine.
k. To reduce fire hazards, keep machine free of grass,
leaves, or other debris build-up. Clean up oil or fuel
spillage and remove any fuel soaked debris.
I. Never store the machine or fuel container inside
where there is an open flame, spark or pilot light
as on a water heater, space heater, furnace, clothes
dryer or other gas appliances.
m. Allow a machine to cool at least five minutes before
storing.
GeneralService
1. Never run an engine indoors or in a poorly ventilated area.
Engine exhaust contains carbon monoxide, an odorless,
and deadly gas.
2. Before cleaning, repairing, or inspecting, make certain the
blade(s) and all moving parts have stopped. Disconnect the
spark plug wire and ground against the engine to prevent
unintended starting.
SECTION 2 -- IMPORTANT SAFE OPERATION PRACTICES S
Page 6
3.
Periodically check to make sure the blades come to
complete stop within approximately (5) five seconds after
operating the blade disengagement control. If the blades
do not stop within the this time frame, your machine
should be serviced professionally by an authorized MTD
Service Dealer.
4. Check brake operation frequently as it is subjected to wear
during normal operation. Adjust and service as required.
5. Check the blade(s) and engine mounting bolts at frequent
intervals for proper tightness. Also, visually inspect blade(s)
for damage (e.g., excessive wear, bent, cracked). Replace
the blade(s) with the original equipment manufacturer's
(O.E.M.) blade(s) only, listed in this manual. "Use of parts
which do not meet the original equipment specifications
may lead to improper performance and compromise
safety!"
6. Mower blades are sharp. Wrap the blade or wear gloves,
and use extra caution when servicing them.
7. Keep all nuts, bolts, and screws tight to be sure the
equipment is in safe working condition.
8. Never tamper with the safety interlock system or other
safety devices. Check their proper operation regularly.
9. After striking a foreign object, stop the engine, disconnect
the spark plug wire(s) and ground against the engine.
Thoroughly inspect the machine for any damage. Repair
the damage before starting and operating.
10. Never attempt to make adjustments or repairs to the
machine while the engine is running.
11. Grass catcher components and the discharge cover are
subject to wear and damage which could expose moving
parts or allow objects to be thrown. For safety protection,
frequently check components and replace immediately
with original equipment manufacturer's (O.E.M.) parts only,
listed in this manual. "Use of parts which do not meet the
original equipment specifications may lead to improper
performance and compromise safety!"
12. Do not change the engine governor settings or over-speed
the engine. The governor controls the maximum safe
operating speed of the engine.
13. Maintain or replace safety and instruction labels, as
necessary.
14. Observe proper disposal laws and regulations for gas, oil,
etc. to protect the environment.
15. According to the Consumer Products Safety Commission
(CPSC) and the U.S. Environmental Protection Agency (EPA),
this product has an Average Useful Life of seven (7) years,
or 270 hours of operation. At the end of the Average Useful
Life have the machine inspected annually by an authorized
service dealer to ensure that all mechanical and safety
systems are working properly and not worn excessively.
Failure to do so can result in accidents, injuries or death.
Donot modify engine
To avoid serious injury or death, do not modify engine in any
way. Tampering with the governor setting can lead to a runaway
engine and cause it to operate at unsafe speeds. Never tamper
with factory setting of engine governor.
Notice Regarding Emissions
Engines which are certified to comply with California and federal
EPA emission regulations for SORE (Small Off Road Equipment)
are certified to operate on regular unleaded gasoline, and
may include the following emission control systems: Engine
Modification (EM), Oxidizing Catalyst (OC), Secondary Air
Injection (SAI) and Three Way Catalyst (TWC) if so equipped.
SparkArrestor
internal combustion engine and should not be used
_ ARNING! This machine is equipped with an
Ifa spark arrester is used, it should be maintained in effective
working order by the operator. In the State of California the
above is required by law (Section 4442 of the California Public
Resources Code). Other states may have similar laws. Federal laws
apply on federal lands.
A spark attester for the muffler is available through your
nearest engine authorized service dealer or contact the service
department, RO. Box 361131 Cleveland, Ohio 44136-0019.
on or near any unimproved forest-covered,
brushcovered or grass-covered land unless the
engine's exhaust system is equipped with a spark
arrester meeting applicable local or state laws (if
any).
WARNING! Your Responsibility--Restrict the use of this power machine to persons who read, understand and
follow the warnings and instructions in this manual and on the machine.
6 J SECTION 2 -- IMPORTANT SAFE OPERATION PRACTICES
SAVETHESEiNSTRUCTIONS!
Page 7
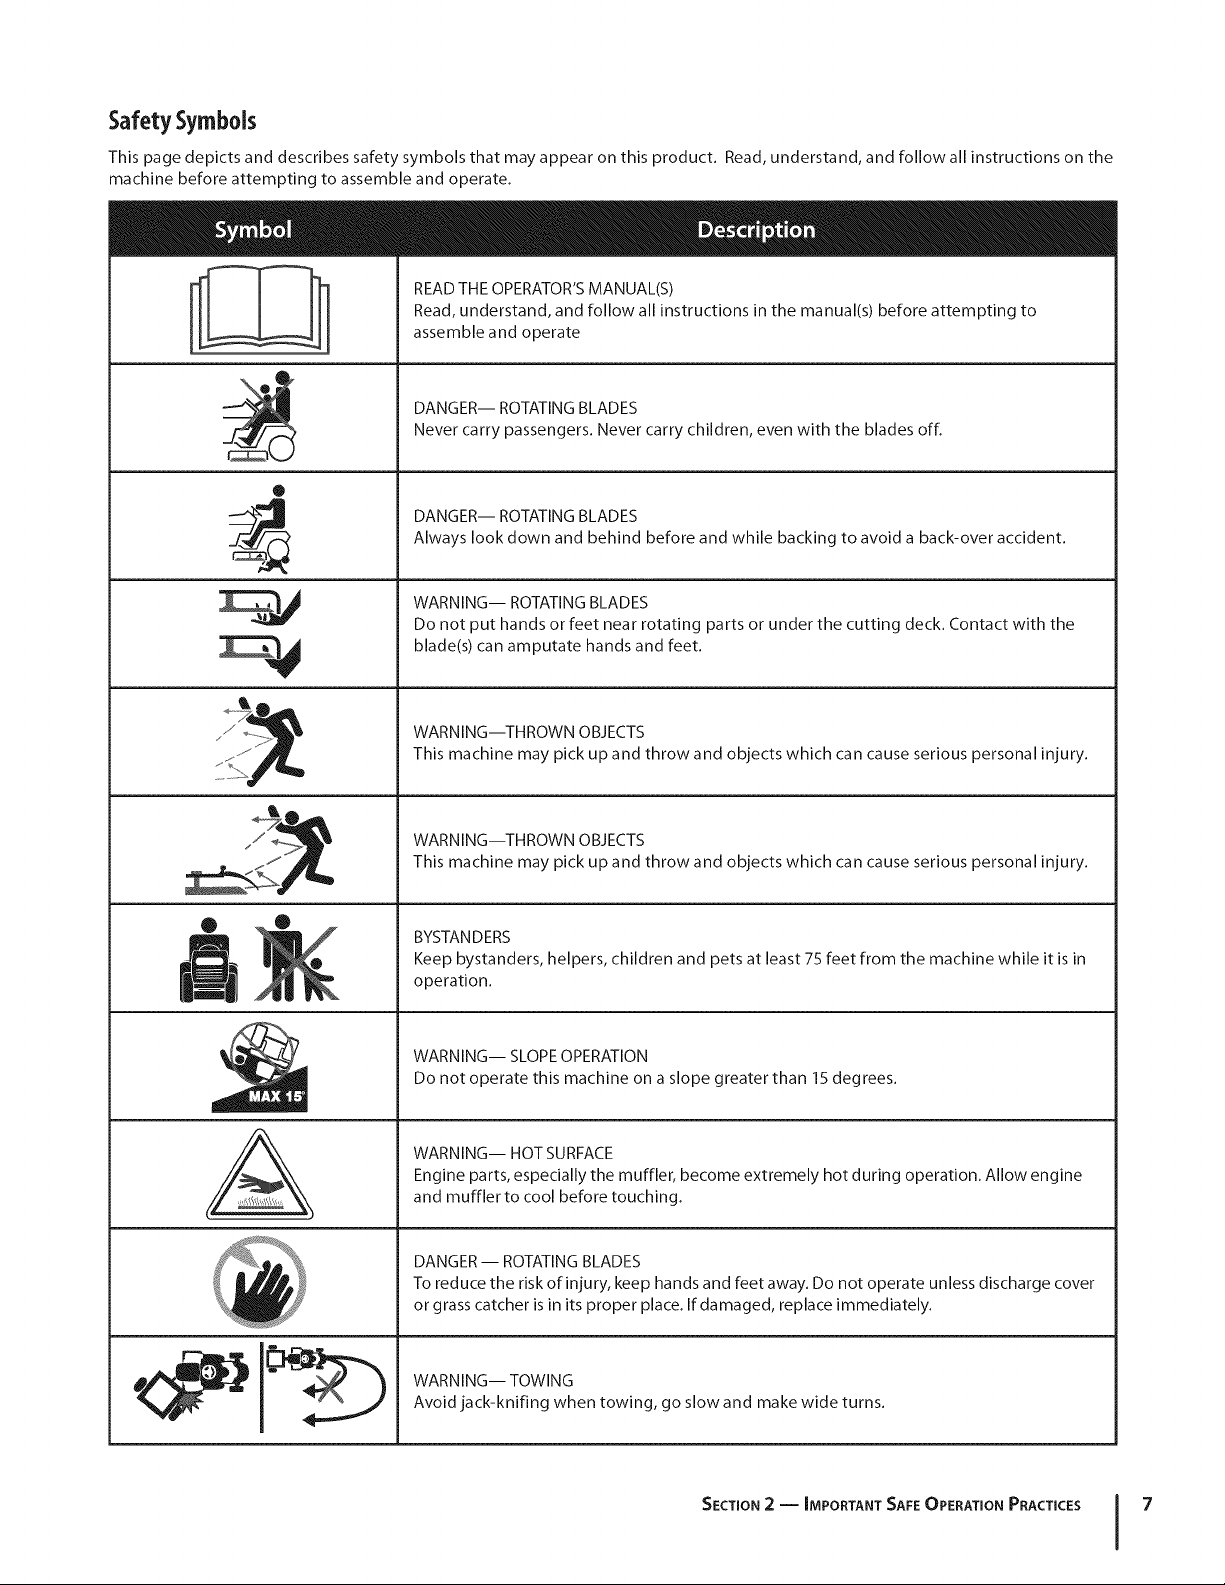
Safety Symbols
This page depicts and describes safety symbols that may appear on this product. Read, understand, and follow all instructions on the
machine before attempting to assemble and operate.
READ THE OPERATOR'S MANUAL(S)
Read, understand, and follow all instructions in the manual(s) before attempting to
assemble and operate
DANGER-- ROTATING BLADES
Never carry passengers. Never carry children, even with the blades off.
O
DANGER-- ROTATING BLADES
Always look down and behind before and while backing to avoid a back-over accident.
J
J
Lq
M
N
A
WARNING-- ROTATING BLADES
Do not put hands or feet near rotating parts or under the cutting deck. Contact with the
blade(s) can amputate hands and feet.
WARNING--THROWN OBJECTS
This machine may pick up and throw and objects which can cause serious personal injury.
WARNING--THROWN OBJECTS
This machine may pick up and throw and objects which can cause serious personal injury.
BYSTANDERS
Keep bystanders, helpers, children and pets at least 75 feet from the machine while it is in
operation.
WARNING-- SLOPE OPERATION
Do not operate this machine on a slope greater than 15 degrees.
WARNING-- HOT SURFACE
Engine parts, especially the muffler, become extremely hot during operation. Allow engine
and muffler to cool before touching.
DANGER -- ROTATING BLADES
To reduce the risk of injury, keep hands and feet away. Do not operate unless discharge cover
or grass catcher is in its proper place. If damaged, replace immediately.
WARNING-- TOWING
Avoid jack-knifing when towing, go slow and make wide turns.
SECTION 2 -- IMPORTANT SAFE OPERATION PRACTICES 7
Page 8
co
-4
6
Z
I
Z
O
6
Z
"o
-4
I
|
I I
I |
' /:Oldo,_ ',
' " .- 22
' diine
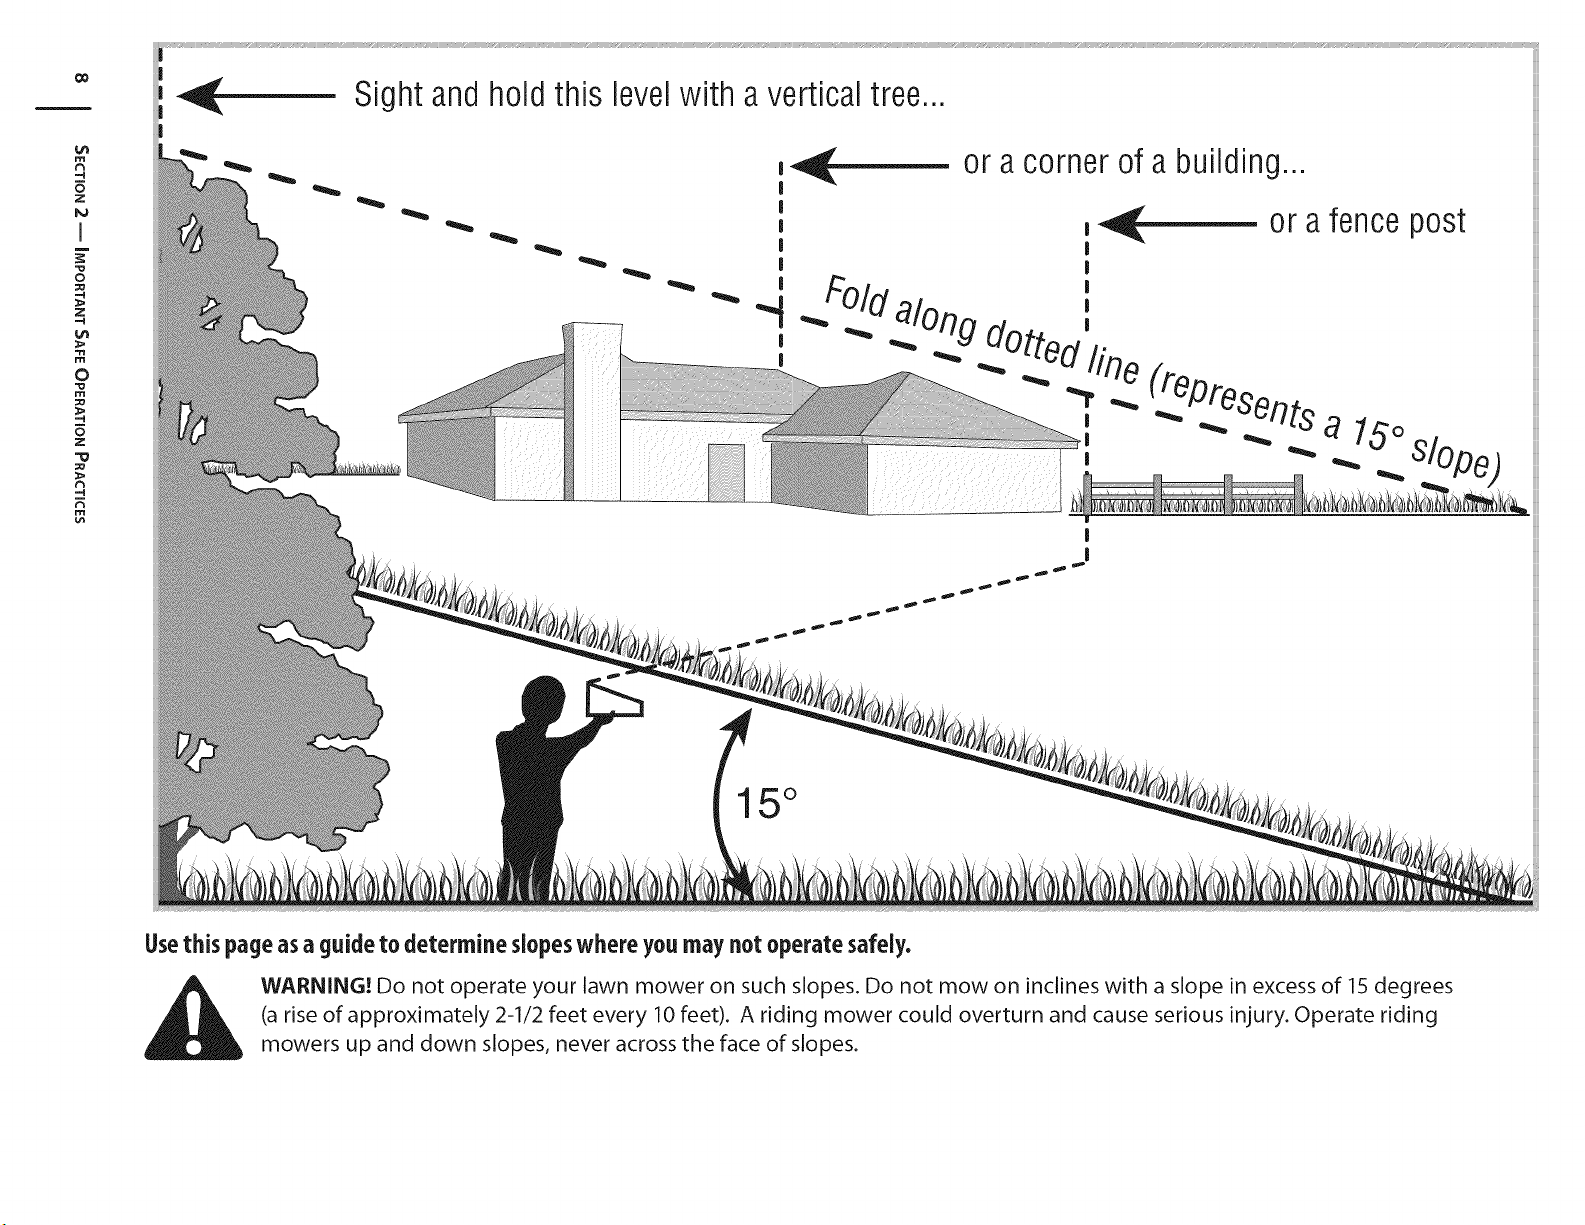
or a corner of a building...I
,_ or a fence post
.I
' a 15Oslope
I
I
15°
Usethis page as a guide to determine slopes where you may not operate safely.
WARNING! Do not operate your lawn mower on such slopes. Do not mow on inclines with a slope in excess of 15 degrees
(a rise of approximately 2-1/2 feet every 10 feet). A riding mower could overturn and cause serious injury. Operate riding
mowers up and down slopes, never across the face of slopes.
Page 9
Assembly&Set-Up
3
TractorSet-Up
NOTE:This Operators Manual covers a range of product
specifications for various models. Characteristics and features
discussed and/or illustrated in this manual may not be applicable
to all models. MTD LLC reserves the right to change product
specifications, designs and equipment without notice and
without incurring obligation.
Connectingthe BatteryCables
CALIFORNIA PROPOSITION 65 WARNING:
Battery posts, terminals, and related accessories
contain lead and lead compounds, chemicals known
to the State of California to cause cancer and
reproductive harm. Wash hands after handling.
CAUTION: When attaching battery cables, always
connect the POSITIVE (Red) wire to its terminal first,
followed by the NEGATIVE (Black) wire.
For shipping reasons, both battery cables on your equipment
may have been left disconnected from the terminals at the
factory. To connect the battery cables, proceed as follows:
NOTE:The positive battery terminal is marked Pos. (+). The
negative battery terminal is marked Neg. (-).
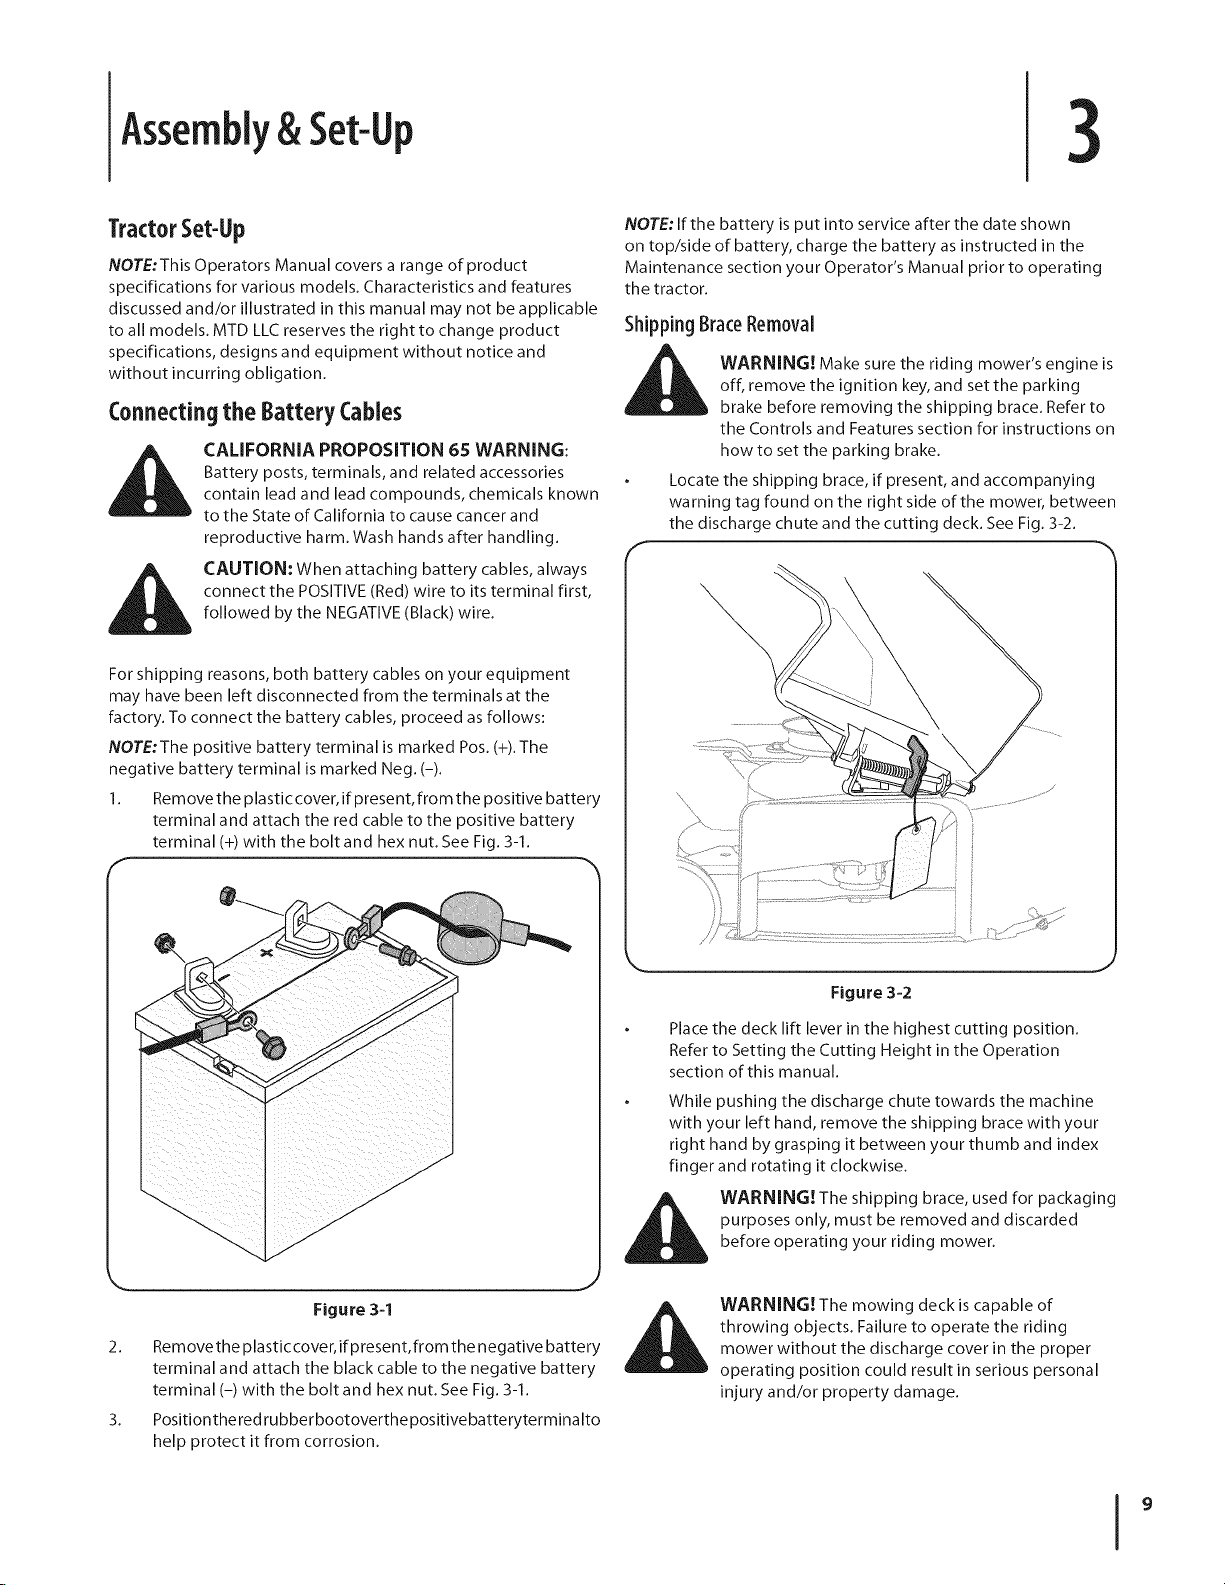
1. Remove the plastic cover, if present, from the positive battery
terminal and attach the red cable to the positive battery
terminal (+) with the bolt and hex nut. See Fig. 3-1.
NOTE: If the battery is put into service after the date shown
on top/side of battery, charge the battery as instructed in the
Maintenance section your Operator's Manual prior to operating
the tractor.
Shipping BraceRemoval
_ ARNING! Make sure the riding mower's engine is
off, remove the ignition key, and set the parking
brake before removing the shipping brace. Refer to
the Controls and Features section for instructions on
how to set the parking brake.
Locate the shipping brace, if present, and accompanying
warning tag found on the right side of the mower, between
the discharge chute and the cutting deck. See Fig. 3-2.
f
\
Figure 3-1
2. Removethe plasticcover, ifpresent, from the negative battery
terminal and attach the black cable to the negative battery
terminal (-) with the bolt and hex nut. See Fig. 3-1.
3. Positionthe red rubberbootoverthe positivebatteryterminalto
help protect it from corrosion.
Figure 3-2
Place the deck lift lever in the highest cutting position.
Refer to Setting the Cutting Height in the Operation
section of this manual.
While pushing the discharge chute towards the machine
with your left hand, remove the shipping brace with your
right hand by grasping it between your thumb and index
finger and rotating it clockwise.
i_li WARNING! The shipping brace, used for packaging
purposes only, must be removed and discarded
before operating your riding mower.
WARNING! The mowing deck is capable of
throwing objects. Failure to operate the riding
mower without the discharge cover in the proper
operating position could result in serious personal
injury and/or property damage.
Page 10
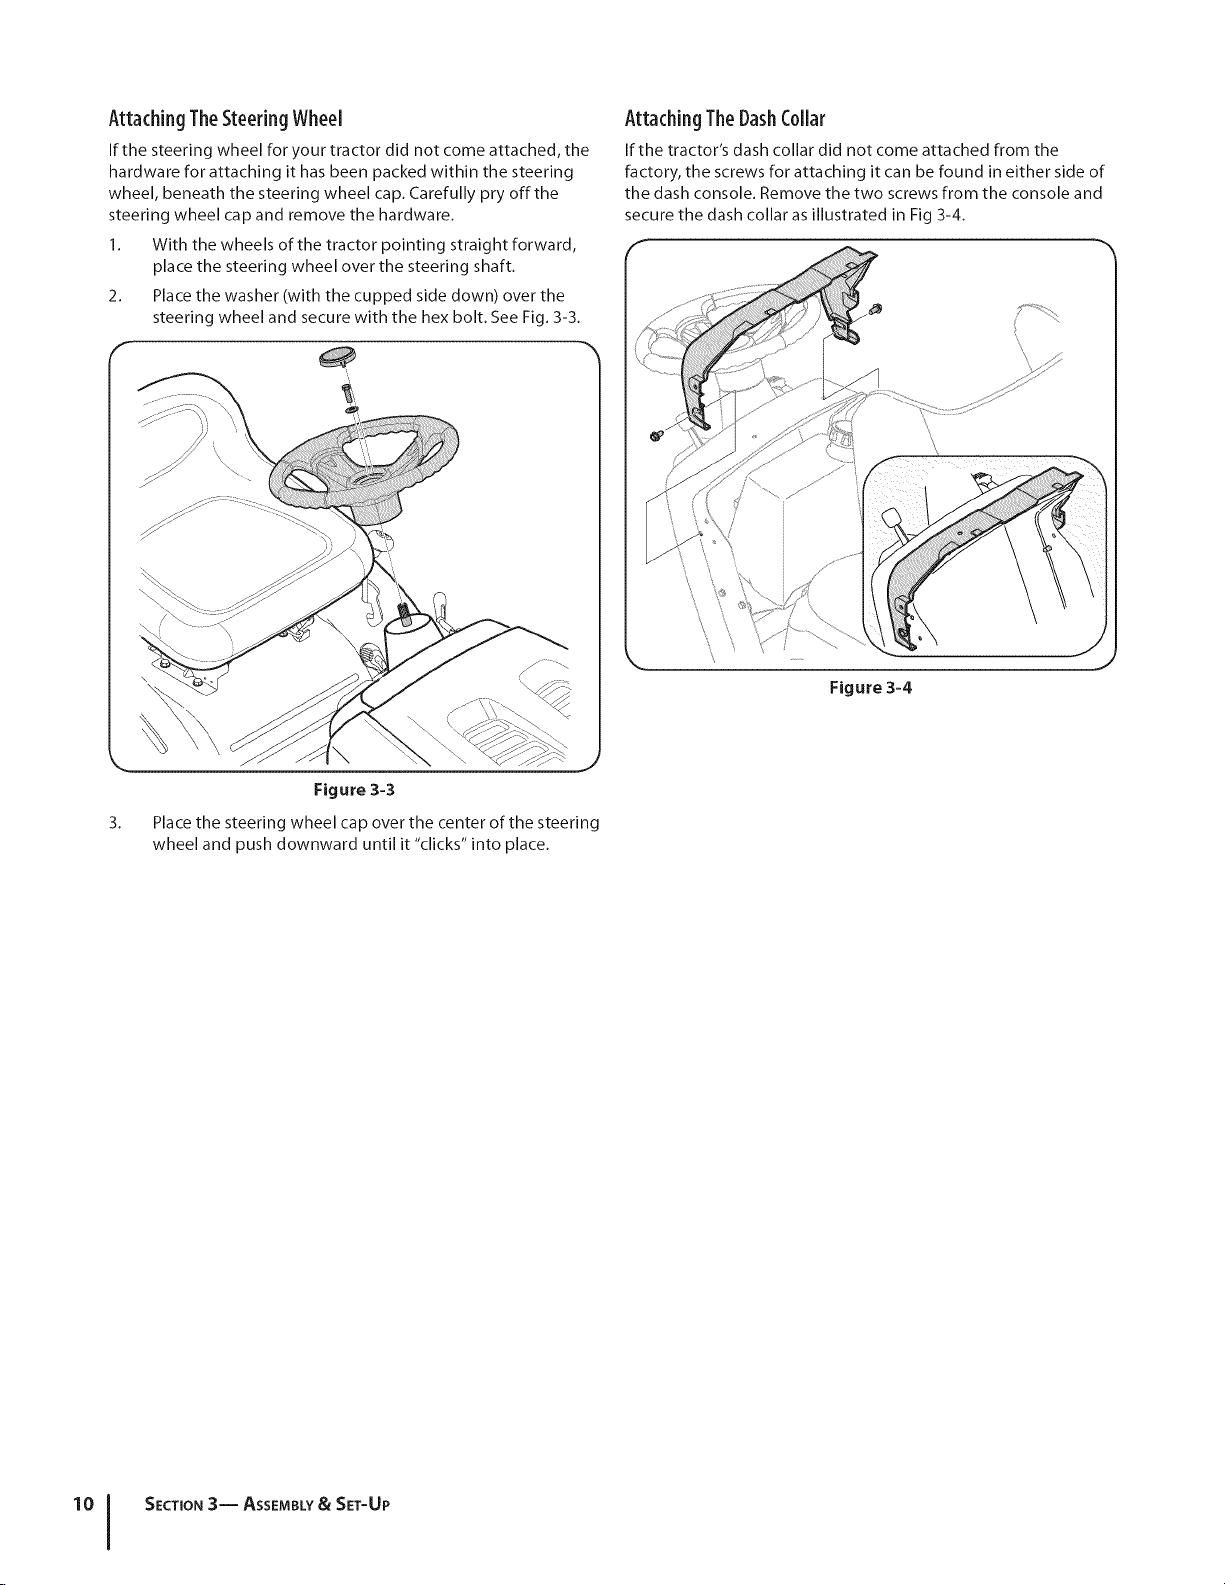
Attaching The SteeringWheel
If the steering wheel for your tractor did not come attached, the
hardware for attaching it has been packed within the steering
wheel, beneath the steering wheel cap. Carefully pry offthe
steering wheel cap and remove the hardware.
I. With the wheels of the tractor pointing straight forward,
place the steering wheel over the steering shaft.
2. Place the washer (with the cupped side down) over the
steering wheel and secure with the hex bolt. See Fig. 3-3.
Attaching TheDashCollar
If the tractor's dash collar did not come attached from the
factory, the screws for attaching it can be found in either side of
the dash console. Remove the two screws from the console and
secure the dash collar as illustrated in Fig 3-4.
f
\
\
\
\
\
\
\
Figure 3-4
\
Figure 3-3
3. Place the steering wheel cap over the center of the steering
wheel and push downward until it "clicks" into place.
J
SECTION 3-- ASSEMBLY& SET-UP
Page 11

Attaching The Seat
If the seat for your tractor was not attached at the factory, follow
the applicable instructions below to attach it.
NOTE: For shipping reasons, some seats are not attached at
the factory. If this is the case, free the seat from its shipping
position and remove the hex screw (or knob screw if applicable)
from the bottom of seat before proceeding with the following
instructions.
1. Positiontheseatfacing forward overtheseat pivotbracket, with
the two forward seat mount tabs fitting into the provided
grooves in the seat pivot bracket.
2. Slide the seat rearward and align the center mounting hole in
the seat with the slot in the seat pan. Insert the hex screw
previously removed. Do not tighten at this point.
3. Adjustthe seattothe optimal operator preferred location,this
may mean actually sitting in the seat to decide what feels
best to the operator. Keep in mind the operator needs to
be able to fully operate all pedals comfortably while sitting
back in the seat.
4.
Tighten the hex screw at this time.
5.
To adjust the position of the seat, loosen the hex screw on the
bottom of the seat. Slide the seat forward or backward as
desired. Retighten the hex screw. See Fig. 3-5.
TirePressure
circumstances is 30 psi. Equal tire pressure should be
_ ARNING! Maximum tire pressure under any
The recommended operating tire pressure is:
maintained at all times. Never exceed the maximum
inflation pressure shown on the sidewall of the tire.
Approximately 10 psi for the rear tires
Approximately 14 psi for the front tires
IMPORTANT: Refer to the tire sidewall for exact tire
manufacturer's recommended or maximum psi. Do not
overinflate. Uneven tire pressure could cause the cutting deck to
mow unevenly.
GasandOilFill-up
The gasoline tank is located under the hood. Do not overfill.
_ ARNING! Use extreme care when handling
Service the engine with gasoline and oil as instructed in the
separate Engine Operator/Owner Manual packed with your
tractor. Read the instructions carefully.
IMPORTANT: Your tractor is shipped with motor oil in the
engine. However, you MUST check the oil level before
operating. Be careful not to overfill.
gasoline. Gasoline is extremely flammable and the
vapors are explosive. Never fuel machine indoors or
while the engine is hot or running. Extinguish
cigarettes, cigars, pipes, and other sources of ignition.
ForCaliforniaModels:
For California models equipped with a tethered, ratcheting fuel
cap, STOP filling tank once fuel is seen inside the filler neck. This
ensures that a proper expansion volume is created, otherwise the
fuel can overflow creating a hazardous situation. Do NOTtop off
the fuel tank. See Fig. 3-6.
He× Screw
Adjust
Figure 3-5
Mulch Plug
Note: See the Attachments & Accessories section if you would
like information regarding adding a mulching system for your
model of tractor.
f
Figure 3-6
SECTION3 -- ASSEMBLY& SET-UP 11
Page 12

ControlsandFeatures
F
Speed Control &
Parking Brake Lever
Clutch/Brake Pedal
4
Ignition Switch
Module
Shift Lever
PTO(Blade Engage) Lever
Figure 4=1
Lawn Tractor controls and features are illustrated in Fig 4-1 and described on the following pages.
Throttle/Choke Lever
J
Deck Lift Lever
before attempting to operate this machine. Failure to comply with all safety rules and instructions may result in personal
i_ WARNING! Read and follow all safety rules and instructions in this manual, including the entire Operation section,
injury.
Page 13

Throttle/ChokeControl Lever
The throttle control lever is located on the right side of the
tractor's dash panel. This lever controls the speed of the engine
and when pushed all the way forward, the choke control also.
When set in a given position, the throttle will maintain a uniform
engine speed. See Fig. 4-2.
CHOKE
BI]
FAST
m
SLOW
Figure 4-2
IMPORTANT:When operating the tractor with the cutting deck
engaged, be certain that the throttle lever is always in the FAST
(rabbit) position.
_ ARNING! Never leave a running machine
IMPORTANT: Prior to operating the tractor, refer to both Safety
Interlock Switches and Starting The Engine in the Operation
section of this manual for further detailed instructions.
unattended. Always disengage PTO, move shift lever
into neutral position, set parking brake, stop engine
and remove key to prevent unintended starting.
Clutch-BrakePedal
The clutch-brake pedal is located on the left side of the lawn
tractor, along the running board. Depress the clutch-brake pedal
part way down when slowing the tractor by changing speeds
(Refer to Speed Control Lever). Depress the pedal all the way down
to engage the disc brake and bring the tractor to a complete
stop.
NOTE:The pedal must be depressed to start the engine. Refer to
Safety Interlock Switches in the Operation section of this manual.
ParkingBrake
To set the parking brake, fully depress the clutch-brake pedal.
Move the speed control lever all the way down and into the
parking brake position. Release the clutch-brake pedal to allow
the parking brake to engage.
To release the parking brake, depress the clutch-brake pedal and
move the speed control lever out of the notches to the desired
position. Release the speed control lever and the clutch-brake
pedal.
NOTE:The parking brake must be set if the operator leaves the
seat with the engine running or the engine will automatically
shut off.
IgnitionSwitch
The ignition switch is activated to start the engine. Insert key
into the ignition switch and turn clockwise to the START position.
Release the key into the ON position once engine has fired. See
Fig. 4-3.
To stop the engine, turn the ignition key counterclockwise to the
OFF position. See Fig. 4-3.
On
Start
Off
Figure 4-3
SECTION4 -- CONTROLS AND FEATURES 13
Page 14

ShiftLever
The shift lever is located on the left side of the fender and has
three positions, FORWARD, NEUTRAL and REVERSE.The brake
pedal must be depressed and the tractor must not be in motion
when the moving shift lever. See Fig. 4-4.
IMPORTANT: Never force the shift lever. Doing so may result in
serious damage to the tractor's transmission.
F
RUETRAL
Figure 4=4
SpeedControl Lever
The speed control lever, located on the left side of
the tractor's dash console, allows you to regulate
the ground speed of the lawn tractor. To use,
depress the clutch-brake pedal and move the lever
out of the parking brake notch and forward to
increase the tractor's ground speed. When a desired
speed has been reached, release the lever into an
appropriate notch to maintain that speed.
Toslow the tractor's ground speed, depress the
clutch-brake pedal and move the speed control
lever rearward and release it into a notch.
NOTE:Lawn tractors vary by model and are
available with either a6- or 7-speed control lever.
PTO(BladeEngage)Lever
Found on the tractor's right fender, the PTO (blade
engage) lever is used to engage power to the cutting
deck or other (separately available) attachments.
To operate, move the lever all the way forward.
Moving the lever all the way rearward into the PTO
OFF position disengages power to the cutting deck/
attachment.
NOTE:The PTO (blade engage)lever must be in the
disengaged (PTO OFF) position when starting the
engine.
DeckLift Lever
Found on your tractor's right fender, the deck lift lever
is used to change the height of the cutting deck. To
use, move the lever to the left, then place in the notch
best suited for your application.
((D)
PARR
BRAKE
_t
Z
| O
m
o
W
r-
m
Z
SECTION 4 -- CONTROLS AND FEATURES
Page 15

Operation
TO AVOID SERIOUS INJURY
OR DEATH
• GOUPAND DOWNSLOPES,NOTACROSS.
• AVOIDSUDDENTURNS.
• DONOTOPERATETHE UNITWHEREIT COULDSLIP
ORTIP.
• IF MACHINESTOPSGOINGUPHILL,STOP BLADE(S)
ANDBACKDOWNHILLSLOWLY.
• KEEPSAFETYDEVICES(GUARDS,SHIELDS,
ANDSWITCHES,ETC.) IN PLACEANDWORKING.
• REMOVEOBJECTSTHATCOULDBETHROWN
BYTHE BLADE(S).
• KNOWLOCATIONANDFUNCTIONOFALL CONTROLS.
• BESUREBLADE(S)AND ENGINEARESTOPPED
BEFOREPLACINGHANDSORFEETNEARBLADE(S).
• BEFORELEAVINGOPERATOR'SPOSITION,
DISENGAGEBLADE(S), ENGAGEPARKINGBRAKE,
SHUTOFFAND REMOVEKEY.
Engagingthe ParkingBrake
Toengagethe parkingbrake:
1. Fully depress the clutch-brake pedal and hold it down with
your foot.
2. Move the speed control lever all the way down and into the
parking brake position.
3. Release the clutch-brake pedal to allow the parking brake
to engage.
Toreleasethe parkingbrake:
1. Depress the clutch-brake pedal and move the speed
control lever out of the parking brake position and into a
desired speed.
Setting the Cutting Height
1. Select the height position of the cutting deck by placing
the deck lift lever in any of the six different cutting height
notches on the right side of the fender.
_ WARNING! Keep hands and feet away from the
discharge opening of the cutting deck.
READ OPERATOR'S
MANUAL
SafetyInterlockSwitches
This tractor is equipped with a safety interlock system for the
protection of the operator. If the interlock system should ever
malfunction, do not operate the tractor. Contact an authorized
MTD service dealer.
The safety interlock system prevents the engine from
cranking or starting unless the parking brake is engaged,
and the PTO (Blade Engage) lever is in the disengaged (OFF)
position.
The engine will automatically shut off if the operator leaves
the seat before engaging the parking brake.
The engine will automatically shut off if the operator leaves
the tractor's seat with the PTO (Blade Engage) lever in the
engaged (ON) position, regardless of whether the parking
brake is engaged.
The engine will automatically shut off if the PTO (Blade
Engage) lever is moved into the engaged (ON) position with
the shift lever in Reverse.
J
15
Page 16

Starting the Engine
i_ WARNING! Do not operate the tractor if the
NOTE: Refer to the Gasoline and Oil fill-up instructions in the
Assembly & Set-up section of this manual.
1. Insert the tractor key into the ignition switch.
2. Place the PTO (Blade Engage) lever in the disengaged (OFF)
3. Engage the tractor's parking brake.
4. Activate the choke control.
5. Turn the ignition key clockwise to the START position. After
6. After the engine starts, deactivate the choke control and
NOTE: Do NOT leave the choke control on while operating the
tractor. Doing so will result in a "rich" fuel mixture and cause the
engine to run poorly.
Stopping the Engine
1.
2.
3.
interlock system is malfunctioning. This system was
designed for your safety and protection.
position.
the engine starts, release the key. It will return to the ON (or
Normal Mowing) position.
CAUTION: Do NOT hold the key in the START
position for longer than ten seconds at a time. Doing
so may cause damage to your engine's electric
starter.
place the throttle control in the FAST position.
WARNING! If you strike a foreign object, stop the
engine, disconnect the spark plug wire(s) and
ground against the engine. Thoroughly inspect the
machine for any damage. Repair the damage before
restarting and operating
If the blades are engaged, place the PTO (Blade Engage)
lever in the disengaged (OFF) position.
Turn the ignition key counterclockwise to the STOP
position.
Remove the key from the ignition switch to prevent
unintended starting.
DrivingTheTractor
WARNING! Avoid sudden starts, excessive speed
and sudden stops.
WARNING! Do not leave the seat of the tractor
without first placing the PTO (Blade Engage) lever in
the disengaged (OFF) position, depressing the brake
pedal and engaging the parking brake. If leaving
the tractor unattended, also turn the ignition key off
and remove the key.
WARNING! Always look down and behind before
and while backing up to avoid a back-over accident.
Depress the brake pedal to release the parking brake and
let the pedal up.
2.
Move the throttle lever into the FAST (rabbit) position.
3.
Place the shift lever in either the FORWARD or REVERSE
position.
IMPORTANT: Do NOTuse the shift lever to change the
direction of travel when the tractor is in motion. Always use
the brake pedal to bring the tractor to a complete stop before
shifting.
4. Releasethe parking brake by depressing the clutch-brake
pedal and positioning the speed control lever in desired
position.
IMPORTANT: First-time operators should use speed positions 1
or 2.Become completely familiar with the tractor's operation and
controls before operating the tractor in higher speed positions.
5. Release clutch-brake pedal slowly to put unit into motion.
6. The lawn tractor is brought to a stop by depressing the
clutch-brake pedal.
NOTE:When operating the unit initially, there will be little
difference between the highest two speeds until after the belts
have seated themselves into the pulleys during the break-in
period.
WARNING! Before leaving the operator's position
for any reason, disengage the blades, place the shift
lever in neutral, engage the parking brake, shut
engine offand remove the key.
IMPORTANT: When stopping the tractor for any reason while
on a grass surface, always:
1. Place the shift lever in neutral,
2. Engage the parking brake,
3. Shut engine off and remove the key. Doing so will minimize
the possibility of having your lawn "browned" by hot
exhaust from your tractor's running engine.
If unit stalls with speed control in high speed, or if unit will
not operate with speed control lever in a low speed position,
proceed as follows:
1. Place shift lever in NEUTRAL.
2. Restart engine.
3. Place speed control lever in highest speed position.
4. Release clutch-brake pedal fully.
5. Depress clutch-brake pedal.
'°1
SECTION 5-- OPERATION
Page 17

6. Place speed control lever in desired position.
7. Place shift lever in either FORWARD or REVERSE,and follow
normal operating procedures.
Driving On Slopes
Refer to the SLOPE GAUGE in the Important Safe Operation
Practices section of the manual to help determine slopes where
you may operate the tractor safely.
Mowing
thrown object injury, keep bystanders, helpers,
_ ARNING! To help avoid blade contact or a
The following information will be helpful when using the cutting
deck with your tractor:
children and pets at least 75 feet from the machine
while it is in operation. Stop machine if anyone
enters the area.
_ ARNING! Do not mow on inclines with a slope in
excess of 15 degrees (a rise of approximately2-1/2 feet
every 10feet). The tractor could overturn and cause
serious injury.
Mow up and down slopes, NEVER across.
Exercise extreme caution when changing direction on
slopes.
Watch for holes, ruts, bumps, rocks, or other hidden
objects. Uneven terrain could overturn the machine. Tall
grass can hide obstacles.
Avoid turns when driving on a slope. Ira turn must be
made, turn down the slope. Turning up a slope greatly
increases the chance of a roll over.
Avoid stopping when driving up a slope. If it is necessary
to stop while driving up a slope, start up smoothly and
carefully to reduce the possibility of flipping the tractor
over backward.
Engagingthe Blades
Engaging the PTO (Blade Engage) transfers power to the cutting
deck or other (separately available) attachments. To engage the
blades, proceed as follows:
1. Move the throttle control lever to the FAST (rabbit)
position.
2. Grasp the PTO (Blade Engage) lever and pivot it a II the way
forward into the engaged (ON) position.
3. Keep the throttle lever in the FAST (rabbit) position for the
most efficient use of the cutting deck or other (separately
available) attachments.
The PTO (Blade Engage)lever must be in the disengaged (OFF)
position when starting the engine, when traveling in reverse, and
if the operator leaves the seat. Refer to Safety Interlock Switches
in the Operation section of this manual.
discharge of materials toward roads, sidewalks,
bystanders and the like. Also, avoid discharging
WARNING! Plan your mowing pattern to avoid
material against a wall or obstruction which may
cause discharged material to ricochet back toward
the operator.
Do not mowat high ground speed, especially ira mulch kit
or grass collector is installed.
For best results it is recommended that the first two laps be
cut with the discharge thrown towards the center. After the
first two laps, reverse the direction to throw the discharge
to the outside for the balance of cutting. This will give a
better appearance to the lawn.
Do not cut the grass too short. Short grass invites weed
growth and yellows quickly in dry weather.
Mowing should always be done with the engine at full throttle.
Under heavier conditions it may be necessary to go back
over the cut area a second time to get a clean cut.
Do NOT attempt to mow heavy brush and weeds and
extremely tall grass. Your tractor is designed to mow lawns,
NOT clear brush.
Keep the blades sharp and replace the blades when worn.
Refer to Cutting Blades in the Service section of this manual
for proper blade sharpening instructions.
Usingthe Deck Lift Lever
To raise the cutting deck, move the deck lift lever to the left, then
place it in the notch best suited for your application. Refer to
Setting The Cutting Height earlier in this section.
SECTION S -- OPERATION 17
Page 18

Maintenance&Adjustments
6
Maintenance
WARNING! Before performing any maintenance or
repairs, disengage PTO, move shift lever into neutral
position, set parking brake, stop engine and remove
key to prevent unintended starting.
Refer to the Engine Operator/Owner Manual for engine
maintenance instructions.
Check engine oil level before each use as instructed in the Engine
Operator/Owner Manual packed with your unit. Follow the
instructions carefully.
ChangingEngineOil
For draining oil from the engine's crankcase of select model
tractors, a plastic oil drain sleeve is packed with this Operator's
Manual. To drain the oil, proceed as follows:
1. Unscrew the oil fill cap and remove the dipstick from the oil
fill tube.
2.
Snapthe small end ofoil drain sleeve onto the oil sump.
SeeFig.6-1.
\
\
\
Air Cleaner
Service the air cleaner element as instructed in the Engine
Operator/Owner Manual packed with your unit.
SparkPlug
The spark plug should be cleaned and the gap reset once a
season. Spark plug replacement is recommended at the start
of each mowing season. Refer to the Engine Operator/Owner
Manual for correct plug type and gap specifications.
Lubrication
inspecting, always disengage PTO, move shift lever
_ll, i WARNING! Before lubricating, repairing, or
Engine
Lubricate the engine with motor oil as instructed in the Engine
Owner Manual packed with your unit.
PivotPoints&Linkage
Lubricate all the pivot points on the drive system, parking brake
and lift linkage at least once a season with light oil.
RearWheels
The rear wheels should be removed from the axles once a
season. Lubricate the axles and the rims well with an all-purpose
grease before re-installing them.
FrontAxles
Each end of the tractor's front pivot bar may be equipped with a
grease fitting. Lubricate with a grease gun after every 25 hours of
tractor operation.
into neutral position, set parking brake, stop engine
and remove key to prevent unintended starting.
Figure 6-1
3. Remove drain plug and drain oil into a suitable container
with a capacity of no less than 64 oz.
Perform the above steps in the opposite order after oil has
finished draining.
5. Refill the engine with new motor oil as instructed in the
Engine Operator/Owner Manual packed with your machine.
NOTE: Refer to the Engine Operator/Owner Manual packed with
your unit for information regarding the quantity and proper
viscosity of motor oil.
Battery
The battery is sealed and is maintenance-flee. Acid levels cannot
be checked.
Always keep the battery cables and terminals clean and
free of corrosive build-up.
After cleaning the battery and terminals, apply a light coat
of petroleum jelly or grease to both terminals.
Always keep the rubber boot positioned over the positive
terminal to prevent shorting.
IMPORTANT: If removing the battery for any reason,
disconnect the NEGATIVE(Black) wire from it's terminal first,
followed by the POSITIVE(Red) wire. When re-installing the
battery, always connect the POSITIVE(Red)wire its terminal
first, followed by the NEGATIVE(Black) wire. Becertain that the
wires are connected to the correct terminals; reversing them
could change the polarity and result in damage to your engine's
alternating system.
Page 19

CleaningBattery
Clean the battery by removing it from the tractor and washing
with a baking soda and water solution. If necessary, scrape the
battery terminals with a wire brush to remove deposits. Coat
terminals and exposed wiring with grease or petroleum jelly to
prevent corrosion.
Battery Failures
Some common causes for battery failure are:
Incorrect initial activation
Overcharging
Freezing
Undercharging
Corroded connections
These failures are NOT covered by your tractor's warranty.
To level the deck from front to rear:
Tighten the lock nut to raise the front of the deck;
Loosen the lock nut to lower the front of the deck.
Cleaningthe EngineAndDeck
Any fuel or oil spilled on the machine should be wiped off
promptly. Do NOTallow debris to accumulate around the cooling
fins of the engine or on any other part of the machine.
IMPORTANT: The use of a pressure washer to clean your
tractor is NOT recommended. It may cause damage to electrical
components, spindles, pulleys, bearings or the engine.
Adjustments
adjustments while the engine is running, except
WARNING! Never attempt to make any
where specified in the operator's manual.
Levelingthe Deck
NOTE: Check the tractor's tire pressure before performing any
deck leveling adjustments. Refer to Tires in the Service section of
this manual for more information regarding tire pressure.
Front ToRear
The front of the cutting deck is supported by a stabilizer bar that
can be adjusted to level the deck from front to rear. The front of
the deck should be between 1/4-inch and %-inch lower than the
rear of the deck. Adjust if necessary as follows:
1. With the tractor parked on a firm, level surface, place the
lever for lifting the platform on the second to the top notch
(second highest position) and rotate the blade as close to
the discharge channel that is parallel to the tractor.
2. Measure the distance from the front of the blade tip to
the ground and the rear of the blade tip to the ground.
The first measurement taken should be between 1/4"and
%" less than the second measurement. Determine the
approximate distance necessary for proper adjustment and
proceed, if necessary, to the next step.
3. Locate the flange nut as seen in Fig. 6-2.
Flange Lock Nut
Figure 6-2
Sideto Side
If the cutting deck appears to be mowing unevenly, a side to side
adjustment can be performed. Adjust if necessary as follows:
1. With the tractor parked on a firm, level surface, place the
deck lift lever in the second from the top notch (second
highest position) and rotate both blades so that they are
perpendicular with the tractor.
2. Measure the distance from the outside of the left blade
tip to the ground and the distance from the outside of the
right blade tip to the ground. Both measurements taken
should be equal. If they're not, proceed to the next step.
3. Loosen, but do NOT remove, the hex cap screw on the left
deck hanger bracket. See Fig. 6-3.
HexCapScrew
Figure 6-3
SECTION 6 -- MAINTENANCE & ADJUSTMENTS 19
Page 20

4. Balance the deck by using a wrench to turn the
adjustment gear (found immediately behind the hex cap
screw just loosened) clockwise/up or counterclockwise/
down. The deck is properly balanced when both blade tip
measurements taken earlier are equal.
5. Retighten the hex cap screw on the left deck hanger
bracket when proper adjustment is achieved.
Seat Adjustment
Refer to the Set-Up a nd Assembly section of this manual for seat
adjustment instructions.
Parking BrakeAdjustment
while the engine is running. Always disengage PTO,
WARNING! Never attempt to adjust the brakes
move shift lever into neutral position, stop engine
and remove key to prevent unintended starting.
If the tractor does not come to a complete stop when the brake
pedal is completely depressed, or if the tractor's rear wheels
can roll with the parking brake applied, the brake is in need of
adjustment. See an authorized MTD Service Dealer to have your
brakes properly adjusted.
SECTION 6-- MAINTENANCE & ADJUSTMENTS
Page 21

MaintenanceSchedule
Before
Eachuse
Every Every Every Every
10 Hours 25 Hours SOHours 100 Hours
Prior
toStoring
,/CleanHood/DashLouvers V/"
CheckEngineOilLevel V/" V/"
CheckAirFilterforDirty, LooseorDamagedParts V/"
ReplaceAirFilter Element V/"
ChangeEngineOil
CleanBatteryTerminals V/" V/"
LubeFrontAxlesandRims _
CleanEngineCoolingFins V/" V/"
LubePedalPivotPoints _
CheckSparkPlugCondition&Gap _
ReplaceFuelFilter
NOTE:This Operators Manual covers a range of product specifications for various models. Characteristics and features discussed and/
or illustrated in this manual may not be applicable to all models. MTD LLC reserves the right to change product specifications, designs
and equipment without notice and without incurring obligation.
IMPORTANT: Since this manual covers a range of various tractor models, it is important to consult the specific engine operator's
manual included with this machine for detailed engine maintenance procedures and intervals.
SECTION 6 -- MAINTENANCE & ADJUSTMENTS 21
Page 22

Service
Cutting DeckRemoval
NOTE: Models equipped with a 38-inch deck have one deck idler
pulley. Models equipped with a 42- and 46-inch deck have two
deck idler pulleys.
To remove the cutting deck, proceed as follows:
1. Place the PTO (Blade Engage) lever in the disengaged (OFF)
position and engage the parking brake.
2. Lower the deck by moving the deck lift lever into the
bottom notch on the right fender.
3. Remove the belt-keeper rod, from around the tractor's
engine pulley, by removing the self-tapping screw (A) that
secures it. See Fig. 7-1.
Note: Make a mental note what hole the other end of the belt-
keeper rod is inserted in for reinstallation purposes.
f -,,
Bow=Tie
/
/
/
/
/ /
Figure 7-2
8.
Gently slide the cutting deck toward the front of the tractor
carefully guiding the hooks on the deck off of the deck
stabilizer rod. See Fig. 7-3
7
//
/
Figure 7=1
4. Removethebelt(C)fromaroundthetractor'senginepulley.See
Fig. 7-1.
5. Looking at the cutting deck from the left side of the tractor,
locate the bow-tie pin that secures the deck support rod on
the rear left side of the deck. See Fig. 7-2. Remove the bow-
tie pin that secures the deck support rod, and carefully
remove the deck support from the deck lift arm.
6. Repeat step 5 on the tractor's right side.
7. Move the deck lift lever into the top notch on the right
fender to raise the deck lift arms up and out of the way.
Figure 7=3
9. CarefullyremovethePTOcablefromtherearofthecuttingdeck
by removing the hair pin clip which secures it. Remove the
spring from the deck idler bracket. See Fig. 7-4 on the next
page.
10. Gently slide the cutting deck (from the leftside) out from
underneath the tractor.
Page 23

Figure 7-4
Tires
_ WARNING! Never exceed the maximum inflation
The recommended operating tire pressure is:
IMPORTANT: Refer to the tire sidewall for exact tire
manufacturer's recommended or maximum psi. Do not
overinflate. Uneven tire pressure could cause the cutting deck to
mow unevenly.
pressure shown on the sidewall of tire.
Approximately 10 psi for the rear tires
Approximately 14 psi for the front tires
Battery
CALIFORNIA PROPOSITION 65 WARNING!
Battery posts, terminals, and related accessories
contain lead and lead compounds, chemicals known
to the State of California to cause cancer and
reproductive harm. Wash hands after handling.
CAUTION: If removing the battery, disconnect the
NEGATIVE (Black) wire from it's terminal first,
followed by the POSITIVE (Red) wire. When re-
installing the battery, always connect the POSITIVE
(Red) wire its terminal first, followed by the
NEGATIVE (Black) wire.
JumpStarting
4.
Make the final connection on the engine block of the
tractor, away from the battery. Attach to a unpainted part
to assure a good connection.
vehicle (i.e. car, truck), do NOT start the vehicle's
_ AUTION: If the jumper battery is installed on a
5.
6.
engine when jump starting your tractor.
Start the tractor (as instructed in the Operation section of
this manual).
Set the tractor's parking brake before removing the jumper
cables, in reverse order of connection.
Charging
WARNING! Batteries give off an explosive gas
while charging. Charge the battery in a well
ventilated area and keep away from an open flame
or pilot light as on a water heater, space heater,
furnace, clothes dryer or other gas appliances.
CAUTION: When charging your tractor's battery,
use only a charger designed for 12V lead-acid
batteries. Read your battery charger's Owner's
Manual prior to charging your tractor's battery.
Always follow its instructions and heed its warnings.
If your tractor has not been put into use for an extended period
of time, charge the battery as follows:
1. Set your battery charger to deliver a max of 10 amperes.
If your battery charger is automatic, charge the battery until the
charger indicates that charging is complete. If the charger is not
automatic, charge for no fewer than eight hours.
Fuse
One 20 AMP fuse is installed in your tractor's wiring harness to
protect the tractor's electrical system from damage caused by
excessive amperage.
If the electrical system does not function, or your tractor's engine
will not crank, first check to be certain that the fuse has not
blown. It can be found at the rear of the unit, underneath the
fender located by the battery.
amperage capacity for replacement.
_ ARNING! Always use a fuse with the same
_ ARNING! Never jump start a damaged or frozen
1. Connect positive (+) cable to positive post (+) of your
2. Connect the other end of the cable to the (positive +) post
3. Connect the second cable (negative -) to the other post of
battery. Be certain the vehicles do not touch, and
ignitions are off. Do not allow cable clamps to touch.
tractor's discharged battery.
of the jumper battery.
the jumper battery.
SECTION7 -- SERVICE 23
Page 24

Cutting Blades
WARNING! Shut the engine off and remove
ignition key before removing the cutting blade(s) for
sharpening or replacement. Protect your hands by
using heavy gloves when grasping the blade.
WARNING! Periodically inspect the blade and/or
spindle for cracks or damage, especially after you've
struck a foreign object. Do not operate the machine
until damaged components are replaced.
To remove the blades, proceed as follows.
1. Remove the deck from beneath the tractor, (refer to
Cutting Deck Removal earlier in this section) then gently
flip the deck over to expose its underside.
2. Place a block of wood between the center deck housing
baffle and the cutting blade to act as a stabilizer.
See Fig. 7-5.
3. Remove the hex flange nut that secures the blade to the
spindle assembly. See Fig. 7-5.
\\
Figure 7-6
NOTE:When replacing the blade, be sure to install the blade with
the side of the blade marked "Bottom" (or with a part number
stamped in it) facing the ground when the mower is in the
operating position.
4. Toproperlysharpenthecutting blades,removeequalamounts
of metal from both ends of the blades along the cutting
edges, parallel to the trailing edge, at a 25 °- to 30 ° angle.
Always grind each cutting blade edge equally to maintain
proper blade balance. See Fig. 7-6.
previously been sharpened, or if any metal
_ AUTION: If the cutting edge of the blade has
separation is present, replace the blades with new
ones.
blade spindle hex flange nut to between 70 Ibs-ft
CAUTION: Use a torque wrench to tighten the
and 90 Ibs-ft.
i_ii WARNING! A poorly balanced blade will cause
5. Test the blade's balance using a blade balancer. Grind
excessive vibration, may cause damage to the
tractor and/or result in personal injury.
metal from the heavy side until it balances evenly.
SECTION7-- SERVICE
Page 25

Changingthe DeckBelt
WARNING! Be sure to shut the engine off, remove
ignition key, disconnect the spark plug wire(s) and
ground against the engine to prevent unintended
starting before removing the belt.
WARNING! All belts on your tractor are subject to
wear and should be replaced if any signs of wear are
present.
IMPORTANT: The V-belt found on your tractor is specially
designed to engage and disengage safely. A substitute (non-
OEM) V-belt can be dangerous by not disengaging completely.
For a proper working machine, use factory approved belts.
To change or replace the deck belt on your tractor, proceed as follows:
1. Lower the deck by moving the deck lift lever into the
bottom notch on the right fender.
2. Remove the belt guards by removing the self-tapping
screws that fasten them to the deck. See Fig. 7-7.
3. Remove the belt keeper rod from around the engine pulley.
injury. Do not place your fingers on the idler spring
_ ARNING! Avoid the possibility of a pinching
5. Remove the deck belt from around all pulleys, including
6. Route the new belt as shown in and Fig. 7-7.
7. Remount the belt guards removed earlier.
or between the belt and a pulley while removing the
belt.
the deck idler pulley.
Changing the TransmissionDrive Belt
NOTE: Several components must be removed and special tools
(i.e. air/impact wrench) in order to change the tractor's drive belt.
See an authorized MTD Service Dealer to have your drive belt
replaced or phone Customer Support as instructed on page 2 for
information on ordering a Service Manual.
Belt Guard
©
Deck idler Pulley
J
Figure 7-7
SECTION7 -- SERVICE 25
Page 26

Troubleshooting
Problem
Engine fails to start
Engine runs erratic
Engine overheats
Engine hesitates at high
RPM
Engine Idles rough
Excessive vibration
Mower will not mulch grass
Uneven cut
Cause
PTO/Blade engaged.
2. Spark plug wire disconnected.
3. Fuel tankempty, or stale fuel.
4. Choke notactivated.
5. Faulty spark plug.
6. Blocked fuel line.
7. Engine flooded.
8. Parking brake notengaged
9. Throttle control lever not in correct starting
position.
1. Unit running with CHOKE activated.
2. Spark plug wires loose.
3. Blocked fuel line or stale fuel.
4. Ventin gascap plugged.
5. Water or dirt in fuel system.
6. Dirty air cleaner.
1. Engine oil level low.
2. Air flow restricted.
1. Spark plug gap too close.
1. Spark plug fouled, faulty or gap too wide.
2. Dffty air cleaner.
1. Cutting blade loose or unbalanced.
2. Damaged or bent cutting blade.
1. Engine speed too low.
2. Wet grass.
3. Excessively high grass.
4. Dull blade.
1. Deck not leveled properly.
2. Dull blade.
3. Uneven tire pressure.
Remedy
1. Place knob (or lever) in disengaged (OFF)
position.
2. Connect wire to spark plug.
3. Fill tank with clean, fresh (less than 30 days
old) gas.
4. Place the throttle control in CHOKE position.
5. Clean, adjust gap or replace plug.
6. Clean fuel line and replace fuel filter.
7. Crankengine with throttle in FAST position.
8. Engage parking brake.
9. Place throttle leverto FAST position.
1. Move the throttle contol out of the CHOKE
position.
2. Connect and tighten spark plug wire.
3. Clean fuel line; fill tank with clean, fresh
gasoline and replace fuel filter, is so equipped.
4. Clear vent or replace cap if damaged.
5. Drain fuel tank. Refill wtth clean, fresh
gasoline.
6. Replace air cleaner paper element or clean
foam precleaner, is so equipped.
1. Fill crankcase with proper amount and
weight of oil.
2. Clean grass clippings and debris from around
the engine's cooling fins and blower housing.
1. Remove spark plug and resetthe gap.
1. Replace spark plug. Set plug gap.
2. Replace air cleaner element and/or clean
pre-cleaner, if so equipped.
1. Tighten blade and spindle. Balance blade.
2. Replace blade.
1. Place throttle in FAST (rabbit) position.
2. Do not mulch when grass is wet.
3. Mowonceata high cutting height, then
mow again at desired height or make a
narrower cutting swath.
4. Sharpen or replace blade.
1. Perform side-to-side deck adjustment.
2. Sharpen or replace blade.
3. Check tire pressure in all four tires.
Page 27

ReplacementParts
DESCRIPTION PARTNO.
DriveBelt(MowingDeck)38"Deck 954-04062
DeckBlade(38" Deck) 942-0610A
DeckSpindle(38"Deck) 918-04474A
Battery 925-1707D
Tire(Front)13x 5 x6 RoundShoulder 734-04372
Tire(Rear)18x 6.5 x8 SquareShoulder 734-0294
FuelTankCap 751-0603A
FuelTankCap(CAModels) 751-10947
ThrottleControl/ChokeCable(SingleCylinderEngines) _746-04364
DischargeChuteAssembly38"Deck 931-1032B
Key 925-1745A
9
NOTE:This Operators Manual covers a range of product specifications for various models. Characteristics and features discussed and/
or illustrated in this manual may not be applicable to all models. MTD LLC reserves the right to change product specifications, designs
and equipment without notice and without incurring obligation.
NOTE: Download a complete Parts Manual free of charge at www.mtdproducts.com or phone (800) 800-7310 to purchase a Parts
Manual. Be sure to have your model number and serial number ready. These can be found on the model plate located under the seat.
Refer to page 2 for more information regarding locating your model and serial numbers.
27
Page 28

Attachments&Accessories
ThefollowingattachmentsandaccessoriesarecompatibleforModelSeries700 LawnTractors.Seetheretailerfromwhichyou
_urchasedyourtractor,anauthorizedMTDServiceDealeror phone(800) 800-7310forinformationregardingpriceandavailability.
CAUTION: ModelSeries700LawnTractorsare NOTdesignedforusewithany typeofground-engagingattachments(e.g.
tilleror plow).Useof thistypeofequipmentWILLvoidthetractor'swarranty.
OEM-190-607
OEM-190-183
OEM-190-032
OEM-19A-218 RearWeightBracketKit
DeluxeTractorSunshade
DeckWheelKit38"
42"SnowThrower
Page 29

11
29
Page 30

FEDERAL and/or CALIFORNIA EMISSION CONTROL WARRANTY STATEMENT
YOUR WARRANTY RIGHTS AND OBLIGATIONS
MTDConsumerGroupInc,the UnitedStatesEnvironmentalProtectionAgency(EPA),and,forthoseproductscertifiedfor salein the stateofCalifornia,the
CaliforniaAirResourcesBoard(CARB)are pleasedtoexplainthe emission(evaporativeand/orexhaust)controlsystem(ECS)warrantyonyouroutdoor2006
andlater smalloff-roadspark-ignitedengineandequipment(outdoorequipmentengine)InCalifornia,newoutdoorequipmentenginesmustbedesigned,builtand
equippedtomeetthe State'sstringentanti-smogstandards(inotherstates, 1997andlater modelyear equipmentmustbedesigned,built,and equippedto meet
theU.S.EPAsmalloff-road, sparkignitionengineregulations.MTDConsumerGroupIncmustwarrantthe ECSonyouroutdoorequipmentenginefor the periodof
timelistedbelowprovidedtherehasbeen noabuse,neglector impropermaintenanceofoutdoorequipmentengine.
YourECSmayincludepartssuchas thecarburetor,fuel-injectionsystem,the ignitionsystem,catalyticconverter,fueltanks,fuel lines,fuelcaps,valves,canisters,
filters,vaporhoses,clamps,connectors,andotherassociatedemission-relatedcomponents.
Wherea warrantableconditionexists, MTDConsumerGroupIncwill repairyouroutdoorequipmentengineatnocost toyouincludingdiagnosis,parts andlabor.
MAN UFACTURER'S WARRANTY COVERAGE:
Thisemissioncontrolsystemiswarrantedfortwo years.Ifany emission-relatedpart onyouroutdoorequipmentengineisdefective,the partwill berepairedor
replacedby MTDCONSUMERGROUPINC.
OWNER'S WARRANTY RESPONSIBILITIES:
Asthe outdoorequipmentengineowner,youareresponsiblefor performanceoftherequiredmaintenancelistedinyourowner'smanual.MTDConsumerGroup
Increcommendsthat youretainallreceiptscoveringmaintenanceonyouroutdoorequipmentengine,butMTDConsumerGroupInc cannotdenywarrantysolely
forthe lackof receipts.
Asthe outdoorequipmentengineowner,youshouldhoweverbe awarethat MTDConsumerGroupIncmaydenyyouwarrantycoverageifyour outdoorequipment
engineor aparthas faileddue toabuse,neglect,orimpropermaintenanceorunapprovedmodifications.
Youare responsiblefor presentingyouroutdoorequipmentengineto MTDConsumerGroupInc'sdistributioncenterorservicecenterassoon asthe problem
exists.Thewarrantyrepairsshouldbecompletedin areasonableamountoftime, nottoexceed30 days.Ifyouhaveaquestionregardingyourwarrantycoverage,
youshouldcontacttheMTDConsumerGroupIncService Departmentat 1-800-800-7310orviaemailat http://support.mtdproducts.com
GENERAL EMISSIONS WARRANTY COVERAGE:
MTDConsumerGroupIncwarrantstothe ultimatepurchaserandeachsubsequentpurchaserthat theoutdoorequipmentengineis: Designed,builtandequipped
soasto conformwithall applicableregulations;andfreefromdefectsin materialsandworkmanshipthatcausethe failureof a warrantedparttobe identicalin all
materialrespectstothat partas describedin MTDConsumerGroupInc'sapplicationforcertification.
Thewarrantyperiodbeginsonthedatetheoutdoorequipmentengineis deliveredtoanultimatepurchaserorfirst placedintoservice.Thewarrantyperiodistwo
years.
Subjecttocertainconditionsand exclusionsasstated below,thewarrantyonemission-relatedpartsis asfollows:
1. Anywarrantedpartthat isnotscheduledfor replacementas requiredmaintenancein thewritten instructionssupplied,is warrantedforthe warrantyperiod
statedabove.Ifthepart failsduringthe periodofwarrantycoverage,thepart willbe repairedor replacedbyMTDConsumerGroupIncaccordingto subsection
(4)below.Anysuchpart repairedor replacedunderwarrantywillbewarrantedforthe remainderof theperiod.
2. Anywarrantedpartthat isscheduledonlyforregularinspectioninthe writteninstructionssuppliedis warrantedforthe warrantyperiodstatedabove.Anysuch
partrepairedor replacedunderwarrantywill bewarrantedforthe remainingwarrantyperiod.
3. Anywarrantedpartthat isscheduledforreplacementas requiredmaintenancein thewritteninstructionssuppliediswarrantedforthe periodoftimebeforethe
firstscheduledreplacementdatefor thatpart.If the partfails beforethefirst scheduledreplacement,thepart willberepairedorreplacedbyMTDConsumer
GroupIncaccordingto subsection(4)below.Anysuchpartrepairedor replacedunderwarrantywill bewarrantedforthe remainderofthe periodpriortothe
firstscheduledreplacementpointfor thepart.
4. Repairorreplacementofanywarrantedpart underthewarrantyprovisionshereinmustbeperformedat awarrantystationat no chargetotheowner.
5. Notwithstandingtheprovisionsherein,warrantyservicesor repairswill beprovidedatallof our distributioncentersthatarefranchisedto servicethe subject
enginesor equipment.
6. Theoutdoorequipmentengineownerwill notbe chargedfor diagnosticlaborthat isdirectlyassociatedwithdiagnosisof adefective,emission-relatedwar-
rantedpart, providedthatsuchdiagnosticworkis performedata warrantystation.
7. MTDConsumerGroupIncisliablefordamagesto otherengineor equipmentcomponentsproximatelycausedbya failureunderwarrantyof anywarranted
part.
8. Throughouttheoff-roadengineandequipmentwarrantyperiodstatedabove,MTDConsumerGroupIncwill maintainasupplyof warrantedpartssufficientto
meetthe expecteddemandforsuchparts.
9. Anyreplacementpartmaybe usedinthe performanceof anywarrantymaintenanceorrepairsand mustbeprovidedwithoutchargetothe owner.Suchusewill
notreducethe warrantyobligationsof MTDConsumerGroupInc.
10.Add-onor modifiedpartsthatare notexemptedbythe AirResourcesBoardmaynot beused.Theuseof any non-exemptedadd-onor modifiedpartsby the
ultimatepurchaserwillbegroundsfor disallowingawarrantyclaims.MTDConsumerGroup Incwill notbeliableto warrantfailuresofwarrantedpartscaused
bythe useof a non-exemptedadd-onormodifiedpart.
Page 31

WARRANTED PARTS:
Therepairorreplacementofanywarrantedpart otherwiseeligibleforwarrantycoveragemaybe excludedfromsuchwarrantycoverageif MTDConsumerGroup
Incdemonstratesthattheoutdoorequipmentenginehasbeenabused,neglected,orimproperlymaintained,and thatsuchabuse,neglect,or impropermainte-
nancewasthe directcauseof the needfor repairorreplacementofthe part.Thatnotwithstanding,anyadjustmentof a componentthat hasafactoryinstalled,
andproperlyoperating,adjustmentlimitingdeviceisstill eligibleforwarrantycoverage.Further,the coverageunderthis warrantyextendsonly to partsthat were
presentonthe off-roadengineandequipmentpurchased.
Thefollowingemissionwarrantypartsarecovered(ifapplicable):
(1)FuelMeteringSystem
• Cold startenrichmentsystem(softchoke)
• Carburetorand internalparts(orfuel injectionsystem)
• Fuelpump
• Fueltank
(2)Air InductionSystem
• Aircleaner
• Intakemanifold
(3) IgnitionSystem
• Sparkplug(s)
• Magnetoignitionsystem
(4) ExhaustSystem
• Catalyticconverter
• SAI(Reedvalve)
(5) MiscellaneousItemsUsedin AboveSystem
• Vacuum,temperature,position,timesensitivevalvesandswitches
• Connectorsandassemblies
(6) EvaporativeControl
• Fuelhose
• Fuelhoseclamps
• Tetheredfuelcap
• Carboncanister
• Vapor lines
GDOC-100223
Page 32

MANUFACTURER'S LiMiTED WARRANTY FOR
The limited warranty set forth below is given by MTD LLC with
respect to new merchandise purchased andused in the United States
and/or its territories and possessions, and by MTD Products Limited
with respect to new merchandise purchased and used in Canadaand/
or its territories and possessions (either entity respectively, "MTD").
"MTD" warrants this product (excluding its Normal WearParts and
Attachments as described below) against defects in material and
workmanship for a period of two (2) years commencing onthe date
of original purchase and will, at its option, repair or replace,free of
charge, any part found to be defective in materials or workmanship.
This limited warranty shall only apply if this product has been
operated and maintained in accordance with the Operator's Manual
furnished with the product, and has not beensubject to misuse,
abuse, commercial use, neglect, accident, improper maintenance,
alteration, vandalism, theft, fire, water, or damage because of other
peril or natural disaster. Damageresulting from the installation or use
of any part, accessory or attachment not approved by MTD for use
with the product(s) covered bythis manual will void your warranty as
to any resulting damage.
Normal WearParts arewarranted to befree from defects in material
andworkmanship for a period of thirty (30) days from the date of
purchase. Normal wear parts include, but are not limited to items
such as: batteries, belts, blades, blade adapters, tines, grass bags,
wheels, rider deck wheels, seats, snow thrower skid shoes, friction
wheels, shaveplates, auger spiral rubber andtires.
Attachments-- MTD warrants attachments for this product against
defects in material and workmanship for a period of one (1) year,
commencing on the date of the attachment's original purchase or
lease.Attachments include, but are not limited to items such as:
grass collectors and mulch kits.
HOWTO OBTAINSERVICE:Warranty service is available, WITH
PROOFOFPURCHASE,through your local authorized service dealer.
Tolocate the dealer in your area:
In the U.S.A.
Checkyour Yellow Pages,or contact MTD LLC at RO. Box 361131,
Cleveland, Ohio 44136-0019, or call 1-800-800-7310, 1-330-220-
4683 or log on to our Web site at www.mtdproducts.com.
In Canada
Contact MTD Products Limited, Kitchener, ON N2G4J1, or call 1-800-
668-1238 or log on to our Web site atwww.mtdcanada.com.
This limited warranty does not provide coverage in the following
cases:
a. Theengine or component parts thereof. These items may carry a
separate manufacturer's warranty. Referto applicable manufac-
turer's warranty for terms and conditions.
b. Log splitter pumps, valves, and cylinders havea separate one-
yearwarranty.
c. Routine maintenance items such as lubricants, filters, blade
sharpening, tune-ups, brake adjustments, clutch adjustments,
deck adjustments, and normal deterioration of the exterior finish
dueto use or exposure.
d. Service completed by someone other than an authorized service
dealer.
e. MTD does not extend any warranty for products sold or exported
outside of the United States and/or Canada,and their respective
possessions and territories, except those sold through MTD's
authorized channels of export distribution.
f. Replacement parts that are not genuine MTD parts.
g. Transportation charges and service calls.
h. MTD does not warrant this product for commercial use.
No implied warranty, includingany implied warranty of
merchantability of fitness for a particular purpose, applies after
the applicable periodof express written warranty above as to the
parts as identified. No other express warranty, whether written or
oral, except as mentioned above, given by any personor entity,
includinga dealer or retailer, with respect to any product,shall
bind MTD. Duringthe period of the warranty, the exclusive remedy
is repair or replacement of the productas set forth above.
The provisionsas set forth inthis warranty providethe sole and
exclusive remedy arising from the sale. MTD shall not be liable
for incidental orconsequential loss or damage including, without
limitation, expenses incurred for substitute or replacement lawn
careservices or for rental expenses to temporarily replace a
warranted product.
Some states do not allow the exclusion or limitation of incidental
or consequential damages, or limitations on how long an implied
warranty lasts, so the above exclusions or limitations may not apply
to you.
In no event shall recovery of any kind begreater than the amount of
the purchase price of the product sold. Alteration of safety features of
the product shall void this warranty. You assume the risk and liability
for loss, damage, or injury to you and your property and/or to others
andtheir property arising out of the misuse or inability to use the
product.
This limited warranty shall not extend to anyone other than the
original purchaser or to the person for whom it was purchased as a
gift.
HOWSTATELAW RELATESTOTHISWARRANTY: This limited
warranty givesyou specific legal rights, and you may also have other
rights which vary from state to state.
IMPORTANT:Owner must present Original Proof of Purchase to
obtain warranty coverage.
MTD LLC, P.O. BOX 361131 CLEVELAND, OHiO 44136=0019; Phone: 1=800=800=7310, 1=330=220=4683
MTD Canada Limited =KITCHENER, ON N2G 4J1; Phone 1=800=668=1238
GDOC-lO0015 REV. B
 Loading...