

Page 1

Safetyo Assembly o Operation oTips &Techniques oMaintenance *Troubleshooting o Parts Lists oWarranty
®
ModelG839EShown
21" Rotary Mower -- Model Series 830
READ SAFETY RULES AND mNSTRUCTmONS CAREFULLY BEFORE OPERATION
Warning: This unitis equippedwithan internalcombustionengineandshouldnotbeusedonornearanyuniiprovedforest=covered,brush=
coveredor grass=coveredlandunlesstheengine'sexhaustsystemisequippedwithasparkattestermeetingapplicablelocalorstatelaws(ifany),
if a sparkattesteris used,itshouldbemaintainedineffectiveworkingorderbytheoperator,inthe StateofCaliforniatheaboveis requiredbylaw
(Section4442ofthe CaliforniaPublicResourcesCode),Otherstatesmayhavesimilarlaws,Federallawsapplyonfederallands,A sparkattester
forthe mufflerisavailablethroughyournearestengineauthorizedservicedealerorcontacttheservicedepartment,RO,Box361131Cleveland,
Ohio44136-0019,
FORMNO,769=01541
PRINTEDiN U,S,A MTD LLC, P.O. BOX 361131 CLEVELAND, OHiO 44136-0019 1/4/2005
Page 2
This Operator's Manua_ is an important part of your new lawn mower, mtwH_ he_p you assemble,
prepare and maintain the unit for best performance. Please read and understand what it says.
Table of Contents
Slope Gauge ....................................................... 3
Safe Operation Practices ................................... 4
Setup and Adjustment ....................................... 6
Operating Your Lawn Mower .............................. 8
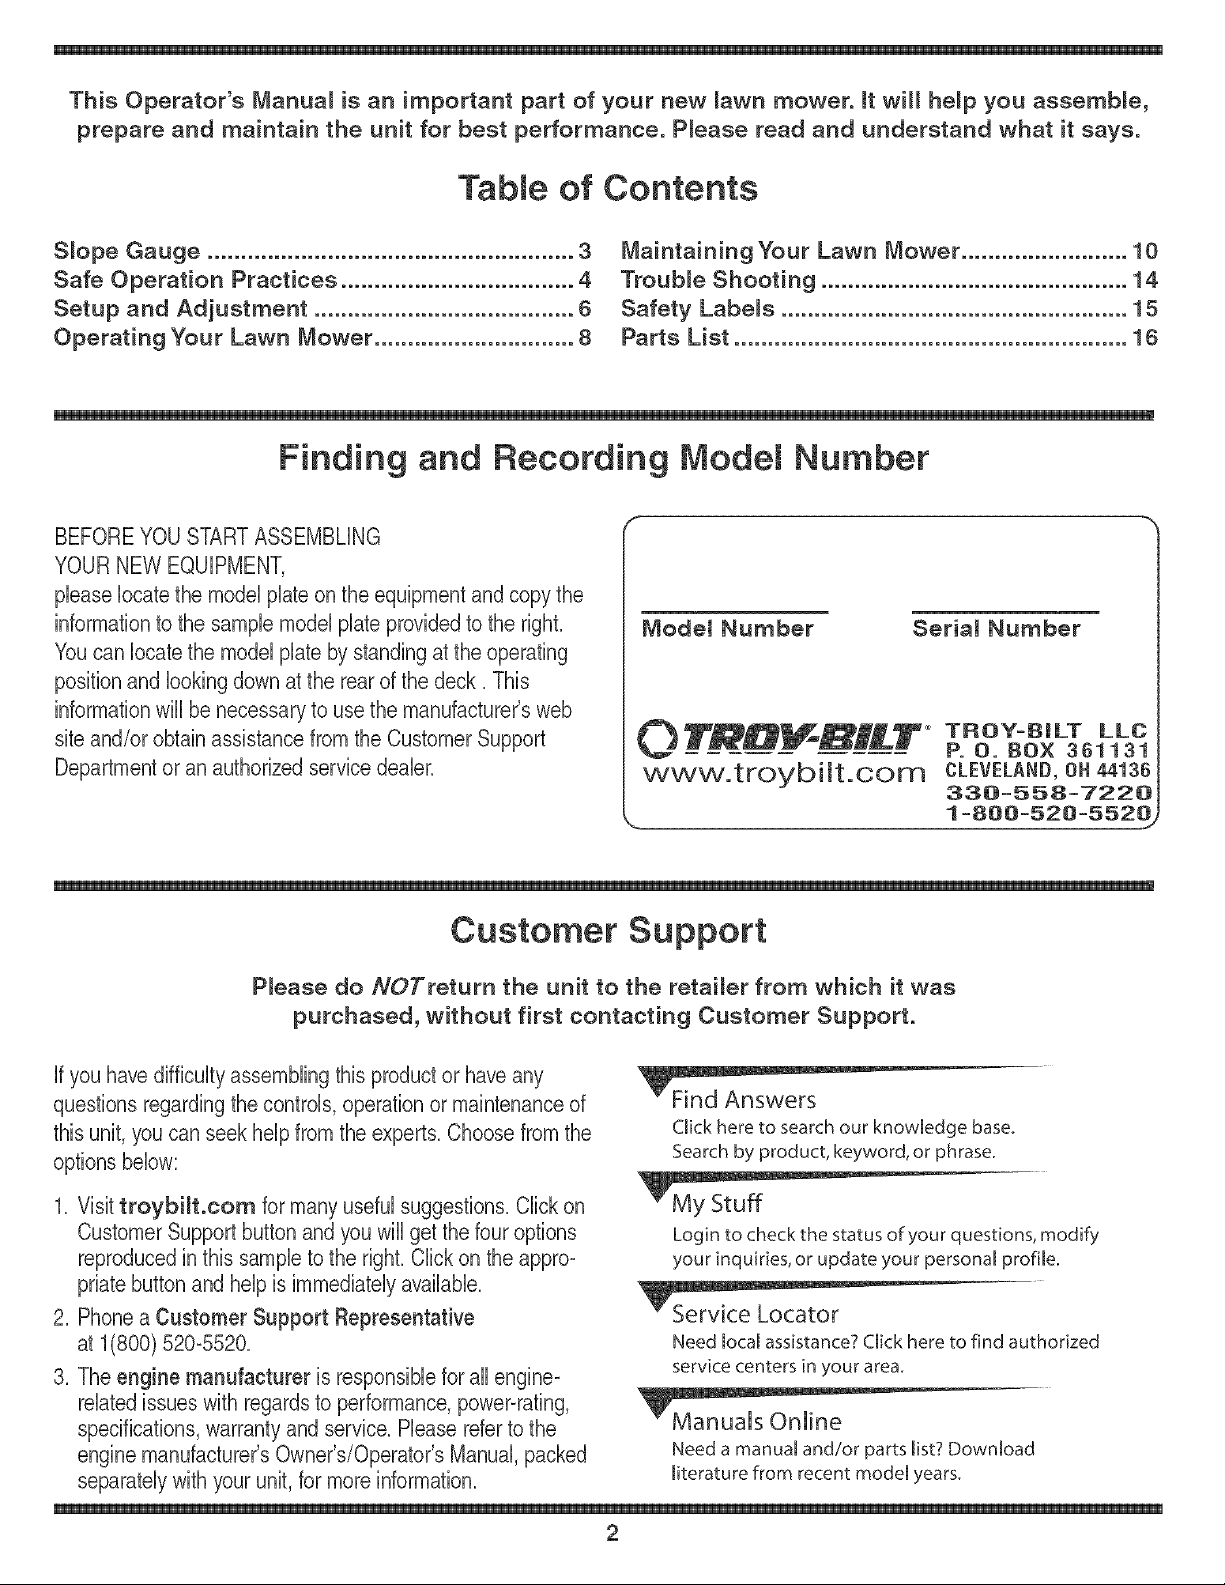
Finding and Recording Model Number
BEFOREYOU STARTASSEMBLING
YOURNEW EQUIPMENT,
please locatethe modelplate onthe equipmentand copythe
informationto the sample model plate providedto the righL
Youcan locatethe modelplateby standing atthe operating
positionand lookingdown at the rearof the deck_ This
informationwill be necessaryto usethe manufacturer'sweb
site and/or obtainassistancefrom theCustomerSupport
Departmentoran authorizedservice dealer_
Maintaining Your Lawn Mower ......................... 10
Trouble Shooting .............................................. 14
Safety Labels .................................................... 15
Parts List ........................................................... 16
Modem Number Serial Number
O TRO_X_--T° TBOY=BRLT LLC
P. O. BOX 361131
www.troybilt.com CLEVELAND, ON 44136
33e=558=7220
% J
1 =800=52e=552e
Customer Support
P{ease do NOTreturn the unit to the retailer from which it was
purchased, without first contacting Customer Support.
Ifyou havedifficulty assemblingthis productor have any
questions regardingthe controls, operationor maintenanceof
this unit, you can seek help from the experts.Choose from the
options below:
1. Visit troybHt.com for manyuseful suggestions.Clickon
CustomerSupport button and you will get the fouroptions
reproducedin this sampleto the right.Click on the appro-
priatebutton and help is immediatelyavailable.
2. Phonea Customer Support Representative
at 1(800)520-5520.
3. The engine manufacturer is responsiblefor all engine°
relatedissueswith regardsto performance,power-rating,
specifications,warrantyand service. Pleasereferto the
eng Need a manual and/or parts list? Download
separatelywithyour unit, for more information, literature from recent model years.
Click here to search our knowledge base.
Searchby product, keyword, or phrase.
Login to check the status of your questions, modify
your inquiries, or update your personal profile.
Need local assistance? Click here to find authorized
service centers in your area.
2
Page 3
£
O
_5
o
(D
_5
03
(D
(D
Cz_
O
03 x= S
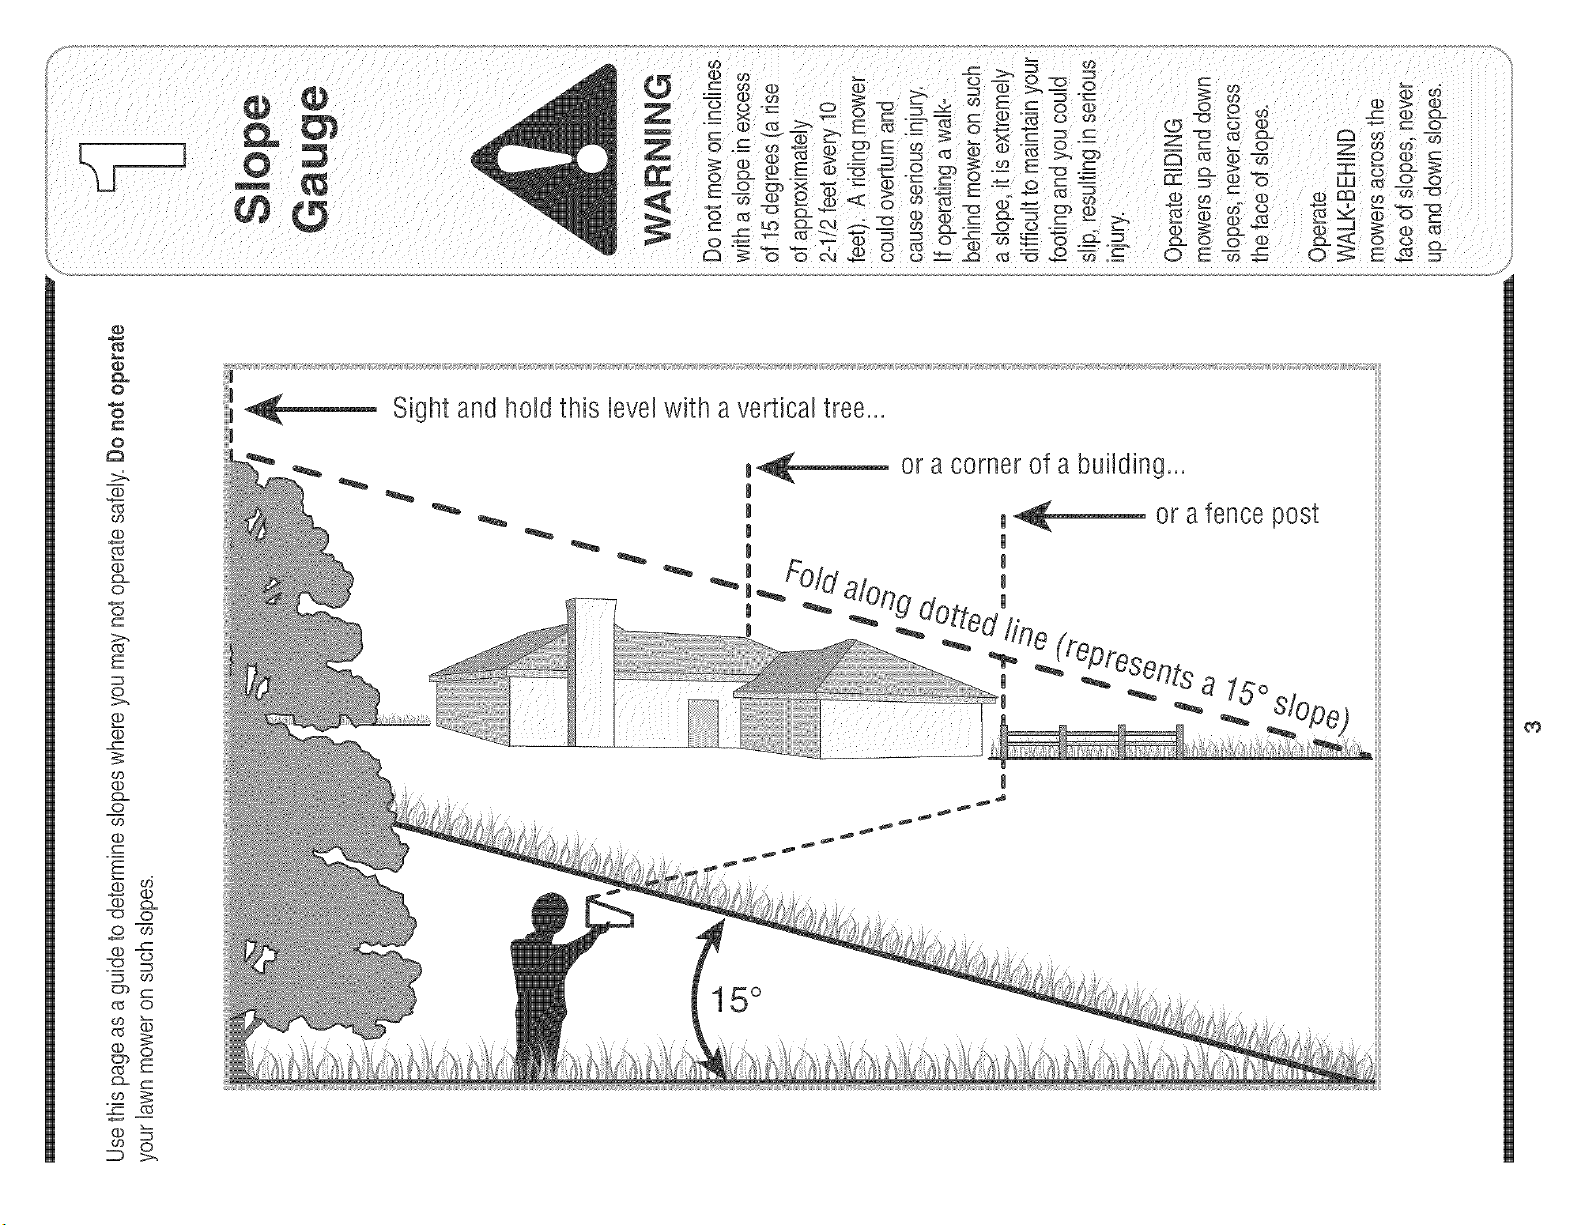
Sight andholdthis levelwith a verticaltree...
_,_ or a corner of a building...
I
__ or afencepost
_5
E
o>.
(D
03
(D
Cz_
o
03
(D
@ CZ.
"7C_ O
o_
"_ o3
Ob
_50
(D O
Ob
£3-
03
D ;>.
0_
15°
E
Page 4
manual.As with any type of powerequipment,carelessnessor error onthe partof the operatorcan
resultin seriousinjury.This machineis capable of amputatinghandsand feet and throwing objects.
! Failureto observethe followingsafetyinstructionscould resultin seriousinjuryor death.
Children
Tragicaccidentscan occurifoperatorisnotalertto presence
ofchildren.Childrenare oftenattractedto mowerandmowing
activity.Theydonot understandthe dangers.Neverassume
thatchildrenwill remainwhereyoulastsawthem.
1. Keepchildrenoutofthe mowingareaandunderwatchful
careof aresponsibleadultotherthanthe operator.
2. Bealertandturnmoweroffifa childentersthearea.
3. Beforeand whilemovingbackwards,look behindanddown
forsmallchildren.
4. Useextremecarewhenapproachingblindcorners,
doorways,shrubs,trees,orotherobjectsthatmayobscure
yourvisionofa childwho mayrun intothemower.
5. Keepchildrenawayfromhot orrunningengines.Theycan
sufferburnsfroma hotmuffler.
6. Neverallowchildrenunder14yearsoldto operateapower
mower.Children14yearsold andovershouldreadand
understandoperationinstructionsandsafetyrulesinthis
manualandshouldbetrainedandsupervisedbyaparent.
endangerthe personal
safetyand/or property
1. Readthis operator'smanual carefullyin its entiretybefore
2. Thismachineisaprecisionpieceof powerequipment,
3. Neverallowchildrenunder 14yearsoldto operatethis
4. Thoroughlyinspecttheareawherethe equipmentisto
and followthewarnings 5. Tohelpavoidbladecontactorathrownobjectinjury, ._ generallya_arning of!rouble.........
and i..struction2 stayinoperatorzone behindhandlesandkeepchildren, "
u _ competestop beforeremovngthe grasscatcheror uncog
, ,i bystanders,helpersandpetsatleast75feet frommower .
un_nusmanuau glngthechute
General Operation
attemptingtoassemblethismachine.Read,understand,
andfollow allinstructionsonthe machineandin the
manual(s) beforeoperation.Becompletelyfamiliarwith
thecontrolsandthe properuseof thismachinebefore
operatingit.Keepthismanualin asafeplaceforfuture
andregularreferenceandfor orderingreplacementparts.
nota plaything.Therefore,exerciseextremecautionat all
times.Yourunithasbeendesignedto performonejob: to
mowgrass.Do notuseitfor anyotherpurpose.
machine.Children14yearsoldand overshouldreadand
understandthe instructionsinthis manualandshould
betrainedand supervisedbya parent.Onlyresponsible
individualswhoarefamiliarwiththese rulesof safe
operationshouldbeallowedtousethis machine.
beused.Removeall stones,sticks,wire,bones,toysand
otherforeignobjectswhichcould betripped overor picked
upand thrownbythe blade.Thrownobjectscancause
seriouspersonalinjury.Planyourmowingpatternto avoid
dischargeofmaterialtowardroads,sidewalks,bystanders
andthe like.Also,avoiddischargingmaterialagainsta
wallorobstructionwhichmaycausedischargedmaterial
toricochetbacktowardtheoperator.
whileit isin operation.Stopmachineifanyoneenters
6. Alwayswearsafetyglassesorsafetygogglesduringopera-
tionandwhileperforminganadjustmentor repairtoprotect
youreyes.Thrownobjectswhich ricochetcancauseserious
injurytothe eyes.
7. Wearsturdy,rough-soledworkshoesand close-fitting
slacksandshirts. Shirtsand pantsthatcoverthe armsand
legsandsteel-toedshoesare recommended.Neveroperate
thismachinein barefeet,sandals, slipperyor lightweight
(e.g.canvas)shoes.
8. Donotputhandsorfeet nearrotatingpartsor undercutting
deck.Contactwithbladecanamputatehandsandfeet.
9. Amissingor damageddischargecovercancauseblade
contactor thrownobject injuries.
10.Manyinjuriesoccurasa resultofthe mowerbeingpulled
overthefoot duringafall causedby slippingortripping.
Do notholdonto the mowerifyouarefalling;releasethe
handleimmediately.
11.Neverpullthe mowerbacktowardyouwhileyouare
walking.Ifyou mustbackthe mowerawayfromawallor
obstructionfirstlookdownandbehindtoavoidtrippingand
thenfollow thesesteps:
a. Stepbackfrommowertofully extendyourarms.
b. Be sureyou arewellbalancedwithsurefooting.
c. Pullthemowerback slowly,no morethanhalfway
towardyou.
d. Repeatthesestepsasneeded.
12.Donotoperatethe mowerwhileunderthe influenceof
alcoholor drugs.
13.Donotengage theself-propelledmechanismon unitsso
equippedwhilestartingengine.
14.Thebladecontrolhandleis asafetydevice.Neverattempt
tobypassits operation.Doingso makesthesafetydevice
inoperativeandmay resultinpersonal injurythrough
contactwiththe rotatingblade.The bladecontrolhandle
mustoperateeasilyin bothdirectionsandautomatically
returntothe disengagedpositionwhenreleased.
15.Neveroperatethe mowerinwetgrass. Alwaysbesure of
yourfooting. A slipandfallcan causeseriouspersonal
injury.If youfeelyouare losingyourfooting,releasethe
bladecontrolhandleimmediatelyandthe bladewillstop
rotatingwithinthreeseconds.
16.Mowonlyindaylightor goodartificiallight.Walk,neverrun.
17.Stopthe bladewhencrossinggraveldrives,walksor roads.
18.Ifthe equipmentshouldstart tovibrateabnormally,stopthe
engineandcheck immediatelyforthecause.Vibrationis
]_ _nutthe engne errandwar unl: me Daaecomes-coa
and on the machine, area.
..... ,J
4
Page 5
Thecuttingbladecontinuesto rotatefora fewsecondsafter
the engineisshutoff. Neverplaceanypartofthe bodyin
the bladeareauntilyou aresurethe blade hasstopped
rotating.
20.Neveroperatemowerwithoutpropertrail shield,discharge
cover,grasscatcher,bladecontrolhandleor othersafety
protectivedevicesin placeandworking.Neveroperate
mowerwithdamagedsafetydevices.Failuretodo so,can
resultin personalinjury.
21.Mufflerandenginebecomehotand cancauseaburn.Do
nottouch.
22.Onlyuseparts andaccessoriesmadefor thismachineby
manufacturer.Failureto dosocanresult inpersonalinjury.
23.Ifsituationsoccurwhichare not coveredinthis manual,
usecareand goodjudgment.Contactyourdealerfor
assistance.Telephone1-800-800-7310forthe nameofyour
nearestdealer.
SJope Operation
Slopesareamajorfactorrelatedto slipandfallaccidentswhich
canresultinsevereinjury.Operationonslopesrequiresextra
caution.Ifyoufeel uneasyonaslope,donotmowit.Foryour
safety,usethe slopegaugeincludedas partofthis manualto
measureslopesbeforeoperatingthisunitona slopedor hilly
area.Iftheslopeis greaterthan15degrees,donotmowit.
Do:
1. Mowacrossthefaceof slopes;neverup anddown.
Exerciseextremecautionwhenchangingdirectionon
slopes.
2. Watchfor holes,ruts, rocks,hiddenobjects,or bumpswhich
can causeyou toslipor trip.Tallgrasscan hideobstacles.
3. Alwaysbesure ofyourfooting.A slip andfallcan cause
seriouspersonalinjury.If youfeelyouarelosingyour
balance,releasetheblade controlhandleimmediately,and
the bladewillstop rotatingwithin3seconds.
Do Not:
1. Donotmowneardrop-offs, ditchesorembankments,you
could loseyourfootingor balance.
2. Donotmowslopesgreaterthan15degrees asshownon
the slopegauge.
3. Donotmowon wetgrass.Unstablefootingcouldcause
slipping.
Service
Safe HandlingOf Gaso%e:
1. Toavoidpersonalinjuryor propertydamageuseextreme
carein handlinggasoline.Gasolineisextremelyflammable
andthevaporsare explosive.Seriouspersonalinjurycan
occurwhengasolineis spilledonyourselforyourclothes
whichcanignite.
2. Washyour skinand changeclothesimmediately.
3. Useonly anapprovedgasolinecontainer.
4. Neverfill containersinsideavehicleoronatruckor trailer
bedwith a plasticliner.Alwaysplacecontainerson the
groundawayfromyourvehiclebeforefilling.
5. Removegas-poweredequipmentfromthe truck ortrailer
andrefuelit on theground.Ifthisis notpossible,then refuel
suchequipmentonatrailerwitha portablecontainer,rather
thanfroma gasolinedispensernozzle.
6. Keepthe nozzleincontactwiththerim of thefuel tankor
containeropeningat alltimesuntilfuelingis complete.Do
notusea nozzlelock-opendevice.
7. Extinguishallcigarettes,cigars,pipesandothersources
ofignition.
8. Neverfuelmachineindoorsbecauseflammablevaporswill
accumulatein the area.
9. Neverremovegascap oraddfuelwhileengineishot or
running. Allowengineto coolat leasttwominutesbefore
refueling.
10.Neveroverfillfueltank. Filltankto nomorethan_ inch
belowbottomof fillerneckto provideforfuelexpansion.
11.Replacegasolinecapandtightensecurely.
12.Ifgasolineis spilled,wipeit off theengineand equipment.
Moveunitto anotherarea.Wait5 minutesbeforestarting
engine.
13.Neverstorethemachineorfuel containernearanopen
flame,sparkorpilot lightas onawater heater,space
heater,furnace,clothesdryeror othergasappliances.
14.Toreducefire hazard,keepmowerfreeofgrass,leaves,
or otherdebrisbuild-up.Cleanupoil orfuel spillageand
removeanyfuel soakeddebris.
15.Allowamowertocool at least5 minutesbeforestoring.
General Service:
1. Neverrunanengineindoorsorina poorlyventilatedarea.
Engineexhaustcontainscarbonmonoxide,an odorlessand
deadlygas.
2. Beforecleaning,repairing,or inspecting,makecertainthe
bladeandall movingpartshavestopped.Disconnectthe
sparkplugwireandgroundagainsttheengineto prevent
unintendedstarting.
3. Checkthe bladeandenginemountingboltsatfrequent
intervalsfor propertightness.Also,visuallyinspectbladefor
damage(e.g.,bent,cracked,worn)Replacebladewiththe
originalequipmentmanufacture's(O.EM.) bladeonly,listed
inthismanual."Useofpartswhichdo notmeettheoriginal
equipmentspecificationsmayleadto improperperformance
andcompromisesafety!"
4. Mowerbladesare sharpandcancut.Wrapthebladeorwear
gloves,anduseextracautionwhenservicingthem.
5. Keepallnuts,bolts,andscrewstighttobe surethe equip-
mentisin safeworkingcondition.
6. Nevertamperwithsafetydevices.Checktheirproperopera-
tionregularly.
7. Afterstrikinga foreignobject,stopthe engine,discon-
nectthe sparkplugwireandgroundagainsttheengine.
Thoroughlyinspectthemowerforanydamage.Repairthe
damagebeforestartingandoperatingthemower.
8. Neverattempttomakea wheelorcuttingheight adjustment
whiletheengineis running.
9. Grasscatchercomponents,dischargecover,andtrail
shieldaresubjecttowear anddamagewhichcould expose
movingpartsorallow objectsto bethrown.Forsafety
protection,frequentlycheckcomponentsand replaceim-
mediatelywithoriginal equipmentmanufacturer's(O.EM.)
partsonly,listedin this manual."Useof partswhich do
not meettheoriginalequipmentspecificationsmayleadto
improperperformanceandcompromisesafety!"
10.Donot changetheenginegovernorsettingor overspeedthe
engine.Thegovernorcontrolsthe maximumsafeoperating
speedofthe engine.
11.Maintainorreplacesafetylabels,asnecessary'.
12.Observeproperdisposallawsand regulations.Improper
disposaloffluidsand materialscanharmtheenvironment.
w o°,°o
ThisSymbQUpoints
ua! beforeattempting to
resuUt in personaUinjury_
::When you see th s
_symbol
,EEDMTSWARNmNG
Responsibility
Restd_tthe use
of this powermachine
to personswhoread
understand
5
Page 6

NOTE:Stand behind
Ihemoweras ifyou
Jveregoingto operate
it,Your righthandcor-
espondsto the right
sideof the mower;your
left hand corresponds
to the left sided the
mower.
NOTE: Forshipping
purposesyour mower
is setwith the wheels
in a lowcutting
heightposition, For
bestresults raisethe
cutting positionuntil il
is determinedwhich
heightis best for your
lawn.See Step 8 for
details.
Figure 1
Figure 2
zJ'i .........
1. Removegrasscatcherand anypackingmaterial
whichmaybe betweenupperandlowerhandles.
a. Removehandknobsfromhandlebracketsand
pullupand backon upperhandleasshownin
Figure1.Makecertainthelowerhandb isseated
securelyintothe handb mountingbrackets,
b. Tightenhandknobssecuringupperhandbto
lowerhandb. Makesurethateach carriageboltis
seatedproperlyinthe handb.
2. Replaceandtightenhandknobsremovedearlbr
securinglowerhandbto handlebrackets,SeeFigure
2.
3. Theropeguideis attachedtotherightsideofthe
upperhandb. Loosenthewingnutwhichsecuresthe
ropeguide,SeeFigure3.
a. Holdthe bladecontrolagainstupperhandle.
b. Pullstarterropeoutofthe engine,Releasethe
bladecontrol.
c. Slipstarterropeintoropeguide,Tightenwingnut,
4. Attachcanes to thelowerhandb withthecane ties
alreadyonthe lowerhandle.Insertpegson cane ties
intothe hobs on the lowerhandle.Pullcane tiestight
andcutoff theextra,
5, Followstepsbelowtoattachgrasscatcher:
a. Lift reardischargedoorand removemulching
baffle.
b, Placegrasscatcheronthepivotrod,Letgo
ofdischargedoorso thatit restsonthegrass
catcher,SeeFigure4.
WARNING: Never operate mower
unless the hooks on the grass
catcher are firmly seated in the
slots on the handle bracket as°
semblies, and the rear discharge
door rests firmly against top of
the grass catcher.
IMPORTANT
DO NOTcrimpthe
cableswhen liftingthe
handleup.
IMPORTANT
This unit isshipped
without gasolineor
oil inthe engine. Fill
upgasoline and oil
manual BEFORE
operating your mower.
Figure 3
Figure 4
6
Page 7

6 Followstepsbelowtoinstallthemulchingbaffle:
a Liftthereardischargedoorandliftthegrass
catcherupandoff of thepivotrod,if installed
b Insertthemulchingbaffleas showninFigure5
and releasethereardischargedoor
7 To converttosidedischarge,makesuregrasscatcher
isoffthe unitandreardischargedooris closed
a On thesideof themower,liftthemulchingplug
b Slidetwo hooksof side-dischargechuteunder
hingepinon mulchingplugassemblyLowerside
mulchingplug SeeFigure6 Donotremovethe
sidemulchingplugat anytime,evenwhenyouare
notmulching
8 The cuttingheightadiustmentleveris locatedabove
therearbft wheel SeeFigure7
a Pulltheleveroutandawayfromthe mower
b Movethe leverforwardorbackfor desiredcutting
height
c Rebaselevertowardsmowerdeck
9 The adiustmentwheelis locatedinthedrivecontrol
handlehousingandis usedto tightenor loosenthe
drivebelt Youwill haveto adiustthedrivecontrolif
anyof thefollowinghappens:
a The mowerdoesnot propelitselfwiththe drive
controlengaged
b The mower'sdrivewheelshesitatewiththedrive
controlengaged
If eitherof theseconditionsoccur,rotatetheadiustment
wheelclockwisetotightenthe cabb and counter-clocb
wisetoloosenthecabb toadjustthe drivecontrol See
Figure8
Figure 5
For rough oruneven
Figure 6
/
/
/
1
Never operate mower
unless the hooks on
the grass Catcher are
firmly seated in the
\
Figure 8
Figure 7
f rmly against top of
the grass catcher,
7
Page 8

Recoil
Control
__ Electric Start
Ignition Switcht
Height LAedjeustment
Fill
GasolineFiII
WARNING
The blade control
mechanism is a
safety device. Never
attempt to bypassits
operations.
Use extreme care
when handling
gasoline. Gasoline is
extremely flammable
and the vapors are
explosive. Neverfuel
the machine indoors
or while the engine
is hot or running.
Extinguish cigarettes,
cigars, pipes and
other sources of
ignition.
Keep hands and feet
_way from the chute
tea on cutting deck.
Refer to warning
label on the unit.
Figure 9
Now that you have set up your lawn mower for op-
eration, get aquainted with its controls and features=
These are described below and illustrated on this
page=This knowledge will allow you to use your
new equipment to its fullest potential=
Blade Control
The blade control is attached to the upper handle
of the mower= Depress and squeeze it against the
upper handle to operate the unit=Release it to stop
engine and blade=
WARNING:This bladecontrol mecha-
nism isa safety device. Neverattempt
to bypass itsoperations.
Drive Contro_
The drive control is Iocated on the upper handIe=
Squeeze the drive control to engage the drive
system= Release it to disengage the drive system=
Release the drive controI to slow down when ap-
proaching an obstacle, making a turn, or stopping=
See Figure 9=
Cutting Height Adjustment Lever
The cutting height adjustment lever is located
above the left rear wheeI. To adjust the cutting
height, refer to the Adjustment Section on page 7=
Recoi_ Starter
The recoiI starter is attached to the right upper
handle= Stand behind the unit and puII the recoil
starter rope to start the unit=
E_ectric Start Ignition Switch (if
equipped)
If your mower is equipped with an electric starter,
the ignition switch is located on the left side of the
handle panel= It is used only for the electric starter=
FreshStart TM Gas Cap (if Equipped}
This unit may be equipped with a FreshStart TM con-
tinuous fuel preserver gas cap which automatically
drips continuous fuel preserver into your fuel tank for
up to six months depending on conditions, such as
temperature, usage patterns, fuel type and blend= To
activate the gas cap, follow the instructions below:
1, Snap the fuel preserver cartridge that comes with your
unit into the fuel cap,
2, Peel off the white tab from the cartridge,
3, Twist the FreshStartTM cap onto the fuel tank,
When you visually see that the fueI preserver car-
tridge is empty, replacement cartridges are available
through your local Troy-Bilt service dealer=
Gas and Oi_ Fill-Up
1, Check oil level and add oil if necessary, Follow engine
manual for this, See Figure 9 above for location of the
oil fill
2, Service the engine with gasoline as instructed in the
engine manual See Figure 9 above for location of
gas fill
WARNING:Useextreme care when han-
dling gasoline. Gasoline is extremely
flammable andthe vapors areexplosive.
Neverfuel the machine indoors or while
the engine is hotor running. Extinguish
cigarettes, cigars, pipesandother
sources of ignition.
Electric Start Units Only
Charge battery for 16 hours before initial use= Follow
instructions on page 11 in Maintenance section=
8
Page 9

adjustments or repairs on it.
Starting Engine
_k ARNING:Besure no one other than
1, Pushprimerthreetimes,Waitabouttwoseconds
betweeneachpush,SeeFigure10,Intemperature
around55° F or below,primefivetimes,Donotprime
to restarta warmengine,
2, Standingbehindthe mower,squeezethebladecontrol
againstupperhandle,SeeFigure10,
3, Recoil Start: Grasprecoilstarterhandleandpull
ropeoutwitha rapid,continuous,fullarm stroke,See
Figure2,Keepingafirmgrip onthestarterhandle,let
theroperewindslowly,Repeatuntilenginecranks,Let
theroperewindeachtimeslowly,
Electric Start: Turnignitionkeytothe righttostart
theengine,Releasethekeyaftertheenginestarts,
the operator is standing nearthe lawn
mowerwhile starting engine or operato
ing mower.Neverrun engine indoors
or in enclosed, poorly ventilated areas.
Engine exhaustcontains carbon monox-
ide,an odorless and deadly gas. Keep
hands,feet, hair and loose clothing
awayfrom anymoving parts onengine
and lawn mower.
Stopping Engine
1, Releasebladecontroltostopthe engineandblade,
2, Disconnectsparkplugwire fromsparkplugand
groundagainsttheengine,
WARNING:Wait for the blade to stop
completely beforedoing anywork
on the moweror to removethe grass
catcher.
Using Your Lawn Mower
WARNING:Neveroperateyour mower
without either the rear door or the entire
grass catcher assembly firmly secured.
Be surelawnisclear ofstones,sticks,wire,or other
obiectswhichcoulddamagelawnmowerorengine,
Suchobiectscouldbe accidentlythrownbythemower
in anydirectionandcauseseriouspersonaliniuryto the
operatorandothers,
Figure 10
WARNING:If you strike aforeign
object, stop the engine. Remove
wire from the spark plug, thoroughly
inspect mowerfor any damage,and
repair damagebefore restarting and
operating. Extensivevibration of
mower during operation isan indica-
tion of damage.Theunit should be
promptly inspected and repaired.
1, Oncethe engineisrunning,squeezethedrive
controlagainsttheupperhandleto propelmower,
2, Forbestresults,do notcut wetgrass,
3, Fora healthierlawn,nevercutoff morethanone-
thirdof thetotallengthofthe grass,
Using as Muncher
Formulchinggrass,removethegrasscatcherfromthe
mower,The reardischargedoorshouldbeclosed,
1, Foreffectivemulching,do notcut wetgrass,
2, Neworthickgrassmayrequirea narrowercut,
Adiustgroundspeedaccordingtoconditionoflawn,
3, If thegrasshas beenallowedto growinexcessof
4 inches,mulchingisnotrecommended,Usethe
grasscatcherto bagclippingsinstead,
Using Grass Catcher
Youcanusethegrasscatchertocollectclippingswhile
youareoperatingthemower,
1, Attachgrasscatcherfollowinginstructionsonpage
7,Grassclippingswill automaticallycollect inbagas
yourun mower,Operatemowertillgrassbagisfull,
2, Stopenginecompletelybyreleasingtheblade
control Makesurethatthe unithascometo a
completestop,
3, Liftdischargedoorand pullgrassbagupandaway
fromthemowertodisposeofthe grassclippings,
y
can result
being thrown into
the eyes Which can ;
damage your eyes
severe!y. Nways wear
safety glasses while
iioperating the mower,
-_ngineor operating
_ower. Never tun
engine !ndoors or
in enclosed poorly
ventilated areas' En_
gine exhaust Contains
carbon monoxide, an
odorless and deadly
_gas, Keep hands, feet,
hair and loose Clothing
away from any mov ng
/
9
Page 10

f====== Lubrication
/ _-J _ 1, Lubricatepivotpointson thebladecontrolat least
"_ _--'_ oncea seasonwithlightoil Thebladecontrolmust
r===_) ) _ ... . operatefreelyinboth directions,SeeFigurell,
\ v / _ _. LuDrlca[e-[nose
,, ,, ,, y= . .
M _ | ['1 t_ ! r'_ | r'_ C reason,lubricatesurfaceof theaxleand innersurface
_= ='3_ = = ........ ofthe wheelwithhghtoff,SeeFigure11,
- _ pc nts before 2, Lubricatethewheelsat leastoncea seasonwith
-- reassembI' lightoil (or motoroil). Ifwheelsare removedforany
3, Lubricatethetorsionspringandpivotpointontherear
dischargedoorandsidemulchplugperiodicallywith
lightoil to preventrust,SeeFigure11,
4, Thetransmissionis pro=lubricatedandsealedatthe
factoryanddoesnotrequirelubrication,
5, Followtheaccompanyingenginemanualforlubrica-
tionscheduleandinstructionforenginelubrication,
Deck Care
1, Disconnectsparkplugwire,Draingasolinefromlawn
mower,or placea pieceof plasticunderthegascap,
2, Tipmowersothat itrestson thehousing,Keepthe
sidewiththe aircleanerfacingup,Holdmowerfirmly,
.......... ..............
WARNING:Nevertip the mowermore
than 90 degrees in anydirections and
do not leavethe mowertipped for any
length of time. Oil can drain intothe
upper part of the enginecausing a
starting problem.
Ionot reCommend
Figure 12
General Recommendations
1, Alwaysobservesafetyruleswhenperforming
anymaintenance,
2, Thewarrantyon thislawnmowerdoes notcover
itemsthathavebeensubjectedtooperatorabuse
or negfigence,Toreceivefullvaluefromwarranty,
operatormustmaintainthe lawnmoweras
instructedhere,
3, Changingofengine=governedspeedwillvoid
enginewarranty,
4, Alladiustmentsshouldbecheckedat leastonce
eachseason,
5, Periodicallycheckall fastenersandmakesurethese
aretight,
_ ARNING:Always stop engine,
disconnect spark plug, and ground
against engine beforecleaning,
lubricating or doing any kind of
maintenanceon your machine.
3, Scrapeandclean theundersideofthe deckwitha
suitabletool Do notspraywithwater,
4, Putthe mowerbackonits wheelsontheground,If
youhadput plasticunderthe gascapearlier,make
sureto removeitnow,
Engine Care
1, Maintainoil levelas instructedin enginemanual,
2, Serviceaircleanerevery25 hoursundernormal
conditions,Cleaneveryfewhoursunderextremely
dustyconditions,Refertoenginemanual
3, Cleansparkplugandresetthegaponcea season,
Checkenginemanualforcorrectplugtype andgap
specifications,
4, Cleanengineregularlywitha clothorbrush,Keepthe
coolingsystem(blowerhousingarea)cleanto permit
properaircirculation,Removeallgrass,dirtand
combustibledebrisfrom mufflerarea,
Replacing Rear Flap
1, Toreplacerearflap,lift upreardoor,
2, Removetwoself=tappingscrewswhichsecurerear
flapto thedeck, SeeFigure12,
3, Replacewith newflapandsecureto deckwiththe two
self=tappingscrewsremovedearlier,
10
Page 11

Replacing Battery (Electric Start Units f -- "_
Removethebatterypackfromthe handlepanelfor ........
replacementonly.Do notseparatethebatteriesforany
Only)
reason.Disposeof batterbsproperly. _i
WARNING:Batteriescontain sulfuric
acid whichmaycause burns. Donot
short circuit or mutilate batteries inany
way.Do not put batteries infire as these
may buretor release toxic materials.
Thepositivebad onthewire harnesshasthe smalbr
connector.Connectthepositivebad to thepositiveside
ofthe batterypack,thenconnectthenegativeside.
NOTE:Whenreplacingbatterypackin handb panel,bat-
tery packmustbepositionedwiththe positiveterminalto
therightsideandthe negativeterminaltothe leftsideof
panel SeeFigure13.Replacingbatterypackincorrectly
willcauseserious damage,
+ Terminal ......:::::.........
a
Figure 13
Charging Battery
WARNING:The battery contains cor-
rosive fluid and toxic material; handle
with careand keep awayfrom children.
Donot puncture, disassemble, mutilate
or incineratethe battery. Explosive
gases could be vented during charging
or discharging. Use ina well ventilated
area,awayfrom sources of ignition.
1. Removethe protectivecapfromthe endofthe battery
packbad. Alwaysplugchargerbad intobatterypack
bad first,andtheninsertbatterychargerpluginto120
voltstandardhouseholdoutlet.Followthisorderof
actioneverytimeyouchargethebattery.
2. Chargebatteryfor16hoursbeforeinitialuse.Donot
charge longer than 20 hours.
3. Aftercharging,disconnectbatterychargerplugfrom
householdoutbt first,then disconnectchargerbad
frombatterypackbad.
WARNING:Donot removethe battery
pack from the handle panelfor any
reasonother than replacement.
mnqine Fuse (EJectric Start Units Only)
Theunit isequippedwithan in=linefuse.Iftheunitfailsto
start,checkthe fuseinsidethe batterycoverby pushing
in andturningtheend ofthe fuseholdercounter=clock=
wiseandremovingfromthebatterycover.SeeFigure
14.Replacewithstandardautomotive7=1/2ampfuse.
Reinsertintobatterycoverby pushingfuseholderinand
turningclockwise.
Figure 14
_Use only the battery
iiiii_ _ i_ i _f_iiiii_ /
ii i . /
When removing
" J iithe cutting blade
B_ade Care
_ WARNING:Whenremovingcutting replacement or
1. Disconnectsparkplug'direfromsparkplug.Turn or use a heavy rag to
moweronits sidemakingsurethattheair filterand
Figure 15
_for sharpen ng Or
blade for sharpening or replacement, when sliding the belt
protect your handswith a pair of around it, protect
heavy gbves or use a heavy ragto your hands with a
hold blade, pair of heavy glOVes
i /
thecarburetorareup, he d the bade.
2. Removebolt,bladebellsupport,blade,andblade
adapterfromthe enginecrankshaft.SeeFigure15.
11
Page 12

Maintaining
\
Toensuresafeoperationofyourmower,periodically
checkthe bladeboltfor correcttorque,
Be_t Care
1, Disconnectthe sparkplugwireandgroundit against
theengine,
2, Drainthe fueltankor placea pieceof plasticbeneath
thecapto preventgasolineleakage,
3, Tipmoweronits side(aircleanersideofengineup),
4, Removeblade,bladeadapter,andrelatedhardware
asinstructedinBladeCareon Page11,
Figure 8
f
5, Loosenself-tappingscrewthatsecuresdeckbaffleto
thedeck,SeeFigure8,
6, Workingfromtherearof themower,carefullyremove
beltfromtransmissionpulley,
7, Oncebelt isofftransmissionpulley,pushdownon
deckbaffletoaccessenginepulleyandslidebeltoff
thispulleyandout fromunderdeck,SeeFigure9,
8, Replacewith newbelt,workingit betweenthedeck
andbaffle,firstaroundthetransmissionpulleyand
thenthe enginepulley,
NOTE: Makecertainthat beltisseatedcorrectlyand
thatitis ridingsmoothlyontheenginepulleyandisnot
pinchedbetweenthelowerandupperpulleyhalves,
An unbalanced blade
wil! cause excessive
vibrationwhen rotat-
ing at high speeds, it
may cause damage
to mower, and could
break causing per-
sonal injury.
All batteriesdischarge
during storage,Re-
charge batteryevery
two months and before
returningto service.
Figure 9
NOTE:Whenremovingtheblade,bladeadpter,etc,,be
carefulnotto removeor losepartsaboveitassociated
withtheenginepulley,
3, Thebladecan besharpenedwitha file or ona
grindingwheel Do notattemptto sharpentheblade
whileit isstillonthe mower,Whensharpeningblade,
followoriginalangleofgrind,Grindcuttingedges
equallyto keepbladebalanced,
4, Removebladefromthe adapterfortestingbalance,
Balancethebladeon a roundshaftscrewdriverto
check,Removemetalfromthe heavysideuntilit
balancesevenly,
_IL ARNING:An unbalanced blade
5, Lubricatetheenginecrankshaftandtheinner
surfaceofthe bladeadapterwithlightoil, Slidethe
bladeadapterontotheenginecrankshaft,Placethe
bladeon theadaptersuchthat theside oftheblade
marked"Bottom"(orwith partnumber)facesthe
groundwhenthe mowerisinthe operatingposition,
Makesurethat bladeis alignedandseatedon blade
adapterflanges,
6, Placebladebellsupportontheblade,Alignnotches
onthebladebellsupportwithsmallholesinblade,
Replacehexboltand tightenhexbolttotorque:450
in,Ibs,rain,,600in,Ibs, max,
will causeexcessive vibration when
rotating at high speeds.It maycause
damageto mower,and could break
causing personalinjury.
9, Tightenself-tappingscrewsecuringdeckbaffle
loosenedearlier,
10,Replaceblade,bladeadapter,andassociated
hardware,Followinstructionsin BladeCaresection
forproperassembly,
11,Tipmowerbackontoitswheelsandremovepieceof
plasticfromundergas cap(if applicable),
OffoSeason Storage
Thefollowingstepsshouldbetakento prepareyourlawn
mowerforstorage,
1, Cleanandlubricatemowerthoroughlyas describedin
thelubricationinstructions,
2, Wedo not recommendthe useof a pressurewasher
orgardenhoseto cleanyourunit,
3, Refertoenginemanualforcorrectengine
storageinstructions,
4, Coatmower'scuttingbladewithchassisgreaseto
preventrusting,
5, Storemowerina dry,cleanarea,Do notstorenextto
corrosivematerials,suchas fertilizer,
Whenstoringanytypeof powerequipmentin a poorly
ventilatedor metalstorageshed,careshouldbetakento
rust-proofthe equipment,Usingalightoil orsilicone,coat
theequipment,especiallycablesandall movingpartsof
yourlawnmowerbeforestorage,
Battery (If equipped)
The batterymustbestoredwitha full charge,A dis_
chargedbatterywillfreeze,
12
Page 13

Notes
Mower
13
\
Page 14

ble
Shooting
For repairs beyond
the minoradjust-
ments listed here,
eentact an authorized
serviee dealer,
Problem Cause Remedy
EnginefaiUsto start !_ BladecontroEdisengaged, i !. EngageNadeeontrol,
spa[k PlugwiredisconneCte& 2: connect wire toSparkpiug:
3. Filltankwithclean,freshgasoline.
8. Replacefusefollowinginstructions
on page11.
Engineruns erratic 1. Sparkplugwireloose. 1. Connectandtightenspark
plugwire.
2. Blockedfuellineor stalefuel 2. Cleanfuelline;filltankwithclean,
freshgasoline.
3. Ventingas capplugged. 3. Clearvent.
4. Waterordirt infuel system. 4. Drainfueltank.Refillwith
freshfuel.
5. Dirtyaircleaner. 5. Refertoenginemanual.
6. Carburetoroutof adjustment. 6. Refertoenginemanual
Engne overheats 1. Engineoil levellow. I. Fill crankcasewithproperoil
I
2. Airflow restricted. 2. Removeblowerhousng
I andclean.
3. Carburetornotadjustedproperly. 3. Referto enginemanual.
il_ _ i i i
Occasional skips 1. Sparkpluggaptooclose. 1. Adjustgapto.030".
(hesitates)at 2. Carburetoridlemixtureadjustment 2. Referto enginemanual
highspeed improperlyset.
2. Carburetorimproperlyadjusted.
3. Referto enginemanual
Excessive 1. Cuttingbladelooseor unbalanced.
Vibration
2. Bentcuttingblade.
1. Tightenbladeandadapter.
Balanceblade.
2. Seean authorizedservicedealer.
Mowerwill not 1, Wetgrass.
mulchgrass
2. Mowonceat a highcuttingheight,
2. Excessivelyhighgrass.
3. Dullblade.
Uneven cut 1. Dullblade.
thenmowagainat desiredheight
or makea narrowercuttingpath.
3. Sharpenor replaceblade.
1. Sharpenor replaceblade.
3. belt.
Damagedorworn
14
wireandcleanoutdebris.
Page 15

DONOTtemeve safety
(or any) labels frem
mewer fet any reasen,
15
\
Page 16

Shown For Reference
Q
Q
/
@
1 618-04229 TransmissionAssembly
2 710-04223 Screw,M6x 1,0
3 715-0221 DowelPin
4 717-04184 SpurGear,14T-LH
5 717-04192 SpurGear,14T-RH
6 732-0611 ExtensionSpring,,38ODx3,6
7 736-0414 FlatWasher,,570x 1,120x ,062
8 741-0710 SleeveBearing,,502x,627x 1,00
9 748-04073 TransmissionBearingSupport
10 750-04317 Clip Spacer
11 754-04078A WBelt,3Lx35,5
12 7867551A WheeIDustCover
13 787-01262 TransmissionCableBracket
14 634-04207 RearWheel
15 734-04033 FrontWheel
16 687-02133 FrontBracketAssembly
............Shown For Reference
17 687-02134 RearBracketAssembly
18 687-02148 HandleBracketAssembly-RH
19 687-02149 HandleBracketAssembly- LH
20 710-0599 TT Screw,1/4-20x ,500
21 71b0431 RangeLockNut, 3/8q6
22 714-0174 CotterPin
23 720-0223 Grip
24 732-04261 SpringLever
25 73b04271 ExtensionSpring,,500IDx 6,85Lg
26 741-04136 Split HexFlangeBearing
27 750-04305 Spacer
28 787-01235 CrossBracket
29 787-01251 StopBracket
30 736-0504 WaveWasher,,510x ,750x ,017
31 731-05237 SpringBracketCover
16
Page 17

1!IIIII iiiiiiii!i IIIIII
Z i i i
i i
1 721-04107 OilSeal
2 741-04106 PlasticBushing
3 707-04409 ShiftFork
4 707-04540 TransmissionBracket
5 710-04329 Screw,,1590Dx,610
6 710-04374 HexScrew,,159ODx,43
7 711-04386 OutputShaft
8 711-04394 [nputShaft
9 712-0411 HexLockNut,5/16-24
10 715-0129 SpirolPin
11 715-04030 DowelPin
12 717-04194 PlasticGear,28T
13 756-04151 Pulley,3,360D
Z
i_ ill _ i£i£i ii£i ii ii£i ii£i£i ii£i ii£i_
14 721-04110 O-Ring
15 726-04043 PushNut,3/8 [Dx3/40D
16 731-04883 LowerHousing
17 731-05099 UpperHousing
18 731-05100 ClutchLever
19 732-04278 CompressionSpring,,5251Dx,588
20 736-0105 BellWasher,,375x ,870x,063
21 736-04170 FlatWasher,,508[D x 1,00OD
22 736-04178 FeltSIottedWasher
23 736-0572 FlatWasher,,510x 1,00x ,060
24 736-0864 ThrustWasher,,375x ,812x ,060
25 741-04116 BallBearing
17
Page 18

18
Page 19

1 747_1161A BladeControl
2 746_04195 DriveCable
3 746_1130 ControlCable
4 710_1667 Screw,#10_16x ,625
5 731-0620 DriveControlLever
6 731q057 UpperControICover
7 731q058 LowerControlCov'er
8 731_1059 MountingCap
9 710q174 CarriageBolt,5/16_18x 2,0
10 710-1205 EyeBolt
11 720-0279 WingNut
12 720_0284 HandleKnob
13 725_0157 CableTie
14 736_0451 SaddleWasher,,320x,93x,060
15 749_04202 LowerHandle
16 749-04209 UpperHandle
17 787_01213 21"Deck
18 647_04048 GrassCatcherFrame
19 664_04042 GrassCatcher
20 731_05017 RearDoor
21 710_0260A CarriageBolt,5/16_18x,62
22 710q241 Screw,1/4_15x 1,00
23 710_0599 TTScrew,1/4_20x ,500
24 710_0653 TTScrew,1/4_20x ,375
25 710_0654A Screw,3/8_16x1,00
26 710_0703 CarriageScrew,1/4_20x ,75
27 710q044 Screw,3/8_24x1,50
28 710q802 Screw,1/4_20x2,00
29 711_04374 DoorPivotRod
30 711_0993 BeltGuardPin
31 712_04064 FlangeLockNut,1/4_20
32 712_3004A FlangeLockNut, 5/16-18
33 712_3027 FlangeLockNut,1/4_20
34 731_05154 DeckBaffle
35 731_05157 MulchRug
36 731_05185 Trailshield
37 732_04264 DoorTorsionSpring- RR
39 736_0463 FlatWasher,,25x ,630x,0515
40 736_0513 SpringWasher,,890x 1,70x ,048
41 736_0514 FlatWasher,,885x 1,850x,060
42 736-0524B BladeBelISupport
43 742_0741 21"MulchingBlade
44 748_0358 EngineSpacer
45 748-0376C BladeAdapter
46 756_04156 LowerEnginePulley
47 756_04157 UpperEnginePulley
48 787-01224 FrontDeckBaffle
49 736_0270 BellWasher,,265x ,75x ,062
50 687-02055 MulchingBaffle
51 17032A DeflectorChuteAdapter
52 732q014 TorsionSpring
53 747_0710 HingePin
54 731-04177 SideDischargeChute
55 725_1442t ElectricStarterHarnessAssembly
56 710_01111 Screw,1/4_20x 1,25
57 710_01361 Screw,1/4_20x 1,75
58 710_09691 Screw,#12_16x 1,00
59 710_12501 CurvedCarriageBolt,5/16x 1,5
60 712_0324t HexLockNut,1/4_20
61 712-30061 HexNut, 1/4-20
62 712_30101 HexNut,5/16_18
63 725_02981 7,5AmpFuse
64 725_0873t KeySwitch
65 725_12061 Plug
66 725_12761 12VoltBattery
67 725_1428t FuseHolder
68 725q5381 ExtHarness
69 731_0891A1-UpperBatteryTray
70 736_02421 BellWasher,,340x ,872x ,060
71 736_02701 BellWasher,,265x ,75x ,062
72 782_9012t LowerBatteryTray
73 725_0727t BatteryCharger(NotShown)
74 735-0226 RubberGromet
tIf equipped
parts, centact 1,800,
e48L6776or visit www.
machine,use Factory
Approved Parts.
V-BELTS are specially
designed to engage
and disengage safely.
A substitute non OEMI
V-Belt canbe danger-
ous by not disengaging
completely.
19
\
Page 20

MANUFACTURER'S LIMITED WARRANTY FOR
®
The limitedwarrantyset forthbelowis givenbyTroy=BiltLLCwithrespect
tonewmerchandisepurchasedandusedin theUnitedStates,itsposses=
sionsandterritories.
"Troy=Bilt"warrantsthisproductagainstdefectsinmaterialandworkman=
shipfor a periodof two(2)yearscommencingon thedateof original
purchaseandwill,atits option,repairorreplace,freeofcharge,anypart
foundto bedefectivein materialsor workmanship.This limitedwarranty
shallonly applyif this producthasbeenoperatedand maintainedin
accordancewiththe Operator'sManualfurnishedwiththeproduct,and
hasnotbeensubiectto misuse,abuse,commerdaluse,neglect,accident,
impropermaintenance,alteration,vandalism,theft,fire,water,or damage
becauseofother perilor naturaldisaster.Damageresultingfromthe
installationor use ofany part,accessoryorattachmentnotapprovedby
Troy=Biltforusewiththeproduct(s)coveredbythismanualwillvoidyour
warrantyastoany resultingdamage.
Normalwearpartsarewarrantedtobefreefromdefectsinmaterialand
workmanshipforaperiodof thirty(30)daysfromthedateofpurchase.
Normalwearpartsinclude,butare notlimitedto itemssuchas: batteries,
belts,blades,bladeadapters,grassbags,riderdeckwheels,seats,snow
throwerskidshoes,shaveplates,augerspiralrubberandtires.
NOWTO OBTAIN SERVICE: Warranty service is available, WITH
PROOFOF PURCHASE,through your local authorizedservice
dealer,To locate the dealer in yourarea, check your YellowPages,
or contact Troy=BiltLLC at RO, Box 361131,Cleveland,Ohio 44136=
0019,or can 1=800=520=5520or 1=330=558=7220,orlog on to our
Web site at www,troybilt,com,
This limitedwarrantydoesnot providecoverageinthefollowingcases:
a. Theengineorcomponentpartsthereof.Theseitemsmay
carrya separatemanufacturer'swarranty.Refertoapplicable
manufacturer'swarrantyfortermsandconditions.
b. Logsplitterpumps,valves,andcylindershaveaseparateone
yearwarranty.
c. Routinemaintenanceitemssuchaslubricants,filters,blade
sharpening,tune=ups,brakeadiustments,clutch adiustments,
deckadiustments,andnormaldeteriorationof theexteriorfinish
duetouse orexposure.
d. Servicecompletedbysomeoneotherthananauthorizedservice
dealer.
e. Troy=Biltdoesnotextendanywarrantyforproductssoldor
exportedoutsideofthe UnitedStates,its possessionsand
territories,exceptthosesold throughTroy=Bilt'sauthorized
channelsofexportdistribution.
f. Replacementpartsthatare notgenuineTroy=Biltparts.
g. Transportationchargesandservicecalls.
Noimplied warranty, including anyimplied warrantyof merchant°
ability offitness for a particular purpose, applies after the applicable
period of express written warranty aboveasto the parts as identi-
fied. Noother express warranty, whether written or oral, exceptas
mentioned above,given by anyperson or entity, including a dealer or
retailer,with respectto any product,shall bind Troy-Bilt. During the
period of the warranty,the exclusive remedy is repair or replacement
of the product as set forth above.
The provisions as set forth inthis warranty provide the sole and
exclusive remedyarising from the sale. Troy-Bilt shall not be liable
for incidentalorconsequential loss or damage including,without
limitation, expensesincurredfor substitute orreplacementlawncare
services or for rental expenses to temporarily replaceawarranted
product.
Somestatesdonot allowtheexclusionorlimitationofinddentalor
consequentialdamages,or limitationson howlonganimpliedwarranty
lasts,sothe aboveexclusionsor limitationsmaynotapplyto you.
Innoeventshall recoveryof anykind begreaterthantheamountofthe
purchasepriceof theproductsold.Alteration of safety features of the
product shall void this warranty. Youassumetheriskandliabilityfor
loss,damage,oriniurytoyouand yourpropertyand/ortoothersandtheir
propertyarisingout ofthe misuseorinabilityto usethe product.
This limitedwarrantyshallnotextendto anyoneotherthanthe original
purchaseror tothe personforwhomitwaspurchasedasagift.
HOWSTATELAWRELATESTOTHiSWARRANTY:This limitedwar-
rantygh,'esyouspecificlegalrights,andyoumayalsohaveotherrights
whichvaryfromstateto state,
IMPORTANT:OwnermustpresentOriginalProofofPurchasetoobtain
warrantycoverage,
Troy-Bilt LLC, P.O.BOX 361131 CLEVELAND, OHIO 44136-0019; Phone: 1-800-520-5520, 1-330-558-7220
 Loading...