

Page 1

Safety • Assembly • Operation • Tips & Techniques • Maintenance • Troubleshooting • Parts Lists • Warranty
A O AL
(
vShownwithoptionalElectricStart
21" Rotary Mower- Model Series 460
iMPORTANT
READ SAFETY RULES AND iNSTRUCTiONS CAREFULLY BEFORE OPERATION
Warning: Thisunit isequippedwithan internalcombustionengineandshouldnot beusedon or nearanyunimprovedforest-covered,brush-
coveredor grass-coveredlandunlesstheengine'sexhaustsystemisequippedwithasparkarrestermeetingapplicablelocalorstatelaws(if any).
If a sparkarresterisused,it shouldbemaintainedineffectiveworkingorderbytheoperator.IntheStateofCaliforniatheaboveisrequiredbylaw
(Section4442ofthe CaliforniaPublicResourcesCode).Otherstatesmayhavesimilarlaws.Federallawsapplyonfederallands.A sparkarrester
forthe mufflerisavailablethroughyournearestengineauthorizedservicedealeror contacttheservicedepartment,RO.Box361131Cleveland,
Ohio44136-0019.
FORMNO.769-02882A
PRINTEDIN U.S.A. MTD LLC, P.O. BOX 361131 CLEVELAND, OHIO 44136-0019 04/02/2007
Page 2

This Operator's Manual is an important part of your new lawn mower, it will help you assemble,
prepare, and maintain the unit for best performance. Please read and understand what it says.
Table of Contents
Slope Gauge ........................................................ 3
Safe Operation Practices ................................... 4
Setup and Adjustment ....................................... 6
Operating Your Lawn Mower .............................. 8
MTDLLCreservestherightto changeproductspecifications,designs,andequipmentwithoutnoticeandwithoutincurringobligation.
Finding and Recording Model Number
BEFOREASSEMBLINGYOURNEWEQUIPMENT,
pleaselocatethe modelplateon theequipmentand
copythe informationto thesamplemodelplatepro-
videdto the right.Youcan locatethe modelplateby
standingat theoperatingpositionand lookingdown
atthe rearofthe deck.Thisinformationwillbe neces-
saryto usethe manufacturer'swebsite, to obtain
assistancefromthe CustomerSupport Department,
orwhen contactingan authorizedservice dealer.
Maintaining Your Lawn Mower ......................... 10
Troubleshooting ................................................ 14
Off-Season Storage and Safety Labels .......... 15
Parts List ........................................................... 16
Model Number
www.mtdproducts.com
Serial Number
MTD LLC
PoO= BOX 361131
CLEVELAND, OH 44136
330-220-4683
800-800-7310
Customer Support
Please do NOT return the unit to the retailer from which it was purchased, without first
contacting Customer Support.
Ifyou have difficultyassemblingthis productor have anyquestionsregardingthe controls, operation,or maintenanceof this
unit,youcanseek helpfromthe experts.Choose from the options below:
• Visit www.mtdproducts.com
• Call a CustomerSupport Representativeat 1-800-800-7310.
• The engine manufacturer is responsiblefor all engine-relatedissueswith regardsto performance,power-rating,specifica-
tions,warranty and service. Pleasereferto the engine manufacturer'sOwner's/Operator's Manual,packedseparatelywith
your unit, for moreinformation.
2
Page 3
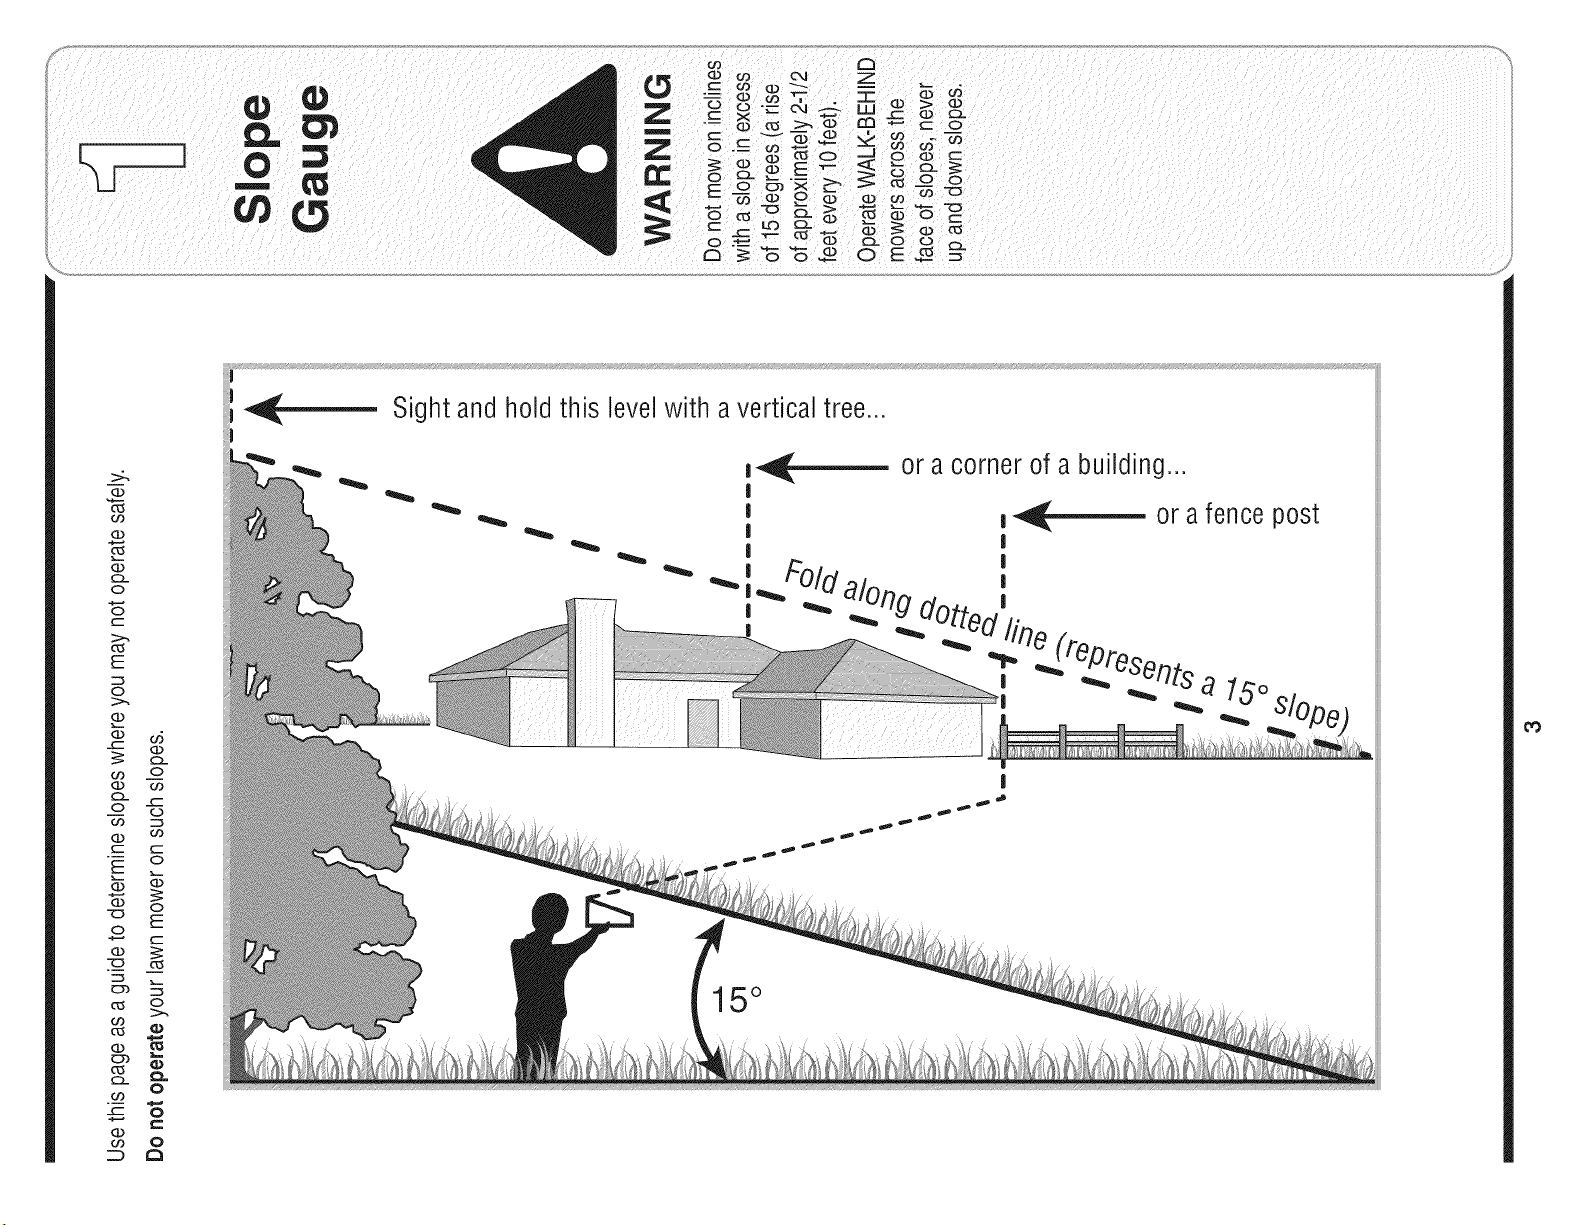
Sightandh01dthis levelwith a verticaltree...
>:.
G.)
o9
(13
(13
O
O
C
::>.,
E
c_
O
G.)
_- (13
o9 .oo
G.) o9
o -_
O9 C:_
G.) O9
C C
_ o
(13
-_ o_
O
(13
c_
o3
c5
C
0
_,_
m_ or a cornerof a building...
|
I
__ or a fence post
|
| |
do;
-- fine (repros
I _ _ erlts a 75o
15°
cO
o9 0
_ a
0
C
Page 4
WARNING: EngineExhaust,some of its constituents, and certain vehicle compo-
nentscontain or emit chemicals known to Stateof Californiato cause cancer and
birth defects or other reproductiveharm.
DANGER: This machinewas builtto be operatedaccordingto the rulesfor safe operation inthis
manual.As with any type of powerequipment,carelessnessor error onthe part ofthe operator
can resultin serious injury.This machine is capable of amputatinghandsand feet and throwing
objects. Failureto observethe following safety instructionscouldresult in seriousinjury ordeath.
WARNING
Thissymbolpoints
out importantsafety
instructionswhich,if
notfollowed,could
endangerthe personal
i safetyand/or property
I ofyourselfand others.
Readandfollowall
instructionsinthis
manualbeforeat-
temptingto operate
i this machine.Failure
I to complywith these
instructionsmayresult
i inpersonalinjury.When
youseethis symbol.
i HEED ITS WARNING!
i Your Responsibility
Restrictthe use
ofthis powermachine
to personswho read.
i understand
andfollow thewarnings
and instructions
I.
=nthis manual
and on the machine.
Children
Tragicaccidentscanoccurifoperatorisnotalertto presence
ofchildren.Childrenare oftenattractedtomowerand mowing
activity.Theydonotunderstandthe dangers.Neverassume
thatchildrenwill remainwhereyoulastsawthem.
1. Keepchildrenoutof the mowingareaand underwatchful
careof a responsibleadultotherthanthe operator.
2. Bealert andturn moweroffif achildentersthearea.
3. Beforeandwhilemovingbackwards,lookbehindanddown
forsmallchildren.
4. Useextremecarewhenapproachingblind corners,
doorways,shrubs,trees,or otherobjectsthatmayobscure
yourvisionofa childwhomayrun intothe mower.
5. Keepchildrenawayfromhotor runningengines.Theycan
sufferburnsfroma hotmuffler.
6. Neverallowchildrenunder14yearsoldto operatea power
mower.Children14yearsoldandovershouldreadand
understandoperationinstructionsandsafetyrulesinthis
manualandshouldbetrainedandsupervisedbyaparent.
General Operation
1. Readthis operator'smanualcarefullyin its entiretybefore
attemptingtoassemblethismachine.Read,understand,
andfollowall instructionsonthe machineandin the
manual(s)beforeoperation.Becompletelyfamiliarwith
thecontrolsandthe properuseof this machinebefore
operatingit.Keepthis manualin asafeplaceforfuture
andregularreferenceandfor orderingreplacementparts.
2. Thismachineisa precisionpieceof powerequipment,
nota plaything.Therefore,exerciseextremecautionat all
times.Yourunithas beendesignedto performonejob: to
mowgrass.Do notuseit for anyotherpurpose.
3. Neverallow childrenunder14yearsoldto operatethis
machine.Children14yearsoldand overshouldreadand
understandthe instructionsinthis manualandshould
betrainedand supervisedbya parent.Onlyresponsible
individualswhoarefamiliarwiththese rulesof safe
operationshouldbeallowedto usethis machine.
4. Thoroughlyinspectthe areawherethe equipmentisto
beused.Removeall stones,sticks,wire,bones,toys
andotherforeignobjects,whichcouldbetrippedover or
pickedupandthrownbythe blade.Thrownobjects can
causeseriouspersonalinjury.Planyourmowingpattern
toavoiddischargeof materialtowardroads,sidewalks,
bystandersandthe like.Also,avoiddischargingmaterial
againsta wallor obstruction,whichmaycausedischarged
materialto ricochetbacktowardthe operator.
5. Tohelpavoidbladecontactora thrownobjectinjury,
stayinoperatorzone behindhandlesandkeepchildren,
bystanders,helpersandpetsatleast75feetfrom mower
whileit is inoperation.Stop machineifanyoneenters
area.
6. Alwayswearsafetyglassesor safetygogglesduringopera-
tionandwhileperforminganadjustmentor repairtoprotect
youreyes.Thrownobjectswhich ricochetcancauseserious
injurytothe eyes.
7. Wearsturdy,rough-soledworkshoesandclose-fitting
slacksandshirts. Shirtsand pantsthatcoverthe armsand
legsandsteel-toedshoesare recommended.Neveroperate
thismachinein barefeet,sandals, slipperyor light-weight
(e.g.canvas)shoes.
8. Do notputhandsorfeetnearrotatingpartsor undercutting
deck.Contactwithbladecanamputatehandsandfeet.
9. A missingor damageddischargecovercancause blade
contactor thrownobject injuries.
10.Manyinjuriesoccuras a resultofthe mowerbeingpulled
overthefoot duringafall causedby slippingortripping.
Do notholdonto the mowerifyouarefalling;releasethe
handleimmediately.
11.Neverpullthe mowerbacktowardyouwhileyouare
walking.Ifyou mustbackthe mowerawayfromawallor
obstructionfirstlookdownand behindtoavoidtrippingand
thenfollowthesesteps:
a. Stepbackfrommowertofully extendyourarms.
b. Besureyouarewell balancedwithsurefooting.
c. Pullthe mowerbackslowly,no morethan halfway
towardyou.
d. Repeatthesestepsas needed.
12.Donotoperatethe mowerwhileunderthe influenceof
alcoholordrugs.
13.Donotengagetheself-propelledmechanismon unitsso
equippedwhilestartingengine.
14.Thebladecontrolhandleis asafetydevice.Neverattempt
tobypassitsoperation.Doingso makesthesafetydevice
inoperativeandmayresult inpersonalinjurythrough
contactwiththe rotatingblade.Thebladecontrolhandle
mustoperateeasily in bothdirectionsandautomatically
returntothe disengagedpositionwhenreleased.
15.Neveroperatethe mowerinwetgrass. Alwaysbesure of
yourfooting. A slipandfall cancauseseriouspersonal
injury.If youfeelyouare losingyourfooting,releasethe
bladecontrolhandleimmediatelyandthe bladewillstop
rotatingwithinthreeseconds.
16.Mowonlyin daylightor goodartificiallight.Walk,neverrun.
17.Stopthe bladewhencrossinggraveldrives,walksor roads.
18.Ifthe equipmentshouldstartto vibrateabnormally,stopthe
engineandcheck immediatelyfor the cause.Vibrationis
generallya warningoftrouble.
4
Page 5
19.Shutthe engineoffand waituntilthe bladecomestoa
completestopbeforeremovingthe grasscatcherorunclog-
gingthe chute.
Thecuttingbladecontinuesto rotatefora fewsecondsafter
the engineisshutoff. Neverplaceany partofthe bodyin
the bladeareauntilyou aresurethe bladehasstopped
rotating.
20.Neveroperatemowerwithoutpropertrailshield,discharge
cover,grasscatcher,bladecontrolhandleorothersafety
protectivedevicesin placeandworking.Neveroperate
mowerwith damagedsafetydevices.Failureto do socan
resultin personalinjury.
21.Mufflerand enginebecomehotandcancausea burn.Do
nottouch.
22.Onlyuseparts andaccessoriesmadeforthis machineby
manufacturer.Failuretodoso can resultinpersonalinjury.
23. Ifsituationsoccur whichare notcoveredinthis manual,
usecareand goodjudgment.Contactyourdealerfor
assistance.
Slope Operation
Slopesare amajorfactorrelatedtoslip andfall accidents,which
canresultinsevereinjury.Operationonslopesrequiresextra
caution.Ifyoufeel uneasyonaslope,do notmowit. Foryour
safety,usetheslopegaugeincludedas partofthis manualto
measureslopesbeforeoperatingthisuniton a slopedorhilly
area.Ifthe slopeisgreaterthan15degrees,donotmowit.
Do:
1. Mowacrossthefaceofslopes;neverupanddown.Exercise
extremecautionwhenchangingdirectionon slopes.
2. Watchfor holes,ruts,rocks,hiddenobjects,or bumps
whichcancauseyouto slipor trip.Tallgrasscan hide
obstacles.
3. Alwaysbesureof yourfooting.A slipandfallcan cause
seriouspersonalinjury.If youfeel youarelosingyour
balance,releasethebladecontrolhandleimmediately,and
the bladewill stoprotatingwithin3seconds.
Do Not:
1. Do notmowneardrop-offs,ditchesor embankments,you
could loseyourfootingor balance.
2. Do notmowslopesgreaterthan 15degreesas shownon
the slopegauge.
3. Do notmowonwet grass.Unstablefootingcouldcause
slipping.
Service
Safe Handling Of Gasoline:
1. Toavoidpersonalinjuryor propertydamageuseextreme
carein handlinggasoline.Gasolineisextremelyflammable
andthevaporsare explosive.Seriouspersonalinjurycan
occurwhengasolineis spilledonyourselfor yourclothes,
whichcanignite.Washyourskin andchangeclothes
immediately.
2. Use onlyan approvedgasolinecontainer.
3. Neverfillcontainersinsidea vehicleor ona truckortrailer
bedwitha plasticliner.Alwaysplacecontainersonthe
groundawayfromyourvehiclebeforefilling.
4. Removegas-poweredequipmentfromthe truckor trailer
andrefueliton theground.If this isnot possible,then refuel
suchequipmenton atrailer witha portablecontainer,rather
thanfroma gasolinedispensernozzle.
5. Keepthe nozzlein contactwiththe rimofthe fueltankor
containeropeningat all timesuntilfuelingis complete.Do
not useanozzlelock-opendevice.
6. Extinguishallcigarettes,cigars, pipesandothersources
ofignition.
7. Neverfuel machineindoorbecauseflammablevaporswill
accumulatein thearea.
8. Neverremovegascap oradd fuelwhileengineishot or
running. Allowengineto coolat leasttwominutesbefore
refueling.
9. Neveroverfill fueltank.Filltankto no morethan Y2inch
belowbottomoffiller neckto provideforfuelexpansion.
10.Replacegasolinecapandtightensecurely.
11.Ifgasolineis spilled,wipeitoff theengineandequipment.
Moveunitto anotherarea.Wait5 minutesbeforestarting
engine.
12.Neverstorethemachineorfuel containernearanopen
flame,sparkor pilot lightas onawater heater,space
heater,furnace,clothesdryeror othergasappliances.
13.Toreducefire hazard,keepmowerfreeofgrass, leaves,
orotherdebrisbuild-up.Cleanupoil orfuelspillageand
removeanyfuel soakeddebris.
14.Allowamowertocool at least5 minutesbeforestoring.
GeneralService:
1. Neverrunanengineindoorsorin apoorlyventilatedarea.
Engineexhaustcontainscarbonmonoxide,anodorless
anddeadlygas.
2. Beforecleaning,repairing,orinspecting,makecertainthe
bladeandall movingpartshavestopped.Disconnectthe
sparkplugwireandgroundagainsttheengineto prevent
unintendedstarting.
3. Checkthebladeandenginemountingboltsatfrequent
intervalsfor propertightness.Also,visuallyinspectblade
fordamage(e.g.,bent,cracked,worn)Replacebladewith
theoriginalequipmentmanufacture's(O.E.M.)bladeonly,
listedin thismanual."Useof partswhichdo notmeetthe
originalequipmentspecificationsmayleadto improper
performanceand compromisesafety!"
4. Mowerbladesaresharpandcancut.Wrapthebladeor
weargloves,anduseextracautionwhenservicingthem.
5. Keepallnuts,bolts,andscrewstightto besuretheequip-
mentis insafeworkingcondition.
6. Nevertamperwithsafetydevices.Checktheirproper
operationregularly.
7. Afterstrikingaforeignobject,stopthe engine,discon-
nectthesparkplugwireandgroundagainsttheengine.
Thoroughlyinspectthemowerforanydamage.Repairthe
damagebeforestartingandoperatingthemower.
8. Neverattemptto makeawheel orcuttingheightadjust-
mentwhilethe engineisrunning.
9. Grasscatchercomponents,dischargecover,andtrail
shieldaresubjecttowear anddamagewhichcould
exposemovingpartsor allowobjectstobethrown.For
safetyprotection,frequentlycheckcomponentsandre-
placeimmediatelywithoriginalequipmentmanufacturer's
(O.E.M.)partsonly,listedin this manual."Useofparts
whichdo notmeettheoriginalequipmentspecifications
mayleadtoimproperperformanceandcompromise
safety!"
10.Donotchangetheenginegovernorsettingor over-revthe
engine.Thegovernorcontrolsthe maximumsafeoperating
speedoftheengine.
11.Maintainorreplacesafetylabels,asnecessary.
12.Observeproperdisposallawsand regulations.Improper
disposaloffluidsand materialscanharmtheenvironment.
Practices
WARNING
Thissymbol points
out importantsafety
instructions,which if
notfollowed,could
endangerthe personal
safety and/or property
of yourselfand others.
Readand followall
instructions inthis man-
ual before attemptingto
operatethis machine.
Failureto comply with
these instructionsmay
result in personalinjury.
Whenyousee this
symbol.
HEED iT'S WARNING!
Your Responsibility
Restrictthe use
of this powermachine
to personswho read.
understand
and followthe warnings
and instructions
in this manua
and on the machine.
5
Page 6
NOTE:Standbehind
themowerasifyou
weregoingtooperate
it.Yourrighthandcor-
respondstotheright
sideofthemower;your
lefthandcorresponds
totheleftsideofthe
mower.
NOTE:Yourmower
i isshippedwiththe
i handleinthehigher
I heightposition.
NOTE:Eachendof
thelowerhandlemust
iblP lacedinthesame
i eativeposition.
IMPORTANT
DONOTcrimpthe
cableswhenliftingthe
handleup.Makesure
toroutethecables
insidethelowerhandle.
Figure 3=1
WingNuts (2)
Figure 3=2
HardwarePack
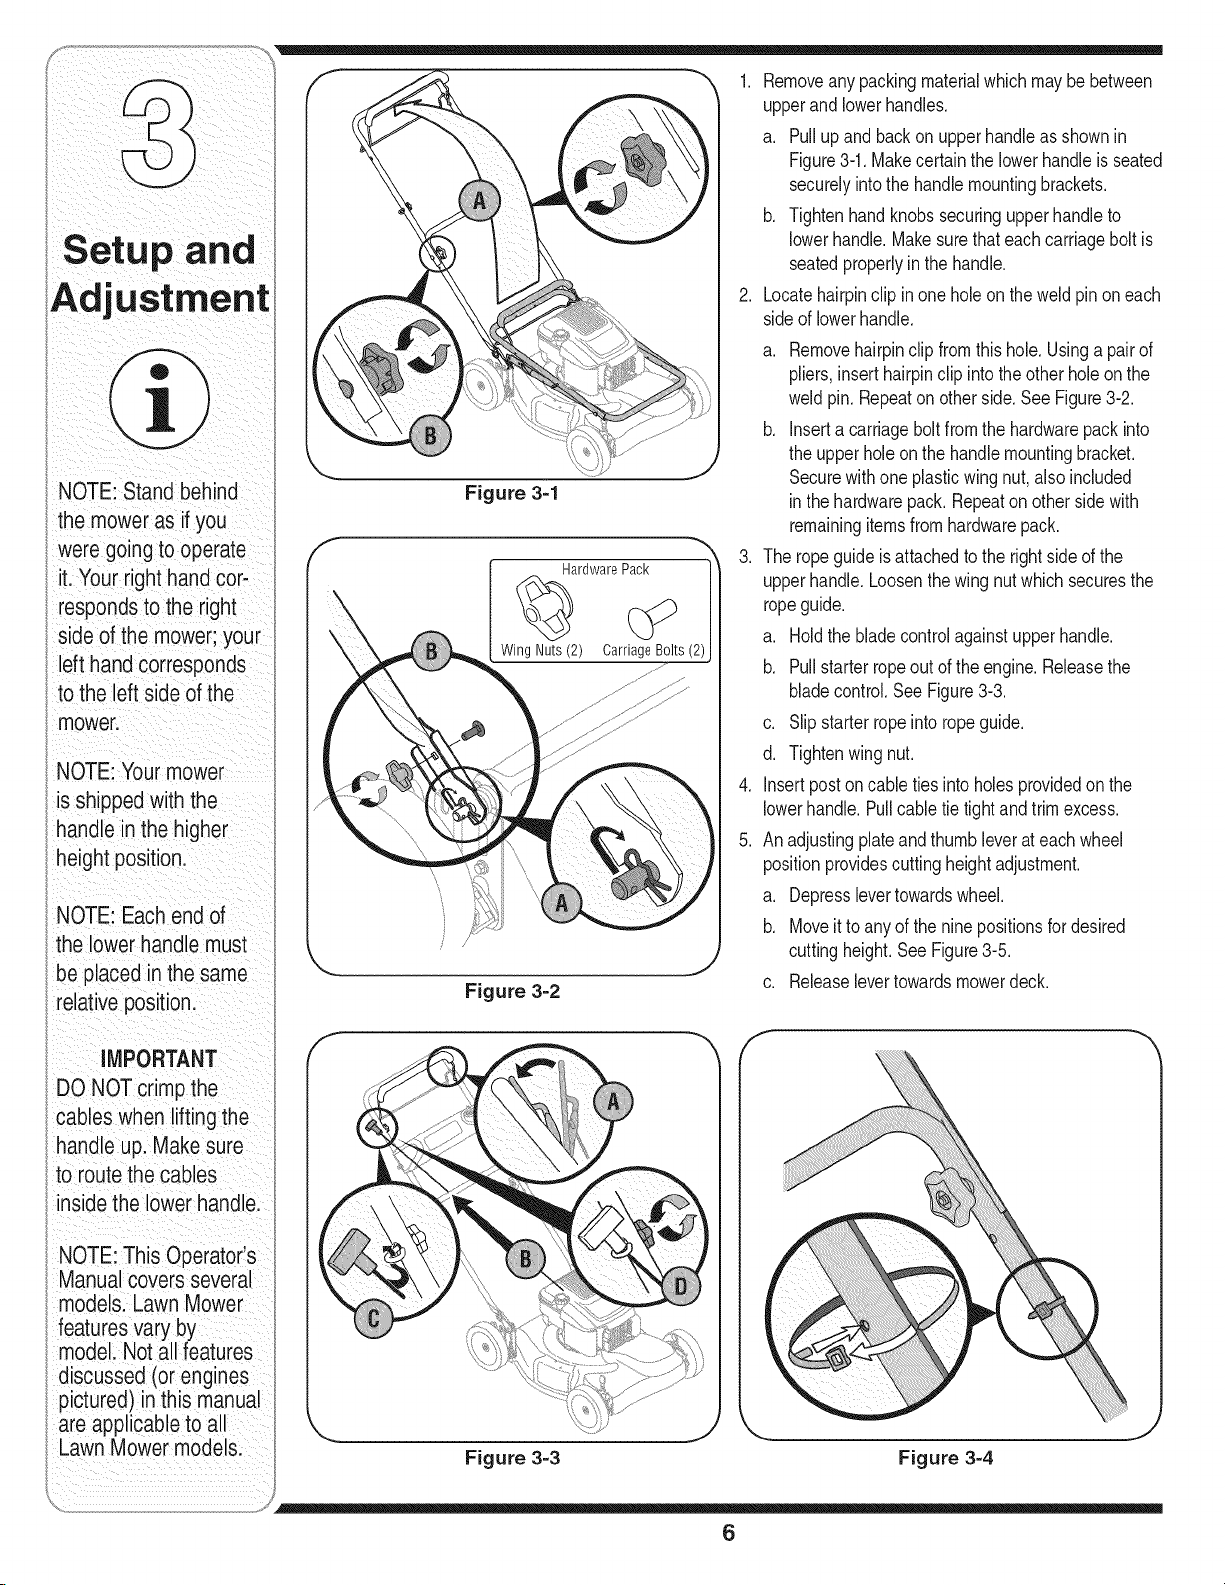
1. Removeanypackingmaterialwhichmaybebetween
upperandlowerhandles.
a. Pullupand backon upperhandleas shownin
Figure3-1.Makecertainthelowerhandleisseated
securelyintothehandlemountingbrackets.
b. Tightenhandknobssecuringupperhandleto
lowerhandle.Makesurethateachcarriageboltis
seatedproperlyinthe handle.
2. Locatehairpinclip inone holeon theweldpinon each
sideof lowerhandle.
a. Removehairpinclipfromthis hole.Usinga pairof
pliers,inserthairpinclipintotheother holeon the
weldpin. Repeaton otherside.SeeFigure3-2.
b. Inserta carriageboltfromthehardwarepackinto
theupperholeonthe handlemountingbracket.
Securewithone plasticwingnut,also included
inthehardwarepack.Repeatonother sidewith
remainingitemsfromhardwarepack.
.
Theropeguideis attachedtotheright sideof the
upperhandle.Loosenthewingnutwhichsecuresthe
ropeguide.
a. Holdthebladecontrolagainstupperhandle.
b. Pullstarterropeoutof theengine.Releasethe
bladecontrol.SeeFigure3-3.
c. Slipstarterropeintoropeguide.
d. Tightenwingnut.
.
Insertpostoncable tiesintoholes providedon the
lowerhandle.Pullcabletie tightandtrimexcess.
5.
Anadjustingplateandthumbleverateachwheel
positionprovidescuttingheightadjustment.
a. Depresslevertowardswheel.
b. Moveit to anyofthe ninepositionsfordesired
cuttingheight.SeeFigure3-5.
c. Releaselevertowardsmowerdeck.
f
NOTE:ThsOperator's
Manualcoversseveral
i models.LawnMower
featuresvaryby
i modelNota.IIfeatures
discussed(orengines
pictured)inthismanual
areapplicabletoall
LawnMowermodels.
i
'_.. j
Figure 3=3 Figure 3=4
6
Page 7
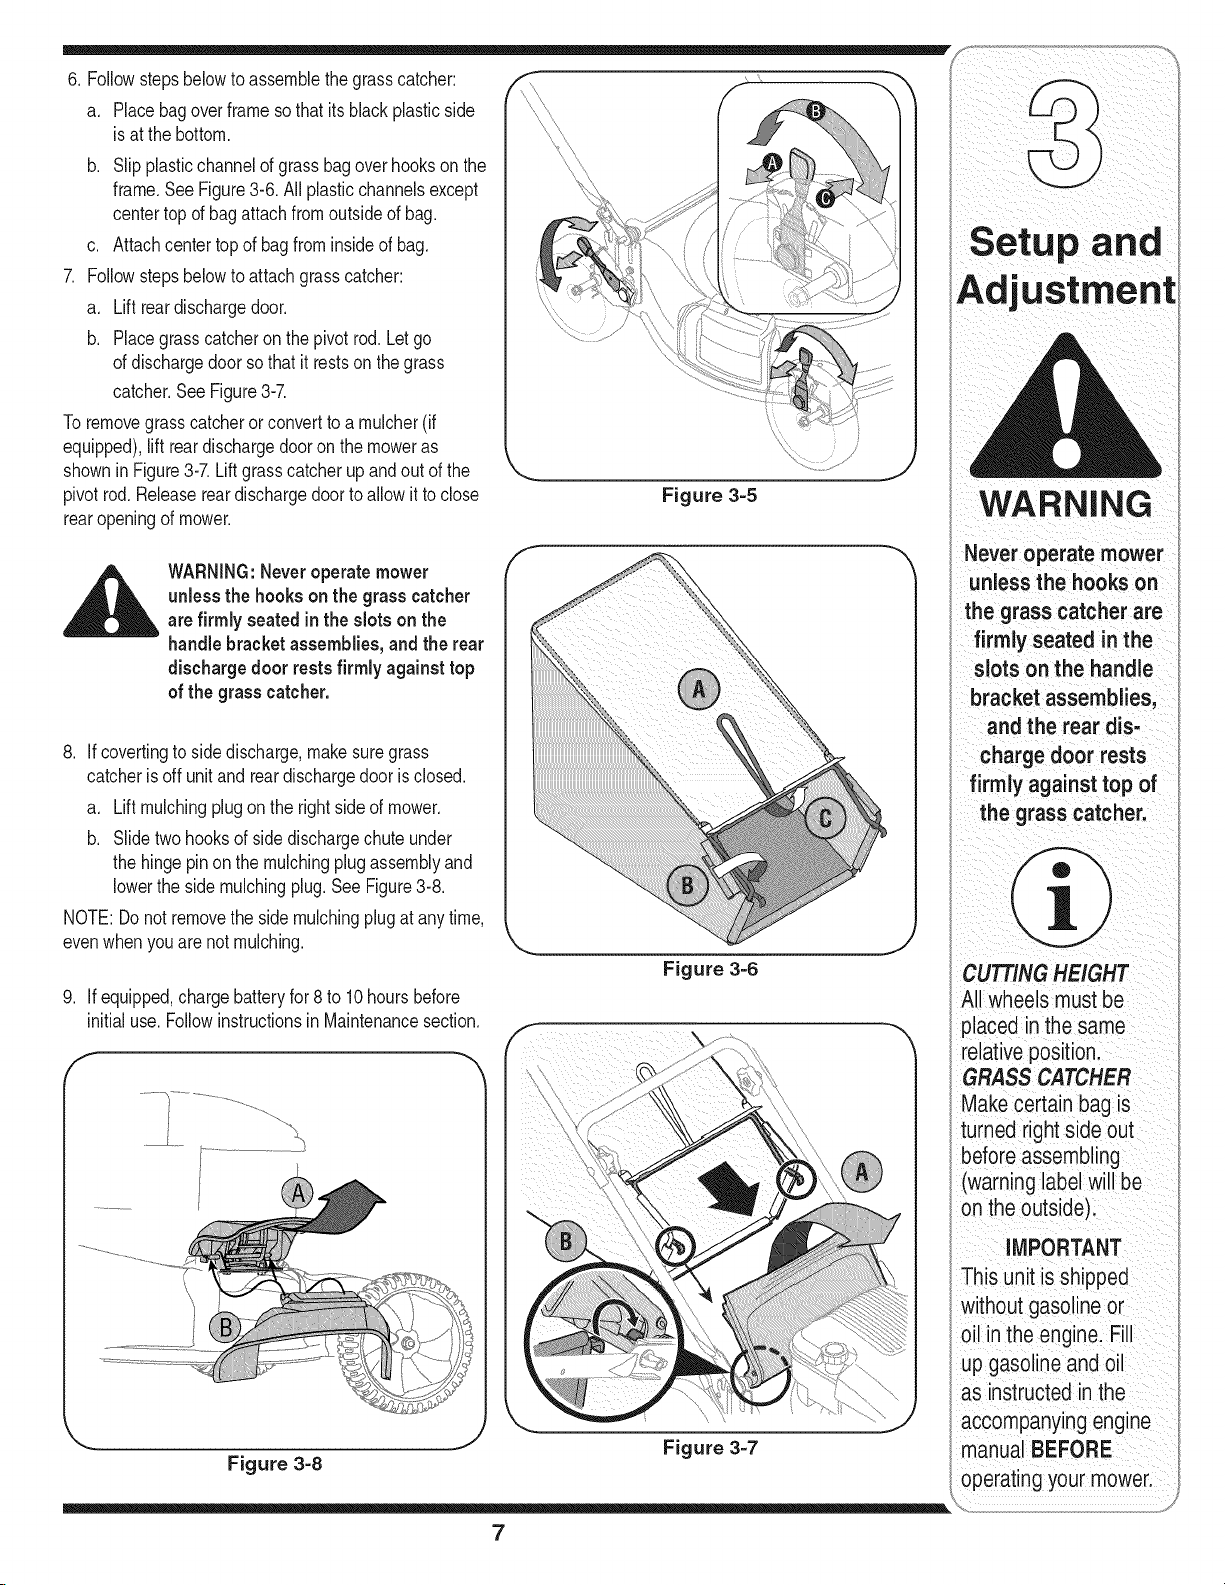
6. Followstepsbelowto assemblethegrasscatcher:
a. Placebagoverframesothat itsblackplasticside
is at thebottom.
b. Slip plasticchannelof grassbagoverhooksonthe
frame.SeeFigure3-6.All plasticchannelsexcept
centertopof bagattachfromoutsideof bag.
c. Attachcentertopofbagfrominsideofbag.
7. Followstepsbelowto attachgrasscatcher:
a. Liftreardischargedoor.
b. Placegrasscatcheron thepivotrod. Letgo
ofdischargedoorsothat itrestson thegrass
catcher.SeeFigure3-7.
Toremovegrasscatcherorconvertto a mulcher(if
equipped),liftreardischargedooronthe moweras
showninFigure3-7.Liftgrasscatcherupandout ofthe
pivotrod.Releasereardischargedoorto allowit toclose
rearopeningofmower.
_ WARNING:Neveroperatemower
8. Ifcovertingtoside discharge,makesuregrass
catcheris off unitand reardischargedooris closed.
a. Liftmulchingplugon therightsideof mower.
b. Slidetwohooksof sidedischargechuteunder
NOTE:Donotremovethesidemulchingplugat anytime,
evenwhenyouarenot mulching.
9. Ifequipped,chargebatteryfor8 to 10hoursbefore
initialuse.Followinstructionsin Maintenancesection.
unless the hookson the grass catcher
arefirmly seatedinthe slotson the
handle bracketassemblies, and the rear
dischargedoorrests firmly againsttop
of the grass catcher.
thehingepinonthe mulchingplugassemblyand
lowerthe sidemulchingplug.See Figure3-8.
\
Figure 3-5
WARNING
i i ii ii
Never operate mower
unless the hooks on
the grass catcher are
seated inthe
slotson
bracket assemblies,
and the rear dis'
charge door rests
f rm yagainsttopof
the grass catcher:
Figure 3=6
CUTTING HEIGHT
placed in thesame
relativep0sition:
GRASS CATCHER
Make certain bagiS
turned right Side out
beforeassembling
(warninglabelwill be
onthe outside)i
Figure 3=8
IMPORTANT
Thisunitis shipped
without gasOIneer
oil inthe enginel Fill
up gasolineandOil
as instructed inthe
accompanyingengine
J
7
Figure 3=7
manUalBEFORE
Page 8
WARNING
Recoil Starte
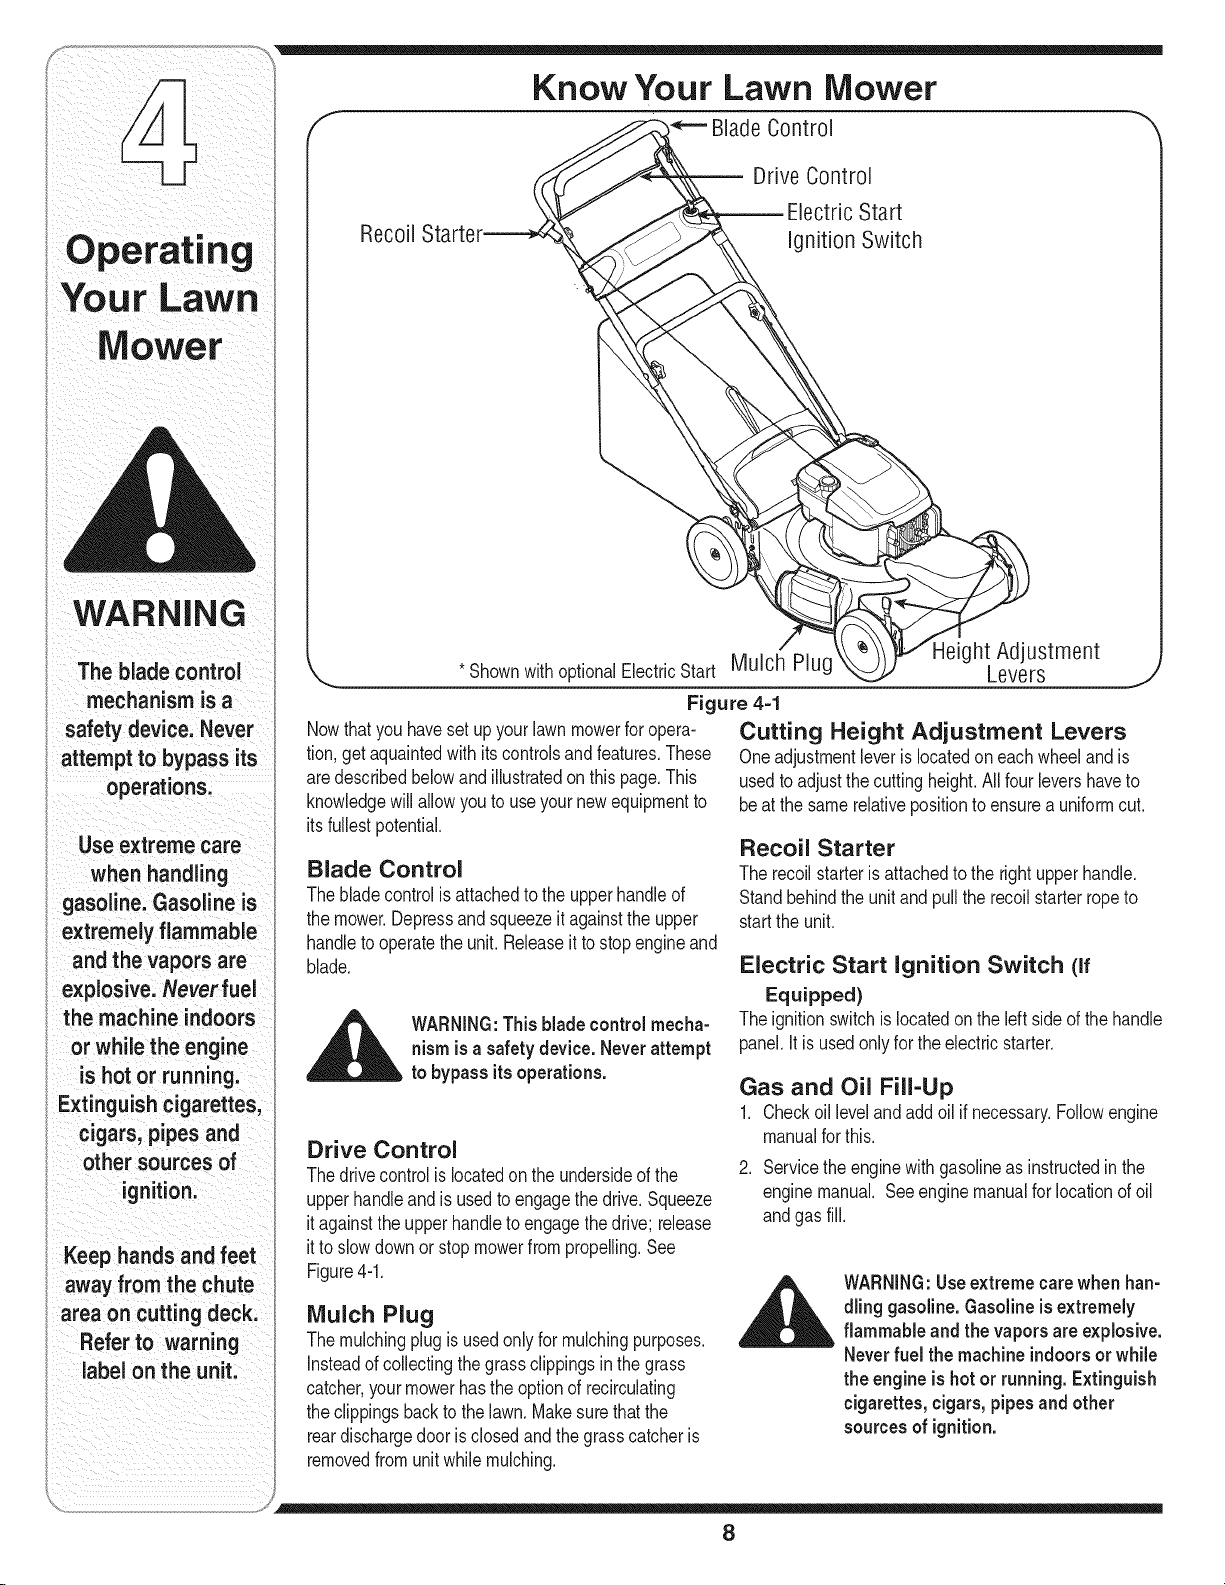
Know Your Lawn Mower
BladeControl
Drive Control
Electric Start
Ignition Switch
The blade control
mechanismisa
safety device. Never
attemptto bypassits
operations.
; Useextreme care
when handling
gasoline.Gasoline is
extremely flammable
and the vapors are
explosive. Never fuel
the machine indoors
or whilethe engine
is hot or running.
I Extinguish cigarettes,
cigars, pipes and
other sources of
ignition.
Keep hands and feet
away from the chute
area on cutting deck.
Referto warning
label onthe unit.
*Shownwith
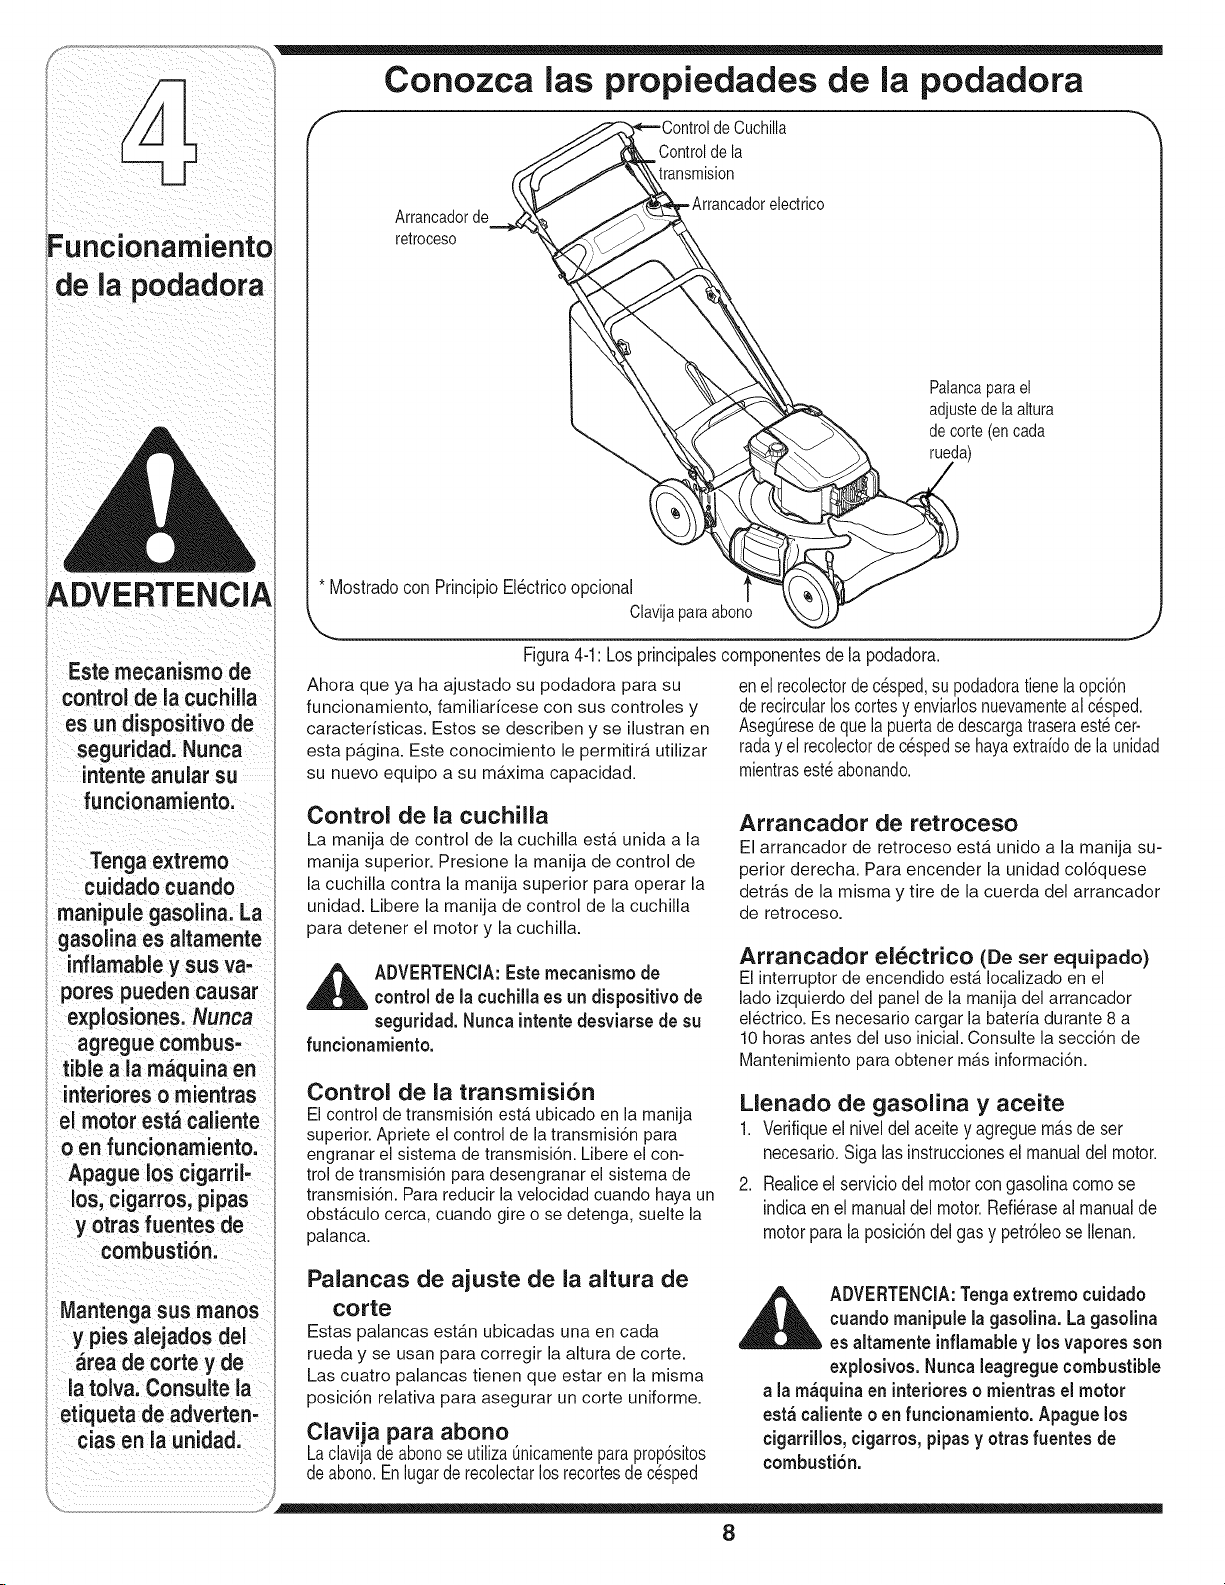
Nowthatyouhavesetupyourlawnmowerforopera-
tion,getaquaintedwithits controlsandfeatures.These
aredescribedbelowandillustratedonthis page.This
knowledgewillallowyouto useyournewequipmentto
itsfullestpotential.
ElectricStart Mulch Plug
Figure 4-1
Blade Control
Thebladecontrolis attachedtothe upperhandleof
themower.Depressand squeezeitagainsttheupper
handletooperatetheunit. Releaseittostopengineand
blade.
,__ WARNING:Thisbladecontrolmecha-
nism isa safetydevice. Neverattempt
to bypass itsoperations.
Drive Control
Thedrivecontrolislocatedonthe undersideofthe
upperhandleand isusedtoengagethedrive.Squeeze
itagainstthe upperhandleto engagethedrive; release
itto slowdownor stopmowerfrompropelling.See
Figure4-1.
Mulch Plug
Themulchingplugis usedonly formulchingpurposes.
Insteadofcollectingthegrassclippingsinthegrass
catcher,yourmowerhas theoptionof recirculating
theclippingsbackto thelawn.Makesurethatthe
reardischargedoorisclosedandthe grasscatcheris
removedfromunitwhile mulching.
Height Adjustment
Levers
Cutting Height Adjustment Levers
Oneadjustmentleveris locatedon eachwheelandis
usedto adjustthecuttingheight.All fourlevershaveto
beatthe samerelativepositiontoensurea uniformcut.
Recoil Starter
Therecoilstarterisattachedtotherightupperhandle.
Standbehindthe unitand pullthe recoilstarterropeto
startthe unit.
Electric Start Ignition Switch (if
Equipped)
Theignitionswitchis locatedonthe leftsideof thehandle
panel.It isusedonlyforthe electricstarter.
Gas and Oil Fill-Up
1. Checkoillevelandaddoil if necessary.Followengine
manualforthis.
2. Servicethe enginewithgasolineasinstructedinthe
enginemanual. Seeenginemanualforlocationofoil
andgasfill.
__kk ARNING:Useextremecarewhenhan-
dling gasoline.Gasolineis extremely
flammableand the vapors areexplosive.
Neverfuel the machine indoorsor while
the engine is hot or running. Extinguish
cigarettes, cigars, pipesandother
sources of ignition.
8
Page 9
_ ARNING:Theoperationof any lawn "_
mowercan result inforeign objects
being thrownintothe eyes,whichcan
damageyoureyesseverely.Always
wearsafetyglasseswhileoperating
the mower,orwhileperforming any
adjustmentsor repairson it.
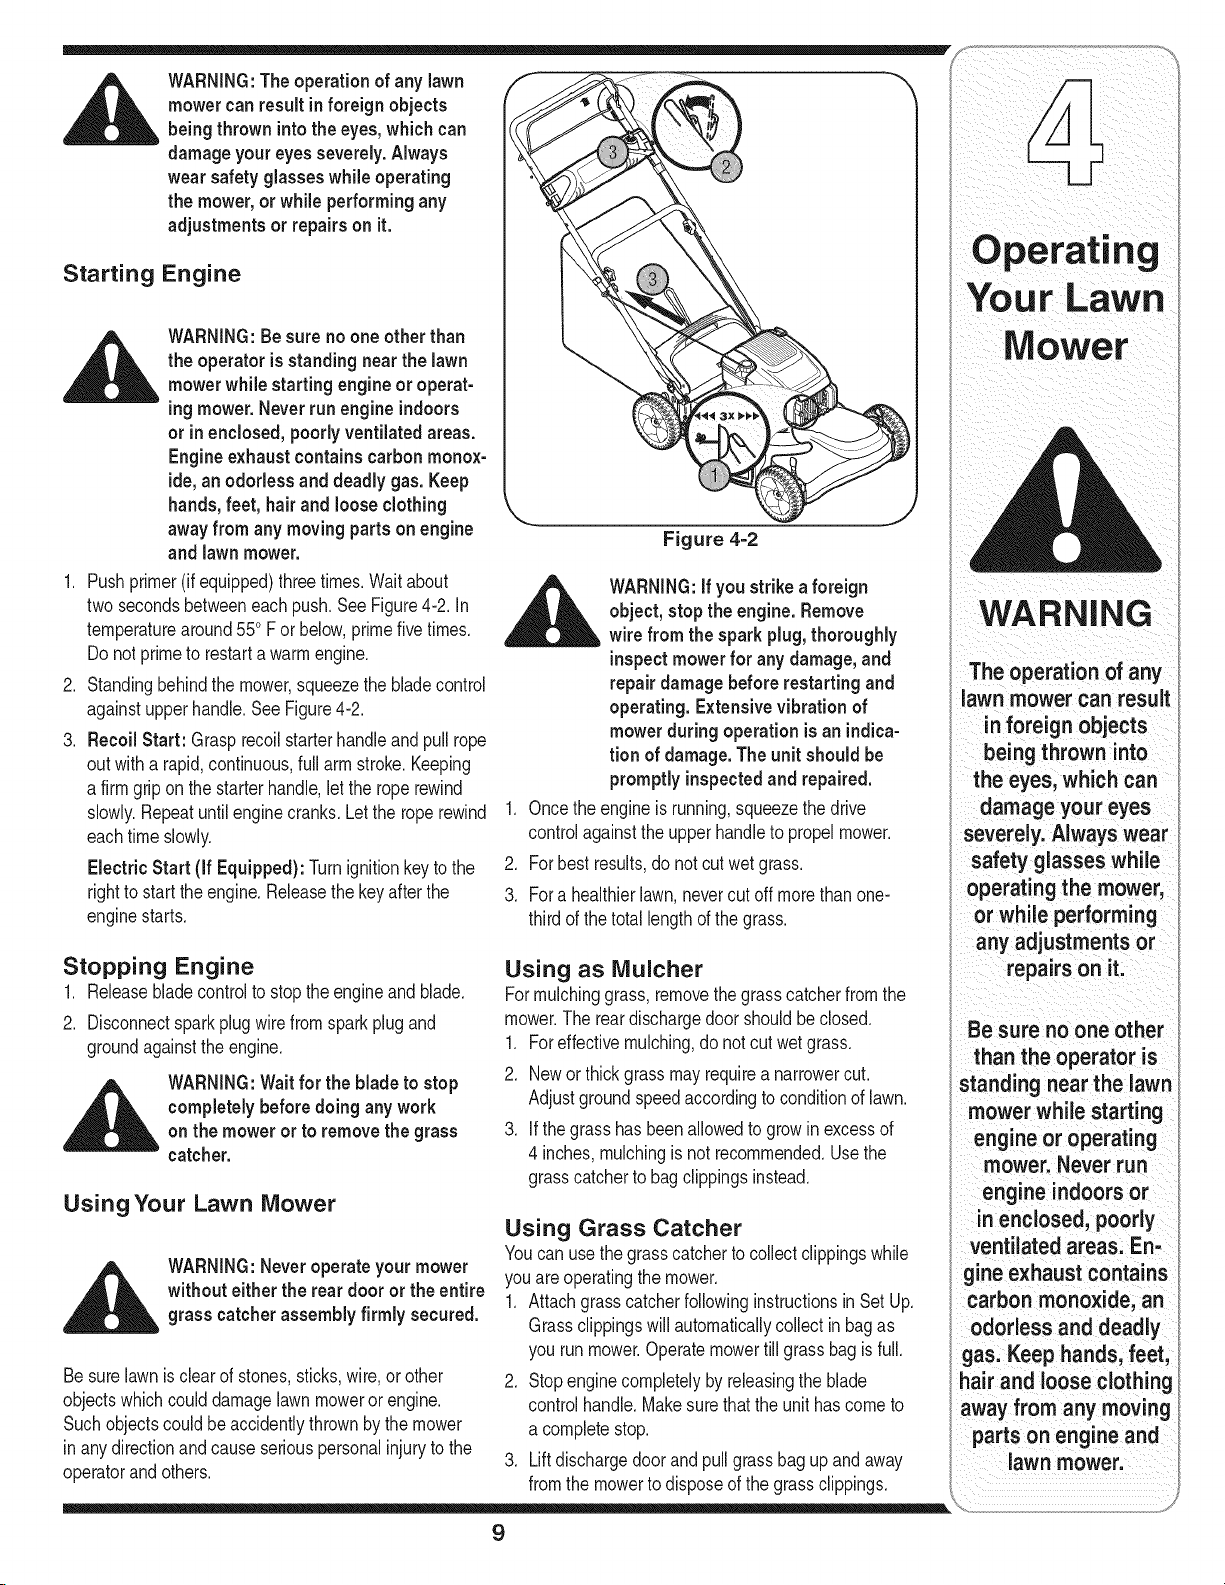
Starting Engine
perating
_l_llk, l=WARNING:Besurenoone otherthan
1. Pushprimer(ifequipped)threetimes.Waitabout
two secondsbetweeneach push.SeeFigure4-2. In
temperaturearound550F or below,primefivetimes.
Donot primeto restarta warmengine.
2. Standingbehindthe mower,squeezethebladecontrol
againstupperhandle.SeeFigure4-2.
3. Recoil Start: Grasprecoilstarterhandleandpull rope
outwitha rapid,continuous,fullarmstroke.Keeping
a firmgripon thestarterhandle,lettheroperewind
slowly.Repeatuntilenginecranks.Lettheroperewind
eachtime slowly.
Electric Start (If Equipped): Turnignitionkeytothe
rightto starttheengine.Releasethekeyafterthe
enginestarts.
theoperatorisstandingnearthe lawn
mowerwhilestartingengineor operat-
ingmower. Neverrun engine indoors
orin enclosed,poorly ventilatedareas.
Engine exhaustcontainscarbon monox-
ide,an odorlessand deadly gas. Keep
hands, feet,hair and looseclothing
awayfrom any moving partson engine
and lawnmower.
Stopping Engine
1. Releasebladecontrolto stoptheengineand blade.
2. Disconnectsparkplugwirefromsparkplugand
groundagainsttheengine.
_ ARNING:Waitfor the blade to stop
completelybeforedoing any work
on the mower or to removethegrass
catcher.
UsingYour Lawn Mower
without eitherthe rear door orthe entire
_ ARNING:Neveroperate your mower
Besurelawnisclearof stones,sticks,wire,or other
objectswhichcoulddamagelawnmowerorengine.
Suchobjectscouldbe accidentlythrownbythemower
in anydirectionandcauseseriouspersonalinjuryto the
operatorandothers.
grass catcher assembly firmly secured.
Figure 4=2
_ ARNING:Ifyoustrikeaforeign
1. Oncetheengineis running,squeezethedrive
controlagainsttheupperhandleto propelmower.
2. Forbest results,do notcut wetgrass.
3. Fora healthierlawn,nevercut offmorethan one-
thirdof thetotallengthofthe grass.
object,stopthe engine.Remove
wire from the spark plug,thoroughly
inspectmowerfor anydamage,and
repairdamagebefore restarting and
operating. Extensive vibration of
mower during operation is an indica-
tion of damage.The unit should be
promptlyinspectedand repaired.
Using as Mulcher
Formulchinggrass,removethegrasscatcherfromthe
mower.Thereardischargedoorshouldbeclosed.
1. Foreffectivemulching,do notcut wetgrass.
2. Newor thick grassmayrequirea narrowercut.
Adjustgroundspeedaccordingtoconditionoflawn.
3. if thegrasshas beenallowedto growinexcessof
4 inches,mulchingisnotrecommended.Usethe
grasscatcherto bagclippingsinstead.
Using Grass Catcher
Youcanusethegrasscatchertocollectclippingswhile
youareoperatingthemower.
1. AttachgrasscatcherfollowinginstructionsinSetUp.
Grassclippingswillautomaticallycollectinbagas
yourunmower.Operatemowertillgrassbagisfull.
2. Stopenginecompletelybyreleasingtheblade
controlhandle.Makesurethattheunit hascometo
a completestop.
3. Liftdischargedoorandpullgrassbagup andaway
fromthe mowertodisposeofthe grassclippings.
The operation of any
lawnmower can result
inforeign objects
being thrown into
the eyes, which can
damage your eyes
severely. Always wear
safety glasseswhile
operatingthe mower,
or while performing
any adjustments or
repairs on it.
Be sure no one other
than the operator is
standing near the lawn
mower while starting
engine or operating
mower. Never run
engine indoors or
in enclosed,poorly
ventilated areas. En-
gine exhaust contains
carbon monoxide, an
odorless and deadly
;tas.Keep hands, feet,
lair and loose clothing
_wayfrom any moving
partson engine and
lawn mower.
9
Page 10
Your Lawn
=,
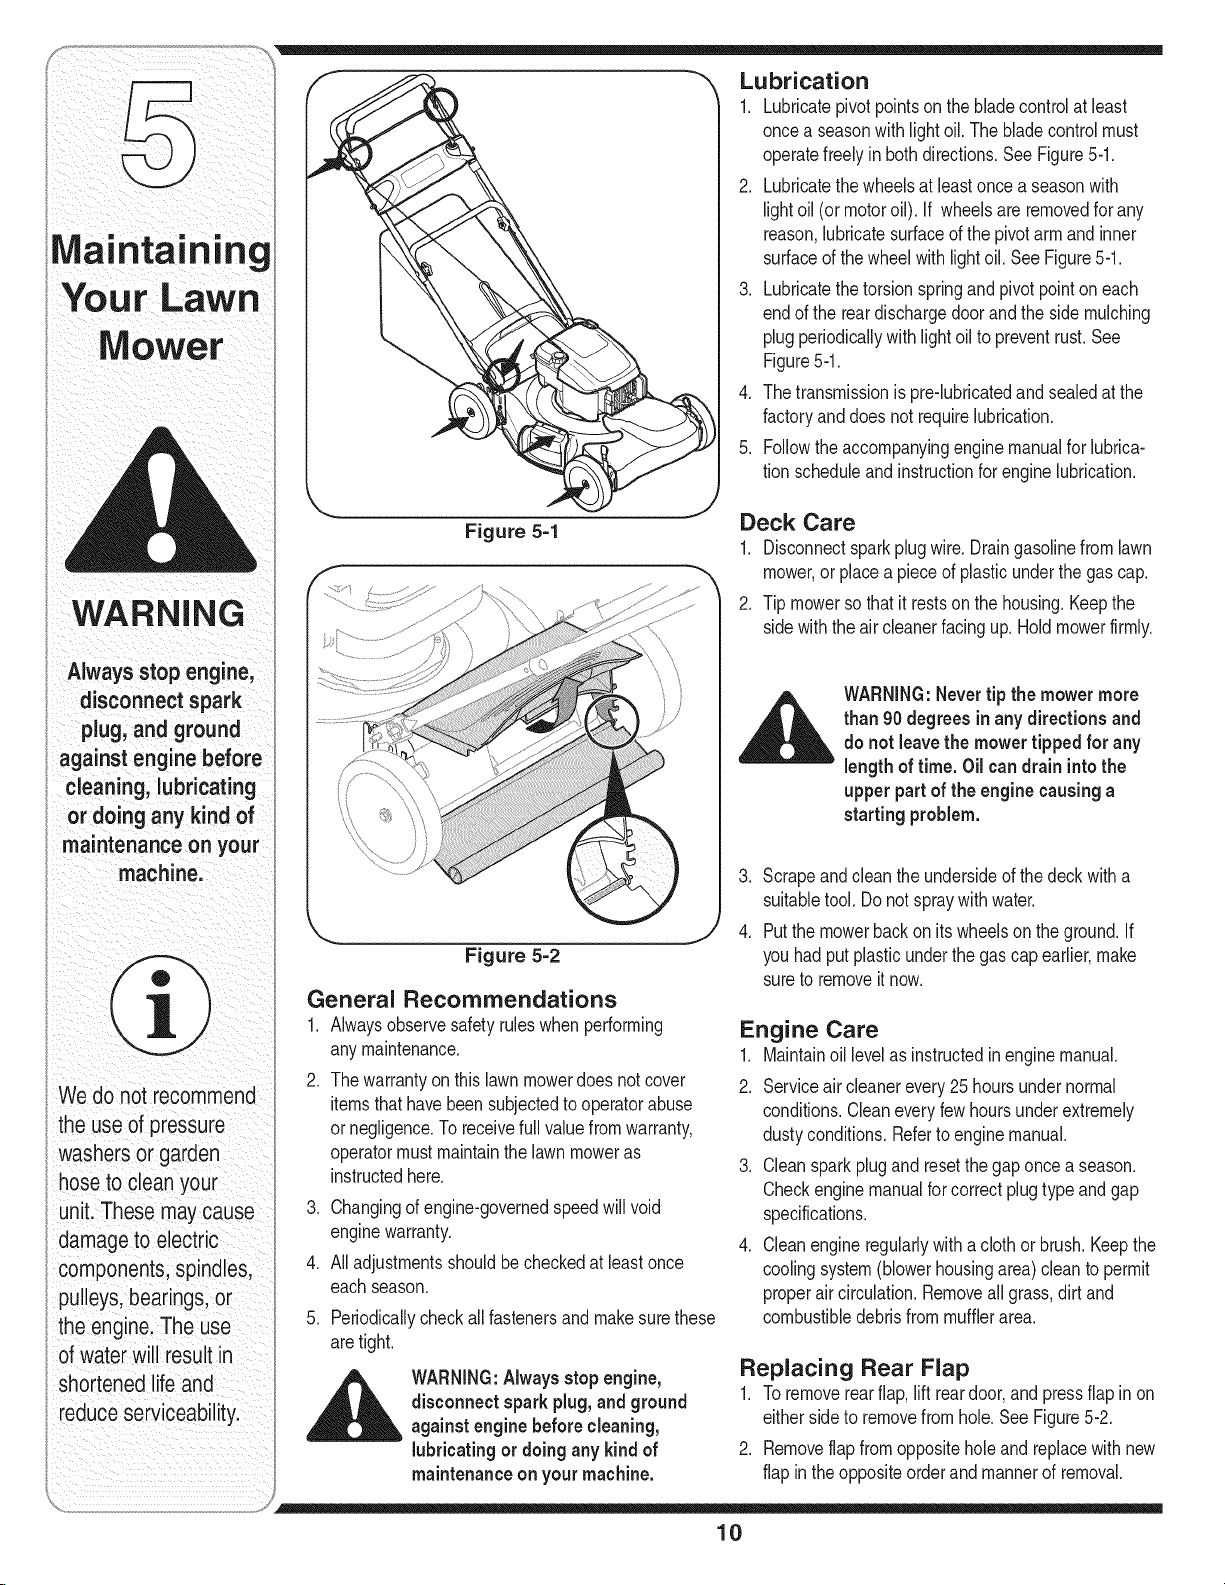
Lubrication
1. Lubricatepivotpointson thebladecontrolatleast
oncea seasonwithlightoil.The bladecontrolmust
operatefreelyinboth directions.SeeFigure5-1.
2. Lubricatethewheelsatleastoncea seasonwith
lightoil (ormotoroil). If wheelsareremovedforany
reason,lubricatesurfaceof thepivotarm andinner
surfaceof thewheelwithlightoil. SeeFigure5-1.
3. Lubricatethetorsionspringandpivotpointoneach
endofthe reardischargedoorandthesidemulching
plugperiodicallywithlightoil to preventrust.See
Figure5-1.
4. Thetransmissionispre-lubricatedand sealedatthe
factoryanddoesnot requirelubrication.
5. Followtheaccompanyingenginemanualforlubrica-
tionscheduleandinstructionforenginelubrication.
Alwaysstop engine;
d sconneot
plug, andground
against engine before
cleaning,lubricating
ordo nganyk nd
a ntenano onyour
machine.
We donot recommend
the use ofpressure
washers
hose to c danyour
i
unit.Thesemay cause
damage to electric
components;spindles,
pulleys,bedringsl
the engine: The use
of WaterWillresult
shortened lifeand
reduce serviceability:
Figure 5-1
Figure 5=2
General Recommendations
1. Alwaysobservesafetyruleswhen performing
anymaintenance.
2. Thewarrantyonthislawnmowerdoesnot cover
itemsthathavebeensubjectedtooperatorabuse
ornegligence.Toreceivefullvaluefromwarranty,
operatormustmaintainthelawn moweras
instructedhere.
.
Changingof engine-governedspeedwillvoid
enginewarranty.
4.
Alladjustmentsshouldbecheckedat leastonce
eachseason.
5.
Periodicallycheckallfastenersandmakesurethese
aretight.
WARNING:Alwaysstop engine,
disconnect spark plug, andground
against enginebeforecleaning,
lubricatingordoing any kind of
maintenanceonyour machine.
Deck Care
1. Disconnectsparkplugwire.Draingasolinefromlawn
mower,or placea pieceof plasticunderthegascap.
2. Tip mowersothat itrestsonthe housing.Keepthe
sidewiththe air cleanerfacingup.Holdmowerfirmly.
than 90 degrees in anydirections and
__IL ARNING:Nevertip the mowermore
3. Scrapeandcleanthe undersideofthedeckwitha
suitabletool.Donotspraywithwater.
4. Putthemowerbackonits wheelsonthe ground.If
youhad putplasticunderthe gascapearlier,make
sureto removeitnow.
do not leavethe mower tipped for any
length of time. Oil can drain intothe
upper part of the engine causinga
starting problem.
Engine Care
1. Maintainoillevelasinstructedinenginemanual.
2. Serviceaircleanerevery25 hoursundernormal
conditions.Cleaneveryfewhoursunderextremely
dustyconditions.Refertoenginemanual.
3. Cleansparkplugand resetthegaponce a season.
Checkenginemanualforcorrectplugtype andgap
specifications.
4. Cleanengineregularlywitha clothorbrush.Keepthe
coolingsystem(blowerhousingarea)cleanto permit
properaircirculation.Removeall grass,dirtand
combustibledebrisfrommufflerarea.
Replacing Rear Flap
1. Toremoverearflap,lift reardoor,andpressflap inon
eithersideto removefromhole.SeeFigure5-2.
2. Removeflapfromoppositeholeand replacewithnew
flapinthe oppositeorderandmannerof removal.
10
Page 11
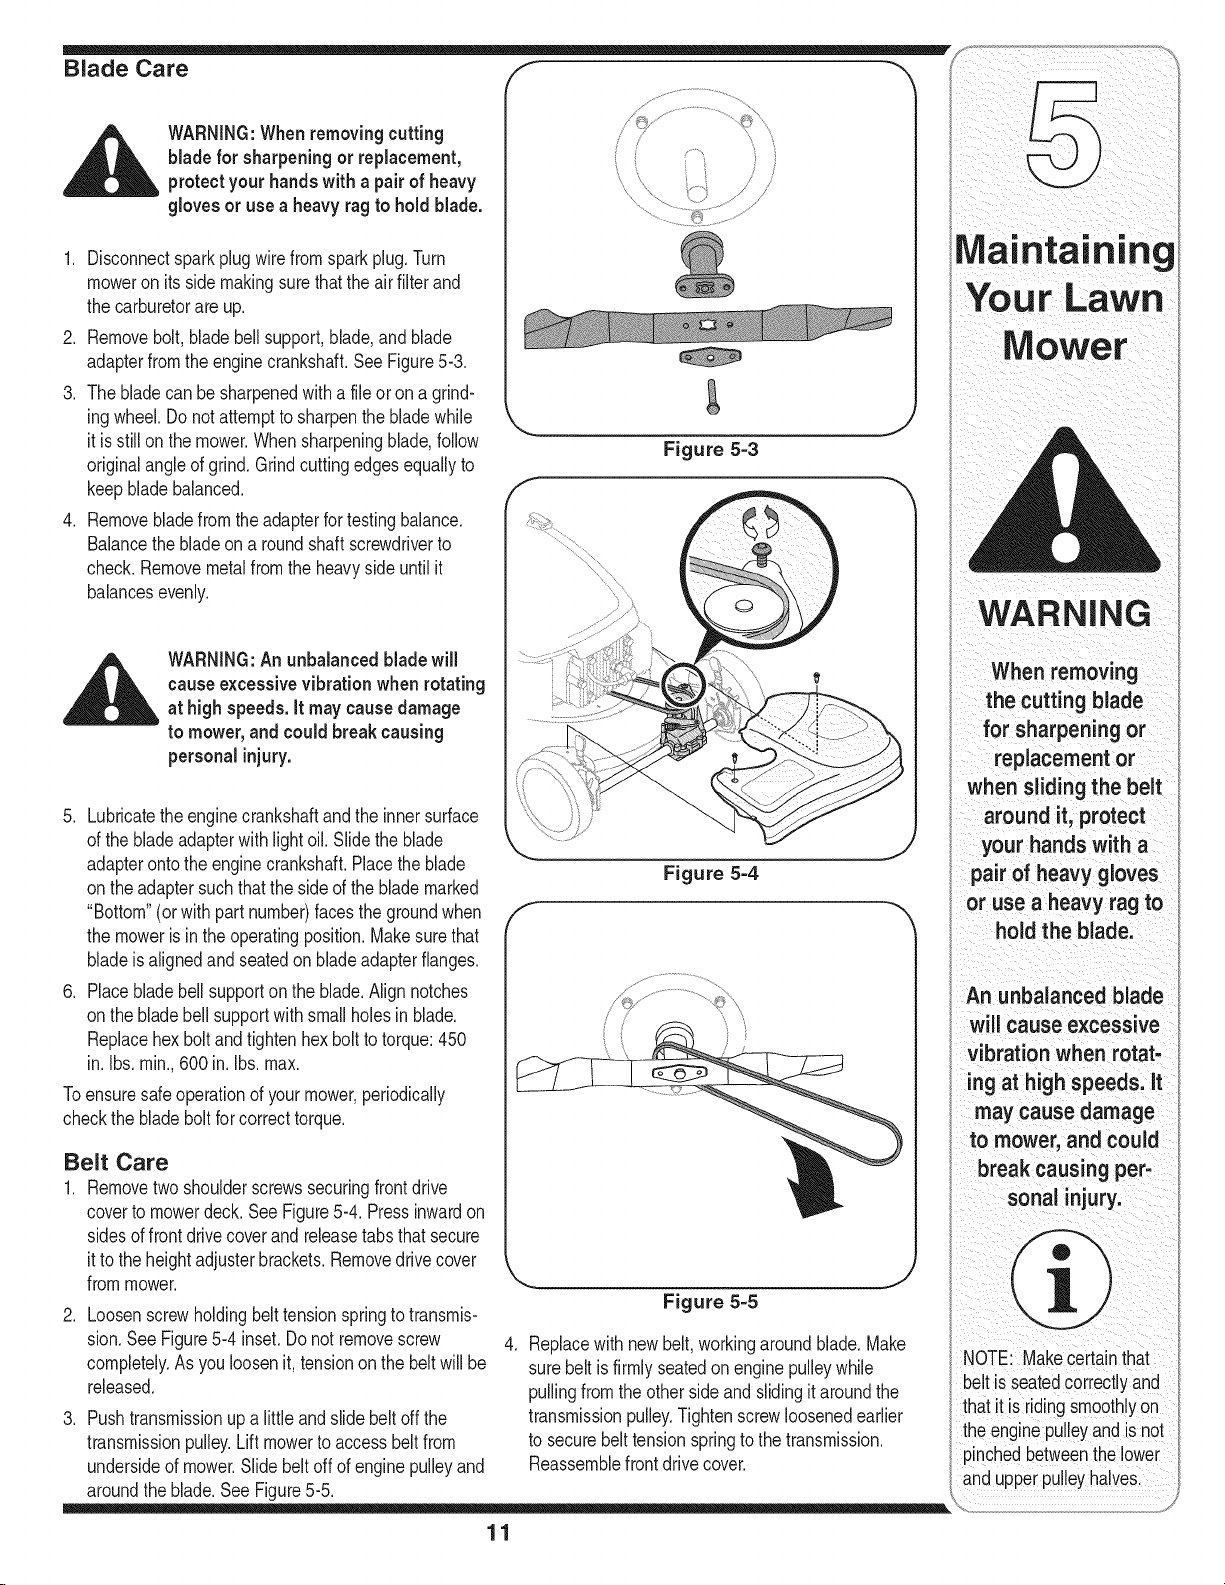
Blade Care f
__ll ARNING:Whenremovingcutting
1. Disconnectsparkplugwirefromsparkplug.Turn
moweron itssidemakingsurethattheairfilterand
thecarburetorareup.
2. Removebolt,bladebellsupport,blade,andblade
adapterfromthe enginecrankshaft.SeeFigure5-3.
3. The bladecanbe sharpenedwitha fileor on a grind-
ing wheel.Donotattempttosharpenthebladewhile
it is stillon themower.Whensharpeningblade,follow
originalangleofgrind.Grindcuttingedgesequallyto
keepbladebalanced.
4. Removebladefromtheadapterfortestingbalance.
Balancethebladeona roundshaftscrewdriverto
check.Removemetalfromthe heavysideuntil it
balancesevenly.
_ WARNING:Anunbalanced bladewill
5. Lubricatetheenginecrankshaftandthe innersurface
ofthe bladeadapterwithlightoil.Slidethe blade
adapterontotheenginecrankshaft.Placetheblade
on theadaptersuchthatthesideofthe blademarked
"Bottom"(orwithpartnumber)facesthe groundwhen
themoweris in theoperatingposition.Makesurethat
bladeisalignedandseatedon bladeadapterflanges.
6. Placebladebellsupportonthe blade.Alignnotches
on thebladebell supportwithsmallholesin blade.
Replacehexboltandtightenhexboltto torque:450
in.Ibs. min.,600in. Ibs.max.
Toensuresafeoperationofyourmower,periodically
checkthe bladeboltfor correcttorque.
blade for sharpeningor replacement,
protectyourhandswitha pairof heavy
gloves or usea heavy ragto hold blade.
causeexcessivevibration whenrotating
athigh speeds. It may causedamage
to mower,and could break causing
personalinjury.
Belt Care
1. Removetwoshoulderscrewssecuringfrontdrive
covertomowerdeck.SeeFigure5-4. Pressinwardon
sidesoffrontdrivecoverand releasetabsthat secure
itto theheightadjusterbrackets.Removedrivecover
frommower.
.
Loosenscrewholdingbelttensionspringtotransmis-
sion.SeeFigure5-4inset. Donot removescrew
completely.As youloosenit, tensiononthebelt willbe
released.
3. Pushtransmissionup a littleandslidebeltoffthe
transmissionpulley.Lift mowertoaccessbeltfrom
undersideofmower.Slidebeltoff ofenginepulleyand
aroundtheblade.SeeFigure5-5.
Figure 5=4
F
Figure 5=5
4. Replacewithnewbelt,workingaroundblade.Make
surebelt isfirmlyseatedonenginepulleywhile
pullingfromtheothersideand slidingitaroundthe
transmissionpulley.Tightenscrewloosenedearlier
tosecurebelt tensionspringtothetransmission.
Reassemblefrontdrivecover.
WARNING
When removing
the cutting blade
for sharpening or
replacementor
when sliding the belt
around it, protect
your hands with a
pair of heavy gloves
or use a heavy rag to
hold the blade.
An unbalanced blade
will causeexcessive
vibrationwhen rotat-
ing at high speeds. It
may cause damage
to mower, and could
break causing per=
sonal injury.
NOTE: Makecertainthat
be!t is seated€orrectlyand
that it isridingSmoothlyon
theenginepulleyandis not
pinchedbetweenthelower
anduppei pulleyhalve&
11
Page 12

f _ Replacing Battery (if Equipped)
WARNING
Batteries contain
sulfuricacidwhich
may cause burns. Do
not short circuit or
mutilate batteries in
any way. Do not put
batteries infire as
i these may burst or
release toxic materi-
als.
Figure 5=6
f +
Positive
Terminal
==
Negative
Terminal
Figure 5=7
__k ARNING:Batteriescontainsulfuric
1. Loosenroundhandleknobssecuringupperandlower
handlesandcarefullyfoldthe upperhandledown
towardthelowerhandleas shownin Figure5-6.
2. Removethetwo screwssecuringbatterycovertobat-
teryhousingandplacethemtothe side.SeeFigure
5-6.
.
Openbatterycover,removepositiveandnegative
leadsfrombattery,removeandreplacewith new
battery.Connectthepositiveleadto thepositiveside
ofthe batterypack,thenconnectthenegativeside.
NOTE:Thebatteryyou havemaydifferslightlyfromthe
oneshownin Figure5-7.Refertothe PartsList.
IMPORTANT:Whenreplacingbatterypackinhandle
panel,batterypackmustbepositionedwiththe positive
terminaltothe leftsideandthe negativeterminaltothe
rightside ofpanel(Positiveterminalisclosestto the key
switch).SeeFigure5-7.Replacingbatterypackincor-
rectlywill causeserious damage.
4. Reattachbatterycoverto batteryhousingbysecuring
withthetwoscrewsremovedearlier,makingsure
tosnapthewireconduiton theleftinto placeonthe
housing.
5. Foldhandlesbackup andtightenhandleknobs.
acid which maycause burns.Donot
short circuit or mutilate batteries in any
way.Do not put batteries infire as these
may burst or releasetoxic materials.
The battery contains
corrosivefluid and
i toxic material; handle
with care and keep
away from children.
Do not puncture,
i disassemble, mutilate
I or incineratethe
i battery. Explosive
gasescould be
vented during charg-
i ingot discharging.
I Usein a well venti-
I lated area, away from
sources of ignition.
I Use onlythe battery
charger supplied with
this mower.
Charging Battery (if Equipped)
,.r _,
WARNING:Thebatterycontainscor-
rosive fluid and toxic material; handle
with careand keepawayfrom children.
Donot puncture,disassemble,mutilate
or incineratethe battery.Explosive
gasescould bevented during charging
or discharging. Useinawell ventilated
area,awayfrom sources of ignition.
1. Plugthe batterychargerintotheoutleton the
undersideofthebatteryhousing.SeeFigure5-8.
Figure 5=8
12
Page 13

IMPORTANT:Alwaysplugchargerleadintobatterypack
leadfirst,andtheninsertbatterychargerpluginto120
volt standardhouseholdoutlet. Followthisorderofaction
everytimeyouchargethebattery.
NOTE:The specialdesignedplugonthe chargerwillonly
fit intothe plugon thebatterybox.
2. Chargebatteryfor8 to 10hoursbeforeinitialuse.Do
not charge longer than 12hours.Thebatteryshould
be chargedatthebeginningandendoftheseason
andafteranyotherextendedperiodsof non-use.
3. Aftercharging,disconnectbatterychargerplugfrom
householdoutletfirst,then disconnectchargerlead
frombatterypacklead.
Figure 5=9
__IL ARNING:Donotremove the battery
packfrom the handlepanelfor any
reasonother thanreplacement.
Replacing Fuse (if Equipped)
Theelectricstartercircuitand batteryareprotectedbya
40 amperefuse.Ifthefuseburnsout,theelectricstarter
willnot operate.Iftheunitfailsto startwiththeelectric
starter,performthefollowingstepstocheckthefuse
insidethe batteryhousing:
1. Openthe batterycoveras describedin Replacing
Battery.See Figure5-6.
2. Removefusefromsocketandinspectas shownin
Figure5-9.If itis burnedout, replacewithstandard
automotive40amperefuse.
3. Carefullyplacewiringbackintohousing,closebattery
cover,andfold upperhandlebackintoplace.
NOTE:The enginecanbestartedmanuallyifthe fuse
burnsout.
Off-Season Storage
Thefollowingstepsshouldbetakento prepareyour
lawnmowerfor storage.
1. Cleanandlubricatemowerthoroughlyasdescribed
inthe lubricationinstructions.
2. Wedo notrecommendtheuseofapressurewasher
orgardenhoseto cleanyourunit.
3. Referto enginemanualforcorrectengine
storageinstructions.
4. Coatmower'scuttingbladewithchassisgreaseto
preventrusting.
5. Storemowerina dry,cleanarea. Donot storenext
tocorrosivematerials,suchas fertilizer.
Whenstoringanytypeof powerequipmentin a poorly
ventilatedor metalstorageshed,careshouldbetaken
torust-prooftheequipment.Usinga lightoil or silicone,
coattheequipment,especiallycables,andall moving
partsofyourlawnmowerbeforestorage.
Battery (if Equipped)
Thebatterymustbestoredwitha full charge.Extended
storageofa dischargedbatterywill reducelifeand
capacityofthe battery.
WARNING
Donotrer.ovethe
battery pack from the
handle panel for any
reason other than
replacement,
NOTE:The enginecanbe
startedmanuallyifthefuse
burnsout.
13
Page 14

Problem Cause Remedy
Enaone fa s to start 1....Bade contro d sengaged 1 Engagebade contro
2. Sparkplugwiredisconnected. 2. Connectwireto sparkplug.
3. Fueltankemptyorstalefuel. 3. Filltankwth clean freshgasoline.
4. Enginenot primed(if equipped). 4. Prmeengineas instructedin
"OperatingYou!LawnMower.
5. Faultysparkplug. 5. Clean,adjustgap,or replace.
6. Blockedfuel line. I 6. Cleanfuel ine.
7. Enginef coded. 7 Waita fewminutesto restart,but
I I do not prme.
8. Burntfuse,(ElectricStartOnly) 8. Replacefuse(see Maintenance
" section)
Engineruns erratic 1, Sparkplugwireloose, 1, Connectandtightenspark
plugwire,
2, Blockedfuel lineor stalefuel, 2, Cleanfuelline; filltankwithclean,
freshgasoline,
3, Ventingascap plugged, 3, Clearvent,
For repairs beyond 4, Waterordirt infuelsystem, 4, Drainfueltank, Refillwith
freshfuel,
merits listed here, 5, Dirtyair cleaner, 5, Referto enginemanual,
contactan authorized 6, Carburetoroutofadjustment, 6, Referto enginemanual,
service dealer.
En in v rh 1 Engne o eve ow 1 F crankcasewthpropero
g eoe eats I " " I " "
H B
2. Air flowrestricted. 2. Removeblowerhousing
_ andclean.
3. Carburetornotadjustedproperly. 3. Referto enginemanual.
Occasionalskips 1, Sparkpluggaptooclose, 1, Adjustgapto ,030",
(hesitates)at 2, Carburetoridlemixtureadjustment 2, Refertoenginemanual,
highspeed improperlyset.
toowide. sparkplug.
Idlespoory 1. Sparkplugfouled,faultyorgap 1. Resetgapto ,030"or replace
I 2 Carburetormproperyadjusted 2 Referto engnemanua.
3. Dirtyair cleaner. 3. Referto enginemanual.
Excessive 1. Cuttingbladelooseor unbalanced. 1. Tightenbladeandadapter.
Vibration Balanceblade.
2. Bentcuttingblade. 2. Seean authorizedservicedealer.
MowerwIInot 1 Wetgrass. 1. Do notmowwhen grassiswet; wait
m h r unt aterto cut
UC g ass
2. Excessivelyhighgrass 2. Mowonceat a highcutt ngheight
I thenmowagainat desire(Jheightor
3. Dull blade, makea narrowercuttingpath.
. 3. Sharpenorreplaceblade.
Unevencut 1. Dullblade. 1. Sharpenor replaceblade.
Mowerwillnot 1. Belt notinstalledproperly I 1. Check beltfor properpulleyinstal-
self ro el ' aton and movement
p p 2. Debriscloggingdriveoperation, i .
3. Damagedorworn belt. 2. Stopengine,disconnectsparkplug
I I w re andceanoutdebrs.
. 3. Inspectandreplacebelt.
14
Page 15

Safety Labels Found On Your Lawn Mower
Label
WArninG
DONOTremovesafety
(or any) labelsfrom
mowerfor any reason.
15
Page 16

Model Series 460
...._ ,_:_;/ '
WheelTreads
Zag Tread Bar Tread
16
Page 17

1 747-1214 DriveControl 42 725-04347t KeySwitch
2 L749-0928A . LowerHandle 43 L725-04323t_ 12VoltBattery
710-0703
4 617-04376A
5 731-05865
6 754-0637A
7 747-1161A
8 749-1233D
749-1092A
9 731-04177
10 687-02055
11 732-04090A
12 747-04080
13 720-0279
14 720-04072
15 710-1205
16 746-1132
746-04309 ControlCable- 39" 58 750-04594 SleeveSpacer8.985"Lg.
746-04135 ControlCable- 39"(Kawasaki) 59 687-02044 PivotPlateAssembly
17 710-1174
18 731-04859t
19 726-0240
20 714-0104
21 710-0654A
22 746-04203
CarriageBolt1/4-20
TransmissionAssembly
RearDischargeDoor
V-Belt
BladeControl
UpperHandle(ElectricStart)
UpperHandle(Non-electricstart)
ChuteDeflector
MulchPlugComplete
TorsionSpring- RH
GrassBagFrame
HandleKnob
HandleKnob
EyeBolt
ControlCable-40.75"
CarriageBolt5/16-18x2.0
BailCover
CableTie
CotterPin
Self-TappingSeresScrew
DriveCable
44 725-04329t
45 710-0599
46 736-0270
47 17032A
48 732-1014
49 747-0710
50 682-0015
51 787-01278
52 687-02194
687-02193
53 750-04595
54 710-0216
55 712-04065
56 782-5002B
57 736-0447
60 720-0426
61 634-0190
734-2042
62 710-04531
63 717-1762
717-1761
BatteryCharger
TT Screw1/4-20x0.5
BellWasher.265x 0.75
DeflectorChuteAdapter
TorsionSpring
HingePin
BearingAssembly
21"Deck
HeightAdjustmentAss'y-RH
HeightAdjustmentAss'y-LH
Slev.Spacer1.4"Lg.
HexScrew,3/8-16x.75
FlangeLockNut,3/8-16
FrontBaffle
WaveWasher
AdjustmentKnob
FrontWheel,8 x 1.8,Bar
FrontWheel,8 x 2.125,Zag
Screw,1/4-20x .390
Gear 14TRHFWD
Gear 14TLHFWD
_FACTORY PARTS
replacement
parts, contact
1-800-800,7310
orvisit
www,mtdproducts:com
23 664-04007A Grassbag-Black 64 L710-1652 TTScr. w/Washer1/4-20x.625
664-04034A
24 710-1650
25 747-04587
26 710-1741
27 732-1043
28 731-05642
29 731-04150C
30 731-0981At HubCap 70 738-0507B ShoulderScr.,500Dia.x.434
31 712-0397
32 731-05013A
731-05250
33 748-04015A
34 742-0741
35 736-0524B
36 710-1257
37 725-04293t EiectricStarterHarness 74 716-0102 SnapRing
38 728-0199t Rivet 75 782-7551A WheelDustCap
39 725-0201t Key 76 736-0504t Washer,Wave,.510x.750x.017
40 710-1667At Screw,#10-16x.75 77 725-04310t ExtensionHarness(Kawasaki)
Grassbag- Gray
ShoulderScrew# 12-24
PivotRod
Screw,1/4-15x 1.00
BeltTensionSpring
RearTrailingShield
RearBaffle
WingNut
TransmissionCover- Black
TransmissionCover- Gray
BladeAdapter
21"MulchingBlade
BladeBellSupport
HexScrew3/8-24x 2.50
65
687-02271
687-02270
66
715-0221
67
736-0474
68
687-02071A
687-02070A
69
732-04175
71 734-1987
734-2004A
734-2005A
72 787-01298
787-01299
73 732-0706
732-0707
HandleBracketAssembly- RH
HandleBracketAssembly- LH
DowelPin
Washer
PivotArmAssembly- RH
PivotArmAssembly- LH
RearSpringLever
RearWheel,8x 1.8,Bar
RearWheel,8x 2.125,Zag,w/BB
RearWheel,8x 2.125,Zag
HeightAdjusterPlate- RH
HeightAdjusterPlate- LH
FrontLever- RH
FrontLever- LH
IMPORTANT
For a properWorking
machine, use Factory
Approved PaFts,
V,BELTS aFespecially
designed to engage
and disengage safelyl
A substitute (non OEM)
V:aelt can bedanger-
ousby not disengaging
completely
__41 731-05459t IBatter Housin _t If Equipped
17
Page 18

MANUFACTURER'S LiMiTED WARRANTY FOR
Thelimitedwarrantysetforthbelowisgivenby MTDLLCwithrespect
tonewmerchandisepurchasedandusedin theUnitedStates,its
possessionsandterritories.
"MTD"warrantsthisproductagainstdefectsinmaterialandworkman-
shipfor a periodoftwo (2)yearscommencingonthe dateof original
purchaseandwill,at itsoption,repairor replace,freeofcharge,any
partfoundto bedefectiveinmaterialsorworkmanship.Thislimitedwar-
rantyshallonlyapplyif thisproducthasbeenoperatedand maintained
inaccordancewiththe Operator'sManualfurnishedwiththeproduct,
andhasnotbeensubjectto misuse,abuse,commercialuse,neglect,
accident,impropermaintenance,alteration,vandalism,theft,fire,water,
ordamagebecauseofotherperilor naturaldisaster.Damageresulting
fromthe installationor useof anypart,accessoryor attachmentnot
approvedby MTDforusewiththeproduct(s)coveredbythis manual
willvoid yourwarrantyasto anyresultingdamage.
Normalwearpartsarewarrantedto befreefromdefectsinmaterialand
workmanshipfora periodof thirty(30)daysfromthe dateof purchase.
Normalwearpartsinclude,butare notlimitedto itemssuchas: batter-
ies,belts,blades,bladeadapters,grassbags,riderdeckwheels,seats,
snowthrowerskidshoes,shaveplates,augerspiralrubberandtires.
HOW TO OBTAIN SERVICE: Warrantyservice isavailable,WITH
PROOFOF PURCHASE, throughyour localauthorized service
dealer.To locate the dealer in your area, check yourYellow Pages,
or contact MTDLLC at RO. Box 361131,Cleveland, Ohio 44136-
0019,or call 1-800-800-7310or 1-330-220-4683 or log on to our
Website at www.mtdproducts.com.
Thislimitedwarrantydoesnot providecoverageinthefollowingcases:
a. Theengineor componentpartsthereof.Theseitemsmaycarrya
separatemanufacturer'swarranty.Referto applicablemanufacturer's
warrantyfortermsandconditions.
b. Logsplitterpumps,valves,andcylindershavea separateoneyear
warranty.
c. Routinemaintenanceitemssuchaslubricants,filters,blade
sharpening,tune-ups,brakeadjustments,clutchadjustments,deck
adjustments,andnormaldeteriorationoftheexteriorfinishdueto
useor exposure.
d. Servicecompletedbysomeoneotherthananauthorizedservice
dealer.
e. MTDdoesnot extendanywarrantyforproductssoldor exported
outsideofthe UnitedStates,its possessionsandterritories,except
thosesoldthroughMTD'sauthorizedchannelsofexportdistribution.
f. ReplacementpartsthatarenotgenuineMTDparts.
g. Transportationchargesandservicecalls.
Noimpliedwarranty,includingany impliedwarranty of mer-
chantabilityof fitness for a particular purpose,applies after the
applicable periodof express written warranty aboveasto the
partsasidentified.Nootherexpresswarranty, whetherwrittenor
oral, except as mentioned above,givenby anypersonor entity,
includinga dealeror retailer, withrespect to any product,shall
bindMTD.Duringthe periodof the warranty,the exclusiveremedy
isrepairor replacementof the productas setforth above.
Theprovisionsas set forth inthis warrantyprovidethesoleand
exclusiveremedy arising from the sale.MTDshallnot be liable
for incidentalor consequentiallossor damageincluding,without
limitation, expensesincurredfor substituteor replacementlawn
careservicesor for rentalexpensesto temporarily replacea
warranted product.
Somestatesdo notallowthe exclusionor limitationofincidentalor
consequentialdamages,orlimitationsonhowlongan impliedwarranty
lasts,sothe aboveexclusionsor limitationsmaynot applyto you.
Innoeventshallrecoveryofanykindbegreaterthantheamountofthe
purchasepriceof theproductsold.Alterationof safetyfeaturesof
the productshallvoid this warranty. Youassumetheriskandliability
forloss,damage,or injurytoyouandyourpropertyand/ortoothersand
theirpropertyarisingoutof themisuseor inabilityto usethe product.
Thislimitedwarrantyshallnotextendto anyoneotherthantheoriginal
purchaserorto the personforwhomitwas purchasedas a gift.
HOWSTATELAWRELATESTOTHISWARRANTY:This limited
warrantygivesyouspecificlegalrights,andyoumayalsohaveother
rightswhichvaryfromstateto state.
IMPORTANT:OwnermustpresentOriginalProofof Purchaseto obtain
warrantycoverage.
IViTDLLC, P.O. BOX 361131 CLEVELAND, OHiO 44136-0019; Phone: 1=800=800-7310, 1-330=220-4683
Page 19

Seguridad=Ensamblaje=Operaci6n=Consejos yT6cnicas.Mantenimiento-Soluci6n de problemas.Lista de Parte=GrantJas
A AL L A O
"k4ostradoconPrincipioEI6ctricoopcional
Podadora giratoria 21"- Modelo Serie 460
IMPORTANTE
LEA CON ATENCION LAS REGLAS DE SEGURIDAD E INSTRUCCIONES ANTES
DE OPERAR LA PODADORA
ADVERTENCIA: Esta unidad est_ equipada con un motor de combusti6n interna y no debe set utilizada en o cerca de un
terreno agreste cubierto por bosque, malezas o hierba excepto que el sistema de escape del motor est6 equipado con un
amortiguador de chispas clue cumpla con las leyes locales o estatales correspondientes (en caso de e×istir). Si se utiliza
un amortiguador de chispas el operador Io debe mantener en condiciones de uso adecuadas. En el Estado de California
las medidas anteriormente mencionadas son exigidas pot ley (Articulo 4442 del C6digo de Recursos P_blicos de Califor=
nia). Es posible que existan leyes similares en otros estados. Las leyes federales se aplican en territorios federales. Su
distribuidor m_s cercano autorizado para realizar el mantenimiento del motor puede conseguir el amortiguador de chispas
para el silenciador sino usted puede comunicarse con el departamento de servicios al apartado postal P.O. Box 361131
Cleveland, Ohio 44136=0019.
PRINTEDIN U.S.A. MTD LLC, P.O. BOX 361131 CLEVELAND, OHIO 44136=0019
Page 20

Este manual del operador es una parte irnportante de su nueva rnaquina podadora. Le
ayudar_ a rnontar, preparar y rnantener la unidad para obtener los rnejores resultados.
Pot favor, lea y cornprenda el contenido del manual.
Indice
Indicador de pendiente ...................................... 3
Pr_cticas de seguridad en la operaci6n .......... 4
Configuraci6n y ajustes .................................... 6
Funcionarniento de la podadora ...................... 8
iVlantenirniento de la podadora ....................... 10
B squeda y registro del n rnero de modelo
ANTESDE COMENZARA MONTARSUNUEVO EQUIPO,
por favor,Iocalice la placadel modeloenel equipo y copie la
informaci6nen la placa del modelo situada a la derecha. Para
encontrarlaplaca demodelo,col6quese detr_.sde la unidad
en la posici6n del operadory mire hacia abajoen laparte
posteriorde lacubierta. La presente informaci6nresultar_.
necesariapara el usodel sitio web del fabricante y / o para
solicitarayudadel Departamento deAsistencia al Cliente o de
un distribuidorautorizado.
Soluci6n de problemas ................................... 14
AIrnacenamiento fuera de ternporada y
etiquetas de seguridad ................................... 15
Lista de piezas ................................................. 16
N_rnero de rnodelo
www.mtdproducts.corn
N_rnero de serie
MTD LLC
P.O= BOX 361131
CLEVELAND, OH 44136
330-220=4683
800-800-7310
Asistencia al cliente
Pot favor, NO devuelva la unidad al minorista a quien se la adquiri6 sin contactar
prirnero con el Departarnento de Asistencia al Cliente.
Encaso de tener problemas para ensamblareste productoo de tener dudas con respecto a los controles,funcionamientoo
mantenimientodel mismo, puede solicitar la ayuda de los expertos. Elijaentre lasopciones que se presentana continuaci6n:
1, Visite mtdproducts.com.
2. Sideseacontactarsecon unRepresentantedel Departamentode Asistencia al Cliente, porfavorcomuniquese al 1(800)
800-7310.
3. Elfabricantedel motor es elresponsablede todas las cuestionesrelacionadascon el rendimiento,potenciade salida,
especificaciones,garantiay mantenimientodel motor.Porfavor, para mayorconfirmaci6n,consulteel manual del propietario/
operadordel fabricante delmotor que es enviado, enun paqueteporseparado,junto con su unidad.
2
Page 21

0
,5
"CD
0
CD_
qD
C9""
O'3
qD
CO
qD
qD
qD
CD-
CO .2
"CD
"CD CD-
CO O'3
o-_
Alineey sostengaestenivelcon unArbolvertical...
o laesquinade unaconstrucci6n...
a/o/argodeZ _
/rheaPUntoa
I_'_ropros,
I
a_ r--_ o el postede
i una cerca.
|
|
|
e_
"-- C2)
CD _
Nz
,__ _
E _
CD _0
_ CI_
|
15
Page 22

Pr cticas de
ADVERTENCIA:El escapedel motor deeste producto,algunosdesuscomponentesy
algunoscomponentesdel vehiculo contieneno emiten productosquimicos queel estado de
California consideraque puedenproducir c_.ncer,defectosde nacimientouotros problemas
reproductivos.
PELIGRO:Estam_.quinaest,. disenadaparaser utilizadarespetandolas reglasde seguridad contenidasen este
manual.AI igual que con cualquier%o deequipo elOctrico,un descuido o error de partedeloperadorpuede
producir lesionesgraves. Estam_.quinaes capazde amputarmanos y piesy dearrojar objetos con granfuerza.
Deno respetar las instruccionesde seguridad siguientesse puedenproducir lesionesgraveso la muerte.
i Estesfmbolo indica in-
struccionesdeseguridad
importantes quede no
seguirse,se podrfaponer
enpeligro laseguridad
i personaly/o la propiedad
i suyaj deterceros. Leay
i sigatodas las instruccio=
neseneste manualantes
i de iniciar la operaciOnde
i estam_quina.Encaso de
no seguirestas instruc-
clonespodrfaprovocar
lesionespersonales.
Cuandovea estesfmbolo
SIGA LA ADVERTENCIA
Su
i responsabilidad:
I SOlopermitaqueusen
estamaquinaeldctrica
las personasquelean.
comprendany respeten
lasadvertenciasy las
instruccionesqueapa-
recenenestemanualy
en lam_.quina.
Ni5os
Puedenocurriraccidentestragicossi eloperadornoestaatentoala
presenciade ni_os,Pot Iogeneralalos nihoslesatraenlaspodadorasy
laactividaddepodarel cOsped.No entiendenlosriesgosni lospeligros.
Nuncad6potsentadoquelosni_ospermaneceranenel mismolugar
dondelosvio por Liltimavez,
1, Mantengaa los ni_osfueradelareadetrabajoybajoestricta
vigilanciadeunadultoresponsableademasdel operador,
2. Est6alertayapaguelapodadorasi unniho ingresaal area,
3, Antesymientasse estamoviendohaciaatras,mirehaciaatrasy
cuidequeno hayani_os,
4, TengaextremaprecauciOncuandoseaproximeaesquinasciegas,en-
tradasdepuertas,arbolesu otrosobjetosquepuedanobstaculizarle
lavistadeun ni_oquepudiesecorrerhaciala podadora,
5, Mantengaalejadosalos nihosdelosmotoresenmarchaocalientes,
Puedensufrirquemadurasconunsilenciadorcaliente,
6, Nuncapermitaquenihosmenoresde 14ahosoperenestamaquina,
Losnihosmayoresde 14 ahosdebenleeryentenderlasinstruc-
cionesdeoperaciOny reglasdeseguridadcontenidasenestemanual
y debenserentrenadosy supervisadospot suspadres,
Funcionamiento
Manejoseguro de lagasolina:
1. Paraevitar lesionespersonalesodahosmaterialesseasumamente
cuidadosoal manipularlagasolina,Lagasolinaesaltamente
inflamabley los vaporessonexplosivos.Sepuedelesionar
gravementesi derramagasolinasobreustedo sobrelaropa yaque
sepuedeencender,
2, Laveselapiel y cambiesederopade inmediato,
3, Utilicesolo recipientesparagasolinaautorizados,
4, Nuncalleneloscontenedoresenel interiorde unvehiculoo
camiono cajadecamionetaconrecubrimientosplasticos,Coloque
siemprelosrecipientesenel pisoy lejosdel vehiculoantesde
Ilenarlos.
5. Retireelequipoagasolinadelcamiono remolquey 116nelo
enel piso.Si estono esposible,entoncesIlenedichoequipo
enunremolquecon unrecipienteportatil,envezdedesdeun
dispensadordegasolina.
6. MantengalaboquilladeIlenadoencontactoconel bordede la
entradadeltanquede gasolinaocontenedorentodomomento
hastaqueest6Ileno.Noutiliceundispositivo paraabrir/cerrarla
boquilla.
7. Apaguetodos loscigarrillos, cigarros,pipasy otrasfuentesde
combustion.
8. Nuncacarguecombustibleen lamaquinaen interioresporquelos
vaporesinflamablespodrianacumularseenelarea.
9. Nuncasaquelatapa delgasni agreguecombustiblemientrasel
motorestacalienteoenmarcha.Dejequeelmotorseenfriepor Io
menosdosminutosantesdevolver acargarcombustible.
10. Nuncarecargueeltanquedecombustible.Lleneeltanqueno mas
de1/2 pulgadapot debajode labasedel cuellodeIlenadopara
dejarespacioparalaexpansiondelcombustible.
11. Vuelvaacolocarlatapade lagasolinay ajListelabien.
12. Limpie lagasolinaderramadasobreelmotory el equipo.Traslade
la maquinaaotrazona.Espere5 minutosantesdeencenderel
motor.
13. Nuncaalmacenelamaquinao el recipientedecombustibleenun
espaciocerradodondehayafuego,chispaso aparatosconpiloto
comoporejemplo,calentadoresde ague,calentadores,hornos,
secadoresderopauotrosaparatosagas,
14, Parareducirel riesgode incendiomantengalamaquinalimpia
depasto,hojasy deacumulaciOndeotros escombros,Limpielos
derramesdeaceiteocombustibleysaquetodos losdesechos
embebidoscon combustible,
15, Dejequela maquinaseenfrie5 minutospor Iomenosantes de
almacenada.
Funcionamientogeneral:
1. Leaysigatodaslasinstruccionescontenidasenestemanualantes
deintentarensamblarestamaquina,Lea,comprendaysigatodaslas
instruccionesquefiguranenla maquinayen elo los manualesantes
deintentaroperarla,Familiaricesecompletamentecon loscontroles
y conel usoapropiadodeestamaquinaantesde operarla,6uarde
estemanualenunlugarseguroparareferenciasfuturasy regularesy
paresolicitarrepuestos,
2, Estamaquinaesunapiezadeequipodeprecision,noun juguete,
Pot tanto,tengalamaximaprecauciOnen todomomento,Su unidad
hasidodisehadapararealizarunatarea:cortar el cOsped,Nola
utilicecon ningLinotto propOsito,
3, Nopermitanuncaquelosni_osmenoresde14ahosoperenesta
maquina,Losni_osde14 ahosy masdebenleery comprenderlas
instruccionescontenidasan estemanualydebenearcapacitados
y supervisadospor unode los padres,Onicamentelos individuos
responsablesque sehayanfamiliarizadoconestasreglasde
seguridadparala operaciOndeberanusarestamaquina,
4, Inspeccioneminuciosamenteel areaendondeutilizaraelequipo,
Saquetodas las piedras,palos,cables,huesos,juguetesy otros
objetosextra_osconlosque podriatropezaroque podrianset
arrojadospot lacuchilla, Losobjetosarrojadospot la maquina
puedenproducirlesionesgraves,Planifiqueel patronenelqueva
airdescargandoelrecorteparaevitarque ladescargadematerial
serealicehacialoscaminos,lasveredas,los observadores,etc,
Eviteademasdescargarmaterialcontralasparedesyobstrucciones
quepodrianprovocarqueel materialdescargadorebotecontrael
operador.
5, Pareayudaraevitarelcontactocon lacuchilla ounalesionpot
unobjetoarrojado,mantOngaseen lazonadel operadordetrasde
lasmanijasymantengaa los ni_os, observadores,ayudantesy
mascotasapartadosal menos25 metrosde lapodadoramientras
estaenoperaciOn,Detengala maquinasi alguienentraen lazona,
6, Paraprotegerselosojosutilice siempreanteojosoantiparrasde
seguridadmientrasoperalamaquinaomientrasla ajustao repara,
Losobjetosarrojadosquerebotanpuedenlesionargravementela
vista,
7, Utilicezapatosdetrabajo resistentes,desuelafuertey pantalones
y camisasajustados,Serecomiendautilizarcamisasy pantalones
quecubranlos brazosy las piernas,asicomocalzadocon puntas
reforzadasenacero,Nuncaopereestamaquinaconlospies
desnudos,sandalias,ocon zapatosligerosocon losquese pueda
resbalar(pot ejemplo,calzadodelone).
8, Nopongalasmanoso lospiescercadelas piezasrotatoriasoenla
tolvade lacortadora,Elcontactocon las cuchillas puedeproducirla
amputaciOndemanosy pies,
9, Unacubiertadedescargafaltanteoda_adapuedeprovocarel
contactoconlacuchillao lesionespor objetosarrojados,
4
Page 23

10. Muchaslesionesocurrencomoresultadodepasarlacortadora
sobre los pies duranteunacaidaprovocadaporderrapesotropiezos.
Nosesostengadelapodadorasiseestacayendo,suelte lamanija
inmediatamente.
11. Nuncatirehaciaustedlapodadoramientrascamina.Si debe
retrocederla podadoraparaevitarunaparedu obstaculo,mire
primeroabajoy atrasparaevitartropezarsey luegosiga estospasos:
a. Retrocedadela podadorahastaestirarcompletamente
susbrazos.
b. AsegLiresequeestabienequilibradoy bien parado.
c. Tirede lapodadoralentamentehaciausted,no masaliade la
mitaddeladistanciaentreustedy la podadora.
d. Repitaestospasoscomose requiera.
12. Noopereestamaquinaestandobajolosefectosdelalcoholo de
drogas.
13. Noembragueelmecanismodeautopropulsi6nenunidadesconeste
equipomientrasarrancaelmotor.
14. Elmecanismode control de lacuchillaes un dispositivode
seguridad.Nuncaintentedesviarsedesufuncionamiento.Dehacerlo
nofuncionarianlosdispositivosdeseguridady podr[anproducirse
lesionespersonalespotel contactocon lascuchillasgiratorias.Las
manijasdecontroldelacuchilladebenfuncionarbienen ambas
direccionesy regresarautomaticamentea la posici6nde desengrane
cuandoselas suelta.
15. Nuncaoperela podadoraenc6spedhLimedo.Siempreest6seguro
desu equilibrio.Sitropiezaycaepuedelesionarsegravemente.Si
sienteque pierdeelequilibrio,suelteinmediatamentelamanijade
control delacuchillay lacuchilladejaradegirar entres segundos.
16. Corteel c6spedsolamentecon luzde diao conunabuenaluz
artificial. Camine,nuncacorra.
17. Detengalacuchillacuandocrucecaminosdegravilla,pasoso
andadores.
18.Si lamaquinacomenzaraavibrar demaneraanormal,detenga
el motor,y busqueinmediatamentelacausa. Lavibraci6npor Io
generalesunaadvertenciadealgLinproblema.
19.Apagueel motory esperehastaquelacuchillasedetengacompleta-
menteantesderetirar laguardaparael recortedec6spedo desatorar
latolva. LacuchillacontinLiagirandopot unoscuantossegundos
despu6squeelmotor sehaapagado.Nuncacoloqueningunaparte
del cuerpoenelareadela cuchillahastaque est6seguroquela
cuchilla hadetenidosu movimientorotatorio.
20. Nuncaoperela cortadorasin lasguardasapropiadas,cubierta de
descarga,guardapararecorte,manijadecontrol de lacuchillay
otrosdispositivosdeseguridadyprotecci6nensu lugary funciona-
ndo.Nuncaoperelacortadorasi losdispositivosdeseguridadestan
da_ados.Si noIohace,estopuedetenercomoresultadolesiones.
21. Elsilenciadoryel motorsecalientany puedenproducirquemaduras.
NoIostoque.
22. Utilicesolamentepartesyaccesoriosfabricadosespecialmentepara
estamaquina,originalesdel fabricante(OEM).Si noIo hace,esto
puedetenetcomoresultadolesionespersonales.
23. Si se presentansituacionesquenoestanprevistasenestemanual
seacuidadosoyuseelsentido comLin.Marqueparacontactarel
departamentodeatenci6nalclienteyobtenerelhombrede su
distribuidor mascercano.
Funcionamientoen pendientes:
Laspendientessonunfactorimportantequeserelacionacon losaccidentes
producidosporderrapesy caidasy quepuedenproducirlesionesgraves.La
operaci6nen pendientesrequieremayorprecauci6n.Si nose sienteseguro
enunapendiente,nolapode.Paraseguridad,useel medidordependientes
quese incluyecomopartedeestemanualparamedirlapendienteantes
deoperarla unidadenunazonainclinada.Si lapendientesuperalos15
grados,no lapode.
HagaIo siguiente:
1. Muevala podadoraatrav6sde las carasdelapendiente,nuncahacia
arribay abajo.Tengacuidadocuandocambiededirecci6ncuando
operela maquinaenpendientes.
2. Est6atentoa losagujeros,raices,rocas,objetosocultoso
abultamientosque puedanprovocarque sederrapeosetropiece.El
c6spedaltopuedeocultarobstaculos.
3. Siempreest6segurodesu equilibrio. Sitropiezay caepuede
lesionarsegravemente.Sisienteque pierdeel equilibrio,suelte
inmediatamentela manijadecontrolde lacuchillayla cuchilla
dejaradegirarentres (3) segundos.
No haga Io siguiente:
1. Nocorteelc6spedcercadepozos,hundimientos,bancos,podria
perderelequilibrio.
2. Nopodependientesmayoresde15gradoscomoIoindicael
medidordependientes.
3. Nopodeelc6spedhLimedo.Si noestafirmementeparado,puede
resbalarse.
Servicio
1. Nuncaenciendaun motoren espacioscerradosoenuna zona con
pocaventilaci6n.Elescapedelmotorcontienemon6xidodecarbono,
ungasinodoroy letak
2. Beforecleaning,repairing,orinspecting,makecertaintheAntesde
limpiar,repararoinspeccionarlamaquina,compruebequelacuchilla
ytodaslaspartesquesemuevensehandetenido.Desconecteelcable
delabuj[ayp6ngalodemaneraquehagamasacontraelmotorpara
evitarqueseenciendade maneraaccidental.
3. Reviselospernosdemontajedelacuchillay delmotora intervalos
frecuentesparaverificarqueest6nbienapretados.Inspeccioneademas
visualmentela cuchillaenbuscadedahos(abolladuras,desgaste,
roturas,etc.).Reemplacelacuchillaconequipooriginaldelfabricante
(OEM)listadoenestemanual."Lautilizaci6nde partesqueno cumplan
conlasespecificacionesdeequiposoriginalespodriatenercomo
resultadounrendimientoincorrectoy ademaslaseguridadpodr[aestar
comprometida"
4. Lascuchillasde laspodadorasson muyafiladasy podr[ancortado.
Envuelvalacuchillao utiliceguantesy extremeprecaucionescuandole
deservicio.
5. Mantengatodoslospernos,tuercasy tornillosbienajustadospara
asegurarsequela maquinaseencuentraencondicionessegurasde
operaci6n.
6. Nuncamanipulelosdispositivosdeseguridadde maneraimprudente.
Controleperi6dicamentequefuncionendeformaadecuada.
7. Afterstrikinga foreignobject,stopthe engine,disconnectthespark
Despu6sde golpearconalg0nobjetoextraho,detengael motor,
desconecteelcabledelabuj[ayconecteelmotoramasa.Inspeccione
minuciosamentelamaquinaparadeterminarsiesta da_ada.Repareel
dahoantesdeencenderlay operada.
8. Nuncatratedeajustarunaruedao laalturadecorte mientrasel
motorestaenmarcha.
9. Loscomponentesdelatolvapararecorte,cubiertadedescargay
escudoderiel, estansujetosadesgasteyda_osquepodr[adejar
expuestaspartesquesemuevenopermitirque searrojenobjetos.
Paraprotegersuseguridad,verifiquefrecuentementetodoslos
componentesy reemplaceloss61ocon partesdelosfabricantesde
equiposoriginales(O.EM.) listadasenestemanual."Lautilizaci6n
departesquenocumplancon las especificacionesdeequipos
originalespodriatenercomo resultado unrendimientoincorrectoy
ademasla seguridadpodriaestarcomprometida"
10. Nocambielaconfiguraci6ndelreguladordelmotorni acelere
demasiadoelmismo.Elreguladorcontrolalavelocidadmaximasegura
deoperaci6ndel motor.
11. Mantengao reemplacelasetiquetasdeseguridad,segLinseanecesario.
12. Observelasleyesynormasaplicablesparadisponeradecuadamentede
losdesechos.Ladescargainapropiadadeliquidoso materialespuede
da_arel medioambiente.
ADVERTENCIA:
Estes[mboloin-
dica instruccionesde
seguridadimportantes
quede noseguirse,se
podria poneren peligro
laseguridadpersonal
y/o lapropiedadsuyay
deterceros.Leay s_ga
todaslas instrucciones
enestemanualantes
deiniciar laoperaciOn
deestam%uina.En
casodenoseguirestas
instruccionespodr[a
_rovocarlesiones
personales.Cuandovea
_stes[mbolo
SIGA LA ADVERTENCIA
Su
responsabilidad:
S01opermitaqueusen
estamaquinael_ctrica
laspersonasquelean.
comprendanyrespeten
lasadvertenciasy las
instruccionesqueapa-
recenenestemanualy
enlam_quina.
5
Page 24

NOTA:Permanezca
detr_.sde la poda-
doracomo sifuese
a ponerlaenfuncio-
namiento.Su mano
derechacorresponde
al ladoderecho de la
podadora,su mano
izquierdacorresponde
al lado izquierdode la
I podadora.
NOTA:Su podadorase
enviacon la manija en
la Dosici6nelevada.
NOTA:Cada extremo
de la manijasuperior
debeser colocadoen
la misma posici6n
relativa.
Figura 3-1
WingNuts (2)
Figura 3=2
HardwarePack
1. Retireel materialdeernpaquequepudieraestarentre
lasrnanijassuperiore inferior.
a.Tirey retrocedalarnanijasuperiorcornose
rnuestraen laFigura3-1.AsegQresede quelarnanija
inferiorest_asentadafirrnernenteen Lossoportesde
rnontajedela rnanija.
b.Aprietelasperillasrnanualesquesujetanla rnanija
superiorala rnanijainferior.AsegQresede queel
bul6nde carroest_apropiadarnenteasentadoenla
rnanija.
2. Localiceelpasadorde horquillaen unorificio enel
pasadorsoldadoa cadaladode la rnanijainferior.
a.Saqueel pasadorde horquillade esteorificio.
Usandolaspinzas,inserteel pasadordehorquilla
enel agujerointernodelpasadorsoldado.Repita
porel otto lado.
b.Inserteel bul6ndecarrodel paquetedehardware
enel orificiosuperioren el soportede rnontajede la
rnanija.Sujeteconunatuercapl_.sticade rnariposa,
quetarnbi_nseincluyeenel paquetedehardware.
Repitadelotroladocon loselernentosrestantesdel
paquetedehardware.
3. Lagalade la cuerdayaest,.unidaalcostadoderecho
dela rnanijasuperior.Aflojelatuercadernariposaque
sujetala guiade cuerda.
a.Sostengalarnanijadecontrolde lacuchillacontra
la rnanijasuperior.
b.Jale lentarnentelacuerdadearranquepara
sacarladelmotor.Sueltela rnanijade controlde la
cuchilla.
c. Deslicelacuerdade arranqueen laguia.Ajustela
tuercaa rnariposa.
.
Insertelos pasadoresde lasunionesdecables
dentrodelos orificiosdela rnanijainferior.Tire de
lasunionesdelcableapret&ndolasy recortandoel
exceso.
IMPORTANTE:
Esta unidadse envia
sin gasolinani aceite
i en el motor.Llenecon
i gasolinayaceitecomo
se indica en las instruc-
clonesque se incluyen
en el manual de motor
adjuntoANTES de
poner en funciona-
mientosu podadora.
i
_h J
Figura 3=3 Figura 3=4
6
Page 25

5. Unaplacadeajustey unapalancaencadarueda
proporcionanel ajustede laalturadecorte.
a. Presionela palancahaciala rueda.
b. Mu_valaacualquierotrade lasnueveposiciones
parala alturadecortedeseada.Veala Figura3-4.
c. Liberelapalancahacialacubiertade la podadora.
6.Sigalos pasosa continuaci6nparaensamblarla
colectoraderecortes:
a.
Coloquelabolsasobreelmarcode modoqueel
ladode pl_.sticonegroquedeenel rondo.
b.
Desliceelcanalpl_.sticode la bolsasobrelos
ganchosenel marco.Veala Figura3-5.Todos
loscanalespl_.sticosexceptoelubicadoenla
partesuperiorcentralde labolsase unendesdeel
exteriorde la bolsa.
c. Lapartecentralsuperiordela bolsaseunedesde
adentro.
7. Sigalos pasosa continuaci6nparaensamblarla
colectoraderecortes:
a. Levantelapuertade descargaposterior.
b. Coloquelacolectoraderecortesen lavarilla.
Descanselapuertade descargasobrela tolva
para recortede cesped.Veala Figura3-6.
Parasacarla tolvapararecortesoconvertirlaen una
abonadora,levantela puertaposteriorparadescargade
la podadora,comosemuestraenla Figura3-6. Levante
la tolvahaciaafuerade la barrade pivote.Sueltela
puertade descargay permitaque la mismacierrela
aberturatraseradela podadora.
Figura 3=5
w
Configuraci6n
y ajustes
ALTURADELCORTE
Todaslas ruedas
deben ser colocadas
en la mismaposici6n
relativa.
TOLVAPARARE-
CORTEDECFtSPED
AsegOreseque la bolsa
para recortesest,.
con el lado derecho
haciaafueraantes de
ensamblar(la etiqueta
deadvertencia estar_
haciaafuera).
__k DVERTENCIA:Nuncahagafuncionar
mecanismos de ensamblede la manijaylapuerta de
descarga posteriordescanse eontrala partesuperior
de latolva pararecorte.
8. Si covertinga ladescargadelado,asegOreseque
el receptorde hierbaesdelaunidadyla puertade
descargatraseraest,.cerrada.
a. Levantamientoquecubreconpajoteenchufeen el
b. Deslizardos ganchosdela tolvade descargade
NOTE:noquiteel ladoquecubrecon pajoteelenchufe
en cualquiermomento,auncuandoustednocubrecon
pajote.
9. Bateriade precio(Deserequipado)durante8 a 10
horasantesdeuso inicial.Sigainstruccionesenla
secci6nde Mantenimiento.
la podadora a rnenosque los ganchos
en latolva pararecortes est_nfirme-
menteasentadosen lasranurasen los
ladoderechodecortac_sped.
ladobajoel alfilerdegozneen laasambleade
enchufequecubrecon pajotey bajarel ladoque
cubrecon pajoteelenchufe.Vetla Figura3-7.
Figura 3=6
Figura 3W
ADVERTENCIA:
funcionar la poda:
doraa menos que los
ganchosen la tolva
pararecortes est_n
firmemente asenta-
dosen las ranuras
en los mecanismos
de ensamble de
manija yla puerta de
descarga posterior
descansecontrala
J
parte superior de la
tolva para recorte.
7
Page 26
FuncionamientO
de la podadora
control de la cuchilla
es undispositivo de
seguridad,Nunca
intenteanular su
funcionamiento,
Tengaextremo
cuidadocuando
i manipule gasolina. La
gasolinaes altamente
i inflamabley sus va-
pores puedencausar
explosiones. Nunca
agregue combus-
tible a la m_quina en
interioreso mientras
el motor esta caliente
o en funcionamiento.
Apague loscigarril-
los,cigarros, pipas
y otrasfuentes de
combustibn.
Mantenga sus manos
y pies alejados del
area de torte y de
latolva. Consulte la
etiquetade adverten-
cias en la unidad.
Controldela
transmision
Arrancadorde
retroceso
* MostradoconPrincipioEl_ctricoopcional
Clavijaparaabono
Figura4-1:Losprincipalescomponentesde lapodadora.
Ahora que ya ha ajustado su podadora para su
funcionamiento, familiaricese con sus controles y
caracteristicas. Estos se describen y se ilustran en
esta pagina. Este conocimiento le permitira utilizar
su nuevo equipo a su maxima capacidad.
Control de la cuchilla
La manija de control de la cuchilla esta unida a la
manija superior. Presione la manija de control de
la cuchilla contra la manija superior para operar la
unidad. Libere la manija de control de la cuchilla
para detener el motor y la cuchilla.
,_ ADVERTENCIA:Este mecanismo de
funcionamiento.
controldela cuchillaes un dispositivo de
seguridad. Nunca intentedesviarse de su
Control de la transmisi6n
El control de transmisi6n esta ubicado en la manija
superior. Apriete el control de la transmisi6n para
engranar el sistema de transmisi6n. Libere el con-
trol de transmisi6n para desengranar el sistema de
transmisi6n. Para reducir la velocidad cuando haya un
obstaculo cerca, cuando gire o se detenga, suelte la
palanca.
Palancas de ajuste de la altura de
torte
Estas palancas estan ubicadas una en cada
rueda y se usan para corregir la altura de corte.
Las cuatro palancas tienen que estar en la misma
posici6n relativa para asegurar un corte uniforme.
Clavija para abono
La clavija de abono seutiliza Qnicamentepara prop6sitos
de abono.En lugarde recolectar los recortes de c_sped
electrico
Palancaparael
adjustedela altura
decorte(en cada
rueda)
enelrecolectordec_sped,supodadoratienelaopci6n
derecircularloscortesyenviarlosnuevamentealc_sped.
AsegQresedequelapuertadedescargatraseraest_cer-
radayelrecolectordec_spedsehayaextrddodela unidad
mientrasest_abonando.
Arrancador de retroceso
El arrancador de retroceso esta unido a la manija su-
perior derecha. Para encender la unidad col6quese
detras de la misma y tire de la cuerda del arrancador
de retroceso.
Arrancador el_ctrico (De set equipado)
El interruptor de encendido esta Iocalizadoen el
lado izquierdodel panel de la manija del arrancador
electrico. Es necesario cargar la bateria durante 8 a
10 horas antes del uso inicial.Consulte lasecci6n de
Mantenimiento para obtener mas informaci6n.
Llenado de gasolina y aceite
1. Verifique el nivel del aceite y agregue mas de ser
necesario. Siga las instruccionesel manual del motor.
2. Realice el servicio del motor con gasolina como se
indica en el manual del motor. Refi_rase al manual de
motor para la posici6n del gas y petr61eose llenan.
,_ ADVERTENCIA:Tengaextremocuidado
__ es altamenteinflamabley los vapores son
a la m_quinaen interioreso mientras el motor
est_ caliente o en funcionamiento. Apague los
cigarrillos, cigarros, pipasy otras fuentes de
combusti6n.
cuando manipule lagasolina.Lagasolina
explosivos. Nuncaleagreguecombustible
8
Page 27

w
_ DVERTENCIA:AIoperarunapodadora
puedeser queobjetose×tra_osseanar-
rojadosalosojos,Iocualpuededa_arlos
gravemente.Utilicesiempregafasde
seguridaddurantelaoperaci6ndela
podadoraomientraslaajustaolarepara.
Encendido del motor
_ ADVERTENCIA:Aseg_resequeninguna
1. Oprimaelcebador(Deserequipado)tresveces.Espere extra_o,detengael motor,Retireelcable
aproximadamentedossegundosentrecadaempuje, de la bujia,inspeccionelapodadorapara
Figura4-2.Entemperaturasdeaprox.55°Foinferiores, -- verque notengadaSos,y repare
cebecincoveces.Nocebeelmotorcalientepara
reiniciarlodespu_sdeunadetenci6nbreve.
2. Col6quesedetr_.sdelapodadora,aprieteelcontroldela
cuchillacontralamanijasuperior,Figura4-2.
3. Arrancadorde retroceso:Sostengalamanijadel
arrancadorderetrocesoy tirede lacuerdaconungolpe
r_.pido,continuoy contodoelbrazo,Figura4-2.Sise
sostieneconfirmezalamanijadelarrancador,lacuerda
serebobinalentamente.Repitahastaqueel motorest_
enmarcha.Dejequelacuerdasevuelvaaenrollar
lentamente.
Arrancadorel_ctrico(Deset equipado):GirelaIlave
deencendidoa laderechaparaponerenmarchael
motor,Figura4-2.SueltelaIlaveunavezqueelmotorse
hapuestoenmarcha.
Detenci6n del motor
1. Sueltelamanijadecontroldelacuchillaparadetenerel
motory lacuchilla.
2. Desconecteelcabledela bujiayp6ngalodemanera
quehagamasacontraelmotor.
personaapartedel operadorpermanezca
cercadela podadoramientras
arrancaelmotor u operalamisma.Nunca
enciendaunmotorenespacioscerradoso
enunazonaconpocaventilaci6n.Elescape
del motorcontienemon6×idodecarbono,
un gasinodoroy letal,Mantengalas manos,
los pies,el cabelloy laropasueltaalejados
de laspartesm6vilesdel motoryde la
podadora, Figura4-2: Poneren marchala podadora.
,_ ADVERTENClA:Si golpeaunobjeto
eldaSoantesde reiniciary operarla
podadora,Lavibraoi6nexcesivade la
podadoradurantela operaci6nesuna
indicaei6ndedaSo.Sedebeinspecoionar
y repararla unidadIoantesposible.
Unavezqueelmotorest_funcionando,aprieteel
controldetransmisi6ncontralamanijasuperiorpara
propulsarlapodadora.
Paraobtenerresultados6ptimos,nocortec_sped
hOmedo.
,, Paraunc_spedm_.ssano,nuncacortem_.sde un
terciodela Iongitudtotaldelc_sped.
Uso como abonadora
Paraabonarelc_sped,quiteelcolectordec_spedde
lam_.quinae instalelatolvadeabono.Lapuertade
descargaposteriordeber_,estarcerrada.
, Paraunabonoeficiente,nocortec_spedhOmedo.
, Elc_spednuevoogruesopodriarequeriruncortem_.s
estrecho.Ajustelavelocidaddepisodeacuerdoconla
condici6ndelc_sped.
ADVERTENClA:Espereaquela cuchillase
hayadetenidopotcompletoantesdehater
cualquiertrabajo enla podadorao de retirar
el colectordec_sped.
,, Sielc_spedhacrecidom_.sde 10,2cm.(4pulg.)nose
recomiendael usodelapodadoracomoabonadora.En
esecaso,useelcolectordec_spedparaembolsarlos
recortes.
Uso del colector de c_sped
Uso de ia podadora de c_sped
ADVERTENClA:Nuncaoperela unidad
sinque lapuertatraserao el conjuntodel
recolectorde c_spedest_nfirmemente
ajustadosensu lugar.
AsegQresequeelc_spedest,.libredepiedras,palos,
cablesu otrosobjetosquepudiesendaSarlacortadorao el
motor.Dichosobjetospuedenserarrojadosaccidentalmente
porlapodadoraencualquierdirecci6ny provocarlesiones
personalesgravesaloperadoryaotraspersonas.
Puedeutilizarel colectordec_spedpararecogerdichos
recortesmientrasoperala podadora.Consultela secci6n
deConfiguraci6nparaverlas instruccionesdeinstalaci6n.
Losrecortesdec_spedsonrecolectadosenlabolsa
deformaautom_.ticaa medidaquepasalapodadora.
Operelapodadorahastaquelabolsade recolecci6n
est_Ilena.
,, Detengael motorporcompletosoltandolamanijade
controldelacuchilla.Compruebequela unidadse
hayadetenidoporcompleto.
,, Paradeshacersedelosrecortesdec_spedlevantela
puertadedescargaytiredelabolsaderecolecci6n
haciaarriba,apart_.ndoladelapodadora.
Funcionarniente
RTEN
AI operar una podadora
puede set que objetos
extraSos sean arrojados
a los ojos, Io cuai puede
daSarlos gravernente.
Utilice siernpre galas
de seguridad durante
la operacion de la
podadora o rnientras ia
ajusta o la repara.
Asegurese que
ninguna persona
aparte del operador
perrnanezcacerca de
la podadora rnientras
arranca el motor u
opera la rnisrna. Nunca
encienda un motor en
espacios cerrados o
en una zona con poca
ventilaci6n. Ei escape
del motorcontiene
rnon6xido de carbono,
un gas inodoro y letal.
Mantenga las rnanos,
los pies, el cabello y la
ropa suelta alejados de
las partes rn6viles del
motor y de la podadora.
9
Page 28

Mantenimiento
dela
ADVERTENCIA
Deter,gasiempreel
motor,desconecte
y asa
contrael motor antes
de limpiar,lubricaro
realizartodo tipo de
NO recomendamos
eluso de lavadorasa
presi6n ni mangUeras
dejardin para li_i
piar su undad Estas
pueden producirdaRos
a loscomponentes
el_ctriCos engranajes
pelea& cOjineteso al
motor: Elusode agua
acortar_,lavida Otilde
la m_.quinay reducir_t
su capaCidadde
servicio:
Lubrique estos puntos
antesde volVera
Figura 5=1
Figura 5=2
Recomendaciones generales
1. Respetesiemprelasreglasdeseguridadcuando
realicetareasdemantenimiento.
.
Lagaranfiadeestapodadoranocubreelementosque
hanestadosujetosalmalusoola negligenciadel
operador.Pararecibirel reembolsototaldelagaranfia,
eloperadordeber_,darmantenimientoalapodadora
comoseindicaenestemanual.
3. Elcambiodelavelocidadcontroladadelmotor
invalidate,lagarantiadelmotor.
4. TodoslosajustesdebenserverificadosporIomenos
unavezencadaestaci6n.
5. Reviseperi6dicamentetodoslossujetadoresy
compruebequeest_nbienajustados.
motor,desconectela bujiay hagamasa
__lh DVERTENCIA:Detengasiempreel
contraelmotorantesde limpiar,lubricar
o hacerIlevara cabocualquierclasede
mantenimientoen
su m_quina.
Lubricacion
1. Lubriqueconaceiteligerolospuntosdepivotede
lamanijadecontroldelacuchillaalmenosunavez
cadaestaci6n.Elcontroldelacuchilladebefuncionar
librementeenambasdirecciones.VealaFigura5-1.
2. LubriquelasruedasporIomenosunavezportempo-
radaconaceiteligerooaceiteparamotor.Sinembargo,
silasruedassequitanpotcualquierraz6n,debelubricar
lasuperficiedelbrazogiratorioy lasuperficieinternade
laruedaconaceiteligero.VealaFigura5-1.
3. Lubriqueelresortedetorsi6ny elpuntodepivotedela
puertatraserade descargaperi6dicamenteconaceite
ligeroparaprevenirlaoxidaci6n.Veala Figura5-1.
4. Latransmisi6nestadoprelubricaday selladaenla
f_.bricaynorequierelubricaci6n.
5. Sigaelmanualadjuntodelmotorparaconocerlas
instruccionesyelprogramade lubricaci6ndelmismo.
Cuidado de la cubierta
Debelimpiarlaparteinferiordelaplataformadelapoda-
doradespu_sdecadausoparaprevenirla acumulaci6nde
recortesdec_sped,hojas,suciedaduotrosdesechos.Si
seacumulandesechos,resultar_,enlaformaci6nde6xido
ycorrosi6n.
1. Desconecteelcabledelabujia.Dronela gasolinade
lapodadorao coloqueuntrozodepl_.sticodebajodel
tap6ndeIlenadodelcombustible.
2. Inclinelapodadorade maneraquequedeapoyada
sobrelacaja.Mantengahaciaarribael ladodonde
seencuentraelfiltrodeaire.Sostengafirmementela
podadora.
_ DVERTENClA:Nuncainclinela
podadoram_sde90gradosenninguna
direcci6ny no deje lapodadorainclinada
en ning_ncaso.Sepuedefiltrar aceite
dentrode lapartesuperior del motor y
causarproblemasde arranque.
3. Raspeylimpielaparteinferiordela plataforma
medianteel usodeunaherramientaadecuada.Nola
rode conagua.
4. Vuelvaacolocarla podadorasobresusruedasenel
suelo.Si pusounpl_.sticodebajodeltap6ndeIlenado
decombustibleaseguresedesacarloenestemomento.
Cuidados para el motor
Acontinuaci6nsepresentaunalistadetareasdeman-
tenimientonecesariasparael buenfuncionamientode la
podadora.Sigael manualadjuntodelmotorparalalista
detalladay lasinstrucciones.
1. Verifiqueel niveldeaceitecomoseindicaenelmanual.
2. Limpieel filtrodeairecada25horasencondiciones
normalesdeuso.Limpieaintervalosdepocashoras
cuandohayamuchopolvo.Consulteelmanualdel
motor.
3. Limpielabujiayrestablezcaladistanciadisruptivapot Io
menosunavezportemporada.Consulteelmanualdel
motorparaconocerlasespecificacionesparaeltipode
bujiayladistanciadisruptivacorrectas.
4. Limpieel motorregularmenteconuntrapoocepillo.
Mantengalimpioelsistemadeenfriamiento(Areadel
soplador)parapermitirlacirculaci6napropiadadeaire.
Quitetodoelc6sped,polvoy residuosdelAreadel
silenciador.
Reemplazo de aler6n trasero
1. Paraquitar latapatrasera,levantelapuertatrasera,
yla tapade prensaena ambosladosparaquitardel
agujero.Verla Figura5-2.
2. Quitarlatapadelagujerodeenfrentey sustituirpor
la nuevatapaen laordendeenfrentey lamaneradel
retiro.
10
Page 29

Cuidado de la cuchilla
paraafilarlao reemplazarla,prot_jaselas
__lh DVERTENClA:Cuandosaque lacuchilla
1. Desconecteelcabledela bujia.Girela podadora
sobreelcostadoycomFuebequeel filtrodeaireyel
carburadorquedenhaciaarriba.
2. Retiredelcig(_eSaldelmotorelperno,el soportede
campanade lacuchilla,lacuchillayeladaptadordela
cuchilla.Veala Figura5-3.
3. Sepuedeafilarlacuchillaconunalimao conuna
ruedaabrasiva.Nointenteafilarlacuchillamientras
seencuentrainstaladaen lapodadora.Cuandoafile
la cuchilla,sigael&ngulooriginaldeafilado.Nile los
bordesdecorteporigualparamantenerelequilibriode
lahoja.
4. Saquelacuchilladeladaptadorparacomprobarel
equilibrio.Balanceelacuchillasobreundestornillador
deejeredondoparainspeccionarla.Saquemetaldel
ladopesadohastaquequedebienequilibrada.
_ esequilibradagenerar_vibraciones
.
Lubriqueel cigQeSaldelmotoryla superficieinterna
deladaptadordelacuchillaconaceiteligero.Deslice
el adaptadordelacuchillasobreelcigQeSaldelmotor.
Instalelacuchillaconel ladomarcado"Bottom"(inferior)
o conelnumerode partehaciaelpisocuandola
podadoraestAen posici6ndeoperaci6n.Asegureseque
la cuchillaquedealineadayasentadaenlasbridasde
suadaptador.
6. Coloqueel soportedecampanadela cuchillaen la
misma.Alineelasmuescasdelsoportedecampana ,f
dela cuchillaconlosorificiospequeSosde lacuchilla.
Vuelvaa colocarelpernohexagonalyajustelosegunlos
siguientesvaloresdetorsi6n:450Ib-pulgcomominimo,
600Ib-pulgcomomAximo
Paraasegurarlaoperaci6nseguradelapodadorarevise
periSdicamenteelpernodelacuchillaparadeterminarsi
estAbienajustado.
Cuidado de ia correa
1. Extraigadoslostornillosconrebordeasegurandola
cubiertafrontala lacubiertadela podadora.Veala
Figura5-4.Presionehaciaadentrosobreloslaterales
delacubiertafrontaly sueltelasaletasquelaaseguran
alas m_nsulasdelajustadordealtura.Quitelacubierta
dela podadora.
2. Tirehaciaarribadelalambrede laguardadelacorreay
extrAigaladela poleadetransmisbn.Veael insertode
la Figura5-4.
3. Hagarodarlacorreafueradelapoleadetransmisbn.
Inclinelapodadorasobresuladoconelfiltrodeaire
haciaarribaparaIlegarala correadesdela parte
inferiordelapodadora.Deslicelacorreafueradela
poleadelmotoryenrosquea trav_sdelaabertura
dentrodela m_nsuladelaguardadelacorrea.Luego
retirelacorreade lacuchillaextrayendounextremopor
vez.VealaFigura5-5.
manosusandoun parde guantespara
trabajo pesadoountrapo gruesopara
sostenerlacuchilla.
ADVERTENCIA:Silacuchillaest,1
excesivascuandorote aaltas velocid-
ades.EstopuedeproducirdaSosa la
podadora,y sepuederomper,causando
asilesionespersonales.
Figura 5-3
Figura 5-4
f
Figura 5=5
4. Reemplacepotunanuevacorrea,coloc_.ndola
alrededordelacuchillayatrav_sdelam_nsulade
laguardadelacorrea.Aseguresedequelacorrea
estAfirmementeasentadasobrelapoleadelmotor
mientrastira delotroladoy ladeslizaalrededorde la
poleadetransmisi6n.Coloquenuevamenteelalambre
delaguardadela correaensu posici6noperativay
ajustelodentrodelaranuraprovista.Reensamblela
cubiertafrontal.
IVlantenimientc
de la
podadora
ADVERTENCIA
Cuando saque la
cuchiHaparaaffiarla
o reemplazarla, o
cuando deslice la
correa alrededor de
la misma, prot_jase
las manos usando un
par de guantes para
trabajo pesado o un
trapo grueso para
sostener la cuchiHa.
Si lacuchiHaest_
desequilibrada
generaravibraciones
excesivas cuando
rote a altas veloci-
dades. Esto puede
producir dahos a la
podadora,y sepuede
romper, causando as{
lesiones personales.
11
Page 30
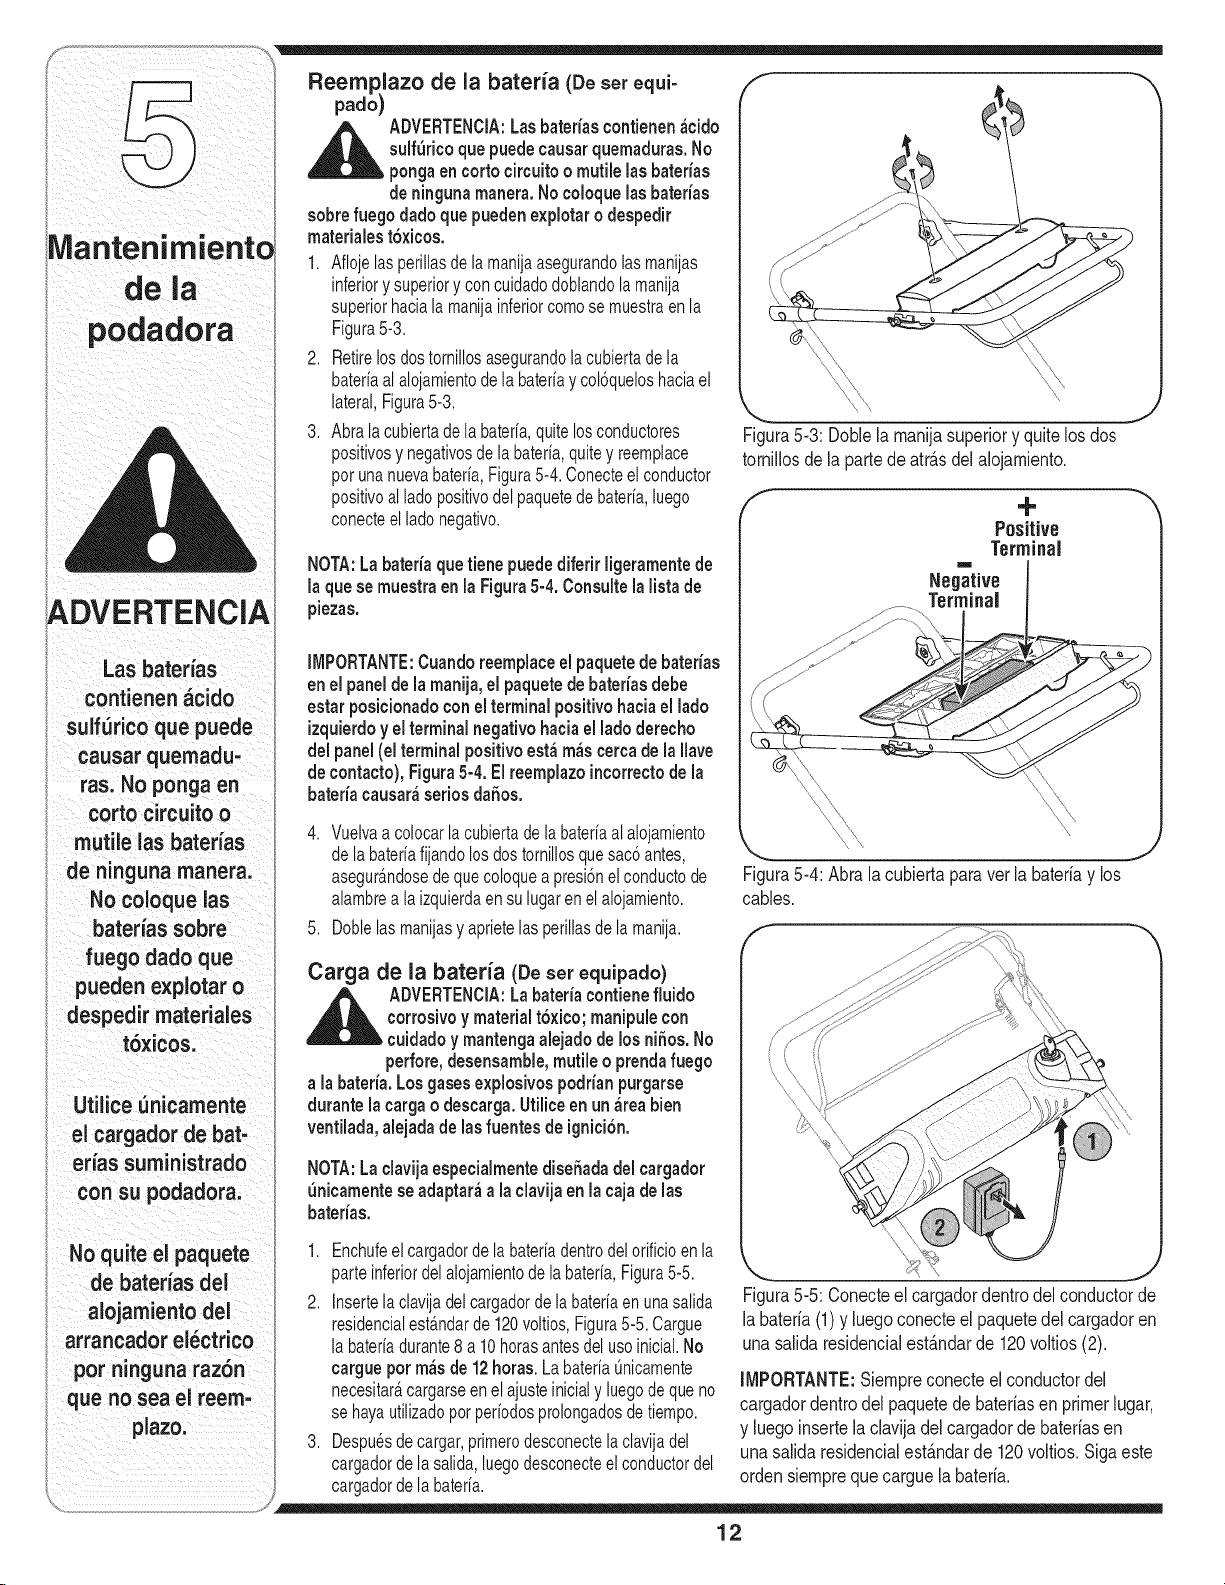
Reemplazo de la bateria (Deserequi-
pado)
=,
Mantenimiento
ADVERTENCIA
Las batedas
contienen_cido
sulf_rico que puede
causarquemadu-
ras. No ponga en
corto circuitoo
mutile las baterias
de ningunamanera.
No coloque ias
bateriassobre
fuego dado que
pueden explotar o
i despedir materiaies
t6xicos.
Utilice _nicamente
el cargadorde bat-
er{as suministrado
con su podadora.
_ DVERTENCiA:Lasbateriascontienen_cido
sobrefuegodadoquepuedenexpiotaro despedir
materiaiest6xicos.
1. Aflojelasperillasdelamanilaasegurandolasmanijas
2. Retirelosdostornillosasegurandolacubiertadela
3. Abralacubiertadelabateria,quitelosconductores
NOTA:Labateriaquetienepuededifeririigeramentede
iaquesemuestraenia Figura5-4.Consuiteialistade
piezas.
iMPORTANTE:Cuandoreempiaceei paquetedebaterias
enei paneldeia manila,eipaquetedebateriasdebe
estarposicionadocon elterminalpositivohaciaeiiado
izquierdoyelterminalnegativohaciaelladoderecho
dei panel(el terminalpositivoest_m_scercadela iiave
decontacto),Figura5-4.Elreemplazoincorrectodeia
bateriacausar_seriosdaSos.
4. Vuelvaa colocarlacubiertadelabateriaalalojamiento
5. Doblelasmanijasy aprietelasperillasdelamanila.
suif_ricoquepuedecausarquemaduras.No
pongaencortocircuitoo mutileiasbaterias
deningunamanera.Nocoioqueiasbaterias
inferiory superioryconcuidadodoblandolamanila
superiorhacialamanilainferiorcomosemuestraenla
Figura5-3.
bateriaalalojamientodelabateriaycol6queloshaciael
lateral,Figura5-3.
positivosy negativosdela bateria,quitey reemplace
porunanuevabateria,Figura5-4.Conecteelconductor
positivoal ladopositivodelpaquetedebateria,luego
conecteel ladonegativo.
delabateriafijandolosdostornillosquesac6antes,
asegurAndosedequecoloqueapresi6nelconductode
alambrea laizquierdaensulugarenelalojamiento.
Carga de la bateria (De ser equipado)
_ DVERTENCiA:Labateriacontienefluido
corrosivoy materialt6×ico;manipuiecon
cuidadoy mantengaaiejadodelos niSos.No
perfore,desensamble,mutiieo prendafuego
a labateria.Losgasesexplosivospodrianpurgarse
durantelacargaodescarga.Utiliceenun_reabien
ventilada,aiejadadeiasfuentesdeignici6n.
NOTA:LaclavijaespecialmentediseSadadelcargador
_nicamenteseadaptar_alaclavijaeniacajadeias
baterias.
\
Figura5-3: Doblelamanilasuperioryquitelosdos
tornillosdela partedeatrfis delalojamiento.
Positive
Terminal
- INegative
Terminal
Figura5-4:Abrala cubiertaparaverla bateriaylos
cables.
No quite el paquete
I de 5atedas del
i aiojamientodel
arrancadorei_ctrico
por ningunarazon
que no sea ei reem-
piazo.
1. Enchufeelcargadordelabateriadentrodelorificioenla
parteinferiordelalojamientodelabateria,Figura5-5.
2. insertelaclavijadelcargadordelabateriaenunasalida
residencialestandarde120voltios,Figura5-5.Cargue
labateriadurante8a 10horasantesdelusoinicial.No
cargueporm_sde 12horas.LabateriaQnicamente
necesitar&cargarseenelajusteinicialy luegodequeno
sehayautilizadoporperiodosprolongadosdetiempo.
3. Despuesdecargar,primerodesconectelaclavijadel
cargadordelasalida,luegodesconecteelconductordel ordensiemprequecargueia bateria.
cargadordelabateria.
Figura5-5: Conecteel cargadordentrodelconductorde
labateria(1)y luegoconecteelpaquetedelcargadoren
unasalidaresidenciaiest_.ndarde 120voitios(2).
iMPORTANTE:Siempreconecteel conductordel
cargadordentrodel paquetede bateriasenprimerlugar,
y luegoinsertelaclavijadelcargadorde bateriasen
unasalidaresidencialest_.ndarde 120voitios.Sigaeste
12
Page 31

Reernplazo del fusible (De set equipado)
Elcircuitodelarrancadorelectricoylabateriaest&nprote-
gidosporunfusiblede40amperes.Sielfusiblesequema,
elarrancadorelectriconofuncionar&.Silaunidadnose
enciendeconelarrancadorelectrico,sigalossiguientespasos
paraverificarqueelfusibleest&dentrodelalojamientodela
bateria:
1. Abralacubiertadelabateriacomosedescribeen
ReemplazodeBateria,verFigura5-3.
2. Retireelfusibledelenchufee inspeccionecomose
muestraenlaFigura5-6.Siest&quemado,reemplacepor
unfusibledeautom6vilesest&ndarde40amperes.
3. Coloqueconcuidadoloscablesdentrodelalojamiento,
cierrelatapadelabateriaydoblelamanijasuperior
nuevamenteensulugar.
IVlantenimiento
de la
NOTA:Elmotorpuedeponerseenmarchamanualmente
sielfusiblesequema.
Almacenamiento fuera de temporada
Sedebenseguirestospasosparalapreparaci6ndela
podadoraparasualmacenamiento.
,, Limpieylubriquelapodadoracomosedescribeenlas
instruccionesdelubricaci6n.
o Norecomendamoselusodeunalimpiadoraapresi6no
mangueradejardinparalimpiarsuunidad.
,, Consulteel manualdelmotorparaconocerlasinstruc-
clonesparaelalmacenamientocorrectodelmismo
,, Cubralacuchillacongrasaparachasisparaimpedirla
oxidaci6n.
o Almacenelaunidadenunazonalimpiay seca.Nola
almacenecercadematerialescorrosivoscomopor
ejemplofertilizantes.
Cuandoalmacenecualquiertipodeequipomotorizadoenun
galp6ndedep6sitomet&licoo conpocaventilaci6n,tenga
especialcuidadoderealizarleuntratamientoantioxidanteal
equipo.Useaceiteligeroosiliconapararecubrirelequipo,
especialmenteloscablesy partesm6vilesdesu podadora
antesdealmacenarla.
Bateria (De ser equipado)
Labateriadebeguardarseconunacargacompleta.El
almacenamientoprolongadodeunabateriadescargada
reducir&lavidaQtilylacapacidaddelabateria.
J
Figura5-6: Cuandoreemplaceelfusible,utiliceun
fusibledeautom6vilesest&ndarde 40amperes.
batedas del
rniento del arrancador
e ctt copot
seae
reemplazo.
El motor puedeponerse
en marcha manualmente
si el fusible se quema.
13
Page 32

Problema Causa Remedio
Elmotor no arranca 1. E controldeI_minase retir6. 1 Contratare contro de _m na
2.Alambredebuj[adesconectado. 2. Unire alambrea labuj[a.
3.Dep6sitode combustiblecombustiblevado 3. Llenareltanquedela gasolinalimpia
oa_ejo. I fresca.
4. Lav_lvuladecombustiblesecerr6. 4. V#,lvuladecombustibleabierta.Verel
Soluci6n de manua,demotor
5.Buj[adefectuosa 5. Limpio ajusteel hueco o sustituir.
6.L[neade combustiblebloqueada. 6. L[neade combustiblelimpia.
I 7.Elmotorsedesbord6. 7.Esperarunos minutosparareactivarse.
8.Fusible quernado. (Principio El_ctrico 8. Sustituyaelfusible (verlasecci6nde
Elmotorfunciona de 1. Elcablede la buj[aest_flojo. 1. Conecteyajusteel cablede la buj[a.
manera err_ttica 2. Lalineadel combustibleest_tapada oel 2. Limpielalineadel combustible;Ilene
Si debe realizar 5. Elfiltrode aireest_ sucio. 5. Consulteelmanualdelmotor.
reparaciones m_s
importantesque las Elmotor recalienta 1. Elniveldeaceitedelmotores bajo. 1. Lleneel c_rterconaceiteadecuado.
enunc_das aqu_
comuniquese
distribuidor
el local
con
autorizado. , _ correctamente.
Saltos ocasionales 1. Ladistanciadisruptivade la buj[aes muy 1. Ajuste ladistanciadisruptivaa 0,76
(pausas)a 2. Ajustede la mezcladelcarburadormal 2. Consulteel manualdel motor.
altavelocidad realizada.
combustibleesviejo, el tanquecon gasolinalimpiay fresca
3. Laventilaci6nen latapa delcombustible 3. Destapelaventilaci6n.
est_obstruida.
4. Aguao suciedaden elsistemadel 4. Vacieel tanquedelcombustible.
combustible. VuelvaaIlenarloconcombustible
limpio.
6. Esnecesarioajustarel carburador. 6. Consulteelmanualdelmotor.
2. Flujodeaire restringido. 2. Retireelalojamientodelsopladory
Ifmpielo.
I 3 E carburadorno est#,ajustado 3. Consulteel manualdel motor.
peque_a, mm(0,03pulg).
, , , I distanciadisruptiva. I mm(0,03)0 reemplacelabuj[a.
marcna enta
Funcionamalen I 1. Buj[aatorada averiadao excesode I 1. Reajusteladistanciadisruptivaa0 76
2. Carburadorajustadoincorrectamente. 2. Consulteelmanualdel motor.
. 3. E f trode are est_ suco. . 3. Consutee manua de motor.
Demasiadavibraci6n 1. Cuchillaflojaodesequilibrada. 1. Aprietelacuchillay el adaptador
Equilibrelacuchilla
2. Cuchillaabollada. 2. Consultea undistribuidorautorizado.
Lapodadoranoabona 1. C6spedhOmedo. 1. Nocorteel c6spedcuandoest_
• , mojado esperehastaqueseam_s
el cespee I tarde parahacerlo.
/s v erie e'u "ad ''_ I 2 C_spedexcesvamenteato 2. Podeunavez auna alturade corte
_, q F a/ elevaday luegovuelvaa realizarel
3. Lacuchillade lacortadoranoest_afilada. 3. Afile ocambiela cuchilla.
cortea laalturadeseada osiga una
ruta decortem#,sestrecha.
Corte desigual 1. Laposici6ndelas ruedasnoescorrecta. 1. ColoqUeposici6ndelaSaltura.CUatr°ruedasen la misma
2. Lacuchillade lacortadoranoest_afilada. 2. Afile ocambiela cuchilla.
Lapodadorano 1. Correarealinstalada. 1. Compruebela correaparavet si la
- I poleaest#,bieninstaladayse mueve
avanza pors[ misma correctamente
I 2. Haydesechos el 2. Detengael motor,desconecteelcable
funcionamientodelatransmisi6n, de a buj[ay mpe os desechos.
i
3. CorreadaSadao desgastada. " 3. Inspeccioneycambieelperno.
m =
bloqueando
14
Page 33
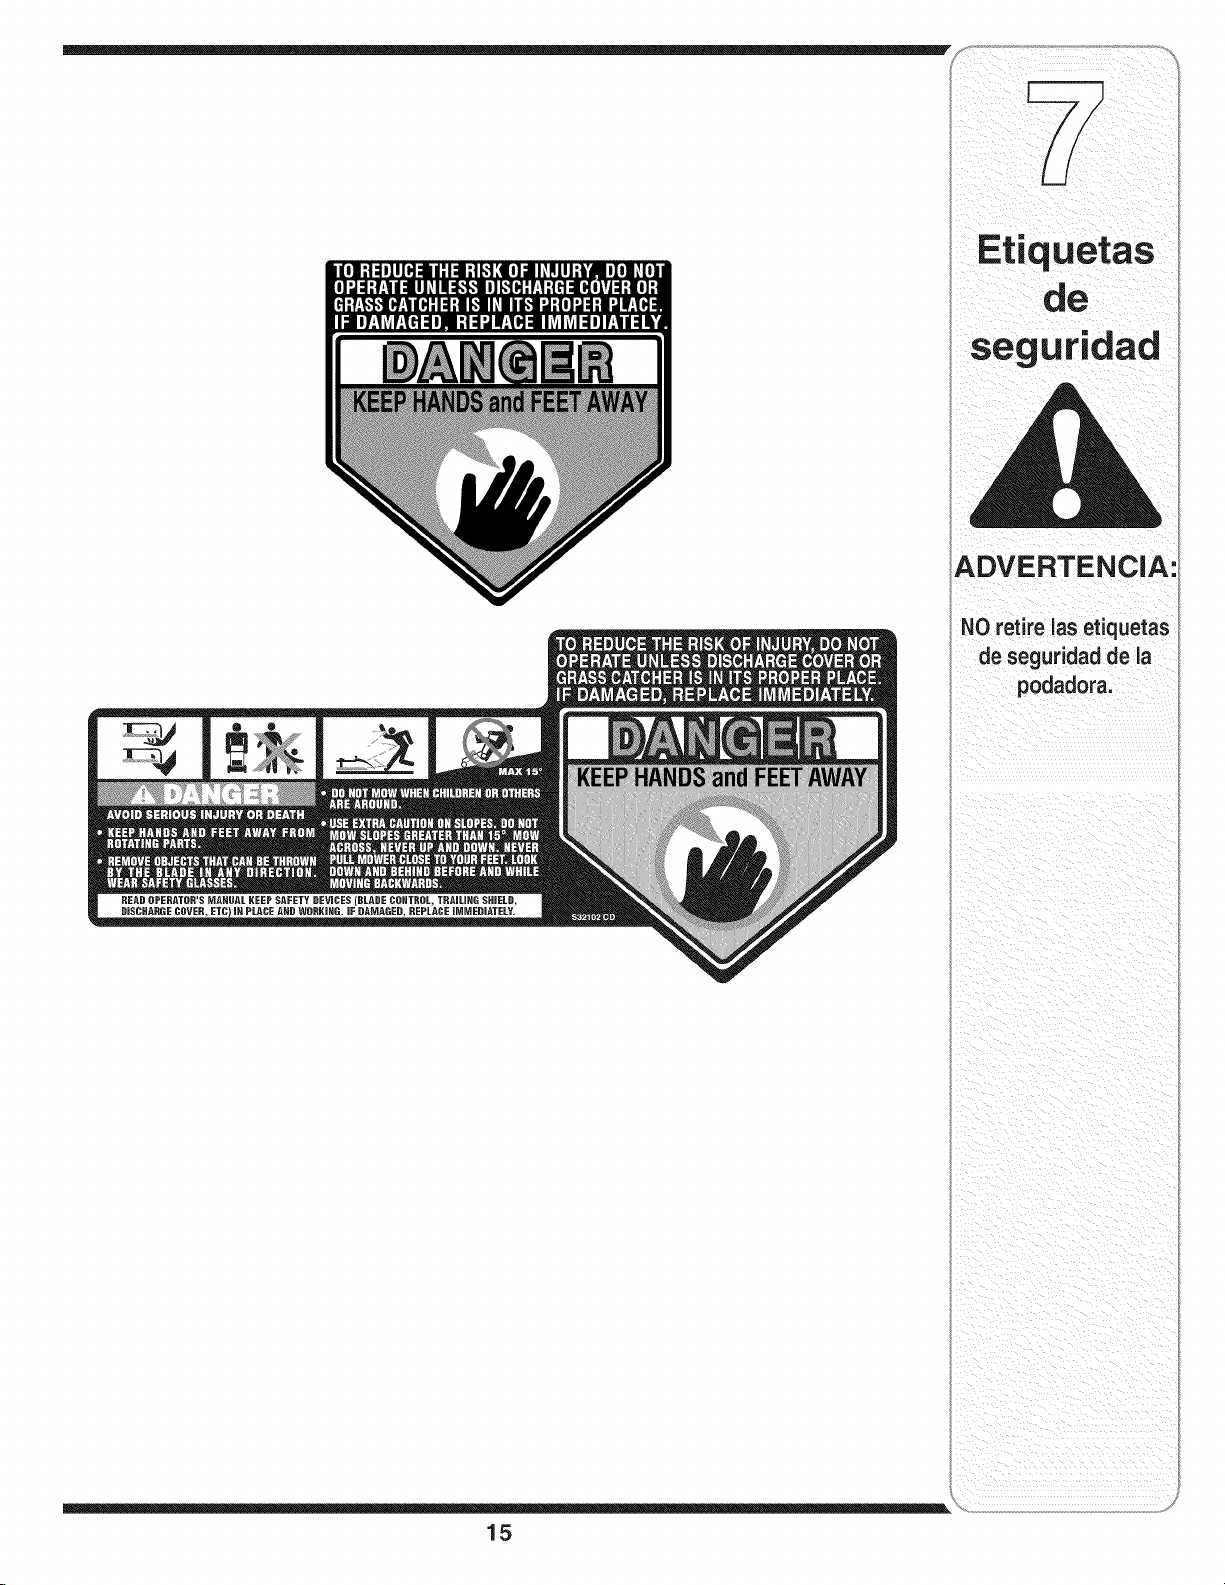
segUridad
ADVERTENCIA:
NO retire Jasetiquetas
de seguridadde =a
ii i _i I_ ii
15
Page 34

Modelo Serie 460
Zag Tread BarTread
16
Page 35

1 747-1214 Controldela transmisi6n
2 749-0928A Manijainferior
3 710-0703 Pernodelcarro, ,1/4-20
4 618-04376A Mecanismode latransmisi6n
5 731-05865 Puertasde descargaposterior
6 754-0637A Correaen V
7 747-1161A Controldela cuchilla
8 749-1233D Manijasuperior(PrincipioElectrico)
749-1092A Manijasuperior(No PrincipioElectrico)
9 731-04177 Tolvadedescarga lateral
10 687-02055 Clavijadeabono
11 732-04090A Resortedetorsi6n-LD
12 747-04080 Marcode latolva pararecortes
13 720-0279 Tuercade mariposa
14 720-04072 Perillamanual
15 710-1205 Guiade lacuerda
16 746-1132 Cable decontrol- 103,5cm.(40,75pulg.)
746-04309 Cabledecontrol- 99,1cm. (39 pulg.)
746-04135 Cabledecontrol- 99,1cm.(Kawasaki)
17 710-1174 Pernodelcarro, ,5/16-18x 2"
18 731-04859t Cubiertadegancho
19 726-0240 Uni6nde cable
20 714-0104 Brochedehorquilla
21 710-0654A TornilloSemsTTde 3/8-16x 1
22 746-04203 Cable detransmisi6n
23 664-04007A Bolsodemierba-Negro
664-04034A BolsodeHierba-Colorgris
24 710-1650 Tornilloconreborde
25 747-04587 Varillagiratoriade la puertatrasera
26 710-1741 Tornillo,1/4-15x 1,00
27 732-1043 Resortedetensi6nde la correa
28 731-05642 Guarda
29 731-04150C Deflectortrasero
30 731-0981At Tapade buje, mecanismode barra
31 712-0397 Tuercade mariposa,1/4-20
32 731-05250 TapadeTransmisi6n-Colorgris
731-05013A TapadeTransmisi6n-Negro
33 748-04015A Adaptadorde lacuchillacon polea
34 742-0741 Cuchillaabonadora
35 736-0524B Soportedecampanade lacuchilla
36 710-1257 Pernohexagonalde3/8-24 x 2,5
37 725-04293t Cableadodel arrancadorelectrico
38 728-0199t Remache
39 725-0201t Llave
40 710-1667At Tornillo,#10-16x 0.750
41 731-05459t Alojamientodela bateria
42 725-04347t Llavedecontacto
43 725-04323t Bateriade 12voltios
44 725-04329t Cargadordebateria
45 710-0599 TornilloTTde 1/4-20x 0.500"
46 736-0270 Arandeladecampana,0.265x 0.75
47 17032A Adaptadordeldeflectordelcanal
48 732-1014 Resortedetorsi6n
49 747-0710 Pasadordebisagra
50 682-0015 Montajede cojinetes
51 787-01278 Cubierta-53,3 cm. (21pulg.)
52 687-02193 Mecanismodeajustedealturafrontal- LI
687-02194 Mecanismodeajustedealturafrontal-LD
53 750-04595 Separadorde la manga- LI
54 710-0216 Tornillohexagonal
55 712-04065 Tuercade seguridaddebrida3/8-16
56 782-5002B Deflectorfrontal
57 736-0447 Arandelaondulatoria
58 750-04594 Separadorde la manga- LD
59 687-02044 Montajede la placagiratoria
60 720-0426 Perillade la palancadeajuste
61 634-0190 Ruedadelantera,8x 1.8,Barra
734-2042 Ruedadelantera,8 x 2.125,Zag
62 710-04531 Tornillo,1/4-20x.390
63 717-1762 Engranaje,14T- LD
717-1761 Engranaje,14T- LI
64 710-1652 TornilloAB
65 687-02270 Mecanismodefijaci6ndela manija
trasera- LI
687-02271 Mecanismodefijaci6nde lamanija
trasera- LD
66 715-0221 Pasadordovela
67 736-0474 Arandela,38,1mm(1,5pulg.)all,metro
exterior
68 687-02071A Montajedel brazogiratorio-LD
687-02070A Montajedel brazogiratorio- LI
69 732-04175 Palancaderesorte
70 738-0507B Tornilloconreborde
71 734-1987 Ruedatrasera,8x 1.8,Barra
734-2004A Ruedatrasera,8 x 2.125,Zag,w/BB
734-2005A Ruedatrasera,8 x 2.125,Zag
72 787-01298 Placadeajuste dela altura- LD
787-01299 Placadeajuste dela altura-LI
73 732-0706 Palancadelantera-LD
732-0707 Palancadelantera-LI
74 716-0102 Junta t6rica
75 782-7551A Tap6nguardapolvosde la rueda
76 736-0504t Arandela
77 725-04310t Cableadodelarrancadorextension
(Kawasaki)
t Sies parte del equipo
17
CTORY PARTS
p oz ,de
repuestoi contacte al
1'800=800.7310
o visite
www,mtdproducts:com
IMPORTANTE
Paraque la mdtquina
funcione demanera
adecUadal userepu_
estosapr0badosporel
fabricante.
LAS CORREAS
EN V estandiseSadas
especialmente para
que se engFaneny de:
sengranen Sinriesgos
El uso deuna correa
en V sustituta (queno
sea defabricante del
eqUipooriginal) puede
resultarpeligF0sosila
misma no se desenz
granacompletamentel
L,...............................................................................................................................y
Page 36

GARANT{A LilVlITADA DEL FABRICANTE PARA
Lagaranfialirnitadaqueseextiendeacontinuaci6nesotorgadapor
laernpresaMTDLLCy cubrernercaderiasnuevascornpradasy
utilizadasen los EstadosUnidos,susposesionesyterritorios.
"MTD"garantizaesteproductopordefectosde rnaterialesyde
fabricaci6npor unperiodode dos (2)a_osa partirde la fechade la
cornpraoriginaly reparar_,ocarnbiar_,sincargocuandoioconsidere
pertinentetodaslaspiezascondefectosde rnaterialeso defabricaci6n.
Estagaranfialirnitadas61oseaplicar_,sielproductohasidooperadoy
rnantenidodeacuerdoconlas instruccionesdelManualdel Operador
queseproporcionaconelproductoy no hasidosujetoa usoinapro-
piado,abuso,usocornercial,abandono,accidente,rnantenirniento
incorrecto,alteraci6n,vandalisrno,robo,incendio,inundaci6no algQn
da_odebidoaotto peligroo desastrenatural.Elda_oresultanteporla
instalaci6no el usode piezas,accesoriosounionesnoaprobadospor
MTDparasu usocon el(los)producto(s)incluido(s)en estemanual
anular_,lagaranfiaenIoquerespectaaesosda_os.
Segarantizaque laspiezascondesgastenormalest_.nlibresde de-
rectosenlos rnaterialeso defabricaci6npotunperiodode treinta(30)
diasapartir dela fechade cornpra.Laspiezaso cornponentessujetos
adesgastenormalincluyenperonoselirnitana: baterias,correas,
cuchillas,adaptadoresparacuchillas,boisasparapasto,ruedaspara
la plataforrnadela podadoratractor,asientos,zapatasantideslizantes,
placas,gornasde corteyneurn_.ticos.
COMOSOLICiTARY OBTENERSERViClOTI_CNICO:Elserviciode
lagaranfiaest,.disponible,CONPRUEBADECOMPRA,a travesdel
distribuidorlocalautorizadoparael rnantenirniento.ParaIocalizaral
distribuidorensu_.rea,busqueenlasp_.ginasarnarillasde suIocalidad
ocontactea MTDLLCal ApartadoPostal361131,Cleveland,Ohio
44136-0019,oilarneai 1-800-800-73106 1-330-220-4683o entrea la
p_.ginaWebenwww.rntdproducts.corn.
Estagaranfialirnitadano Iocubrir_,enlos siguientescasos:
a. El motory laspiezascornponentesdel rnisrno.Estosproductos
puedentenergaranfiadelfabricanteporseparado.Consultelos
t_rrninosycondicionesde la garanfiaaplicabledelfabricante.
b. Las bornbasparaelcortedernadera,lasv_.lvulasyloscilindros
tienenunagaranfiaindependientede unaSo.
c. Losarficulosnecesariosparaelrnantenirnientode rutinacornopor
ejernplolubricantes,filtros,afiladoresde cuchillas,losajustesde los
frenos,delernbragueo de lapiataforrnay eldeterioronormaldel
acabadoexteriordebidoalusoo exposici6n.
d. Servicionorealizadopoteldistribuidorautorizadoparaelmantenimiento.
e. MTDnoproporcionaningunagaranfiaporproductosvendidos
o exportadosfuerade losEstadosUnidosdeAmerica,sus
posesionesy territorios,exceptoaquellosquefuerenvendidosa
travesdelos canalesautorizadosporMTDparaladistribuci6nde
exportaciones.
f. Piezasde reernplazoqueno sonpiezasgenuinasde MTD.
g. Gastosde transportey Ilarnadaspor serviciost_cnicos.
Nose aplican garantiasimplicitas,incluidaslas garantias
implicitasde comerciabilidado de adecuaci6n paraun prop6sito
determinado,despu_s del periodo de aplicacibn delagarantiaes-
crita expresaextendida m_sarriba paralas piezas de acuerdocon
su identificaci6n.Ninguna otra garantiaexpresa, oral o escrita,
exceptola mencionada anteriormente, extendida pot personaso
personasjuridicas, incluidoslos distribuidores o los minoristas
con respecto a los productos, obligar_ aMTD.Duranteelplazo
de la garantiael _nico recursoes la reparaci6no reemplazodel
producto como se indic6anteriormente.
Lasdisposiciones incluidasenesta garantiaproveen el recurso
5nico y exclusivo que surge de lasventas. MTDno ser_respon-
sable pot p_rdidas o daSos incidentalesodirectos, incluyendo
sin limites, los gastos incurridosparalos servicios de cuidado
del pasto de reemplazoocambio, o los gastosdealquiler para
reemplazarde maneratransitoria un producto bajo garantia.
Theprovisionsasset forth inthis warranty providethesoleand
exclusive remedy arising from the sale. MTDshall not beliable
for incidentalor consequential loss or damageincluding,without
limitation, expenses incurredfor substitute or replacementlawn
careservices or for rental expensesto temporarily replacea
warranted product.
Algunosestadosnoperrnitenla exclusi6no lirnitaci6nde losdaSosy
perjuiciosincidentaleso directos,o las lirnitacionessobrela duraci6n
de lasgarantiasirnpiicitas,porIo quelasexclusionesolirnitaciones
rnencionadasanteriorrnentepuedennoserlede aplicaci6n.
EnningQncasoseobtendr_,unacornpensaci6nmayoralrnontodel
preciodecornpradel productovendido.Laalteraci6n de las carac-
teristicas de seguddad del producto anular_ esta garantia.Usted
asurneelriesgoy la responsabilidadpotlasp_rdidas,daSosolesiones
quesufranUstedy susbienesy/ o otraspersonasysus bienescorno
consecuenciadeluso,delusoincorrectoode la irnposibilidadde uso
deesteproducto.
Estagaranfialirnitadaalcanzasolarnenteal cornpradororiginal,o a la
personaquerecibi6el productode regalo.
COMOSE RELACiONALALEGISLACIONESTATALCONESTAGA-
RANT{A: Estagarantialirnitadaleotorgaderechoslegalesespedficos
yustedtarnbi_npuedecontarconotrosderechosquevariandeun
estadoa otro.
iMPORTANTE:Eipropietariodebepresentarpruebadecornpra
originalparaobtenerlacoberturade lagaranfia.
MTD LLC, P.O. BOX 361131 CLEVELAND, OHiO 44136=0019, Tel_fono: 1=800=800=7310, 1=330=220=4683
 Loading...