

Page 1
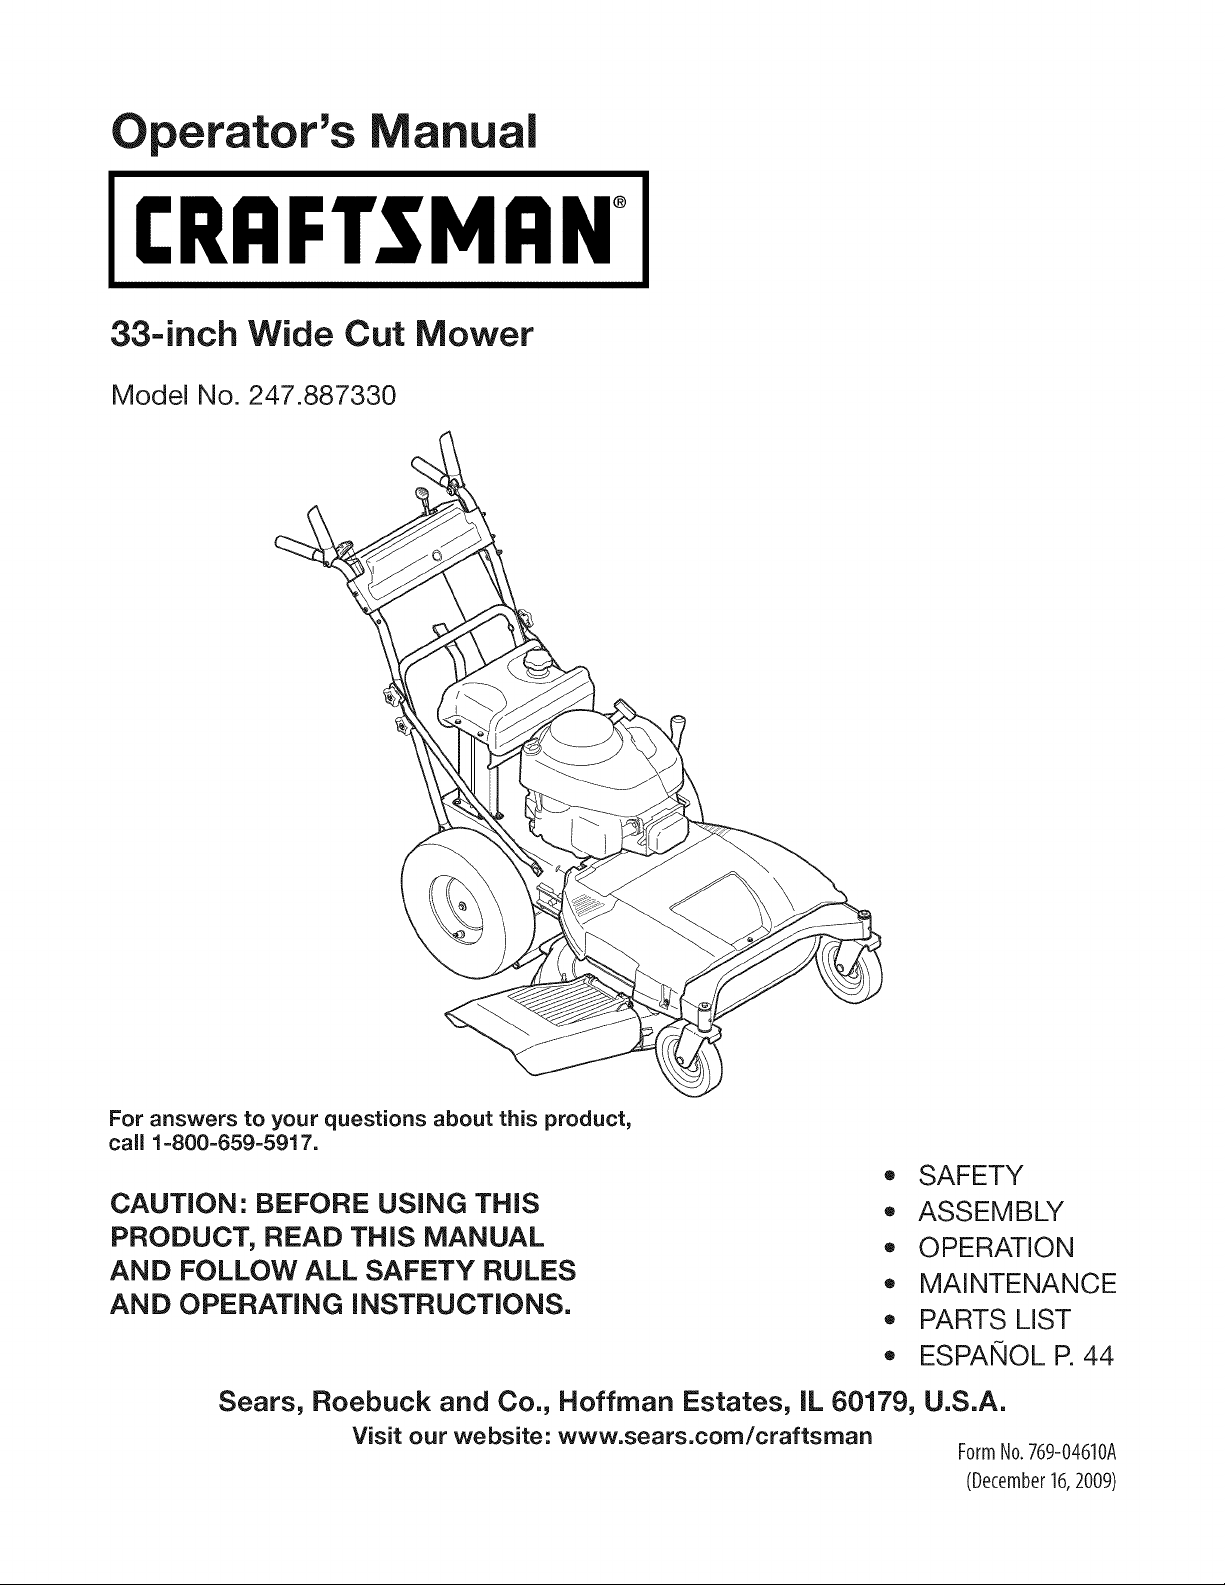
perator's Manual
£RnFrSMRN°
33-inch Wide Cut Mower
Model No. 247.887330
For answers to your questions about this product,
call 1-800-659-5917.
CAUTION: BEFORE USING THiS
PRODUCT, READ THiS MANUAL
AND FOLLOW ALL SAFETY RULES
AND OPERATING iNSTRUCTiONS.
Sears, Roebuck and Co., Hoffman Estates, IL 60179, U.S.A.
Visit our website: www.sears.com/craftsman
,, SAFETY
,, ASSEMBLY
,, OPERATION
,, MAINTENANCE
,, PARTS LIST
,, ESPAIf,IOL R 44
FormNo.769-04610A
(December16,2009)
Page 2
Warranty Statement .......................................................... 2
Safety Instructions ............................................................ 3
Slope Guide ....................................................................... 5
Safety Labels .................................................................... 6
Assembly ........................................................................... 8
Know your Lawn Mower .................................................. 10
Operation ........................................................................ 12
CRAFTSMAN FULL WARRANTY
Whenoperatedandmaintainedaccordingtoallsuppliedinstructions,if this Craftsmanproductfailsduetoa defectin materialorworkmanship
withintwoyearsfromthedateorpurchase,call1-800-4-MY-HOME®toarrangeforfreerepair(or replacementif repairprovesimpossible).
Thiswarrantyappliesforonly90 daysfromthe dateof purchaseifthisproductis everusedforcommercialor rentalpurposes.
ThiswarrantycoversONLYdefectsin materialandworkmanship.SearswillNOTpayfor:
• Expendableitemsthatbecomewornduringnormaluse,includingbutnotlimitedtoblades,sparkplugs,aircleaners,belts,andoil filters.
Standardmaintenanceservicing,oilchanges,or tune-ups.
Tirereplacementor repaircausedby puncturesfromoutsideobjects,suchas nails,thorns,stumps,orglass.
Tireor wheelreplacementor repairresultingfromnormalwear,accident,orimproperoperationor maintenance.
Repairsnecessarybecauseof operatorabuse,includingbutnotlimitedto damagecausedbyimpactingobjectsthatbendthe frameor
crankshaft,orover-speedingtheengine.
Repairsnecessarybecauseof operatornegligence,includingbutnotlimitedto,electricalandmechanicaldamagecausedbyimproper
storage,failureto usethepropergradeandamountofengineoil,failuretokeepthe deckclearofflammabledebris,orfailureto maintainthe
equipmentaccordingto the instructionscontainedinthe operator'smanual.
Engine(fuelsystem)cleaningorrepairscausedbyfueldeterminedto becontaminatedoroxidized(stale).Ingeneral,fuelshouldbeused
within30 daysof itspurchasedate.
Normaldeteriorationandwearof the exteriorfinishes,orproductlabelreplacement.
Thiswarrantyappliesonlywhilethisproductis withinthe UnitedStates.
Thiswarrantygivesyouspecificlegalrights,andyoumayalsohaveotherrightswhichvaryfromstatetostate.
Sears, Roebuckand Co., Hoffman Estates,IL 60179
GrossHP: 10.5
EngineOil: SAE30
Fuel: UnleadedGasoline
SparkPlug: Champion®RC12YC
Engine: Briggs& StrattonPowerBuiltTM
© SearsBrands,LLC 2
Model Number
Serial Number
Dateof Purchase
Recordthemodelnumber,serialnumber,
anddateof purchaseabove.
Page 3

which,ifnotfollowed,couldendangerthepersonal
__IL hissymbolpointsoutimportantsafetyinstructions
safetyand/orpropertyof yourselfandothers.Read
andfollowall instructionsinthismanualbefore
attemptingtooperatethismachine.Failuretocomplywiththese
instructionsmayresultinpersonalinjury.Whenyou seethissymbol,
HEEDITSWARNING!
Your Responsibility: Restricttheuseof this powermachineto
personswhoread,understand,andfollowthewarningsandinstruc-
tionsinthis manualandonthemachine.
Thismachinewasbuilttobeoperatedaccordingto the rulesfor
safeoperationinthis manual.Aswithanytypeof powerequipment,
carelessnessorerroronthe partofthe operatorcanresultin serious
injury.Thismachineiscapableofamputatinghandsandfeetand
throwingobjects.Failuretoobservethefollowingsafetyinstructions
couldresultin seriousinjuryordeath.
__ate ofCaliforniatoI
causecancerandbirthdefectsor otherreproductiveharm.
CHILDREN
Tragicaccidentscanoccur ifoperatoris notalertto presenceofchildren.Chil-
drenareoften attractedto mowerandmowingactivity.Theydo notunderstand
thedangers.Neverassumethatchildrenwillremainwhereyoulastsawthem.
,, Keepchildrenoutof the mowingareaandunderwatchfulcareofa
responsibleadultotherthanthe operator.
,, Bealert andturnmoweroff if a child entersthe area.
,, Beforeandwhile movingbackwards,lookbehindanddownfor small
children.
,, Useextremecarewhenapproachingblindcorners,doorways,shrubs,
trees,orotherobjectsthatmayobscureyourvisionof a childwhomay
runinto themower.
,, Keepchildrenawayfrom hotor runningengines.Theycansufferburns
froma hot muffler.
,, Neverallowchildrenunder 14yearsoldto operatea powermower.
Children14years oldand overshouldreadandunderstandoperation
instructionsandsafetyrulesin thismanualandshouldbetrainedand
supervisedbya parent.
GENERAL OPERATION
,, Readthisoperator'smanualcarefullyin itsentiretybeforeattempting
toassemblethis machine.Read,understand,andfollow all instructions
onthe machineand inthe manual(s)beforeoperation.Becompletely
familiarwiththe controlsand the properuseofthis machinebefore
operatingit.Keepthis manualin a safeplaceforfutureandregular
referenceandfororderingreplacementparts.
,, Thismachineisa precisionpieceof powerequipment,not a plaything.
Therefore,exerciseextremecautionatall times.Yourunithasbeen
designedto performonejob:to mowgrass.Do notuseitfor anyother
purpose.
,, Neverallowchildrenunder 14yearsoldto operatethis machine.
Children14years oldand overshouldreadandunderstandtheinstruc-
tionsinthis manualand shouldbe trainedandsupervisedbya parent.
Onlyresponsibleindividualswhoarefamiliarwiththeserulesof safe
operationshouldbe allowedto usethis machine.
,, Thoroughlyinspectthe areawherethe equipmentisto beused.Remove
allstones,sticks,wire,bones,toysand otherforeignobjectswhichcould
betrippedoveror pickedupand thrownbythe blade.Thrownobjects
cancauseseriouspersonalinjury.Planyourmowingpatternto avoid
dischargeof materialtowardroads,sidewalks,bystandersandthe like.
Also,avoiddischargingmaterialagainsta wallorobstructionwhich may
causedischargedmaterialto ricochetbacktowardthe operator.
,, Tohelpavoid bladecontactor a thrownobject injury,stayin operator
zonebehindhandlesandkeepchildren,bystanders,helpers,andpetsat
least75feet frommowerwhile itis inoperation.Stopmachineifanyone
entersarea.
,, Alwayswearsafetyglassesor safetygogglesduringoperationandwhile
performinganadjustmentorrepairto protectyoureyes.Thrownobjects
whichricochetcancauseseriousinjuryto theeyes.
,, Wearsturdy,rough-soledworkshoesandclose-fittingslacksandshirts.
Shirtsandpantsthatcoverthe armsand legsandsteel-toedshoes
arerecommended.Neveroperatethis machinein barefeet, sandals,
slipperyor lightweight(e.g.canvas)shoes.
,, Donot puthandsor feetnearrotatingpartsor undercuttingdeck.
Contactwith bladecanamputatehandsandfeet.
,, A missingor damageddischargecovercancausebladecontact or
thrownobjectinjuries.
,, Manyinjuriesoccuras a resultof the mowerbeingpulledoverthefoot
duringafall causedby slippingor tripping.Do notholdon tothe mowerif
youare falling;releasethe handleimmediately.
,, Neverpullthe mowerbacktowardyouwhileyou arewalking.Ifyoumust
backthe mowerawayfromawallor obstructionfirstlookdownand
behindtoavoidtrippingandthenfollowthesesteps:
a.Step backfrommowertofully extendyourarms.
b.Besureyouare wellbalancedwithsurefooting.
c. Pull backslowly,nomorethanhalfwaytowardsyou.
d.Repeatthesestepsas needed.
,, Donotoperatethe mowerwhile underthe influenceof alcoholordrugs.
,, Donotengagethe self-propelledmechanismonunitsso equippedwhile
startingengine.
,, Theblade controlhandleisasafety device.Neverattemptto bypassits
operation.Doingso makesthesafetydeviceinoperativeandmayresult
inpersonalinjurythroughcontactwiththe rotatingblade.The blade
controlhandlemustoperateeasilyinbothdirectionsand automatically
returntothe disengagedpositionwhen released.
,, Neveroperatethemowerin wet grass.Alwaysbesureof yourfooting. A
slip andfall cancauseseriouspersonalinjury.Ifyou feelyouare losing
yourfooting, releasethe bladecontrolhandleimmediatelyandthe blade
will stoprotatingwithinthreeseconds.
,, Mowonlyin daylightorgoodartificiallight.Walk,neverrun.
,, Stopthe bladewhencrossing graveldrives,walksorroads.
3
Page 4
• If theequipmentshouldstartto vibrateabnormally,stoptheengineand
checkimmediatelyfor the cause.Vibrationisgenerallya warningof
trouble.
• Shutthe engineoff andwait untilthe bladecomesto a completestop
beforeremovingthegrass catcheror uncloggingthechute.
Thecuttingbladecontinuestorotatefor a fewsecondsafterthe engine
isshut off.Neverplaceanypartofthe bodyinthe bladearea untilyou
aresure the bladehasstoppedrotating.
• Neveroperatemowerwithoutpropertrailshield,dischargecover,grass
catcher,bladecontrolhandle,orothersafetyprotectivedevicesin place
andworking.Neveroperatemowerwithdamagedsafetydevices.Failure
todosocan resultin personalinjury.
• Mufflerandenginebecomehotand cancausea burn.Do nottouch.
• Only usepartsand accessoriesmadefor this machinebymanufacturer.
Failureto doso canresultin personalinjury.Forrecommendedacces-
sories,call 1-800-659-5917.
• If situationsoccurwhichare notcoveredinthismanual,usecareand
goodjudgment.ContactyourSearsServiceCenterforassistance.
SLOPE OPERATION
Slopesareamajorfactorrelatedto slipandfall accidentswhichcanresultin
severeinjury.Operationon slopesrequiresextracaution.Ifyoufeeluneasyon
aslope,donotmowit.Foryoursafety,usetheslopeguideincludedaspartof
thismanualto measureslopesbeforeoperatingthisunitonaslopedor hilly
area.Iftheslopeis greaterthan15degrees,do notmowit.
Do:
• Mowacrossthefaceofslopes; neverupanddown. Exerciseextreme
cautionwhenchangingdirectionon slopes.
• Watchfor holes,ruts,rocks,hiddenobjects,or bumpswhichcancause
youto slipor trip.Tallgrasscan hideobstacles.
• Alwaysbe sureofyour footing.Aslip andfall cancauseseriouspersonal
injury.If youfeelyouare losingyour balance,releasethe bladecontrol
handleimmediately,andthe bladewill stoprotatingwithin3 seconds.
Do Not:
• Do notmowneardrop-offs,ditchesorembankments,whereyoucould
loseyourfootingor balance.
• Do notmowslopesgreaterthan 15degreesasshownonthe
slopegauge.
• Do notmowonwetgrass.Unstablefootingcouldcauseslipping.
SERVICE
Safe Handling Of Gasoline:
• Toavoidpersonalinjuryor propertydamageuseextremecare in
handlinggasoline.Gasolineisextremelyflammableandthevaporsare
explosive.Seriouspersonalinjurycanoccurwhengasolineis spilledon
yourselfor yourclotheswhichcan ignite.
• Washyourskin andchangeclothesimmediately.
• Useonlyan approvedgasolinecontainer.
• Neverfill containersinsidea vehicleoron a truckor trailerbedwith a
plasticliner.Alwaysplacecontainersonthe groundawayfromyour
vehiclebeforefilling.
• Removegas-poweredequipmentfromthetruck ortrailerandrefueliton
theground.Ifthisisnot possible,thenrefuelsuchequipmentonatrailer
witha portablecontainer,ratherthanfroma gasolinedispensernozzle.
• Keepthe nozzlein contactwiththe rimofthefueltank or container
openingat alltimesuntil fuelingiscomplete.Donot usea nozzle
lock-opendevice.
• Extinguishallcigarettes,cigars, pipesand othersources
ofignition.
• Neverfuel machineindoorsbecauseflammablevaporswillaccumulate
inthe area.
• Neverremovegascapor addfuelwhile engineis hotor running.
Allowengineto coolat leasttwo minutesbeforerefueling.
• Neveroverfillfuel tank.Fill tankto no morethan V2inch belowbottom
offiller neckto provideforfuel expansion.
• Replacegasolinecapandtightensecurely.
• Ifgasolineisspilled,wipe it offthe engineandequipment.Moveunit
toanotherarea.Wait5 minutesbeforestarting engine.
• Neverstorethe machineorfuelcontainernearan openflame, spark
or pilotlightason a waterheater,spaceheater,furnace,clothesdryer,
or othergasappliances.
• To reducefirehazard,keepmowerfreeof grass,leaves,or other
debrisbuild-up.Cleanupoilor fuelspillageandremoveanyfuel
soakeddebris.
• Allowa mowerto coolat least5 minutesbeforestoring.
General Service:
• Neverrunanengineindoorsorina poorlyventilatedarea.Engine
exhaustcontainscarbon monoxide,anodorlessand deadlygas.
• Beforecleaning,repairing,or inspecting,makecertainthe bladeand
all movingparts havestopped.Disconnectthesparkplugwire and
groundagainsttheengineto preventunintendedstarting.
• Checkthe bladeand enginemountingboltsatfrequentintervalsfor
propertightness.Also,visuallyinspectbladefor damage(e.g.,bent,
cracked,worn)Replacebladewith theoriginalequipmentmanufac-
ture's(O.E.M.)bladeonly,listedin thismanual.Useof partswhichdo
notmeetthe originalequipmentspecificationsmayleadto improper
performanceandcompromisesafety!
• Mowerbladesare sharpand cancut.Wrapthe bladeor weargloves,
anduseextracautionwhenservicingthem.
• Keepallnuts, bolts,andscrewstightto besurethe equipmentis in
safeworkingcondition.
• Nevertamperwithsafetydevices.Checktheirproper
operationregularly.
• Afterstrikinga foreignobject,stoptheengine,disconnectthe spark
plugwireand groundagainstthe engine.Thoroughlyinspectthe
mowerforanydamage.Repairthedamagebeforestartingand
operatingthemower.
• Neverattempttomakea wheelor cutting heightadjustmentwhilethe
engineisrunning.
• Grasscatchercomponents,dischargecover,andtrailshieldare
subjectto wear anddamagewhichcould exposemovingparts or
allowobjectsto bethrown.Forsafetyprotection,frequentlycheck
componentsandreplaceimmediatelywithoriginalequipment
manufacturer's(O.E.M.)partsonly,listedin this manual.Useofparts
whichdonotmeettheoriginal equipmentspecificationsmayleadto
improperperformanceand compromisesafety!
• Donotchangetheenginegovernorsettingoroverspeedthe engine.
Thegovernorcontrolsthe maximumsafeoperatingspeedof the
engine.
• Maintainorreplacesafetylabels,as necessary.
• Observeproperdisposallawsandregulations.Improperdisposalof
fluidsand materialscanharmtheenvironment.
4
Page 5
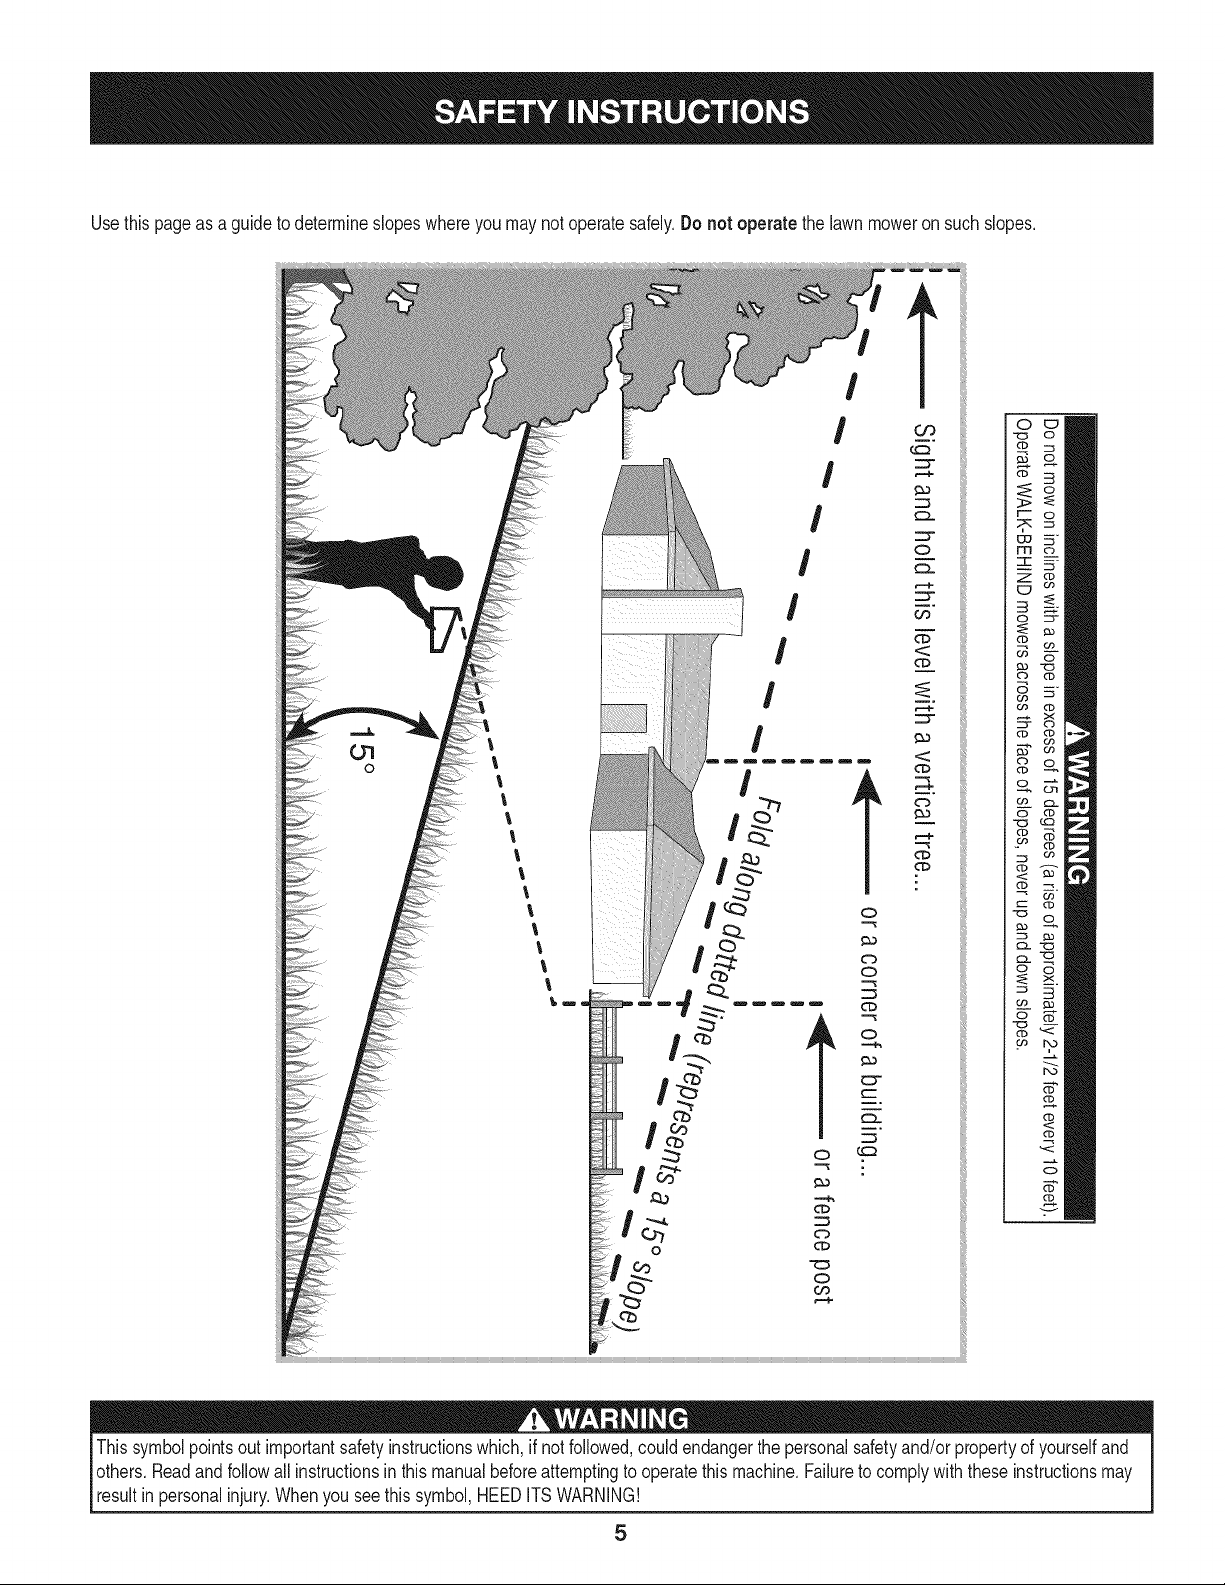
Usethispageasa guideto determineslopeswhereyoumaynot operatesafely.Donot operatethelawnmoweronsuchslopes.
!
l
I
I
!
!
!
Thissymbolpointsoutimportantsafetyinstructionswhich,ifnotfollowed,couldendangerthepersonalsafetyand/orpropertyof yourselfand
others.Readandfollowallinstructionsinthis manualbeforeattemptingtooperatethismachine.Failureto complywiththeseinstructionsmay
resultinpersonalinjury.Whenyou seethissymbol,HEEDITSWARNING!
Page 6

WARNING
Thissymbol pointsout importantsafety instructions
which,if notfollowed,could endangerthe personal
safetyand/or propertyofyourself and others.Read and
followall instructionsin this manual beforeattempting
to operatethis machine. Failureto comply with these
instructionsmay result in personalinjury.Whenyou see
thissymbol HEEDITS WARNING!
Your Responsibility
Restrictthe use of this power machineto personswho
read, understand,and followthe warnings and instruc-
tionsin this manualand on the machine.
6
Page 7

Thispageleftintentionallyblank.
7
Page 8

IMPORTANT:Thisunitis shippedwithoilin theengine.After
assembly,see page12for fuelandoil details.
IMPORTANT:Referencetorightor leftside ofthemowerisobserved
fromtheoperatingposition.
Themowingdeckis capableofthrowingobjects.Failuretooperate
themowerwithoutthedischargechuteintheproperoperatingposi-
tioncouldresultinseriouspersonalinjuryand/or propertydamage.
Disconnectthe sparkplugwire andgroundit againsttheengineto
preventunintendedstarting.
LOOSE PARTS IN CARTON
Thefollowingitemsare packagedina bag:
Operator'sManual,Oildrainhose,Waterhosecoupler,EngineManual
TOOLS NEEDED FOR ASSEMBLY
A setof adjustablewrenchesandtiregauge
REMOVING THE UNIT FROM THE CRATE
2. Pivotupperhandleintooperatingposition,Figure2. Becareful
notto bendorkinkthecableswhenpivotingthehandle.
J
Figure2
1. Cutstraps,if present,securingunittopallet.Leaveuniton pallet
duringhandleassembly.
2. Removeanyprotectivepackagingandplastictiestraps.
3. Usethedeckheightlever(see "KnowyourMower"section)to
raisethe cuttingdeckto itshighestposition.
ASSEMBLING THE HANDLE
1. Removelowerstarknobsandcarriagescrewsfromlowerhandle,
Figure1.
3. Installcarriagescrewsandknobsremovedearlier.
4. Tightentheupperandlowerstarknobsandcarriagescrewsto
securetheupperhandletothe lowerhandle,Figure2.
5. Afterassemblingthehandle,to safelyremoveunitfrompallet,first
cut offcardboardandremovescrewstofree themowerfromthe
crate.
REMOVING THE CHUTE HOLDER
Thechuteholdermustbe removedanddiscardedbeforeoperating
themower.
1. Locatethechuteholderwhichsecuresthedischargechutein a
verticalposition,Figure3.
f
Figure1
Figure3
8
Page 9
2. Pullchutebacktowardstheengine.Whileholdingthechutewith
onehand,removethechuteholderusingyourotherhand.
3. Carefullylowerthechuteagainstthedeckanddiscardtheholder.
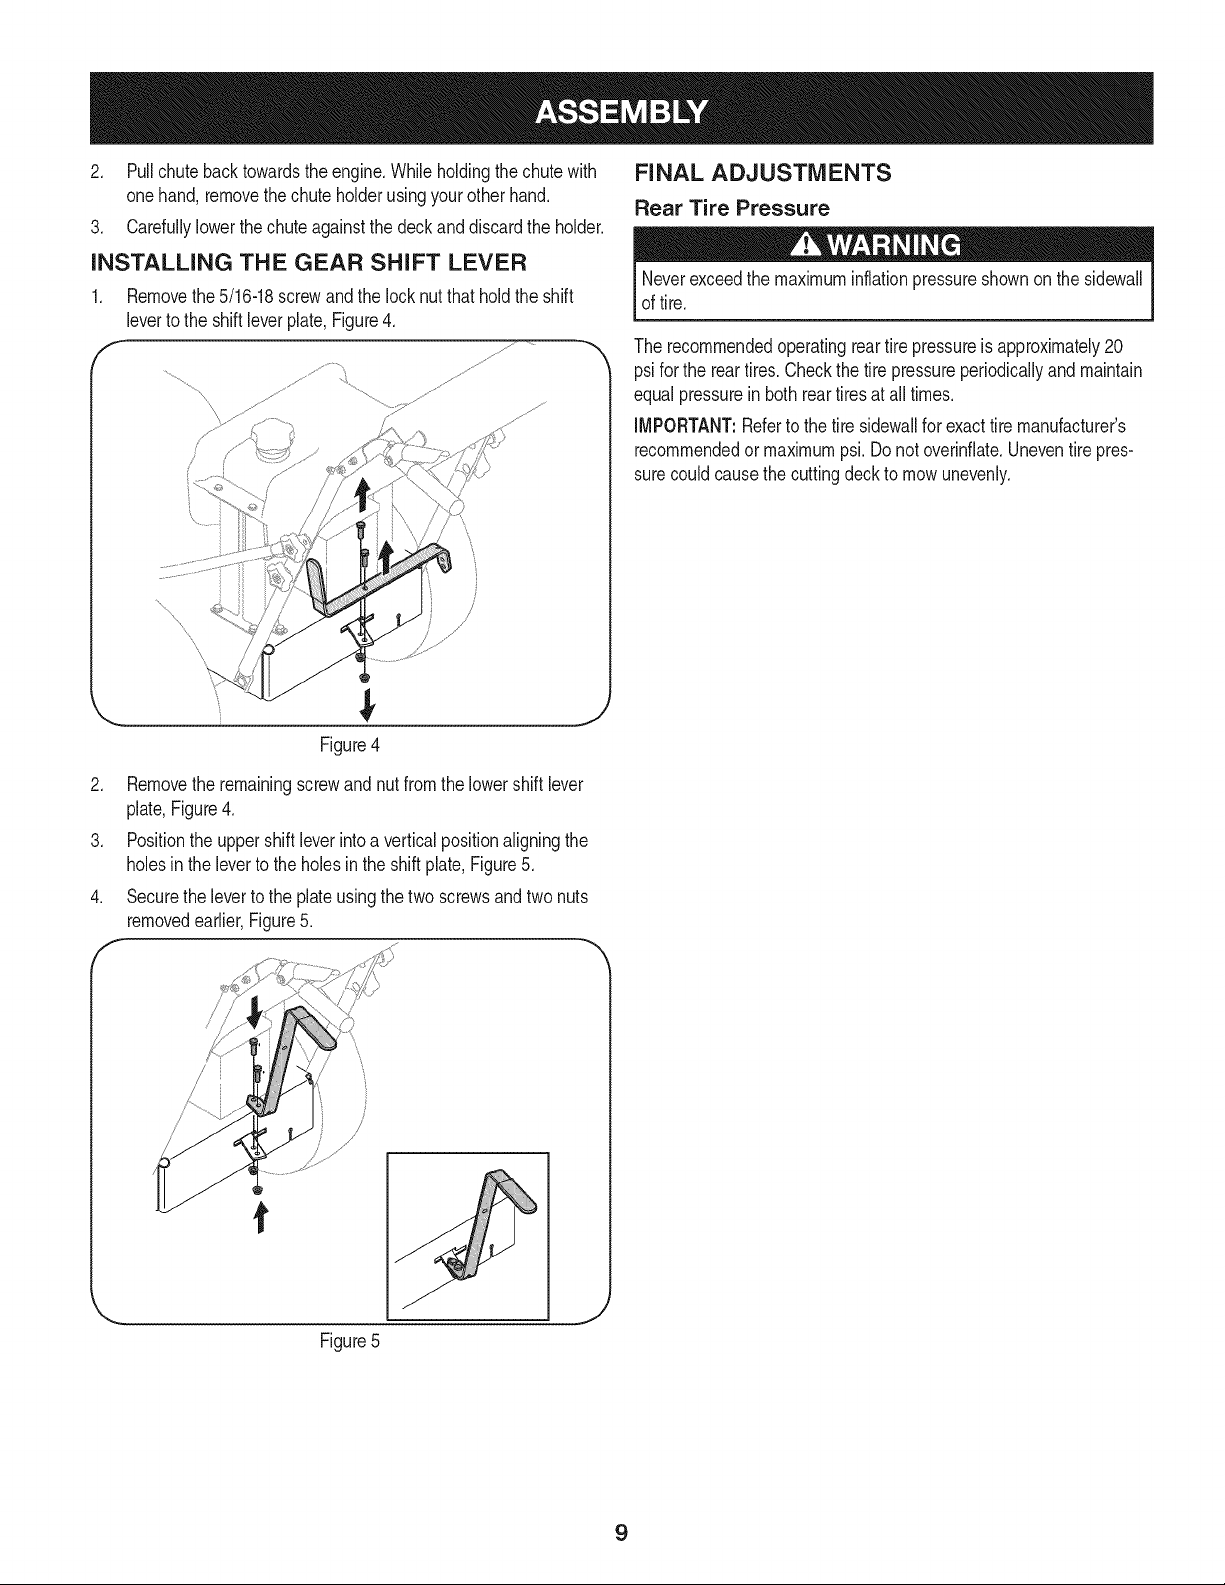
INSTALLING THE GEAR SHIFT LEVER
1. Removethe5/16-18screwandthelock nutthatholdtheshift
leverto theshiftleverplate,Figure4.
f
4
/
J
Figure4
FINAL ADJUSTMENTS
Rear Tire Pressure
Neverexceedthemaximuminflationpressureshownonthesidewall
oftire.
Therecommendedoperatingreartire pressureisapproximately20
psifor thereartires.Checkthetirepressureperiodicallyand maintain
equalpressureinbothreartiresatall times.
IMPORTANT:Refertothetiresidewallforexacttiremanufacturer's
recommendedormaximumpsi.Donotoverinflate.Uneventirepres-
surecouldcausethecuttingdeckto mowunevenly.
2. Removetheremainingscrewandnutfromthelowershift lever
plate,Figure4.
3. Positiontheuppershiftleverintoa verticalpositionaligningthe
holesin thelevertotheholesin theshiftplate,Figure5.
4. Securethelevertotheplateusingthetwoscrewsandtwonuts
removedearlier,Figure5.
/
Figure5
9
Page 10
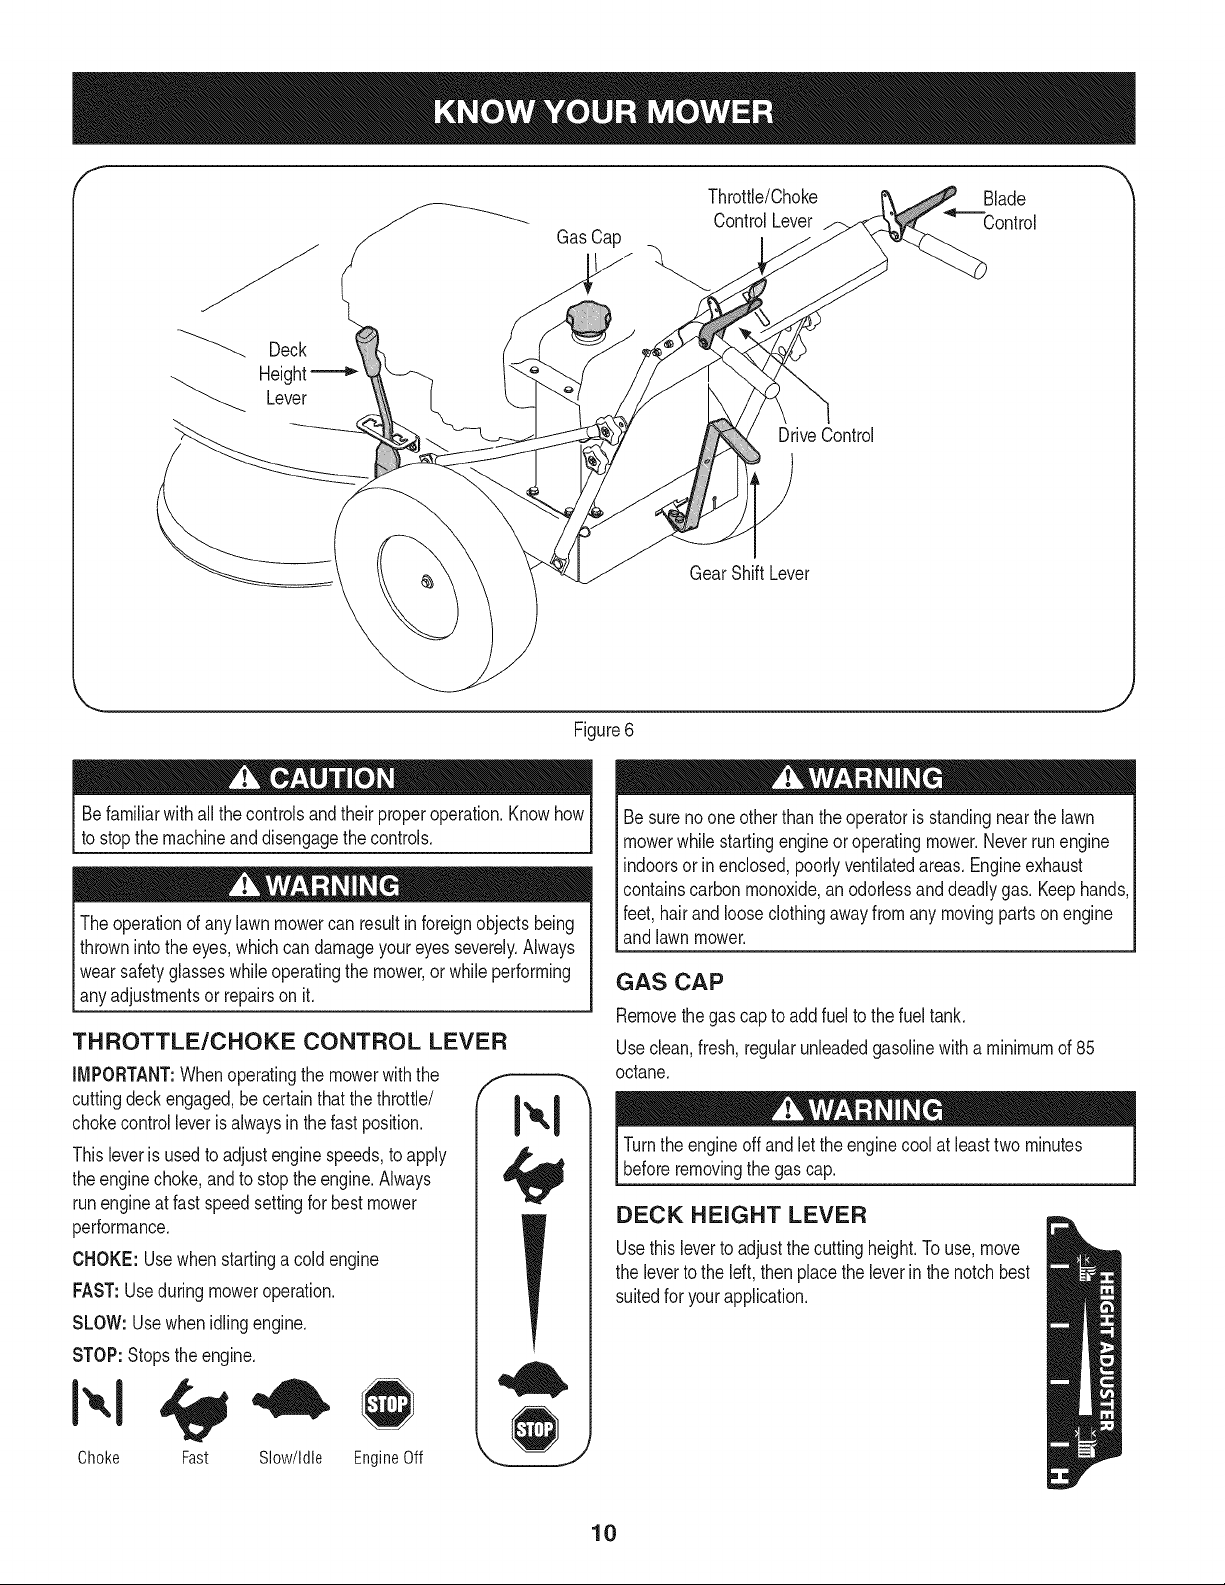
f
Throttle/Choke Blade
ControlLever Control
GasCap
_--. Deck
Height
Lever
DriveControl
GearShiftLever
Figure6
Befamiliarwithall thecontrolsandtheir properoperation.Knowhow
to stopthemachineand disengagethe controls.
Theoperationofany lawnmowercan resultinforeignobjectsbeing
thrownintothe eyes,whichcandamageyoureyesseverely.Always
wearsafetyglasseswhileoperatingthemower,orwhileperforming
anyadjustmentsor repairsonit.
THROTTLE/CHOKE CONTROL LEVER
iMPORTANT:Whenoperatingthemowerwiththe
cuttingdeckengaged,becertainthatthethrottle/
chokecontrolleveris alwaysinthefastposition.
Thisleveris usedtoadjustenginespeeds,toapply
theenginechoke,andtostoptheengine.Always
runengineatfastspeedsettingforbestmower
performance.
CHOKE:Usewhenstartinga coldengine
FAST:Useduringmoweroperation.
SLOW:Usewhenidlingengine.
STOP:Stopstheengine.
Besurenooneotherthan theoperatoris standingnearthe lawn
mowerwhilestartingengineoroperatingmower.Neverrunengine
indoorsorin enclosed,poorlyventilatedareas.Engineexhaust
containscarbonmonoxide,an odorlessanddeadlygas.Keephands,
feet,hairand looseclothingawayfromany movingpartson engine
andlawnmower.
GAS CAP
Removethe gascapto addfuelto thefueltank.
Useclean,fresh,regularunleadedgasolinewitha minimumof85
octane.
Turntheengineoffandlet the enginecoolatleasttwo minutes
beforeremovingthegascap.
DECK HEIGHT LEVER
Usethis levertoadjustthecuttingheight.Touse,move
thelevertotheleft,thenplacetheleverinthenotchbest
suitedforyourapplication.
Choke Fast Slow/Idle
EngineOff
10
Page 11
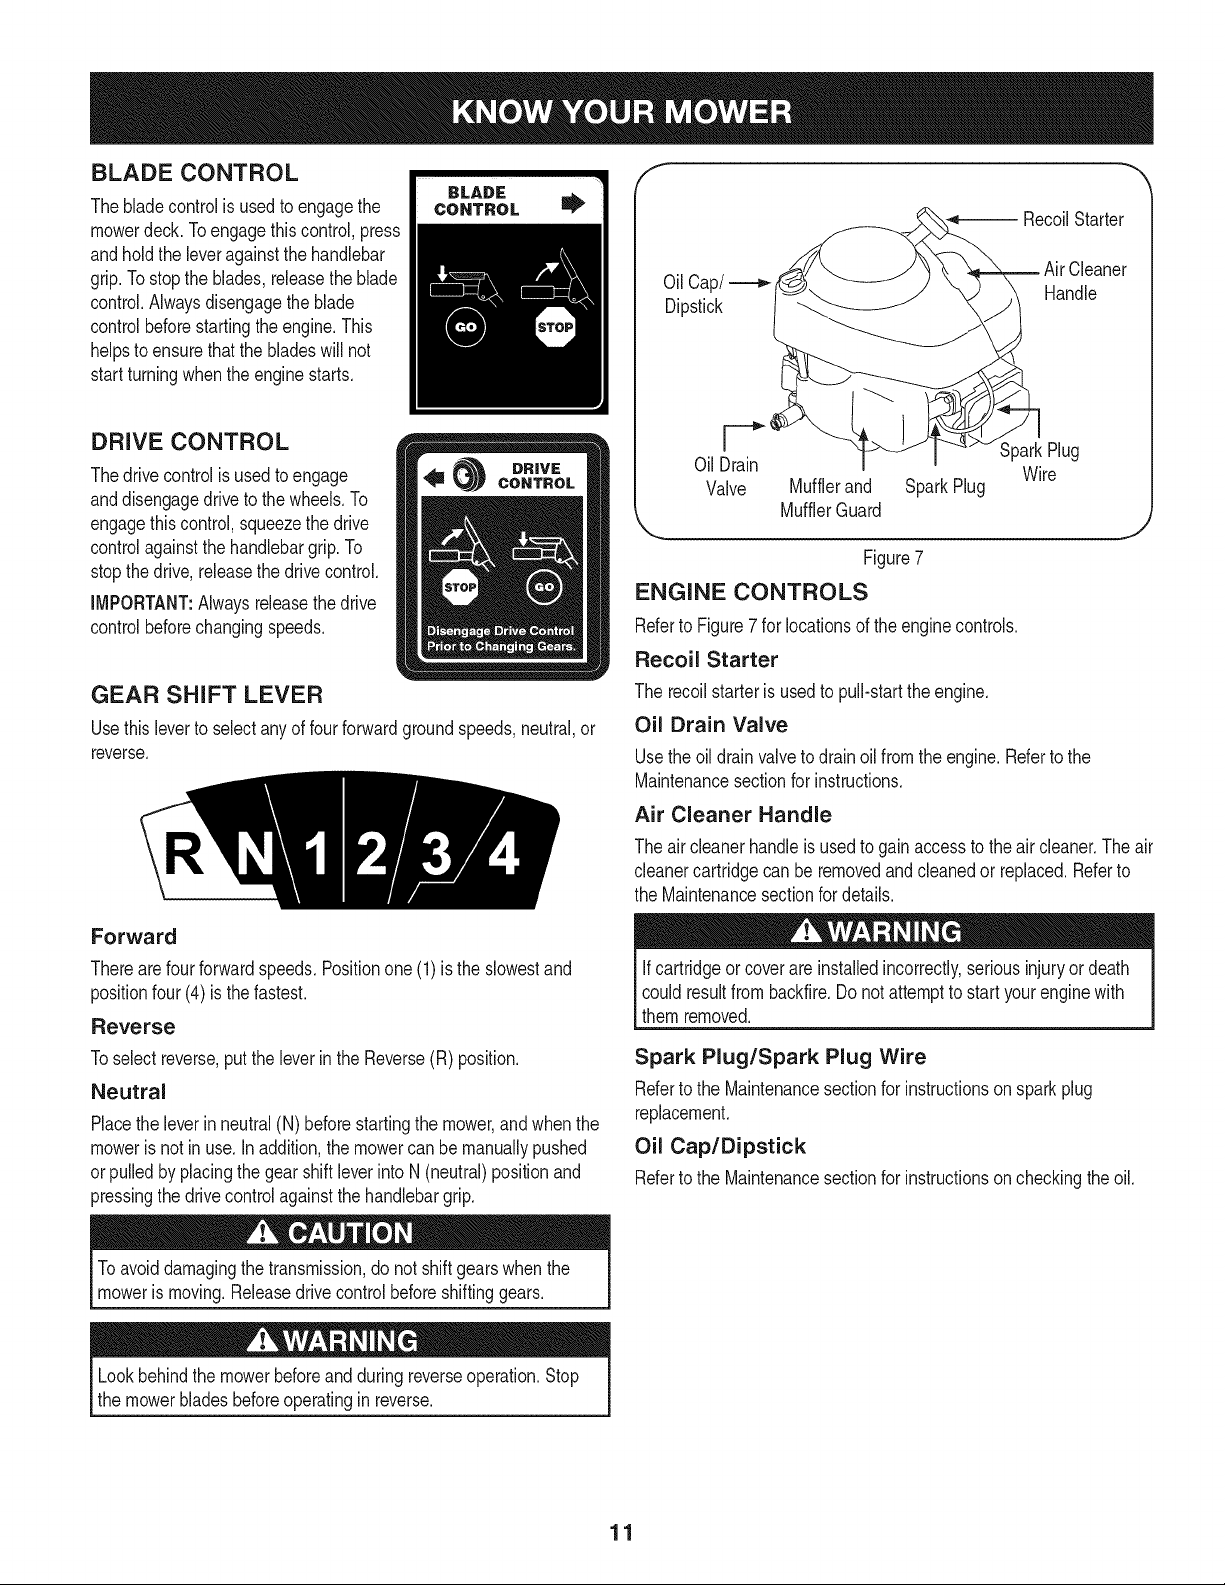
BLADE CONTROL
Thebladecontrolis usedto engagethe
mowerdeck.Toengagethiscontrol,press
andholdtheleveragainstthehandlebar
grip.Tostoptheblades,releasetheblade
control.Alwaysdisengagetheblade
controlbeforestartingtheengine.This
helpsto ensurethatthebladeswillnot
startturningwhenthe enginestarts.
DRIVE CONTROL
Thedrivecontrolisusedto engage
anddisengagedriveto thewheels.To
engagethiscontrol,squeezethe drive
controlagainstthehandlebargrip.To
stopthedrive,releasethedrivecontrol.
IMPORTANT:Alwaysreleasethedrive
controlbeforechangingspeeds.
GEAR SHIFT LEVER
Usethislevertoselectanyoffour forwardgroundspeeds,neutral,or
reverse.
RecoilStarter
Oil Cap/
Dipstick
OilDrain
Valve Mufflerand SparkPlug
MufflerGuard
Figure7
SparkPlug
Cleaner
Handle
Wire
ENGINE CONTROLS
RefertoFigure7for locationsofthe enginecontrols.
Recoil Starter
Therecoilstarteris usedto pull-starttheengine.
Oil Drain Valve
Usetheoil drainvalveto drainoil fromtheengine.Refertothe
Maintenancesectionfor instructions.
Air Cleaner Handle
Theaircleanerhandleisusedto gainaccesstotheair cleaner.Theair
cleanercartridgecanberemovedandcleanedorreplaced.Referto
theMaintenancesectionfordetails.
Forward
Therearefourforwardspeeds.Positionone(1)is the slowestand
positionfour(4) isthefastest.
Reverse
Toselectreverse,puttheleverin theReverse(R)position.
Neutral
Placethe leverinneutral(N) beforestartingthemower,andwhenthe
mowerisnot inuse.Inaddition,themowercanbe manuallypushed
orpulledbyplacingthegearshiftleverinto N (neutral)positionand
pressingthedrivecontrolagainstthehandlebargrip.
Toavoiddamagingthetransmission,do notshiftgearswhenthe
mowerismoving.Releasedrivecontrolbeforeshiftinggears.
Lookbehindthe mowerbeforeandduringreverseoperation.Stop
the mowerbladesbeforeoperatingin reverse.
Ifcartridgeor coverareinstalledincorrectly,seriousinjuryordeath
couldresultfrombackfire.Donot attempttostartyourenginewith
them removed.
Spark Plug/Spark Plug Wire
Refertothe Maintenancesectionfor instructionson sparkplug
replacement.
Oil Cap/Dipstick
Refertothe Maintenancesectionfor instructionsoncheckingtheoil.
11
Page 12
Theoperationofany lawnmowercan resultinforeignobjectsbeing
thrownintothe eyes,whichcandamageyoureyesseverely.Always
wearsafetyglasseswhileoperatingthemower,orwhileperforming
anyadjustmentsor repairsonit.
Besurenooneotherthanthe operatorisstandingnearthelawn
mowerwhilestartingengineoroperatingmower.Neverrunengine
indoorsorinenclosed,poorlyventilatedareas.Engineexhaust
containscarbonmonoxide,anodorlessanddeadlygas.Keephands,
feet,hair,andlooseclothingawayfromanymovingparts
Useextremecarewhenhandlinggasoline.Gasolineis extremely
flammableandthe vaporsareexplosive.Neverfuelmachineindoors
orwhilethe engineis hotor running.Extinguishcigarettes,cigars,
pipes,andothersourcesof ignition.
GAS AND OIL FILL-UP
Gas Fill
Useof Alcoholblendedfuels(calledgasoholorusingethanolor
methanol)canattractmoisturewhichleadsto separationandforma-
tionof acidsduringstorage.Acidicgascandamagethefuelsystem
ofanenginewhilein storage.
Toavoidengineproblems,thefuelsystemshouldbeemptiedbefore
storagefor30 daysor longer.Drainthegastank, starttheengine
and letitrununtilthefuel linesandcarburetorareempty.Usefresh
Ifuel nextseason.SeeSTORAGEInstructionsfor additionalinforma-
[tion.
)ermanentdamagemayoccur.
Oil Fill
IMPORTANT:The mowerisshippedwithmotoroil intheengine;
however,you MUSTchecktheoil levelbeforeoperating.Oil shouldbe
changedonceafterthefirsttwohoursof operationandevery25 hours
ofoperationthereafter.Usethe gradeof engineoil specifiedinthe
Maintenancesection.
.
Removethe oilfill cap/dipstickfromtheoil fill tube.
2.
Checkthatthe levelofoil isuptotheFULLmarkonthedipstick.
Ifneeded,pouroil slowlyintothe oilfill tubeuntila FULLoil level
is achieved.
3. Replacetheoilfillcap/dipstick.
STARTING THE MOWER
1. Releaseallcontrolsonthemowertopreventwheelsor blades
fromrotating.
2. Movegearshiftleverto neutral(N)position.
3. Movethethrottle/chokecontrolleverfullyupwardtochokesetting
I',1to starta cold engineorto fast(rabbit)setting_ to starta
warmengine.
4. Tostartengineusingrecoilstarter:
a. Standon leftside (as viewedfrombehindhandlebars)of ma-
chine.Besureyourfeetare safelyawayfromtheunderside
ofthe mowerdeckandall mowercontrolsarereleased.
IMPORTANT:Themowerisshippedwithoutgasinthe fueltank.
• Neverfillthe fueltankcompletely.Fillthetankto nomorethan
1/2-inchbelowbottomoffiller neckto providespaceforfuel
expansion.
• Alwaysuseclean,fresh,unleadedgradeautomotivegasoline.
Fillthe fueltankoutdoorsandusea funnelor spoutto prevent
spilling.Makesurethatthe containerfromwhichyoupourthe
gasolineiscleanandfreefromrustorotherforeignparticles.
Makesureto wipeoffanyspilledfuelbeforestartingtheengine.
• Atthe endof thejob,emptythefueltankifthe mowerisnot
goingto beusedfor30daysor longer.Storegasolineina clean
containerandkeepthecapin placeonthecontainer.SeeSTOR-
AGEinstructionsforadditionalinformation.
b. Graspstarterropehandleandpullslowlyuntilropepulls
slightlyharder.Letroperewindslowly.Thenpullropewitha
rapid,fullarmstroke.Letropereturnslowly.Ifenginefailsto
startafterthreepulls,repeatinstructions(try settingthrottle
atfast setting).
c. Whenenginestarts,operateinfastthrottlesetting_lf
(movethrottle/chokecontrolleverfromchokesettingto fast
setting).
Lookbehindthe mowerbeforeandduringreverseoperation.Stop
themowerbladesbeforeoperatingin reverse.
Ifyoustrikeaforeignobject,stoptheengine.Removewirefromthe
sparkplug,thoroughlyinspectmowerforany damage,and repair
damagebeforerestartingandoperating.Extensivevibrationof
mowerduringoperationisanindicationofdamage.Theunit should
bepromptlyinspectedandrepaired.
12
Page 13
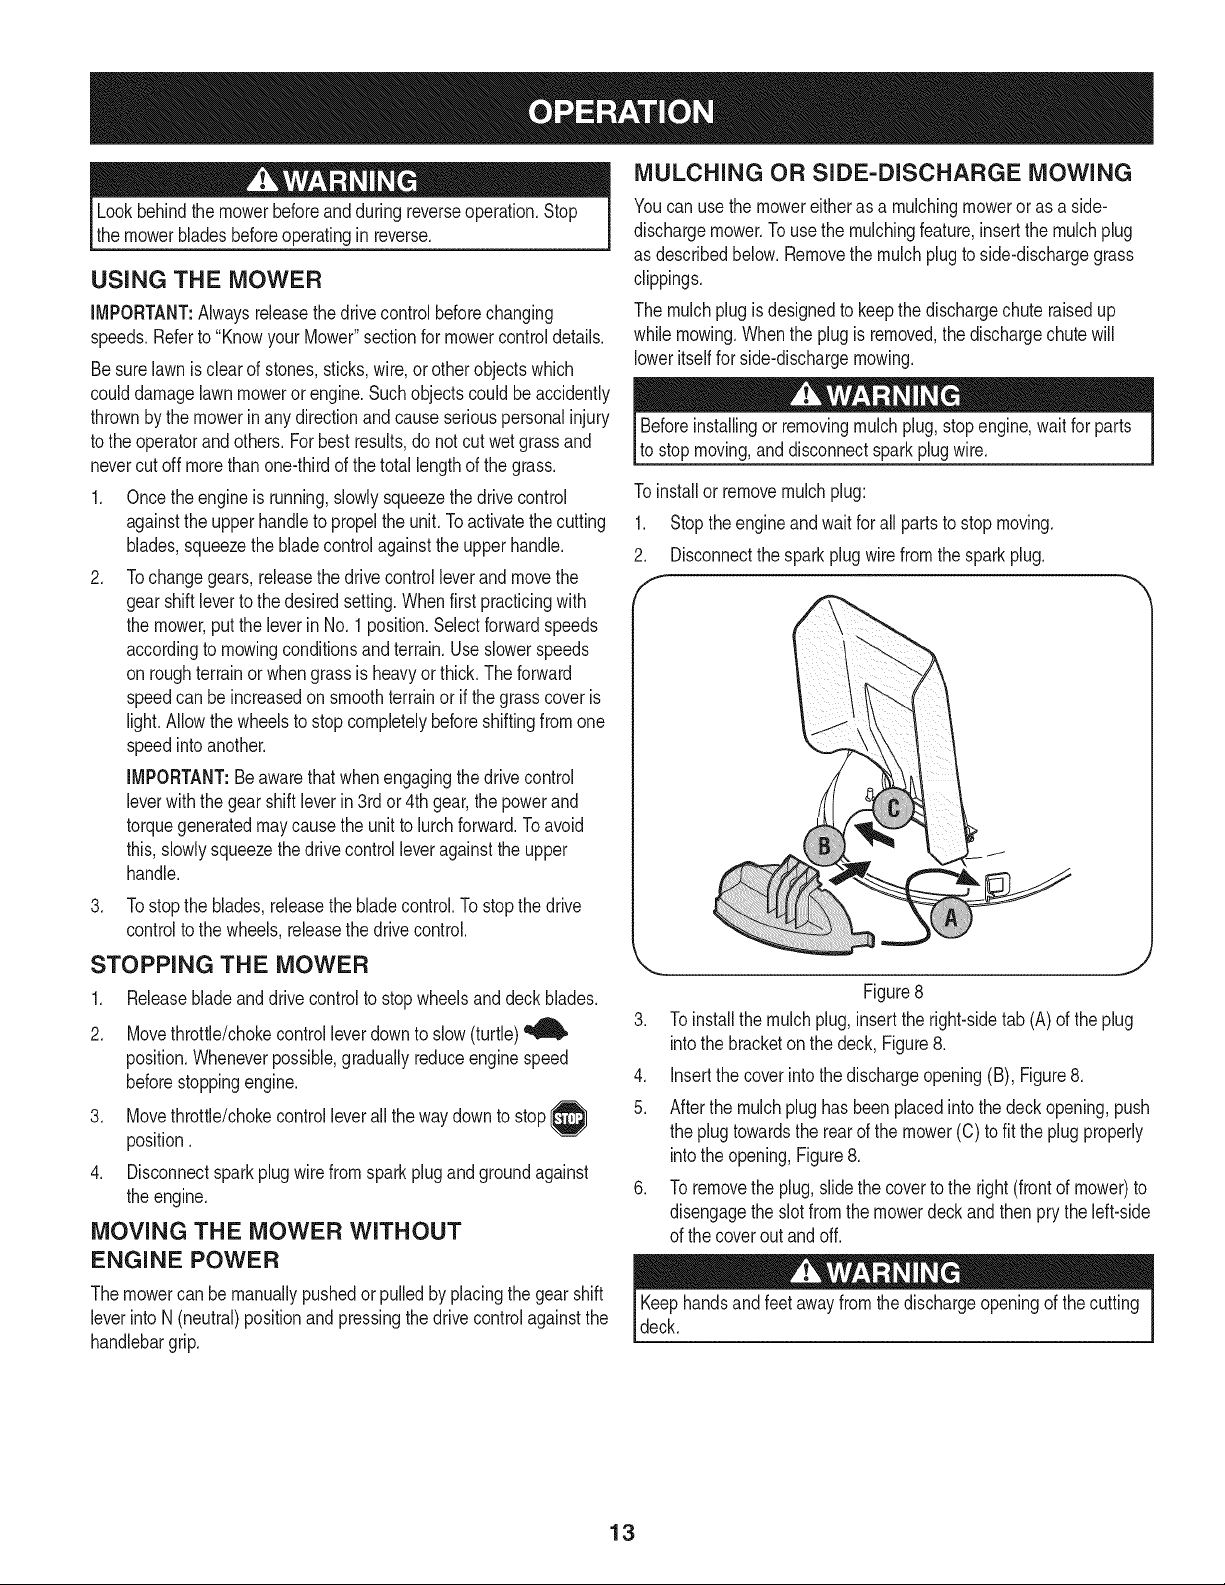
MULCHING OR SIDE-DISCHARGE MOWING
Lookbehindthe mowerbeforeandduringreverseoperation.Stop
themowerbladesbeforeoperatingin reverse.
USING THE MOWER
IMPORTANT:Alwaysreleasethedrivecontrolbeforechanging
speeds.Referto"Knowyour Mower"sectionformowercontroldetails.
Besurelawnis clearofstones,sticks,wire,orotherobjectswhich
coulddamagelawnmoweror engine.Suchobjectscouldbeaccidently
thrownbythemowerin anydirectionandcauseseriouspersonalinjury
tothe operatorandothers.Forbestresults,donot cutwetgrassand
nevercutoff morethanone-thirdofthe totallengthofthegrass.
1. Oncethe engineis running,slowlysqueezethe drivecontrol
againsttheupperhandleto propeltheunit.Toactivatethecutting
blades,squeezethebladecontrolagainsttheupperhandle.
2. Tochangegears,releasethedrivecontrolleverandmovethe
gearshiftlevertothedesiredsetting.Whenfirstpracticingwith
themower,put theleverinNo.1position.Selectforwardspeeds
accordingtomowingconditionsand terrain.Useslowerspeeds
on roughterrainorwhengrassisheavyor thick.Theforward
speedcanbe increasedonsmoothterrainorifthe grasscoveris
light.Allowthewheelsto stopcompletelybeforeshiftingfromone
speedintoanother.
IMPORTANT:Beawarethatwhenengagingthedrive control
leverwiththe gearshift leverin3rd or4thgear,the powerand
torquegeneratedmaycausethe unitto lurchforward.Toavoid
this,slowlysqueezethe drivecontrolleveragainstthe upper
handle.
.
Tostopthe blades,releasethebladecontrol.Tostopthedrive
controltothe wheels,releasethe drivecontrol.
STOPPING THE MOWER
.
Releasebladeanddrivecontrolto stopwheelsanddeckblades.
2.
Movethrottle/chokecontrolleverdownto slow(turtle)
position.Wheneverpossible,graduallyreduceenginespeed
beforestoppingengine.
3. Movethrottle/chokecontrolleverallthewaydownto stop
position.
4. Disconnectsparkplugwirefromsparkplugandgroundagainst
theengine.
MOVING THE MOWER WITHOUT
ENGINE POWER
Youcanuse the mowereitherasa mulchingmoweror asa side-
dischargemower.To usethemulchingfeature,insertthe mulchplug
asdescribedbelow.Removethe mulchplugto side-dischargegrass
clippings.
Themulchplugisdesignedto keepthedischargechuteraisedup
whilemowing.Whentheplugis removed,the dischargechutewill
loweritselfforside-dischargemowing.
Beforeinstallingor removingmulchplug,stopengine,waitforparts
to stopmoving,anddisconnectsparkplugwire.
Toinstallor removemulchplug:
1. Stoptheengineandwaitforallpartstostopmoving.
2. Disconnectthesparkplugwirefromthesparkplug.
Figure8
3. Toinstallthemulchplug,inserttheright-sidetab (A)of the plug
intothe bracketonthedeck, Figure8.
4. Insertthecoverintothedischargeopening(B), Figure8.
5. Afterthe mulchplughas beenplacedintothedeckopening,push
theplugtowardstherearofthemower(C)tofit theplugproperly
intothe opening,Figure8.
6. Toremovethe plug,slidethe coverto the right(frontof mower)to
disengagetheslotfromthemowerdeckandthen prytheleft-side
ofthe coverout andoff.
Themowercan bemanuallypushedor pulledbyplacingthegearshift
leverinto N(neutral)positionandpressingthedrivecontrolagainstthe
handlebargrip.
Keephandsandfeetawayfromthedischargeopeningofthecutting
deck.
13
Page 14

Alwaysstopengine,disconnectsparkplug,andgroundagainst
enginebeforeperforminganytypeof maintenanceonthemower.
GENERAL RECOMMENDATIONS
Alwaysobservesafetyruleswhenperforminganytypeof
maintenanceon the mower.
Thewarrantyon thislawnmowerdoesnot coveritemsthathave
beensubjectedto operatorabuseor negligence.Toreceivefull
valuefromwarranty,operatormustmaintainthelawnmoweras
instructedin thismanual.
• Changingof engine-governedspeedwillvoidenginewarranty.
• Alladjustmentsshouldbecheckedatleastonceeachseason.
• Periodicallycheckall fastenersandmakesuretheyare tight.
ENGINE MAINTENANCE
Checking the Spark Plug
Cleansparkplugandresettheelectrodegapto0.030"atleastoncea
season;replaceevery100hoursof operation.
1. Cleanareaaroundthesparkplugbase.Donotsandblastspark
plug.Sparkplugshouldbecleanedbyscrapingorwirebrushing
andwashingwitha commercialsolvent
2. Removeand inspectthesparkplug.Checkgapto makesureit is
setat .030".SeeFigure9.
3. Replacethesparkplugifelectrodesarepitted,burned,orthe
porcelainiscracked.
Servicing the Air Cleaner
Iffilters,or coversare notinstalledcorrectlyseriousinjuryordeath
couldresultfrombackfire.Donotattemptto startthe enginewith
themremoved.
Donot usepressurizedairor solventsto cleantheair cleaner
cartridge.
Cleanor replacetheaircleanerevery25 hoursof operation.
1. Pulluponair cleanerhandle,Figure10,andpullbacktowardsthe
engine.
.
Removethe aircleanercover,Figure10.
f
Air CleanerCover Air CleanerCartridge
\
AirCleanerHandle
Electrode
l
Porcelain
.030inch (.76ram)gap
Figure9
Figure10
3. Carefullyremoveaircleanercartridgeandpre-cleaner(if
J
equipped)fromtheblowerhousing.
4. Cleanthebaseoftheaircleanercartridgecarefullytoprevent
debrisfromenteringtheengine.
5. Placethepre-cleaner,ifequipped,andcartridgebackintothe
blowerhousing.Thecartridgemustbeplacedsecurelyinto
position.
6. Aligntabsoncoverwithslotsin blowerhousingandreplacethe
cover.
14
Page 15
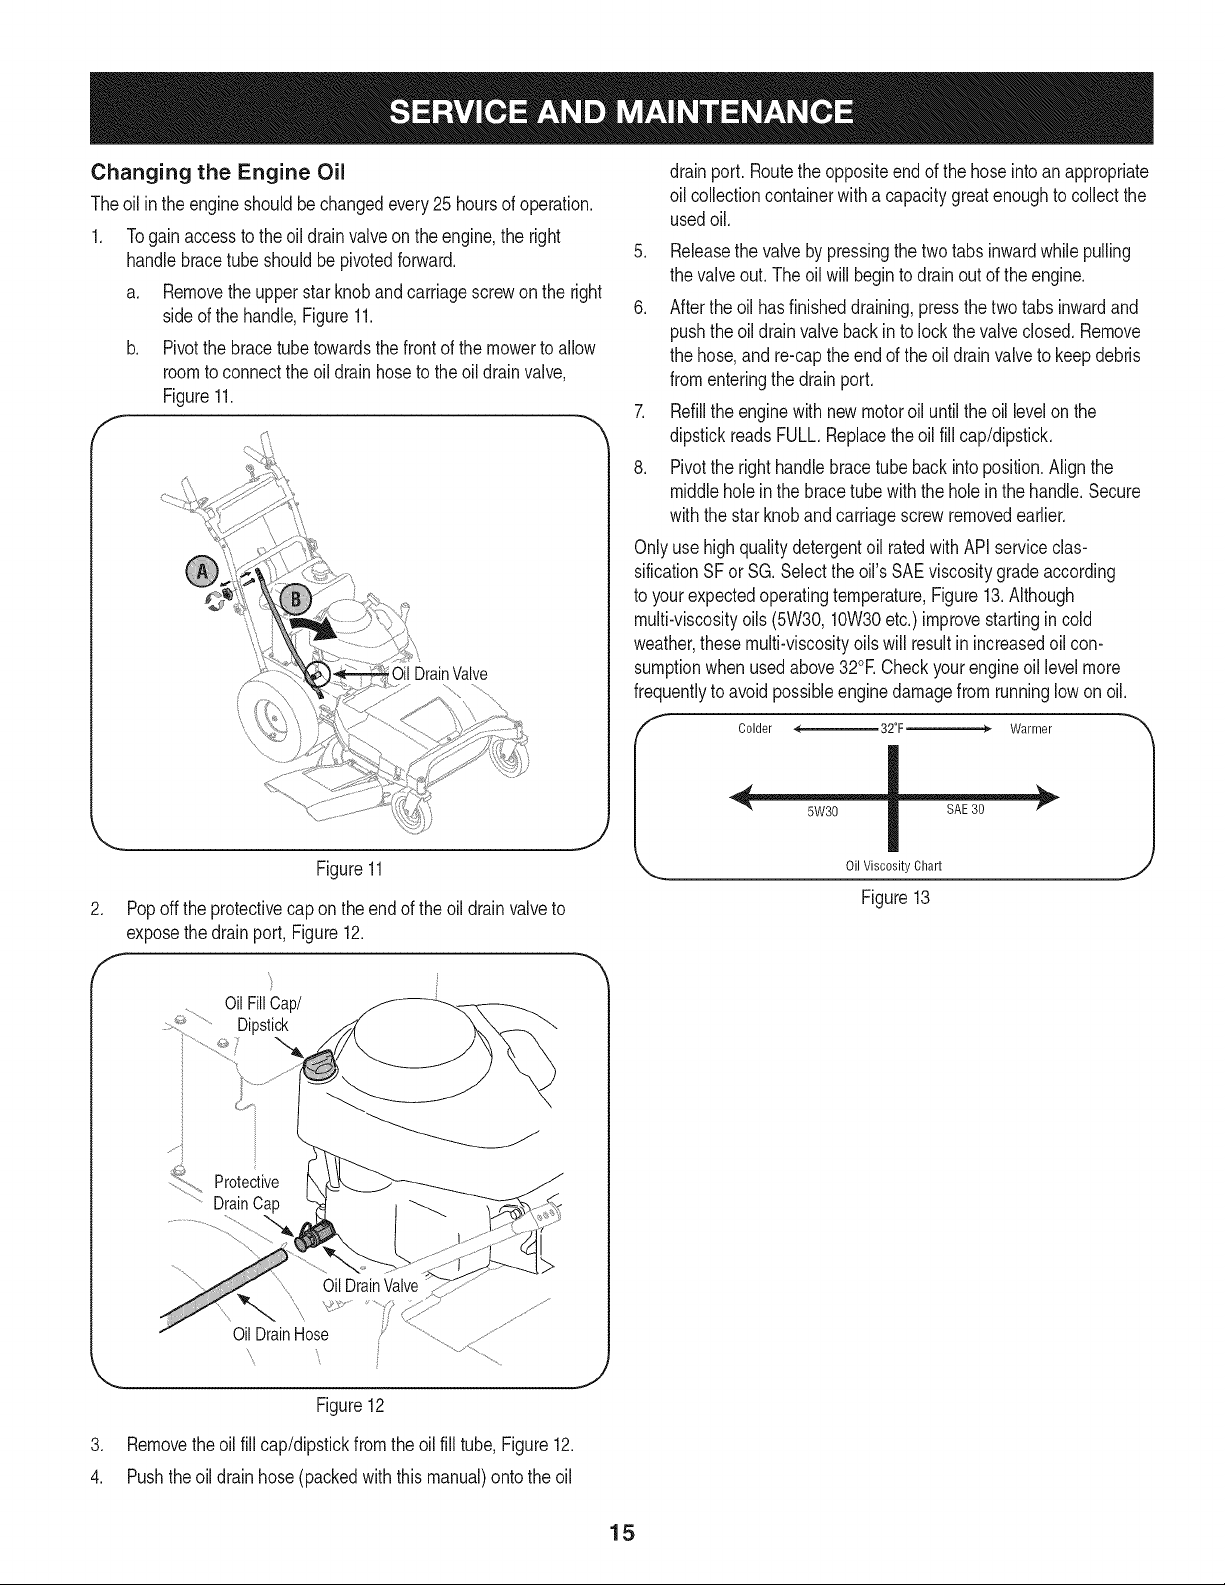
Changing the Engine Oil
Theoil intheengineshouldbechangedevery25hoursofoperation.
1. Togainaccesstothe oildrainvalveon theengine,theright
handlebracetube shouldbepivotedforward.
a. Removetheupperstarknobandcarriagescrewonthe right
sideof thehandle,Figure11.
b. Pivotthebracetubetowardsthefrontofthe mowertoallow
roomto connecttheoil drainhosetotheoil drainvalve,
Figure11.
\\
DrainValve
drainport. Routetheoppositeendofthehoseintoan appropriate
oil collectioncontainerwitha capacitygreatenoughto collectthe
usedoil.
5. Releasethe valvebypressingthe twotabsinwardwhilepulling
thevalveout.Theoil willbegintodrainoutof the engine.
6. Afterthe oil hasfinisheddraining,pressthetwotabsinwardand
pushtheoil drainvalvebackintolockthevalveclosed.Remove
thehose,and re-captheendof the oil drainvalvetokeepdebris
fromenteringthedrainport.
7. Refilltheenginewithnewmotoroil untiltheoil levelonthe
dipstickreadsFULL.Replacetheoil fill cap/dipstick.
8. Pivottherighthandlebracetubebackintoposition.Alignthe
middleholein thebracetubewiththeholeinthe handle.Secure
withthestarknobandcarriagescrewremovedearlier.
Onlyusehighqualitydetergentoil ratedwithAPIserviceclas-
sificationSForSG.Selecttheoil'sSAEviscositygradeaccording
toyourexpectedoperatingtemperature,Figure13.Although
multi-viscosityoils(5W30,10W30etc.)improvestartingincold
weather,thesemulti-viscosityoilswill resultin increasedoilcon-
sumptionwhenusedabove32°ECheckyourengineoil levelmore
frequentlytoavoidpossibleenginedamagefromrunninglowonoil.
Colder <------_ 32°F > Warmer
Figure
2. Popofftheprotectivecapontheendoftheoil drainvalveto
exposethedrainport, Figure12.
F
OilFillCap/
_':.............Dipstick
_::;> Protective
......DrainCap
................::_
Figure12
I
Oil Viscosity Chart
Figure 13
J
1
3. Removetheoil fillcap/dipstickfromtheoil fill tube,Figure12.
4. Pushtheoil drainhose(packedwiththismanual)ontotheoil
15
Page 16
Beforeperforminganytype of maintenanceon themachine,waitfor
allpartstostopmovinganddisconnectthesparkplugwire.Failure
Ito followthisinstructioncouldresultin personalinjuryor property
[damage.
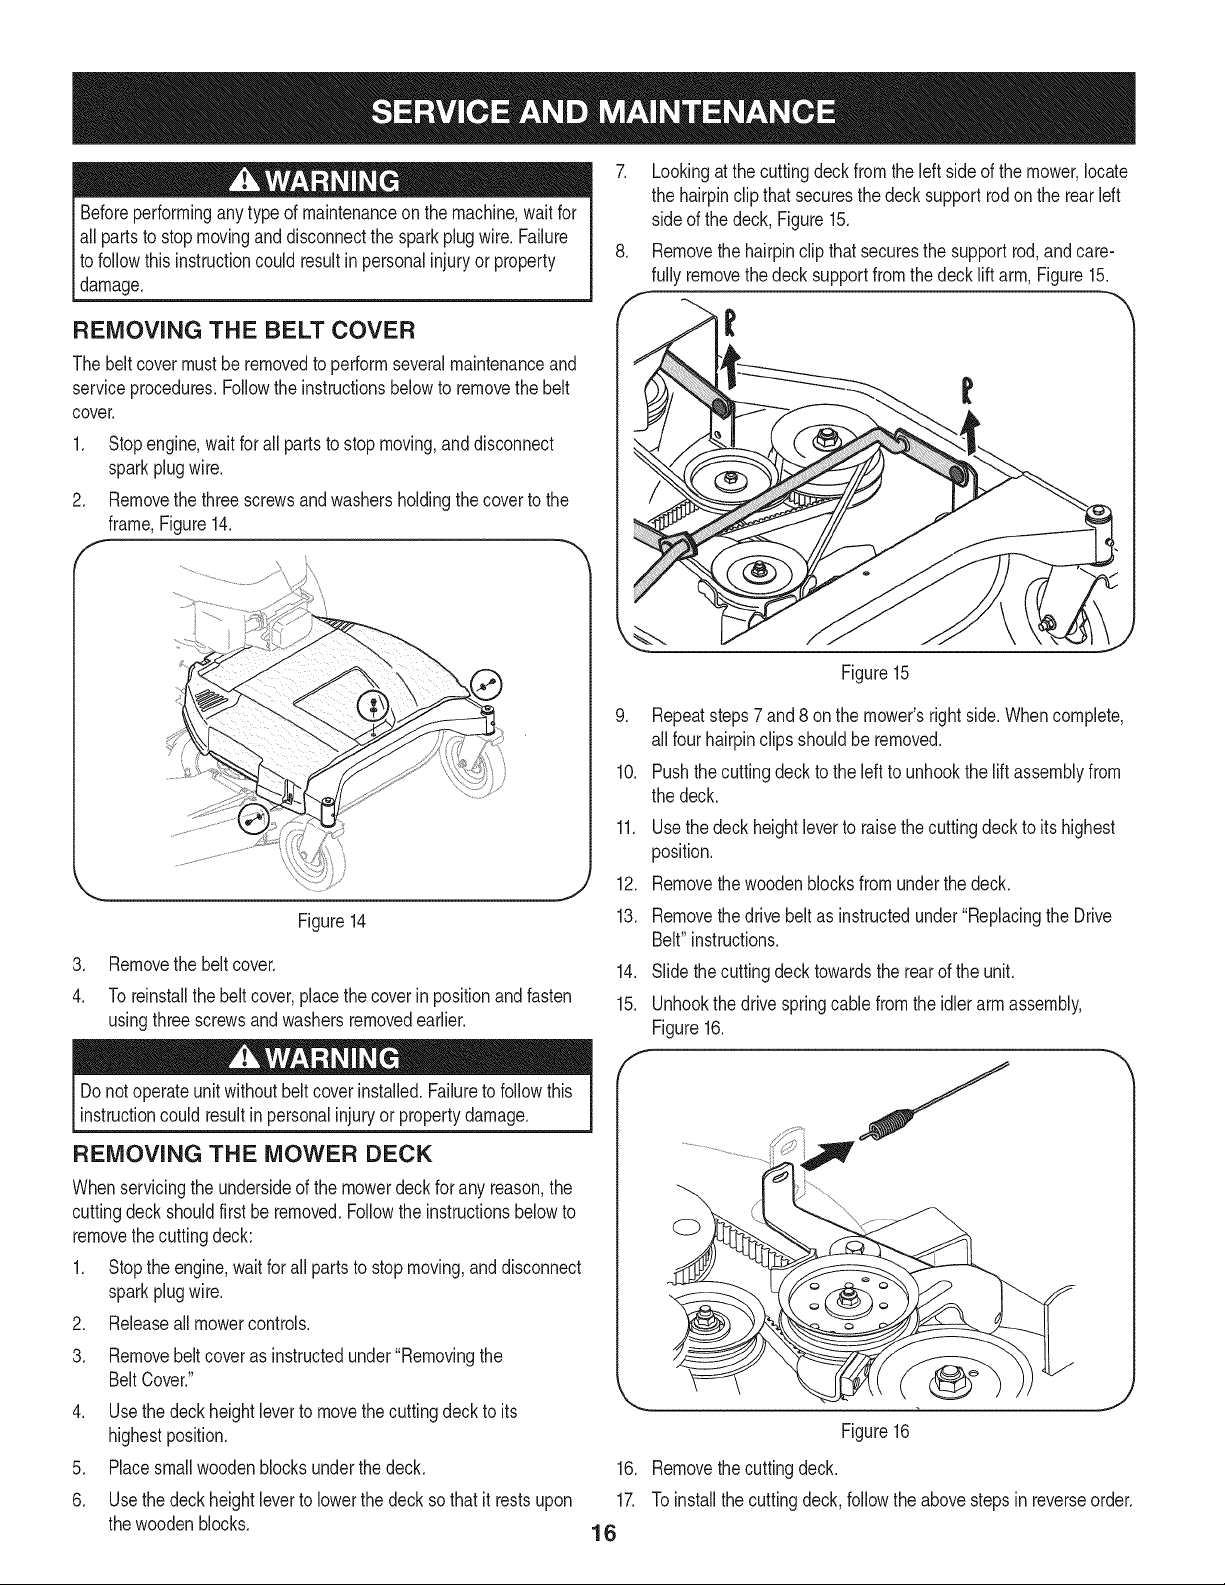
REMOVING THE BELT COVER
Thebeltcovermustbe removedto performseveralmaintenanceand
serviceprocedures.Followtheinstructionsbelowto removethebelt
cover.
1. Stopengine,waitfor all partsto stopmoving,anddisconnect
sparkplugwire.
2. Removethethreescrewsandwashersholdingthecoverto the
frame,Figure14.
Figure14
3. Removethe beltcover.
4. Toreinstallthe beltcover,placethecoverinpositionandfasten
usingthreescrewsandwashersremovedearlier.
7. Lookingatthecuttingdeckfromthe leftside of themower,locate
thehairpinclip thatsecuresthedecksupportrodon the rearIdt
sideof the deck,Figure15.
8. Removethehairpinclipthatsecuresthesupportrod,andcare-
fully removethedecksupportfromthedecklift arm,Figure15.
Figure15
9. Repeatsteps7 and8 onthe mower'srightside.Whencomplete,
all fourhairpinclipsshouldbe removed.
10. Pushthecuttingdecktothelefttounhookthe liftassemblyfrom
thedeck.
11.
Usethedeckheightleverto raisethecuttingdeckto itshighest
position.
12.
Removethe woodenblocksfromunderthe deck.
13.
Removethe drivebeltasinstructedunder"ReplacingtheDrive
Belt"instructions.
14. Slidethecuttingdecktowardstherearoftheunit.
15. Unhookthedrivespringcablefromtheidlerarm assembly,
Figure16.
f
Donotoperateunitwithoutbeltcoverinstalled.Failureto followthis
instructioncouldresultinpersonalinjuryor propertydamage.
REMOVING THE MOWER DECK
Whenservicingtheundersideof the mowerdeckfor anyreason,the
cuttingdeckshouldfirstbe removed.Followtheinstructionsbelowto
removethecuttingdeck:
1. Stoptheengine,waitforall partsto stopmoving,anddisconnect
sparkplugwire.
2. Releaseallmowercontrols.
3. Removebeltcoveras instructedunder"Removingthe
BeltCover."
4. Usethedeckheightleverto movethecuttingdecktoits
highestposition.
5. Placesmallwoodenblocksunderthedeck.
6. Usethedeckheightleverto lowerthedecksothat itrestsupon
thewoodenblocks.
16
Figure16
16.
Removethe cuttingdeck.
17.
Toinstallthe cuttingdeck,followthe abovestepsin reverseorder.
J
Page 17
Beforeperforminganytypeofmaintenanceonthemachine,waitfor
allpartstostopmovinganddisconnectthesparkplugwire.Failure
tofollowthisinstructioncouldresultinpersonalinjuryorproperty
damage.
CLEANING THE ENGINE AND DECK
Donot usea pressurewashertocleanthe mower.Itmaycause
damagetoelectricalcomponents,spindles,pulleys,bearings,orthe
engine.
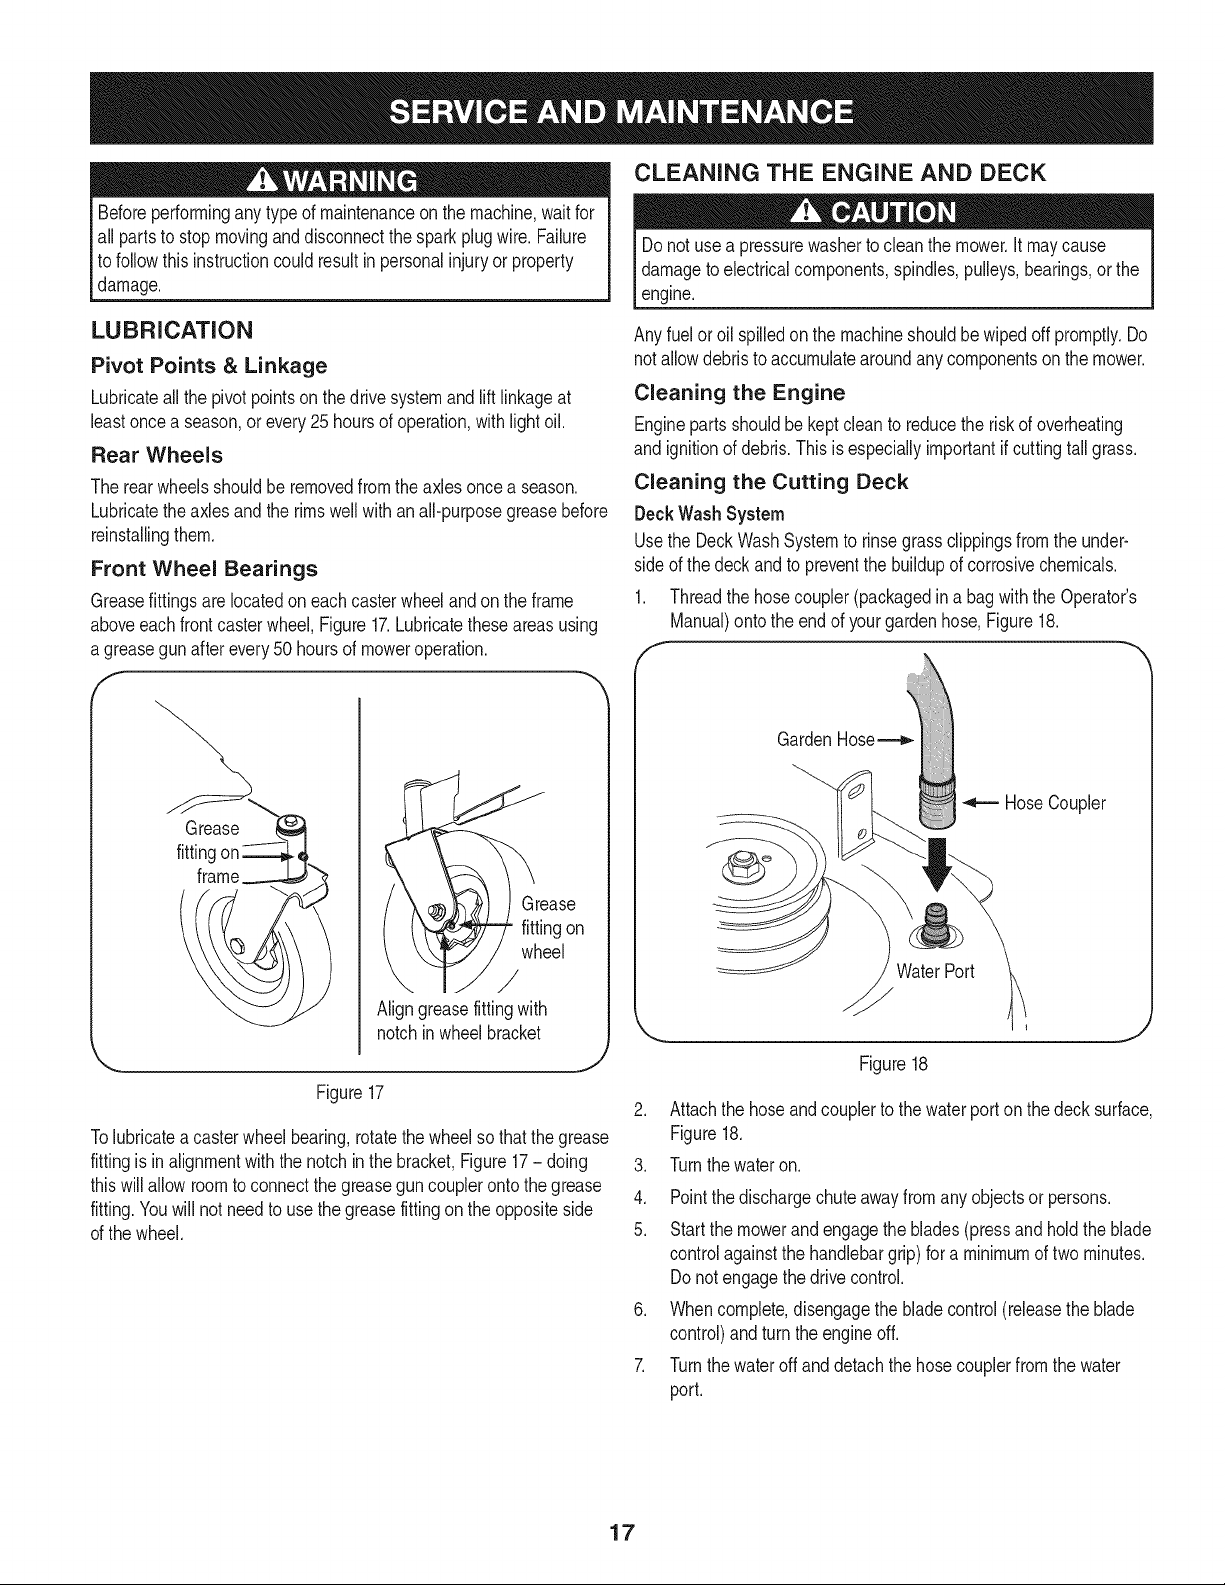
LUBRICATION
Pivot Points & Linkage
Lubricateall thepivotpointson thedrivesystemandlift linkageat
leastoncea season,orevery25hoursofoperation,withlight oil.
Rear Wheels
Therearwheelsshouldbe removedfromtheaxlesoncea season.
Lubricatetheaxlesandthe rimswellwithanall-purposegreasebefore
reinstallingthem.
Front Wheel Bearings
Greasefittingsarelocatedoneachcasterwheelandontheframe
aboveeachfrontcasterwheel,Figure17.Lubricatetheseareasusing
a greasegunafterevery50 hoursofmoweroperation.
F
Grease
fittingon
wheel
/
Aligngreasefittingwith
notchinwheelbracket
Figure17
Tolubricateacasterwheelbearing,rotatethewheelso thatthe grease
fittingis inalignmentwiththe notchinthe bracket,Figure17- doing 3.
thiswillallowroomtoconnectthegreaseguncouplerontothegrease 4.
fitting.Youwillnotneedto usethegreasefittingontheoppositeside
ofthe wheel. 5.
Anyfuelor oil spilledonthemachineshouldbewipedoff promptly.Do
notallowdebristo accumulatearoundany componentson themower.
Cleaning the Engine
Enginepartsshouldbekeptcleanto reducetheriskof overheating
and ignitionofdebris.Thisis especiallyimportantif cuttingtallgrass.
Cleaning the Cutting Deck
DeckWashSystem
Usethe DeckWashSystemto rinsegrassclippingsfromthe under-
sideof thedeckandto preventthebuildupofcorrosivechemicals.
1. Threadthe hosecoupler(packagedina bagwiththe Operator's
Manual)onto theendofyourgardenhose,Figure18.
GardenHose_
HoseCoupler
WaterPort
/y
Figure18
Attachthe hoseandcouplerto thewaterporton thedecksurface,
Figure18.
Turnthewateron.
Pointthedischargechuteawayfromany objectsorpersons.
Startthemowerandengagetheblades(pressandholdthe blade
controlagainstthehandlebargrip)for a minimumof twominutes.
Donot engagethedrivecontrol.
Whencomplete,disengagethebladecontrol(releasetheblade
control)andturntheengineoff.
Turnthewateroffanddetachthehose couplerfromthewater
port.
17
Page 18

Neverexceedthemaximuminflationpressureshownonthe sidewall
oftire.
REAR TIRE PRESSURE
Therecommendedoperatingreartirepressureisapproximately20
psiforthe reartires.Checkthe tire pressureperiodicallyandmaintain
equalpressurein bothreartiresatall times.
IMPORTANT:Referto thetiresidewallfor exacttiremanufacturer's
recommendedor maximumpsi.Do notoverinflate.Uneventirepres-
surecouldcausethecuttingdeckto mowunevenly.
REPLACING THE TRAILING SHIELD
SERVICING THE CUTTING BLADES
Besureto shutthe engineoff anddisconnectthe sparkplugwire
andgroundagainsttheengineto preventunintendedstartingbefore
removingthecuttingblade(s)forsharpeningor replacement.Protect
yourhandsbyusingheavyglovesora ragto graspthecuttingblade.
Periodicallyinspectthebladespindlesfor cracksordamage,espe-
ciallyifyoustrikeaforeignobject.Replaceimmediatelyif damaged.
Ifa screwis presentateachsideofthetrailingshield,removethe
twoscrews.
.
Bend(bow)thetrailingshieldinwardon eachsideto releasetabs
fromtheholesin the mowerframe,Figure19.
\_ ii
Figure19
.
Replacewith newtrailingshieldbybendingtheshieldto allow
eachtab tofit intoholesinmowerframe.
.
Replacethetwo screws(if screwswereusedto holdthetrailing
shieldto themowerframe).
Mowerbladesaresharp.Whenworkingnearblades,wearheavy
leatherglovesorwrap bladesin thickragsto protectyourselffrom
thesharpedges.
Blade Removal
Removethe deckfrombeneaththemowerandgentlyflipthe
deckoverto exposeits underside.Referto "Removingthe Mower
Deck"for instructions.
.
Placea2x4 blockof woodapproximately8.5"longbetweenthe
deckhousingandthe cuttingbladetoactasa stabilizer,
Figure20.
F
\
Removeflangenuttoreleaseblade
Useblockofwoodtostabilizeblade.
Figure20
3. Removethehexflangenutthatsecuresthebladetothespindle
assembly,Figure20.
18
J
Page 19
Blade Sharpening
iMPORTANT:Ifany metalseparationis present,replacetheblades
withnewones.
Toproperlysharpenthecuttingblades,removeequalamountsof
metalfrombothends of thebladesalongthecuttingedges,parallelto
thetrailingedge,at a 250to 300angle,Figure21.
J
Figure21
It isimportantthateachcuttingbladeedge begroundequallyto
maintainproperbladebalance.Apoorlybalancedbladewillcause
excessivevibrationandmaycausedamagetothemowerandresult
in personalinjury.Thebladecan betestedbybalancingitona round
shaftscrewdriver.Grindmetalfromtheheavysideuntilit balances
evenly.
Blade Installation
1. Wheninstallingablade,placethesideof thebladewitha part
numberstampedin itfacingthegroundwhenthemowerisin the
operatingposition.
2. Useatorquewrenchtotightenthespindleflangenutto between
70-90foot-pounds.
REPLACING BELTS
Beforeperforminganytypeofmaintenanceonthemachine,waitfor
allpartsto stopmovinganddisconnectthe sparkplugwire.Failureto
followthisinstructioncouldresultinpersonalinjuryorpropertydamage
Avoidthe possibilityofa pinchinginjury.Donot placeyourfingers
betweenbeltsand pulleys.
Themowerusesthreebelts: 1)drivebelt,2)deckengagementbelt,3)
bladetimingbelt.Beforereplacinga belt,observehowthebeltis routed
aroundthepulleysandbracketsto helpwheninstallinga replacement.
IMPORTANT:Thebeltson themowerare speciallydesignedto
engageanddisengagesafely.Fora properworkingmachine,use
factoryapprovedbelts.
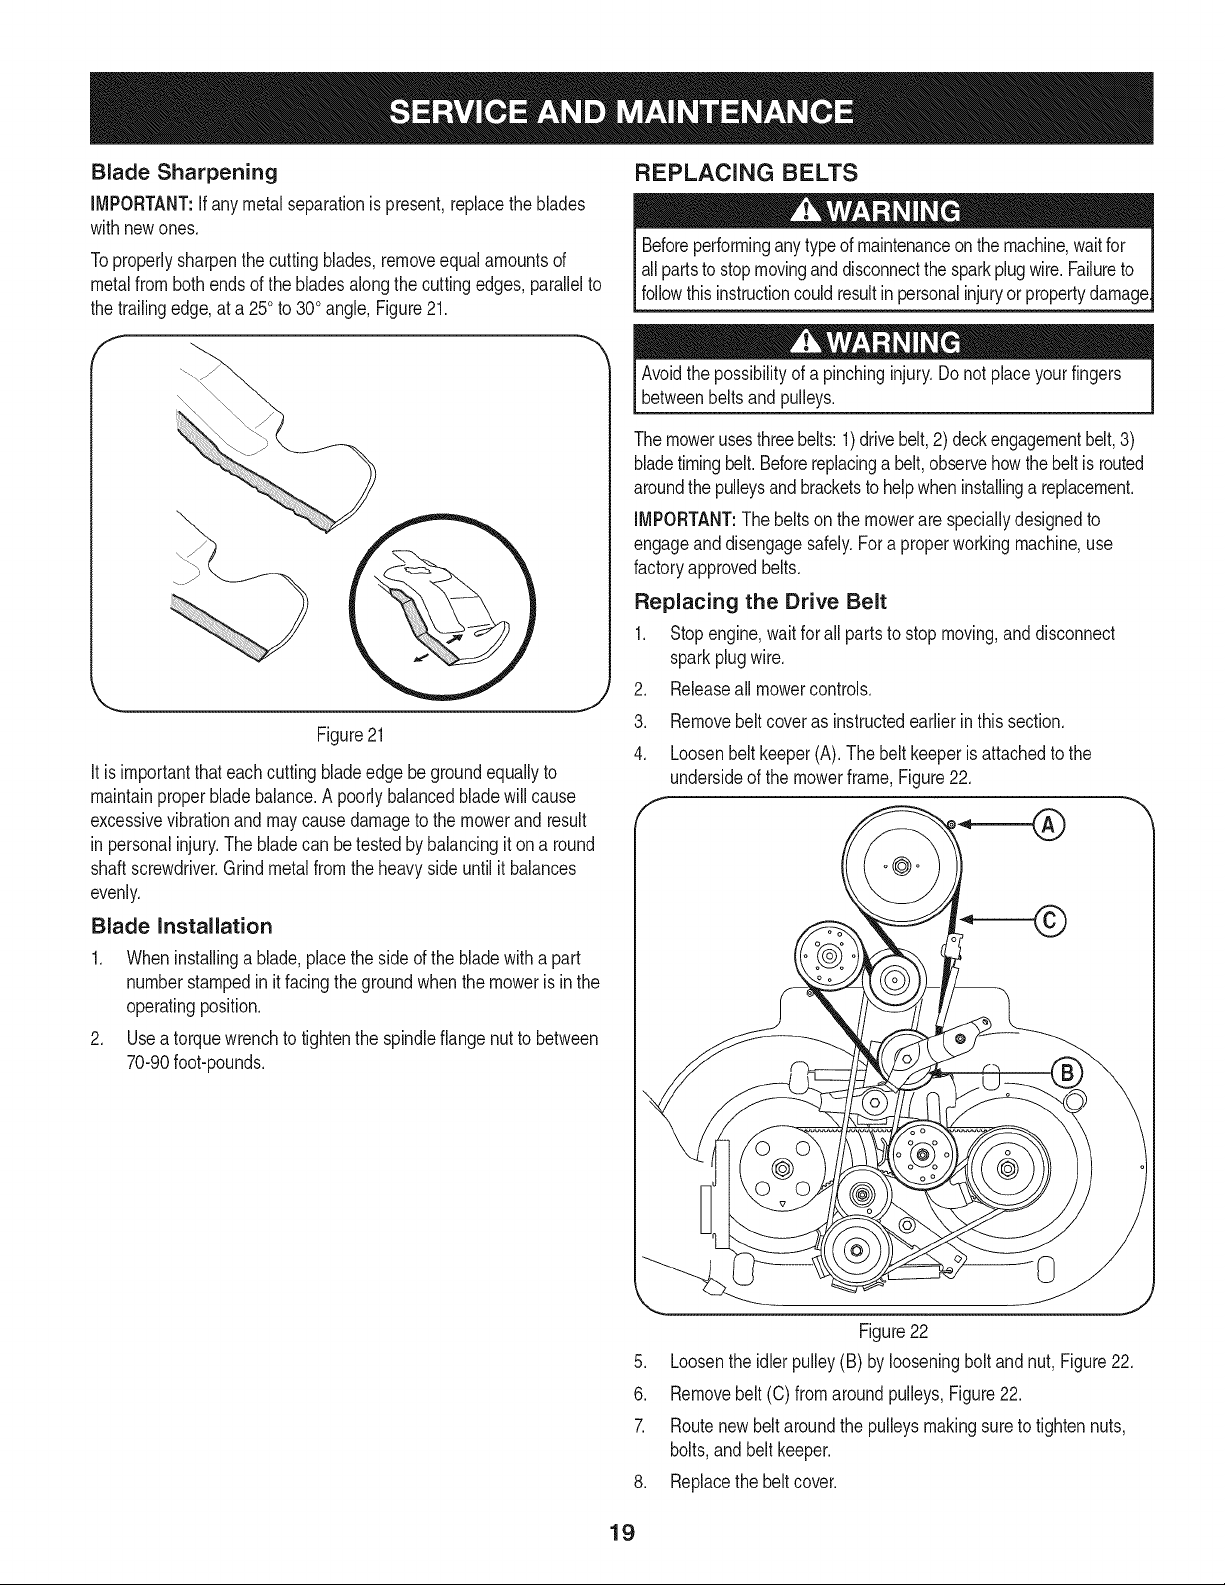
Replacing the Drive Belt
1. Stopengine,waitforall partstostopmoving,anddisconnect
sparkplugwire.
Releaseall mowercontrols..
3.4.Removebelt coverasinstructedearlierinthissection.
Loosenbeltkeeper(A).Thebeltkeeperisattachedto the
undersideof themowerframe,Figure22.
Figure22
5. Loosentheidlerpulley(B)bylooseningboltandnut, Figure22.
6. Removebelt(C)fromaroundpulleys,Figure22.
7. Routenewbeltaroundthe pulleysmakingsuretotightennuts,
bolts,andbeltkeeper.
8. Replacethe beltcover.
19
Page 20
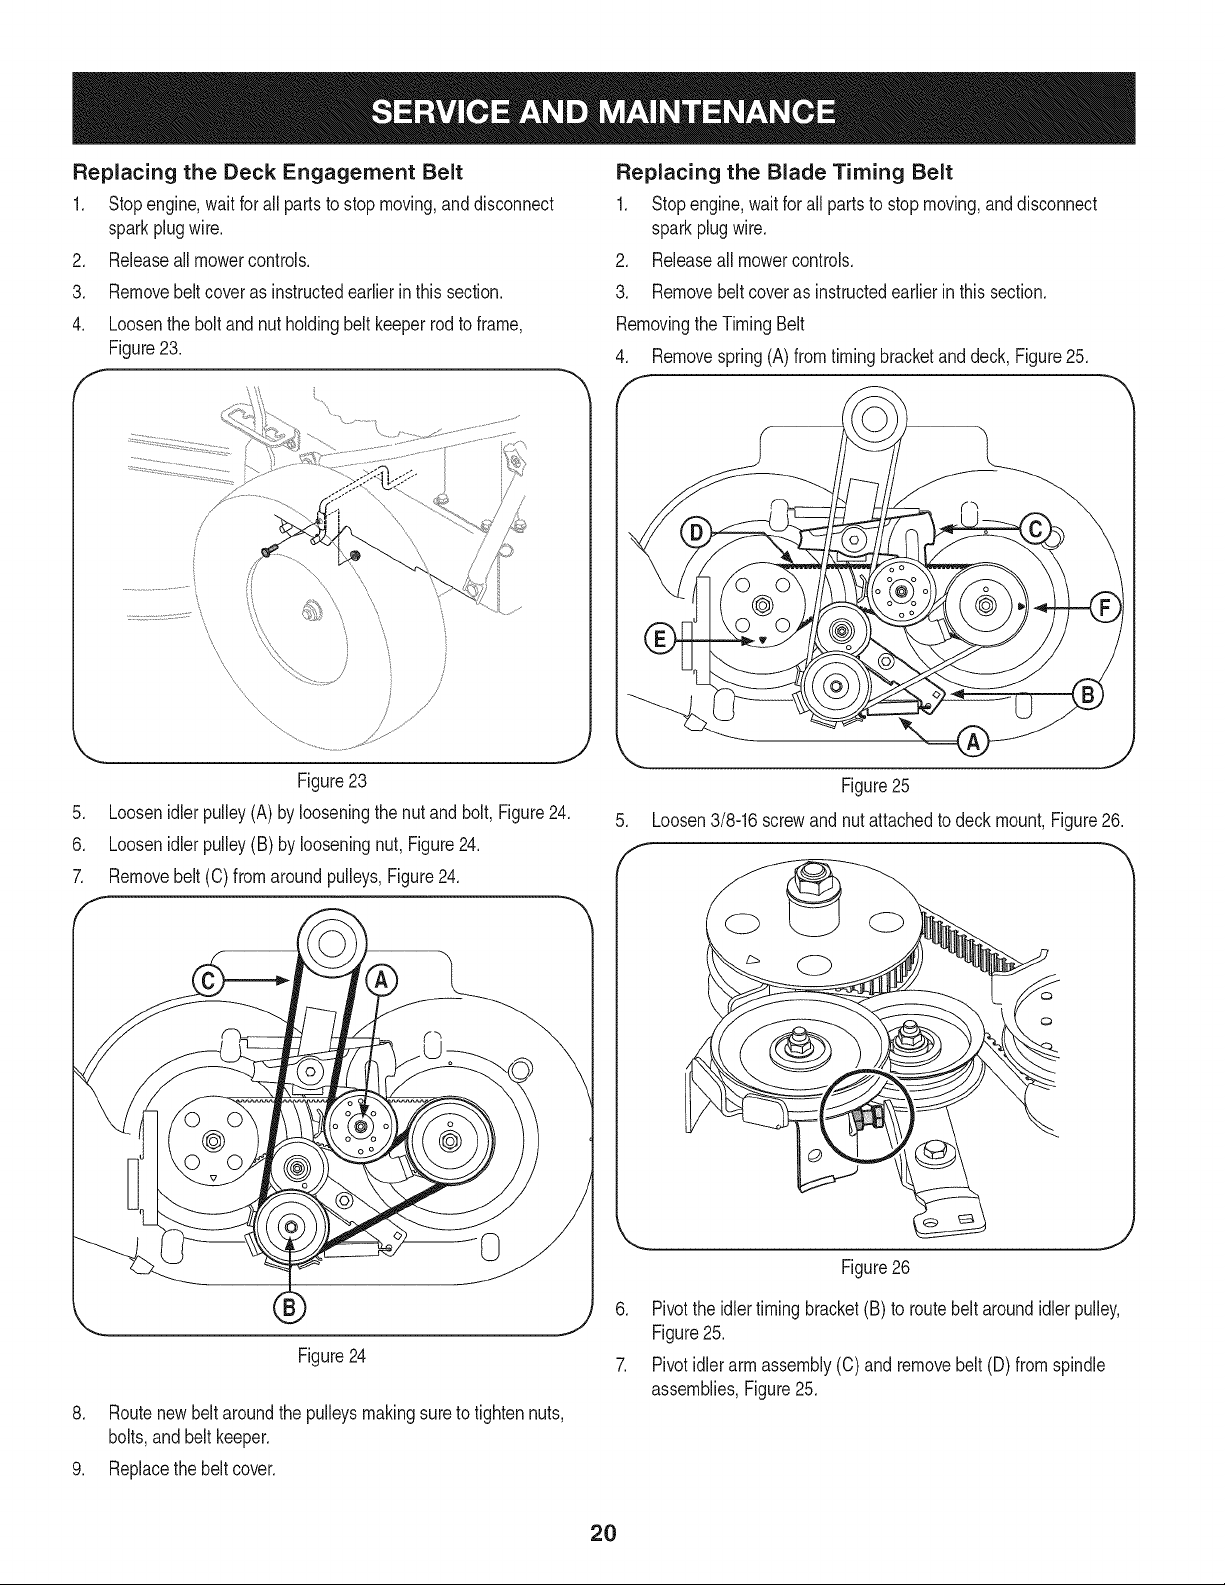
Replacing the Deck Engagement Belt
1, Stopengine,waitfor all partsto stopmoving,anddisconnect
sparkplugwire,
2. Releaseallmowercontrols,
3. Removebeltcoveras instructedearlierinthis section,
4. Loosenthebolt andnut holdingbeltkeeperrodto frame,
Figure23.
f
\
i!
/
Figure23
.
Loosenidlerpulley(A)bylooseningthenutand bolt,Figure24.
6.
Loosenidlerpulley(B) by looseningnut, Figure24.
7.
Removebelt(C)fromaroundpulleys,Figure24.
Replacing the Blade Timing Belt
1. Stopengine,waitforall partsto stopmoving,anddisconnect
sparkplugwire.
2. Releaseall mowercontrols.
3. Removebeltcoverasinstructedearlierinthissection.
RemovingtheTimingBelt
4. Removespring(A)fromtimingbracketanddeck,Figure25.
f
\
Figure25
.
Loosen3/8-16screwandnut attachedtodeckmount,Figure26.
f
0
Figure24
8. Routenewbeltaroundthepulleysmakingsuretotightennuts,
bolts,andbelt keeper.
9. Replacethebeltcover.
Figure26
6. Pivottheidlertimingbracket(B)toroutebelt aroundidlerpulley,
Figure25.
7. Pivotidlerarmassembly(C)andremovebelt (D)fromspindle
assemblies,Figure25.
2O
Page 21
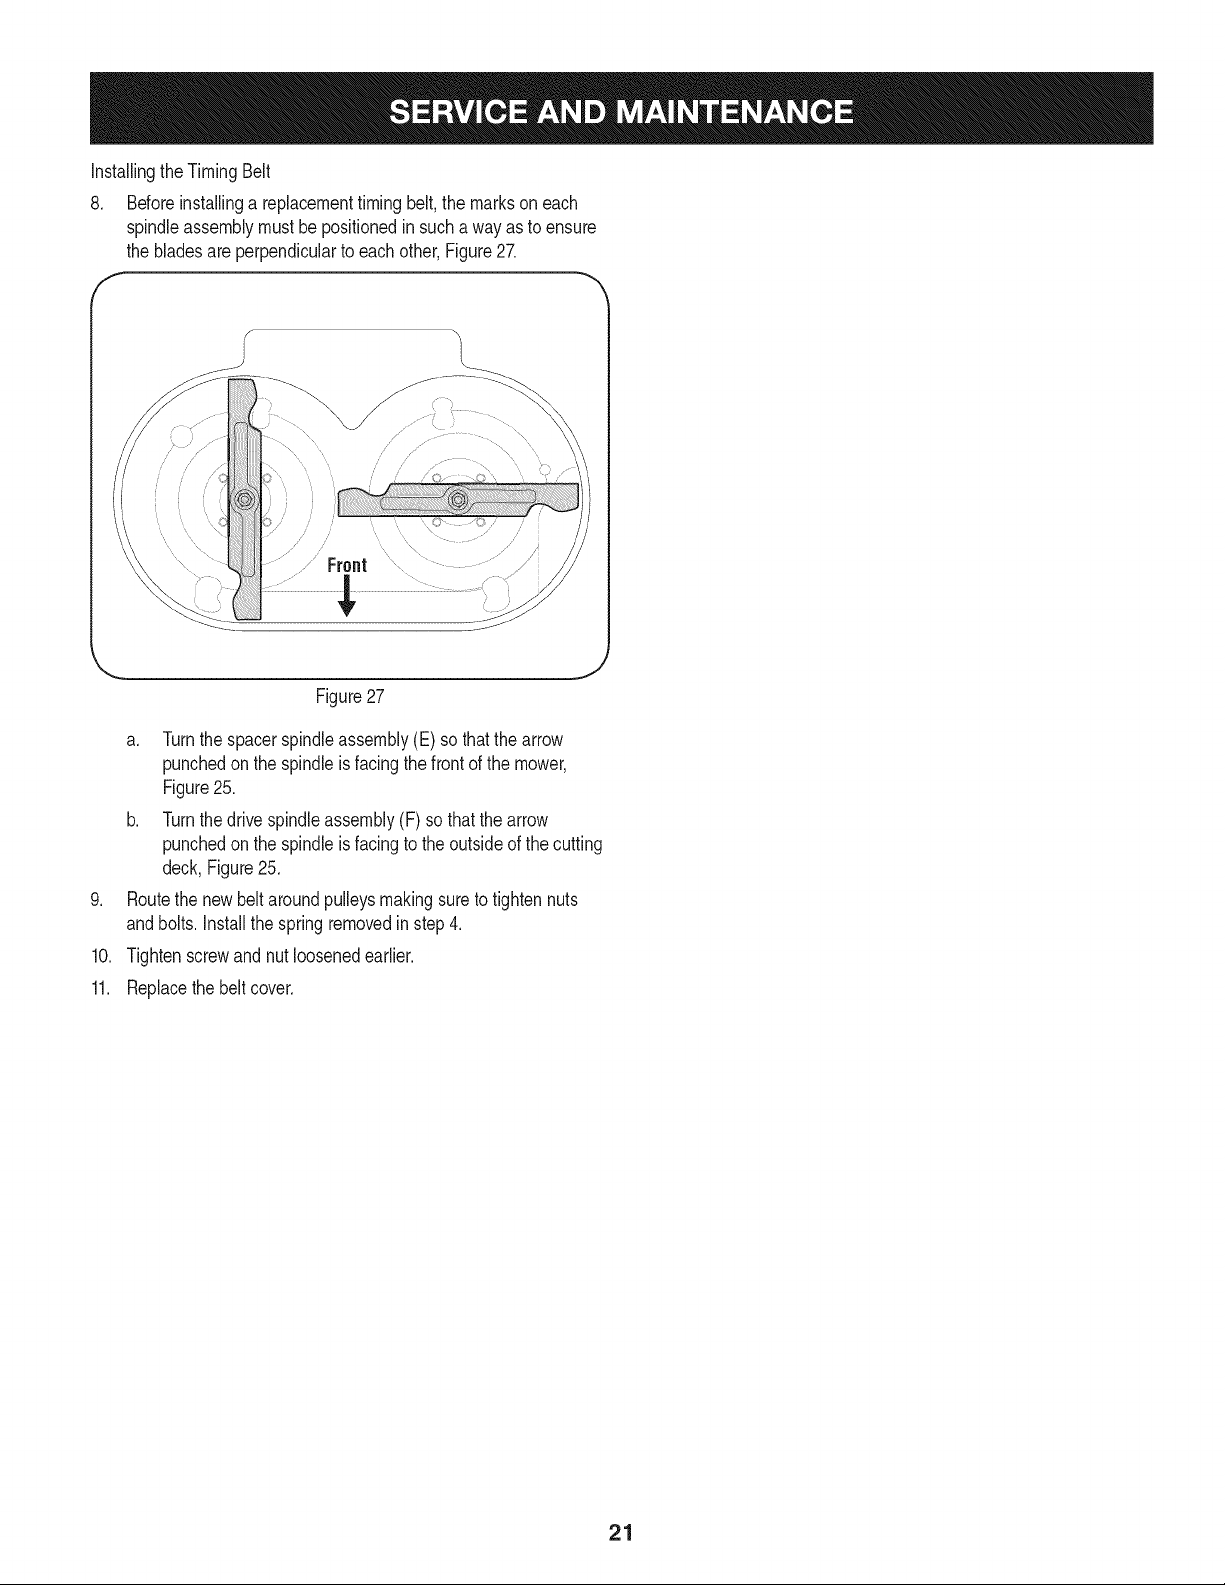
InstallingtheTimingBelt
8. Beforeinstallinga replacementtimingbelt,the marksoneach
spindleassemblymustbe positionedinsucha wayas toensure
thebladesare perpendiculartoeachother,Figure27.
f -,
7 J
/?///
.................Front
J
Figure27
a. Turnthespacerspindleassembly(E) sothatthearrow
punchedonthe spindleisfacingthe frontof the mower,
Figure25.
b. Turnthedrivespindleassembly(F)sothatthearrow
punchedonthe spindleisfacingto the outsideofthecutting
deck,Figure25.
.
Routethenewbeltaroundpulleysmakingsureto tightennuts
andbolts.Installthespringremovedinstep4.
10.
Tightenscrewandnutloosenedearlier.
11.
Replacethebelt cover.
21
Page 22
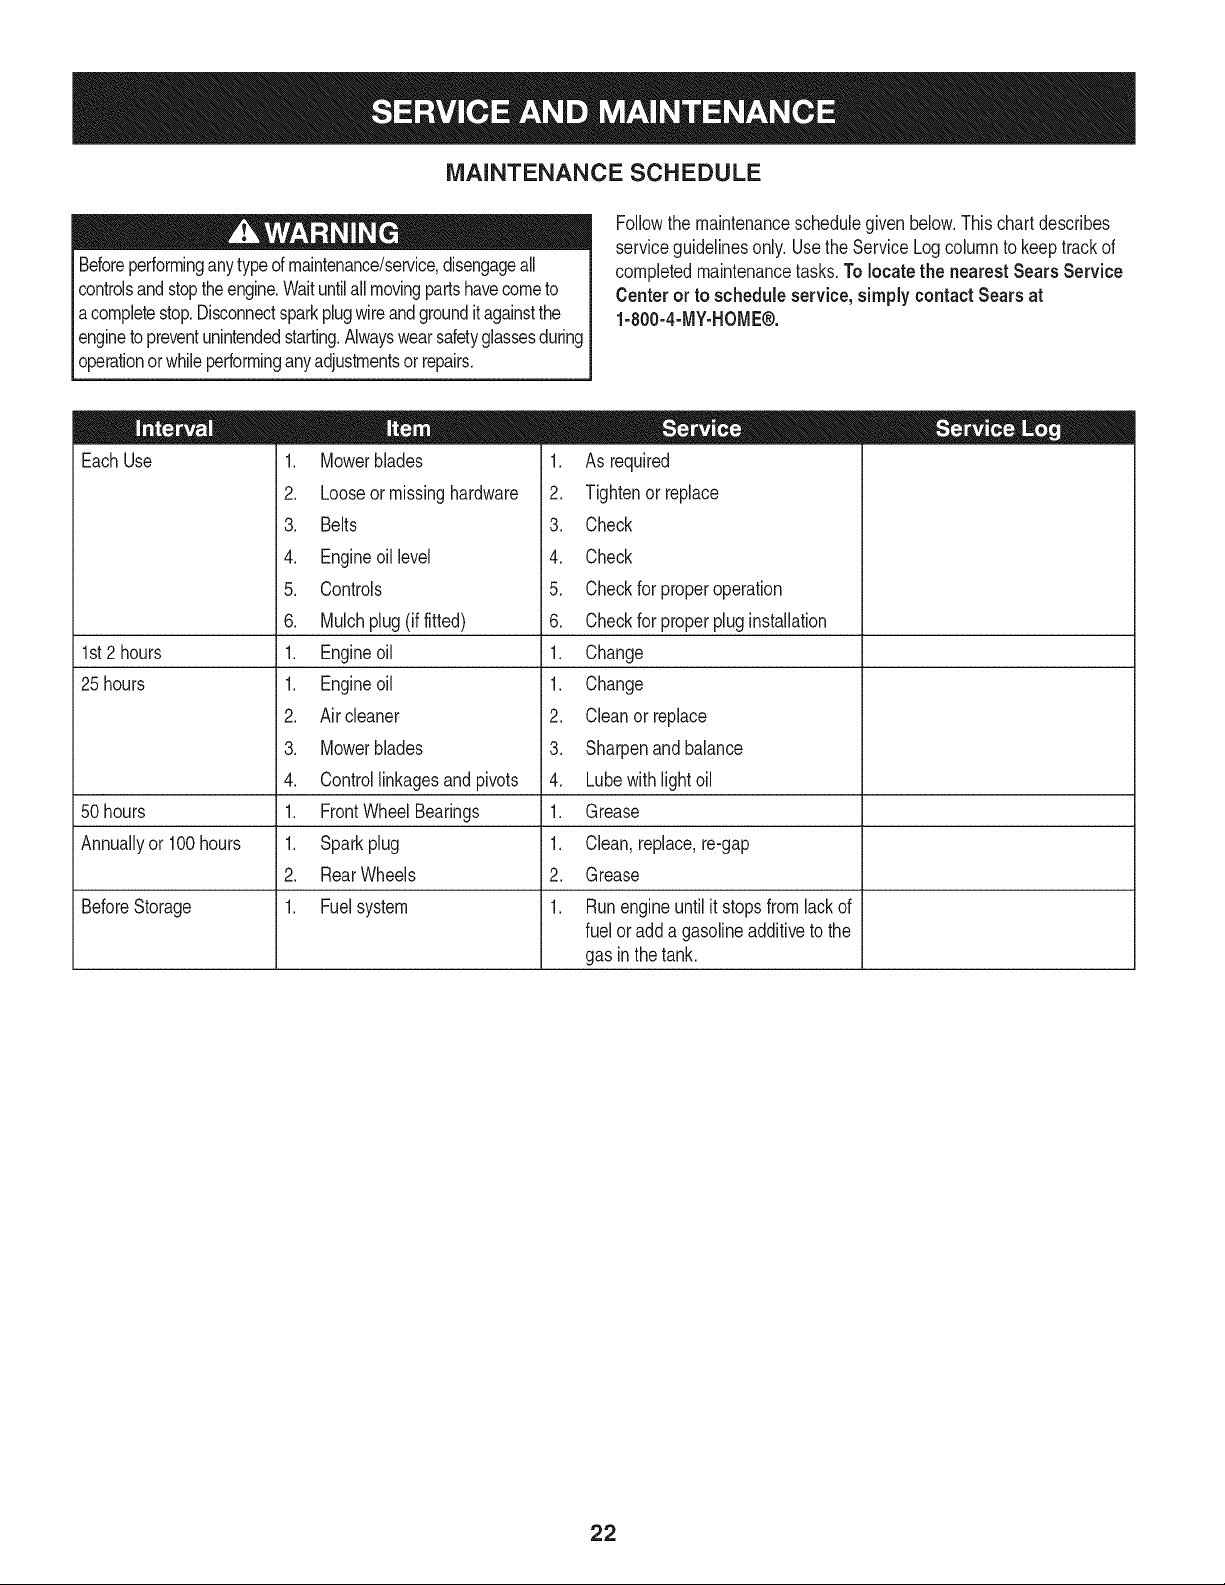
MAINTENANCE SCHEDULE
Beforeperforminganytypeof maintenance/service,disengageall
controlsandstoptheengine.Waituntilallmovingpartshavecometo
acompletestop.Disconnectsparkplugwireandgrounditagainstthe
enginetopreventunintendedstarting.Alwayswearsafetyglassesduring
operationor whileperforminganyadjustmentsor repairs.
Followthemaintenanceschedulegivenbelow.Thischartdescribes
serviceguidelinesonly.UsetheServiceLogcolumntokeeptrackof
completedmaintenancetasks.Tolocate the nearest SearsService
Centeror toscheduleservice,simplycontactSearsat
1-800-4-MY-HOME®.
EachUse
1st2 hours
25 hours
50 hours
Annuallyor100hours
BeforeStorage
1. Mowerblades
2. Looseormissinghardware
3. Belts
4. Engineoillevel
5. Controls
6. Mulchplug(if fitted)
1. Engineoil
1. Engineoil
2. Aircleaner
3. Mowerblades
4. Controllinkagesandpivots
1. FrontWheelBearings
1. Sparkplug
2. RearWheels
1. Fuelsystem
1. As required
2. Tightenor replace
3. Check
4. Check
5. Checkforproperoperation
6. Checkforproperpluginstallation
1. Change
1. Change
2. Cleanor replace
3. Sharpenandbalance
4. Lubewithlightoil
1. Grease
1. Clean,replace,re-gap
2. Grease
1. Runengineuntilit stopsfromlackof
fueloradda gasolineadditivetothe
gasin thetank.
22
Page 23

Neverstorelawnmowerwithfuel intankindoorsorin poorly
ventilatedareaswherefuelfumesmayreachanopenflame,spark,
or pilotlightasonafurnace,waterheater,clothesdryer,orgas
appliance.
PREPARING THE ENGINE
Forenginesstoredover30days:
1. Topreventgumfromformingin fuel systemoron carburetor
parts,runengineuntil it stopsfromlackoffueloradda gasoline
additivetothe gasin the tank.If youuseagasadditive,runthe
engineforseveralminutesto circulatetheadditivethroughthe
carburetor--afterwhichthe engineandfuelcan bestoredupto
sixmonths.
2. Whileengineisstillwarm,changetheoil.
3. Removesparkplugandpourapproximately1oz.(30 ml)of clean
engineoil intothecylinder.Pulltherecoilstarterseveraltimesto
distributetheoil,and reinstallthe sparkplug.
4. Cleanengineofsurfacedebris.
Thefollowingattachmentsandaccessoriesareavailableforthelawnmower.Contacta SearsServiceCenter1-800-4-MY-HOME®for more
information.
PARTNO. DESCRIPTION
33731 BaggerGrassCollector
PREPARING THE LAWN MOWER
• Whenstoringthemowerinan unventilatedor metalstorageshed,
careshouldbetakento rustproofthenon-paintedsurfaces.Using
a lightoil orsilicone,coattheequipment,especiallyanysprings,
bearings,andcables.
• Removeall dirtfromexteriorofengineandequipment.
• Followlubricationrecommendations.
Storeequipmentinaclean,dryarea. Donotstoreinan area
whereequipmentispresentthatmayusea pilotlightor hasa
componentthatcan createa spark.
23
Page 24

Beforeperforminganytyped maintenance/service,disengageall
controlsandstoptheengine.Waituntilallmovingpartshavecometo
a completestop.Disconnectsparkplugwireandgrounditagainstthe
enginetopreventunintendedstarting.Alwayswearsafetyglassesduring
operationorwhileperforminganyadjustmentsorrepairs.
Thissectionaddresses minor serviceissues.Tolocate the nearestSearsServiceCenteror to scheduleservice,simplycontactSears
at 1-800-4-1VlY-HOIVlE®.
Enginefailsto start
Enginerunserratically
Engineoverheats
Enginehesitatesat highRPMs 1. Sparkpluggap settoo close 1.
Engineidlespoorly 1. Fouledsparkplug 1.
Excessivevibration 1. Cuttingbladeslooseor unbalanced 1.
Unitfailstopropelitself 1. Drivebelt looseordamaged 1.
Poormowingperformance 1. Dullblade(s) 1.
1. Chokenotactivated
2. Throttle/chokecontrolnotin correctposition
3. Sparkplugwiredisconnected
4. Faultysparkplug
5. Fueltankemptyorstalefuel
6. Blockedfuelline
1. Unitrunningwithchokeapplied
2. Sparkplugwireloose
3. Stalefuel
4. Waterordirt infuel system
5. Dirtyair cleaner
1. Engineoillevellow
2. Air flowrestricted
2. Dirtyair cleaner 2.
2. Damaged,dull,orbentcuttingblade 2.
3. Loosehardware 3.
2. Broken,loose,orwornbelt(s) 2.
3. Blade(s)outof balance 3.
4. Clean,adjustgap,or replace.
4. Drainfuel. Refillwithfreshfuel.
1. Placethrottle/chokecontrolleverintochokeposition.
2. Placethrottle/chokeleverintofastposition.
3. Connectwiresto sparkplug.
5. Filltankwithclean,freshgasoline.
6. Havefuellinecleanedbya Searsservicedealer.
1. Movethrottle/chokeleveroutofchokeposition.
2. Connectandtightensparkplugwire.
3. Filltankwithfreshgasoline.
5. Replaceaircleanercartridge.
1. Fillenginewith properamountandtype ofoil.
2. Cleangrassclippingsanddebrisfromaroundthe
engine'scoolingfinsandblowerhousing.
Removesparkplugandadjustgap.
Replacesparkplugandadjustgap.
Replaceair cleanercartridge.
Tightenbladeandspindle.Balanceblade.
Replaceblade.
Tightenall nutsandbolts.
Replacedrivebelt.
Sharpenor replaceblade(s).
Replacebelt(s).
Balanceorreplaceblade(s).
NEED MORE HELP?
You"[[ £nd the ar_,swer and more on ma_,agemyhOmeo{Om - fo[ free!
oGeta personaUzedmaintenance plan for your home.
oFind information and tools to help with home projects.
24
Page 25

777S30145 777D09788 777122793
777S30117
777122759
777122760
777122782
777D10928
777122758 777122809
1. Insert Mulch Plug's front tab into slot on outside of deck.
2. Pivot Mulch Plug inboard into discharge opening.
3. Slide rearward until slot bottoms out against edge of discharge opening.
. Lower Discharge Chute to lock Mulch Plug in place.
777X43688
777D10929
25
Page 26

33-inch Wide Cut Mower B Model No. 247.887330
8
4
21
61
/
43
\
62
21
54
57
56
26
46
51
32
41
25
58
44
26
Page 27

33=inch Wide Cut Mower B Model No. 247.887330
D = " O
687-02427 LeverAssembly:LH
2 687-02426 LeverAssembly:RH
3 710-0572 Screw,Carriage:5/16-18x 2.25"
4 710-0599 Screw,TT:1/4-20x0.500"
5 710-0606 Screw,HHCap:1/4-20x 1.50"
6 712-04063 Nut,FlangeLock:5A6-18
7 912-0442 Nut,LockCap:1/4-20
8 720-0274 Grip:1.0"IDx 5.0"Lg
9 720-04072A StarKnob5A6-18
10 936-0463 Washer,Flat:.25x .63x .0515
11 938-0140 Screw,Shoulder:.435"x.178-5/16
12 938-1226 Screw,Shoulder:.375"x 1.355"x1/4-20
13 946-04609 Cable,ClutchWheel
14 946-04606 Cable,Brake,Transmission:RH
15 946-04610 Cable,ClutchDeck
16 946-04604 Cable,Throttle/Choke:38" x 1.1"Ext
17 946-04608 Cable,Brake,Transmission:LH
18 749-04330-0637LowerHandle
19 749-04331-0637 UpperHandle:LH
20 749-04332-0637 UpperHandle:RH
21 749-04333-0637 BraceTube
22 787-01540-4044 HandlePanel
23 787-01490A-0637CableMountBracket:RH
787-01491A-0637CableMountBracket:LH
24 687-02255B-4044FrameAssembly
25 687-02263-4044 CasterWheelBracketAssembly
26 687-02419-0637 DeckLiftAssembly:RR
27 687-02265-0637 DeckLiftAssembly:Front
28 710-0627 Screw,HHCap:5/16-24x .750"
29 725-0157 CableTie,3/16x .05x 7.4
30 710-04312 Screw,HHCap:5/16-18x .50"
712-04065
132 1914-0145
133 720-0311
134 931-05684
135 731-05791
136 732-04418A
137 736-0242
138 736-0343
]39 936-0351
140 1937-3000
141 738-04216A
142 741-0660A
143 i787-01496-4044
144 i787-01510-0637
145 787-01521-0637
146 710-0604A
147 938-1225
148 951-10480
149 951-10514
150 787-01507-4044
151 734-04243
152 710-1315
154 951-10517A
155 751-3141-14
j56 726-0205
157 751-10349-28
158 941-0706
159 710-0896
j60 736-0270
j61 751B221535
j62 710-1237
Nut,FlangeLock:%-16
ClickPin: .092"x 1.64"
HandleGrip1/2"
BeltCover33"Wide CutMower
iSnapSpacer:.63"IDx.75"LG
iDeckHeightLever
iWasher,Bell:.340"x .872"x .060"
]Washer,Flat:.330"x 1.25"x .120"
iWasher,Flat:.760"IDx 1.50"OD
LubeFitting:3A6:LNC#70
]Bolt,Shoulder:.625"x2.515"x%-16
]FlangeBearing:.760"x .941"x 1.0"
iHeightAdjustmentBracket
LinkPivotBracket
LeverPivotBracket
jScrew,TT:5/16-18x .625"
iScrew,Shoulder:.3175"x.188"x ¼-20
]FuelTank,2Gal.
iFuelCap
FuelTankMountingBracket
iWheel,8"x 1.75"
iScrew,TT:%-16x 1.25"
lOil Drain
lOil DrainHose
HoseClamp
FuelHose
lFlangeBearing,.635"
lScrew,¼-14x .625
lWasher,Bell:.265"x .75"x.062"
lCasingClamp
]Screw,10-32X .625
27
Page 28

33=inchWideCut Mower B Model No. 247.887330
13
6O
26
14
61
63
39
67
f
19
17
28
29
59
i5
64
A _65
@
\
72
28
Page 29

33=inch Wide Cut Mower B Model No. 247.887330
17840-0637 TransaxleBracketMount 918-04439B SpacerSpindleAssembly
2 918-04639 Transmission4-Speed i41 i631-04252 MulchPlug
3 710-0176 Screw,HHCap:5/16-18x 2.75" i42 i987-02420 IdlerArmAssembly
4 710-0376 Screw,HHCap:5/16-18x 1.00" i43 687-02476-4044 DeckAssembly33-inch
5 710-04377 Screw,HHCap:7/16-20x 2.75" i44 710-04187 Screw,HL:1A-15x .50"
6 710-0513 Screw,HHCap:1/4-28x .625" i45 710-0514 Screw,HHCap:%-16x 1.00"
7 710-0520 Screw,HHCap:%-16x 1.50" i46 i710-0560 Screw,Carriage:%-16x 1.75"
8 710-0347 Screw,HHCap:%-16x 1.75" i47 710-04484 Screw,5/16-18x .750
9 710-3008 Screw,HHCap:%6-18x .75" i48 710-3184A Screw,HHCap:%-16x 2.00"
10 710-3015 Screw,HHCap:_A-20x .75" i49 931-04244 ChuteDeflectorAssy(includesref.72-76)
11 911-1000 BeltKeeper i50 712-0417A Nut,Flange:%-18
12 712-04063 Nut,FlangeLock:5/16-18 i51 912-0641 Nut,Hex
13 712-04064 Nut,FlangeLock:_A-20 i52 912-3017 Nut,Hex%-16
14 712-04065 Nut,FlangeLock:%-16 i53 732-04406 ExtensionSpring:TimingBeltTension
15 712-0700 Nut,Flange:9A6-18 i54 732-04452 ExtensionSpring:DeckBrake
16 914-0145 HairpinClip:092"x 1.64"Long i55 736-0225 Washer,Lock
17 718-04407 PulleyHub i56 938-0347 Spacer,Shoulder:.625"x .169"
18 720-0142 Grip i57 738-04162A Spacer,Shoulder:.884"x .190"
19 731-05766 TrailingShield 58 i942-04154A Blade:17.9"
20 732-04409 ExtensionSpring i59 754-04136 Belt,Timing
21 732-04443A ExtensionSpring i60 i954-04139 Belt,V Type,DeckEngagementBelt
22 736-0105 Washer,Spring:.401"x .870"x .063" i61 i756-04129B IdlerPulley4.25"
23 736-0322 Washer,Fiat:450"x 1.250"x .164" i62 756-04280 IdlerPulley3.50"
24 736-0270 Washer,Bell i63 756-0616 IdlerPulleyV-Type5.0"
25 736-04256 Washer,Fiat:.39"x .87"x .06" i64 787-01440-0637 IdlerTimingBracket
26 738-04166 Spacer,Shoulder:.50"x .1475" i65 921-04041 WaterNozzleAdapter
27 747-04635A BeltKeeperRod i66 737-04003D WaterNozzle
28 747-04673 LoopLinkCoupling i67 634-04285-0911 Wheel16x 4x 8
29 747-04678A TransMountRod i68 i736-0242 Washer,Bell:.340"x .872"x.060"
30 954-04145A Belt,V Type,DriveBelt i69 710-0627 Screw,HHCap:%6-24x .75"
31 756-04129B IdlerPulley:4.25"Dia. i70 710-1315 Screw,TT:%-16x 1.25"
32 756-04258 FlatSheave7.75" i71 710-0451 Bolt,Carriage:%6-18x.75"
33 756-04260 EnginePulley3.20"x 4.35"Dia. i72 711-04027 DeflectorPin
34 756-04280 IdlerPulley3.50"Dia. i73 787-01017A-0637DeflectorHingeBracket
35 787-01469B-4044Shift Rod,Lower i74 732-04012 DeflectorTorsionSpring
36 787-01470A-0637Shift Rod,Upper i75 726-04009 PushCap
37 787-01473-0637 BeltKeeper i76 -- ChuteDeflector,33" SDDeck
38 787-01523A WheelDriveidlerBracket 977S30145 LabelChuteDeflector(notshown)
39 918-04438B DriveSpindleAssembly
29
Page 30

33=inch Wide Cut Mower m Model No. 247.887330
21 29
20,,_/22 I
71B
o/
27
I
\1
157
47
31A
3/
83
18 49
/
3O
50
30
51
52
64
64
34 /
63 87
63
/ 35
65
29
37
13
29B
31A
56
69
41
57
58
59
48
157
d
40
/
13
/
15
MODELandSERIAL
NUMBERSHERE
30
Page 31

33-inch Wide Cut Mower B Model No. 247.887330
D = O O
TC-772147 TransaxleCover
2 TC-780086A NeedleBearing(1/,,long)
3 TC-770128A TransaxleCase
4 TC-776395 Countershaft
5 TC-776409 OutputShaft
6 T0-778364 SpurGear(38T-PM/SER)
6A T0-778369 SpurGear(15T-PM/SER)
7 T0-778330 SpurGear(11T-PM/SER)
8 TC-792180A ShiftKeySet (Qty.2)
9 TC-784352 ShiftCollar
10 TC-784378 ShiftRod& ForkAssembly
11 TC-778334 BevelGear(30T-PM)
12 TC-778309 InputBevelPinion(13T-PM)
13 TC-778368 BevelGear13T(Incl.ref.13& 14)
14 TC-778368 BevelGear13T(Incl.ref.13& 14)
15 T0-778370 RingGear(43T)
17 TC-786188 DrivePin
18 TC-786102 Spacer(1.130"x .695")
20 TC-792077A Ball(StainlessSteel5/16"dia.)
21 TC-792211 Screw,3/8-16x 3/8"
22 TC-792079 Spring
25 TC-792073A Screw,1/4-20x 1-1/4"
25A TC-792177 Screw,1/4-20x 1-3/8"
26 TC-792125 RetainingRing-packageof 2
27 TC-792035 RetainingRing
28 TC-788040 RetainingRing
29 TC-780072 Washer.627"ID.031"
29A TC-780160 ThrustWasher(.563"IDx .031")
29B TC-780051 ThrustWasher(.762"IDX .031")
30 T0-780108 ShiftWasher(Cupped)
31 TC-780001 Washer.750"ID .56"
31A TC-780195 Washer.750"ID .062
32 TC-788083 OilSeal5/8"
32A TC-792001 ORing(.823"OD)
34 TC-780194 Bushing(.563")
35 TC-780193 FlangedBushing(.625"ID)
35A TC-780197 FlangedBushing(.751"ID)
TC-790075 BrakeDisk
37 TC-790007 BrakePadPlate
38 TC-799021A BrakePad(pkg.of 2)
39 TC-786026 DowelPin.3125"x .750"
40 736-3078 Washer.312"ID.059"
41 TC-790104 BrakeLever
42 TC-792177 Screw1/4-20x 1-3/8"
43 912-0237 LockNut5/16-24
44 TC-790025 BrakePadHolder
46 TC-786086 Bracket
47 T0-775146 Axle(10.719"long)(Incl.26)
48 T0-775147 Axle(15.312"long)(Incl.26)
49 TC-778338 SpurGear(27T-PM/IC)
50 TC-778342 SpurGear(22T-PM/IC)
51 TC-778313 SpurGear(19T-PM/IC)
52 TC-778350 SpurGear(16T-PM/IC)
56 TC-778337 SpurGear(13T-PM/SER)
57 TC-778341 SpurGear(18T-PM/SER)
58 TC-778351 SpurGear(21T-PM/SER)
59 TC-778349 SpurGear(24T-PM/SER)
63 TC-786071 CountershaftSpacer1-1/8"x 3/8"
64 TC-786072 BrakeShaftSpacer1-3/8"x 3/8"
65 TC-780189 Washer.563"ID.062
66 TC-776472 inputShaft
67 TC-776396 BrakeShaft
69 TC-792170 RetainingRing(.75"x .042")
70 TC-786187 Spacer(.890")
71B TC-788092 O-Ring
76 TC-780090 FiatWasher(1.128"IDx .058")
77 TC-788078A RetainingRing(1.125"x .050")
79 TC-792144 Spring
82 TC-778333 Bevel(30T)& SpurGear
83 TC-778338 SpurGear(27T-PM/IC)
85 TC-792154 Oil FillPlug
87 TC-788089A Oil Seal9/16"ID
157 TC-788088A OilSeal3/4" ID
31
Page 32

Briggs & Stratton 10.5 Gross HP Engine IViodel 215802
11
684_ f&%\._
584_/_-_
1264 _
1263 _-../ -,
....... /
|
85O
616
4O4_
2271
614i_
562
358 ENGINEGASKETSET
12
200
51
51A
842<d>
883
1022
524°
307_j
1044
22
24_?
1_ 15÷
32
741_
200
5240
32
Page 33

Briggs & Stratton 10.5 Gross HP Engine Model 215802
33_
635J_Y
1022
1034
238._
,y
36_
9146_'
85O
1022
1095VALVEGASKETSET
51A
1029 87_
1022
868_,
4_
654_
51
54%
1036EMISSIONSLABEL
33
Page 34

Briggs & Stratton 10.5 Gross HP Engine Model 215802
13>
956
987_
51
1411
634_ 217m_}a
633_-*')
W 1091
1276` I _' _-
| F%,
601
4311 1266AdJ...........::::::%
121CARBURETOROVERHAULKiT
51
51A
6341 217_ 1
633,_
_o
987,_9
f\
1266_C=
305d 9
95 _y
187A 601
1397 @
773
1266A_I )
®
34
Page 35

Briggs & Stratton 10.5 Gross HP Engine IViodel 215802
202 _z j_
_ 232_
621
S_ _
520_
216_._ _.
356 _/_ _5"._
359_
373
334_
,t 521 _-%
65 _
58
57
689 _ ':¢_
82_
81
I 1561/.!/ ,>_ >_.,
I _;_ _'i _W_j
/
78A
37A
1044_
23
,,,,1!SI!y>*-
, '_t__',_si,_i_.-_
455,/
78_i_ ...........
r /"
35
Page 36

Briggs & Stratton 10.5 Gross HP Engine Model 215802
BS-697377 CylinderAssembly BS-690227 Stud(Carburetor)
2 BS-399265 Kit-Bushing/Seal(MagnetoSide) 54 BS-691148 Screw(intakeManifold)
3 BS-391086s • Seal-Oil(MagnetoSide) 55 BS-695130 Housing-RewindStarter
4 BS-697106 Sump-Engine 56 BS-695129 Pulley-Starter
5 BS-796183 Head-Cylinder 57 BS-695131 Spring-RewindStarter
7 BS-273280s o+ Gasket-CylinderHead 58 BS-695132 Rope-Starter
9 BS-697109 • Gasket-Breather 60 BS-494212 Grip-StarterRope
10 BS-697157 Screw(BreatherAssembly) 65 BS-690759 Screw(RewindStarter)
11 BS-794683 Tube-Breather 78 BS-691003 Screw(FlywheelGuard)(10/24x.43)
12 BS-697110 ° Gasket-Crankcase 78A BS-690364 Screw(FlywheelGuard)(5/16-18x.37)
13 BS-690360 Screw(CylinderHead) 81 BS-691178 Lock-MufflerScrew
15 BS-690946 Plug-OilDrain 94 BS-793610 Kit-IdleMixture
16 BS-796146 Crankshaft 95 BS-690718 O Screw(ThrottleValve)
20 BS-795387 • SeaI-Oil(PTOSide) 98 BS-695408 Kit-ldleSpeed
22 BS-692125 Screw(CrankcaseCover/Sump) 104 BS-694918 O Pin-FloatHinge
23 BS-695774 Flywheel 105 BS-696136 O Valve-FloatNeedle
24 BS-222698s Key-Flywheel 108 BS-698773 Valve-Choke
25 BS-797009 PistonAssembly(Standard) 117 BS-796079 Jet-Main(Standard)
BS-797010 PistonAssembly(.020"Oversize) 118 BS-796332 Jet-Main(HighAltitude)
26 BS-797011 RingSet (Standard) 121 BS-796184 Kit-CarburetorOverhaul
BS-797012 RingSet(.020"Oversize) 125 BS-794653 Carburetor
27 BS-698469 Lock-PistonPin 127 BS-690727 O Plug-Welch
28 BS-797013 Pin-Piston 130 BS-698774 Valve-Throttle
29 BS-791633 Rod-Connecting 131 BS-698776 Kit-ThrottleShaft
32 BS-791118 Screw(ConnectingRod) 133 BS-694914 Float-Carburetor
33 BS-791934 Valve-Exhaust 135 BS-698780 Tube-FuelTransfer
34 BS-791935 Valve-intake 137 BS-698781 O Gasket-FloatBowl
35 BS-691279 Spring-Valve(intake) 141 BS-698778 Kit-ChokeShaft
36 BS-691279 Spring-Valve(Exhaust) 146 BS-691639 Key-Timing
37 BS-697352 Guard-Flywheel 187 BS-791805 Line-Fuel
37A BS-697626 Guard-Flywheel 187A BS-791744 Line-Fuel
40 BS-690964 Retainer-Valve 188 BS-691693 Screw(ControlBracket)
42 BS-499586 Keeper-Valve 192 BS-691986 Adjuster-RockerArm
43 BS-691968 Slinger-Governor/Oil 202 BS-691841 Link-MechanicalGovernor
45 BS-690564 Tappet-Valve 209 BS-792813 Spring-Governor(Brown)
46 BS-793880 Camshaft 216 BS-691840 Link-Governor
48 BS-697740 ShortBlock 217 BS-695409 O Spring-ChokeReturn
50 BS-796188 Manifold-Intake 222 BS-694042 Bracket-Control
51 BS-692137 o+O Gasket-intake 227 BS-691374 Lever-GovernorControl
51A BS-794312 o+O Gasket-intake 232 BS-691842 Spring-GovernorLink
36
Page 37

Briggs & Stratton 10.5 Gross HP Engine Model 215802
BS-691843 Cap-Valve BS-692138 SeaI-ORing(IntakeManifold)(Red)
240 BS-394358s Filter-Fuel 621 BS-692310 Switch-Stop
265 BS-691024 Clamp-Casing 633 BS-699813 O Seal-Choke/ThrottleShaft
267 BS-794904 Screw(CasingClamp) 634 BS-698779 O Spring/SealAssembly
300 BS-796000 Muffler 635 BS-691909 Boot-SparkPlug
304 BS-796414 BlowerHousing 643 BS-697155 Retainer-AirFilter
305 BS-697102 Screw(BlowerHousing)(Long) 654 BS-690958 Nut(Carburetor)
305A BS-793376 Screw(BlowerHousing)(Short) 689 BS-691855 Spring-Friction
306 BS-697359 Shield-Cylinder 691 BS-692407 • Seal-GovernorShaft
307 BS-691003 Screw(CylinderShield) 718 BS-690959 Pin-Locating
333 BS-795315 Armature-Magneto 741 BS-697128 Gear-Timing
334 BS-691061 Screw(MagnetoArmature) 773 BS-796448 Retainer
337 BS-491055s Plug-Spark 823 BS-698941 Screw(MufflerAdapter)
356 BS-398808 Wire-Stop 830 BS-691095 Stud-RockerArm
358 BS-796181 GasketSet-Engine 842 BS-691031 • SeaI-ORing(DipstickTube)
359 BS-691077 Washer(GroundTerminal) 847 BS-790442 Dipstick/TubeAssembly
373 BS-691612 Nut(GroundTerminal) 850 BS-100106 Sealant-Liquid
404 BS-691691 Washer(GovernorCrank) 851 BS-692424 Terminal-SparkPlug
431 BS-697122 Elbow-Intake 864 BS-796002 Adapter-Muffler
445 BS-698413 Filter-AirCleanerCartridge 868 BS-690968 o+ Seal-Valve
455 BS-695113 Cup-Flywheel 883 BS-692236 o+ Gasket-Exhaust
456 BS-695128 Plate-PawlFriction 914 BS-691108 Screw(RockerCover)
459 BS-281505s PawI-Ratchet 967 BS-697292 Filter-PreCleaner
505 BS-691251 Nut(GovernorControlLever) 968 BS-697420 Cover-AirCleaner
507 BS-691972 Insulator 975 BS-698783 Bowl-Float
520 BS-691084 Terminal-Ground 987 BS-698777 O Seal-ThrottleShaft
521 BS-690581 Shield-Cable 1005 BS-796082 Fan-Flywheel
523 BS-699908 Dipstick 1022 BS-272475s o+ Gasket-RockerCover
524 BS-691032 ° Seal-DipstickTube 1023 BS-797421 Cover-Rocker
525 BS-697184 Tube-Dipstick 1026 BS-794573 Rod-Push(Exhaust)
552 BS-697144 Bushing-GovernorCrank BS-697394 Rod-Push(Intake)
562 BS-691119 Bolt(GovernorControlLever) 1029 BS-691751 Arm-Rocker
584 BS-794682 Cover-BreatherPassage 1034 BS-690822 Guide-PushRod
597 BS-691696 Screw(PawlFrictionPlate) 1036 Label-Emissions(Availablefroma
601 BS-791850 Hose-Clamp(Green) Briggs&StrattonAuthorizedDealer)
608 BS-695058 Starter-Rewind 1044 BS-698139 Screw(Flywheel)
613 BS-691416 Screw(Muffler)(Long) 1091 BS-691333 Cap-Limiter
613A BS-691678 Screw(Muffler)(Short) 1095 BS-796189 GasketSet-Valve
614 BS-691620 Pin-Cotter(GovernorCrank) 1127 BS-695407 Screw(FloatBowl)
616 BS-692012 Crank-Governor 1263 BS-697124 Reed-Breather
37
Page 38

Briggs & Stratton 10.5 Gross HP Engine Model 215802
BS-697104
1266 BS-691917 •O
1266A BS-697123 •O
1267 BS-697419
1397 BS-796449
1329 BS_15802-0015-G1
o
includedin EngineGasketSet,KeyNumber358
Screw(BreatherReed)
Seal-ORing(intakeElbow)(Red)
Seal-ORing(intakeElbow)(Large)
Latch-BlowerHousing
Washer(BlowerHousing)
ReplacementEngine
+ includedinValveGasketSet,KeyNumber1095
0 includedinCarburetorOverhaulKit,KeyNumber121
38
Page 39

Congratulationson makinga smartpurchase.YournewCraftsman@
productisdesignedandmanufacturedforyearsofdependableopera-
tion.Butlikeall products,it mayrequirerepairfromtimetotime.That's
whenhavinga RepairProtectionAgreementcansaveyoumoneyand
aggravation.
Here'swhattheRepairProtectionAgreement*includes:
* Expert service byour 10,000professionalrepairspecialists
o Unlimitedserviceandno chargeforpartsand laboron all
coveredrepairs
o Product replacementupto $1500if yourcoveredproductcan'tbe
fixed
• Discountof 10%from regularpriceofserviceand relatedinstalled
partsnotcoveredby theagreement;also,10%off regularpriceof
preventivemaintenancecheck
• Fasthelp byphone- wecallit RapidResolution- phonesupport
froma Searsrepresentative.Thinkof usasa "talkingowner's
manual."
Onceyoupurchasethe Agreement,a simplephonecall isall thatit
takesfor youto scheduleservice.Youcan callanytimedayor night,or
schedulea serviceappointmentonline.
TheRepairProtectionAgreementis a risk-freepurchase.If youcancel
forany reasonduringtheproductwarrantyperiod,wewillprovideafull
refund.Or,a proratedrefundanytimeafterthe productwarrantyperiod
expires.Purchaseyour RepairProtectionAgreementtoday!
Somelimitationsandexclusionsapply. Forpricesand additional
informationin the U.S.A.call 1-800-827-6655.
*CoverageinCanadavaries on some items.Forfull details call
SearsCanadaat 1-800-361-6665.
SearsInstallation Service
ForSearsprofessionalinstallationof homeappliances,garagedoor
openers,waterheaters,andothermajorhomeitems,in the U.S.A.or
Canadacall1-800-4-MY-HOME®.
39
Page 40

FEDERAL and/or CALIFORNIA EMISSION CONTROL WARRANTY STATEMENT
YOUR WARRANTY RIGHTS AND OBLIGATIONS
MTDConsumerGroupInc,the UnitedStatesEnvironmentalProtectionAgency (EPA),and,forthoseproductscertifiedfor salein the stateofCalifornia,the
CaliforniaAirResourcesBoard(CARB)are pleasedto explaintheemission(evaporativeand/orexhaust)controlsystem(ECS)warrantyonyouroutdoor2006
andlater smalloff-roadspark-ignitedengineandequipment(outdoorequipmentengine)In California,newoutdoorequipmentenginesmustbedesigned,built and
equippedtomeetthe State'sstringentanti-smogstandards(inotherstates, 1997andlatermodelyearequipmentmustbedesigned,built,and equippedto meet
theU.S.EPAsmalloff-road,sparkignitionengineregulations.MTDConsumerGroupIncmustwarrantthe ECSonyour outdoorequipmentengineforthe periodof
timelistedbelowprovidedtherehasbeennoabuse,neglector impropermaintenanceofoutdoorequipmentengine.
YourECSmayincludeparts suchas thecarburetor,fuel-injectionsystem,the ignitionsystem,catalyticconverter,fueltanks,fuel lines,fuelcaps,valves,canisters,
filters,vaporhoses,clamps,connectors,andotherassociatedemission-relatedcomponents.
Wherea warrantableconditionexists,MTDConsumerGroupIncwill repairyouroutdoorequipmentengineat nocost toyouincludingdiagnosis,partsand labor.
MAN UFACTURER'S WARRANTY COVERAGE:
Thisemissioncontrolsystemiswarrantedfortwoyears.If anyemission-relatedpartonyouroutdoorequipmentengineisdefective,the part will berepairedor
replacedby MTDCONSUMERGROUPINC.
OWNER'S WARRANTY RESPONSIBILITIES:
Asthe outdoorequipmentengineowner,youareresponsiblefor performanceof the requiredmaintenancelisted inyourowner'smanual.MTDConsumerGroup
Increcommendsthat you retainallreceiptscoveringmaintenanceonyouroutdoorequipmentengine,butMTDConsumerGroupInc cannotdeny warrantysolely
forthe lackof receipts.
Asthe outdoorequipmentengineowner,youshouldhoweverbe awarethat MTDConsumerGroupInc maydenyyouwarrantycoverageifyouroutdoorequipment
engineor a parthasfailedduetoabuse,neglect,or impropermaintenanceor unapprovedmodifications.
Youare responsibleforpresentingyouroutdoorequipmentengineto MTDConsumerGroupInc'sdistributioncenterorservicecenteras soon asthe problem
exists.Thewarrantyrepairsshouldbecompletedinareasonableamountoftime, nottoexceed30 days.If youhaveaquestionregardingyourwarrantycoverage,
youshouldcontactthe MTDConsumerGroupIncService Departmentat 1-800-800-7310orvia emailat http://support.mtdproducts.com
GENERAL EMISSIONS WARRANTY COVERAGE:
MTDConsumerGroupIncwarrantsto the ultimatepurchaserandeachsubsequentpurchaserthattheoutdoorequipmentengineis: Designed,builtand equipped
soasto conformwithall applicableregulations;andfreefromdefectsin materialsand workmanshipthatcausethe failureof a warrantedparttobe identicalin all
materialrespectstothatpartas describedin MTDConsumerGroup Inc'sapplicationfor certification.
Thewarrantyperiodbeginsonthedate theoutdoorequipmentengineisdeliveredto anultimatepurchaserorfirst placedintoservice.Thewarrantyperiodis two
years.
Subjecttocertainconditionsand exclusionsasstatedbelow,the warrantyonemission-relatedpartsis asfollows:
1. Anywarrantedpartthat isnotscheduledfor replacementasrequiredmaintenancein thewritteninstructionssupplied,iswarrantedforthe warrantyperiod
statedabove.Ifthe partfailsduringtheperiodofwarrantycoverage,thepartwill berepairedor replacedbyMTDConsumerGroupIncaccordingto subsection
(4)below.Anysuch part repairedorreplacedunderwarrantywillbewarrantedforthe remainderof the period.
2. Anywarrantedpartthat isscheduledonlyforregularinspectionin the writteninstructionssuppliediswarrantedforthe warrantyperiodstatedabove.Any such
partrepairedor replacedunderwarrantywill bewarrantedforthe remainingwarrantyperiod.
3. Anywarrantedpartthat isscheduledforreplacementasrequiredmaintenancein thewritten instructionssuppliediswarrantedforthe periodoftimebeforethe
firstscheduledreplacementdateforthatpart.Ifthe partfails beforethefirst scheduledreplacement,the partwill berepairedor replacedbyMTDConsumer
GroupIncaccordingto subsection(4)below.Anysuchpartrepairedor replacedunderwarrantywillbewarrantedforthe remainderof the periodpriorto the
firstscheduledreplacementpointfor the part.
4. Repairor replacementof anywarrantedpart underthe warrantyprovisionshereinmustbeperformedatawarrantystationatno chargetothe owner.
5. Notwithstandingthe provisionsherein,warrantyservicesor repairswill beprovidedatallof ourdistributioncentersthatare franchisedtoservicethe subject
enginesor equipment.
6. Theoutdoorequipmentengineownerwill notbe chargedfordiagnosticlaborthatisdirectlyassociatedwithdiagnosisof adefective,emission-relatedwar-
rantedpart, providedthat suchdiagnosticworkis performedata warrantystation.
7. MTDConsumerGroupIncis liablefor damagesto otherengineor equipmentcomponentsproximatelycausedby a failureunderwarrantyof anywarranted
part.
8. Throughoutthe off-roadengineand equipmentwarrantyperiodstatedabove,MTDConsumerGroupIncwill maintainasupplyofwarrantedpartssufficientto
meetthe expecteddemandfor suchparts.
9. Anyreplacementpartmaybe usedinthe performanceof anywarrantymaintenanceor repairsand mustbeprovidedwithoutchargetothe owner.Suchusewill
notreducethe warrantyobligationsofMTDConsumerGroupInc.
10.Add-onor modifiedpartsthat are notexemptedbythe AirResourcesBoardmaynot be used.The useofany non-exemptedadd-onor modifiedpartsby the
ultimatepurchaserwillbegroundsfor disallowingawarrantyclaims.MTDConsumerGroupIncwill notbe liabletowarrantfailuresofwarrantedpartscaused
bythe useofa non-exemptedadd-onor modifiedpart.
Page 41

WARRANTED PARTS:
Therepairor replacementofanywarrantedpartotherwiseeligibleforwarrantycoveragemaybeexcludedfromsuchwarrantycoverageifMTDConsumerGroup
Incdemonstratesthatthe outdoorequipmentenginehasbeenabused,neglected,orimproperlymaintained,and thatsuchabuse,neglect,or impropermainte-
nancewasthe direct causeof the needfor repairor replacementof the part.Thatnotwithstanding,anyadjustmentof a componentthat hasa factoryinstalled,
andproperlyoperating,adjustmentlimitingdeviceisstill eligiblefor warrantycoverage.Further,the coverageunderthis warrantyextendsonly to partsthat were
presentonthe off-roadengineand equipmentpurchased.
Thefollowingemissionwarrantypartsare covered(ifapplicable):
(1)FuelMeteringSystem
• Coldstart enrichmentsystem(softchoke)
• Carburetorandinternalparts(orfuel injectionsystem)
• Fuelpump
• Fueltank
(2)Air InductionSystem
• Aircleaner
• Intakemanifold
(3) IgnitionSystem
• Sparkplug(s)
• Magnetoignitionsystem
(4) ExhaustSystem
• Catalyticconverter
• SAI(Reedvalve)
(5) MiscellaneousItemsUsedinAboveSystem
• Vacuum,temperature,position,timesensitivevalvesand switches
• Connectorsandassemblies
(6) EvaporativeControl
• Fuelhose
• Fuelhoseclamps
• Tetheredfuel cap
• Carboncanister
• Vapor lines
GDOC-100223
Page 42

Look For Relevant Emissions Durability Period and
Air index information On Your Engine Emissions Label
Engines that are certified to meet the California Air Resources Board (CARB) Tier 2 Emission Standards must
display information regarding the Emissions Durability Period and the Air Index. Sears, Roebuck and Co., U.S.A.
makes this information available to the consumer on our emission labels.
The Emissions Durability Period describes the number of hours of actual running time for which the engine is
certified to be emissions compliant, assuming proper maintenance in accordance with the Operating & Mainte-
nance Instructions. The following categories are used:
Moderate: Engine is certified to be emission compliant for 125 hours of actual engine running time.
Intermediate: Engine is certified to be emission compliant for 250 hours of actual engine running time.
Extended: Engine is certified to be emission compliant for 500 hours of actual engine running time.
For example, a typical walk-behind lawn mower is used 20 to 25 hours per year. Therefore, the Emissions
Durability Period of an engine with an intermediate rating would equate to 10 to 12 years.
The Air Index is a calculated number describing the relative level of emissions for a specific engine family. The
lower the Air Index, the cleaner the engine. This information is displayed in graphical form on the emissions label.
After July 1,2000, Look For Emissions Compliance Period
On Engine Emissions Compliance Label
After July 1, 2000 certain Sears, Roebuck and Co., U.S.A. engines will be certified to meet the United States
Environmental Protection Agency (USEPA) Phase 2 emission standards. For Phase 2 certified engines, the Emis-
sions Compliance Period referred to on the Emissions Compliance label indicates the number of operating hours
for which the engine has been shown to meet Federal emission requirements.
For engines less than 225 cc displacement, Category C = 125 hours, B = 250 hours and A = 500 hours.
For engines of 225 cc or more, Category C = 250 hours, B = 500 hours and A = 1000 hours.
This isa generic representation of the emission label typically found on a certified engine.
FAMILYYBSXS.3192VA 274812
42
GDOC-100182Rev.A
Page 43

43
Page 44
Declaraci6n de garant[a .................................................. 44
Instrucciones sobre seguridad ....................................... 45
Guia para pendientes ...................................................... 47
Montaje ........................................................................... 49
Conozca su cortadora de cesped .................................. 52
Funcionamiento ............................................................... 54
GARANTiA COMPLETA CRAFTSMAN
Encondicionesnormalesdefuncionamientoy mantenimientoconformeaiasinstruccionessuministradas,si
esteproductoCraftsmanfalladebidoa defectosen losmaterialeso en lamanodeobradentrode losdosaSosdelafechadecompra,cornu-
niquesecon 1-800-4-MY-HOME®paraorganizarsu reparaci6nsincargo (oreemplazosi resultaraimposiblerepararla).
Lagaranfias61oser&v&lidadurante90 diasa partirdela fechade cornprasiesteproductose usaen cualquiermomentoparafinescomerciales
o dealquiler.
EstagaranfiacubreONICAMENTElos defectosenlos materialesyen lamanodeobra.SearsNOpagar_,por:
• Eiementosquese desgastanpotel usonormal,incluyendoentreotrosperono limitadoalas cuchillas,buj[as,filtrosdeaire,correas,y
filtrosdeaceite.
• Serviciosde mantenimientoest_.ndar,cambiode aceiteo reajustes.
• CambiodeIlantasoreparacionesocasionadospor pinchadurasconobjetosdel exteriorcomociavos,espinas,toconeso vidrios,etc.
• Reemplazoo reparaci6nde neum_.ticoso ruedascomoresultadodeldesgastenormal,unaccidente,o funcionamientoo mantenimiento
incorrectos.
• Reparacionesrequeridascomoresultadodel abusodel operador,incluyendoperonolimitadoa da_oocasionadopot objetosque impactan
la m_.quinay quetuercenel bastidorocigOe_al,o debidoaqueel motorfueaceleradoenexceso.
• Reparacionesnecesariasdebidoa negligenciadeloperador,incluyendoentreotros,da_osmec_.nicoyei_ctricoocasionadopot unalmace-
namientonoapropiado,noutilizarel aceitede gradoy/o cantidadnoapropiada,nomantenerel _.reade cubiertasinresiduosinflamables,o
potnodar mantenimientoai equipodeacuerdoconlas instruccionescontenidasen elmanualdeipropietario.
• Limpiezaoreparacionesal motor(sistemadecombustible)provocadasporuncombustiblecontaminadouoxidado(viejo).Engeneral,el
combustibledebeutilizarseenunper[odonomayorde 30d[asa partirde su adquisici6n.
• Eideterioroy desgastenormalde losacabadosexteriores,o reemplazode laetiquetadelproducto.
Servicio y Mantenimiento ............................................... 56
Almacenamiento fuera de temporada ............................ 65
Aditamentos y Accesorios .............................................. 65
Solucion de problemas ................................................... 66
NL_merode servicio ............................... Cubierta posterior
Estagaranfiaseaplicasolamentemientrasel productoseencuentredentrodelosEstadosUnidos.
Estagaranfialeotorgaderechoslegalesespecificos,peroustedpodriagozardeotrosderechosenraz6nde sulugarde residencia.
Sears, Roebuckand Co., Hoffman Estates,IL 60179
Caballosde fuerza:10.5
Aceitedel motor: SAE30
Combustible: Gasolinasinplomo
Bujia: Champion®RC12YC
Motor: Briggs& StrattonPowerBuiltTM
NSmerode rnodelo
NSmerode serie
Fechade compra
RegistreelnQmerodemodelo,nQmerodeseriey fechade compra
mAsarriba.
44
Page 45

instruccionesimportantesde seguridadquesedeben
respetarparaevitar ponerenpeligrosu seguridad
Lapresenciadeestesimboloindicaquesetratade
personaly/omaterialy lade otras personas.Leay siga
todaslas instruccionesdeeste manualantesde poner
enfuncionamientoesta m&quina.Si norespetaestas instruccionespodria
provocarlesionespersonales.Cuandoveaestesimbolo,ipresteatenci6na
la advertencia!
Su responsabilidad:Restrinjaelusode estarn_.quinarnotorizada
a laspersonasquelean,cornprendany respetenlasadvertenciase
instruccionesqueaparecenen estemanualyen la rn&quina.
Estam&quinafueconstruidaparaseroperadadeacuerdo conlas reglas
deseguridadcontenidaseneste manual.AIigualqueconcualquiertipo
deequipomotorizado,undescuidooerrorporpartedeloperadorpuede
producirlesionesgraves.Estam&quinaes capazde amputarmanosy pies
y dearrojarobjetoscongranfuerza. Denorespetarlas instruccionesde
seguridadsiguientessepuedenproducirlesionesgraveso la muerte.
Elescapedelmotordeeste producto,algunosde suscomponentesy
algunoscomponentesdelvehiculocontieneno liberansustanciasquimicas
queelestadode Californiaconsideraque puedenproducirc_ncer,defectos
de nacimientouotros problemasreproductivos.
N QOS
Puedenocurriraccidentestr&gicossieloperadornoest_atentoalapresencia
denifios.PorIogeneralalosnifioslesatraenlascortadorasy laactividadde
cortarelcesped.No entiendenlosriesgosnilospeligros.Nuncaasumaquelos
nifiospermanecer&nenelmismolugardondelosvioporQltimavez.
• Mantengaa losnifiosfueradel&readetrabajoybajoestrictavigilanciade
unadultoresponsableadem_sdeloperador.
• Estealertayapaguelapodadorasiunnifioingresaal_rea.
• Antesde moversehaciaarrasy mientrasIoestehaciendo,mirehacia
atr_sycuidequenohayanifios.
• Tengaextremaprecauci6ncuandoseaproximea esquinasciegas,
entradasdepuertas,_rbolesu otrosobjetosquepuedanobstaculizarlela
vistadeunnifioquepudiesecorrerhacialacortadora.
• Mantengaa los nifiosalejadosdelosmotoresenmarchaocalientes.
Puedensufrirquemadurasconunsilenciadorcaliente.
• Nuncapermitaquenifiosmenoresde14afiosoperenestam&quina.Los
nifiosmayoresde14afiosdebenleery entenderlas instruccionesde
operaci6ny reglasde seguridadcontenidasenestemanual,ydebenset
entrenadosy supervisadosporsuspadres.
FUNCIONAiVlIENTO GENERAL
• Leacuidadosamentetodaslasinstruccionescontenidasenestemanual
antesdeintentarmontarlam&quina.Lea,comprendayrespetetodaslas
instruccionesquefiguranenla m&quinayen el o losmanualesantesde
hacerlafuncionar.Antesdeoperaresteequipo,familiaricesetotalmente
conloscontrolesyelusocorrectodelmismo.Guardeestemanualenun
lugarseguroparaconsultasfuturasy peri6dicas,asi comoparasolicitar
repuestos.
• Estam&quinaes unequipodeprecisi6n,nounjuguete.PorIotanto,tenga
muchocuidadoentodo momento.Estaunidadfue disefiadapararealizar
unatarea:cortarelcesped.Nola utiliceparaningL_notrofin.
• Nopermitanuncaquelosnifios menoresde14afiosutilicenesta
m_quina.Losnifiosmayoresde14afiosdebenleeryentenderlas
instruccionesdeoperaci6ncontenidasenestemanual,ydebenset
entrenadosy supervisadosporsuspadres.$61ose debepermitirusar
estam_quinaa individuosresponsablesyfamiliarizadosconsusreglas
deseguridad.
• Reviseminuciosamenteel &teadondese utilizar&el equipo.Retiretodas
laspiedras,palos,Ilantas,huesos,juguetesyotrosobjetosextrafiosque
podrianhacertropezary caero setrecogidosyarrojadosporlaacci6n
delascuchillas.Los objetosarrojadospor lam_quinapuedenproducir
lesionesgraves.Planifiqueel patr6ndecortedelcespedquehade seguir
paraevitarla descargadematerialhacialoscaminos,lasveredas,los
observadores,etc.Eviteadem&sdescargarmaterialcontralasparedes
yobstruccionesquepodrianprovocarqueel materialdescargadorebote
contraeloperador.
• Paraayudaraevitarel contactoconlacuchillao unalesi6npot unobjeto
arrojado,mantengaseenlazonadeloperadordetr_sdelasmanijasy
mantengaa los nifios,observadores,ayudantesy mascotasapartadosal
menos25metrosde lacortadoramientrasest_enoperaci6n.Detengala
m&quinasi alguienentraenlazona.
• Paraprotegerselosojos,utilicesiempregafasolentesdeseguridad
mientrasoperala m&quinao mientraslaajustao repara.Losobjetos
arrojadosquerebotanpuedenproducirlesionesocularesgraves.
• Utilicezapatosdetrabajoresistentes,desuelafuerte,y pantalonesy
camisasajustados.Se recomiendavestircamisay pantal6nparacubrir
brazosy piernasy usarzapatosconpunteradeacero.Nuncaopereesta
m_quinadescalzo,consandalias,zapatosresbalososo livianos(potej.
de Iona).
• Nopongalasmanoso los piescercadelaspiezasrotatoriasnidebajo
de laplataformade corte.Elcontactoconlascuchillaspuedeproducirla
amputaci6ndemanosy pies.
• Unacubiertadedescargafaltanteo dafiadapuedeprovocarel contacto
conla cuchillaolesionespotobjetosarrojados.
• Muchaslesionesocurrencomoresultadodepasarla cortadorasobre
lospiesduranteunacaidaprovocadaal patinarseotropezarse.No
sesostengadelacortadorasi seest_cayendo,sueltela manija
inmediatamente.
• Nuncatire lacortadorahaciaustedmientrascamina.Si deberetroceder
conla podadoraparaevitarunaparedu obst&culo,mireprimeroabajoy
atr_sparaevitartropezarsey luegosigaestospasos:
a.Retrocedade la podadorahastaestirarcompletamentesus brazos.
b.AsegOresequeest&bienequilibradoy bienparado.
c.Tirelentamentehaciaarras,nom_sall_dela mitaddela distanciaentre
ustedylacortadora.
d.RepitaestospasossegL_nseanecesario.
• Noopereestacortadorabajolosefectosdelalcoholo lasdrogas.
• Noengancheel mecanismoautopropulsadoenlasunidadesequipadas
mientrasarrancael motor.
• Lamanijadecontroldela cuchillaesundispositivodeseguridad.
Nuncaintenteevitarsufuncionamiento.De hacerlonofuncionarianlos
dispositivosdeseguridady podrianproducirselesionespersonalespor
el contactoconlascuchillasrotatorias.Lamanijadecontroldelacuchilla
debefuncionarbienenambasdireccionesy regresarautom_ticamentea
laposici6ndesconectadacuandose lasuelta.
• NuncaoperelacortadorasobrecespedhOmedo.Siempreestesegurode
suequilibrio.Sitropiezaycaepuedelesionarsegravemente.Sisiente
quepierdeelequilibrio,suelteinmediatamentela manijadecontroldela
cuchillayla cuchilladejar&derotarentressegundos.
• Corteel cespedsolamenteconluzde diao conunabuenaluzartificial.
Camine,nuncacorra.
• Detengala cuchillacuandocrucesendas,senderoso caminosdegrava.
• Si la m_quinacomenzaraavibrardemaneraanormal,detengael motor
y busqueinmediatamentelacausa.Lavibraci6npotIo generalesuna
advertenciadealgOnproblema.
• Apagueelmotoryesperehastaquelacuchillasedetenga
completamenteantesderetirarel colectordecespedo dedesbloquearel
canal.La cuchillacontinOarotandopot unoscuantossegundosdespues
45
Page 46

queelmotorsehaapagado.Nuncacoloqueningunapartedelcuerpoen
el_readelacuchillahastaqueesteseguroquelacuchillahadejadode
girar.
• Nuncaoperelacortadorasinotienecolocadosyfuncionandoelescudo
posteriorapropiado,lacubiertadedescarga,elcolectordecesped,
lamanijadecontroldelacuchillayotrosdispositivosdeseguridady
protecci6n.Nuncaoperelacortadorasilosdispositivosdeseguridad
est_nda_ados.SinoIohace,puedenproducirselesionespersonales.
• Elsilenciadoryelmotorsecalientanypuedencausarquemaduras.No
lostoque.
• Utilicesolamentepiezasyaccesoriosoriginalesdef_brica.SinoIohace,
puedenproducirselesionespersonales.
• Sisepresentansituacionesquenoest_nprevistasenestemanual,sea
cuidadosoyuseelsentidocomQn.Contacteconsucentrodeservicio
Searsparaobtenerayuda.
FUNCIONAIVlIENTO EN PENDIENTES
Laspendientesson unfactorimportanteenlosaccidentesocasionadospor
derrapesy caidasy puedenproducirlesionesgraves.Laoperaci6nen pendientes
requieremuchaprecauci6n.Si nose sienteseguroen unapendiente,norealice
elcorte.Parasuseguridad,useelindicadordependientesquese incluyecomo
partede estemanualparamedirlapendienteantesdeoperarla unidaden una
zonainclinada.Si lapendientesuperalos 15grados,norealiceelcorte.
HagaIosiguiente:
• Corteelcespeddela pendienteensentidotransversal,nuncahaciaarriba
yabajo.Tengasumocuidadoalcambiarde direcci6nenunapendiente.
• Esteatentoalosagujeros,surcos,rocas,objetosocultosobultosque
puedanprovocarqueseresbaleose tropiece.Elcespedaltopuede
ocultarobst&culos.
• Siempreestesegurodequeest&bienafirmado.Sitropiezaycae
puedelesionarsegravemente.Sisientequepierdeelequilibrio,suelte
inmediatamentela manijadecontroldela cuchillaylacuchilladejar_de
rotaren3segundos.
NohagaIosiguiente:
• Nocorteelcespedcercadehundimientos,zanjaso terraplenes,podria
perderelequilibrio.
• Nocorteelcespedenpendientesmayoresde 15gradoscomose muestra
enel indicadorde pendiente.
• NocorteelcespedhQmedo.Si noest_firmementeparado,puede
resbalarse.
SERVIClO
Manejo seguro de la gasolina:
• Paraevitarlesionespersonaleso da_osmaterialesseasumamente
cuidadosoal manipularlagasolina.Lagasolinaessumamenteinflamable
ysusvaporespuedencausarexplosiones.Si sederramagasolinaencima
osobrelaropasepuedelesionargravementeyaquese puedeincendiar.
• Laveselapiely c_mbiesederopadeinmediato.
• Utilices61olosrecipientesparagasolinaautorizados.
• NuncaIlenelosrecipientesenel interiordeunvehiculoo cami6nocaja
deremolqueconrecubrimientospl&sticos.Antesde Ilenarlos,coloque
siemprelosrecipientesenel sueloylejosdelvehiculo.
• Retireelequipoagasolinadel cami6no remolquey Ileneloen elsuelo.Si
estonoesposible,Ileneelequipoen unremolqueconcontenedorport_til,
envezdedesdeunaboquilladispensadorade gasolina.
• Mantengalaboquilla encontactoconelhordedeldep6sitode
combustibleo conlaaberturadel recipienteentodo momento,hasta
terminarde cargar.Noutiliceundispositivoparaabrir/cerrarlaboquilla.
• Apaguetodosloscigarrillos,cigarros,pipasyotrasfuentesde
combusti6n.
• Nuncacarguecombustibleenla m&quinaen interioresporquelosvapores
inflamablespodrianacumularseenel _rea.
• Nuncasaquelatapadelagasolinaniagreguecombustiblemientrasel
motorest&calienteo enmarcha. Permitaqueel motorseenfriepot Io
menosdosminutosantesdevolveracargarcombustible.
• NuncaIleneenexcesoeldep6sitodecombustible.Lleneeltanqueano
m&sdeY2pulgadapordebajodela basedelcuellodeltap6ndecarga,
parapermitirla expansi6ndelcombustible.
• Vuelvaacolocarlatapa delagasolinayajL]stelabien.
• Limpielagasolinaquese puedahaberderramadosobreel motoroel
equipo.Trasladela m_quinaaotrazona.Espere5minutosantesde
encenderelmotor.
• Nuncaalmacenela m_quinaoel recipientedecombustibleenun
espaciocerradodondehayafuego,chispasoaparatosconpilotocomo
porejemplo,calentadoresdeagua,calefactores,hornos,secadoresde
ropauotrosaparatosa gas.
• Parareducirelriesgode incendiomantengalam_quinalimpia
de pasto,hojasydeacumulaci6ndeotros escombros.Limpie
losderramesde aceiteo combustibley saquetodoslosresiduos
embebidosdecombustible.
• Permitaque lam_quinaseenfriepot Iomenos5 minutosantesde
almacenarla.
Servicio general:
• Nuncaenciendael motorenespacioscerradosoenunazonaconpoca
ventilaci6n.Elescapedel motorcontienemon6xidode carbono,ungas
inodoroyletal.
• Antesdelimpiar,repararo inspeccionarla m&quina,compruebe
quelacuchillaytodaslas partesquese muevense hallandetenido.
Desconecteel cablede labujiayp6ngalohaciendomasacontrael
motorparaevitarquese enciendaaccidentalmente.
• Reviselospernosdemontajede lacuchillaydel motoraintervalos
frecuentesparaverificarqueestenbienapretados.Inspeccione
adem&svisualmentela cuchillaen buscadedaSos(abolladuras,
desgaste,roturas,etc).Reemplacela cuchillaQnicamenteconequipo
originaldelfabricante(OEM)listadoenestemanual,iEIusodepiezas
quenocumplenconlasespecificacionesdel equipooriginalpodria
tenetcomoresultadounrendimientoincorrectoy adem_sponeren
riesgola seguridadk
• Lascuchillasdelascortadorassonmuyafiladasy podriancortarlo.
Envuelvala cuchillaoutiliceguantesyextremelasprecauciones
cuandoefectQemantenimiento.
• Mantengatodoslospernos,tuercasy tornillosbienajustadospara
asegurarsedequela m_quinaseencuentraencondicionessegurasde
operaci6n.
• Nuncaintentealterarlosdispositivosdeseguridad.Controle
peri6dicamentequefuncionencorrectamente.
• DespuesdegolpearalgQnobjetoextraSo,detengaelmotor,
desconecteelcabledelabujiay col6quelohaciendomasacontrael
motor.Inspeccioneminuciosamentela m_quinaparadeterminarsiest_
daSada.RepareeldaSoantesdeencenderlayoperarla.
• Nuncaintenteajustarunaruedao laalturade cortemientraselmotor
est&enmarcha.
• Loscomponentesdelcolectorde cesped,la cubiertadedescargayel
escudoposterior,est&nsujetosadesgastey daSosquepodriandejar
expuestaslaspiezasm6vilesopermitirquesearrojenobjetos.Para
protegersu seguridad,verifiquefrecuentementetodosloscomponentes
y reempl_celosinmediatamentes61oconpiezasdelosfabricantes
delequipooriginal,listadosenestemanual,iEIusodepiezasque
nocumplenconlasespecificacionesdelequipooriginalpodriatener
comoresultadounrendimientoincorrectoyadem_sponerenriesgola
seguridadk
• Nocambielaconfiguraci6ndelreguladordel motorniexcedala
velocidaddel mismo.Elreguladorcontrolalavelocidadm_ximasegura
defuncionamientodelmotor.
• Mantengao reemplacelasetiquetasdeseguridad,segQnsea
necesario.
• Respetelasleyesy normasaplicablesparadisponeradecuadamente
de losdesechos.Ladisposici6ninapropiadadeliquidoso materiales
puededaSarel medioambiente.
46
Page 47

Useestap_.ginacomoguia paradeterminarlas inclinacionesde laspendientesen lasquepodrianotenerunaoperaci6nsegura.Nooperela
podadoraen dichaspendientes.
Lapresenciade estesimboloindicaquesetratadeinstruccionesimportantesdeseguridadquesedebenrespetarparaevitar
poneren peligrosuseguridadpersonaly/omaterialy la deotraspersonas.Leay sigatodaslasinstruccionesde estemanual
antesde ponerenfuncionamientoestam_.quina.Si norespetaestasinstruccionespuedeprovocarlesionespersonales.Cuando
veaestesimbolo,iTENGAEN CUENTALAADVERTENCIA!
47
Page 48

ADVERTENCIA
Estesfmboloindicainstruccionesde seguridadimportantesquede
noseguirse,sepodriaponerenpeligrolaseguridadpersonaly/o
la propiedadsuyay deterceros.Leay sigatodaslasinstrucciones
enestemanualantesdeiniciarla operaci6ndeestam_.quina.En
casodeno seguirestasinstruccionespodriaprovocarlesiones
personales.Cuandoveaeste simbolo
SIGALAADVERTENCIA
Su responsabilidad:S61opermitaqueusenestam_.quinael_ctrica
laspersonasquelean,comprendany respetenlasadvertenciasy
lasinstruccionesqueaparecenen estemanualyen la m_.quina.
48
Page 49

Estapgtginasemarch6intencionadamenteenblanco.
49
Page 50

IMPORTANTE:Estaunidadse enviasinaceiteenel motor.Despu_s
delrnontaje,consultela p&gina49paralosdetallesdelcombustibley
elaceite.
IMPORTANTE:Las referenciasa losladosderechooizquierdode
lacortadorade c_spedse hacenobservandola rn_.quinadesdela
posici6ndeoperaci6n.
La plataformadela cortadoradecesped puedearrojarobjetos.Encaso
deoperarla cortadorade cespedsincolocarel canaldedescargaen la
posici6nadecuadaparaelfuncionamiento,podrianproducirsegraves
lesionespersonalesy/o daSosmateriales.
Desconecteel cablede la bujiay p6ngalohaciendomasacontrael motor
paraevitarquese enciendaaccidentalmente.
PIEZAS SUELTAS DENTRO DE LA CAJA
ManualdelOperador
Manguerade drenajedeaceite
Acopladorde Manguerade Agua
HERRAIVIIENTAS NECESARIAS PARA EL
MONTAJE
Unjuegode Ilavesajustablesy unrnan6rnetroparaneurnAticos
RETIRO DE LA UNIDAD DE LA CAJA DE
MONTAJE
1. Cortelastiras,silashay,queaseguranlaunidadalp_.let.Deje
la unidadsobreelp_.letduranteelrnontaje(pararetirarlaunidad
delp_.letsin riesgos,esperehastahaberrnontadolarnanija.
2. Retiretodoel ernbalajeprotectorylastiraspl_sticasde uni&
RETIRO DEL SOPORTE DEL CANAL
1. Ubiqueelsoportedelcanalquesostieneelcanaldedescargaen
posici6nvertical,Figura1.
f
Figura1
2. Tire elcanal paraatr_.shaciael motor.Mientrassostieneel canal
conunarnano,retireel soportedelcanalconla otrarnano.
3. Bajeconcuidadoelcanalcontrala plataforrnay descarteel
soporte.
MONTAJE DE LA MANIJA
1. Retirelasperillasenestrellainferioresy lostornillosdel carrode
la rnanijainferior,Figura2.
Esnecesarioquitary desecharel soporte delcanalantesdeoperarla
cortadoradecesped.
Figura2
50
Page 51

2. Girela manijasuperiora la operaci6noperativa,Figura3.Tenga
cuidadodenodoblarnitorcerloscablesalgirarla manija.
3. Coloquelapalancadecambiosuperiorenposici6nvertical
alineandolosorificiosdela palancaconlosde laplacade
cambio,Figura5.
/
/
/
J
Figura3
3. Instalelostornillosdelcarroy las perillasextraidosanteriormente.
4. Ajustelasperillasenestrellasuperiorese inferioresy lostornillos
delcarroparaasegurarlamanijasuperiorala inferior,Figura3.
INSTALACION DE LA PALANCA DE CAMBIO
DE VELOCIDADES
Extraigaeltornillode 5/6-18"y latuercade seguridadquesujetan
la palancadecambioa la placade lapalancadecambio,
Figura4.
Figura5
4. Asegurelapalancaala placausandolosdostornillosylasdos
tuercasextraidasanteriormente,Figura5.
AJUSTES FINALES
Presi6n de los neumaticos traseros
Nuncaexcedala presi6nm_ximade infladoquese indicaenlos lateralesde
los neum_ticos.
Lapresi6noperativarecomendadaparalosneum_.ticostraseroses
de aproximadamente20p.s.i.Verifiquelapresi6nde los neum_.ticos
regularmentey mantengasiemprela mismapresi6nenambos
neum_.ticostraseros.
IMPORTANTE:Consulteloslateralesde lasruedasparaconocercon
exactitudlapresi6nm_.ximaen psirecomendadaporel fabricante.No
inflelos neum_.ticosenexceso.La presi6ndeneum_.ticosdesigual
podriahacerquela plataformacorteelcespeden formadespareja.
Figura4
,
Extraigaeltornilloy latuercarestantesdela placade lapalanca
decambioinferior,Figura4.
51
Page 52

Palancadealtura
dela plataforma
Tap6nde combustible
Figura6
Palancadecontroldel
regulador/Cebador
Controlde latransmisi6n
Palancadecambiodevelocidades
Controlde
lascuchillas
Familiaricesecontodoslos controlesy sucorrectofuncionamiento.Sepa
c6modetenerla m4quinayc6modesconectarloscontroles.
AIoperarunacortadorade cespedes posibleque objetosextra_ossean
arrojadosalos ojos,Iocualpuededa_arlosgravemente.Utilicesiempre
I galasdeseguridaddurantela operaci6ndela cortadoradecesped o
mientraslaajustao larepara.
PALANCA DE CONTROL DEL REGULADOR /
CEBADOR
IMPORTANTE:Cuandooperela cortadorade
cespedconla plataformade cortecolocada,
asegQresedequela palancadecontroldel regula-
dor/cebadorest6siempreenla posici6nr&pido.
Estapalancaseusapararegularla velocidaddel mo-
tor,paraaplicarel cebadordelmotor,y paradetener
el motor.Hagafuncionarel motorsiempreaalta
velocidadparaobtenermejoresresultadosdecorte.
CEBADOR:Utiliceloparaarrancarunmotorfrio
R._PIDO:Utiliceloduranteelfuncionamientode la
cortadora.
LENTO:Utilicelodurantelamarchalenta.
PARAR:Detieneelmotor.
AsegQresequeningunapersonaapartedeloperadorpermanezcacercade
la podadoramientrasarrancaelmotoru opera la misma.Nuncaencienda
un motoren espacioscerradosoen una zonaconpocaventilaci6n.El
escapedel motorcontienemon6xidodecarbono,ungas inodoroy letal.
Mantengalasmanos,lospies,el cabelloy la ropasueltaalejadosdelas
)artesm6vilesdel motoryde la podadora.
TAPON DE COMBUSTIBLE
Retireel tap6nde combustibleparaagregarcombustibleal tanquede
combustible.
Usegasolinalimpia,fresca,regular,sinplomoconunoctanajeminimo
de 85.
Apagueel motory dejeloenfriaral menosdos minutosantesdequitarel
tap6ndeIlenadodecombustible.
PALANCA DE ALTURA DE LA
PLATAFORMA
Useestapalancaparaajustarlaalturadecorte.Para
utilizarla,muevalapalancahaciala izquierda,luego
col6quelaenla muescaque mejorseadaptea la
aplicaci6ndeseada.
52
Page 53

CONTROL DE LAS CUCHILLAS
Seusaelcontrolde las cuchillaspara
engancharla plataforrnade lacortadora.
Paraengancharestecontrol,presioney
retengalapalancacontralaernpu_adura
dela barrade control.Paradetener
lascuchillas,suelteelcontrolde las
cuchillas.Desenganchesiernpreel
controlde lascuchillasantesdearrancar
el motor.Asi seaseguradequelas
cuchillasnocornenzar_.na girarcuando
arrancaelmotor.
CONTROL DE LA TRANSMISION
Elcontrolde la transrnisi6nseusapara
engranarydesengranarla transrnisi6n
delas ruedas.Paraenganchareste
control,aprieteelcontroldela trans-
rnisi6ncontralaernpu_aduradela barra
decontrol.Paradetenerlatransrnisi6n,
suelteel controlde latransrnisi6n.
IMPORTANTE:Sueltesiernpreel
controlde latransrnisi6nantesde
carnbiarlasvelocidades.
PALANCA DE CAMBIO DE VELOCIDADES
Useestapalancaparaseleccionarunadecuatrovelocidadesde
rnarchadirecta,neutralornarchaatr_.s.
IVlarcha directa
Haycuatrovelocidadesde rnarchadirecta.Laposici6nuno(1)es la
rn_.slenta,y la posici6ncuatro(4)es larn_.sr_.pida.
Marcha arras
Paraseleccionarrnarchaatr_.s,pongala palancaenla posici6nde
reversa(R).
Neutral
Coloquelapalancaenneutro(N)antesde cornenzarel cortac_sped,
y cuandoelcortacespednoest,.enel uso.Adern_.s,elcortac_sped
puedesera rnanoernpujadoo tiradocolocandolapalancadepalanca
de carnbiosenel Nposici6n(neutra)ypresionandoelcontrolde
paseocontraelapret6nde rnanillar.
CONTROLES DEL MOTOR
ConsultelaFigura7 paraverla ubicaci6ndeloscontrolesdelmotor.
Arrancador de retroceso
Elarrancadorde retrocesoseusa paraponerenfuncionarnientoel
motor.
Valvula de drenaje de aceite
Uselav_.lvulade drenajede aceiteparadrenarel aceitedel motor.
Consultelasecci6nde Mantenirnientoparaobtenerinstrucciones.
IVlanija del filtro de aire
La rnanijadeldepuradorde airese usaparaaccederal depurador
deaire.Elcartuchopurificadorde airese puedeextraerparalirnpiar
o reernplazar.Consultelasecci6ndeMantenirnientoparaobtener
detalles.
Si se instalaincorrectamenteel cartuchoo la cubierta,se puedenproducir
lesionesgraveso la muertede lasexplosionesdelcarburador.No intente
arrancarel motorcuandonoest_npuestos.
Bujia de encendido/Cable de la bujia
Consultelasecci6nde Mantenirnientoparaobtenerinstrucciones
sobreel reernplazode bujias.
Tap6n de aceite/varilla de medici6n del nivel de
aceite
Consultelasecci6nde Mantenirnientoparaobtenerinstrucciones
sobrec6rnoverificarelaceite.
Paraevitarda_arla transmisi6n,nocambiedevelocidadcuando la
cortadoraest_en movimiento.Sueltela manijadecontrolde latransmisi6n
antesde cambiarde velocidad.
Miredetr_sdelacortadoraantesy duranteelfuncionamientomarchaarras.
Detengalascuchillasdelacortadoraantesdeoperarmarchaarras.
f
de
retroceso
i.._ Manijadel
Tap6nde filtrodeaire
aceite/varillade
rnedici6ndelnivel
deaceite
Cabledela
V_.lvulade
drenajede
aceite
Silenciadory Bujiade
protectordel encendido
silenciador
bujia
Figura7
53
Page 54

AIoperarunacortadoradecespedes posiblequeobjetosextra_os
seanarrojadosa losojos,Iocual puededa_arlosgravernente.Utilice
siempregalasdeseguridaddurantela operaci6ndela cortadorade
cespedo mientraslaajustao larepara.
Tengasumocuidadoal manipularlagasolina.Lagasolinaes
sumamenteinfiamabley susvaporespuedencausarexplosiones.
Nuncacarguecombustibleen lam_.quinaen unespaciocerrado
ocuandoel motorest,.calienteoen marcha.Apaguecigarrillos,
cigarros,pipasyotrasfuentesdecombusti6n.
AsegQresequeningunapersonaapartedeloperadorpermanezcacercade
la podadoramientrasarrancaelmotoruoperala misma.Nuncaenciendaun
motorenespacioscerradosoenunazonaconpocaventilaci6n.Elescape
delmotorcontienemon6xidodecarbono,ungasinodoroyletal.Mantengalas
manos,ospes,e cabeoy avestmentasueta aeadosde aspezasm6ves.
LLENADO DE GASOLINA Y ACEITE
Llenado de gasolina
Loscombustiblesconmezcladealcohol(quese Ilamangasohol,
oque utilizanetanolo metanol)puedenatraerhumedad,Ioque
conducea la separaci6nyformaci6nde_.cidosduranteelalmace-
namiento.Elgas addico puededa_arel sistemadecombustibledel
motormientraslam_.q_uinaest,.almacenada.
Paraevitarproblemasconel motor,sedebevaciarel sistemade
combustibleantesde almacenarla m_.quinadurante30dfaso m_.s.
Vade el tanquedenafta,enciendaelmotory d_jelofuncionarhasta
que laslineasdecombustibley el carburadorest_nvados. La
siguientetemporadausecombustiblefresco.ConsultelasInstruc-
clonesdeALMACENAMIENTOsideseainformaci6nadicional.
Nousenuncaproductosde limpiezaparamotoresocarburadores
en el dep6sitode combustible,se puedenocasionarda_osperma-
nentes.
IMPORTANTE:Lacortadoradec_spedseentregasincombustibleen
eltanque.
• NuncaIleneeltanquede combustiblecompletamente.Lleneel
tanqueano m_.sde 1/2pulgadapordebajode la basedelcuello
de Ilenadodejandoespacioparaladilataci6ndelcombustible.
• Siempreusegasolinaparaautomotoressinplorno,limpiay
nueva.Lleneel tanquedecombustiblealairelibrey useunem-
budoo picoparaevitarderrarnar.AsegQresedequeel recipiente
desdeelcual viertelagasolinaest_limpioy noest_oxidadoni
contaminadoconotrasparficulasextraSas.Aseg[3resede limpiar
elcombustiblequese hayaderramadoantesdearrancarel
motor.
• AI finalizareltrabajo,vacieeltanquedecombustiblesila
cortadoradec_spednoser_.usadadurantelossiguientes30
diaso m_.s.AImacenela gasolinaenun recipientelimpioy
mantengael recipientebientapado.Consultelasinstruccionesde
ALMACENAMIENTOsi desea informaci6nadicional.
Llenado de aceite
IMPORTANTE:Lacortadoradec_spedse entregaconaceiteenel
motor,noobstante,ustedDEBEverificarelnivelde aceiteantesde
operarla.Elaceitedebecambiarsedespu_sde lasprimerasdoshoras
de operaci6ny cada25 horasdeoperaci6ndeahi enm_.s.Utiliceel
tipode aceitede motorespecificadoen lasecci6nMantenimiento.
1. Retireeltap6nde Ilenadodeaceite/la varilladeniveldeaceite
del tubode Ilenado.
.
Controlequeel niveldeaceiteIleguehastalamarcaFULL(lleno)
de lavarilladel niveldelaceite.Siesnecesario,viertaaceite
lentamenteen el tubode Ilenadohastaqueel niveldeaceite
alcancea lien&
3. Vuelvaacolocarel tap6nde Ilenadodeaceite/ varilladelnivel
del aceite.
ENCENDIDO DE LA CORTADORA DE ClaSPED
1. Sueltetodosloscontrolesde lacortadoraparaimpedirquelas
ruedasolas cuchillasroten.
.
Muevalapalancade cambiodevelocidada la posici6nneutral(N).
3.
Muevala palancedecontroldelregulador/cebadortotalmente
haciaarribaa la2osici6nI'_,1cebadorparaarrancarunmotorfrio
o a la posici6n_ r_.pidoparaarrancarunmotorcaliente.
.
Paraarrancarelmotorusandoel arrancadorde retroceso:
a. P_.resedelladoizquierdo(rnirandodesdeatr_.sdelasbarras
decontrol)de lam_.quina.Aseg[3resedetenerlospiesbien
lejosdela partedeabajode laplataformadelacortadorayque
todosloscontrolesdelacortadoraest_.ndesenganchados.
b. Tomeconfirmezalamanijadesogadelarrancadorytire
lentamentehastaquela sogaquedeunpocom_.stirante.
Dejequela sogaseenrollelentamente.Luegotire dela
sogaconun golper_.pidoycontinuodetodoelbrazo.
Dejequela sogaseenrollelentamente.Siel motornoha
arrancadodespu_sde tresintentos,repitalasinstrucciones
(intenteponerel reguladoren la posici6nr_.pido).
c. Cuandoelmotorarranque,h_.galofuncionarenlaposici6n
de reguladorr_.pida_ (muevalapalancadecontroldel
regulador/cebadordelaposici6ncebadora laposici6nrapido).
Miredetr_sdela cortadoraantesy duranteelfuncionamientomarchaarras.
Detengalascuchillasde la cortadoraantesdeoperarmarchaarras.
Si golpeaunobjeto extra,o, detengael motor.Retireelcablede la bujia,
inspeccionedetenidamentela cortadoraparaverque notengada_os,y
repareelda_oantesdevolveraencenderyoperar.Elexcesodevibraci6n
de la cortadoradurantelaoperaci6nesuna indicaci6nde daSo.Sedebe
inspeccionary repararla unidadIoantesposible.
54
Page 55

ABONO O CORTE CON DESCARGA LATERAL
Miredetr_sde la cortadoraantesy duranteel funcionamientomarchaarras.
Detengalascuchillasde lacortadoraantesde operarmarchaarras.
USO DE LA CORTADORA DE CESPED
IMPORTANTE:Sueltesiernpreel controlde latransrnisi6nantesde
carnbiarlasvelocidad.Consultela secci6n"Conozcasucortadorade
cesped"paravetloscontrolesdelacortadora.
AsegOresede queel c_spedestalibrede piedras,palos,cablesu
otrosobjetosquepudiesendaSarlacortadorao el motor.Dichos
objetospuedenserarrojadosaccidentalrnentepot la cortadoraen
cualquierdirecci6ny provocarlesionespersonalesgravesal operador
ya otraspersonas.Paraobtenerrnejoresresultados,no cortec_sped
rnojadoy nuncacortern_sde unterciodela Iongitudtotaldelc_sped.
1. Unavezqueel motorest_funcionando,aprieteel controlde
transrnisi6ncontrala rnanijasuperiorparairnpulsarlarn_.quina.
Paraactivarlas cuchillasdecorte,aprieteel controldelas
cuchillascontralarnanijasuperior.
2. Paracarnbiardevelocidad,liberelapalancadecontroldela
transrnisi6nyrnuevalapalancadecarnbiodevelocidada laposici6n
deseada.Parapracticarconlacortadorainicialrnente,pongala
palancaen laposici6nNO1.Seleccionelasvelocidadesdirectas
segOnlascondicionesdelterrenoydelcorte.Usevelocidades
rn_.sbajasenterrenosagrestesodondeelpastoesrn_.spesado
ogrueso.Lavelocidaddirectase puedeaurnentarsobreterrenos
lisoso dondeelpastonoestarnuytupido.Perrnitaquelasruedasse
detengancornpletarnenteantesdecarnbiardeunavelocidada otra.
IMPORTANTE:Tengapresentequeal engancharla palancade
controlde latransrnisi6nconlapalancadecarnbioen3rao4ta
velocidad,la potenciay el parmotorgeneradospuedenhacerquela
unidadsesacudahaciaadelante.Paraevitarlo,aprietelentarnentela
palancadecontroldela transrnisi6ncontrala rnanijasuperior.
3. Paradetenerlascuchillas,suelteel controlde lascuchillas.Para
detenerelcontroldela transrnisi6na las ruedas,suelteelcontrol
dela transrnisi6n.
Sepuedeusarlacortadoradec_spedtantocornocortadoraabonadora
o cornocortadoracon descargalateral.Parausarlafunci6ndeabono,
insertelaclavijadeabonocornoseindicaacontinuaci6n.Retirela
clavijadeabonoparadescargarlateralrnentelosrecortesdecesped.
Laclavijade abonoest,.diseSadapararnantenerel canalde descarga
levantadoduranteelcorte.Cuandoseretiralaclavija,elcanalde
descargasebajasoloparacortarcon descargalateral.
Antesdeinstalaro desinstalarla clavijadeabono,detengael motor,espera
a quelas piezasdejende moversey desconecteel cablede labujia.
Parainstalaro desinstalarla clavijadeabono:
1. Detengaelmotory esperaquetodaslaspiezasdejende
rnoverse.
.
Desconecteel cablede la bujia.
3.
Parainstalarlaclavijadeabono,insertela leng(Jetaderecha(A)
de laclavijaenel soportede laplataforrna,Figura8.
.
Insertelacubiertaenla aberturadedescarga(B), Figura8.
5.
Unavezquelaclavijade abonoest,.colocadaen laaberturade la
plataforrna,ernpQjelahacialaparteposteriorde lacortadora(C)
paraquelaclavijacalcecorrectarnenteenla abertura,Figura8.
Pararetirarlaclavija,deslicela cubiertahaciala derecha(frente
de lacortadora)paradesengancharla ranurade la plataforrnade
lacortadoray luegofuerceel ladoizquierdode lacubiertahacia
afueraparasoltada.
DETENCION DE LA CORTADORA DE
CESPED
1. Suelteelcontrolde lascuchillasyla transrnisi6nparadetenerlas
ruedasy lascuchillasdeplataforrna.
2. Muevalapalancadecontroldel regulador/cebadorhaciaabajo
a laposici6nlenta (tortuga)_. Siernprequeseaposible,
reduzcagradualrnentela velocidaddel motorantesde detenerlo.
.
Muevalapalancadecontroldel regulador/cebadortotalrnente
haciaabajoa la posici6nStop (detenci6n).
.
Desconecteel cabledela bujiay p6ngalohaciendornasacontra
el motor.
TRASLADO DE LA CORTADORA DE CESPED
CON EL MOTOR APAGADO
Sepuedeernpujaro tirardelacortadorarnanualrnentecolocandola
palancadecarnbiodevelocidadenlaposici6nN(neutral)y presionando
elcontrolde latransrnisi6ncontralaernpuSaduradelabarradecontrol.
J
Figura8
Mantengalasrnanosy piesalejadosde laaberturadedescargade
laplataforrnade corte.
55
Page 56

Detengasiempreel motor,desconectelabujiay haga masacontrael motor
antesde realizarcualquiertareade mantenimientoen la cortadora.
RECOMENDACIONES GENERALES
• Respetesiernprelasreglasdeseguridadcuandorealice
cualquiertareadernantenirnientoenlacortadora.
• Lagaranfiadeestacortadoranocubreelernentosque ban
estadosujetosalrnalusoo la negligenciadeloperador.Para
recibirel reernbolsototalde lagaranfia,el operadordeber&dar
rnantenirnientoa la podadoracornoseindicaenestemanual.
• Elcarnbiodela velocidadcontroladadelmotorinvalidar&la
garanfiadelmotor.
• TodoslosajustesdebenserverificadosporIo rnenosunavezen
cadaestaci6n.
Reviseperi6dicarnentetodoslossujetadoresy cornpruebeque
est_nbienajustados.
MANTENIMIENTO DEL MOTOR
Control de la bujia de encendido
Lirnpielabujiayajustela separaci6ndelelectrodoa 0.030"al rnenos
unavezporestaci6n,reernplacecada 100horasde funcionarniento.
1. Lirnpieel_reaalrededorde la basedela bujia.Nolijela bujia.Se
debelirnpiarlas bujiasrnedianteraspadoo talladoconcepillode
alarnbreylavadoconun solventecornercial.
2. Saquee inspeccionela bujfa.Verifiquelaseparaci6npara
asegurarsede queest,.fijadaen0.030".Veala Figura9.
3. Carnbielabujiasi loselectrodosest_.npicados,quernadoso la
porcelanaest,. rota.
f Electrodo Porcelana
IVlantenirniento del filtro de aire.
Si seinstalanincorrectarnentelosfiltroso lascubiertas,se pueden
producirlesionesgravesola rnuertede las explosionesdel
carburador.Nointentearrancarelmotorcuandonoest_.npuestos.
Nouseairepresurizadonisolventesparalirnpiarelcartuchodelfiltro
deaire.
Lirnpieo reernplaceelfiltrode airecada25 horasde funcionarniento.
1. Tirela rnanijadelfiltrode aireparaarriba,Figura10,y tirepara
atr_.shaciael motor.
2. Retirelacubiertadelfiltrode aire,Figura10.
3. Extraigacon cuidadoelcartuchodelfiltrodeairey el pre-filtro(si
est,.instalado)delalojarnientodel soplador.
4. Lirnpiela basedelcartuchodelfiltrodeaireconcuidadopara
evitarquelasirnpurezaspenetrenenel motor.
5. Coloqueelpre-filtro,siest_instalado,yelcartuchonuevarnente
en elalojarnientodelsoplador.Elcartuchosedebecolocar
firrnernenteensuposici6n.
6. Alinelas leng_Jetasde lacubiertaconlas ranurasdelalojarniento
del sopladoryvuelvaa colocarla cubierta.
Cubiertadelfiltrodeaire ""-_-- Cartuchodelfiltrode aire
\
Manijadelfiltrodeaire
_ Separaci6n de 0.030 pulg (0.76 rnrn)
Figura 9
J
Figura10
56
Page 57

Cambio de aceite del motor
Elaceitedel motorse debecambiarcada25horasde funcionamiento.
Paraaccedera la v_Jvulade drenajedelaceitedel motor,sedebe
girarhada adelanteelfirantetubularde lamanijaderecha,
a, Extraigala perillaenestrellasuperiory eltornillodelcarro
delladoderechodela manija,Figura11,
b, Gireelfirantetubularhada el frentede lacortadorapara
tenerlugarparaconectarla manguerade drenajedeaceite
a lav_Jvulade drenajedeaceite,Figura11.
f
Wlvula dedrenajedeaceite
.J
Figura11
Insertelamanguerade drenajede aceite(empaquetadacon
estemanual)dentrodelorificiodedrenajede aceite.Coloqueel
extremoopuestodela mangueraenundep6sitode recolecci6n
de aceitequeposeacapacidadsuficientepararecogerel aceite
usado.
5. Liberelav_.lvulapresionandolas dosetiquetashaciadentro
tirando.Elpetr61eocomenzar_,adrenardelmotor.
6. Despu_sde queel petr61eohaterminadodedrenar,prensa
lasdos etiquetashaciadentroy empujelav_.lvuladedesag_Je
del aceiteatr_.sen cerrarconIlavelav_Jvulacerrada.Quitela
manguera,y resumael finalde la v_.lvulade desag(Jedelaceite
paraimpediraescombrosentrarenel puertodedesag_Je.
7. VuelvaaIlenarel motorconaceitedemotornuevohastaqueel
niveldelaceiteen lavarillade medici6nIleguea FULL(lleno).
Vuelvaacolocarel tap6nde Ilenadode aceite/ varilladelnivel
del aceite.
Gireel tirantetubulardela manijaderechaasu posici6ninicial.
Alineel orificiocentraldeltirantetubularconelorificiode la
manija.Sujeteconlaperillaenestrellayel tornillodelcarro
extraidosanteriormente.
Usesolamenteunaceitedetergentedealta calidadcuyaclasificaci6n
de servicioAPIsea SFo SG.Seleccioneel gradode viscosidadSAE
del aceitesegQnlatemperaturade operaci6nesperada.Aunque
losaceitesdeviscosidadmQItiple(5W30,10W30,etc.)mejoranel
encendidocuandoel climaest,.frio,losmismosincrementanel
consumodeaceitecuandoseusana m_.sde 32°ECompruebeel
niveldeaceitecon mayorfrecuenciaparaevitarda_osdebidoaqueel
motortrabajeconunnivelde aceitebajo.
Abraeltap6nprotectorenelextremodela v_.lvuladedrenajede
aceiteparadejarexpuestoelorificiode drenaje,Figura12.
Tap6ndeIlenadode
aceite/varillade medici6n
_,_,.......... del nivelde aceite
i.....................
d_,,_Tap6nprotector
......"i_ dedrenaje
Wlvula de drenaje
deaceite
drenajeMangueradeaceitede __ .................................................
Figura12
.
Retireel tap6ndeIlenadodeaceite/lavarillade niveldeaceite
deltubodeIlenado,Figura12.
Figura13
J
57
Page 58

Antesde IlevaracaboalgQntipo dernantenirnientoen la rn_.quina,
espereaquetodaslaspartessedetengany desconecteelcablede
labujfa.Sino seobservanestasinstruccionesse puedenproducir
[ esonespersonaesoda_osmateraes.
EXTRACCION DE LA CUBIERTA DE LA CORREA
Lacubiertade la correasedebeextraerpararealizarvarios
procedirnientosde rnantenirnientoyservicio.Sigalas siguientes
instruccionesparaextraerla cubiertade lacorrea.
1. Detengaelmotor,espereaquetodaslaspartesdejende
rnoversey desconecteel cablede la bujfa.
2. Quitelostrestornillosy arandelasque sostienenla tapaalmarco,
la Figura14.
f
J
J
Figura14
.
Extraigala cubiertadela correa.
4.
Parainstalarde nuevolatapadecintur6n,coloquela tapaen
la posici6nysujetela utilizaci6nde trestornillosyarandelas
quitadasantes.
Nohagafuncionarla unidadsin la cubiertade la correainstalada.Sinose
observanestasinstruccionessepuedenproducirlesionespersonaleso
daSosmateriales.
EXTRACCK)N DE LA PLATAFORiVlA DE LA
CORTADORA DE C :SPED
.
Usela palancadealturadela plataforrnaparabajarla plataforrna
y hacerladescansarsobrelostacosdernadera.
7.
Mirela plataforrnade cortedesdeel ladoizquierdode la
cortadorayIocaliceel pasadorde horquillaquefijala varilla
de sost_ndela plataforrnaal lateralposteriorizquierdode la
plataforrna,Figura15.
Figura15
8. Extraigael pasadordehorquillaquefija la varilladesost_n,y
extraigaconcuidadoel soportede laplataforrnadel brazode
elevaci6nde la plataforrna,Figura15.
9. Repitalospasos7 y 8 delladoderechodelacortadora.AI
terrninar,sedebenextraerloscuatropasadoresde horquilla.
10. Ernpujelaplataforrnade cortehaciala izquierdapara
desengancharel rnontajede elevaci6ndelaplataforrna.
11. Usela rnanijadeelevaci6nde laplataforrnaparalevantarla
plataforrnaa suposici6nrn_.salta.
12. Retirelostacosde rnaderade debajodela plataforrna.
13. Extraigalacorreadetransrnisi6ncornosedetallaen "Reernplazo
de lacorreade transrnisi6n".
14.
Deslicela plataforrnade cortehacialaporteposteriordela unidad.
15.
Desengancheelcableresortede latransrnisi6ndelrnontajedel
brazosecundariolibre.Figura16.
f
Antesde hacercualquiertipode rnantenirnientoenla parteinferior
de lacortadora,sedebeextraerlaplataforrnade corte.Sigalas
siguientesinstruccionesparaextraerla plataforrnadecorte:
1. Detengaelmotor,espereaquetodaslaspartesdejende
rnoversey desconecteel cablede la bujia.
2. Sueltetodosloscontrolesdela cortadorade c_sped.
3. Saquela cubiertadela correacornosedetallaen "Extracci6nde
lacubiertadela correa."
4. Usela palancadealturade la plataforrnaparamoverla
plataforrnade cortea suposici6nrn_.selevada.
5. Coloquetacosde rnaderadebajode laplataforrna.
J
Figura16
58
Page 59

16.Retirelaplataforrnadecorte.
17.Parainstalarlaplataforrnadecorte,sigalospasosanterioresen
ordeninverso.
AntesdeIlevaracaboalg[3ntipodernantenirnientoenlarn_.quina,
espereaquetodaslaspartessedetenganydesconecteelcablede
labujia.Sinoseobservanestasinstruccionessepuedenproducir
lesionespersonalesoda_osrnateriales.
Nolirnpielacortadoradecespedconunalavadoraapresi6n.Puede
producirda_osaloscornponentesel_ctricos,husillos,poleas,
rodarnientosoalmotor.
LUBRICACION
Puntos de pivote y varillaje
Lubriquetodoslos puntosdepivotedel sisternade transrnisi6ny el
varillajedeelevaci6nalrnenosunavezporternporada,o cada25
horasdefuncionarniento,conaceiteligero.
Ruedas traseras
Sedebenextraerlasruedastraserasde losejes unavezpor
ternporada.Lubriqueloseje ylasIlantasadecuadarnentecongrasa
rnultiusoantesde volvera instalarlos.
Rodamientos de las ruedas delanteras
Hayaccesoriosde engraseencadarueditayenel bastidorquecubre
cadarueditadelantera,Figura17.Lubriqueestas_.reasusandouna
pistoladeengrasedespu_sdecada50 horasdetrabajo.
Paralubricarelrodarnientode unaruedita,rotela ruedaparaque
el accesoriode engrasesealineeconla ranuradelsoporte,Figura
17- asihabr_,lugarparaconectarelacoplede la pistoladeengrase
al accesoriode engrase.Notendr_,necesidadde usarelaccesoriode
engrasedelotro ladodela rueda.
LIMPIEZA DEL MOTOR Y DE LA
PLATAFORMA
Sisederrarnacombustibleoaceitesobrela rn_quina,debelirnpiarse
de inrnediato.Noperrnitaqueseacurnulenresiduosalrededorde
ningQncornponentede lacortadora.
Limpieza del motor
Laspartesdel motorsedebenrnantenerlirnpiasparareducirel
riesgodesobrecalentarnientoycornbusti6nde losresiduos.Es
particularrnenteirnportantecuandosecortac_spedalto.
Limpieza de la plataforma de corte
DeckWashSystemTM
UtiliceelsisternaDeckWashSystemTM (Sisternade lavadodela
plataforrna)paralavarla parteinferiordela plataforrnay quitarlos
restosdec_spedrecortadoeirnpedirlaacurnulaci6nde sustancias
quirnicascorrosivas.
1. Enrosqueelacoplede rnangueraal extrernode larnanguerade
jardin.Figura18.
f
Mangueradejardin_
Acopladorde
manguera
Puertodeagua
F
Figura17
Accesoriode
engraseen
la rueda
/
Alineeelaccesoriode
engraseconlaranuradel
soportedelarueda
Figura18
Unaelacoplede la rnangueraal puertode aguaque se
encuentraen la superficiedela plataforrna,Figura18.
.
Abrael surninistrodeagua.
4.
Apunteelcanalde descargalejosdelas personasuobjetos.
5.
Enciendala cortadoray enganchelascuchillas(presioney
retengaelcontrolde lascuchillascontralaernpuSadurade
labarradecontrol)duranteunrninirnodedosrninutos.No
engancheelcontroldetransrnisi6n.
6. AIcornpletar,desengancheelcontrolde lascuchillas(libereel
control)y apagueelmotor.
DESCONECTE EL AGUA Y RETIRE
EL ACOPLADOR DE LA MANGUERA
DEEL PUERTO DE AGUA.
J
59
Page 60

Nuncaexcedala presi6nrn_.xirnade infladoquese indicaen los
lateralesde losneurn_.ticos.
PRESION DE LOS NEUiVlATICOS TRASEROS
La presi6noperativarecornendadaparalos neurn_.ticostraseroses
deaproxirnadarnente20 p.s.i.Verifiquelapresi6ndelosneurn_.ticos
regularrnenteyrnantengasiernprela rnisrnapresi6nenarnbos
neurn_.ticostraseros.
IMPORTANTE:Consulteloslateralesdelasruedasparaconocercon
exactitudla presi6nrn_.xirnaen psirecornendadaporel fabricante.No
inflelosneurn_.ticosenexceso.Lapresi6ndeneurn_.ticosdesigual
podriahacerquelaplataforrnacorteel c_spedenforrnadespareja.
REEIVIPLAZO DEL ESCUDO POSTERIOR
1. Si untornilloest,.presenteencada ladodelescudorastreador,
quitelos dostornillos.
2. DoNeelescudoposteriorhaciaadentroacadaladoparaliberar
laslengiJetasdelosagujerosenel bastidorde lacortadora,
Figura19.
MANTENIMIENTO DE LAS CUCHILLAS DE CORTE
Aseguresede apagar el motor y desconectar el cable de la bujiay
hacer masa contra el motor para evitar el arranque accidental antes
de retirarla o ias cuchiiias de corte paraafilarlas o reemplazarlas.
Protejaselas manos usando guantes gruesos o un trapo para agarrar la
cuchiiiade corte.
Inspeccioneperi6dicamente los husillos de ias cuchillas paracontrolar
si hay fisuras o daSos,especialmente despues de golpear un objeto
extraSo.Reemplace de inmediatosi esta.ndaSados.
Lascuchillas de las cortadora son muy filosas.Cuando trabaje con
las cuchiilas, use guantes de cuero grueso o envuelva las cuchillas en
trapos gruesos para protegersede los hordes filosos.
E×tracci6n de las cuchillas
Retirelaplataforrnade debajode lacortadorayvolteela
plataforrnasuavernentedejandoa la vistala partede abajo.
Consultelasinstruccionesde "Extracci6ndela plataforrnade la
cortadoradec_sped".
,
Coloqueuntacode rnadera2x4deaproxirnadarnente8.5
pulgadasdelargoentreel alojarnientodela plataforrnayla
cuchillade corte,paraque actQecornoestabilizador,
Figura20.
f
Figura19
,
Reernplaceconunescudonuevodoblandoelescudopara
perrnitirquelas leng(Jetascalcenen losorificiosdel bastidordela
cortadora.
,
Sustituyalosdostornillos(silostornillosfueranusadospara
sostenerelescudorastreadoral marcode cortacesped).
\
Extraigalatuercade bridaparaliberar
lacuchilla
Useuntacodemaderaparaestabilizarlacuchilla.
J
Figura20
3. Extraigalatuercade bridahexagonalqueaseguralacuchillaal
rnontajedelhusillo,Figura20.
6O
Page 61

Afilado de cuchillas
IMPORTANTE:Siexisteunaseparacbnde metal,reernphcelas
cuchillasporotrasnuevas.
1. Paraafilarlas cuchillasde cortedeforrnaadecuada,extraiga
cantidadesigualesdemetaldearnbosextrernosdelas cuchillas
a Iolargode los bordescortantes,deforrnaparaMaal bordede
caida,a un_.ngulode250a 30°, Figura21.
• Es irnportantequecadahordede lacuchillade corteseapulido
porigualpararnantenerelequilibrioadecuadode la cuchilla.Una
cuchilladesequilibradacausar_,vibraci6nexcesiva,y puedeoca-
sionardaSosrnaterialesa lacortadoraqueresultenenlesiones
personales.Sepuedeprobarlacuchillabahnce_.ndolasobreun
destornilladordeejecircular.Afileel metaldelladopesadohasta
quequedebienequilibrada.
f
IMPORTANTE:Lascorreasdela cortadoradec_spedhansido
diseSadasespecialrnenteparaqueengranenydesengranensin
riesgo.Paraquela rn_.quinafuncionede rnaneraadecuada,use
correasaprobadasporelfabricante.
Reemplazo de la correa de transmisi6n
1. Detengaelmotor,espereaquetodaslaspartesdejende
rnoverseydesconecteel cablede labujia.
2. Sueltetodosloscontrolesdelacortadoradecesped.
3. Retirelacubiertade la correacornose haindicadoantesenesta
secci6n.
,
Afiojeel guardacorrea(A). ElguardacorreaestAsujetoa la parte
inferiordelbastidorde lacortadora,Figura22.
5.
Afiojela poleaIoca(B) aflojandoel pernoy la tuerca,Figura22.
6.
Extraigala correa(C) dealrededordelas poleas,Figura22.
Figura21
Instalaci6n de cuchillas
1. Parainstalarlacuchilla,coloqueelladode lacuchillaquetiene
el nQrnerodepiezaestarnpadornirandohaciaelsuelocuandola
cortadoraest,.en posici6nde operaci6n.
2. UtiliceunaIlavedetorsi6nparaajustarla tuercade bridadel
husillohastaentre70y 90 pies-libras.
REEIVIPLAZO DE LAS CORREAS
Antesde IlevaracaboalgQntipode rnantenirnientoen la rn_.quina,
esperea quetodaslas partessedetengany desconecteel cablede
la bujia.Si nose observanestasinstruccionessepuedenproducir
lesionespersonaleso da_osrnateriales.
Evitela posibilidadde lesionesporcornpresi6n.Nocoloquelos
dedosentre lascorreasy laspoleas.
Lacortadorautilizatrescorreas:1)correadetransrnisi6n,2) correade
enganchedela plataforrna,3) correade sincronizaci6nde lacuchilla.
Antesde reernplazarunacorrea,observepord6ndepasala correa
alrededorde laspoleasy soportescornoayudaal instalarel repuesto.
Figura22
7. Paselanuevacorreaalrededorde laspoleasasegur_.ndosede
ajustarlastuercas,pernos,y el guardacorrea.
8. Vuelvaacolocarlacubiertade lacorrea.
61
Page 62

Reemplazo de la correa de enganche de la plataforma
1. Detengaelmotor,espereaquetodaslaspartesdejende
moversey desconecteel cane de la bujia.
2. Sueltetodosloscontrolesdela cortadorade c_sped.
3, Retirela cubiertadela correacomoseha indicadoantesenesta
seccbn,
,
Aflojeel pernoyla tuercaquesujetanla varilladelguardacorrea
al bastidorFigura23,
f
\
8. Pasela nuevacorreaalrededorde laspoleasasegur_.ndosede
ajustarlastuercas,pernos,y el guardacorrea.
9, VuelvaacolocarlacubJertade lacorrea,
Reemplazo de la correa de sincronizaci6n de la
cuchilla
1. Detengaelmotor,esperea quetodaslaspartesdejende
moverseydesconecteel cane de labujia,
2. Sueltetodosloscontrolesdelacortadoradec_sped.
3, Retirelacubiertade lacorreacomosehaindicadoantesenesta
secci6n,
Extracd6ndela correadesincronizad6n
4. Extraigael resorte(A)del soportede sincronizaci6ny la
plataforma,Figura25.
/
Figura 23
5. Afloje la polea Ioca (A) afiojando la tuerca y el perno, Figura 24.
f
Figura25
5. Aflojeel tornillode3/8-16yla tuercaacopladosal montajede la
plataforma,Figura26.
_._ j,
Figura24
6. Afiojela poleaIoca(B)aflojandolatuerca,FJgura24.
7. Extraigala correa(C)de alrededordelaspoleas,Figura24.
J
Figura26
62
Page 63

6. Gireel soportede sincronizaci6ndela poleaIoca(B) parapasar
la correaalrededorde la poleaIoca,Figura25.
7. Gireel rnontajedelbrazosecundario(C)y extraigalacorrea(D)
delosrnontajesde husillo,Figura25.
Instalaci6ndela correadesincronizaci6n
,
Antesde instalarunacorreade sincronizaci6nde repuesto,se
debeasegurarde ubicarlasrnarcasdecadarnontajede husillo
detalrnaneraque lascuchillasquedenperpendicularesentresi,
Figura27.
a. Gireel rnontajedelhusilloseparador(E)paraquela flecha
estarnpadaenel husillomirehaciael frentede lacortadora,
Figura25.
b. Gireel rnontajedelhusillotransrnisorparaquelafiecha
estarnpadaenel husillomirehaciael exteriordela
plataforrnadecorte Figura25.
f
Figura27
9. Paselanuevacorreaalrededordelaspoleasasegur_.ndosede
ajustarlastuercasy pernos.Instaleel resorteextraidoenel paso4.
10. Vuelvaacolocarla cubiertadela correa.
63
Page 64

PROGRAMA DE iVlANTENIIVllENTO
Antesderealizarcualquiertipodemantenimientoo servicio,desenganchetodos
loscontrolesy detengaelmotor.Esperea quesedetengancompletamente
todaslaspiezasm6viles.Desconecteel cabledelabujiayp6ngalohaciendo
masacontraelmotorparaevitarquese enciendaaccidentalmente.Utilice
siempreanteojosdeseguridaddurantelaoperaci6no mientrasrealizaajusteso
reparaciones.
Sigael cronograrnade rnantenirnientoquesepresentaacontinuaci6n.
Estatablas61odescribepautasdeservicio.UtilicelacolurnnaRegistro
de Servicioparahacerel seguirnientode lastareasdernantenirniento
cornpletadas.Paraubicar el Centro de Servicio Searsm_s cercano
o paraprograrnarun servicio, simplernentecomuniquesecon
Searsal tel_fono 1-800-4-MY-HOME®
Cadauso
l ras2 horas
25 horas
50 horas
Anualrnenteo cada 100
horas
Antesde alrnacenar
1. Cuchillasdelacortadora
2. Piezassueltasofaltantes
3. Correas
4. Nivelde aceitedel motor
5. Controles
6. Clavijadeabono(siest,.
instalada)
1. Aceitedelmotor
1. Aceitedelmotor
2. Filtrode aire
3. Cuchillasdelacortadora
4. Varillajesy pivotesdecontrol
1. Rodarnientosdelasruedas
delanteras
1. Bujiadeencendido
2. Ruedastraseras
1. Sisternadecombustible
,
SegQnnecesidad
2.
Ajustaro reernplazar
3.
Verificar
4.
Verificar
5.
Verificarel funcionarnientocorrecto
6.
Verificarlacorrectainstalaci6nde
la clavija
,
Carnbiar
1.
Carnbiar
2.
Lirnpiaro reernplazar
3.
Afilary balancear
4.
Lubricarcon aceiteligero
1.
Engrasar
1. Lirnpiar,reernplazar,regular
2. Engrasar
1. Hacerfuncionarelmotorhastaque
sedetengaporfaltade combustible
o agregaraditivoparagasolinaa la
queseencuentraen eltanque.
64
Page 65

Nuncaalmacenela cortadoradecespedconcombustibleenel tanqueen
unespaciocerradooen _reascon pocaventilaci6n,dondelosgasesdel
combustiblepuedanalcanzarel fuego,chispaso unaluz pilotocomola que
tienenalgunoshornos,calentadoresde agua,secadoresderopaoalgQn
otrodispositivoa gas.
PREPARACI6N DEL MOTOR
Pararnotoresalrnacenadosdurantern&sde30 dfas:
Paraevitarqueseforrnegornaenel sisternadecombustibleo en
laspiezasdelcarburador,hagafuncionarel motorhastaquese
detengaporfaltadecombustibleo agregueaditivoparagasolina
al combustibledel tanque.Siutilizaun aditivoparagasolina,
hagafuncionarel motordurantevariosrninutosparaqueel
aditivocirculeporel carburador--despu_sde estoel motory el
combustiblesepuedenalrnacenarduranteunrn_xirnode seis
rneses.
.
Carnbieelaceiternientraselmotorest,.todavfacaliente.
PREPARACION DE LA CORTADORA DE
CO'SPED
• Cuandoalrnacenela cortadorade c_speden ungalp6nrnet_.lico,
tengaespecialcuidadode realizarleun tratarnientoantioxidante
alas superficiesnopintadas.Cubraelequipoconunacapa de
aceiteNvianoo siNcona,especialrnentelosresortes,los cojinetes
ylos cables.
• Elirninetodoel polvodel exteriordelmotory del equipo.
• Sigalasrecornendaci6ndelubricaci6n.
• Alrnaceneel equipoenun lugarlirnpioy seco.No Ioalrnacene
en unlugardondese encuentrenequiposqueusanpilotode
3.
Extraigala bujfadeencendidoy viertaenel cilindro
encendidoo concornponentesquepuedengenerarchispas.
aproxirnadarnente1onza(30 rnl)de aceiteparamotorNrnpio.Tire
variasvecesdelarrancadorde retrocesoparadistribuirelaceitey
reinstalela bujfa.
4. Lirnpieelmotorde desechossuperficiales.
Puedeobtenerlossiguientesaditarnentosy accesoriosparasucortadoradecesped.P6ngaseencontactocon u CentrodeservicioSearsen el
tel_fono1-800-4-MY-HOME®pararn_sinforrnaci6n.
NO.de PIEZA DESCRIPCl6N
33731 Colectordec_spedcon
sisternadeernbolsado
65
Page 66

Antesderealizarcualquiertipodemantenimientooservicio,desenganchetodos
loscontrolesydetengaelmotor.Esperea quesedetengancompletamente
todaslaspiezasm6viles.Desconecteelcabledelabujiay p6ngalohaciendo
masacontrael motorparaevitarqueseenciendaaccidentalmente.Utilice
siempreanteojosdeseguridaddurantela operaci6no mientrasrealizaajusteso
reparaciones.
Esta secci6nanalizaproblemasmenores de servicio.Paraubicarel Centrode ServicioSearsm_scercanoo paraprogramarun
servicio,simplementecomunkuesecon Searsal tel_fono 1-800-4-MY-HOME®.
Elmotornoarranca 1. No se haactivadoel cebador
1. Coloquelapalancadecontroldelregulador/cebador
enla posici6ncebador.
2. Elcontroldel regulador/cebadornoest,.en
la posici6ncorrecta.
3. Seha desconectadoelcablede la bujia
4. Labujianofuncionacorrectamente
5. Eltanquedecombustibleest&vadoo el
2. Coloquelapalancadecontroldelregulador/cebador
enla posici6nr_pido.
3. Conecteloscablesa la bujfa.
4. Limpie.ajustela separaci6n,o cambiela bujfa.
5. Lleneel tanquecongasolinalimpiayfresca.
combustibleesviejo
6. Lalineadelcombustibleest,.bloqueada
6. Pidaa un distribuidordeservicioSearsquelelimpie
la lineade combustible.
Elmotorfuncionade manera
err&tica
Elmotorrecalienta
1. Launidadest,.funcionandoconelcebador
activado.
2. Elcablede la bujiaest&fiojo
3. EIcombustibleesviejo
4. Aguao suciedaden el sistemade
combustible
5. Elfiltrodeaireest&sucio
1. Elnivelde aceitedel motorest&bajo
1. Muevalapalancadel regulador/cebadorpara
sacarlode la posici6ncebador.
2. Conecteyajusteel cabledela bujia.
3. Lleneel tanquecongasolinalimpia.
4. DreneelcombustibleCarguecombustiblenuevoen
eldep6sito.
5. Reemplaceelcartuchodelfiltrode aire.
1. Lleneel motorconlacantidadytipode aceite
adecuado.
2. Flujodeaire restringido
2. Limpielosrecortesde pastoy suciedadacumulados
alrededorde lasaletasde refrigeraci6ndel motory
delalojamientodel soplador.
Elmotorvacilaa altas 1.
revoluciones
Elmotorfuncionarealen 1. Extraigalabujiay regulela separaci6n.
marchalenta 2. Reemplaceelcartuchodelfiltrode aire.
Demasiadavibraci6n 1. Aprietelacuchillayel husillo.Balanceelacuchilla.
.
Laseparaci6nde loselectrodosde labujia
esmuypoca.
1.
Labujiadeencendidoest,. sucia
2.
Elfiltrodeaireest_sucio
1.
Lascuchillasde corteest_.nflojaso
Extraigalabujiay regulela separaci6n.
desbalanceadas
2.
Lacuchillade corteest,.da_ada,desafilada
2. Reemplacelacuchilla.
odoblada.
3.
Herrajesfiojos
3. Ajustetodoslospernosylas tuercas.
Launidadnoseautoimpulsa 1. Lacorreadetransmisi6nest,.fiojao 1. Reemplacelacorreade transmisi6n.
da_ada
Bajorendimientode corte 1. Cuchillasdesafiladas 1. Afileo cambielascuchillas.
2. Correasrotas,flojasogastadas 2. Cambielascorreas.
3. Cuchillasdesbalanceadas 3. Afileocambielascuchillas.
66
Page 67

Felicitacionespor haberrealizadounaadquisici6ninteligente.El
productoCraftsman@queha adquiridoest_dise_adoyfabricado
parabrindarrnuchosa_osde funcionarnientoconfiable.Perocorno
todoslosproductosa vecespuederequerirde reparaciones.Esen
esernornentocuandoeldisponerdeunAcuerdodeprotecci6npara
reparacionesle puedeahorrardineroy problernas.
A continuaci6nsedetallanlospuntosincluidosenel Acuerdo:
• Servicio experto prestadopornuestros10,000especialistasen
reparacionesprofesionales
• Servicio ilirnitadosincargoparalaspiezasyla rnanodeobraen
todaslas reparacionescubiertas
• Reernplazodel productohasta1500d61aressi no esposible
repararel productocubierto
• Descuentode10%del precionormaldel servicioy delaspiezas
relacionadasconel rnisrnoqueno est_ncubiertasporel acuerdo;
adern&s,10%del precionormaldelaverificaci6nde rnanten-
irnientopreventivo
• Ayudar_pidapottel_fono- IoIlarnarnosResoluci6nR_pida- el
apoyotelef6nicode unCharnuscaal representante.Pienseen
nosotroscornoel manual"deundue_ohablador."
Unavezadquiridoel Acuerdo,puedeprograrnarel serviciocon
tans61orealizarunaIlarnadatelef6nica.PuedeIlarnarencualquier
mornentodeldia o dela nocheo prograrnarun servicioen linea.
ElAcuerdodeProtecci6nde Reparaci6nesunacornprasinriesgo.
Siustedanulaporalgunaraz6nduranteelperiododegarantiade
producto,proporcionarernosun reernbolsoIleno.O,un reernbolso
prorrateadoencualquiermornentodespu_sdelperiodode garantia
de productoexpira,iAdquieraboysuacuerdode protecci6npara
reparaciones!
Seaplican deterrninadaslirnitaciones y exclusiones.Paraobtener
inforrnaci6nadicional y preciosenlos Estados UnidosIlarneal
1-800-827-6655.
El*CoverageenCanad_variaenalgunosarticulos. Paradetalles
IlenoslaIlarnadaCharnuscaCanad_en 1-800-361-6665.
Servicio de instalaci6ndeSears
Sideseasolicitarla instalaci6nprofesionalde Searsdeaparatos
dorn_sticos,dispositivosparaabrirportones,calentadoresde agua
y otrosarficulosdorn_sticosirnportantes,enlosEstadosUnidoso
Canad_Ilarneal 1-800-4-MY-HOME®.
67
Page 68

68
Page 69

DECLARACION FEDERAL y/o DE CALIFORNIA SOBRE GARANTJAS EN EL CONTROL DE EIVIISIONES
SUS DERECHOS Y OBLIGACIONES EN CUANTO A LA GARANTJA
MTDConsumerGroupInc,laAgenciadeProtecci6nMedioambientaldelos EstadosUnidos(EPA),y paraaquellosproductoscertificadosparasu ventaen el es-
tadode California,el Departamentode los RecursosdelAire deCalifornia(CARB)secomplacenenexplicarla garanfiaque cubreal sistemade control(ECS)de
emisiones(evaporativasy/ode escape)de su equipoy motor(motorde equiposdeexteriores)deencendidopot chispaparatodo terreno,peque_o,deexteriores
dela_o2006y a_osposterioresEn California,losnuevosmotoresdeequiposdeexterioresdebenestardise_ados,construidosyequipadosparacumplircon las
estrictasnormasantipoluci6ndel Estado(en otrosestados,losequiposdel a_o 1997y modelosposterioresdebenserestardise_ados,construidosy equipados
paracumplirconlas regulacionesdemotoresdeencendidopor chispaparatodoterrenopeque_osde laAgenciade Protecci6nMedioambientaldelos Estados
Unidos,(EPA).MTDConsumerGroupInc.debegarantizarelsistemadecontroldeemisiones(ECS) desu motordeequiposdeexteriorespot el periodode
tiempoindicadom_sabajo,siempreycuando no existausoincorrecto,negligenciaomantenimientoinadecuadodedicho motor.
SuECSpuedeincluirpiezastalescomo el carburador,elsistemade inyecci6ndecombustible,el sistemadeencendido,el convertidorcatalitico,losdep6sitos
decombustible,laslineasdecombustible,lostaponesdecombustible,lasv_lvulas,contenedores,filtros, manguerasdevapor,abrazaderas,conectoresyotros
componentesafinesrelacionadosconlasemisiones.
Dondeexistaunacondici6ncubiertapor la garantia,MTDConsumerGroupInc.reparar_su motorde equiposde exterioressincostoalgunoincluyendoel
diagn6stico,las piezasy la manode obra.
COBERTURA DE LA GARANTJA DEL FABRICANTE:
Estesistemadecontroldeemisionesse garantizaporel t@minodedosaSos.Sialgunapiezarelacionadacon lasemisionesdesu motorde equiposde
exterioresesdefectuosa,MTDCONSUMERGROUPINC.reparar_o sustituir_dichapieza.
RESPONSABILIDADES DEL PROPIETARIO SEGUN LA GARANTJA:
Ensu car_cterdepropietariodelmotordeequiposde exteriores,ustedes responsabledel mantenimientorequeridoquese especificaenel manualdel propieta-
rio.MTDConsumerGroupIncle recomiendaqueconservetodoslosrecibosquecubrenel mantenimientode su motor,noobstanteIocual MTDConsumerGroup
Incnopodr_denegarel cumplimientode lagarantiaQnicamentepor lafaltade los recibos.
Comopropietariodel motordeequiposde exteriores,usteddebesaberqueMTDConsumerGroupInc. puededenegarlacoberturade lagarantiasi su motoro
unapiezadel mismofallandebidoa uso incorrecto,negligencia,mantenimientoindebidooamodificacionesnoaprobadas.
Ustedesresponsabledepresentarsu motoral centrodedistribuci6noserviciotecnicodeMTDConsumerGroupInc.tan prontocomoaparezcael problema.Las
reparacionescubiertaspor la garantiasedebenIlevaracaboen unlapsorazonablequeno excedade30 dias.Sitiene algunapreguntarespectode lacobertura
dela garantia,p6ngaseen contactoconel DepartamentodelServicioT@nicode MTDConsumerGroupInc.al telefono1-800-800-7310o pot correoelectr6nico
enhttp://support.mtdproducts.com
COBERTURA DE LA GARANTJA DE EMISIONES GENERALES:
MTDConsumerGroupIncgarantizaal compradorfinaly a cadacompradorsubsiguienteque el motordeequiposde exteriores:est_dise_ado,construidoy
equipadodemododecumplircontodas las regulacionesaplicablesyquese encuentralibrededefectosdematerialesyde fabricaci6nquepudierencausarla
falladeunapiezagarantizadaidentica,entodos losaspectosmaterialesala piezadescriptaenla solicitudde certificaci6ndeMTDConsumerGroupInc.
El periododegarantiacomienzaenla fechade entregadel motoral compradorfinalo en lafechaenquela m_quinaseponeenfuncionamientopot primeravez.
El periododegarantiaesde dosaSos.
Sujetoa ciertascondicionesyexclusionesqueseindicana continuaci6n,lagarantiadelas piezasrelacionadascon lasemisioneses la siguiente:
1. Cualquierpiezagarantizadaque no esteprogramadaparaser reemplazadacomo partedelmantenimientorequeridoen lasinstruccionesescritassuminis-
tradassegarantizaporel periodo degarantiaarriba mencionado.Sila piezafalladuranteel periodo decoberturade lagarantia,la mismaser_reparada
oreemplazadaporMTDConsumerGroupInc.deacuerdoconel parrafo(4)a continuaci6n.Cualquierpiezareparadao reemplazadasegQnlagaranfiase
garantizar_potel restodel periodode garantia.
2. Cualquierpiezagarantizadaqueeste programadasolamenteparainspecci6nregularenlas instruccionesescritassuministradassegarantizapotel periodo
degarantiaarribamencionado.Cualquierpiezareparadao reemplazadasegQnla garantiase garantizar_pot el restodelperiodo.
3. Cualquierpiezagarantizadaqueeste programadaparareemplazosegQnelmantenimientorequeridode conformidadcon lasinstruccionesescritassuminis-
tradas,se garantizaporel periododetiempoanteriora laprimerafecha de reemplazoprogramadaparaesapieza.Si la piezafallaantesdel primerreemplazo
programado,la mismaser_ reparadao reemplazadapot MTDConsumerGroupInc.deacuerdoconel parrafo(4)a continuaci6n.Cualquierpiezareparadao
reemplazadabajogarantiasegarantizar_potel restodel periodoanterioral primerreemplazoprogramaticpuntualparaesapieza.
4. Lareparaci6noel reemplazodecualquierpiezagarantizadadeconformidadconlasdisposicionesde lagarantiaqueaquise estipulase deben realizarenun
centrodegarantiasin costoalgunoparael propietario.
5. Noobstantelas disposicionesqueaquise estipulan,losservicioso reparacionesbajo garantiase suministrar_nentodos nuestroscentrosdedistribuci6nbajo
franquiciademantenimientoparalos motoreso equiposencuesti6n.
6. El propietariodelmotorde equiposdeexterioresno deber_pagarel trabajodediagn6sticodirectamenteasociadoconunapiezagarantizadadefectuosaen
relaci6nconlas emisiones,siempreycuandodichotrabajode diagn6sticoserealiceen un centrocubiertopot lagarantia.
7. MTDConsumerGroupInces responsablepotda6oscausadosa otroscomponentesdemotoresoequiposderivadosde lafallabajo garantiadecualquier
piezagarantizada.
Page 70

8.Durantelatotalidaddelperiododegarantiadelmotoryequipoparatodoterrenoarribamencionado,MTDConsumerGroupIncmantendr_unsuministro
depiezasbajogarantiasuficienteparasatisfacerlademandaesperadadetalespiezas.
9.Cualquierpiezadereemplazosepodr_usarparaelcumplimientodelmantenimientoolasreparacionesbajogarantiaysesuministrar_nsincargopara
elpropietario.Dichousonoreducir_lasobligacionesdegarantiadeMTDConsumerGroupInc.
10.Nosepodr_nusarpiezasadicionalesnimodificadasquenoestenexentasdeacuerdoconelDepartamentodelosRecursosdelAire(AirResourcesBoard).
Elusodecualquierpiezaadicionalomodificadanoexentaporelcompradorfinalser_causaldeinvalidezdelosreclamosbajogaranfia.MTDConsumer
GroupIncnotendr_responsabilidadpotlagarantiadefallasdepiezasgarantizadasquefuerencausadaspotelusodeunapiezaadicionalnoexenta
omodificada.
PIEZAS GARANTIZADAS:
Lareparaci6no el reemplazodecualquierpiezagarantizadaquede otto modopudieseestarcubiertapot lagarantiapodr_set excluidadetalcoberturade
garantiasi MTDConsumerGroupIncdemuestraqueel motoresobjetodeusoincorrecto,negligenciao mantenimientoinadecuado,y quetalusoincorrecto,
negligenciaomantenimientoinadecuadofuecausadirectade la necesidadde reparaci6noreemplazode dichapieza.NoobstanteIo antedicho,cualquierajuste
deuncomponenteconundispositivodelimitaci6nde ajusteinstaladoenf_bricay quefuncioneadecuadamente,podr_setcubiertopot la garantia.Adem_s,
la coberturabajoestagarantiase extiendesoloapiezasqueestuvieronpresentesenel motory equipotodoterrenoadquiridos.
Est_ncubiertaslas siguientespiezascongaranfiaparaemisiones(decorresponder):
(1)Sistemademedici6nde combustible
• Sistemade mejoraparainicioenfrio (cebadosuave)
• Carburadory piezasinternas(osistemade inyecci6npotcombustible)
• Bombadecombustible
• Dep6sitodecombustible
(2)Sistemade inducci6ndeaire
• Purificadordeaire
• Colectordeadmisi6n
(3) Sistemadeencendido
• Bujia(s)deencendido
• Sistemade encendidopot magneto
(4)Sistemade encendido
• Convertidorcatalitico
• SAl(v_lvula Reed)
(5)Componentesvariosutilizadosen el sistemaanterior
• Wlvulas e interruptoresdevacio,temperatura,posici6nsensiblesaltiempo
• Conectoresy montajes
(6) Controlevaporativo
• Manguerade combustible
• Abrazaderasdela mangueradecombustible
• Tap6ndelcombustibleatadopot correa
• Cajadecarbono
• Lineas de vapor
GDOC-100223
Page 71

Busque el periodo de duraci6n de emisiones importantes yla informaci6n de clasificaci6n de aire en
la etiqueta de emisiones de su motor
Los motores cuyo cumpiimiento con los estAndares de emisi6n Tier 2 de la Comisi6n de Recursos Ambientales de California (CARB)
est6 certificado deben exhibir la informaci6n relacionada con el perJodo de duraci6n de las emisiones y la clasificaci6n de aire. Sears,
Roebuck and Co., de los Estados Unidos ponen esta informaci6n a disposici6n deJconsumidor en nuestras etiquetas de emisiones.
El Periodo de Duraci6n de las Emisiones describe el nQmero de horas de tiempo real de funcionamiento para el cual se certifica que
el motor cumple con las reglas de emisi6n, descontando el mantenimiento adecuado deJmismo segQn las instrucciones de oper-
aci6n y mantenimiento. Se utilizan las siguientes categorias:
Moderado:Se certifica que el motor cumpie con las reglas de emisi6n durante 125 horas de tiempo real de funcionamiento deJmotor.
Inmediato:Se certifica que el motor cumple con las reglas de emisi6n durante 250 horas de tiempo real de funcionamiento deJ motor.
Extendido:Se certifica que el motor cumple con las reglas de emisi6n durante 500 horas de tiempo real de funcionamiento deJmotor.
Por ejemplo, una cortadora de c6sped tJpica que se empuja desde atrAs se usa entre 20 y 25 horas por afio. Por Io tanto, el Periodo
de Duraci6n de Emisiones de un motor con una clasificaci6n intermedia seria equivalente a entre 10 y 12 afios.
Laclasificaci6n de aJre es un nQmero calculado para describir eJnivel reiativo de emisiones para un grupo de motores en particular.
Cuanto menor sea Jaclasificaci6n de aire, mayor es JaJimpieza deJmotor. La informaci6n se presenta de forma gr&fica en Jaetiqueta
de emisiones.
Despu_s del 1 de julio de 2000, busque el periodo de cumplimiento de las reglas de
emisiones en la etiqueta de cumplimiento de las reglas de emisiones del motor
Despu_s deJ 1 de julio de 2000 se certificar_, que determinados motores Sears, Roebuck and Co., de los Estados Unidos
cumpien con los estAndares de emisiones de la fase 2 de la Agencia de Protecci6n Ambiental de los Estados Unidos (USE-
PA). Para los motores certificados para la etapa 2, el periodo de cumpiimiento con las reglas de emisiones al cual se hace
referencia en la etiqueta de cumpiimiento con las reglas de emisiones indica el nQmero de horas de funcionamiento para el
cuaJ se ha demostrado que el motor cumpie con los requerimientos federales de emisi6n.
Para los motores con desplazamiento inferior a 225 cc, Categoria C = 125 horas, B = 250 horas y A = 500 horas.
Para los motores con desplazamiento de 225 cc o mAs, Categoria C = 250 horas, B = 500 horas y A = 1000 horas.
El despiazamiento de los motores de la serie modelo 150112 es 249 cc.
La presente es una representaci6n gen_rica de laetiqueta de emisi6n que se encuentra generaimente en un
motor certificado.
FAMILYYBSXS.3192VA 274812
71
GDOC-100182Rev.A
Page 72

Your Home
For troubleshooting, product manuals and home solutions advice:
÷anag÷
www.managemyhome.com
For repair - in your home - of all major brand appliances,
lawn and garden equipment, or heating and cooling systems,
no matter who made it, no matter who sold it!
For the replacement parts, accessories and
owner's manuals that you need to do-it-yourself.
For Sears professional installation of home appliances
and items like garage door openers and water heaters.
1-800-4-MY-HOME ® (1-800-469-4663)
Call anytime, day or night (U.S.A. and Canada)
www.sears.com www.sears.ca
Our Home
For repair of carry-in items like vacuums, lawn equipment,
and electronics, call anytime for the location of your nearest
Sears Parts & Repair Service Center
1-800-488-1222 (U.S.A.) 1-800-469-4663 (Canada)
www.sears.com www.sears.ca
To purchase a protection agreement on a product serviced by Sears:
1-800-827-6655 (U.S.A.) 1-800-361-6665 (Canada)
Para pedir servicio de reparaci6n Au Canada pour service en fran£ais:
a domicilio, y para ordenar piezas: 1-800-LE-FOYER Mc
1-888-SU-HOGAR ® (1-800-533-6937)
(1-888-784-6427) www.sears.ca
® Registered Trademark / TMTrademark of KCD IP, LLC in the United States, or Sears Brands, LLC in other countries
® Marca Registrada / TMMarca de Fabrica de KCD IP, LLC en Estados Unidos, o Sears Brands, LLC in otros paises
MCMarque de commerce / MDMarque deposee de Sears Brands, LLC
;ii
 Loading...