

Page 1

Safety • Setup • Adjustments • Operation • Maintenance • Troubleshooting • Parts Lists • Warranty
A O A AL
\
\.
\\
21" Rotary Mower- Model Series 260
iMPORTANT
READ SAFETY RULES AND iNSTRUCTiONS CAREFULLY BEFORE OPERATION
Warning: Thisunitis equippedwithaninternalcombustionengineandshouldnot beusedon or nearanyunimprovedforest-covered,brush-
coveredor grass-coveredlandunlesstheengine'sexhaustsystemisequippedwithasparkarrestermeetingapplicablelocalor statelaws(if any).
If a sparkarresterisused,it shouldbemaintainedineffectiveworkingorderby theoperator.IntheStateofCaliforniatheaboveisrequiredbylaw
(Section4442ofthe CaliforniaPublicResourcesCode).Otherstatesmayhavesimilarlaws.Federallawsapplyonfederallands.A sparkarrester
forthe mufflerisavailablethroughyournearestengineauthorizedservicedealeror contacttheservicedepartment,RO.Box361131Cleveland,
Ohio44136-0019.
ForUSCustomers: MTDLLC,P.O.BOX361131CLEVELAND,OHIO44136-0019 772C0797
PRINTEDIN U.S.A. ForCanadianCustomers:MTDProducts Ltd.,P.O.Box 1386,KITCHENER,ONTARION2G4J1 10/15/2005
Page 2

This Operator's Manual is an important part of your new equipment, it will help you assemble,
prepare and maintain the unit for best performance. Please read and understand what it says.
Table of
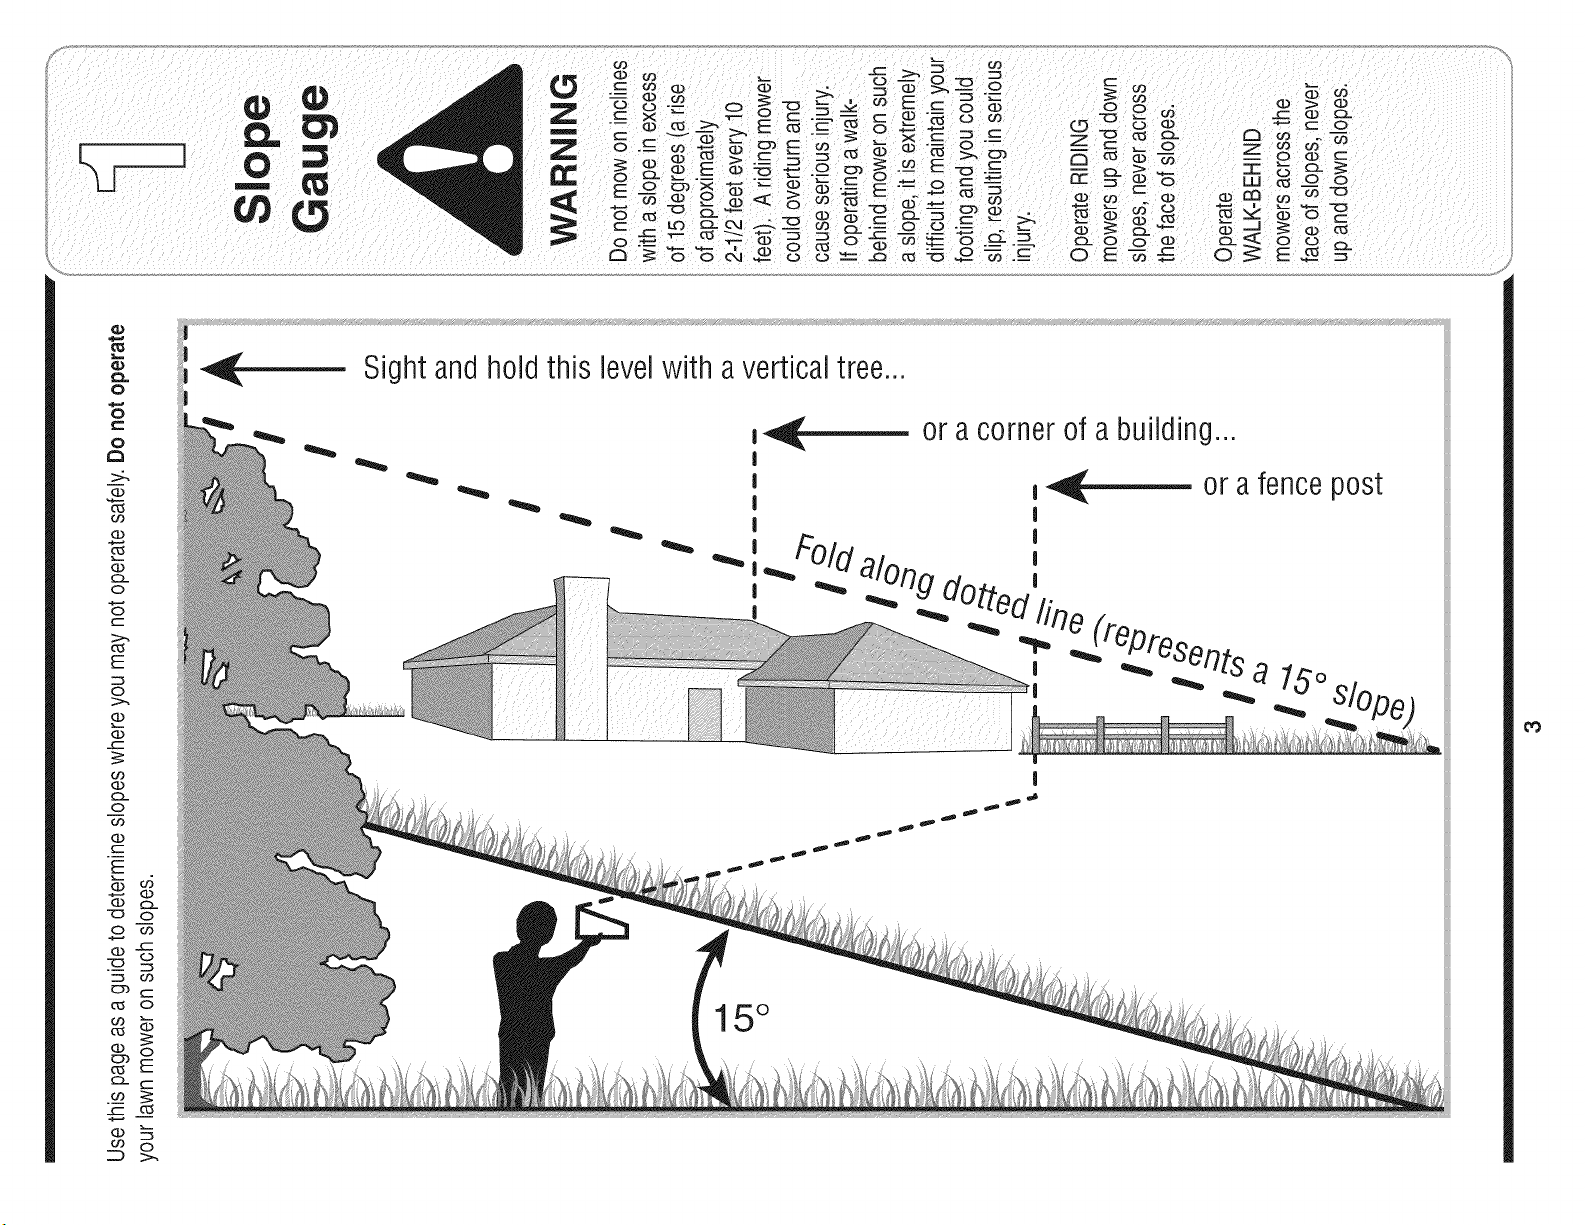
Slope Gauge ....................................................... 3
Safe Operation Practices ................................... 4
Set-Up & Adjustments ........................................ 6
Operation ............................................................. 8
Finding and Recording IVlodel Number
BEFOREYOU STARTASSEMBLING
YOURNEW EQUIPMENT,
please locatethe modelplate onthe equipmentand copy the
themodel number andthe serialnumber tothe sample model
plate provided to the right. You can locatethe model plate by
standing atthe operatingposition and looking downatthe rear
of the deck.
Contents
Maintenance & Off-Season Storage ................ 10
Trouble Shooting .............................................. 12
Warranty ............................................................ 13
illustrated Parts Lists ....................................... 14
Model Number Serial Number
Num6ro de module Num6ro de s_rie
XXXXXXXXXXX XXXXXXXXXXX
__ MTD LLC
USA-www.mtdproducts.com 1-800-800-7310
CAN-www.mtdcanada.com 1-800-668-1238
CLEVELAND, OH 44136
MTD PRODUCTS LIMITED
KITCHENER, ON N2G 4J1
Customer Support
Please do NOTretum the unit to the retailer from which it was purchased,
without first contacting Customer Support.
Ifyou havedifficulty assembling this productor haveany questionsregarding the controls, operationor maintenanceof thisunit,
pleasecall a CustomerSupport Representative.
For US Customers: 1-330-220-4MTD (4683)or 1-800-800-7310
For Canadian Customers: 1-800-668-1238
Pleasehaveyour unit's modelnumberand serialnumber ready when you call. See previoussection to locate this information.
Youwill beasked to enterthe serial numberinorderto processyour call.
The engine manufactureris responsiblefor all enigne-relatedissueswith regardsto performance, power-rating,specifications,
warrantyand service. Please referto the enginemanufacturer'sOwner's/Operator'sManual,packedseparatelywith your unit,
for more information.
2
Page 3
O
o
o
C_
>:.
{33
O3
(13
(13
O...
O
C
>.,
C5
E
CD
O
(D
O3
G)
C1.
o
O9
G)
CC
-$
=9
Sight and holdthis levelwith a verticaltree...
,_------- or a corner of a building...
|
_ o9
_ 0
con
_ 0
15 °
Page 4
i il / i¸¸i :/ (:
emitchemicalsknowntoStateof Californiatocausecancerandbirthdefectsor otherreproduc-
WARNING:EngineExhaust,someof itsconstituents,andcertainvehiclecomponentscontainor
tiveharm.
DANGER:Thismachinewasbuiltto beoperatedaccordingtotherulesforsafeoperationinthismanual.Aswith
anytypeof powerequipment,carelessnessor erroron the partoftheoperatorcanresultinseriousinjury.This
machineiscapableofamputatinghandsandfeetandthrowingobjects.Failuretoobservethefollowingsafety
instructionscouldresultin seriousinjuryor death.
WARNING
Thissymbolpoints
out importantsafety
instructionswhich,if
notfollowed,could
endangerthe personal
i safetyand/or property
I ofyourselfand others.
Readandfollowall
instructionsinthis
manualbeforeat-
temptingto operate
i this machine.Failure
I to complywith these
instructionsmayresult
i inpersonalinjury.When
youseethis symbol.
HEED iTS WARNING!
i Your Responsibility
i Restrictthe use
i ofthis powermachine
to personswho read,
understand
and follow the warnings
and instructions
, in this manual
I and onthe machine.
General Operation
1. Readthis operator'smanual carefully inits entiretybefore
attemptingtoassemblethismachine.Read,understand,
andfollowall instructionsonthe machineandin the
manual(s) beforeoperation.Becompletelyfamiliarwith
thecontrolsandthe properuseof this machinebefore
operatingit.Keepthis manualin a safeplaceforfuture
andregularreferenceandfororderingreplacementparts.
2. Thismachineisa precisionpieceof powerequipment,
nota plaything.Therefore,exerciseextremecautionat all
times.Yourunithas beendesignedto performonejob: to
mowgrass.Do notuseit for anyotherpurpose.
3. Neverallow childrenunder14yearsoldto operatethis
machine.Children14yearsoldand overshouldreadand
understandthe instructionsinthis manualandshould
betrainedand supervisedbya parent.Onlyresponsible
individualswhoarefamiliarwiththese rulesofsafe
operationshouldbeallowedto usethismachine.
4. Thoroughlyinspectthe areawherethe equipmentisto
beused.Removeall stones,sticks,wire,bones,toysand
otherforeignobjectswhichcouldbetripped overorpicked
upandthrownbythe blade.Thrownobjectscancause
seriouspersonalinjury.Planyourmowingpatternto avoid
dischargeof materialtowardroads,sidewalks,bystanders
andthe like.Also,avoiddischargingmaterialagainsta
wallorobstructionwhichmaycausedischargedmaterial
toricochetbacktowardtheoperator.
5. Tohelpavoidbladecontactora thrownobjectinjury,
stayinthe operatorzonebehindthe handlesand keep
children,bystanders,helpersand petsatleast75feet
fromthe mowerwhileit isin operation.Stopmachineif
anyoneentersthe area.
6. Alwayswearsafetyglassesor safetygogglesduring
operationandwhileperforminganadjustmentor repair
toprotectyoureyes.Thrownobjectswhich ricochetcan
causeseriousinjurytothe eyes.
7. Wearsturdy,rough-soledworkshoesandclose-fitting
slacksandshirts. Shirtsandpantsthatcoverthe arms
and legsand steel-toedshoesare recommended.Never
operatethismachinein barefeet,sandals,slipperyor light
weight(e.g.canvas)shoes.
8. Do notputhandsorfeet nearrotatingpartsor underthe
cuttingdeck.Contactwiththe blade canamputatehands
andfeet.
9. A missingor damageddischargecovercancause blade
contactor thrownobject injuries.
10.Manyinjuriesoccuras a resultof the mowerbeingpulled
overthefoot duringafall causedby slippingor tripping.
Do notholdontothe mowerifyouare falling;releasethe
handleimmediately.
11.Neverpullthe mowerbacktowardyouwhileyouare
walking.Ifyou mustbackthemowerawayfromawall or
obstructionfirstlookdownand behindtoavoidtripping
andthen followthesesteps:
a. Stepbackfromthe mowerto fullyextendyourarms.
b. Be sureyouare wellbalancedwithsurefooting.
c. Pullthe mowerbackslowly,no morethanhalf way
towardyou.
d. Repeatthesestepsas needed.
12.Donotoperatethemowerwhileunderthe influenceof
alcoholordrugs.
13.Donotengagetheself-propelledmechanismon unitsso
equippedwhilestartingengine.
14.Thebladecontrolhandleis asafetydevice.Neverattempt
tobypassitsoperation.Doingso makesthe safetydevice
inoperativeandmayresult in personalinjurythrough
contactwiththe rotatingblade.The bladecontrolhandle
mustoperateeasily in bothdirectionsandautomatically
returntothe disengagedpositionwhenreleased.
15.Neveroperatethe mowerinwet grass.Alwaysbesureof
yourfooting. A slipand fall cancauseseriouspersonal
injury.If youfeelyou arelosingyourfooting,releasethe
bladecontrolhandleimmediatelyand the bladewillstop
rotatingwithinthreeseconds.
16.Mowonlyin daylightorin goodartificiallight.Walk,never
run.Stopthebladewhencrossinggraveldrives,walksor
roads.
17.Iftheequipmentshouldstartto vibrateabnormally,stopthe
engineandcheck immediatelyfor the cause.Vibrationis
generallya warningoftrouble.
18.Shutthe engineoff andwait untilthe bladecomesto
acompletestopbeforeremovingthegrass catcheror
uncloggingthe chute.The cuttingbladecontinuesto rotate
fora few secondsafterthe engineisshutoff. Neverplace
anypartofthe bodyin the bladeareauntilyou aresurethe
bladehasstoppedrotating.
19.Neveroperatemowerwithoutpropertrailshield,discharge
cover,grasscatcher,bladecontrolhandleor othersafety
protectivedevicesin placeandworking.Neveroperate
mowerwithdamagedsafetydevices.Failureto doso,can
resultinpersonalinjury.
20.Mufflerandenginebecomehotand cancauseaburn.Do
nottouch.
21.Onlyusepartsandaccessoriesmadefor thismachineby
the manufacturer.Failuretodo socan resultin personal
injury.
22.Ifsituationsoccurwhicharenotcoveredinthis manual,use
careand goodjudgment. Call customerassistancefor the
nameofyournearestservicingdealer.
Slope Operation
Slopesare a majorfactor relatedtoslip andfallaccidentswhich
canresultinsevereinjury.Operationon slopesrequiresextra
caution.Ifyoufeel uneasyona slope,do notmowit. Foryour
safety,usethe slopegaugeincludedas partof this manualto
measureslopesbeforeoperatingthisuniton aslopedor hilly
area.Ifthe slopeisgreaterthan15degrees,do not mowit.
4
Page 5
Do:
1. Mowacrossthe faceofslopes; neverup anddown.
Exerciseextremecautionwhenchangingdirectionon
slopes.
2. Watchfor holes,ruts,rocks, hiddenobjects,or bumpswhich
can causeyouto slipor trip. Tallgrass canhideobstacles.
3. Alwaysbesureof yourfooting.A slip andfall cancause
seriouspersonalinjury.If youfeelyouare losingyour
balance,releasethebladecontrolhandleimmediately,and
the bladewill stoprotatingwithin3 seconds.
Do Not:
I. Donot mowneardrop-offs,ditchesorembankments,you
could loseyour footingorbalance.
2. Donot mowslopesgreaterthan 15degreesasshownon
the slopegauge.
3. Donot mowon wetgrass. Unstablefootingcouldcause
slipping.
Children
Tragicaccidentscanoccurifthe operatorisnot alertto the
presenceofchildren.Childrenare oftenattractedtothe mower
andthe mowingactivity.Theydo notunderstandthe dangers.
Neverassumethatchildrenwillremainwhereyou lastsaw
them.
1. Keepchildrenout ofthe mowingareaandunderthewatch-
ful careof a responsibleadultotherthanthe operator.
2. Be alertandturnmoweroff if achild entersthe area.
3. Beforeand whilemovingbackwards,lookbehindanddown
forsmallchildren.
4. Useextremecare whenapproachingblindcorners,
doorways,shrubs,trees,or otherobjectsthatmayobscure
yourvisionof a childwhomayrunintothe mower.
5. Keepchildrenawayfrom hotor runningengines.Theycan
suffer burnsfroma hotmuffler.
6. Neverallowchildrenunder14 yearsoldto operatea power
mower.Children14yearsold andovershouldreadand
understandthe operationinstructionsand safetyrulesin
this manualandshould betrainedand supervisedbya
parent.
Service
Safe Handling Of Gasoline:
1. To avoidpersonalinjuryorpropertydamageuseextreme
care inhandlinggasoline.Gasolineis extremelyflammable
andthevaporsare explosive.Seriouspersonalinjurycan
occurwhengasolineis spilledonyourselforyour clothes
whichcanignite.
2. Wash yourskin andchangeclothesimmediately.
3. Useonly anapprovedgasolinecontainer.
4. Neverfill containersinsidea vehicleoron atruckor trailer
bedwitha plasticliner.Alwaysplacecontainersonthe
groundawayfromyourvehiclebeforefilling.
5. Removegas-poweredequipmentfromthe truck ortrailer
andrefuelit onthe ground.Ifthis is notpossible,then refuel
suchequipmentonatrailerwitha portablecontainer,rather
thanfroma gasolinedispensernozzle.
6. Keepthe nozzleincontactwiththe rimofthefueltank or
containeropeningat alltimesuntilfuelingis complete.Do
notuseanozzlelock-opendevice.
7. Extinguishallcigarettes,cigars,pipesand othersourcesof
ignition.
8. Neverfuel machineindoorsbecauseflammablevapors
willaccumulateinthearea.
9. Neverremovegascap oraddfuelwhilethe engineis
hotor running. Allowengineto cool atleasttwo minutes
beforerefueling.
10.Neveroverfillfueltank. Filltankto nomorethan Y2inch
belowbottomoffiller neckto providefor fuelexpansion.
11.Replacegasolinecapandtightensecurely.
12.Ifgasolineis spilled,wipe itoff theengineand equipment.
Moveunitto anotherarea.Wait5minutesbeforestarting
theengine.
13.Neverstorethemachineorfuel containernearanopen
flame,sparkor pilotlightas ona waterheater,space
heater,furnace,clothesdryeror othergasappliances.
14.Toreducefire hazard,keepmowerfreeof grass,leaves,
orotherdebrisbuild-up.Cleanupoil orfuelspillageand
removeanyfuel soakeddebris.
15.Allowamowertocoolat least5 minutesbeforestoring.
General Service:
1. Neverrunan engineindoorsorin a poorlyventilatedarea.
Engineexhaustcontainscarbon monoxide,anodorless
anddeadlygas.
2. Beforecleaning,repairing,orinspecting,makecertainthe
bladeand allmovingparts havestopped.Disconnectthe
sparkplugwireandgroundagainsttheengineto prevent
unintendedstarting.
3. Checkthe bladeand enginemountingboltsat frequent
intervalsfor propertightness.Also,visuallyinspectblade
fordamage(e.g.,bent,cracked,worn)Replacebladewith
theoriginalequipmentmanufacture's(O.E.M.)bladeonly,
listedinthismanual."Useofparts whichdo notmeetthe
originalequipmentspecificationsmayleadto improper
performanceand compromisesafety!"
4. Mowerbladesaresharpandcan cut.Wrapthe bladeor
weargloves,and useextracautionwhenservicingthem.
5. Keepall nuts,bolts,and screwstightto besurethe
equipmentis insafeworkingcondition.
6. Nevertamperwithsafetydevices.Checktheir proper
operationregularly.
7. Afterstrikingaforeignobject,stoptheengine,discon-
nectthe sparkplugwireand groundagainsttheengine.
Thoroughlyinspectthemowerfor anydamage.Repairthe
damagebeforestartingand operatingthemower.
8. Neverattemptto makea wheelor cuttingheightadjust-
mentwhilethe engineisrunning.
9. Grasscatchercomponents,dischargecover,andtrail
shieldaresubjecttowear anddamagewhichcould
exposemovingpartsor allowobjectsto bethrown.For
safetyprotection,frequentlycheckcomponentsandre-
placeimmediatelywithoriginalequipmentmanufacturer's
(O.E.M.)partsonly,listedin this manual."Useof parts
whichdo notmeetthe originalequipmentspecifications
mayleadtoimproperperformanceandcompromise
safety!"
10.Donotchangetheenginegovernorsettingor overspeed
theengine.The governorcontrolsthemaximumsafe
operatingspeedoftheengine.
11.Maintainorreplacesafetylabels,asnecessary.
12.Observeproperdisposallawsandregulations.Improper
disposaloffluidsand materialscan harmtheenvironment.
Practices
WARNING
Thissymbolpoints
outimportantsafety
instructionswhich,if
notfollowed,could
endangerthe personal
safetyand/orproperty
ofyourselfandothers.
Readandfollowall
instructionsinthis
manualbeforeat-
temptingto operate
this machine.Failure
to complywith these
instructionsmayresult
in personalinjury.When
youseethis symbol.
HEED ITS WARNING!
Your Responsibility
Restrictthe use
ofthis power machine
to personswho read,
understand
andfollow the warnings
and instructions
in this manual
andon the machine.
5
Page 6

set.pand
Yourmowerisshipped
with the handleinthe
higher height position.
NOTE: Eachend of
the lowerhandle must
be placed inthe same
relativeposition.
iMPORTANT
This unit is shipped
WITHOUT GASOLINE
or OiL. After assem-
bly, service engine
with gasolineand
oil as instructedin
the separate engine
manual packedwith
your unit.
_ ARNING: Disconnect and
!
ground the spark plugwire as
instructedinthe separate engine
manual.
1. Thechutedeflectoronyour mowermaybe heldinan
uprightpositionbya blockforshippingpurposesonly.
Thisshippingblockmustbe removedanddiscarded
beforethemoweris putintooperation.SeeFigure1.
a. Pullthechutedeflectoruptowardsengine.
b. Removetheblockandcarefullylowerthe chuteinto
operatingposition,keepingfingersoutofthe way.
2. Performthefollowingsequenceforhandlesetup:
a. Pullupand backon theupperhandleto raisethe
handlefrompositionA intothe operatingposition
B.SeeFigure2.
Figure 1
Figure 2
b. Makesurethecarriageboltis seatedproperlyin
thehandle.Tightenwingnuts(starknobs)securing
upperhandletothe lowerhandle.
NOTE:Onsomemodelswingnutshavebeenreplaced
withstarknobs.Figuresshowwingnutsonly.
3. If satisfiedwith heightof handle,tightenwingnuts(star
knobs)attheendsof the lowerhandleshownin Figure
3. Forconvenienceof operating,youmayadjustthe
handleheightas follows:
a. Removethewing nuts(starknobs)shownin Figure
3 andremovethelowerhandle.
b. Positioneachhandlebracketstudintothetop hole
in thelowerhandle.SeeFigure3 inset.
c. Tightenthewingnuts(starknobs).
.
Insertpostoncable tiesintoholesprovidedon the
lowerhandle.Pullcabletie tightandtrimexcess.See
Figure4.
Figure 3 Figure 4
6
Page 7

5. RopeguideSetupas follows,seeFigure5:
a. Holdthebladecontrolagainstthe upperhandle.
PositionA.
b. Slowlypullstarterropeoutof engine.PositionB.
c. Slipstarterropeintotheropeguide.PositionC.
d. Tightenropeguidewingnut. PositionD.
,
Eachwheelhasa heightadjustmentleverto change
thecuttingheightofthe mower.Tochangetheheight
ofcut, squeezeadjusterlevertowardthewheel,
movingupor downto selectedheight.SeeFigure6.
7, If yourmoweris equippedwithan optionalmulching
Figure 5
NOTE: All wheels must
bein the sameheight
of cut.
Whencutting inheavy
or moist grass,the rear
of the lawnmowermay
beraisedhigher to
allow beter discharge
ofthe grass.
baffle,installit as shownin Figure7.
a. Lift upandholdthe side-dischargechutedeflector
andinsertbottomlipof themulchingbaffleinside
thechuteopening.
b. Pushthehooksonthe topof thebaffleuntilthey
snapoverthehingeon the dischargechute.
Releasethechutedeflector.
NOTE: Whenyouwishtomowinsteadof mulch,
simplyraisethechutedeflector,graspthehandleonthe
mulchingbaffleandlift upwardto removethebaffle. It is
notnecessarytoremovethe mulchingblade.
Figure 6
Figure 7
7
Page 8

Your Lawn
Mower
WARNING
Read,understand,
and follow all instruc-
tions and warnings
on the machineand
inthis manual before
operating.
Know Your Lawn Mower
Blade Control Handle
Drive Control Handle
Recoil Starter
i
i
/
Mulching Baffle
Chute Deflector
Height Adjustment
Levers
This blade control
mechanism is a
safety device. Never
attempt to bypass its
operations.
Useextreme care
when handling
gasoline.Gasoline is
trernely flammable
and the vapors are
explosive.Never fuel
the machine indoors
or while the engine
is hot or running.
Extinguish cigarettes,
cigars, pipes and
other so urcesof
ignition.
Figure 8
Blade Control Handle
Thebladecontrolhandleis locatedon theupperhandle
ofthe mower.SeeFigure8.The bladecontrolhandle
mustbedepressedinorderto operatetheunit.Release
thebladecontrolhandleto stoptheengineand blade.
Drive Control Handle
Thedrivecontrolhandleislocatedonthe upperhandle.
Squeezethedrivecontrolhandleagainstthe upper
handletoengagedrivesystem.Releasethecontrol
handletodisengagethedrive systeminorderto stop,
slowdown,or backup.
Recoil Starter
Therecoilstarteris attachedtotherightupperhandle.
Standbehindthe unitand pullthe recoilstarterropeto
startthe unit.
Mulching Baffle
Themulchingbaffleis usedto recirculategrassclip-
pingsbackto thelawn.Attachitas instructedonpage7
ofthismanual.
Cutting Height Adjustment Levers
Oneadjustmentleveris locatedoneachwheelandis
usedto adjustthecuttingheight.All fourlevershaveto
beatthe samerelativepositiontoensureuniformcut.
Before Starting
1. Servicethe enginewithgasolineandoilasinstructed
in theseparateenginemanual.
2. Attachsparkplugwireto sparkplug. If unitis
equippedwitha rubberbootovertheendofthe spark
plugwire,makecertainthemetalloopon theend of
thesparkplugwire(insidethe rubberboot)is fastened
securelyoverthemetaltip on thesparkplug.
3. Beforeeachuse,checkforproperdriveclutchopera-
tionby performingthefollowingbeforestartingthe
engine:
a. Withthe drivecontrolreleased,pushmower
forward.Itshouldmovefreely.Pullmowerback-
ward.Itshouldmovewithonlya smallamountof
resistance.
If itdoesnottheclutchmaynotbereleasing
completely.Donotstart theengineuntilcorrections
havebeenmade.Checkthecontrolcablefor
severebend,kinksandbinding.Alsocheckfor
grassbuild-uparoundthebelt.
8
Page 9

f
Using Your Lawn Mower
Besurethe lawnis clearof stones,sticks,wire,or other
objectswhichcoulddamagethe lawnmowerorthe
engine.Suchobjectscouldbeaccidentlythrownbythe
mowerin anydirectionandcauseseriouspersonalinjury
tothe operatorandothers.
Figure 9
To Start Engine
1. If yourunit isequippedwitha primer,primeengineas
instructedintheseparateenginemanualpackedwith
yourunit.
2. Standingbehindtheunit,depressthebladecontrol
handleandholditagainstthe upperhandleasshown
inFigure9. 3.
3. Graspthe starterhandleas shownand pullslowly
untilresistanceisfelt,then pullrapidlyto startengine 4.
andavoidkickback.Returnitslowlyto theropeguide.
2.
ToStop Engine 5.
1. Releasethebladecontrolhandletostopthe engine
andblade. 6.
__k WARNING: The blade continues
to rotate for a few seconds after
the engine isshut off.
2. Disconnectandgroundthesparkplugwireas
instructedin theseparateenginemanualto prevent
accidentalstartingwhileequipmentisunattended.
2. The warrantyonthislawnmowerdoesnotcover
3. Changingofengine-governedspeedwillvoid
4. All adjustmentsshouldbecheckedatleastonceeach
5. Periodicallycheckallfastenersandmakesurethese
WARNING: if you strike a foreign
object, stop the engine. Remove
wire from the spark plug, thor-
oughly inspectthe mower for any
damage, and repair the damage
before restarting and operating
the mower. Extensive vibration
of the mower during operation is
an indication of damage. The unit
should be promptly inspected
and repaired.
Toengagethe drive,squeezethedrive controlhandle
towardstheupperhandle.Releasethedrivecontrol
toslowdownwhennegotiatinganobstacle,makinga
turn,or stopping.
Forbestresultsandeffectivemulching,do notcut wet
grass.
Newgrass,thickgrass,orwet grassmayrequirea
narrowercut.
Fora healthierlawn,nevercutoff morethanone-third
ofthe totallengthof thegrass.
Yourlawnshouldbecut inthefall aslongasthere
isgrowth.
Ifthegrasshasbeenallowedtogrowin excessof 4
inches,mulchingis notrecommended.Mowusing
thesidedischargetoreducethegrassheightto3-1/4
inchesor lessbeforemulching.
General Recommendations
1. Alwaysobservesafetyruleswhenperforming
anymaintenance.
itemsthathavebeensubjectedto operatorabuse
or negligence.Toreceivefullvaluefromwarranty,
operatormustmaintainthelawnmoweras
instructedhere.
enginewarranty.
season.
aretight.
Operating
WARNING
The operation of any
lawn mower can result
inforeign objects
being thrown into
the eyes, which can
damage your eyes
severely. Always wear
safety glasses while
operating the mower,
or while performing
any adjustments or
repairs on it.
Besure no one other
than the operator is
standing near the lawn
mower while starting
engine or operating
mower. Never run
engine indoorsor
in enclosed, poorly
ventilated areas. En-
gine exhaust contains
carbon monoxide, an
odorless and deadly
gas. Keep hands, feet,
hair and loose clothing
away from any moving
parts on engine and
lawn mower.
9
Page 10

:wARN!NG
Always stopengine,
disconnectspark
plug,andground
againstenginebefore
cleaning,lubricating
or doing any kindof
maintenanceonyour
machine!
if unit istipped for
easieraccessto
bladeorbeltltip
mowerasspecified
inseparateengine
manual,ifitdoesnot
specifyturnmower
on its sidemaking
sure that the air filter
and the carburetor
cuttinggrassin
sandy soil Condition
causes abrasive wear
to the bladei
Lubricate
thesepoints
before
reasembly.
Figure 10
Lubrication
1. Lubricatethepivotpointsonthebladecontrolhandle
atleastoncea seasonwithlightoil. Theblade
controlmustoperatefreelyin bothdirections.See
Figure10.
2. If yourmoweris equippedwith ballbearingwheels,
lubricateat leastonce a seasonwitha light oil,all
othertypes requireno lubrication.However,ifthe
wheelsareremovedforany reason,lubricatethe
surfaceoftheaxle boltandthe innersurfaceofthe
wheelwithlightautomotiveoil.
3. Lubricatethetorsionspringandpivotpointperiodi-
callywithlightoil topreventrust.SeeFigure10.
4. Followthe accompanyingenginemanualforlubrica-
tionscheduleandinstruction.
Engine
.
Refertothe separateenginemanualforengine
maintenanceinstructions.
2.
Maintainengineoil asinstructedinthe separate
enginemanualpackedwithyourunit. Readand
followinstructionscarefully.
.
Undernormalconditionsserviceaircleaneras in-
structedintheseparateengine manualpackedwith
yourunit. Cleaneveryfewhoursunderextremely
dustyconditions. Poorengineperformanceand
floodingusuallyindicatesthattheaircleanershould
be serviced.
4. The sparkplugshouldbecleanedandthegap
resetoncea season. Sparkplugreplacementis
recommendedatthe startof eachmowingseason;
checkenginemanualforcorrectplugtypeandgap
specifications.
NOTE:Thissparkignitionsystemmeetsall require-
mentsof theCanadianInterference-CausingEquipment
Regulations.
.
Cleantheengineregularlywithaclothor brush.
Keepthecoolingsystem(blowerhousingarea)clean
topermitproperair circulationwhichisessentialto
engineperformanceandlife.Becertaintoremoveall
grass,dirt andcombustibledebrisfrommufflerarea.
Deck
Theundersideofthe mowerdeckshouldbecleanedafter
eachuseto preventabuildupof grassclippings,leaves,
dirtorother matter.If thisdebrisisallowedtoaccumulate,
itwill inviterustandcorrosion,and maypreventproper
mulching.
Thedeckmaybecleanedbytiltingthe mowerandscrap-
ingcleanwitha suitabletool (makecertainthesparkplug
wireis disconnected).
Blade Care
Periodicallyinspectthebladeadapterforcracks,especial-
lyif youstrikea foreignobject.Replacewhennecessary.
Followthestepsbelowforbladeservice:
1. Removethebolt andthebladebellsupportwhich
holdthebladeandthe bladeadapterto theengine
crankshaft.SeeFigure11.
2. Removebladeandadapterfromthe crankshaft.
3. Theblademayberesharpenedby removingitand
eithergrindingorfilingthecuttingedgekeepingas
closetotheoriginalbevelaspossible.Donotattempt
tosharpenthebladewhile itis still onthe mower.
4. it is extremely important thateachcuttingedge
receivesanequalamountof grindingto preventan
unbalancedblade.
NOTE:improperbladebalancewillresultin excessive
vibrationcausingeventualdamageto theengineand
mower.Besuretocarefullybalancebladeaftersharpen-
ing.Possibledamageresultingfrombladeunbalance
conditionisnotthe responsibilityof themanufacturer.
NOTE:Alwaysremovebladefromtheadapterfortesting
balance.
5. Thebladecanbetestedforbalancebybalancingit
ona roundshaftscrewdriver.Removemetalfromthe
heavysideuntilit balancesevenly.
6 Beforereassemblingthebladeandthe bladeadapter
tothe unit,lubricatetheenginecrankshaftandthe
innersurfaceofthebladeadapterwithlightoil.
7. Installthebladeadapteron thecrankshaftwiththe
"star"awayfromtheengine.SeeFigure11.Place
thebladewiththe sidemarked"bottom"(orwithpart
number)facingawayfromthe adapter.Aligntheblade
bellsupportoverthe bladewiththetabsin theholesof
thebladeandinsertthe hexbolt.
8. Tightenthe hexbolttothetorquelistedbelow:
Blade Mounting Torque
CenterBolt450 in. lb.rain.,600 in.lb,max.
Toinsuresafeoperationofyourunit,ALLnutsand bolts
mustbecheckedperiodicallyfor correcttightness.
10
Page 11

/
J
Figure 11
,J
Drive Belt RemovalAnd Replacement
1. Drainthefueltankor placeapieceof plasticbeneath
thecapto preventgasolineleakage.
2. Togeteasieraccesstothe belt,just securelyplace
themoweronraisedblocks.
3. Removethetransmissioncoverbyslidingoff thetwo
plasticrivetswitha screwdriveroneachsideofcover.
SeeFigure12.
4. Removethe belttensionspringfromthefrontheight
adjustmentplateto releasethetensiononthebelt.
5. Pushthetransmissionupa littleandslidethebelt
offthetransmissionpulley.Liftthemowerto access
thebeltfromtheundersideofthe mower.Slidethe
beltoff the enginepulleyandaroundtheblade.See
Figure13.
6. Replacewiththe newbelt,workingaroundtheblade.
Makesurethe beltis firmlyseatedontheengine
pulleywhilepullingfromtheother sideandslidingit
aroundthetransmissionpulley.
7. Putthemowerdownwithallfourwheelsfirmlyplaced
onone level.Tightenthescrew,loosenedearlier,to
securethebelttensionspringto thetransmission,
andreassemblethefrontdrivecover.
Figure 12
Figure 13
Off-Season Storage
Thefollowingstepsshouldbetakento prepareyourlawn
mowerforstorage.
1. Cleanandlubricatemowerthoroughlyasdescribedin
thelubricationinstructions.
2. Wedo notrecommendtheuseof a pressurewasher
or gardenhoseto cleanyourunit.
3. Refertoenginemanualforcorrectengine
storageinstructions.
4. Coatmower'scuttingbladewithchassisgreaseto
preventrusting.
5. Storemowerin adry,cleanarea. Donotstorenextto
corrosivematerials,suchasfertilizer.
NOTE:Whenstoringanytypeof powerequipmentin
a poorlyventilatedor metalstorageshed,careshould
betakentorust-prooftheequipment.Usinga lightoilor
silicone,coattheequipment,especiallycablesandall
movingpartsofyourlawnmowerbeforestorage.
WA=.I.G
When removing the
cutting blade or belt,
protect your hands
With a pair of heavy
glovesor use a heavy
rag to hold the blade,
An unbalanced blade
will cause excessive
vibrationwhen rotat'
at highspeeds:It
may cause damage
to mower, and could
break causing per,
sonal injuryl
We do not recommend
the Used pressure
washers or garden
hose tOCleanyour
unit Thesemaycause
damage toe ectrical
components,spindles;
pulleys,bearings;or
the engi!e:The use
of waterwill resultin
Shortened life and
reduceSerViceabilityl
11
Page 12

Shooting
Problem Cause Remedy
Enginefails tostart i BladeControlhandledisengaged. !. Engagebladecontrolhandlel
2. Spark plugwiredisconnected, connect wiretoSpaAplugl
3 Fueltankemptyor stalefuei. & Filltank Withcleanlfreshgasolinel
Enginenotprimed 4. Refertoenginemanual
&FaUitY sparkp ugl clean adjustgaP oi replacel
Bockedfue ne 61 ceaniue iinel
7. Enginef!ooding_
7: Waitafew minutesto restart,butdonot prime.
For repairs beyond
theminor adjust-
ments listed here;
contactanautho;ized
service dealer.
Enginerunserratic
Engineoverheats 1. Engineoillevel low. 1. Fillcrankcasewithproperoil.
Occasionalskip(hesitates) 1. Sparkpluggaptoo close. 1. Adjustgapto .030".Referto enginemanual.
at highspeed 2. Carburetoridlemixtureadjustment 2. Referto enginemanual.
Excessivevibration 1. CuttingBladelooseor unbalanced. 1. Tightenbladeand adapter.Balanceblade
1. Sparkplugwireloose.
2. Blockedfuel lineorstale fuel.
3. Gascap vent plugged.
4. Wateror dirt infuel system.
5. Dirty aircleaner.
6. Carburetorout ofadjustment.
2. Drty airfilter 2. Refertothe enginemanualpackedwithyour
I 3. Airflow restricted. I 3. Removeblowerhousingandclean.
4. Carburetornotadjustedproperly. 4. Refertoenginemanual.
improperlyset.
1. Sparkpug fouled faulty or gaptoo 1 Resetgapto .030"orreplacesparkplug.
wide. Referto enginemanual.
2. Carburetorimproperlyadjusted. 2. Refertoenginemanual.
3. Dirtyair cleaner. _3. Referto enginemanual.
2. Bent cuttingblade. 2. Replaceblade.
1. Connectandtightenspark
plugwire.
2. Cleanfuel line;fill tankwithclean,fresh
gasoline.
3. Clearvent.
4. Drainfuel tankand carburetor.Refillwithfresh
fuel.
5. Refertoenginemanual.
6. Refertoenginemanual.
unit.
!
i i/_II!IIIIi iil iiii!iiii !iii! i_i!
i_i i i ii i i i
Mowerw notmuch 1 Wetgrass 1. Do notmowwhengrassis wet
grass waituntillaterto cut.
2. Excessivehighgrass. 2. Mowonceata high cuttingheight,then mow
againat desiredheightormakea narrower
I I cuttngpath.
" 3. Dull blade. 3. Sharpenorreplace blade.
Unevencut 1. Wheelsnot positionedcorrectly. 1. Raceall fourwheelsin same heightposition.
2. Dullblade. 2. Sharpenor replaceblade.
WheelswII notpropel 1. Beltnot installedproperly. 1. Checkingbeltfor properpulleyinstallationand
I ' movement
2. Debriscloggingdriveoperation. 2. Cleanout debris.
Page 13

MANUFACTURER'S LiMiTED WARRANTY FOR
Thelimitedwarrantysetforthbelowis givenby MTDLLCwithrespecttonew merchandisepurchasedandusedin theUnitedStatesand/orits territories
and possessions,and by MTDProductsLimitedwithrespecttonewmerchandisepurchasedandusedin Canadaand/oritsterritoriesandpossessions
(eitherentity respectively,"MTD").
MTDwarrantsthis product(excludingitsnormalwearpartsasdescribedbelow)againstdefectsinmaterialandworkmanshipfora periodoftwo(2)
yearscommencingonthe dateof originalpurchaseandwill,at its option,repairor replace,freeofcharge,anypartfoundtobedefectivein materials
or workmanship.Thislimitedwarrantyshallonlyapplyifthis producthasbeenoperatedandmaintainedinaccordancewiththe Operator'sManual
furnishedwiththeproduct,andhasnotbeensubjectto misuse,abuse,commercialuse,neglect,accident,impropermaintenance,alteration,vandalism,
theft,fire,water,ordamagebecauseofother perilornaturaldisaster.Damageresultingfromtheinstallationoruseofany part,accessoryorattachment
notapprovedbyMTDforusewiththeproduct(s)coveredbythis manualwillvoidyourwarrantyasto anyresultingdamage.
Normalwearpartsarewarrantedtobefreefromdefectsin materialandworkmanshipfor a periodofthirty(30) daysfromthe dateofpurchase.Normal
wearpartsinclude,but arenotlimitedto itemssuchas:batteries,belts,blades,bladeadapters,grassbags,riderdeckwheels,seats,snowthrowerskid
shoes,frictionwheels,shaveplates,augerspiralrubberandtires.
HOWTOOBTAINSERVICE:Warrantyserviceisavailable,WITHPROOFOFPURCHASE,throughyourlocalauthorizedservicedealer.Tolocatethe
dealerinyourarea;
In the U.S.A.: CheckyourYellowPages,orcontactMTDLLCatRO.Box361131,Cleveland,Ohio44136-0019,orcall 1-800-800-7310or
1-330-220-4683or logon to ourWebsiteatwww.mtdproducts.com.
In Canada: ContactMTDProductsLimited,Kitchener,ON N2G4J1,orcall 1-800-668-1238or logon toourWebsiteatwww.mtdcanada.com.
Thislimitedwarrantydoesnotprovidecoverageinthefollowingcases:
a. The engineorcomponentpartsthereof.Theseitemsmaycarrya separatemanufacturer'swarranty.Referto applicablemanufacturer'swarrantyfor
termsandconditions.
b. Logsplitterpumps,valves,andcylindershaveaseparateone-yearwarranty.
c. Routinemaintenanceitemssuchas lubricants,filters,bladesharpening,tune-ups,brakeadjustments,clutchadjustments,deckadjustments,and
normaldeteriorationoftheexteriorfinishdue to useorexposure.
d. Servicecompletedbysomeoneotherthananauthorizedservicedealer.
e. MTDdoesnotextendanywarrantyforproductssoldor exportedoutsideof theUnitedStatesand/orCanada,andtheirrespectivepossessionsand
territories,exceptthosesoldthroughMTD'sauthorizedchannelsofexportdistribution.
f. ReplacementpartsthatarenotgenuineMTDparts.
g. Transportationchargesandservicecalls.
h. If Productsare usedcommercially.(MTDmayseparatelyofferLimitedCommercialWarrantiesoncertainselectproducts.Askyourdealeror retailer
fordetailsor contactMTDServiceformore information.)
No impliedwarranty, includinganyimpliedwarrantyof merchantability of fitness for a particular purpose,appliesafter the applicable period
of expresswritten warranty above asto the partsas identified.Noother expresswarranty,whetherwritten or oral, exceptas mentioned
above, givenby any personor entity,includingadealer or retailer, withrespect to any product,shallbindMTD.Duringthe period of the
warranty, the exclusive remedyisrepairorreplacementof the productassetforth above.
Theprovisions as setforth inthis warrantyprovidethe soleand exclusive remedy arising from thesale. MTDshallnot be liablefor incidental
or consequential lossor damage including,without limitation,expensesincurredfor substituteor replacementlawncareservicesor for
rentalexpensesto temporarily replacea warranted product.
Somejurisdictionsdonotallowthe exclusionorlimitationof incidentalorconsequentialdamages,or limitationson howlonganimpliedwarrantylasts,
sothe aboveexclusionsor limitationsmaynot applytoyou.
Innoeventshall recoveryof anykind begreaterthantheamountofthepurchasepriceof theproductsold.Alterationof safetyfeatures of the
productshall void thiswarranty. Youassumetheriskandliabilityfor loss,damage,orinjuryto youandyourpropertyand/orto othersandtheir
propertyarisingout ofthe misuseorinabilitytouse theproduct.
Thislimitedwarrantyshallnotextendto anyoneotherthantheoriginalpurchaseror to thepersonforwhomitwaspurchasedasa gift.
NOWLOCALLAWSRELATETOTHIS WARRANTY:Thislimitedwarrantygivesyouspecificlegalrights,andyoumayalsohaveotherrightsthatvary
in differentjurisdictions.
iMPORTANT:OwnermustpresentOriginalProofof Purchasetoobtainwarrantycoverage.
MTDLLC,P.O.BOX361131CLEVELAND,OHiO44136-0019;Phone:1-600-600-7310,1-330-220-4683
MTDProducts Ltd., P.O.BOX1386,KITCHENER,ONN2G4J1; Phone: 1-800-668-1238
13
Page 14

\\\\\
\
\
\
14
Page 15

REF
NO,
N° DE
REF
I
PART
NO.
N° DE
PIECE
747-1214
747-1161A
746-1114
746-04274
749-1092A
710-1205
720-0279
732-1026
687-02139
710-1174
736-0451
720-0284
749-04037
725-0157
17098
731-04019
710-0599
682-3064
736-0741
712-04065
682-3065
887-02046
710-0654A
754-04100
782-0585A
728-0199
750-04407
716-0198
618-04375
750-04406A
731-0073
748-04016A
742-0742A
736-0524B
710-1044
782-0584
741-0710
710-0216
720-0426
748-0455
731-04643
715-0221
717-1762
717-1761
732-04049
634-0190
747-0710
732-1014
731-1034B
736-0270
17032A
741-0751
687-02051
687-02140
687-02141
887-02094
738-1173
716-0865
734-1987
731-04045
748-0390
731-1035B
720-04072
DESCRIPTION
Drive Control Handle
Blade Control Handle
Blade Control Cable 50.56" Lg.
Drive Control Cable
Upper Handle
Rope Guide Bolt
Knob - ERS Guide 1/4-20
Spring Lever
Pivot Arm Assembly
Carriage Bolt 5/16-18 x 2.0
Saddle Washer .320 ID x .93 OD x .06
Wing Nut
Lower Handle
Cable Tie
Hinge Clip
Trail Shield
Hex Wash S-Tapp Scr 1/4-20 x .50
Handle Bracket Ass'y RH
Cupped Washer .760 ID x 1.25 OD x .041
Flanged Lock Nut 3/8-16
Handle Bracket Ass'y LH
Deck Ass'y
Hex Wash HD Tap Scr 3/8-16 x .88
V-Belt
Forward Height Adjustment plate - LH
Plastic Rivet
Sleeve Spacer .550 ID x 2.22 OD
Retainer Ring
Transmission Assembly Complete
Sleeve Spacer .550 ID x 8.51 OD
Transmission Cover
Blade Adapter
Mulching Blade 22"
Bell Blade Support
Hex Bolt 3/8-24 x 1.5" Lg. (Grade 8)
Forward Height Adjustment plate - RH
Sleeve Brg..502 x .627 x 1.0
Hex Cap Screw 3/8-16 x .75
Knob
Bearing Support
Dust Wheel Cover
Pin
Spur Gear 14T RH
Spur Gear 14T LH
Ext. Spring .47 OD x2.50
Wheel Ass'y Comp. 8 x 1.8 Spoke Bar
Hinge Pin
Torsion Spring
',Side Discharge Assembly
Cupped Washer .25 ID x .88 OD X .062
Chute Adapter
Height Adjuster Bearing
Lever Ass'y
Spring Lever Assembly (LH)
Spring Lever Assembly (RH)
Pivot Arm Assembly
Shoulder Screw 3/8-16
Snap Ring
Wheel Ass'y Comp. 8 x 1.8
Snap Mulching Plug
Bearing Spacer
Chute Deflector
Knob - Star 5/16-18
DESCRIPTION
Poignee de commande d'embrayage de I'entrafnment
Poignee de commande de la lame
C&ble de commande de la lame 50,56 po de Ig.
C&ble de commande d'embrayage de I'entrainement
Guidon superieur
Boulon de guidage de cordon
Bouton - 1/4-20
Levier de ressort
Bras de pivot
Boulon ordinaire 5/16-18 x 2.0
Rondelle selle 0,320 DI x 0,93 DE x 0,06
€:crou & oreilles
Guidon inf@ieur
Attache c&ble
Attache
Abattant de protection arriere
Vis autotaraudeuse & rondelle hex. 1/4-20 x 0,50
Support-droite
Rondelle creuse 0,760 x 1,25 x 0,041
Ecrou de blocage 3/8-16
Support de montage du guidon CG
Plateau de coupe
Vis autotaraudee 3/8-16 x 0,88
Courroie trapezoidale
Plaque de reglage avant - CG
Rivet en plastique
Entretoise 0,550 DI x 2,22 DE
Bague
Transmission
Entretoise 0,550 DI x 8,51 DE
Couvercle de la transmission
Adaptateur de la lame
Lame dechiqueteuse 22 po
Support
Vis & t_te hex. 3/8-24 x 1,50 po de Ig (Qual. 8)
Plaque de reglage avant - CD
Roulement 0,502 x 0,627 x 1,0
Vis & chapeau & six pans de 3/8-16 x 0,75
Bouton
Support
Couvercle
Goupille
Engrenage 14 dents droite
Engrenage 14 dents gauche
Ressort d'extension 0,47 x 2,50
Ensemble de roue complet 8 x 1,80
Axe fixe
Ressort de torsion
Deflecteur lat@ale
Rondelle creuse 0,25 DI x 0,88 DE x 0,062
Adaptateur de la deflecteur
Roulement
Levier
Levier de ressort (CG)
Levier de ressort (CD)
Bras de pivot
Vis & epaulement 3/8-16
Joint
Ensemble de roue complet 8 x 1,80
Deflecteur de dechiquetage
Entretoise
Deflecteur
Bouton - etoile 5/16-18
12A-263
10.25.05
d6tach es
Forparts and/or
accessories refer to
customersupport on
page 2.
Adressez-vous au
,_Serviceapr_s-vente_,
&la page 2 pour ce qui
concerneles pi_ces
et/ou accessoires.
15
 Loading...