


Safety • Assembly • Operation • Tips & Techniques • Maintenance • Troubleshooting • Parts Lists • Warranty
A O A AL
21" Hi=Wheel Mower- Model Series 540
iMPORTANT
READ SAFETY RULES AND iNSTRUCTiONS CAREFULLY BEFORE OPERATION
Warning: Thisunitisequippedwithaninternalcombustionengineandshouldnotbeusedon or nearanyunimprovedforest-covered,brush-
coveredor grass-coveredlandunlesstheengine'sexhaustsystemisequippedwitha sparkarrestermeetingapplicablelocalor statelaws(if any).
If a sparkarresterisused,it shouldbemaintainedineffectiveworkingorderby theoperator.IntheStateofCaliforniatheaboveisrequiredbylaw
(Section4442oftheCaliforniaPublicResourcesCode).Otherstatesmayhavesimilarlaws.Federallawsapplyonfederallands.A sparkarrester
forthemufflerisavailablethroughyournearestengineauthorizedservicedealeror contactthe servicedepartment,RO.Box361131Cleveland,
Ohio44136-0019.
FORMNO.769-00447E
PRINTEDIN U.S.A.
MTD LLC, P.O. BOX 361131 CLEVELAND, OHIO 44136-0019
3/17/2006

This Operator's Manual is an important part of your new lawn mower, it will help you assemble,
prepare and maintain the unit for best performance. Please read and understand what it says.
Table of Contents
Customer Support .............................................. 2
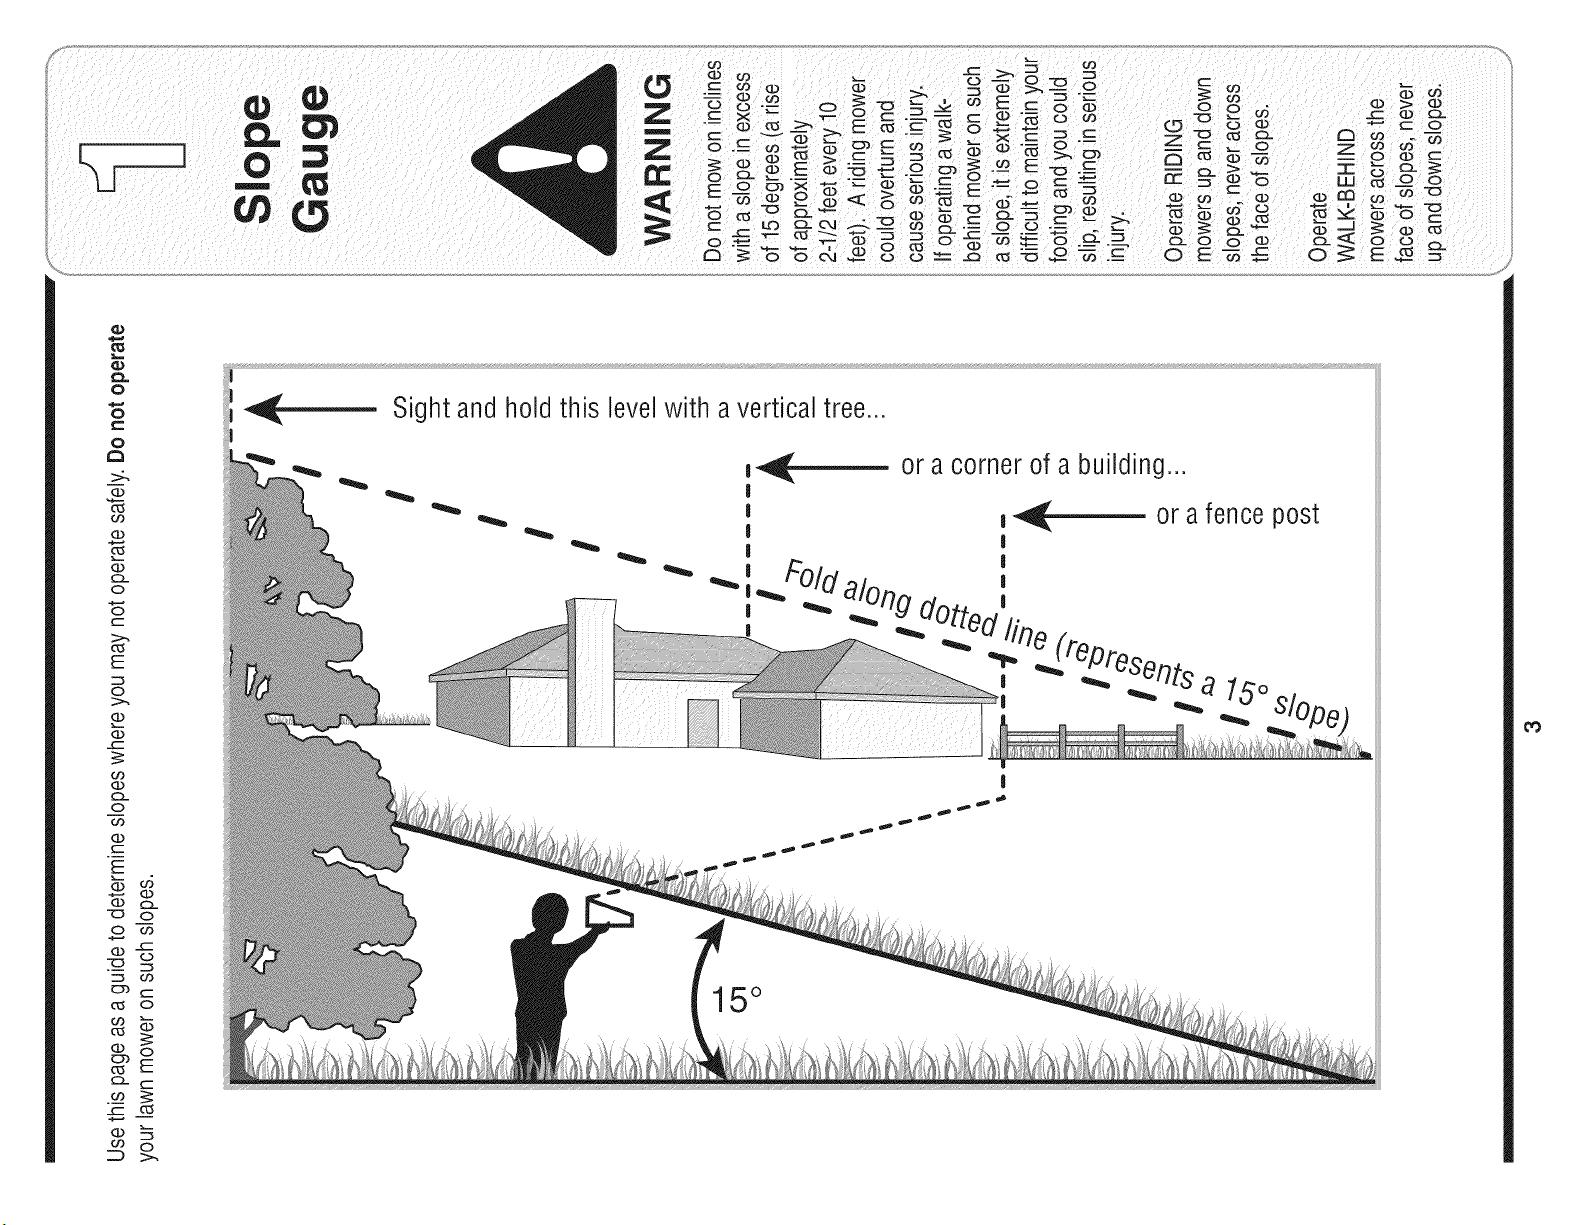
Slope Guage ........................................................ 3
Safe Operation Practices ................................... 4
Setup And Adjustment ....................................... 6
Operating Your Lawn Mower .............................. 8
Finding and Recording Model Number
BEFOREASSEMBLINGYOURNEW EQUIPMENT,
please locatethe modelplate onthe equipmentand copy
the informationto the sample modelplate providedto the
right.You can locatethe model plate bystanding at the
operatingposition and looking down at the rear of the
deck.This informationwill be necessarywhen using the
manufacturer'swebsite, to obtainassistance from the
CustomerSupport Department, or when contacting an
authorizedservice dealer.
Maintaining Your Lawn Mower ......................... 10
Troubleshooting ................................................ 12
Safety Labels .................................................... 13
Parts List ........................................................... 14
Warranty ............................................ Back Cover
f
Model Number
Serial Number
MTD LLC
P.O. BOX 361131
CLEVELAND, OH 44136
®
www.mtdproducts,com
330 -220 -4683
800-800-731 0
J
Customer Support
Please do NOTreturn the unit to the retailer from which it was
purchased, without first contacting Customer Support.
Ifyou havedifficulty assembling this productor haveany questionsregarding the controls, operation, or maintenanceof this
unit,youcan seek helpfrom the experts. Choose from the options below:
1. Visit mtdproducts.com. Clickon the Service& Support menuoption.
MTD Intem_fic_al Award Wi_n i_ IProd_cf_ i _r Compe_y ct L& _ri'_,ocy Polly
Ser,#ice 8,_Suppe_
Product Registration
2. Phonea Customer Support Representative at 1 (800) 800-7310.
3. Theengine manufacturer is responsible for all engine-related issues with regards to performance,power-rating,specifica-
tions,warrantyand service. Pleaserefer to the engine manufacturer'sOwner's/Operator'sManual, packedseparatelywith
your unit,for more information.
2
O
o
1=
Sightandholdthis levelwith a verticaltree...
o
>:.
(13
O3
(13
(13
O-
O
O
(--
O5
E
O
(13
(13
also
o3
(13
O-
O
o3
(13
I
E
o5
(]3
(13
(13
O-
O
O3
o
(13
-5
C5
O3
('5
O
O3
O5
(13
O
E
t"b
(13
O9
15°
WARNING: EngineExhaust,some of its constituents,andcertain vehicle compo-
nentscontain or emit chemicals knownto Stateof Californiato cause cancerand
birth defects or other reproductiveharm.
DANGER: This machinewas builtto beoperatedaccordingto the rulesfor safe operationin this
manual.As with anytypeof power equipment,carelessnessor error on the part of the operator can
result in seriousinjury.This machine iscapableof amputatinghands andfeet andthrowing objects.
Failureto observethe followingsafetyinstructionscould result in serious injury or death.
WARNING
Thissymbolpoints
out importantsafety
instructionswhich,if
notfollowed,could
endangerthe personal
i safetyand/or property
I ofyourselfandothers.
Readandfollowall
instructionsinthis
manualbeforeat-
temptingto operate
i this machine.Failure
I to complywiththese
instructionsmayresult
i inpersonalinjury.When
youseethis symbol.
i HEED ITS WARNING!
Your Responsibility
Restrictthe use
ofthis powermachine
to personswho read,
_understand
ano followthe warnings
and instructions
inthis manual
and on the machine.
Children
Tragicaccidentscanoccurifoperatorisnotalertto presence
ofchildren.Childrenareoftenattractedtomowerandmowing
activity.Theydonot understandthe dangers.Neverassume
thatchildrenwill remainwhereyoulastsawthem.
1. Keepchildrenoutof the mowingareaandunderwatchful
careof a responsibleadultotherthanthe operator.
2. Bealert andturn moweroff if a childentersthearea.
3. Beforeandwhilemovingbackwards,lookbehindanddown
forsmallchildren.
4. Useextremecarewhenapproachingblindcorners,
doorways,shrubs,trees,or otherobjectsthatmayobscure
yourvisionofachild whomayrunintothe mower.
5. Keepchildrenawayfromhotorrunningengines.Theycan
sufferburnsfroma hotmuffler.
6. Neverallowchildrenunder14yearsoldto operateapower
mower.Children14yearsoldandovershouldreadand
understandoperationinstructionsandsafetyrulesinthis
manualandshouldbetrainedandsupervisedbya parent.
General Operation
1. Readthis operator'smanualcarefullyin its entiretybefore
attemptingtoassemblethismachine.Read,understand,
andfollowall instructionsonthemachineandin the
manual(s)beforeoperation.Becompletelyfamiliarwith
thecontrolsandthe properuseofthis machinebefore
operatingit.Keepthis manualin asafeplaceforfuture
andregularreferenceandfor orderingreplacementparts.
2. Thismachineisaprecisionpieceof powerequipment,
nota plaything.Therefore,exerciseextremecautionat all
times.Yourunithas beendesignedto performonejob: to
mowgrass.Do notuseitfor anyotherpurpose.
3. Neverallow childrenunder 14yearsoldto operatethis
machine.Children14yearsoldand overshould readand
understandthe instructionsinthismanualandshould
betrainedand supervisedbya parent.Onlyresponsible
individualswhoarefamiliarwiththeserulesofsafe
operationshouldbeallowedto usethis machine.
4. Thoroughlyinspectthe areawherethe equipmentisto
beused.Removeallstones,sticks,wire,bones,toys
andotherforeignobjects,whichcouldbetrippedoveror
pickedupandthrownbytheblade.Thrownobjectscan
causeseriouspersonalinjury.Planyour mowingpattern
toavoiddischargeofmaterialtowardroads,sidewalks,
bystandersandthe like.Also,avoiddischargingmaterial
againsta wall or obstruction,whichmaycausedischarged
materialto ricochetbacktowardthe operator.
5. Tohelpavoidbladecontactorathrownobjectinjury,
stayinoperatorzone behindhandlesand keepchildren,
bystanders,helpersandpetsatleast75feetfrom mower
whileitis inoperation.Stopmachineifanyoneenters
area.
6. Alwayswearsafetyglassesor safetygogglesduringopera-
tionandwhile performinganadjustmentor repairto protect
youreyes.Thrownobjectswhichricochetcancauseserious
injurytothe eyes.
7. Wearsturdy,rough-soledworkshoesand close-fitting
slacksandshirts. Shirtsand pantsthatcoverthe armsand
legsandsteel-toedshoesarerecommended.Neveroperate
thismachinein barefeet,sandals,slipperyorlight-weight
(e.g.canvas)shoes.
8. Do notputhandsorfeet nearrotatingpartsor undercutting
deck.Contactwithbladecanamputatehandsandfeet.
9. A missingor damageddischargecovercancauseblade
contactor thrownobject injuries.
10.Manyinjuriesoccuras a resultofthemowerbeing pulled
overthefoot duringa fall causedbyslippingor tripping.
Do notholdontothe mowerifyouarefalling;releasethe
handleimmediately.
11.Neverpullthe mowerbacktowardyouwhileyouare
walking.Ifyoumust backthe mowerawayfroma wallor
obstructionfirstlookdownandbehindtoavoidtrippingand
thenfollowthesesteps:
a. Stepbackfrommowertofullyextendyourarms.
b. Besure youarewellbalancedwithsurefooting.
c. Pullthe mowerbackslowly,no morethan half way
towardyou.
d. Repeatthesestepsas needed.
12.Donotoperatethe mowerwhileunderthe influenceof
alcoholordrugs.
13.Donotengagetheself-propelledmechanismon unitsso
equippedwhilestartingengine.
14.Thebladecontrolhandleisasafetydevice.Neverattempt
tobypassitsoperation.Doingso makesthe safetydevice
inoperativeandmayresult in personalinjurythrough
contactwiththe rotatingblade.Thebladecontrolhandle
mustoperateeasily in bothdirectionsandautomatically
returntothe disengagedpositionwhenreleased.
15.Neveroperatethe mowerinwetgrass.Alwaysbesureof
yourfooting. A slipandfall cancauseseriouspersonal
injury.If youfeelyouarelosingyourfooting,releasethe
bladecontrolhandleimmediatelyand the bladewillstop
rotatingwithinthreeseconds.
16.Mowonlyin daylightor goodartificiallight.Walk,neverrun.
17.Stopthe bladewhencrossinggraveldrives,walksor roads.
18.Iftheequipmentshouldstartto vibrateabnormally,stopthe
engineandcheckimmediatelyforthe cause.Vibrationis
generallya warningoftrouble.
4
19.Shuttheengineoff andwait untilthebladecomesto a
completestopbeforeremovingthegrasscatcheror unclog-
ging thechute.
The cuttingbladecontinuesto rotatefor a fewsecondsafter
the engineisshutoff.Neverplaceany partofthe bodyin
the bladearea untilyou are surethe blade hasstopped
rotating.
20. Neveroperatemowerwithoutpropertrail shield,discharge
cover,grasscatcher,bladecontrolhandleor othersafety
protectivedevicesin placeandworking.Neveroperate
mowerwithdamagedsafetydevices.Failuretodo so can
resultin personalinjury.
21. Mufflerandenginebecomehotandcan causeaburn.Do
nottouch.
22.Onlyusepartsand accessoriesmadeforthis machineby
manufacturer.Failuretodo so canresultinpersonalinjury.
23. Ifsituationsoccurwhicharenotcoveredinthis manual,
usecareand goodjudgment.Contactyourdealerfor
assistance.Telephone1-800-800-7310forthe nameofyour
nearestdealer.
Slope Operation
Slopesare amajorfactorrelatedto slipandfallaccidents,which
can resultinsevereinjury.Operationonslopesrequiresextra
caution.Ifyoufeeluneasyona slope,do notmowit.Foryour
safety,usetheslopegaugeincludedaspartof this manualto
measureslopesbeforeoperatingthis unitonaslopedor hilly
area.Iftheslopeisgreaterthan 15degrees,donot mowit.
Do:
1. Mowacrossthefaceof slopes;neverupanddown.Exercise
extremecautionwhenchangingdirectiononslopes.
2. Watchfor holes,ruts,rocks, hiddenobjects,or bumpswhich
can causeyouto slipor trip.Tallgrass canhideobstacles.
3. Alwaysbesureofyourfooting.A slip andfallcancause
seriouspersonalinjury.Ifyoufeelyouare losingyour
balance,releasethebladecontrolhandleimmediately,and
the bladewill stoprotatingwithin 3seconds.
Do Not:
1. Donot mowneardrop-offs,ditchesorembankments,you
could loseyourfootingorbalance.
2. Donot mowslopesgreaterthan 15degreesasshownon
the slopegauge.
3. Donot mowon wetgrass.Unstablefootingcouldcause
slipping.
Service
Safe HandlingOf Gasoline:
1. To avoidpersonalinjury orpropertydamageuseextreme
care inhandlinggasoline.Gasolineisextremelyflammable
andthevaporsareexplosive.Seriouspersonalinjurycan
occurwhengasolineisspilledonyourselforyourclothes,
whichcanignite.
2. Wash yourskin andchangeclothesimmediately.
3. Useonly anapprovedgasolinecontainer.
4. Neverfillcontainersinsideavehicleoron atruckor trailer
bedwitha plasticliner.Alwaysplacecontainersonthe
groundawayfromyourvehicle beforefilling.
5. Removegas-poweredequipmentfromthetruck ortrailer
andrefuelit onthe ground.Ifthis is notpossible,thenrefuel
suchequipmenton a trailerwitha portablecontainer,rather
thanfroma gasoline dispensernozzle.
6. Keepthe nozzleincontactwiththe rimofthefueltank or
containeropeningat alltimesuntil fuelingis complete.Do
notuseanozzlelock-opendevice.
7. Extinguishallcigarettes,cigars, pipesandothersources
ofignition.
8. Neverfuel machineindoorbecauseflammablevaporswill
accumulatein thearea.
9. Neverremovegascap oraddfuelwhileengineishot or
running. Allowengineto coolatleasttwo minutesbefore
refueling.
10.Neveroverfillfueltank.Filltankto nomorethanY2inch
belowbottomoffiller neckto providefor fuelexpansion.
11.Replacegasolinecap andtightensecurely.
12.Ifgasolineis spilled,wipeitoff theengineandequipment.
Moveunitto anotherarea.Wait5minutesbeforestarting
engine.
13.Neverstorethe machineorfuel containernearanopen
flame,sparkor pilot lightasona waterheater,space
heater,furnace,clothesdryeror othergasappliances.
14.Toreducefire hazard,keepmowerfreeof grass,leaves,
orotherdebrisbuild-up.Cleanupoil orfuelspillageand
removeanyfuel soakeddebris.
15.Allowa mowertocool at least5 minutesbeforestoring.
GeneralService:
1. Neverrunanengineindoorsorina poorlyventilatedarea.
Engineexhaustcontainscarbonmonoxide,anodorlessand
deadlygas.
2. Beforecleaning,repairing,orinspecting,makecertainthe
bladeandall movingpartshavestopped.Disconnectthe
sparkplugwireandgroundagainstthe engineto prevent
unintendedstarting.
3. Checkthebladeandenginemountingboltsatfrequent
intervalsfor propertightness.Also,visuallyinspectbladefor
damage(e.g.,bent,cracked,worn)Replacebladewiththe
originalequipmentmanufacture's(O.E.M.)bladeonly,listed
inthismanual."Useof partswhichdo notmeetthe original
equipmentspecificationsmayleadto improperperformance
andcompromisesafety!"
4. Mowerbladesaresharpandcancut.Wrapthebladeor wear
gloves,anduseextracautionwhenservicingthem.
5. Keepallnuts,bolts,andscrewstightto besurethe equip-
mentis insafeworkingcondition.
6. Nevertamperwithsafetydevices.Checktheirproperopera-
tionregularly.
7. Afterstrikingaforeignobject,stopthe engine,discon-
nectthesparkplugwireandgroundagainsttheengine.
Thoroughlyinspectthemowerforanydamage.Repairthe
damagebeforestartingandoperatingthemower.
8. Neverattemptto makeawheelor cuttingheightadjustment
whiletheengineis running.
9. Grasscatchercomponents,dischargecover,andtrail
shieldaresubjecttowear anddamagewhichcouldexpose
movingpartsor allowobjectsto bethrown.Forsafety
protection,frequentlycheckcomponentsandreplaceim-
mediatelywithoriginal equipmentmanufacturer's(O.E.M.)
partsonly,listedinthis manual."Useofpartswhich do
notmeetthe originalequipmentspecificationsmayleadto
improperperformanceandcompromisesafety!"
10.Donotchangetheenginegovernorsettingor over-revthe
engine.Thegovernorcontrolsthe maximumsafeoperating
speedoftheengine.
11.Maintainorreplacesafetylabels,asnecessary.
12.Observeproperdisposallawsand regulations.Improper
disposaloffluidsand materialscanharmtheenvironment.
Operation
WARNING
Thissymbol points
out importantsafety
instructions,which if
notfollowed,could
endangerthe personal
safety and/or property
of yourselfand others.
Readand followall
instructions inthis man-
ual before attemptingto
operatethis machine.
Failureto comply with
these instructionsmay
result in personalinjury.
Whenyou seethis
symbol.
HEED IT'S WARNING!
YourResponsibility
Restrictthe use
of this powermachine
to personswho read.
understand
and followthe warnings
and instructions
in this manua
and on the machine.
5

Standbehindthe
mowerasifyouwere
goingtooperateit.
Yourrighthandcor-
respondstotheright
sideofthemower;your
lefthandcorresponds
totheleftsideofthe
mower.
I Makesureto route
i cable outsidethe lower
handle. Do not crimp
cablewhile liftingthe
handleup.
Figure3-1:Unfoldhandle,tightenhardwareandattachwheel.
Hardware Pack
Wing Nuts (2) Carriage Bolts (2)
Figure3-2:Securelowerhandleto mountingbrackets.
1. Removeanypackingmaterialwhichmaybebetween
upperandlowerhandles.
a. Pullupand backon upperhandleasshownin
Figure3-1.Makecertainthelowerhandleisseated
securelyintothehandlemountingbrackets.Donot
crimpcablewhile liftingthe handleup.
b. Tightenstarknobstosecureupperhandleto
lowerhandle.Makesurethateachcarriageboltis
seatedproperlyinthehandle.
c. Placeablockunderthemowerdecktoraisethe
unitoffofthegroundandremovetheflangelock
nutfromthe axle.Installrearwheelandreplaceand
tightentheflangelocknut.Repeatontheotherside.
2. Locatethe hairpinclipon the weldpinon eachsideof
lowerhandle.
a.
Removehairpinclipfromthishole.Usinga pair
ofpliers,inserthairpinclipintothe holeon pin
closesttothebracket,Figure3-2.Repeatonother
side.
b. Insertacarriageboltfromthehardwarepackinto
theupperholeonthehandlemountingbracket.
Securewithone plasticwingnut,alsoincluded
inthehardwarepack.Repeatonothersidewith
remainingitemsfromhardwarepack.
.
Theropeguideisattachedtotherightsideofthe
upperhandle,Figure3-3.Loosenthewingnutwhich
securestheropeguide.
a. Holdbladecontrolhandleagainstupperhandle.
b. Pullstarterropeoutofthe engine.Releaseblade
controlhandle.
c. Slipstarterropeinto ropeguide.
d. Tightenwingnut.
.
Insertpostoncabletiesintoholesprovidedon the
lowerhandle.Pullcabletiestightandtrimexcess,
Figure3-4.
IMPORTANT
i This unitis shipped
without gasolineor
oil in the engine. Fill
upgasolineand oil
as instructed inthe
accompanyingengine
i manual BEFORE
operatingyour mower.
Figure3-3:Pullrecoilstarterthroughropeguideandtighten.
\
Figure3-4:Securecablestohandleusingcableties.
6
,J

5. 7. Yourmoweris shippedasa mulcher.Toconvertto
Followstepsbelowtoassemblethegrasscatcher.
Makecertainbagisturnedrightsideout before
assembling(warninglabelwillbe ontheoutside)
a. Placebagoverframesothat itsblackplasticside
is at thebottom.
b. Slip plasticchannelof grassbagoverhooksonthe
frame,Figure3-5.All theplasticchannelsexcept
centertopofbagattachfromoutsideofbag.
c. Attachcentertopofbagfrominsideof bag.
sidedischarge,makesuregrasscatcherisoff ofthe
unitand reardischargedoorisclosed.
a. Onthesideofthe mower,liftthemulchingplug,
Figure3-7.
b. Slidetwohooksofside dischargechuteunder
hingepinonmulchingplugassembly.Lowerthe
mulchingplug.Donotremovesidemulchingplug
atanytime,evenwhenyouarenotmulching.
\
/
Figure3-7:Liftmulchplugandinstallsidedischargechute.
Adjustment
'_ .y
Figure3-5:Assemblethegrasscatcher.
6. Followthestepsbelowtoattachthe grasscatcher:
a. Liftreardischargedoor,Figure3-6.
b. Placegrasscatcheron thepivotrod.Letgo
ofdischargedoorsothatit restson thegrass
catcher.
_ WARNING:Neveroperate mower unless the
on the pivotrod and the reardischargedoor rests
firmly against top of thegrasscatcher.
hooksonthe grasscatcherarefirmly seated
Adjustments
Anadjustingplateandthumbleverateachwheel
providescuttingheightadjustment.
1. Depresslevertowardswheel.
2. Moveittoanyoneofthepositionsfordesiredcutting
height,Figure3-8. Makesurethateachwheelis
positionedatthesameheight.
3. Releaselevertowardsmowerdeck.
When adjustingthe
cutting height, all wheels
must be positioned at
the sameheighL
WARNING
Neveroperate mower
w thootthem,,o, og
plug, the grasscatcher,
or the discharge chute
properly installed'
Figure3-6:Attachthegrasscatcher.
j'i
Figure3-8:Useleverstoadjustcuttingheight.
7

Mower
WARNING
/
Know Your Lawn Mower
f BladeControl
Recoil Starter=====_,
GrassCatcher_
The blade control isa
safety device. Never
attempt to bypass its
operations.
i Useextreme carewhen
; handling gasoline.
Gasoline is extremely
flammable and the
vapors are explosive.
Neverfuel the machine
i indoors or while the
; engine is hot or running.
; Exhngwsh c_garettes,
cigars, pipes, and other
sources of ignition.
Keep hands and feet
away from the cutting
deck. Referto warning
label on the unit.
MulchPlug--
Side Discharge Chute _,.__
Figure4-1:The majorparts onthelawnmower.
Now that you have set up your lawn mower for
operation, read this section to become acquainted
with its controls and features. This knowledge will
allow you to use your new equipment to its fullest
potential.
Blade Control
The blade control is attached to the upper handle.
Depress and squeeze it against the upper handle
to operate the unit. Release it to stop engine and
blade.
_1_11=WARNING:Thisbladecontrolis a safety
device.Donot bypass its operations.
Cutting Height Adjustment Levers
One adjustment lever is located on each wheel and
is used to adjust the cutting height. All four wheels
must be at the same position to ensure a uniform
cut.
Recoil Starter
The recoil starter is attached to the right upper
handle. Stand behind the unit and pull the recoil
starter rope to start the unit.
Mulch Plug
The mulch plug is used for mulching purposes.
Instead of collecting the grass clippings in a grass
catcher or using the side discharge chute, some
mower models have the option of recirculating the
clippings back to the lawn. This is called mulching.
Grass Catcher
The grass catcher, located at the rear of the mower,
is used to bag the grass clippings for disposal at an-
other site. Once the bag is full, it has to be removed
from the mower and emptied before any further
mowing.
Gas and Oil Fill-Up
1. Check oil level and add oil if necessary. Follow engine
owner's manual forthis.
2. Servicethe enginewithgasolineasinstructedinthe
engineowner'smanual.
_b ARNING:Useextremecarewhenhandling
gasoline.Gasolineisextremelyflammable
and thevapors are explosive. Neverfuel the machine
indoorsor while the engineishotor running.Extin-
guish cigarettes,cigars,pipes,and other sourcesof
ignition.
8

_ ARNING:Theoperationofany lawn
youreyesseverely.Alwayswearsafetyglasses
whileoperatingthe moweror whileperformingany
adjustmentsor repairson it.
mowercan result inforeign objects being
thrownintothe eyeswhichcan damage
Starting Engine
,4_i_ WARNING:Besurenooneotherthan the
Neverrunengineindoorsorin enclosed,poorly
ventilatedareas.Engineexhaustcontainscarbon
monoxide, an odorlessand deadlygas. Keephands,
feet,hairand looseclothingawayfromanymoving
partsonengineandlawnmower.
NOTE:Referto the enginemanualfor help with
enginerelatedoperations.
1. Pushprimerthreetimes.Waitabouttwoseconds
betweeneachpush.SeeFigure4-2.Intemperature
around550For below,primefivetimes.Donotprime
to restarta warmengine.
2. Standingbehindthe mower,squeezethebladecontrol
againstupperhandle.SeeFigure4-2.
3. Holdingthesetwo handlestogetherfirmly,grasp recoil
starterhandleand pullropeoutwitha rapid,continu-
ous,fullarmstroke.SeeFigure4-2.Keepinga firm
grip onthestarterhandle,letthe roperewindslowly.
Repeatuntilenginecranks.Letthe roperewindeach
timeslowly.
operatorisstandingnearthe lawnmower
whilestartingengineor operatingmower.
Stopping Engine
1. Releasebladecontrolto stoptheengineand blade.
2. Disconnectsparkplugwirefromsparkplugand
groundagainsttheengine.
_ ARNING:Wait for the blade to stop
completely before performinganywork
on the mower or to removethe grass
catcher.
UsingYour Lawn Mower
,__ WARNING:Neveroperateyourmower
__ grasscatcher assembly firmly secured.
Besurelawnisclearof stones,sticks,wire,or other
objectswhichcoulddamagelawnmowerorengine.
Suchobjectscouldbe accidentlythrownbythemower
in anydirectionandcauseseriouspersonalinjurytothe
operatorandothers.
without eitherthe reardoor or the entire
Figure4-2:Startingthe mower.
_ ARNING:ifyou strikea foreign object,
for any damage,and repair damagebefore restart-
ingand operating. Extensive vibration of mower
during operation is an indicationof damage.The
unit should be promptlyinspectedand repaired.
1. Oncetheengineis running,squeezethe blade
controlagainsttheupperhandletoengagethe
blade.
• Forbestresults,donotcutwetgrassand never
cutoffmorethanone-thirdofthe totallengthofthe
grass.
stop the engine.Removewirefrom the
sparkplug,thoroughly inspectmower
Using as Mulcher
Formulchinggrass,removethegrasscatcherorside
dischargechutefromthemower.Thereardischarge
doorshouldbeclosed.
Foreffectivemulching,do notcutwetgrass.New
orthickgrassmayrequirea narrowercut. Adjust
groundspeedaccordingtoconditionoflawn.
• If thegrasshas beenallowedto growinexcessof
fourinches,mulchingisnotrecommended.Usethe
grasscatcherto bagclippingsinstead.
Using Grass Catcher
Youcanusethegrasscatchertocollectclippingswhile
youareoperatingthemower.
.
AttachgrasscatcherfollowinginstructionsinSetup
section.Grassclippingswillautomaticallycollectin
bagasyourunmower.Operatemowertillgrassbag
isfull.
2. Stopenginecompletelybyreleasingtheblade
control.Makesurethattheunithas cometoa
completestop.
3. Liftdischargedoorandpullgrassbagup andaway
fromthe mowerto removethebag.Disposeofthe
grassclippingsand reinstallthebagwhencomplete.
You r LaWn
Mow
WARNING
The operation of any
lawn mower can result
inforeign objects being
thrown intothe eyes,
which can damage your
eyes severely. Always
wear safety glasses
while operating the
mower or while perform-
ingany adjustments or
repairs on it.
Be sure no one other
than the operator is
standing near the
lawn mower while
starting engine or
operating mower. Never
run engine indoors or
in enclosed, poorly
ventilated areas. Engine
exhaust contains carbon
monoxide, an odorless
and deadly gas. Keep
hands, feet, hair and
loose clothing away
from any moving parts
on engine and lawn
mower....
9

Lubricate these
q
points before
reassembly.
Deck Care
Cleanundersideofthe mowerdeckaftereachuseto
preventbuild-upofgrassclippingsorotherdebris.Follow
stepsbelowforthisjob.
1. Disconnectsparkplugwire.Draingasolinefromlawn
mowerorplacea pieceof plasticunderthegascap.
2. Tip mowersothat itrestsonthe housing.Keepthe
sidewiththeaircleanerfacingup.Hold mowerfirmly.
A vays
disconnectspark
plugl and ground
againsten- nebefore
performinganytype
ofmaintenanceon
your macNnel
I iii i _ i
Do not usea pressure
WaSheror garden
hose to clean your
uniLThese may cause
damage to electriC
componentS;s indlesl
pulleys; bearings,or
the engine:The use
of water will resut in
shortened lifeand
reduceserviceability:
Figure5-1:Areasto lubricateonmower.
General Recommendations
• Alwaysobservesafetyruleswhen performing
anymaintenance.
• Thewarrantyonthislawnmowerdoesnotcover
itemsthathavebeensubjectedtooperatorabuse
ornegligence.Toreceivefullvaluefromwarranty,
operatormustmaintainthelawn moweras
instructedhere.
• Changingofengine-governedspeedwillvoid
enginewarranty.
• Alladjustmentsshouldbecheckedat leastonce
eachseason.
• Periodicallycheckallfastenersandmakesurethese
aretight.
_kl= ARNING:Alwaysstopengine,discon-
nect spark plug, and groundagainst
engine before performinganytype of
maintenanceon your machine.
Lubrication
1. Lubricatepivotpointson thebladecontrolatleast
oncea seasonwithlightoil.Thebladecontrolmust
operatefreelyinboth directions,Figure5-1.
2. Lubricatethewheelsatleastonceaseasonwith
lightoil (ormotoroil). If wheelsareremovedforany
reason,lubricatesurfaceof thepivotarmandinner
surfaceof thewheelwithlightoil,Figure5-1.
3. Lubricatethetorsionspringandpivotpointonthe
reardischargedoorandsidemulchplugperiodically
withlightoil topreventrust,Figure5-1.
4. Followtheaccompanyingenginemanualforlubrica-
tionscheduleandinstructionforenginelubrication.
,_ WARNING:Nevertip the mower more
time. Oil can drain intothe upper partof theengine
causing a starting problem.
3. Scrapeandcleantheundersideofthedeckwitha
suitabletool.Donotspraywithwater.
4. Putthemowerbackonitswheelsonthe ground.If
youhadputplasticunderthegascapearlier,make
sureto removeitnow.
than 90°in anydirection anddo not
leavethe mower tipped for any length of
Engine Care
A listofkeyenginemaintenancejobs requiredforgood
performanceby themowerisgivenbelow.Followthe
accompanyingenginemanualforadetailedlistand
instructions.
• Maintainoillevelasinstructedin enginemanual.
• Serviceaircleanerevery25hoursundernormal
conditions.Cleaneveryfewhoursunderextremely
dustyconditions.Poorengineperformanceand
floodingusuallyindicatesthattheaircleanershould
beserviced.Toservicetheaircleaner,referto the
enginemanual.
• Cleansparkplugandresetthegaponcea season.
Sparkplugreplacementisrecommendedat thestart
ofeachmowingseason.Checkenginemanualfor
correctplugtypeand gapspecifications.
• Cleanengineregularlywitha clothorbrush.Keepthe
coolingsystem(blowerhousingarea)cleantopermit
properaircirculation.Removeall grass,dirt,and
combustibledebrisfrommufflerarea.
10

Blade Care
F
_ ARNING:Whenremovingthe cutting
Periodicallyinspectthebladeadapterforcracks,
especiallyifyoustrikeaforeignobject.Replacewhen
necessary.Followthe stepsbelowforbladeservice.
1. Disconnectsparkplugwirefromsparkplug.Turn
moweron itssidemakingsurethattheairfilterand
thecarburetorarefacingup.
2. Removetheboltandthe bladebellsupportwhich
holdthebladeand thebladeadaptertotheengine
crankshaft,Figure5-2.
3. Removebladeandadapterfromthecrankshaft,
Figure5-2.
4. The bladecanbe sharpenedwithafileor on a grind-
ingwheel.Do notattemptto sharpenthebladewhileit
isstillonthemower.
Whensharpeningtheblade,followtheoriginalangle
ofgrind.Grindeachcuttingedgeequallyto keepthe
bladebalanced.
5. Totestforbalance,removebladeandbalanceon
a roundshaftscrewdriver.Removemetalfromthe
heavysideuntilitbalancesevenly.
_ ARNING:Anunbalanced bladewill
6. Lubricatetheenginecrankshaftandthe innersurface
ofthebladeadapterwithlightoil. Slidetheblade
adapterontotheenginecrankshaft.
7. Placethebladeon theadaptersuchthattheside
oftheblademarked"Bottom"(orwithpartnumber)
facesthe groundwhenthe mowerisintheoperating
position.Makesurethatthebladeisalignedand
seatedon thebladeadapterflanges.
8. Placebladebellsupportonthe blade.Alignnotches
on thebladebell supportwith smallholesinblade.
9. Replacehexboltandtightenhexboltto torque:450
in.Ibs. rain.,600 in.Ibs.max.
Toensuresafeoperationofyourmower,periodically
checkthe bladeboltforcorrecttorque.
bladefor sharpeningor replacement,
protectyourhandswith a pairof heavy
gloves or usea heavy ragto hold the
blade.
causeexcessivevibration when rotating
at high speeds. It maycausedamageto
mower and could break causing personal
injury.
Replacing Rear Flap
1. To removerearflap,cutofftheflat endofthewirerod
whichsecuresitto thedeck,Figure5-3.
2. Attachthenewflapandnewrodto deck,bendingthe
endsofthenewrodovertosecuretodeck.
Blade Bell Support / _,_ Bolt .........................
Figure5-2:Removethebolt,support,andadaptertoaccess
theblade.
Figure5-3:Cut wireto removerearflap.
Off-Season Storage
Thefollowingstepsshouldbetakento prepareyour
lawnmowerfor storage.
• Cleanandlubricatemowerthoroughlyas described
inthe lubricationinstructions.
• Donot usea pressurewasherorgardenhoseto
cleanyourunit.
Refertoenginemanualforcorrectengine
storageinstructions.
Coatmower'scuttingbladewithchassisgreaseto
preventrusting.
Storemowerina dry,cleanarea.Donot storenext
tocorrosivematerials,suchas fertilizer.
Whenstoringanytypeof powerequipmentinapoorly
ventilatedor metalstorageshed,careshouldbetaken
torust-prooftheequipment.Usingalightoil or silicone,
coattheequipment,especiallycablesandall moving
partsofyourlawnmowerbeforestorage.
Your LaWn
MoWer
WARNING
When removing
the cuttingblade
for sharpening or
replacement, protect
your handswith a pair
of heavy glovesor use
a heavy rag to hold
the blade.
An unbalanced blade
will causeexcessive
vibrationwhen rotat=
ing at high speeds, it
may causedamage
to mower and could
break causing per-
sonal injury.
11

Problem Cause Remedy
Engine fails to Start i adecontroldisengagedl b!adecontro!,
21 sparkplugWire disconnected• connect wiretospark p!ug•
31 FueltankemptyOrStalefuel• Ell!tankWithclean,!reshgasoline•
4. Enginenotprreed. 4. Primeengineas instructedin'fOperat,
ingyour LawnMowei!I,
5: Faultyspark pug 5, Clean,adjustgap, or replace.
6. BloCkedfuel linel 6, cieanfueliinel
7: Engineflooded. 7: Wait afew minutesto restart,but do
I netprime:
_iiii _ ii _ _ i _ _i _ i
Enginerunserratic 1. Sparkplugwireloose.
2. Blockedfuel lineor stalefuel.
3. Ventingascap plugged.
4. Wateror dirt infuel system.
5. Dirtyair cleaner.
6. Carburetorout ofadjustment.
Engine overheats 1 Engineoil levellow. 1. Fillcrankcasewithproperoil.
2....A rfow restrcted I 2 Removebower housngandcean
3. Carburetornotadjustedpropery. 3• Referto engne manua.
Occasional skips 1. Sparkpluggap tooclose. 1. Adjust gapto .030-inch.
(hesitates) at high speed 2. Carburetoridlemixtureadjustment 2. Referto enginemanual.
improperlyset.
Idles poorly 1. Sparkplugfouled,faultyorgaptoo wide. 1. Resetgapto .030-inchor replace
2 Carburetorimproperlyadjusted 2. Referto enginemanual•
. 3. Dirtyair cleaner• 3. Referto enginemanual•
Excessive Vibration 1. Cuttingbladelooseor unbalanced. 1. Tighten bladeandadapter.Balance
2. Bentcuttingblade. 2. See anauthorizedservicedealer.
Mower will not mulch grass 1 Wetgrass• 1. Donot mowwhengrassiswet wait
2. Excessivelyhighgrass. 2. Mowonceata highcuttingheight,
, 3• Du bade. , 3• Sharpenor replaceblade•
1. Connectandtightensparkplugwire.
2. Cleanfuelline;fill tank withclean,
freshgasoline.
3. Clearvent.
4. Drainfueltank. Refillwithfreshfuel.
5. Referto enginemanual.
6. Referto enginemanual.
sparkpug.
blade.
untillaterto cut.
then mowagainatdesirecJheightor
I makea narrowerCuttingpath.
i i i ¸ ! !
i_ i_ _i!: _ i ii _ii__ii_I iiiii_
Uneven cut 1. Wheelsnotpositionedcorrectly. 1. Placeallfour wheelsin same
heightposition.
2. Dullblade. 2. Sharpenor replaceblade.
12

WARNING
DO NOTremove safety
(or any)labels from
mower for any reason:
ii i _iI_ ii
13

14

747-1161A BladeControl 732-0404 FrontSpringLever
2 749-1092A UpperHandle 30 720-0426 HeightAdjustKnob
3 746-1130 Cntrl.Cable,40" Model546&549 31 710-0599 TTScrew,1/4-20x .500
746-1137 CntrlCable,53"Model543 32 736-0270 BellWasher
4 726-0240 CableTie 33 710-0654A TTScrew,3/8-16x 1.0
5 664-04080 GrassBagAssembly 34 710-0216 HexScrew,3/8-16x .75
6 747-04080 GrassBagFrame 35 710-1652 TTScrew,1/4-20x .625
7 732-0700 TrailshieldWire 36 720-0312 FoamGrip
8 731-04998 Trailshield 37 734-04082 RearWheel,12x 1.8GrayBar
9 747-0996 PivotRod 38 710-1205 EyeBolt
10 731-04134A RearDischargeDoor 39 732-0866 RearHi-WheelSpringLever
11 687-02057 RearHandleBracketAssy.-LH 40 687-02039A RearPivotArmAssy- RH
687-02056 Rear HandleBracketAssy.- RH 687-02040A RearPivotArmAssy- LH
12 787-01279 Deck21-inch 41 714-0104 HairpinClip
13 687-02075A FrontHeightAdj.Assy-LH 42 687-02192 HandleBracketAssy- RH
687-02074A FrontHeightAdj.Assy-RH 687-02191 HandleBracketAssy- LH
14 782-5002B FrontBaffle 43 710-0703 CarriageBolt,1/4-20x.75
15 748-0377C BladeAdapter 44 731-04150C RearBaffle
748-04082 BladeAdapterw/Star t 45 710-04371 ScrewHL,1/4-15x 1.00
16 742-0741 21-inchMulchingBlade 46 732-04090A TorsionSpring- RH
17 736-0524B Bell BladeSupport
18 710-1257 HexScrew,3/8-24x 2.5 47
19 731-04177 SideDischargeChute 48
20 17032A DeflectorChuteAdaptor 49
21 732-1014 TorsionSpring 50
22 747-0710 HingePin 51
23 687-02055 HingedMulchPlugAssembly 52
24 712-04065 FlangeLockNut3/8-16
25 787-01290 HeightAdjustmentPlate
26 687-02077A FrontPivotArmAssembly-RH
687-02076A FrontPivotArmAssembly- LH
27 734-1987 FrontWheel,8 x 1.8GrayBar
734-1988 FrontWheel,7 x 1.8GrayBart
28 738-0507B ShoulderScrew,.5Dx .434
732-04089A TorsionSpring-LH
750-04162 Spacer
712-0397 WingNut
749-0928A
710-1174
720-04072
720-0279
751B281440
710-1256
751A1432613
7510042823
751B790880 EngineShroudModel546Bt
751B095050 ScrewModel546Bt
LowerHandle
CarriageBolt,5/16-18x2
StarKnob
HandleKnob
EngineShroudModel549Rt
Screw#8-18 x 1.250549Rt
EngineShroudModel543Bt
ScrewModel543Bt
Parts List
To order replacement
parts, call
1o330'220'4683,
1'800.800-7310
orvisit
www,rntdproducts.com
ii i _iI_ ii
t NotShown
15

MANUFACTURER'S LiMiTED WARRANTY FOR
ThelimitedwarrantysetforthbelowisgivenbyMTDLLCwithrespect
tonewmerchandisepurchasedandusedin the UnitedStates,its
possessionsandterritories.
"MTD"warrantsthisproductagainstdefectsinmaterialandworkman-
shipfor a periodoftwo (2)yearscommencingonthedateof original
purchaseandwill,at itsoption,repairor replace,freeof charge,any
partfoundto bedefectiveinmaterialsorworkmanship.Thislimitedwar-
rantyshallonlyapplyifthisproducthasbeenoperatedand maintained
inaccordancewiththe Operator'sManualfurnishedwiththeproduct,
andhasnotbeensubjectto misuse,abuse,commercialuse,neglect,
accident,impropermaintenance,alteration,vandalism,theft,fire,water,
ordamagebecauseofotherperilor naturaldisaster.Damageresulting
fromthe installationor useof anypart,accessoryorattachmentnot
approvedby MTDforusewiththeproduct(s)coveredbythis manual
willvoid yourwarrantyastoanyresultingdamage.
Normalwearpartsarewarrantedto befreefromdefectsinmaterialand
workmanshipfora periodofthirty(30)daysfromthedateof purchase.
Normalwearpartsinclude,butarenotlimitedto itemssuchas:batter-
ies,belts,blades,bladeadapters,grassbags,riderdeckwheels,seats,
snowthrowerskidshoes,shaveplates,augerspiralrubberandtires.
NOW TO OBTAIN SERVICE: Warrantyservice isavailable,WITH
PROOFOF PURCHASE,throughyour localauthorized service
dealer.Tolocatethe dealer in yourarea, check yourYellowPages,
or contact MTDLLC at RO. Box 361131,Cleveland,Ohio44136-
0019,or call 1-800-800-7310or 1-330-220-4683 or logonto our
Website at www.mtdproducts.com.
Thislimitedwarrantydoesnotprovidecoverageinthefollowingcases:
a. Theengineor componentpartsthereof.Theseitemsmaycarrya
separatemanufacturer'swarranty.Refertoapplicablemanufacturer's
warrantyfortermsandconditions.
b. Logsplitterpumps,valves,andcylindershavea separateoneyear
warranty.
c. Routinemaintenanceitemssuchaslubricants,filters,blade
sharpening,tune-ups,brakeadjustments,clutchadjustments,deck
adjustments,andnormaldeteriorationoftheexteriorfinishdueto
useor exposure.
d. Servicecompletedbysomeoneotherthananauthorizedservice
dealer.
e. MTDdoesnot extendanywarrantyforproductssoldor exported
outsideoftheUnitedStates,itspossessionsandterritories,except
thosesoldthroughMTD'sauthorizedchannelsofexportdistribution.
f. ReplacementpartsthatarenotgenuineMTDparts.
g. Transportationchargesandservicecalls.
Noimpliedwarranty,includingany impliedwarrantyof mer-
chantabilityof fitness for a particular purpose,appliesafter the
applicable periodof expresswritten warranty aboveas to the
partsasidentified.Nootherexpresswarranty,whetherwritten or
oral, except as mentioned above,givenby anypersonor entity,
includinga dealeror retailer, withrespect to any product,shall
bindMTD.Duringthe periodof the warranty,the exclusiveremedy
isrepairor replacementof the productas setforth above.
Theprovisionsasset forth inthis warrantyprovidethesoleand
exclusiveremedy arising from the sale.MTDshallnot be liable
for incidentalor consequentiallossordamageincluding,without
limitation, expensesincurredfor substituteor replacementlawn
careservicesor for rentalexpensesto temporarily replacea
warranted product.
Somestatesdo notallowtheexclusionor limitationofincidentalor
consequentialdamages,orlimitationsonhowlonganimpliedwarranty
lasts,sothe aboveexclusionsor limitationsmaynot applyto you.
Innoeventshallrecoveryofanykindbegreaterthanthe amountofthe
purchasepriceof theproductsold.Alterationof safetyfeaturesof
the product shallvoid this warranty. Youassumetheriskand liability
forloss,damage,orinjurytoyou andyourpropertyand/ortoothersand
theirpropertyarisingoutofthe misuseorinabilityto usethe product.
Thislimitedwarrantyshallnotextendtoanyoneotherthan theoriginal
purchaserorto thepersonforwhomitwas purchasedasagift.
HOWSTATELAWRELATESTOTHISWARRANTY:This limited
warrantygivesyouspecificlegalrights,and youmayalsohaveother
rightswhichvaryfromstatetostate.
IMPORTANT:OwnermustpresentOriginalProofof Purchasetoobtain
warrantycoverage.
MTD LLC, P.O. BOX 361131 CLEVELAND, OHIO 44136=0019; Phone: 1=800=800=7310, 1=330=220=4683
 Loading...