

Page 1
GB
F
ES
NL
elite
MEO - 60 IX
MEOS - 60 IX
GB
F
ES
NL
Page 2

Page 3

GB
1
Built in oven 600 mm
ELECTRONIC OVEN
MEO 60 IX
ELCTRONIC OVEN STEAM ASSISTED MEOS 60 IX
INSTRUCTION BOOKLET
INSTALLATION –USE- MAINTENANCE
Page 4

GB
2
Dear customer
We wholeheartedly thank you and congratulate you on the choice you have made.
This new product carefully designed and manuf actured utilizing supe rior quality materials, and has been diligently tested to ensure perfect cooking
results . Please read and follow the simple instructions given in this booklet that will allow you to achieve excellent results right from the first ti me
you use the appliance.
THE MANUFACTURER
Maxfaro Elettrodomestici Srl
Front page…………………………………………………………………………………………………………..1
Instruction booklet - Contents………………………………………………………………………………2
Environmentlally Friendly........................................................................................................................................ 3
Saving on energy...........................................................................................................................................……… 3
RECCOMANDATIONS...........................................................................................................................................3
Before connecting the new appliance to the mains……………………………………………………………… 3
Safety instructions and precautions……………………………………………………………………………….. 3
How to avoid damaging the appliance.......................................................................................................................4
Electromechanical control panel functions /Symbols……………………………………………………… 4-5-6-7
Digital clock ………………………………………………………………………………… 7
First use – exemple of cooking methods…………………………………………………………………………..8
Touch control programmer…………………………………………………………………………………… 8-9
Core probe use………………………………………………………………………………………………….. 9
Accessories ……………………………………………………………………………………. … 9
Maintenance and Cleaning ………………………………………………………………………………………10
Replacement of the seal and oven light …………………………………………………………………………10
Servicing the unit.....................................................................................................................................................10
Instructions for Installation (water and electric )…………………………………………………………… 10-11
Page 5

GB
3
Environmentally Friendly
The packaging utilized has protected your new appliance during transport. All packaging materials used are
environmentally friendly and recyclable. Remember to dispose of packaging in an ecologically correct manner.
Old and disused appliances are not worthless waste. If scrapped in an ecologically orientated manner, valuable raw
materials may be recuperated.
Before scrapping a disused appliance make sure it no longer functions or affix an adhesive label on the appliance with
the wording «Warning: out of order appliance!»
Get information on the current scrapping services offered by your local specialized retailer or by your local council
administration.
Saving on energy
� Only preheat the oven if recommended in the recipe or in the instructions for use.
� Use dark oven trays/baking tins with a black lacquer or enamel finish. These types of oven trays/baking tins
efficiently absorb oven heat.
� When baking a number of cakes it is recommended to bake them in sequence (one after an another). As the
oven is still hot from having baked the first cake, baking time required for the second cake is reduced. It is
possible to cook two different kind of food in the same time.
� With long cooking/baking times it is convenient to turn the oven off ten minutes prior to end of cooking as the
residual heat in the oven can be exploited to finish cooking.
RECCOMANDATIONS
Before connecting the new appliance to the mains electricity supply
Before using the new appliance carefully read these instructions. They contain important information on the use and
maintenance of the appliance.
� Keep the instruction and installation booklet in a safe place. If you return the appliance, you are requested to also
return the instruction and installation booklet.
� If the appliance shows signs of damage provoked during transport, do not connect the appliance to the mains.
� Always call in a specialized fitter to install and connect the appliance and who must adhere to the instructions and
diagrams given in this booklet. Warranty terms covering this appliance shall be null and void if the appliance is
damaged caused by an incorrect installation / connection to the mains electricity supply.
Safety instructions and precautions
� This appliance conforms to the electric safety regulations. Repairs must be performed by the manufacturer’s
qualified servicing engineers. Incorrect or improper repair work may create hazardous conditions.
� When the appliance is in use the cooking surfaces, the heating elements, the oven interior cabinet and door
surfaces become hot enough to cause burns. The knobs and the external surfaces of the oven may become hot
enough when the appliance is in use for a long period of time at a high temperature. Keep children away!
� Do not jam the power cable in the oven door especially when hot. Cable insulation may be damaged creating
an electrical hazard such as a short-circuit or electric shock !
� Do not keep flammable objects in the oven. They could catch fire if the oven is turned on creating a dangerous
burning hazard for the user!
� If the appliance is faulty, turn the main switch off. Immediately contact your local service engineer.
� The appliance is to be used only for preparing and cooking food. It must not be used to heat up the room in
which it is installed or for other different uses.
� Do not use any steam cleaning appliance to clean the oven – risk of short-circuits!
� The door must be closed properly. It may cause jam and crush your fingers and hands.
� Open the door carrefully when the oven is in use as hot air or steam can escape from the interior of the cabinet.
� Do not leave the oven door half-closed or not completely opened. During the cooking operation the surface
inside the oven door gets very hot , risk of burns! Attention that the opened door does not swing back when
you stand in front of the appliances. Risk of burns!
Page 6

GB
4
How to avoid damaging the appliance
� Do not place oven trays directly on the bottom of the oven cavity, do not cover the bottom of the oven cavity
with aluminium foil creating a hazardous increase and accumulation of heat that may cause damage on the
oven.
� Never clean the oven with water when it is still hot. If the oven is on enamel finish may be damaged
� Fruit juices leave irremovable stains. When baking rich fruit cakes with a high-juice content always use a drip
pan as it is deeper than standard baking trays.
� Ensure the oven door closes correctly. Always keep the oven door seal clean.
� Use the grill function always and only with door closed
� Do not leave the oven door half-closed or not completely opened during the use as the heat may cause the
overheat of the control knobs and control panel and damage the electronic or the kitchen surfaces.
� The oven must be connected ONLY TO THE COLD water system, do not connect to the hot water system
� Do not use any silver tableware in the oven
� In the case of st/Steel oven, the inside of the cube may become discoloured during after cookings, this hasn’t
any influence on the functioning of the oven.
Control panel electronic oven
CODE: MEO 60X
Page 7
GB
5
STEAM ASSISTED OVEN - Electromechanical control panel functions / symboles
NB. We like to inform you that the novelty of this appliance is the steam assisted cooking (nr. 5 traditional cooking
functions can be combined with the steam function).
The most famous international Cheffs are using the kind of steam assisted cooking as it allows gentle preparation of the
food. The steam helps your food to retain their natural moisture, a sofisticate electronic device inject the steam into the
oven at intervals of time to produce different levels of moisture (theorically from 20 to 80%)
Control Panel steam assisted oven
CODE: MEOS 60X
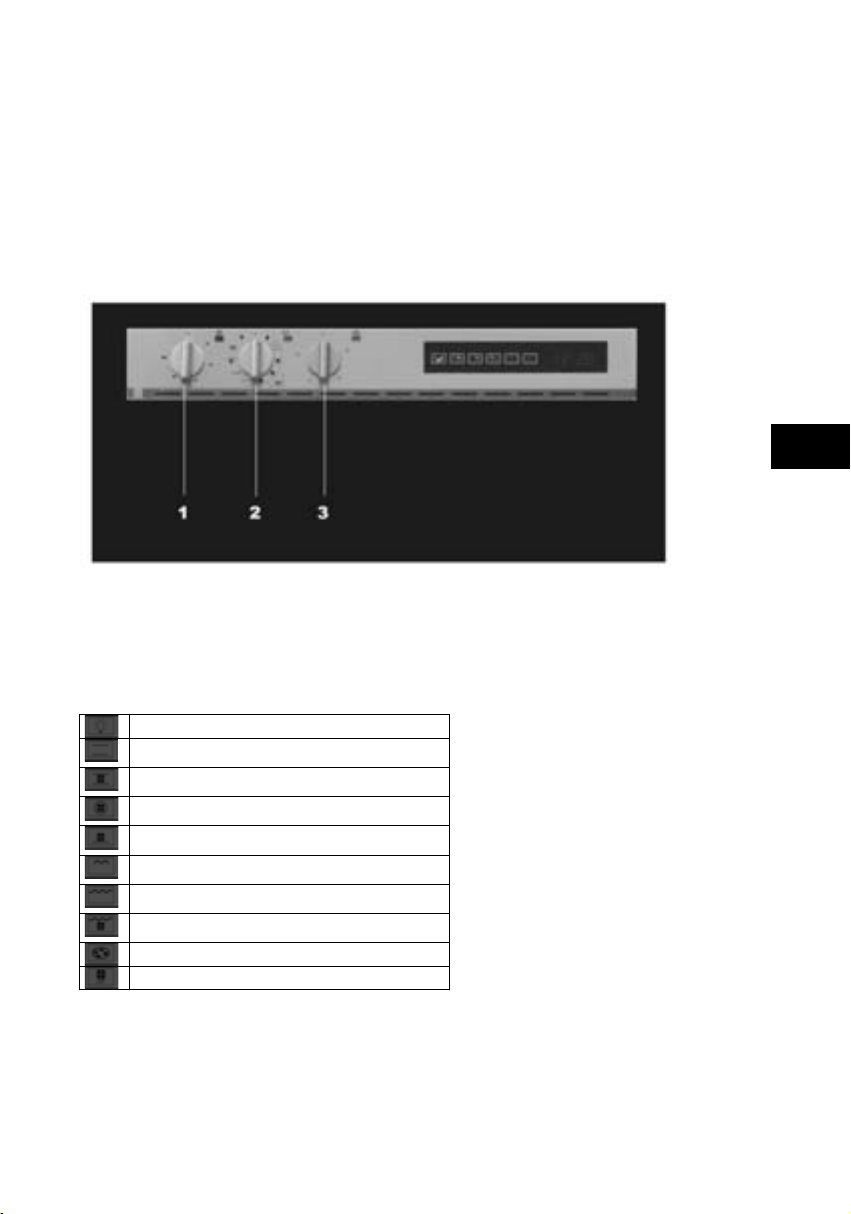
KNOB NR. 1 = CONTROL KNOB FOR TEMPERATURE. From 50°C until 275°C.
KNOB NR. 2 = CONTROL KNOB FOR OVEN FUNCTIONS.
Functions:
Oven light
Static oven
Static + fan
Fan forced
Lower Element + fan
Half grill
Full grill
Grill + fan
Pizza function- fan, circular element + lower element
Defrost
KNOB NR. 3= CONTROL KNOB FOR STEAM (GRAPHIC FROM 80 TO 20) MEANS DIFFERENT theoretical
LEVELS OF MOISTURE INSIDE THE OVEN.
Position 80: the steam is injected every 30 seconds
Position 60: the steam is injected every 60 seconds
Position 40: the steam is injected every 90 seconds
Position 20 : the steam is injected every 120 seconds
Page 8
GB
6
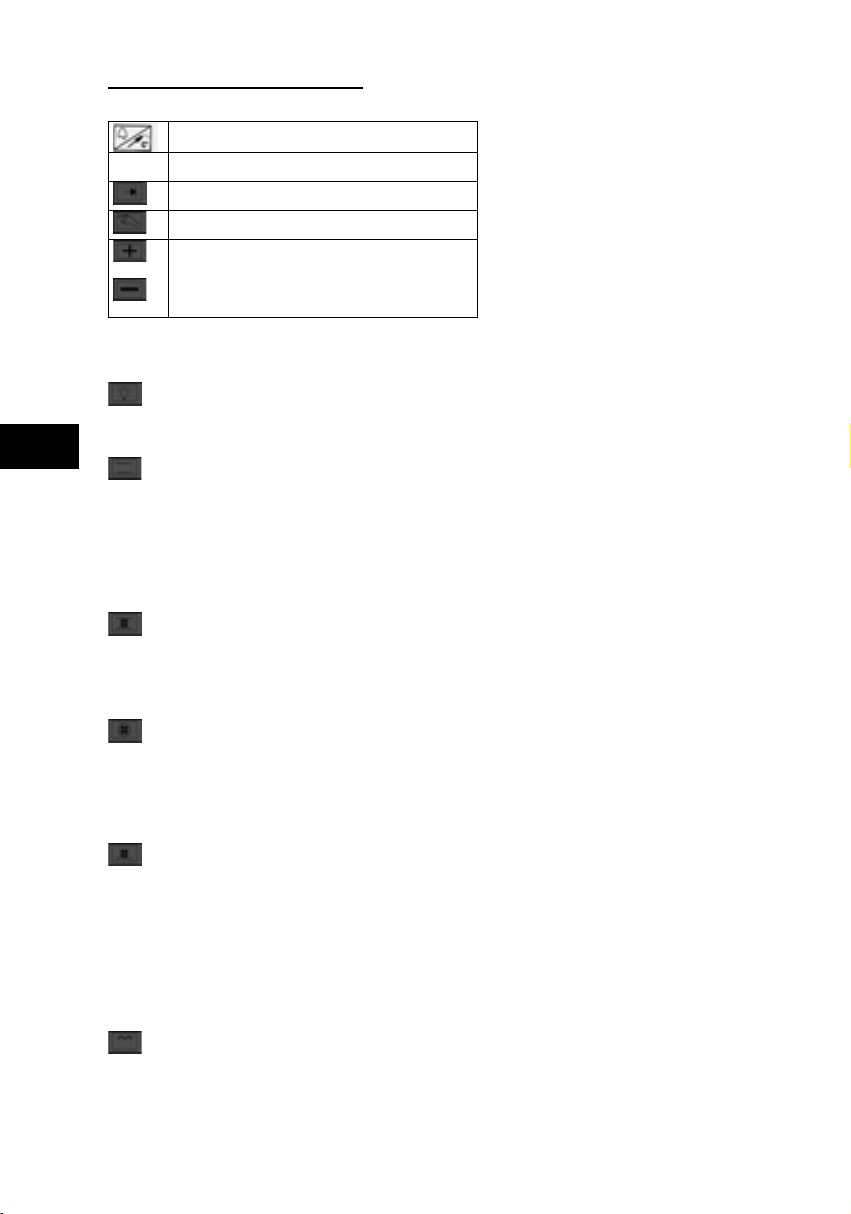
SYMBOLES OF THE DIGITAL CLOCK
Buzzer/core probe
Duration of cooking time (touch control)
Start cooking time (touch control)
Manual function (touch control), clock
Plus / minus
Symboles of the graphic in the control panel
Oven light
In this position the interior of the oven light up without an heat function. In all the other next functions the light will
remain on so you can always control the cooking through the glass door.
Static
The top and lower elements are on. With this function the food receive the heat from the top and from the bottom . It is
suggested to put the meal at the second level from the bottom. This cooking is recommended for roasts, Roast beef,
stewing veals, fish in a closed pan, bread, bisquites.
Static + fan
In this position the top, the bottom element and the fan are on. The fan distributes at all the oven levels the heat
generated by the top and bottom elements. This function is ideal for cooking dishes on different racks at the same time.
It is the perfect cooking method for backing fairly cakes or puff pastry.
Fan forced
In this position the fan and the round element on the back of the fan are on. The fan distributes the oven heat at the
different racks. With this function you can cook dishes on different rack position at the same time.
It is the most requested cooking methode for bigne’, different kind of cakes, bisquits.
Lower element + fan
In this position the heat comes from the lower part of the oven but is is also distribuites inside the oven from the fan.
This kind of cooking is indicated from food that you prefere to cook from the base to the top.
Half Grill
In this posistion the grill element is on, install the shelf in the higher position or one step lower and set up the wished
temperature. PLEASE use this function always with door closed!
This kind of cooking is ideal for bacon, saussages, chops, fish and to toast bread
Page 9
GB
7
Full Grill
This is the most complete grill function. PLEASE use this function always with door closed. An additional top element
in additional to the top half grill allow to grill the food put on the full surface of the shelf. Attention: the cooking time
are shorter than the normal half grill function.
This kind of cooking is ideal for bacon, saussages, chops, fish and to toast bread.
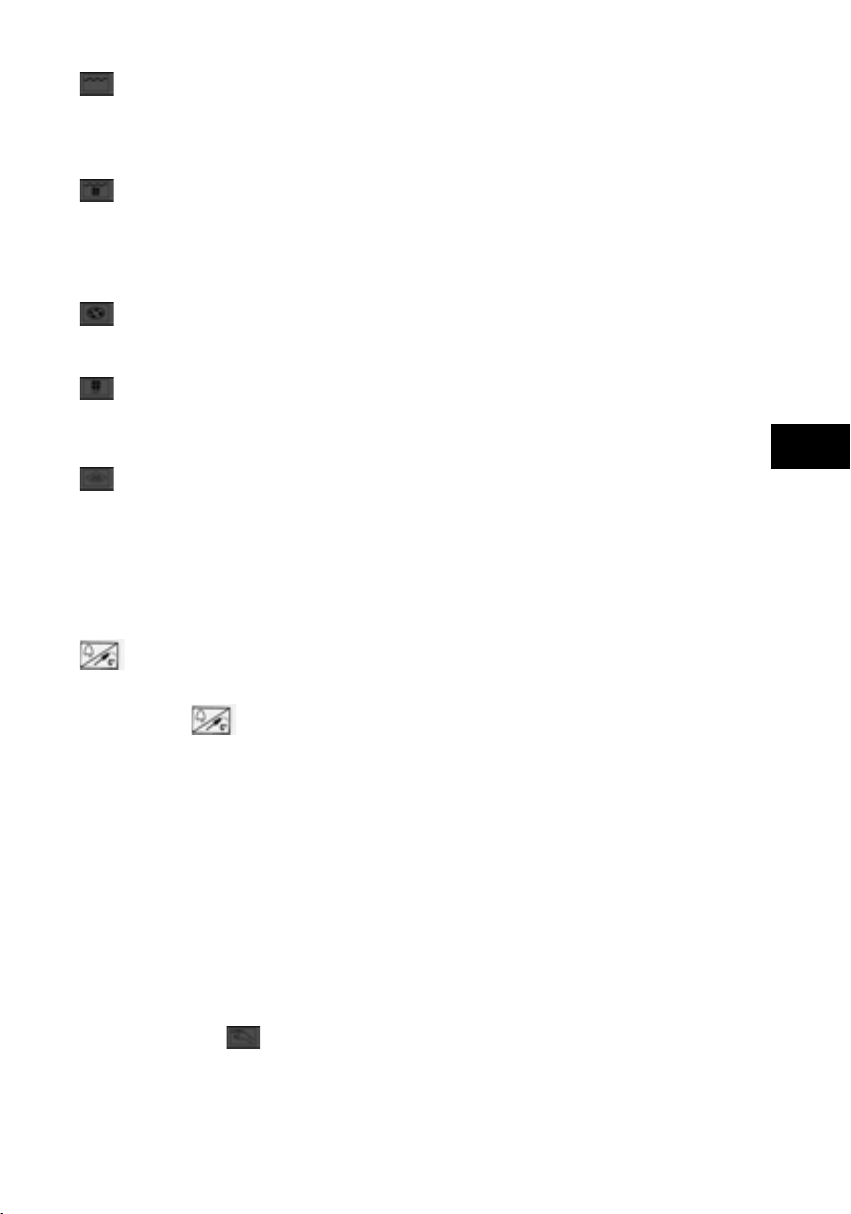
Top grill + fan
In this posistion the full grill and the fan are on. The fan distributes the heat inside the oven. It is suggested to cook
bacon, saussages, steaks, fish, toasted bread. It is also recommanded to browning foods after after other kind of
cooking.
Pizza (circular element+lower element+fan)
This function allows the maximum heating power of the oven, it is ideal for Pizza cooking and the bread.
Defrost
No heating functions, only the fan is on and blows forced air continually inside the oven so allows the fast and uniform
defrosting of all kind of meat,fish,bread, sweet, cakes. The time of defrosting depends of the weight of the food..
Steam function
It is necessary to use the steam function exclusively combined with a cooking oven function.
You will obtain the real professional cooking, the one used from the most famous Chefs. It is possible to cook the most
sofisticated recipt. It is ideal for vegetables, fish, shellfish, all kind of meats. You can set with the kontrol knob nr. 2,
four different moisture levels (Theoric from 20 to 80 % moisture inside your oven).
Attention! This function is starting when your oven reach the inside oven themperature of 100° C.
SWITCH OFF THE Steam function : turn the steam knob to “0”.
BUZZER LEVEL
It is possible to set the sound level of the buzzer as follow:
push the symbol
for 4 seconds and the symbols + or – to choose one of the six desidered buzzer
sound evels. Attention that the oven probe is not inserted in the oven.
DIGITAL CLOCK
1. push the symbol
for 4 seconds
2. push the symbol + or – to set the actual time
It is necessary to make this operation at the first connection of the oven and also after a power failure.
The oven can’t operate if the clock is not settled.
Page 10
GB
8
FIRST USE
- After water and electrical connection on the digital clock will flash the symbol “
“. Follow the above
instruction to set the digital clock.
-Remove all the accessories (grill trays and backing trays) from the oven and clean them separately with hot water and
neutral detergent.
-Close the oven door, turn the temperature knob to 200°C and the function knob to the fan forced function
. Leave
the oven to operate for 1 houre. This procedure is suggested to eliminate residual of graces wich may create bad smells
when cooking. It is suggested to well ventilate the room during this time. When the oven is cold, clean it using a moist
cloth and wipe it dry with a soft dry cloth.
EXEMPLE COOKING METHODOS
Traditional cooking, instruction for the control panel
Cooking of a chicken of 1 kg
Turn the temperature knob to 200°C position. Turn the function knob to fan forced function
. When the oven
reach the settled temperature, the light positioned near the temperature knob switch off.
Open the door completely and introduce now your cicken at the second level in the oven.
WARNING! The inner oven door surface and the oven cabinet and accessories are hot, caution during this operation
risk of burns.
Traditional cooking assisted with steam function
Turn the temperature knob to 200°C position. Turn the function knob to fan forced function
. Turn the steam
temperature to “100” position. You will hear the first injection of steam when the inside temperature of the oven will
reach about 100°C. After this first injection the steam will be injected every 30 seconds for a duration of about 8
seconds. During the steam injection the light near the steam knob will be switched on.
When the light near the temperature knob switch off, this means that the inside of the oven reached the settled
temperature, in our exemple is 200°c.
Open the door completely and introduce now your cicken at the second level in the oven.
WARNING! The inner oven door surface and the oven cabinet and accessories are hot, caution during this operation
risk of burns.
When the chicken is ready, remove it carefully from the oven. Than to SWITCH off the oven, turn the steam knob to
“0” and than turn to “0” the function knob and latest the temperature knob.
TOUCH CONTROL PROGRAMMER (Use )
MAUAL IMMEDIATE STARTING
� be sure that the digital clock is showing the actual time, if not set the digital clock as per previous explanation.
� turn the cooking mode knob and themperature knob at the desidered positions. the oven is now working. in the
case that the oven remains off:
Page 11

GB
9
� please check that on the timer display is not appearing any red light . in the case of the red light on the display
it means that the last cooking was a programmed cooking; in this case you will see also the temperathure knob
and the cooking mode knob not in zero position.
� in this case, you have to turn both knobs to “ zero” position and than to push for 4 seconds the manual
function
.
� the red light on the display will switch off and the oven will be in manual functioning.
PROGRAMMED COOKING WITH DELAIED STARTING
(DURATION AND START DELAIED SETTING)
1. push the symbol on the digital display
and after push the symbol + or – to set the duration of the
cooking time, for exemple for 45’ minutes. please take note of the preheating time, if for exemple the
preheating time is 15 minutes you have to add this time to the real time of cooking. time of cooking is 45
minutes and preheating is 15 minutes, you set 60 minutes.
2. push the symbol start of cooking and than set with the symbol + and – the exact hour when you like that
the oven start the cooking. for exemple it is 09:00 am and you like the start of the oven at 11:30. if the selected
duration of cooking was setted for 60’ minutes, your oven will automatically switch off at 12:30 am
.
CORE PROBE
The probe to be used is exclusively the one supplied with this appliance.
The probe allow to mesure the core temperature inside the food , between 1°C to 100°C. When the set core temperature has been reached the settled
temperature, the oven will switch off authomatically.
The cooking with probe avoid overcooking and allow save of energy.
1. first preheat the oven.
2. open the oven door, put your food inside the oven. lift up first the closing cover inside the oven cabinet and
insert the probe in the little hole. pay attention as the sides of the oven are hot.
3. insert the pin of the probe in the thickest part of the food you like to cook.
4. on the digital clock will flash alternately the actual temperature registered from the probe and the actual time.
5. push the symbol “probe”
on the digital display for 4 seconds, 100 will appear on the display. touch the
symbol + or – to set the temperature that you like inside your food.
6. when the probe will register the selected temperture inside the food , the oven will switch off
automatically.
7. remove the meal from the oven. let the oven cooling down and than disconnect the probe. push for 4
seconds the symbol
8. it is possible to cook with the probe also witht the delay cooking . in this case first set the probe and
later the duration and start of cooking.
Cooling fan
The oven is supplied with a cooling fan. It switch on automatically and remain on also after you switch off the oven to
allow the cooling down of the appliance. It switch off automatically about 40 minutes after the end of cooking.
Oven and accessories
The drip pan / rack can be positioned at 4 different heights.
The drip pan / rack can be pulled two thirds of the way out of the oven without risk of falling. This facilitates removing
trays and dishes from the oven cavity.
Rack for cookware, baking tins, roasts, grills and ready-cooked frozen dishes.
Glass oven ware for rich cakes and desserts with a high-juice content, oven-ready frozen foods and large roasts. This
ovenware can also be used for collecting fat when grilling. Slide the drip-pan as far as it goes into the oven cavity with
the bevelled corner facing the oven door.
Stone plate
This is stone plate ideal for cooking of the Pizza , bread or fish
Page 12

GB
10
Maintenance and cleaning
By respecting and adhering to the following simple instructions , the beauty of your oven will last in the time: NEVER
USE scouring pads or abrasive sponges, never use corrosive or abrasive cleaning products.
� Cleaning of the interior of the oven (st/steel Never use abrasive or corrosive cleaning products . It is enough
to clean with a weat cloth , if it is very dirthy add to the warm water some neutral soap , finally dry with a dry
cloth.
� Cleaning of the interior of the oven (enamel finish) Never use abrasive or corrosive cleaning products . It is
enough to clean with a weat cloth , if it is very dirthy add to the warm water some neutral soap , finally try
with a dry cloth. In the case of difficult dirty plese use detergent for oven when oven is cold. If you are not
able to remove some particular marks, preheating the oven with the fan forced function for a maximum of 50
minutes, switch off the oven and repeat the cleaning
� Cleaning of the accessories after the use is better to put the accessories in the dishwasher (not the pizza stone
plate) or dip in the water with detergent for dishes . Use a normal sponge not abrasive for particular resistant
dirth.
� Cleaning of the pizza stone use only warm water for resistant dirt use a plastic scraper or a drop of neutral
detergent in warm water. Rince with care and well dry before to use it again
� Cleaning supports for accessories
� Remove these supports. To clean use washing up liquid and a washing up sponge. To remove resistant stains
and crusts use an abrasive sponge. After cleaning replace the supports.
� Light cover to be cleaned with a weat cloth and some drops of neutral detergent.
What to do in the event of a fault?
Before calling in a specialised service engineer read the following precautions and check the appliance:
The oven does not work:
� Check the mains electricity supply has not been cut off
Only call in specialised service engineers to repair faults. Any appliance that is not repaired correctly may create
hazardous conditions for the user.
Replacing the oven seal
It is important to control the wear and tear of the oven seal to avoid escape of heat from the oven and therefore also
waste of energy. Remove the seal turning right and left the clip fasteners positionet on the corners and on the top and
bottom of the cube.
Replacing the oven light bulb
Caution:
The oven is supplied with two alogen lamps of 40 W each.
If you need to change them first disconnect the oven. Put a dry cloth on the base of the cabinet.
Remove the light cover pushing and pull it, and replace the oven lamp.
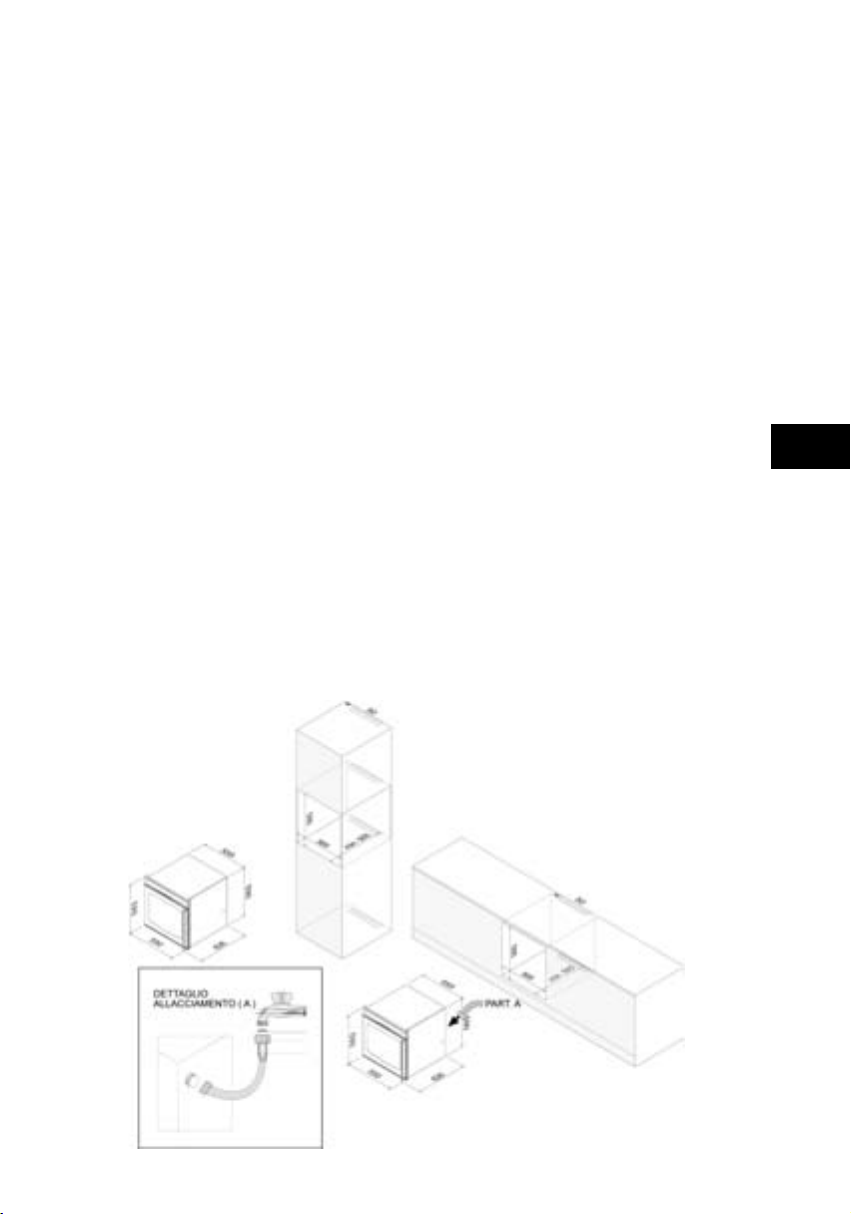
INSTALLATION
� This built-in oven can be installed under a bench BUT NOT UNDER A HOB
. It can be installed in a column
kitchen unit. The measurements for installation in kitchen units are given in the below diagram.
� The kitchen unit must be fabricated in heat resistant materials. The oven must be aligned in the centre of the
unit and secured in position utilizing the screws and bushing provided with the appliance.
Page 13
GB
11
Electric connection
Before connecting to the mains electricity supply make sure that:
� The wiring and mains supply are suitable for the appliance. All information is given on the rating plate affixed
to the front of the oven.
� Type of cable to be used not lighter than type H05VV-F or H05RR-F. Minimum section of the cable for ovens
of 3500 Watt is 3 x 1,5mm2.
� The appliance has been earthed conforming with the safety regulations and law in force. Earthing is obligatory
by law. In the event the appliance is not supplied with a power cable and/or appropriate plug only use materials
suitable for the electrical input given in the rating plate affixed to the appliance. The power cable must not
under any circumstances, along any point, reach a temperature higher than 50° C room temperature. If you
wish to connect the appliance directly to the mains electricity supply it is necessary to wire an omnipolar
switch with a minimum opening of 3 mm between the contacts. This switch must be dimensioned for the
power rating and must conform to the safety and electrical standards in force (the yellow-green earth wire must
not under any circumstances be cut off by the omnipolar switch). The socket or the omnipolar switch must be
in an easily accessible position with the appliance installed.
Water connection
First of all it is important to check the water hardness. We strong suggest to install a descaling system in the case of
hard water (more than 7°). You can find out the hardness of the water by consulting your waterworks or using a test
strip.
The oven has an electronic safety valve on the incoming water line and a second safety valve that allow the steam to
work only when the oven is functioning and has reached an inside temperature of about 100°C, it is however suggested
to install the acquastop.
specialised plumber have to connect the oven to the water network, use a normal waterhose tube for dishwasher.
attach the tube the the cold water faucet.
If the tube is being attached to new pipes that have not been used for a long time, you should let the water run for some
time before attaching the tube in order to make sure that dirt and rust residues are eliminated.
The oven is supplied from the manifacturer with a calibration of 4 atmosphere , please check the water pressure at the
installation place.
N.B. The manufacturer declines all responsibility in the event the foregoing instructions and the accident
prevention standards in force are not respected. The manufacturer further declines all responsibility in the
event there are inaccuracies in this booklet due to printing or copying errors. The manufacturer reserves the
right to improve, modify or make any changes considered necessary to its products without impairing the
essential features.
Page 14

BORETTI b.v.
De Dollard 17
1454 AT Watergang
T +31(0)20-4363439
F +31(0)20-4361326
E info@boretti.com
The Netherlands
n.v. BORETTI s.a.
Rupelweg 16
2850 BOOM
T +32-(0)3-4508180
F +32-(0)3-4586847
E info@boretti.com
Belgium
BORETTI s.l.
Oficina en Avd. de la Barrosa 63c
11139 Chiclana de la Frontera (Cadiz)
T +34 956 494684
F +34 956 494150
E info@boretti.com
Spain
WWW.BORETTI.COM
Page 15

F
FOUR 600mm. encastrable
FOUR ELECTRONIQUE
MEO 60 IX
FOUR ELECTRONIQUE A VAPEUR ASSISTEE MEOS 60 IX
MANUEL D’INSTRUCTIONS
INSTALLATION –MODE D’EMPLOI- ENTRETIEN
Page 16

F
2
Cher client,
Nous vous remercions vivement et nous vous félicitons pour le choix fait.
Ce nouveau produit soigneusement projeté et construit avec matériaux de première qualité, a été
soigneusement essayé pour pouvoir satisfaire toutes les exigences d'une parfaite cuisson. Nous
vous prions donc de lire et de respecter les faciles instructions qui vous permettront d’atteindre
d’excellents résultats dès la première utilisation.
LE CONSTRUCTEUR
MANUEL D’INSTRUCTIONS.....................................................................1
Contenu du Manuel d'instructions ………………………………………………………………..2
La défense de l'environnement ……...……………………………………………………………..3
Pour économiser de l'énergie ………………………………………………………………………….
3
Recomandations …………………………………………………………………………………….3
Avant de raccorder l'appareil……………………………….…………………………………………3
Instructions de sécurité et précautions………………………………………………………………..3
Pour éviter les dommages de l'appareil ……………………………………………………….4
Fonctions panneau de contrôle/symboles ………………………………………………… 4-5-6-7
Horloge digitale……………………………………………………………………………………..7
Première utilisation- exemple de méthodes de cuisson …………………………………………8
Programmateur touch control………………………………………………………………… 8-9
Utilisation de la sonde cuisson……………………………………………………………………..9
Accessoires………………………………………………………………………………………….9
Entretien et nettoyage…………………………………………………………………………… 10
Remplacement de la garniture et de la lumière du four……………………………………… 10
Assistance à l'appareil ….……………………………………………………………………… 10
Mode d'emploi de l'installation (eau et électricité)…………………………………………..10-11
Page 17

F
3
Défense de l’environnement
Instructions pour l'écoulement
L'emballage a protégé votre nouvel appareil pendant le transport jusqu’à chez vous. Tous les matériaux utilisés sont
compatibles avec l’environnement et recyclables. Vous étés priés de collaborer, en éliminant l'emballage d’une manière
écologiquement correcte.
Les appareils abandonnés ne sont pas des déchets sans valeur. Par une élimination écologique correcte on peut
récupérer des matières premières précieuses.
Avant de mettre l'appareil abandonné à la ferraille, rendez-le inutilisable ou bien marquez-le avec une étiquette adhésive
« Attention: appareil défectueux!»
Informez-vous sur les actuelles possibilités d'élimination près de votre revendeur spécialisé, ou bien auprès de votre
administration communale.
Pour économiser de l’énergie
� Préchauffer le four seulement s’il est indiqué dans la recette ou dans le tableau du mode d’emploi.
� Utiliser des moules foncés pour le four, laqués en noir ou émaillés. Ils absorbent très bien la chaleur du four.
� Si on veut cuire plus de gâteaux, il vaut mieux les cuire séquentiellement. Le four est encore chaud, le temps
de cuisson pour le second gâteau s’abrège. On peut introduire aussi deux gâteaux (par exemple dans les moules
rectangulaires) mis côte à côte.
� Quand on utilise des temps de cuisson plus longs on peut éteindre le four 10 minutes avant la fin du temps de
cuisson et exploiter la chaleur restante pour terminer la cuisson.
Recommandations
Avant de raccorder l'appareil
Avant d’utiliser le nouvel appareil, vous êtes priés de lire attentivement ces modes d’emploi. Ils contiennent des
informations importantes sur l'usage et sur l'entretien de l'appareil.
� Conserver soigneusement le manuel du mode d’emploi et du montage. Si vous cédez l'appareil, vous êtes priés
de livrer aussi le mode d’emploi et le montage.
� En cas d’une constatation d’un dommage de transport ne mettez pas l'appareil en marche.
� Faire exécuter le montage et le branchement de l'appareil par un technicien spécialisé, selon les instructions
jointes et le schéma du branchement. Le droit à la garantie s'éteint en cas de dommage causé par un
raccordement erroné de l'appareil.
Instructions de sûreté
� Cet appareil est conforme aux normes de sûreté pour les appareils électriques. Les réparations doivent être
exécutées seulement par les techniciens de l'assistance technique qualifiés par la maison productrice. Les
réparations non effectuées selon les règles de l’art peuvent causer des dangers considérables.
� Quand l'appareil est en marche les surfaces de cuisson, les résistances, l'intérieur du four et la porte se
surchauffent. Les boutons et les surfaces externes du four peuvent se surchauffer quand l'appareil est en
marche depuis longtemps et à une température haute. Eloigner les enfants.
� Le câble du raccordement des appareils électriques ne doit pas être écrasé avec la porte du four chaude.
L'isolement pourrait subir des dommages. Court-circuit, décharge électrique !
� Ne conserver pas d’objets inflammables dans le four. Ils pourraient se brûler si le four vient allumé. Danger de
brûlures !
� Si l'appareil est défectueux, débrancher l'interrupteur principal. S’adresser immédiatement à l'assistance
technique locale.
� L'appareil doit être utilisé uniquement pour préparer et cuisiner nourritures. Il ne doit pas être utilisé pour
réchauffer la pièce où il est installé ou pour d’autres usages.
� N’utiliser aucun appareil de nettoyage à vapeur pour nettoyer le four - risque de court-circuit !
� La porte doit être fermée d’une manière appropriée. Elle peut causer l’écrasement des doigts et des mains.
� Ouvrir la porte avec beaucoup de précaution quand le four est en marche. L’air chaud et la vapeur peuvent
sortir de l'intérieur du four.
� Ne laisser pas la porte du four partiellement fermée ou incomplètement ouverte. Pendant les opérations de
cuisson les surfaces intérieures du four se surchauffent, risque de brûlures ! Faire attention que la porte ouverte
ne retourne pas en arrière quand vous vous trouvez devant le four. Risque de brûlures !
Page 18

F
4
Pour éviter les dommages de l'appareil
� Ne mettre pas la lèchefrite ou les casseroles directement sur le fond du four, ne couvrir pas le fond avec la
feuille d'aluminium, autrement on provoque une accumulation de chaleur qui peut causer des dommages à
l'appareil.
� Ne jamais verser de l’eau directement dans le four chaud. L'émail peut subir des dommages.
� Les jus de fruits qui dégouttent du plat à four, laissent des taches indélébiles. Pour cuire des gâteaux aux fruits
riches en jus, utiliser plutôt la lèchefrite qui est plus profonde.
� La porte du four doit être bien fermée. Maintenir nettoyées les surfaces de la garniture de la porte.
� Utiliser toujours la fonction grill et seulement avec la porte fermée.
� Ne laisser pas la porte du four mi-close ou incomplètement ouverte pendant l'usage puisque la chaleur peut
causer la surchauffe des boutons et du tableau de bord et peut endommager l'électronique ou les surfaces de la
cuisine.
� Le four doit être lié SEULEMENT au tuyau d’eau froide, ne jamais le lier au tuyau d’eau chaude.
� N’employer pas de vaisselle/couverts d'argent à l'intérieur du four.
� Si le four a l’intérieur en inox, les parois intérieurs peuvent subir des variations de couleur après quelques
utilisations, cela n'a aucune influence sur le fonctionnement correct du four.
Tableau du bord du four ELECTRONIQUE
CODE: MEO 60X
Page 19

F
5
FOUR À VAPEUR - Fonctions tableau de bord/symboles
NB. Nous voulons vous informer que la nouveauté de cet électroménager consiste dans la cuisson à vapeur (les cinq
fonctions de la cuisson traditionnelle peuvent être combinées avec la fonction à vapeur).
Les plus renommés chefs internationaux utilisent le type de cuisson à vapeur parce qu'il permet une préparation de la
nourriture très délicate. La vapeur permet à votre nourriture de maintenir sa naturelle humidité, un dispositif sophistiqué
électronique introduit la vapeur à l'intérieur du four par intermittence de manière à produire de différents niveaux
d’humidité (théoriquement de 20 à 80%)
Panneau de contrôle four à vapeur
CODE : MEOS 60 IX
BOUTON N. 1 = Bouton du contrôle de la température. De 50°C jusqu’au 275°C (MAX).
BOUTON N. 2= Bouton du contrôle des fonctions du four
Fonctions:
Lumière de four
Statique
Statique ventilé
Ventilé
Sole ventilée
Seulement grill
Grill + résistance supérieure
Grill ventilé
Fonction pizza -ventilateur + résistance circulaire
+ sole
Décongélation
BOUTON N. 3= BOUTON DU CONTROLE DE LA VAPEUR (GRAPHIQUE de 80 à 20 ) IL SIGNIFIE de différents
niveaux d’humidité théorique interne du four.
Position 80: La vapeur est introduite toutes les 30 secondes
Position 60: La vapeur est introduite toutes les 60 secondes
Position 40: La vapeur est introduite toutes les 90 secondes
Position 20: La vapeur est introduite toutes les 120 secondes
Page 20

F
6
SYMBOLES DE L’HORLOGE DIGITALE
Avertisseur sonore/sonde
Durée de la cuisson (controllo touch)
Début de la cuisson (controllo touch)
Manuel (controllo touch), horloge
Plus/Moins
Symboles de la graphique:
Lumière du four
Avec cette fonction, l'intérieur du four est illuminé sans aucune fonction de chauffage. Dans toutes les autres fonctions
qui suivent, la lumière restera allumée de manière qu’on puisse toujours contrôler la cuisson par l'intermédiaire du
verre.
Statique
La résistance supérieure et celle inférieure sont en marche. Avec cette fonction la nourriture reçoit la chaleur du haut en
bas. On suggère de mettre la nourriture au deuxième niveau du bas. Ce type de cuisson est indiqué pour rôtis, viandes
rôties, viande de veau braisée, poisson cuit en casserole fermée, pain, biscuits.
Statique ventilé
Avec cette fonction la résistance supérieure, celle inférieure et le ventilateur sont en marche en même temps. Le
ventilateur a la fonction de distribuer la chaleur produite par les résistances supérieures et inférieures à tous les niveaux
du four. Cette fonction est idéale pour la cuisson des plats à différents niveaux simultanément. C’est la méthode de
cuisson parfaite pour cuire des gâteaux ou pâte feuilletée.
Ventilé
Avec cette fonction le ventilateur et la résistance circulaire positionnée derrière le ventilateur fonctionnent ensemble. Le
ventilateur distribue la chaleur à tous les niveaux du four. Avec cette fonction on peut cuisiner en même temps des plats
divers à différents niveaux du four. C’est la méthode de cuisson la plus demandée pour le chou à la crème, différents
types de gâteaux et biscuits.
Sole ventilée
Avec cette fonction, la chaleur arrive de la partie basse du four, elle est distribuée aussi par le ventilateur à l'intérieur du
four. Ce type de cuisson est indiqué pour nourritures cuites partant de la base vers le haut.
Seulement Grill- Vitrocéramique
Le four est fourni d'un grill spécial avec la surface en vitrocéramique qui permet la meilleure distribution de la chaleur
afin d’obtenir un parfait résultat de cuisson.
Dans cette position la résistance du grill est partiellement allumée, on peut mettre le gril dans la position la plus haute
ou dans la position immédiatement inférieure et fixer la température désirée. Cette fonction doit être utilisée seulement
avec la PORTE FERMEE !
Ce type de cuisson est idéal pour rissoler les plats, pour saucisses, côtelettes, poisson et pour griller le pain.
Page 21

F
7
Gril + résistance supérieure vitrocéramique
Avec cette fonction la surface vitrocéramique est complètement allumée. Cette fonction doit être utilisée seulement
avec la porte fermée. Une ultérieure résistance supérieure en complètement au gril permet de griller la nourriture
positionnée sur toute la surface du grill.
Attention : les temps de cuisson sont plus brefs par rapport à ceux d’une fonction normale du grill.
Ce type de cuisson est idéal pour rissoler les plats, pour saucisses, côtelettes, poisson et pour griller le pain.
Gril ventilé
Avec cette fonction l'élément grill et le ventilateur fonctionnent en même temps Le ventilateur distribue la chaleur à
l'intérieur du four. Cette fonction est recommandée pour la cuisson du bacon, saucisses, bifteck, poisson, pain grillé. On
recommande aussi pour rissoler la nourriture après n'importe quel type de cuisson.
Pizza (résistance circulaire + résistance inférieure + ventilateur)
Cette fonction permet la puissance maximale de la chaleur du four, elle est idéale pour la cuisson de la pizza et du pain.
Décongélation
Aucune fonction de chaleur, seulement le ventilateur est allumé et fait circuler l'air continuellement à l'intérieur de
manière à permettre une rapide et uniforme décongélation de toute type de viande, poisson, pain, gâteaux. Le temps de
décongélation dépend du poids du plat principal.
Fonction vapeur
Il est nécessaire d’employer les fonctions vapeur exclusivement combinées avec une de 5 fonctions de cuisson
indiquées dans le graphique autour du bouton numéro 2. On obtiendra la vraie cuisson professionnelle, celle employée
par les chefs les plus célèbres. Il est possible cuire les recettes les plus sophistiquées. Il est idéal pour les légumes,
poisson et tout type de viande. On peut régler avec le bouton numéro 2, quatre niveaux différents d’humidité (humidité
théorique de 20 à 80% à l'intérieur du four). Attention ! Cette fonction commence quand la température intérieure du
four a atteint 100°C.
EXTINCTION DE LA FONCTION VAPEUR: Tourner le bouton de contrôle vapeur jusqu’à « 0 » .
Niveau d'alarme
Il est possible régler le niveau sonore de l'alarme comme suit :
Appuyer sur le symbole pendant 4 secondes et les symboles + ou - pour choisir le niveau sonore désiré de
l'alarme, entre 6 niveaux existants. Attention qui la sonde ne soit pas insérée dans le four.
L’horloge digitale
1. Appuyer sur le symbole
pendant 4 secondes.
2. Appuyer sur le symbole + ou – pour régler l’heure exacte.
Il est nécessaire d’accomplir cette opération à la première connexion du four et ensuite à une chute de tension. Le four
ne peut pas opérer si l’horloge n'est pas réglée.
PREMIÈREMENT UTILISATION
-Après la connexion hydrique et électrique, le symbole
clignotera sur l’horloge digitale. Il faut suivre les
instructions susmentionnées pour régler l’horloge digitale.
-Enlever tous les accessoires (grill et lèchefrites) du four et nettoyer les accessoires séparément avec de l’eau chaude et
un détergent neutre.
-Fermer la porte du four, tourner le bouton de la température jusque à l'obtention de 200°C et positionner le bouton des
fonctions sur la fonction ventilée
.
Page 22

F
8
Laisser le four fonctionner de cette manière pour 1 heure. Cette procédure est suggérée pour éliminer les éventuels
restes de graisses qui peuvent créer une mauvaise odeur pendant la cuisson. On recommande de bien ventiler la pièce
pendant cette opération. Quand le four est froid, il sera nettoyé avec un chiffon humide et séché avec un chiffon doux et
sec.
EXEMPLES DE MÉTHODES DE CUISSON
Cuisson traditionnelle, instructions pour le tableau de bord
Cuisson d'un poulet avec le poids d’un kilogramme.
Tourner le bouton de température jusque à l’obtention de la position 200°C. Tourner le bouton des fonctions à la
fonction ventilée
. Quand le four atteint la température réglée, la lumière positionnée près du bouton de
température s'éteint. Ouvrir complètement la porte de four et introduire le poulet au deuxième niveau du four.
AVIS ! La surface intérieure du four, la structure du four et les accessoires sont chauds, opérer avec précaution pour
éviter les brûlures.
Cuisson traditionnelle assistée par la fonction à vapeur
Tourner le bouton de contrôle de la température jusque à 200°C. Tourner le bouton de contrôle des fonctions à la
fonction ventilée
.
Tourner le bouton vapeur jusqu’à la position « 100 ». Quand la température intérieure du four atteindra 100°C, on
sentira la première introduction de vapeur. Après cette première introduction, la vapeur sera introduite toutes les 30
secondes avec une durée d'environ 8 secondes. Pendant l'introduction de la vapeur, la lumière près du bouton de vapeur
restera allumée.
Quand la lumière près du bouton de la température s'éteint, il signifie que l'intérieur du four a atteint la température
réglée, dans notre cas de 200°C.
Ouvrir complètement la porte du four et introduire le poulet au deuxième niveau.
ATTENTION! La surface intérieure de la porte, l'intérieur du four et les accessoires sont chauds, opérer avec précaution
pour éviter les brûlures.
Quand le poulet est prêt, tirez-le du four avec attention. Puis, pour l'extinction du four, tourner le bouton de contrôle de
la vapeur sur « 0 » , le bouton de contrôle des fonctions sur « 0 » et à la fin le bouton de température.
PROGRAMMATEUR TOUCH CONTROL (Usage)
MODALITE MANUELLE DÉPART IMMÉDIAT
� Assurer que l’horloge digitale présente l’heure exacte, sinon régler l’horloge conformément aux précédentes
instructions.
� Tourner le bouton de fonctions de la cuisson et le bouton de la température dans les positions désirées.
Maintenant le four est en marche. Si le four reste éteint :
� Contrôler qu’aucune lumière rouge n'apparaisse pas sur le display. En cas d’apparition de la lumière rouge,
cela signifie que la dernière utilisation effectuée était une cuisson programmée; dans ce cas on voit le bouton
de la température ainsi que le bouton fonctions de la cuisson qu’ils ne se trouvent pas en position « zéro ».
� Dans ce cas les deux boutons doivent être positionnés sur « zéro », par la suite on doit appuyer pendant 4
secondes sur la fonction manuelle
.
� La lumière rouge sur le display s’éteindra et le four sera en fonctionnement manuel.
CUISSON PROGRAMMÉE AVEC DÉBUT DIFFERENT
(REGLAGES DE LA DURÉE ET DÉBUT DIFFERENT)
1. Appuyer sur le symbole
sur le display digital et par la suite appuyer sur le symbole + ou - pour fixer la
durée du temps de la cuisson, par exemple pour 45 minutes.
Page 23

F
9
Prendre en considération le temps de préchauffage, si par exemple le temps de préchauffage est de 15 minutes,
ce temps doit être ajouté au temps de la cuisson. Si le temps de la cuisson est de 45 minutes et le préchauffage
est de 15 minutes, on doit fixer un temps de 60 minutes.
2. Appuyer sur le symbole de début de la cuisson
et puis avec les symboles + ou - régler l’ heure exacte
désirée du début de la cuisson. Par exemple dans ce moment il est 09:00 heures du matin et on désire
commencer la cuisson à 11:30 heures. Si la durée de la cuisson sélectionnée a été fixée à 60 minutes, le four
s’éteindra automatiquement à 12 :30 heures.
LA SONDE DE CUISSON
La sonde à utiliser est exclusivement celle fournie avec cet électroménager.
La sonde permet de mesurer la température à l'intérieur de la nourriture, entre 1° et 100°C. Quand la température
sélectionnée par la sonde a été atteinte, le four s'éteint automatiquement.
La cuisson avec sonde évite de cuire trop les nourritures et porte à une économie d'énergie.
1. Premièrement, préchauffer le four.
2. Ouvrir la porte du four, et insérer la nourriture à l'intérieur du four. Soulever le bouchon de fermeture de la
sonde situé à l’intérieur du four et insérer la sonde dans le trou respectif. Faire attention puisque les côtés du
four sont chauds.
3. Insérer l'épingle de la sonde dans la partie la plus épaisse de la nourriture qu’on désire être cuisinée.
4. Sur horloge digitale apparaissent alternativement la température enregistrée de la sonde et l’heure actuelle.
5. Appuyer sur le symbole « sonde » sur le display digital pendant 4 secondes, 100 apparaîtra dans le display.
Agir sur les symboles + ou - pour régler la température désirée à l'intérieur de la nourriture.
6. Lorsque la sonde enregistrera à l'intérieur de la nourriture la température sélectionnée, le four s’éteindra
automatiquement.
7. Enlever la nourriture du four. Laisser refroidir le four et déconnecter ensuite la sonde. Appuyer 4 secondes sur
le symbole
.
8. Il est possible cuire avec la sonde avec la cuisson différente. Dans ce cas il faut premièrement fixer la sonde et
ensuite la durée et le début de la cuisson.
Ventilateur de refroidissement
Le four est pourvu d'un ventilateur de refroidissement. Il démarre automatiquement et il reste actif aussi après
l'extinction du four pour permettre le refroidissement de l'électroménager. Il s’éteint automatiquement environ 40
minutes après la fin de la cuisson.
Four et accessoires
La grille du four peut être positionnée sur 4 différents niveaux.
La grille du four peut être tirée deux tiers sans se renverser. Ainsi c’est plus facile prélever les plats.
Grille pour la vaisselle, moules pour gâteaux, rôtis, grillade et plats surgelés.
Plat à four en verre pour gâteaux riches en jus et desserts très juteux, nourritures surgelées à cuire au four et grands
rôtis. Il peut être utilisé en tant que récipient de collecte de la graisse lorsqu’on cuit au gril directement sur la grille.
Introduire la lèchefrite au four jusqu’au bout avec l’émoussement tourné vers la porte du four.
L’assiette à pizza
Cette assiette en terre cuite est idéale pour la cuisson de la pizza, du pain ou du poisson.
Entretien et nettoyage
Si on respecte les simples instructions mentionnées au-dessous, la beauté du four durera dans le temps :
Eviter absolument l'emploi d'éponges abrasives et produits corrosifs ou abrasifs pour le nettoyage.
� Nettoyage de l'intérieur du four (finissage en inox) Eviter l'usage de produits de nettoyage abrasifs ou
corrosifs. Il suffit de nettoyer avec un chiffon humide, si l'intérieur du four est très sale ajouter à l'eau tiède un
peu du savon neutre, à la fin essuyer avec un chiffon sec.
� Nettoyage de l'intérieur du four (finissage émaillé) Eviter l'usage de produits abrasifs ou corrosifs de
nettoyage Il suffit de nettoyer avec un chiffon humide, si l'intérieur du four est très sale ajouter à l'eau tiède un
Page 24

F
10
peu de savon neutre, à la fin essuyer avec un chiffon sec. En cas de saleté difficile employer un produit de
nettoyage pour le four, seulement quand le four est froid. S’il n’est pas en mesure d'enlever les taches
particulières, préchauffer le four avec la fonction ventilée pour un maximum de 50 minutes, éteindre le four et
répéter le nettoyage.
� Nettoyage des accessoires après l'usage il est indiqué de mettre les accessoires dans le lave-vaisselle (mais pas
l’assiette à pizza) ou les laver à l'eau avec détergent pour la vaisselle. Employer une éponge non abrasive pour
la saleté particulièrement résistante.
� Nettoyage de l’assiette à pizza utiliser seulement de l’eau tiède pour la saleté résistante, employer un grattoir
en plastique ou bien une goutte de détergent neutre à l'eau tiède. Rincer soigneusement et sécher très bien avant
d’une nouvelle utilisation.
� Nettoyage des supports de la grille Enlever les supports. Pour les nettoyer utiliser l'éponge et le détergent.
Pour taches résistantes et incrustations on peut employer une éponge abrasive. Après le nettoyage repositionner
les supports.
� Couvre- lampe. Pour le nettoyage utiliser un chiffon humide et quelques gouttes de détergent neutre.
Quoi faire en cas de défection ?
Avant de vous adresser à l'assistance technique, vous devez tenir compte des instructions suivantes et contrôler
l’appareil :
Le four ne fonctionne pas :
� Contrôler s’il y a une interruption de courant.
� Contrôler dans le boite à soupapes si le fusible de la cuisine est intact.
Faire les réparations seulement par les techniciens de l'assistance technique. L'appareil non réparé selon les règles
d'art peut provoquer des dangers considérables.
Remplacer la garniture du four
Il est très important de contrôler l’usure de la garniture pour éviter l’écoulement de la chaleur du four et la perte de
l’énergie. Enlever la garniture en tournant à droite et à gauche les crochets positionnés aux angles et dans la partie haute
et basse de la moufle du four.
Le remplacement de la lampe du four
Attention:
Le four est pourvu de 2 lampes halogènes de 40W cd.
S’il est nécessaire le remplacement, avant d’agir, déconnecter le four. Mettre un chiffon sec sur la base de la moufle.
Enlever le couvre lampe en le poussant pour pouvoir le tirer, procéder au remplacement de la lampe.
INSTALLATION
� Ce four encastrable peut être installé sous un plan qui ne doit pas AVOIR UN PLAN CUISSON installé. Il
peut être installé dans une colonne. Les dimensions de l’encastrement doivent être celles présentées dans la
figure.
� Le matériel du meuble doit être en mesure de résister à la chaleur. Le four doit être centré par rapport aux
parois du meuble et fixé avec les vies et les boussoles fournies en dotation.
Raccordement électrique
Avant d’effectuer le raccordement électrique vérifier :
� Les caractéristiques de l’installation sont telles à remplir les indications sur la plaque d’immatriculation
appliquée sur la partie supérieure du four;
� La typologie du câble à employer n’est pas inférieure au type H05VV-F ou H05RR-F. La section minimale du
câble pour le four de 3500 watts est de 3 x 1, 5mm2.
� L'électroménager a la mise à la terre conforme aux lois en vigueur sur la sécurité. La mise à la terre est
obligatoire aux termes de la loi. Si l’équipement n’est pas muni du câble et/ou d’une fiche correspondante
utiliser un matériel adéquat pour l'absorption indiquée dans plaque d’immatriculation et pour la température de
travail.
� Le câble ne devra pas atteindre une température supérieure à 50° C par rapport à celle ambiante. Si on désire
une liaison directe au réseau, il est nécessaire d’interposer un interrupteur omnipolaire avec l'ouverture
minimale entre les contacts de 3 mm, dimensionné pour la charge de la plaque qui doit correspondre aux
normes en vigueur ( le câble de terre jaune –vert ne doit pas être interrompu par l’interrupteur). La prise ou
l’interrupteur omnipolaire doivent être faciles à atteindre par l’équipement installé.
Page 25

F
11
Connexion hydrique
Premièrement, il est important de contrôler la dureté de l'eau. On recommande fortement d'installer un système de
décalcification de l'eau (adoucissant) en cas de l'eau dure (plus que 7°). On peut contrôler la dureté de l'eau en
consultant l’administrateur de la fourniture d'eau ou faire un simple test.
Le four est doué d'une soupape de sûreté électronique située au début de la ligne d'entrée de l'eau et une deuxième
soupape de sûreté qui permet à la vapeur de fonctionner seulement quand le four est allumé et quand il a atteint la
température d'environ 100°C, il est toutefois conseillé l'installation d’un stop- eau.
Un plombier spécialisé doit relier le four au réseau hydrique, en employant un tuyau normal de liaison pour le lavevaisselle. Le tuyau doit être relié au robinet d’eau froide.
Si le tuyau est relié à nouvelles conduites qui n’ont pas été utilisées depuis longtemps, il faut laisser écouler l'eau pour
un peu de temps avant de relier le tuyau, de manière qu’on assure l’élimination des restes et de la saleté. Le four est
fourni par le producteur avec un calibre de 4 atmosphères, contrôler la pression de l'eau au point d'installation.
N.B. Le constructeur décline toute responsabilité si les choses susmentionnées et les normes usuelles ne sont pas
respectées. La maison constructrice décline toute responsabilité pour les possibles inexactitudes contenues dans
la présente brochure, imputables aux erreurs d'imprimerie ou de transcription. Elle se réserve le droit
d'apporter aux propres produits les modifications retenues nécessaires ou utiles, sans compromettre les
caractéristiques essentielles.
Régulateur de flux
Page 26

BORETTI b.v.
De Dollard 17
1454 AT Watergang
T +31(0)20-4363439
F +31(0)20-4361326
E info@boretti.com
The Netherlands
n.v. BORETTI s.a.
Rupelweg 16
2850 BOOM
T +32-(0)3-4508180
F +32-(0)3-4586847
E info@boretti.com
Belgium
BORETTI s.l.
Oficina en Avd. de la Barrosa 63c
11139 Chiclana de la Frontera (Cadiz)
T +34 956 494684
F +34 956 494150
E info@boretti.com
Spain
WWW.BORETTI.COM
Page 27

ES
HORNO 600mm incastrable
HORNO ELECTRICO MULTIFUNCIONAL
MEO 60 IX
HORNO ELECTRICO CON VAPORES MEOS 60 IX
LIBRO DE UTILIZACION
INSTALACION –UTILIZACION - MANTENIMIENTO
Page 28

ES
2
Estimado cliente
Le agradecemos y le felicitamos por su eleccion.
Este nuevo producto proyectado con cuidado y realizado de materiales de qualidad
superior fue homologado con cuidado para satisfacer todas las demandas de un
cocimiento perfeto. Por favor, lee y respeta las instrucciones faciles que le permitiran de
obtenir unos resultados excelentes desde la primera utilizacion.
EL CONSTRUCTOR
LIBRO DE UTILIZACION..............................................................................1
El contenido del libro de utilizacion………………………………………………………………..2
La proteccion del medio...……...…………………………………………………………………...3
Para ahorar energia..............………………………………………………………………………….….3
Recomendaciones…..……………………………………………………………………………….3
Antes de empalmar el aparato.....…………………….…………………………………………………3
Instrucciones de sigurancia y precauciones ………………………………………………………..3
Para evitar los danos del aparato....... ………………………………………………………………….4
Las funcciones del tablero de comanda/simboles..…………………………………….4-5-6-7
Reloj digital ………………………………………..……………………………………………….7
Primera utilizacion - exemplos de metodos para cocer..…………………………………………8
Programador touch control………………..……………………………………………………....8
La utilizacion de la sonda de cocer ..………………………………………………...……………9
Accesorios..……….…………………………………………………………………………………9
Mantenimiento y limpieza...………………………………………………………………………..9
Remplazo del juego y de la luz de horno .... …..……………………………………………...…10
La asistencia del aparato ….……………………………….……………………………………10
Instrucciones de instalacion (agua y electricidad)...……..…………………………………...11-11
La proteccion del medio
Page 29

ES
3
Instrucciones para eliminar el embalaje
El embalaje a protegido su nuevo aparato durante el transporte hasta su domicilio.
Todos los materiales utilizados estan compatibles con el medio y estan reciclables. Por favor, colaboren
eliminando el embalaje correctamente desde el punto de vista ecologico. Los aparatos que no estan utilizados
no son desperdicios sin valor. Segun una eliminacion correcta desde el punto de vista ecologico se pueden
recuperar materias primas muy preciosas.
Antes de tirar el aparato hierro antiguo, hechan lo inutilizable y marcanlo con una etiqueta adesiva
„Atencion: aparato deteriorado!”.
Informense de las posibilidades actuales de venta a su vendedor de specialidad o a su administracion
comunal.
Para ahorar energia
� Calienten el horno solamente si esta indicado el la receta o en el tabelo con las instrucciones de
utilizacion.
� Usen bandejas para horno de color oscuro, pintados en color negra o emailados. Estos absorben muy
bien la calor del horno.
� Si quieren cocer mucho mas pasteles, es mejor de cocerles succesivamente. El horno esta todavia
caldo, el tiempo para el segundo pastel se va reducir. Se pueden introducir y dos pasteles (por
exemplo en bandejas rectangulares) dispuestas una al lado de otra.
� Cuando se usa un tiempo de cocer muy prolongado, se puede parrar el horno para 10 minutos antes
de termonar el tiempo de cocer y la utilizacion del calor restante para terminar de cocer.
Recomendaciones
Antes de empalmar el aparato
Antes de utilizar el nuevo aparato, por favor, leen atentamente estos instrucciones de utilizacion. Ellos
contienen informaciones importantes con respeto a la utilizacion y mantenimiento del aparato.
� Guarden con cuidado el libro de instrucciones y montaje. Si regalan el aparato, estan ruedados de dar
y las instrucciones de utilizacion y montaje.
� No ponen el aparato en funccion si han constatado un perjuicio de transporte.
� Hacen el montaje y empalmo del aparato con un tecnico de specialidad, en conformedad con las
instrucciones anejados y con la esquema de empalmar. El derecho de guarantia no es valido en el
caso de un perjuicio provocado por la falta de una empalmacion erronea del aparato.
Instrucciones de sigurancia
� Este aparato es en conformedad con las normas de sigurancia para los aparatos electricos. Las
reparaciones deben estar efectuadas por los tecnicos qualificados del servicio de asistencia tecnica
de la casa de produccion. Las reparaciones que nos estan efectuadas correctamente pueden cauzar
peligros considerables.
� Cuando el aparato esta en uso, las superficies de cocer, rezistencias, el interior del horno y la puerta
del horno se supra-calienten. Los botones y las superficies externas del horno se pueden supracalientar cuando el aparato esta en funcion para mucho tiempo y a una temperatura alta. No dejen
los ninos de cercar.
� El cablo de conexion de los aparatos electricos no deber estar preso en la puerta caliente de horno. La
izolacion podria sufrir perjuicios. Corte-circuito, descarga electrica.
� No guarden objetos inflamables en el horno. Podrian quemar si el horno serra encendido. Peligro de
quemas!
� Si el aparato esta defecto, deconecten el interruptor principal. Adresen inmediatamente al servicio de
asistencia tecnica local.
� El aparato debe estar utilizado solamente para preparar y cocinar la comida. No debe estar utilizado
para calientar el cuarto donde esta instalado o para otras utilizaciones diferentes.
� No utilisen ningun aparato de limpiar con vapores para limpiar el horno - riesgo de corte-circuito!
� La puerta debe estar cerrada correctamente. Puede cauzar aplasto de los dedos y de las manos.
� Abren la puerta con atencion cuando el horno esta funccionando. El aire caliente y los vapores
pueden evacuarse del interior del horno.
� No dejen la puerta parcialmente abierta. Durante las operaciones de cocer los superficies internas del
horno se sobre-calientan, riesgo de quemas! Cuidado que la puerta abierta no se torna cuando estan
en frente del horno. Riesgos de quemas!
Page 30

ES
4
Para evitar los danos del aparato
� No ponen la bandeja para el ascurrimiento de la grasa o las ollas directamente al fondo del horno, no
cobren el fondo con una folla de aluminium porque se acumula calor y puede cauzar danos al
aparato.
� No verten en ningun momento agua directamente en el horno caliente. Pueden ocurrir danos.
� Los jugos de frutas que se verten el el recipiente de cocer dejan tachas que no pueden ser borradas.
Para cocer pasteles con frutas con mucho jugo, usen la bandeja de verter que es mas profonda.
� La puerta del horno debe estar bien cerrada. Mantengan limpias los superficies del juego de la
puerta.
� Utilisen siempre la funccion grill y solamente con la puerta cerrada.
� No dejen la puerta del horno medio-cerrada durante la utilizacion porque la calor puede cauzar de
sobre-calientar los botones y del tablero y puede deteriorar la aparatura electronica y los superficies
de la cocina.
� El horno debe ser conectado SOLAMENTE a la conducta de agua fria, nunca conectenlo a la
conducta de agua caliente.
� Nunca utilisen vajilas/cubiertos de argento en el interior del horno.
� En el caso de que el horno tiene el interior de inox, los muros internos pueden sufrir variaciones de
color despues varios utilizaciones. Este no tiene ningun influencia sobre el funccionamiento correcto
del horno.
Las funcciones del tablero de comanda del horno ELECTRONICO
CODE: MEO 60X
Page 31

ES
5
HORNO CON VAPORES – Las funcciones del tablero de comanda/simboles
NB. Deseamos de informarles que la novedad de este nuevo producto electro-casnico consta
en cocer con vapores (los 5 funcciones de cocer tradicionales pueden ser combinadas con la
funccion con vapores).
Los mas famosos cocineros usan el tipo de cocer con vapores porque permite una preparacion de la comida
muy delicada. Los vapores permeten a sus comidas de mantener la humedad natural, un dispositivo
electronico sofisticado introduce los vapores en el interior del horno con intermitencia para producir nivelos
de humedad (teoreticamente desde 20 hasta 80%).
Las funcciones del tablero de comanda del horno con vapores
CODE MEOS
60 IX
EL BOTON DE COMANDA NO. 1 = El boton de verificar la temperatura. Desde 50°C hasta 275°C (MAX) .
EL BOTON DE COMANDA NO. 2= El boton para verificar las funcciones del horno
Funcciones:
La luz del horno
Statico
Statico ventilado
Ventilado
Fogon ventilado
Solamente grill
Grill + resistencia superior
Grill ventilado
Funccion para pizza - Ventilador +
resistencia circular+ fogon
Dezhielo
EL BOTON DE COMANDA NO. 3= EL BOTON PARA VERIFICAR LOS VAPORES (GRAFICA DESDE 80
HASTA 20) PRESENTA VARIOS NIVELES de humedad teoretica interna del horno.
Posicion 80: Los vapores estan introduidos cada 30 segundos
Posicion 60: Los vapores estan introduidos cada 60 de segundos
Posicion 40: Los vapores estan introduidos cada 90 de segundos
Posicion 20: Los vapores estan introduidos cada 120 de segundos
Page 32

ES
6
LOS SIMBOLES DEL RELOJ DIGITAL
Senalizator acustico/sonda
Periodo de cocer (control touch)
Empieza de cocer (control touch)
Manual (control touch), reloj
+/-
Los simboles de la grafica:
Luz del horno
Mediante esta funccion, el interior del horno esta iluminado sin ningun funccion de calientar. En todas las
funcciones siguientes, la luz se queda encenderda para que la cocida pueda ser controlada permanente por el
vidrio.
Statico
La resistencia superior y inferior estan funccionando. Mediante esta funccion la comida recibe el calor por
encima y por abajo. Este tipo de cocer es adecuado para asado, carne frita, carne de vaca frita, pescado frito
en recipiente serrado, pan, biscotes
Statico ventilado
Mediante esta funccion, la resistencia superior, inferior y el ventilador funccionen en el mismo tiempo. El
ventilador tiene la funccion de distribuir el calor producido de las resistencias superior y inferior a todos los
nivelos del horno. Esta funccion es ideal para cocer todos los tipos de comida, a diferentes nivelos, en el
mismo tiempo. Es el metodo de cocer ideal para los pasteles o hojaldre.
Ventilado
Mediante esta funccion, el ventilador y la resistencia circular posicionada detras del ventilador funccionan
juntos. El ventilador distribuie el calor a todos los nivelor del horno en el mismo tiempo. Es el metodo de
cocer ideal para chou à le crème, varios tipos de pasteles y biscotes.
Fogon ventilado
Mediante esta funccion el calor viene desde abajo del horno pero esta distribuido en el interior del horno por
el ventilador. Este tipo de cocer es ideal para las comidas que prefieren estar cocidas desde el base arriba.
Solamente Grill- vetroceramico
El horno esta equipado con un grill especial con una superficie vetroceramica que permete la mejor
distribucion del calor para obtenir un resultado perfecto de cocer.
En este posicion, la resistencia del grill esta parcialmente encendida, el grill se puede dejar en la posicion mas
alta o en la posicion inmediatamente inferior y se establece la temperatura deseada. Esta funccion debe ser
utilizada solamente con LA PUERTA DEL HORNO CERRADA. Este tipo de cocer es ideal para tostar la
comida, para salsas, carne al grill, pescado y para tostar el pan.
Grill + resistencia superior vetroceramica
Mediante esta funccion la superficie vetroceramica esta completamente calientada. Esta funccion debe ser
utilizada solamente con LA PUERTA DEL HORNO CERRADA. Una resistencia superior suplementaria para
el grill permete cocer la comida posicionada sobre la entera superficie del grill.
Atencion: los tiempos de cocer son inferiores comparativo con la funccion normal del grill-ului.
Este tipo de cocer es ideal para tostar la comida, para salsas, carne al grill, pescado y para tostar el pan.
Page 33

ES
7
Grill ventilado
Mediante esta funccion el elemento grill y el ventilador funccionan el el mismo tiempo. El
ventilador distribuye el calor en el interior del horno. Esta recomendado para cocer el bacon, salsas,
biftec, pescado, pan tostado. Esta recomendado y por tostar la comida despues de cualquier tipo de
cocer.
Pizza (resistencia circular + resistencia inferior + ventilador)
Este funccion admite el poder maximo del calor del horno, esta ideal para pizza y para el pan.
Dezhielo
Ninguna funccion de calor; esta encendido solamente el ventilador que permete la continua circulacion del
aire en el interior del horno para permitir un dezhielo rapido y uniforme de cualquier tipo de carne, pescado,
pan, pasteles.
La funccion para los vapores
Es necesario de utilizar la funccion para los vapores exclusivamente en combinacion con una de las
5 funcciones de cocer indicadas en el grafico cerca del batan numero 2. Van a obtener una
verdadera cocina profesional, la que esta utilizada por los mas famosos cocineros. Pueden setar con
la ayuda del boton 2 cuatro nivelos diferentes de humedad (humedad teoretica desde 20 hasta 80%
en el interior del horno).
Atencion! Este funccion empieza cuando la temperatura interna del horno es de 100°C.
PARA APAGAR LA FUNCCION CON LOS VAPORES: Torna el boton para verificar el valor
de los vapores hasta “0”.
El nivel de alarma
Es posible de setar el nivelo sonoro de la alarma en el siguiente modo:
Apretan el simbolo
para 4 segundos y los simbolos + o – para elegir el nivelulo sonoro deseado
de la alarma, entre los 6 nivelos existentes. Cuidado que la sonda no sea introducida en el horno.
Reloj digital
1. Apreten el simbolo
para 4 segundos.
2. Apreten el simbolo + o – para arreglar la hora exacta.
Es necesario el cumplimiento de esta operacion a la primera conexion del horno y, succesivamente, a una
caida de tension. El horno no puede funccionar si el reloj no esta arreglado.
LA PRIMERA UTILIZACION
- Despues la conexion hidrica y electrica, el simbolulo
va aparecer sobre el reloj digital. Siguien las
instrucciones presentadas arriba para arreglar el reloj digital.
- Alejan todos los accesorios (grill y bandeja para el ascurrimiento) del forno y limpian los accesorios
separadamente con agua caliente y detergente neutro.
- Fermen la puerta del horno, manejen el buton para la temperatura hasta 200°C y posicionen el boton de
las funcciones en el funccion de ventilar
. Dejen el forno de funccionar en este modo para una hora. Este
procedimiento esta sugerido para eliminar los eventuales restos de grasa que pueden generar odores
desagradables mientras cocer. Esta recomendado de aerar muy bien el cuarto durante este operacion.
Page 34

ES
8
Cuando el forno esta frio, se va a limpiar con un trapo humedo y se va a secar con un trapo seco.
EXEMPLOS DE METODOS PARA COCER
Cocina tradicional, instrucciones para el tablero de comanda
La cocina de un pollo con un pesso de 1 kg.
Manejen el buton para verificar la temperatura hasta 200°C. Manejen el boton de las funcciones sobre la
funccion de ventilar.
. Cuando el forno tiene la temperatura setada, la luz posicionada cerca del boton
de temperatura se apaga. Abren, completamente, la puerta del forno y introduzcan el pollo al segundo nivelo
del horno
ATENCION! La superficie interna del horno, la estructura del horno y los accesorios estan caldos, operan con
cuidado para evitar las quemaduras.
Cocina tradicional asistada por la funccion de los vapores
Manejen el buton para verificar la temperatura hasta 200°C. Manejen el boton de las funcciones sobre la
funccion de ventilar.
. Manejen el boton de los vapores en la posicion “100”. Cuando la temperatura
interna del horno est de 100°C, se va sentir la primera emision de los vapores. Despues de esta primera
emision, los vapores seran introduidos cada 30 de segundos con una duracion de aproximadamente 8
segundos. Mientras introducir los vapores, la luz cerca del boton se queda encendida. Cuando la luz cerca del
boton se apaga, significa que el interior del horno tiene la temperatura setada, en el caso del nuestro exemplo
200°C.
Abren, completamente, la puerta del forno y introduzcan el pollo al segundo nivelo.
ATENCION! La superficie interna del horno, la estructura del horno y los accesorios estan caldos, operan con
cuidado para evitar las quemaduras. Cuando el pollo esta listo, sacanlo cuidadamente del horno. Despues,
para apagar el horno, posicionen el boton de verification de los vapores en la posicion „o”, el boton para
verificar las funcciones en la posicion „o” y, al final, el boton de la temperatura.
EL PROGRAMADOR TOUCH CONTROL (Utilizacion)
MODALIDAD MANUAL DE PARTIDA INMEDIATA
� Asegurense que el reloj digital muestra la hora exacta, si no, arreglen el reloj en conformedad con las
instrucciones precedentes.
� Manejen el boton de las funcciones de cocinar y el boton de la temperatura en las posiciones
deseadas. Ahora el horno esta funccionando. En caso que el horno se queda apagado:
� Verifiquen que sobre el display no aparece ninguna luz roja. En caso de que aparece una luz roja
significa que la ultima utilizacion efectuada fue una cocina programada; en este caso se va ver que
tanto el boton de la temperatura que el de las funcciones de cocinar no estan en la posicion zero.
� En este caso, los dos botones deben ser posicionadas sobre „zero”, despues se va apretar por 4
segundos sobre la funccion manual
.
�
La luz roja sobre el display se va apagar y el horno va haber un funccionamiento manual.
COCINA PROGRAMADA CON DIFERENTE EMPIEZA
(LAS POSICIONES DE DURATA Y EMPIEZA DIFERENTE)
1. Apretan el simbolo
sobre el display digital y, despues, apretan el simbolo + o – para setar la
duracion del tiempo de cocinar, por exemplo para 45 de minutos. Tengan en consideracion el tiempo
de pre-calientar, si, por exemplo, el tiempo de pre-calientar este de 15 minutos, este tiempo tiene que
ser anadido al tiempo de cocinar. Si el tiempo de cocinar es de 45 de minute y el tiempo de precalientar es de 15 minute, deberia ser setado un tiempo de 60 de minutos.
2. Apretan sobre el simbolo de empezar de cocinar
y, despues, con los simbolos + o – establecen
la hora exacta deseada de empezar de cocer. Por exemplo, en este momento son las 09:00 de la
manana, y se desea empezar de cocer a las 11:30. Si la duracion de cocer selectada a 60 de minutos, el
horno se va apagar automatamente a las 12:30.
Page 35

ES
9
LA SONDA DE COCER
La sonda que sera utilizada esta exclusivo la que fue furnizada con este aparato electrocasnico.
La sonda permite de mesurar la temperatura en el interior entre 1° y 100°C. Cuando fue realizada la
temperatura selectada por la sonda, el horno se apaga automatamente.
La cocina con el ayudo de la sonda evita la cocina prolongada de la comida y hace un ahoro de energia.
1. Primero, pre-calienten el horno.
2. Abren la puerta del horno y introduzcan la comida en el interior. Levanten la tapadera de fermar
posicionado en el interior del horno y introduzcan la sonda en el respectivo lugar. Acuerden una
atencion maxima porque los margines del horno esta calientes.
3. Introduzcan el aguja de la sonda en la parte mas prominenta de la comida que se desea ser cocinada.
4. En el reloj digital van aparecer alternativo la temperatura registrada y la hora actual.
5. Apreten sobre el simbolo “sonda” en el display digital para 4 segundos, 100 va aparecer sobre
el display. Utilizen los simbolos + o – para setar la temperatura deseada en el interior de la comida.
6. Cuando la temperatura sera la que fue setada en el interior de la comida, el horno se va apagar
automatamente.
7. Sacan la comida del horno. Dejen el horno de refriarse y, despues, deconecten la sonda. Apreten
para cuatro segundos sobre el simbolo
.
8. Es posible de cocinar con sonda para una cocina diferente. En este caso, primero hay que setar la
sonda y, despues, la duracion y la empieza de la cocina.
El ventilador de enfriar
El horno esta dotado con un ventilador para enfriar. Se enciende automatamente y se queda activo despues
de apagar el horno para permitir el enfrio del aparato electrocasnico. Se va apagar automatamente despues
de aproximativo 40 minutos del final de la cocina.
El horno y los accesorios
El grill del horno puede ser posicionado sobre 4 nivelos diferentes.
El grill del horno puede ser sacado por dos tercios sin caer. Asi es mas facil de sacar la comida.
Grill para los platos, bandejas de pasteles, carne, carne al grill y tipos de comida congelada.
Bandeja de vidrio para los pasteles con mucho jugo y dulces con mucho jugo, comida congelada para ser
cocinada en el horno y carne muy grande. Puede ser utilizada y como recipiente de acumular la grasa cuando
se cocina directamente sobre el grill. Introduzcan en el horno, hasta al cabo, la bandeja de ascurrimiento con
las cabezas orientadas hasta la puerta del horno.
El plato para pizza
Este plato de ceramica esta ideal para cocer pizza, pan y pescado.
Mantenimiento y limpieza
Si respeten los instrucciones simples de abajo, la beleza del horno sera de longa duracion.
Eviten de utilizar, sobre todo, esponjas abrasivos y productos de limpiar corrosivos o abrasivos.
� Limpieza del interior del horno (acabado inoxidable) Eviten de utilizar productos de limpiar
corrosivos o abrasivos. Es suficiente de utilizar un trapo humedo, si el interior del horno esta muy
sucio anaden agua caliente, un poco de jabon y despues secan con un trapo seco.
� Limpieza del interior del horno (acabado emailado) Eviten de utilizar productos de limpiar
corrosivos o abrasivos. Es suficiente de utilizar un trapo humedo, si el interior del horno esta muy
sucio anaden agua caliente, un poco de jabon neutro y despues secan con un trapo seco. En el caso de
una suciedad dificil, usen un producto para limpiar hornos solamente cuando el horno esta frio. Si no
puede eliminar los tachas speciales, pre-calienten el horno con la funccion de ventilador para
maximum 50 de minute, apagan el horno y repiten la limpieza.
Page 36

ES
10
� Limpieza de los accesorios despues de utilizar esta indicado de poner los accesorios en la
lavadora de platos (pero no el plato para pizza) o de limpiarle con detergente para platos. Usen un
esponjo non-abrasivo para la suciedad bastante resistente.
� Limpieza del plato para pizza utilizen solamente agua caliente, para la suciedad resistente
utilizen un esponja de plastico o una gota de detergente neutro en agua caliente. Limpian con
cuidado y secan muy bien antes de utilizar de nuevo.
� Limpieza de los soportes del grill Sacan los soportes. Para limpiarles utilizen el esponja y el
detergente. Para tachas resistentes se puede utilizar un esponja abrasivo. Despues de la limpieza,
pongan los soportes a sus plazo.
� Soporte de cobrar el bombilla Para limpiar, utilizen un trapo humedo y unas gotas de
detergente neutro.
Que hay que hacer en caso de defeccion?
Antes de llamar al equipo de asistencia tecnica tienen en cuenta los siguientes avertizaciones y controlen el
aparato.
El horno no funcciona:
� Verifiquen si hay una interrupcion de energia;
� Verifiquen en el tablero si el fusible de la cocina esta intacta.
� Efectan las reparaciones solamente con los tecnicos del equipo tecnica. El aparato que no
esta reparado correctamente puede causar danos considerables.
Remplazo del juego del horno
Es muy importante de controlar la usura del juego para evitar las perdidas de calor del horno y la perdida de
energia. Sacan el juego, manejando desde la derecha hasta la izquierda los ganchos posicionados en los
rincones y en la parte superior y baja del horno.
Remplazo de la bombilla del horno
Atencion:
El horno esta equipado con dos bombillas halogenos de 40W.
Si es necesario el remplazo antes de operar, deconecten el horno. Pongan un trapo seco e la base. Alejan el
soporte del bombilla, empujando para poder sacarlo y remplacen el bombilla.
INSTALACION
� Este horno puede ser instalado sobre una superficie plana que NO DEBE HABER UN PLANO DE
COCINAR instalado. Puede ser instalado en una columna. Las dimensiones deben ser las que estan
presentadas en la figura.
� El material del mueble debe ser capable de resistir al calor. El horno debe ser centrado en
comparacion con los muros del mueble y fijado con tornillos y manguitos que estan furnizadas.
La conexion electrica
Antes de efectuar la conexion electrica verifiquen que
:
� Las caracteristicas de la instalacion cumplen las indicaciones del platillo de registracion aplicado en
la parte frontal del horno;
� La tipologia del cablo que sera utilizado no sea inferior del tipo H05VV-F o H05RR-F. La seccion
minima del cable para el horno de 3500 Watt es 3 X 1,5mm2.
� El aparato electro-menajero tiene el aterramiento en conformedad con las leyes de sigurancia
vigentes. El aterramiento es obligatorio segun la ley. En caso que el aparato no esta equipado con el
respectivo cable, usan el material correspondiente para absorber indicado en el numero de
registracion y para la temperatura de trabajo. El cable no tiene que llegar en ningun punto a una
temperatura mas alta que 50° C. Si se desea una conexion directa a la red, este necesario de
interponer un switch omnipolar con apertura minima entre los contactos de 3 mm para el cargo
indicado y debe corresponder a las normas vigentes (el cable para aterramiento amarillo - verde no
debe ser interrumpido desde el switch). Debe haber un acceso facil al enchufe o al switch omnipolar
con los aparatos instalados.
Page 37

ES
11
Conexion hidrica
Primero, es importande de verificar la duridad del agua. Le aconsejamos de instalar un sistema de dedurizar
el agua (dedurizador) en el caso de un agua dura (mas de 7°). Se puede verificar la duridad del agua
consultiendo el administrador y haciendo un pequeno test.
El horno esta equipado con una supapa de sigurancia electronica posicionada al inicio de la linea de entrar
del agua y una segunda supapa de sigurancia permite a los vapores de funccionar solamente cuando el horno
esta encendido y tiene la temperatura de 100°C. Esta recomendada la instalacion de un dispositivo
para parar el agua.
Un instalador especializado debe conectar el horno al red electrico usando un tubo de conexion para la
maquina de lavar platos. El tubo debe ser conectado al agua fria. Si el tubo esta conectado a nuevos
conductos que no fueron utilizados para mucho tiempo, el agua debe correr un tiempo antes de conectar el
tubo, para que la suciedad y los restos sean eliminados.
El horno esta furnizado por el productor con un calibro de 4 atmosferas, controlen la presion del agua en el
punto de instalacion.
N.B. El constructor se declina cualquier responsabilidad en caso que los datos presentados
arriba y las normas uzuales no estan respectadas. La casa productora declina cualquier
responsabilidad para los posibles inexactidades en este libro, imputables a unos errores de
editar o transcripcion. Se reserva el derecho de traer nuevas modificaciones a sus propios
productos que considera necesarios, sin perjudicar los caracteristicos esenciales.
Page 38

BORETTI b.v.
De Dollard 17
1454 AT Watergang
T +31(0)20-4363439
F +31(0)20-4361326
E info@boretti.com
The Netherlands
n.v. BORETTI s.a.
Rupelweg 16
2850 BOOM
T +32-(0)3-4508180
F +32-(0)3-4586847
E info@boretti.com
Belgium
BORETTI s.l.
Oficina en Avd. de la Barrosa 63c
11139 Chiclana de la Frontera (Cadiz)
T +34 956 494684
F +34 956 494150
E info@boretti.com
Spain
WWW.BORETTI.COM
Page 39

NL
OVEN 600mm integreerbaar
ELECTRISCHE MULTIFUNCTIONELE OVEN MEO 60 IX
STOOMOVEN MEOS 60 IX
GEBRUIKERSGIDS
INSTALLATIE –GEBRUIK - ONDERHOUD
Page 40

NL
2
Geachte klant,
Wij willen u graag bedanken voor de keuze die u net heeft gemaakt.
Dit nieuw product nauwkeurig ontworpen uit hoge kwaliteit stoffen werd goedgekeurd
om aan alle eisen van een perfect koken te kunnen voldoen.Lees zorgvuldig de
onderstaande gebruiksaanwijzingen zodat u vanaf het eerste gebruik uitstekende
resultaten zult bereiken.
De fabrikant
GEBRUIKERSGIDS....................................................................................................1
INHOUD……………………………………………………………….. 2
Milieuvriendelijkheid...……...…………………………………………………………………3
Energie bezuinigen..............................................................................................
3
Richtlijnen..……………………………………………………………………………………3
Vóór de electrische aansluiting……….…………………………………………………3
Veiligheidsaanwijzingen en voorichtigheidsmaatregelen ................…………………3
Beschadiging vermijden ………………………………………………………………….4
Bedieningspaneel functies/symbolen ..………………………………………………….4-5-6-7
Digitale klok
………………………………………………………………………………………….8
Eerste gebruik- koken metoden: voorbeelden..…………………………………………………8
Touch control bediening………………………………………………………………....9
Gebruik van kooksonde ..………………………………………………………………………9
Oventoebehoren……………………………………………………………………………………10
Onderhoud en reiniging...…………………………………………………………………….10-11
Vervanging van de ovenlamp …..………………………………………………11
Servicedienst …….…………………………………………………………………………11
Aansluiting voorwaarden(water en electrische stroom) ...........………………………...11-12
Page 41

NL
3
Milieuvriendelijkheid
Anwijzingen voor de verwijdering van de verpakking
De verpakking heeft uw nieuwe toestel beschermd tijdens het vervoer naar uw huis. Alle gebruikte stoffen
zijn milieuvriendelijk en worden gerecycleerd.Doet u alstublieft mee door de verpakkingsafval op een juiste
manier te verwijderen.De toestellen die niet meer gebruikt worden, zijn er geen waardeloze afvallen. Door
een juiste ecologische verwijdering ervankan men waardevolle grondstoffen recycleren.
Voordat u het toestel weggooit, maakt u het onbruikbaar en waarschuwt de anderen door er een briefje op te
plakken: ,,Let op!beschadigd toestel!”
Informeert u maar over de mogelijkheden bij uw vakkundig verkoper of bij uw gemeentelijk bestuur.
Aanwijzingen voor energie bezuiniging
� Verwarm de oven alleen maar als dat in het recept of in de aanwijzingen tabel angeduid wordt.
� Gebruik donkere, zwarte of geemailleerde oven schotels
� Wanneer u meerdere gebakjes wil bakken, dan is het best als u dat om de beurt doet. De oven is er
nog verwarmd,de bakkentijd voor de volgende gebak kan wel verminderen. Men kan zelfs twee
gebakken daarin, in twee rechthoekige schotels
� Als er een lange kookduur gebruikt wordt,dan kan men de oven 10 minuten al eerder de eindtijd
stoppen en de blijvende warmte om het koken te kunnen voltooien.
Belangrijke opmerkingen!
Vóór de electrische aansluiting
Voordat u dit toestel gaat gebruiken,lees nauwkeurig de onderstaande gebruiksaanwijzingen. Deze bevatten
er belangrijke informatie over de gebruik en de onderhoud van het apparaat.
� Bewaar zorgvuldig deze gebruikersgids(installatie-onderhoud). Als u er afstand van doet, geef er
deze mee
� Zet het apparaat niet aan als het toestel tijdens het transport beschadigd wordt.
� Laat de inbouw en de installatie van het apparaat door een vakman doen.De garantieprestaties
gelden niet meer in het geval dat de aansluiting niet op de juiste manier gebeurt.
Veiligheidsmaatregelen
� Dit apparaat is in overeenstemming met alle veiligheidsnormen voor huishoudelijke apparaten. De
reparaties moeten alleen door de bevoegde technici van de gekwalificeerde servicedienst gedaan
worden. De reparaties die niet overeenkomend met de normen zijn kunnen tot aan aanzienlijke
gevaren veroorzken.
� De kookoppervlaktes,de zekeringen, de binnenkant van de oven kunnen heet worden terwijl het
apparaat in werking is.De knoppen en de exterieure oppervlakten overhitten bij een langdurig en op
een hoge temperatuur gebruik . De voedingskabel mag niet tussen de deur en de binnenkant van de
overhitte oven vast te hangen want hij beschadigd zou kunnen worden. Kortsluitingsgevaar !
� Bewaar geen ontvlambare objecten in de oven.Zij kunnen ontsteken tijdens de werking van de oven.
Verbrandingsgevaar!
� Als het apparaat kapot gaat,schakel het maar uit. U moet meteen naar de bevoegd servicepunt zich
toe richten.
� Het toestel mag gebruikt worden slechts voor koken. Men mag niet het om de ruimte waarin het
ingebouwd werd verwarmd te laten worden of voor andere doelen.
� Gebruik geen stoomreinigingstoestel want kortsluitingsgevaar !
� De ovendeur moet behoorlijk dichtgedaan worden. Men kan zich erdoor zijn handen of vingers
verwonden hebben.
� Doet de ovendeur voorzichtig open . De warme lucht en da stoom kunnen van binnen uitstrooien.
� Doet u maar de ovendeur helemaal dicht,niet half open of dichtdoen. Tijdens de koken worden de
ovenruimte overhit, verbrandingsgevaar! Ga niet op de deur staan en let op dat de open deur niet
tegen u stoot terwijl u vooraan de oven zich bevindt.
Beschadiging vermijden
� Zet geen afvoergoot of geen potten direct op de ovensbodem neer, plaats geen aluminiumfolie op de
ovensbodem:deze veroorzaakt immers warmteontwikkeling die het apparaat kan beschadigen.
� Giet er geen water in de warme ovenruimte.Dat zou in hoge mate het toestel kunnen beschadigen.
� De vruchtensappen die direct op de kookschotel afvloeien maken vlekken daarrop.
� De ovensdeur moet helemaal dichtgedaan worden. Bewaar er netjes de garnituren van.
� Gebruik altijd de functie grilleren alleen met de deur dicht.
Page 42

NL
4
� Doet u maar de ovendeur helemaal dicht,niet half open of dichtdoen tijdens de koken want door de
warmteontwikkeling de knoppen en de bedieninsgpaneel zouden kunnen overhit raken en andere
huishoudelijke toestellen van de keuken of de keuken zelf beschadigd kunnen worden.
� De oven kan allen maar op de koude water buis aangesloten worden, sluit hem nooit aan op die
warme.
� Plaats geen serviesgoed of zilveren bestekken binnen de ovenruimte.
� Als er de ovenruimte uit inox is,kunnen dan de binnenwanden zich na enkele gebruiken van kleur
veranderen.Dat heeft met het juiste fungeren van de oven niets mee te maken.
Bedieningspaneel van de electrische oven
CODE: MEO 60X
Page 43

NL
5
Inbouwstoomoven –Bedieningspaneel functies/symbolen
NB. Wij zullen graag u willen mededelen dat wat echt nieuw op deze oven is de stoomkoken –
de vijf functies van de traditionele koken kunnen met de stoomtechniek gepaard gaan.
De meest bekende chefs gebruiken stoomkoken voor een fijne voorbereiding van het eten.Stomen verzekert
het behoud van de natuurlijke vocht van uw gerechten,door een electronische systeem wordt de stoom de
oven binnen zodat meerdere vochtigheidpeilen verschijnen (teoretisch tussen 20 tot/met 80%).
Bedieningspaneel van de electrische stoomoven
CODE : MEOS 60 IX
KNOP 1 = temperatuur instellen. Van 50°C met/tot 275°C (MAX).
KNOP 2= functies selector
Functies:
Ovenlamp
Bakken
Circulatie bakken
Blaaslucht
Klassiekbakken+Circulatie
Grilleren
Grilleren + aanvullende bovenelement
Circulatie grilleren
Pizza - Circulatie + cirkelvormige element+
+haard +onderste element
Ontdooien
KNOP 3= STOOM GENERATOR (GRAFICA DE LA 80 LA 20) GEEFT DE VERSCHILLENDE
TEORETISCHE VOCHTIGHEIDSPEILEN van de oven
Positie 80:de ovenruimte is gevuld met stoom om de 30 seconden
Positie 60: de ovenruimte is gevuld met stoom om de 60 seconden
Positie 40: de ovenruimte is gevuld met stoom om de 90 seconden
Positie 20 de ovenruimte is gevuld met stoom om de 120 seconden
Page 44

NL
6
SYMBOLEN VAN DE DIGITALE KLOK
pieptoon/sonde
Kooktijd (control touch)
Begin kooktijd (control touch)
Manueel (control touch), KLOK
+/-
Symbolen:
Ovenlamp
Door bemiddeling van deze functie wordt de ovenruimte verlicht zonder andere verwarmingsfuncties. Voor
de andere functies die hieronder aangeduid zijn,zal de licht aan blijven staan zodat het koken door de
ovenvenster gecontroleerd kan worden.
Bakken
Boven- en onderelement in werking. Door bemiddeling van deze functie krijgt het gerecht de warmte van
boven- en onderelementen. Deze kookmethode is geschikt voor gebraad,gebraden rundvlees, gebraden vis
brood, biskwietjes
Circulatie bakken
Door bemiddeling van deze functie,ventilator,boven-en onderelement werken terzelfder tijd.De ventilator
heeft de functie om de hele lucht vootgebracht door de boven-en onderelementen op alle niveaus van de
oven.Het is perfect voor koken op meerdere niveaus terzelfder tijd.Het is de kookmethode voor gebakken of
feuillettee-gebakken.
Blaaslucht
Door bemiddeling van deze functie,de ventilator en de cirkelvormige element die achter de ventilator staat
werken samen. De ventilator blaast hete lucht van een verwarmingselement rond de ventilator door heel de
oven.Het is d de meest aangevraagde kookmethode voor chou à le crème,allerlei soorten gebakken en
koekjes.
Klassiek bakken + circulatie
Door bemiddeling van deze functie, komt de hete lucht van onder naar boven. Deze kookmethode is geschikt
voor gerechten die van onderste naar boven gekookt moeten worden.
Grilleren
De oven is uitgerust met een speciaal grilleerrooster met een vitroceramischeoppervlakte dat laat de heet
best circuleren voor een perfect kookresultaat.
Op deze positie, de grillelement is gedeeltelijk aan,men kan de rooster op de gewenste inschuifhoogte-de
hoogste of een lagere –zetten en de temperatuur instellen.Men kan gebruik ervan maken alleen maar door
de OVENDEUR DICHT TE DOEN. Deze kookmethode is best om gerechten te roosteren, namelijk sauzen,ge
grilde vlees, vis of brood.
Page 45

NL
7
Grill +aanvullende vitroceramische bovenzekering
Door bemiddeling van deze functie,de vitroceramische oppervlakte is helemaal verwarmd. Men kan gebruik
ervan maken alleen maar door de OVENDEUR DICHT TE DOEN.Een aanvullende verwarmingselement voor
roosteren verzekert het grondig koken van de voedsel.
Opgelet!: de kooktijden zijn verminderd in vergelijking met de gewone functie roosteren.
Deze kookmethode is best om gerechten te roosteren, namelijk sauzen,ge grilde vlees, vis of brood.
Circulatie grilleren
Door bemiddeling van deze functie,de rooster en de v
entilator werken terzelfder tijd.De ventilator blaast de
hete lucht in de oven. Het is geschikt voor het roosteren van bacon,sauzen,rosbief,vis,brood.Het is ook
aangeraden om voedsel te roosteren na iedere type koken.
Pizza (cirkelvormige element + onderelement + ventilator)
Deze functie laat het maximale vermogen van de oven toe,het is best voor pizza en brood.
Ontdooien
Geen verwarmingsfunctie; de ventilator slechts laat lucht in de oven circuleren waardoor de voedsel kan snel
en gelijkvormig ontdooien van allerlei soorten vlees,vis,brood,cake.De ontdooiingstijd hangt van het gewicht
van te ontdooien voedsel af.
Stoomfunctie
Het is noodzakelijk het stomen alleen maar in combinatie met een van de vijf kookfuncties aangetoond in
tabel toelichtend KNOP 2 te gebruiken.U zult een echt professioneel koken verkrijgen,het meest gebruikt
door de meest bekende chefs. Door bemiddeling van KNOP 2,kunt u 4 verschillende vochtigheidsniveaus
Opgelet! Deze functie werkt als een temperatuur van 100°C breikt wordt.
EIND STOOMFUNCTIE: Draai de stoomknop naar “0”terug
Alarm niveau
Het is mogelijk de alarm in te stellen zoals volgt:
Druk op de toets 4 seconden lang en op + sau – om de niveau van de alarm vanuit 6 mogelijke in te
stellen .Let op dat de sonde niet in de oven gezet wordt.
Digitale klok
1. Druk op de toets 4 seconden lang.
2. Stel de tijd in met de toetsen + of – .
Het is noodzakelijk dit te doen op de eerste aansluiting van de oven en achtereenvolgens na elke
stroomstoring. De oven kan niet fungeren indien er geen tijd ingsteld wordt.
EERSTE GEBRUIK
- Na de water en electrische aansluiting.,zal het symbole
op de digitale klok knipperen.Volg de
bovenstaande richtlijnen na om te digitale klok in te stellen.
Page 46

NL
8
- Verwijder toebehoren (de inschuifroosteren de afvoergoot) uit de oven en maak ieder onderdeel separaat
schoon met warme water en neutraal reinigingsmidel.
- Doet u maar de ovendeur dicht, conditioneer de oven door hem gedurende een uur op,,circulatie bakken”
, 200ºC in te stellen.Deze behandeling is aangeraden voor de verwijdering van eventuele
vetgeuren.Zorg er voor een goede verluchting van de keuken.Wanneer de oven afgekoeld is, kan men hem
reinigen met een droog doekje.
KOKEN METHODEN : VOORBEELDEN
Traditionele koken/bakken - beadieningspaneel aanwijzingen
een kip bakken
Conditioneer de oven door hem op,,circulatie bakken”
, 200ºC in te stellen.Als de gewenste
temperatuur bereikt is, gaat het display licht voor temperatuur uit.Doet u maar de open open terwijl u de kip
er op de tweede rek stopt.
LET OP! De ovenruimte,de oven elementen en toebehoren zijn ovehit, wees voorzichtig want u verbrand zou
kunnen raken.
Traditionele koken/bakken+stoomfunctie
Conditioneer de oven door hem op,,circulatie bakken”
, 200ºC in te stellen.Draai de stoomknop tot de
“100”. Als een temperatuur van 200ºC bereikt is, zal zich de eerste waterdamp strooien.Daarna zal het
stomen gedurende 8 seconden om de 30 seconden gebeuren en het licht op het display zal knipperen.Als de
ovenruimte de ingestelde temperatuur bereikt ,in ons geval 200ºC, doet het licht uit.
Doet u maar de open open terwijl u de kip er op de tweede rek stopt.
OPGELET! De ovenruimte,de oven elementen en toebehoren zijn ovehit, wees voorzichtig want u verbrand
zou kunnen raken.Als de kip klaargekookt is, trek hem maarvoorzichtig uit.Om de oven uit te schakelen
draai de stoomknop,de functie selector en de temperatuurknop naar „o” terug.
TOUCH CONTROL BEDIENING(handleiding)
MANUEEL OPSTARTEN
� Vergewis zich dat de digitale klok de juiste tijd aangeeft,in tegendeel stel maar de klok in volgens de
hierboven aagetoon aanwijzingen.
� Draai de koken- en de temperatuurknop naar de gewenste posities.Aldus treedt de oven in werking.
Als het niet werkt:
� Controleer of op het display geen rood licht verschijnt.Als dat gebeurt dat betekent dat de laatste
gebruiktefunctie was een ingesteld koken
� In dit geval beide knoppen moeten op,,0” ingesteld worden,druk daarna gedurende 4 seconden
lang
.
�
Het rode licht verdwijnt en de oven werkt normalerwijze..
INGESTELD KOKEN MET VERSCHILLEND BEGIN
(VERSCHILLENDE KOOK –EN BEGINTIJD )
Page 47

NL
9
1. Op het digitale display stel maar de kooktijd in met behulp van de toetsen + sau -, voor 45
minuten bijvoorbeeld. Houd er rekening met de tijd voor,,circulatie bakken”, als het duurt
bijvoorbeeld 15 minuten, dan moet die toegevoegd aan de kooktijd. Er moet bijvoorbeeld de tijd voor
60 minuten ingesteld worden,als er de kooktijd van 45minuten is en de ,,circulatie bakken” tijd van
15 minuten.
2. Druk de toets
op om de functie koken te kiezen en daarna precies de gewenste begintijd voor
koken instellen met behulp van toetsen + of -. Bijvoorbeeld het is 9 uur `s morgen`s en men heeft
als begintijd voor koken 11.30 ingesteld.Als de kooktijd voor60 minuten ingesteld is dan wordt de
oven automatisch om 12.30 uitgeschakeld.
Vleessonde
Gebruik alleen de sonde die met dit apparaat werd meegeleverd.
Met behulp daarvan kan men de binnen temperatuur meten tussen . De oven wordt automatisch
uitgeschakeld waneer de ingestelde temperatuur bereikt wordt. Koken met een sonde vermijdt een lange
kooktijd en helpt energie te bezuinigen..
1. Ten eerste gaat u maar de oven op ,,circulatie bakken” instellen
2. Open de ovendeur en leg er het vlees in. Hef de sluitingsdeksel op en steek de sonde in de aansluiting
. Wees heel voorzichtig want de oven binnenwanden overhit zijn.
3. Maak een scherpe mes een insnijding in het dikste deel van het vlees,steek de vleessonde erin.
4. Op de digitale klok verschijnen om de beurt de opgenomen temperatuur en de tijd.
5. Door op het digitale display 4 seconden lang te drukken, verschijnt 100 daarop.Regel de gewenste
temperatuur met behulp van de toetsen + of -
6. De oven wordt automatisch uitgeschakeld waneer de ingestelde temperatuur van de voedsel bereikt
wordt.
7. Trek er de voedsel uit. Laat de oven afgekoelen en zet de sonde uit. Druk 4 seconden lang op de
toets
.
8. Koken met een sonde is mogelijk zelfs op een andere manier.In dit geval moet men de sonde,de
kooktijd en de begintijd instellen .
De ventilator
De oven is uitgerust met een ventilator. Deze treedt altijd automatisch in werking;wanneer de oven
uitgeschakeld is, blijft deze doorwerken totdat het toestel afgekoeld is.Hij gaat na 40 minuten van het het
uitschakelen van de oven automatisch uit .
De oven toebehoren
De ovenrooster kan op vier inschuifhoogtes aagepast worden.
De ovenrooster kan op twee derden van zijn vlakteuitgetrokken worden.Zo is het gemakkelijker de voedsel
uit te halen.
Grillerrek voor serviesgoed,bakplaten,gebraden en gegrild vlees, diepgevroren voedsel.
Glazen bakplaat voor vruchtencakes en sappige vlaatjes, diepgevroren voedsel,grote stukken vlees.Deze kan
wel als vetafvoergoot gebruikt worden wanneer de roosterin werking is.
Pizza plaat
Deze keramiek plaat is best voor pizza, brood en vis
Onderhoud en reinigen
Als u door de richtlijnen hieronder na te volgen, zult uw oven een langdurige schoonheid.
Vermijd het gebruik van de schuursponsen en van de schuur- of verwerendreinigingsmiddelen.
� Ovenruimte schoonmaken (staalvrij inox) Vermijd het gebruik van de schuur- of
verwerendreinigingsmiddelen.Het is genoeg een vochtige doekje te gebruiken, als er te moeilijke
vlekken zijn dan schoon met lauwe wateren neutraal zeep en droog vervolgens met een droge doekje.
Page 48

NL
10
� Ovenruimte schoonmaken (geemaillerede) Vermijd het gebruik van de schuursponsen en van
de schuur- of verwerendreinigingsmiddelen.Voor erg moeilijke vlekken gebruik een reinigingsmiddel
voor de oven alleen maar die afgekoeld is. Als het niet lukt, conditioneer de oven door gedurende 50
minuten de blaaslucht in te stellen, schakel de oven uit en herhaal het schoonmaken.
� Toebehoren schoonmaken Na het gebruik is het geschikt om die in de vaatwasmachine neer te
leggen (maar geen pizza plaat)of met warme water en reinigingsmiddel wassen.Voor moeilijke
vlekken gebruik een schuurspons
� Schoonmaken van pizza plaat Gebruik alleen maar lauwe water, voor moeilijke vlekken gebruik
een schhurspons met enkele druppen reinigingsmiddel erop. Spoel er heel goed af en laat maar
drogenvoordat u dat weer gebruikt.
� Schoonmaken van geleiderails Verwijder de rails en gebruik een spons en reinigingsmiddel om
deze schoon te maken. Voor moeilijke vlekken gebruik een schuurspons.Na het schoonmaken plaats
maar de geleiderails terug.
� Schoonmaken van het vensterkapje Om schoon te maken gebruik een vochtig doekje met
enkele neutraal reinigingsmiddel erop.
Problemen en oplossingen
Voordat u met servicedienst contact opneemt ,houd er met de volgende richtlijnen rekening mee en
controleer als
De oven werkt niet:
� Controleer als een stroomstoring gebeurt;
� Controleer als de keukenzekering niet kapot is;
� Laat de reparaties alleen door de servicedienst vakmannen . Het apparaat dat niet door
een erkend vakman gerepareerd wordt kan er ernstige schade toe brengen.
Vervanging van de ovengarnituur
Het is heel belangrijk om de slijtage van de ovensgarnituur te controleren voor vermijding van warmte- en
energieverlies.Trek er de garnituur maar uit door de hoekige haken naar rechts en naar links te draaien op
de bovesnste- en ondestekant van de ovensmof.
Vervanging van de ovenlamp
Opgelet !
De oven is uitgerust met twee halogeenslampen van 40W.
Als een lamp vervangen moet worden,onderbreek de stroomtoevoer naar de oven.Leeg een droog
doekje aan de mof neer.Zet er het vensterkapje opzij door het te schuiven,draai het lampje los en na
het vervangen ervan zet het vensterkapje terug.
Installatie
� Deze oven kan op een horizontale oppervlakte ingebouwd worden die GEEN HORIZONTALE
KOOKVLAKTEal geinstalleerd heeft.Inbouwbaar in nis .De afmetingen zijn dezelfde die al aangeduid
werden.
� De meubels moeten door warmtevastheid gekenmerkt worden.De stoomoven moet zodanig
geplaatst dat hij in het midden zich bevindt in vergelijking met de wanden van de meubels.Schroef
hem in het meubel vast met de schroeven die al beschikbaar zijn.
�
Electrische aansluiting
Vóór de electrische aansluiting, controleer als:
� Installatieregels moeten met degene die opgeplakt op de ovenvoorzijde plaat
overeenstemmend zijn
� De voedingskabel mag niet lager dan H05VV-F o H05RR-F.De minimale doorsnede van de
voedingskabel voor een totaal vermogen van de oven van 3500W is 3×1,5 mm2.
�
Gebruik eern stopcontact datvoorzien is van een aardingsklem en volgens de geldende
veiligheidsnormen is aangesloten.În het geval dat er geen kabel of geen stekker bestaat,
gebruik die soort aansluitsnoer aangeraden als werktemperatuur op het nummerplaat. De
kabelstemperatuur mag niet hoger dan 50ºC boven de milieutemperatuur. Bij een directe
aansluiting,is het noodzakelijk een eendelige schakelaar te gebruiken die aan de geldende
veiligheidsnormen voldoet(de aardingskabel geel-groen kan niet door de schakelknop
gehandeld worden).Het toestel moet zodanig geplaatst worden dat de stekker of de
schakelaar gemakkelijk bereikbaar kunnen zijn.
Page 49

NL
11
Water aansluiting
Ten eerste is het belangrijk de hardheid van het water te meten.Wij raden u aan om een
wateronthardingssysteem te installeren als er de waterhardheid hoger dan 7º is.Men kan de hardheid van het
water meten door de waterbeheersysteem te checken en door de waterkwaliteit te testen.
De oven is uitrgerust met een electronische veiligheidsklep geplaatst op toevoerlijn;
er bestaat ook een tweede zekerheidsklep waardoor de stoomgenerator kan fungeren indien de oven
aangesloten is en de temperatuur van 100ºc bereikt is.Het is toch sterk aangeraden om een installatie
waardoor de watertoevoer gehouden kan worden.
Een erkende installateur moet de oven op de electrische installatie aan te sluiten door bemiddeling van een
buis voor de wasmachine De buis moet op de koude water toevoerlijn aangesloten te worden..Als die buis op
nieuwe toevoerlijnen aangesloten moet worden en deze niet in gebruik tot dat moment toe waren , moet men
de kraan laten lopen om de vuilnis en allerlei soorten overblijfsels te kunen weg te
De oven is uitgerust door de fabrikant met 4 drukken, meet u maar de water druk op de installatiepunt.
N.B De fabrikant neemt op zich geen verantwoordelijkheid als de bovenstaande richtlijnen en
de algemene veiligheidsnormen niet nagekomen zijn.. De producent neemt op zich geen
verantwoordelijkheid voor de eventuele onjuistheden uit de bovenstaande brochure wegens
druk- of transcriptiefouten.Hij voorbehoudt zich het recht om aan de bestaande producten
de noodzakelijke wijzigingen te brengen zonder dat afbreuk aan de kernkwaliteiten van
producten te doen.
Page 50

- ES EN FR NL
1
2
3
*
4
5
6
**
***
****
7
8
Mas eficiente
*
More efficient
Èconome
Efficiënt
Fabricante Manufacturer Fabricant Fabrikant
Modelo Model Modèle Model
Classe de eficiencia
energetica
- Calentamiento
convencional
- Conveccion forzada
Consumo de
energia. Función de
calentamiento
- Calentamiento
convencional
- Conveccion forzada
Volumen neto
(litros)
Tipo:
- Pequeño
- Medio
- Grande
Tiempo de cocción
con carga normal:
- Calentamiento
convencional
- Conveccion forzada
Superficie de la placa
de cocción de mayor
tamaño
A B C D E F G
Energy efficiency
class
- Conventional
- Forced air convection
Energy consumption.
Heating function:
- Conventional
- Forced air convection
Usable volume
(litres)
Size:
- Small
- Medium
- Large
Time to cook
standard load:
- Conventional
- Forced air convection
The area of the largest
baking sheet
Classement selon son
efficacité ènergétique
- Classique
- Convection forces
Consumation
d’énergie.
Fonction chauffage:
- Classique
- Convection forces
Volume utile
(litres)
Type:
- Faible volume
- Volume moyen
- Grand volume
Temps de cuisson en
charge normale:
- Classique
- Convection forces
Alne de la surface de
la plus grande plaque
pour patisserie
Menos eficiente
Less efficient
Peu économe
Inëfficient
** 12 l Volumen neto/ Usable volume/ < 35 l
*** 35 l Volumen neto/ Usable volume/ < 65 l
**** 65 l Volumen neto/ Usable volume/
Energie
- Conventioneel
- Geforceerde
- Conventioneel
- Geforceerde
Type:
- Klein
- Middelgroot
- Groot
- Conventioneel
- Geforceerde
eficiëntieklasse
luchtconvectie
Energieverbruik.
Verhitings-lunctie:
luchtconvectie
Netto volume
(liter)
Bereidingslijd bij
standaardbelasing:
luchtconvectie
Oppervialde van de
grootsle bakplaat
Volume utile/Netto volume
Volume utile/Netto volume
Volume utile/Netto volume
EN 50304 - 2002/40/CE
1,263 kWh
0,998 kWh
65
48,2 min.
43,8 min.
1370 cm
2
Page 51

Page 52

BORETTI b.v.
De Dollard 17
1454 AT Watergang
T +31(0)20-4363439
F +31(0)20-4361326
E info@boretti.com
The Netherlands
n.v. BORETTI s.a.
Rupelweg 16
2850 BOOM
T +32-(0)3-4508180
F +32-(0)3-4586847
E info@boretti.com
Belgium
BORETTI s.l.
Oficina en Avd. de la Barrosa 63c
11139 Chiclana de la Frontera (Cadiz)
T +34 956 494684
F +34 956 494150
E info@boretti.com
Spain
WWW.BORETTI.COM
 Loading...