

Page 1
M/W
Grill
Weight
Defrost
Time
Defrost
1. Roast Beef
2. Roast Pork
3.
Roast Chicken
4.
Beverage Coffee
5. Soup
6. Casserole
Combi Temp
Stop/Clear Start/Clock
Speedy Cook
Program Cook
M/W
Program
cook
Temp
cook
kg
Grill Combi
Defrost
Weight Time
Microwave Oven
with Grill and Convection
Instruction manual
MCM600
Page 2

M/W
Grill
Weight
Defrost
Time
Defrost
1. Roast Beef
2. Roast Pork
3.
Roast Chicken
4.
Beverage Coffee
5. Soup
6. Casserole
Combi Temp
Stop/Clear Start/Clock
Speedy Cook
Program Cook
M/W
Program
cook
Temp
cook
kg
Grill Combi
Defrost
Weight Time
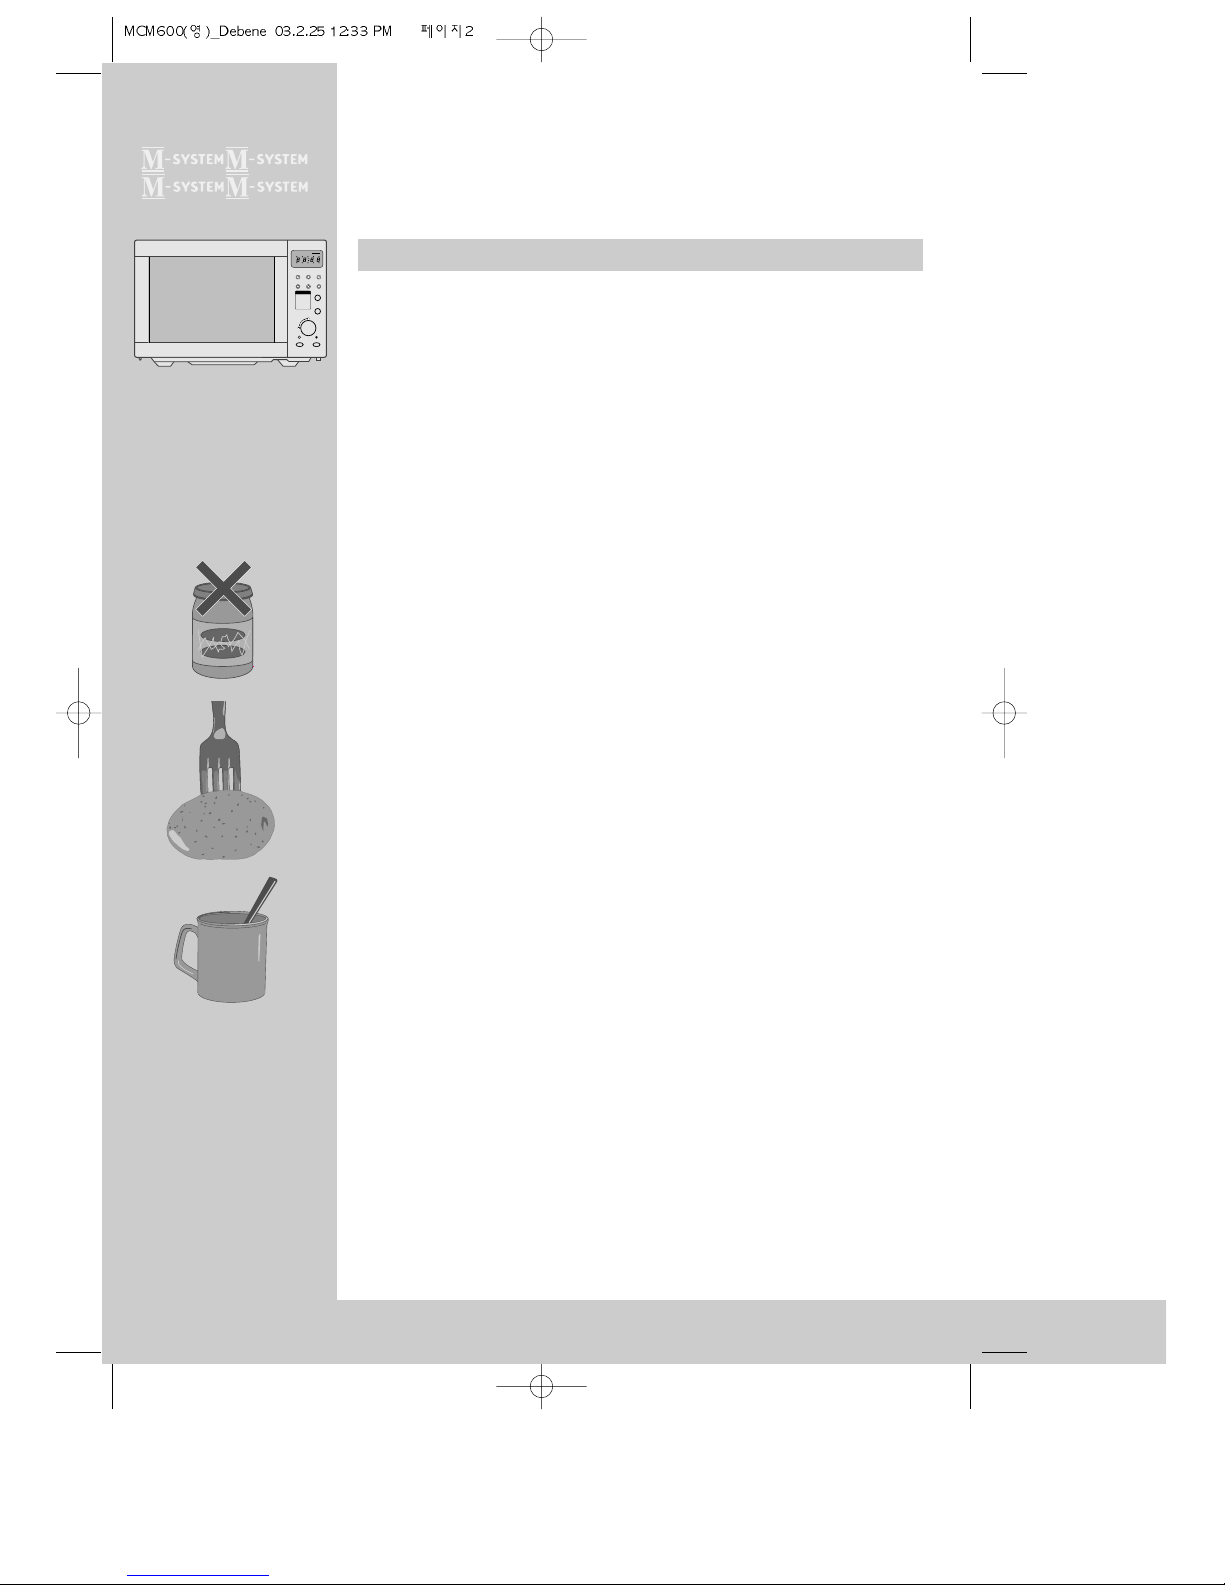
Using a microwave oven safely
The right place for your microwave oven
SHOULD KNOW!
Things you
When you unpack your microwave oven from its box, please check it immediately for
damage. If the door is damaged or bent, if there are dents inside the oven etc., get in
touch with your retail outlet immediately.
◆ WARNING: If the door or door seals are damaged, the oven must
not be operated until it has been repaired by a trained person.
◆ WARNING: It is hazardous for anyone other than a trained person
to carry out any service or repair operation which involves the
removal of any cover which gives protection against exposure to
microwave energy.
◆ WARNING: Liquids or other foods must not be heated in sealed
containers since they are liable to explode.
◆ WARNING: Only allow children to use the oven without
supervision when adequate instructions have been given so that the
child is able to use the oven in a safe way and understands the
hazards of improper use.
◆ This microwave oven contains no user-serviceable components. Any
adjustments or repairs must be performed by a qualified technician.
◆ Never use the oven with the door open. There is the risk of being
exposed to dangerous microwave energy. Never manipulate or
tamper with the safety locks and the hinges of the door.
◆ Keep the seals and seal surfaces clean and free of contamination
like food remains and cleaner residue.
◆ Microwave heating of beverages can result in delayed eruptive
boiling, therefore care has to be taken when handling the container.
◆ Use the microwave oven for cooking purposes only.
Do not use it to dry animals, clothing, paper or other objects or for
sterilisation or as a storage space for books, cooking utensils etc.
◆ Utensils should be checked to ensure that they are suitable for use
in microwave ovens.
◆ When heating food in plastic or paper containers, check the oven
frequently due to the possibility of ignition.
◆ If smoke is observed, switch off or unplug the appliance and keep
the door closed in order to stifle any flames.
◆ The microwave oven should stand on a flat, stable surface. This
appliance is designed for standing only.
◆ The area immediately around the oven should be free to allow the
circulation of fresh air for cooling.
◆ Do not place the microwave oven near a radio or television set etc.
This might cause interference.
◆ Never place the oven where it is exposed to convection, steam or
humidity.
◆ The minimum height of free space necessary above top surface of
the oven is 150mm.
WARNING
When heating liquids, e.g.
soups, sauces and beverages in
your microwave oven,
overheating the liquid beyond
boiling point can occur without
evidence of bubbling.
This could result in a sudden
boil over of the hot liquid.
To prevent this possibility the
following steps should be
taken:
◆ Avoid using straight sided
containers with narrow
necks.
◆ Do not overheat.
◆ Stir the liquid before placing
the container in the oven
and again halfway through
the heating time.
◆ After heating, allow to stand
in the oven for a short time,
stir or shake them again
carefully and check the
temperature of them before
consumption to avoid burns
(especially, contents of
feeding bottles and baby
food jars).
Page 3
Connecting up your microwave oven
ENGLISH
Contents
SHOULD KNOW!
Things you
Before using the oven please read these
instructions carefully, they contain safety notes and
useful tips.
Microwaves and oven
Cooking safely with microwaves - The oven.....................................................................................2 - 3
Accessories
...................................................................................................................................................................................4 - 5
Using the oven
The controls - Setting the clock - Child lock
.......................................................................................6 - 7
Cooking with microwaves
Easy cooking - Speedy cooking - Programmed cooking.....................................................8 - 9
Cooking with convection
Easy baking .........................................................................................................................................................................................10
Cooking with convection&combi
Combination microwaves and Convection...................................................................................................11
Defrosting and grilling
Defrosting by time - Defrosting by weight - Easy grilling with top heaters
......12 - 13
Appendix
Tips and guidelines - Error messages..................................................................................................14 - 15
Before calling technical service
..............................................................................................................................16
Microwave suitable dishes and utensils - Care and maintenance - Power Supply
........17
Technical data - Electrical connection
...............................................................................................................18
Moulded plugs
.................................................................................................................................................................................19
◆ The oven requires a mains electrical connection of 230 V ~ / 50 Hz with a
15 Amp. fuse.
◆ Only insert the plug into properly installed electrical sockets. If in doubt
contact an electrician.
◆ Faulty connections can start fires and create other risks and prevent the
oven from working correctly. DAEWOO is not liable for any damage due to
faulty connection.
◆ A defective power cable must be replaced by a qualified technician with
an new special replacement cable from DAEWOO.
Prior to use! The grill elements of your oven have been covered by a
coating in order to protect during transporting and storage.To remove the
coating heat the elements about 5 minutes (bad odour):
Place a bowl suitable for microwaves, not too small, filled with 0,2 l water or
more into the oven chamber. See chapter "Easy grilling" and start grilling
with the time set to 5:00 minutes.
1
Page 4
Cooking safely with microwaves
and OVEN
MICROWAVES
When preparing ready-to-serve food (like TV dinners) always carefully follow the
instructions provided by the food manufacturer on the package and also the
tips and
guidelines contained at the end of this manual.
◆ Microwaves are high frequency electromagnetic waves like radio waves.
They create heat by causing the molecules in water, fat and sugar to vibrate.
They only penetrate a certain depth (e.g. approx.
25 mm into meat) and this heat is then conducted to the rest of the item
being cooked.
◆ Tableware must be suitable for use in a microwave oven.
For example, dishes made of temperature resistant glass, ceramics,
porcelain and plastic (in the case of combination cooking it should also be
fireproof).
Never place closed metal containers into your microwave oven the microwaves are reflected and the food will not get warm.
◆ In the case of TV dinners the food can be left in the aluminium tray with the
top removed.
◆ Microwaves can damage any crockery with gold or silver decoration.
◆ Never place food in the oven in closed containers - the container could
explode.
◆ Food with a skin or peel can explode. Never place eggs in a microwave.
When cooking items such as potatoes, chicken livers etc., puncture the skin
using e.g. a fork to allow steam to escape.
◆ Never heat spirits (alcoholic drinks) to high temperatures; they may self-
ignite.
◆ When heating small amounts of liquid (e.g. a cup of tea/coffee), place a
spoon in the cup to prevent boiling over.
◆ Food which has been cooked with a microwave continues to cook after
the oven is switched off.
Before allowing others, in particular children or older people, to eat food or
drinks from the microwave oven check that the temperature of the food is
acceptable (danger of burning/scalding).
◆ Help the heat to spread uniformly by stirring and turning,
in particular after only short heating periods.
◆ Never turn the microwave oven on without food in the chamber -
it might overload and get damaged.
◆ Metal items, e.g. dishes, should not touch the walls of the oven, this can
cause sparking and could cause a fire.
◆ Eggs in their shell and whole hard-boiled eggs shall not be heated in
microwave ovens since they may explode.
2
M/W
Grill
Weight
Defrost
Time
Defrost
1. Roast Beef
2. Roast Pork
3.
Roast Chicken
4.
Beverage Coffee
5. Soup
6. Casserole
Combi Temp
Stop/Clear Start/Clock
Speedy Cook
Program Cook
M/W
Program
cook
Temp
cook
kg
Grill Combi
Defrost
Weight Time
Page 5
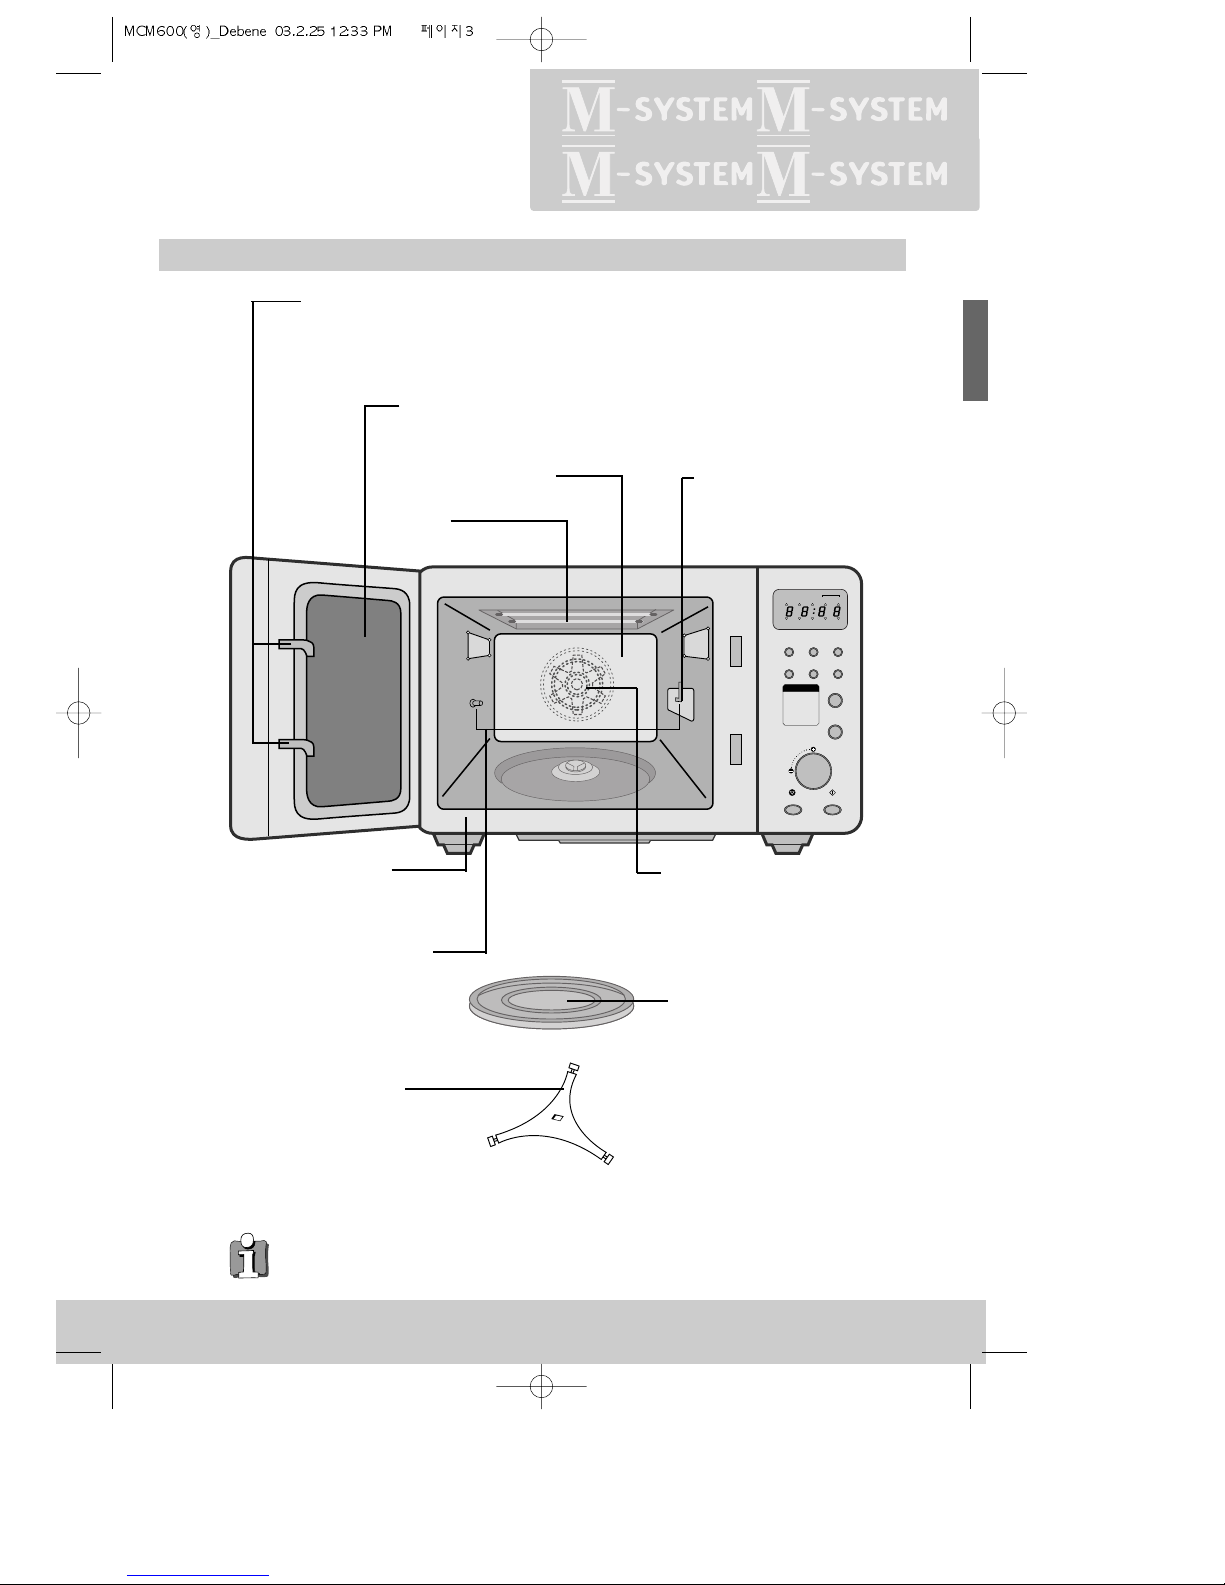
The microwave oven
and
OVEN
MICROWAVES
◆ Only use the oven with the rotating plate in position.
◆ To secure your safety, please use thick oven gloves when you remove food or accessories
from the oven chamber.
3
ENGLISH
Safety door lock
The oven will only operate with the door fully closed. When the door is open the oven
turns off and will only start again after the door is closed.
The seal surfaces prevent
microwaves escaping from the
chamber.
The rotating base supports
the rotating plate. The rotating base can be
easily removed for cleaning.
Make sure they are correctly positioned
(indentation) when reinserting.
The oven chamber
Grill
(Top heaters)
The microwave window is
protected by a splash
guard.
This special oven window is transparent to light, but prevents
microwaves escaping.
Place food in a suitable
container (dish) on the
rotating plate.
Convection outlet & fan & Heater
This oven includes the convection fan. It
help the hot air convect guickly and
uniformly.
M/W
Grill
Defrost
Rotisserie
1. Roast Beef
2. Roast Pork
3.
Roast Chicken
4.
Beverage Coffee
5. Soup
6. Casserole
Combi Temp
Stop/Clear Start/Clock
Speedy Cook
Program Cook
M/W
Program
cook
Temp
cook
Rotisserie
kg
Grill Combi
Defrost
Weight Time
This motor and rotisserie-guide are
used for rotating the utensil bar. This
motor is always rotated when the oven
is operating (Rotisserie type only).
Page 6
M/W
Grill
Weight
Defrost
Time
Defrost
1. Roast Beef
2. Roast Pork
3.
Roast Chicken
4.
Beverage Coffee
5. Soup
6. Casserole
Combi Temp
Stop/Clear Start/Clock
Speedy Cook
Program Cook
M/W
Program
cook
Temp
cook
kg
Grill Combi
Defrost
Weight Time
4
M/W
Grill
Weight
Defrost
Time
Defrost
1. Roast Beef
2. Roast Pork
3.
Roast Chicken
4.
Beverage Coffee
5. Soup
6. Casserole
Combi Temp
Stop/Clear Start/Clock
Speedy Cook
Program Cook
M/W
Program
cook
Temp
cook
kg
Grill Combi
Defrost
Weight Time
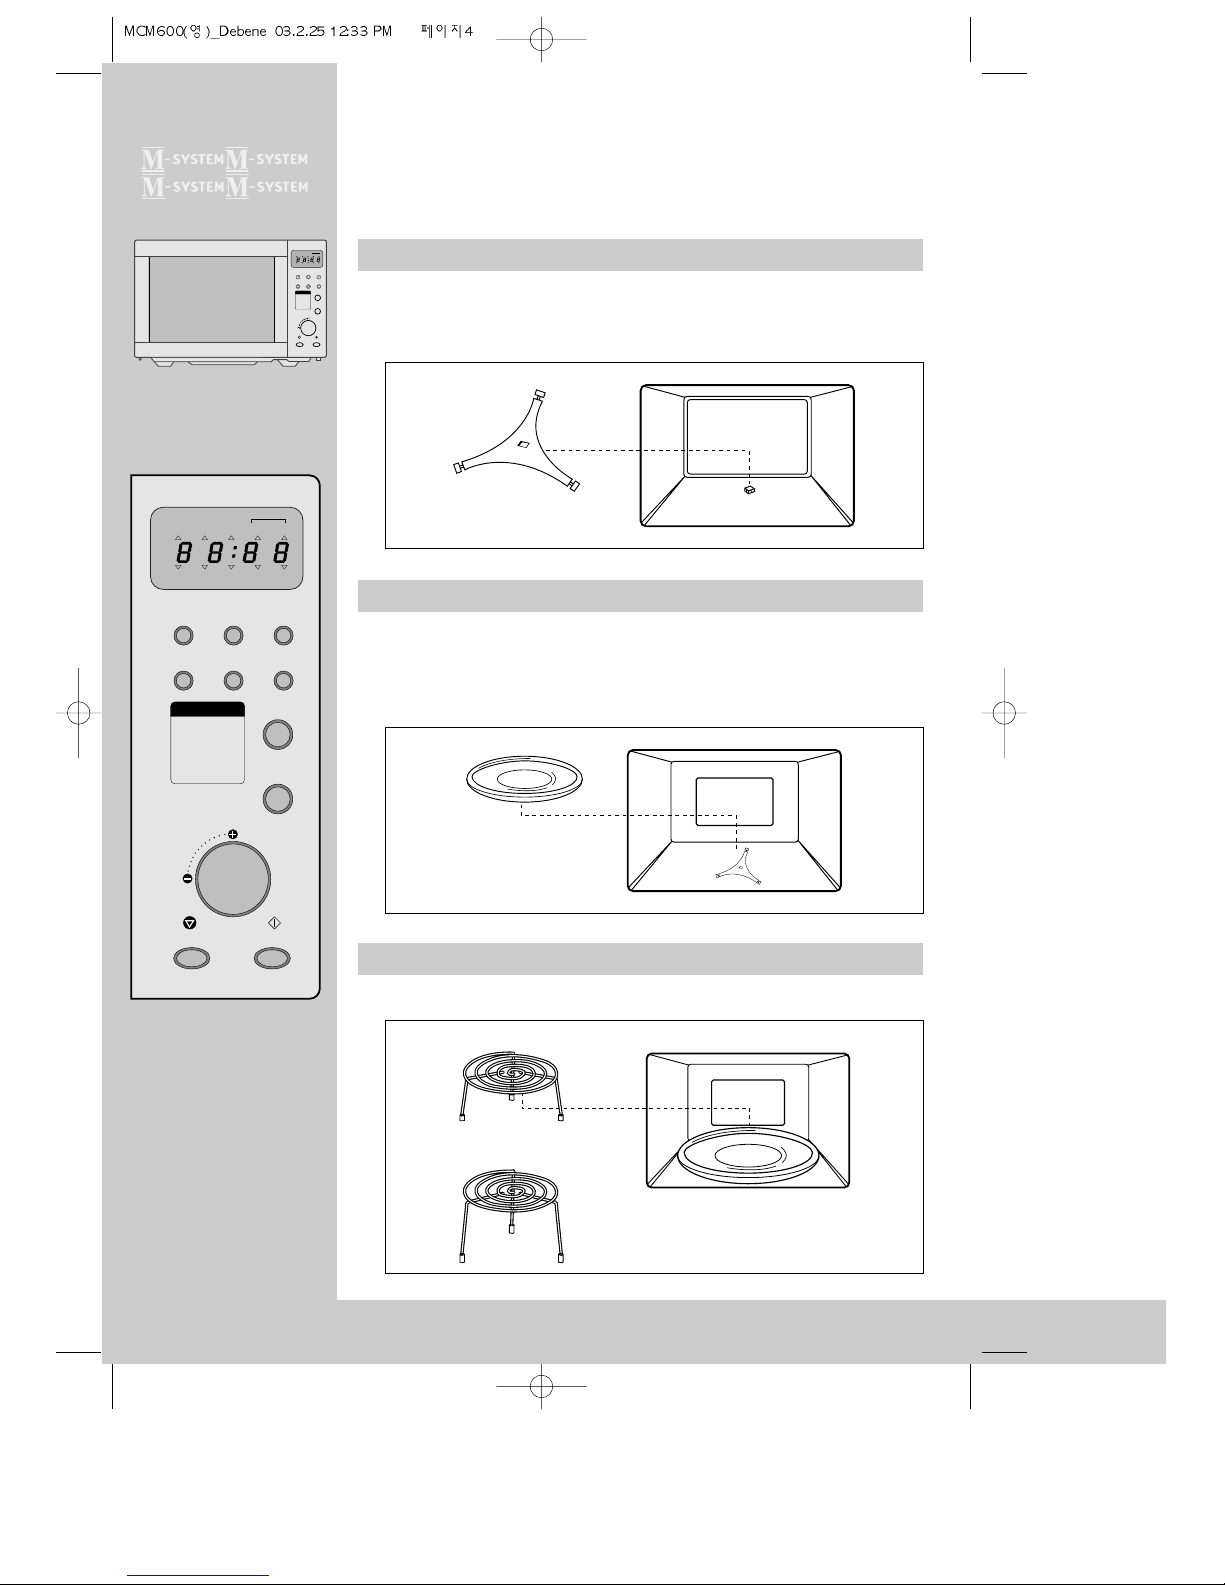
Rotating base
ACCESSORIES
This oven comes equipped with several accessories. They can be used in various ways
to facilitate cooking. Be sure to follow specific directions for their use when given in
charts or recipes in the cookbook.
This fits over the shaft in the center of the oven’s cavity floor. This is to
remain in the oven for all cooking. It should only be removed for
cleaning.
Turntable tray or turntable
This metal tray fits oven the rotating base and locks into place. This is
to be used in the oven for all cooking. It rotates clockwise or
counterclockwise during cooking. It is easily removable for cooking and
cleaning needs.
Metal rack
This metal rack is used with the turntable tray.
Low Metal Rack
High Metal Rack
Page 7
ENGLISH
ACCESSORIES
5
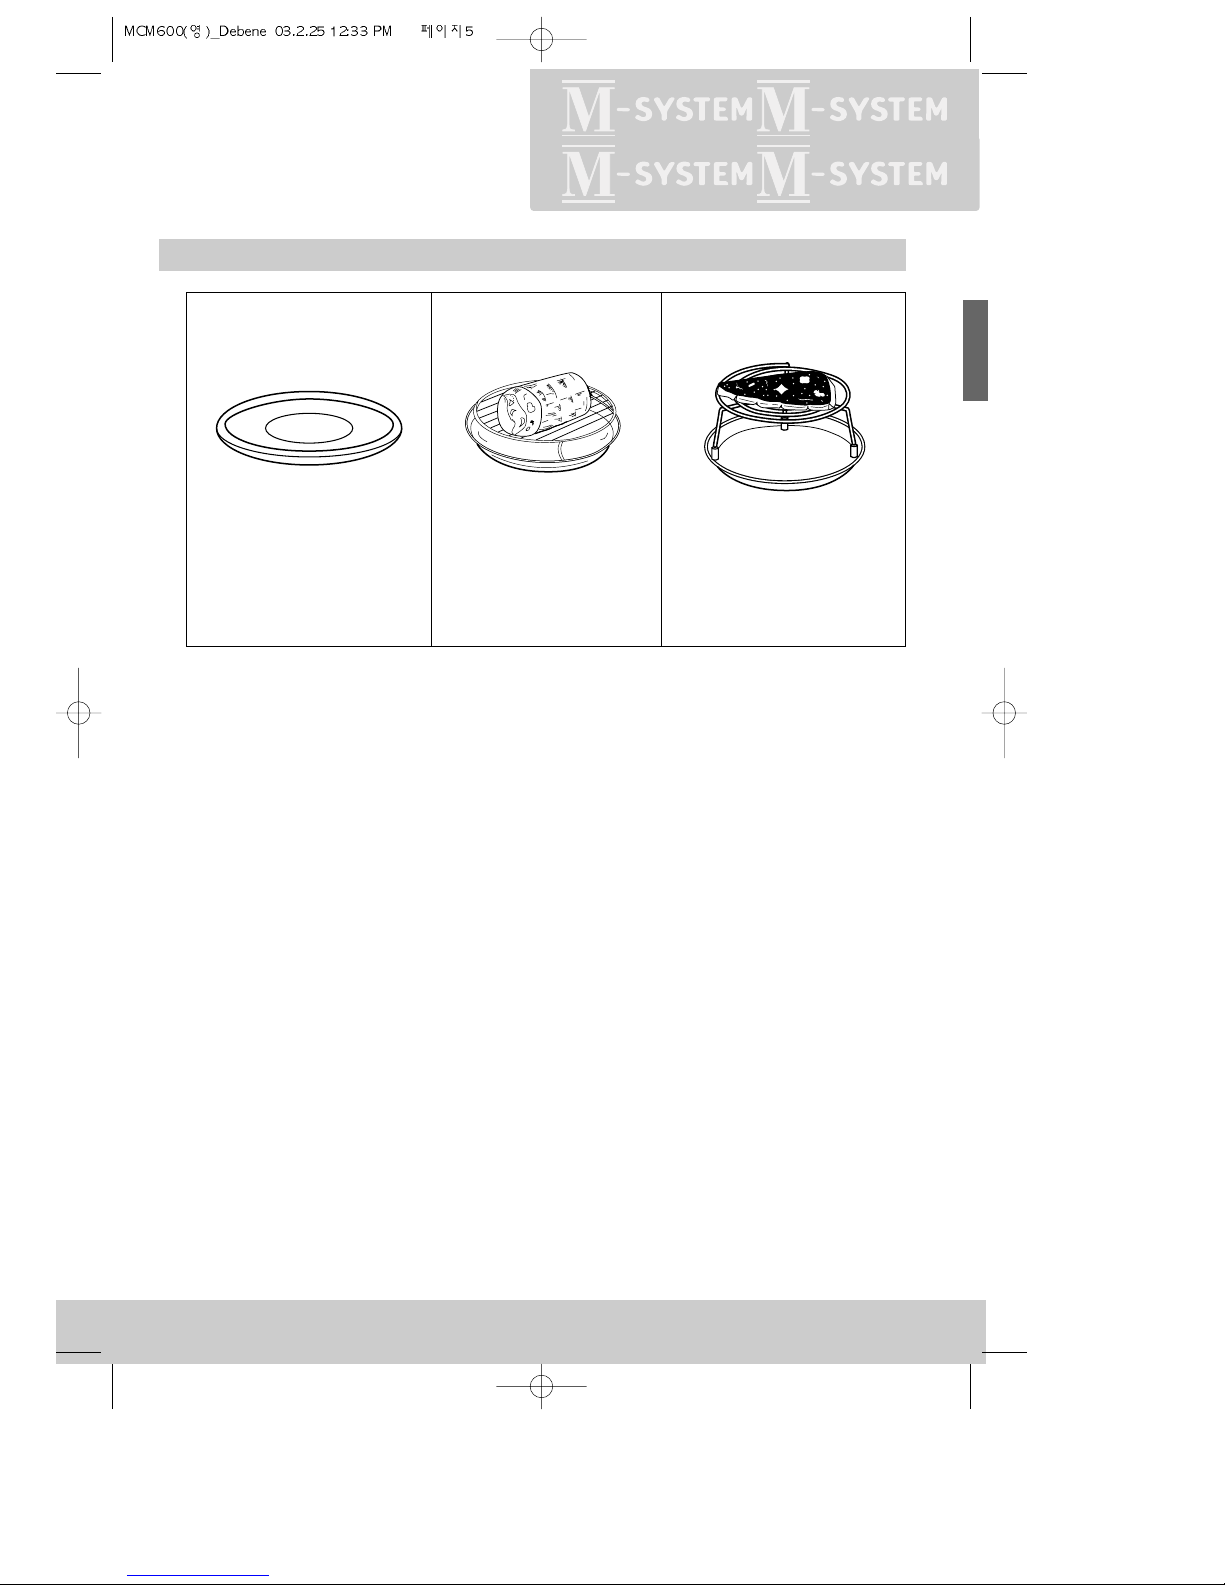
How to use the accessories of cooking
■ Turntable
• MICROWAVE
• CONVECTION
• COMBINATION
• GRILL
■ Low metal rack
• MICROWAVE
• DEFROST
• CONVECTION
• COMBINATION
■ High metal rack
• GRILL
Page 8

M/W
Grill
Weight
Defrost
Time
Defrost
1. Roast Beef
2. Roast Pork
3.
Roast Chicken
4.
Beverage Coffee
5. Soup
6. Casserole
Combi Temp
Stop/Clear Start/Clock
Speedy Cook
Program Cook
M/W
Program
cook
Temp
cook
kg
Grill Combi
Defrost
Weight Time
6
M/W
Grill
Weight
Defrost
Time
Defrost
1. Roast Beef
2. Roast Pork
3.
Roast Chicken
4.
Beverage Coffee
5. Soup
6. Casserole
Combi Temp
Stop/Clear Start/Clock
Speedy Cook
Program Cook
M/W
Program
cook
Temp
cook
kg
Grill Combi
Defrost
Weight Time
The controls
Using the
OVEN
Your DAEWOO microwave oven always keeps you well informed: the display tells you
which buttons can be pressed next or which settings are required (user guide).
Display (flashes to tell you what the oven is doing):
Buttons:
M/W Cooking with microwaves
GRILL Grilling with top heaters
COMBI Combination microwaves and convection
DEFROST - WEIGHT Defrosting food by weight
DEFROST - TIME Defrosting food by time
PROGRAM COOK Cooking using a program
TEMP COOK Baking
kg Weight information
Selects grill.
Selects combined microwaves and convection.
Select the baking temperature (hold down for fast
selection).
Press to cook using a program.
Selects microwaves. Press to select the power (hold down
for fast selection).
Defrosting, press to select weight.
Defrosting press to select time.
Press to start operation and for clock setting.
Stops the operation, also erases all entries.
Dial for setting time, temperature and weight.
Press for Speedy cook (each press adds 30 seconds
microwave cooking time).
Program Cook
Weight
Defrost
Time
Defrost
Start/Clock
Stop/Clear
Speedy Cook
Page 9

ENGLISH
Setting the clock
Child lock
Using the
OVEN
When not in use the display shows the present time.
When first connected to the mains, the display
looks like this (also after power disconnection).
Hold the button pressed for a few seconds (4 sec.) for
24 hour clock. (Press the button once more after 24 hour
clock for 12 hour clock.)
Turn the dial to adjust hours.
Turn the dial to adjust minutes.
Start the clock. The two dots flash each second.
The child lock prevents the oven from being used. For example because children could hurt
themselves on hot liquids etc.
Hold the button pressed for a few seconds. (3 sec.)
when loc appears in the display, the oven is locked.
Hold the button for a few seconds to release the lock.
When the time appears in the display, the oven is again available for normal
use.
7
Stop/Clear
Start/Clock
Press the button.
Start/Clock
Start/Clock
3 sec.
4 sec.
8 8 8 0
2 4 H 8
I 4 2 5
L 6 2 8
I 4
Page 10

I 8 0 0
Easy cooking
Speedy cooking
Cooking with
MICROWAVES
Cookery books and recipes provide details of power settings and times.
Press the button a number of times
to set a cooking time between 30
seconds and
5 minutes.
The oven starts automatically at high power
level after the button is released.
Set one of the 10 power
levels.
Press button 1 - 10 times.
Turn the dial to set the cooking
time.
Up to 60 minutes.
Start the operation.
"▲" flashes below "M/W" in the
display.
◆ The microwave power can be set in 10 levels, even during cooking.
◆ When the operation is finished the oven beeps four times, the clock
appears in the display, the rotating plate stops turning and the oven
light turns off.
◆ If you have used the appliance for grilling, convection or combination
cooking, let the oven cool down before using again.
◆ The oven displays the set cooking time in 10 seconds steps (up to
5 minutes cooking time), in 30 seconds steps (up to 15 minutes
cooking time), in 1 minute steps (up to 30 minutes cooking time), and
2 minutes steps (up to 60 minutes cooking time).
◆ Opening the oven door interrupts any operation except cooling fan.
To cancel the operation, press STOP. To continue the operation, press
START.
M/W
Grill
Weight
Defrost
Time
Defrost
1. Roast Beef
2. Roast Pork
3.
Roast Chicken
4.
Beverage Coffee
5. Soup
6. Casserole
Combi Temp
Stop/Clear Start/Clock
Speedy Cook
Program Cook
M/W
Program
cook
Temp
cook
kg
Grill Combi
Defrost
Weight Time
8
M/W
Grill
Weight
Defrost
Time
Defrost
1. Roast Beef
2. Roast Pork
3.
Roast Chicken
4.
Beverage Coffee
5. Soup
6. Casserole
Combi Temp
Stop/Clear Start/Clock
Speedy Cook
Program Cook
M/W
Program
cook
Temp
cook
kg
Grill Combi
Defrost
Weight Time
Start/Clock
Speedy Cook
1-10x
P - 8 0
8 8 3 0
M/W
M/W
M/W
Level P-10 P-20 P-30 P-40 P-50 P-60 P-70 P-80 P-90 P-HI
Power
(watt)
10% 20% 30% 40% 50% 60% 70% 80% 90% 100%
▲
▲
▲
Page 11

ENGLISH
Programmed cooking
MICROWAVES
Cooking with
◆ When the operation is finished the oven beeps four times, the clock appears in the display,
the rotating plate stops turning and the oven light turns off.
◆ Opening the oven door interrupts any operation except cooling fan. To cancel the operation,
press STOP. To continue the operation, press START.
General cooking hints
◆ If during the program cooking operation you hear sound 4 times 3 beeps, turn over the food.
◆ When cooking a roast with an excess amount of drippings, it is helpful to remove the dripping at turnover time to
prevent spattering.
◆ Prick the meats, fish or poultry with a fork to prevent bursting. Steam builds up pressure in meats, fish, or poultry
which are tightly covered by a skin or membrance.
◆ Reduce suggested cooking times. It is aways better to undercook food rather than to overcook them. If a range of
times is stated in a recipe, cook the minimum suggested time, check for doneness, and then cook slightly longer
if necessary.
Cooking Programs
Start the operation.
"▼" flashes above "PROGRAM COOK" in the display and
the cooking time is also displayed.
Category Food Quantity Food Temp Utensils
AC-1 Roast Beef 0.7kg~1.3kg Refrigerated Temp(10~15˚C) Roasting Rack
AC-2 Roast Pork 0.7kg~1.3kg Refrigerated Temp(10~15˚C) Roasting Rack
AC-3 Roast Chicken 0.7kg~1.5kg Refrigerated Temp(10~15˚C) Roasting Rack
AC-4 Beverage Coffee 1cup(250ml)~4cup Refrigerated Temp(5~10˚C) mug
AC-5 Soup 0.2kg/0.4kg/0.6kg/0.8kg Refrigerated Temp(5~10˚C) Casserole
AC-6 Casserole 0.2kg/0.4kg/0.6kg/0.8kg Refrigerated Temp(5~10˚C) Casserole
Item Directions
Roast Beef Place roasts fat-side down and whole poultry breast-side down
Roast Pork on a microwave roasting rack.
Roast Chicken Place dish on the turntable.
Beverage Coffee
Pour beverage in microwave mug. Place on the edge of the turntable in oven.
Do not cover. Stir before serving.
Soup For reheating refrigerated Soup, Casserole. Pour refrigerated it in casserole.
Casserole Cover and microwave stir after reheating.
Select one of the six menu programs.
Select by pressing the button 1 - 6 times.
You need set neither power nor time.
9
Program Cook
Start/Clock
1-6x
A C — 2
PROGRAM
COOK
▲
Turn the dial to set weights or cups.
I 5
PROGRAM
COOK
▲
kg
▲
Page 12

Easy baking
CONVECTION
Cooking with
The temperature can be selected between 100˚ C and 250˚ C in 10˚ C steps for
cooking and baking.
Top heaters and under heater operate simultaneously and convection fan rotates.
Set one of the 16 temperature
levels.
Press the button 1 - 16 times.
Turn the dial to set the time.
Up to 60 minutes.
Start the operation.
"▼" flashes above "TEMP COOK" in
the display.
M/W
Grill
Weight
Defrost
Time
Defrost
1. Roast Beef
2. Roast Pork
3.
Roast Chicken
4.
Beverage Coffee
5. Soup
6. Casserole
Combi Temp
Stop/Clear Start/Clock
Speedy Cook
Program Cook
M/W
Program
cook
Temp
cook
kg
Grill Combi
Defrost
Weight Time
10
M/W
Grill
Weight
Defrost
Time
Defrost
1. Roast Beef
2. Roast Pork
3.
Roast Chicken
4.
Beverage Coffee
5. Soup
6. Casserole
Combi Temp
Stop/Clear Start/Clock
Speedy Cook
Program Cook
M/W
Program
cook
Temp
cook
kg
Grill Combi
Defrost
Weight Time
Start/Clock
I 5 0 C
TEMPCO
OK
I 8 0 0
1-16x
▲
▲
TEMPCO
OK
Page 13

ENGLISH
CONVECTION&COMBI
Cooking with
This appliance has multiple heating systems to help
cook meals uniformly and crisply. The oven does not
need to be preheated.
◆ When the operation is finished the oven beeps four times, the clock appears in the display, the rotating plate
stops turning and the oven light turns off.
◆ To check the temperature during cooking press Temp, after a few seconds the display shows the cooking time
again.
◆ Opening the oven door interrupts any operation except cooling fan. To cancel the operation (and clear the
memory), press STOP. To continue the operation, press START.
Press the button one to three times to select the
microwave power.
"▲
" appears below "COMBI" in the display together with the
microwave power level: "Lo" = low (500 watt),
"0" = medium (600 watt), "HI" = high (700 watt).
Set one of the 16 temperature levels for the
convection. Press the button 1 - 16 times.
Set the cooking time on the dial.
Up to 60 minutes.
Start the operation.
"▲" flashes below "COMBI" in the display.
11
Start/Clock
1-3x
1-16x
C — H I
COMBI
I 5 0 C
COMBI
I 8 0 0
COMBI
▲
▲
▲
Combination microwaves and Convection
Page 14

Defrosting by time
Defrosting by weight
and
GRILLING
DEFROSTING
Press the button once.
"▲" appears below "TIME" in the
display.
◆ When the operation is finished the oven beeps four times, the clock
appears in the display, the rotating plate stops turning and the oven light
turns off.
◆ Tu rn the food over during defrosting after the 4 beeps to ensure complete
and even defrosting.
◆ Press the Defrost button to switch: defrosting by weight, "WEIGHT" ➡➡
defrosting by time, "TIME"➡➡ etc.
◆ Opening the oven door interrupts any operation except cooling fan. To
cancel the operation (and clear the memory), press STOP. To continue the
operation, press START.
M/W
Grill
Weight
Defrost
Time
Defrost
1. Roast Beef
2. Roast Pork
3.
Roast Chicken
4.
Beverage Coffee
5. Soup
6. Casserole
Combi Temp
Stop/Clear Start/Clock
Speedy Cook
Program Cook
M/W
Program
cook
Temp
cook
kg
Grill Combi
Defrost
Weight Time
12
M/W
Grill
Weight
Defrost
Time
Defrost
1. Roast Beef
2. Roast Pork
3.
Roast Chicken
4.
Beverage Coffee
5. Soup
6. Casserole
Combi Temp
Stop/Clear Start/Clock
Speedy Cook
Program Cook
M/W
Program
cook
Temp
cook
kg
Grill Combi
Defrost
Weight Time
Set the defrost time on the
dial.
Up to 60 minutes.
Start the operation.
"▲" flashes below "TIME" in the
display.
Press the button once.
"▲" appears below "WEIGHT" in the display
and "▼" flashes above "kg".
Use the dial to adjust the
weight of the food.
Weights from 0.1 kg up to 2.9 kg are
possible.
Start the operation.
"▲" flashes below "WEIGHT" in the
display.
Time
Defrost
Weight
Defrost
Start/Clock
Start/Clock
8 0 0 8
WEIGHT
kg
8 8 8 0
TIME
2 0 0 0
TIME
0 2 3 0
WEIGHT
kg
▲
▲
▲
▲
▲
▲
Page 15

ENGLISH
and GRILLING
DEFROSTING
13
Easy grilling with top heaters
◆ When the operation is finished the oven beeps four times, the clock appears in the display, the
rotating plate stops turning and the oven light turns off.
◆ The grill element is at the top of the oven compartment.
◆ Do not preheat before grilling.
◆ The oven displays the set grill time in 10 seconds steps (up to 5 minutes cooking time),
in 30 seconds steps (up to 10 minutes cooking time) and in 1 minute steps (up to 60 minutes cooking
time).
◆ Opening the oven door interrupts any operation except cooling fan. To cancel the operation (and
clear the memory), press STOP. To continue the operation, press START.
Press the button once.
"▲" appears below "GRILL" in the display.
Set the grill time on the dial.
Up to 60 minutes.
Start the operation.
"▲" flashes below "GRILL" in the display.
To use the metal rack.
• Place food on the rack
• Place the rack on the rotating plate.
• WARNING
- The temperature inside the oven and window is very high.
- Do not touch the oven window and metallic interoir of the oven when taking food
in and out.
- Use thick oven gloves while handling food or accessories.
Start/Clock
0
GRILL
2 3 0 0
GRILL
▲
▲
Page 16

Tips and guidelines
APPENDIX
Cooking with microwaves differs in some aspects from normal cooking. The guidelines
and tips below will help you get better results using a microwave oven.
14
M/W
Grill
Weight
Defrost
Time
Defrost
1. Roast Beef
2. Roast Pork
3.
Roast Chicken
4.
Beverage Coffee
5. Soup
6. Casserole
Combi Temp
Stop/Clear Start/Clock
Speedy Cook
Program Cook
M/W
Program
cook
Temp
cook
kg
Grill Combi
Defrost
Weight Time
Wait time
Microwaves do not usually completely penetrate the food on the rotary plate. The
wait time allows the food to continue cooking even after the oven has switched off.
The temperature can rise by up to 8° C inside the food.
After heating food in the microwave, let it stand in the oven for a short time to allow
the temperature to equalise. The wait time depends on the weight, volume and
density of the food (and can be up to 10 minutes).
How to cook food without overcooking (drying, charring etc.)
◆ Select the right cooking level.
◆ Select the right cooking time. Times quoted in recipes are approximate and
depend upon initial temperature, weight, density of food etc.
◆ Always use microwave-suitable dishes.
Defrosting
◆ Defrosting is faster in flatter dishes than in higher dishes.
◆ Divide large pieces of food into smaller pieces for faster defrosting.
◆ Cover the smaller pieces when they start to warm up.
◆ Do not defrost completely under power, let the food stand for a while.
Amount
To warm up more food you need more time. Rule of thumb:
double the food, double the time (almost).
Initial temperature
The colder the food, the more time is needed.
Different foods
When cooking a meal with various ingredients remember that fat and sugar heat up
faster than water.
This means that ingredients with higher fat and sugar contents will have higher
temperatures after cooking than those containing water.
The more dense a food, the longer it takes to cook/defrost. Very dense foods, like
meat, take much longer to warm up than say sponge cake.
Micro heating of beverages can result in delayed eruptive boiling, therefore care has
to be taken when handling the container.
Skins, peels, shells ...
Some foods have a skin, peel or a shell (eggs, potatoes, apples, liver, sausages).
Puncture the skin or peel with for example a fork to allow steam to escape and the
food to expand - this releases pressure and prevents the food from bursting.
3/4
Page 17

ENGLISH
APPENDIX
15
Water
Cooking in a microwave needs very little water. For 100 g of vegetables or potatoes, use 1 tablespoon of water.
Covering food
Food can be covered with foils or tops which let microwave through in order
◆ to prevent splashing
◆ to shorten the cooking time and/or
◆ to retain any natural moisture in the food (➝ Microwave suitable dishes and utensils).
Arranging food - size and shape
To achieve the shortest cooking times and the best results it is sometimes useful to arrange the food in a
certain way.
Small pieces cook faster than big pieces.
Pieces of the same size cook more evenly than different sized pieces.
In the case of irregularly shaped pieces, the thin sections will cook faster than the thick sections.
When cooking several of the same item, e.g. stuffed tomatoes, arrange them on the rotating plate in a circle to
achieve even cooking.
When cooking irregularly shaped items or food with different thicknesses, place the smaller or thinner
parts in the middle and the thicker (denser) parts towards the outside. Alternatively, cover thinner parts with a
piece of aluminium foil to prevent drying or charring.
Where possible, place fish with the tail towards the centre, slit the skin to prevent the skin from tearing or
bursting open. Another possibility is to cover the head and the tail ends with aluminium foil to prevent
premature drying or charring.
When warming up pre-cooked meals, place the thinner and lighter items towards the middle, the heavier
and denser items towards the outside of the plate.
Place thin slices (e.g. bacon) on top of one another (fully or partially).
Arrange sausages close together.
Drinks, sauces and gravy should be heated in separate containers. Fill tall narrow vessels only
3
/
4 full.
Stir or turn the food every now and then to help spread the heat more evenly.
Error messages
1
E - - 2
• When temperature sensor is disconnected, E--3 appears.
• Call technical service.
2
E - - 3
• When inside part of the oven is very hot abnormally, E--2 appears.
• Let the oven cool 15~20 minutes opening the door slightly.
• Unplug the power and then plug the power again.
• If the oven does not work normally, call technical service.
Page 18

Before calling technical service
No components of this microwave oven are user-serviceable. Any repairs or
adjustments must always be performed by qualified service technicians.
◆ For more information read the first chapter and the appendix.
This should answer most of your questions.
◆ If you cannot solve your problem, ask a qualified service technician.
M/W
Grill
Weight
Defrost
Time
Defrost
1. Roast Beef
2. Roast Pork
3.
Roast Chicken
4.
Beverage Coffee
5. Soup
6. Casserole
Combi Temp
Stop/Clear Start/Clock
Speedy Cook
Program Cook
M/W
Program
cook
Temp
cook
kg
Grill Combi
Defrost
Weight Time
16
M/W
Grill
Weight
Defrost
Time
Defrost
1. Roast Beef
2. Roast Pork
3.
Roast Chicken
4.
Beverage Coffee
5. Soup
6. Casserole
Combi Temp
Stop/Clear Start/Clock
Speedy Cook
Program Cook
M/W
Program
cook
Temp
cook
kg
Grill Combi
Defrost
Weight Time
APPENDIX
Before calling your technical service, check the following:
Oven doesn't work?
◆ Is the power supply correctly connected?
◆ Is the oven door shut?
◆ Has a cooking time been set?
◆ Has the house mains switch disconnected or the fuse blown?
Sparks in the oven?
◆ Is there metal, or a dish with metal edges or aluminium foil, in the
oven? Metal must never touch the inner walls of the oven.
Turn the microwave on without food in oven?
◆ Although switching the oven on for short periods will cause no
damage, it is not recommended.
Use the oven without the rotating plate?
◆ No – always ensure that the rotating plate and its support ring are
correctly inserted.
Open door during cooking?
◆ The door can be opened at any time during an operation (e.g. to stir,
turn over). The oven switches the operation off immediately. Any
settings are kept and when the door is closed again the operation
can be continued by pressing START, or cancelled by pressing STOP.
Condensation on oven walls and/or door?
◆ Condensation on the inner surfaces is normal when cooking water
containing food.
Can microwaves pass through the door window?
◆ No – the window is made of a special glass which lets no
microwaves through.
Page 19

ENGLISH
17
APPENDIX
Microwave suitable dishes and utensils
Care and maintenance
Microwave suitable dishes are transparent to microwaves (i.e. made of such materials as plastic, glass and ceramics),
especially when also fireproof. Suitable dishes only become slightly warm after one minute microwave cooking at high
power.
Dishes unsuitable for microwave ovens are all metal dishes which reflect microwaves. Also unsuitable for
microwaves are dishes made of lead glass, dishes with metal applications (gold edged), paper or plastic containers which
cannot withstand high temperatures (120° C).
◆ If in doubt, check for information such as "microwave suitable".
◆ Bear in mind that this appliance is not only a microwave unit.
Any dishes must also be fireproof when used with the grill or convection.
◆ Dishes, foils and covers should never be allowed to touch the walls of the oven compartment.
Best cooking results are achieved if not only the material but also the shape of the dish is suitable.
Round dishes promote more even heating, whereas in square or rectangular dishes the food can easily dry out or char in
the corners.
Food in flat dishes will cook more evenly.
Small pieces of aluminium foil are good for covering any vulnerable sections (e.g. the thin flat tail end of a fish).
Although this microwave oven is fitted with state-of-the-art safety arrangements ...
◆ Never manipulate or tamper with the door locks or hinges,
◆ Make sure the seals and seal surfaces are free of contamination e.g. food remains or cleaner residues.
Clean the oven – especially the seal areas of the door – with a mild cleaning agent.
Do not use any abrasive agents or abrasive pads.
◆ Make sure the oven door is not mistreated (e.g. that children don't swing on it). Do not use the oven if it is damaged.
It is especially important that the door closes properly. The door must have no distortions, the hinges and locks must
not be broken, bent or loose and the seal surfaces must not be corroded.
◆ Only allow children to use the oven without supervision when adequate instructions have been given so that the child
is able to use the oven in a safe way and understands the hazards of improper use.
◆ The contents of feeding bottles and baby food Jars are to be stirred or shaken and the temperature is to be checked
before consumption, in order to avoid the burns;
Power Supply
◆ Check your local power source. This oven requires a current of approximately 13 amperes, 230V, 50Hz.
(KOC-995T2S : 12 amperes)
◆ Power supply cord is ablut 1.2 meter long.
◆ The voltage used must be the same as specified on this oven. Using a higher voltage may result in a
fire or other accident causing oven damage. Using low voltage will cause slow cooking. We are not
responsible for damage resulting from use of this oven with a voltage of ampere fuse other than those
specified.
◆ If the supply cord is damaged, it must be replaced by the manufacturer or its service agent or similarly
qualified person in order to avoid a hazard.
Page 20

APPENDIX
18
M/W
Grill
Weight
Defrost
Time
Defrost
1. Roast Beef
2. Roast Pork
3.
Roast Chicken
4.
Beverage Coffee
5. Soup
6. Casserole
Combi Temp
Stop/Clear Start/Clock
Speedy Cook
Program Cook
M/W
Program
cook
Temp
cook
kg
Grill Combi
Defrost
Weight Time
Technical data
Power supply 230 V~, 50 Hz
Microwave Power consumption 1550 Watt
Power 1000 Watt (IEC 705)
Frequency 2450 MHz
Grill power consumption 1400 Watt
Convection power consumption 1450 Watt (Temporary Maximum Power
Consumption : 2800 Watt)
Microwave/convection power consumption
2950 Watt
Dimensions (w-h-d) 526 x 345 x 496 mm
Oven chamber (w-h-d) 335 x 260 x 335 mm
Weight 23 kg
The right to make technical improvements is reserved. Errors and omissions excepted.
Electrical connection
(for UK only)
◆ We recommend the use of a good quality plug.
◆ The pages of this instruction manual show pictures of the various
control buttons referred to in the text. Descriptions of the display
information are also shown where applicable.
◆ For your own safety read the following instructions carefully before attempting to connect
this unit to mains.
◆ Check that the voltage on the rating plate corresponds to the voltage in your home. The
rating plate is on the back panel of the appliance.
The power cable must be fitted with a fused plug approved by ASTA or BSI to BS 1362 and
provided with a 13 A fuse. The fuse cover must always be securely replaced. If the oven is not
working, the fuse may need replacing.
The wires of the mains lead fitted to this appliance are coloured in accordance with the
following code:
GREEN and YELLOW = EARTH (GREEN or GREEN and YELLOW or )
BLUE = NEUTRAL (BLACK)
BROWN = LIVE (RED)
If the terminals in the plug are unmarked or you are in any doubt as to the correct connections,
consult a qualified electrician.
Please read also chapter "Moulded plugs".
13A
13
A
E
L
N
6A
BLUE BROWN
GREEN and YELLOW
13
A
Page 21

ENGLISH
APPENDIX
19
Moulded plugs
(for UK only)
◆ Should it be necessary to remove a moulded on plug from the mains cable, it should be cut off and replaced with
a suitable replacement.
◆ The moulded plug cannot be used for any other appliance, therefore remove the fuse and dispose immediately
and safely to prevent anyone, especially children from plugging it in to a wall socket, which will create a safety
hazard.
◆ Should the mains lead ever require replacement, it is essential that this operation be carried out by a qualified
electrician and should only be replaced with a flexible cord obtained from the manufacturer.
◆ Applicable only if moulded plug is fitted.
◆ After replacement of a fuse in the plug, the fuse cover must be refitted. If the fuse cover is lost a replacement
cover must be obtained. The colour of the correct replacement fuse cover is that of the coloured insert in the
base of the plug or the colour that is embossed in words in the base of the plug recess or elsewhere on the plug.
Always state this colour when ordering a replacement fuse cover.
◆ Only 13 A replacement fuses which are ASTA approved to BS 1362 should be fitted.
Caution:
When operating this unit on 230 V ~ mains supply, please note that
when the power switch is in the off mode, the unit is not disconnected
from the mains supply.
However, please be assured that it is perfectly safe to leave the unit
connected to the mains supply.
This symbol means that this unit is double insulated, an earth
connection is not necessary.
Caution:
To prevent electric shock, do not remove any covers.
No user serviceable parts inside, refer servicing to qualified service
personnel.
 Loading...