

Page 1
Instructions for Use
Combi Microwave
Bedienungsanweisung
Mikrowelle
MCM 450
Page 2

1
EN
Dear Customer:
Before going any further, we want to thank you for
preferring our product. We are sure that this
modern, functional and practical microwave oven,
manufactured with top quality materials, will fully
meet your expectations.
We ask you to read the instructions in this booklet
very carefully as this will allow you to get the best
results from using your microwave oven.
KEEP THE DOCUMENTATION OF THIS
PRODUCT FOR FUTURE REFERENCE.
Always keep the instruction manual handy. If
you lend the microwave oven to someone else
give them the manual as well!
Environmental protection
Disposal of the packaging
The packaging bears the Green Point mark.
Dispose of all the packaging materials such as
cardboard, expanded polystyrene and plastic
wrapping in the appropriate bins. In this way you
can be sure that the packaging materials will be
re-used.
Disposal of equipment no longer used
According to European Directive 2002/96/EC on
the management of waste electrical and electronic
equipment (WEEE), home electrical appliances
should not be put into the normal systems for
disposal of solid urban waste.
Outdated appliances should be collected
separately to optimise component material
recovery and re-cycling rates and to prevent
potential harm to human health and the
environment. The symbol of a rubbish container
superimposed by a diagonal cross should be put
on all such products to remind people of their
obligation to have such items collected separately.
Consumers should contact their local authorities
or point of sale and request information on the
appropriate places to leave their old home
electrical appliances.
Before disposing of your appliance, render it nonusable by pulling out the power cable, cutting this
and disposing of it.
Page 3

2
EN
Contents
Installation instructions .....................................................................................................................3
Before installation .............................................................................................................................3
Electrical Installation.........................................................................................................................3
After installation................................................................................................................................3
Microwave safety ................................................................................................................................4
The advantages of microwaves.........................................................................................................6
Description of your oven....................................................................................................................7
Basic settings .....................................................................................................................................8
Setting the clock ...............................................................................................................................8
Hiding/Displaying the Clock..............................................................................................................8
Child lock..........................................................................................................................................8
Basic Functions ..................................................................................................................................9
Microwaves.......................................................................................................................................9
Grill ...................................................................................................................................................9
Microwaves + Grill ..........................................................................................................................10
Hot-Air ............................................................................................................................................10
Microwaves + Hot-Air .....................................................................................................................11
Grill + Fan.......................................................................................................................................11
Auto Defrost....................................................................................................................................12
When the oven is working................................................................................................................13
Interrupting a cooking cycle............................................................................................................13
Altering parameters ........................................................................................................................13
End of a cooking cycle....................................................................................................................13
Defrosting..........................................................................................................................................14
General instructions for defrosting..................................................................................................14
Cooking with a microwave oven .....................................................................................................16
Cooking with the grill .......................................................................................................................18
Cooking with Microwaves + Hot-Air................................................................................................21
Cooking with Hot-Air ........................................................................................................................22
What kind of ovenware can be used?.............................................................................................23
Microwave function.........................................................................................................................23
Grill and Hot-Air functions...............................................................................................................23
Combined functions........................................................................................................................23
Aluminium containers and foil.........................................................................................................23
Lids.................................................................................................................................................23
Oven Cleaning and Maintenance.....................................................................................................25
Front surface ..................................................................................................................................25
Oven interior...................................................................................................................................25
Oven ceiling....................................................................................................................................26
Accessories ....................................................................................................................................26
What should I do if the oven doesn’t work?...................................................................................27
Technical characteristics.................................................................................................................28
Installation.........................................................................................................................................57
Page 4
3
EN
Installation instructions
Before installation
Check that the input voltage indicated on the
characteristics plate is the same as the voltage of the
power outlet you are going to use.
Open the oven door and take out all the accessories
and remove the packing material, including the white
polystyrene part that holds the turntable plate.
Do not remove the mica cover on the ceiling of the
interior! This cover stops fat and pieces of food
damaging the microwave generator.
Warning! The front surface of the oven may be
wrapped with a protective film. Before using the oven
for the first time, carefully remove this film, starting on
the inside.
Make sure that the oven is not damaged in any
way. Check that the oven door closes correctly and
that the interior of the door and the front of the oven
opening are not damaged. If you find any damage
contact the Technical Assistance Service.
DO NOT USE THE OVEN if the power cable or the
plug are damaged, if the oven does not function
correctly or if it has been damaged or dropped.
Contact the Technical Assistance Service.
Put the oven on a flat and stable surface. The oven
must not be put close to any sources of heat, radios or
televisions.
During installation, make sure that the power cable
does not come into contact with any moisture or
objects with sharp edges behind the oven. High
temperatures can damage the cable.
Warning: after the oven is installed you must make
sure you can access the plug.
Electrical Installation
Electrical installation must be performed by an
electrician qualified in accordance with the legislation
in force.
Before connecting the microwave oven to the electric
mains, check that the voltage and frequency of the
mains matches that which is shown on the rating plate
located in the cavity front, and on the guarantee
certificate, which should be kept together with this
manual.
The electric connection is made via plug (where
accessible) or via an omnipolar switch, which is
suitable for the intensity to be tolerated and which has
a minimum gap of 3mm between its contacts, to
ensure disconnection in case of emergency or when
cleaning the microwave.
The connection should include correct earthing, in
compliance with current norms. WARNING: THE
OVEN MUST BE EARTHED.
If the flexible supply cable fitted to the microwave ever
needs to be changed, it should be replaced by an
official After Sales Service, because it requires special
tools.
The manufacturer and retailers do not accept
responsibility for any damage that may be caused to
people, animals or property if these installation
instructions are not observed.
After installation
The oven only functions when the door is closed
correctly.
After the first use, clean the inside of the oven and the
accessories, following the cleaning instructions given in
the section “Oven cleaning and maintenance”.
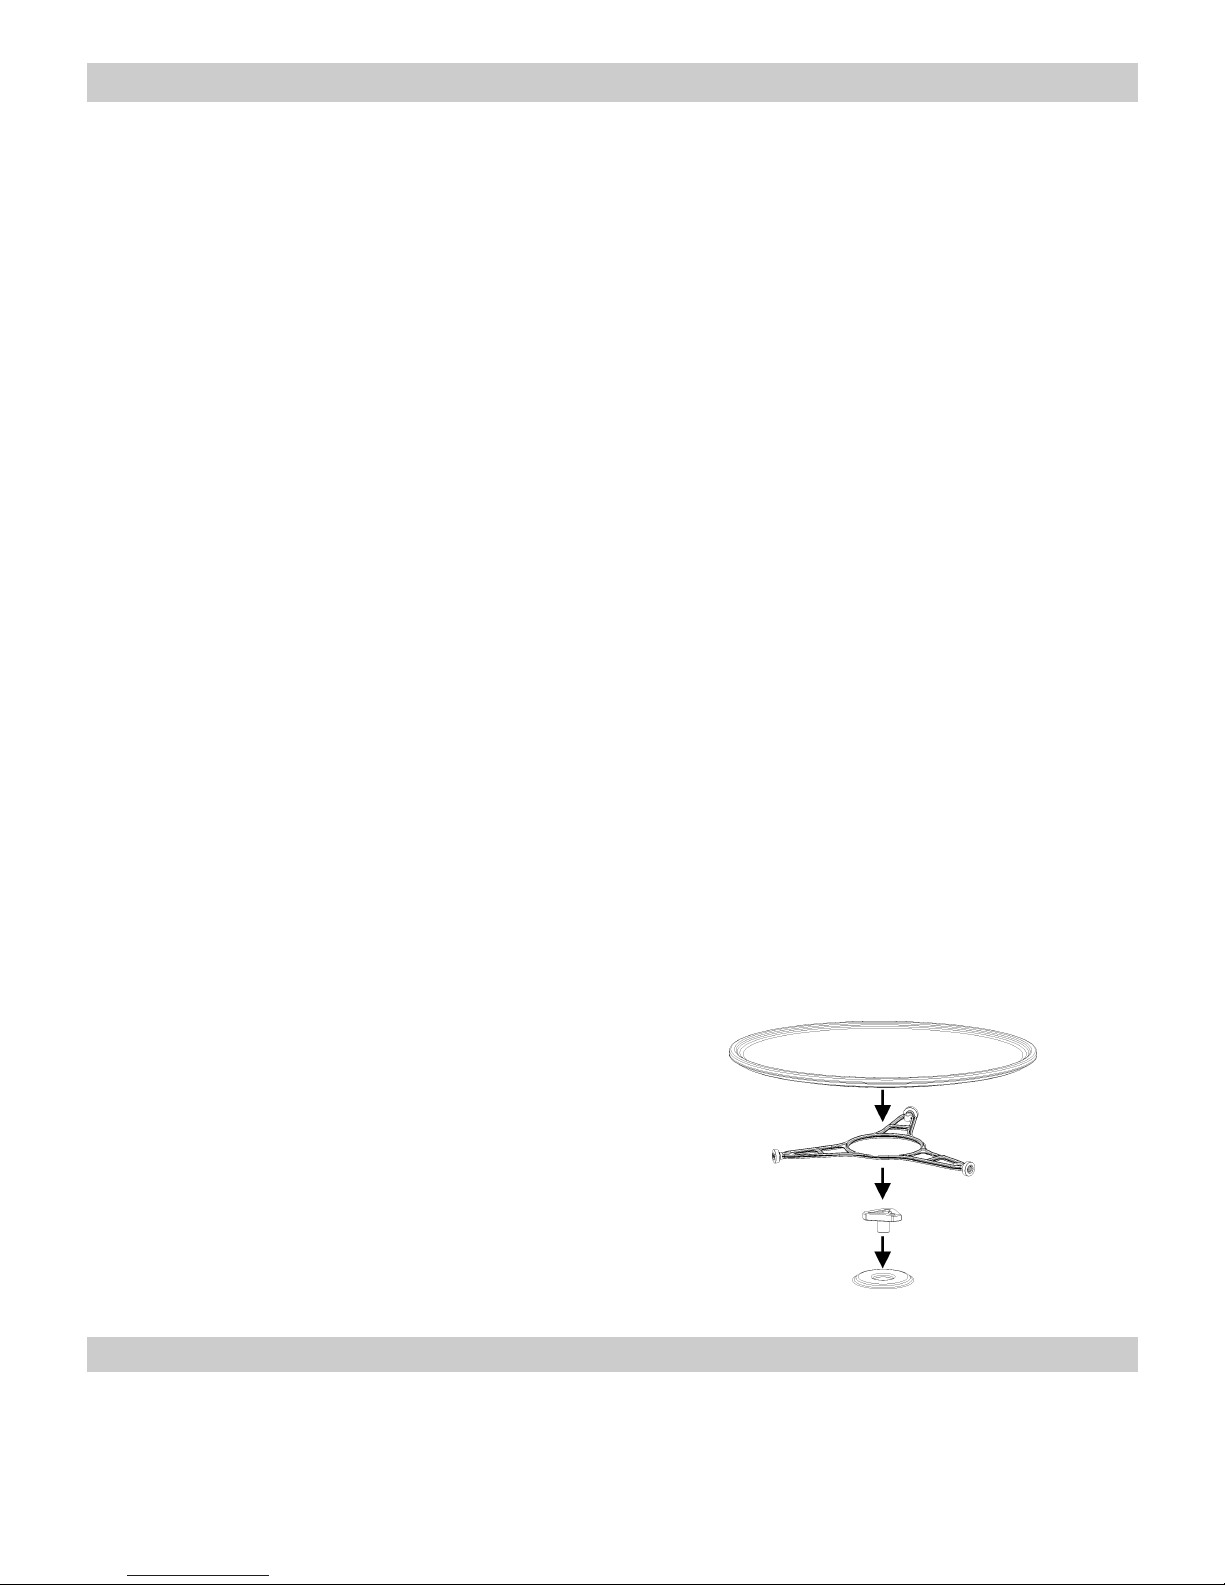
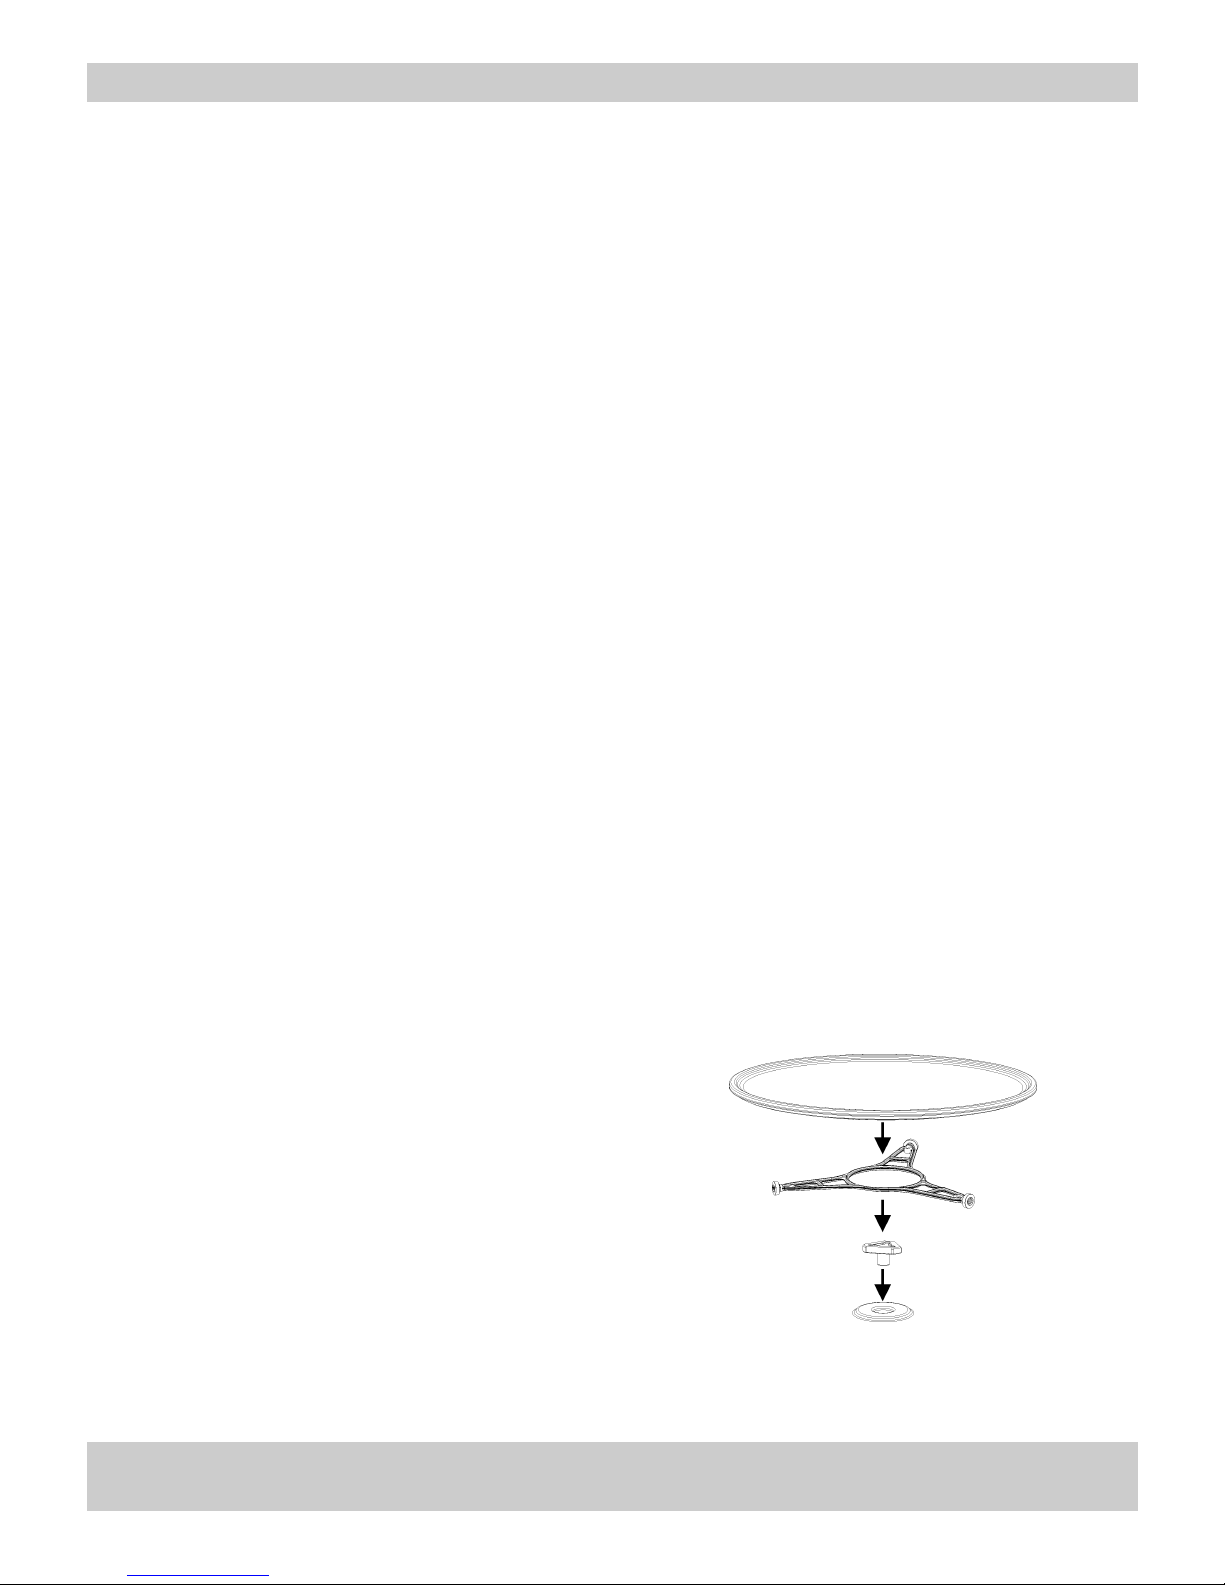
Fit the Turntable support in the centre of the oven cavity
and put the Turntable ring and the Turntable plate on top,
making sure they slot in. Whenever you use the
microwave, the turntable plate and the respective
accessories must be inside and correctly fitted. The
turntable plate can rotate in both directions.
During installation, follow the instructions supplied separately.
Page 5
4
EN
Microwave safety
• Warning: Don’t use the baking tray with
microwave function or combined microwave
function.
• Warning! Never leave the oven unwatched,
especially when using paper, plastic or other
combustible materials. These materials can
char and may fire. FIRE RISK!
• Warning! If you see smoke or fire, keep the
door closed in order to smother the flames.
Switch off the oven and take the plug out of
the socket or cut off the oven power supply.
• Warning! Do not heat pure alcohol or
alcoholic drinks in the microwave. FIRE
RISK!
• Warning! Do not heat liquids or other foods
in closed containers since these may
explode readily.
• Warning! This appliance is not intended for
use by persons (including children) with
reduced physical, sensory or mental
capabilities, or lack of experience and
knowledge, unless they have been given
supervision or instruction concerning use of
the appliance by a person responsible for
their safety. Children should be supervised
to ensure that they do not play with the
appliance.
• Warning! If the oven has a combined
function mode (microwave with other means
of heating), children should not be allowed to
use the oven without adult supervision on
account of the high temperatures generated.
• Warning! The oven cannot be used if:
- The door is not closed correctly;
- The door hinges are damaged;
- The surfaces of the contact between the
door and the oven front are damaged;
- The door window glass is damaged;
- There is frequent electrical arcing inside the
oven even though there is no metal object
inside.
• The oven can only be used again after it
has been repaired by a Technical
Assistance Service technician.
• During use the appliance becomes hot. Care
should be taken to avoid touching heating
elements inside the oven.
• Warning: Accessible parts may become hot
during use. Young children should be kept
away.
• Do not use harsh abrasive cleaners or sharp
metal scrapers to clean the oven door glass
since they can scratch the surface, which
may result in shattering of the glass.
Beware!
• Never heat baby foods or drinks in
bottles or jars with the teats or lids on
them. After heating the food mix or shake
well so that the heat is spread evenly.
Check the food temperature before
feeding this to the child. DANGER OF
BURNING!
• To avoid food overheating or burning it is
very important not to select long time
periods or power levels that are too high
when heating small quantities of food. For
example, a bread roll can burn after 3
minutes if the power selected is too high.
• For toasting, use just the grilling function and
watch the oven all the time. It you use a
combined function to toast bread it will catch
fire in a very short time.
• Make sure you never catch the power cables
of other electrical appliances in the hot door
or the oven. The cable insulation may melt.
Danger of short-circuiting!
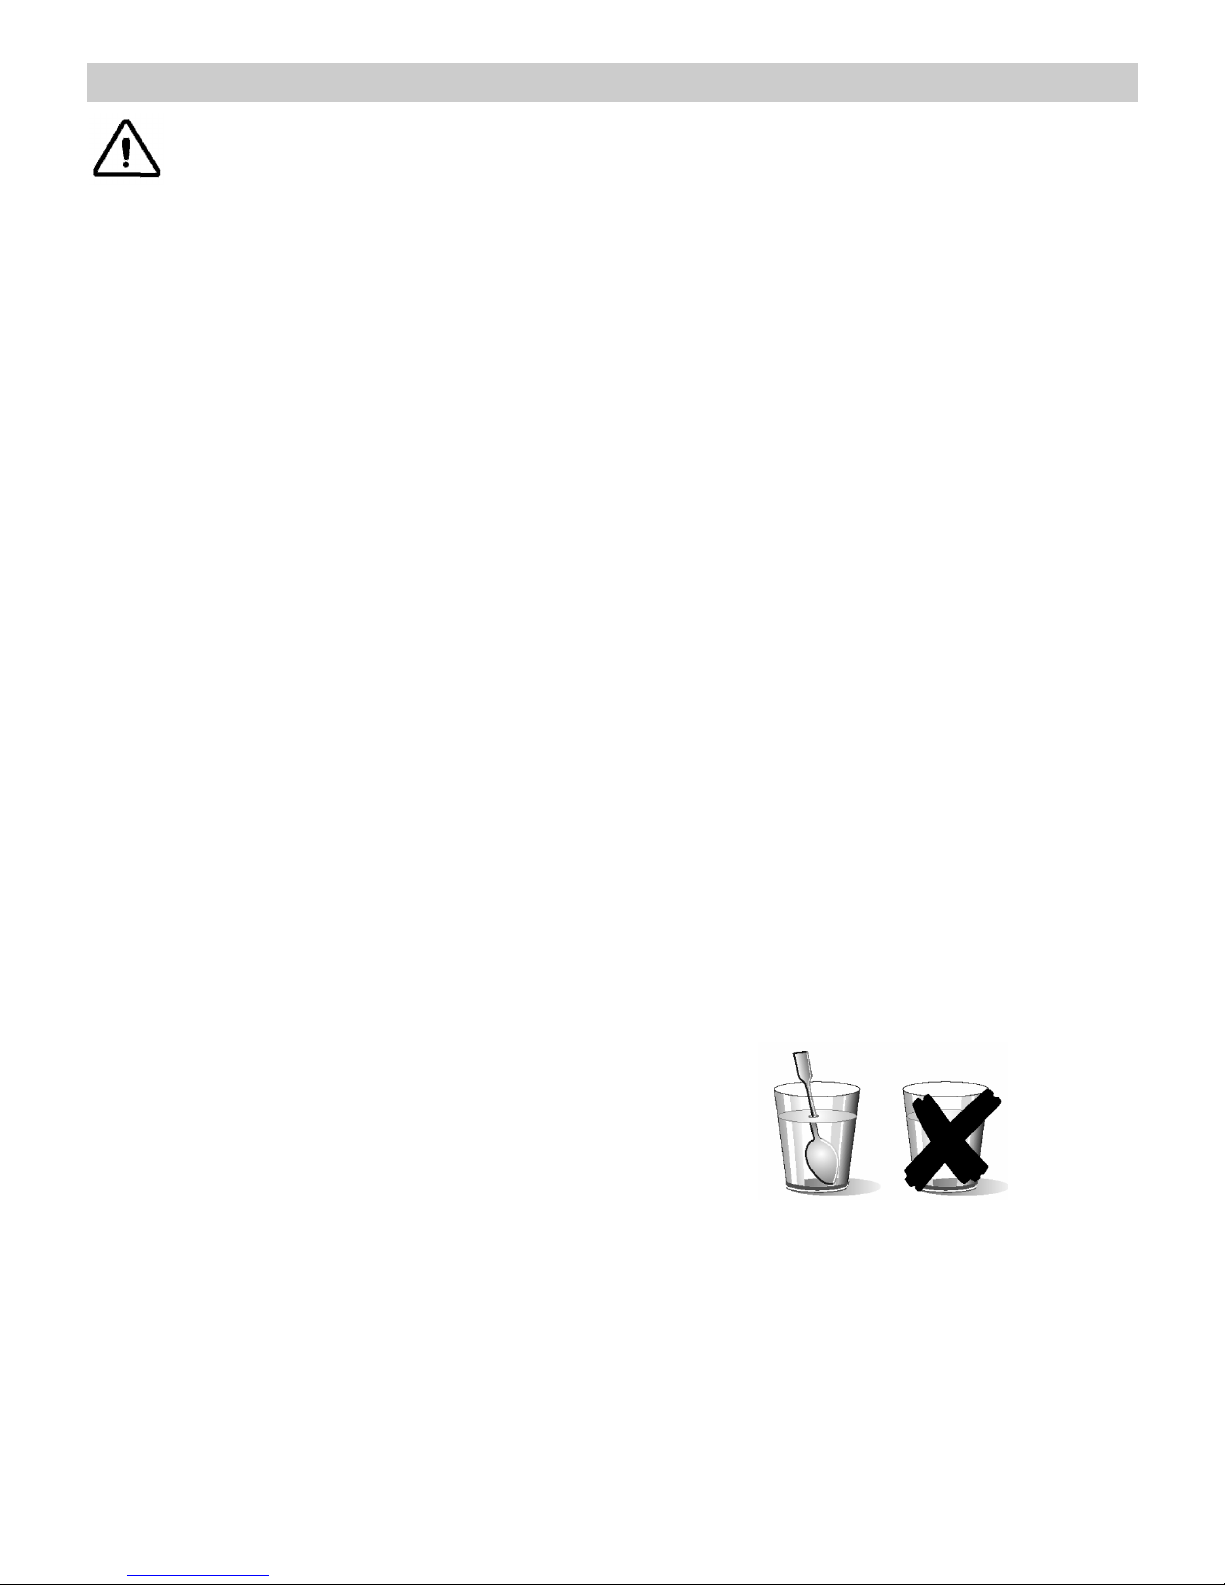
Take care when heating liquids!
When liquids (water, coffee, tea, milk, etc.) are
nearly at boiling point inside the oven and are
taken out suddenly, they may spurt out of their
containers. DANGER OF INJURIES AND
BURNS!
To avoid that type of situation when heating
liquids, put a teaspoon or glass rod inside the
container.
Page 6

5
EN
Microwave safety
This oven is exclusively for domestic use!
Use the oven only for preparing meals.
Avoid damaging the oven or other dangerous
situations by following these instructions:
• Do not switch on the oven without the
turntable support, the turntable ring and
the respective plate being in place.
• Never switch on the microwave when it is
empty. If there is no food inside there may
be an electrical overcharge and the oven
could be damaged. RISK OF DAMAGE!
• For carrying out oven programming tests
put a glass of water inside the oven. The
water will absorb the microwaves and the
oven will not be damaged.
• Do not cover or obstruct the ventilation
openings.
• Use only dishes suitable for microwaves.
Before using dishes and containers in the
microwave, check that these are suitable
(see the section on types of dishes).
• Never remove the mica cover on the
ceiling of the oven interior! This cover
stops fat and pieces of food damaging the
microwave generator.
• Do not keep any inflammable object inside
the oven as it may burn if the oven is
switched on.
• Do not use the oven as a pantry.
• Eggs with their shells and whole boiled
eggs must not be heated in microwave
ovens because they may explode.
• Do not use the oven for frying as it is
impossible to control the temperature of oil
heated by microwaves.
• To avoid being burnt, always use oven
gloves for handling dishes and containers
and touching the oven.
• Do not lean or sit on the open oven door.
This may damage the oven, especially in the
hinge zone. The door can bear a maximum
weight of 8 kg.
• The turntable and the grills can bear a
maximum load of 8 kg. To avoid damaging
the oven, do not exceed this load.
Cleaning:
• Warning! Your microwave oven must be
cleaned regularly. All food remains must be
removed (see section on Oven Cleaning). If
the microwave oven is not kept clean its
surface may deteriorate and this may
shorten the oven’s working life and could
even result in a dangerous situation.
• The door contact surfaces (the front of the
cavity and the inside part of the doors) must
be kept very clean in order to ensure the
oven functions correctly.
• Please follow the instructions regarding
cleaning in the section “Oven Cleaning and
Maintenance”.
Repairs:
• Warning – Microwaves! The outer
protection of the oven must not be
removed. It is dangerous for anyone not
authorised by the manufacturer to carry out
any kind of repair or maintenance work.
• If the power cable is damaged it should be
substituted by the manufacturer, authorised
agents or technicians qualified for this task
in order to avoid dangerous situations.
Furthermore, special tools are required for
this task.
• Repair and maintenance work, especially of
current carrying parts, can only be carried
out by technicians authorised by the
manufacturer.
Page 7
6
EN
The advantages of microwaves
In conventional ovens, heat radiated by electrical
elements or gas burners slowly penetrates the
food from outside to inside. On account of this
there is a major amount of energy is wasted
heating the air, the oven components and the food
containers.
In a microwave oven, heat is generated by the
food itself and the heat travels from inside to
outside. No heat is lost to the air, the walls of the
oven cavity or the dishes and containers (if these
are suitable for use in microwave oven), in other
words, only the food is heated.
Microwave ovens have the following advantages:
1. Shorter cooking times; in general these are
up to 3/4 less than the time required for
conventional cooking.
2. Ultra-fast food defrosting, thus reducing the
danger of bacterial development.
3. Energy savings.
4. Conservation of the nutritional value of foods
due to the shorter cooking times.
5. Easy to clean.
How a microwave oven works
In a microwave oven there is a high tension valve
called a magnetron which converts electrical
energy into microwave energy. These
electromagnetic waves are channelled to the
interior of the oven through a wave guide and
distributed by a metallic spreader or through a
turntable.
Inside the oven the microwaves propagate in all
directions and are reflected by the metal walls,
uniformly penetrating the food.
Why food heats up
Most foods contain water and water molecules
vibrate when subjected to microwaves.
The friction between molecules produces heat
which raises the temperature of the food, defreezing it, cooking it or keeping it hot.
Since the heat arises inside the food:
• This can be cooked with little or no liquid or
fats/oils;
• De-freezing, heating or cooking in a
microwave oven is quicker than in a
conventional oven;
• The vitamins, minerals and nutritional
substances in the food are conserved;
• The natural colour and aroma of the food are
unchanged.
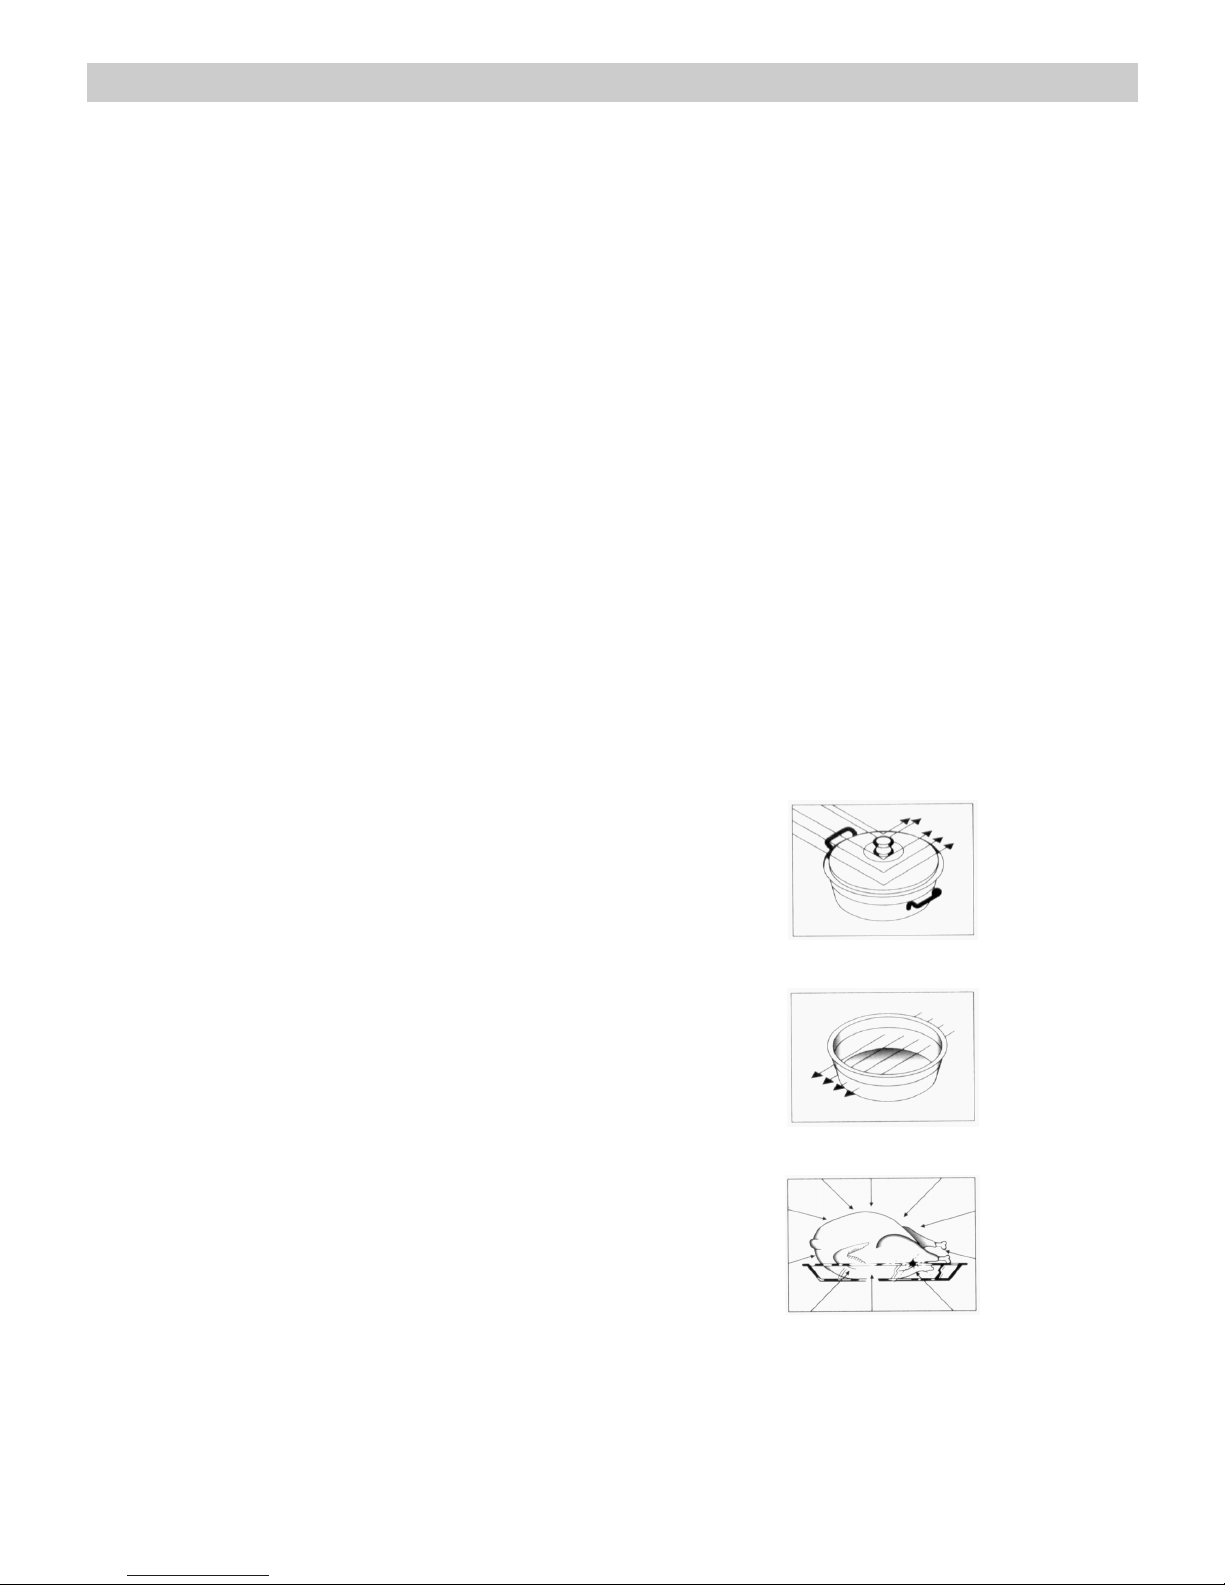
Microwaves pass through china, glass, cardboard
or plastic but do not go through metal. For this
reason, metal containers or ones with metal parts
must not be used in a microwave oven.
Microwaves are reflected by metal...
... but go through glass and china...
... and are absorbed by foods.
Page 8
7
EN
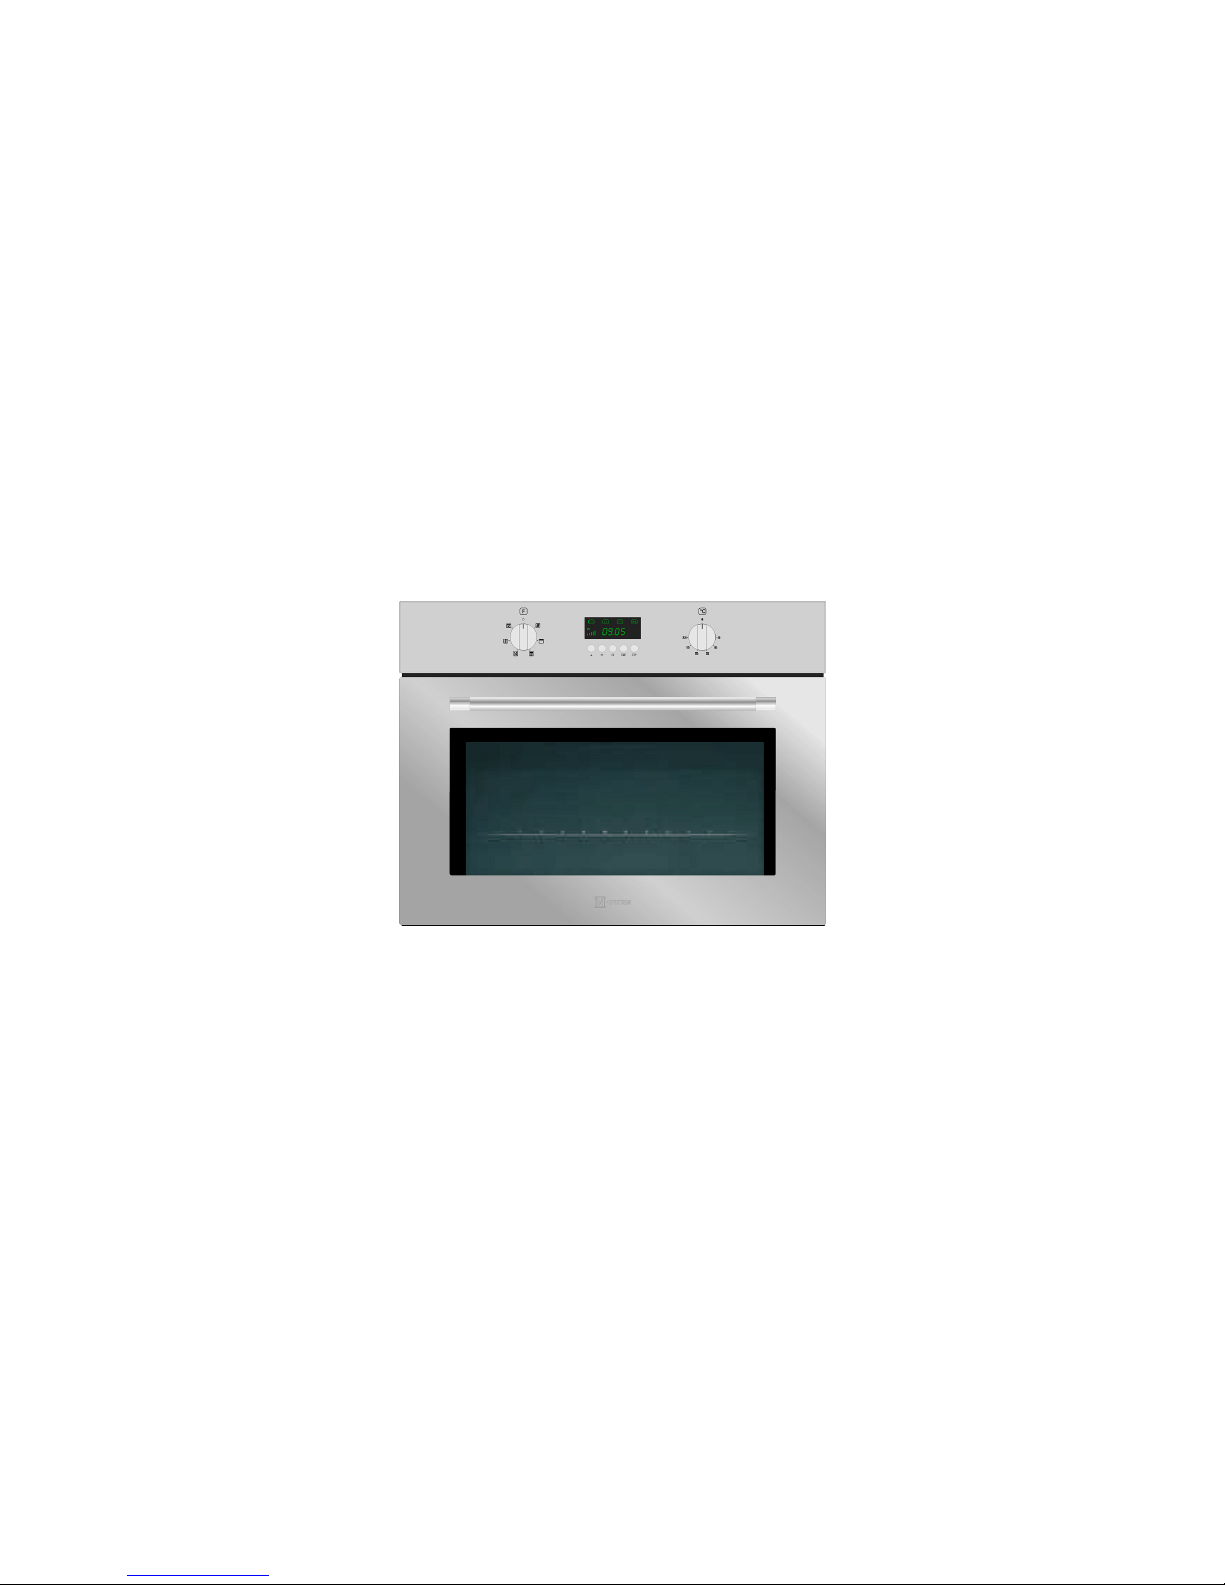
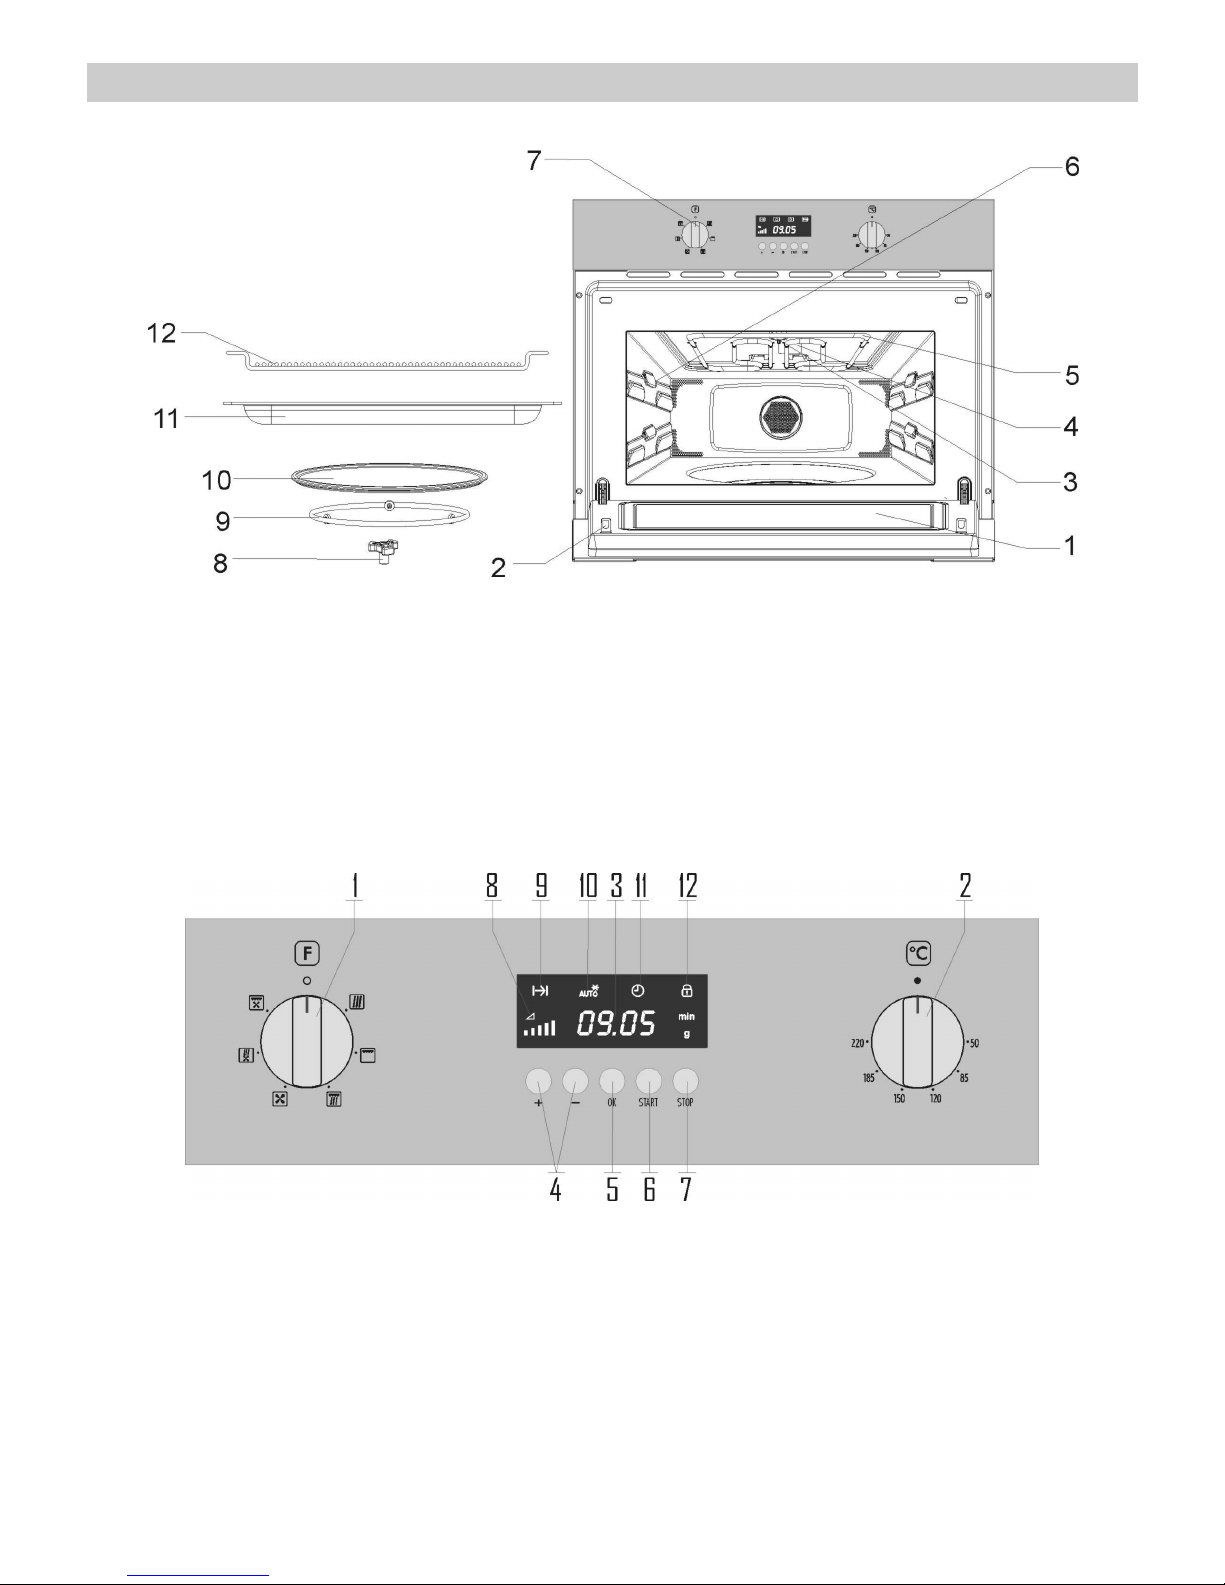
Description of your oven
1. – Door window glass 8. – Turntable support
2. – Catches 9. – Turntable ring
3. – Lamp bulb 10. – Turntable plate
4. – Mica cover 11. – Enamelled tray
5. – Grill heater (Don’t use with microwaves)
6. – Lateral supports 12. Rectangular rack
7. – Control panel
1. Function Selector 7. Stop key
2. Thermostat 8. Power level indicator light
3. Display 9. Operating time indicator light
4. “+” and “-“ keys 10. Defrost indicator light
5. OK key 11. Clock indicator light
6. Start key 12. Child lock indicator light
Page 9
8
EN
Basic settings
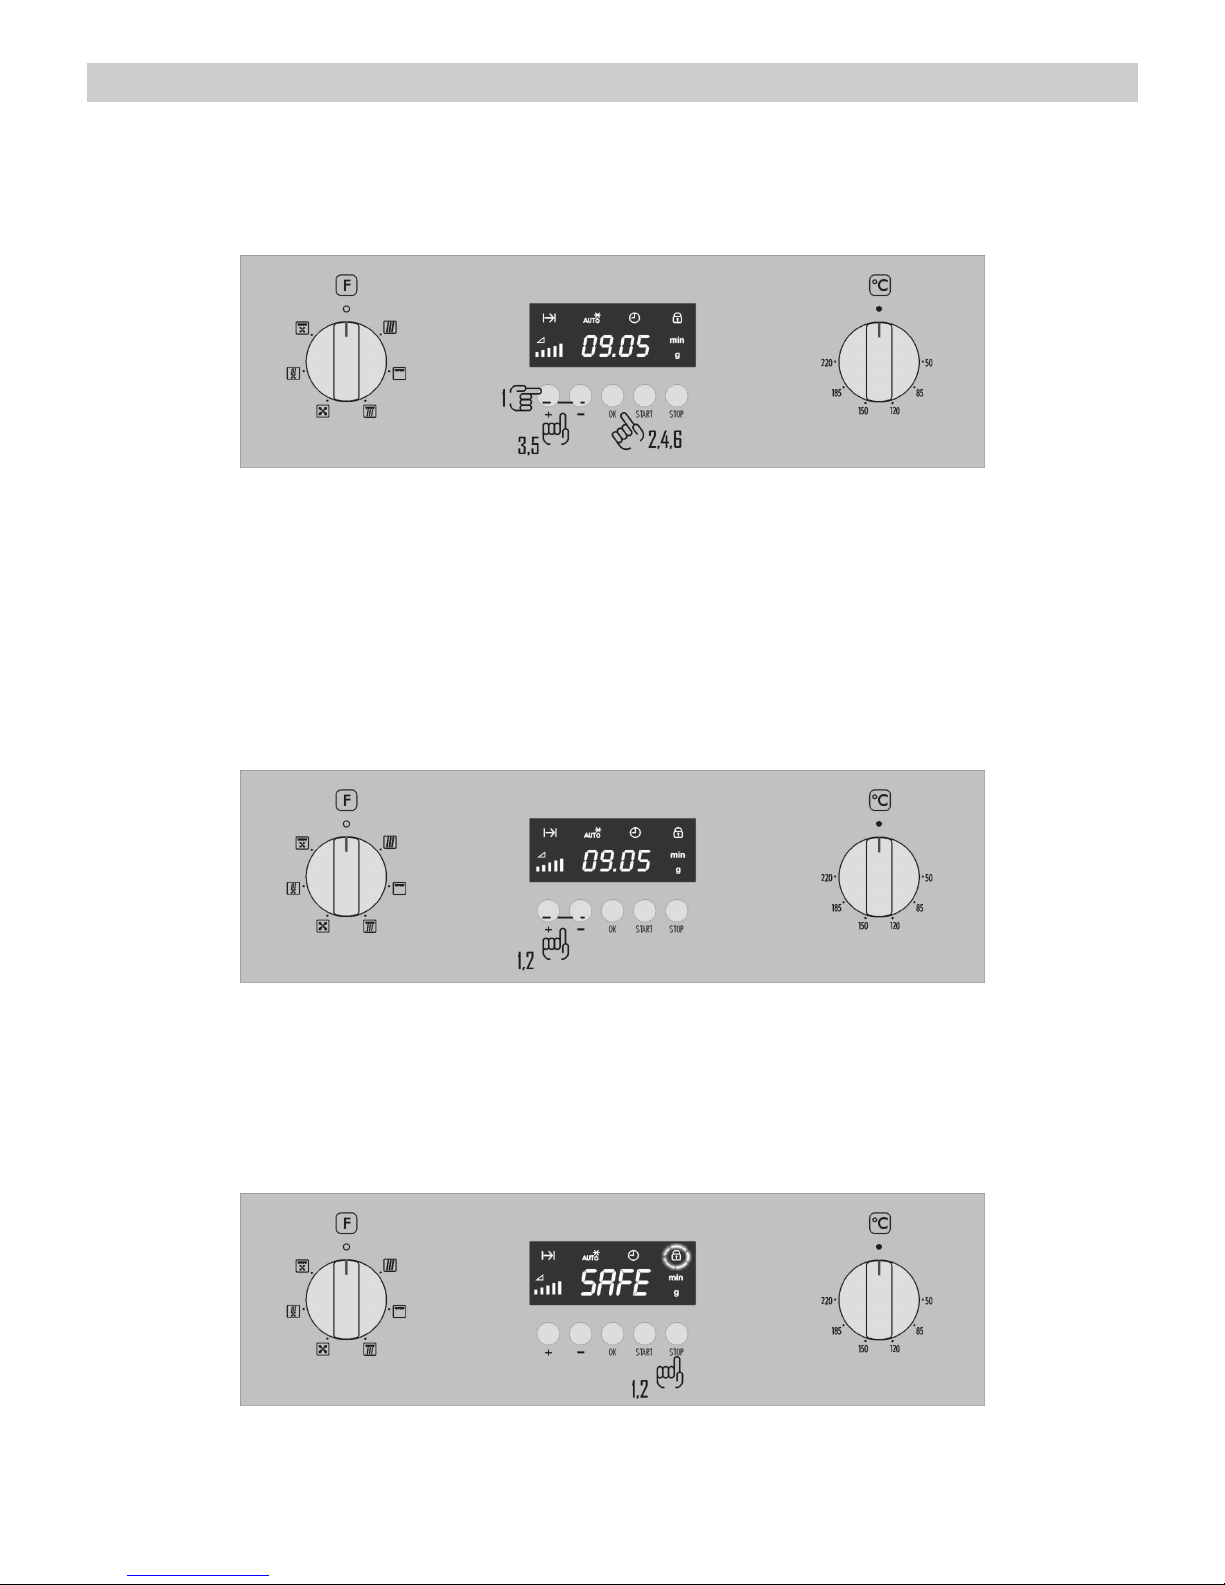
Setting the clock
After your microwave oven is first plugged-in or after a power failure, the clock display will flash to
indicate that the time shown is not correct. Before using the microwave oven, adjust the clock through
the procedure described below but starting on Step 2.
To set the clock, proceed as follows:
1. Press the “+” key until the Clock Indicator
Light starts to flash.
2. Press the OK key.
3. Press “+” and “–” keys to set the correct hour
value.
4. Press the OK key to validate the hour value.
The minute numbers will start to flash.
5. Press “+” and “–” keys to set the correct minute
value.
6. To finish, press the OK key again.
Hiding/Displaying the Clock
If the clock display disturbs you, you can hide it.
1. Press the “+” and “-” keys simultaneously for 3
seconds. The dots that separate the hours and
minutes will flash but the rest of the clock display
will be hidden.
2. If you want to see the clock again, press the “+”
and “-” simultaneously again for 3 seconds.
Child lock
The oven functioning can be blocked (for example to stop it being used by children).
1. To Block the oven, press the Stop key for 3
seconds. When a key is pressed the display
shows a Key symbol and the oven performs no
function.
2. To unblock the oven press again the Stop key for
3 seconds.
Page 10
9
EN
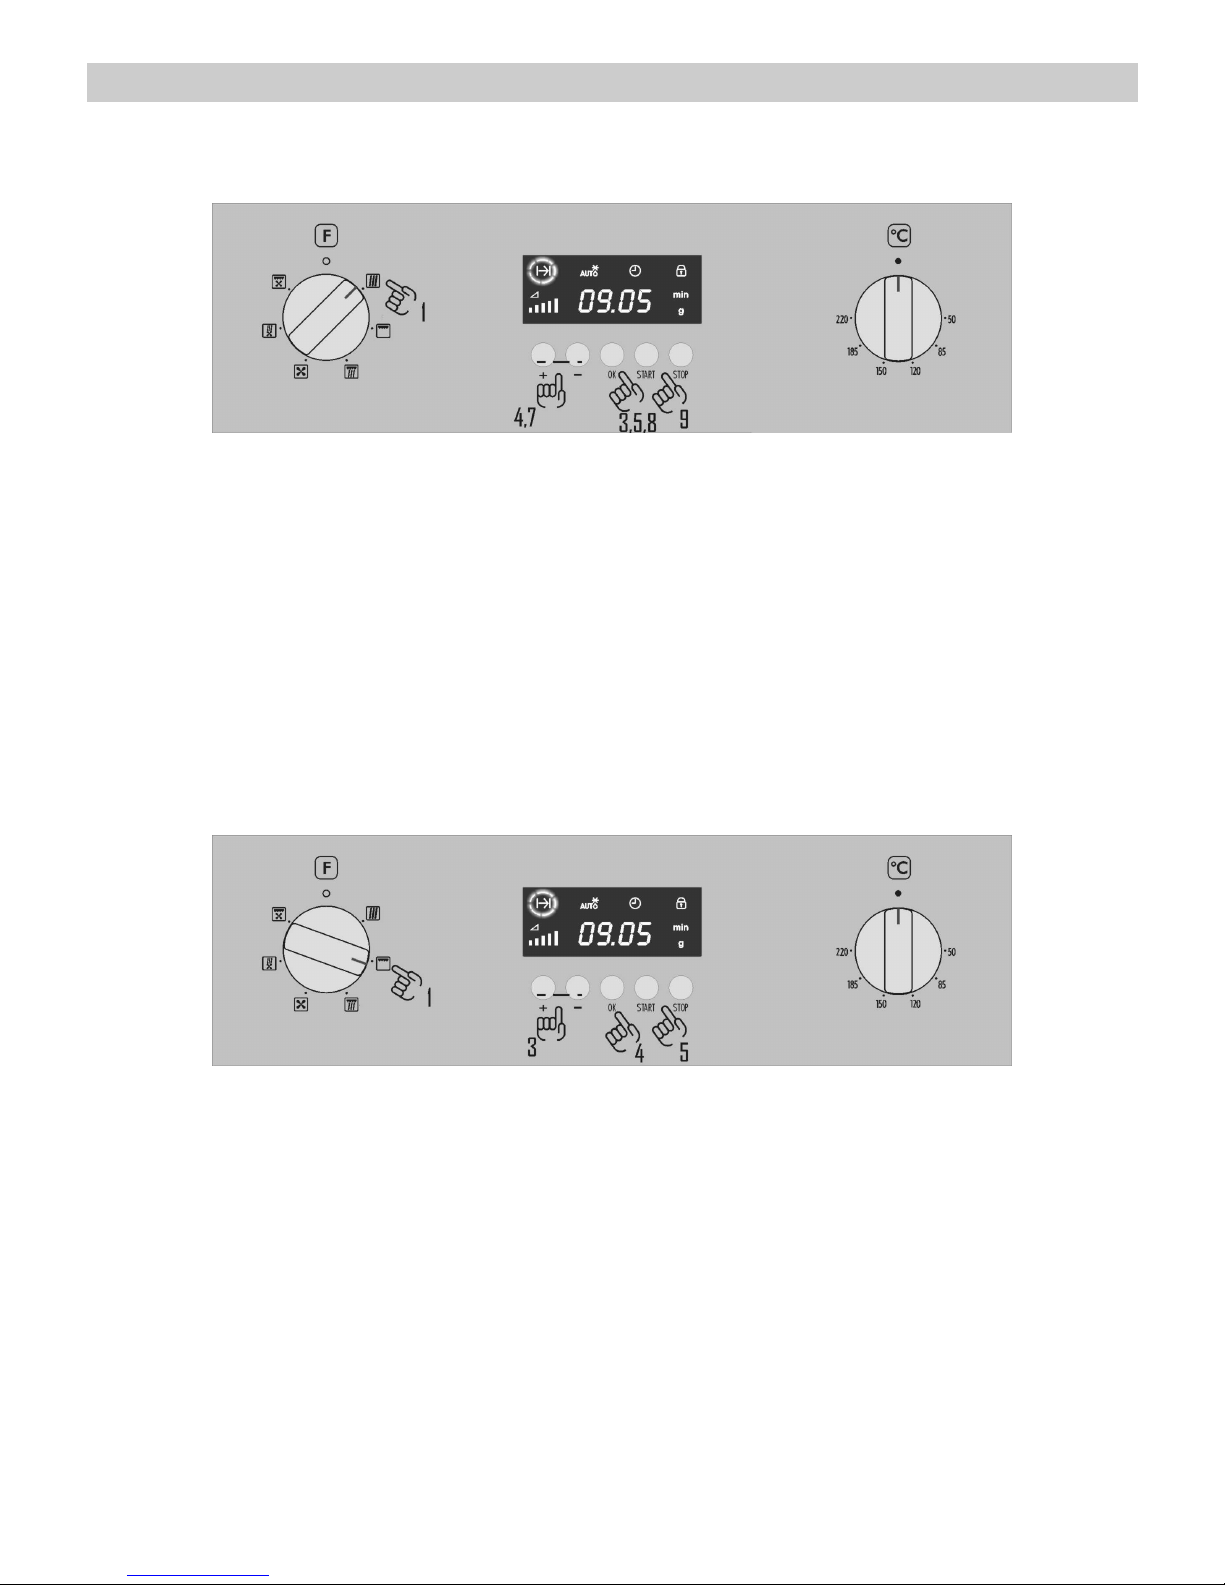
Basic Functions
Microwaves
Use this function to cook and heat vegetables, potatoes, rice, fish and meat.
1. Rotate the Function Selector to the position
corresponding to the Microwave Function.
2. The Operating Time Indicator Light flashes.
3. Press the OK key.
4. Using the “+” and “-” keys set the desired
operating time.
5. Press the OK key.
6. The Power Level Indicator Light will start to
flash.
7. Using the “+” and “-” keys set the required
microwave power level.
8. Press the OK key.
9 Press the Start key. The oven will start to
operate.
Grill
Use this function to brown the top of food quickly.
1. Rotate the Function Selector to the position
corresponding to the Grill Function.
2. The Operating Time Indicator Light and the
Display start to flash.
3. With the “+” and “-” keys set the desired
operating time.
4. Press the OK key.
5. Press the Start key. The oven will start to
operate.
Page 11

10
EN
Basic Functions
Microwaves + Grill
Use this function to cook lasagne, poultry, roast potatoes and toasted foods.
1. Rotate the Function Selector to the position
corresponding to the Microwave + Grill
Function.
2. The Operating Time Indicator Light will flash
and the Power Level Indicator Light will be
on. The operating time will flash in the display.
3. With the “+” and “-” keys set the desired
operating time.
4. Press the OK key.
5. The Power Level Indicator Light will flash.
6. Using the “+” and “-” keys select the required
microwave power level.
7. Press the OK key.
8. Press the Start key. The oven will start to
operate.
Hot-Air
Use this function to bake food.
1. Rotate the Function Selector to the position
corresponding to the Hot-Air Function.
2. The Operating Time Indicator Light and the
Display start to flash.
3. With the “+” and “-” keys set the desired
operating time.
4. Press the OK key.
5. Select the desired oven temperature using the
Thermostat control.
6. Press the Start key. The oven will start to
operate.
Page 12

11
EN
Basic Functions
Microwaves + Hot-Air
Use this function to rapidly bake the foods.
1. Rotate the Function Selector to the position
corresponding to the Microwave + Hot-Air
Function.
2. The Operating Time Indicator Light will flash
and the Power Level Indicator Light will be
on. The operating time will flash in the display.
3. With the “+” and “-” keys set the desired
operating time.
4. Press the OK key.
5. The Power Level Indicator Light will flash.
6. With the “+” and “-” keys set the desired
microwave power level.
7. Press the OK key.
8. Select the desired oven temperature using the
Thermostat control.
9. Press the Start key. The oven will start to
operate.
Grill + Fan
Use this function to bake evenly the food and at the same time brown their surface.
1. Rotate the Function Selector to the position
corresponding to the Grill + Fan Function.
2. The Operating Time Indicator Light and the
Display start to flash.
3. With the “+” and “-” keys set the desired
operating time.
4. Press the OK key.
5. Press the Start key. The oven will start to
operate.
Page 13

12
EN
Basic Functions
Auto Defrost
This function is used to automatically defrost, meat, poultry, fish, vegetables and bread.
1. Rotate the Function Selector to the position
corresponding to the Microwave Function.
2. The Operating Time Indicator Light will light
in the display.
3. Press the “-” key to select the Auto Defrost
function which will flash.
4. Press the OK key. The display will show the
type of food “F 01”.
5. Using the “+” and “-” keys, scroll through “F 01”
– “F 05” until the desired food type is selected.
6. Press the OK key. The “g” symbol will flash.
7. By using the “+” and “-” keys enter the frozen
weight of the food in grammes.
8. Press the OK key.
9 Press the Start key. The oven will start to
operate.
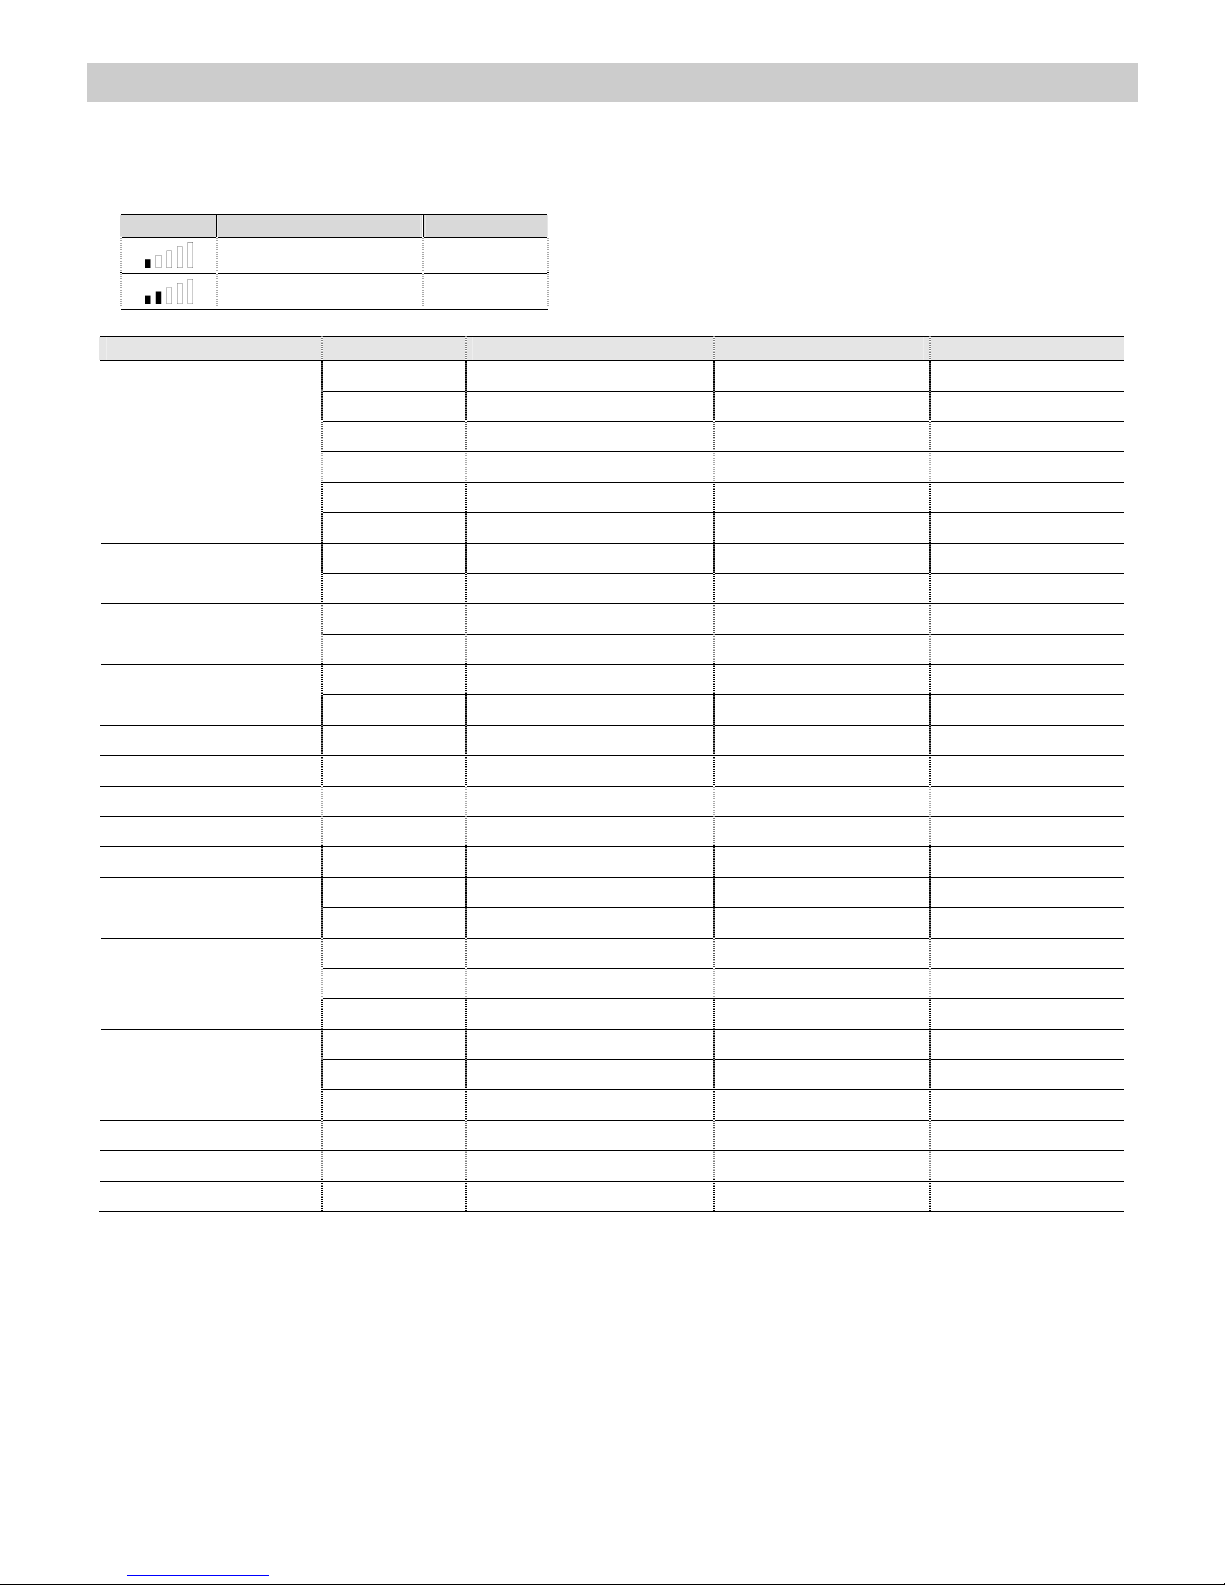
The following table shows the defrosting by weight function programmes, indicating weight intervals, and
defrosting and standing times (in order to ensure the food is of a uniform temperature).
Programme Food Weight (g) Time (min) Standing time (min)
F 01 Meat 100 – 2000 2 – 43 20 – 30
F 02 Poultry 100 – 2500 2 – 58 20 – 30
F 03 Fish 100 – 2000 2 – 40 20 – 30
F 04 Fruit 100 – 500 2 – 13 10 – 20
F 05 Bread 100 – 800 2 – 19 10 – 20
Page 14

13
EN
When the oven is working...
Interrupting a cooking cycle
You can stop the cooking process at any time by
pressing the Stop key once or by opening the
oven door.
In both cases:
• Microwave emission is stopped
immediately.
• The grill is de-activated but is still very hot.
Danger of burning!
• The timer stops automatically, indicating the
operating time that is left.
If you wish, at this time you can:
1. Turn or stir the food to ensure it will be
evenly cooked.
2. Change the process parameters.
To restart the process, close the door and press
the Start key
Altering parameters
The function and temperature can be altered
when the oven is operating or when the cooking
process has been interrupted by simply turning
the respective knob to the new setting.
To change power level and operating time, please
proceed as follows:
- Press the “+” and “-” keys to change
directly the operating time.
- Press the Ok key to enable power change.
The Power Level Indicator starts to flash.
- Press the “+” and “-” keys to change the
power level.
- Press the OK key.
Cancelling a cooking cycle
If you wish to cancel the cooking process, rotate
the Function Selector until zero or press the
Stop key twice.
End of a cooking cycle
When the set time has elapsed, the oven beeps
and the Display shows END.
If you have finished the cooking process, turn the
function selector and the thermostat to zero.
Page 15

14
EN
Defrosting
General instructions for defrosting
1. When defrosting, use only dishes that are
appropriate for microwaves (china, glass,
suitable plastic).
2. The defrost function by weight and the tables
refer to the defrosting of raw food.
3. The defrosting time depends on the quantity
and thickness of the food. When freezing
food keep the defrosting process in mind.
Distribute the food evenly in the container.
4. Distribute the food as best as possible inside
the oven. The thickest parts of fish or
chicken drumsticks should be turned towards
the outside. You can protect the most
delicate parts of food with pieces of
aluminium foil. Important: The aluminium foil
must not come into contact with the oven
cavity interior as this can cause electrical
arcing.
5. Thick portions of food should be turned
several times.
6. Distribute the frozen food as evenly as
possible since narrow and thin portions
defrost more quickly than the thicker and
broader parts.
7. Fat-rich foods such as butter, cream cheese
and cream should not be completely
defrosted. If they are kept at room
temperature they will be ready to be served
in a few minutes. With ultra-frozen cream, if
you find small pieces of ice in it, you should
mix these in before serving.
8. Place poultry on an upturned plate so that
the meat juices can run off more easily.
9. Bread should be wrapped in a napkin so that
it does not become too dry.
10. Turn the food at regular intervals.
11. Remove frozen food from its wrapping and
do not forget to take off any metal twist-tags.
For containers that are used to keep frozen
food in the freezer and which can also be
used for heating and cooking, all you need to
do is take off the lid. For all other cases you
should put the food into containers that are
suitable for microwave use.
12. The liquid resulting from defrosting,
principally that from poultry, should be
discarded. In no event should such liquids be
allowed to come into contact with other
foods.
13. Do not forget that by using the defrosting
function you need to allow for standing time
until the food is completely defrosted
Page 16
15
EN
Defrosting
To defrost food you should select Microwave
function with one of the following Power Levels:
Position Power Level Power
Defrost / Keep Warm 200 W
Defrost 400 W
The table below shows different defrosting and
standing times (in order to ensure the food
temperature is evenly distributed) for different types
and weights of food, plus recommendations.
Food Weight (g) Defrosting time (min) Standing time (min) Recommendation
100 2-3 5-10 Turn once
200 4-5 5-10 Turn once
500 10-12 10-15 Turn twice
1000 21-23 20-30 Turn twice
1500 32-34 20-30 Turn twice
Portions of meat,
veal, beef, pork
2000 43-45 25-35 Turn three times
500 8 -10 10-15 Turn twice
Goulash
1000 17-19 20-30 Turn three times
100 2-4 10-15 Turn twice
Minced meat
500 10-14 20-30 Turn three times
200 4-6 10-15 Turn once
Sausages
500 9-12 15-20 Turn twice
Poultry (portions) 250 5-6 5-10 Turn once
Chicken 1000 20-24 20-30 Turn twice
Poularde 2500 38-42 25-35 Turn three times
Fish fillet 200 4-5 5-10 Turn once
Trout 250 5-6 5-10 Turn once
100 2-3 5-10 Turn once
Prawns
500 8-11 15-20 Turn twice
200 4-5 5-10 Turn once
300 8-9 5-10 Turn once
Fruit
500 11-14 10-20 Turn twice
200 4-5 5-10 Turn once
500 10-12 10-15 Turn once
Bread
800 15-17 10-20 Turn twice
Butter 250 8-10 10-15
Cream cheese 250 6-8 10-15
Creams 250 7-8 10-15
Page 17

16
EN
Cooking with a microwave oven
Warning! Read the section “Microwave Safety”
before cooking with your microwave.
Follow these recommendations when cooking with
your microwave:
• Before heating or cooking foods with peel or
skin (e.g. apples, tomatoes, potatoes,
sausages) prick them so that they do not
burst. Cut the food up before starting to prepare
it.
• Before using a container or dish make sure that
it is suitable for microwave use (see the section
on types of ovenware).
• When cooking food with very little moisture
(e.g. defrosting bread, making popcorn, etc.)
evaporation is very quick. The oven then works
as if it was empty and the food may burn. The
oven and the container may be damaged in
such a situation. You should therefore set just
the cooking time necessary and you must keep
a close eye on the cooking process.
• It is not possible to heat large quantities of oil
(frying) in the microwave.
• Remove pre-cooked food from the containers
they come in since these are not always heat
resistant. Follow the food manufacturer’s
instructions.
• If you have several containers, such as cups,
for example, set them out uniformly on the
turntable plate.
• Do not close plastic bags with metal clips. Use
plastic clips instead. Prick the bags several
times so that the steam can escape easily.
• When heating or cooking foods, check that they
reach at least a temperature of 70°C.
• During cooking, steam may form on the oven
door window and may start to drip. This
situation is normal and may be more noticeable
if the room temperature is low. The oven’s safe
working is not affected by this. After you have
finished cooking, clean up the water coming
from the condensation
• When heating liquids, use containers with a
wide opening, so that the steam can
evaporate easily.
Prepare the foods as per the instructions and
keep in mind the cooking times and power levels
indicated in the tables.
Keep in mind that the figures given are only
indicative and can vary depending on the initial
state, temperature, moisture and type of food. It is
advisable to adjust the times and power levels to
each situation. Depending on the exact
characteristics of the food you may need to
increase or shorten the cooking times or increase
or decrease the power levels.
Cooling with microwaves...
1. The greater the amount of food, the longer the
cooking time. Keep in mind that:
• Double the quantity » double the time
• Half the quantity » half the time
2. The lower the temperature, the longer the
cooking time.
3. Foods containing a lot of liquid heat up more
quickly.
4. Cooking will be more uniform if the food is
evenly distributed on the turntable. If you put
dense foods on the outside part of the plate and
less dense ones on the centre of the plate, you
can heat up different types of food simultaneously.
5. You can open the oven door at any time. When
you do this the oven switches off automatically.
The microwave will only start working again when
you close the door and press the start key.
6. Foods that are covered require less cooking
time and retain their characteristics better. The
lids used must let microwaves pass through and
have small holes that allow steam to escape.
Page 18

17
EN
Cooking with a microwave oven
Tables and suggestions – Cooking vegetables
Food Quantity (g)
Addition of
liquids
Power
(Watt)
Time
(min.)
Standing
Time (min.)
Instructions
Cauliflower
Broccoli
Mushrooms
500
300
250
100 ml
50 ml
25 ml
800
800
800
9-11
6-8
6-8
2-3
2-3
2-3
Cut into slices.
Keep covered.
Peas & carrots
Frozen carrots
300
250
100 ml
25 ml
800
800
7-9
8-10
2-3
2-3
Cut into chunks or
slices. Keep covered.
Potatoes 250 25 ml 800
5-7 2-3 Peel and cut into equal
sized pieces. Keep
covered.
Paprika
Leek
250
250
25 ml
50 ml
800
800
5-7
5-7
2-3
2-3
Cut into chunks or slices
Keep covered.
Frozen Brussel
sprouts
300 50 ml 800 6-8 2-3 Keep covered.
Sauerkraut 250 25 ml 800 8-10 2-3 Keep covered.
Tables and suggestions – Cooking fish
Food Quantity (g)
Power
(Watt)
Time
(min.)
Standing
Time (min.)
Instructions
Fish fillets 500 600 10-12 3
Cook covered over. Turn after half of
cooking time.
Whole fish 800
800
400
2-3
7-9
2-3
Cook covered over. Turn after half of
cooking time. You may wish to cover up
the small edges of the fish.
Page 19

18
EN
Cooking with the grill
For good results with the grill, use the grid iron
supplied with the oven.
IMPORTANT POINTS:
1. When the microwave grill is used for the first
time there will be some smoke and a smell
coming from the oils used during oven
manufacture.
2. The oven door window becomes very hot
when the grill is working. Keep children
away.
3. When the grill is operating, the cavity walls
and the grid iron become very hot. You
should use oven gloves.
4. If the grill is used for extended period of time it
is normal to find that the elements will switch
themselves off temporarily due to the safety
thermostat.
5. Important! When food is to be grilled or
cooked in containers you must check that the
container in question is suitable for microwave
use. See the section on types of ovenware!
6. When the grill is used it is possible that some
splashes of fat may go onto the elements and
be burnt. This is a normal situation and does
not mean there is any kind of operating fault.
7. After you have finished cooking, clean the
interior and the accessories so that cooking
remains do not become encrusted.
Page 20

19
EN
Cooking with the Grill
Tables and suggestions – Grill without microwave
Fish Quantity (g) Time (min.) Instructions
Fish
Bass
Sardines/gurnard
800
6-8 fish.
18-24
15-20
Spread lightly with butter. After half of
cooking time turn and spread with
seasoning.
Meat
Sausages 6-8 units 22-26 Prick after half cooking time and turn.
Frozen hamburgers 3 units 18-20
Spare rib (approx. 3 cm thick) 400 25-30 After half of cooking time, baste and turn.
Others
Toast 4 units 1½-3 Watch toasting.
Toasted sandwiches 2 units 5-10 Watch toasting.
Heat up the grill beforehand for 2 minutes. Unless
indicated otherwise, use the grid iron. Place the
grid on a bowl so that the water and the fat can
drop. The times shown are merely indicative and
can vary as a function of the composition and
quantity of the food, as well as the final condition
wished for. Fish and meat taste great if, before
grilling, you brush them with vegetable oil, spices
and herbs and leave to marinate for a few hours.
Only add salt after grilling.
Sausages will not burst if you prick them with a
fork before grilling.
After half the grilling time has passed, check on
how the cooking is going and, if necessary, turn
the food over.
The grill is especially suitable for cooking thin
portions of meat and fish. Thin portions of meat
only need to be turned once, but thicker portions
should be turned several times.
Page 21

20
EN
Cooking with the Grill
Tables and suggestions – Microwave + Grill
The microwave + grill function is ideal for cooking
quickly and, at the same time, browning foods.
Furthermore, you can also grill and cook cheese
covered food.
The microwave and the grill work simultaneously.
The microwave cooks and the grill toasts.
Food Quantity (g) Dish
Power
(Watt)
Time (min.)
Standing
time (min.)
Cheese topped pasta 500 Low dish 400 12-17 3-5
Cheese topped potatoes
800
Low dish
600 20-22 3-5
Lasagne approx. 800
Low dish
600 15-20 3-5
Grilled cream cheese approx. 500
Low dish
400 18-20 3-5
2 fresh chicken legs
(grilled)
200 each
Low dish
400 10-15 3-5
Chicken approx. 1000 Low and wide dish 400 35-40 3-5
Cheese topped onion
soup
2 x 200 g cups Soup bowls 400 2-4 3-5
Before using a dish in the microwave oven make
sure that it is suitable for microwave use. Only use
dishes or containers that are suitable for
microwave use.
The dish to be used in the combined function
must be suitable for microwave and grill use. See
the section on types of ovenware!
Keep in mind that the figures given are merely
indicative and can vary as a function of the initial
state, temperature, moisture and type of food.
If the time is not enough to brown the food well,
put it under the grill for another 5 or 10 minutes.
Please follow the standing times and don’t forget
to turn the meat pieces.
Unless indicated to the contrary, use the turntable
plate for cooking.
The values given in the tables are valid when the
oven cavity is cold (it is not necessary to pre-heat
the oven).
Page 22

21
EN
Cooking with Microwaves + Hot-Air
Tables and suggestions – Roasting
Type Quantity (g)
Power
(Watt)
Temperature ºC
Time
(min)
Standing
Time (min)
Comments
Beef stew 1000 200 160/170 80/90
10
Do not put lid on
container
Pork loin 500/600 200 180/190 35/40
10
Do not put lid on
container
Whole
chicken
100/1200 400 230/250 30/40
10
Put lid on container.
Breast facing
upwards. Do not turn.
Chicken
portions
800 400 230/250 25/35
10
Do not put lid on
container. Arrange
portions with skin
facing upwards. Do
not turn.
Duck 1500/1700 200 220/240 70/80
10
Put lid on container.
Do not turn.
Advice for roasting meat
Turn the pieces of meat halfway through the
cooking time. When the roasted meat is ready
you should let it stand for 10 minutes in the oven
with this switched off and closed. This will
ensure the juices in the meat are well
distributed.
Add 2 to 3 soup spoons of gravy or similar liquid
to lean meat and 8 to 10 soup spoons to stews,
depending on the amount of meat in question.
The roasting temperature and time required
depends on the type and amount of meat being
cooked.
If the weight of the meat to be roasted does not
appear on the table choose the settings for the
weight immediately below and extend the cooking
times.
Advice on ovenware
Check that the ovenware fits inside the oven.
Hot glass containers should be put on a dry kitchen
cloth. If such containers are put on a cold or wet
surface the glass may crack and break. Use oven
gloves to take the ovenware out of the oven.
Page 23

22
EN
Cooking with Hot-Air
Tables and suggestions – Cakes
Type Container Level Temperature Time (min)
Walnut cake Spring-form type tin 1 170/180 30/35
Fruit tart Spring-form type tin 2 150/160 35/45
Fruit cakes
Cake tin with central
hole
1 170/190 30/45
Savoury tarts Spring-form type tin 2 160/180 50/70
Simple cake (sponge cake) Spring-form type tin 1 160/170 40/45
Almond cakes Cake tray 2 110 35/45
Puff pastry Cake tray 2 170/180 35/45
Advice on cake baking ware
The most commonly used type of baking ware is
black metal tins. If you are also going to use the
microwave, use glass, ceramic or plastic baking
ware. These must be able to withstand
temperatures up to 250ºC. If you use these
types of baking ware the cakes are not browned
as much.
Advice on how to bake cakes
Different amounts and types of pastry require
different temperatures and baking times. Try low
settings first of all and then, if necessary, use
higher temperatures next time. A lower
temperature will result in more uniform baking.
Always put the cake tray in the centre of the
turntable.
Baking suggestions
How to check if the cake is properly cooked
Start sticking a tooth pick in the highest part of
the cake 10 minutes before the end of the
baking time. When no dough sticks to the tooth
pick the cake is ready.
If the cake is very dark on the outside
Next time choose a lower temperature and let
the cake bake for a longer time.
If the cake is very dry
Make small holes in the cake with a tooth pick
after baking has finished. Then sprinkle the cake
with some fruit juice or alcoholic drink. Next time
increase the temperature by about 10º and
reduce the baking time.
If the cake does not come free when turned
Let the cake cool down for 5 to 10 minutes after
baking and it will come out of the tin more easily.
If the cake still does not come free run a knife
carefully around the edges. Next time grease the
cake tin well.
Advice on saving energy
When you are making more than one cake, it is
advisable to bake them in the oven one after the
other when the oven is still hot. This lets you
reduce the baking time for the second and later
cakes.
It is preferable to use dark coloured baking ware
- painted or enamelled black – since such baking
tins absorb heat better.
When dealing with long baking times, you can
switch the oven off 10 minutes before the end of
the time and make use of the residual heat to
complete the baking.
.
Page 24

23
EN
What kind of ovenware can be used?
Microwave function
For the microwave function, keep in mind that
microwaves are reflected by metal surfaces.
Glass, china, clay, plastic, and paper let
microwaves pass.
For this reason, metal pans and dishes or
containers with metal parts or decorations
cannot be used in the microwave. Glass ware
and clay with metallic decoration or content
(e.g. lead crystal) cannot be used in microwave
ovens.
The ideal materials for use in microwave ovens
are glass, refractory china or clay, or heat
resistant plastic. Very thin, fragile glass or china
should only be used for short period of times (e.g.
heating).
Hot food transmits heat to the dishes which can
become very hot. You should, therefore, always
use an oven glove!
How to test ovenware you want to use
Put the item you want to use in the oven for 20
seconds at maximum microwave power. After that
time, if it is cold and just slightly warm, it is
suitable to use. However, if it heats up a lot or
causes electric arcing it is not suitable for
microwave use.
Grill and Hot-Air functions
In the case of the grill function, the ovenware must
be resistant to temperature of at least 300°C.
Plastic dishes are not suitable for use in the grill.
Combined functions
In the microwave + grill function, the ovenware
used must be suitable for use in both the
microwave and the grill.
Aluminium containers and foil
Pre-cooked food in aluminium containers or in
aluminium foil can be put in the microwave if the
following aspects are respected:
• Keep in mind the manufacturer’s
recommendations written on the packaging.
• The aluminium containers cannot be more
than 3 cm high or come in contact with the
cavity walls (minimum distance 3 cm). Any
aluminium lid or top must be removed.
• Put the aluminium container directly on top
of the turntable plate. If you use the grid iron,
put the container on a china plate. Never put
the container directly on the grid iron!
• The cooking time is longer because the
microwaves only enter the food from the top.
If you have any doubts, it is best to use only
dishes suitable for microwave use.
• Aluminium foil can be used to reflect
microwaves during the defrosting process.
Delicate food, such as poultry or minced
meat, can be protected from excessive heat
by covering the respective
extremities/edges.
• Important: aluminium foil cannot come into
contact with the cavity walls since this may
cause electrical arcing.
Lids
We recommend you use glass or plastic lids or
cling film since:
1. This will stop excessive evaporation (mainly
during very long cooking times);
2. The cooking times are shorter;
3. The food does not become dry;
4. The aroma is preserved.
The lid should have holes or openings so that no
pressure develops. Plastic bags must also be
opened. Baby feeding bottles or jars with baby
food and similar containers can only be heated
without their tops / lids otherwise they can burst.
Page 25

24
EN
What kind of ovenware can be used?
Table of Ovenware
The table below gives you a general idea of what type of ovenware is suitable for each situation.
Microwave
Operating mode
Type of
ovenware
Defrosting /
heating
Cooking
Grill
Microwave +
Grill
Glass and china 1)
Home use, not flame resistant, can
be used in dish washer
yes yes no no
Glazed china
Flame resistant glass and china
yes yes yes yes
China, stone ware 2)
Unglazed or glazed without metallic
decorations
yes yes no no
Clay dishes 2)
Glazed
Unglazed
yes
no
yes
no
no
no
no
no
Plastic dishes 2)
Heat resistant to 100°C
Heat resistant to 250°C
yes
yes
no
yes
no
no
no
no
Plastic films 3)
Plastic film for food
Cellophane
no
yes
no
yes
no
no
no
no
Paper, cardboard, parchment 4)
yes no no no
Metal
Aluminium foil
Aluminium wrappings 5)
Accessories (grid iron)
yes
no
no
no
yes
no
yes
yes
yes
no
yes
yes
1. Without any gold or silver leaf edging; no
lead crystal.
2. Keep the manufacturer’s instructions in
mind!
3. Do not use metal clips for closing bags.
Make holes in the bags. Use the films only to
cover the food.
4. Do not use paper plates.
5. Only shallow aluminium containers without
lids/tops. The aluminium cannot come into
contact with the cavity walls.
Page 26

25
EN
Oven Cleaning and Maintenance
Cleaning is the only maintenance normally
required.
Warning! Your microwave oven should be
cleaned regularly, with all food remains being
removed. If the microwave is not kept clean its
surfaces may deteriorate, reducing the oven’s
working life and possibly resulting in a
dangerous situation.
Warning! Cleaning should be done with the
oven power switched off. Take the plug out of
the socket or switch off the oven’s power
circuit.
Do not use aggressive or abrasive cleaning
products, scourers that scratch surfaces or
sharp objects, since stains may appear.
Do not use high pressure or stream jet
cleaning appliances.
Front surface
Normally you just need to clean the oven with a
damp cloth. If it is very dirty, add a few drops of
dishwashing liquid to the cleaning water.
Afterwards, wipe the oven with a dry cloth.
In an oven with an aluminium front, use a glass
cleaning product and a soft cloth that does not
release any fibres or threads. Wipe from side to
side without exerting any pressure on the surface.
Immediately remove lime, fat, starch or egg white
stains. Corrosion can occur under these stains.
Do not let any water get inside the oven.
Oven interior
After each time the oven is used, clean the inside
walls with a damp cloth since this is the easiest
way to remove splashes or spots of food that may
have stuck to the inside.
To remove dirt that is harder to shift, use a nonaggressive cleaning product. Do not use oven
sprays or other aggressive or abrasive
cleaning products.
Always keep the door and the oven front very
clean to ensure that the door opens and
closes properly.
Make sure water does not enter the microwave
ventilation holes.
Regularly take out the turntable plate and the
respective support and clean the cavity base,
especially after any liquid spillage.
Do not switch on the oven without the
turntable and the respective support being in
place.
If the oven cavity is very dirty, put a glass of water
on the turntable and switch on the microwave
oven for 2 or 3 minutes at maximum power. The
steam released will soften the dirt which can then
be cleaned easily using a soft cloth.
Unpleasant odours (e.g. after cooking fish) can be
eliminated easily. Put a few drops of lemon juice
in a cup with water. Put a spoonful of coffee in the
cup to avoid the water boiling over. Heat the water
for 2 to 3 minutes at maximum microwave power.
Page 27

26
EN
Oven Cleaning and Maintenance
Oven ceiling
If the oven ceiling is dirty, the grill can be lowered
to make cleaning easier.
To avoid the danger of burning, wait until the
grill is cold before lowering it. Proceed as
follows:
1. Turn the grill support by 180º (1).
2. Lower the grill gently (2). Do not use
excessive force as this may cause
damage.
3. After cleaning the ceiling, put the grill (2)
back in its place, carrying out the previous
operation.
IMPORTANT WARNING: The grill heating
element support (1) may fall when it is rotated. If
this happens, insert the grill heating element
support (1) into the slot in the ceiling of the cavity
and rotate it 90º to the grill heating element
support (2) position.
The mica cover (3) located in the ceiling must
always be kept clean. Any food remains that
collect on the mica cover can cause damage or
provoke sparks.
Do not use abrasive cleaning products or
sharp objects.
To avoid any risk, do not remove the mica
cover.
The glass lamp cover (4) is located on the oven
ceiling and can be removed easily for cleaning.
For this you just need to unscrew it and clean it
with water and dishwashing liquid.
Accessories
Clean the accessories after each use. If they are
very dirty, soak them first of all and then use a
brush and sponge. The accessories can be
washed in a dish washing machine.
Make sure that the turntable plate and the
respective support are always clean. Do not
switch on the oven unless the turntable and the
respective support are in place.
Page 28

27
EN
What should I do if the oven doesn’t work?
WARNING! Any type of repair must only be
done by a specialised technician. Any repair
done by a person not authorised by the
manufacturer is dangerous.
You do not need to contact Technical Assistance
to resolve the following questions:
• The display is not showing! Check if:
- The time indication has been switched off
(see section on Basic Settings).
• Nothing happens when I press the keys!
Check if:
- The Safety Block is active (see section on
Basic Settings).
• The oven does not work! Check if:
- The plug is correctly fitted in the socket.
- The oven’s power is switched on.
- The door is completely closed. The door
should close with an audible click.
- There are any foreign bodies between the
door and the cavity front.
• When the oven is operating I can hear
some strange noises! Check if:
- There is any electrical arcing inside the oven
caused by foreign metallic objects (see
section on type of ovenware).
- The ovenware is touching the oven walls.
- There are any loose items of cutlery or
cooking tools inside the oven.
• The food doesn’t heat up or heats very
slowly! Check if:
- You have inadvertently used metal
ovenware.
- You have selected the correct operating
times and power level.
- The food you have put inside the oven is a
larger amount or colder than you usually put
in.
• The food is too hot, dried out or burnt!
Check if you selected the correct operating
time and power level.
• I hear some noises after the cooking
process is finished! This is not a problem.
The cooling fan keeps on working for some
time. When the temperature has dropped
sufficiently, the fan will switch itself off.
• The oven switches on but the interior
light does not go on! If all the functions
work properly it is probable that the lamp
has blown. You can keep on using the oven.
Substitution of light bulb
To substitute the light bulb, proceed as follows:
- Disconnect the oven from the power supply.
Take the plug out of the socket or switch off
the oven’s power circuit.
- Unscrew and remove the glass light cover
(1).
- Remove the halogen light bulb (2). Warning!
The bulb may be very hot.
- Fit a new 12V / 20W halogen bulb. Warning!
Do not touch the light bulb surface
directly with your fingers because you
may damage the bulb. Follow the lamp
manufacturer’s instructions.
- Screw the glass light cover into place (1).
Connect the oven again to the power supply.
Page 29
28
EN
Technical characteristics
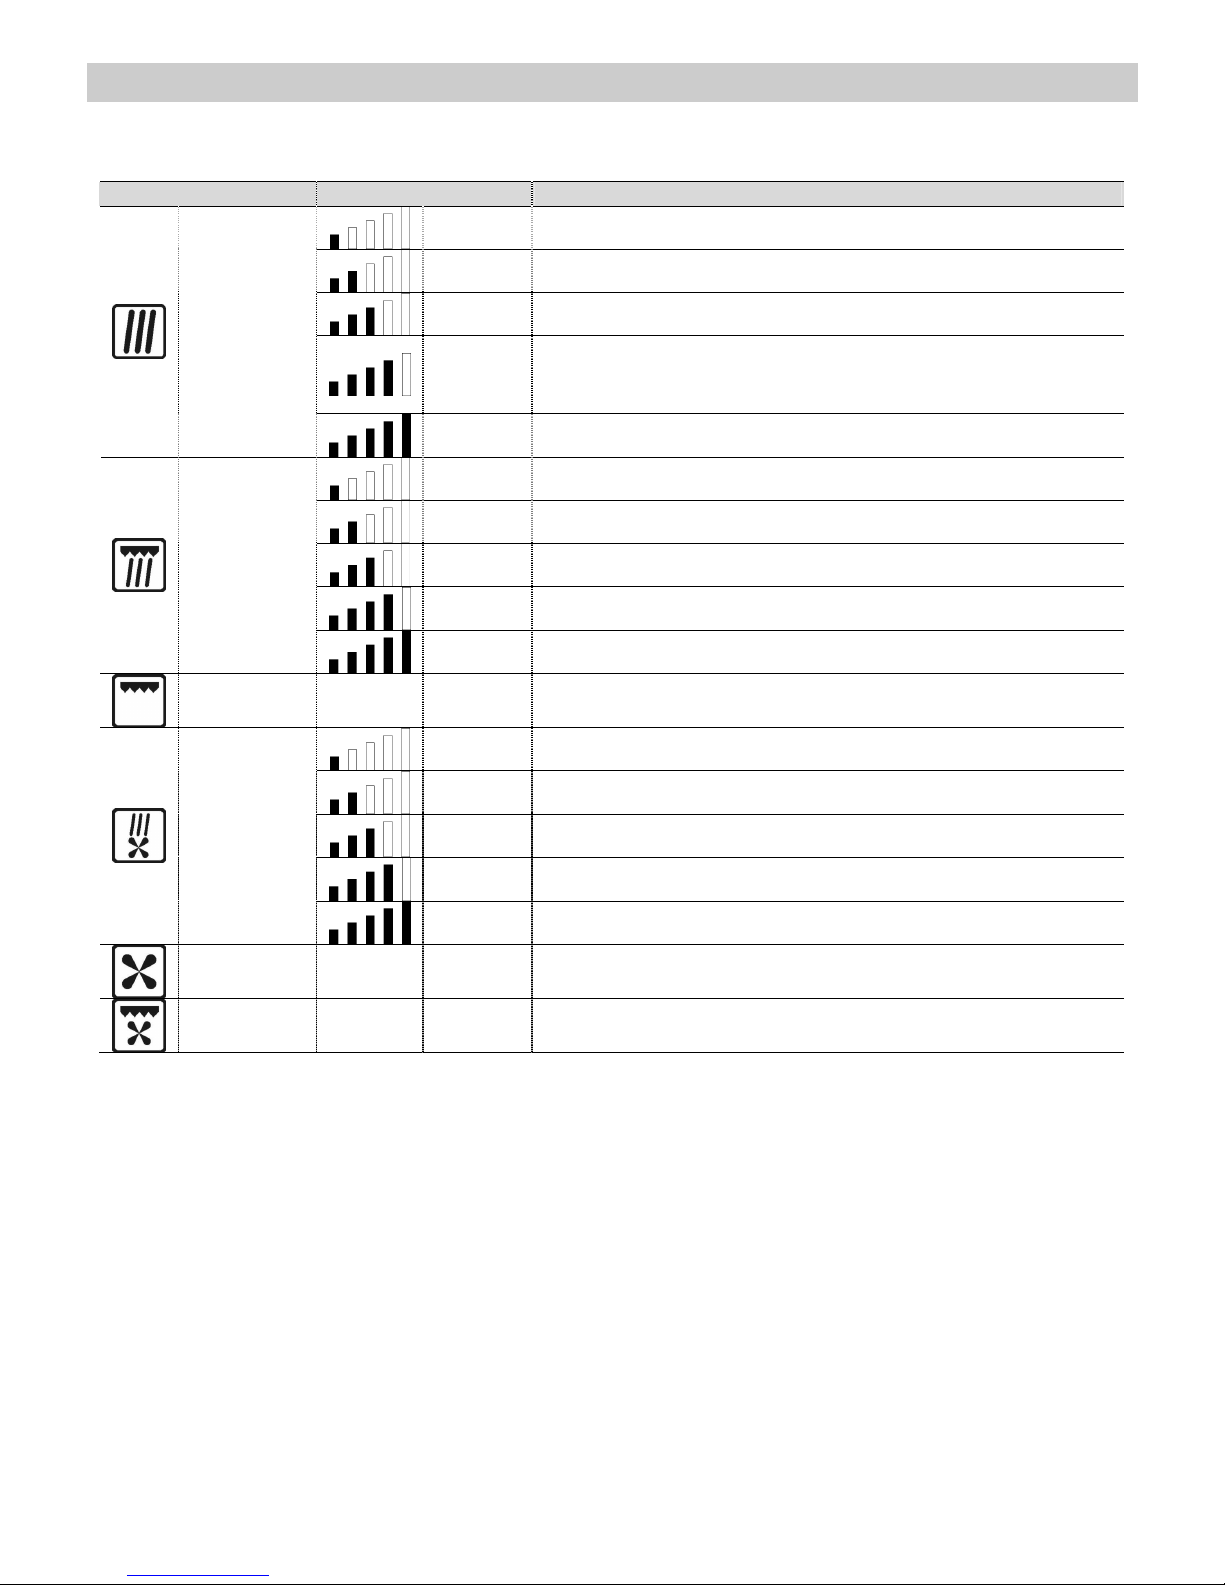
Description of Functions
Function Microwaves Power Foods
200 W
Slow defrosting for delicate foods; keeping food hot
400 W
Cooking with little heat; boiling rice. Rapid defrosting
600 W
Melting butter. Heating baby food
800 W
Cooking vegetables and food. Cooking and heating carefully.
Heating and cooking small portions of f
ood. Heating delicate
food
Microwave
1000 W
Cooking and rapidly heating liquids and pre-cooked foods
200 W
Toasting food
400 W
Grilling poultry and meat
600 W
Cooking pies and cheese-topped dishes
800 W
Use carefully: food might burn.
Microwaves
+ Grill
1000 W
Use carefully: food might burn.
Grill ---
---
Grilling food
200 W
Meat roast and simmer
400 W
Poultry roast
600 W
Other fast roasts
800 W
Use carefully: food might burn.
Microwaves +
Hot-Air
1000 W
Use carefully: food might burn.
Hot-Air ---
---
Roast and bake
Grill + Fan ---
---
Food even browning
Specifications
• AC Voltage...................................................................................... 230-240 V / 50 Hz
• Power required................................................................................ 3400 W
• Grill power....................................................................................... 1500 W
• Hot-Air power. ................................................................................. 1600 W
• Microwave output power. ................................................................ 1000 W
• Microwave frequency…................................................................... 2450 MHz
• Exterior dimensions (W×H×D)......................................................... 595 × 455 × 542 mm
• Interior dimensions (W×H×D).......................................................... 420 × 210 × 390 mm
• Oven capacity. ................................................................................ 32 ltr
• Weight............................................................................................. 38 kg
Page 30

29
DE
Werter Kunde:
Vor allem möchten wir uns bei Ihnen für den
Vorzug bedanken, den Sie unserem Erzeugnis
gegeben haben. Wir sind uns dessen gewiss,
dass dieser moderne, funktionelle und praktische
Mikrowellenofen, welcher aus Werkstoffen von
ausgezeichneter Qualität hergestellt wurde, Ihre
Erwartungen erfüllen wird.
Wir bitten Sie, die in diesem Buch enthaltenen
Anweisungen aufmerksam durchzulesen, die
Ihnen ermöglichen werden, bei der Nutzung Ihres
Mikrowelleherdes bessere Ergebnisse zu erzielen.
BEWAHREN SIE DIE DOKUMENTATION
DIESES GERÄTES AUF, UM KÜNFTIG IN IHR
NACHSCHLAGEN ZU KÖNNEN.
Halten Sie die Gebrauchsanleitung immer
griffbereit. Falls Sie das Gerät Dritten
überlassen, stellen Sie ihnen auch die
entsprechende Betriebsanleitung zur
Verfügung!
Hinweise zum Umweltschutz
Entsorgung der Verpackung
Die Verpackung ist mit einem Grünen Punkt
gekennzeichnet.
Benutzen Sie geeignete Behältnisse, um alle
Verpackungsmaterialien, wie Pappe, Styropor und
Folien, zu entsorgen. Auf diese Weise wird die
Wiederverwertung der Verpackungsmaterialien
gewährleistet.
Entsorgung von stillgelegten Geräten
Die europäische Richtlinie 2002/96/EG über
Elektro- und Elektronik-Altgeräte (WEEE) sieht
vor, dass die elektrischen Haushaltgeräte nicht im
normalen Abfallfluss des festen Stadtmülls
entsorgt werden dürfen.
Die außer Betrieb gesetzten Geräte müssen
getrennt abgeholt werden, um den Anteil der
Rückgewinnung und Wiederverwendung der
Werkstoffe, aus denen sie bestehen, zu
optimieren und um potentielle Schäden für die
Gesundheit der Menschen und die Umwelt zu
vermeiden. Das Symbol, welches aus einem mit
einem Kreuz durchgestrichenen Müllcontainer
besteht, ist auf sämtlichen Erzeugnissen
anzubringen, um so an die Verpflichtung der
separaten Abholung zu erinnern.
Die Verbraucher haben sich mit den lokalen
Behörden bzw. den Verkaufsstellen in Verbindung
zu setzen, um Informationen über den Ort
einzuholen, der zur Lagerung der alten
elektrischen Haushaltsgeräte geeignet ist.
Machen Sie Ihr Gerät unbrauchbar, bevor Sie es
entsorgen. Ziehen Sie das Netzkabel heraus,
schneiden Sie es ab und entsorgen Sie es
Page 31

30
DE
Inhaltsverzeichnis
Installationsanleitung.......................................................................................................................31
Vor der Installation..........................................................................................................................31
Elektrische Installation....................................................................................................................31
Nach der Installation.......................................................................................................................31
Sicherheitshinweise .........................................................................................................................32
Die Vorteile der Mikrowelle ..............................................................................................................34
Beschreibung des Gerätes ..............................................................................................................35
Grundeinstellungen..........................................................................................................................36
Einstellung der Uhr .........................................................................................................................36
Uhr ausblenden/anzeigen...............................................................................................................36
Sicherheitsverriegelung ..................................................................................................................36
Grundfunktionen...............................................................................................................................37
Mikrowelle.......................................................................................................................................37
Grill .................................................................................................................................................37
Mikrowelle + Grill ............................................................................................................................38
Heißluft ...........................................................................................................................................38
Mikrowelle + Heißluft ......................................................................................................................39
Grill mit Umluft................................................................................................................................39
Automatisches Auftauen.................................................................................................................40
Während des Betriebes....................................................................................................................41
Unterbrechung eines Kochvorgangs ..............................................................................................41
Änderung der Einstellungen ...........................................................................................................41
Einen Kochvorgang löschen...........................................................................................................41
Ende eines Kochvorgangs..............................................................................................................41
Auftauen ............................................................................................................................................43
Mit der Mikrowelle garen..................................................................................................................44
Zubereitung mit dem Grill ................................................................................................................46
Zubereitung mit der Mikrowelle + Heißluft .....................................................................................49
Zubereitung mit der Heißluft............................................................................................................50
Welche Art von Geschirr kann benutzt werden? ...........................................................................51
Funktion Mikrowelle........................................................................................................................51
Funktionen Grill und Umluft ............................................................................................................51
Kombinierte Funktionen..................................................................................................................51
Aluminiumgefäße und –folien .........................................................................................................51
Deckel ............................................................................................................................................51
Tabelle – Geschirr ..........................................................................................................................52
Reinigung und Wartung des Gerätes..............................................................................................53
Was ist im Falle einer Funktionsstörung zu tun? ..........................................................................55
Lampenwechsel..............................................................................................................................55
Technische Eigenschaften...............................................................................................................56
Spezifikation ...................................................................................................................................56
Einbau................................................................................................................................................57
Page 32
31
DE
Installationsanleitung
Vor der Installation
Überprüfen Sie, dass die Versorgungsspannung,
die auf dem Typenschild angegeben ist, mit Ihrer
Netzspannung übereinstimmt.
Öffnen Sie die Tür und entnehmen Sie alle
Zubehörteile sowie das Verpackungsmaterial.
Nehmen Sie die Abdeckung aus Glimmer an der
Decke des Innenraumes nicht ab. Diese Abdeckung
verhindert, dass Fett und Speisereste den
Mikrowellengenerator beschädigen.
Achtung! Die Vorderseite des Gerätes kann mit einer
Schutzfolie versehen sein. Ziehen Sie diese Folie vor
der ersten Benutzung des Gerätes vorsichtig ab,
indem Sie an deren Unterseite beginnen.
Vergewissern Sie sich, dass das Gerät nicht
beschädigt ist. Überprüfen Sie, ob die Tür richtig
schließt und ob die Innenseite der Tür sowie die
Stirnseite des Innenraumes nicht beschädigt sind.
Benachrichtigen Sie den Kundendienst im Falle von
vorhandenen Schäden.
BENUTZEN SIE DAS GERÄT NICHT, falls das
Netzkabel oder der Stecker beschädigt ist, falls das
Gerät nicht richtig funktioniert bzw. wenn es Schäden
erlitten hat oder heruntergefallen ist. Setzen Sie sich
gegebenenfalls mit dem Kundendienst in Verbindung.
Stellen Sie das Gerät auf eine ebene und stabile
Fläche. Das Gerät darf nicht in der Nähe von
Heizelementen, Radios und Fernsehgeräten
aufgestellt werden.
Vergewissern Sie sich während der Installation,
dass das Netzkabel nicht mit Feuchtigkeit,
scharfkantigen Gegenständen und der Rückseite
des Gerätes in Berührung kommt, denn die hohen
Temperaturen können das Kabel beschädigen.
Achtung: Nach der Aufstellung des Gerätes ist der
Zugang zum Stecker zu gewährleisten
.
Elektrische Installation
Die elektrische Installation muss von einem Elektriker
durchgeführt werden, der über die gesetzlich
vorgeschriebene Qualifikation verfügt.
Bevor Sie die Mikrowelle an das Stromnetz
anschließen, überprüfen Sie, ob die Spannung und die
Frequenz des Stromnetzes mit derjenigen
übereinstimmen, die auf dem Typenschild an der
Ofenzellenvorderseite und im Garantiezertifikat
angegeben ist. Bewahren Sie das Garantiezertifikat
zusammen mit diesem Handbuch auf.
Der elektrische Anschluss erfolgt über einen Stecker
(wo zugänglich) oder über einen allpoligen Schalter,
der für die Stärke geeignet ist und der einen
Kontaktabstand von mindestens 3 mm hat, damit im
Notfall oder bei Reinigung der Mikrowelle das Gerät
vom Stromkreis abgetrennt wird.
Der Anschluss muss entsprechend den gültigen
Normen korrekt geerdet sein. ACHTUNG: DAS
GERÄT MUSS UNBEDINGT GEERDET WERDEN.
Falls das biegsame Versorgungskabel der Mikrowelle
ausgetauscht werden muss, sollte dies durch den
offiziellen Kundendienst geschehen, da hierfür
spezielle Werkzeuge erforderlich sind.
Der Hersteller und die Wiederverkäufer lehnen
jegliche Haftung für eventuelle Schäden ab, die
Personen, Tieren oder Sachen zugefügt werden, falls
die Nichtbeachtung der vorliegenden
Installationsanleitung festgestellt wird.
Nach der Installation
Das Gerät funktioniert nur, wenn die Tür richtig
geschlossen ist.
Säubern Sie vor der ersten Benutzung das
Geräteinnere und die Zubehörteile gemäß den
Hinweisen zur Reinigung unter dem Punkt “Reinigung
und Wartung des Gerätes”.
Führen Sie das Kupplungsstück in der Mitte des
Garraumes ein und legen Sie den Rollring sowie den
Drehteller so auf, dass dieser einrastet. Immer, wenn
die Mikrowelle benutzt wird, ist es notwendig, dass
sowohl der Drehteller als auch das entsprechende
Zubehör sich im Garraum befinden und richtig
eingesetzt sind. Der Drehteller dreht sich in beide
Richtungen.
Während der Installation sind die getrennt mitgelieferten Anleitungen zu
befolgen.
Page 33

32
DE
Sicherheitshinweise
• Achtung! Verwenden Sie das Backblech nicht
mit der Mikrowellen- oder der kombinierten
Mikrowellen-Funktion.
• Achtung! Lassen Sie das Gerät nicht
unbeaufsichtigt, insbesondere wenn Papier,
Kunststoff oder andere brennbare Materialien
Verwendung finden. Diese können verkohlen
und sich entzünden. FEUERGEFAHR!
• Achtung! Falls Sie Rauch oder Feuer
bemerken, halten Sie die Tür geschlossen, um
die Flammen zu ersticken. Schalten Sie das
Gerät ab und ziehen Sie den Stecker aus der
Steckdose oder unterbrechen Sie die
Stromversorgung des Gerätes.
• Achtung! Erwärmen Sie keinen reinen
Alkohol und keine alkoholischen Getränke in
der Mikrowelle. FEUERGEFAHR!
• Achtung! Erhitzen Sie weder Flüssigkeiten
noch andere Esswaren in geschlossenen
Gefäßen, da diese leicht explodieren können.
• Achtung! Dieses Gerät ist nicht für den
Gebrauch durch Personen (einschließlich
Kindern) geeignet, die nicht im vollen Besitz
ihrer körperlichen, sensoriellen und geistigen
Fähigkeiten sind. Benutzer, denen es an
Erfahrung und Kenntnis des Geräts mangelt
oder die nicht in die Verwendung des Geräts
eingewiesen wurden, müssen durch eine
Person überwacht werden, die für ihre
Sicherheit verantwortlich ist. Kinder müssen
überwacht werden, um sicher zu stellen, dass
sie nicht mit dem Gerät spielen.
• Achtung! Falls das Gerät eine kombinierte
Betriebsart aufweist (Mikrowellen mit anderen
Heizmedien), gestatten Sie den Kindern
wegen der erzeugten hohen Temperaturen
nicht, das Gerät ohne Beaufsichtigung durch
einen Erwachsenen zu benutzen.
• Achtung! Das Gerät darf nicht benutzt
werden, falls
- die Tür nicht richtig schließt,
- die Scharniere der Tür beschädigt sind,
- die Kontaktflächen zwischen der Tür und der
Stirnseite beschädigt sind,
- die Glasscheibe der Tür beschädigt ist,
- im Inneren häufig ein Lichtbogen auftritt, ohne
dass irgendwelche metallischen Gegenstände
vorhanden sind.
Das Gerät darf erst wieder benutzt werden,
nachdem es von einem Kundendiensttechniker
repariert worden ist.
• Während des Gebrauches kann das Gerät
sehr heiß werden. Bitte seien Sie vorsichtig
und vermeiden Sie jeglichen Kontakt mit den
Heizkörpern im Innenraum des Gerätes.
• Vorsicht: zugängliche Teile können während
des Gebrauches heiß werden. Kinder sind
vom Gerät fernzuhalten.
• Zum Reinigen der Geräteglastür, verwenden
Sie keine scharfen Reinigungsmittel oder
Schaber, denn es kann die Oberfläche
verkratzen und eventuell das Glas zerbrechen.
Vorsicht!
• Erwärmen Sie die Babynahrung immer in
Fläschchen bzw. Flaschen ohne Deckel und
ohne Sauger. Nach Erwärmung der Nahrung
ist diese gut umzurühren oder zu schütteln,
damit die Wärme gleichmäßig verteilt wird.
Prüfen Sie die Temperatur der Nahrung,
bevor Sie diese dem Kind verabreichen.
VERBRENNUNGSGEFAHR!
• Um zu verhindern, dass die Nahrung zu sehr
erhitzt wird oder sich entzündet, ist es sehr
wichtig, weder lange Zeiträume noch zu hohe
Leistungsstufen zu wählen, wenn kleine
Nahrungsmengen erwärmt werden. Zum
Beispiel kann Brot nach 3 Minuten brennen,
wenn eine zu hohe Leistung eingestellt wird.
• Nutzen Sie die Grillfunktion zum Grillen,
überwachen Sie ständig das Gerät. Falls Sie
eine kombinierte Betriebsart zum Grillen
verwenden, kann das Brot innerhalb einer sehr
kurzen Zeit verbrennen.
• Klemmen Sie nie die Netzkabel anderer
elektrischer Geräte in die heiße Gerätetür ein.
Die Isolierung des Kabels kann schmelzen.
Kurzschlussgefahr!
Vorsicht beim Erwärmen von Flüssigkeiten!
Wenn Flüssigkeiten (Wasser, Kaffee, Tee, Milch, usw.)
innerhalb des Gerätes den Siedepunkt fast erreicht
haben und plötzlich herausgezogen werden, können
sie überschwappen. VERLETZUNGS- UND
VERBRENNUNGS-GEFAHR!
Geben Sie einen Teelöffel oder ein Glasstäbchen in
das Gefäß, um derartige Situationen zu vermeiden,
wenn Sie Flüssigkeiten erhitzen.
Page 34

33
DE
Sicherheitshinweise
Dieses Gerät ist lediglich für den Hausgebrauch
bestimmt!
Nutzen Sie das Gerät ausschließlich für die
Zubereitung von Mahlzeiten.
Wenn Sie den Hinweisen gemäß vorgehen, dann
vermeiden Sie Schäden am Gerät und sonstige
gefährliche Situationen:
• Setzen Sie das Gerät nicht ohne das
Kupplungsstück, den Rollring und den
entsprechenden Drehteller in Betrieb.
• Schalten Sie die leere Mikrowelle nicht ein.
Sie kann überlastet und beschädigt werden,
wenn sich in ihr keine Speisen befinden.
BESCHÄDIGUNGSGEFAHR!
• Stellen Sie ein Glas Wasser in das Gerät, um
dessen Programmierung zu testen. Das
Wasser absorbiert die Mikrowellen, und das
Gerät wird nicht beschädigt.
• Verdecken oder verstopfen Sie die
Belüftungslöcher und -schlitze nicht.
• Benutzen Sie nur für die Mikrowelle
geeignetes Geschirr. Vor Verwendung von
Geschirr und Gefäßen in der Mikrowelle,
überprüfen Sie deren Eignung (siehe Abschnitt
über die Art des Geschirrs).
• Nehmen Sie die Abdeckung aus Glimmer
an der Decke des Innenraumes nicht ab.
Diese Abdeckung verhindert, dass Fett und
Speisereste den Mikrowellengenerator
beschädigen.
• Bewahren Sie keinerlei brennbare
Gegenstände im Gerät auf, denn diese
können sich entzünden, wenn Sie das Gerät
einschalten.
• Nutzen Sie das Gerät nicht als
Speisekammer.
• Eier mit Schale und gekochte ganze Eier
dürfen nicht in Mikrowellengerät erhitzt
werden, denn sie können explodieren.
• Benutzen Sie das Gerät nicht, um im Ölbad
zu frittieren, da es unmöglich ist, die
Temperatur des Öles unter Einwirkung von
Mikrowellen zu kontrollieren.
• Tragen Sie zwecks Vermeidung von
Verbrennungen stets Küchenhandschuhe,
um die Gefäße zu handhaben und das
Geräteinnere zu berühren.
• Stützen oder setzen Sie sich nicht auf die
geöffnete Gerätetür. Das kann Schäden
besonders im Bereich der Scharniere
hervorrufen. Die Tür hält maximal 8 kg aus.
• Der Drehteller und die Roste halten einer
Höchstbelastung von 8 kg stand.
Überschreiten Sie diese Belastung nicht, um
Schäden zu vermeiden.
Reinigung:
• Achtung! Das Mikrowellengerät ist
regelmäßig zu säubern, wobei sämtliche
Essensreste zu beseitigen sind (siehe
Abschnitt über die Reinigung des Geräts).
Wenn das Mikrowellengerät nicht
ordnungsgemäß sauber gehalten wird, kann
seine Oberfläche in Mitleidenschaft gezogen
werden, was wiederum die Lebensdauer
des Gerätes verringern und
möglicherweise zu einer gefährlichen
Situation führen kann.
• Die Kontaktflächen der Tür (Stirnseite des
Garraums und Innenseite der Tür) müssen
sehr sauber gehalten werden, um die
einwandfreie Funktionsweise zu
gewährleisten.
• Bitte beachten Sie die Hinweise bezüglich der
Sauberkeit unter dem Punkt “Reinigung und
Wartung des Gerätes”.
Im Falle einer Reparatur:
• Achtung – Mikrowellen! Das
Gerätegehäuse darf nicht abgenommen
werden. Jede Reparatur oder Wartung durch
Personen, die nicht vom Hersteller autorisiert
sind, ist gefährlich.
• Falls das Netzkabel beschädigt wird, ist es
vom Hersteller, von autorisierten Vertretern
oder von für diese Aufgabe qualifizierten
Technikern zu ersetzen, um gefährliche
Situationen zu vermeiden und weil dazu
Spezialwerkzeuge notwendig sind.
• Reparaturen und Wartungsarbeiten,
besonders an unter Strom stehenden Teilen,
dürfen nur durch vom Hersteller autorisierten
Technikern ausgeführt werden.
Page 35

34
DE
Die Vorteile der Mikrowelle
Im konventionellen Küchenherd dringt die von den
Widerstandsheizelementen oder Gasbrennern
ausgestrahlte Wärme langsam, von außen nach
innen, in die Nahrungsmittel ein. Dadurch entsteht
bei der Erwärmung der Luft, der Bauteile des
Herdes und der Gefäße ein großer Energieverlust.
In den Mikrowellengeräten wird die Wärme von
den Esswaren selbst erzeugt, das heißt, die
Wärme geht von innen nach außen. Es ergibt sich
keinerlei Wärmeverlust durch die Luft, die Wände
des Innenraumes und die Gefäße (falls diese für
Mikrowellengeräte geeignet sind), es werden
lediglich die Nahrungsmittel erhitzt.
Zusammenfassend weisen die Mikrowellengeräte
folgende Vorteile auf:
1. Einsparung an Garzeit, in die allgemeine
Verringerung um 3/4 der Zeit im Verhältnis
zum konventionellen Kochvorgang.
2. Superschnelles Auftauen der Lebensmittel,
dadurch Verringerung der Gefahr der
Bakterienbildung.
3. Energieersparnis.
4. Beibehaltung des Nährwertes der
Lebensmittel dank der Verkürzung der
Kochzeit.
5. Leichte Reinigung.
Funktionsweise des Mikrowellengerätes
Im Mikrowellengerät ist eine als Magnetron
bezeichnete Hochspannungsröhre vorhanden,
welche die Elektroenergie in Mikrowellenenergie
umwandelt. Diese elektromagnetischen Wellen
werden durch einen Wellenleiter in das Innere des
Gerätes geführt und von einer metallischen
Streueinrichtung bzw. einem Drehteller verteilt.
Im Inneren des Gerätes breiten sich die
Mikrowellen in sämtliche Richtungen aus, werden
von den metallischen Wänden reflektiert und
dringen gleichmäßig in die Speisen ein.
Warum die Lebensmittel warm werden
Der größte Teil der Nahrungsmittel enthält
Wasser, dessen Moleküle durch die Wirkung der
Mikrowellen in Schwingung versetzt werden.
Die Reibung zwischen den Molekülen erzeugt
Wärme, die die Temperatur der Lebensmittel
erhöht, sie auftaut, sie gart oder warm hält.
Da die Wärme im Inneren der Nahrungsmittel
entsteht:
• können sie ohne oder mit wenig Flüssigkeit
oder Fett zubereitet werden,
• verläuft das Auftauen, Erhitzen oder
Zubereiten im Mikrowellengerät schneller als
in einem konventionellen Herd,
• bleiben die Vitamine, Mineralien und
Nährstoffe erhalten,
• ändert sich weder die natürliche Farbe noch
das Aroma.
Die Mikrowellen durchdringen Porzellan, Glas,
Pappe oder Plastik, aber kein Metall. Benutzen
Sie deshalb im Mikrowellengerät keine
Metallgefäße oder Gefäße, die Metallteile
aufweisen.
Die Mikrowellen werden vom Metall reflektiert, ...
... durchdringen Glas und Porzellan ...
... und werden von den Lebensmitteln absorbiert.
Page 36
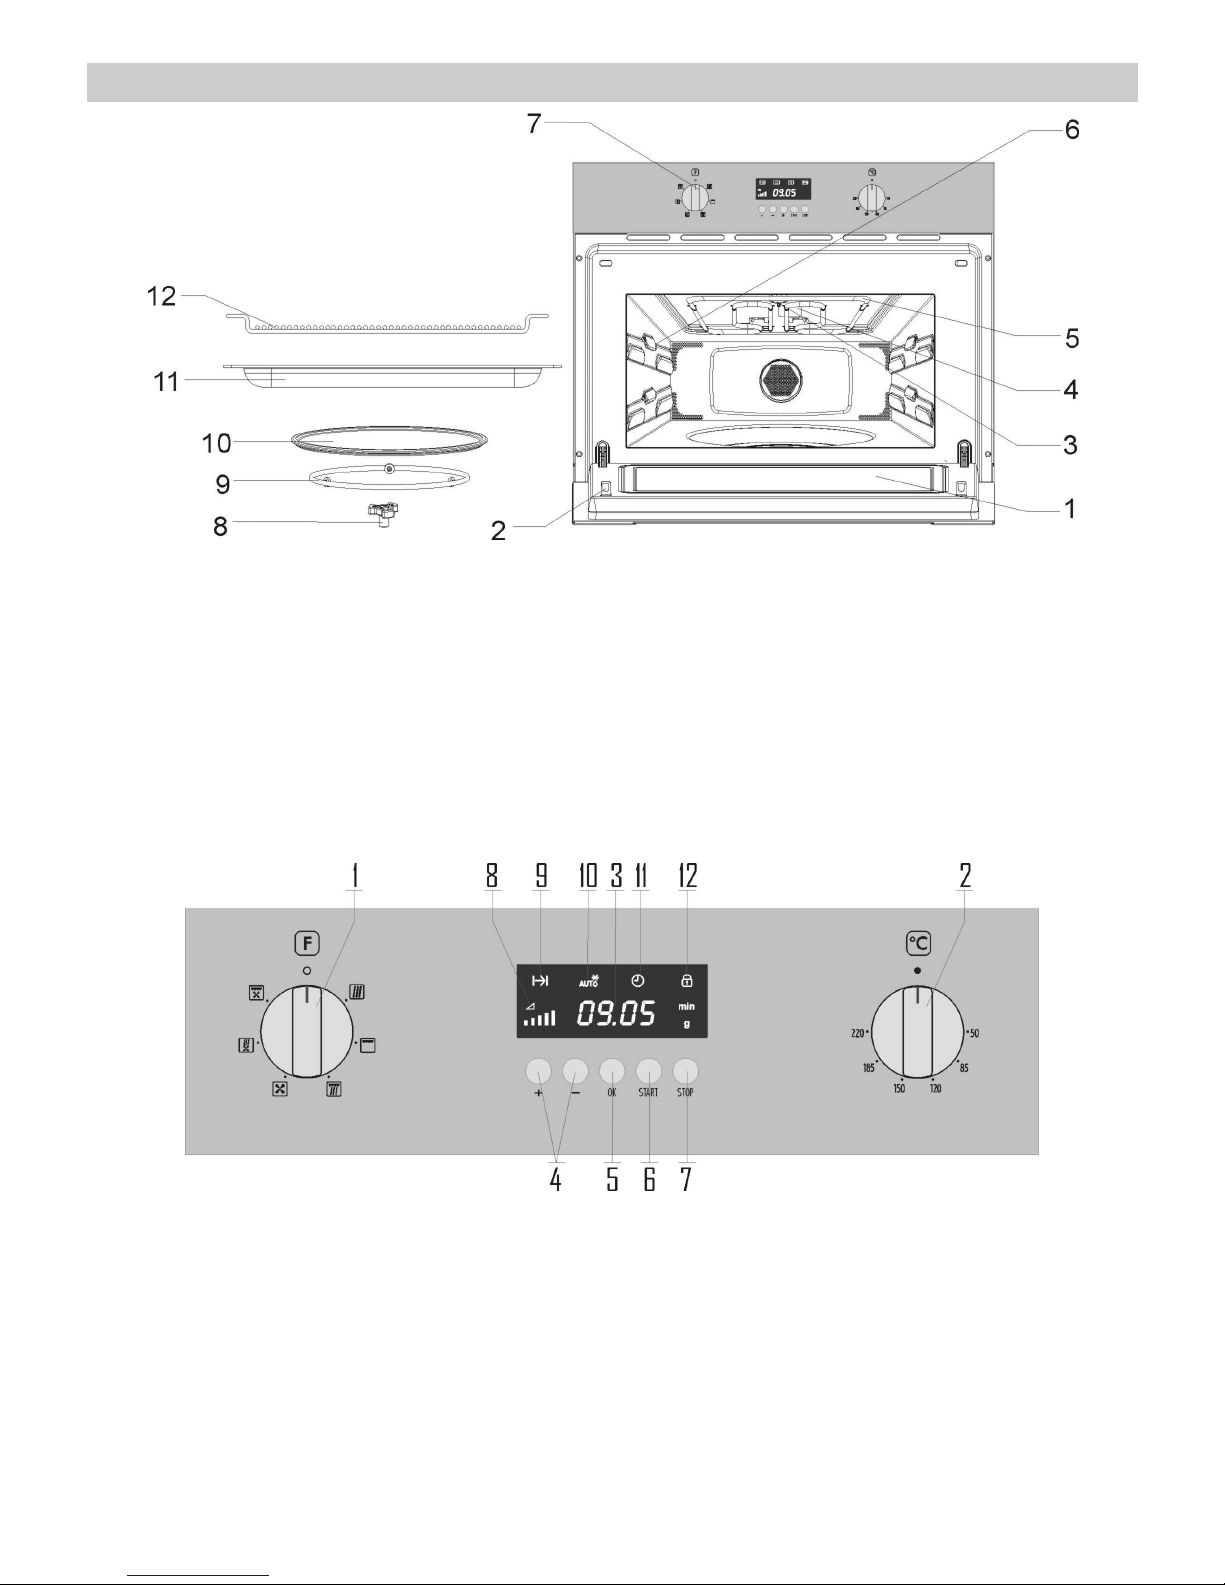
35
DE
Beschreibung des Gerätes
1. – Türglass 8. – Kupplungsstück
2. – Sicherheitsverriegelung 9. – Rollring
3. – Lampe 10. – Drehteller
4. – Abdeckung 11. – Emaliertes Backblech
5. – Grill
(nicht mit der Funktion Mikrowelle verwenden)
6. – Seitliche Verprägungen 12. – Grillrost
7. – Bedienblende
1. Funktionswähler 7. Stop-Taste
2. Temperaturwähler 8. Leistung
3. Anzeige 9. Betriebsdauer
4. "+" und "-"-Taste 10. Auftauen
5. OK-Taste 11. Uhranzeige
6. Start-Taste 12. Kindersicherung
Page 37

36
DE
Grundeinstellungen
Einstellung der Uhr
Nach Anschluss des Gerätes an das Netz oder nach einem Stromausfall blinkt die Uhr und zeigt damit an,
dass die Uhrzeit nicht korrekt ist. Vor Verwendung der Mikrowelle stellen Sie die Uhr ein. Gehen sie hierfür
wie nachfolgend beschrieben vor, beginnend bei Punkt 2.
Um die Uhr einzustellen, gehen Sie wie folgt vor:
1. Drücken Sie die "+"-Taste bis die Uhranzeige zu
blinken beginnt.
2. Drücken Sie die OK-Taste.
3. Drücken Sie die "+"- und "-"-Tasten, um die
Stunden einzustellen.
4. Drücken Sie OK, um die Stunden zu bestätigen.
Die Minutenanzeige beginnt zu blinken.
5. Drücken Sie die "+"- und "-"-Tasten, um die
Minuten einzustellen.
6. Zum Beenden drücken Sie wieder OK.
Uhr ausblenden/anzeigen
Falls die Uhr Sie stört, können Sie diese ausblenden.
2. Halten Sie die "+"- und die "-"-Taste gleichzeitig
für 3 Sekunden gedrückt. Die Punkte zwischen
Stunden- und Minutenanzeige beginnen zu
blinken. Der Rest der Uhrenanzeige ist nicht
sichtbar.
3. Wenn Sie die Uhr wieder einblenden möchten,
drücken Sie die "+"- und die "-"-Taste wieder
gleichzeitig für 3 Sekunden.
Sicherheitsverriegelung
Der Betrieb des Gerätes kann blockiert werden (zum Beispiel, um die Benutzung durch Kinder zu verhindern).
1. Um das Gerät zu sperren, halten Sie die Stop-Taste
für 3 Sekunden gedrückt. Wird dann eine Taste
gedrückt, erscheint in der Anzeige ein Schlüssel
und es wird keine Funktion ausgeführt.
2. Um das Gerät zu entsperren, halten Sie die Stop-
Taste für 3 Sekunden gedrückt.
Page 38

37
DE
Grundfunktionen
Mikrowelle
Diese Funktion benutzen, um Gemüse, Kartoffeln, Reis, Fisch und Fleisch zuzubereiten und
aufzuwärmen.
1. Drehen Sie den Funktionswähler bis zu dem
Zeichen für die Mikrowelle.
2. Die Anzeige für die Betriebsdauer blinkt.
3. Drücken Sie die OK-Taste.
4. Durch Drücken der "+"- und der "-"-Taste
stellen Sie die gewünschte Betriebsdauer ein.
5. Drücken Sie die OK-Taste.
6. Die Anzeige für die Leistung beginnt zu
blinken.
7. Durch Drücken der "+"- und der "-"-Taste
stellen Sie die gewünschte Leistung ein.
8. Drücken Sie die OK-Taste.
9 Drücken Sie die Start-Taste. Das Gerät
beginnt.
Grill
Diese Funktion benutzen, um die Oberfläche der Nahrungsmittel schnell zu bräunen.
1. Drehen Sie den Funktionswähler bis zu dem
Zeichen für den Grill.
2. Die Anzeige für die Dauer und die Anzeige
beginnen zu blinken.
3. Durch Drücken der "+"- und der "-"-Taste
stellen Sie die gewünschte Betriebsdauer ein.
4. Drücken Sie die OK-Taste.
5. Drücken Sie die Start-Taste. Das Gerät
beginnt.
Page 39
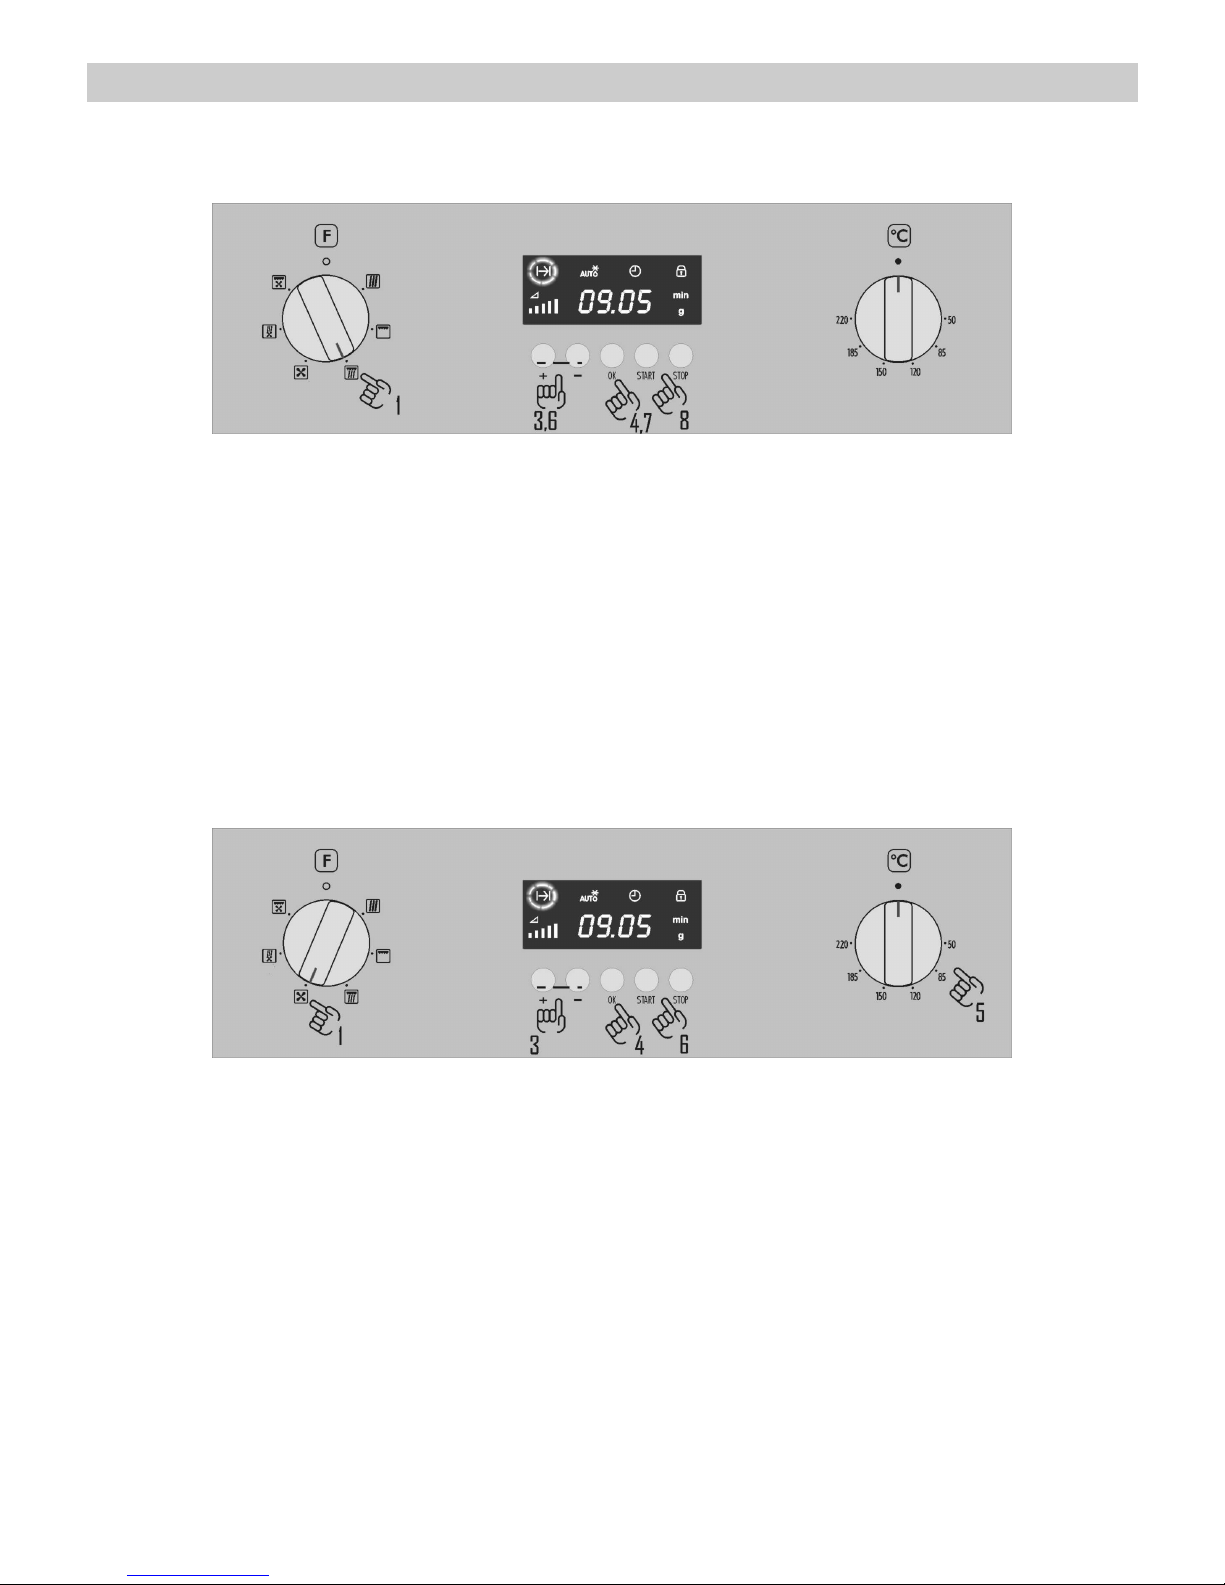
38
DE
Grundfunktionen
Mikrowelle + Grill
Diese Funktion benutzen, um Lasagne, Geflügel, Bratkartoffeln und Aufläufe zuzubereiten.
1. Drehen Sie den Funktionswähler bis zu dem
Zeichen für Mikrowelle + Grill.
2. Die Anzeige für die Dauer beginnt zu blinken
und die Anzeige für die Leistung leuchtet. Die
Betriebsdauer blinkt in der Anzeige.
3. Durch Drücken der "+"- und der "-"-Taste
stellen Sie die gewünschte Betriebsdauer ein.
4. Drücken Sie die OK-Taste.
5. Die Anzeige für die Leistung blinkt.
6. Durch Drücken der "+"- und der "-"-Taste stellen
Sie die gewünschte Mikrowellenleistung ein.
7. Drücken Sie die OK-Taste.
8. Drücken Sie die Start-Taste. Das Gerät
beginnt.
Heißluft
Diese Funktion zum Backen und Braten benutzen .
1. Drehen Sie den Funktionswähler bis zu dem
Zeichen für Heißluft.
2. Die Anzeige für die Dauer und die Anzeige
beginnen zu blinken.
3. Durch Drücken der "+"- und der "-"-Taste
stellen Sie die gewünschte Betriebsdauer ein.
4. Drücken Sie die OK-Taste.
5. Wählen Sie die gewünschte Temperatur mit
dem Temperaturwähler aus.
6. Drücken Sie die Start-Taste. Das Gerät
beginnt.
Page 40

39
DE
Grundfunktionen
Mikrowelle + Heißluft
Diese Funktion zum Backen und Braten benutzen
1. Drehen Sie den Funktionswähler bis zu dem
Zeichen für Mikrowelle + Heißluft.
2. Die Anzeige für die Dauer beginnt zu blinken
und die Anzeige für die Leistung leuchtet. Die
Betriebsdauer blinkt in der Anzeige.
3. Durch Drücken der "+"- und der "-"-Taste
stellen Sie die gewünschte Betriebsdauer ein.
4. Drücken Sie die OK-Taste.
5. Die Anzeige für die Leistung blinkt.
6. Durch Drücken der "+"- und der "-"-Taste stellen
Sie die gewünschte Mikrowellenleistung ein.
7. Drücken Sie die OK-Taste.
8. Wählen Sie die gewünschte Temperatur mit
dem Temperaturwähler aus.
9. Drücken Sie die Start-Taste. Das Gerät
beginnt.
Grill mit Umluft
Mit dieser Funktion können Sie Speisen gleichmäßig garen und gleichzeitig ihre Oberfläche bräunen.
1. Drehen Sie den Funktionswähler bis zu dem
Zeichen für Grill + Umluft.
2. Die Anzeige für die Dauer und die Anzeige
beginnen zu blinken.
3. Durch Drücken der "+"- und der "-"-Taste
stellen Sie die gewünschte Betriebsdauer ein.
4. Drücken Sie die OK-Taste.
5. Drücken Sie die Start-Taste. Das Gerät
beginnt.
Page 41
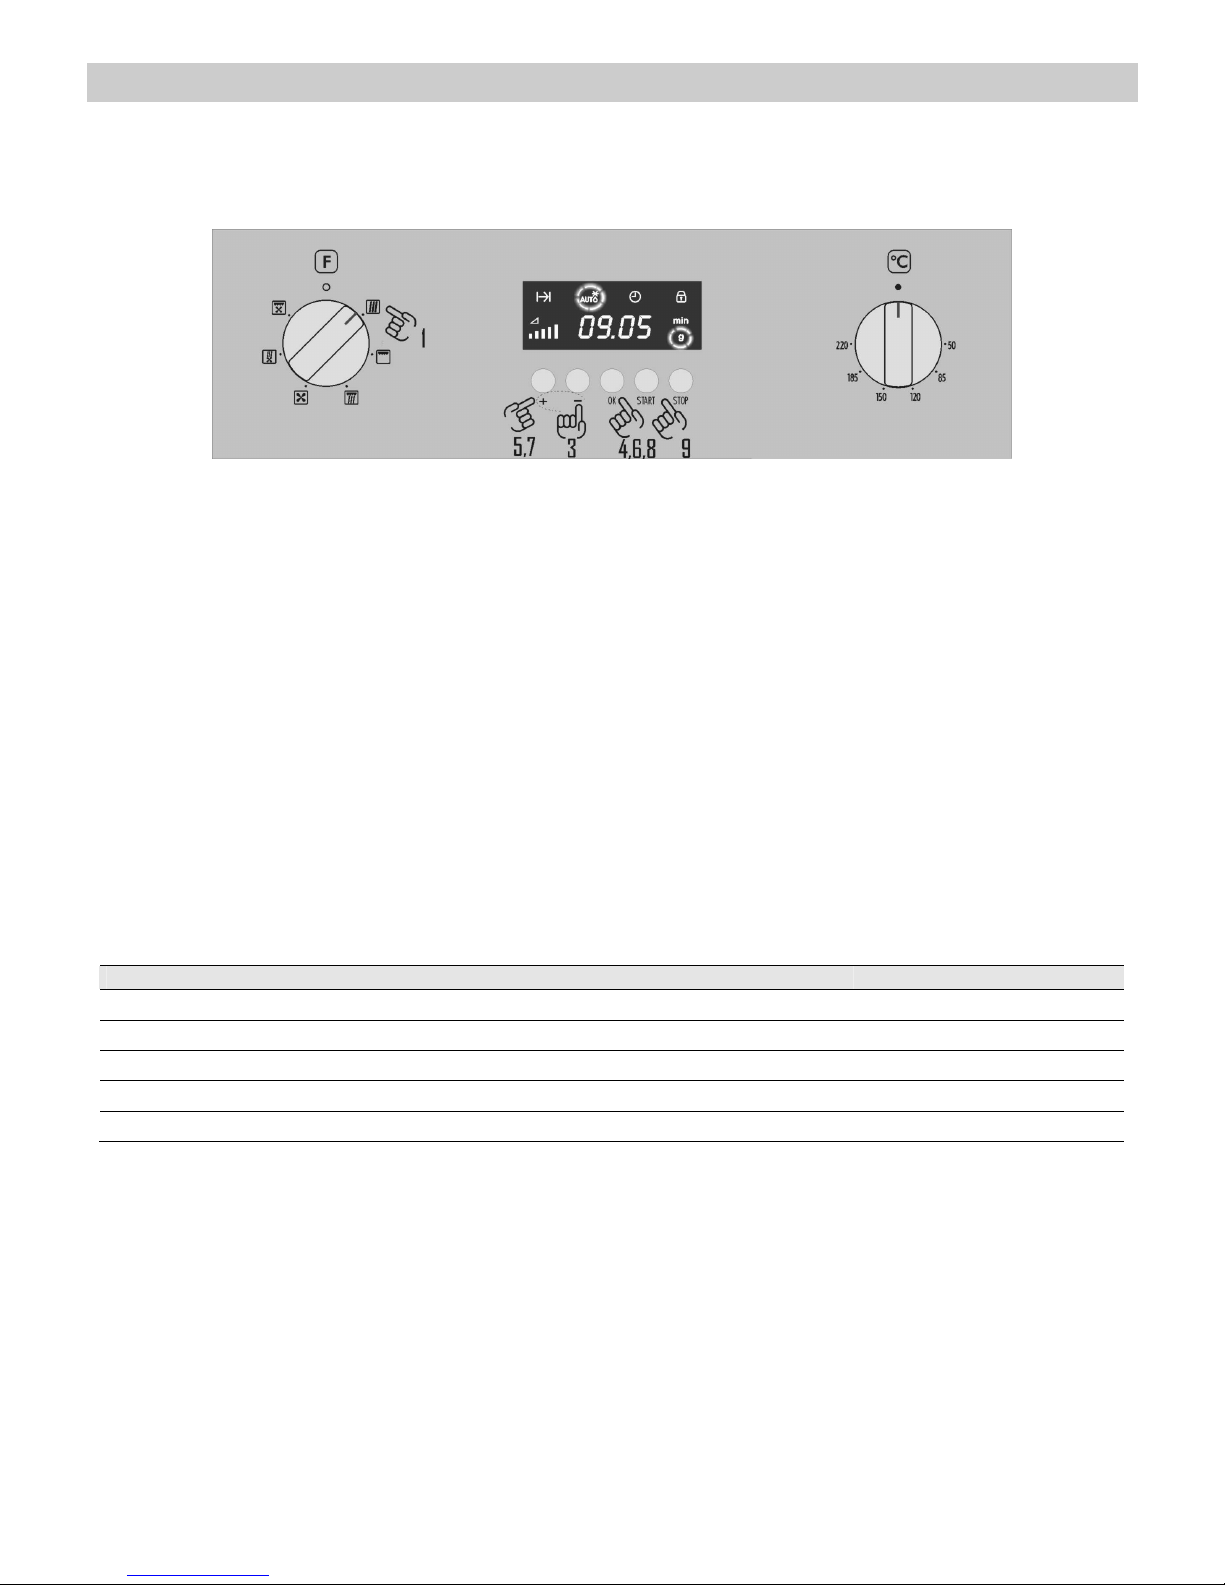
40
DE
Grundfunktionen
Automatisches Auftauen
Diese Funktion dient zum automatischen Auftauen von Fleisch, Geflügel, Fisch, Gemüse und Brot.
1. Drehen Sie den Funktionswähler bis zu dem
Zeichen für Mikrowelle.
2. Die Anzeige für die Betriebsdauer leuchtet in
der Anzeige.
3. Drücken Sie die "-"-Taste, um die Funktion
Automatisches Auftauen auszuwählen. Sie
beginnt zu blinken.
4. Drücken Sie die OK-Taste. In der Anzeige
erscheint die Lebensmittelart "F 01".
5. Durch Drücken der "+"- und der "-"-Taste
blättern Sie durch "F 01" - "F 05" bis zur
gewünschten Lebensmittelart.
6. Drücken Sie die OK-Taste. Das "g"-Zeichen
blinkt.
7. Durch drücken der "+"- und "-"-Tasten geben
Sie das Gewicht der Lebensmittel in
gefrorenem Zustand in Gramm ein.
8. Drücken Sie die OK-Taste.
9 Drücken Sie die Start-Taste. Das Gerät
beginnt.
Die folgende Tabelle zeigt die Programme für das Auftauen nach Gewicht, die Gewichtsintervalle und
die Auftau- sowie die Standzeiten (um sicherzustellen, dass die Lebensmittel eine gleichmäßige
Temperatur aufweisen).
Programm Lebensmittel Gewicht (gr) Zeit (min) Standzeit (min)
F 01 Fleisch 100 – 2000 2 – 43 20 – 30
F 02 Geflügel 100 – 2500 2 – 58 20 – 30
F 03 Fisch 100 – 2000 2 – 40 20 – 30
F 04 Obst 100 – 500 2 – 13 10 – 20
F 05 Brot 100 – 800 2 – 19 10 – 20
Page 42

41
DE
Während des Betriebes...
Unterbrechung eines Kochvorgangs
Sie können den Kochvorgang jederzeit
unterbrechen, indem Sie einmal die Taste Stop
drücken bzw. die Gerätetür öffnen.
In jedem Falle:
• hört die Ausstrahlung von Mikrowellen
auf,
• wird der Grill deaktiviert, hat das Gerät aber
weiterhin eine sehr hohe Temperatur,
Verbrennungsgefahr!
• stoppt die Zeitschaltuhr, und die Anzeige
gibt die restliche Betriebsdauer an.
Falls Sie es wünschen, können Sie:
1. die Lebensmittel wenden oder umrühren, um
einen einheitlichen Kochvorgang zu
erreichen,
2. die Einstellungen verändern,
Schließen Sie die Tür und drücken Sie die Taste
Start, um den Vorgang wieder aufzunehmen.
Änderung der Einstellungen
Die Funktion und die Temperatur können
geändert werden, während das Gerät in Betrieb
ist oder wenn der Kochvorgang durch einfaches
Drehen des Schalters zu der neuen Einstellung
unterbrochen wurde.
Um die Leistung und die Betriebsdauer zu ändern,
gehen Sie bitte wie folgt vor:
- Drücken Sie die "+"- und die "-"-Taste um
die Betriebsdauer direkt zu ändern.
- Drücken Sie die OK-Taste, um die
Leistung ändern zu können. Die Anzeige
der Leistung beginnt zu blinken.
- Drücken Sie die "+"- und die "-"-Taste um
die Leistung zu ändern.
- Drücken Sie die OK-Taste.
Einen Kochvorgang löschen
Falls Sie den Kochvorgang abbrechen möchten,
drehen Sie den Funktionswähler auf Null oder
drücken Sie zweimal die Stop-Taste.
Ende eines Kochvorgangs
Nach Ablauf der eingestellten Zeit ertönt ein
Piepsignal und in der Anzeige erscheint END.
Drehen Sie nach dem Kochvorgang den
Funktions- und den Temperaturwähler auf Null.
Page 43

42
DE
Auftauen
Allgemeine Hinweise zum Auftauen
1. Nutzen Sie zum Auftauen nur mikrowellentaugliches Geschirr (Porzellan, Glas, geeignete
Plastik).
2. Die Funktion Auftauen nach Gewicht und die
Tabellen beziehen sich auf das Auftauen von
rohen Esswaren.
3. Die Auftauzeit hängt von der Menge und der
Höhe des Nahrungsmittels ab. Wenn Sie
Lebensmittel einfrieren, berücksichtigen Sie
den Auftauvorgang. Verteilen Sie die
Lebensmittel gleichmäßig entsprechend der
Größe des Gefäßes.
4. Geben Sie das Gefriergut auf den Drehteller in
das Gerät. Die dicksten Teile des Fisches oder
der Hähnchenschenkel müssen nach außen
zeigen. Sie können die dünneren Teile mit
einer Alufolie schützen. Wichtig: Die Alufolie
darf nicht mit den Wänden des Garraumes in
Berührung kommen, da dies einen Lichtbogen
auslösen kann.
5. Die kompaktesten Stücke müssen mehrfach
gewendet werden.
6. Verteilen Sie die tiefgekühlten Nahrungsmittel
so gleichmäßig wie möglich, denn die
schmalsten und dünnsten Teile tauen schneller
auf als die dickeren und höheren Stellen.
7. Fettreiche Lebensmittel, wie Butter, Weißkäse
und Rahm, dürfen nicht völlig aufgetaut
werden. (es besteht die Gefahr der
Überhitzung) Bei Raumtemperatur sind sie in
wenigen Minuten zum Servieren bereit.
Tiefgekühlte Sahne sollte vor dem Verbrauch
durchgerührt werden.
8. Legen Sie Geflügel auf einen umgedrehten
Teller, damit die Auftauflüssigkeit abfließen
kann.
9. Brot kann in eine Serviette eingewickelt
werden, um das Austrocknen zu verhindern.
10. Wenden sie die Nahrungsmittel.
11. Nehmen Sie tiefgekühlte Nahrungsmittel aus
der Verpackung, und vergessen Sie nicht, falls
vorhanden, die Metallklammern zu entfernen.
Im Falle von Behältnissen, die dazu dienen, die
Lebensmittel im Gefrierschrank aufzubewahren
und gleichermaßen zum Auftauen verwendet
werden können, brauchen Sie lediglich deren
Deckel zu entfernen. Geben Sie in allen
übrigen Fällen die Speisen in
mikrowellentaugliche Gefäße.
12. Die durch das Auftauen hauptsächlich bei
Geflügel anfallende Flüssigkeit, muss
weggegossen werden und darf keinesfalls mit
den übrigen Lebensmitteln in Berührung
kommen.
13. Beachten Sie, dass bei den Auftaufunktionen
eine Ruhezeit notwendig ist, bis das
Nahrungsmittel völlig aufgetaut ist.
Page 44
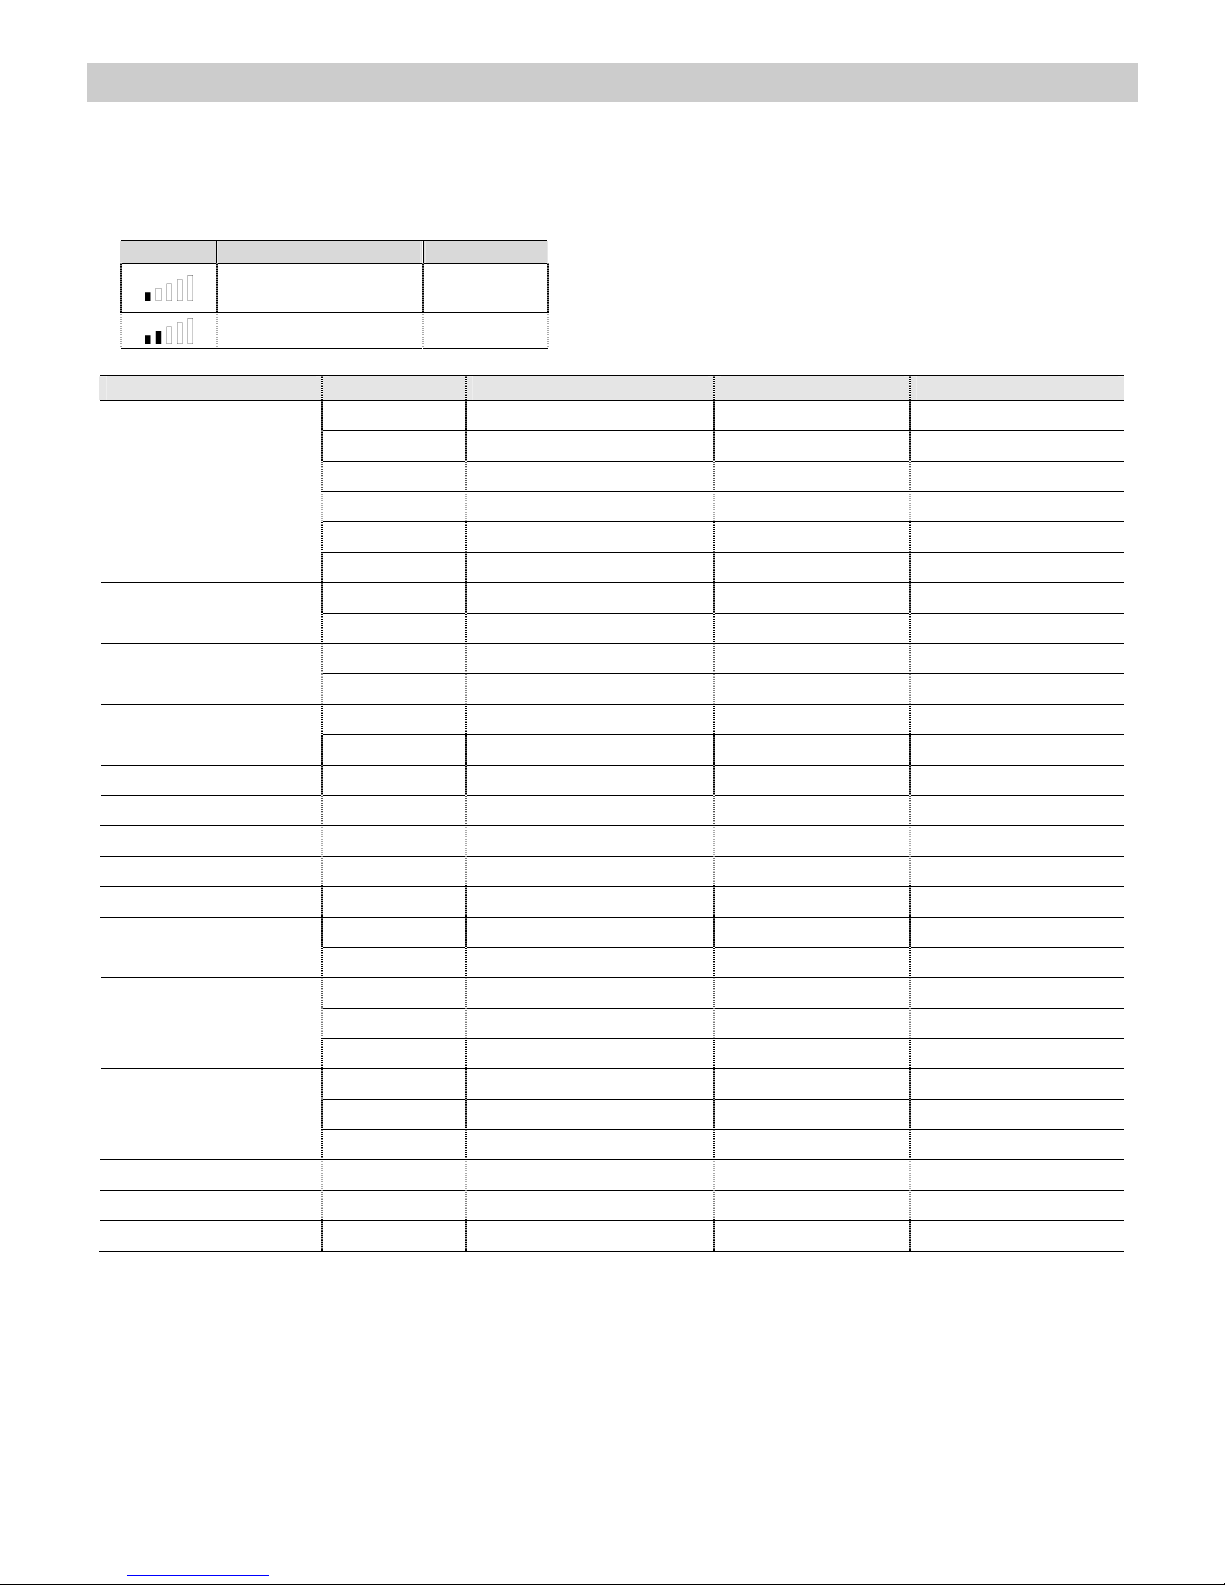
43
DE
Auftauen
Zum Auftauen von Speisen wird empfohlen, die
Funktion Mikrowelle gemeinsam mit einer der
folgenden Leistungsstufen zu wählen:
Position Leistungsstufe Leistung
Auftauen/
warm halten
200 W
Auftauen 400 W
Die folgende Tabelle zeigt zusammenfassend
die verschiedenen Auftau- und Ruhezeiten (um
zu gewährleisten, dass die Speisen eine
gleichmäßige Temperatur erlangen), in
Abhängigkeit von Art und Gewicht der
Nahrungsmittel, sowie die entsprechenden
Empfehlungen.
Lebensmittel Gewicht (g) Auftauzeit (min.) Ruhezeit (min.) Bemerkung
100 2-3 5-10 1 x wenden
200 4-5 5-10 1 x wenden
500 10-12 10-15 2 x wenden
1000 21-23 20-30 2 x wenden
1500 32-34 20-30 2 x wenden
Fleisch am Stück,
Schwein, Rind, Kalb,
Wild
2000 43-45 25-35 3 x wenden
500 8-10 10-15 2 x wenden
Goulasch
1000 17-19 20-30 3 x wenden
100 2-4 10-15 2 x wenden
Hackfleisch
500 10-14 20-30 3 x wenden
200 4-6 10-15 1 x wenden
Bratwurst
500 9-12 15-20 2 x wenden
Geflügel, Geflügelteile 250 5-6 5-10 1 x wenden
Hähnchen 1000 20-24 20-30 2 x wenden
Poularde 2500 38-42 25-35 3 x wenden
Fischfillet 200 4-5 5-10 1 x wenden
Forelle 250 5-6 5-10 1 x wenden
100 2-3 5-10 1 x wenden
Krabben
500 8-11 15-20 2 x wenden
200 4-5 5-10 1 x wenden
300 8-9 5-10 1 x wenden
Obst
500 11-14 10-20 2 x wenden
200 4-5 5-10 1 x wenden
500 10-12 10-15 1 x wenden
Brot
800 15-17 10-20 2 x wenden
Butter 250 8-10 10-15
Quark 250 6-8 10-15
Sahne 250 7-8 10-15
Page 45

44
DE
Mit der Mikrowelle garen
Achtung! Lesen Sie den Abschnitt
“Sicherheitshinweise” aufmerksam durch, bevor
Sie mit der Mikrowelle garen.
Befolgen Sie nachstehende Hinweise beim garen
mit der Mikrowelle:
• Bevor Sie Lebensmittel mit einer Schale oder
einer Haut (z. B. Äpfel, Tomaten, Kartoffeln,
Würstchen) erhitzen oder kochen, stechen
Sie diese an, damit sie nicht platzen. Garen
Sie Lebensmittel möglichst von gleicher Größe
um ein gleichmäßiges Ergebnis zu erzielen.
• Überprüfen Sie, bevor Sie ein Gefäß
benutzen, ob dieses für die Mikrowelle
geeignet ist (siehe Abschnitt über die Art des
Geschirrs).
• Beim Verarbeiten von Nahrungsmitteln mit
geringer Feuchtigkeit (z. B.: Auftauen von
Brot, Zubereiten von Popcorn, usw.) tritt eine
rasche Verdampfung auf. Somit arbeitet das
Gerät im Leerlauf, und die Speise kann
verkohlen. Dieser Umstand kann Schäden am
Gerät und am Geschirr hervorrufen. Stellen
Sie deshalb nur die allernotwendigste Zeit ein
und überwachen Sie den Ablauf.
• Es ist nicht möglich, große Mengen Öl
(Frittieren) im Mikrowellengerät zu erhitzen.
• Nehmen Sie die Fertiggerichte aus deren
Verpackung, denn diese ist nicht immer
hitzebeständig. Befolgen Sie die vom
Hersteller gegebene Anleitung.
• Haben Sie mehrere Gefäße, wie zum Beispiel
Tassen, dann ordnen Sie diese gleichmäßig
auf dem Drehteller an.
• Verschließen Sie die Plastiktüten nicht mit
Metallklemmen sondern mit Plastikklemmen.
Durchlöchern Sie die Tüte mehrfach, damit der
Dampf leicht entweichen kann.
• Vergewissern Sie sich beim Erwärmen oder
Zubereiten von Lebensmitteln, dass diese eine
Mindesttemperatur von 70°C erreichen.
• Während der Zubereitung kann sich
Wasserdampf an der Glasscheibe der Tür
niederschlagen und gegebenenfalls
heruntertropfen. Das ist normal und kann noch
ausgeprägter sein, wenn die
Umgebungstemperatur niedrig ist. Die
Sicherheit des Gerätes wird nicht in Frage
gestellt. Wischen Sie nach Benutzung das
Kondenswasser ab.
• Wenn Sie Flüssigkeiten erhitzen, dann
benutzen Sie Gefäße mit großen Öffnungen,
damit der Dampf leicht entweichen kann.
Bereiten Sie die Nahrungsmittel gemäß Anleitung
zu, und beachten Sie die in den Tabellen
angegebenen Kochzeiten sowie Leistungsstufen.
Berücksichtigen Sie, dass die angeführten Werte
lediglich der Orientierung dienen und, in
Abhängigkeit vom Ausgangszustand, von der
Temperatur, Feuchtigkeit und Art des
Nahrungsmittels, abweichen können. Es ist ratsam,
die Zeiten und Leistungsstufen den entsprechenden
Gegebenheiten anzupassen. Je nach Art der Speise
ist es notwendig, die Zubereitungszeiten zu
verlängern oder zu verkürzen bzw. die
Leistungsstufe zu erhöhen oder zu verringern.
Die Zubereitung in der Mikrowelle...
1. Je größer die Menge der Nahrungsmittel ist,
desto länger ist die Zubereitungszeit.
Beachten Sie:
• Doppelte Menge = doppelte Zeit
• Halbe Menge = halbe Zeit
2. Je geringer die Temperatur ist, desto länger ist
die Zubereitungszeit.
3. Die flüssigen Nahrungsmittel erwärmen sich
schneller.
4. Eine gute Verteilung der Lebensmittel auf dem
Drehteller erleichtert die gleichmäßige
Zubereitung. Wenn Sie die kompakteren
Nahrungsmittel an den Rand des Tellers und
die weniger kompakten in die Mitte des Tellers
legen, dann können Sie verschiedene Arten
von Lebensmitteln gleichzeitig erhitzen.
5. Die Tür des Gerätes kann zu jeder Zeit
geöffnet werden. Das Gerät schaltet sich
automatisch ab. Es setzt sich erst wieder in
Betrieb, wenn Sie die Tür schließen und
erneut die Starttaste drücken.
6. Die meisten Lebensmittel müssen abgedeckt
werden. Sie behalten dadurch ihre
Feuchtigkeit und ihren Eigengeschmack. Der
Deckel muss für Mikrowellen durchlässig sein
und über kleine Öffnungen verfügen., die das
Entweichen des Dampfes gestatten.
Page 46
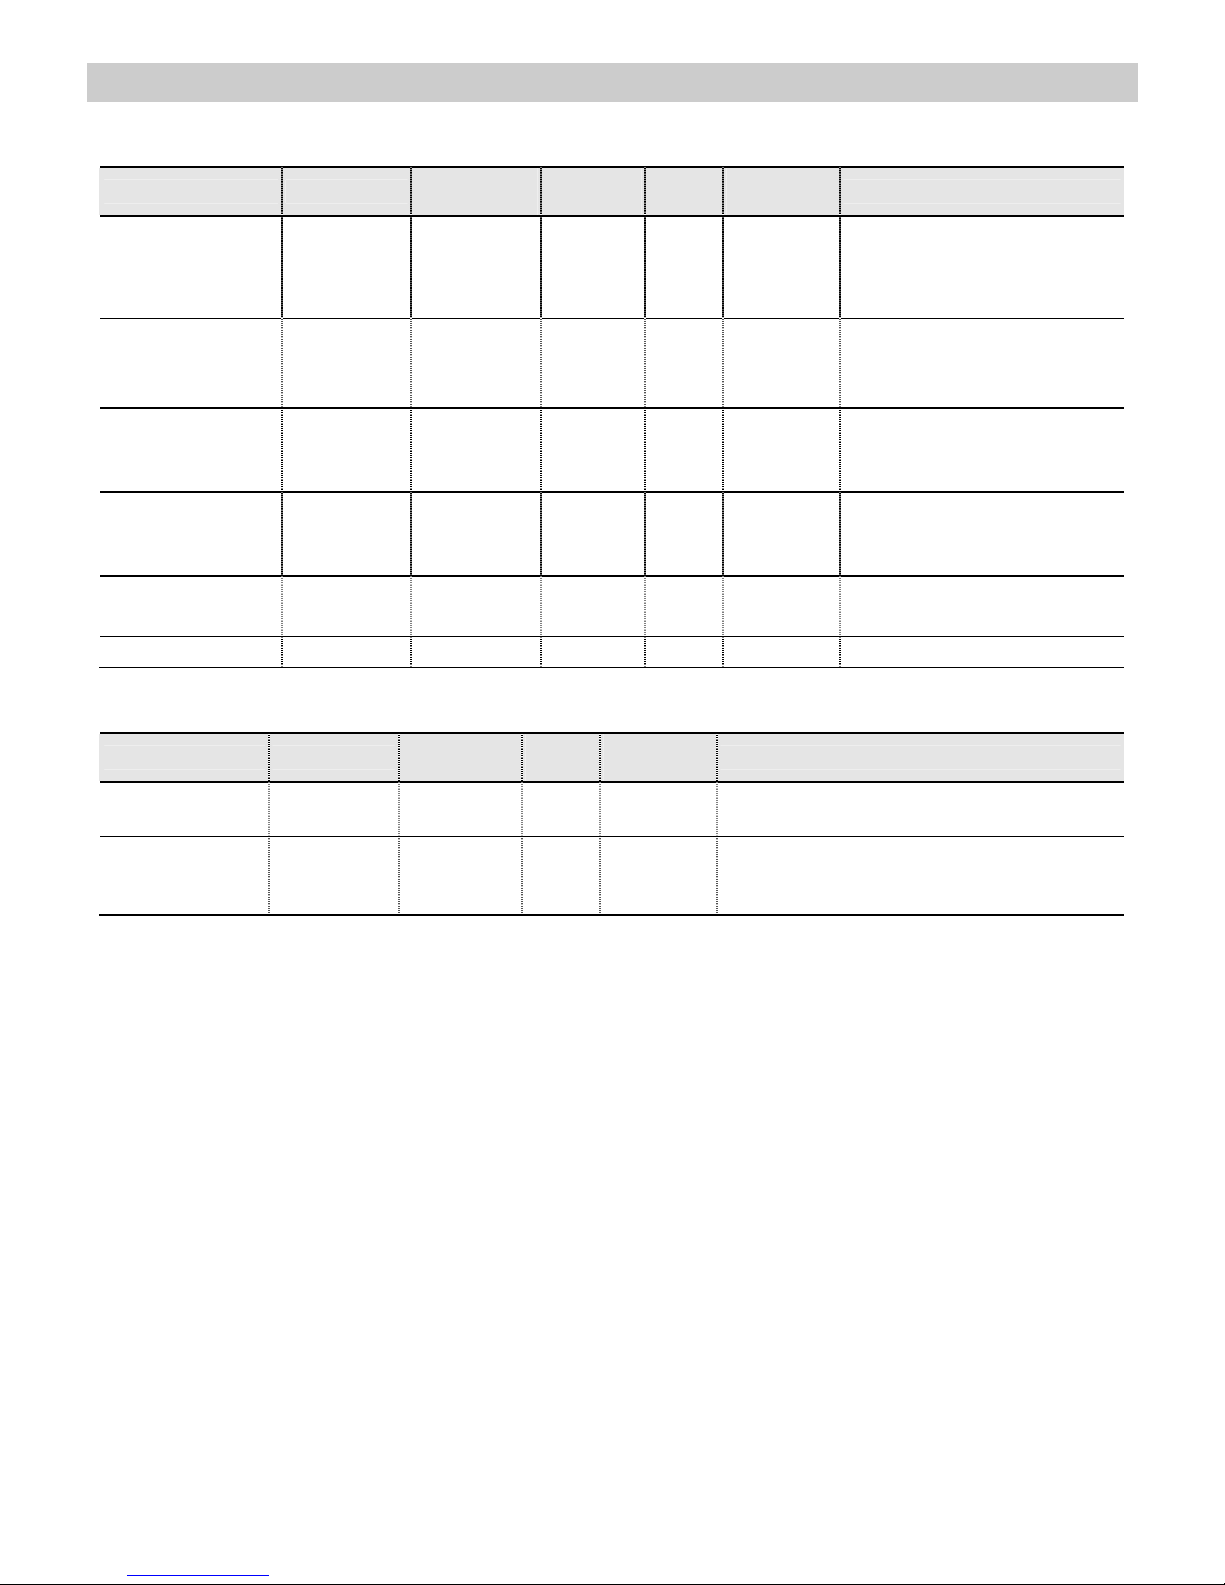
45
DE
Mit der Mikrowelle garen
Tabellen und Anregungen – Gemüse zubereiten
Lebensmittel Menge (g)
Zugabe von
Flüssigkeit
Leistung
(Watt)
Zeit
(min.)
Ruhezeit
(min.)
Hinweise
Blumenkohl
Brokkoli
Pilze
500
300
250
100 ml
50 ml
25 ml
800
800
800
9-11
6-8
6-8
2-3
2-3
2-3
In Röschen teilen. In
Scheiben schneiden.
Abdecken
Erbsen & Möhren,
Tiefgekühlte
Möhren
300
250
100 ml
25 ml
800
800
7-9
8-10
2-3
2-3
In Würfel oder Scheiben
schneiden. Abdecken
Kartoffeln 250 25 ml 800
5-7 2-3 Schälen, in gleiche Stücke
schneiden. Abdecken
Paprika
Porree
250
250
25 ml
50 ml
800
800
5-7
5-7
2-3
2-3
In Stücke oder Scheiben
schneiden. Abdecken
Rosenkohl,
tiefgekühlt
300 50 ml 800
6-8 2-3 Abdecken
Sauerkraut 250 25 ml 800 8-10 2-3 Abdecken
Tabellen und Anregungen – Fisch zubereiten
Lebensmittel Menge (g)
Leistung
(Watt)
Zeit
(min.)
Ruhezeit
(min.)
Hinweise
Fischfilet 500 600 10-12 3
Zugedeckt zubereiten. Nach der Hälfte der
Zeit umdrehen.
Ganzer Fisch 800
800
400
2-3
7-9
2-3
Zugedeckt zubereiten. Nach der Hälfte der
Zeit umdrehen. Gegebenenfalls die
dünneren Enden des Fisches bedecken.
Page 47

46
DE
Zubereitung mit dem Grill
Benutzen Sie den mit dem Gerät mitgelieferten
Rost, um gute Ergebnisse mit dem Grill zu
erreichen.
Setzen Sie den Grillrost so ein, dass er die
Metalloberflächen des Nutzraumes nicht
berührt, da die Gefahr der Entstehung eines
Lichtbogens gegeben ist, der das Gerät
beschädigen kann.
WICHTIGE HINWEISE:
1. Beim ersten Einsatz des Grills ist das Auftreten
von etwas Rauch und Geruch festzustellen,
das auf den Gebrauch von Ölen während der
Herstellung zurückzuführen ist.
2. Die Glasscheibe der Tür erreicht während des
Betriebs sehr hohe Temperaturen. Halten Sie
Kinder fern!
3. Während der Nutzung des Grills erreichen die
Wände des Innenraumes sehr hohe
Temperaturen. Es wird der Gebrauch von
Küchenhandschuhen empfohlen.
4. Wird der Grill über einen längeren Zeitraum
betrieben, ist es normal, dass die Heizelemente
durch das Sicherheitsthermostat zeitweise
ausgeschaltet werden.
5. Wichtig! Wenn die Nahrungsmittel in Gefäßen
gegrillt oder gegart werden, ist es notwendig,
zu überprüfen, ob die Gefäße dazu geeignet
sind oder nicht. Siehe Abschnitt über die Art
des Geschirrs!
6. Beim Einsatz des Grills ist es möglich, dass
Fettspritzer an das Heizelement gelangen und
verbrannt werden. Das ist normal und stellt
keinerlei Art von Funktionsstörung dar.
7. Reinigen Sie den Innenraum und das Zubehör
nach jeder Zubereitung, damit der Schmutz
nicht verkrustet.
Page 48
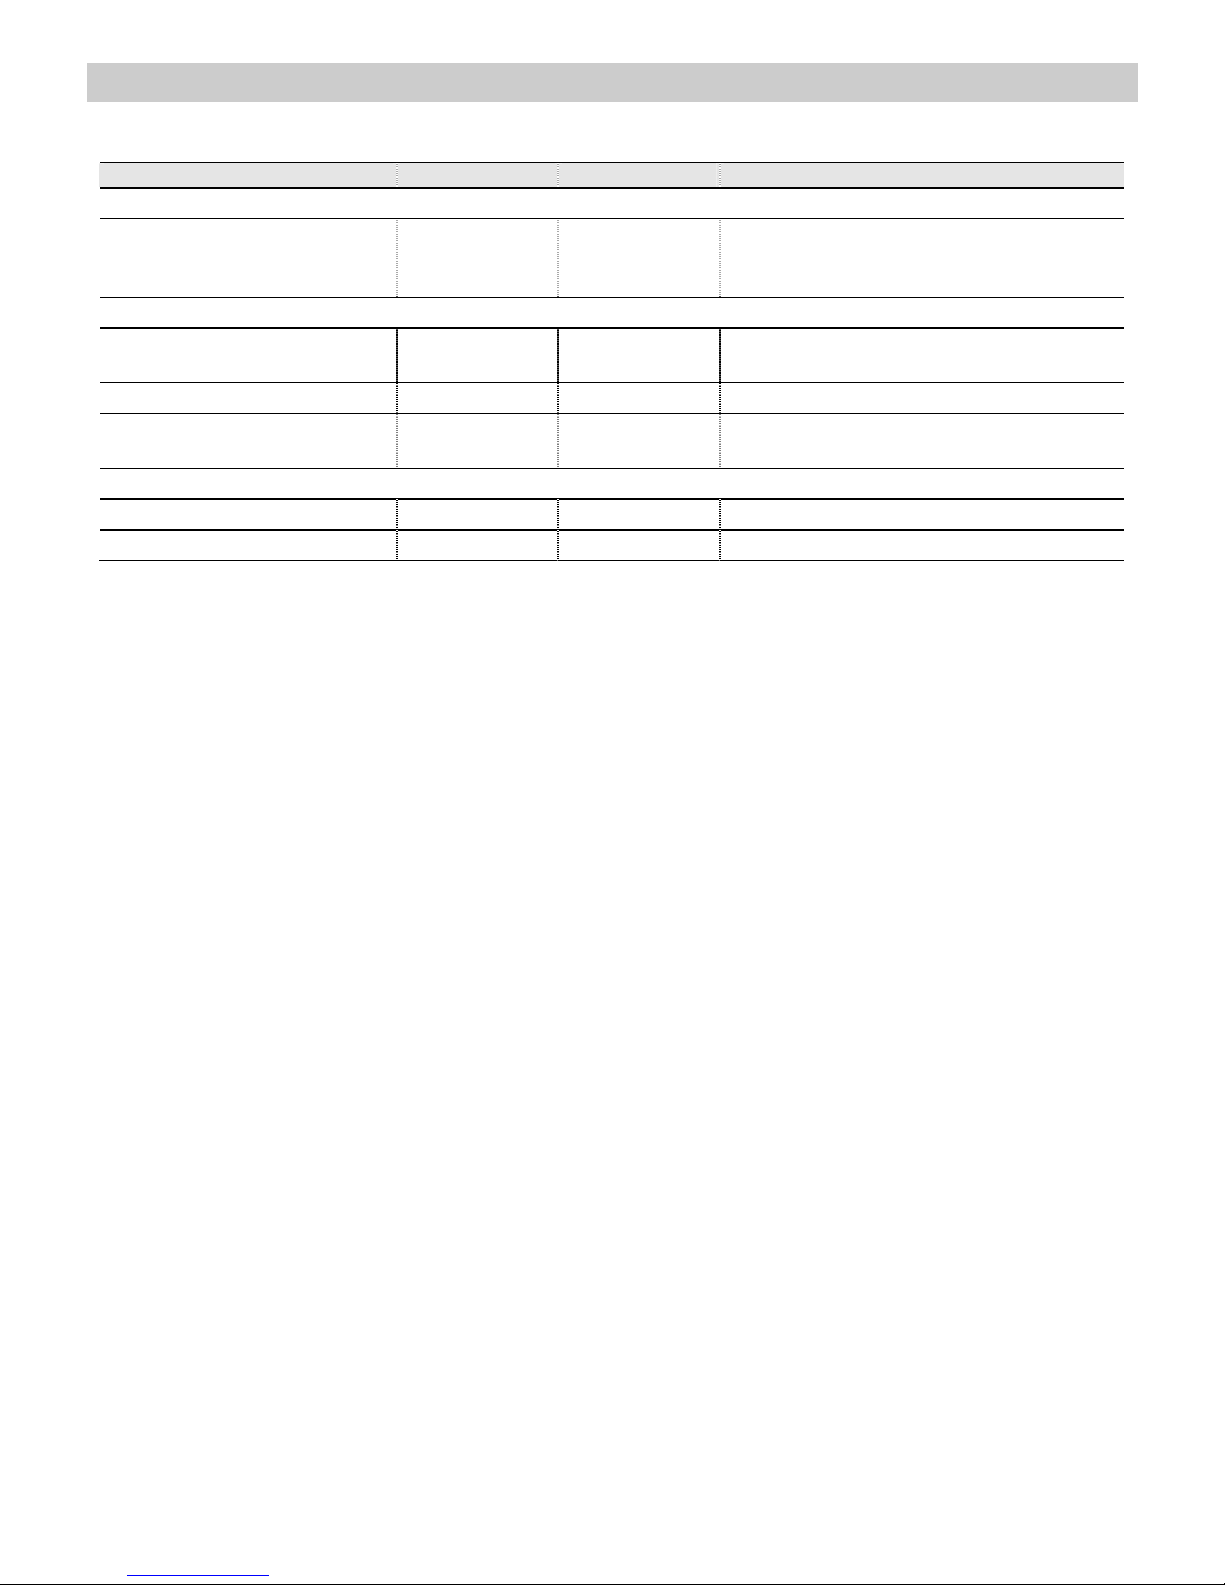
47
DE
Zubereitung mit dem Grill
Tabellen und Anregungen – Grill ohne Mikrowelle
Lebensmittel Menge (g) Zeit (min.) Hinweise
Fisch
Goldbrasse
Sardinen/Seehahn
800
6-8 Stk.
18-24
15-20
Mit etwas Butter einstreichen. Nach der
Hälfte der Zeit, wenden und mit Gewürzen
bestreuen.
Fleisch
Würstchen 6-8 Stk. 22-26
Nach der Hälfte der Zeit einstechen und
wenden.
Hamburger, tiefgekühlt 3 Stk. 18-20 Nach der Hälfte der Zeit wenden
Mittelrippenstück (etwa 3 cm
stark)
400 25-30
Mit Öl bepinseln. Nach der Hälfte der Zeit
wenden.
Sonstiges
Toastbrote 4 Stk. 1½-3 Das Toasten beaufsichtigen. wenden
Sandwichs überbacken 2 Stk. 5-10 Das Überbacken beaufsichtigen.
Heizen Sie den Grill 2 Minuten vor. Falls kein
gegenteiliger Hinweis vorliegt, benutzen Sie den
Grillrost. Stellen Sie den Grillrost in eine
Auffangschüssel damit das heruntertropfende
Wasser und Fett aufgefangen werden darf.
Die angegebenen Zeiten sind lediglich
Orientierungswerte und können je nach
Zusammensetzung, Menge und angestrebtem
Zustand der Speise abweichen. Fisch und Fleisch
erlangen einen optimalen Geschmack, wenn Sie
diese vor dem Grillen mit Pflanzenöl einpinseln,
Gewürze und Kräuter hinzugeben und schließlich
einige Stunden lang marinieren lassen. Salzen
Sie erst nach dem Grillen.
Würstchen platzen nicht, wenn sie vorher mit
einer Gabel angestochen werden.
Beobachten Sie den Kochvorgang nach Ablauf
der Hälfte der Zeit, und wenden Sie die Speise.
Der Grill ist besonders dazu geeignet, dünne
Stücke Fleisch und Fisch zuzubereiten. Dünne
Fleischstücke brauchen nur einmal gewendet zu
werden, die dicken mehrere Male.
Page 49

48
DE
Zubereitung mit dem Grill
Tabellen und Anregungen – Mikrowelle + Grill
Die Funktion Mikrowelle mit Grill ist ideal, um
Speisen schnell zuzubereiten und gleichzeitig zu
bräunen. Außerdem können Nahrungsmittel
überbacken werden.
Mikrowelle und Grill arbeiten gleichzeitig. Die
Mikrowelle gart und der Grill bräunt.
Gericht Menge (g) Geschirr
Leistung
(Watt)
Zeit (min.)
Ruhezeit
(min.)
Nudelauflauf 500 flach 400 12-17 3-5
Kartoffelauflauf 800 flach 600 20-22 3-5
Lasagne etwa 800 flach 600 15-20 3-5
Quarkauflauf etwa 500 flach 400 18-20 3-5
2 Hähnchenkeulen,
frisch (auf dem Rost)
jeweils 200 flach 400 10-15
3-5
Hähnchen etwa 1000
flaches und breites
Gefäß
400 35-40 3-5
Zwiebelsuppe
überbacken
2 Tassen
zu 200
Suppenschalen 400 2-4 3-5
Überprüfen Sie, bevor Sie Geschirr und Gefäße in
der Mikrowelle benutzen, ob diese geeignet sind.
Verwenden Sie ausschließlich mikrowellentaugliches Geschirr.
Das Geschirr, das für die kombinierte Funktion
eingesetzt werden soll, muss sowohl für die
Mikrowelle als auch für den Grill geeignet sein.
Siehe Abschnitt über die Art des Geschirrs!
Beachten Sie, dass die angegebenen Zeiten
lediglich Orientierungswerte sind und je nach
Ausgangszustand, Temperatur, Feuchtigkeit und
Art des Nahrungsmittels abweichen können.
Falls die Zeit nicht ausreichend war, um das
Nahrungsmittel entsprechend zu bräunen, dann
behandeln Sie es weitere 5 oder 10 min. mit der
Grillfunktion.
Beachten Sie bitte die Ruhezeiten, und wenden
Sie die Fleisch- und Geflügelstücke
Benutzen Sie den Drehteller zur Zubereitung, falls
keine gegenteiligen Hinweise gegeben werden.
Die in den Tabellen angegebenen Werte gelten
unter Berücksichtigung dessen, dass der Garraum
kalt ist (es ist nicht nötig, ihn vorzuheizen).
Page 50

49
DE
Zubereitung mit der Mikrowelle + Heißluft
Tabellen und Ratschläge – Zubereitung von Fleisch
Speise
Gewicht
(g)
Leistung
(W)
Temperatur
ºC
Zeit
(Min.)
Ruhezeit
(Min.)
Hinweise
Roastbeef 1000 200 160/170 80/90 10 Nicht abdecken
Schweinerücken
500/600 200 180/190 35/40 10 Nicht abdecken
Hähnchen, ganz 100/1200 400 230/250 30/40 10
Abdecken.
Brustseite nach
oben. Nicht
wenden.
Hähnchenteile /
halbe Hähnchen
800 400 230/250 25/35 10
Nicht abdecken.
Legen Sie die Teile
so, dass die Haut
nach oben zeigt.
Nicht wenden.
Ente 1500/1700 200 220/240 70/80 10
Abdecken. Nicht
wenden.
Tipps zum Braten
Wenden Sie die Fleischstücke nach der Hälfte der
Garzeit. Wenn der Braten fertig ist, sollte er noch
10 Minuten im ausgeschalteten, geschlossenen
Herd verbleiben. Auf diese Art und Weise wird der
Fleischsaft besser verteilt.
Bei magerem Fleisch fügen Sie 2 bis 3 Esslöffel
Fleischbrühe oder ähnliche Flüssigkeit hinzu, bei
Schmorfleisch 8 bis 10 Esslöffel, je nach
Fleischmenge.
Die Temperatur und die Zubereitungszeit hängen
von der Art der Speise und der entsprechenden
Menge ab.
Falls das Bratengewicht in der Tabelle nicht
verzeichnet ist, wählen Sie die Angabe, welche
dem unmittelbar darunter liegenden Gewicht
entspricht, und verlängern Sie die Zeit.
Tipps zum Geschirr
Überprüfen Sie, ob das Geschirr überhaupt in das
Gerät passt.
Heißes Glasgeschirr sollte auf einem trockenen
Küchentuch abgestellt werden. Wenn es auf einer
kalten oder nassen Unterlage abgesetzt wird,
kann das Glas springen und zu Bruch gehen.
Benutzen Sie immer einen Topflappen, um das
Geschirr aus dem Ofen zu nehmen.
Page 51

50
DE
Zubereitung mit der Heißluft
Tabellen und Ratschläge – Backen
Gebäck Behältnis Einschub Temperatur Zeit (Min.)
Nusskuchen Napfkuchenform 1 170/180 30/35
Obsttorte/Rührteig Springform Ø 28 cm 2 150/160 35/45
Napfkuchen Napfkuchenform 1 170/190 30/45
Pikante Kuchen z.B.
Kartoffel-Pizza
Runde Glasform 2 160/180 50/70
Biskuittorte Springform Ø 26 cm 1 160/170 40/45
Biskuitrolle Glaskuchenblech 2 110 35/45
Kirschkuchen Glaskuchenblech 2 170/180 35/45
Tipps zu den Kuchenbackformen
Am üblichsten sind dunkle Backformen aus
Metall. Falls Sie zusätzlich die Mikrowelle
benutzen, dann verwenden Sie Kuchenformen
aus Glas, Keramik oder Plastik. Diese müssen bis
250 °C hitzebeständig sein. Wenn Sie diese Art
von Formen einsetzen, wird der Kuchen weniger
gebräunt.
Tipps zum Kuchenbacken
Temperatur und Backzeit des Kuchens hängen
von der Qualität und der Menge der Zutaten ab.
Versuchen Sie es zuerst einmal mit einem
niedrigen Wert und wählen Sie das nächste Mal,
bei Bedarf, eine höhere Temperatur. Eine
niedrigere Temperatur ergibt eine gleichmäßigere
Bräunung. Stellen Sie die Backform immer in die
Mitte des Rostes oder auf den Drehteller.
Tipps zum Backen
Wie festgestellt wird, ob Kuchen
durchgebacken ist:
Stechen Sie mit einem Holzstäbchen
(Zahnstocher) in die höchste Stelle des Kuchens.
Wenn der Teig nicht am Holzstäbchen haften
bleibt, ist der Kuchen fertiggebacken.
Der Kuchen wird sehr dunkel:
Wählen Sie beim nächsten Mal eine niedrigere
Temperatur und lassen Sie den Kuchen länger
backen.
Der Kuchen ist zu trocken:
Stechen Sie mit einem Holzstäbchen kleine
Löcher in den fertigen Kuchen. Träufeln Sie
danach Obstsaft oder Alkoholisches darauf.
Erhöhen Sie beim nächsten Mal die Temperatur
um etwa 10 °C und verringern Sie die Backzeit.
Der Kuchen löst sich nicht beim Stürzen:
Lassen Sie den Kuchen nach dem Backen 5 bis
10 Minuten auskühlen; so löst er sich leichter aus
der Form. Sollte er sich immer noch nicht lösen,
dann fahren Sie mit einem Messer am Rand
entlang. Fetten Sie beim nächsten Mal die Form
gut ein.
Tipps zur Energiersparnis
Wenn Sie mehr als einen Kuchen backen, dann
ist es ratsam, diese kurz nacheinander in den
Herd zu schieben. Der Herd ist so noch warm,
und dadurch verkürzt sich die Backzeit des
darauffolgenden Kuchens.
Verwenden Sie vorzugsweise helle oder
emaillierte Backformen.
Bei längeren Back- bzw. Garzeiten können sie
das Gerät 10 Minuten vor deren Ende
ausschalten und die Restwärme zum
Fertigbacken oder –garen nutzen.
Page 52

51
DE
Welche Art von Geschirr kann benutzt werden?
Funktion Mikrowelle
Beachten Sie bei der Funktion Mikrowelle, dass
die Mikrowellen von den metallischen Flächen
reflektiert werden. Glas, Porzellan, Steingut,
Plastik und Papier lassen die Mikrowellen durch.
Deshalb dürfen Metalltöpfe und –geschirr bzw.
Gefäße mit Metallteilen oder –dekor nicht in
der Mikrowelle benutzt werden. Glas und
Steingut mit Metalldekor und –teilen (z. B.,
Bleikristall) sind nicht zu verwenden.
Das Ideale für die Zubereitung im
Mikrowellengerät ist feuerfestes Glas, Porzellan
oder Steingut sowie hitzebeständige Plastik. Sehr
feines und zerbrechliches Glas und Porzellan
sollte nur kurzzeitig verwendet werden, z.B. um
etwas zu erwärmen.
Die heißen Speisen übertragen die Wärme auf
das Geschirr, das sehr heiß werden kann.
Benutzen Sie deshalb immer einen Topflappen!
Geschirrtest
Stellen Sie bei maximaler Mikrowellenleistung das
Geschirr 20 Sekunden lang in das Gerät. Falls es
kalt bleibt oder nur wenig erhitzt wird, ist es
geeignet. Wenn es sich jedoch sehr erwärmt oder
einen Lichtbogen hervorruft, ist es ungeeignet.
Funktionen Grill und Umluft
Im Falle der Grillfunktion muss das Geschirr eine
Temperatur von zumindest 300°C aushalten.
Plastikgeschirr ist ungeeignet.
Kombinierte Funktionen
Bei der Funktion Mikrowelle + Grill muss das
benutzte Geschirr sowohl für die Mikrowelle als
auch für den Grill geeignet sein.
Aluminiumgefäße und –folien
Die in Aluminiumgefäßen oder -folie befindlichen
Fertiggerichte können unter Beachtung folgender
Aspekte in die Mikrowelle eingebracht werden:
• Beachten Sie die Empfehlungen des
Herstellers auf der Verpackung.
• Aluminiumgefäße dürfen nicht höher als 3
cm sein und nicht mit den Wänden des
Garraumes in Berührung kommen
(Mindestabstand 3 cm). Aluminiumdeckel
sind abzunehmen.
• Stellen Sie das Aluminiumgefäß direkt auf
den Drehteller. Falls Sie den Grillrost
verwenden, stellen Sie das Gefäß auf einen
Porzellanteller. Stellen Sie das Gefäß nie
direkt auf den Rost!
• Die Garzeit ist länger, denn die Mikrowellen
dringen nur von oben in die Speise ein.
Nutzen Sie im Zweifelsfalle nur
mikrowellentaugliches Geschirr.
• Aluminiumfolie kann während des Auftauvorgangs benutzt werden, um die
Mikrowellen zu reflektieren. Empfindliche
Nahrungsmittel, wie Geflügel bzw.
Hackfleisch, können gegen übermäßige
Hitze geschützt werden, indem die
entsprechenden Stellen damit abgedeckt
werden.
• Wichtig! Die Aluminiumfolie darf nicht mit
den Wänden des Nutzraumes in Berührung
kommen, da diese einen Lichtbogen
hervorrufen kann.
Deckel
Es wird die Benutzung von Deckeln aus Glas,
Plastik oder Klarsichtfolie empfohlen, denn auf
diese Art und Weise:
1. wird eine zu starke Verdampfung vermieden
(hauptsächlich bei sehr langen Garzeiten),
2. geht der Zubereitungsvorgang schneller
vonstatten,
3. werden die Speisen nicht ausgetrocknet,
4. wird das Aroma bewahrt.
Die Deckel dürfen nicht luftdicht abschließen,
damit keinerlei Druck entsteht. Plastiktüten
müssen gleichermaßen Öffnungen haben. Sowohl
Saugflaschen als auch Gläschen mit
Babynahrung und ähnliche Gefäße dürfen nur
ohne Deckel erwärmt werden, da sie platzen
können.
Page 53

52
DE
Welche Art von Geschirr darf verwendet werden?
Tabelle – Geschirr
Folgende Tabelle gibt Ihnen eine allgemeine Übersicht, welcher Geschirrtyp für den jeweiligen Fall
geeignet ist.
Mikrowelle
Betriebsart
Geschirrtyp
Auftauen /
erwärmen
Zubereiten
Grill
Mikrowelle +
Grill
Glas und Porzellan 1)
Für den Haushalt bestimmt, nicht
feuerfest, kann im Geschirrspüler
gereinigt werden.
ja ja nein nein
Glasierte Keramik
Feuerfestes Glas und Porzellan
ja ja ja ja
Keramik, Steingutgeschirr 2)
Ohne Glasur bzw. Glasur ohne
Metalldekors
ja ja nein nein
Tongeschirr
2)
Glasiert
Unglasiert
ja
nein
ja
nein
nein
nein
nein
nein
Plastikgeschirr 2)
Hitzebeständig bis 100°C
Hitzebeständig bis 250°C
ja
ja
nein
ja
nein
nein
nein
nein
Plastikfolien 3)
Plastikfolie für Lebensmittel
Cellophan
nein
ja
nein
ja
nein
nein
nein
nein
Papier, Pappe, Pergament 4)
ja nein nein nein
Metall
Aluminiumfolie
Aluminiumverpackungen 5)
Zubehör (Rost)
ja
nein
nein
nein
ja
nein
ja
ja
ja
nein
ja
ja
1. Ohne Gold- oder Silberrand und ohne
Bleikristall.
2. Hinweise des Herstellers beachten!
3. Benutzen Sie keine Metallklammern, um die
Tüten zu verschließen. Durchlöchern Sie die
Tüten. Nutzen Sie die Folien nur zum
Abdecken.
4. Verwenden Sie keine Pappteller.
5. Ausschließlich flache
Aluminiumverpackungen ohne Deckel. Das
Aluminium darf mit den Wänden des
Garraumes nicht in Berührung kommen.
Page 54

53
DE
Reinigung und Wartung des Gerätes
Die Reinigung stellt die einzige, normalerweise
erforderliche Wartung dar.
Achtung! Das Mikrowellengerät ist regelmäßig zu
reinigen, wobei sämtliche Essensreste entfernt
werden müssen. Wenn das Mikrowellengerät
nicht ordnungsgemäß sauber gehalten wird, kann
seine Oberfläche in Mitleidenschaft gezogen
werden, was wiederum die Lebensdauer des
Gerätes verringern und gegebenenfalls zu
einer gefährlichen Situation führen kann.
Achtung! Die Reinigung muss an dem von der
Stromversorgung getrennten Gerät
durchgeführt werden. Ziehen Sie den Stecker
aus der Steckdose oder schalten Sie den
Stromversorgungskreis des Gerätes ab.
Benutzen Sie keine aggressiven Reinigungsoder Scheuermittel, keine kratzenden
Scheuertücher noch spitze Gegenstände,
denn es können Flecken entstehen.
Verwenden Sie keine Hochdruck- oder
Dampfstrahlreinigungsgeräte.
Stirnseite
Es reicht, das Gerät mit einem feuchten Lappen
zu reinigen. Geben Sie, falls es sehr verschmutzt
sein sollte, einige Tropfen Geschirrspülmittel ins
Waschwasser. Wischen Sie danach das Gerät mit
einem trockenen Lappen ab.
Benutzen Sie bei Geräten mit einer
Aluminiumvorderseite ein mildes
Glasreinigungsmittel und einen weichen,
fusselfreien Lappen. Wischen Sie diese in
horizontaler Richtung ab, ohne Druck auf die
Oberfläche auszuüben.
Entfernen Sie Kalk-, Fett-, Stärke- und
Eisweißflecken umgehend. Unter diesen Flecken
kann es zur Korrosion kommen.
Vermeiden Sie das Eindringen von Wasser ins
Geräteinnere.
Geräteinnenraum
Reinigen Sie nach jeder Nutzung die Innenwände
mit einem feuchten Lappen, so ist es leichter,
Spritzer und anhaftende Speisereste zu
beseitigen.
Nutzen Sie ein nicht aggressives Reinigungsmittel, um hartnäckigere Verunreinigungen zu
entfernen. Verwenden Sie weder
Backofensprays noch sonstige aggressive
bzw. scheuernde Reinigungsmittel.
Halten Sie die Tür und die Vorderseite des
Gerätes stets sehr sauber, um dessen
einwandfreie Funktionsweise zu
gewährleisten.
Verhindern Sie das Eindringen von Wasser in die
Belüftungslöcher und –schlitze der Mikrowelle.
Nehmen Sie regelmäßig den Drehteller und den
entsprechenden Träger (Kupplungsstück +
Rollring) ab und reinigen Sie den Boden des
Innenraumes, besonders wenn Flüssigkeiten
verschüttet worden sind.
Schalten Sie das Gerät ohne Drehteller und
dazugehörigen Träger nicht ein.
Falls der Garraum des Gerätes sehr verschmutzt
ist, dann stellen Sie ein Glas Wasser auf den
Drehteller und schalten Sie die Mikrowelle mit
maximaler Leistung 2 oder 3 Minuten lang ein.
Der freigesetzte Dampf weicht die Verschmutzung
auf, welche mit einem weichen Tuch leicht
abgewischt werden kann.
Unangenehme Gerüche (z. B., nach der
Zubereitung von Fisch) können mit Leichtigkeit
beseitigt werden. Geben Sie einige Tropfen
Zitronensaft oder Essig in eine Tasse Wasser.
Geben Sie einen Teelöffel in die Tasse, um einen
Siedeverzug zu vermeiden. Erhitzen Sie das
Wasser 2 bis 3 Minuten lang bei Maximallleistung
der Mikrowelle.
Page 55

54
DE
Reinigung und Wartung des Gerätes
Decke des Gerätes
Wenn die Decke des Gerätes verunreinigt ist,
dann kann der Grill heruntergeklappt werden, um
die Reinigung zu erleichtern.
Warten Sie, bis der Grill erkaltet ist, bevor Sie
ihn herunterklappen, um eine
Verbrennungsgefahr auszuschließen.
Gehen Sie folgendermaßen vor:
1. Drehen Sie den Halter de Grills um 180º (1).
2. Klappen Sie den Grill vorsichtig herunter (2).
Wenden Sie keine übermäßige Kraft an,
da diese Schäden verursachen kann.
3. Bringen Sie nach Reinigung der Decke den
Grill (2) wieder in seine Lage, indem Sie
umgekehrt vorgehen.
WICHTIGER HINWEIS: Die Halterung des Grills
(1) kann herunterfallen, wenn sie gedreht wird.
Sollte dies passieren, schieben Sie die Halterung
des Grills (1) in das vorhandene Loch in der
Decke des Backofeninnenraumes und drehen Sie
sie um 90º bis zu der Position, die ein Halten des
Grills (2) ermöglicht.
Die Glimmerabdeckung (3), die sich an der
Decke befindet, muss ständig sauber gehalten
werden. Speisereste, die sich an der
Glimmerabdeckung angesammelt haben, können
Schäden bzw. Funken verursachen.
Verwenden Sie weder scheuernde Reinigungsmittel noch spitze Gegenstände.
Nehmen Sie die Glimmerabdeckung nicht ab,
um jegliches Risiko zu vermeiden.
Die Glasabdeckung der Lampe (4) befindet sich
an der Decke des Gerätes und kann zur
Reinigung leicht abgenommen werden.
Schrauben Sie diese dazu ab und reinigen Sie
diese mit Wasser und Geschirrspülmittel.
Zubehör
Reinigen Sie das Zubehör nach jeder Benutzung.
Falls es sehr verschmutzt ist, weichen Sie es
zuerst ein, und benutzen Sie dann eine Bürste
und einen Schwamm. Das Zubehör kann in einer
Geschirrspülmaschine gereinigt werden.
Vergewissern Sie sich, dass der Drehteller und
sein entsprechender Träger immer sauber sind.
Schalten Sie das Gerät ohne Drehteller und
entsprechenden Träger nicht ein.
Page 56
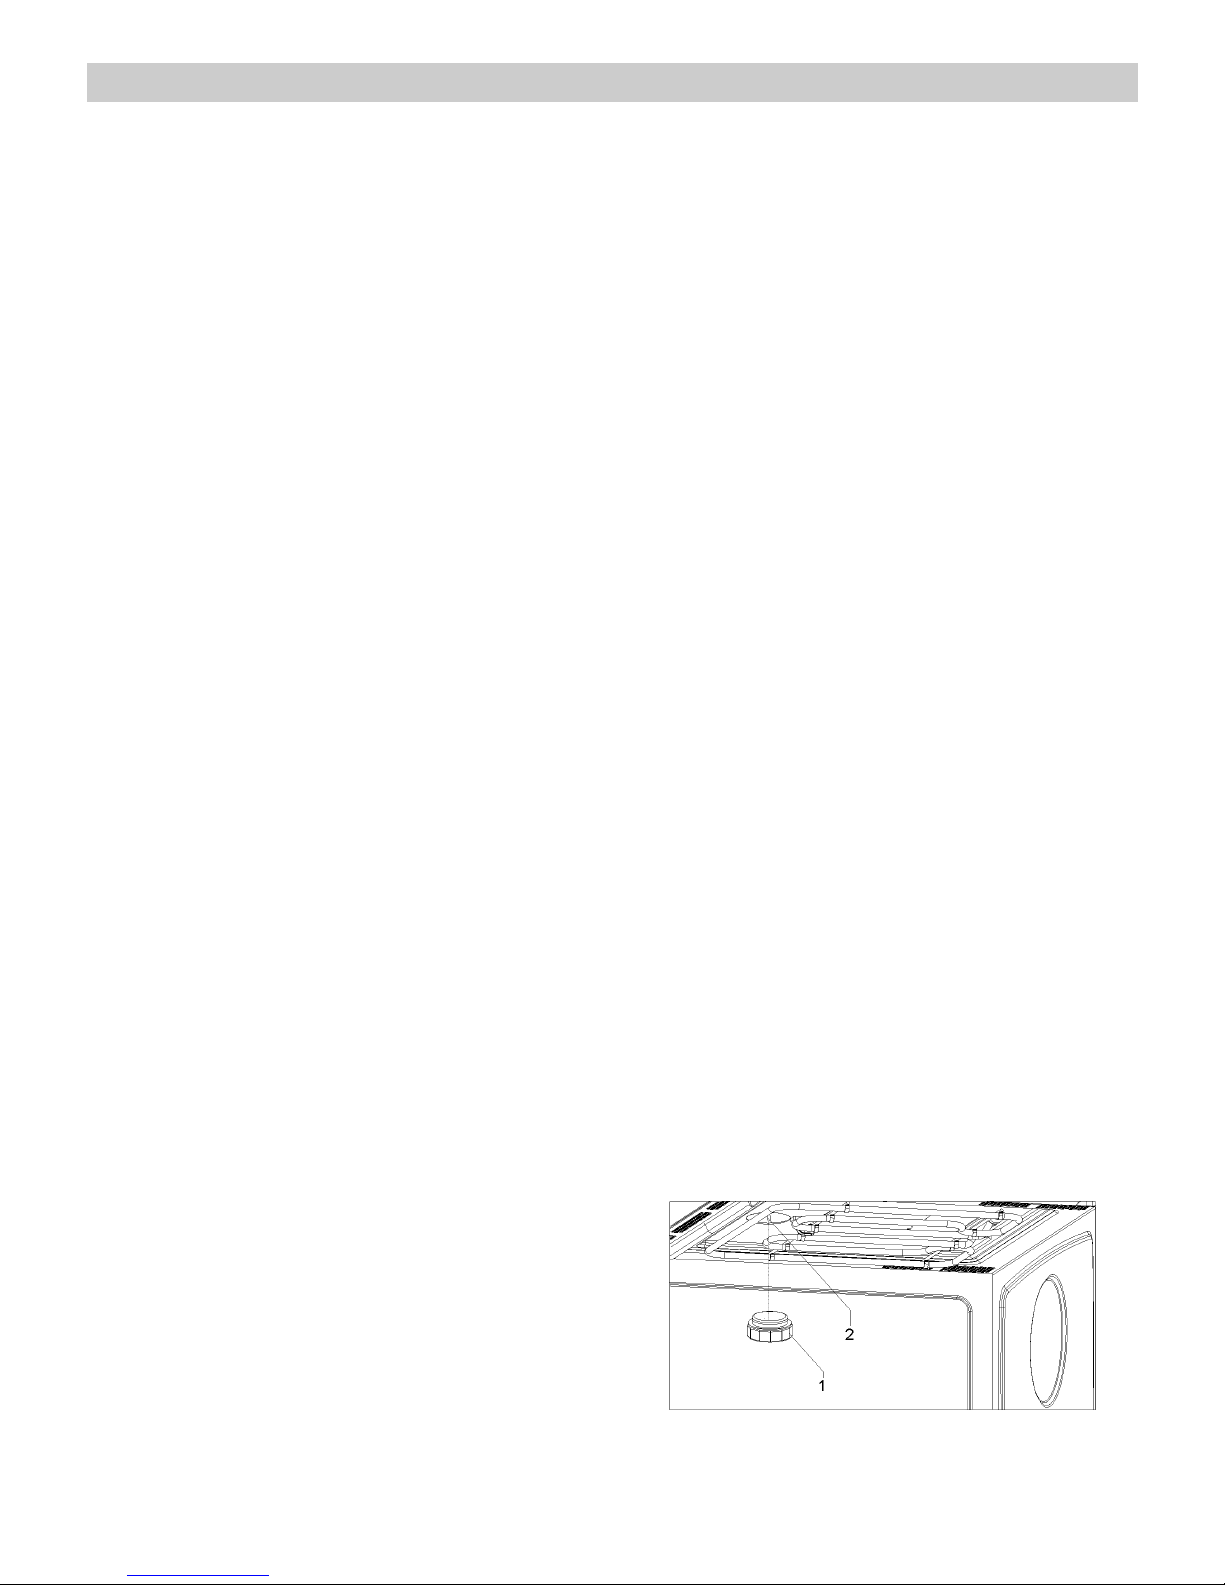
55
DE
Was ist im Falle einer Funktionsstörung zu tun?
ACHTUNG! Jegliche Art von Reparatur darf
nur von spezialisierten Fachleuten ausgeführt
werden. Jeder Eingriff, der durch nicht vom
Hersteller autorisierte Personen
vorgenommen wird, ist gefährlich.
Folgende Probleme können behoben werden,
ohne den Kundendienst zu benachrichtigen:
• Die Anzeige ist aus! Überprüfen, ob:
- die Stundenanzeige ausgeschaltet wurde
(siehe Abschnitt zu den Grundeinstellungen).
• Es geschieht nichts, wenn die Tasten
gedrückt werden! Überprüfen, ob:
- die Sicherheitsverriegelung aktiviert ist
(siehe Abschnitt zu den Grundeinstellungen).
• Das Gerät funktioniert nicht! Überprüfen,
ob:
- der Stecker richtig an die Steckdose
angeschlossen ist,
- der Stromversorgungskreis des Gerätes
eingeschaltet ist,
- die Tür ganz geschlossen ist. Die Tür muss
hörbar einrasten.
- Fremdkörper zwischen Tür und Stirnseite
des Innenraumes vorhanden sind.
• Während des Betriebs sind eigenartige
Geräusche zu hören! Überprüfen, ob:
- Lichtbögen im Inneren des Gerätes
auftreten, welche durch metallische
Fremdkörper hervorgerufen werden (siehe
Abschnitt über die Art des Geschirrs),
- das Geschirr mit den Wänden des Gerätes
Berührung hat,
- im Geräteinneren lose Spieße oder Löffel
vorhanden sind.
• Die Nahrungsmittel werden nicht heiß
oder werden sehr langsam heiß!
Überprüfen, ob:
- Sie aus Unachtsamkeit Metallgeschirr
benutzt haben,
- Sie eine geeignete Betriebsdauer bzw.
Leistungsstufe gewählt haben,
- Sie eine größere oder kältere
Nahrungsmittelmenge als gewöhnlich in das
Innere des Gerätes getan haben.
• Das Nahrungsmittel ist übermäßig heiß,
ausgetrocknet oder verbrannt!
Überprüfen, ob Sie eine geeignete
Betriebsdauer bzw. Leistungsstufe gewählt
haben.
• Nach Beendigung eines Kochvorgangs
ist ein Geräusch zu hören! Das ist kein
Problem. Der Kühlventilator läuft eine
gewisse Zeit lang nach. Wenn die
Temperatur genügend zurück-gegangen ist,
schaltet sich der Ventilator ab.
• Das Gerät funktioniert, die
Innenbeleuchtung geht aber nicht an!
Falls alle Funktionen richtig ablaufen, ist
wahrscheinlich die Lampe durchgebrannt.
Sie können das Gerät weiterhin benutzen.
Lampenwechsel
Gehen Sie folgendermaßen vor, um die Lampe
auszutauschen:
- Trennen Sie das Gerät von der
Stromversorgung. Ziehen Sie den Stecker
aus der Steckdose bzw. unterbrechen Sie
den Stromversorgungskreis des Gerätes.
- Schrauben Sie den Glasdeckel von der
Lampe (1) ab.
- Nehmen Sie die Halogenlampe heraus (2).
Achtung! Die Lampe kann sehr heiß sein.
- Setzen Sie eine neue Halogenlampe 12V /
10W ein. Achtung! Berühren Sie den
Glaskolben der Lampe nicht direkt mit
den Fingern, denn das kann ihr schaden.
Befolgen Sie die Anweisungen des
Lampenherstellers.
- Schrauben Sie den Glasdeckel der Lampe
ein (1).
- Schließen Sie das Gerät wieder an die
Stromversorgung an.
Page 57

56
DE
Technische Eigenschaften
Funktionsbeschreibung
Funktion Mikrowelle Leistung
Lebensmittel
200 W
Langsames Auftauen von empfindlichen Speisen;
Speisen
warmhalten
400 W
Kochen bei schwacher Hitze; Reis kochen. Schnelles Auftauen
600 W
Butter schmelzen. Babynahrung erwärmen
800 W
Garen von Gemüse und Speisen
. Schonend kochen und
erwärmen. Kleine Mengen erhitzen und garen
. Erwärmen von
empfindlichen Speisen
Mikrowelle
1000 W
Kochen und schnelles Erwärmen von Flüssigkeiten und
vorgekochten Speisen
200 W
Speisen rösten
400 W
Geflügel und Fleisch grillen
600 W
Pasteten und Aufläufe zubereiten
800 W
Vorsicht: Speisen können verbrennen.
Mikrowelle
+ Grill
1000 W
Vorsicht: Speisen können verbrennen.
Grill ---
---
Speisen grillen
200 W
Fleisch braten und köcheln
400 W
Geflügel braten
600 W
Andere schnelle Braten
800 W
Vorsicht: Speisen können verbrennen.
Mikrowelle +
Heißluft
1000 W
Vorsicht: Speisen können verbrennen.
Heißluft ---
---
Braten und Backen
Grill
+Umluft
---
---
Speisen gleichmäßig bräunen
Spezifikation
• Spannung (WS)........................................................................................ 230-240 V / 50 Hz
• Geforderte Leistung.................................................................................. 3400 W
• Leistung des Grills.................................................................................... 1500 W
• Leistung der Heisluft................................................................................. 1600 W
• Ausgangsleistung der Mikrowelle. ............................................................ 1000 W
• Mikrowellenfrequenz …............................................................................ 2450 MHz
• Außenabmessungen (B×H×T). ................................................................. 595 × 455 × 542 mm
• Abmessungen des Garraumes (B×H×T)................................................... 420 × 210 × 390 mm
• Fassungsvermögen des Ofens................................................................. 32 l
• Gewicht .................................................................................................... 38 kg
Page 58
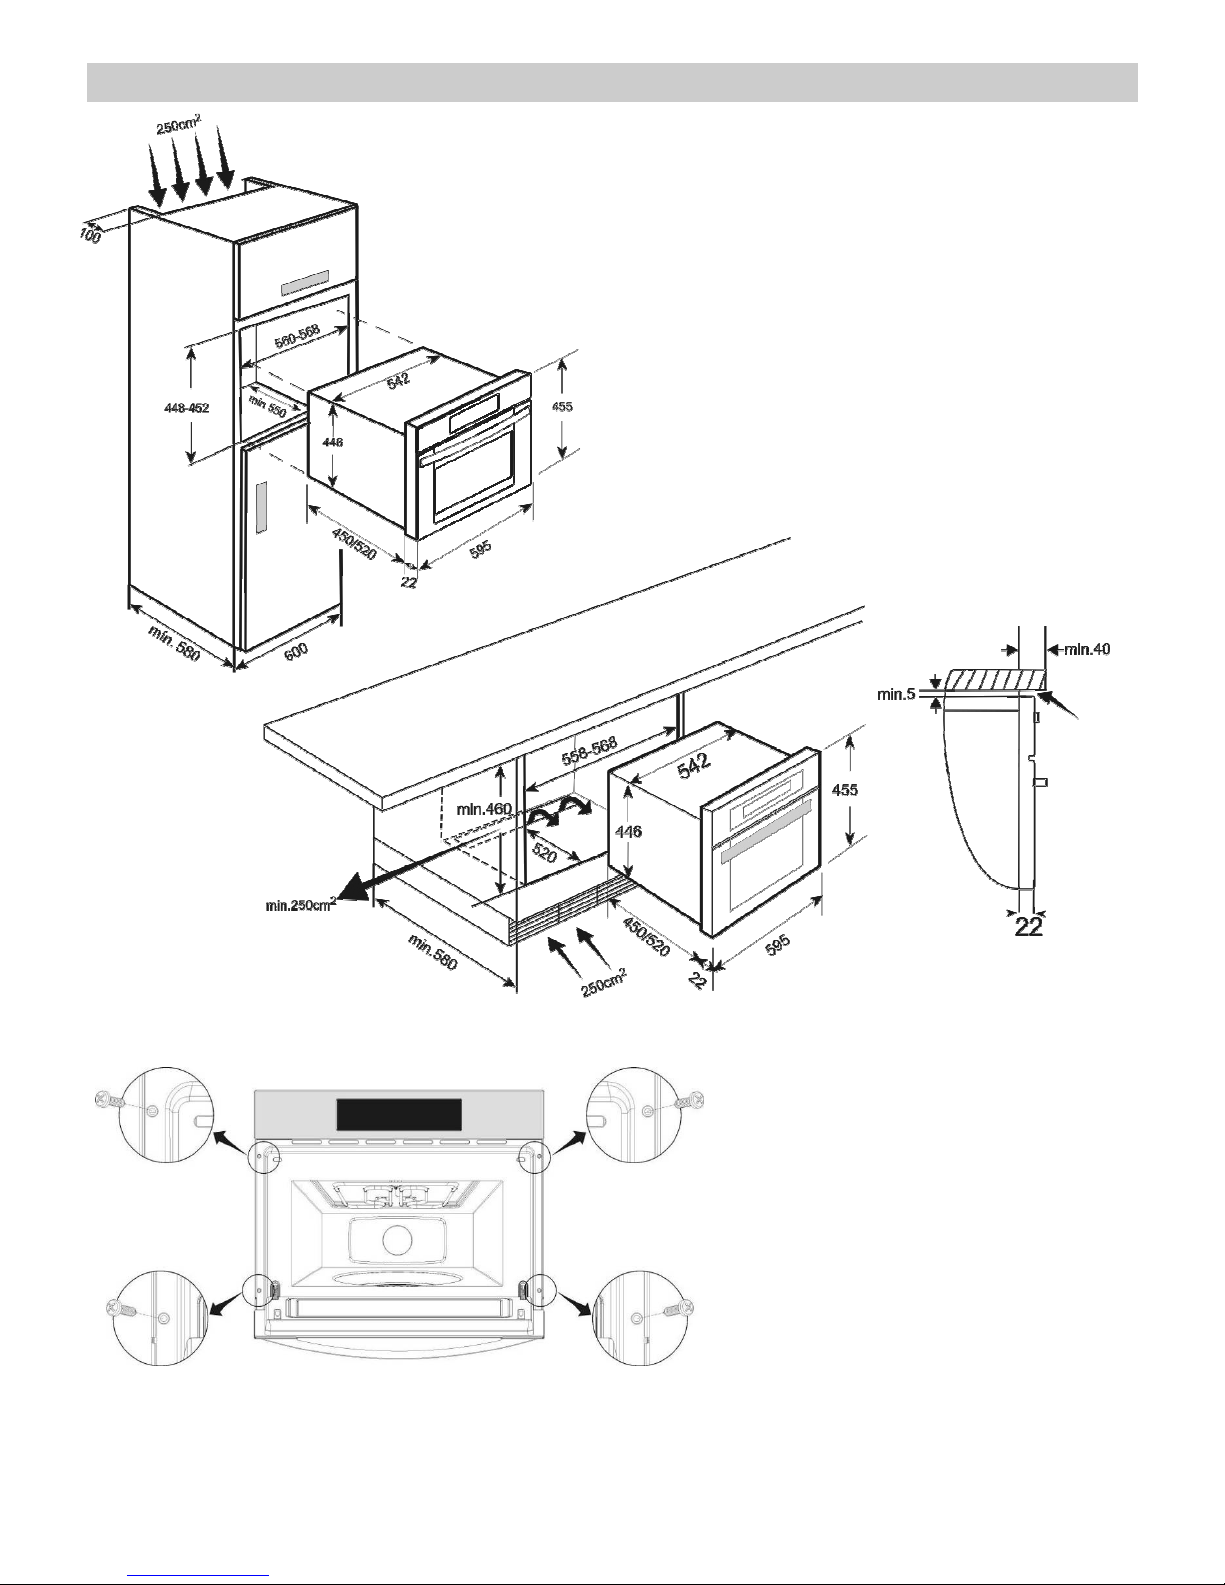
57
Installation / Einbau
EN
• Push oven completely into the
cabinet and centre it.
• Open microwave door and fasten
the appliance to the cabinet using
the four screws provided. Insert the
screws through the front holes.
DE
• Die Mikrowelle in die Nische
einschieben und entsprechend
anpassen.
• Die Tür der Mikrowelle öffnen und
das Gerät mit den vier
mitgelieferten Schrauben am
Küchenmöbel wie im Bild
dargestellt befestigen.
Page 59

Page 60

Cód: 163638
 Loading...