


mophie connect
1190_RCN-RMT-BLK
User Manual
Revision 1.0
Getting Started
Unpacking and Checking the Contents
Unpack the mophie connect and check that the following items are included (If any item is missing
or damaged, repack and return it to your reseller.)
y mophie connect
y Power Adapter
y Micro USB Cable
y IR Cable
y User Manual
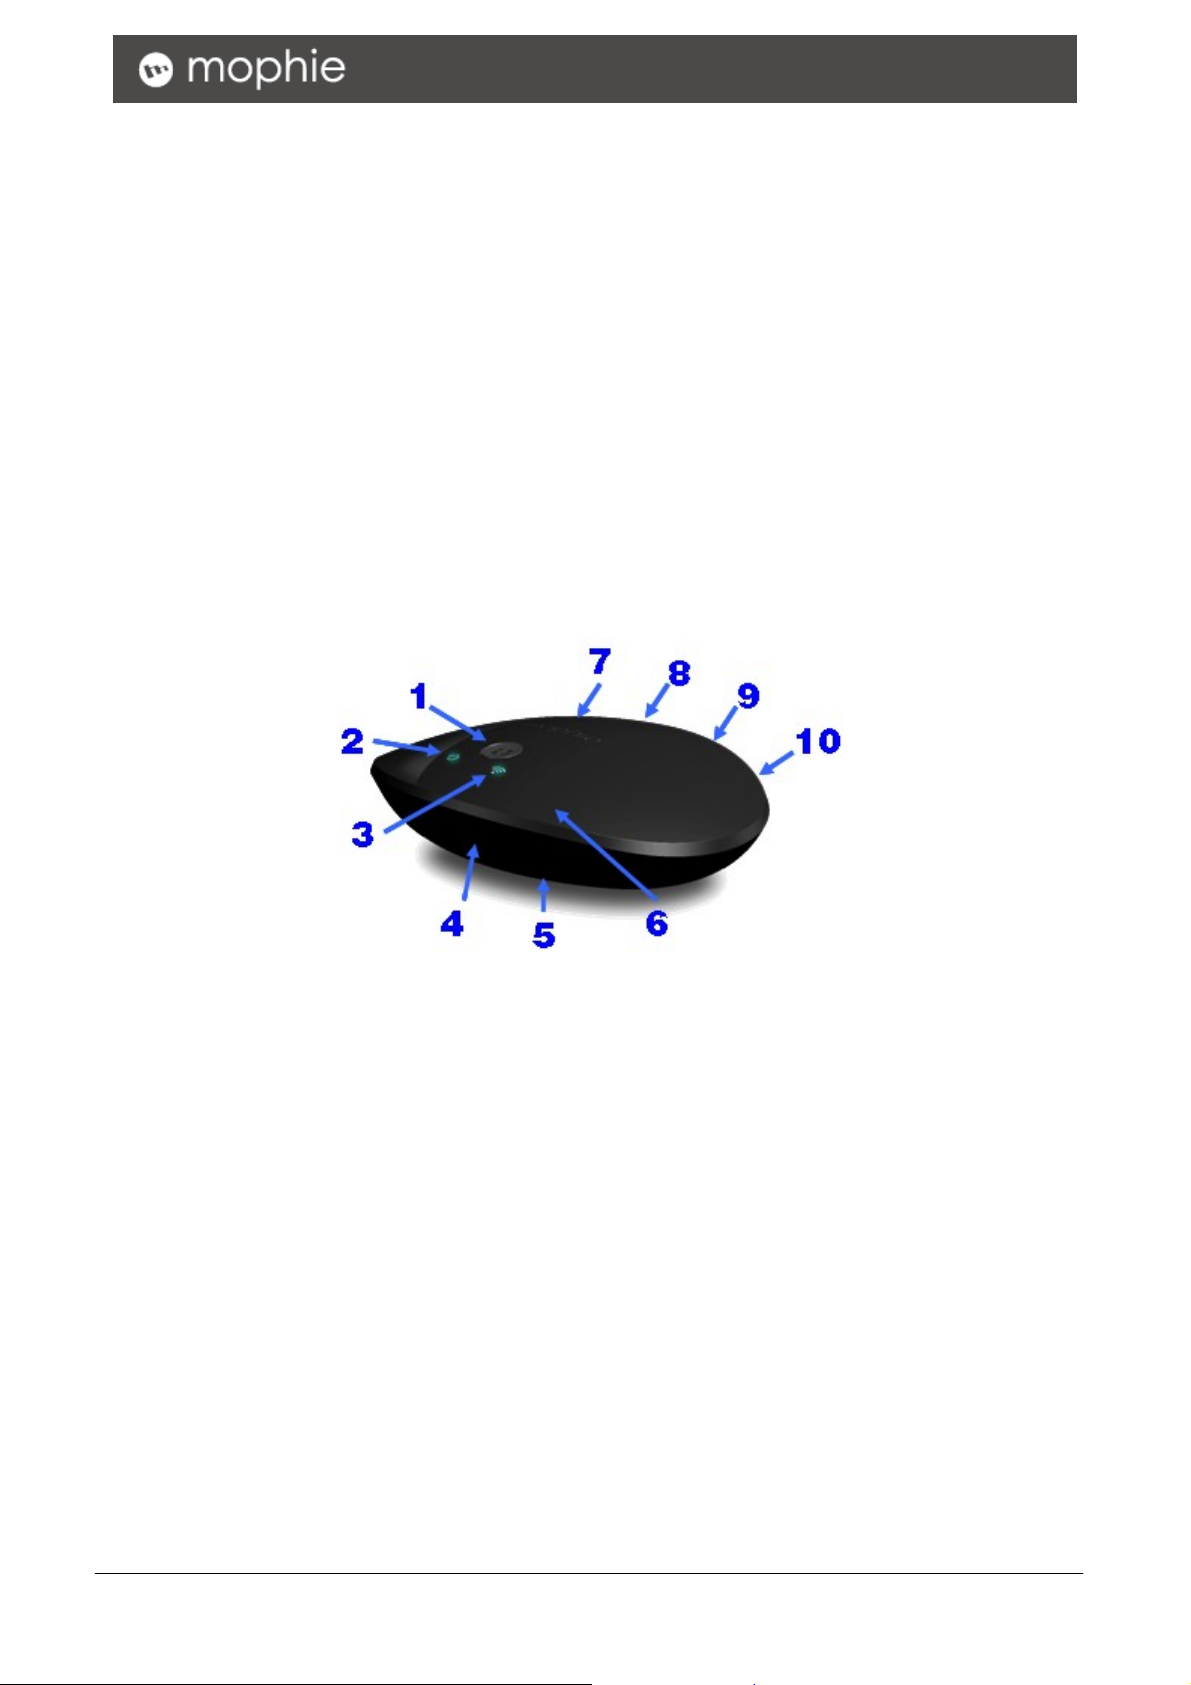
Identifying Components
1: Config button
2. Power LED
3. Wireless LED
4. IR learning LED
5. Reset button
6. IR emitting LEDs
7. IR blaster port (for IR cable, to point to IR
receiver of other Home device)
8. IR blaster port (for IR cable, to point to IR
receiver of other Home device)
9. Micro USB port (for power input)
10. Power switch
Note:
You need iPhone application (running on iPhone) to setup and control this device.
mophie connect User Manual 10-2

Connecting the mophie connect for First Use
1. Unpack and plug the mophie connect into an AC outlet
2. Install the mophie connect iPhone application (please download it from Apple Store)
3. Switch the iPhone WiFi settings to point at mophie connect network
4. Launch the mophie connect iPhone application
5. Configure the mophie connect configuration screen and clicks Done
1. Input a nickname or a room name to your
device. Example “Brian’s Room’
2. Choose “Use mophie connect as AP” or “Use
your home network”. If choose “Use mophie
connect as AP”, SSID and Password fields will
disappear
3.Input the S SID of your home network
4, Input the PW of your home network
5. Input your email address (optional for later)
6. Click ‘DONE’
6. mophie connect starts configuring itself
a. If configuration successes, the application automatically switched into the mophie connect
main screen. User is prompted to wait while the HMR-130 configures itself.
b. If configuration failed to connect to the network, please repeat step5.
mophie connect User Manual 10-3

Basic Operations
Choose Pre-defined Device
Example 1: Watch TV
mophie connect User Manual 10-4

Example 2: Watch DVD
mophie connect User Manual 10-5
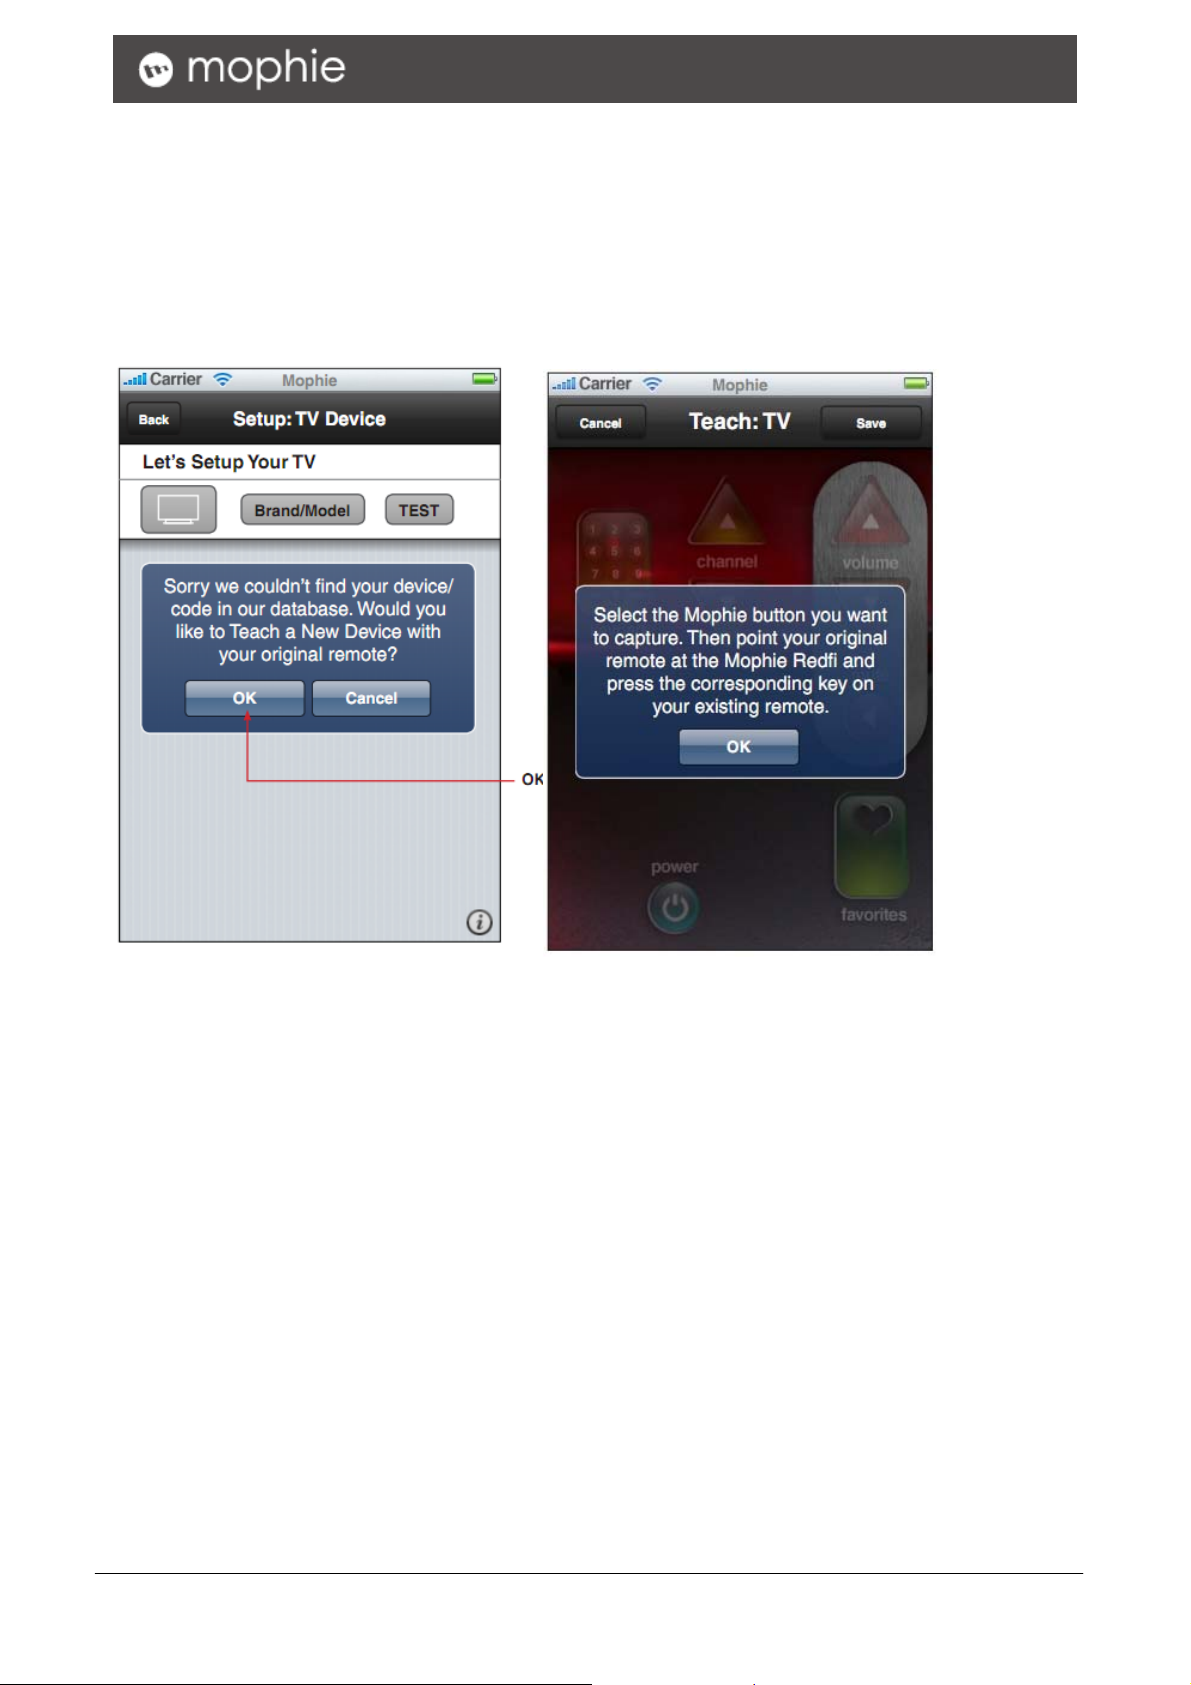
Add New Device
1. Place your remote control close to mophie connect
2. Select the button you want to teach
3. press the appropriate button on your remote control
4. save the commands
5. back to step 2 to teach other commands
mophie connect User Manual 10-6

mophie connect User Manual 10-7

Federal Communication Commission Interference Statement
This equipment has been tested and found to comply with the limits for a Class B digital device,
pursuant to Part 15 of the FCC Rules. These limits are designed to provide reasonable protection
against harmful interference in a residential instal lation. This equipment generates, uses and can
radiate radio frequency energy and, if not installed and used in accordance with the instructions,
may cause harmful interference to radio communications. However, there is no guarantee that
interference will not occur in a particular installation. If this equipment does cause harmful
interference to radio or television reception, which can be determined by turning the equipment off
and on, the user is encouraged to try to correct the interference by one of the following measures:
- Reorient or relocate the receiving antenna.
- Increase the separation between the equipment and receiver.
- Connect the equipment into an outlet on a circuit different from that
to which the receiver is connected.
- Consult the dealer or an experienced radio/TV technician for help.
This device complies with Part 15 of the FCC Rules. Operation is subject to the following two
conditions: (1) This device may not cause harmful interference, and (2) this device must accept any
interference received, including interference that may cause undesired operation.
FCC Caution: Any changes or modifications not expressly approved by the party responsible for
compliance could void the user's authority to operate this equipment.
IEEE 802.11b or 802.11g operation of this prod uct in the U.S.A. is firmware-limited to channels 1
through 11.
IMPORTANT NOTE:
FCC Radiation Exposure Statement:
This equipment complies with FCC ra diation exposure limits set forth for an uncontrolled
environment. This equipment should be installed and operated with minimum dis tance 20cm
between the radiator & your body.
This transmitter must not be co -located or operating in conjunction with any other antenna or
transmitter.
mophie connect User Manual 10-8

Specifications
PHYSICAL SPECIFICATIONS
Processor
External Port
Interface
LED Indication
IR coverage
Ralink SoC
Power Jack DC input, MICRO USB type
Power Switch Turn ON/OFF power
Config Button Go to Config mode (push>5secs)
IR blaster out Two IR blaster out ports, 3.5mm type
Reset Button Reset to factory default setting
Power
AP Mode
(default)
Wireless
Station
Mode
Emitter
Receiver Frequency: 20KHz~56KHz
Blue: ON, while power on.
Blue: Blinking, IR learning
Blue: ON, wireless ready
Blue: Blinking, wireless traffic activity
Green: slow blinking, no connection.
Green: ON, wireless linked
Green: Blinking, wireless traffic activity
Frequency: 20KHz~56KHz
Coverage: at least 8m, ±45°
IR blaster cable: 3m
Power Supply
Dimension
Weight
Solution
WLAN Standard
Media Access Protocol
Operating Frequency
Operating Channels
Data Rate Shifting
5V,1A
114x90x26mm
60g
RADIO SPECIFICATIONS
Ralink SoC
IEEE 802.11n
IEEE 802.11/11b Industry standards
IEEE 802.11g standard
IEEE 802.11
2.412 - 2.462 GHz (FCC, North America)
2.412 - 2.472 GHz (TELEC, Japan)
2.412 - 2.472 GHz (ETSI, EURO)
11 for FCC, North America
13 for JTAC, Japan
13 for ETSI, Europe
1, 2, 5.5, 6, 9, 11, 12, 18, 24, 36, 48, 54Mbps, and 802.11n offering up to
300Mbps
mophie connect User Manual 10-9

Transmits mode
Receive mode
System Management
Wireless
Security
UI Communication Protocol
Temperature
Humidity
11n/b/g
11n/b/g
Configuration Via Web UI
Firmware
upgrade
Encryption AES, TKIP, and 64/128 bits WEP
WPA WPA-PSK mode, WPA2-PSK
Operating 0ºC to 40ºC (32ºF to 104ºF)
Storage -20ºC to 60ºC (-4ºF to 140ºF)
Operating 10% to 85% Non-Condensing
Storage 5% to 90% Non-Condensing
SOFTWARE SPECIFICATIONS
Allow firmware upgrade through WiFi
Defined by 3
ENVIRONMENTAL SPECIFICATIONS
rd
Party
mophie connect User Manual 10-10
 Loading...